Arris SBR AC1200P User Guide Manual AC1200P: UG
User Manual: Arris SBR-AC1200P SBR-AC1200P: User Guide
Open the PDF directly: View PDF ![]() .
.
Page Count: 72
- Patent Notice
- Important Safety Instructions
- Product Overview
- Installing the Wi-Fi Router
- Setting up an Internet Connection
- Setting Up a Wireless Network Connection
- Adding G.hn Extenders To Your Network
- Managing Your Wi-Fi Router and Connected Networks
- Use the ARRIS SURFboard Manager App
- Start the Wi-Fi Router Web Manager
- Wi-Fi Router Web Manager Menu Options
- Get Help
- View the Wi-Fi Router Product Information
- Test Your Connection
- Set Up DHCP
- Set Up Dynamic DNS
- View Your IPv6 Configuration
- View Your USB Configuration and Status Information
- Disable LEDs on the Back Panel
- Adjust Your Time Zone
- Set Up Your Primary Wireless Network
- Set Up a Guest Wireless Network
- Configure Your Wi-Fi Radio
- Back Up Your Wi-Fi Router Configuration
- Restore Your Gateway Configuration Settings
- Reset the SBR-AC1200P Configuration Settings
- Update Your Wi-Fi Router Firmware
- Exit the SBR-AC1200P Web Manager
- Protecting & Monitoring Your Wireless Network
- Prevent Unauthorized Access
- Change the Default User Name and Password
- Set Up Firewall Protection
- Set Up Firewall Event Log Notifications
- Set Up Remote Configuration Management
- Filter Devices Based on IP Address
- Filter Devices Based on MAC Address
- Choose a Method for Configuring Wireless Extenders
- Restrict Wireless Access
- Prioritize Network Traffic Based on Media Type
- Configure Wireless Media Settings
- Set Up Parental Controls
- Set Up Port Triggers
- Set Up Port Forwarding
- Set Up the DMZ Host
- Troubleshooting
SURFboard SBR
-AC1200P
Wi-Fi Router
User Guide
STANDARD PN 365-095-28243 x.3
April 2017
SURFboard SBR-AC1200P Wi-Fi Router User Guide
STANDARD PN 365-095-28243 x.3
ARRIS Copyrights and Trademarks
© 2016-2017 ARRIS Enterprises LLC. All Rights Reserved.
No part of this publication may be reproduced in any form or by any means or used to make
any derivative work (such as translation, transformation, or adaptation) without written
permission from ARRIS Enterprises LLC. (“ARRIS”). ARRIS reserves the right to revise this
publication and to make changes in content from time to time without obligation on the part
of ARRIS to provide notification of such revision or change.
ARRIS and the ARRIS logo are all trademarks of ARRIS Enterprises LLC. Other trademarks and
trade names may be used in this document to refer to either the entities claiming the marks
or the names of their products. ARRIS disclaims proprietary interest in the marks and names
of others.
ARRIS provides this guide without warranty of any kind, implied or expressed, including, but
not limited to, the implied warranties of merchantability and fitness for a particular purpose.
ARRIS may make improvements or changes in the product(s) described in this manual at any
time.
The capabilities, system requirements and/or compatibility with third-party products
described herein are subject to change without notice.
Apple and the Apple logo are trademarks of Apple Inc., registered in the U.S. and other
countries. App Store is a service mark of Apple Inc.
Android, Google Play and the Google Play logo are trademarks of Google Inc.
Patent Notice
Protected under one or more of the following U.S. patents: http://www.arris.com/legal
Other patents pending.

STANDARD PN 365-095-28243 x.3 SURFboard SBR-AC1200P Wi-Fi Router User Guide
© 2016-2017 ARRIS Enterprises LLC. All Rights Reserved. 3
Table of Contents
1. Important Safety Instructions .................................................................................. 6
Temperature Requirements .............................................................................................. 7
FCC Part 15 ........................................................................................................................ 7
RF Exposure ............................................................................................................... 8
Innovation, Science and Economic Development Canada statement: ............................. 8
Radiation Exposure Statement ............................................................................... 10
Déclaration d'exposition aux radiations ................................................................. 10
CARING FOR THE ENVIRONMENT BY RECYCLING YOUR ARRIS EQUIPMENT .................. 10
2. Product Overview ................................................................................................. 11
Introduction ..................................................................................................................... 11
About The Wi-Fi Router ................................................................................................... 12
What is RipCurrent? ........................................................................................................ 12
What's in the Box? ........................................................................................................... 13
Items You Need ............................................................................................................... 13
System Requirements ...................................................................................................... 13
Recommended Hardware ....................................................................................... 14
Windows ................................................................................................................. 14
Mac OS .................................................................................................................... 14
Linux/Unix ............................................................................................................... 14
About this Manual ........................................................................................................... 15
Contact Information ........................................................................................................ 15
3. Installing the Wi-Fi Router ..................................................................................... 16
Front Panel ...................................................................................................................... 16
Rear Panel ........................................................................................................................ 17
Indicator Lights for the SBR-AC1200P ............................................................................. 18
Standby Mode ................................................................................................................. 19
Selecting an Installation Location .................................................................................... 19
Desktop Mounting Instructions .............................................................................. 19
Factors Affecting Wireless Range ........................................................................... 20
Ethernet, Wireless, or Gigabit Home Networking? ......................................................... 20
Configuring and Installing the Wi-Fi Router .................................................................... 21
Configuring the Wireless Connection .............................................................................. 22
4. Setting up an Internet Connection ......................................................................... 23
Configure Your IP Address ............................................................................................... 23
Verify & Renew Your IP Address ...................................................................................... 25

STANDARD PN 365-095-28243 x.3 SURFboard SBR-AC1200P Wi-Fi Router User Guide
© 2016-2017 ARRIS Enterprises LLC. All Rights Reserved. 4
5. Setting Up a Wireless Network Connection ............................................................ 26
Launch the SBR-AC1200P Quick Start Wizard ................................................................. 26
Manually Connect to Your Wireless Network ................................................................. 30
Use the WPS Button to Connect Your WPS-Enabled Wireless Device ............................ 30
Test Your Wireless Network Connection ......................................................................... 30
Register Your SBR-AC1200P ............................................................................................. 31
Connect Mobile Devices To Your Network ...................................................................... 31
6. Adding G.hn Extenders To Your Network ............................................................... 32
Pairing Your SBR-AC1200P with a Network Extender ..................................................... 32
Creating a Custom Domain Name and Password to Pair Your SBR-AC1200P ................. 33
Unpairing Your SBR-AC1200P .......................................................................................... 35
7. Managing Your Wi-Fi Router and Connected Networks .......................................... 36
Use the ARRIS SURFboard Manager App......................................................................... 36
Start the Wi-Fi Router Web Manager .............................................................................. 37
Wi-Fi Router Web Manager Menu Options..................................................................... 38
Main Menu Buttons ................................................................................................ 38
Main Menu Links ..................................................................................................... 38
Get Help ........................................................................................................................... 39
Help Overview ......................................................................................................... 39
Help Links ................................................................................................................ 40
Field Level Help ....................................................................................................... 40
View the Wi-Fi Router Product Information ................................................................... 40
Test Your Connection ...................................................................................................... 41
Set Up DHCP .................................................................................................................... 42
Set Up Dynamic DNS ........................................................................................................ 42
View Your IPv6 Configuration .......................................................................................... 43
View Your USB Configuration and Status Information .................................................... 43
Disable LEDs on the Back Panel ....................................................................................... 44
Adjust Your Time Zone .................................................................................................... 44
Set Up Your Primary Wireless Network ........................................................................... 45
Set Up a Guest Wireless Network ................................................................................... 46
Configure Your Wi-Fi Radio ............................................................................................. 49
Back Up Your Wi-Fi Router Configuration ....................................................................... 49
Restore Your Gateway Configuration Settings ................................................................ 50
Reset the SBR-AC1200P Configuration Settings .............................................................. 50
Update Your Wi-Fi Router Firmware ............................................................................... 51
Exit the SBR-AC1200P Web Manager .............................................................................. 52

STANDARD PN 365-095-28243 x.3 SURFboard SBR-AC1200P Wi-Fi Router User Guide
© 2016-2017 ARRIS Enterprises LLC. All Rights Reserved. 5
8. Protecting & Monitoring Your Wireless Network ................................................... 53
Prevent Unauthorized Access .......................................................................................... 53
Change the Default User Name and Password ............................................................... 53
Set Up Firewall Protection ............................................................................................... 55
Set Up Firewall Event Log Notifications........................................................................... 56
Set Up Remote Configuration Management ................................................................... 57
Filter Devices Based on IP Address .................................................................................. 58
Filter Devices Based on MAC Address ............................................................................. 58
Choose a Method for Configuring Wireless Extenders ................................................... 59
Restrict Wireless Access .................................................................................................. 60
Prioritize Network Traffic Based on Media Type ............................................................. 60
Configure Wireless Media Settings ................................................................................. 61
Set Up Parental Controls ................................................................................................. 61
To Block Certain URL Addresses ............................................................................. 62
To Block All Web Browsing ..................................................................................... 63
To Block All Internet Use......................................................................................... 64
To Set Up a Custom Filter ....................................................................................... 65
Set Up Port Triggers ......................................................................................................... 66
Set Up Port Forwarding ................................................................................................... 66
To Set Up Port Forwarding for IPv4 Addresses ....................................................... 67
To Set Up Port Forwarding for IPv6 Addresses ....................................................... 68
Set Up the DMZ Host ....................................................................................................... 69
9. Troubleshooting .................................................................................................... 70
The Wi-Fi Router is plugged in, but the Power light is Off .............................................. 70
My wireless Internet connection stops working sometimes .......................................... 70
I'm not getting on the Internet ........................................................................................ 70
The Wi-Fi Router didn't pair successfully pair with the Network Extender .................... 71

STANDARD PN 365-095-28243 x.3 SURFboard SBR-AC1200P Wi-Fi Router User Guide
© 2016-2017 ARRIS Enterprises LLC. All Rights Reserved. 6
Chapter 1
Important Safety Instructions
Read This Before You Begin — When using your equipment, basic safety precautions should
always be followed to reduce the risk of fire, electric shock, and injury to persons, including
the following:
Read all of the instructions listed here and/or in the user manual before you operate this
device. Give particular attention to all safety precautions. Retain the instructions for
future reference.
This device must be installed and used in strict accordance with manufacturer’s
instructions, as described in the user documentation that is included with the device.
Comply with all warning and caution statements in the instructions. Observe all warning
and caution symbols that are affixed to this device.
To prevent fire or shock hazard, do not expose this device to rain or moisture. The device
must not be exposed to dripping or splashing. Do not place objects filled with liquids,
such as vases, on the device.
This device was qualified under test conditions that included the use of the supplied
cables between system components. To ensure regulatory and safety compliance, use
only the provided power and interface cables and install them properly.
Different types of cord sets may be used for connections to the main POWER supply
circuit. Use only a main line cord that complies with all applicable device safety
requirements of the country of use.
Installation of this device must be in accordance with national wiring codes and conform
to local regulations.
Operate this device only from the type of power source indicated on the device’s
marking label. If you are not sure of the type of power supplied to your home, consult
your dealer or local power company.
Do not overload outlets or extension cords, as this can result in a risk of fire or electric
shock. Overloaded electrical outlets, extension cords, frayed power cords, damaged or
cracked wire insulation, and broken plugs are dangerous. They may result in a shock or
fire hazard.
Route power supply cords so that they are not likely to be walked on or pinched by items
placed upon or against them. Pay particular attention to cords where they are attached
to plugs and convenience receptacles, and examine the point where they exit from the
device.
Place this device in a location that is close enough to an electrical outlet to
accommodate the length of the power cord.
Place the device to allow for easy access when disconnecting the power cord of the
device from the electrical wall outlet.
Do not connect the plug into an extension cord, receptacle, or other outlet unless the
plug can be fully inserted with no part of the blades exposed.

Chapter 1: Important Safety Instructions
STANDARD PN 365-095-28243 x.3 SURFboard SBR-AC1200P Wi-Fi Router User Guide
© 2016-2017 ARRIS Enterprises LLC. All Rights Reserved. 7
Place this device on a stable surface.
It is recommended that the customer install an electrical surge protector in the electrical
outlet to which this device is connected. This is to avoid damaging the device by local
lightning strikes and other electrical surges.
Postpone installation until there is no risk of thunderstorm or lightning activity in the
area.
Do not use this product near water: for example, near a bathtub, washbowl, kitchen sink
or laundry tub, in a wet basement, or near a swimming pool.
Do not cover the device or block the airflow to the device with any other objects. Keep
the device away from excessive heat and humidity and keep the device free from
vibration and dust.
Wipe the device with a clean, dry cloth. Never use cleaning fluid or similar chemicals. Do
not spray cleaners directly on the device or use forced air to remove dust.
For added protection, unplug the device from the wall outlet and disconnect the cables
to avoid damage to this device during lightning activity or power surges.
Upon completion of any service or repairs to this device, ask the service technician to
perform safety checks to determine that the device is in safe operating condition.
Do not open the device. Do not perform any servicing other than that contained in the
installation and troubleshooting instructions. Refer all servicing to qualified service
personnel.
This device should not be used in an environment that exceeds 104° F (40° C).
SAVE THE ABOVE INSTRUCTIONS
Temperature Requirements
The Wi-Fi Router is capable of operating in an ambient temperature range of 0° - 40°C,
without any functional performance degradation.
FCC Part 15
This equipment has been tested and found to comply with the requirements for a Class B
digital device under Part 15 of the Federal Communications Commission (FCC) rules. These
requirements are intended to provide reasonable protection against harmful interference in
a residential installation. This equipment generates, uses and can radiate radio frequency
energy and, if not installed and used in accordance with the instructions, may cause harmful
interference to radio communications. However, there is no guarantee that interference will
not occur in a particular installation. If this equipment does cause harmful interference to
radio or television reception, which can be determined by turning the equipment off and on,
the user is encouraged to try to correct the interference by one or more of the following
measures:
Reorient or relocate the receiving antenna.
Increase the separation between the equipment and receiver.

Chapter 1: Important Safety Instructions
STANDARD PN 365-095-28243 x.3 SURFboard SBR-AC1200P Wi-Fi Router User Guide
© 2016-2017 ARRIS Enterprises LLC. All Rights Reserved. 8
Connect the equipment into an outlet on a circuit different from that to which the
receiver is connected.
Consult the dealer or an experienced radio/TV technician for help.
FCC Caution
Changes or modifications to this equipment not expressly approved by the party responsible
for compliance could void the user’s authority to operate the equipment.
This device complies with Part 15 of the FCC Rules. Operation is subject to the following two
conditions: (1) this device may not cause harmful interference, and (2) this device must
accept any interference received, including interference that may cause undesired
operation.
RF Exposure
This equipment complies with FCC radiation exposure limits set forth for an uncontrolled
environment. This equipment should be installed and operated with minimum distance of
11.8 inches (30 cm) between the radiator and your body. This transmitter must not be
co-located or operating in conjunction with any other antenna or transmitter.
Country Code selection feature to be disabled for products marketed to the US/CANADA.
Operation of this device is restricted to indoor use only.
Innovation, Science and Economic Development
Canada statement:
This device complies with Innovation, Science and Economic Development Canada’s
licence-exempt RSSs. Operation is subject to the following two conditions:
(1) This device may not cause interference; and
(2) This device must accept any interference, including interference that may cause
undesired operation of the device.
Le présent appareil est conforme aux CNR d’Innovation, Sciences et Développement
économique Canada applicables aux appareils radio exempts de licence. L’exploitation est
autorisée aux deux conditions suivantes :
1) l’appareil ne doit pas produire de brouillage;
2) l’utilisateur de l’appareil doit accepter tout brouillage radioélectrique subi, même si le
brouillage est susceptible d’en compromettre le fonctionnement.
This radio transmitter (ISED: 6670A-SBRAC1200P) has been approved by Innovation, Science
and Economic Development Canada to operate with the antenna types listed below with the
maximum permissible gain indicated. Antenna types not included in this list, having a gain

Chapter 1: Important Safety Instructions
STANDARD PN 365-095-28243 x.3 SURFboard SBR-AC1200P Wi-Fi Router User Guide
© 2016-2017 ARRIS Enterprises LLC. All Rights Reserved. 9
greater than the maximum gain indicated for that type, are strictly prohibited for use with
this device.
Le présent émetteur radio (ISDE : 6670A-SBRAC1200P) a été approuvé par Innovation,
Sciences et Développement économique Canada pour fonctionner avec les types d'antenne
énumérés ci-dessous et ayant un gain admissible maximal. Les types d'antenne non inclus
dans cette liste, et dont le gain est supérieur au gain maximal indiqué, sont strictement
interdits pour l'exploitation de l'émetteur.
Antenna Peak gain ( dBi )
Type Connector 2400 ~
2483.5MHz
5150 ~
5250MHz
5250 ~
5350MHz
5470 ~
5725MHz
5725 ~
5850MHz
Dipole I-pex 1.83 -- -- -- --
Dipole I-pex 2.02 -- -- -- --
PIFA I-pex -- 2.87 2.87 3.2 3.6
PIFA I-pex -- 3.23 3.23 3.54 3.82
Caution:
(i) the device for operation in the band 5150–5250 MHz is only for indoor use to reduce the
potential for harmful interference to co-channel mobile satellite systems;
(ii) for devices with detachable antenna(s), the maximum antenna gain permitted for devices
in the bands 5250-5350 MHz and 5470-5725 MHz shall be such that the equipment still
complies with the e.i.r.p. limit;
(iii) for devices with detachable antenna(s), the maximum antenna gain permitted for
devices in the band 5725-5850 MHz shall be such that the equipment still complies with the
e.i.r.p. limits specified for point-to-point and non-point-to-point operation as appropriate;
and
(iv) the worst-case tilt angle(s) necessary to remain compliant with the e.i.r.p. elevation
mask requirement set forth in Section 6.2.2(3) shall be clearly indicated.
Operations in the 5.25-5.35GHz band are restricted to indoor usage only.
Avertissement :
(i) les dispositifs fonctionnant dans la bande de 5150 à 5250MHz sont réservés uniquement
pour une utilisation à l'intérieur afin de réduire les risques de brouillage préjudiciable aux
systèmes de satellites mobiles utilisant les mêmes canaux;
(ii) pour les dispositifs munis d'antennes amovibles, le gain maximal d'antenne permis pour
les dispositifs utilisant les bandes de 5250 à 5350MHz et de 5470 à 5725 MHz doit être
conforme à la limite de la p.i.r.e;
(iii) pour les dispositifs munis d'antennes amovibles, le gain maximal d'antenne permis (pour
les dispositifs utilisant la bande de 5725 à 5850 MHz) doit être conforme à la limite de la

Chapter 1: Important Safety Instructions
STANDARD PN 365-095-28243 x.3 SURFboard SBR-AC1200P Wi-Fi Router User Guide
© 2016-2017 ARRIS Enterprises LLC. All Rights Reserved. 10
p.i.r.e. spécifiée pour l'exploitation point à point et l'exploitation non point à point, selon le
cas;
(iv) les pires angles d'inclinaison nécessaires pour rester conforme à l'exigence de la p.i.r.e.
applicable au masque d'élévation, et énoncée à la section 6.2.2(3), doivent être clairement
indiqués.
Les opérations dans la bande de 5.25-5.35GHz sont limitées à un usage intérieur seulement.
Radiation Exposure Statement
This equipment complies with Canada radiation exposure limits set forth for an uncontrolled
environment. This equipment should be installed and operated with minimum distance
30cm between the radiator & your body.
Déclaration d'exposition aux radiations
Cet équipement est conforme Canada limites d'exposition aux radiations dans un
environnement non contrôlé. Cet équipement doit être installé et utilisé à distance
minimum de 30cm entre le radiateur et votre corps.
CARING FOR THE ENVIRONMENT BY RECYCLING
YOUR ARRIS EQUIPMENT
Please do not dispose of this product or any included electronic accessories, i.e., power
supply or battery, with your residential or commercial waste. ARRIS devices may be disposed
of through the ARRIS Product Recycling program, further described on the Corporate
Responsibility page of the ARRIS website. Go to http://www.arris.com, scroll to the bottom
of the page, and click Corporate Responsibility.
You may also contact your local community authorities for information regarding where you
may dispose of your ARRIS devices.
STANDARD PN 365-095-28243 x.3 SURFboard SBR-AC1200P Wi-Fi Router User Guide
© 2016-2017 ARRIS Enterprises LLC. All Rights Reserved. 11
Chapter 2
Product Overview
Introduction
Get ready to experience the Internet’s express lane! Whether you’re checking out streaming
media, downloading new software, or checking your email, the SURFboard SBR-AC1200P
Wi-Fi Router brings it all to you faster and more reliably.
The SURFboard SBR-AC1200P Wi-Fi® Router provides four Ethernet connections for use as
the hub of your home/office Local Area Network (LAN). The SBR-AC1200P also provides
802.11a/b/g/n/ac wireless connectivity for enhanced mobility and versatility.
The SURFboard RipCurrent™ feature (using G.hn Power Line Communication) also allows you
to place wired and wireless extenders around your home using your home's existing power
lines and power outlets to allow for network connectivity in or around your home
environment.

Chapter 2: Product Overview
STANDARD PN 365-095-28243 x.3 SURFboard SBR-AC1200P Wi-Fi Router User Guide
© 2016-2017 ARRIS Enterprises LLC. All Rights Reserved. 12
About The Wi-Fi Router
The SBR-AC1200P is more than just a Wi-Fi Router. This advanced Access Point is the start of
a new home network experience that offers the following benefits:
Two concurrent 802.11ac radios: one for the 5 GHz band and one for the 2.4 GHz band.
These radios provide automatic client-directed connections for optimal Wi-Fi
connectivity and speed based on a client's capability. Each radio includes a 2x2 MIMO
antenna array for the best reach, range, and throughput.
Four 10/100 Mbps Ethernet LAN ports and a Gigabit Ethernet WAN port for ultra fast
wired connectivity.
One USB 2.0 port for data and media storage or transfer and print sharing.
Embedded RipCurrent technology via your home power lines, ready to connect to
RipCurrent or other compatible G.hn extenders to reliably take your network to the
farthest reaches of your environment.
The SBR-AC1200P includes the following features:
Supports Ethernet and 802.11a/b/g/n/ac wireless connections; both wired and wireless
connections can be used simultaneously.
Auto connection to RipCurrent Network Extenders, including the wireless settings.
Option for automated product firmware upgrades.
Network supports up to 15 connected power line extenders.
Easy to navigate user interface, including a network set-up Wizard.
Default settings configured for standard environments, with advanced settings for
sophisticated users.
USB port includes a file structure that provides high-speed throughput and data integrity
protection.
Support for NAS and DLNA.
What is RipCurrent?
SURFboard RipCurrent is a technology that allows you to set up a high-speed home network
that uses existing AC wiring and outlets. There's no need to run additional cables; your
devices can communicate at data rates up to 1 Gbps using the network of power lines that
already exists in your home.
The SBR-AC1200P uses the power cable connected to the Wi-Fi Router to connect to the
power lines that already exist in your home. RipCurrent is based on G.hn Power Line
Communication (PLC), which is an ITU Specification managed by the HomeGrid™ Forum.
This technology allows the SBR-AC1200P to distribute all data to each of the AC power
outlets in the home. With a corresponding G.hn Extender, the Wi-Fi or wired network can be
extended to any room, including basements, garages, or far reaching bedrooms. Connect
entertainment devices, security cameras, gaming consoles, managed appliance, anything
that uses IP (Internet Protocol).

Chapter 2: Product Overview
STANDARD PN 365-095-28243 x.3 SURFboard SBR-AC1200P Wi-Fi Router User Guide
© 2016-2017 ARRIS Enterprises LLC. All Rights Reserved. 13
The G.hn technology is more robust than previous home power line communication
implementations to give you better ‘real world’ throughput and stability. G.hn proves much
more efficient in an environment with multiple power line networks (such as apartment
buildings or office buildings) with the capability of recognizing up to 250 other networks to
avoid interference. G.hn communications are encrypted using the advanced standard AES
128-bit encryption for secure transmissions.
In order to ensure the best performance of your G.hn network, we recommend that you only
use 3-prong grounded outlets. A 2-prong outlet will operate sufficiently, but with a lower
throughput speed.
What's in the Box?
Make sure you have the following items before proceeding.
SBR-AC1200P Wi-Fi Router.
Power Cable.
Wireless Installation Guide.
Ethernet Cable.
End User License Agreement.
Important: Before returning this product to the store, please call ARRIS Technical Support
for assistance in resolving any technical issues.
Support for SURFboard products is managed by ARRIS. For assistance, please call
1-877-466-8646 or visit the ARRIS Consumer Support website at
http://www.arris.com/selfhelp.
Items You Need
Make sure you have the following items on hand before continuing:
Wi-Fi Router package: see What's in the Box? (page 13) for a list of items in the package.
Ethernet Cable for LAN input: In addition to the Ethernet cable provided, you may need
additional Ethernet cables if you want to connect to wired clients. Please use a standard
CAT 5e or CAT 6-rated Ethernet cable with RJ45 type connectors on both ends. You can
buy Ethernet cables from any electronics retailer and many discount stores.
System Requirements
The SURFboard Wi-Fi Router operates with most computers and wireless devices. The
following describes requirements for each operating system; see the documentation for your
system for details on enabling and configuring networking.
To use the Wi-Fi Router, you need high-speed Internet service from your service provider.

Chapter 2: Product Overview
STANDARD PN 365-095-28243 x.3 SURFboard SBR-AC1200P Wi-Fi Router User Guide
© 2016-2017 ARRIS Enterprises LLC. All Rights Reserved. 14
Recommended Hardware
The following hardware configuration is recommended. Computers not meeting this
configuration can still work with the SBR-AC1200P, but may not be able to make maximum
use of SBR-AC1200P throughput.
CPU: P4, 3 GHz or faster.
RAM: 1 GB or greater.
Ethernet: Gig-E (1000Base-T).
Wi-Fi: 802.11a, b, g, n, or ac compliant Wi-Fi equipment.
Windows
Windows 7, Windows 8, or Windows 10. A supported Ethernet or wireless LAN connection
must be available.
Mac OS
System 7.5 to Mac OS 9.2 (Open Transport recommended), Mac OS X, or iOS (for mobile
devices). A supported Ethernet or wireless LAN connection must be available.
Linux/Unix
Hardware drivers, TCP/IP, and DHCP must be enabled in the kernel. A supported Ethernet or
wireless LAN connection must be available.
Chapter 2: Product Overview
STANDARD PN 365-095-28243 x.3 SURFboard SBR-AC1200P Wi-Fi Router User Guide
© 2016-2017 ARRIS Enterprises LLC. All Rights Reserved. 15
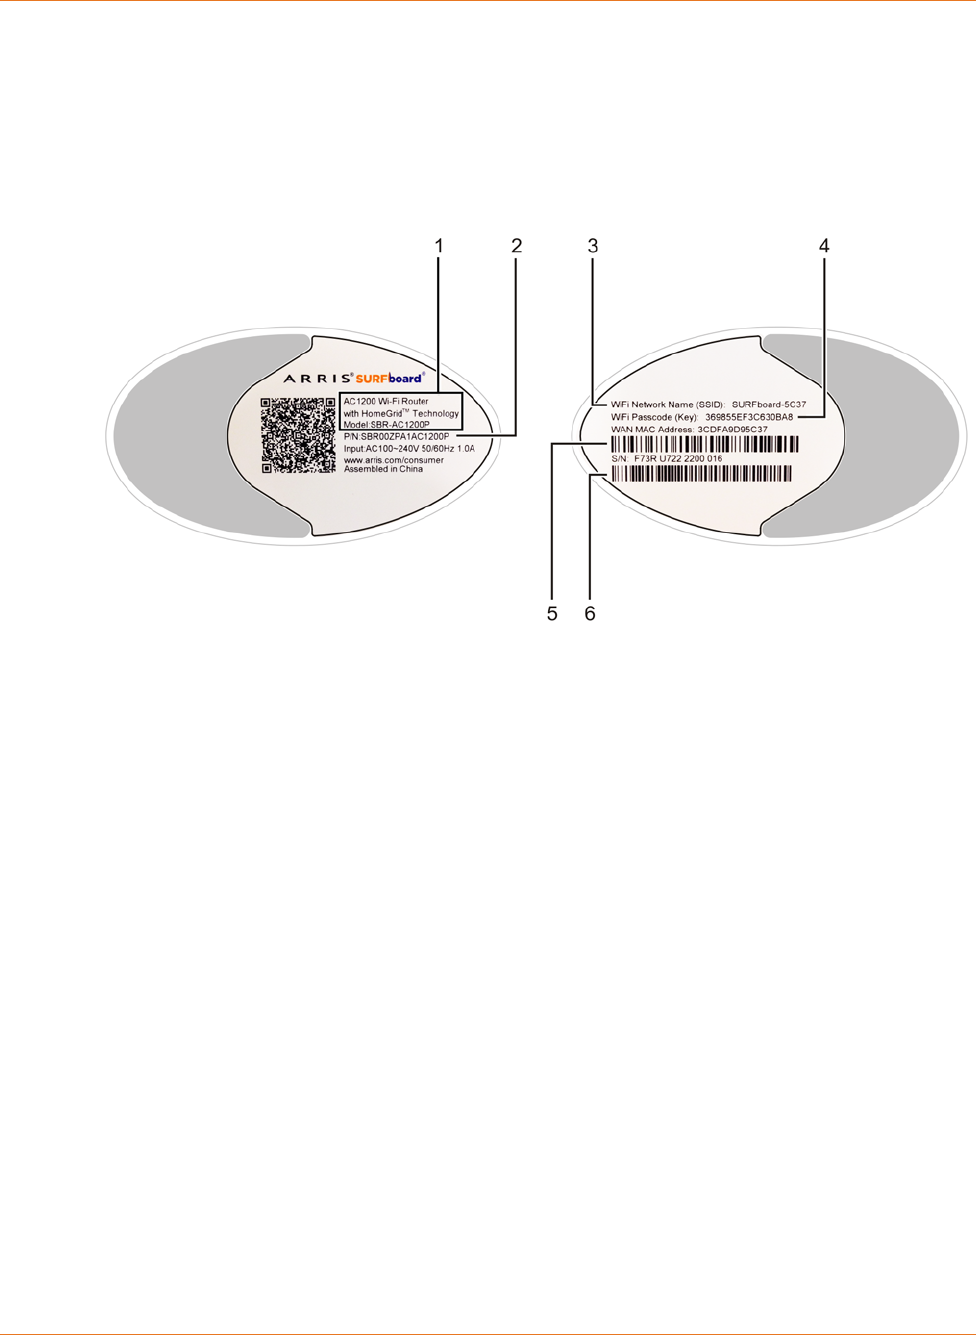
About this Manual
This manual covers the SURFboard SBR-AC1200P Wi-Fi Router. The model number is on the
label affixed to the bottom of the Wi-Fi Router.
1. Model name.
2. Part number.
3. WiFi network name (SSID).
4. WiFi passcode (key).
5. WAN MAC address.
6. Serial number.
Contact Information
Please visit the ARRIS Support website http://www.SURFboard.com/Support/SBR-AC1200P
for self-help technical support and product documentation. We can also provide technical
assistance via chat and email on the support website. ARRIS Support is available by phone at
877-466-8646. Please be prepared to provide your product's model number and serial
number, which can be found on the Wi-Fi Router's label.
For information on additional SURFboard products, or to purchase SURFboard products
(including other RipCurrent-enabled devices), visit http://www.surfboard.com.
For informational videos and tutorials about this and other ARRIS products, visit the ARRIS
Everywhere YouTube channel at https://www.youtube.com/user/ARRISmarketing/featured.

STANDARD PN 365-095-28243 x.3 SURFboard SBR-AC1200P Wi-Fi Router User Guide
© 2016-2017 ARRIS Enterprises LLC. All Rights Reserved. 16
Chapter 3
Installing the Wi-Fi Router
Before you start, make sure that:
You have all the Items You Need (page 13).
The modem and power outlets are available nearby.
Front Panel
The front of the Wi-Fi Router has a single LED that indicates the status of the Wi-Fi Router.
Color/Behavior Description
Solid green The Wi-Fi Router has obtained an IP address and connected to
the modem.
Flashing green Unable to connect to the WAN or the modem.
Solid amber Standby mode.
Flashing amber WPS pairing mode.
Flashing red Start-up mode, or error.
In addition, the following patterns may appear while you are pairing or unpairing your Wi-Fi
Router.
Color/Behavior Description
Flashing amber and green You have initiated G.hn encrypted pairing. See Pairing Your
SBR-AC1200P with a Network Extender (page 32) for more
information.
Solid amber You have initiated WPS pairing. See Use the WPS Button to
Connect Your WPS-Enabled Wireless Device_SBR-AC3200P (page
30) for more information.
Flashing red and green You have unpaired your Wi-Fi Router from other devices. See
Unpairing Your SBR-AC1200P (page 34) for more information.
After the pairing or unpairing process is initiated, the LED returns to its normal function.
Chapter 3: Installing the Wi-Fi Router
STANDARD PN 365-095-28243 x.3 SURFboard SBR-AC1200P Wi-Fi Router User Guide
© 2016-2017 ARRIS Enterprises LLC. All Rights Reserved. 17
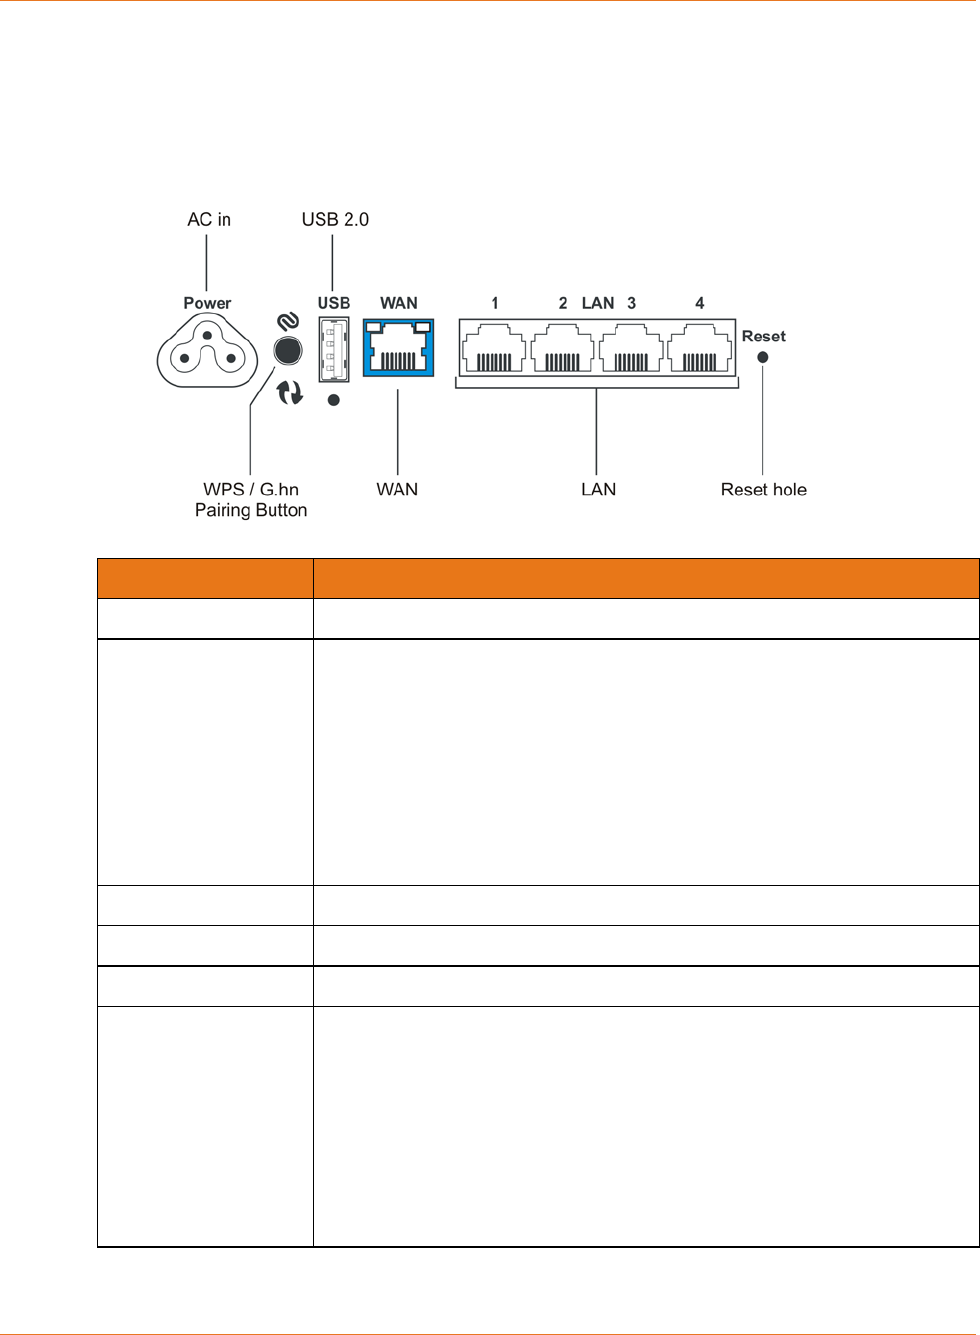
Rear Panel
The rear of the Wi-Fi Router has the following connectors and controls:
Name Description
AC in Connector for the power cord.
WPS/G.hn pairing
button
Begins associating the Wi-Fi Router with either a wireless device or a
G.hn device.
Press and hold the button for two to three seconds to initiate G.hn
pairing.
Press and hold the button for five to 10 seconds to initiate WPS
pairing.
Press and hold the button for 15 Seconds or more to unpair the
Wi-Fi Router from the G.hn network.
USB 2.0 USB 2.0 host connector.
WAN Connector for the modem.
LAN (1 - 4) Connectors for use with a computer Ethernet port.
Reset Can be used either to reset the Wi-Fi Router to its factory settings or to
restart the Wi-Fi Router. Use a pointed non-metallic object to press and
hold this button.
Press and hold this button for three to five seconds to restart the
Wi-Fi Router as if you power cycled the device.
Press and hold this button for more than 10 seconds if you want to
reset the Wi-Fi Router to its factory default settings and restart the
device. Any customized settings that you have set will be lost.

Chapter 3: Installing the Wi-Fi Router
STANDARD PN 365-095-28243 x.3 SURFboard SBR-AC1200P Wi-Fi Router User Guide
© 2016-2017 ARRIS Enterprises LLC. All Rights Reserved. 18
Indicator Lights for the SBR-AC1200P
The Wi-Fi Router has several LED indicator lights on the rear panel to assist in
troubleshooting:
LED Color/Behavior Description
G.hn signal
strength
Solid green Excellent link (at least 80 Mbps).
Flashing green Receiving/transmitting data, excellent link.
Solid amber Good link (between 40 Mbps and 80 Mbps).
Flashing amber Receiving/transmitting data, good link.
Solid red Fair link (less than 40 Mbps).
Flashing red Receiving/transmitting data, fair link.
Off No link.
G.hn
encrypted
link
Solid green Pairing complete (encrypted). Connected to G.hn
network with encryption enabled.
Flashing green Pairing in progress (encrypted). Trying to connect to G.hn
network.
Solid red Connection complete (unencrypted). Connected to G.hn
network without encryption.
Flashing red Connection in progress (unencrypted). Trying to connect
to G.hn network.
Off No link.
2.4 Ghz
Wi-Fi
Solid green 2.4 Ghz wireless interface enabled, but no activity.
Flashing green 2.4 Ghz wireless interface activity.
5 Ghz Wi-Fi
Solid green 5 Ghz wireless interface enabled, but no activity.
Flashing green 5 Ghz wireless interface activity.
Chapter 3: Installing the Wi-Fi Router
STANDARD PN 365-095-28243 x.3 SURFboard SBR-AC1200P Wi-Fi Router User Guide
© 2016-2017 ARRIS Enterprises LLC. All Rights Reserved. 19
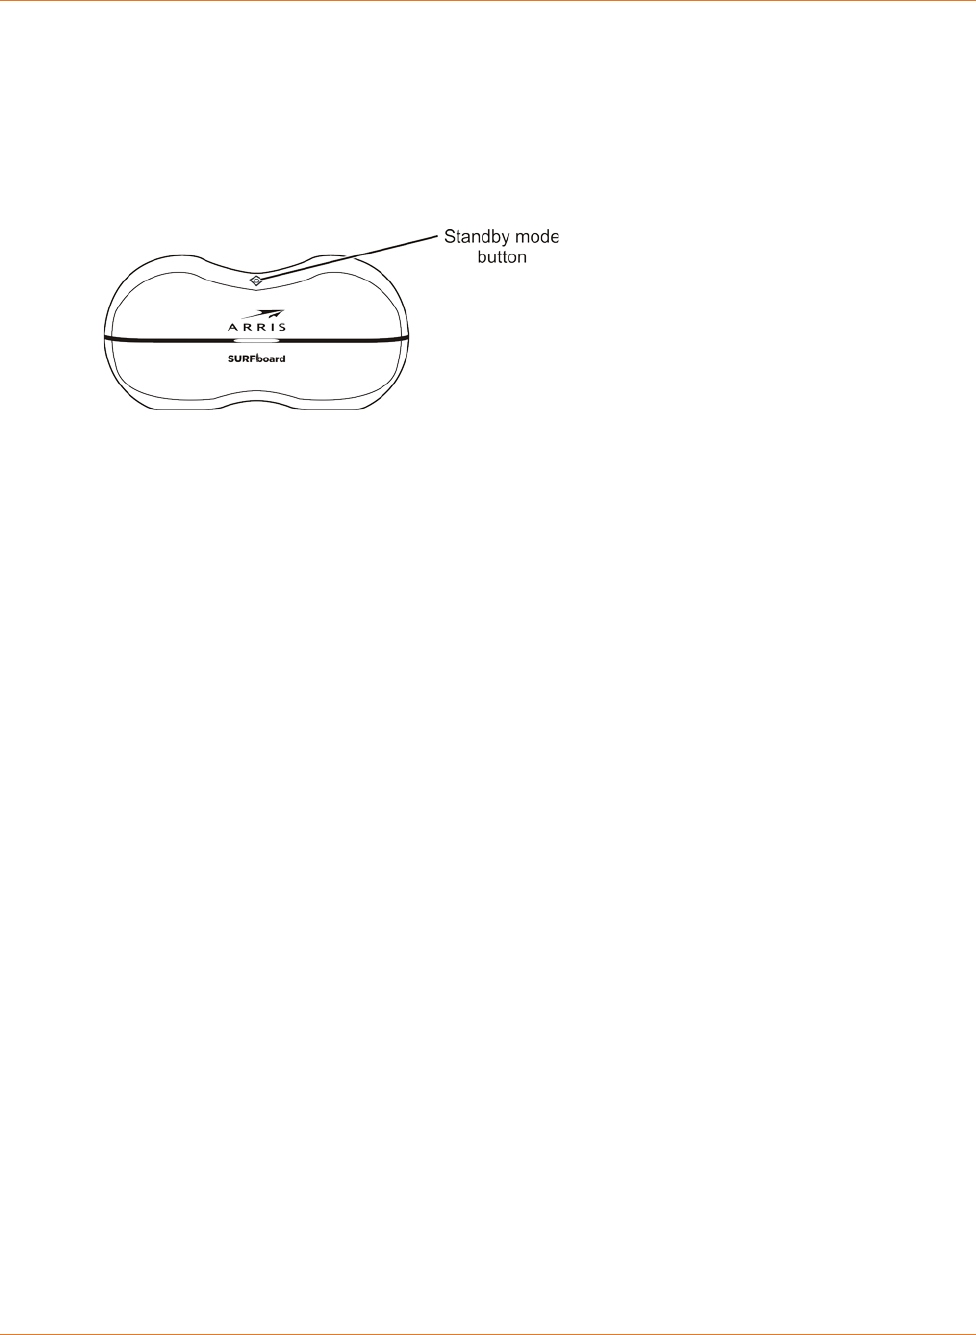
Standby Mode
The diamond-shaped button on top of the Wi-Fi Router is used to put the Wi-Fi Router into
Standby mode. When you press this button, the Wi-Fi capability is disabled for additional
security and power savings. The front LED turns amber when Standby is activated.
Press the button again to re-activate the Wi-Fi Router.
Selecting an Installation Location
There are a number of factors to consider when choosing a location to install the Wi-Fi
Router:
Is an AC outlet available nearby? For best results, the outlet should not be switched and
should be close enough to the Wi-Fi Router that extension cords are not required.
Is the modem nearby? Can you easily run cables between the Wi-Fi Router’s location and
the modem?
If you are connecting devices to the Ethernet ports, can you easily run cables between
the Wi-Fi Router’s location and those devices?
If you want to install the Wi-Fi Router on a desktop, is there enough space on either side
to keep the vents clear? Blocking the vents may cause overheating.
How close are the wireless devices? In general, the Wi-Fi Router should be located
centrally within the premises, as close as possible to the location where users will want
to access the wireless connection.The Wi-Fi Router wireless connection range is typically
100–200 feet (30m–65m) for 2.4 GHz signals and less for 5 GHz signals. A number of
factors can affect connection range, as described below.
Desktop Mounting Instructions
Position the Wi-Fi Router so that:
Air flows freely around it.
The back faces the nearest wall.
It will not fall to the floor if bumped or moved.
The sides of the unit are not blocked.
If the modem is not located in an ideal location for the Wi-Fi Router, you can add a
RipCurrent Network Extender to the modem device, then connect the SBR-AC1200P to the
Internet using the power line in another location.
Chapter 3: Installing the Wi-Fi Router
STANDARD PN 365-095-28243 x.3 SURFboard SBR-AC1200P Wi-Fi Router User Guide
© 2016-2017 ARRIS Enterprises LLC. All Rights Reserved. 20
Note: Clean the Wi-Fi Router using only a clean, slightly moistened, cloth. Do not use
aerosols in the vicinity of the Wi-Fi Router.
Factors Affecting Wireless Range
A number of factors can affect the usable range for wireless connections.
Increase range Locating the unit centrally.
Creating as much "line-of-sight" as possible with client devices.
Decrease range Metal or concrete walls between the Wi-Fi Router and other devices.
Large metal appliances, aquariums, or metal cabinets between the Wi-Fi
Router and other devices.
Interference and RF noise (2.4 GHz wireless phones, microwave ovens,
wireless speaker/receiver systems, or other wireless networks).
Placing the device in a cabinet or other enclosed space.
Note: Decreasing the range of the wireless network may be beneficial, as long as the
decreased range is sufficient for your needs. By limiting the network’s range, you reduce
interference with other networks and make it harder for unwanted users to find and connect
to the network.
Note: Setting the transmit power level to High increases the range. Setting it to Medium or
Low decreases the range proportionately. Medium or Low may be more appropriate for
high-density residential locations.
Note: For locations within the home that do not receive a steady/stable Wi-Fi signal, simply
add a RipCurrent Wi-Fi extender for full coverage in that location.
Ethernet, Wireless, or Gigabit Home Networking?
There are three ways to connect the computer (or other equipment) to the Wi-Fi Router.
The following will help you decide which is best for you:
Ethernet
Ethernet is a standard method of connecting two or more computers into a Local Area
Network (LAN). You can use the Ethernet connection if the computer has built-in Ethernet
hardware. The SBR-AC1200P provides support for up to four such connected devices.
Note: To connect more than four computers to the SBR-AC1200P through the Ethernet
ports, you need an Ethernet switch (available at computer retailers).
The Wi-Fi Router package comes with one 4-foot (1.2m) Ethernet cable (the connectors look
like wide telephone connectors); you can purchase more cables if necessary at a computer
retailer. If you are connecting the Wi-Fi Router directly to a computer, or to an Ethernet
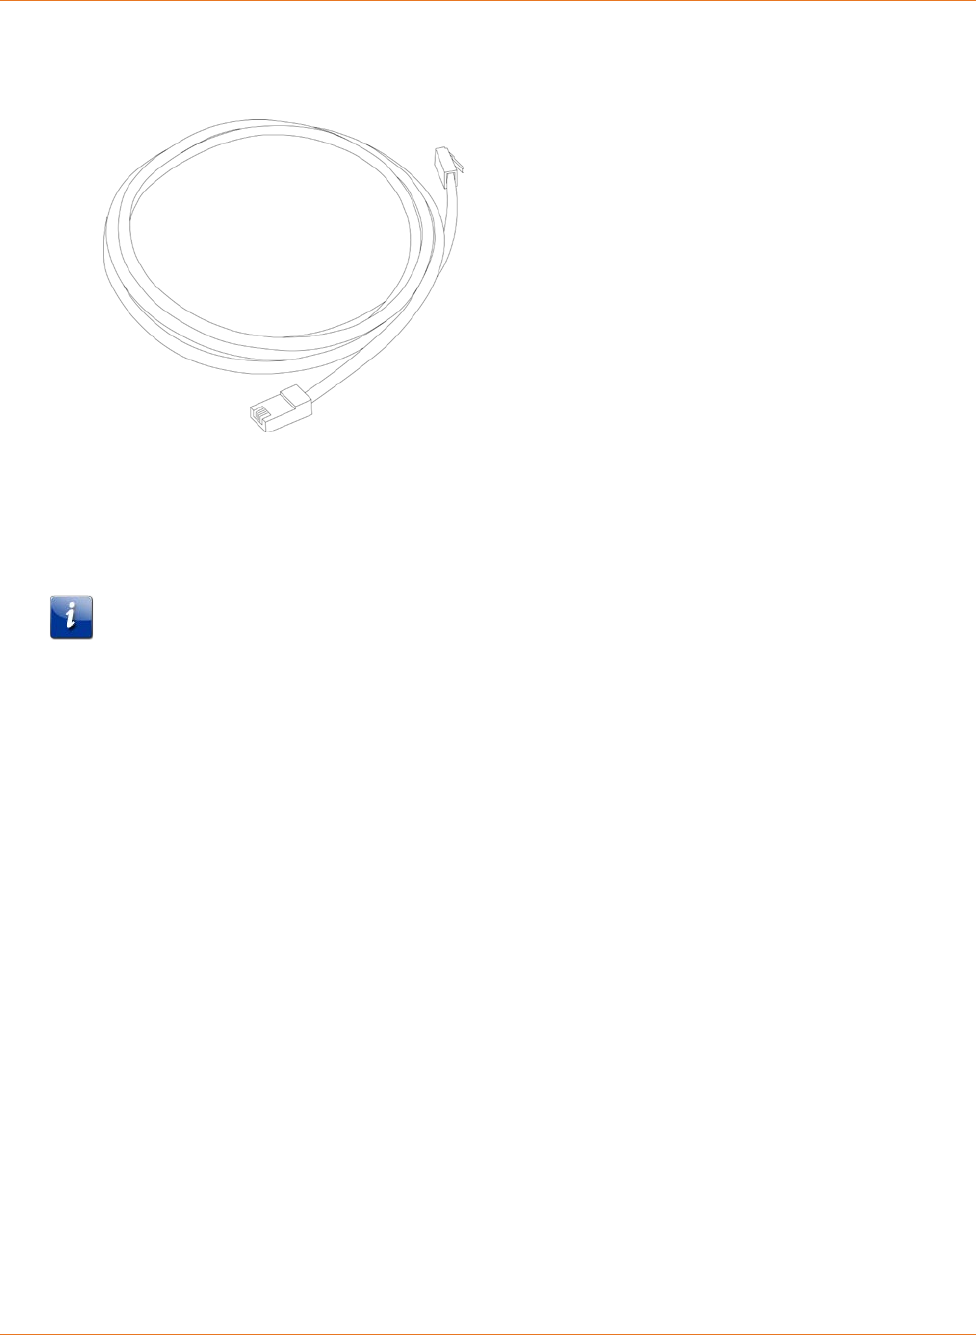
Chapter 3: Installing the Wi-Fi Router
STANDARD PN 365-095-28243 x.3 SURFboard SBR-AC1200P Wi-Fi Router User Guide
© 2016-2017 ARRIS Enterprises LLC. All Rights Reserved. 21
switch with a cross-over switch, ask for Category 5e (CAT5e) straight-through cable. CAT5e
or Cat6 cable is required for gigabit Ethernet (Gig-E), not regular CAT5 cable.
Wireless
Wireless access lets you connect additional (wireless-capable) devices to the Wi-Fi Router.
The 802.11 wireless LAN standard allows one or more computers to access the SBR-AC1200P
using a wireless (radio) signal. These connections are in addition to the connections
supported via Ethernet.
Note: You can use the wireless connection if the computer has a built-in or aftermarket
plug-in wireless adapter. To learn more about which wireless hardware works best with the
computer, see your computer dealer.
Gigabit Home Networking
Gigabit Home Networking lets you connect additional devices over power lines using the
G.hn Power Line Communications Standards. G.hn also allows you to use your AC power
lines to transmit and receive network communications from your SBR-AC1200P to clients
connected to a G.hn Network Extender.
Combined
If you have two or more computers, you can use Ethernet for up to four devices and wireless
or Gigabit Home Networking for the others. To connect five or more computers to the
Ethernet ports, you will need an Ethernet switch (available at computer retailers).
Configuring and Installing the Wi-Fi Router
1. Unplug the power to turn off your modem.
2. Connect one end of the Ethernet cable (included) to the modem, and the other end to
the WAN port on the Wi-Fi Router.
3. Reconnect the plug on the modem to turn the modem back on. Wait approximately 2
minutes to allow the modem to fully power up.
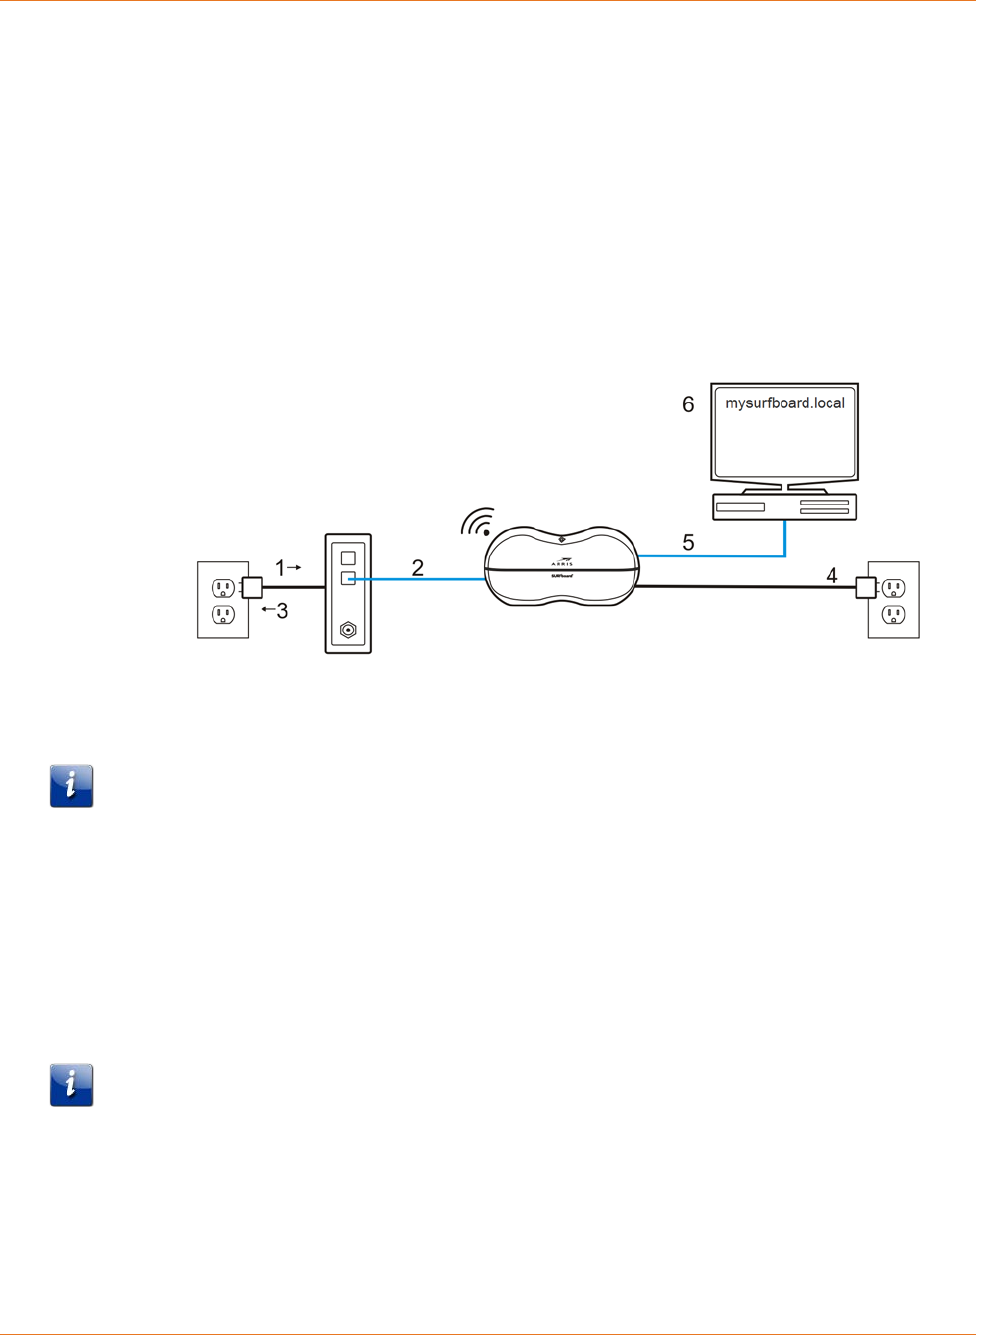
Chapter 3: Installing the Wi-Fi Router
STANDARD PN 365-095-28243 x.3 SURFboard SBR-AC1200P Wi-Fi Router User Guide
© 2016-2017 ARRIS Enterprises LLC. All Rights Reserved. 22
4. Connect the power adapter (included) to the power connector on the back of the Wi-Fi
Router, and then connect the power adapter to an available AC outlet. Wait until the 2.4
GHz and 5 GHz LEDs on the rear panel of the Wi-Fi Router turn solid green.
5. To manage the setup of the Wi-Fi Router, you can use a second Ethernet cable (not
provided) to connect a computer to an available LAN port on the SBR-AC1200P, or you
can connect wirelessly by using the preset wireless security settings printed on the Wi-Fi
Router's label located on the bottom of the Wi-Fi Router.
6. Open a browser on the computer to access the management interface of the Wi-Fi
Router, and navigate to http://mysurfboard.local. If the webpage does not display
correctly, try another browser.
Note: If you are connecting to an existing Wi-Fi modem or gateway, you must place that
device in a 'bridged mode.' For more information, see the documentation for your Internet
access device, or contact your service provider or device manufacturer.
Configuring the Wireless Connection
The SBR-AC1200P ships with a secure SSID that is unique for every device. Wi-Fi network
information is located on the label on the bottom of the Wi-Fi Router. You should configure
the Wi-Fi Router's wireless settings.
Note: At a minimum, you should set a login password and set up wireless security. See
Setting Up a Wireless Network Connection (page 26) for complete instructions on configuring
the wireless connection.

STANDARD PN 365-095-28243 x.3 SURFboard SBR-AC1200P Wi-Fi Router User Guide
© 2016-2017 ARRIS Enterprises LLC. All Rights Reserved. 23
Chapter 4
Setting up an Internet Connection
Important: Your computer may already be configured to automatically access the Internet. If
so, do not change the network options on your computer. Please contact ARRIS Technical
Support for assistance or verification.
If you cannot access the Internet after installing the Wi-Fi Router, you may have to manually
set up your computer to connect to the Internet. To do this, you will have to enable the
network options on your computer to automatically obtain an IP address and DNS server
address. After configuring the network options, you should verify the IP address.
If you still cannot access the Internet after configuring the IP address, contact ARRIS
Technical Support for assistance.
Please note, operating system-specific commands for configuring computer network options
are not provided in this document. The same general steps provided below apply to the
following Microsoft Windows operating systems:
Windows 10.
Windows 8.
Windows 7.
Note: For Mac, UNIX, and Linux computers, please follow the instructions provided in the
applicable user documentation.
If you are unfamiliar with the network configuration commands for your operating system or
need assistance, we highly recommend that you refer to the user documentation for the
operating system running on your computer for more information.
Configure Your IP Address
Note: The following instructions apply to Windows 7. Some windows and commands used in
this procedure may differ slightly from your computer, depending on your operating system.
1. Click the Start button and use the Search box to search for network and sharing.
2. Select Network and Sharing Center.
3. Click Change adapter settings from the Control Panel Home pane to open the Network
Connections window.
Chapter 4: Setting up an Internet Connection
STANDARD PN 365-095-28243 x.3 SURFboard SBR-AC1200P Wi-Fi Router User Guide
© 2016-2017 ARRIS Enterprises LLC. All Rights Reserved. 24
4. Click Local Area Connection to open the Local Area Connection Status window.
5. Click Properties to open the Local Area Connection Properties window.
Chapter 4: Setting up an Internet Connection
STANDARD PN 365-095-28243 x.3 SURFboard SBR-AC1200P Wi-Fi Router User Guide
© 2016-2017 ARRIS Enterprises LLC. All Rights Reserved. 25
6. Select Internet Protocol Version 4 (TCP/IPv4) and then click Properties to open the
TCP/IPv4 Properties window.
7. Select Obtain an IP address automatically and Obtain DNS server address
automatically.
8. Click OK to save the TCP/IP settings and close the Internet Protocol Properties window.
9. Close the remaining windows.
Verify & Renew Your IP Address
1. Open a command prompt window using the Start button and Run command from the
Taskbar on your desktop.
2. Type cmd and click OK to open a command prompt window.
3. Type ipconfig and press Enter to display the IP configuration.
4. To renew the IP address, type ipconfig/renew and press Enter. A new IP address for your
computer or other Ethernet-enabled device will display.
5. Type exit and then press Enter to return to Windows.

STANDARD PN 365-095-28243 x.3 SURFboard SBR-AC1200P Wi-Fi Router User Guide
© 2016-2017 ARRIS Enterprises LLC. All Rights Reserved. 26
Chapter 5
Setting Up a Wireless Network Connection
It is highly recommended that you first verify that your computer can connect to the Internet
using an Ethernet connection before configuring your wireless network.
You must currently have access to an Internet service in your home before you can set up a
wireless network connection. Also, make sure your computer and the SBR-AC1200P are
connected through an Ethernet connection.
Choose one of the following options to set up your wireless network connection:
Launch the SBR-AC1200P Quick Start Wizard (page 26).
Manually Connect to Your Wireless Network (page 30).
Use the WPS Button to Connect Your WPS-Enabled Wireless Device (page 30).
After setting up a wireless connection on your home network, check that your wireless
network connection was set up properly. See Test Your Wireless Network Connection (page
30) for more information.
Launch the SBR-AC1200P Quick Start Wizard
The SBR-AC1200P Quick Start Wizard helps you to quickly configure your basic wireless
network settings. Depending on your home network setup, you can further customize your
wireless home network configuration after completing the wizard.
1. Open a web browser (Internet Explorer, Google Chrome, Firefox, or Safari) on the
computer connected to the SBR-AC1200P.
2. Type the default LAN IP address http://mysurfboard.local in the Address bar and then
press Enter. The Login screen appears.
3. Type the default username and password. Both entries are case-sensitive.
Username: admin
Password: password
Chapter 5: Setting Up a Wireless Network Connection
STANDARD PN 365-095-28243 x.3 SURFboard SBR-AC1200P Wi-Fi Router User Guide
© 2016-2017 ARRIS Enterprises LLC. All Rights Reserved. 27
4. Click Login to open the SBR-AC1200P Web Manager. The Launch Quick Start Wizard
screen appears.
Note: If you have changed the default user name or password and cannot remember the
new user name or password, you can reset the Wi-Fi Router to the factory default settings.
To do this, insert a pointed, non-metallic object into the indented Reset button on the back
of the SBR-AC1200P, then press and hold the button for more than 10 seconds. The Wi-Fi
Router will be reset to its original factory settings, and any customized settings that you have
set will be lost.
5. Click Launch Quick Start Wizard to start the wizard. The Welcome screen appears.
Chapter 5: Setting Up a Wireless Network Connection
STANDARD PN 365-095-28243 x.3 SURFboard SBR-AC1200P Wi-Fi Router User Guide
© 2016-2017 ARRIS Enterprises LLC. All Rights Reserved. 28
6. Click Next. The Quick Start Wizard asks if you want to disable Band Steering.
7. Click Next. The Quick Start Wizard prompts you to enter a network name and
passphrase.
8. Enter a Network Name (SSID) for your wireless network. The network name must
contain from one to 32 alphanumeric characters.
9. Enter a Passphrase or Wi-Fi Security Key. This is the sign-on access code for your wireless
network. The code must contain from 8 to 64 characters consisting of any combination
of letters, numbers, and symbols.
Remember that your passphrase should be as unique as possible to protect your wireless
network and deter hackers or unauthorized access to your network.
10. Click Next. Network configurations are created for each band in your wireless network.
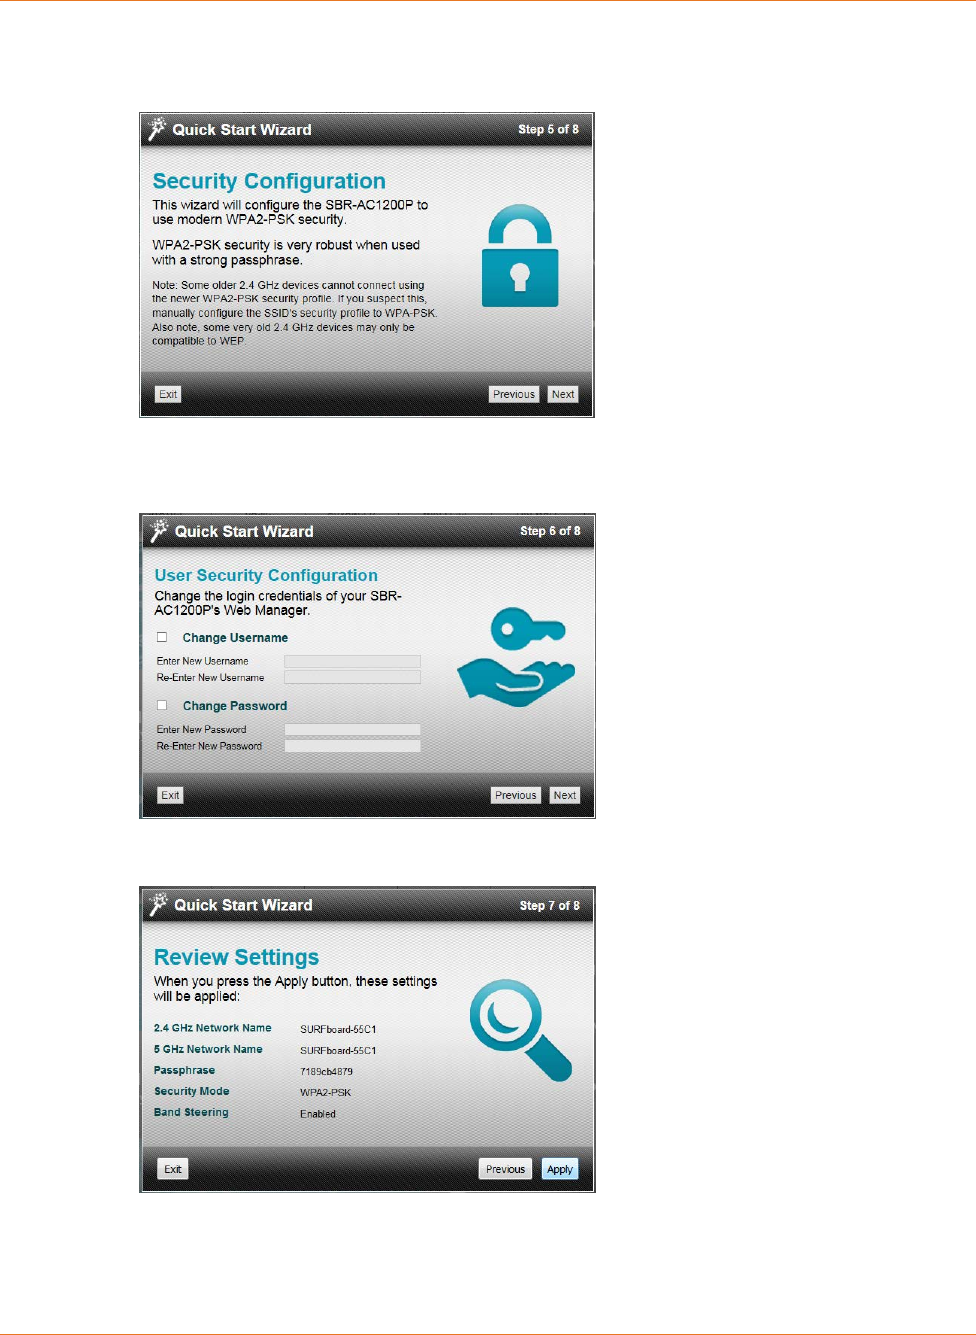
Chapter 5: Setting Up a Wireless Network Connection
STANDARD PN 365-095-28243 x.3 SURFboard SBR-AC1200P Wi-Fi Router User Guide
© 2016-2017 ARRIS Enterprises LLC. All Rights Reserved. 29
11. Click Next. The Wi-Fi security type is created. The WPA2-PSK security code is the
strongest security default.
12. Click Next. The Quick Start Wizard prompts you to change the default username or
password. If you do not change your username and password now, you can choose to
change them later using the standard configuration screens.
13. Click Next to start the Wi-Fi Security mode. WPA2-PSK (the default security code) is
automatically set, and the network settings are displayed.
14. Click Apply to accept or Previous to change the configuration.

Chapter 5: Setting Up a Wireless Network Connection
STANDARD PN 365-095-28243 x.3 SURFboard SBR-AC1200P Wi-Fi Router User Guide
© 2016-2017 ARRIS Enterprises LLC. All Rights Reserved. 30
Manually Connect to Your Wireless Network
You can use your Wi-Fi-enabled device to connect to the SBR-AC1200P by searching for the
network name assigned to your network. The default network name is listed on the security
label on the bottom of your Wi-Fi Router.
When prompted, enter your Wi-Fi Passcode to connect. The default passcode is listed on the
security label on the bottom of your Wi-Fi Router.
Use the WPS Button to Connect Your
WPS-Enabled Wireless Device
You can use the Wi-Fi Protected Setup (WPS) button on the Wi-Fi Router to connect your
WPS-enabled wireless devices. WPS automatically assigns a random wireless network name
(SSID) and Wi-Fi Security Key (password) to the SBR-AC1200P and other WPS-enabled
wireless devices to connect to your wireless network.
Note: To use the WPS Pairing button option, your computer hardware must support WPS
and also have WPA security compatibility.
1. Power ON the Wi-Fi Router and your other WPS-enabled wireless devices that you want
to connect to your wireless network.
2. Press and hold the WPS pairing button located on the back of the SBR-AC1200P for five
to 10 seconds and then release. See Rear Panel (page 17) for the location of the pairing
button. The LED on the front panel of the Wi-Fi Router changes to amber.
3. If applicable, press the WPS button on your WPS-enabled computer or other
WPS-enabled wireless device.
4. Repeat step 3 for each additional WPS-enabled wireless device that you want to connect
to your wireless network.
Test Your Wireless Network Connection
Perform the following connectivity test to confirm that your wireless connection is working
on the SBR-AC1200P and your computer:
1. Disconnect the Ethernet cable, if connected, from the SBR-AC1200P and your computer.
2. Check that the Wireless LED on the SBR-AC1200P front panel is lit solid green.
3. Open a web browser on your computer, such as Internet Explorer, Google Chrome,
Firefox, or Safari.
4. Type a valid URL (such as http://www.surfboard.com) in the address bar, and press
Enter.
If the website failed to open, please contact your service provider or call ARRIS Technical
Support at 1-877-466-8646 for assistance.
Chapter 5: Setting Up a Wireless Network Connection
STANDARD PN 365-095-28243 x.3 SURFboard SBR-AC1200P Wi-Fi Router User Guide
© 2016-2017 ARRIS Enterprises LLC. All Rights Reserved. 31
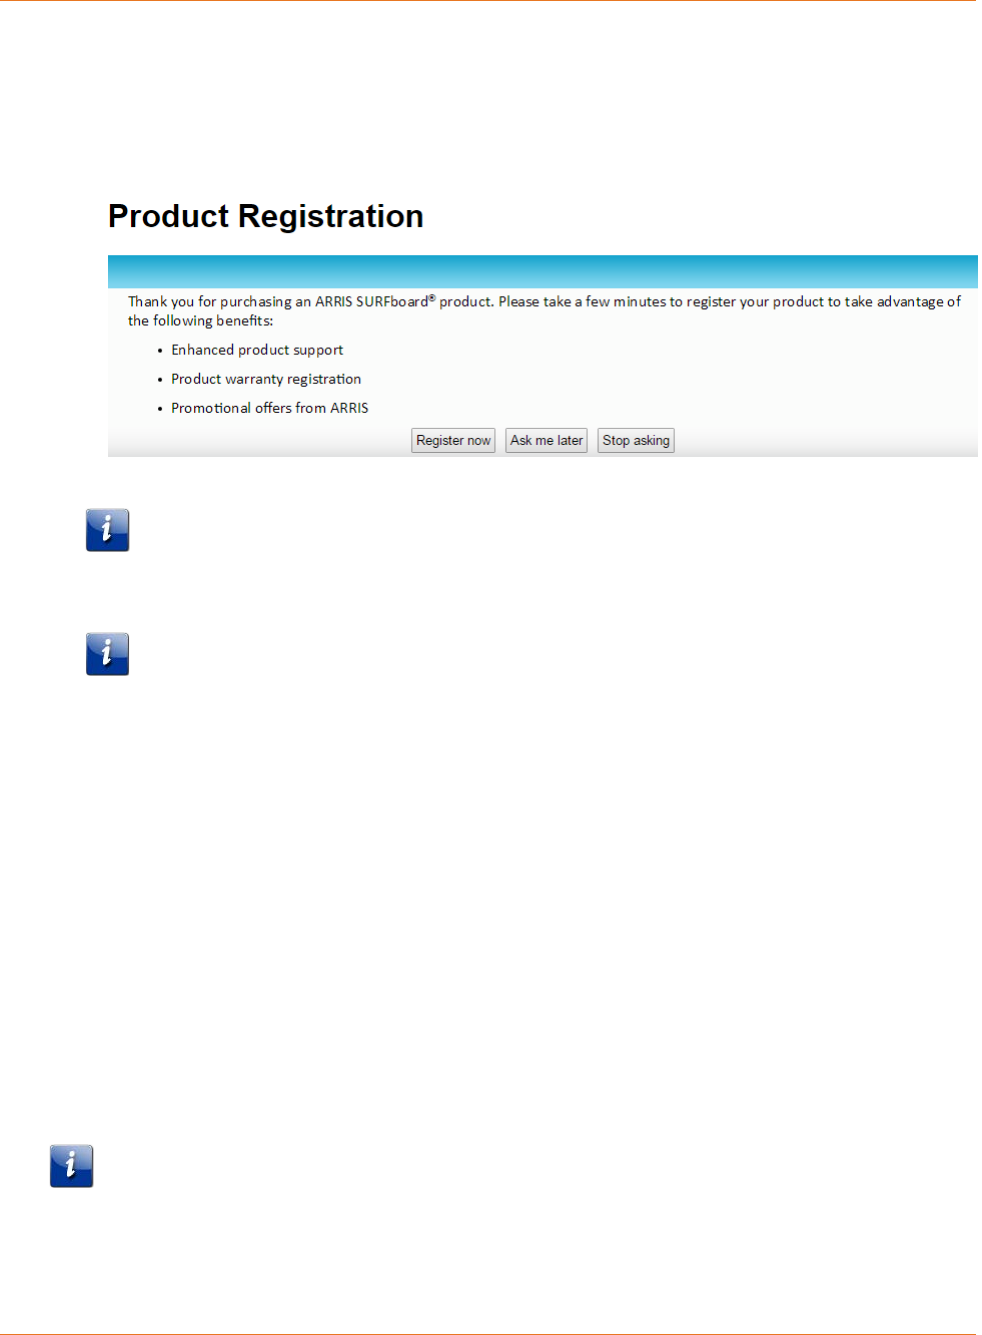
Register Your SBR-AC1200P
After you complete the Quick Start Wizard, the Web Manager prompts you to register your
SBR-AC1200P.
1. Click Register now to register your SBR-AC1200P now.
Note: If you do not want to register your SBR-AC1200P right now, you can click Ask me
later. The Web Manager will prompt you to register the next time you log into the Web
Manager.
Note: If you do not want the Web Manager to prompt you to register again, click Stop
asking. If you decide to register later, or if you need to update your registration, you can
click Status from the configuration screen and select Product Information from the
drop-down menu.
2. Follow the instructions on screen to register your SBR-AC1200P.
Connect Mobile Devices To Your Network
The SBR-AC1200P provides two simple ways that you can use to connect mobile devices to
your network:
• Use the ARRIS SURFboard Manager App (page 36). When you first launch the app,
you are prompted to scan the QR code on the bottom of the Wi-Fi Router.
• Use any QR code reader to scan the QR code on the bottom of your Wi-Fi Router.
After you scan the QR code, your default SSID and passkey are loaded into your phone.
Follow the prompts on your screen to connect to your network.
Note: These two methods of connecting mobile devices only work if you are using the
default SSID and passkey for your Wi-Fi Router and the default login for the Wi-Fi Router
Web Manager.

STANDARD PN 365-095-28243 x.3 SURFboard SBR-AC1200P Wi-Fi Router User Guide
© 2016-2017 ARRIS Enterprises LLC. All Rights Reserved. 32
Chapter 6
Adding G.hn Extenders To Your Network
Whenever you plug multiple G.hn devices into a power outlet in your home, the devices will
detect each other automatically and begin to communicate over your home's existing power
lines. However, these devices will be communicating over an unencrypted connection.
To increase security, you can choose to pair the devices with each other over an encrypted
connection. This step creates an encrypted network between two or more G.hn devices on a
power grid. It also helps you to secure your local area network (LAN) by randomizing your
domain name and password. Once your devices are paired over an encrypted connection,
then any devices that have not been paired will not be able to connect to your network.
Pairing Your SBR-AC1200P with a Network
Extender
There must be at least two G.hn transmitters for the distribution network to function. Your
router will need at least one companion device to use the RipCurrent feature. To take
advantage of the SBR-AC1200P RipCurrent capability, please visit http://www.surfboard.com
for information on SURFboard Extender and Accessory products compatible with the
technology.
Follow these steps to create an encrypted network and pair your SBR-AC1200P with a
Network Extender.
1. Plug in your RipCurrent Extender, or other G.hn device, into an AC outlet close to the
SBR-AC1200P Router. The G.hn network will connect automatically over an encrypted
connection, and the G.hn encrypted link LED on the back panel of the SBR-AC1200P will
change to red.
Note: Allow two minutes for devices to fully power up before pairing.
2. Press and hold the G.hn Pairing button on the back of the Router for three seconds. The
LED on the front panel of the SBR-AC1200P begins to flash amber and green, and the
G.hn encrypted link LED on the back panel of the SBR-AC1200P will first blink green and
then become solid green when pairing is successful. (In some instances the pairing LED
will blink until the Wi-Fi Hotspot is moved.)
Note: If your pairing is not successful, you can reset the G.hn settings for the Wi-Fi
Router by pressing and holding the Pairing button for at least 15 seconds. Then, test
your connection in unencrypted mode before trying again to pair again.
Chapter 6: Adding G.hn Extenders To Your Network
STANDARD PN 365-095-28243 x.3 SURFboard SBR-AC1200P Wi-Fi Router User Guide
© 2016-2017 ARRIS Enterprises LLC. All Rights Reserved. 33
3. Press the Pairing button on the other G.hn device. (For a SURFboard extender, press and
hold for three seconds). The Pairing LED will blink green and become solid green when
pairing is successful.
The G.hn signal strength LED on the back of the SBR-AC1200P indicates the strength of
the G.hn signal. If the LED is red or amber, consider adjusting the location to find a better
signal.
LED Color G.hn Signal Strength
Green Excellent signal.
Amber Good signal.
Red Fair signal.
4. Once the devices are paired over an encrypted connection (Green LED), you are now
ready to connect your client device (PC, TV, Game Console, etc.) to the Extender using a
wired or wireless connection, depending on the capability of your Extender model.
To add another G.hn device to your encrypted network, repeat this procedure using the
Pairing button on any connected G.hn device and on the new Wi-Fi Router or Network
Extender.
Note: If you are creating a new network, all of your devices must be set to the factory
default settings before you begin. You must reset any devices that have been previously
installed.
If you are adding a Network Extender to an existing network, then the Network Extender
must be reset to its factory settings. (However, the Router does not need to be reset.) For
more details, see the Quick Start Guide for your Network Extender.
Creating a Custom Domain Name and Password
to Pair Your SBR-AC1200P
In most cases, when you pair your SBR-AC1200P with a Network Extender, the domain name
and password are randomly generated and assigned to your network. If you prefer, you can
follow these instructions to create your own domain name and password for your network.
Note: You must use the default user name and password (listed below) to log in to the
SBR-AC1200P Web Manager for the first time. For network security purposes, we highly
recommend that you change the default user name and password after logging onto the
SBR-AC1200P for the first time. See Change the Default User Name and Password (page 53)
for more information.
1. Open any web browser on the computer connected to the SBR-AC1200P.
Chapter 6: Adding G.hn Extenders To Your Network
STANDARD PN 365-095-28243 x.3 SURFboard SBR-AC1200P Wi-Fi Router User Guide
© 2016-2017 ARRIS Enterprises LLC. All Rights Reserved. 34
2. In the Address bar, type http://mysurfboard.local for the IP address, and then press
Enter. The Login screen appears.
3. Type the default user name and password. Both entries are case-sensitive.
Username: admin
Password: password
4. Click Login to open the SBR-AC1200P Web Manager. The SBR-AC1200P Main Screen
appears.
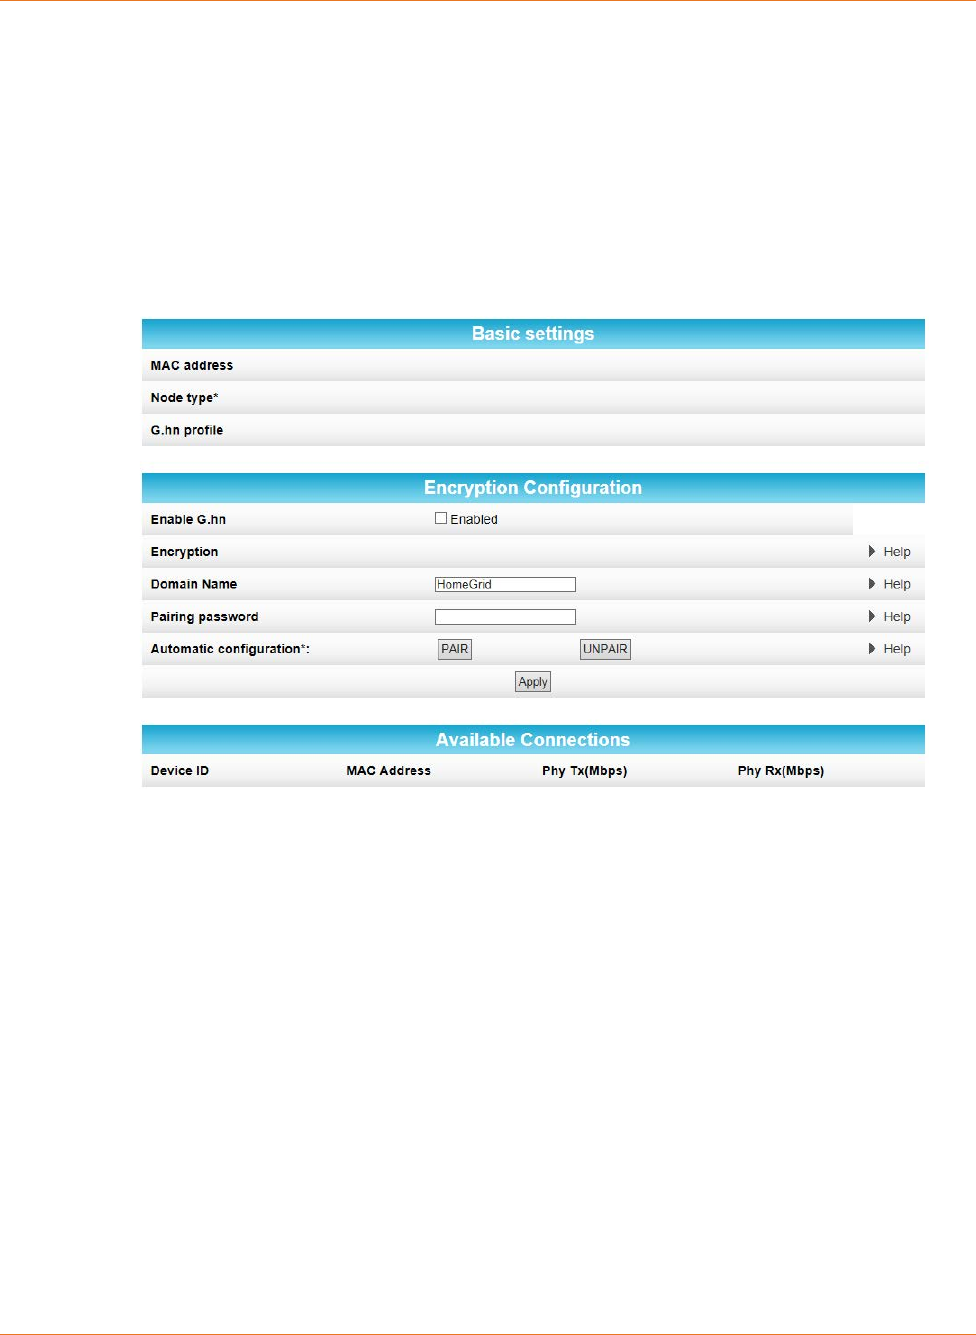
5. Click Advanced on the SBR-AC1200P Main Menu, and click RipCurrent (G.hn) from the
Advanced submenu options.
6. In the Domain Name field, enter the domain name that you want to assign to your
network.
7. In the Pairing password field, enter the pairing password that you want to assign to your
network.
8. Click Apply.
9. Plug the Network Extender into an electrical outlet near the SBR-AC1200P.
10. You must manually enter the same domain name and password into any new extenders
that were added to your RipCurrent network in order to create an encrypted connection.
The pairing process begins. Once the pairing process is complete, both LEDs stop flashing
and become solid green. It may take up to 60 seconds for the pairing process to
complete.
11. Use an Ethernet cable to connect the Network Extender to its client device.

Chapter 6: Adding G.hn Extenders To Your Network
STANDARD PN 365-095-28243 x.3 SURFboard SBR-AC1200P Wi-Fi Router User Guide
© 2016-2017 ARRIS Enterprises LLC. All Rights Reserved. 35
Unpairing Your SBR-AC1200P
Follow these steps if you need to unpair the SBR-AC1200P from the Network Extender.
Note: You must use the default user name and password (listed below) to log in to the
SBR-AC1200P Web Manager for the first time. For network security purposes, we highly
recommend that you change the default user name and password after logging onto the
SBR-AC1200P for the first time. See Change the Default User Name and Password (page 53)
for more information.
1. Open any web browser on the computer connected to the SBR-AC1200P.
2. In the Address bar, type http://mysurfboard.local for the IP address, and then press
Enter. The Login screen appears.
3. Type the default user name and password. Both entries are case-sensitive.
Username: admin
Password: password
4. Click Login to open the SBR-AC1200P Web Manager. The SBR-AC1200P Main Screen
appears.
5. Click Advanced on the SBR-AC1200P Main Menu, and click RipCurrent (G.hn) from the
Advanced submenu options.
6. Click UNPAIR. All of the paired devices will be disconnected from the SBR-AC1200P, and
any client devices that are connected to Network Extenders will lose connection to the
Internet. The domain name and password will also be deleted as well.

STANDARD PN 365-095-28243 x.3 SURFboard SBR-AC1200P Wi-Fi Router User Guide
© 2016-2017 ARRIS Enterprises LLC. All Rights Reserved. 36
Chapter 7
Managing Your Wi-Fi Router and
Connected Networks
Use the ARRIS SURFboard Manager app or the SBR-AC1200P Web Manager to view and
monitor the configuration settings and operational status of your Wi-Fi Router.
You can also use the SBR-AC1200P Web Manager to configure your network connections
and wireless security settings. See Protecting & Monitoring Your Wireless Network (page 53)
for more information.
Use the ARRIS SURFboard Manager App
The ARRIS SURFboard Manager app is available for Android™ and Apple® mobile devices at
no charge. You can download it on Google Play™ or on the App Store®.
The app lets you manage the SBR-AC1200P directly from your mobile devices. Use the ARRIS
SURFboard Manager to view connected devices on your network, manage parental controls,
and set other network parameters. Once you have connected your mobile device to the
SBR-AC1200P, then you can view and manage the SBR-AC1200P either locally on the
network or remotely.
The ARRIS SURFboard Manager lets you scan the QR code on your Wi-Fi Router's security
label to automatically connect the Wi-Fi Router with your mobile device.
The SBR-AC1200P Quick Start Guide also includes QR codes to download this User Guide or
connect to the ARRIS Everywhere YouTube channel.
Note: In order to connect your mobile device to the SBR-AC1200P using the QR code, your
network must be using the default network name and Wi-Fi security password.
You can download the ARRIS SURFboard Manager on Google Play or on the App Store.
Follow the instructions in the app to connect and manage your Wi-Fi Router.
Chapter 7: Managing Your Wi-Fi Router and Connected Networks
STANDARD PN 365-095-28243 x.3 SURFboard SBR-AC1200P Wi-Fi Router User Guide
© 2016-2017 ARRIS Enterprises LLC. All Rights Reserved. 37
Start the Wi-Fi Router Web Manager
Note: You must use the default user name and password (listed below) to log in to the
SBR-AC1200P Web Manager for the first time. For network security purposes, we highly
recommend that you change the default user name and password after logging onto the
SBR-AC1200P for the first time. See Change the Default User Name and Password (page 53)
for more information.
1. Open any web browser on the computer connected to the SBR-AC1200P.
2. In the Address bar, type http://mysurfboard.local for the IP address, and then press
Enter. The Login screen appears.
3. Type the default user name and password. Both entries are case-sensitive.
Username: admin
Password: password
4. Click Login to open the SBR-AC1200P Web Manager. The SBR-AC1200P Main Screen
appears.
Note: If you have changed the default user name or password and cannot remember the
new user name or password, you can reset the Wi-Fi Router to the factory default
settings. To do this, insert a pointed, non-metallic object into the indented Reset button
on the back of the SBR-AC1200P, then press and hold the button for more than 10
seconds. The Wi-Fi Router will be reset to its original factory settings, and any
customized settings that you have set will be lost.
Chapter 7: Managing Your Wi-Fi Router and Connected Networks
STANDARD PN 365-095-28243 x.3 SURFboard SBR-AC1200P Wi-Fi Router User Guide
© 2016-2017 ARRIS Enterprises LLC. All Rights Reserved. 38
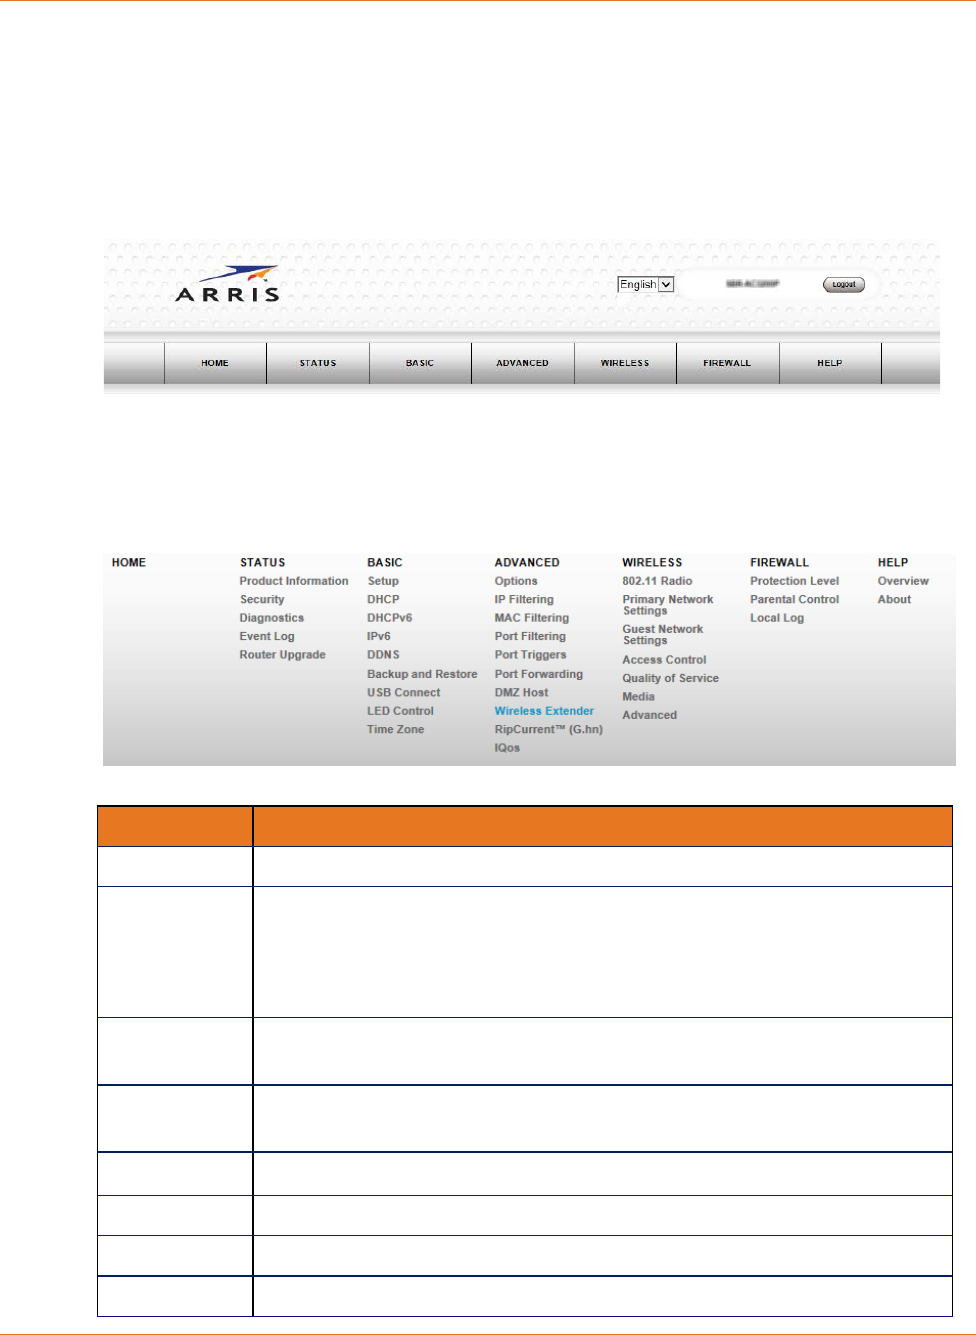
Wi-Fi Router Web Manager Menu Options
Main Menu Buttons
The SBR-AC1200P main menu buttons are displayed along the top of the SBR-AC1200P Web
Manager screen. To display the drop-down submenu options, click the menu button.
Main Menu Links
The SBR-AC1200P main menu and related submenu option links are also displayed along the
bottom of the SBR-AC1200P Web Manager screen. To open a submenu option, click the link.
Menu Option Function
Home Displays the Quick Start Wizard main screen.
Status Provides information about the Wi-Fi Router hardware and software, MAC
address, Wi-Fi Router IP address, serial number, and related information.
Additional screens provide diagnostic tools and also allow you to change
your Wi-Fi Router user name and password.
Basic Configures the Wi-Fi Router IP-related configuration data, including
Network Configuration, WAN Connection Type, DHCP, and DDNS.
Advanced Controls Internet protocols which configure and monitor how the Wi-Fi
Router routes IP traffic on the SBR-AC1200P.
Wireless Configures and monitors the Wi-Fi Router wireless networking features.
Firewall Configures and monitors the Wi-Fi Router firewall.
Help Provides general information to help you set up your home network.
Logout Closes the SBR-AC1200P Web Manager.
Chapter 7: Managing Your Wi-Fi Router and Connected Networks
STANDARD PN 365-095-28243 x.3 SURFboard SBR-AC1200P Wi-Fi Router User Guide
© 2016-2017 ARRIS Enterprises LLC. All Rights Reserved. 39
Get Help
You can choose any of the following three options to obtain help information for any
SBR-AC1200P Web Manager function. General help information is available for any
SBR-AC1200P menu option when you click the Help button on that page.
Help Overview (page 39).
Help Links (page 40).
Field Level Help (page 40).
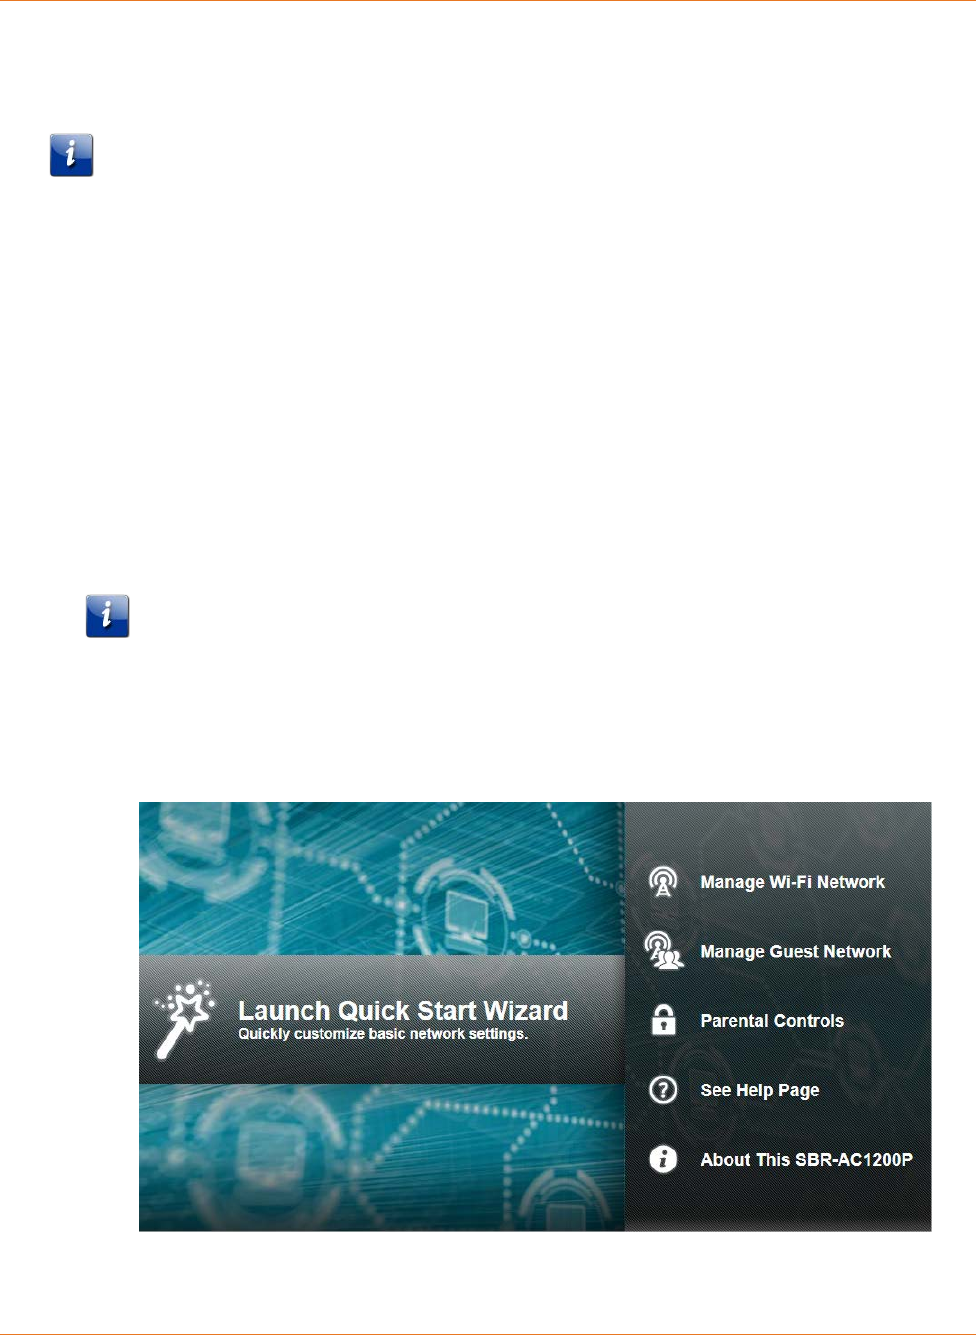
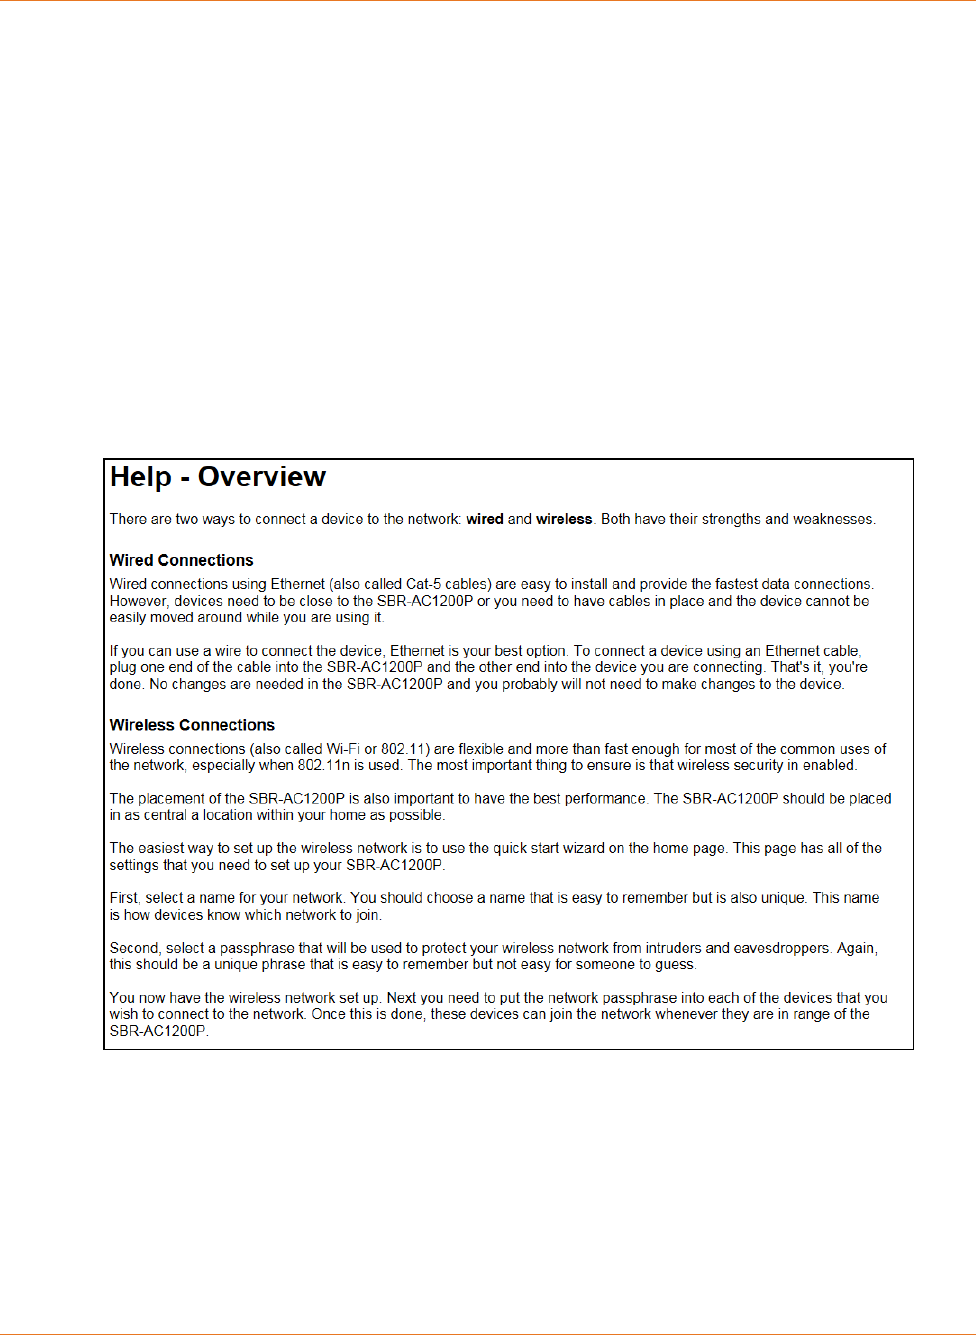
Help Overview
General help information is available when you click Help, Overview on the SBR-AC1200P
Main Menu.
Chapter 7: Managing Your Wi-Fi Router and Connected Networks
STANDARD PN 365-095-28243 x.3 SURFboard SBR-AC1200P Wi-Fi Router User Guide
© 2016-2017 ARRIS Enterprises LLC. All Rights Reserved. 40
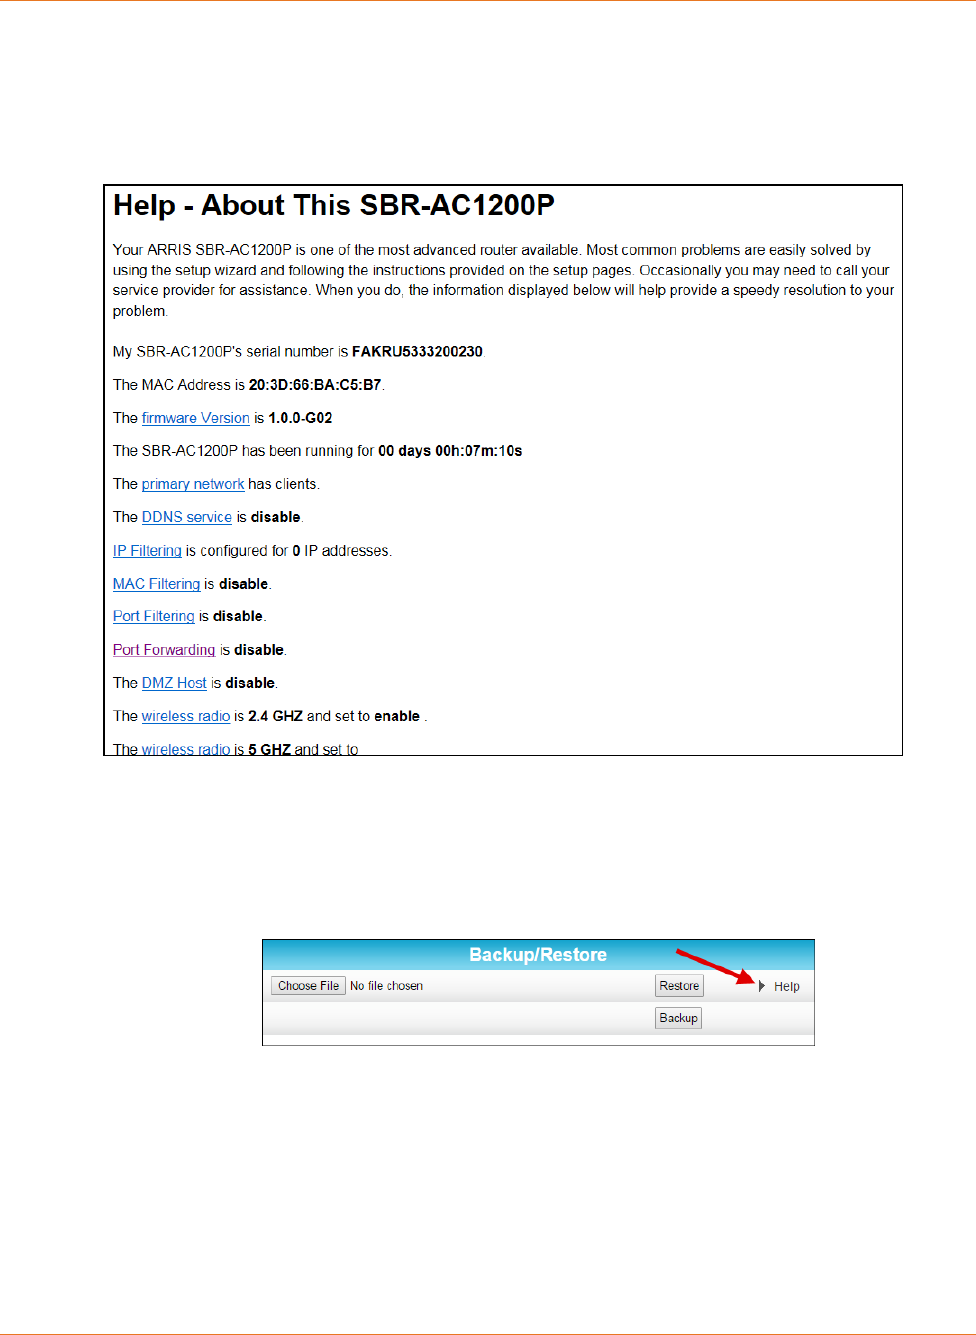
Help Links
Provides a concise list of your configuration settings with applicable links for easy access
when you click Help, About on the SBR-AC1200P Main Menu. The link opens the related
configuration screen.
Field Level Help
More specific help information is available throughout the web manager for field level help
when you click Help located to the right of the applicable field (see sample screenshot
below).
View the Wi-Fi Router Product Information
The Status Product Information screen displays general product information, including the
software (or firmware) version and the current network connection status of the Wi-Fi
Router.
To open the Status Product Information page:
1. Click Status on the SBR-AC1200P Main Menu.
Chapter 7: Managing Your Wi-Fi Router and Connected Networks
STANDARD PN 365-095-28243 x.3 SURFboard SBR-AC1200P Wi-Fi Router User Guide
© 2016-2017 ARRIS Enterprises LLC. All Rights Reserved. 41
2. Click Product Information from the Status submenu options.
3. Click the Refresh button (F5) in your web browser to reload the information on the
screen.
Test Your Connection
The Status Diagnostics screen lets you perform a series of tests to make sure that your
SBR-AC1200P is connected and displays information about the ping test parameters.
To run a ping test:
1. Click Status on the SBR-AC1200P Main Menu.
2. Click Diagnostics from the Status submenu options.
3. In the Select Utility section, select the kind of test that you want to run.
4. In the Ping Test Parameters section, set the parameters that you would like to use for
your test.
5. Click Start Test to begin the test. The results will appear in the box at the bottom of the
screen.
Chapter 7: Managing Your Wi-Fi Router and Connected Networks
STANDARD PN 365-095-28243 x.3 SURFboard SBR-AC1200P Wi-Fi Router User Guide
© 2016-2017 ARRIS Enterprises LLC. All Rights Reserved. 42
Set Up DHCP
The Basic DHCP screen lets you manually assign IP addresses to devices on your LAN.
To configure your LAN:
1. Click Basic on the SBR-AC1200P Main Menu.
2. Click DHCP from the Basic submenu options.
3. In the LAN Network Configuration section, choose the settings that you would like to
apply to your LAN, and click Apply.
4. In the Reserved IP Client List section, click Add to set up a list of IP addresses that you
want to reserve.
5. In the Attached Client List section, select the IP address of any clients that you want to
reserve, and click Reserve.
Set Up Dynamic DNS
The Basic DDNS screen uses dynamic DNS to let you give your SBR-AC1200P a "friendly"
name, for example, in case you are setting up a web server in the home. Most users will not
need to set up dynamic DNS.
If you do need to set up dynamic DNS:
1. Click Basic on the SBR-AC1200P Main Menu.
Chapter 7: Managing Your Wi-Fi Router and Connected Networks
STANDARD PN 365-095-28243 x.3 SURFboard SBR-AC1200P Wi-Fi Router User Guide
© 2016-2017 ARRIS Enterprises LLC. All Rights Reserved. 43
2. Click DDNS from the Basic submenu options.
3. In the DDNS Service field, select the DDNS service that you are using.
4. In the Username field, type the username associated with the DDNS account.
5. In the Password field, type the password associated with the DDNS account.
6. In the Host Name field, type the "friendly" name that you want to assign to your
SBR-AC1200P.
7. Click Apply to save your changes.
View Your IPv6 Configuration
The Basic IPv6 screen shows the IP address, MAC address, and reachability status of your
Wi-Fi Router.
To view your IPv6 configuration:
1. Click Basic on the SBR-AC1200P Main Menu.
2. Click IPv6 from the Basic submenu options.
View Your USB Configuration and Status
Information
The Basic USB Connect screen shows the USB configuration and status information for your
Wi-Fi Router.
To view your USB configuration and status information:
1. Click Basic on the SBR-AC1200P Main Menu.
Chapter 7: Managing Your Wi-Fi Router and Connected Networks
STANDARD PN 365-095-28243 x.3 SURFboard SBR-AC1200P Wi-Fi Router User Guide
© 2016-2017 ARRIS Enterprises LLC. All Rights Reserved. 44
2. Click USB Connect from the Basic submenu options.
Disable LEDs on the Back Panel
The Basic LED Control screen lets you disable the LEDs on the back panel of your Wi-Fi
Router, if you want.
To disable the LEDs on the back panel:
1. Click Basic on the SBR-AC1200P Main Menu.
2. Click LED Control from the Basic submenu options.
3. In the LEDs field, select Disabled.
4. Click Apply.
Adjust Your Time Zone
You can adjust your time zone if necessary so that the SBR-AC1200P is set to the correct
local time. You can also choose to adjust for Daylight Saving Time automatically.
To disable the LEDs on the back panel:
1. Click Basic on the SBR-AC1200P Main Menu.
2. Click Time Zone from the Basic submenu options.
3. Select your time zone from the Current Time Zone drop-down box.
4. Select Yes or No to automatically adjust the time for Daylight Saving Time.
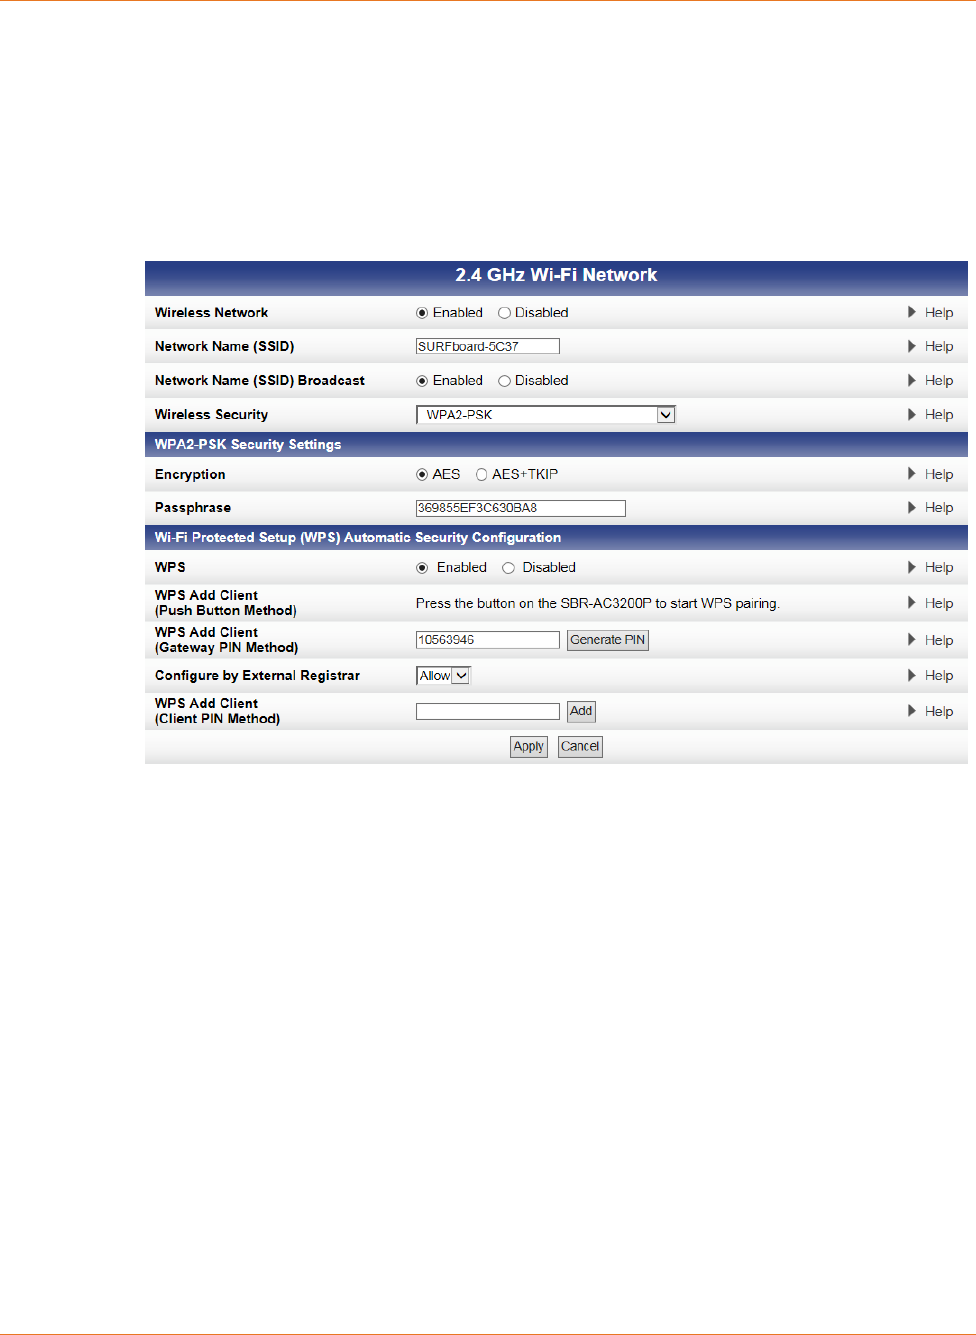
Chapter 7: Managing Your Wi-Fi Router and Connected Networks
STANDARD PN 365-095-28243 x.3 SURFboard SBR-AC1200P Wi-Fi Router User Guide
© 2016-2017 ARRIS Enterprises LLC. All Rights Reserved. 45
5. Click Apply.
Set Up Your Primary Wireless Network
1. Click Wireless on the SBR-AC1200P Main Menu.
2. Click Primary Network Settings from the Wireless submenu options.
3. Select the tab for the band whose settings you want to configure.
4. Select Enabled or Disabled in the Wireless Network field to turn ON or OFF wireless
networking on your home network.
5. Do one of the following to set the network name for your wireless network in the
Network Name (SSID) field:
• Keep the default network name listed in the field (also listed on your gateway label).
• Enter a different name for your primary network.
The wireless network name must be different from any other network name on your
home network. You can use any combination of letters (lowercase and uppercase),
numbers, and/or special characters (symbols); 32 characters maximum.
6. Select Enabled or Disabled in the Network Name (SSID) Broadcast field to turn On or Off
showing your SSID as an available network.
When SSID Broadcast is enabled, your SSID is visible to wireless clients that are within
range of your home network to connect to it.
When SSID broadcast is disabled, your SSID is not visible to unauthorized wireless clients.

Chapter 7: Managing Your Wi-Fi Router and Connected Networks
STANDARD PN 365-095-28243 x.3 SURFboard SBR-AC1200P Wi-Fi Router User Guide
© 2016-2017 ARRIS Enterprises LLC. All Rights Reserved. 46
7. Select one of the following Wireless Security modes for your wireless gateway from the
Security Mode drop-down list:
• WPA2-PSK: Wi-Fi Protected Access version 2 with Pre-Shared Key. Provides the best
security for your network (recommended).
• WPA2-PSK + WPA-PSK: combination Wi-Fi Protected Access version 2 with
Pre-Shared Key and Wi-Fi Protected Access with Pre-Shared Key.
• Unencrypted: network security is not set for your wireless network. This allows
access to your wireless network without a Wi-Fi Security key.
• WPA-PSK: combination Wi-Fi Protected Access with Pre-Shared Key and Wi-Fi
Protected Access with Pre-Shared Key.
• WPA2 (Enterprise): Wi-Fi Protected Access version 2 provides additional network
security and requires a user name and password for network logon.
• WPA2 + WPA (Enterprise): combination Wi-Fi Protected Access version 2 and Wi-Fi
Protected Access provides additional network security and requires a user name and
password for network logon.
8. Choose the Encryption type for your wireless network in the Encryption field:
• AES – Advanced Encryption Standard: Provides the strongest encryption
(recommended).
• AES+TKIP – Advanced Encryption Standard and Temporal Key Integrity Protocol:
Allows both AES and TKIP-capable clients to connect to your wireless network.
9. Enter your wireless network password in the Passphrase field. You can use any
combination of letters, numbers, and/or special characters.
10. Click Apply.
Set Up a Guest Wireless Network
If you wish, you can set up your Wi-Fi Router to host a guest network. By doing so, you can
give your guests access to part of your wireless network, yet still keep certain parts private.
To set up a guest network:
1. Click Wireless on the SBR-AC1200P Main Menu.

Chapter 7: Managing Your Wi-Fi Router and Connected Networks
STANDARD PN 365-095-28243 x.3 SURFboard SBR-AC1200P Wi-Fi Router User Guide
© 2016-2017 ARRIS Enterprises LLC. All Rights Reserved. 47
2. Click Guest Network Settings from the Wireless submenu options.
3. Select the tab for the band whose settings you want to configure.
4. Select the guest network from the Selected Guest Network drop-down list.
5. Select Enabled or Disabled in the Guest Network field to turn ON or OFF the selected
wireless guest network.
6. Do one of the following to set the network name for your wireless network in the
Network Name (SSID) field:
• Keep the default network name listed in the field.
• Enter a different name for your guest network.
The wireless network name must be different from any other network name on your
home network. You can use any combination of letters (lowercase and uppercase),
numbers, and/or special characters (symbols); 32 characters maximum.
7. Select LAN or Guest from the IP Network drop-down list.
• LAN – Configures the guest network to be part of your primary network and allow
guest users to connect to your primary network.
• Guest – Configures the guest network to only allow access to a specific network and
not your primary network.
8. Enter the IP address for the SBR-AC1200P on the Guest network in the IP Address field.
9. Enter the first IP address of the range of IP addresses for the guest network lease pool in
the Lease Pool Starting IP Address field. These are IP addresses that the SBR-AC1200P
assigns to devices on your guest network.

Chapter 7: Managing Your Wi-Fi Router and Connected Networks
STANDARD PN 365-095-28243 x.3 SURFboard SBR-AC1200P Wi-Fi Router User Guide
© 2016-2017 ARRIS Enterprises LLC. All Rights Reserved. 48
10. Enter the last IP address of the range of IP addresses for the guest network lease pool in
the Lease Pool Ending IP Address field.
11. Enter the amount of time (in seconds) that an IP address will be available to a device on
your guest network in the Lease Time field.
12. Select Enabled or Disabled in the UPnP (Universal Plug and Play) Enable field to allow or
block any network devices, such as computers, smart phones, tablets, gaming devices, or
printers to automatically connect to your home network.
13. Select Enabled or Disabled in the Firewall Enable field to turn ON or OFF the gateway
firewall.
14. Select Enabled or Disabled in the DHCPv6 Server field to allow the DHCP server to send
leases to the guest network clients from the guest network lease pool you specified
earlier.
Note: If the DHCP server is disabled, you must assign static IP addresses to the guest
network stations.
15. Select one of the following wireless network security options for your wireless network
from the Wireless Security drop-down list:
• WPA2-PSK: Wi-Fi Protected Access version 2 with Pre-Shared Key. Provides the best
security for your network (recommended).
• WPA2-PSK + WPA-PSK: combination Wi-Fi Protected Access version 2 with
Pre-Shared Key and Wi-Fi Protected Access with Pre-Shared Key.
• Unencrypted: network security is not set for your wireless network. This allows
access to your wireless network without a Wi-Fi Security key.
• WPA-PSK: combination Wi-Fi Protected Access with Pre-Shared Key and Wi-Fi
Protected Access with Pre-Shared Key.
• WPA2 (Enterprise): Wi-Fi Protected Access version 2 provides additional network
security and requires a user name and password for network logon.
• WPA2 + WPA (Enterprise): combination Wi-Fi Protected Access version 2 and Wi-Fi
Protected Access provides additional network security and requires a user name and
password for network logon.
16. Choose the wireless network encryption type in the Encryption field:
• AES – Advanced Encryption Standard: Provides the strongest encryption
(recommended).
• TKIP+AES –Temporal Key Integrity Protocol and Advanced Encryption Standard:
Allows both AES and TKIP-capable clients to connect to your wireless network.
17. Enter any combination of characters and letters for the wireless guest network password
in the Passphrase field.
18. Select Show Passphrase to display your password while you type.
19. When done, deselect Show Passphrase so that your password will not be visible.
20. Click Apply.
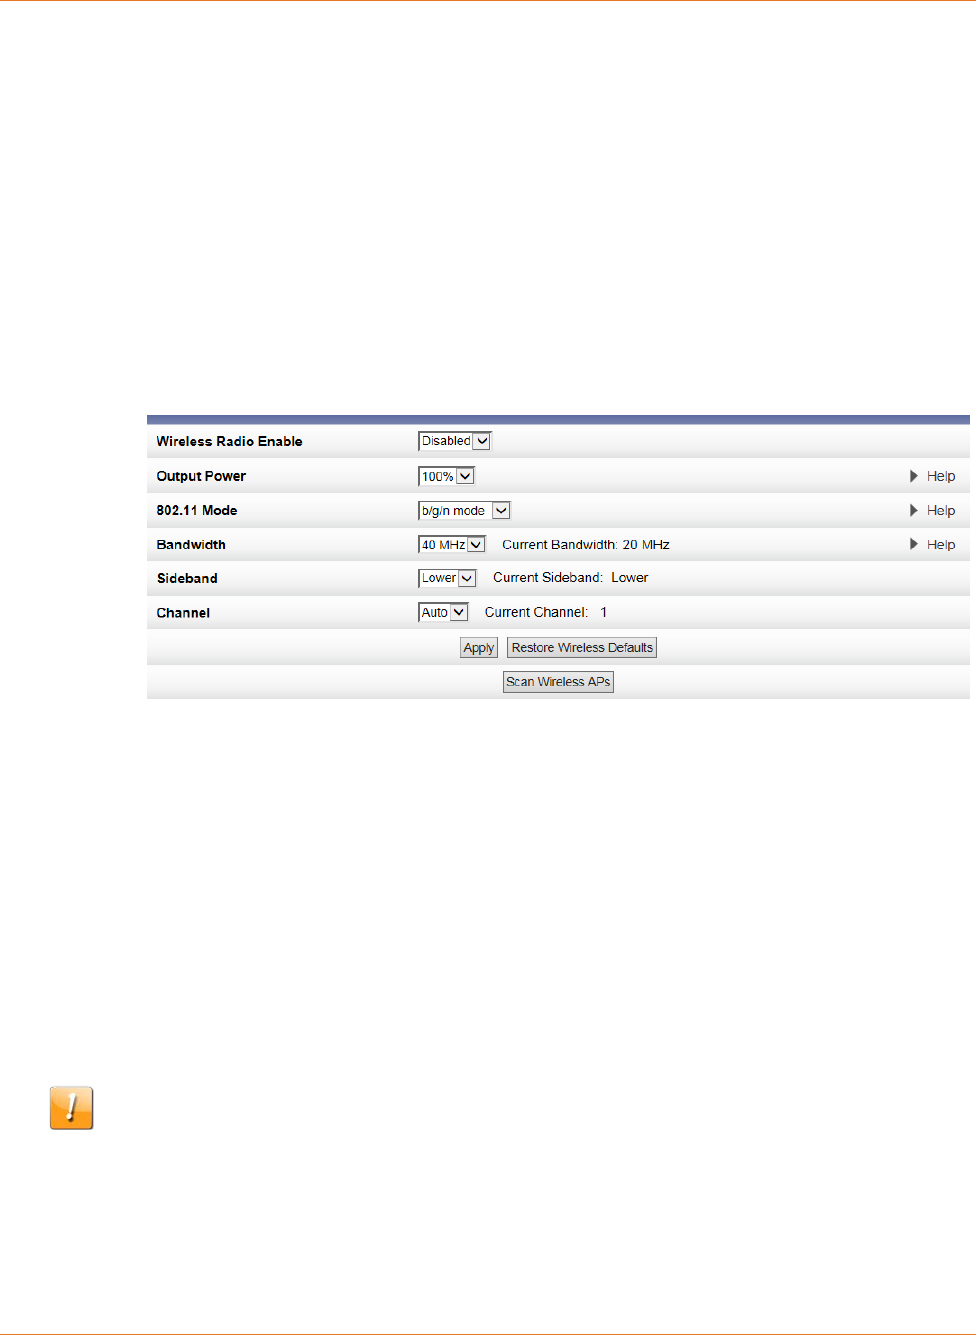
Chapter 7: Managing Your Wi-Fi Router and Connected Networks
STANDARD PN 365-095-28243 x.3 SURFboard SBR-AC1200P Wi-Fi Router User Guide
© 2016-2017 ARRIS Enterprises LLC. All Rights Reserved. 49
Configure Your Wi-Fi Radio
Network interference can occur at any time when using a wireless network connection. This
may be caused by other wireless access points that are using the same wireless channel as
your SBR-AC1200P and are also operating within close proximity in your home. If you
experience wireless network interference, try changing the wireless channel on the
SBR-AC1200P to improve network connectivity (or signal strength) and avoid network
interference. By default, your SBR-AC1200P is set to choose a channel automatically.
To change the wireless channel on the SBR-AC1200P:
1. Click Wireless on the SBR-AC1200P Main Menu.
2. Click 802.11 Radio from the Wireless submenu options.
3. Select the tab for the band whose settings you want to configure.
4. Select Enabled from the Wireless Radio Enable drop-down list to turn ON the Wi-Fi Radio
on the SBR-AC1200P.
5. Select a new channel number from the Channel drop-down list.
6. Click Apply.
Back Up Your Wi-Fi Router Configuration
You can save a backup copy of the current configuration settings to your local computer. You
can use the backup file to restore your custom settings in the event that you made changes
that you no longer want.
Caution: We highly recommend that you perform the configuration backup using the
SBR-AC1200P default login username and password.
To create a backup copy of your configuration settings:
1. Click Basic on the SBR-AC1200P Main Menu.
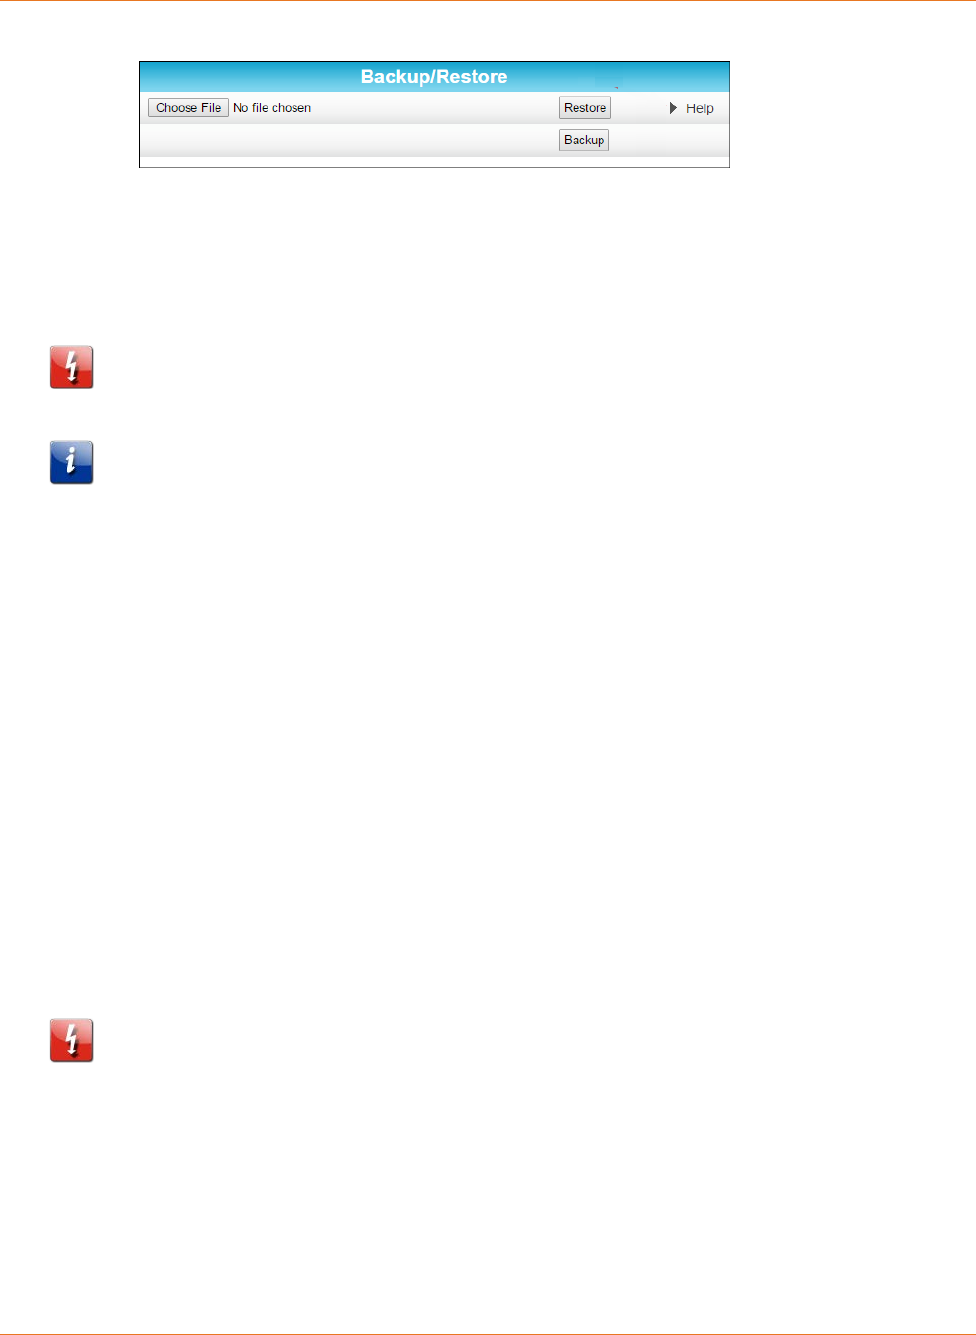
Chapter 7: Managing Your Wi-Fi Router and Connected Networks
STANDARD PN 365-095-28243 x.3 SURFboard SBR-AC1200P Wi-Fi Router User Guide
© 2016-2017 ARRIS Enterprises LLC. All Rights Reserved. 50
2. Click Backup and Restore from the Basic submenu options.
3. Click Backup to create a backup file of your SBR-AC1200P configuration settings. Follow
the on-screen prompts to save the configuration file.
Restore Your Gateway Configuration Settings
Caution: This action will delete your current SBR-AC1200P configuration settings and allow
you to restore a previously saved gateway configuration.
Note: After the configuration settings are restored, the SBR-AC1200P will automatically
reboot and you will have to log on using the default username (admin) and password
(password).
1. Click Basic on the SBR-AC1200P Main Menu.
2. Click Backup and Restore from the Basic submenu options.
3. Click Browse to search for a previously saved configuration file from the Downloads
folder on your computer.
4. Click Restore. The SBR-AC1200P will automatically reboot.
Reset the SBR-AC1200P Configuration Settings
You can reset your SBR-AC1200P configuration back to the factory default configuration.
There are two options available for resetting the SBR-AC1200P:
Use a pointed, non-metallic object to press the Reset button on the back of the
SBR-AC1200P. Hold the button for more than 10 seconds to reset the SBR-AC1200P to
factory default settings and reboot. See Rear Panel (page 17) for more information.
Use the SBR-AC1200P Web Manager. Follow the steps below.
Caution: This process deletes your current user name, password, and any custom gateway
configurations you may have already set up. We recommend that you create a backup copy
of your configuration before resetting the SBR-AC1200P. See Back Up Your Wi-Fi Router
Configuration (page 49) for more information.
From the SBR-AC1200P Web Manager, do the following to open the Status Security screen:
1. Click Status on the SBR-AC1200P Main Menu.
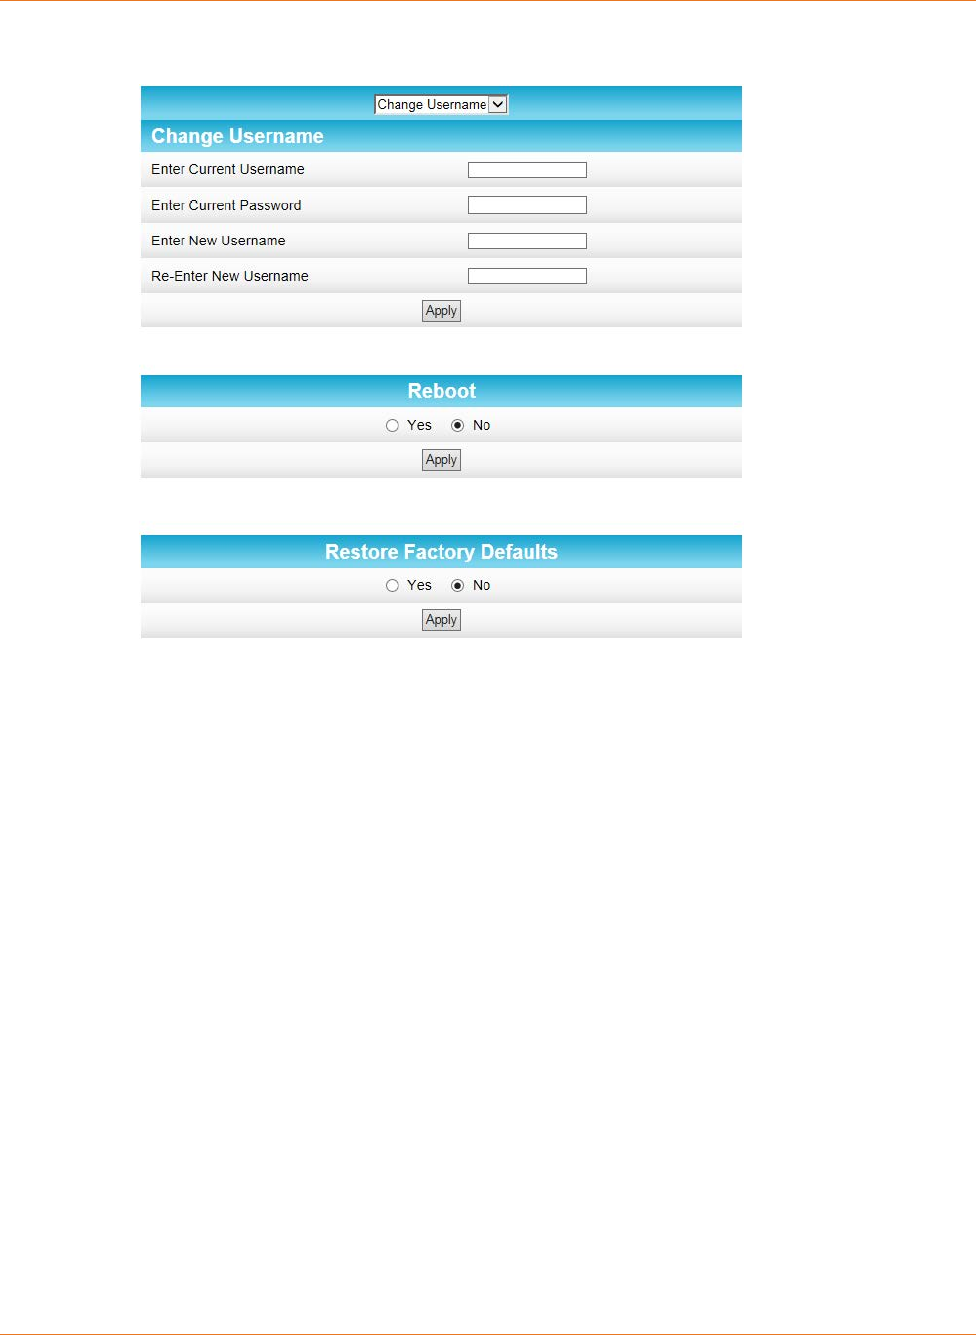
Chapter 7: Managing Your Wi-Fi Router and Connected Networks
STANDARD PN 365-095-28243 x.3 SURFboard SBR-AC1200P Wi-Fi Router User Guide
© 2016-2017 ARRIS Enterprises LLC. All Rights Reserved. 51
2. Click Security from the Status submenu options.
3. Select Yes under Restore Factory Defaults.
4. Click Apply. A message appears, telling you to reboot the modem for the new settings to
take effect.
5. Click OK.
6. Click Status on the SBR-AC1200P Main Menu.
7. Click Configuration from the Status submenu options to display the Status Configuration
screen.
8. Click Reboot.
9. Log back in using the default username and password.
• Username: admin
• Password: password
Update Your Wi-Fi Router Firmware
You can update the firmware on your SBR-AC1200P Wi-Fi Router when ARRIS releases new
firmware versions. The new firmware releases may contain updates for operational
improvements or resolutions to problems. These updates will not delete or overwrite your
personal user settings such as your password.
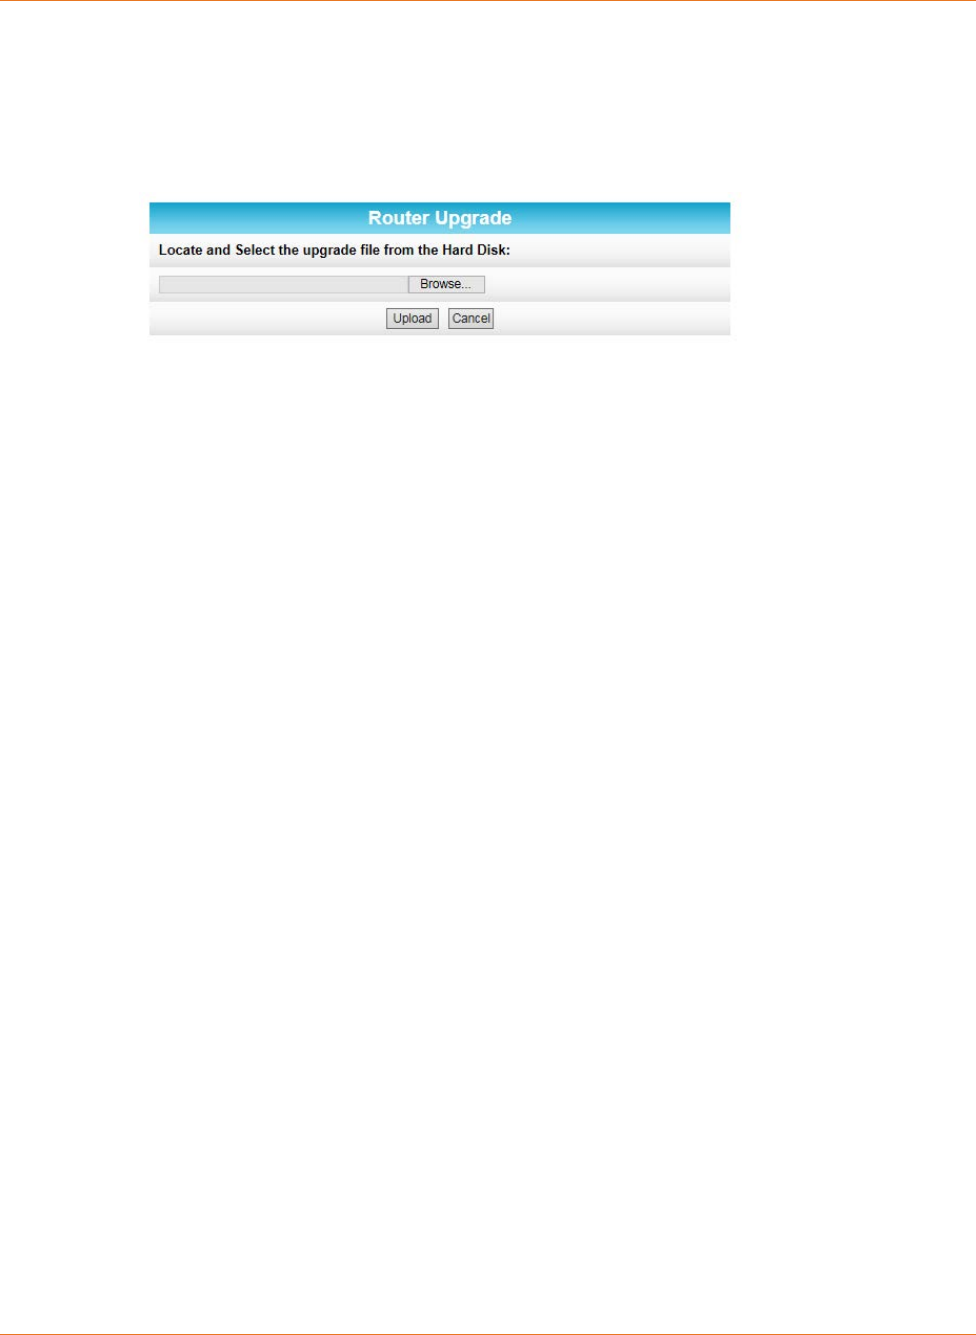
Chapter 7: Managing Your Wi-Fi Router and Connected Networks
STANDARD PN 365-095-28243 x.3 SURFboard SBR-AC1200P Wi-Fi Router User Guide
© 2016-2017 ARRIS Enterprises LLC. All Rights Reserved. 52
You can download the latest firmware release from
http://www.SURFboard.com/Support/SBR-AC1200P. To load the new firmware release onto
your SBR-AC1200P Wi-Fi Router:
1. Click Status from the configuration screen and select Router Upgrade from the
drop-down menu.
2. Click Browse to locate the new firmware file.
3. Select the new firmware file and click Open.
4. Click Upload to load the new firmware onto your SBR-AC1200P Wi-Fi Router.
Exit the SBR-AC1200P Web Manager
To log out and close the SBR-AC1200P Web Manager:
Click Logout button located in the upper right corner of the SBR-AC1200P Web Manager
screen.

STANDARD PN 365-095-28243 x.3 SURFboard SBR-AC1200P Wi-Fi Router User Guide
© 2016-2017 ARRIS Enterprises LLC. All Rights Reserved. 53
Chapter 8
Protecting & Monitoring Your Wireless
Network
After you have successfully connected the SBR-AC1200P and your wireless devices, you
should configure the Wi-Fi router to protect your wireless network from unwanted and
unauthorized access by any wireless devices that are within range of your wireless network.
Although security for the SBR-AC1200P is already configured, you can use the SBR-AC1200P
Web Manager to set the level of security and access that you want on your home network.
Prevent Unauthorized Access
Caution: To prevent unauthorized access and configuration to your wireless network, we
highly recommend that you immediately change the default user name and password after
connecting to the Internet and logging on to the SBR-AC1200P for the first time.
One of the most important recommendations for securing your wireless home network is to
change the default administrator password on your SBR-AC1200P and other wireless devices
as well. Default passwords are commonly used and shared on the Internet.
To help secure your wireless home network, it is recommended that you follow these best
practices for user passwords:
Always create a secure password or pass phrase that is not easily guessed.
Use phrases instead of names so that it may be easier for you to remember.
Use a combination of upper and lowercase letters, numbers, and symbols.
Continue to change your administrator password on a regular basis.
Change the Default User Name and Password
1. Open any web browser on the computer connected to the SBR-AC1200P.
2. In the Address bar, type http://mysurfboard.local for the IP address, and then press
Enter. The Login screen appears.
3. Type the default user name and password. Both entries are case-sensitive.
Username: admin
Password: password
4. Click Login to open the SBR-AC1200P Web Manager. The SBR-AC1200P Main Screen
appears.
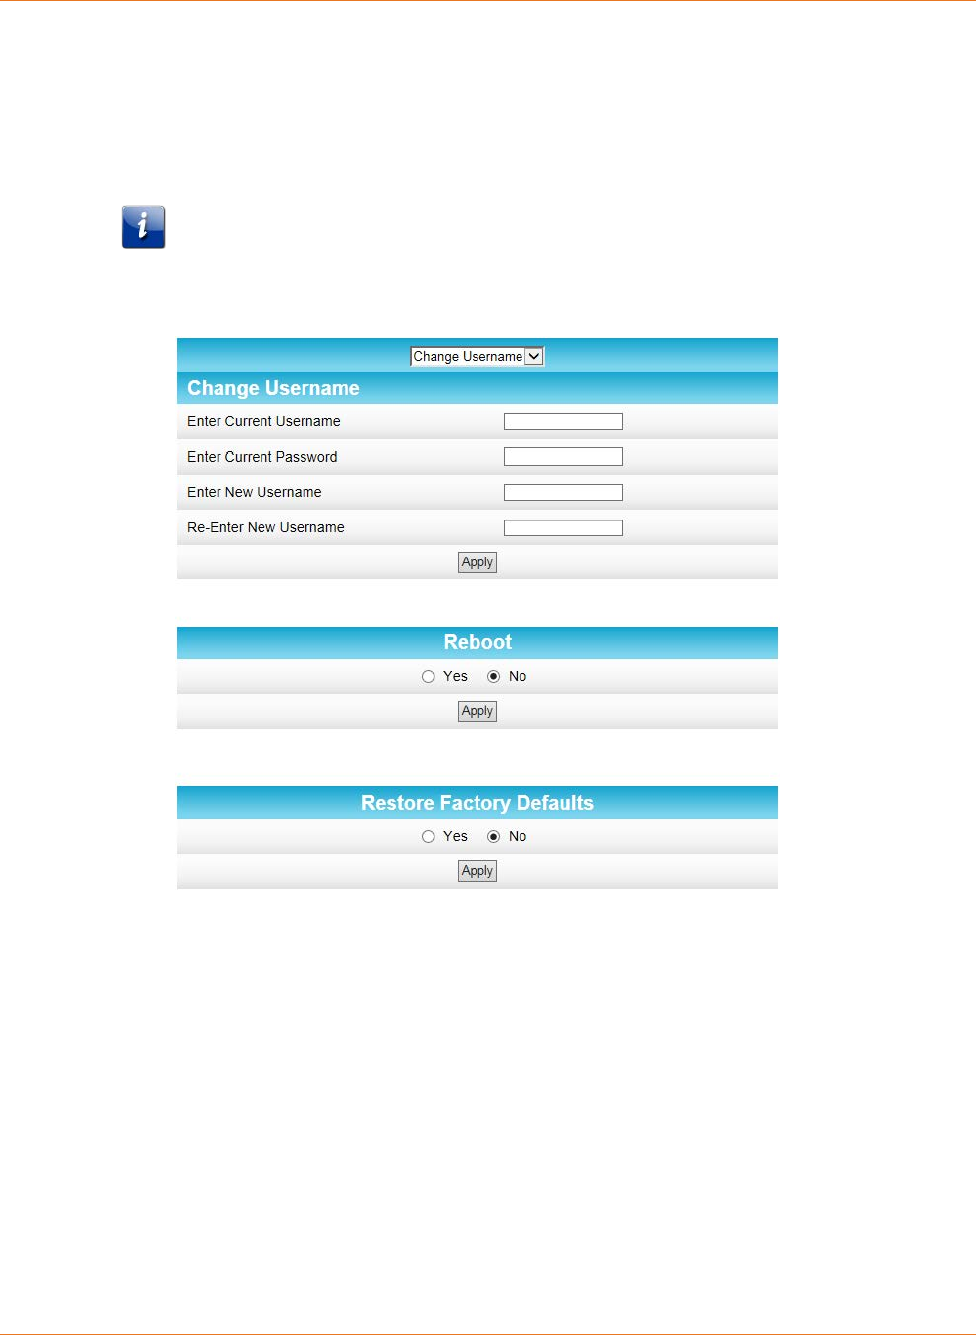
Chapter 8: Protecting & Monitoring Your Wireless Network
STANDARD PN 365-095-28243 x.3 SURFboard SBR-AC1200P Wi-Fi Router User Guide
© 2016-2017 ARRIS Enterprises LLC. All Rights Reserved. 54
5. Click the Status menu button and then click Security to display the Status Security
screen.
6. Confirm that Change Username is displayed in the drop-down selection box.
7. Complete each field entry, but note the following:
• All fields (for example, Current Username & Current Password) are case-sensitive.
Note: The first time that you log in, the Current Username is admin and the Current
Password is password.
• Make sure No is selected under Restore Factory Defaults.
8. Click Apply to update your user name.
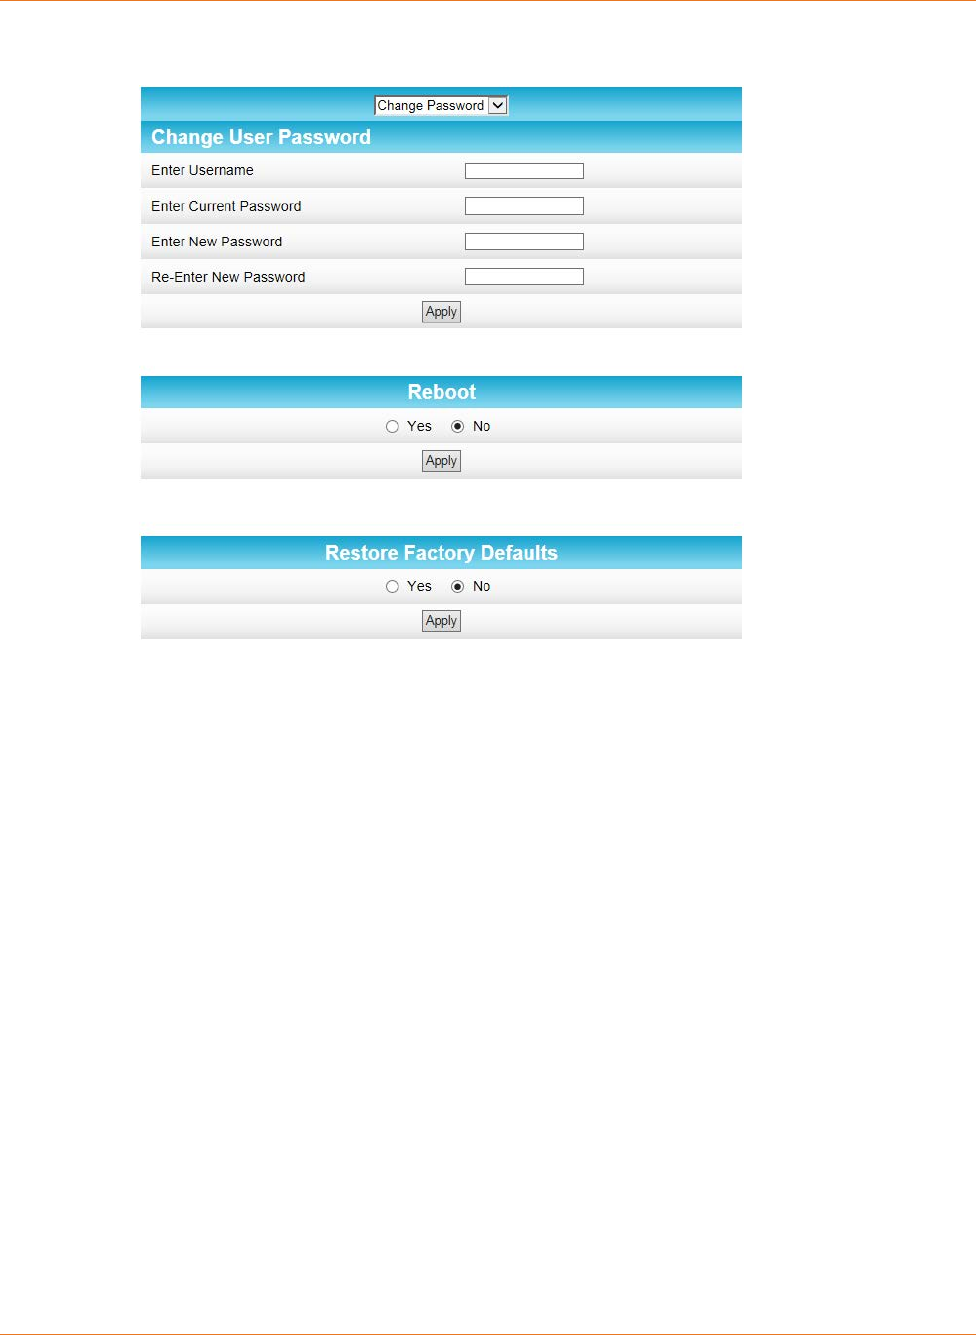
Chapter 8: Protecting & Monitoring Your Wireless Network
STANDARD PN 365-095-28243 x.3 SURFboard SBR-AC1200P Wi-Fi Router User Guide
© 2016-2017 ARRIS Enterprises LLC. All Rights Reserved. 55
9. Click the drop-down arrow to select Change Password.
10. Complete each field entry, but note the following:
• All fields are case-sensitive.
• The Username is your new user name, if you changed it.
• Make sure No is selected for Restore Factory Defaults.
• Find a secure place to write down and keep your new user name and password.
11. Click Apply to update your password.
Set Up Firewall Protection
You can set up firewall filters and firewall alert notifications on your wireless home network.
You can also block Java Applets, Cookies, ActiveX controls, popup windows, Proxies, and
website access.
To set the firewall protection level:
1. Click Firewall on the SBR-AC1200P Main Menu.
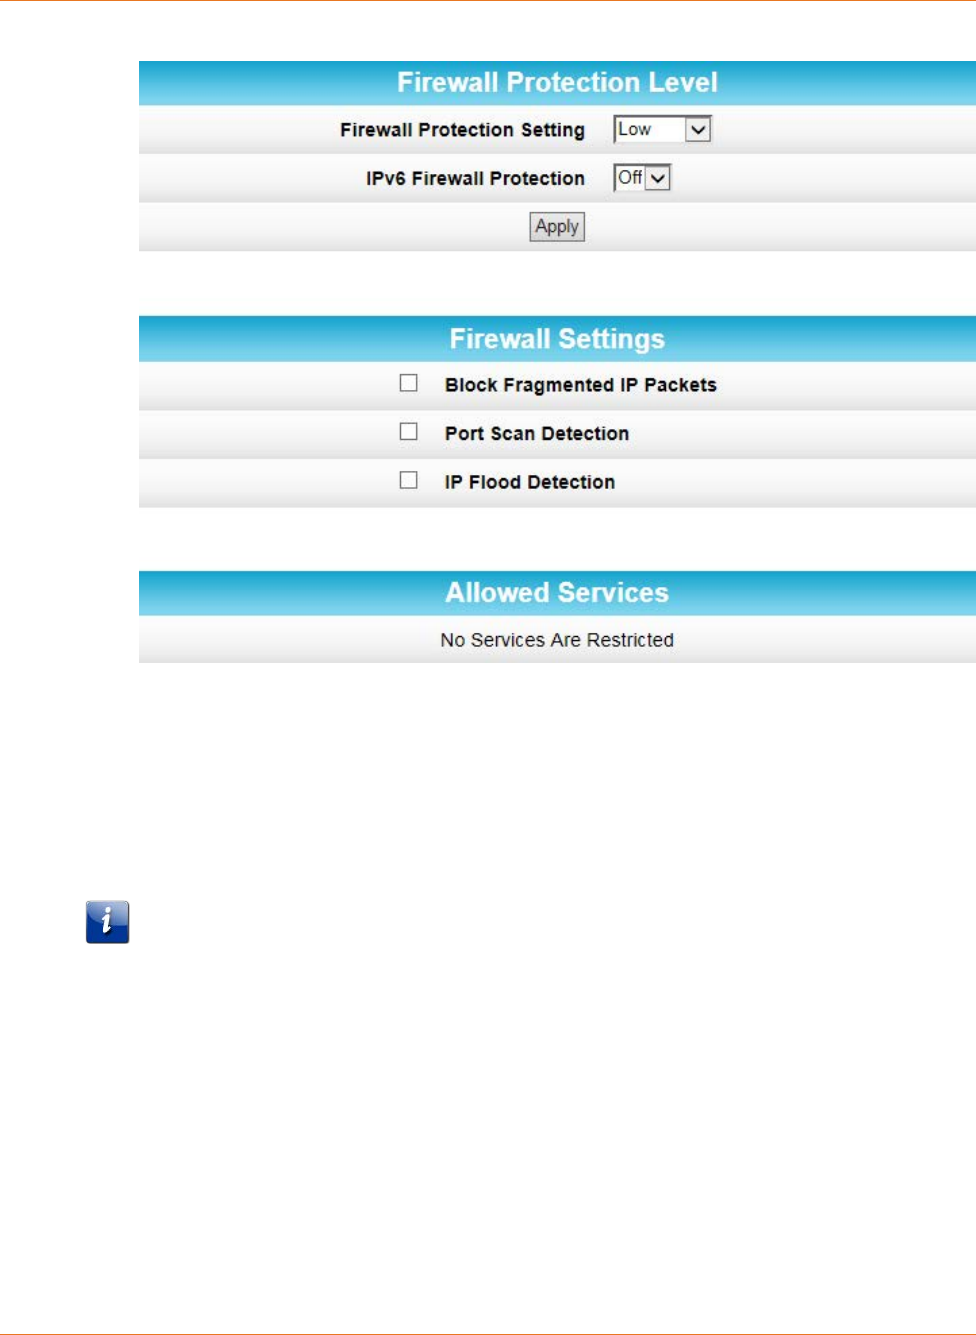
Chapter 8: Protecting & Monitoring Your Wireless Network
STANDARD PN 365-095-28243 x.3 SURFboard SBR-AC1200P Wi-Fi Router User Guide
© 2016-2017 ARRIS Enterprises LLC. All Rights Reserved. 56
2. Click Protection Level from the Firewall submenu options.
3. Click the Firewall Protection Setting drop-down button to select the firewall protection
level.
Possible values:
• Off.
• Low.
• Medium.
• High.
Note: Selecting Off will disable firewall protection on your home network. Your
computer(s) and other Ethernet-enabled devices on your network will be at risk for
possible attacks from viruses and hackers.
4. Use the IPv6 Firewall Protection drop-down button to turn firewall protection on or off
for IPv6 connections.
5. Select each Web filter that you want to set for the firewall and then click Apply.
Set Up Firewall Event Log Notifications
When a firewall attack is detected on your home network, a separate email alert notification
is generated and a local log or report of the event is created. You can set up automatic email
alert notifications for whenever a firewall attack is detected on the SBR-AC1200P.
Chapter 8: Protecting & Monitoring Your Wireless Network
STANDARD PN 365-095-28243 x.3 SURFboard SBR-AC1200P Wi-Fi Router User Guide
© 2016-2017 ARRIS Enterprises LLC. All Rights Reserved. 57
To set up Firewall Event Log notifications:
1. Click Firewall on the SBR-AC1200P Main Menu.
2. Click Local Log from the Firewall submenu options.
3. Enter your email address in the Contact Email Address field.
4. Enter the name of the email server in the SMTP Server Name field. Check with your
service or email provider.
5. Enter the user name for your email account in the SMTP Username field.
6. Enter the password for your email account in the SMTP Password field.
7. Select Enable in the E-mail Alerts field to allow for automatic Email alerts.
8. Click Apply.
Set Up Remote Configuration Management
The Advanced Options screen lets you set up Remote Configuration Management so that
you can access and configure the SBR-AC1200P from anywhere on the Internet. Once you set
up Remote Configuration Management, you can access the SBR-AC1200P by browsing to the
WAN IP address at port 80.
To set up remote configuration management:
1. Click Advanced on the SBR-AC1200P Main Menu.
2. Click Options from the Advanced submenu options.
3. Click the check box to enable Remote Config Management, and click Apply.
Chapter 8: Protecting & Monitoring Your Wireless Network
STANDARD PN 365-095-28243 x.3 SURFboard SBR-AC1200P Wi-Fi Router User Guide
© 2016-2017 ARRIS Enterprises LLC. All Rights Reserved. 58
Note: Most users will not need to set up a pass-through MAC address. However, if you need
to do so, type the address in the Pass-through MAC Addresses field, and click Add MAC
Address.
Filter Devices Based on IP Address
You can set up your Wi-Fi Router to prevent certain devices from accessing the Internet,
based on IP address.
To block certain devices from reaching the Internet:
1. Click Advanced on the SBR-AC1200P Main Menu.
2. Click IP Filtering from the Advanced submenu options.
3. Use the Start Address and End Address fields to identify ranges of IP addresses that you
want to prevent from reaching the Internet.
4. Click Enabled to block each range of IP addresses.
5. Click Apply.
Filter Devices Based on MAC Address
You can set up your Wi-Fi Router to prevent certain devices from accessing the Internet,
based on MAC address.
To block certain devices from reaching the Internet:
1. Click Advanced on the SBR-AC1200P Main Menu.
Chapter 8: Protecting & Monitoring Your Wireless Network
STANDARD PN 365-095-28243 x.3 SURFboard SBR-AC1200P Wi-Fi Router User Guide
© 2016-2017 ARRIS Enterprises LLC. All Rights Reserved. 59
2. Click MAC Filtering from the Advanced submenu options.
3. In the MAC Filters section, type the MAC address of the device that you want to block
from reaching the Internet, and click Add Mac Address. The address is added to the
white box in the middle of the screen.
Choose a Method for Configuring Wireless
Extenders
You can set up your Wi-Fi Router to configure wireless extenders automatically, or you can
choose to configure any wireless extenders manually. Your Wi-Fi Router is set up to
configure wireless extenders automatically by default.
To choose a method for configuring wireless extenders:
1. Click Advanced on the SBR-AC1200P Main Menu.
2. Click Wireless Extender from the Advanced submenu options.
3. In the Configure Mode field, select one of the following:
• Choose Auto if you want your Wi-Fi Router to automatically push the settings from
your Wi-Fi Router to the wireless extenders.
• Choose Semi-Auto if you want to choose which wireless extender should receive
settings from the Wi-Fi Router.
• Choose Disable if you do not want to be able to configure wireless extenders from
the Wi-Fi Router. If you choose Disable, you will need to access each wireless
extender individually in order to change its configuration settings.
4. Click Apply.

Chapter 8: Protecting & Monitoring Your Wireless Network
STANDARD PN 365-095-28243 x.3 SURFboard SBR-AC1200P Wi-Fi Router User Guide
© 2016-2017 ARRIS Enterprises LLC. All Rights Reserved. 60
Restrict Wireless Access
You can restrict access to your wireless network based on MAC address.
To restrict access to your wireless network:
1. Click Wireless on the SBR-AC1200P Main Menu.
2. Click Access Control from the Wireless submenu options.
3. Select the tab for the band whose access you want to restrict.
4. In the Selected Network field, choose the network for which you want to restrict access.
5. In the MAC Restrict Mode field, select one of the following:
• Select Allow if you want to allow access to the devices that you specify (and deny all
others).
• Select Deny if you want to deny access to the devices that you specify (and allow all
others).
6. Use the MAC Address List fields to identify a list of devices.
7. Click Apply.
Prioritize Network Traffic Based on Media Type
Wi-Fi Multimedia (WMM) allows you to prioritize network traffic based on its media type.
You can configure the quality of service (QoS) parameters for WMM.
To configure your quality of service parameters:
1. Click Wireless on the SBR-AC1200P Main Menu.
Chapter 8: Protecting & Monitoring Your Wireless Network
STANDARD PN 365-095-28243 x.3 SURFboard SBR-AC1200P Wi-Fi Router User Guide
© 2016-2017 ARRIS Enterprises LLC. All Rights Reserved. 61
2. Click Quality of Service from the Wireless submenu options.
3. Choose your configuration settings, and click Apply.
Configure Wireless Media Settings
1. Click Wireless on the SBR-AC1200P Main Menu.
2. Click Media from the Wireless submenu options.
3. Select the tab for the band whose settings you want to configure.
4. Choose your configuration settings, and click Apply.
Set Up Parental Controls
You can set up the following Parental Controls on your home network:
Block access to specific Internet sites.
Block access to specific MAC addresses.
Set time limitations for computer usage or Internet access.
Note: Any Parental Control filters that do not include assigned ports will apply to all ports.
This also applies to MAC addresses as well.
You can also link each user on your network to specified rules for login, time-access, and
content filtering.
To set Parental Controls:
1. Click Firewall on the SBR-AC1200P Main Menu.
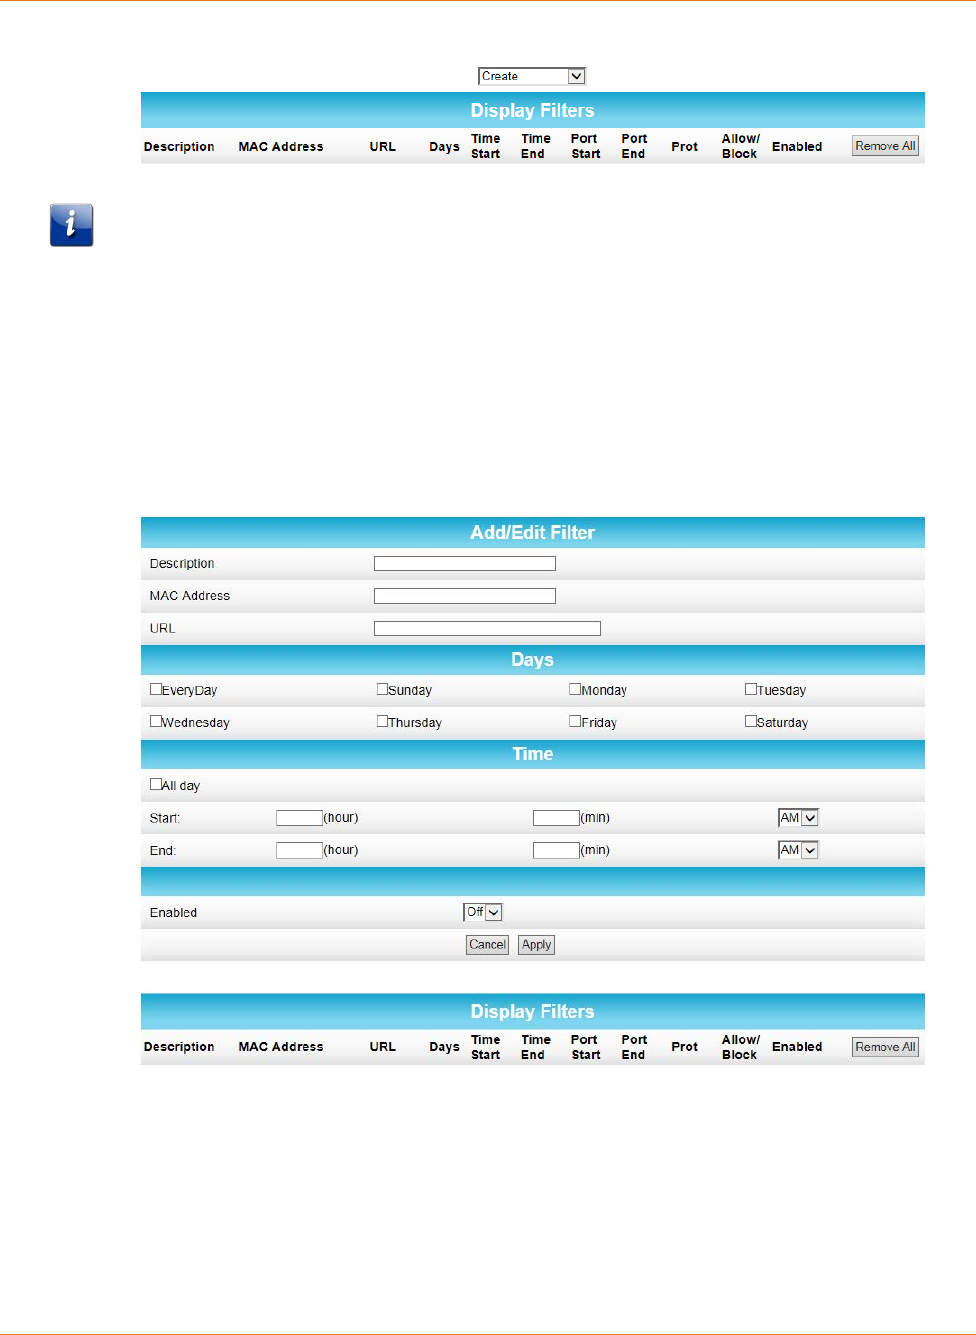
Chapter 8: Protecting & Monitoring Your Wireless Network
STANDARD PN 365-095-28243 x.3 SURFboard SBR-AC1200P Wi-Fi Router User Guide
© 2016-2017 ARRIS Enterprises LLC. All Rights Reserved. 62
2. Click Parental Control from the Firewall submenu options.
3. Follow the directions in the following sections to set up different kinds of filters.
Note: You can set up multiple filters, if necessary. For example, suppose you want to block
certain websites at all times, but you also want to block all web browsing on weekdays
between 2:00 and 5:00 p.m. You would follow the steps in To Block Certain URL Addresses
(page 62) to set up a filter to block that website at all times. Then you would use To Block All
Web Browsing (page 63) to set up a different filter to block all web browsing during the
times you specify.
To Block Certain URL Addresses
1. At the top of the screen, click the drop-down box and select Block URL.
2. Enter a name to identify this user profile in the Description field.
3. Enter the 12-digit (hexadecimal) MAC address of the device for which you are creating
Parental Controls in the MAC Address field.
4. Enter the web address of the Internet site that you want to block in the URL field.
5. Select the days of the week that you want to block access.
6. Select the time range that you want to block access.
7. In the Enabled field, select On or Off to enable or disable this Parental Control
restriction.
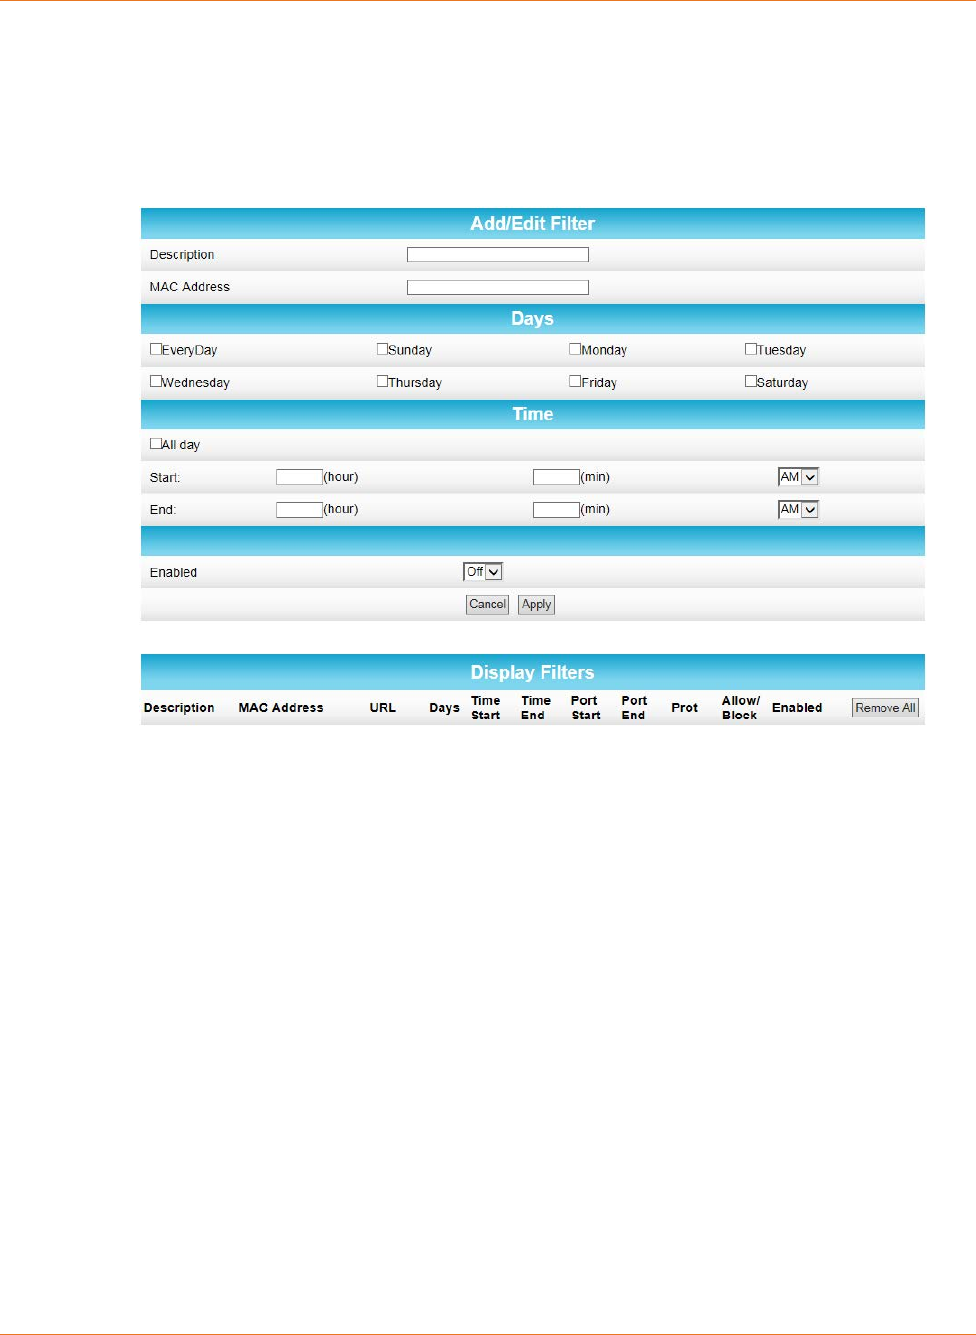
Chapter 8: Protecting & Monitoring Your Wireless Network
STANDARD PN 365-095-28243 x.3 SURFboard SBR-AC1200P Wi-Fi Router User Guide
© 2016-2017 ARRIS Enterprises LLC. All Rights Reserved. 63
8. Click Apply.
To Block All Web Browsing
1. At the top of the screen, click the drop-down box and select Block Web Browsing.
2. Enter a name to identify this user profile in the Description field.
3. Enter the 12-digit (hexadecimal) MAC address of the device for which you are creating
Parental Controls in the MAC Address field.
4. Select the days of the week that you want to block access.
5. Select the time range that you want to block access.
6. In the Enabled field, select On or Off to enable or disable this Parental Control
restriction.
7. Click Apply.
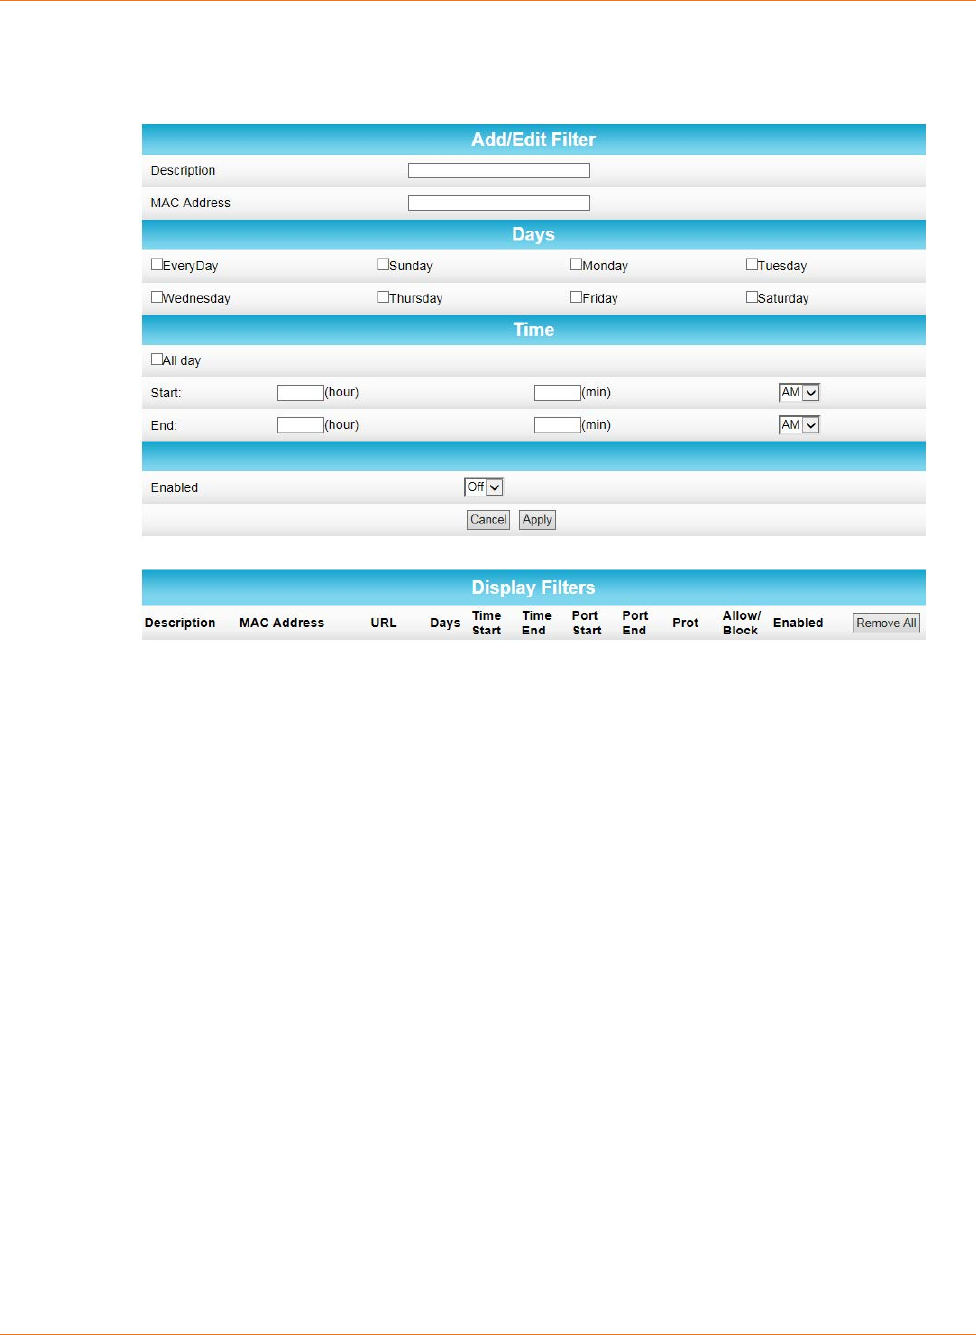
Chapter 8: Protecting & Monitoring Your Wireless Network
STANDARD PN 365-095-28243 x.3 SURFboard SBR-AC1200P Wi-Fi Router User Guide
© 2016-2017 ARRIS Enterprises LLC. All Rights Reserved. 64
To Block All Internet Use
1. At the top of the screen, click the drop-down box and select Block All Internet.
2. Enter a name to identify this user profile in the Description field.
3. Enter the 12-digit (hexadecimal) MAC address of the device for which you are creating
Parental Controls in the MAC Address field.
4. Select the days of the week that you want to block access.
5. Select the time range that you want to block access.
6. In the Enabled field, select On or Off to enable or disable this Parental Control
restriction.
7. Click Apply.
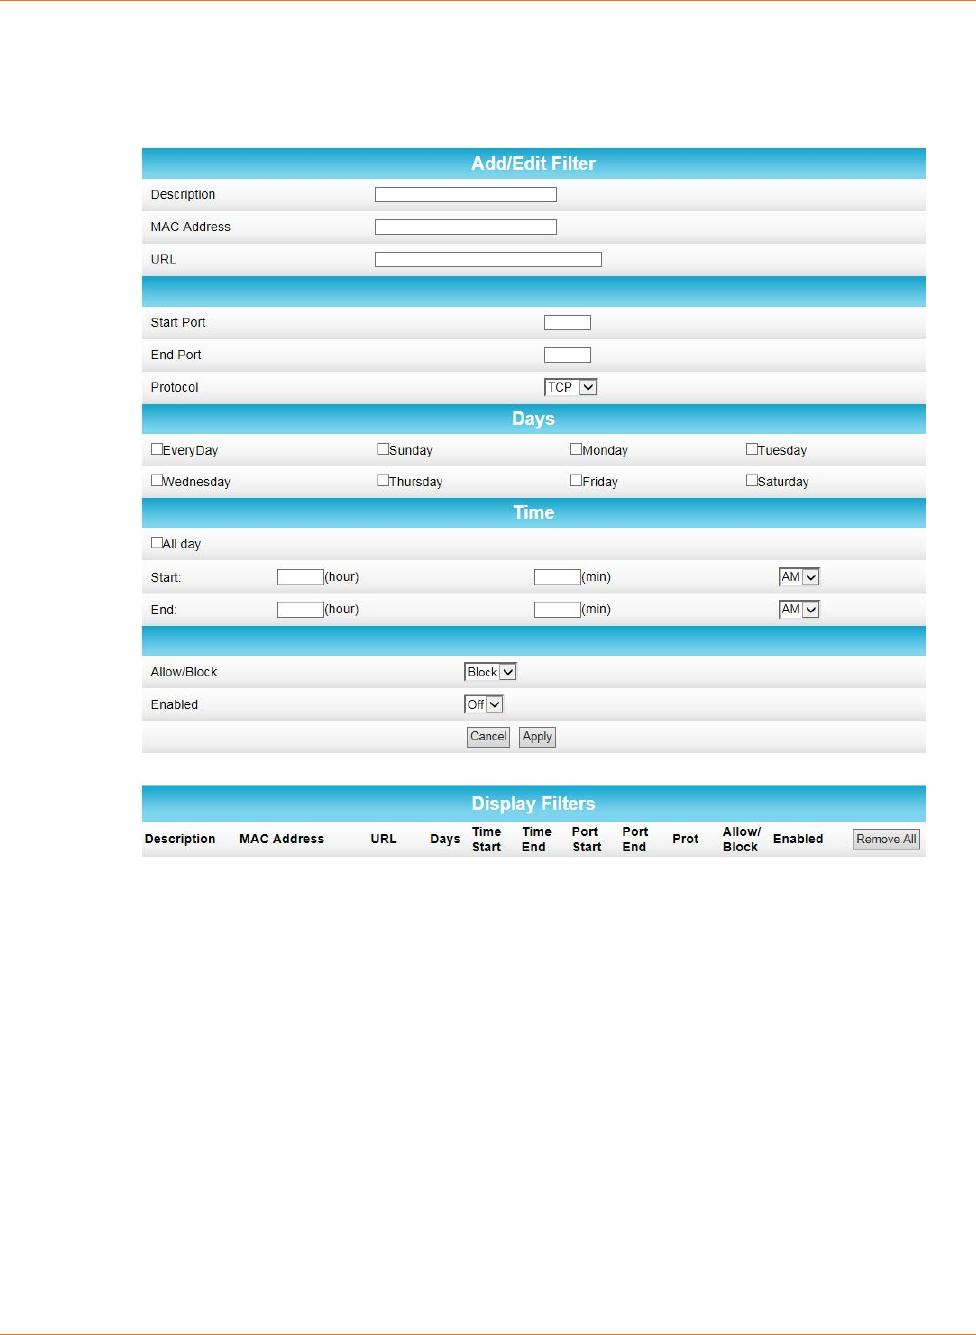
Chapter 8: Protecting & Monitoring Your Wireless Network
STANDARD PN 365-095-28243 x.3 SURFboard SBR-AC1200P Wi-Fi Router User Guide
© 2016-2017 ARRIS Enterprises LLC. All Rights Reserved. 65
To Set Up a Custom Filter
1. At the top of the screen, click the drop-down box and select Block Custom.
2. Enter a name to identify this user profile in the Description field.
3. Enter the 12-digit (hexadecimal) MAC address of the device for which you are creating
Parental Controls in the MAC Address field.
4. Enter the web address of the Internet site that you want to block in the URL field.
5. Enter the Start Port number and the End Port number, and select the Protocol that you
want to use.
6. Select the days of the week that you want to block access.
7. Select the time range that you want to block access.
8. In the Enabled field, select On or Off to enable or disable this Parental Control
restriction.
9. Click Apply.
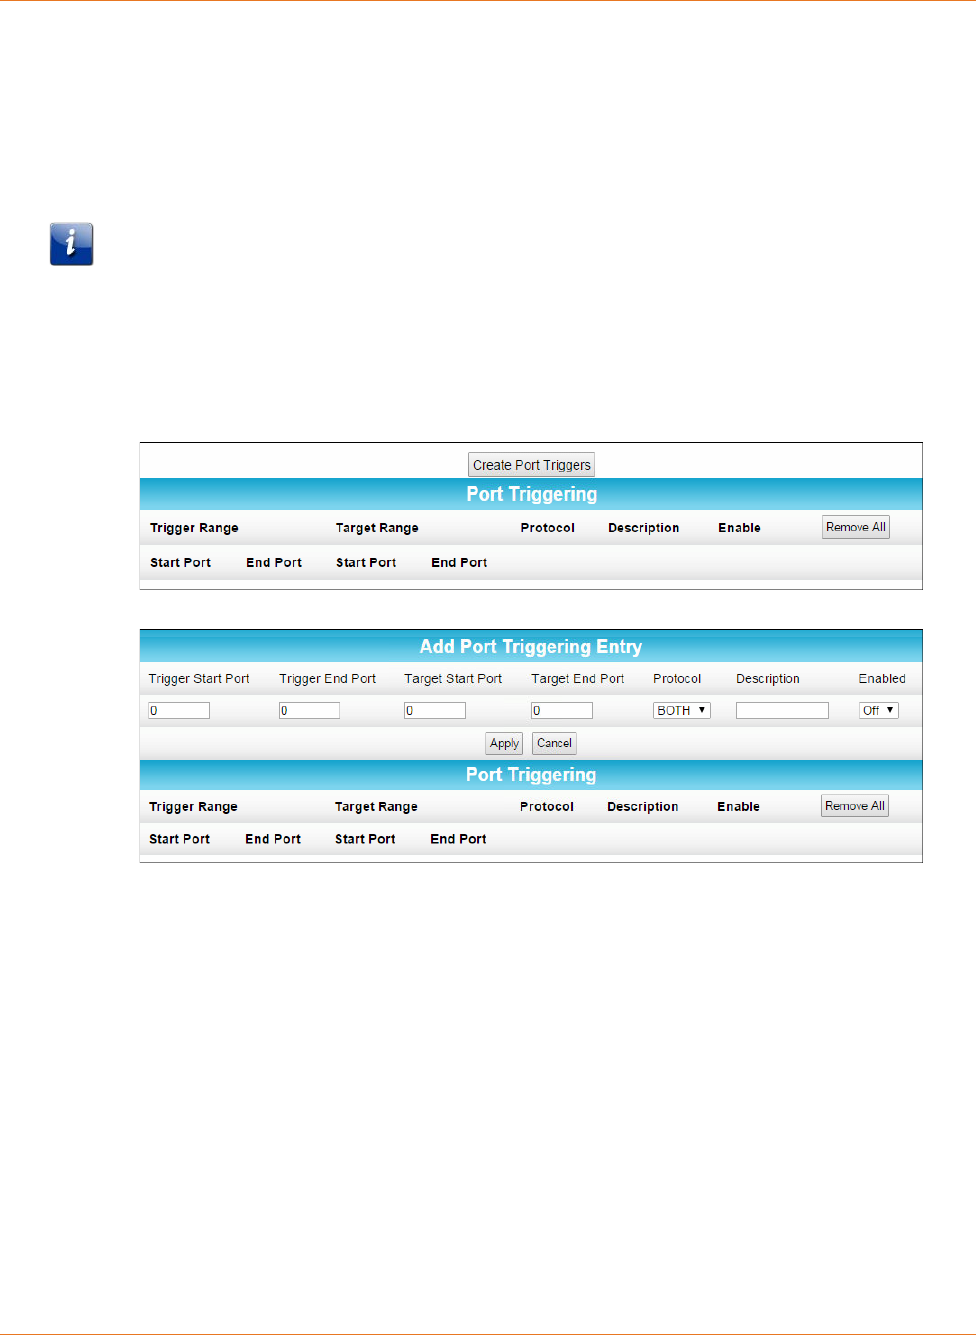
Chapter 8: Protecting & Monitoring Your Wireless Network
STANDARD PN 365-095-28243 x.3 SURFboard SBR-AC1200P Wi-Fi Router User Guide
© 2016-2017 ARRIS Enterprises LLC. All Rights Reserved. 66
Set Up Port Triggers
You can use Port Triggers to configure dynamic triggers to specific devices on the LAN. This
allows special applications that require specific port numbers with bi-directional traffic to
function properly. Applications such as video conferencing, voice, gaming, and some
messaging program features may require these special settings.
Note: If you enable the firewall and set up custom port triggers, then you must configure the
firewall to allow traffic through those custom ports. See Set Up Firewall Protection (page 55)
for more information.
To configure Port Triggers:
1. Click Advanced on the SBR-AC1200P Main Menu bar.
2. Click Port Triggers from the Advanced submenu options.
3. Click Create Port Triggers to open the Add Port Triggering Entry window.
4. Enter the starting and ending port numbers for the port to be triggered in the Trigger
Start Port and Trigger End Port fields.
5. Enter the starting and ending port numbers of the Port Trigger range in the Target Start
Port and Target End Port fields.
6. Select TCP, UDP, or BOTH from the Internet Protocol field.
7. Select On to enable IP port triggers or Off to disable them.
8. Click Apply to create your port triggers.
9. Repeat steps 3 through 8 for each additional port trigger that you want to create.
Set Up Port Forwarding
You can use Port Forwarding to set up a computer or other network device on your home
network (LAN) to be accessible to computers or other remote network devices on the
Internet. This allows you to open specific ports behind the firewall on your LAN to set up

Chapter 8: Protecting & Monitoring Your Wireless Network
STANDARD PN 365-095-28243 x.3 SURFboard SBR-AC1200P Wi-Fi Router User Guide
© 2016-2017 ARRIS Enterprises LLC. All Rights Reserved. 67
dedicated connections between your computer and other remote computers for online
gaming or other online services. Some allowable services are predefined under the
Commonly Forwarded Ports.
Note: It is recommended that you manually configure the TCP/IP settings listed below on the
computer you are setting up for remote access. Otherwise, remote access to your computer
will not be available on the Internet.
IP address
Subnet mask
Default gateway
DNS address (at least one)
To set up Port Forwarding:
1. Click Advanced on the SBR-AC1200P Main Menu bar.
2. Click Port Forwarding from the Advanced submenu options.
To Set Up Port Forwarding for IPv4 Addresses
Note: To map a port for IPv4, you would enter the range of port numbers that you want
forwarded locally and the IP address for sending traffic to those ports. If you only want a
single port specification, enter the same port number in the start and end locations for that
IP address.
1. Click Create IPv4 to view the IPv4 Entry screen.
2. Do either of the following to set up the External IP Address:
• Keep the IP Address set at 0.0.0.0 in the External IP Address field and then enter the
port number in the Start Port field. Repeat the same port number in the End Port
field. This allows incoming data traffic on the specified ports from any remote IP
address.
• Enter a specific remote IP address of your choice in the External IP Address field and
then enter the specific port numbers in the Start Port and End Port fields. This allows
incoming data traffic on the specified ports from only one remote IP address.
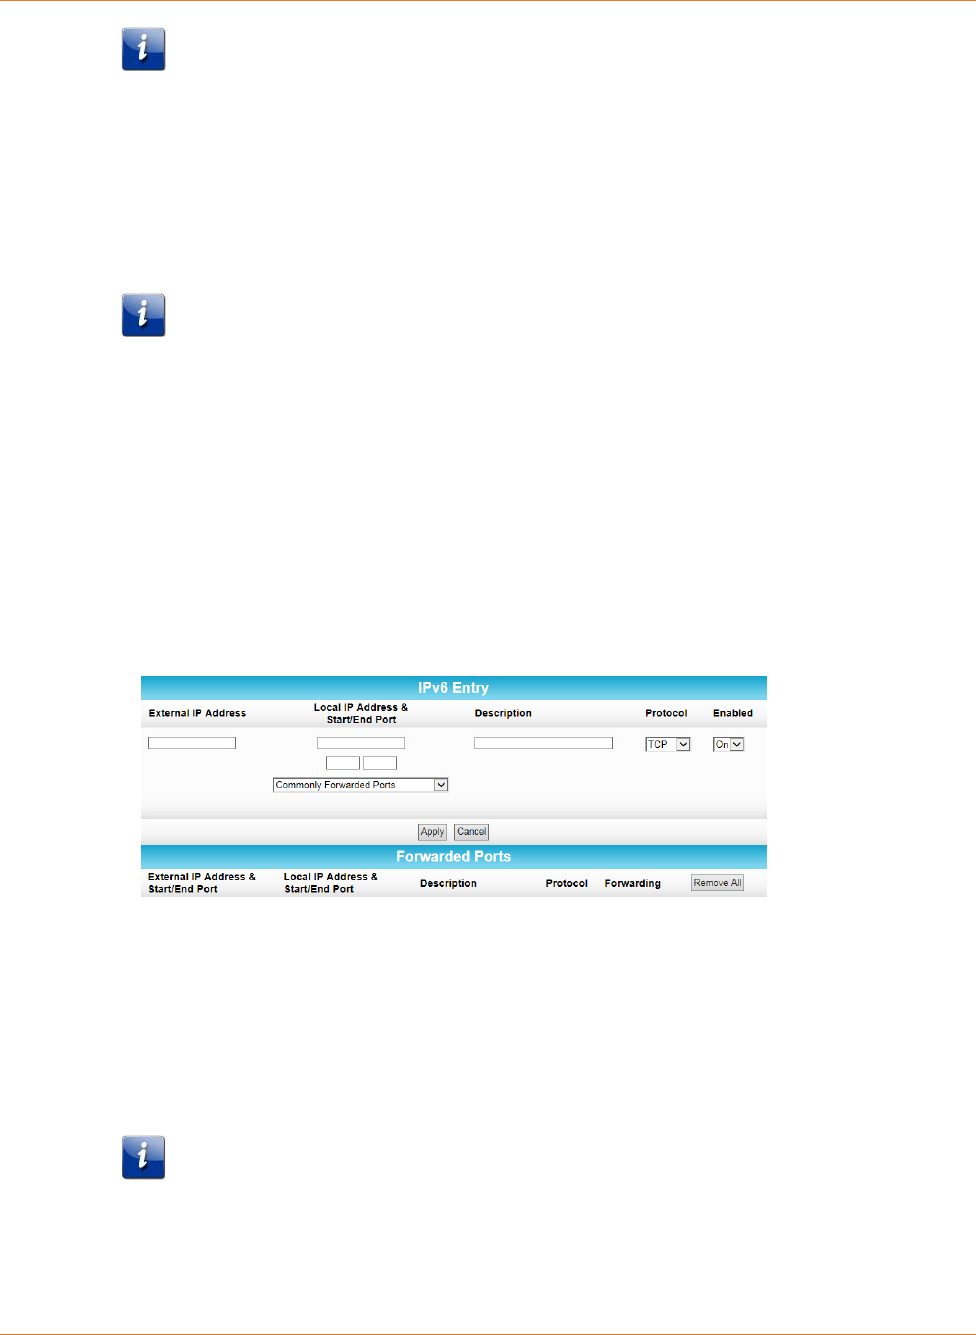
Chapter 8: Protecting & Monitoring Your Wireless Network
STANDARD PN 365-095-28243 x.3 SURFboard SBR-AC1200P Wi-Fi Router User Guide
© 2016-2017 ARRIS Enterprises LLC. All Rights Reserved. 68
Note: To forward a range of ports, enter the first number of the port range in the
Start Port field and the last number of the port range in the End Port field.
3. Do the following to set up your Local IP Address:
a. Enter the IP address of your local computer that you are setting up for port
forwarding.
b. Enter the port number of your choice in the Start Port field. Repeat the same port
number in the End Port field.
Note: To forward a range of ports, enter the first number of the port range in the
Local Start Port field and the last number of the port range in the Local End Port
field.
c. Enter a description to name the forwarded port you are creating.
d. Select TCP, UDP, or BOTH from the Internet Protocol drop-down list.
e. Select On to enable port forwarding or Off to disable it.
4. Click Apply.
To Set Up Port Forwarding for IPv6 Addresses
1. Click Create IPv6 to view the IPv6 Entry screen.
2. Enter the remote IP address of your choice in the External IP Address field. This allows
incoming data traffic from only one remote IP address.
3. Do the following to set up your Local IP Address:
a. Enter the IP address of your local computer that you are setting up for port
forwarding.
b. Enter the port number of your choice in the Start Port field. Repeat the same port
number in the End Port field.
Note: To forward a range of ports, enter the first number of the port range in the
Local Start Port field and the last number of the port range in the Local End Port
field.
c. Enter a description to name the forwarded port you are creating.
d. Select TCP, UDP, or BOTH from the Internet Protocol drop-down list.
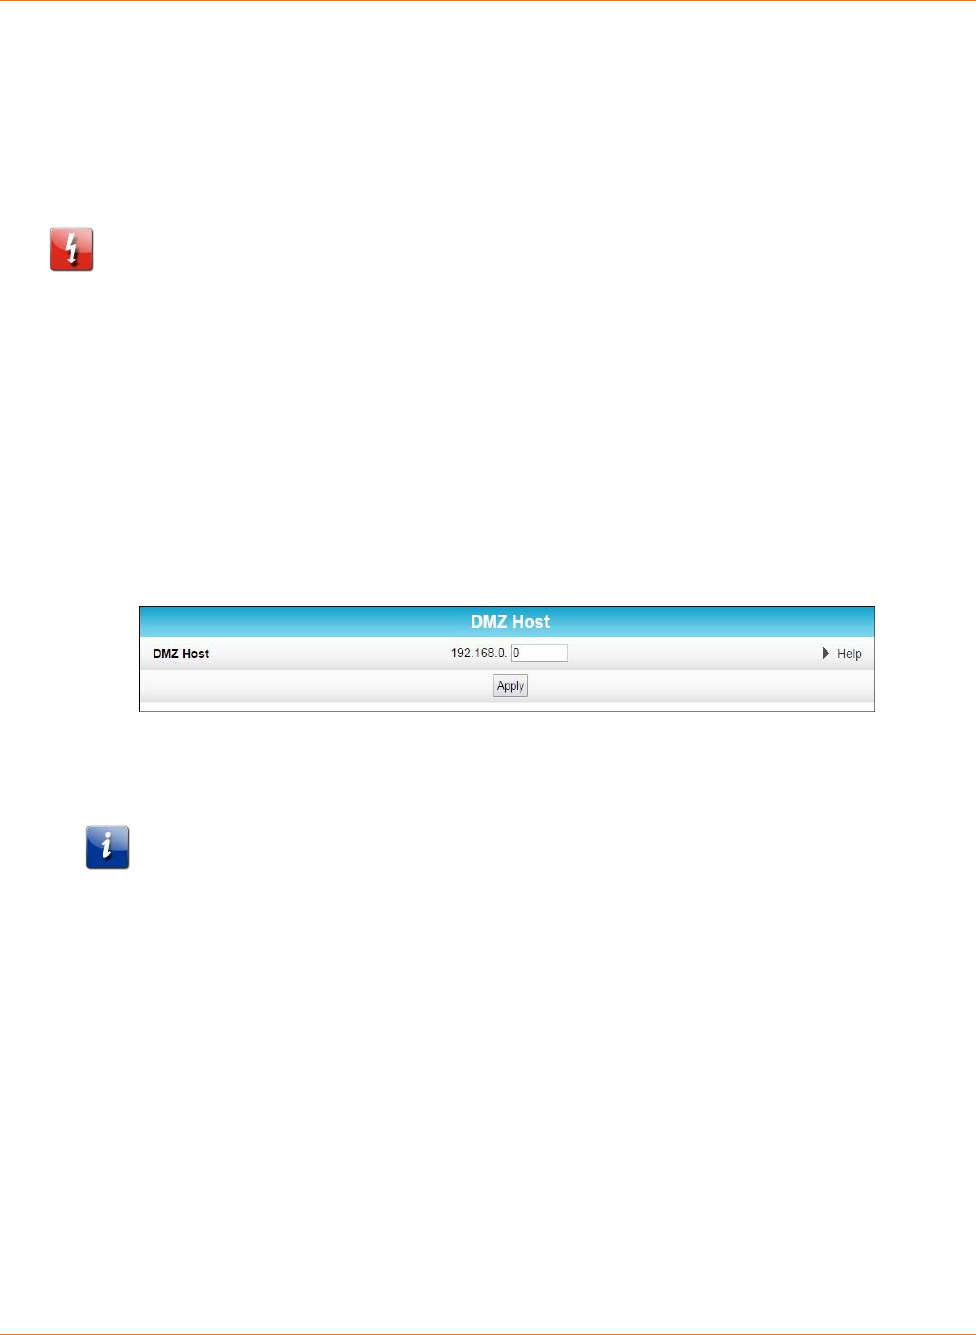
Chapter 8: Protecting & Monitoring Your Wireless Network
STANDARD PN 365-095-28243 x.3 SURFboard SBR-AC1200P Wi-Fi Router User Guide
© 2016-2017 ARRIS Enterprises LLC. All Rights Reserved. 69
e. Select On to enable port forwarding or Off to disable it.
4. Click Apply.
Set Up the DMZ Host
Caution: The gaming DMZ host is not protected by the SBR-AC1200P Wi-Fi Router firewall. It
is exposed to the Internet and thus vulnerable to attacks or hacking from any computer on
the Internet. Consider carefully before configuring a device to be in the DMZ.
You can configure one computer on your home network to be the DMZ Host. That computer
will operate outside of the SBR-AC1200P firewall and allow remote access from the Internet
to your computer, gaming device, or other IP-enabled device. The DMZ Host feature will only
allow outside users to have direct access to the designated DMZ Host device and not your
home network.
To create the DMZ Host:
1. Click Advanced on the SBR-AC1200P Main Menu bar.
2. Click DMZ Host from the Advanced submenu options.
3. Enter the last one to three digits (from 2 to 254) of the IP address of the computer or
gaming device that you are setting up as the DMZ host.
4. Click Apply.
Note: Remember to reset the IP address back to 0 (zero) to close all the ports when you
are finished with the needed application. If you do not reset the IP address, that
computer will be exposed to the public Internet.

STANDARD PN 365-095-28243 x.3 SURFboard SBR-AC1200P Wi-Fi Router User Guide
© 2016-2017 ARRIS Enterprises LLC. All Rights Reserved. 70
Chapter 9
Troubleshooting
The Wi-Fi Router is plugged in, but the Power
light is Off
Check all power connections. Is the power cord plugged in firmly at both ends?
If you plugged the power cord into a power strip, make sure the strip is switched on.
Try to plug the power cord into a different outlet. If the outlet is controlled by a wall switch,
make sure the switch is on.
Finally, check the fuse or circuit breaker panel.
My wireless Internet connection stops working
sometimes
This is usually caused by interference. Two common sources are 2.4 GHz "remote"
telephones and microwave ovens. If you cannot remove the interfering product, trying using
a different channel. See Configure Your Wi-Fi Radio (page 49) for more information.
I'm not getting on the Internet
Check that your Internet services modem is connected to the Internet and receiving a good
signal. You can connect a device directly to the Ethernet port on your modem to verify this.
Make sure that your modem is connected to the WAN input port on the Wi-Fi Router using
an Ethernet cable. This port is color-coded blue.
On your Wi-Fi Router, check the LED above the Ethernet port that you are using.
If the LED is lit, reboot your Wi-Fi Router.
If the LED is not lit, try using a different Ethernet cable and reboot your modem.

Chapter 9: Troubleshooting
STANDARD PN 365-095-28243 x.3 SURFboard SBR-AC1200P Wi-Fi Router User Guide
© 2016-2017 ARRIS Enterprises LLC. All Rights Reserved. 71
The Wi-Fi Router didn't pair successfully pair with
the Network Extender
Press the reset button on the back panel of the Wi-Fi Router and hold it for three seconds,
then press the reset button on the Network Extender and hold it for three seconds. See
Pairing Your SBR-AC1200P with a Network Extender (page 32) for more information.

Corporate Headquarters
ARRIS · Suwanee · Georgia · 30024 · USA
T: 1-678-473-2000 F: 1-678-473-8470
www.arris.com
