Arts Digital Technology GL703BT Globe Bluetooth Speaker User Manual
Arts Digital Technology (HK) Limited Globe Bluetooth Speaker
User Manual.pdf
INSTRUCTION MANUAL
GL703-BT
GLOBE BLUETOOTH SPEAKER

1
IMPORTANT SAFETY INSTRUCTIONS
When used in the directed manner, this unit has been designed and manufactured to
ensure your personal safety. However, improper use can result in potential electrical
shock or fire hazards. Please read all safety and operating instructions carefully
before installation and use, and keep these instructions handy for future reference.
Take special note of all warnings listed in these instructions and on the unit.
1. Read these instructions – All the safety and operating instructions should be read
before the appliance is operated.
2. Keep these instructions – The safety and operating instructions should be kept for
future reference.
3. Heed all warnings – All warnings on the appliance and in the operating
instructions should be adhered to.
4. Follow all instructions – All operation and use instructions should be followed.
5. Do not use this apparatus near water – The appliance should not be used near
water; for example, near a bath tub, washbowl, kitchen sink, laundry tub, in a wet
basement, or near a swimming pool.
6. Clean only with dry cloth – The appliance should be cleaned only as
recommended by the manufacturer.
7. Do not block any ventilation openings. Install in accordance with the
manufacturer’s instructions. The appliance should be situated so that its location
or position does not interfere with its proper ventilation. For example, the
appliance should not be situated on a bed, sofa, rug, or similar surface that may
block the ventilation openings; or placed in a built-in installation, such as a
bookcase or cabinet that may impede the flow of air through the ventilation
openings.
8. Do not install near any heat sources such as radiators, heat registers, stoves, or
other apparatus (including amplifiers) that produce heat.
9. Protect the adapter / power cord from being walked on or pinched particularly at
plugs, convenience receptacles, and the point where they exit from the apparatus.
10. Only use attachments / accessories specified by the manufacturer.
11. Unplug the ac adaptor of this apparatus during when unused for long periods of
time.
12. Refer all servicing to qualified service personnel. Servicing is required when the
apparatus has been damaged in any way, such as ac adaptor is damaged, liquid
has been spilled or objects have fallen into the apparatus, the apparatus has been
exposed to rain or moisture, does not operate normally or has been dropped.

2
IIIMPORTANT SAFETY INSTRUCTIONSCONTINUE
13. This appliance shall not be exposed to dripping or splashing water and that no
object filled with liquids such as vases shall be placed on the apparatus.
14. Power Sources – The appliance should be connected to a power supply only of
the type described in the operating instructions or as marked on the appliance. Do
not overload wall outlet.
15. Do not attempt to dismantle, open or repair this product yourself. If a fault occurs,
seek advice from your local qualified service technician or contact the distributor
via the telephone number at the back of this instruction manual.
16. Nameplate is located on bottom of the product.
•Places exposed to direct sunlight or close to heat radiating appliances such as
electric heaters.
IMPORTANT NOTES
Avoid installing the unit in locations described below:
•Places subject to constant vibration.
•Dusty, humid or moist places.

3
COMPLIANCE WITH FCC
This device complies with Part 15 of the FCC Rules. Operation is subject to the
following two conditions:
(1) this device may not cause harmful interference, and
(2) this device must accept any interference received, including interference that
may cause undesired operation.
NOTE: This equipment has been tested and found to comply with the limits for a Class
B digital device, pursuant to Part 15 of the FCC Rules. These limits are designed to
provide reasonable protection against harmful interference in a residential installation.
This equipment generates, uses and can radiate radio frequency energy and, if not
installed and used in accordance with the instructions, may cause harmful
interference to radio communications. However, there is no guarantee that
interference will not occur in a particular installation. If this equipment does cause
harmful interference to radio or television reception, which can be determined by
turning the equipment off and on, the user is encouraged to try to correct the
interference by one or more of the following measures:
- Reorient or relocate the receiving antenna.
- Increase the separation between the equipment and receiver.
- Connect the equipment into an outlet on a circuit different from that to which the
receiver is connected.
- Consult the dealer or an experienced radio/TV technician for help.
CAUTION: Changes or modifications not expressly approved by the party
responsible for compliance could void the user’s authority to
operate the equipment.
4
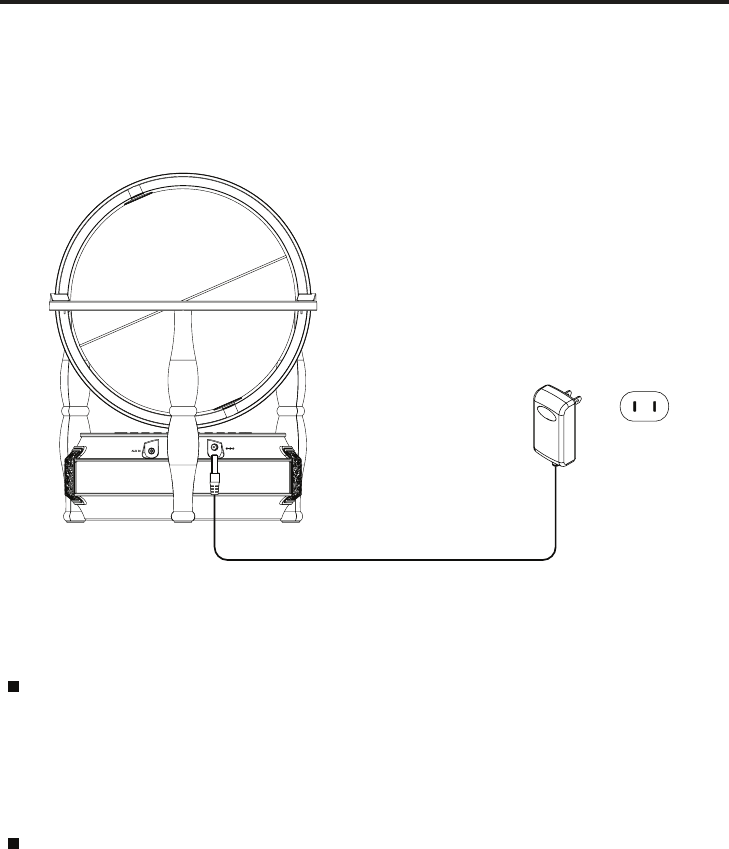
CONNECTING POWER
Plug the supplied power adapter small end into the DC jack located on the rear panel, plug the adapter into the standard
GENERAL OPERATION
AC wall socket.
CAUTION: The unit is designed to operate from a mains supply of AC 120V~60Hz. If the adapter does not fit properly,
turn it over and again. Do not force it.
NOTES: When the unit not operation by the AC power or unused for long periods of the time. Please remove the power
adapter from the wall outlet and unplug from the main unit.
5
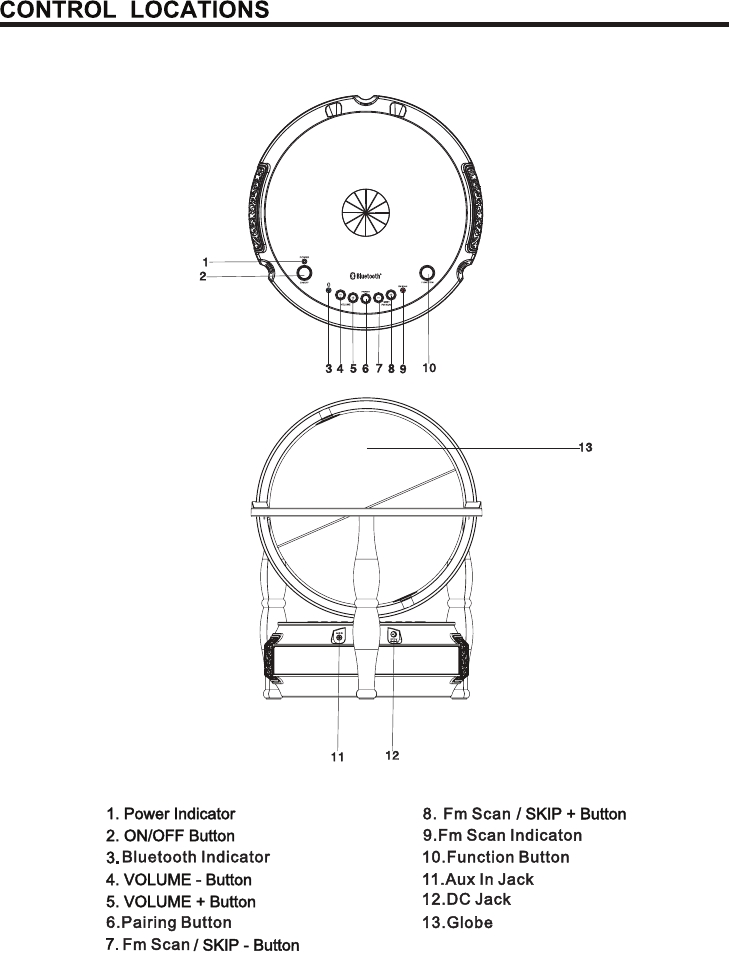
TUNING ON/OFF
1. Press the ON/OFF button to turn on the unit, Power indicator will light up.
2. Press the ON/OFF button again to turn off the unit. The power indicator will turn
off.
ADJUST VOLUME
Press the VOLUME+/ VOLUME- buttons to increase / decrease the sound level.

BLUETOOTH OPERATION
RADIO OPERATION
6
If the unit has been paired with a Bluetooth device before, you need to follow the pairing
instruction below to link the GL703-BT with you Bluetooth device.
1. Press the power ON/OFF button to turn on the unit, power indicator will light up.
2. The unit will search the paired device with the light bluetooth indicator flashing quickly and
"Do Do" is heard.
3. Turn on Bluetooth function of your device and enable the search or scan function to find
GL703-BT. (See your device's instructions to add or setup a Bluetooth device).
4. Select "GL703-BT" from the device list when it appears on your device screen. If required,
enter the pass code "0000" to pair (link) GL703-BT with your device.
5. After successfully paired with a device, The Bluetooth indicator will light steadily and you
will hear the sound "Do" to confirm that pairing is completed.
NOTE :
If you can't pair the unit with your Bluetooth enabled device, you can try turn OFF & ON
the power of your unit to solve the problem.
Playing from a Bluetooth device
you can play music from your Bluetooth device wirelessly to GL703-BT after successfully.
1. Selecting your favorite song, press the PLAY button on your Bluetooth device to
playback.
2. Adjust the VOLUME +/- buttons of the unit until you reach a comfortable listening level.
3. Press SKIP +/- buttons of the unit to skip the previous or next song.
NOTES :
1. Your Bluetooth enabled device will not play the music through the speaker, even if
connect (linked), if the device does not support the A2DP Bluetooth profile.
2. Remember to turn off the GL703-BT when you have finished listening.
3. Don't forget to turn off the power of your external audio device as well.
1. Press the ON/OFF button to turn on the unit.
2. Press the FUNCTION button to select radio mode, the FM scan indicator will light up.
3. Press SKIP +/- buttons of the unit to scan the previous or next FM station, repeatedly
until your desired FM station.
7
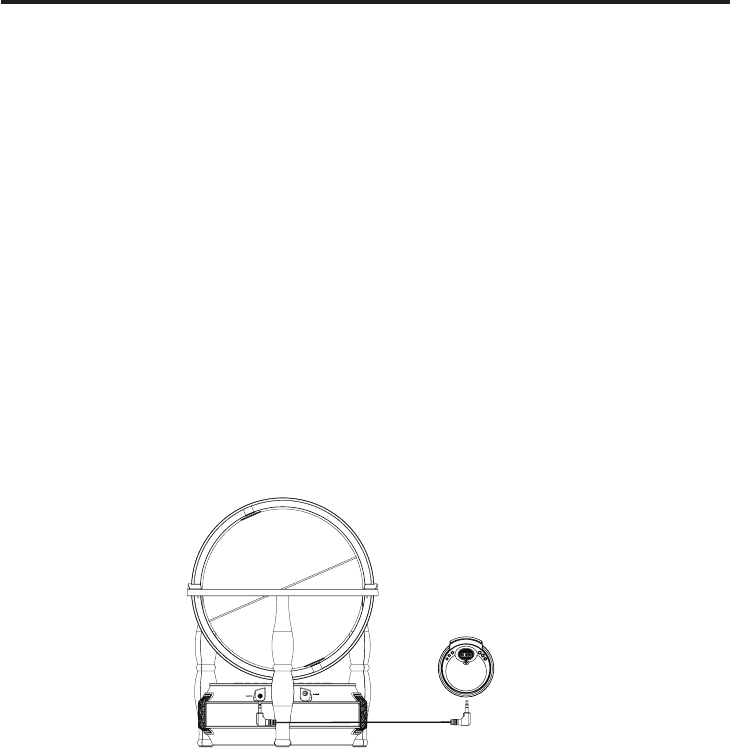
OTHER AUDIO DEVICES
By using a home audio connection cable (not included), you can listen to an external
audio unit through this unit's speakers. Before making any connections, Turn off the
power to all equipment.
1. Plug a 3.5mm audio cable (not included) into your external music player and
connect the other end (3.5mm Jack) into the AUX IN jack at the rear of the unit.
2. Power on the unit and make sure your external music player is turned on.
3. Start music playback on your external music player.
4. Adjust VOLUME +/- buttons to control the sound level of music playback through
your unit's speaker.
5. When don't listening, press the ON/OFF button to turn the unit off and unplug the
AUX IN cable from the unit.
Remember to turn off your audio device too.
NOTE:
If you are in Radio / Bluetooth mode, when you connect an external device to the
AUX IN jack, this unit will automatically switch to AUX mode. If you remove the plug
from the AUX IN jack, the unit will resume to the mode it was in before the external
device was connected.

TROUBLESHOOTING GUIDE
Symptom Possible Problem Solution
The unit does not
respond (no power)
The unit is disconnected from
the AC outlet. Reconnect to the AC outlet.
The AC outlet has not power. Try the unit on another outlet.
Unit is ON but there
is low or no volume
The volume control has been
turned all the way down.
Turn the Volume control to a
higher output.
No sound when
playing audio via
Bluetooth.
Your Bluetooth device has
been paired properly.
Pairing your Bluetooth device
according to the ”LISTENING TO A
BLUETOOTH ENABLED DEVICE”
section.
The volume control of your
Bluetooth device is set at too
low.
Increase the volume of your
Bluetooth device.
The volume control of main
unit is set at too low.
Increase the volume of main unit
to adjust to “+” level.
distorted on FM
broadcast
FM.
The FM rod antenna is not fully
extended.
Fully extend the FM rod antenna.
Sound is distorted
Volume level is set too high. Decrease the volume.
Sound source is distorted.
If you are using an external sound
source like older generation of
iPod, try reducing the output
volume on the device itself. Also
try turning bass boost OFF or
change the EQ setting.
U
FM no reception
nit gets warm after
extended play at
high volume
This is normal. Turn the unit off for a period of time
or lower volume.
• Under the influence of
electrstatic phenomenon, in
case the product may
malfunction we suggest user
to power reset
• Disconnect the machine from the
power source for 30 seconds then
reconnect
Noise or sound Station not tuned properly for Retune the FM broadcast station.
8
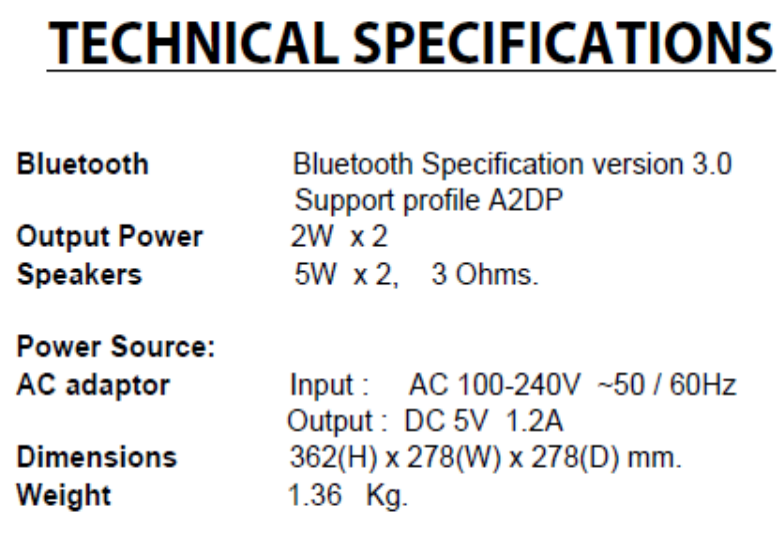
Operating frequency:
2402-2480MHz