Arts Digital Technology KS800BT Bluetooth Karaoke System w/7 Inch TFT User Manual
Arts Digital Technology (HK) Limited Bluetooth Karaoke System w/7 Inch TFT
User Manual
INSTRUCTION MANUAL
KS800-BT
Bluetooth Karaoke System
Thank you for purchasing this Karaoke System. Please read this instruction manual carefully before
using this product to ensure proper use. Keep this manual in a safe place for future reference.
w/7" TFT
EN - 1
WARNINGS
C A UTION:TO P R EVEN T T H E RI SK O F
ELECTRIC SHOCK, DO NOT REMO V E
COVER OR BACK. NO USER-SERVICEABLE
PARTS INSIDE. REFER SERVICING TO
QUALIFIED PERSONNEL.
CAUTION
RISK OF ELECTRIC SHOCK
DO NOT OPEN
WARNING: TO REDUCE THE RISK OF
FIRE OR SHOCK HAZARD, DO NOT EXPOSE
THIS PRODUCT TO RAIN OR MOISTURE.
This symbol is intended to alert you to
the presence of uninsulated dangerous
voltage within the product’s enclosure
that might be of sufficient magnitude to
constitute a risk of electric shock. Do
not open the product’s case.
This symbol is intended to inform you
t h at important operating and
maintenance instructions are included
in the literature accompanying this
product.
DRIPPING WARNING
The product shall not be exposed to dripping or
splashing and that no objects filled with liquids,
such as vases, shall be placed on the product.
VENTILATION WARNING
The normal ventilation of the product shall not be
impeded for intended use.
Warning: Changes or modifications to this unit not
expressly approved by the party responsible for
This device complies with Part 15 of
the FCC Rules. Operation is subject
to the following two conditions: (1)
this device may not cause harmful
interference, and (2) this device must
accept any interference recieved,
including interference that may cause
undesired operation.
compliance could void the user’s authority to
operate the equipment.
Class ll equipment symbol
This symbol indicates that the power
adaptor has a double insulation system.
This equipment complies with FCC’s and IC’s RF
radiation exposure limits set forth for an
uncontrolled environment. The antenna(s) used for
this transmitter must be installed and operated to
provide a separation distance of at least 20 cm from
all persons and must not be collocated or operating
in conjunction with any other antenna or transmitter.
Installer must ensure that 20 cm separation
distance will be maintained between the device
and user.
FCC RADIATION EXPOSURE
STATEMENT
DECLARATION DE LA FCC RELATIVE
A L'EXPOSITION AU RAYONNEMENT
Cet appareil est conforme aux limites d'exposition
au rayonnement RF stipulées par la FCC et IC pour
une utilisation dans un environnement non contrôlé.
Les antenne utilisées pour cet émetteur doivent être
installées et doivent fonctionner à au moins 20 cm
de distance des utilisateurs et ne doivent pas être
placées près d’ autres antennes ou émetteurs ou
fonctionner avec ceux-ci. Les installateurs doivent
s'assurer qu’une distance de 20 cm sépare
l’appareil des utilisateurs.
EN - 2
FCC AND CANADIAN ICES
IMPORTANT SAFETY INSTRUCTIONS
NOTE: This digital apparatus does not exceed the Class B limits for radio noise emissions from digital
apparatus as set out in the radio interference regulations of Industry Canada.
Le présent appareil numérique n’émet pas de bruits radioélectriques dépassant les limites applicables aux
appareils numériques de Classe B prescrites dans le règlement sur le brouillage radioélectrique édicté par
Industrie Canada.
NOTE: This equipment has been tested and found to comply with the limits for a Class B digital device,
pursuant to part 15 of the FCC Rules. These limits are designed to provide reasonable protection against
harmful interference in a residential installation. This equipment generates, uses and can radiate radio
frequency energy and, if not installed and used in accordance with the instructions, may cause harmful
interference to radio communications. However, there is no guarantee that interference will not occur in a
particular installation. If this equipment does cause harmful interference to radio or television (which can be
determined by turning the equipment off), the user is encouraged to try to correct the interference by one or
more of the following measures:
Reorient or relocate the receiving antenna.
Increase the separation between the equipment and receiver.
Connect the equipment into an outlet on a circuit different from that to which the receiver is connected.
Consult the dealer or an experienced / TV technician for help.
1. Read these Instructions.
2. Keep these Instructions.
3. Heed all Warnings.
4. Follow all instructions.
5. Do not use this apparatus near water.
6. Clean only with a dry cloth.
7. Do not block any of the ventilation openings. Install in accordance with the manufacturers instructions.
8. Do not install near any heat sources such as radiators, heat registers, stoves, or other apparatus
(including amplifiers) that produce heat.
9. Do not defeat the safety purpose of the polarized or grounding - type plug. A polarized plug has two
blades with one wider than the other. A grounding type plug has two blades and a third grounding prong.
The wide blade or the third prong are provided for your safety. When the provided plug does not fit
into your outlet, consult an electrician for replacement of the obsolete outlet.
10. Protect the power cord from being walked on or pinched particularly at plugs, convenience
receptacles, and the point where they exit from the apparatus.
11. Only use attachments/accessories specified by the manufacturer.
12. Use only with a cart, stand, tripod, bracket, or table specified by the manufacturer, or sold with the
apparatus. When a cart is used, use caution when moving the cart/apparatus combination to avoid
injury from tip-over.
Portable Cart Warning
13. Unplug this apparatus during lightning storms or when unused for long periods of time.
14. Refer all servicing to qualified service personnel. Servicing is required when the apparatus has been
damaged in any way, such as power-supply cord or plug is damaged, liquid has been spilled or objects
have fallen into the apparatus, the apparatus has been exposed to rain or moisture , does not operate normally,
or has been dropped.

EN - 3
To reduce the risk of fire or electric shock, do not expose this apparatus to rain or moisture.
Avertissement: pour réduire le risque d’incendie ou de choc électrique, ne pas exposer cet appareil
sous la pluie et l’humidité.
The apparatus shall not be exposed to dripping or splashing and that no objects filled with liquids, such
as vases, shall be placed on apparatus.
L’appareil ne doit pas être exposé aux écoulements ou aux éclaboussures et aucun objet ne contenant
de liquide, tel qu’un vase, ne doit être placé sur l’objet.
The MAINS plug / power adaptor is used as the disconnect device, it should remain readily operable
during intended use.
In order to disconnect the apparatus from the mains completely, the main plug / power adaptor should
be disconnected from the mains socket outlet completely.
La prise du secteur ne doit pas être obstruée ou doit être facilement accessible pendant son utilisation.
Pour être complètement déconnecté de l’alimentation d’entrée, la prise doit être débranchée du secteur.
WARNINGS:
Battery shall not be exposed to excessive heat such as sunshine, fire or the like.
Les piles ne doivent pas être exposées à de forte chaleur, tel qu’à la lumière du soleil, au feu ou
autres choses de semblable.
IMPORTANT SAFETY INSTRUCTIONS
Caution Marking and rating plate was located at bottom enclosure of the apparatus.
Les marquages sont inscrits en bas de l'appareil.
Les précautions d'emploi sont inscrites en bas de l'appareil.
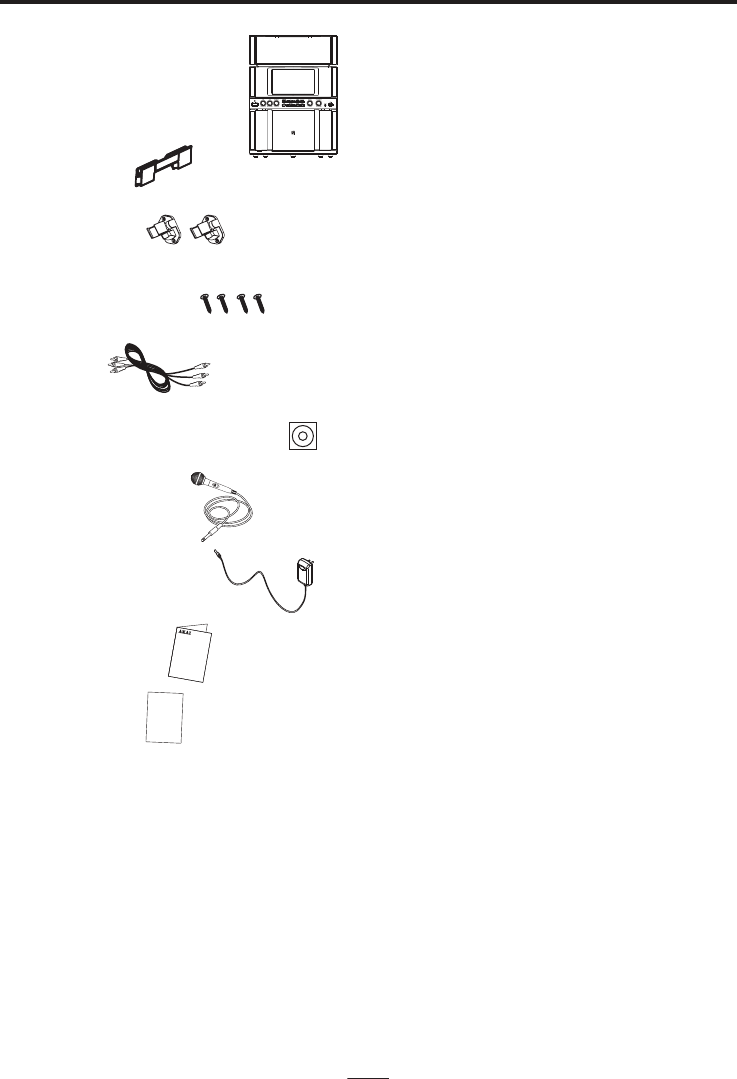
WHAT’S IN THE BOX
Contents
1. Karaoke System
5. AV Cable
3. Mic Holder x 2
4. Mic Holder Screw x 4
6. Pre-recorded Karaoke CD+G Disc
7. Dynamic Microphone
8. AC-DC Power Adaptor
9. Instruction Manual
10. Warranty Card
If you are missing any parts above, please contact ADT Digital LLC.
Tel: 561 922 6886
Fax: 561 922 6159
EN - 4
2. Tablet Cradle
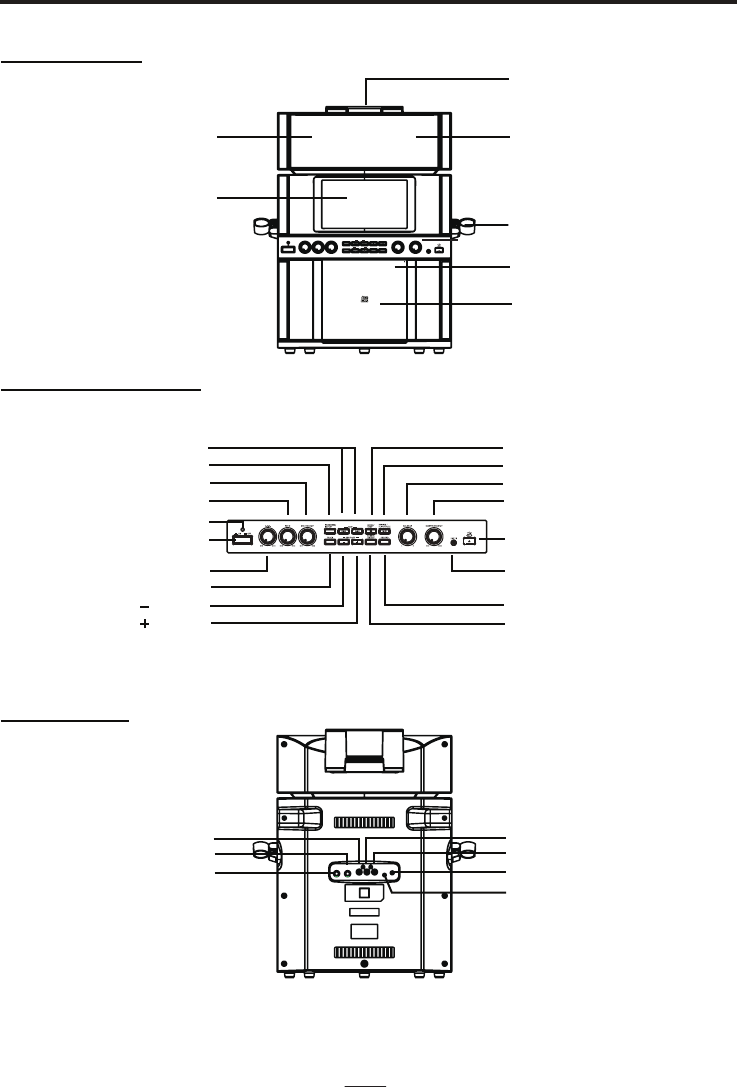
CONTROL LOCATION
FRONT SIDE
LEFT SIDE SPEAKER RIGHT SIDE SPEAKER
CD DOOR OPEN AREA
CD DOOR
TFT SCREEN
CONTROL PANEL
BACK SIDE
NOTTUB POTS / EDOMSNOTTUB PIKS
PAIRING / PLAY / PAUSE BUTTON
BALANCE CONTROL
MASTER VOLUME CONTROL
USB SOCKET
LINE IN JACK
RECORD BUTTON
TFT SCREEN
ON / OFF BUTTON
MIC VOLUME
ECHO CONTROL
POWER ON INDICATOR
ON / OFF BUTTON
A.V.C CONTROL
TRACK BUTTON
BUTTON
BUTTON
KEY / PAGE
PROGRAM/REPEAT BUTTON
VIDEO JACK AUDIO OUT (R) JACK
AUDIO OUT (L) JACK
DC JACK
LINE OUT JACK
MIC 2 JACK
MIC 1 JACK
EN - 5
PROGRAM /
REPEAT
MODE /
STOP PLAY/PAUSESKIP
TRACK
SCREEN /
ON/OFF RECORDKEY/PAGE
MIC VOLUME
MIN MAX
BALANCE
LR
MASTER VOLUME
LINE IN
MIN MAX
EHCO
MIN MAX
A.V.C.
MIN MAX
OPEN
CRADLE
MIC HOLDER
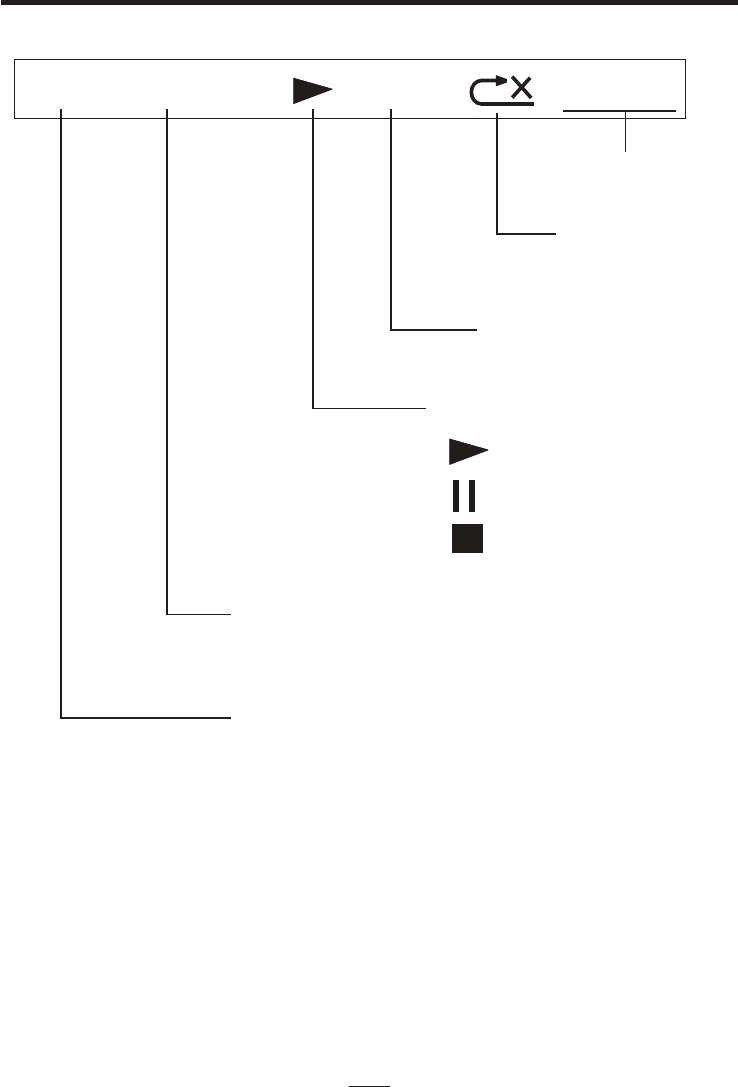
TFT DISPLAY ICON
EN - 6
CDG TRK 10/10 PROG 00:16:04
PLAYING TIME
REPEAT MODE
PROGRAM MODE
PLAY / PAUSE / STOP INDICATOR
PLAYING MODE
PAUSE MODE
STOP MODE
PLAYING TRACK NUMBER AND TOTAL TRACK NUMBER
CDG=CD+G DISC PLAYING
PLAYING CD/ CDR/ USB
MAKING THE CONNECTIONS
CONNECTING POWER
Plug the supplied power adapter small end into the DC jack located on the rear panel, plug the adapter
into the standard AC wall socket.
CAUTION: The unit is designed to operate from a mains supply of AC 100-240V~50/60Hz. If the adapter
does not fit properly, turn it over and try again. Do not force it.
NOTES: When the unit is not operated by the AC power or unused for long periods of the time. Please
remove the power adapter from the wall outlet and unplug from the main unit.
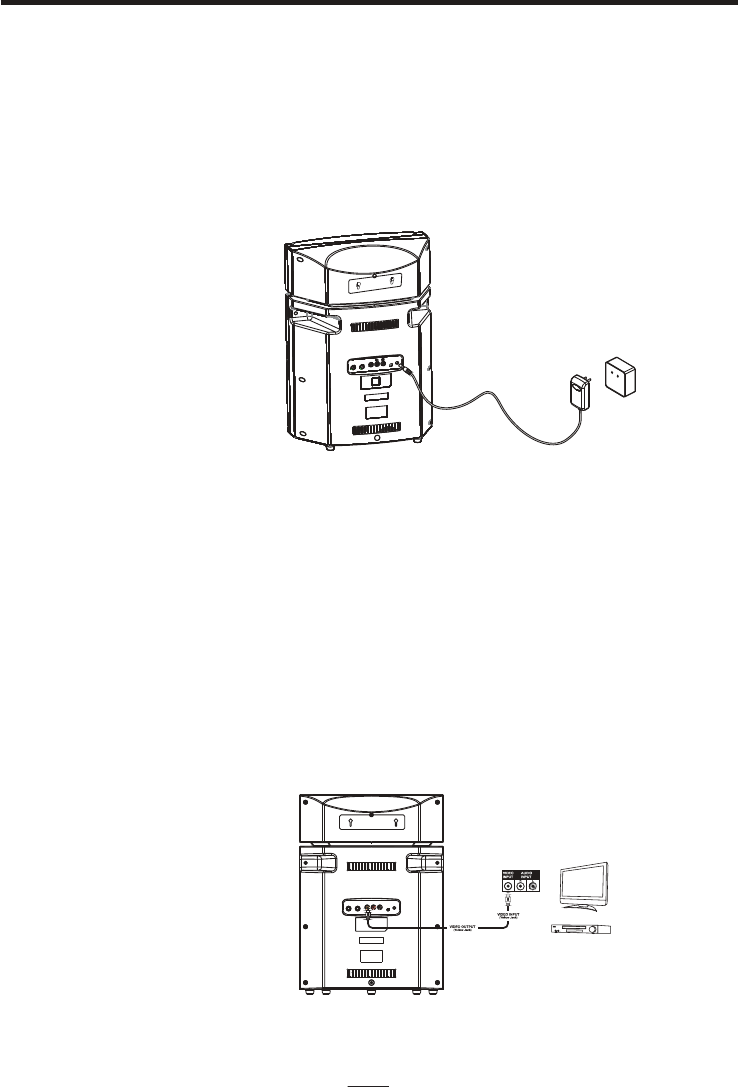
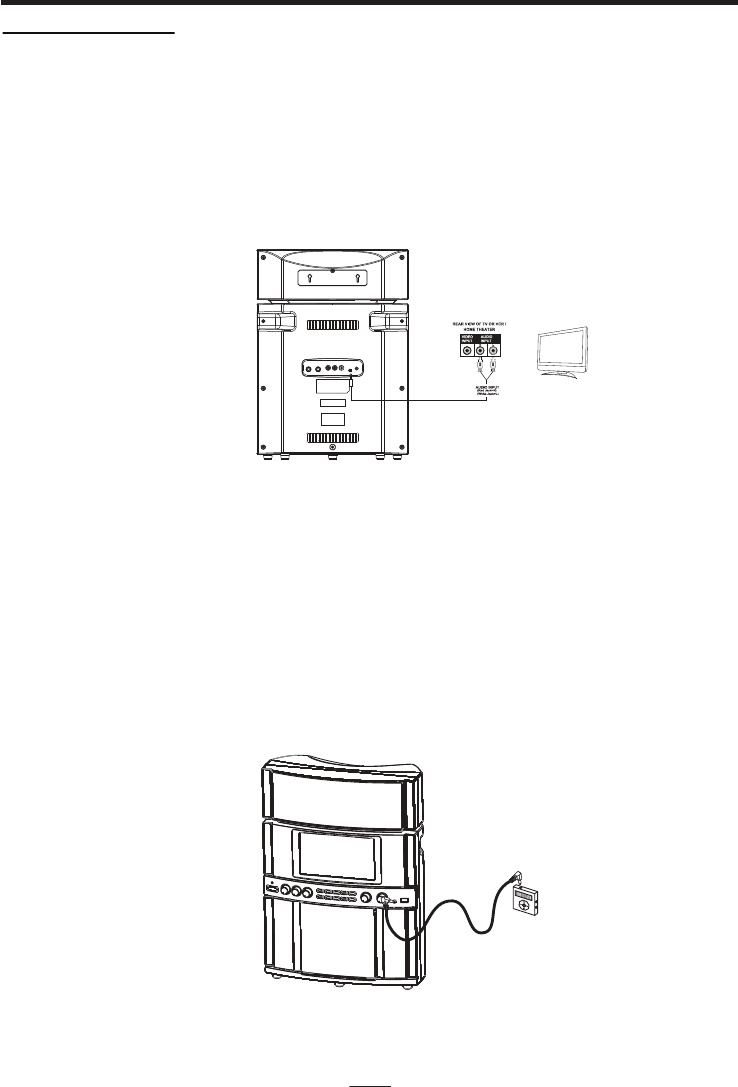
CONNECTING TO YOUR TV OR VCR / HOME THEATER
Your Karaoke machine is designed to connect to your TV the same way you would connect
most video cameras, VCR / Home theater or video games consoles. We have provided
RCA cables to connect your unit to a TV, VCR / Home theater, video device or an external
audio / sound system. The RCA cables have three connections at each end (white and red
are for left and right audio connections and the yellow is for video connections).
VIDEO CONNECTION
Please follow the steps below to display CD+G lyrics on the TV screen:
1. Locate the multi-colored RCA cables
2. Connect video cable (yellow) to the Video Out of the back of the Karaoke Machine
3. Connect the other end of the video cable (yellow) to the video input on your TV or VCR /
Home theater.
EN - 7
MAKING THE CONNECTIONS
SELECTING YOUR KARAOKE MACHINE AS YOUR SOURCE/INPUT
Selecting your Karaoke Machine as a source / input on your TV is very similar to connecting
a VCR/DVD or Satellite system.
We’ve listed below the most common ways of selecting the source from your TV or VCR /
Home Theater:
1. In the set up menu of the TV or VCR / Home theater there may be an option for “Input
Select” where you can choose between “Cable/Ant., Video 1, Video 2, etc” as the input
source.
2. Look for a TV channel between the highest and lowest on your TV or VCR / Home
theater (i.e AUX, EXT, LINE 1 or LINE IN)
3. Your remote control for your TV or VCR / Home Theater may have source input
selections as well as detailed below: “Video, Video 1, Game, AUX, EXT or LINE-IN.”
Choosing one of those sources in most cases should display the lyrics from your
Karaoke Machine as well.
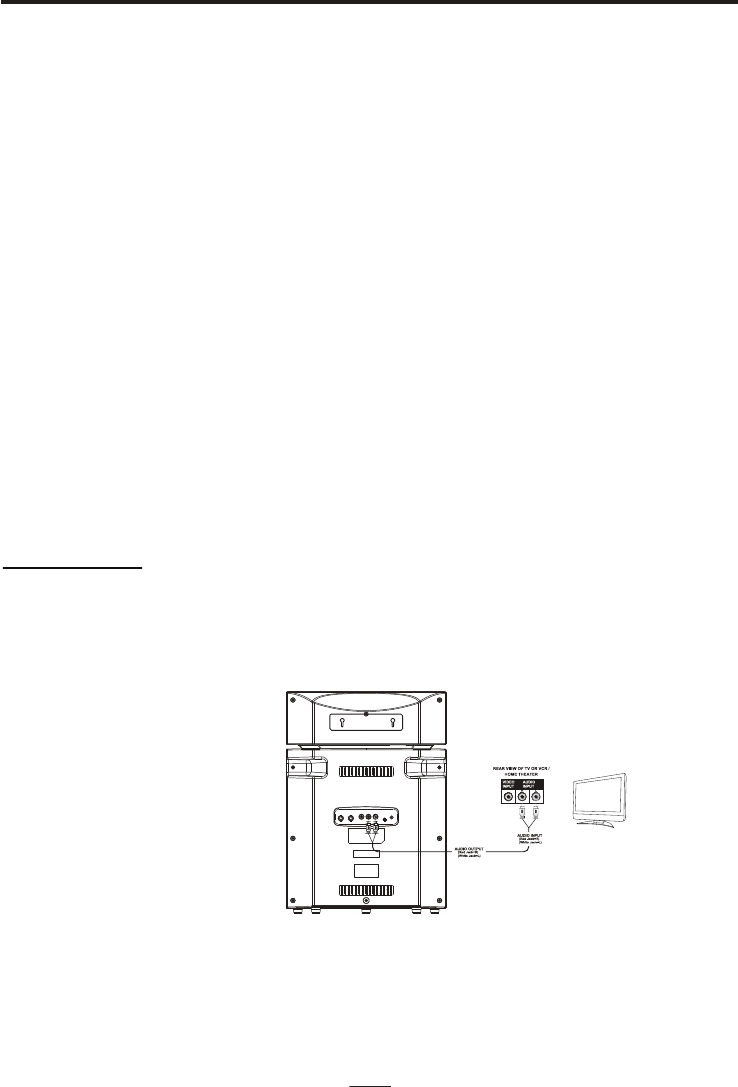
AUDIO CONNECTION
Please follow the steps below to connect audio signal from the unit to your TV, VCR/Home
Theater or home audio system.
RCA connection
1. Locate the multi-colored RCA cables (White and Red)
2. Connect audio cables to the Audio Out of the back of your Karaoke Machine.
3. Connect the other end of the audio cables to the Audio/Auxiliary input on your TV or
VCR/Home Theater or home audio system.
EN - 8
MAKING THE CONNECTIONS
Line-out connection
Except the RCA connection, there is another audio line-out with 3.5mm jack on the unit. User
can use a 3.5mm to RCA cable (not included) to connect the audio signal from the unit to
your TV/ Home theater and other stereo audio system.
1. Connect the 3.5mm plug audio cables to the Line Out of the back of your Karaoke
Machine.
2. Connect the other end of the audio cables to the Audio/Auxiliary input on your TV or
VCR/Home Theater or home audio system.
SETTING UP LINE IN CONNECTION
The Line-in jack will allow you to connect external music player or external sound source to
your Karaoke Machine speakers
1. Plug a 3.5mm audio cable (not included) into your external music player and connect the
other end (3.5mm jack) into the LINE IN jack on the front of your Karaoke Machine.
2. Make sure your external music is turned on.
3. Start music playback on your external music player.
4. Adjust MASTER VOLUME to control the sound level of music playback from the speakers
on the Karaoke machine.
EN - 9

INSTALLATION GUIDE FOR MIC HOLDERS
1. Take microphone holders and screws from polybag.
2. Put one microphone holder to one side. You need to match its orientation just like the
picture shown.
3. Use screwdriver to tighten the microphone holder just like the picture shown. You need two
screws for each microphone holder.
4. Repeat step 2 - 3 to install another microphone holder on the other side.
EN - 10
MAKING THE CONNECTIONS
CD OR CD+G / MP3+G OPERATION
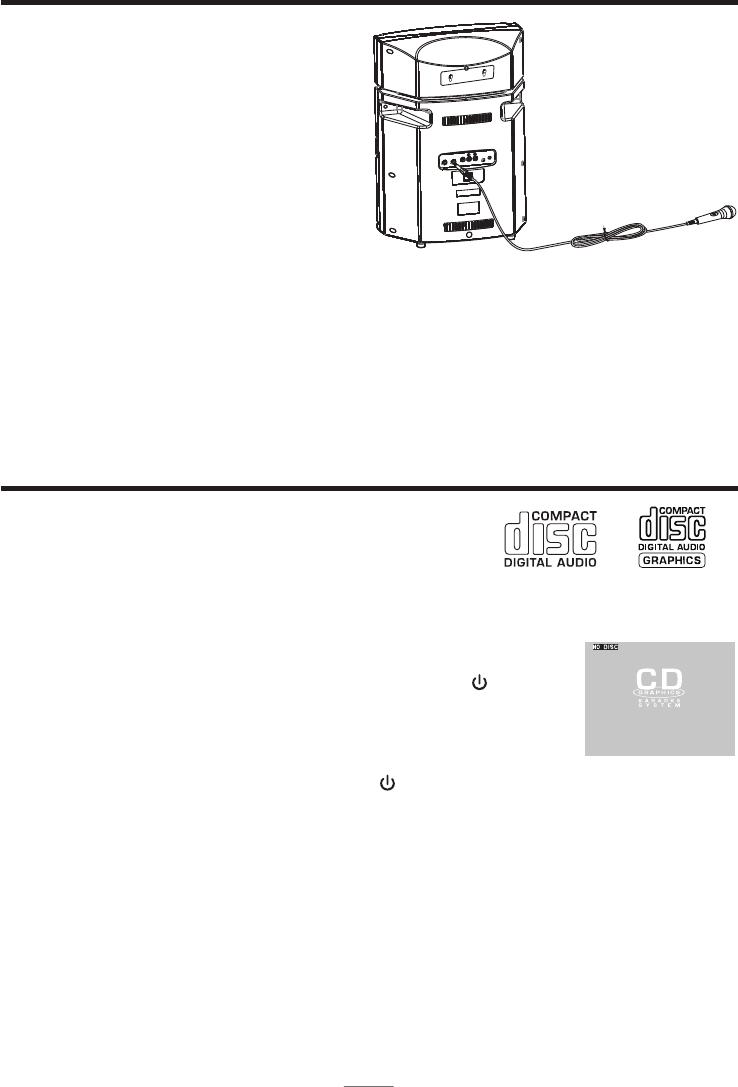
SETTING UP YOUR MICROPHONE
1. Plug a microphone into the MIC1
or MIC2 jack at the rear of your
Karaoke Machine. Their output is
mixed with playback from
CD/CD+G.
2. Located on the microphone,
there is an ON/OFF switch.
3. Ensure you set the ON/OFF
switch on the microphone to ON
when required for use.
This unit is designed to play CDs/CD+G/MP3/MP3+G
disc bearing the identification logo respectively. If the
disc does not conform to the standard, it may not play
properly.
NOTE: The unit may not be able to read CDR or CDRW disc correctly. The readability
depends on the quality of recording produced by CD recorder or CD writer.
LOADING A DISC
1. Pull the CD door on the front from the position close to the CD
Door Open Area. Place a disc in the CD compartment with the
printed side facing toward you.
2. Gently close the CD Door to the CD compartment. The Karaoke
Machine begins to read the disc and “READ” will be displayed.
After that, the operation icon will appear on the top of the TFT
screen.
3. Press PLAY/PAUSE to play the disc. (If no disc is loaded, it will
display “NO DISC”)
Warning:
Please do not point the microphone head directly to the front of the speaker(s) on the unit
when you are singing, it would cause unwanted feedback sound that may affect the
performance of your unit.
Tapping or dropping the microphone while it is on can permanently damage your
microphone. Resist the urge to swing the microphone around by the cord!
VHF wireless microphones are not recommended to work with this Karaoke system. Some
VHF wireless microphones may cause unwanted noise and interference.
EN - 11
TURNING POWER ON/OFF
1. To turn on the Karaoke Machine, press the STANDBY button
once, the POWER indicator will light up to full brightness and TFT
2. To turn off the system, press the STANDBY button again. The
power indicator will light to half brightness and TFT screen will turn
screen will display the OPENING SCREEN and start to read CD.
(If no disc is loaded, it will display “NO DISC”)
off.
CD OR CD+G / MP3+G OPERATION
PLAY/PAUSE
1. To start playing, press the PLAY/PAUSE button once, the currently track number and
PLAY indicator will appear on the screen.
2. To temporarily stop playing, press the PLAY/PAUSE button, the PAUSE indicator will be
shown on the screen.
3. To resume play, press the PLAY/PAUSE button again, the PLAY indicator will be shown on
the screen.
STOP
If the STOP button is pressed in the course of playing, the disc will cease to play.
SKIP PLAY (For both CD and CD+G/MP3+G discs)
In stop or playback mode, you can skip up or down to a specific track by
pressing the forward or back SKIP Button.
ENTER A TRACK NUMBER TO PLAYBACK
1. Press the TRACK button once, the track number and total track number will be
displayed. The track number will be blinking for user selection.
2. Press the SKIP or SKIP button to select a desired track.(if the number of
tracks is less than 10)
3. If there are 10 or more tracks on the media, the first digit of track number will be
blinking.
4. Press the or SKIP button to adjust the first digit.
5. Then, press TRACK button again to advance to second or third digit.
6. Press the SKIP or SKIP button to adjust the second or the third digit.
7. Press the PLAY/PAUSE button when you have selected the desired track to
play.
SEARCH (For CD disc /MP3 disc only)
When playing a CD disc or MP3 disc, you can press and hold the SKIP
buttons ( or ) to locate a specific point on a track. The system will
search at high speed in the forward or reverse direction. By releasing the
button, normal play will be resumed.
NOTE: - Pressing pause when a CD+G/MP3+G is playing may cause distorted lyrics
on the screen, any distortion will remain until the whole screen is
refreshed during an instrumental break or you stop the song and start it
from the beginning
- Never place anything except a compact disc on the disc compartment.
Foreign objects can damage the unit.
- Do not apply excessive force to disc cover.
- Only place one disc on the disc compartment at a time.
- Do not open the disc cover of the CD compartment while it’s playing.
SKIP
EN - 12

CD OR CD+G / MP3+G OPERATION
REPEAT PLAY (For both CD and CD+G/MP3+G discs)
1. During playback, press PROGRAM/REPEAT button once, the REP ONE
indicator will appear on the TFT screen, it can keep repeat the current track.
2. To repeat the Directory/Folder, press PROGRAM/REPEAT button twice, the
REP FOLDER indicator will appear on the TFT screen.
3. To repeat all tracks in disc, press PROGRAM/REPEAT button again,
the REP ALL indicator will appear on the TFT screen.
4. To clear the REPEAT function, press PROGRAM/REPEAT button again,
the NO REP indicator will appear on the TFT screen.
PROGRAMMING CD PLAYBACK
This unit can be programmed to play up to 20 tracks/files in CD mode. Load the
music CD/CD+G or MP3/MP3+G disc onto the CD compartment (without pressing
the PLAY/PAUSE button).
1) Press PROGRAM/REPEAT button once in stop mode. “PRG SET 00:XX” will be
shown on the screen.
2) Press the SKIP buttons to select the desired track to be programmed.
3) Press PROGRAM/REPEAT button again to save the selected track/files.
4) Repeat steps 2–3 to program up to 20 tracks/files.
5) Press the PLAY/PAUSE button to play the programmed tracks after
is completed. The “PROG” indicator will appear on screen during the
programmed playback.
6) To clear program and resume normal playback, press the STOP button twice
during playback, or open the CD door to clear the programmed tracks.
REMARK:
The unit can store up to 20 tracks/files in the programmable memories. During the
programmed playback, user can still select the “repeat one/repeat all” function.
PAGE+ / PAGE-
During the STOP mode, press PAGE+/PAGE- to advance song selection by 10
tracks or to go to the next page of song list.
KEY+ / KEY-
Your system includes a digital key controller to adjust the audio tone (pitch) of the
music. Key control should be done in the PLAY MODE only.
Press the KEY+ button to raise the key of the music, and press the KEY- button
to lower the key. (max. 6 times)
ECHO
Adjust the ECHO control to enhance your voice for a concert hall effect.
programming
EN - 13
CD OR CD+G / MP3+G OPERATION
BALANCE
Adjust the BALANCE control between the pre-recorded singer’s voice and the
music when using a multiplex karaoke disc.
AUTO VOICE CONTROL
AUTO VOICE CONTROL can be activated and adjusted by the AVC control knob.
The vocals on the Multiplex recording will be muted when the singer starts to sing
through the microphone. When the singer stops singing, the vocals will resume to
normal.
MASTER VOLUME
Rotate to the MASTER VOLUME control to obtain the desired sound level.
MIC VOLUME
Adjust the MIC VOLUME control to a desired level and obtain the best
performance.
SCREEN ON/OFF
Press the SCREEN ON/OFF button to turn the TFT screen ON/OFF.
SELECTING THE AUDIO SOURCE
Press STOP/MODE button to toggle between CD, USB, Bluetooth modes.
Note: Selecting the audio source should be done in the stop mode only.
RECORDING AUDIO
You can record CD+G video and audio together with the singer’s voice to a USB
flash drive. The recording will be in MP3 format. The stored file name after recording
will be “TRKXX.MP3”.
• Plug a USB flash drive to USB socket.
• Start the desired track to play on CD/CD+G disc by pressing the
SKIP or
SKIP
button.
• Press RECORD button to record the
CD/CD+G playback together with your voice.
(The percentage of completion will be
displayed.)
• Press RECORD again to stop recording.
• To playback the recording, it is the same as
playing back the MP3 or MP3+G
USB flash drive, please follow instructions in
USB OPERATION.
NOTE: This Karaoke system can only record tracks on CD / CD+G disc.
EN - 14
file on the
USB OPERATION
INSERTING USB FLASH DRIVE
1. Insert a USB flash driver into the USB socket on the front of your karaoke system.
2. Make sure that USB is selected as the audio source.
See "SELECTING THE AUDIO SOURCE”
3. Press PLAY/PAUSE to start playback.
PLAY/PAUSE
1. To start playing, press the PLAY/PAUSE button once, the currently track number and
PLAY indicator will appear on the screen. (“USB” will be shown on the screen).
2. To temporarily stop playing, press the PLAY/PAUSE button, the PAUSE indicator will be
shown on the screen.
3. To resume play, press the PLAY/PAUSE button again, the STOP indicator will be shown
on the screen.
STOP
If the STOP button is pressed in the course of playing, the USB playback will cease to play.
SKIP PLAY
In stop or playback mode, you can skip up or down to a specific track by pressing the
forward or back SKIP Button.
ENTER A TRACK NUMBER TO PLAYBACK
1. Press the TRACK button once, the track number and total track number will be displayed.
The track number will be blinking for user selection.
2. Press the SKIP or SKIP button to select a desired track.(if the number of tracks is
less than 10)
3. If there are 10 or more tracks on the media, the first digit of track number will be blinking.
4. Press the SKIP or SKIP button to adjust the first digit.
5. Then, press TRACK button again to advance to second or third digit.
6. Press the SKIP or SKIP button to adjust the second or the third digit.
7. Press the PLAY/PAUSE button when you have selected the desired track to play.
NOTE: - Pressing pause when playing on the USB, it may cause distorted lyrics on the
screen, any distortion will remain until the whole screen is refreshed during an instrumental
break or you stop the song and start it from the beginning
SEARCH (For MP3 file only)
When playing a MP3 file on the USB, you can press and hold the SKIP buttons
( SEARCH ) to locate a specific point on a track. The system will search at high speed in
the forward or reverse direction. By releasing the button, normal play will be resumed.
EN - 15

USB OPERATION
REPEAT PLAY
1. During playback, press PROGRAM/REPEAT button once,the REP ONE indicator
will appear on the TFT screen, it can keep repeat the current track.
2. To repeat the Directory/Folder, press PROGRAM/REPEAT button twice,
the REP FOLDER indicator will appear on the TFT screen.
3. To repeat all tracks in disc, press PROGRAM/REPEAT button again,
the REP ALL indicator will appear on the TFT screen.
4. To clear the REPEAT function, press PROGRAM/REPEAT button again,
the NO REP indicator will appear on the TFT screen.
PROGRAMMING USB PLAYBACK
This unit can be programmed to play up to 20 tracks/files in USB mode. Plug the USB flash
drive and select USB mode. (without pressing the PLAY/PAUSE button).
1) Press PROGRAM/REPEAT button once in stop mode. “PRG SET 00:XXX” will be shown
on the screen.
2) Press the SKIP buttons to select the desired track to be programmed.
3) Press PROGRAM/REPEAT button again to save the selected track/files.
4) Repeat steps 2–3 to program up to 20 tracks/file.
5) Press the PLAY/PAUSE button to play the programmed tracks after programming is
completed. The “PROG” indicator will appear on screen during the programmed
6) To clear program and resume normal playback, press the STOP button twice during
playback to clear the programmed tracks.
REMARK:
The unit can store up to 20 tracks/files in the programmable memories. During the
programmed playback, user can still select the “repeat one/repeat all” function.
EN - 16
playback.

2. The Bluetooth indicator will flash quickly. If the unit does not automatically begin to
pair, press and hold the button.
3. Using the native controls on your Bluetooth Device, select the " KS800-BT" in your Bluetooth
setting to pair.
4. When successfully paired, the Bluetooth indicator will stop flashing.
After initial pairing, the unit will stay paired unless unpaired manually by the user or erased
due to a reset of the devices.
If your device should become unpaired, follow the above steps again.
If any pairing issues should occur, un-pair the unit on your Bluetooth device and follow the
above steps again.
BLUETOOTH SETUP
1. Follow the instructions for Pairing a Bluetooth Device.
2. Use the native controls on the connected Bluetooth Device to select a track.
3. To play, pause or skip the selected track, use the native controls on the connected Bluetooth
Device or press the button of unit.
4. Audio playback from the connected Bluetooth device can now be heard through the speaker.
PLAYING MUSIC VIA BLUETOOTH
Pairing is the term used when two Bluetooth devices are connected wirelessly for the first time.
BLUETOOH OPERATION
1 Press
STOP / MODE button to toggle to Bluetooth mode.
PAIRING
PAIRING
EN - 17
CARE AND MAINTENANCE
EN - 18
*Carrying for Compact Discs
1. Treat the disc carefully. Handle the disc only by its edges. Never allow your fingers to come
in contact with the shiny, unprinted side of the disc.
2. Do not attach adhesive tape, stickers, etc. to the disc label.
3. Clean the discs periodically with a soft, lint-free, dry cloth. Never use detergents or abrasive
cleaners to clean the disc. If necessary, use a CD cleaning kit. If a disc skips or gets stuck
on a section of the disc, it is probably dirty or damaged (scratched). When cleaning the disc,
wipe in straight lines from the center of the disc to the outer edge of the disc. Never wipe in
circular motions.
4. This unit is designed to play discs bearing the identification logo as shown here or MP3
format Disc. Other discs may not conform to the CD standard and may not play properly.
5. Discs should be stored in their cases after each use to avoid damage.
6. Do not expose discs to direct sunlight, high humidity, high temperatures, or dust, etc.
Prolonged exposure or extreme temperatures can warp the disc.
7. Do not stick or write anything on either side of the disc. Sharp writing instruments or the
ink may damage the surface.
*Care of the Cabinet
1. To prevent fire or shock hazard, disconnect your unit from the AC power source when
cleaning.
2. The finish on your unit may be cleaned with a dust cloth and cared for as other furniture.
Use caution when cleaning and wiping the plastic parts.
3. Mild soap and a damp cloth may be used on the front panel.
*To Clean the Lens
If the lens get dirty, your player may skip or may not play a CD
1. Open the CD door.
2. Use a camera lens blower/brush to blow on the lens once or twice, brush the dust or
particles off the lens then blow again.
3. To remove fingerprints, use a dry cotton swab to wipe from the middle to outer edge of
the lens.
TROUBLE SHOOTING
No power when POWER
is on.
AC adaptor is not plugged
into a wall outlet or the
connector is not plugged
into the power supply jack
on the back of the unit.
Plug the AC adaptor into a
wall outlet and plug the
connector into the supply
jack on the unit.
The AC outlet may not have
power.
Check the outlet with a
working lamp or other
electrical appliance.
• TV system is set to
minimum
• TV system is powered Off
• RCA cords are not
connected securely.
• Turn up the volume on
the TV system
• Power the TV system on.
• Ensure white and red RCA
cords are securely inserted
into into the karaoke system
and the TV system.
CD Player does not work
normally
• Disc is inserted upside
down
• Disc is dirty
• Disc is scratched
• Disc is warped
• A non standard disc is
inserted
• Moisture has formed
inside the CD deck
• Karaoke system needs to
be reset
• Insert the disc correctly
• Wipe clean with a soft cloth
• Use a new disc
• Use a new disc
• Only use discs bearing
correct identification logo
• Wait about 20 - 30 mins to
let it dry out.
• Disconnect the machine
from the power source for
30 seconds then reconnect
No sound - If audio is going
through TV or VCR.
• Source Selection on TV or
VCR is not correct.
• RCA cords are not
connected securely
• Follow directions “Making
the connections”
• Ensure white and red RCA
cords are securely inserted
into both the karaoke
system and the home
stereo system.
PROBLEM POSSIBLE CAUSE SOLUTION
EN - 19
No power when plugged in.
No sound from TV.

TROUBLE SHOOTING
PROBLEM POSSIBLE CAUSE SOLUTION
No sound - when audio is
connected to a home
stereo.
• Source Selection on your
stereo is not set properly
• Improper Connection to
stereo system
• RCA cords are not
connected securely.
• Select AUX IN as the
source for your home stereo
• Follow direction on “Making
the for Connections” for
connecting to a home stereo
system
• Ensure white and red RCA
cords are securely inserted
into both the karaoke system
and the home stereo system
No song lyrics appear on
the TV screen
• Video cable is not
connected properly to the
TV
• Source selector on TV is
not set to VIDEO
•TV does not have video
line input
• A CDG is loaded but the
CD+G icon is not lit
• Mic volume control is set to
minimum
• Connect the video cable to
the karaoke system’s VIDEO
OUT and to the TV VIDEO
IN.
• Using your TV remote to
select VIDEO input or select
the proper VIDEO input on
the TV itself.
• Connect from VIDEO OUT
of the system to the VIDEO
IN on your VCR/Home
theater. Refer to “Making
the Connections. Check
the disc to be sure it is a
CD+G
• Check the disc to be sure it
is clean.
• Mic is off
•Adjust mic volume to max,
and then re-adjust to a
comfortable level
No Video is displayed on
the TFT Screen.
No sound from mic
•
•
Set Screen button to turn
ON.
Ensure you are playing a
CD+Graphics or CD+G
Karaoke disc.
•
•
The TFT Screen is turned
OFF.
The disc being played is a
regular music CD,in which
case no image will be
displayed.
• Turn on mic with the
ON/OFF switch located on
the microphone
EN - 20
SPECIFICATION
Specifications are typical, individual units might vary. They are subject to continuous
improvement without notice and without incurring any obligation.
Audio Section
Output power
Output impedance
CD OR CD+G player
Frequency response
Signal - to - noise ratio
Number of programs
Microphone
5 watt + 5 watt RMS
3 Ohms
100 Hz - 20 kHz
50 dB
20 STEPS RANDOM ACCESS PROGRAMMING
-73 dB 600 OHMS IMPEDANCE WITH
Ø 6.3mm DYNAMIC MICROPHONE
EN - 21
TROUBLE SHOOTING
No sound when playing
audio via Bluetooth.
Your Bluetooth device hasn’t
been paired properly.
Pairing your Bluetooth device
according to the "Bluetooth setup"
section.
The volume control of your
Bluetooth device is set too
low.
Increase the volume of your Bluetooth
device.
The volume control of the unit
is set too low.
Increase the volume of the unit by
VOLUME control.

THE KARAOKE MACHINE (GLOSSARY OF TERMS)
Following are some brief descriptions of karaoke terms you may need:
Echo:
By adding some minor feedback to your voice the Echo feature adds depth and
resonance to a singer's voice. Echo affects only your voice and not the music. It
will make you sound like you are singing in a big concert hall.
Multiplex:
This karaoke system is capable of playing Multiplex CD+G Karaoke discs.
Multiplex Karaoke discs feature two mono versions of the same recording on left
and right channels. The right channel features a mono version of the song with the
lead vocals pre-recorded. The left channel features the same song, without the
lead vocals recorded.
Auto Voice Control (A.V.C.):
This is short for “Automatic Vocal Control”. When the AVC knob on the front panel
of the player is turned clockwise, the AVC function is activated. AVC is used to
eliminate the singer's vocals from specially made Multiplex CD+G karaoke discs.
Once the AVC is activated, as you sing into the microphone, the pre-recorded
vocals are eliminated and replaced with your singing voice. Set the AVC to a lower
setting, and you'll be able to hear the pre-recorded vocals in low volume as well as
your own singing voice. Set the AVC to maximum and as you sing into the
microphone, the pre-recorded lead vocals will be completely eliminated, and only
your own singing voice will be heard.
NOTE: The AVC controls is only functional with specific Multiplex CD+G Karaoke
Discs. AVC will not eliminate the vocals from standard music CDs, and will not
function when playing standard Karaoke CD+G discs, such as the disc included
with this system.
CD+G:
This is short for Compact Disc plus Graphics. This is a regular audio CD with the
lyrics stored in a data track. While your karaoke player will play regular audio CDs
they will not have the background data track that will allow the lyrics to be
displayed.
EN - 22