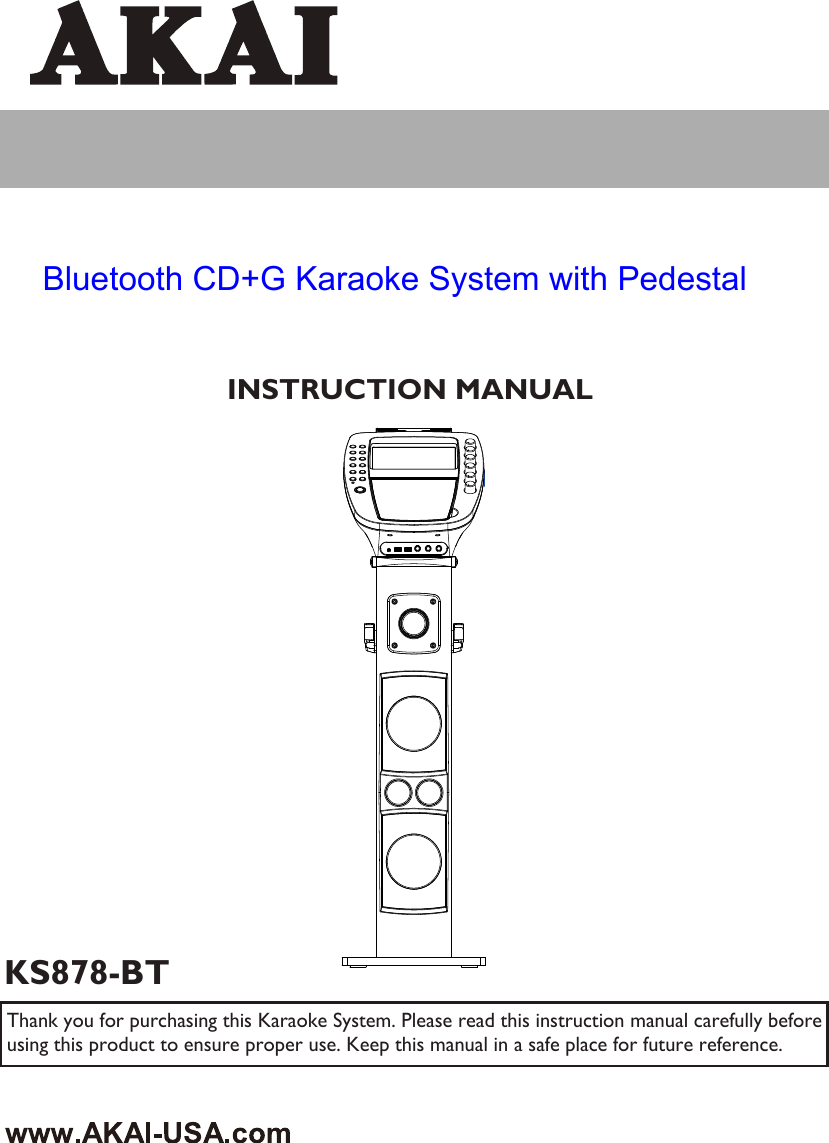
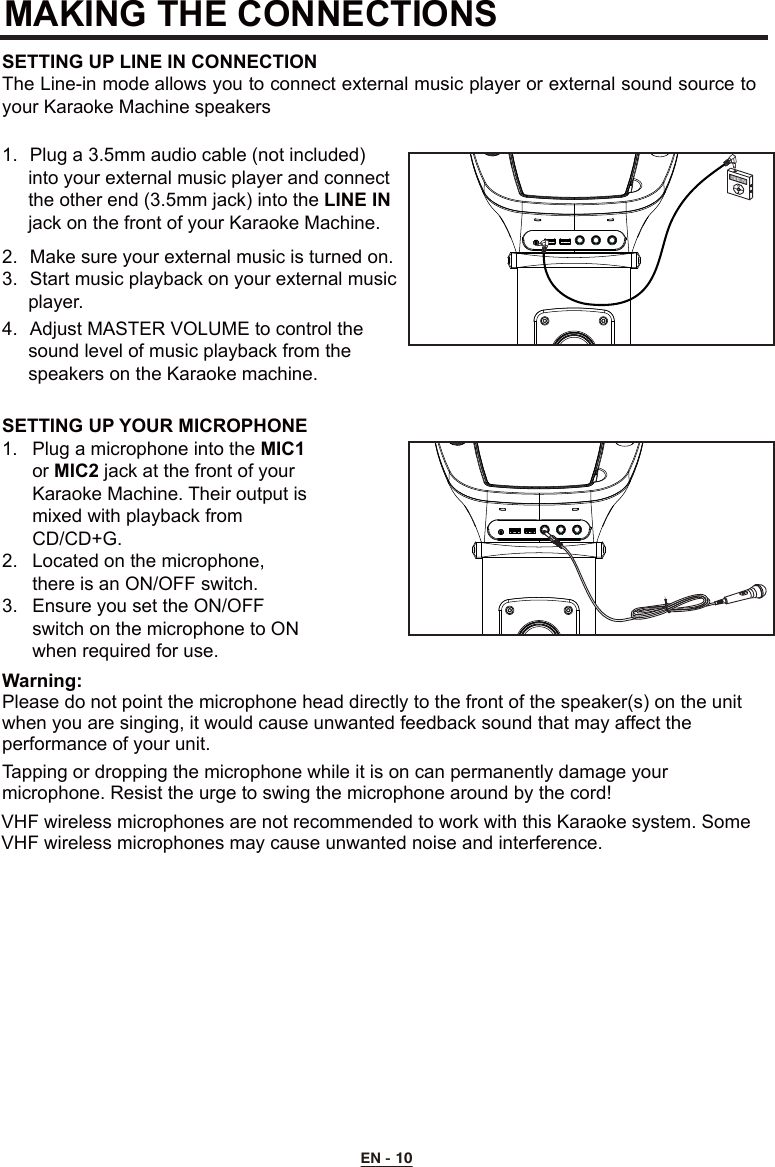
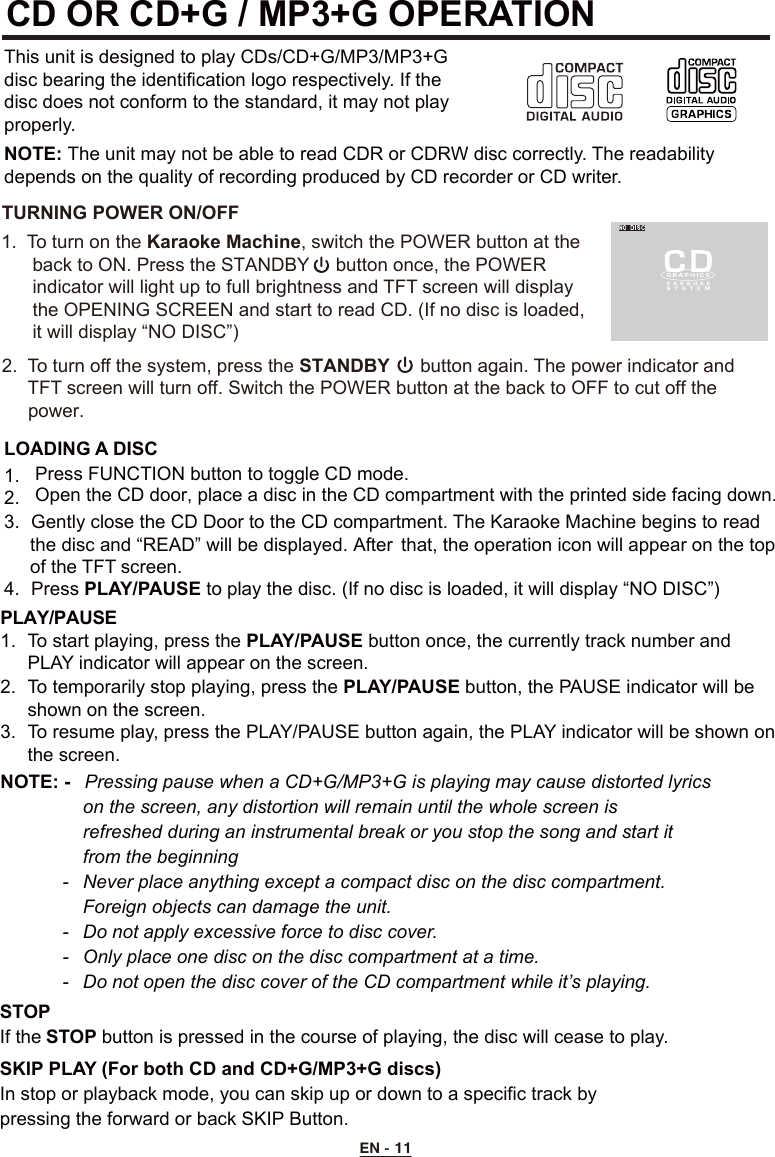
Arts Digital Technology KS878BT Bluetooth CD+G Karaoke System with Pedestal User Manual KS878 BT AKAI IM English 20160719

Arts Digital Technology (HK) Limited Bluetooth CD+G Karaoke System with Pedestal KS878 BT AKAI IM English 20160719

User Manual

INSTRUCTION MANUALThank you for purchasing this Karaoke System. Please read this instruction manual carefully beforeusing this product to ensure proper use. Keep this manual in a safe place for future reference.KS878-BTBluetooth CD+G Karaoke System with Pedestal
EN - 1WARNINGSC A UTION:TO   P R EVEN T  T H E   RI SK  O F ELECTRIC SHOCK, DO NOT REMO V E COVER OR BACK. NO USER-SERVICEABLE PARTS INSIDE. REFER SERVICING TO QUALIFIED PERSONNEL.CAUTIONRISK OF ELECTRIC SHOCK DO NOT OPENWARNING: TO REDUCE THE RISK OF FIRE OR SHOCK HAZARD, DO NOT EXPOSE THIS PRODUCT TO RAIN OR MOISTURE.This symbol is intended to alert you to the presence of uninsulated dangerous voltage within the product’s enclosure that might be of sufficient magnitude to constitute a risk of electric shock.  Do not open the product’s case.This symbol is intended to inform you t h at important  operating and maintenance instructions are included in the literature accompanying this product.DRIPPING WARNINGThe product shall not be exposed to dripping or splashing and that no objects filled with liquids, such as vases, shall be placed on the product.VENTILATION WARNINGThe normal ventilation of the product shall not be impeded for intended use.Warning: Changes or modifications to this unit not expressly approved by the party responsible for This device complies with Part 15 ofthe FCC Rules. Operation is subjectto the following two conditions: (1)this device may not cause harmfulinterference, and (2) this device mustaccept any interference recieved,including interference that may causeundesired operation.compliance could void the user’s authority to operate the equipment.Class ll equipment symbolThis symbol indicates that the power adaptor has a double insulation system.This equipment complies with FCC’s and IC’s RFradiation exposure limits set forth for anuncontrolled environment. The antenna(s) used forthis transmitter must be installed and operated toprovide a separation distance of at least 20 cm fromall persons and must not be collocated or operatingin conjunction with any other antenna or transmitter.Installer must ensure that 20 cm separationdistance will be maintained between the deviceand user.FCC RADIATION EXPOSURESTATEMENTDECLARATION DE LA FCC RELATIVE A L'EXPOSITION AU RAYONNEMENTCet appareil est conforme aux limites d'exposition au rayonnement RF stipulées par la FCC et IC pour une utilisation dans un environnement non contrôlé.Les antenne utilisées pour cet émetteur doivent être installées et doivent fonctionner à au moins 20 cm de distance des utilisateurs et ne doivent pas être placées près d’ autres antennes ou émetteurs ou fonctionner avec ceux-ci. Les installateurs doivent s'assurer qu’une distance de 20 cm sépare l’appareil des utilisateurs.FCC ID : OWT-KS878BT
EN - 2FCC AND CANADIAN ICESIMPORTANT SAFETY INSTRUCTIONSNOTE: This digital apparatus does not exceed the Class B limits for radio noise emissions from digital apparatus as set out in the radio interference regulations of Industry Canada.Le présent appareil numérique n’émet pas de bruits radioélectriques dépassant les limites applicables aux appareils numériques de Classe B prescrites dans le règlement sur le brouillage radioélectrique édicté par Industrie Canada.NOTE: This equipment has been tested and found to comply with the limits for a Class B digital device, pursuant to part 15 of the FCC Rules. These limits are designed to provide reasonable protection against harmful interference in a residential installation. This equipment generates, uses and can radiate radio frequency energy and, if not installed and used in accordance with the instructions, may cause harmful interference to radio communications. However, there is no guarantee that interference will not occur in a particular installation. If this equipment does cause harmful interference to radio or television (which can be determined by turning the equipment off), the user is encouraged to try to correct the interference by one or more of the following measures:Reorient or relocate the receiving antenna.Increase the separation between the equipment and receiver.Connect the equipment into an outlet on a circuit different from that to which the receiver is connected.Consult the dealer or an experienced / TV technician for help. 1.   Read these Instructions.  2.   Keep these Instructions.  3.   Heed all Warnings.  4.   Follow all instructions.  5.   Do not use this apparatus near water. 6.   Clean only with a dry cloth.  7.   Do not block any of the ventilation openings. Install in accordance with the manufacturers instructions. 8.   Do  not  install  near  any  heat  sources  such  as  radiators,  heat  registers,  stoves, or  other apparatus (including amplifiers) that produce heat. 9.   Do not defeat the safety purpose of the polarized  or  grounding  -  type  plug.  A  polarized plug has two blades with one wider than the other. A grounding type plug has two blades and  a  third grounding  prong. The  wide  blade  or  the  third  prong    are  provided  for  your safety.  When  the  provided  plug  does not  fit into  your  outlet,  consult  an  electrician  for replacement of the obsolete outlet. 10. Protect  the  power  cord  from  being  walked  on  or  pinched  particularly  at  plugs, convenience receptacles, and the point where they exit from the apparatus. 11. Only use attachments/accessories specified by the manufacturer. 12. Use only with a cart, stand, tripod, bracket, or table specified by the manufacturer, or sold with  theapparatus.  When  a  cart  is  used,  use  caution  when  moving  the  cart/apparatus combination to avoid injury from tip-over. Portable Cart Warning13.  Unplug this apparatus during lightning storms or when unused for long periods of time. 14.  Refer  all  servicing  to  qualified  service personnel.  Servicing  is  required  when  the apparatus  has  beendamaged in  any  way,  such  as  power-supply  cord  or  plug  is damaged, liquid has been spilled or objects have fallen into the apparatus, the apparatus has been exposed to rain or moisture , does not operate normally, or has been dropped.
EN - 3To reduce the risk of fire or electric shock, do not expose this apparatus to rain or moisture.Avertissement: pour réduire le risque d’incendie ou de choc électrique, ne pas exposer cet appareil sous la pluie et l’humidité.The apparatus shall not be exposed to dripping or splashing and that no objects filled with liquids, such as vases, shall be placed on apparatus.L’appareil ne doit pas être exposé aux écoulements ou aux éclaboussures et aucun objet ne contenant de liquide, tel qu’un vase, ne doit être placé sur l’objet.The MAINS plug / power adaptor is used as the disconnect device, it should remain readily operable during intended use.In order to disconnect the apparatus from the mains completely, the main plug / power adaptor should be disconnected from the mains socket outlet completely.La prise du secteur ne doit pas être obstruée ou doit être facilement accessible pendant son utilisation. Pour être complètement déconnecté de l’alimentation d’entrée, la prise doit être débranchée du secteur.WARNINGS:Battery shall not be exposed to excessive heat such as sunshine, fire or the like.Les piles ne doivent pas être exposées à de forte chaleur, tel qu’à la lumière du soleil, au feu ou autres choses de semblable. IMPORTANT SAFETY INSTRUCTIONSCaution Marking and rating plate was located at bottom enclosure of the apparatus. Les marquages sont inscrits en bas de l'appareil.Les précautions d'emploi sont inscrites en bas de l'appareil.DC voltageCaution Please refer for further information to the user manualRECYCLINGThis product bears the selective sorting symbol for Waste electrical and electronic equipment (WEEE). This means that this product must be handled pursuant to European directive 2012/19/EU in order to be recycled or dismantled to minimize its impact on the environment.User has the choice to give his product to a competent recycling organization or to the retailer when he buys an new electrical or electronic equipment.Polarity of d.c. power connector
WHAT’S IN THE BOXEN - 4Contents1. CD+G Pedestal Karaoke System3.  AV Cable4.  Pre-recorded Karaoke CD+G Disc5. 2 x Dynamic Microphone6.  AC-DC Power Adaptor7.  Instruction Manual8.  Warranty CardIf you are missing any parts above, please contact ADT Digital LLC.Tel:  561 922 6886Fax: 561 922 61592.  Tablet Cradle
CONTROL LOCATIONEN - 5TOP VIEWCD DOORMIC VOLUMEEXTERNAL INPUTVOLUMEBALANCE CONTROLECOCONTROLA.V.CCONTROLBASSCONTROLFUNCTION BUTTONRECORD BUTTONPAIR/ PLAY / PAUSE BUTTONSTOP BUTTONSTANDBY BUTTONPOWER  INDICATORPAIR  INDICATORRANDOMBUTTONPROG./ REPEATBUTTONKEY/ PAGE  -/ + BUTTONSKIPBUTTONLIGHT ON / OFFBUTTONSCREEN ON / OFFBUTTONCRADLE
REAR VIEWEN - 6CONTROL LOCATIONTOP VIEWMASTER VOLUMESPEAKERSMIC HOLDERVIDEOJACKMIC JACK 1MIC JACK 2EXTERNAL INPUTJACKLINE IN JACKAUDIO OUT (R) JACKAUDIO OUT (L) JACKUSB SOCKET 1USB SOCKET 2DC JACKPOWER ON/ OFF SWITCH
TFT DISPLAY ICONEN - 7CDG  TRK 10/10           PROG   00:16:04PLAYING TIMEREPEAT MODE PROGRAM MODEPLAY / PAUSE / STOP  INDICATORPLAYING MODEPAUSE MODESTOP MODEPLAYING TRACK NUMBER AND TOTAL TRACK NUMBERCDG=CD+G DISC PLAYINGPLAYING CD/ CDG/ USB / BLUETOOTH/ LINE IN
MAKING THE CONNECTIONSCONNECTING POWERPlug the supplied power adaptor small end into the DC jack located on the rear panel, plug the adaptor into the standard AC wall socket.CAUTION: The unit is designed to operate from a mains supply of AC 100-240V~50/60Hz. If the adaptor does not fit properly, turn it over and try again. Do not force it.NOTES: When the unit is not operated by the AC power or unused for long periods of the time. Please remove the power adaptor from the wall outlet and unplug from the main unit.CONNECTING TO YOUR TV OR VCR / HOME THEATERYour Karaoke machine is designed to connect to your TV the same way you would connect most video cameras, VCR / Home theater or video games consoles. We have provided RCA cables to connect your unit to a TV, VCR / Home theater, video device or an external audio / sound system. The RCA cables have three connections at each end (white and red are for left and right audio connections and the yellow is for video connections).VIDEO CONNECTIONPlease follow the steps below to display CD+G lyrics on the TV screen:1. Locate the multi-colored RCA cables2. Connect video cable (yellow) to the Video Out of the back of the Karaoke Machine3. Connect the other end of the video cable (yellow) to the video input on your TV or VCR /    Home theater.EN - 8
MAKING THE CONNECTIONS SELECTING YOUR KARAOKE MACHINE AS YOUR SOURCE/INPUTSelecting your Karaoke Machine as a source / input on your TV is very similar to connecting a VCR/DVD or Satellite system.We’ve listed below the most common ways of selecting the source from your TV or VCR / Home Theater:1.  In the set up menu of the TV or VCR / Home theater there may be an option for “Input      Select” where you can choose between “Cable/Ant., Video 1, Video 2, etc” as the input     source.2.  Look for a TV channel between the highest and lowest on your TV or VCR / Home      theater (i.e AUX, EXT, LINE 1 or LINE IN)3.  Your remote control for your TV or VCR / Home Theater may have source input      selections as well as detailed below: “Video, Video 1, Game, AUX, EXT or LINE-IN.”      Choosing one of those sources in most cases should display the lyrics from your     Karaoke Machine as well.AUDIO CONNECTION Please follow the steps below to connect audio signal from the unit to your TV, VCR/Home Theater or home audio system.RCA connection1.  Locate the multi-colored RCA cables (White and Red) 2.  Connect audio cables to the Audio Out of the back of your Karaoke Machine.3.  Connect the other end of the audio cables to the Audio/Auxiliary input on your TV or      VCR/Home Theater or home audio system.EN - 9
MAKING THE CONNECTIONS EN - 10SETTING UP YOUR MICROPHONE1.  Plug a microphone into the MIC1   or MIC2 jack at the front of your     Karaoke Machine. Their output is    mixed with playback from      CD/CD+G.2.  Located on the microphone,      there is an ON/OFF switch.3.  Ensure you set the ON/OFF      switch on the microphone to ON    when required for use.Warning:Please do not point the microphone head directly to the front of the speaker(s) on the unit when you are singing, it would cause unwanted feedback sound that may affect the performance of your unit.Tapping or dropping the microphone while it is on can permanently damage your microphone. Resist the urge to swing the microphone around by the cord!SETTING UP LINE IN CONNECTIONThe Line-in mode allows you to connect external music player or external sound source to your Karaoke Machine speakers1.  Plug a 3.5mm audio cable (not included)      into your external music player and connect      the other end (3.5mm jack) into the LINE IN     jack on the front of your Karaoke Machine.   2.  Make sure your external music is turned on.3.  Start music playback on your external music      player.4.  Adjust MASTER VOLUME to control the      sound level of music playback from the      speakers on the Karaoke machine.  VHF wireless microphones are not recommended to work with this Karaoke system. Some VHF wireless microphones may cause unwanted noise and interference.
CD OR CD+G / MP3+G OPERATIONThis unit is designed to play CDs/CD+G/MP3/MP3+G disc bearing the identification logo respectively. If the disc does not conform to the standard, it may not play properly.NOTE: The unit may not be able to read CDR or CDRW disc correctly. The readability depends on the quality of recording produced by CD recorder or CD writer.LOADING A DISC2. 3.  Gently close the CD Door to the CD compartment. The Karaoke Machine begins to read      the disc and “READ” will be displayed. After  that, the operation icon will appear on the top      of the TFT screen.       4.  Press PLAY/PAUSE to play the disc. (If no disc is loaded, it will display “NO DISC”)  STOP If the STOP button is pressed in the course of playing, the disc will cease to play.SKIP PLAY (For both CD and CD+G/MP3+G discs)In stop or playback mode, you can skip up or down to a specific track by     pressing the forward or back SKIP Button.PLAY/PAUSE 1.  To start playing, press the PLAY/PAUSE button once, the currently track number and      PLAY indicator will appear on the screen. 2.  To temporarily stop playing, press the PLAY/PAUSE button, the PAUSE indicator will be    shown on the screen. 3.  To resume play, press the PLAY/PAUSE button again, the PLAY indicator will be shown on    the screen.NOTE: -   Pressing pause when a CD+G/MP3+G is playing may cause distorted lyrics      on the screen, any distortion will remain until the whole screen is        refreshed during an instrumental break or you stop the song and start it      from the beginning  -   Never place anything except a compact disc on the disc compartment.       Foreign objects can damage the unit.  -  Do not apply excessive force to disc cover.  -  Only place one disc on the disc compartment at a time.  -  Do not open the disc cover of the CD compartment while it’s playing.EN - 11TURNING POWER ON/OFF1.  To turn on the Karaoke Machine, switch the POWER button at the       back to ON. Press the STANDBY     button once, the POWER       indicator will light up to full brightness and TFT screen will display       the OPENING SCREEN and start to read CD. (If no disc is loaded,       it will display “NO DISC”)      2.  To turn off the system, press the STANDBY  button again. The power indicator and    TFT screen will turn off. Switch the POWER button at the back to OFF to cut off the      power. Open the CD door, place a disc in the CD compartment with the printed side facing down.   1.  Press FUNCTION button to toggle CD mode.
CD OR CD+G / MP3+G OPERATION SEARCH (For CD disc /MP3 disc only)When playing  a  CD disc or MP3  disc,  you  can  press and  hold the SKIP buttons  (     or    )  to locate  a specific point on a track.  The  system will search at high speed in the forward  or  reverse  direction.  By releasing  the button, normal play will be resumed.REPEAT PLAY (For both CD and CD+G/MP3+G discs)1.  During playback, press PROGRAM/REPEAT button once, the repeat one  indicator will appear on the TFT screen, it can keep repeat the current track.2.  To repeat the Directory/Folder, press PROGRAM/REPEAT  button twice, the      repeat folder indicator will appear on the TFT screen.3.  To repeat all tracks in disc, press PROGRAM/REPEAT  button again,  the repeat all indicator will appear on the TFT screen.4.  To clear the REPEAT function, press PROGRAM/REPEAT button again.PROGRAMMING CD PLAYBACKThis unit can  be  programmed  to play up  to  20 tracks/files in  CD  mode. Load the music CD/CD+G or MP3/MP3+G disc into the CD compartment (without pressing the PLAY/PAUSE button).1)  Press PROGRAM/REPEAT  button once in stop mode. “PRG SET 01:XX” will be           shown on the screen.2)  Press the SKIP buttons to select the desired track to be programmed.3)  Press PROGRAM/REPEAT button again to save the selected track/files.4)  Repeat steps 2–3 to program up to 20 tracks/files.5)  Press the PLAY/PAUSE  button to play the programmed tracks after         is completed. The “PROG” indicator will appear on screen during the     programmed playback. 6)  To clear program and resume normal playback, press the STOP button twice      during playback, or open the CD door to clear the programmed tracks.REMARK:   The unit can store up to 20 tracks/files in the programmable memories. During the programmed playback, user can still select the “repeat one/repeat all” function.PAGE+ / PAGE-During the STOP mode, press PAGE+/PAGE- to advance song selection by 10    tracks or to go to the next page of song list.KEY+ / KEY-Your system includes a digital key controller to adjust the audio tone (pitch) of the  music. Key control should be done in the PLAY MODE only. Press the KEY+ button to raise the key of the music, and press the KEY- button to lower the key. (max. 6 times)    programmingEN - 12
EN - 13CD OR CD+G / MP3+G OPERATION  ECHOAdjust the ECHO control to enhance your voice for a concert hall effect.BALANCE Adjust the BALANCE  control between the pre-recorded singer’s voice and the    music when using a multiplex karaoke disc. AUTO VOICE CONTROL  AUTO VOICE CONTROL can be activated and adjusted by the AVC control knob.    The vocals on the Multiplex recording will be muted when the singer starts to sing    through the microphone. When the singer stops singing, the vocals will resume to    normal.MASTER VOLUME  Rotate to the MASTER VOLUME control to obtain the desired sound level.MIC VOLUME    Adjust the MIC VOLUME control to a desired level and obtain the best      performance.SCREEN ON/OFF  Press the SCREEN ON/OFF button to turn the TFT screen ON/OFF.SELECTING THE AUDIO SOURCE  Press FUNCTION button to toggle between CD, USB 1, USB 2, Bluetooth and Line in mode.Note: Selecting the audio source should be done in the stop mode only.RANDOMPress RANDOM button to start playback CD/CDG randomly. Press RANDOM button again to go back to normal playback.LIGHT EFFECTPress LIGHT ON/OFF button once to switch on LED light effect. Press the button again to switch off.
PAGE+ / PAGE-During the STOP mode, press PAGE+/PAGE- to advance song selection by 10    tracks or to go to the next page of song list.EN - 14REPEAT PLAY 1.  During playback, press PROGRAM/REPEAT button once,the repeat one indicator  will appear on the TFT screen, it can keep repeat the current track.2.  To repeat the Directory/Folder, press PROGRAM/REPEAT  button twice,  the repeat folder indicator will appear on the TFT screen.3.  To repeat all tracks in disc, press PROGRAM/REPEAT  button again,  the repeat all indicator will appear on the TFT screen.4.  To clear the REPEAT function, press PROGRAM/REPEAT  button again.USB OPERATIONINSERTING USB FLASH DRIVE1.  Insert a USB flash driver into the USB socket on the front of your karaoke system. There      are TWO USB in this machine - USB 1 & USB 2. Both of them can play MP3 and MP3G      files. 2.  Make sure that the correct USB is selected. Press FUNCTION button to toggle to USB 1      or USB 2.3.  Press PLAY/PAUSE to start playback.PLAY/PAUSE 1.  To start playing, press the PLAY/PAUSE button once, the currently track number and      PLAY indicator will appear on the screen.2.  To temporarily stop playing, press the PLAY/PAUSE button, the PAUSE indicator will be    shown on the screen. 3.  To resume play, press the PLAY/PAUSE button again, the STOP indicator will be shown    on the screen.STOP If the STOP button is pressed in the course of playing, the MP3+G playback will cease to play.SKIP PLAY In stop or playback mode, you can skip up or down to a specific track by pressing the  forward or back SKIP Button.NOTE:  -  Pressing  pause  when  playing  on the  MP3+G,  it may  cause  distorted lyrics  on the screen, any distortion will remain until the whole screen is refreshed during an instrumental break or you stop the song and start it from the beginningSEARCH (For MP3 file only)When playing a MP3 file on the USB, you can press and hold the SKIP buttons (     SKIP     ) to locate a specific point on a track. The system will search at high speed inthe forward or reverse direction. By releasing the button, normal play will be resumed.RANDOMPress RANDOM button to start playback USB randomly. Press RANDOM button again to go back to normal playback.
RECORDING IN USB 1You can record your performance in different modes:1. CDG mode - record CDG track with microphone voice & external input as MP3G.                         record CD or MP3 CD track with microphone voice & external input as MP3.2. USB 2 mode - record MP3G or MP3 with microphone voice & external input as MP33. Bluettoh or Line-in mode - record music with microphone voice & external input as MP3All recording files are stored in USB 1 flash drive under a folder named “REC”. The following are the procedures for recording. •  Plug a USB flash drive into USB 1 socket.•  Press FUNCTION button to toggle to mode you want to record - CDG/ USB2/ Bluetooth/      Line-in mode. Make sure that the corresponding music content is ready.•  Locate the desired track or file to play by pressing the     Press PLAY button to start.SKIP       or •  Press RECORD button to start recording together with your voice and external input.       (The percentage of completion will be displayed.)  •  Press RECORD button again to stop recording.•  To playback the recording, it is the same as playing back the MP3 or MP3+G    USB 1 flash drive, please follow instructions in USB OPERATION.  SKIP        buttonfile on the USB OPERATION PROGRAMMING USB PLAYBACKThis unit can be programmed to play up to 20 files in USB mode. Plug the USB flash drive and select USB mode. (without pressing the PLAY/PAUSE button).1)  Press PROGRAM/REPEAT button once in stop mode. “PRG SET 00:XXX” will be shown      on the screen.2)  Press the SKIP buttons to select the desired track to be programmed.3)  Press PROGRAM/REPEAT button again to save the selected track/files.4)  Repeat steps 2–3 to program up to 20 tracks/file.5)  Press the PLAY/PAUSE button to play the programmed tracks after programming is     completed. The “PROG” indicator will appear on screen during the programmed6)  To clear program and resume normal playback, press the STOP button twice during      playback to clear the programmed tracks.REMARK:  The unit can store up to 20 tracks/files in the programmable memories. During the programmed playback, user can still select the “repeat one/repeat all” function.EN - 15playback.
EN - 162.  The Bluetooth indicator will flash quickly. If the unit does not automatically begin to      pair, press and hold the   button.3.  Using the native controls on your Bluetooth Device, select the " KS878BT" in your Bluetooth     setting to pair.      4.  When successfully paired, the Bluetooth indicator will stop flashing.     After initial pairing, the unit will stay paired unless unpaired manually by the user or erased     due to a reset of the devices.     If your device unpaired, follow the above steps again.     If any pairing issues occur, un-pair the unit on your Bluetooth device and follow the above      steps again.BLUETOOTH SETUP1.  Follow the instructions for Pairing a Bluetooth Device.2.  Use the native controls on the connected Bluetooth Device to select a track.3.  To play, pause or skip the selected track, use the native controls on the connected Bluetooth     Device or press the   buttons of unit.4.  Audio playback from the connected Bluetooth device can now be heard through the speaker.PLAYING MUSIC VIA BLUETOOTHPairing is the term used when two Bluetooth devices are connected wirelessly for the first time.BLUETOOH OPERATIONENERGY SAVING (Auto Power System - APS) 1 Press   FUNCTION button to toggle to Bluetooth mode.PAIR PLAY/PAUSE & SKIP  The unit will automatically turn to ‘Standby’ mode in 15 minutes in the following situations:1. There is no CD in the compartment or CD had been stopped for playing when the       source had been selected to CD.2. There is no USB flash drive plugged in or USB flash drive had been stopped for playing     when the source had been selected to USB.3. There is no audio cable plugged into the LINE IN jack when the source had been     selected to AUX.The unit can be resumed to turn on by pressing the STANDBY     button once.
CARE AND MAINTENANCEEN - 17*Carrying for Compact Discs1. Treat the disc carefully. Handle the disc only by its edges. Never allow your fingers to come      in contact with the shiny, unprinted side of the disc.2. Do not attach adhesive tape, stickers, etc. to the disc label.3. Clean the discs periodically with a soft, lint-free, dry cloth. Never use detergents or abrasive     cleaners to clean the disc. If necessary, use a CD cleaning kit. If a disc skips or gets stuck     on a section of the disc, it is probably dirty or damaged (scratched). When cleaning the disc,     wipe in straight lines from the center of the disc to the outer edge of the disc. Never wipe in     circular motions. 4. This unit is designed to play discs bearing the identification logo as shown here or MP3     format Disc. Other discs may not conform to the CD standard and may not play properly.5. Discs should be stored in their cases after each use to avoid damage.6. Do not expose discs to direct sunlight, high humidity, high temperatures, or dust, etc.     Prolonged exposure or extreme temperatures can warp the disc.7. Do not stick or write anything on either side of the disc. Sharp writing instruments or the     ink may damage the surface. *Care of the Cabinet1. To prevent fire or shock hazard, disconnect your unit from the AC power source when     cleaning.2. The finish on your unit may be cleaned with a dust cloth and cared for as other furniture.      Use caution when cleaning and wiping the plastic parts.3. Mild soap and a damp cloth may be used on the front panel.*To Clean the LensIf the lens get dirty, your player may skip or may not play a CD1. Open the CD door.2. Use a camera lens blower/brush to blow on the lens once or twice, brush the dust or     particles off the lens then blow again.3. To remove fingerprints, use a dry cotton swab to wipe from the middle to outer edge of     the lens.
TROUBLE SHOOTING No power when POWERis on. AC adaptor is not plugged into a wall outlet or the connector is not plugged into the power supply jackon the back of the unit. Plug the AC adaptor into a wall outlet and plug the connector into the supply jack on the unit.  The AC outlet may not havepower. Check the outlet with a working lamp or other electrical appliance.  TV system is set to minimum TV system is powered Off RCA cords are not connected securely. Turn up the volume on the TV systemPower the TV system on. Ensure white and red RCA cords are securely inserted into into the karaoke system and the TV system.CD Player does not worknormally Disc is inserted upside down Disc is dirty Disc is scratched Disc is warped A non standard disc is inserted Moisture has formed inside the CD deck  Karaoke system needs to be reset Insert the disc correctly Wipe clean with a soft cloth Use a new disc Use a new disc Only use discs bearing correct identification logoWait about 20 - 30 mins to let it dry out. Disconnect the machine from the power source for 30 seconds then reconnect No sound - If audio is goingthrough TV or VCR. Source Selection on TV or VCR is not correct.  RCA cords are not connected securely Follow directions “Making the connections”Ensure white and red RCAcords are securely inserted into both the karaoke system and the home stereo system.PROBLEM POSSIBLE CAUSE SOLUTION No power when plugged in.No sound from TV.EN - 18
TROUBLE SHOOTING PROBLEM POSSIBLE CAUSE SOLUTION No song lyrics appear onthe TV screen Video cable is not connected properly to the TV Source selector on TV is not set to VIDEO TV does not have video line input Mic volume control is set tominimumConnect the video cable to the karaoke system’s VIDEO OUT and to the TV VIDEO IN. Using your TV remote to select VIDEO input or select the proper VIDEO input on the TV itself. Connect from VIDEO OUT of the system to the VIDEO IN on your VCR/Home theater. Refer to “Making the Connections. Checkthe disc to be sure it is a CD+G  Mic is offAdjust mic volume to max, and then re-adjust to a comfortable level No Video is displayed on the TFT Screen. No sound from mic Set screen button to turn ON.Ensure you are playing a CD+Graphics or CD+G Karaoke disc.The TFT screen is turned OFF.The disc being played is a regular music CD,in which case no image will be displayed.  Turn on mic with the ON/OFF switch located on the microphoneEN - 19No sound when playing audio via Bluetooth.Your Bluetooth device hasn’t been paired properly. Pairing your Bluetooth device according to the “Bluetooth setup” section.The volume control of yourBluetooth device is set toolow. The volume control of yourBluetooth device is set toolow. Increase the volume of your Bluetooth device.Increase the volume of the unit by VOLUME control.
SPECIFICATIONSpecifications are typical, individual units might vary. They are subject to continuous improvement without notice and without incurring any obligation.Audio SectionOutput powerOutput impedanceCD OR CD+G playerFrequency responseSignal - to - noise ratioNumber of programsMicrophone40W RMSTop speaker:   16 ohmBase speaker:    6 ohm100 Hz - 20 kHz50 dB20 STEPS RANDOM ACCESS PROGRAMMING-73 dB 600 OHMS IMPEDANCE WITHØ 6.3mm DYNAMIC MICROPHONEEN - 20
THE KARAOKE MACHINE (GLOSSARY OF TERMS)Following are some brief descriptions of karaoke terms you may need:Echo:By adding some minor feedback to your voice the Echo feature adds depth and resonance to a singer's voice. Echo affects only your voice and not the music. It will make you sound like you are singing in a big concert hall.Multiplex:This karaoke system is capable of playing Multiplex CD+G Karaoke discs. Multiplex Karaoke discs feature two mono versions of the same recording on left and right channels. The right channel features a mono version of the song with the lead vocals pre-recorded. The left channel features the same song, without the lead vocals recorded.Auto Voice Control (A.V.C.):This is short for “Automatic Vocal Control”. When the AVC knob on the front panel of the player is turned clockwise, the AVC function is activated. AVC is used to eliminate the singer's vocals from specially made Multiplex CD+G karaoke discs. Once the AVC is activated, as you sing into the microphone, the pre-recorded vocals are eliminated and replaced with your singing voice. Set the AVC to a lower setting, and you'll be able to hear the pre-recorded vocals in low volume as well as your own singing voice. Set the AVC to maximum and as you sing into the microphone, the pre-recorded lead vocals will be completely eliminated, and only your own singing voice will be heard.NOTE: The AVC controls is only functional with specific Multiplex CD+G Karaoke Discs. AVC will not eliminate the vocals from standard music CDs, and will not function when playing standard Karaoke CD+G discs, such as the disc included with this system.CD+G:This is short for Compact Disc plus Graphics. This is a regular audio CD with the lyrics stored in a data track. While your karaoke player will play regular audio CDs they will not have the background data track that will allow the lyrics to be displayed.EN - 21

Navigation menu