Arts Digital Technology SMK470 Candy House - Sing-along with Bluetooth Music User Manual SMK470 Candy House IM English 161125
Arts Digital Technology (HK) Limited Candy House - Sing-along with Bluetooth Music SMK470 Candy House IM English 161125
User Manual
Candy House - Sing-along with
Bluetooth Music
INSTRUCTION MANUAL
SMK470
Thank you for purchasing this Singalong. Please read this instruction manual carefully before
using this product to ensure proper use. Keep this manual in a safe place for future reference.
W
ARNINGS
EN - 1
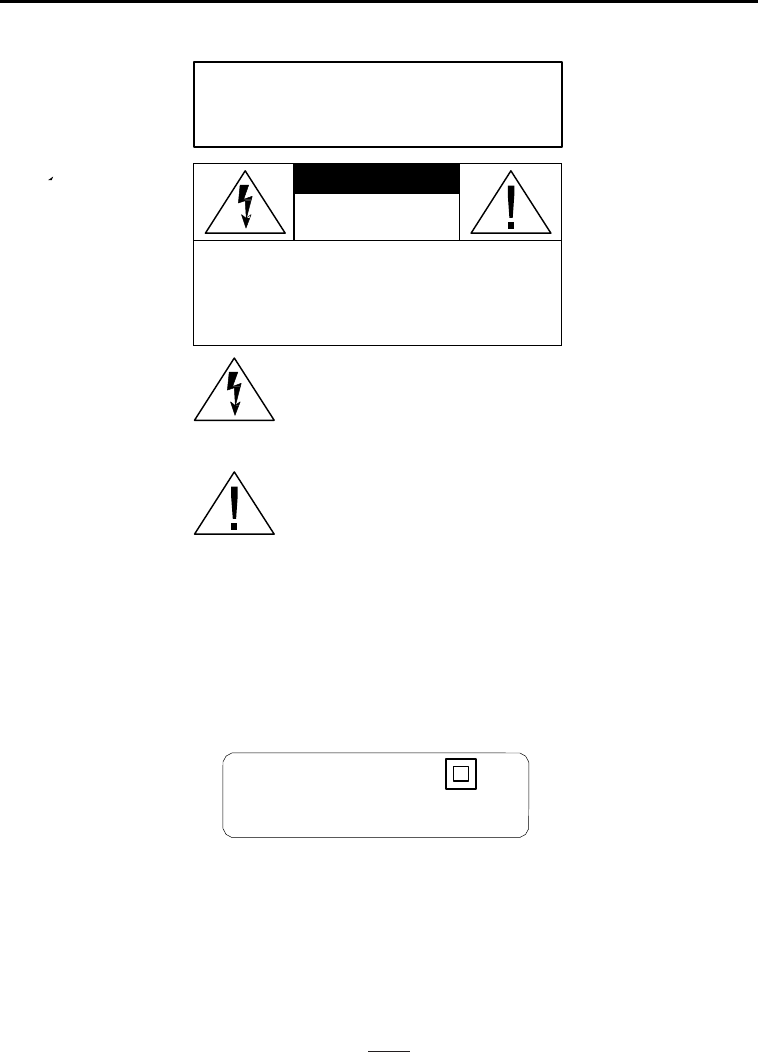
WARNING: TO REDUCE THE RISK OF
FIRE OR SHOCK HAZARD, DO NOT EXPOSE
THIS PRODUCT TO RAIN OR MOISTURE.
CAUTION
RISK OF ELECTRIC SHOCK
DO NOT OPEN
C
A
UTION
:
T
O
PREVEN
T
TH
E
RI
SK
O
F
ELECTRIC SHOC K , DO NOT
REMOV
E
COVER OR BACK. NO USER-SERVICEABLE
PARTS INSIDE. REFER SERVICING
T
O
QUALIFIED PERSONNEL.
This symbol is intended to alert you to the
presence of uninsulated dangerous
voltage within the product’s enclosure that
might be of sufficient magnitude to
constitute a risk of electric shock. Do not
open the product’s case.
This symbol is intended to inform you t h a t
i m p o r t a
n t o p e r a t in g a n d
maintenance instructions are
included i
n the
lite
r
ature
a
c
companying
thi
s product.
DRIPPING WARNING
The product shall not be exposed to dripping or
splashing and that no objects filled with liquids, such
as vases, shall be placed on the product.
VENTILATION WARNING
The normal ventilation of the product shall not be
impeded for intended use.
Class ll equipment symbol
This symbol indicates that the power adaptor
has a double insulation system.

EN - 2
FCC
AND
CANADIAN
ICES
IC Caution.
RSS-Gen Issue 4 November 2014"&"CNR-Gen 4e éditionNovember 2014:
- English:
This device complies with Industry Canada licence-exempt RSS standard(s).
Operation is subject to the following two conditions: (1) This device may not cause interference, and (2) This
device must accept any interference, including interference that may cause undesired operation of the device.
- French:
Le présentappareilestconforme aux CNR d'Industrie Canada applicables aux appareils radio exempts de
licence. L'exploitationestautorisée aux deux conditions suivantes:
(1) l'appareil ne doit pas produire de brouillage, et
(2) l'utilisateur de l'appareildoit accepter tout brouillageradioélectriquesubi, mêmesi le brouillageest
susceptible d'encompromettre le fonctionnement.
Le dispositif a été évalué pour répondre aux exigences générales d'exposition aux radiofréquences.
L'appareil peut être utilisé dans un état d'exposition portable sans restriction.
FCC Caution.
This equipment has been tested and found to comply with the limits for a Class B digital device, pursuant to
part 15 of the FCC Rules. These limits are designed to provide reasonable protection against harmful
interference in a residential installation. This equipment generates, uses and can radiate radio frequency
energy and, if not installed and used in accordance with the instructions, may cause harmful interference to
radio communications. However, there is no guarantee that interference will not occur in a particular
installation. If this equipment does cause harmful interference to radio or television reception, which can be
determined by turning the equipment off and on, the user is encouraged to try to correct the interference by
one or more of the following measures:
•Reorient or relocate the receiving antenna.
•Increase the separation between the equipment and receiver.
•Connect the equipment into an outlet on a circuit different from that to which the receiver is connected.
•Consult the dealer or an experienced radio/TV technician for help.
Caution: Any changes or modifications to this device not explicitly approved by manufacturer could void your
authority to operate this equipment.
This device complies with part 15 of the FCC Rules. Operation is subject to the following two conditions: (1)
This device may not cause harmful interference, and (2) this device must accept any interference received,
including interference that may cause undesired operation.
The device has been evaluated to meet general RF exposure requirement. The device can be used in portable
exposure condition without restriction.
EN - 3
FCC
AND
CANADIAN
ICES
IMPORT
ANT
SAFETY
INSTRUCTIONS
1. Read these Instructions.
2. Keep these Instructions.
3. Heed all Warnings.
4. Follow all instructions.
5. Do not use this apparatus near water.
6. Clean only with a dry cloth.
7. Do not block any of the ventilation openings. Install in accordance with the manufacturers instructions.
8. Do not install near any heat sources such as radiators, heat registers, stoves, or other apparatus
(including amplifiers) that produce heat.
9. Do not defeat the safety purpose of the polarized or grounding - type plug. A polarized plug has two blades with
one wider than the other. A grounding type plug has two blades and a third grounding prong. The wide blade or the
third prong are provided for your safety. When the provided plug does not fit into your outlet, consult an
electrician for replacement of the obsolete outlet.
10. Protect the power cord from being walked on or pinched particularly at plugs, convenience
receptacles, and the point where they exit from the apparatus.
11. Only use attachments/accessories specified by the manufacturer.
12. Use only with a cart, stand, tripod, bracket, or table specified by the manufacturer, or sold with the apparatus.
When a cart is used, use caution when moving the cart/apparatus combination to avoid
injury
from
tip-over.
Portable Cart Wa
rn
i
ng
13. Unplug this apparatus during lightning storms or when unused for long periods of time.
14. Refer all servicing to qualified service personnel. Servicing is required when the apparatus has been damaged in
any way, such as power-supply cord or plug is damaged, liquid has been spilled or objects have fallen into the
apparatus, the apparatus has been exposed to rain or moisture , does not operate normally, or has been dropped.
EN - 4
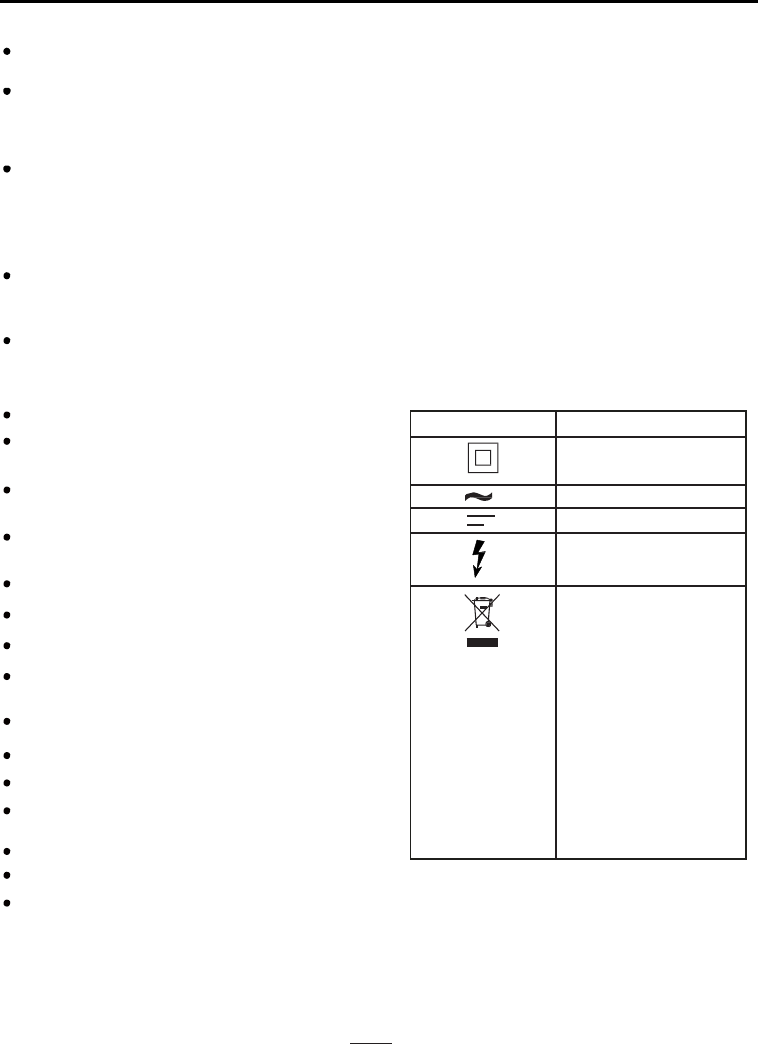
Symbols
Explantation
Class II
equipment
AC
voltage
DC
voltage
Hazard live
parts
RECYCLING
This product bears the
selective
sorting symbol for Waste
electrical
and electronic equipment
(WEEE).
This means that this product
must
be handled pursuant to
European
directive 2012/19/EU in order
to
be recycled or dismantled
to
minimize its impact on
the
environment.
User has the choice to give
his
product to a competent
recycling
organization or to the retailer
w
hen
he buys a new electrical
or
electronic
equipment.
IMPORT
ANT
SAFETY
INSTRUCTIONS
W
ARN
INGS
:
To reduce the risk of fire or electric shock, do not expose this apparatus to rain or moisture. Avertissement:
pour réduire le risque d’incendie ou de choc électrique, ne pas exposer cet appareil sous la pluie et l’humidité.
The apparatus shall not be exposed to dripping or splashing and that no objects filled with liquids, such as vases,
shall be placed on apparatus.
L’appareil ne doit pas être exposé aux éc oulements ou aux éclaboussures et aucun objet ne contenant
de liquide, tel qu’un vase, ne doit être placé sur l’objet.
The MAINS plug / power adaptor is used as the disconnect device, it should remain readily operable during
intended use.
In order to disconnect the apparatus from the mains completely, the main plug / power adaptor should be
disconnected from the mains socket outlet completely.
La prise du secteur ne doit pas être obstruée ou doit être facilement accessible pendant son utilisation. Pour êt re
complètement déconnecté de l’alimentation d’entrée, la prise doit êt re débranchée du secteur.
Battery shall not be exposed to excessive heat such as sunshine, fire or the like.
Les piles ne doivent pas être exposées à de forte chaleur, tel qu’à la lumière du soleil, au feu ou autres
choses de semblable.
Caution Marking and rating plate was located at bottom enclosure of the apparatus. Les
marquages sont inscrits en bas de l'appareil.
Les précautions d'emploi sont inscrites en bas de l'appareil.
Non-rechargeable batteries are not to be recharged,
Rechargeable batteries are to be removed from the toy
before being charged,
Rechargeable batteries are only to be charged under adult
supervision,
Different types of batteries or new and used batteries are
not to be mixed,
Batteries are to be inserted with the correct polarity,
Exhausted batteries are to be removed from the toy. The
supply terminals are not to be short-circuited,
Not connected more than recommended number of power
supplied
Warning ! Not suitable for children under 36 months
The toy must only be used with the transformer for toys
The toy is not intended for children under 3 years old
The model number or specification of a suitable
transformer for use with the toy
The transformer is not a toy,
Toys liable to be cleaned with liquid are to be disconnected from the transformer before cleaning.
Transformers (Input 100 - 240V ~ 50/60 Hz 0.5A, Output DC 5V / 0.6A) used with the toy are to be regularly
examined for damage to the cord, plug, enclosure and other parts, and that, in the event of such damage, the
toys must not be used with this transformer until the damage has been repaired.
EN - 4
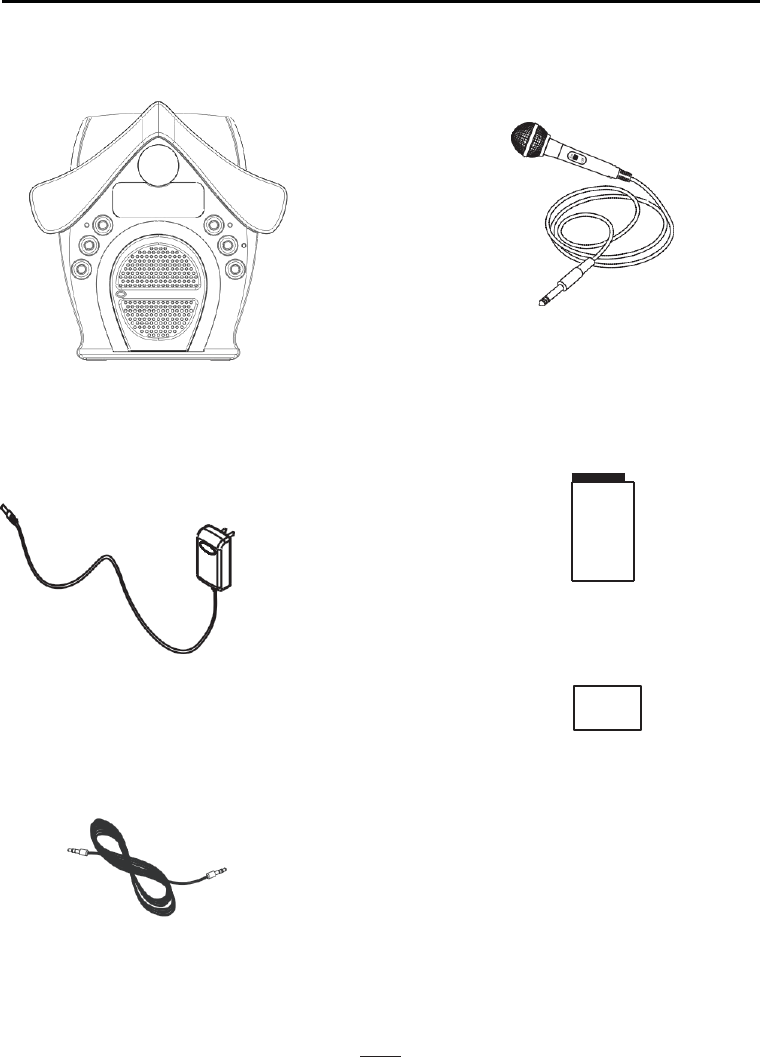
WH
A
T’S
IN
THE
BOX
C
on
t
e
n
t
s
1. Candy House
2. AC Power Adaptor
4. Microphone
5. Instruction Manual
6. Warranty Card
3. Line-in Cable

EN - 5
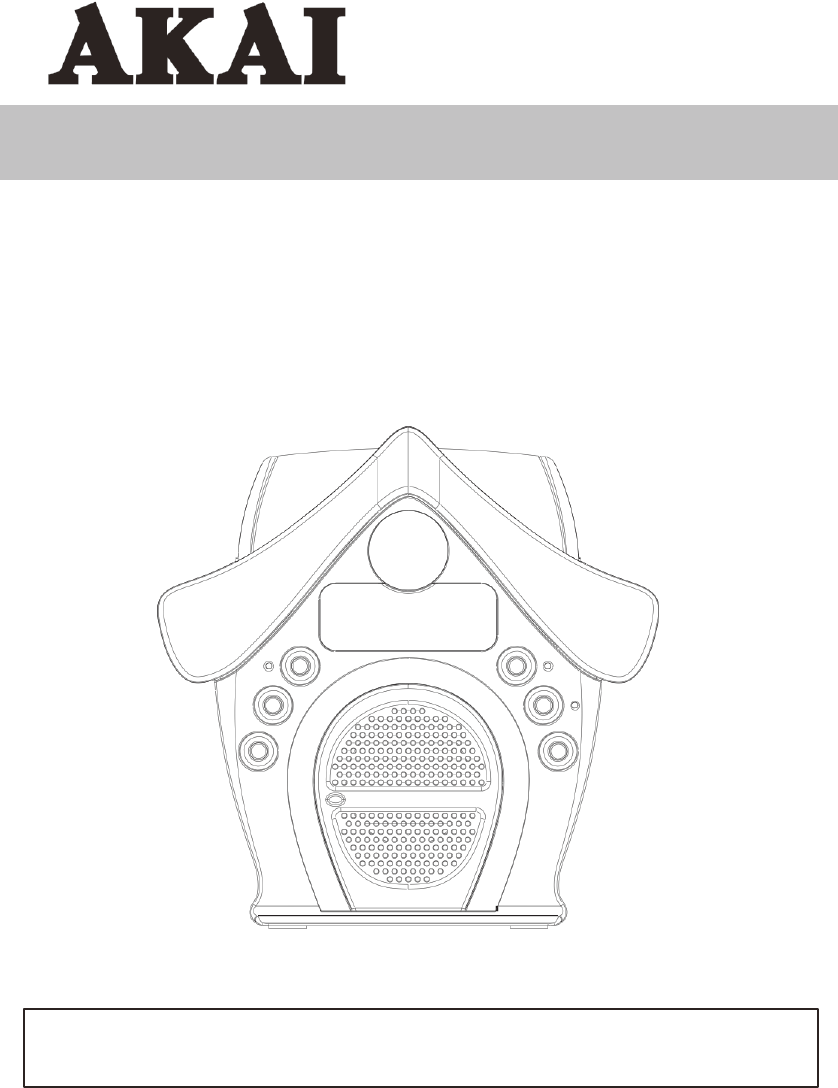
CONTROL
LOC
A
TIONS
Front
V
iew
LED lights
Power with LED Indicator
Volume +
Volume -
Back
V
iew
Battery Compartment
Play / Pause / Pair with
LED Indicator
Record with LED Indicator
Light ON/ OFF
Speaker
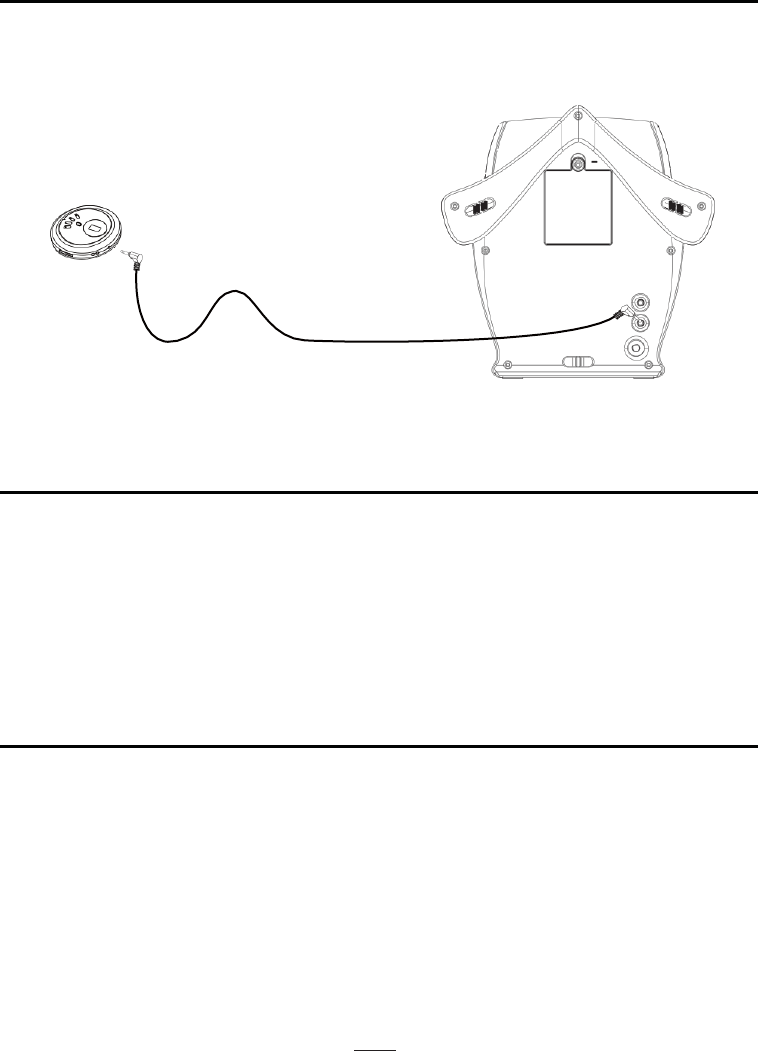
Mic In Jack
Line-in Jack
DC IN Jack

EN - 6
POWER
CONNECTION
Connecting
AC
Power
Plug the Power Adaptor into the AC jack that
located on the rear of the product and plug the
other end into a standard AC socket.
CAUTION: The AC Adaptor has a polarized plug that fits into the wall outlet only one way.
If the plug does not fit properly, turn it over and try again. Do not force it.
NOTE: When the unit is intended for being unused for a long period of the time. Please turn off the unit and unplug the power
adaptor from the AC wall outlet.
Battery
Operation
Before installing batteries (not included), ensure that
the unit is disconnected from the mains supply.
Remove the battery compartment cover on the
bottom of the main unit AND the microphone
by a screw driver. The battery covers can then be
lifted away.
Fit 4 x 1.5V AA-size batteries (not included)
into the main unit AND 2 x 1.5V AAA-size batteries
into the microphone (not included).
Refer to the polarity markings inside the battery
compartment. Never mix old and new batteries.
Finally, replace the cover.
For battery operation, switch off the mains
supply and remove the AC power adaptor from
the power socket, battery operation will be
selected automatically.
1.5V
AAA/LR03
1.5V
AAA/LR03
1. 5V AAA /L R0 3
1. 5V AAA /L R0 3
Caution:
There is a danger of explosion if batteries are replaced incorrectly.
Replace batteries with the same type and same brand only.
If the unit will not be used for a long period of time, turn OFF the unit and microphone and remove all
batteries from the main unit and microphone.

EN - 7
LED
LIGHT
ON
MAIN
UNIT
&
MICROPHONE
Main
Unit
1. Press POWER button to turn on the main unit.
2. Press LIGHT ON/OFF button to switch on LED light on the roof top.
3. You will see the LED light flash.
4. Press LIGHT ON/OFF button again to switch it off.
Microphone
1. Once you installed batteries, switch on the microphone the LED lights inside the microphone will be turned on.
2. Switch off the microphone and the light will turn off.
BLUET
OOTH P
AIRING
AND
CONNECTION
NOTE:
Before pairing, make sure the LINE IN cable is not plugged into the LINE IN jack.
First time
pairing
1. Press the power button to turn on the unit.
2. The unit will search the paired device with the Bluetooth indicator flashing quickly.
3. Turn on Bluetooth function of your device and enable the search or scan function to find the main unit. (See your
device's instructions to add or setup a Bluetooth device).
4. Select "Candy House" from the device list when it appears on your device screen.
5. After successfully paired with a device, the Bluetooth indicator will stay lit in blue and you will hear “paired” which
confirms the pairing had been done.
To pair with another
Bluetooth device
1. Press and hold the PAIR button for 2 seconds to unpair your Bluetooth device.
2. Repeat above step 2 to 5 to pair another Bluetooth device.
Playing from a paired
Bluetooth device
You can play music from your Bluetooth device wirelessly to the main unit by following the steps below after
successfully paired.
1. To play your favorite song, press the PLAY button on your Bluetooth device to start playback.
2. Press the VOLUME +/- buttons on the main unit until you obtain a comfortable listening level.
3. Press the SKIP buttons of the Bluetooth device to skip to previous or next song. Note:
1. Remember to turn off the main unit after you have finished listening.
2. Please do not forget to switch off the power of your external audio device as well if you do not use it for other
purpose.
Establish
a safe sound
level
Over time your hearing will adapt to continuous loud sound and will give the impression that the volume has in fact
been reduced. What seems normal to you may in fact be harmful. To guard against this before your hearing adapts,
set the volume to a low level.
Slowly increase the level until you can hear comfortably and clearly and without distortion. Damage to your hearing is
accumulative and is irreversible. Any ringing or discomfort in the ears indicates that the volume
is too loud. Once you have established a comfortable listening level, do not increase the sound level.
Adjusting
the
V
olume
Press the VOLUME buttons to increase / decrease the volume.
EN - 8
LINE-IN
FUNCTION
1. Press POWER button to turn on the unit. Red LED indicator will turn on.
2. Plug a 3.5mm line-in cable into your external music player and connect the other end into the LINE IN jack on the back side of the
unit.
3. Make sure your external music player is turned on and the unit has been turned on
4. Start music playback on your external music player.
5. Adjust volume by pressing Vol+ or Vol –
6. You can plug the microphone in and sing with music you play.
Note: the player is set to be LINE-IN priority which means once line-in cable plugged in, it will switch to LINE-IN mode
automatically. To go back to Bluetooth mode unplug the line-in cable.
RECORD
AND
PL
A
YBACK
FUNCTION
1. You can sing while it is in Bluetooth or Line-in mode. Play music in Bluetooth or Line-in mode by following
instructions in previous senctions
2. Plug the microphone into the mic in jack at the back of the unit. Switch on your microphone and you can start to
sing.
3. While you are singing, press record button, the record LED flashes. Your voice with music will be recorded.
Press record button again to stop recording.
4. You can listen your recording by pressing the Play button. The record LED stays lit. Press the button
again to stop.
5. Please note that each time when a new recording is being recorded it would cover the old recording.
ENERGY
S
A
VING
The unit will automatically turn into standby mode in 15 minutes in the following situations. The power LED indicator will be
turned off:
1. No Bluetooth connection for 15 minutes
2. No playback from your external music player for 15 minutes.
3. No button being pressed for 15 minutes.
4. Not playing music & singing to the microphone for 15 minutes.
The unit would be turned on again by pressing any button. The power LED indicator will be turned on.
EN - 9
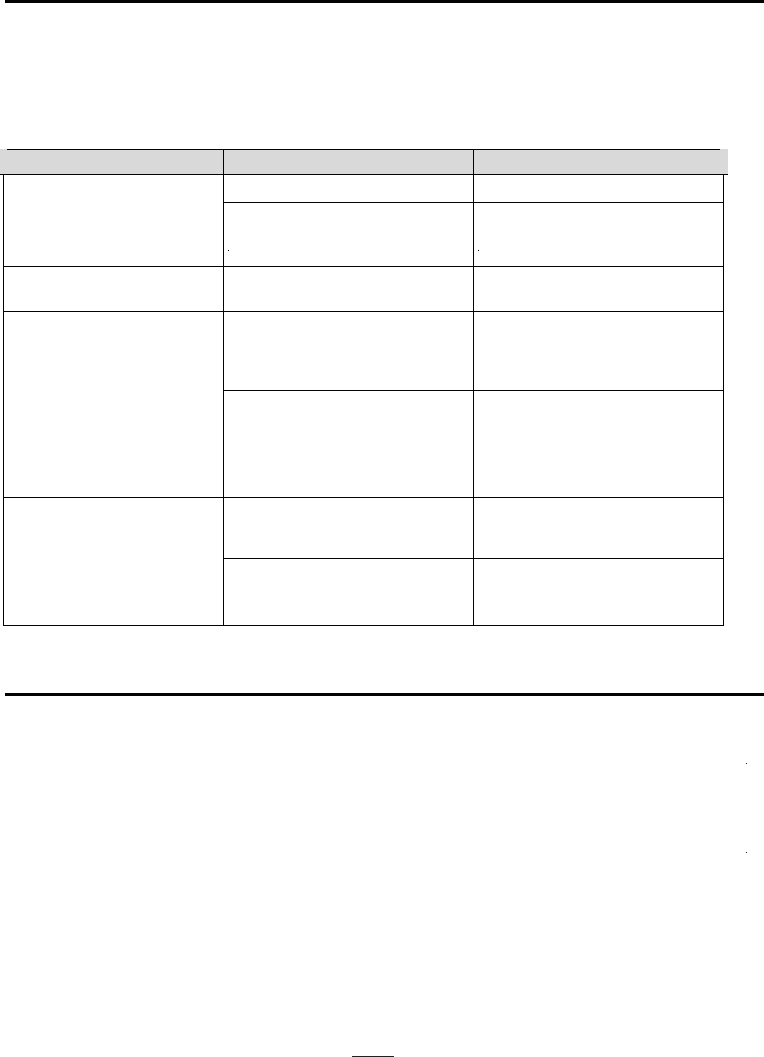
TROUBLESHOOTING
If a fault occurs, first check the points listed below before taking the unit for repair. If you are unale to remedy a problem
by following these hints, consult your dealer or service center.
WARNING: Under no circumstances should you try to repair the unit yourself, as this would invalidate the guarantee.
PROBLEM
POSSIBLE
CAUSE
REMEDY
No sound in general
Volume not adjusted.
Press the vol + button
No battery in battery
compartment
Put 4 new AA size batteries into the
battery compartment according to
instructions
No sound from microphone
Microphone is switched off
Switch on the microphone
No sound in line in mode
The music player is not playing.
Start to play the music in your
music player. Adjust volume by
pressing volume buttons on the
unit.
The line in cord is not properly
connected.
Follow instruction to connect the line
in cord between the unit and the music
player. Adjust volume by pressing
volume buttons on the unit.
Bluetooth reception failure
The external device is far from
the unit
Put the external BT device close to
the unit.
It is not paired
Pair the unit with the BT Device
by following the procedures stated in
this manual.
TECHNICAL
SPECIFIC
A
TOIN
Power
Supply
Main Unit DC 6V (“AA” size 1.5V x 4pcs, not
i
ncluded)
Or
AC power
adaptor
Input 100 - 240V ~ 50/60 Hz
0.5A
Output DC 5V /
1.2A
Microphone DC 3V (“AAA” size 1.5V x 2pcs, not
i
ncluded)
Line in
3.5mm
Power output 2W
(RMS)
Dimension 9.5”W x 9.6”H x
3.7”D
IMPORTANT: Due to
continual revision
and
improvement
on our
product design,
specifications
are subject to change
without
further
notice.