Arts Electronics GTSB Portable Electronic Scoreboard and Audio Player User Manual
Arts Electronics Co., Ltd Portable Electronic Scoreboard and Audio Player
User Manual
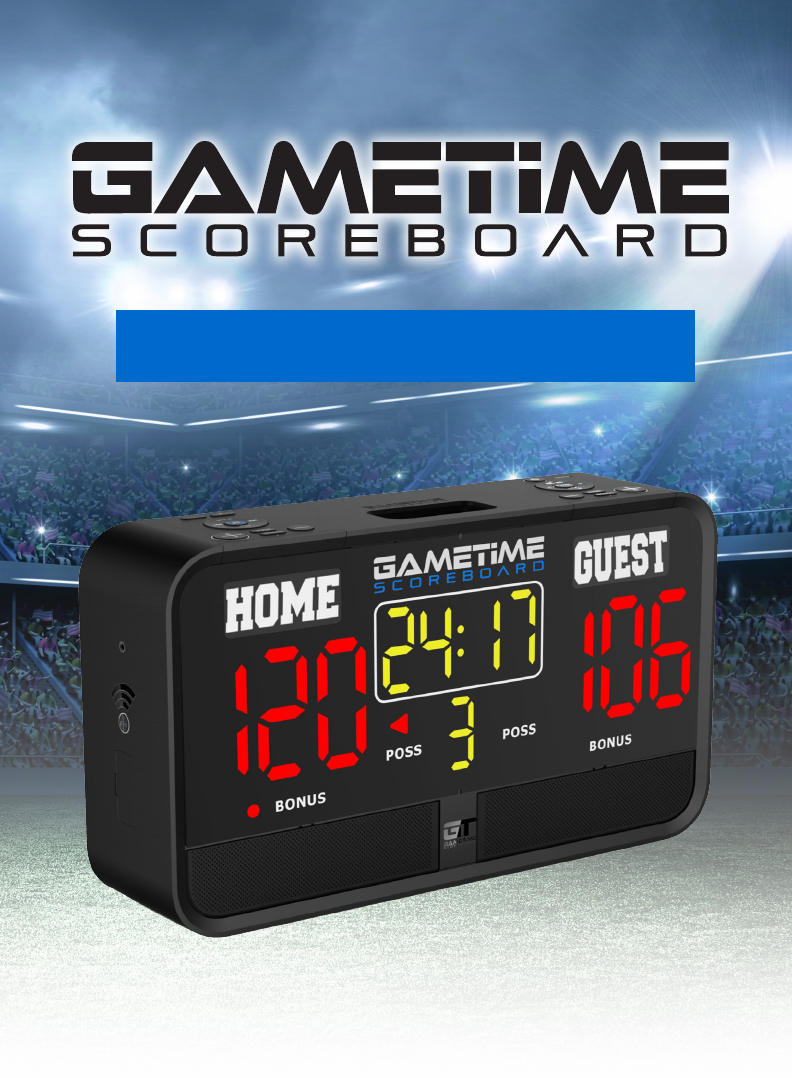
GAMETIME PORTABLE
ELECTRONIC SCOREBOARD
AND AUDIO PLAYER
MODEL: GTSB
Gametime Wi-Fi Password: 88888888
Get more info at:
gametimescoreboard.com/support
QUICK START GUIDE

2
If you are reading this document, it’s probably because you have already
purchased a Gametime Scoreboard unit. Before you go any further in this
document, we would like to sincerely THANK YOU for your support.
You will now be able to bring the stadium at home, in your gym or at any
activity you may participate in!
Download our FREE app NOW!
If you have an iOS device such as iPhone, iPod Touch, iPad mini or iPad, we highly recommend
that you go on the App Store and download the FREE Gametime Scoreboard App.
By connecting your iOS device to the Gametime Scoreboard Wi-Fi network you will nd an
easy way to remotely control the unit, stream your favorite songs, create or add your own
customized sound effects and even stream your voice as a real sports announcer.
Disposal of your old product
Your product is designed and manufactured with high quality materials and components,which
can be recycled and reused.
When this crossed-out wheeled bin symbol is attached to a product it means the product is
covered by the European Directive 2012/96/EC
Please inform yourself about the local separate collection system for electrical and electronic
products.
Please act according to your local rules and do not dispose of your old products with your
normal household waste. The correct disposal of your old product will help prevent potential
negative consequences for the environment and human health.

3
IMPORTANT SAFETY INSTRUCTIONS
1. Read these instructions carefully and keep them in a safe place.
2. DO NOT USE THE UNIT PLUGGED IN NEAR WATER OR IF RAINING ON THE UNIT.
3. Clean only with a soft dry cloth.
4. Only use attachments/accessories specied by the manufacturer.
5. Always unplug this unit during lightning storms or when not in use.
6. Refer all servicing to a qualied service personnel. Servicing is required when the
appliance is damaged in any way.
7. No object lled with liquids shall be placed on the appliance.
8. Do not place naked ame sources such as candles on the appliance.
9. Make sure all electrical connections are properly made in accordance with the
manufacturer’s instructions. Switch off and unplug from the AC adapter before changing
any connections.
10. Make sure the AC adapter is routed so that it is not likely to be walked on, or subjected to
water and heat.
11. Do not obstruct the speakers which such things as newspapers, tablecloths, curtains and so on.
12. Do not operate the appliance if you are in doubt about it working normally, or if it is
damaged in anyway.
13. Make sure there is adequate ventilation space around the appliance, at least 10 cm at the
sides and on the top.
14. Lower the volume before using headphones with this unit, then gradually increase the
volume to a comfortable level. Listening to music at a high volume and for a prolonged
period of time can cause damage to hearing.
Electrical Information
Warning
Read these electrical safety instructions carefully before connecting the AC adaptor to the
mains.
• This unit is supplied with an AC mains adaptor.
• This AC mains adaptor is designed to operate on AC 100-240V, 50/60Hz supply only.
• Connecting it to any other power sources may damage the unit.
• The AC mains adaptor is designed for indoor use only.
• The AC mains adaptor is a sealed unit. There are no user serviceable parts inside and it
does not require any electrical adjustments.
• Do not attempt to open the AC mains adaptor.
• If the AC mains adaptor is not suitable for your socket, or becomes damaged, it must be
replaced and disposed of in a safe and environmentally protective way.
• Always refer to qualied personnel.
• Periodically inspect the battery pack main adaptor for damage. Do not use if faults or
damages are found. Refer to qualied personnel.
• Battery pack shall not be exposed to excessive heat such as sunshine, re or the like.
• CAUTION: Danger of explosion if battery is incorrectly replaced. Never try to open the
appliance casing and replace battery pack by yourself.
• Where the plug of the Direct Plug-in Adapter is used as the disconnect device, the
disconnect device remain readily operable.

4
FCC
Changes or modications not expressly approved by the party responsible for compliance
could void the user’s authority to operate the equipment.
This equipment has been tested and found to comply with the limits for a Class B digital
device, pursuant to Part 15 of the FCC Rules. These limits are designed to provide
reasonable protection against harmful interference in a residential installation. This
equipment generates, uses and can radiate radio frequency energy and, if not installed
and used in accordance with the instructions, may cause harmful interference to radio
communications. However, there is no guarantee that interference will not occur in a
particular installation.
If this equipment does cause harmful interference to radio or television reception, which
can be determined by turning the equipment off and on, the user is encouraged to try to
correct the interference by one or more of the following measures:
-- Reorient or relocate the receiving antenna.
-- Increase the separation between the equipment and receiver.
-- Connect the equipment into an outlet on a circuit different from that to which the
receiver is connected.
-- Consult the dealer or an experienced radio/TV technician for help.
This equipment complies with FCC radiation exposure limits set forth for an uncontrolled
environment. This equipment should be installed and operated with minimum distance
20cm between the radiator and your body. This transmitter must not be co-located or
operating in conjunction with any other antenna or transmitter.
IC
This device complies with Industry Canada license-exempt RSS standard(s). Operation is
subject to the following two conditions: (1) this device may not cause interference, and (2)
this device must accept any interference, including interference that may cause undesired
operation of the device.
5
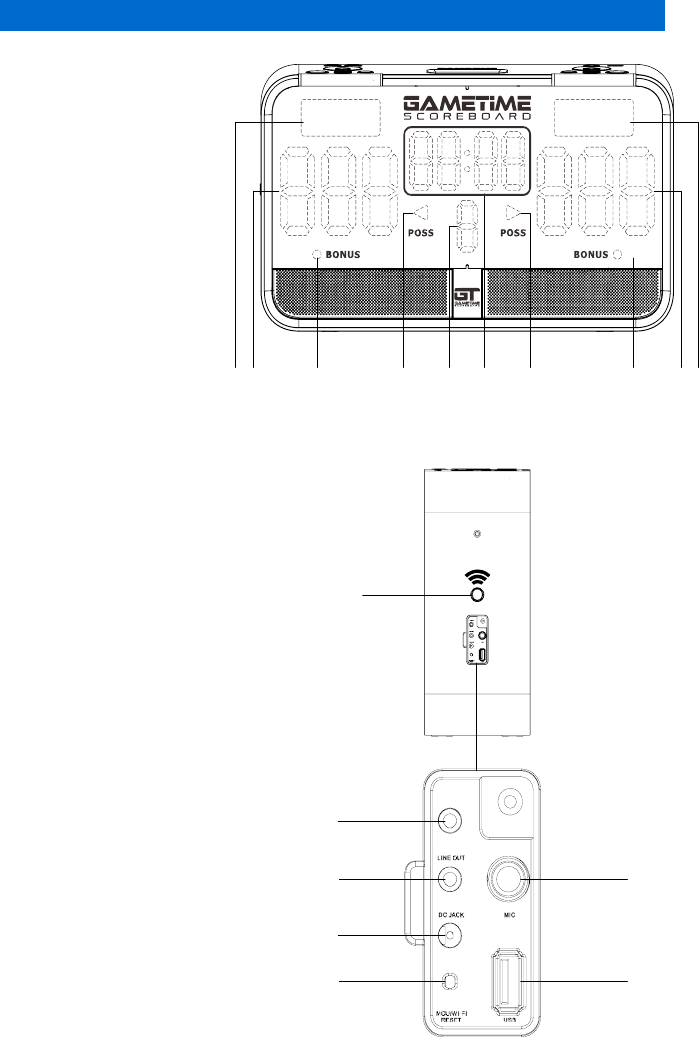
LOCATION OF UNIT CONTROLS
3 4
LOCATION OF UNIT CONTROLS
FRONT VIEW
TOP VIEW
1. HOME FACEPLATE
2. HOME SCORE
3. HOME BONUS LED
4. HOME POSSESSION LED
5. PERIOD DISPLAY
6. TIMER
7. GUEST POSSESSION LED
8. GUEST BONUS LED
9. GUEST SCORE
10. GUEST FACEPLATE
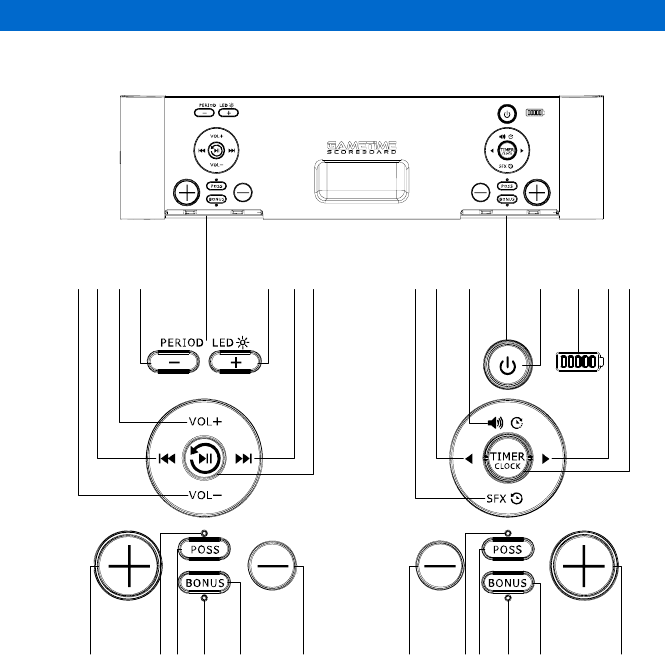
18. VOLUME DOWN
PREVIOUS TRACK
19.
20. VOLUME UP
21. PERIOD DOWN & LED BRIGHTNESS DOWN
22. PERIOD UP & LED BRIGHTNESS UP
23. NEXT TRACK
24. PLAY/PAUSE & RESET FUNCTIONS
SOUND EFFECTS ON/OFF & COUNT DOWN TIMER
25.
26. TIMER DOWN ADJUSTMENT
27. BUZZER & STOPWATCH MODE
28. POWER ON/OFF
29.
BATTERY LEVEL INDICATOR
30. TIMER UP ADJUSTMENT
31. TIMER START/STOP, TIMER SETTINGS & CLOCK SETTINGS
LEFT VIEW
11. MUSIC SOURCE & 2ndF BUTTON
12. AUXILIARY IN FOR AUDIO
13. AUDIO LINE OUT
14. DC SOCKET
15. MCU/Wi-Fi RESET BUTTON
16. MIC SOCKET
17. USB PORT
73 5 6
2
LOCATION OF UNIT CONTROLS
18 9 104
11
13
14
17
16
12
15
43 42 39 38
21 222019 232418 292726 30 3125
37 35 33 32
28
32. GUEST SCORE UP
33. GUEST BONUS BUTTON
34. GUEST BONUS LIGHT
35. GUEST POSS BUTTON
36. GUEST POSS LIGHT
37. GUEST SCORE DOWN
38. HOME SCORE DOWN
39. HOME BONUS BUTTON
40. HOME BONUS LIGHT
41. HOME POSS BUTTON
42. HOME POSS LIGHT
43. HOME SCORE UP
40 436314
AUX IN
6
3 4
LOCATION OF UNIT CONTROLS
FRONT VIEW
TOP VIEW
1. HOME FACEPLATE
2. HOME SCORE
3. HOME BONUS LED
4. HOME POSSESSION LED
5. PERIOD DISPLAY
6. TIMER
7. GUEST POSSESSION LED
8. GUEST BONUS LED
9. GUEST SCORE
10. GUEST FACEPLATE
18. VOLUME DOWN
PREVIOUS TRACK
19.
20. VOLUME UP
21. PERIOD DOWN & LED BRIGHTNESS DOWN
22. PERIOD UP & LED BRIGHTNESS UP
23. NEXT TRACK
24. PLAY/PAUSE & RESET FUNCTIONS
SOUND EFFECTS ON/OFF & COUNT DOWN TIMER
25.
26. TIMER DOWN ADJUSTMENT
27. BUZZER & STOPWATCH MODE
28. POWER ON/OFF
29.
BATTERY LEVEL INDICATOR
30. TIMER UP ADJUSTMENT
31. TIMER START/STOP, TIMER SETTINGS & CLOCK SETTINGS
LEFT VIEW
11. MUSIC SOURCE & 2ndF BUTTON
12. AUXILIARY IN FOR AUDIO
13. AUDIO LINE OUT
14. DC SOCKET
15. MCU/Wi-Fi RESET BUTTON
16. MIC SOCKET
17. USB PORT
73 5 6
2
LOCATION OF UNIT CONTROLS
18 9 104
11
13
14
17
16
12
15
43 42 39 38
21 222019 232418 292726 30 3125
37 35 33 32
28
32. GUEST SCORE UP
33. GUEST BONUS BUTTON
34. GUEST BONUS LIGHT
35. GUEST POSS BUTTON
36. GUEST POSS LIGHT
37. GUEST SCORE DOWN
38. HOME SCORE DOWN
39. HOME BONUS BUTTON
40. HOME BONUS LIGHT
41. HOME POSS BUTTON
42. HOME POSS LIGHT
43. HOME SCORE UP
40 436314
AUX IN
LOCATION OF UNIT CONTROLS

7
GET STARTED
Connect power
You can use the Gametime Scoreboard on AC power or battery power.
OPTION 1: AC POWER
Caution
• Risk of product damage! Ensure that the power supply voltage corresponds to the
voltage indicated on the label located on back of the product.
• Risk of electric shock! When you unplug the AC adaptor, always pull the plug from the
socket. Never pull the cord.
• Use only the AC adaptor specied by the manufacturer or supplied with this unit.
1. Connect one end of the AC adaptor to the DC socket on the main unit 14 .
2. Connect the other end of the AC adaptor to the wall outlet.
OPTION 2: BATTERY POWER
The Gametime Scoreboard can be operated using the built-in rechargeable battery.
Recharge battery
• Charge your Gametime Scoreboard overnight or at least 6 hours consecutively for the
rst charge. This will maximize the battery life.
• Subsequent charging time will take between 4 and 6 hours depending if unit is being
recharged while OFF or charging while in use.
• The green charging light 29 will stop ashing when the battery becomes fully charged.
• The battery autonomy may vary from 3 to 5 hours depending on the functions
being used.
Condition and attention:
• Do not short-circuit the terminals.
• Recharge the battery when you are ready to use it again.
• To get the longest service life of the rechargeable battery, charge at indoor temperature.
• Never dispose of the rechargeable battery in re or water. Never heat up the rechargeable
battery.
TIP
Once the battery level 29 reaches 10%, the red light will start blinking. Charge the
battery to ensure normal operation.
8
SCOREBOARD OPERATION
TIP:
Bilingual (English and French) Home 1 and Guest 10 faceplates are supplied with the
scoreboard. You may visit our website to download the faceplate template that you may use to
customize with your own team logo.
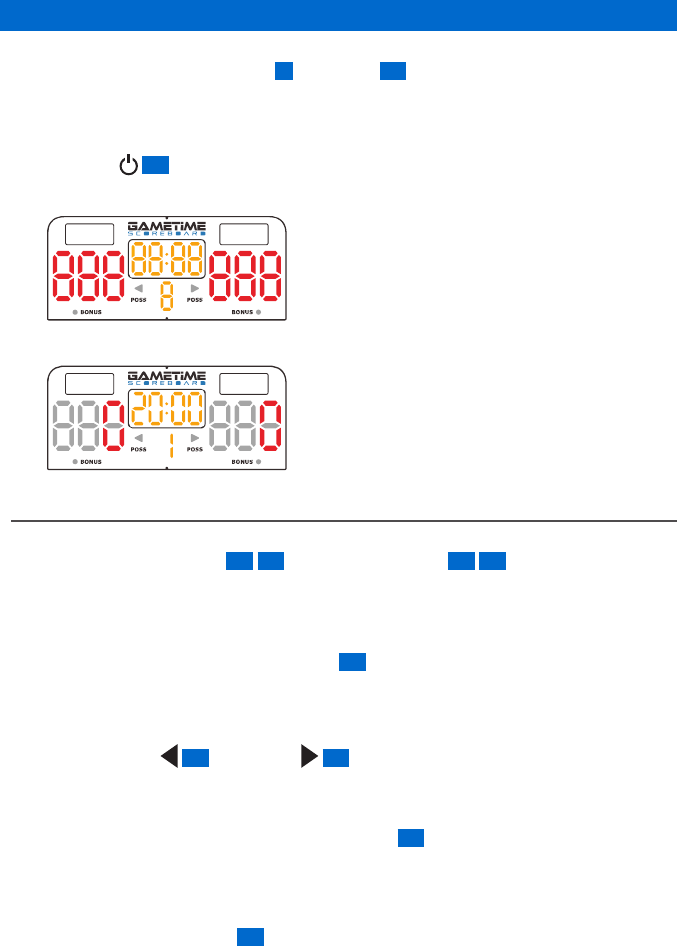
Switching the unit ON
Press POWER 28 .
ÎThe unit will display as following:
ÎAfter 5 seconds, the unit will display as follow:
BASIC CONTROLS
Score Control
Press the SCORE + BUTTON 32 43 or SCORE - BUTTON 37 38 to increase or decrease
the score.
The scores can be adjusted in the range of 0-999.
Timer Control
1. Press and hold TIMER CLOCK BUTTON 31 for 3 seconds.
ÎThe timer digits for the minutes will blink.
ÎThe timer digits for the minutes will always blink if there is no operation.
2. Press BUTTON 26 or BUTTON 30 to set the minutes then press TIMER CLOCK
BUTTON to conrm.
3. Repeat step 1 to set the other minutes and seconds digits.
4. Once timer is set, press and hold TIMER CLOCK 31 until the digits stop blinking to
conrm.
ÎThe count down timer can be set in the range of 00:00 to 99:59 (99 minutes and 59
seconds)
Press TIMER CLOCK BUTTON 31 to start or stop the timer.
*Timer can’t be changed if the timer is running.
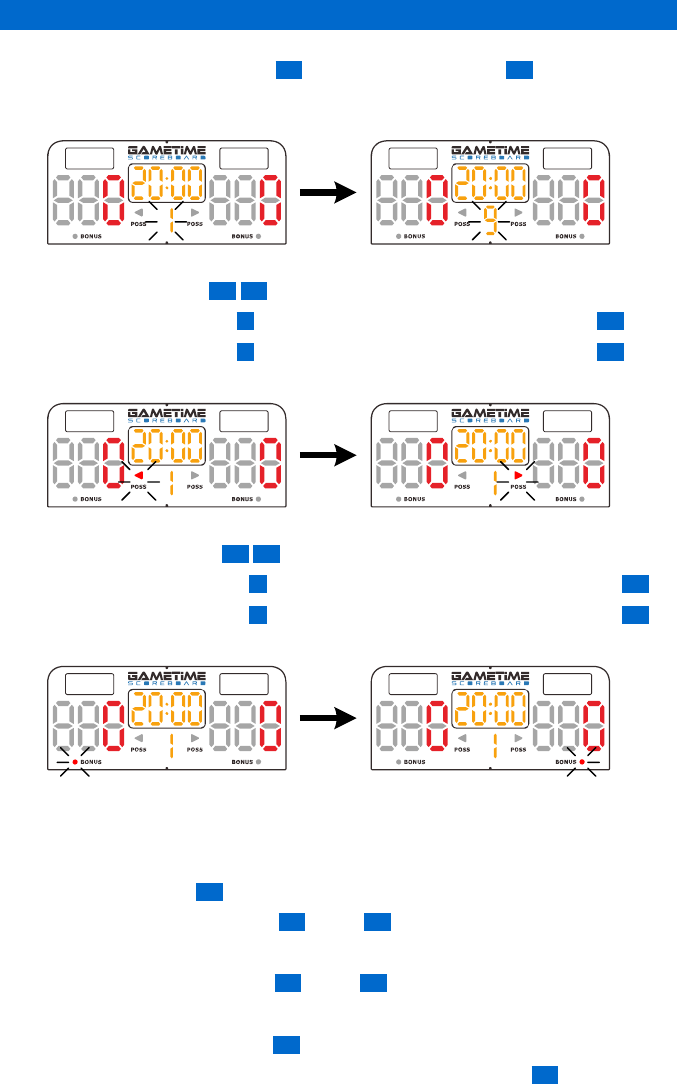
Timing Units
If the clock is counting DOWN and there are fewer than 60 seconds on the game clock, the
clock display shows seconds and hundredths of a second.
This is indicated by a period “ . ” rather than a colon “ : ” in between the digits.
9
SCOREBOARD OPERATION
Period Control
1. Press PERIOD LED + BUTTON 22 or PERIOD LED - BUTTON 21 to increase or
decrease the period.
ÎThe period can be adjusted in the range of 1-9.
Poss Control
1. Press POSS BUTTON 35 41 to select the offensive team in possession of ball.
ÎThe Home POSS LED 4 will turn ON if you press Home POSS BUTTON 41 .
ÎThe Guest POSS LED 7 will turn ON if you press Guest POSS BUTTON 35 .
2. To turn POSS light OFF, just press on the button of the lit poss LED.
Bonus Control
1. Press BONUS BUTTON 33 39 to select the bonus team.
ÎThe Home BONUS LED 3 will turn ON if you press Home BONUS BUTTON 39 .
ÎThe Guest BONUS LED 8 will turn ON if you press Guest BONUS BUTTON 33 .
2. To turn BONUS light OFF, just press on the button of the lit bonus LED.
Game Sound Effects (SFX)
The Gametime Scoreboard is designed to bring the feeling of a stadium right to your home!
When certain events happen, they will be accompanied by an appropriate sound effect playing
through the speakers.
1. Press SFX BUTTON 25
2. Press SCORE + BUTTON of left 43 or right 32 .
ÎA loud cheer rings out.
3. Press SCORE - BUTTON of left 38 or right 37 .
ÎA crowd noise rings out.
4. Press TIMER CLOCK BUTTON 31
5. To turn OFF all SFX (except the BUZZER) just press the SFX button 25 once. If SFX
are OFF and you want to turn them on, simply press this same button and SFX will be
activated.
10
SCOREBOARD OPERATION
Buzzer sound
Single press will produce the Buzzer 31 sound for 3sec.
*The buzzer sound can not ring if the time is running in count up or count down mode.
OTHER FEATURES
USB OPERATION
Listening to audio les from your USB stick.
1. If unit is OFF, press POWER 28 .
2. Connect a USB data medium to the USB PORT 17 .
3. Press MUSIC SOURCE BUTTON 11 to select USB mode.
ÎThe unit will say USB and begin to play automatically.
ÎIf no audio le is available, the unit will not play.
Press VOL + BUTTON 20 or VOL - BUTTON 18 to increase or decrease the volume.
4. Press BUTTON 19 or BUTTON 23 to select your desired track (with USB only)
5. Press BUTTON 24 to start or pause the music
Attention
The USB connection is only designed to be used for USB memory sticks. Other external storage
media such as external hard disks can’t be operated via the USB port. You may use this port to
recharge your portable device but we recommend that you do this only if the unit is plugged in.
AUDIO LINE IN & LINE OUT
The unit includes two inputs. AUX IN 12 allows
to connect a portable device to play music while
LINE OUT 13 allows to connect additional
speakers to the unit.
1. Connect an audio input cable (not
supplied) with a 3.5 mm connector on
both ends to the AUX IN 12 port on the
left of this unit and to the headphone
port of your portable device.
2. Press the MUSIC SOURCE BUTTON 11
to select the AUX IN mode. A voice
will say: Auxiliary In once this port is
selected.
3. Play audio les from your portable
device (refer to its user manual).
MICROPHONE
A microphone (not included) can be used
to make announcements, call the game
or cheer. Your voice will be amplied
and played through the speakers! The
microphone can be plugged into the MIC
port 16 located on the left hand side of the
unit while facing it.
Wi-Fi OPERATION
The built-in Wi-Fi module of the Gametime
Scoreboard enables it to receive audio from
various devices wirelessly (for example, a
mobile phone, PDA etc.) within a range up to
50 meters (165 feet).
Connecting a mobile device with
the unit
1. If unit is OFF, press POWER 28 and.
2. connect to the GAMETIME SB APP
3. Place the portable device within 50
meters (165 feet) from the unit.
4. Set the portable device in search mode
for Wi-Fi until it detects “Gametime”.
5. Select “Gametime”
6. Enter “88888888” when prompted for a
password.
7. Repeat the above steps if you want to
connect more devices to the Wi-Fi.
Disconnecting from the Gametime Wi-Fi
Disconnect from the Gametime Wi-Fi or turn
off the Wi-Fi on your mobile device.

11
TROUBLESHOOTING
WARNING
Never remove the casing of this unit.
To keep the warranty valid, never try to repair the system yourself.
If you encounter problems when using this unit, check the following points before requesting
service.
NO POWER
• Make sure that the AC power plug of the unit is connected properly.
• Make sure that there is power at the AC outlet.
NO SOUND OR POOR SOUND
• Adjust the volume.
• If using the AUX IN function with a portable media player ensure that the headphone
volume is turned to full volume.
• If playing from a USB memory drive, check source MP3 le’s recorded volume levels. If the
source MP3 le is too quiet, adjust or acquire new content.
• If playing from a mobile phone, check source mobile phone’s recorded volume levels. If the
source mobile phone is too quiet, adjust or acquire new content.
NO RESPONSE FROM THE UNIT
• Disconnect and reconnect the AC power plug, then turn on the unit again.
• Check if the unit is in battery power and the battery power is low. If yes, charge the
rechargeable battery.
LOW Wi-Fi SIGNAL STRENGHT
• Check the distance between your mobile device and the unit.
• Turn the unit off and turn it on again.
• Proceed to MCU/Wi-Fi module reset 15 as indicated in point 28 of the User Manual.
Visit gametimescoreboard.com/support to download full User Manual.
NOT POSSIBLE TO CONNECT TO GAMETIME SCOREBOARD’S Wi-Fi
• Congure the Wi-Fi settings from your mobile device again.
• Turn the unit off and turn it on again.
• Proceed to MCU/Wi-Fi module reset 15 as indicated in point 28 of the User Manual.
Visit gametimescoreboard.com/support to download full User Manual.
• Unplug the unit and plug it again.
THE UNIT DOES NOT WORK
• Unplug the unit and plug it again.
• Press & hold the PLAY/PAUSE button 24 during 8 seconds to restore to factory
settings.
12
SPECIFICATIONS
1. GENERAL
Power requirements INPUT: 100-240V ~ 50/60Hz 1.5A Max
OUTPUT: 15V 3A
Dimensions of main unit 24” (W) x 14” (H) x 6” (D)
600 (W) x 350 (H) x 150 (D) mm
Weight of main unit 14 lbs / 6.43 Kg
2. AMPLIFIER SECTION
Power Output 45Watt
3. Wi-Fi
Frequency Band / Output Power 2412-2472MHz (Europe) / ≤18dBm
Support Wireless Standards 802.11 b/g/n
Support Channels 2.4GHz 1 to 13 (Europe) or 1 to 11 (USA and Canada)
4. SPEAKER SYSTEM
Speaker 10W x 4 Speakers
Impedance 4 ohms
JOIN THE GAMETIME SCOREBOARD COMMUNITY
facebook.com/GTScoreboard
twitter.com/GTScoreboard
instagram.com/GTScoreboard
HELP AND SUPPORT
DOWNLOAD THE USER MANUAL
To learn more about your Gametime scoreboard, download the User Manual at
gametimescoreboard.com/en/content/9-user-manual
TUTORIAL VIDEOS
Watch how-to tutorials showing your Gametime features at
gametimescoreboard.com/en/content/10-videos
DOWNLOAD OUR FREE APP AND GET FULL REMOTE CONTROL
To get access to all the features of your Gametime Scoreboard, download the free app now at
gametimescoreboard.com/en/content/12-download-the-free-mobile-app-and-remote
CUSTOMER SUPPORT
Need help? Find answers to your questions at
gametimescoreboard.com/en/content/category/3-support
GAMETIMESCOREBOARD.COM