Ascalade Technologies B200R36H BABY MONITOR - HANDSET UNIT User Manual SCD589 DECT 3 US
Ascalade Technologies, Inc. BABY MONITOR - HANDSET UNIT SCD589 DECT 3 US
users manual

SCD589
User manual 4
Mode d’emploi X
Instrucciones de manejo X
ES
FR
EN

13 Unplug this product from the wall outlet and refer servicing to qualified service personnel
under the following conditions:
A.When the power supply cord or plug is damaged or frayed.
B. If the product has been exposed to rain or water.
C. If the product does not operate normally by following the operating instructions.
D. If the product’s cabinet has been damaged.
E. If the product exhibits a distinct change in performance.
14 Do not place this product on an unstable cart, stand or table.The product may fall, causing
serious damage to the product.
15 Make sure the baby unit and adapter cable are always out of reach of the baby
(at least 1 meter / 3 feet away).
16 Never place the baby unit inside the baby’s bed or playpen.
17 Never cover the baby monitor (with a towel, blanket, etc.).
If your product utilizes batteries, the following additional precautions should be
observed:
1Use only the type and size of the battery(ies) specified in the user manual.
2Do not dispose of the battery(ies) in fire.They may explode. Check with local regulations for
possible special disposal instructions.
3Do not open or mutilate the battery(ies). Released electrolyte is corrosive and may cause
damage to the eyes or skin. It may be toxic if swallowed.
4Exercise care in handling battery(ies) in order not to short out the battery(ies) with
conducting materials such as rings, bracelets and keys.The batter(ies) or conductor may
overheat and cause burns.
5 Do not attempt to recharge the battery(ies) provided with or identified for use with this
product that are not intended to be charged.The battery(ies) may leak corrosive electrolyte
or explode.
6Do not attempt to rejuvenate the battery(ies) provided with or identified for use with this
product by heating them. Sudden release of the battery(ies) electrolyte may occur causing
burns or irritation to eyes or skin.
7When replacing battery(ies), all batteries should be replaced at the same time. Missing fresh
and discharged batteries could increase internal cell pressure and rupture the discharged
battery(ies). (Applies to products employing more than one separately replaceable primary
battery.)
8When inserting battery(ies) into this product, the proper polarity or direction must be
observed. Reverse insertion of battery(ies) can cause charging, and that may result in leakage
or explosion.
9Remove battery(ies) from this product if storing over 30 days because the battery(ies) could
leak and damage the product.
10 Discard ‘dead’ battery(ies) as soon as possible since ‘dead’ batteries are more likely to leak in
a product.
11 Do not store this product, or the battery(ies) provided with or identified for use with this
product, in high-temperature areas. Batteries that are stored in a freezer or refrigerator for
the purpose of extending shelf life should be protected from condensation during storage
and defrosting. Batteries should be stabilized at room temperature prior to use after cold
storage.
Important
3
EN

3
+
+
+
+
+
+
1
3
5
10
8
713
12
6
2
9
4
11
+
+
+
+
+
+
1
4
8
7
6
5
9
2
3
10
11
+
+
+
+
+
+
13
8
9
12
17
A. Baby unit
B. Parent unit
14
14
15
16
4
EN
A. Baby unit
A-1 On/Off button (y)
A-2 Temperature sensor
A-3 LINK light
A-4 Volume – / + buttons
A-5 PAGE button
A-6 Microphone
A-7 Night light button ( )
A-8 Lullaby button ( )
A-9 Play/stop button (29)
A-10 Night light
A-11 Display
A-12 Battery compartment cover
A-13 DC 9V / 300mA power supply jack
A-14 AC power adapter
B. Parent Unit
B-1 TALK button
B-2 MENU button
B-3 LINK light
B-4 Loudspeaker
B-5 Microphone
B-6 On/Off button (y)
B-7 OK button
B-8 Display
B-9 Sound level lights
B-10 Volume – / + buttons
B-11 Recess for the belt clip or neck strap
B-12 Battery compartment cover
B-13 Belt clip
B-14 AC power adapter
B-15 Charging base
B-16 POWER light
B-17 Neck strap
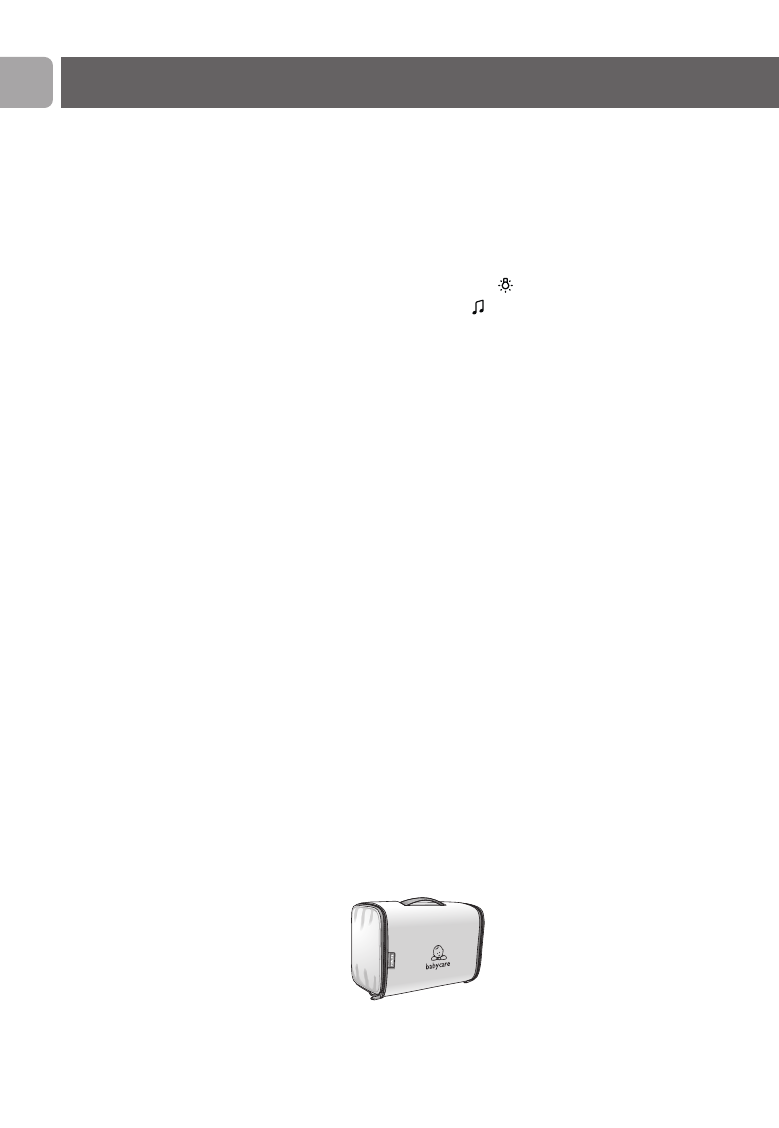
B-18 Travel bag
Legend of functions
Legend of functions
5
C.What else you need
Both units can be battery operated.
For battery-operated use you’ll need:
– 4 x 1.5V AA non-rechargeable batteries for baby unit.
Not supplied.
– 2 x 1.2V AAA rechargeable batteries for parent unit. Supplied.
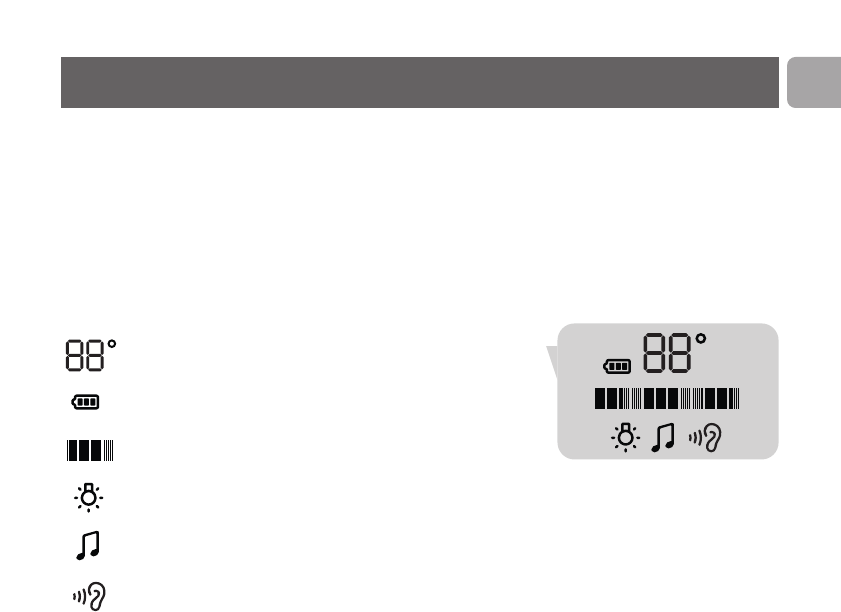
D. Display
Room temperature indicator
Battery indicator
Volume indicators
Night light indicator
Lullaby indicator
Microphone sensitivity indicator
High - Room temperature above temperature set in menu
LoW - Room temperature below temperature set in menu
Not LinKed - No connection between units
VoluMe 9 9 9 - Volume indication
PauSed - Playback of lullaby interrupted
EN

2Important Safety Instructions
3 Illustrations
4 Legend of functions
4 Baby unit
4 Parent unit
5 What else you need
5 Display
6 Contents
7 Welcome
9 Getting your baby monitor
ready for use
9 Baby unit
10 Parent unit
11 Using your baby monitor
12 Other features
12 Adjusting loudspeaker volume
13 Talking to your baby
13 Monitoring baby silently
14 Switching nightlight on / off
14 Paging the parent unit
14 Playing lullabies
15 Connecting / disconnecting belt clip and
neck strap
16 Menu options
16 Menu operation - General explanation
17 Switching nightlight on / off
17 Playing lullabies
17 Adjusting microphone sensitivity
18 Switching sound alert on / off
18 Setting room temperature range
18 Setting temperature alert
19 Troubleshooting
21 Frequently asked questions
22 Important information
22 Technical specifications
22 Maintenance
23 Environmental information
23 Factory initialization mode
24 Compliance information
24 Radio Interference
25 FCC RF Radiation Exposure Statement
18
Need help?
25 Guarantee and service
25 Service centers
6
EN Contents
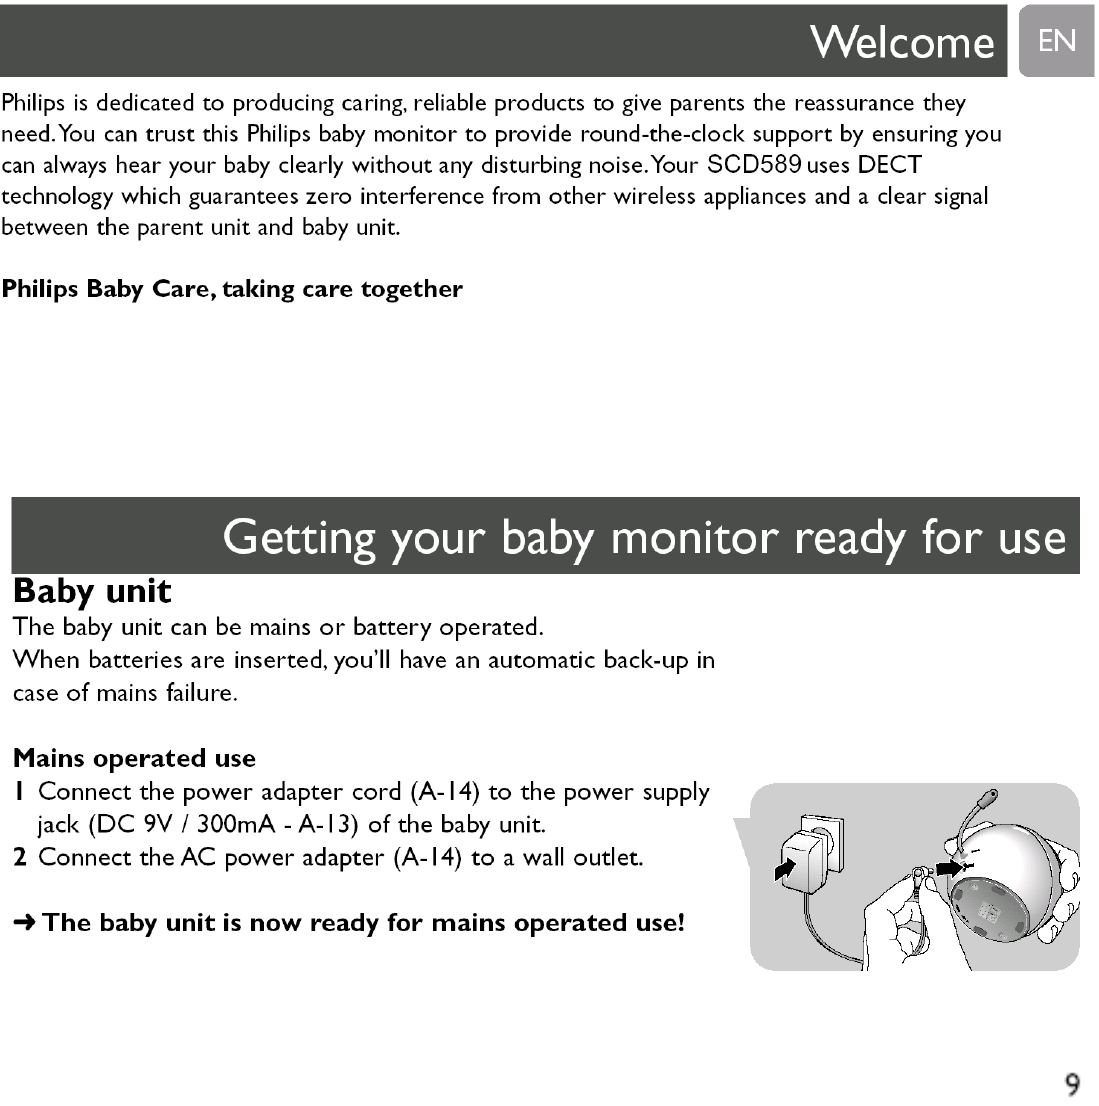

Battery operated use
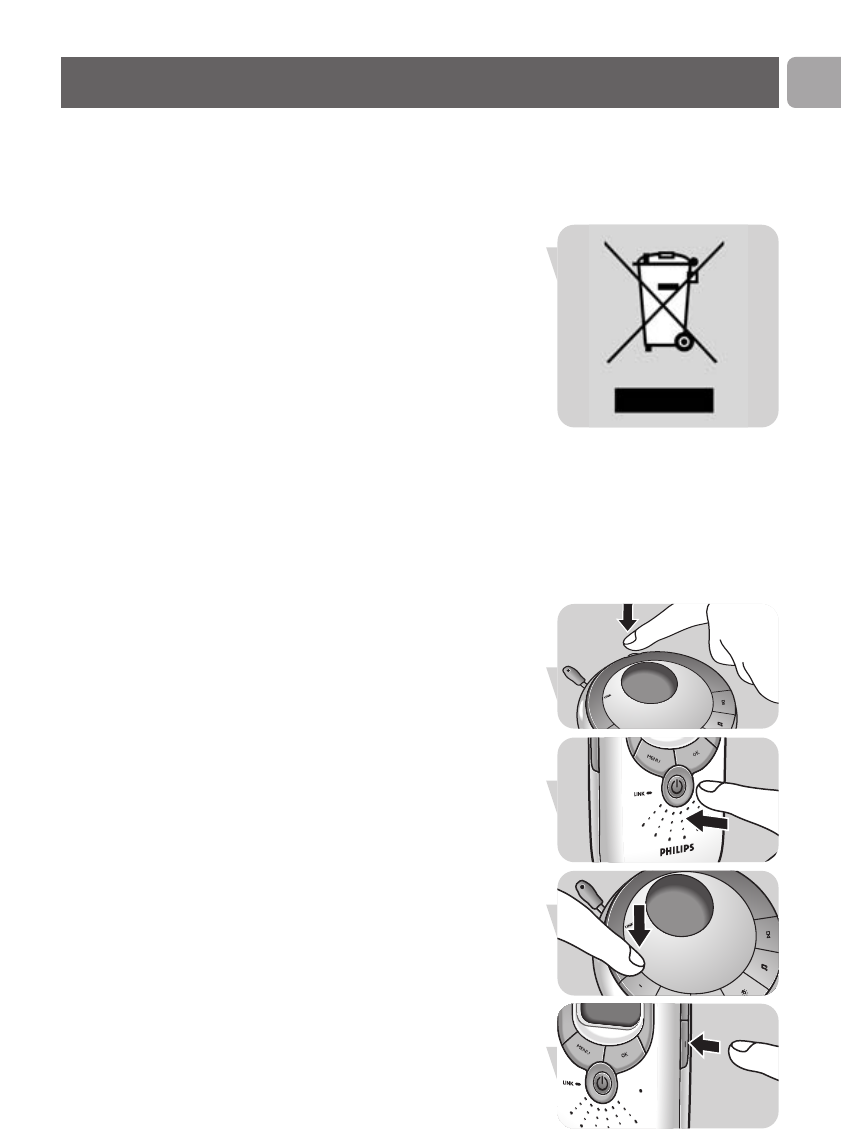
1Open the battery compartment by turning the cover (A-12)
to the left (1OPEN), using the palm of your hand.
Take off the cover.
2Insert four 1.5V AA batteries, noting the + and –
configuration inside the battery compartment (batteries are
not supplied; we recommend Philips Alkaline batteries).
3Put the battery compartment cover (A-12) back in place.
Close the compartment by turning the cover (A-12) to the
right (CLOSE 2), using the palm of your hand.
Note:When the units are switched off, in case of battery
operated use, the batteries still discharge slowly.
➜The baby unit is now ready for battery operated use!
Parent unit
1Open the battery compartment by sliding the cover (B-12)
downwards.
2 Insert the two 1.2V AAA size NiMH rechargeable batteries
(supplied), noting the + and – configuration inside the battery
compartment.
3Put the battery compartment cover (B-12) back in place.
Close the compartment by sliding the cover (B-12) upward
until it clicks in position.
4Connect the AC power adapter (B-14) of the charging base
(B-15) to a wall outlet.
10
EN
+
+
+
+
+
+
+
+
+
+
+
+
+
+
+
+
+
+
Getting your baby monitor ready for use
5Place the parent unit in the charging base (B-15).
> The POWER light (B-16) lights up red.
6Leave the parent unit in the charging base until the batteries
are fully charged (at least 16 hours).
> The POWER light (B-16) will stay red, even when batteries
are fully charged.
>When the batteries are fully charged, the parent unit can be
taken out of the charging base and used cordlessly for at
least 8 hours.
> When the battery indicator ( ) in the display (B-8) is
empty and the parent unit beeps, battery power is low.
Place the parent unit in the charging base (B-16) to
recharge the batteries.
Notes:
– Operation time will be 8 hours only when the baby unit is
transmitting 25% of the time and is in standby mode for the
rest of the time (baby does not make sound).
– When the parent unit batteries are charged for the first time,
operating time will be less than 8 hours.The batteries will use
their maximum capacity after at least four times charging and
discharging.
➜The parent unit is now ready for use!
Getting your baby monitor ready for use
11
EN
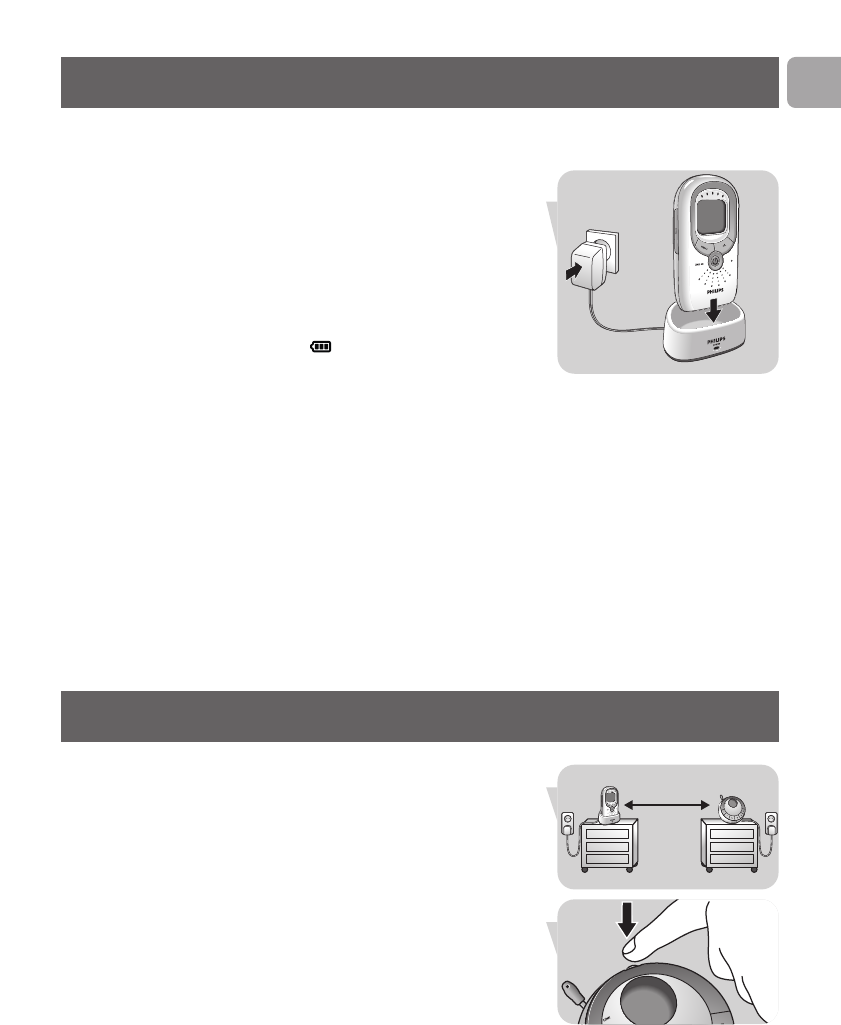
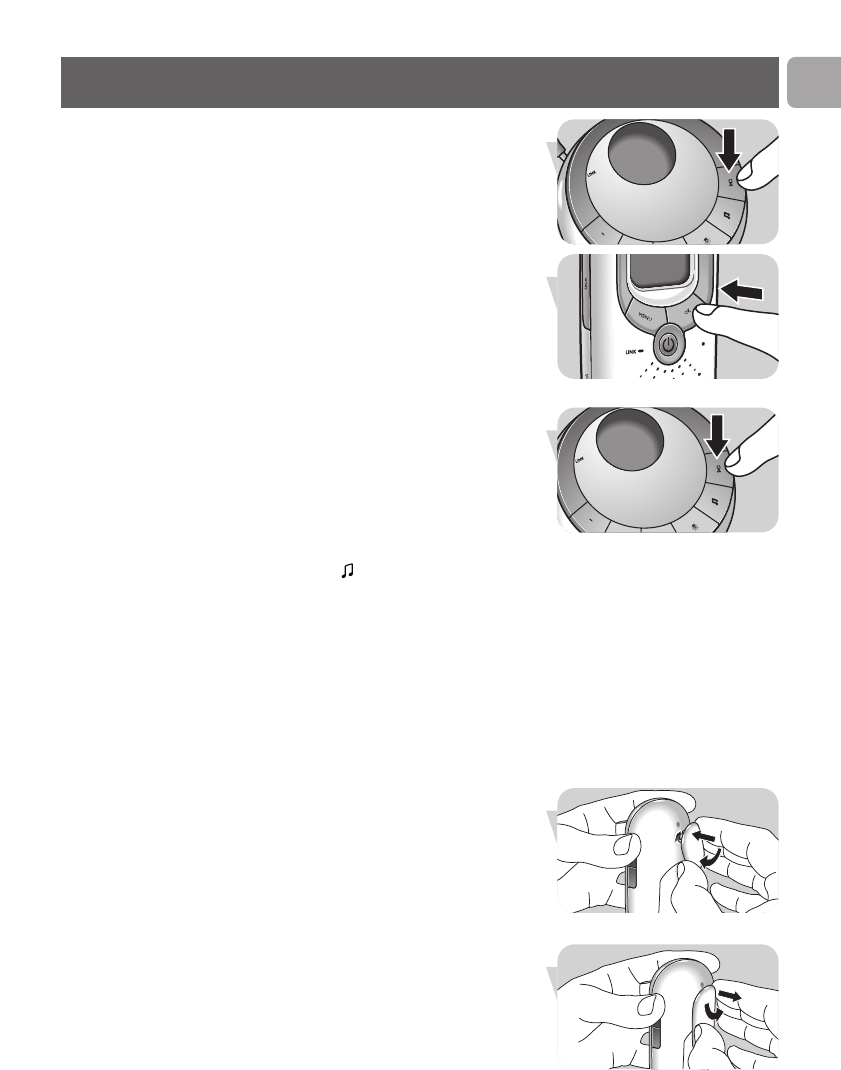
Using your baby monitor
1Position both units in the same room to test the connection.
Make sure the baby unit is at least 1 meter / 3 feet away from
the parent unit.
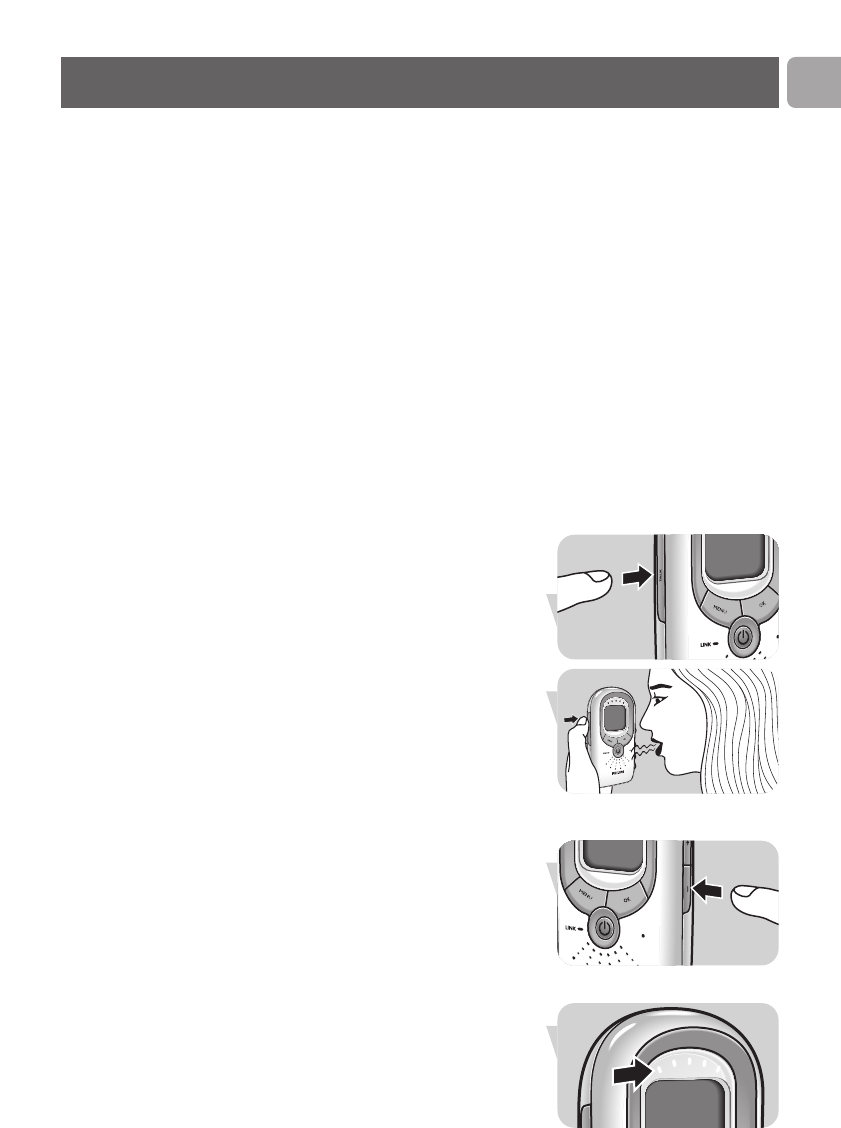
2Press and hold the On/Off (y) button (A-1) on the baby unit
for 2 seconds.
> The nightlight (A-10) lights up briefly.
> The display light (A-11) lights up indicating the current
room temperature.
> Not LinKed lights up on the display and the LINK light
(A-3) starts blinking red, searching connection with the
parent unit.
1m / 3 ft
> 1 m / 3 feet

3Press and hold the On/Off button (y) (B-6) on the parent
unit for 2 seconds.
> The sound level lights (B-9) briefly light up orange.
> The display (B-8) lights up.The battery indicator ( ) and
the room temperature light up in the display.
> The LINK light (B-3) lights up red briefly then starts
blinking green, searching connection with the parent unit.
> The LINK light (B-3) on the parent unit blinks green and
the LINK light (A-3) on the baby unit blinks red until
connection has been established.This will take up to
30 seconds. Both LINK lights (A-3, B-3) then light
continously green and the message Not LinKed will
disappear from the baby unit the display (A-11).
4Position the baby unit at least 1 meter / 3 feet away from
your baby.
5Position the parent unit at the desired place within the
operating range of the baby unit but at least 1 meter / 3 feet
away from the baby unit.
For more information on the operating range see ‘Technical
specifications’.
➜You can now monitor your baby!
Using your baby monitor
12
EN
> 1m / 3 ft
Other features
Adjusting loudspeaker volume
•Briefly press the volume + and – buttons (A-4) on the baby
unit repeatedly until the desired loudspeaker volume for the
baby unit has been reached.
• Briefly press the volume + and – buttons (B-10) on the
parent unit repeatedly until the desired loudspeaker volume
for the parent unit has been reached.
13
> The displays (A-11, B-8) give visual feedback on the volume
settings of the units:
- VoluMe OFF: parent unit volume switched off /
monitoring baby silently;
- VoluMe 9: minimum volume
(parent unit and baby unit);
- VoluMe 9 9 9 9 9: maximum volume
(parent unit and baby unit).
Notes:
– If you press the Volume + and – buttons (A-4, B-10) too long,
the volume will not be adjusted.
– You only need to adjust the baby unit volume when using the
talk function (see below).
– When the volume is set to a high level, the units consume
more power.
Talking to your baby (Talk function)
While using the TALK button (B-1) on the parent unit you can
talk to your baby (e.g to comfort your baby).
•Press and hold the TALK button (B-1) and talk clearly into
the microphone (B-5).
•Release the TALK button (B-1) when finished talking.
Note:When the TALK button (B-1) is pressed, you can no
longer hear your baby.
Monitoring baby silently
•Briefly press the Volume – button (B-10) on the parent unit
repeatedly until the volume is switched off completely.
> When no sound is detected, all sound-level lights (B-9) will
be off.
Other features EN
14
EN Other features
> When sound is detected the sound-level lights (B-9) light up
orange.
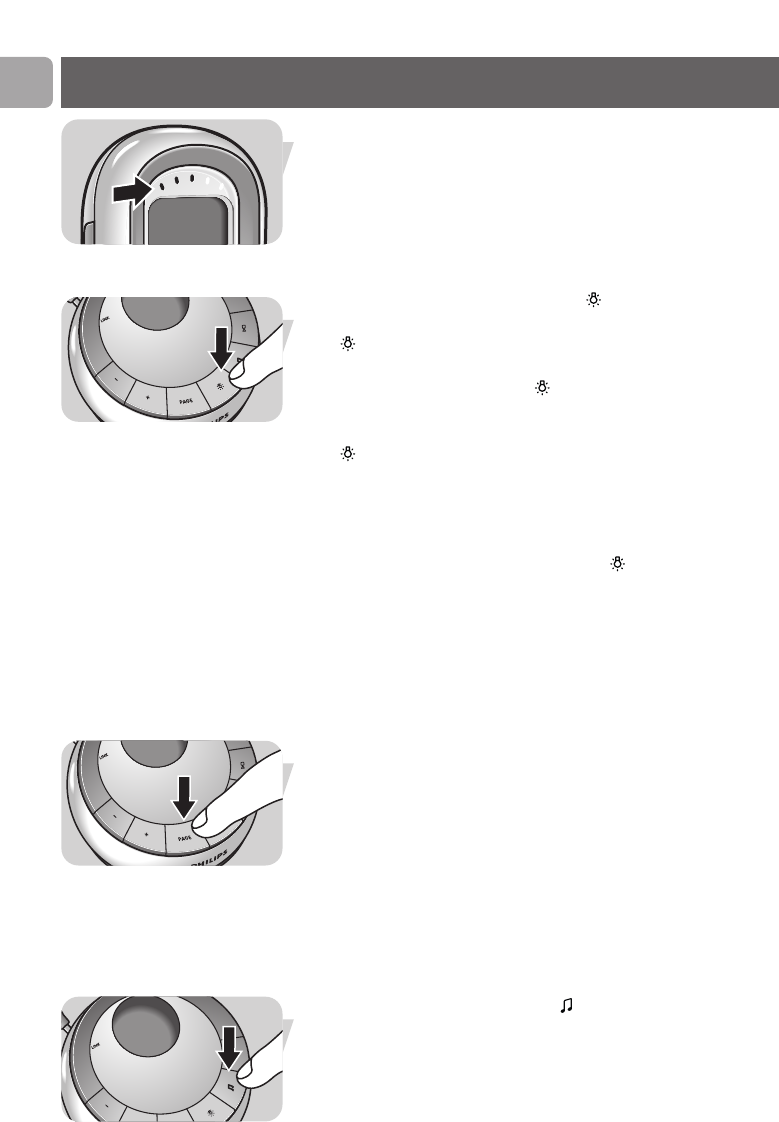
Switching night light on/off
1Briefly press the night light button ( ), A-7) on the baby unit
to switch on the night light (A-10).
> lights up on both displays.
2Press the night light button ( ),A-7) again briefly to switch
off the night light (A-10).
> The night light dims and gradually switches off.
> goes out on both displays.
•Switch off the night light when operating the baby unit on
batteries.This saves power!
Note: If you press the night light button ( ),A-7) too long, the
night light (A-10) will not switch on/off.
Paging the parent unit
When the parent unit is misplaced and the volume is switched
off, you can use the PAGE button (A-5) on the baby unit to
locate the parent unit.
1Briefly press the PAGE button (A-5) on the baby unit
> Paging appears on both displays (A-11, B-8).
> The parent unit will automatically reset to medium volume
level and a paging alert will sound.
2To stop the paging alert, press the page button (A-5) again
briefly or any button on the parent unit
Note: If you press the PAGE button (A-5) too long, the paging
alert will not sound.
Playing lullabies
1Briefly press the lullaby button ( , A-8) on the baby unit
repeatedly to select one out of five available lullabies
Other features
15
2Briefly press the play/stop button (29,A-9) to play the
selected lullaby.
•Briefly press the OK button (B-7) on the parent unit to
interrupt playback of the lullaby. Press the play/stop button
(29, A-9) on the baby unit or the OK button (B-7) on the
parent unit again to restart playback of the lullaby.
> If the lullaby is not restarted within 60 seconds, the lullaby
function will switch off automatically.
•Briefly press the play/stop button (29,A-9) on the baby unit
again to stop playback of the lullaby
Note: If you press the lullaby button ( ,A-8) too long, no
lullaby will be selected.
Connecting / disconnecting belt clip and
neck strap
If the parent unit is operating on batteries, you can carry it in
and around your house, giving you freedom of movement while
still monitoring your baby.
Connecting the belt clip
•Insert the little spindle on the rear of the belt clip into the
recess (B-11) on the rear of the parent unit.
Turn the belt clip to the left until it clicks in position.
Disconnecting the belt clip
•Turn the belt clip to the right (TURN 2) and take it off.
EN

Most functions of your baby monitor can be operated via the
local buttons on the units.The functions described hereafter can
only be operated remotely via the parent unit menu.The
nightlight and lullaby functions can be operated via both menu
and local keys.
Note:All buttons mentioned are located on the parent unit.
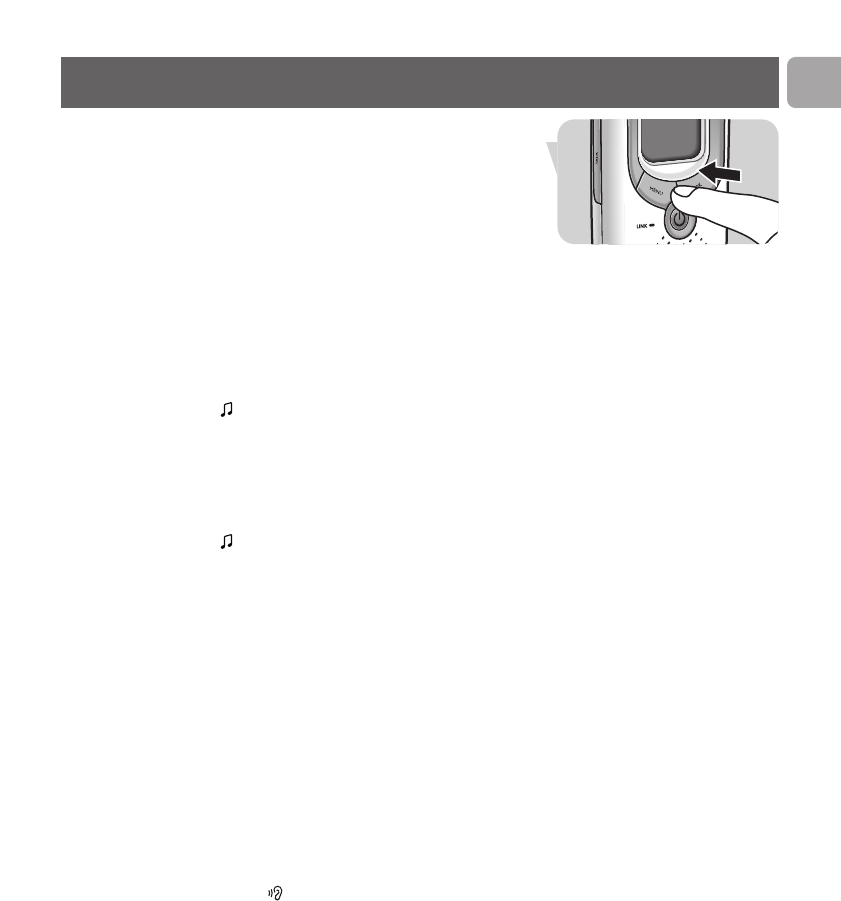
Menu operation - General explanation
1Press the MENU button (B-2) to open the menu.
> The first menu option appears on the display.
2Use the – and + buttons (B-10) to select the desired menu
option.
3Press the OK button (B-7) to confirm your selection.
> SaVed appears on the display.
16
EN Other features
Menu options
Connecting the neck strap
•Insert the little spindle at the end of the neck strap into the
recess (B-11) on the rear of the parent unit.
Turn the spindle to the left until it clicks in position.
Disconnecting the neck strap
•Turn the spindle to the right (TURN 2) and take it off.
Menu options
17
4Press the MENU button (B-2) again to exit the menu.
Note:Always press the buttons MENU (B-2), – and + (B-10) and
OK (B-7) shortly.
Switching night light on/off
•Select Light on? or Light oFF?, using – and +
(B-10). Confirm with OK (B-7).
Playing lullabies
To play or stop a lullaby:
•Select LullabY , using – and + (B-10).
Confirm with OK (B-7).
•Select PlaY? to replay the last played lullaby or StoP
LullabY? to stop playback. Confirm with OK (B-7).
To select a different lullaby:
•Select LullabY , using – and + (B-10).
Confirm with OK (B-7).
•Select Select neW, using – and + (B-10).
Confirm with OK (B-7).
•Select the desired lullaby, using – and + (B-10).
Confirm with OK (B-7).
Adjusting microphone sensitivity
You can set the sound sensitivity of the baby unit to the desired
level.When set to the maximum sensitivity level all sounds
(including your baby’s breathing, when loud enough) can be
heard on the parent unit.You can only change the microphone
sensitivity if the connection between the baby unit and the
parent unit is established (when LINK lights (A-3, B-3) light
continuously green).
•Select SenSitiVitY , using – and + (B-10).
Confirm with OK (B-7).
•Select the desired sensitivity level for the baby unit
microphone, using – and + (B-10). Confirm with OK (B-7).
> Sensitivity 9= minimum level / lowest sensitivity;
Sensitivity 9 9 9 9 9 =
maximum level / highest sensitivity
Note:When the sensitivity level of the baby unit is set to a high
level, the unit will consumes power because it is in
continuous transmission mode.
EN

Switching sound alert on and off
If sound alert is switched on, the parent unit beeps as soon as
the second sound level light (B-9) lights orange while the
volume is switched off.
•Select Sound Alert, using – and + (B-10).
Confirm with OK (B-7).
•Select Alert on? or Alert oFF?.
Confirm with OK (B-7).
Setting room temperature range
You can set the temperature range (minimum and maximum
temperature) for your baby’s room.
•Select TeMPerature – – °, using – and + (B-10).
Confirm with OK (B-7).
> Range appears on the display. Confirm with OK (B-7).
•Set the desired minimum temperature, using – and + (B-10).
Confirm with OK (B-7).
•Set the desired maximum temperature, using – and + (B-10).
Confirm with OK (B-7).
Note:When the set maximum temperature is lower than the
room temperature, the unit consumes more power
because the display is continuously lit.This is also the case
when the set minimum temperature is higher than the
room temperature.
Setting temperature alert
Temperature alert will sound from the parent unit if the actual
room temperature exceeds the set minimum or maximum
temperature or if the room temperature drops below 7°C or
rises above 33°C.
•Select TeMPerature – – °, using – and + (B-10).
Confirm with OK (B-7).
•Select Alert On/OFF, using – and + (B-10).
Confirm with OK (B-7).
•Select Alert On? or Alert OFF?.
Confirm with OK (B-7).
18
EN Menu options

Troubleshooting
19
Problem Possible cause Solution
LINK light (A-3, B-3) Parent unit:
does not light at all. Power adapter (B-14) not Connect power adapter (B-14) to
plugged in. wall outlet.
Unit not turned on. Press and hold On/Off button (y)
(B-6) for two seconds.
Batteries are low. Recharge batteries (B-12).
Batteries are empty. Replace batteries (B-12).
Baby unit:
Power adapter (A-14) not Connect power adapter (A-14) to
plugged in. baby unit.
Connect power adapter (A-14) to
wall outlet.
Unit not turned on. Press and hold On/Off button (y)
(A-1) for two seconds.
Batteries are low. Replace batteries (A-12).
LINK light (A3, B-3) Units out of range. Decrease distance between units
flashing red/alarm (see ‘Technical specifications).
beeping on parent unit.
Baby unit batteries are low. Replace batteries (A-12).
Parent unit batteries are low. Recharge batteries (B-12).
Parent unit batteries are Replace batteries (B-12).
empty.
Units cannot establish connection, Try solving the problem by using
even when close to each other. the factory initialization mode.
See chapter ‘Factory initialization
mode’
No power on one of the units. Press On/Off button (A-1, B-6)
for two seconds.
Charging time of parent Parent unit switched on during Switched off parent unit (B-6).
unit batteries exceeds charging.
16 hours.
EN

Problem Possible cause Solution
High pitched noise. Units are too close to each Move parent unit away from baby
other. unit (at least 1 meter / 3 feet).
Volume on parent unit Decrease volume (B-10) on
set too high. parent unit.
No sound/ Volume on parent unit is Increase volume on parent unit
baby’s crying cannot set too low or switched off. (B-10).
be heard.
Microphone sensitivity level Increase microphone sensitivity
set too low on parent unit. level in parent unit menu.
Units are out of range Move parent unit closer to
baby unit.
Parent unit reacts too Ambient sounds trigger Move baby unit closer to baby
fast to other ambient transmission. (keep minimal distance of 1 meter
sounds. / 3 feet).
Microphone sensitivity level Decrease microphone sensitivity
set too high. level in parent unit menu.
Battery check light ( ) Batteries are low or empty. Replace / recharge batteries
lights up on the (A-12, B-12).
display (A-11, B8).
Parent unit reacts slow/ Microphone sensitivity is set too Increase microphone sensitivity
late to baby's crying. low. level in parent unit menu and/or
move baby unit closer to baby
(keep minimal distance of 1 meter/
3 feet).
Baby unit battery power Microphone sensitivity setting Set microphone sensitivity to a
diminishes rapidly. too high. lower level.
Set minimum/maximum Select lower/higher
temperature higher/lower minimum/maximum temperature.
than room temperature.
Volume setting too high. Set volume to a lower level (A-4).
20
EN Troubleshooting

Question
The technical specifications
show an operating range of
300 meters / 900 feet outdoors.
How come my baby monitor
manages much less than that?
The link is lost every now and
then, sound interruptions etc.
What happens during a mains
failure?
Is my DECT baby monitor
secure from eavesdropping and
interference?
Some buttons do not seem to
work when I press them.
What do I do wrong?
I place the parent unit in the
charging base (B-15) but the unit
doesn’t function.
Operating time of the parent
unit batteries is supposed to be
at least 8 hours. How come the
battery operating time of my
parent unit is less?
Frequently asked questions
21
Answer
The specified range is only valid outdoors in open air. Inside
your house the workable range is limited by the amount and
type of walls and/or ceilings in between. Inside the house the
operating range will be up to 50 meters / 150 feet.
You are probably approaching the outer limits of the practical
range.Try a different location or decrease the distance
between the units slightly. Please note that it takes about 30
seconds each time before a new link between the units is
established.
When batteries are installed in the both units, the units will
automatically switch over to battery use in case of mains
failure.
The 60 channels guarantee no interference from other
equipment.
Except for the On/Off buttons (A-1, B-6), only press the
buttons shortly.
When the batteries of the parent unit are low, you have to
wait for up to 20 minutes after placing the unit in the charger
before the unit starts functioning.
Maybe the baby unit is transmitting too much. Operation time
will be 8 hours only when the baby unit is transmitting 25% of
the time and is in standby mode for the rest of the time (baby
does not make sound).
When the parent unit batteries are charged for the first time,
operating time will be less than 8 hours.The batteries will use
their maximum capacity after at least four times charging and
discharging.
Maybe the volume setting too high.When the volume is set to
a high level, the units consumes more power. Set the volume to
a lower level (B-10).
EN

Technical specifications
– 1 x AC power adapter DC 9V / 300mA for baby unit
(supplied).
– 1 x charging base DC 9V / 300mA for parent unit (supplied).
– 4 x AA 1.5V Alkaline batteries for baby unit. (not supplied).
– 2 x AAA NiMH 1.2V rechargeable batteries for parent unit
(supplied).
Up to 300 meters / 900 feet in ideal condition.Walls, doors,
etc will affect range. Indoors the range is up to 50 meters
(150 feet).
Dry materials Material thickness Loss of range
Wood, plaster, < 30cm / 12˝ 0 - 10%
plaster cardboard,
glass (without metal
or wires, no lead)
Brick, plywood < 30cm / 12˝ 5 - 35%
Reinforced concrete < 30cm / 12˝ 30 - 100%
Metal grids, bars < 1cm / 0.4˝ 90 - 100%
Metal, aluminium < 1cm / 0.4˝ 100%
sheets
+ 0°C – + 40°C
Digital Enhanced Cordless Telecommunication (DECT)
The DECT standard makes use of advanced digital radio
techniques to achieve efficient use of the radio spectrum. It
delivers high speech quality and security and low power
technology. It makes it possible to hear your baby at a range of
up to 300 meters / 900 feet in open air.
Maintenance
• Clean the baby monitor with a damp cloth
• Dispose of used batteries in an environmentally friendly
manner.
• If the batteries are left in the unit when it is powered from
the mains, check them for leakage every six months.
22
EN
Power supply
Operating range
Operating temperature
Standard
Important information
Environmental information
Disposal of your old product
Your product is designed and manufactured with high quality
materials and components, which can be recycled and reused.
When this crossed-out wheeled bin symbol is attached to a
product it means the product is covered by the European
Directive 2002/96/EC.
Please inform yourself about the local separate collection
system for electrical and electronic products.
Please act according to your local rules and do not dispose of
your old products with your normal household waste.The
correct disposal of your old product will help prevent potential
negative consequences for the environment and human health.
Factory initialization mode
In this mode both units can be reset to the default factory
settings. Factory initialization can be used if problems occur
which can not be solved by following the suggestions in chapter
‘Troubleshooting’. Resetting must be done separately for each
unit.
1Press and hold the On/Off (y) button (A-1, B-6) for
2 seconds to switch on the unit.
2When the LINK light (A-3, B-3) on the unit lights up,
immediately press and hold the volume – button (A-4, B-10).
> The unit has now been reset to the default factory settings.
Important information
23
EN

Default factory settings
Parent unit
– Loudspeaker volume: 1
– Microphone sensitivity: 5 (maximum)
– Sound alert: on
– Temperature alert: off
Baby unit
– Loudspeaker volume: 3
– Nightlight: off
– Lullaby: 1
– Temperature alert low: 14°C
– Temperature alert high: 23°C
The FCC ID number is located on the cabinet bottom of Parent Unit and in battery
compartment of Baby Unit.
The term ‘IC:’ before the certification number signifies that Industry Canada technical
specifications were met.This certification means that the equipment meets certain radio
communications and operational requirements.
Compliance information
This device complies with Part 15 of the FCC Rules and ICES-003 of Industry Canada. Operation
is subject to the following two conditions: (1) this device may not cause harmful interference, and
(2) this device must accept any interference received, including interference that may cause
undesired operation.This device complies also with RSS-213 of Industry Canada.
Radio Interference
This equipment has been tested and found to comply with the limits for a Class B digital device,
pursuant to Part 15 of the FCC Rules and applicable Industry Canada specifications.These limits
are designed to provide reasonable protection against harmful interference in a residential
installation.This equipment generates, uses and can radiate radio frequency energy and, if not
installed and used in accordance with the instructions, may cause harmful interference to radio
communications. However, there is no guarantee that interference will not occur in a particular
installation. If this equipment does cause harmful interference to radio or television reception,
which can be determined by turning the equipment off and on, the user is encouraged to try to
correct the interference by one or more of the following measures:
• Reorient or relocate the receiving antenna.
• Increase the separation between the equipment and receiver.
• Connect the equipment into an outlet on a circuit different from that to which the receiver is
connected.
24
EN Important information

25
RF Radiation Exposure Statement
This equipment complies with FCC RF radiation exposure limits set forth for an uncontrolled
environment.This equipment should be installed and operated with a minimum distance of 20
centimeters between the radiator and your body. For hand held operation, this equipment has
been tested and meets the FCC RF exposure guidelines. Use of other accessories may not
ensure compliance with FCC RF exposure guidelines. For body worn operation, this product has
been tested and meets the FCC RF exposure guideline when used with the belt clip or neck strap
supplied with this product. User must maintain a separation distance of 3mm between the back of
the unit and the body to ensure compliance. Use of other accessories may not ensure compliance
with the FCC RF exposure guidelines.This transmitter must not be co-located or operating in
conjunction with any other antenna or transmitter. This equipment complies also with Industry
Do not attempt to repair or modify this equipment
Any repairs or alterations made by the user to the equipment may cause the equipment void in
product warranty and compliance. Refer servicing to authorized or designated service centers.
Important information EN
Guarantee & service
If you need information or if you have a problem, please visit
the Philips website at www.philips.com or contact the Philips
Customer Care Centre in your country (you will find its phone
number in the worldwide guarantee leaflet). If there is no
Customer Care Centre in your country, turn to your local
Philips dealer or contact the Service Department of Philips
Domestic Appliances and Personal Care BV.
Service Centers
Service Center in USA
1010 Washington Boulevard
Stamford, CT 06912-0015
Tel.: 1-800-243-7884
Service Center in Canada
Personal Edge, Exchange Tower
130 King Street West, #CU15
Toronto, ON M5X 1A9
Tel.: (416) 361-1335
Canada RSS-102 with respect to Canada’s Health Code 6 for Exposure of Humans to RF Fields.