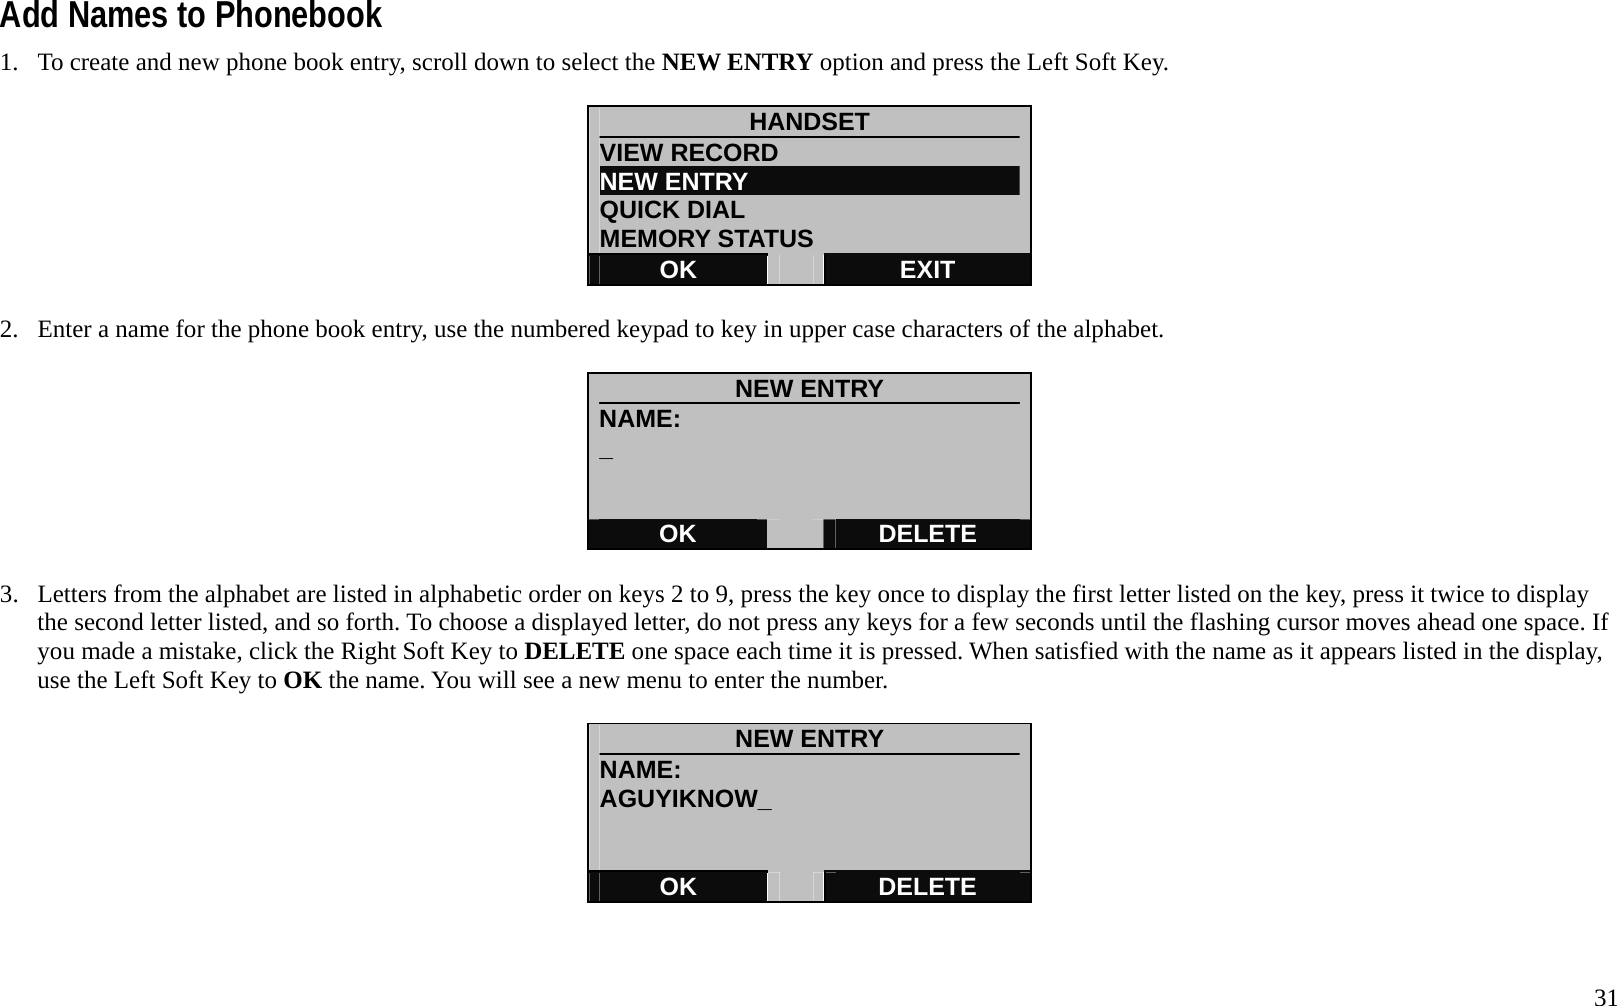
Ascalade Technologies DT19R35H US DECT HANDSET UNIT User Manual
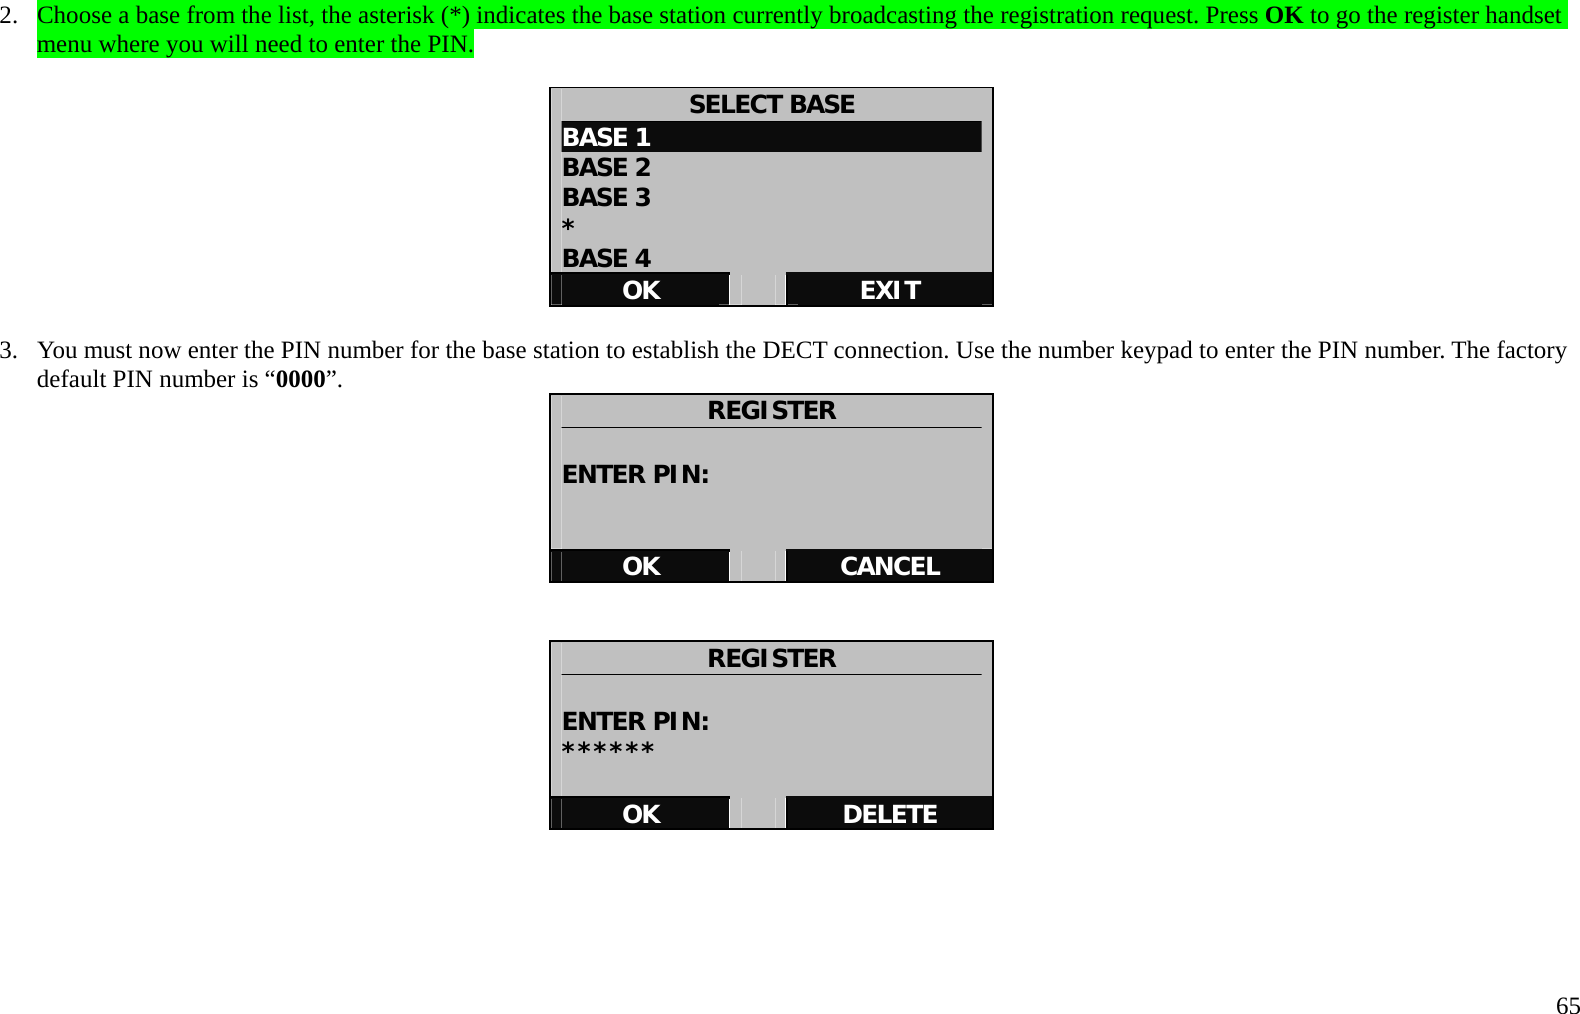
Ascalade Technologies, Inc. US DECT HANDSET UNIT
UserManual.wiki
>
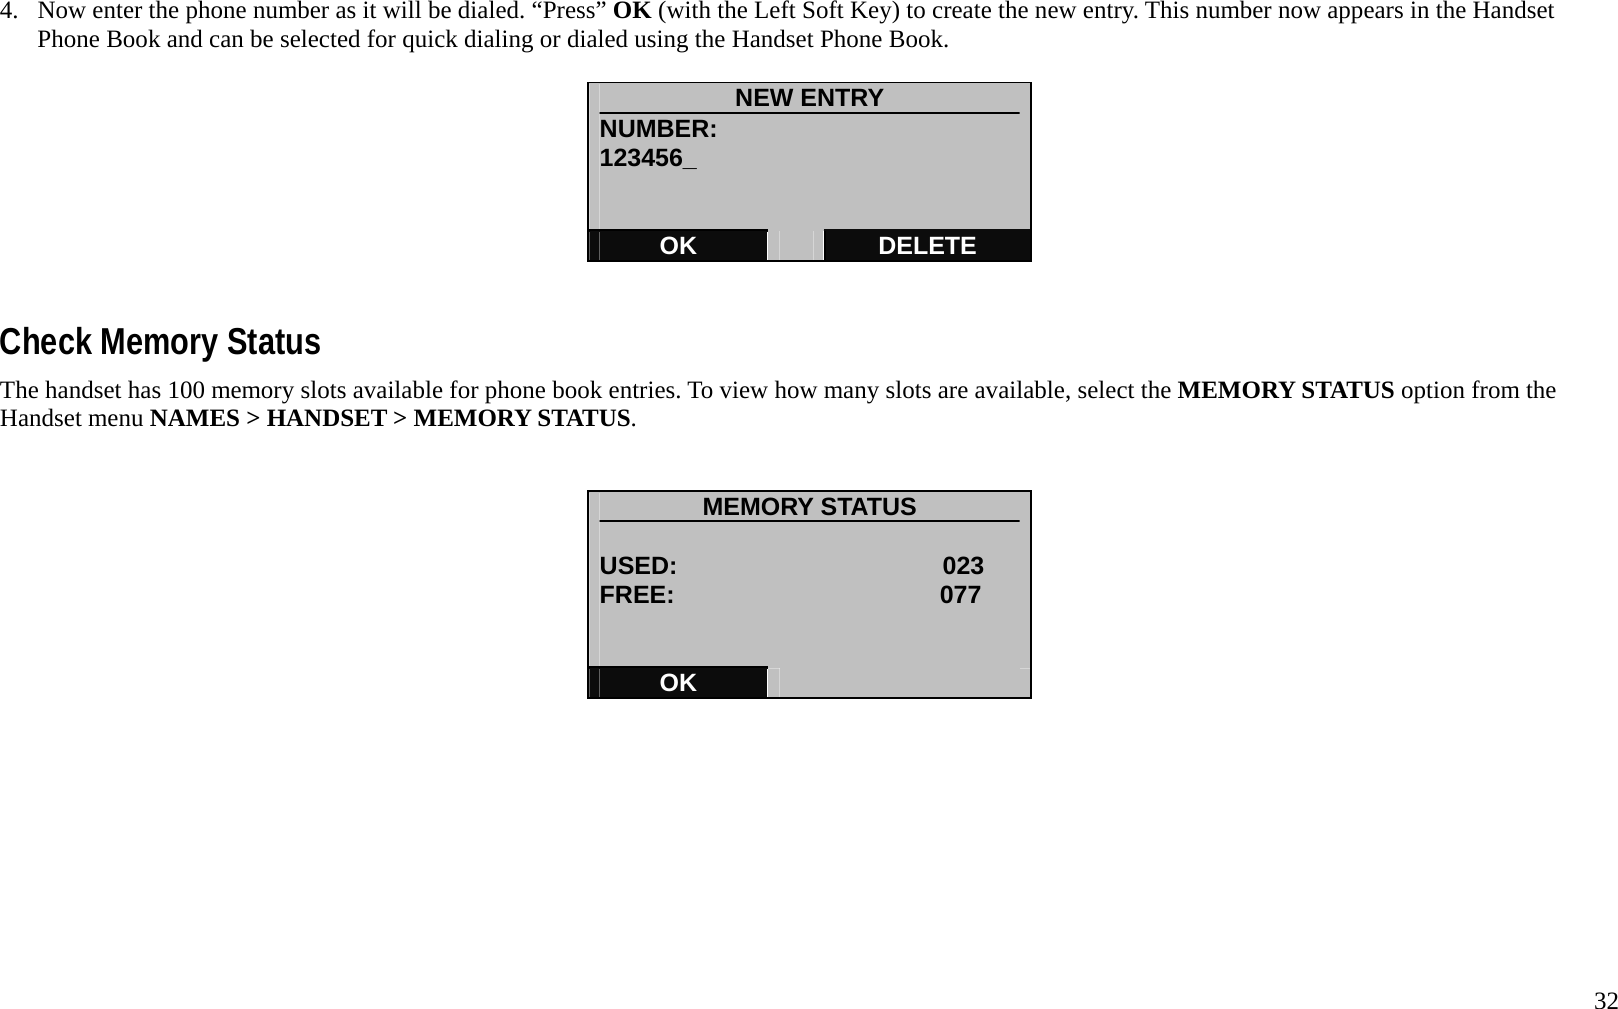
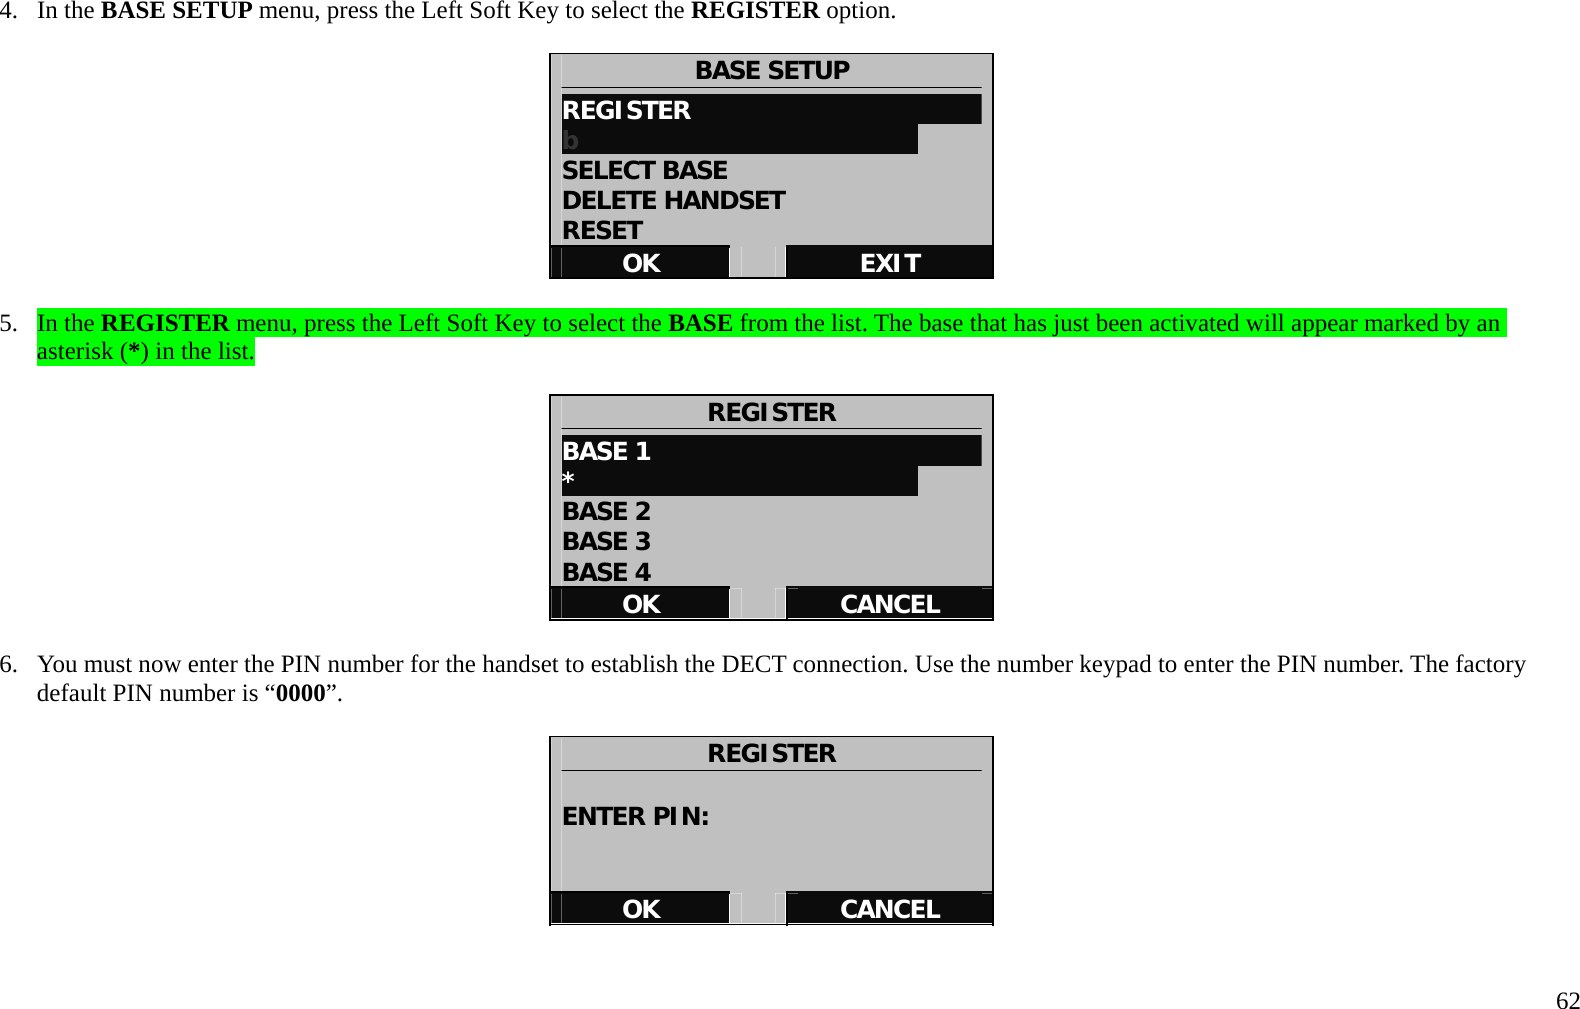
Ascalade Technologies
>
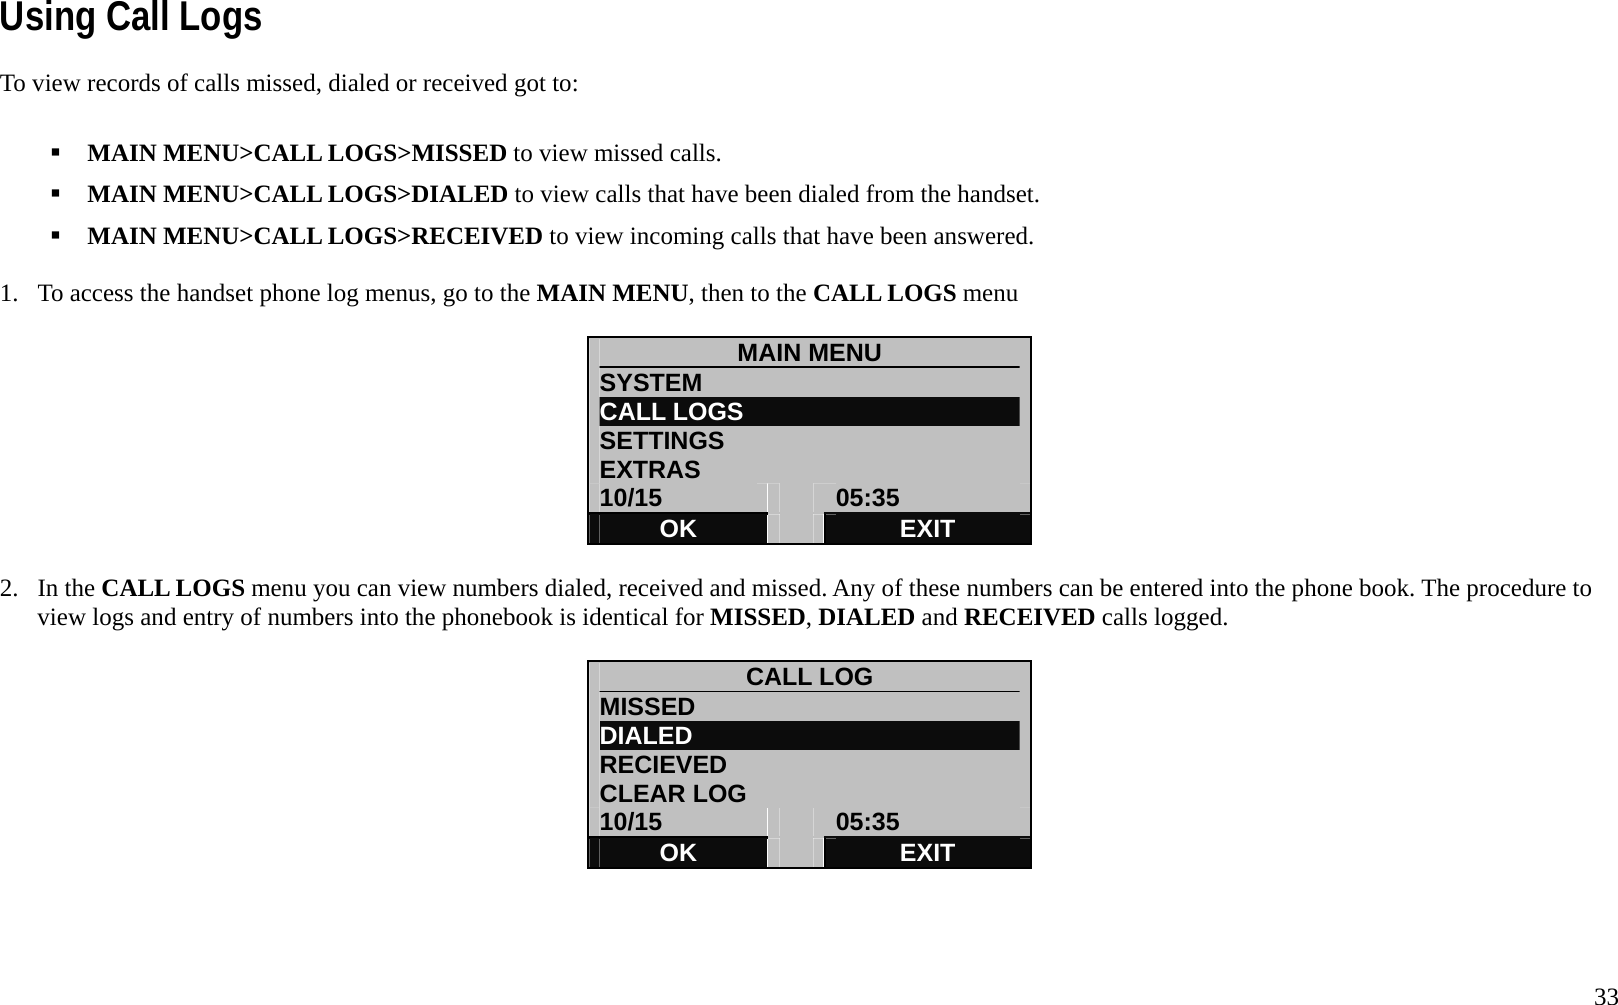
DT19R35H User Manual
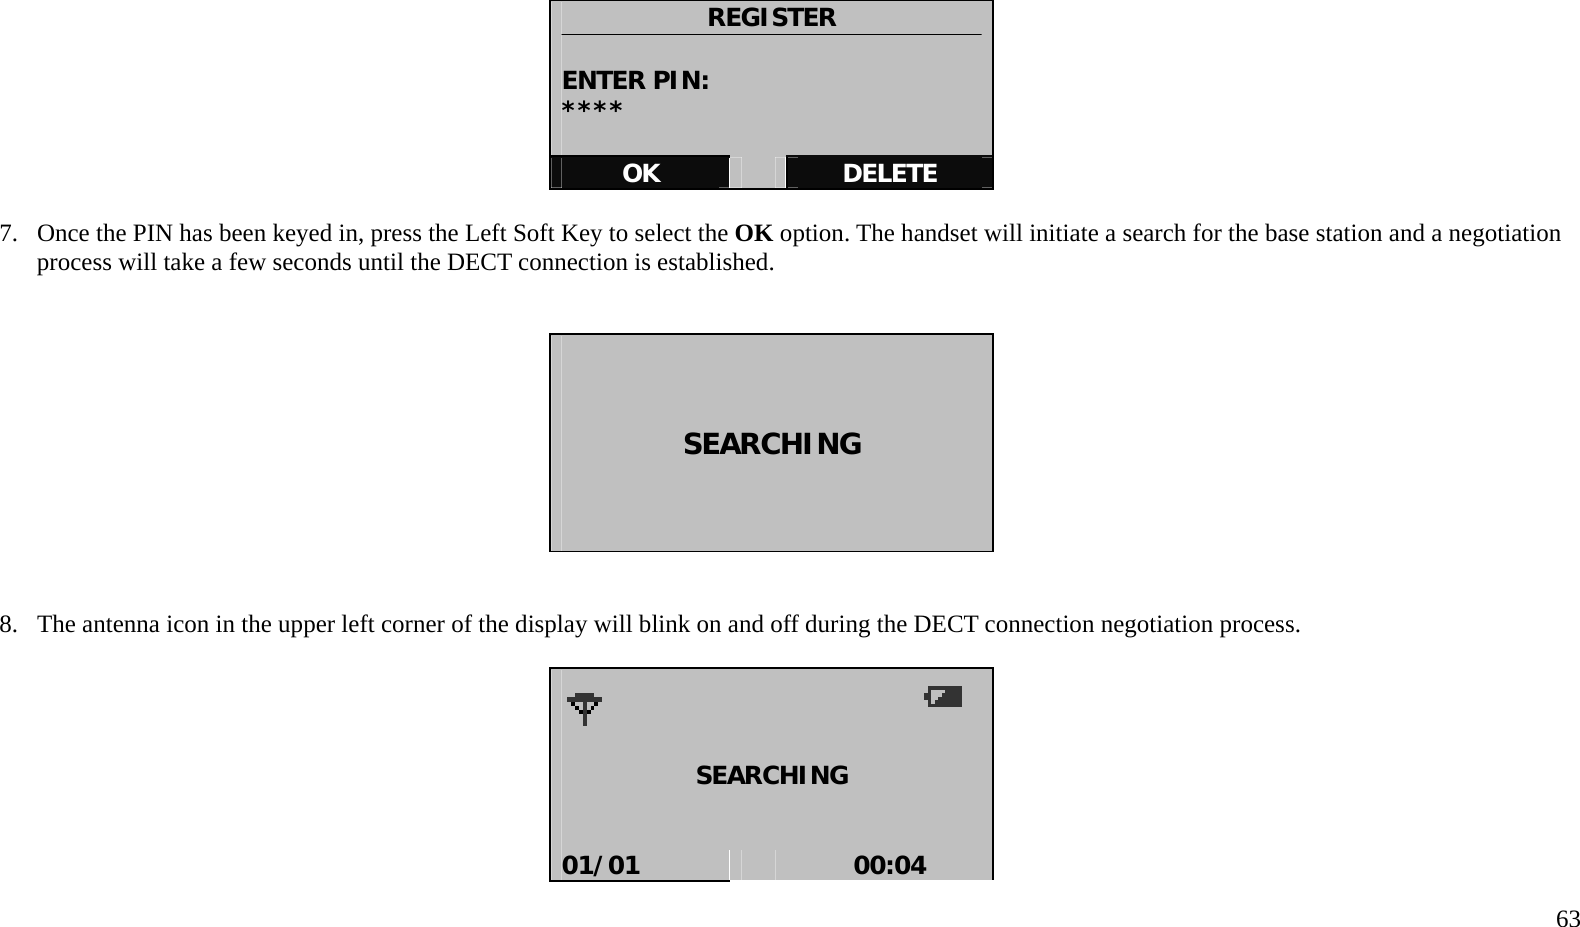
>
USERS MANUAL 1
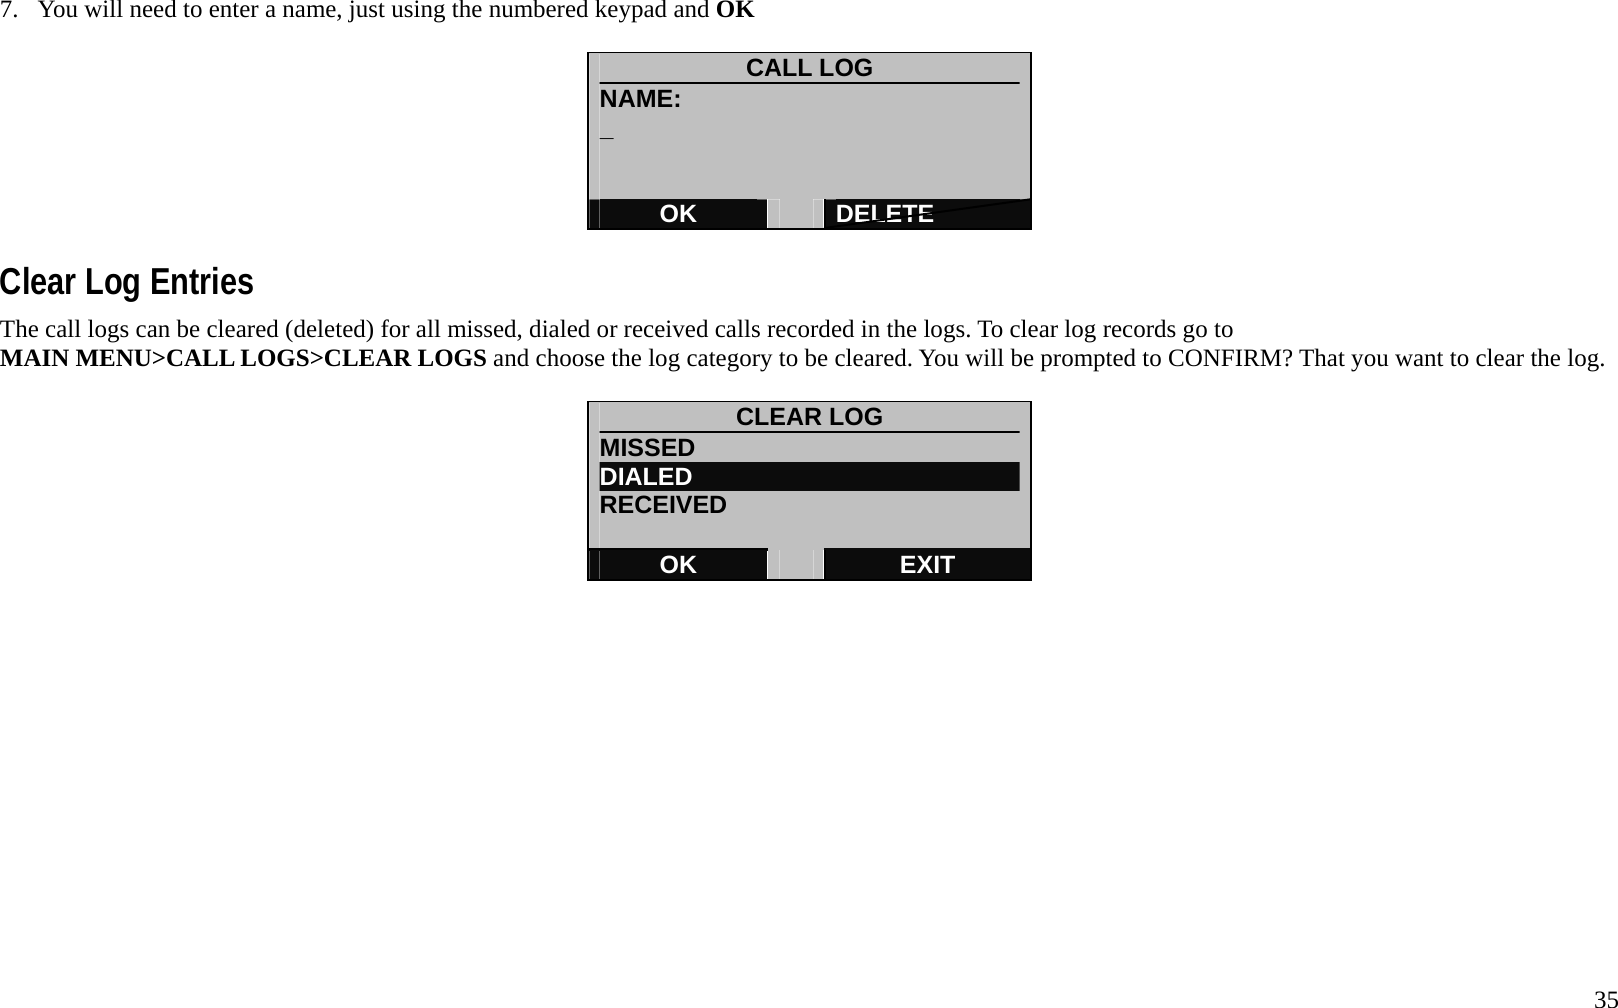
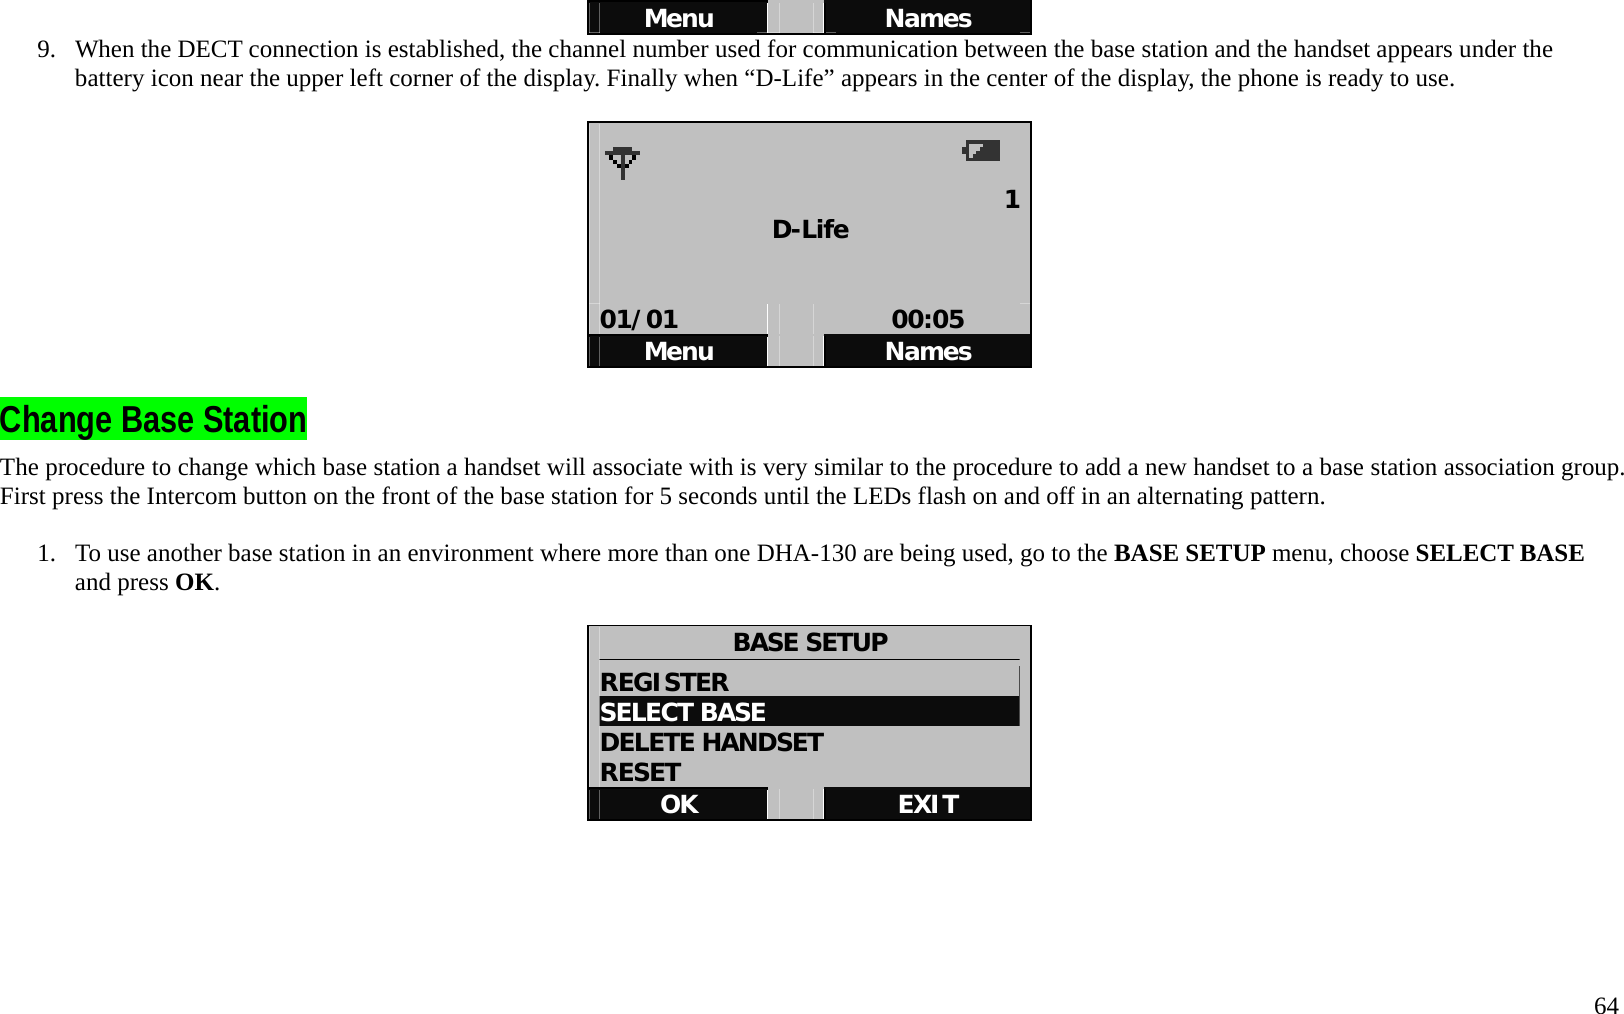
Contents
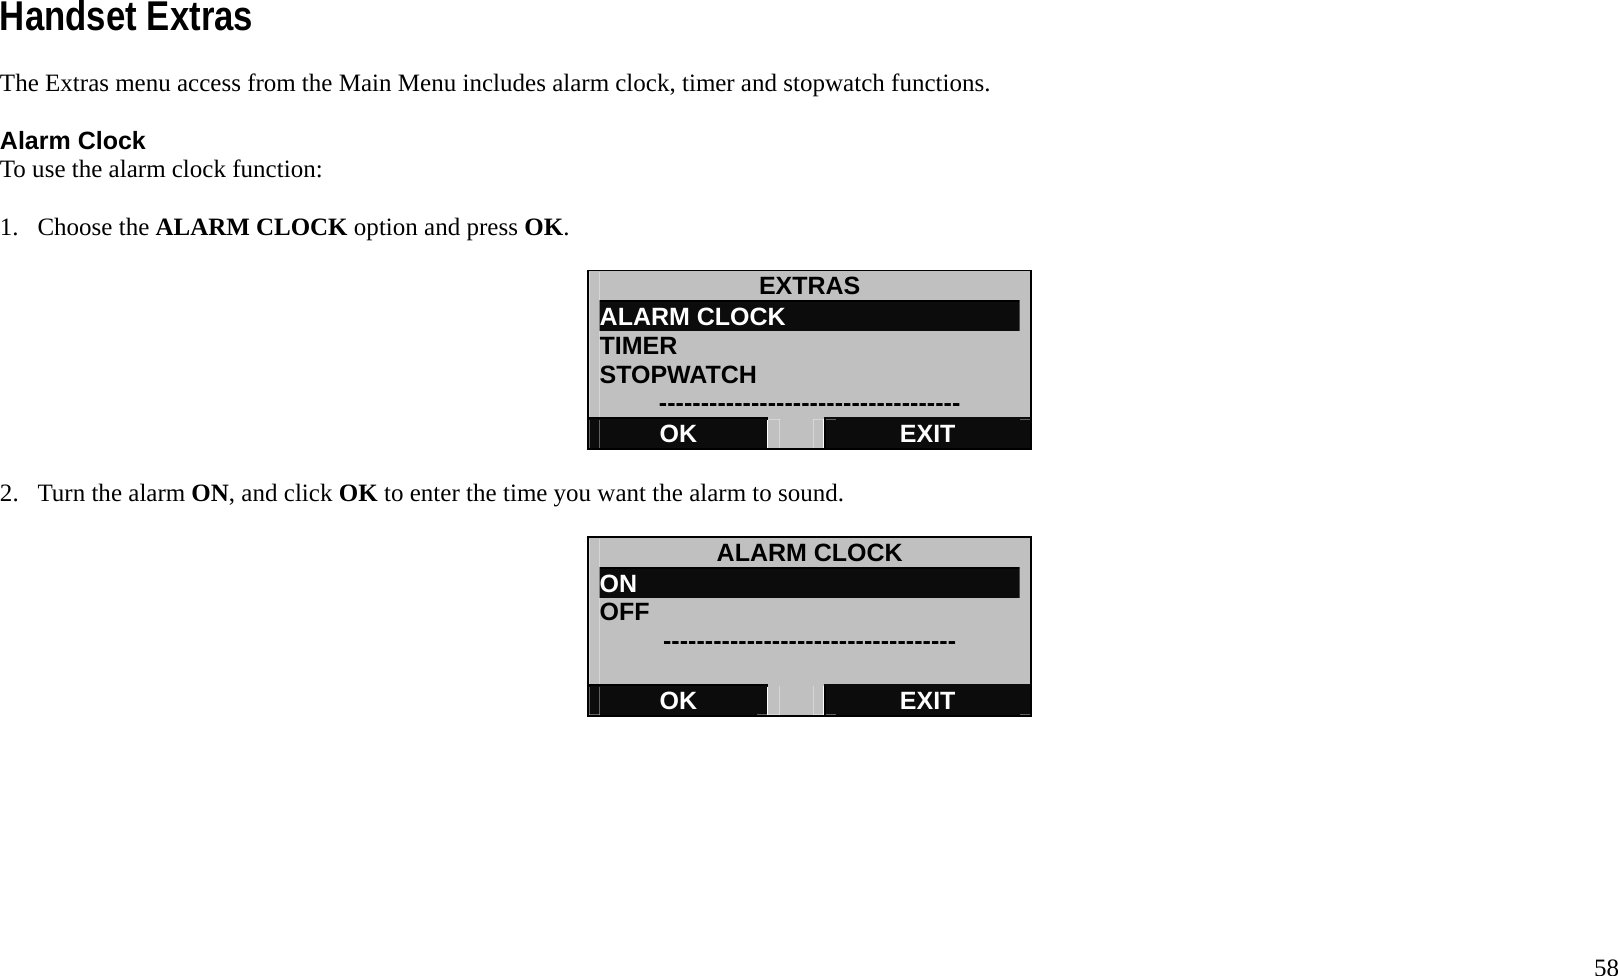
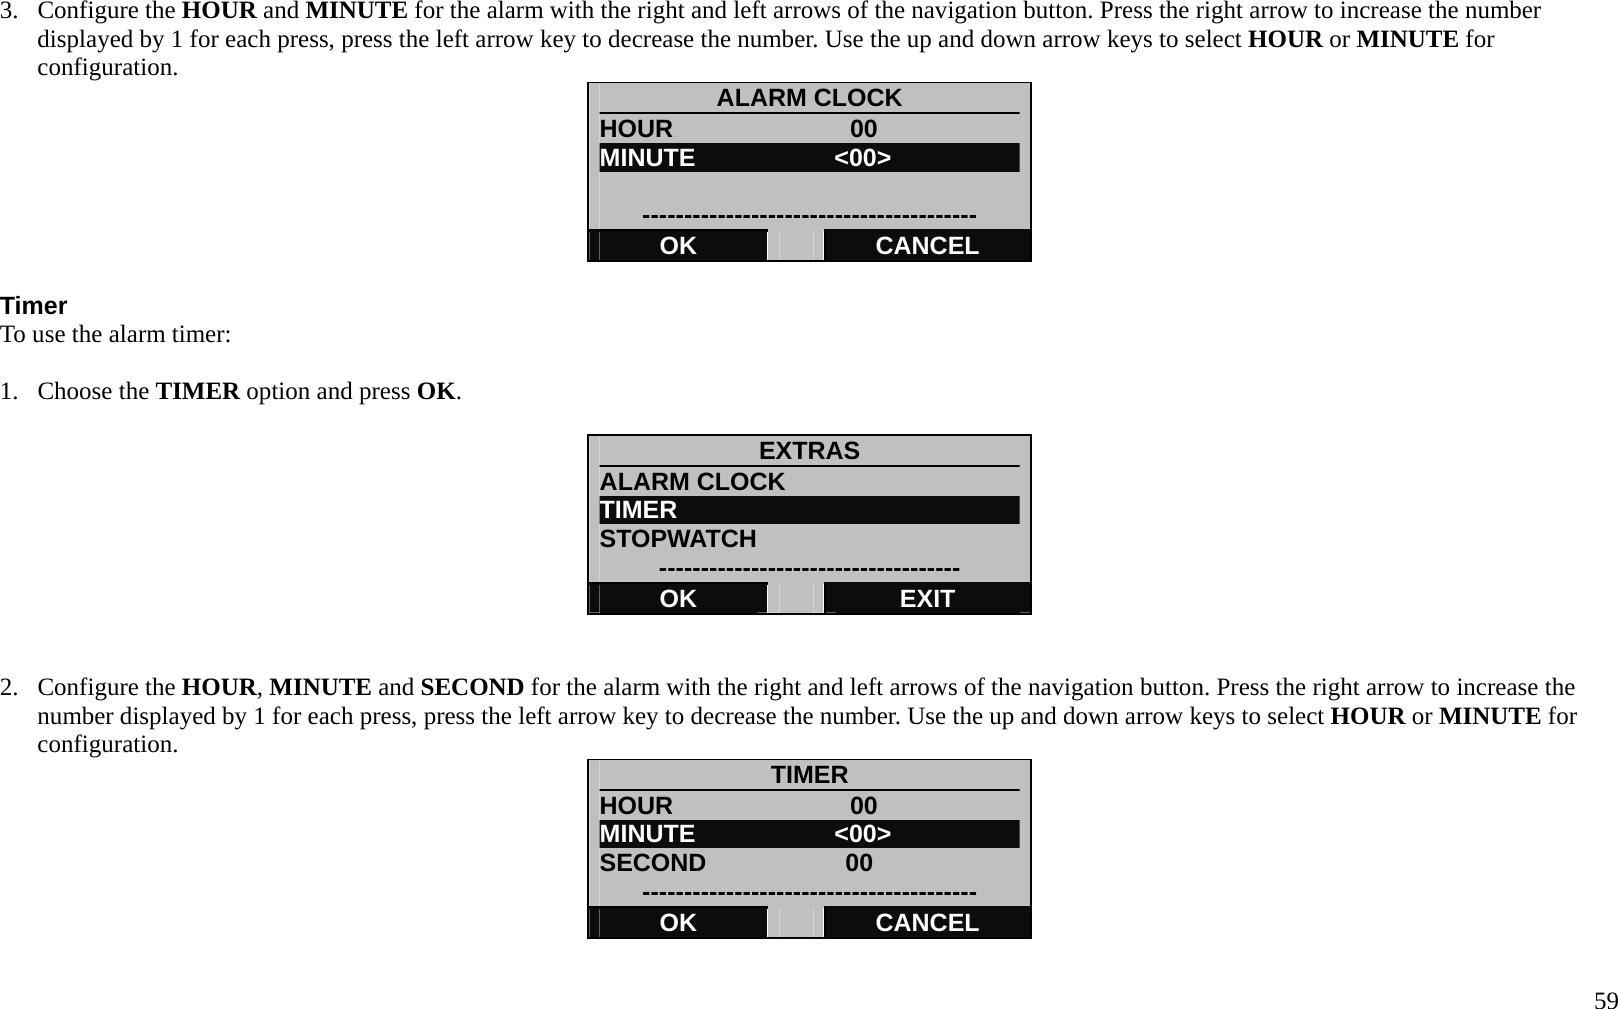
1.
USERS MANUAL 1
2.
USERS MANUAL 2
USERS MANUAL 1
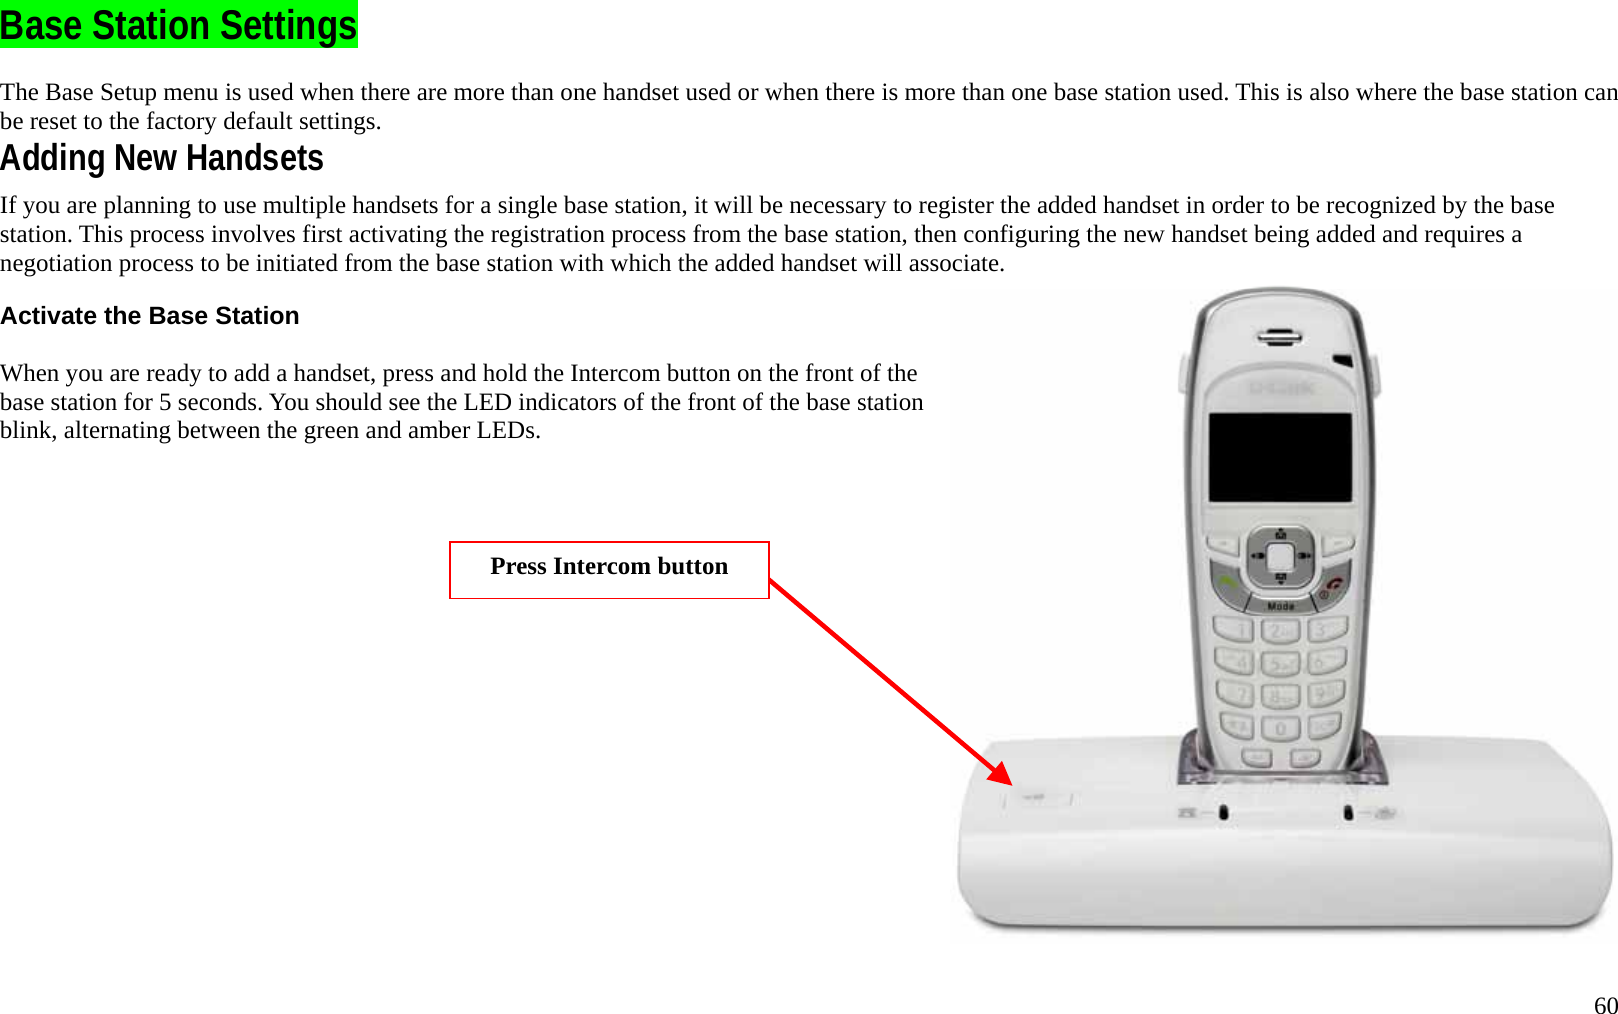
Navigation menu
Upload a User Manual
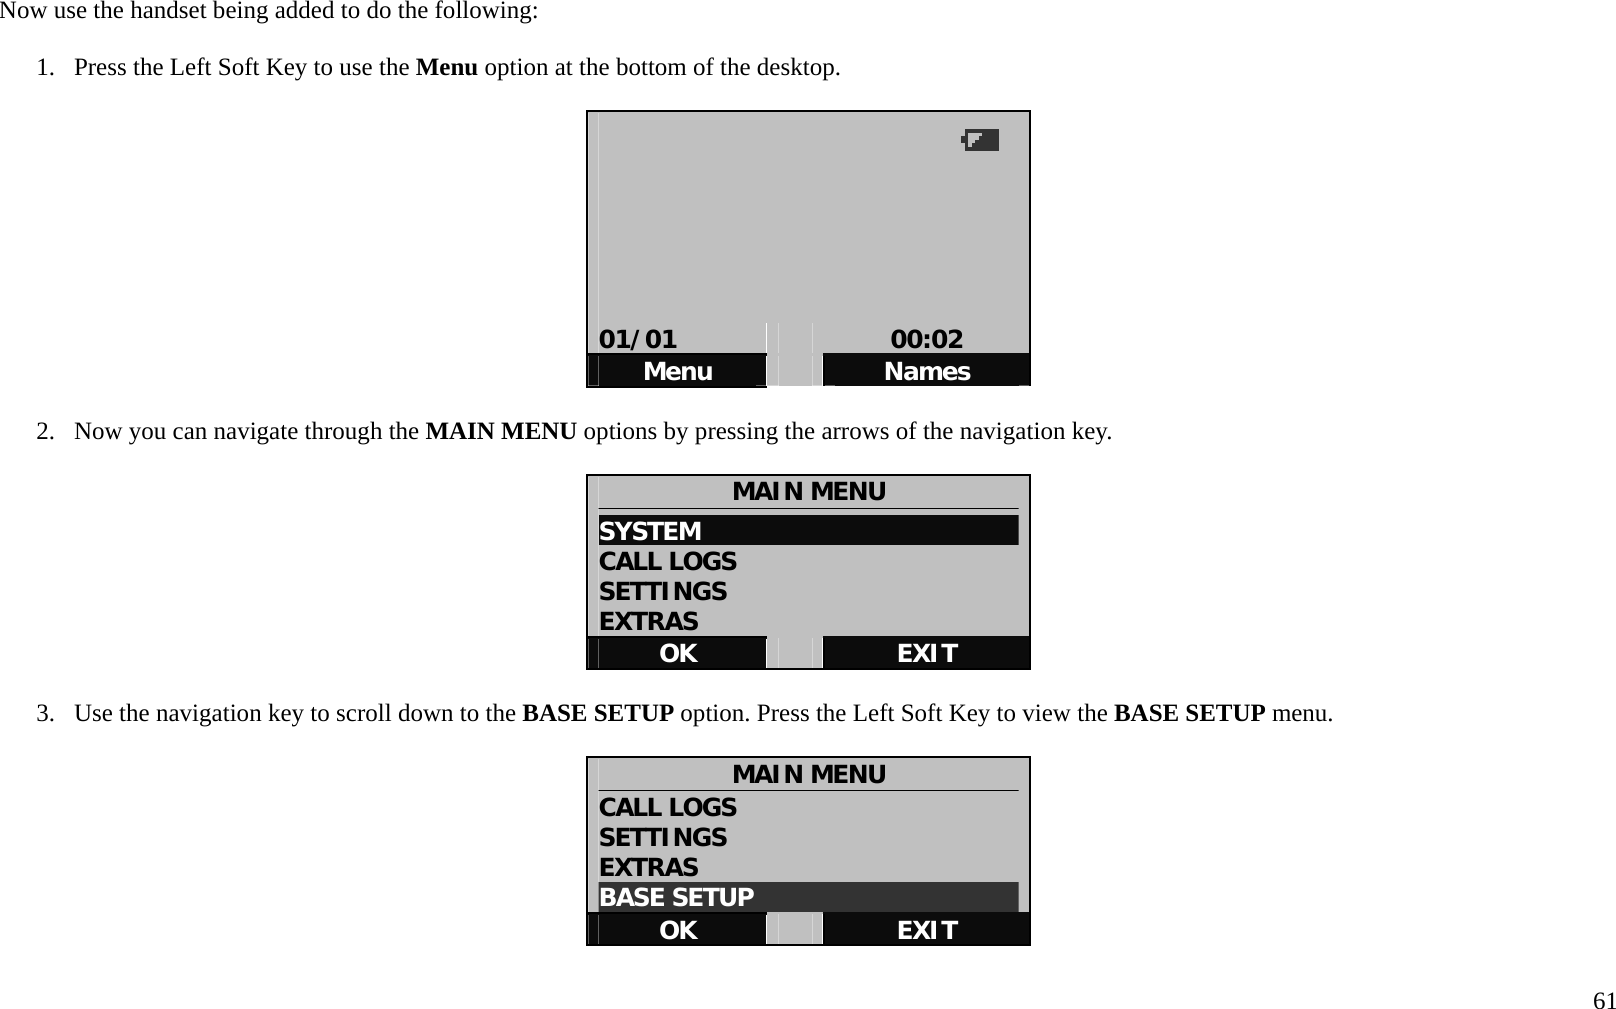
Namespaces
Wiki Guide
HTML
PDF
Info
Views
User Manual
Discussion / Help
Navigation

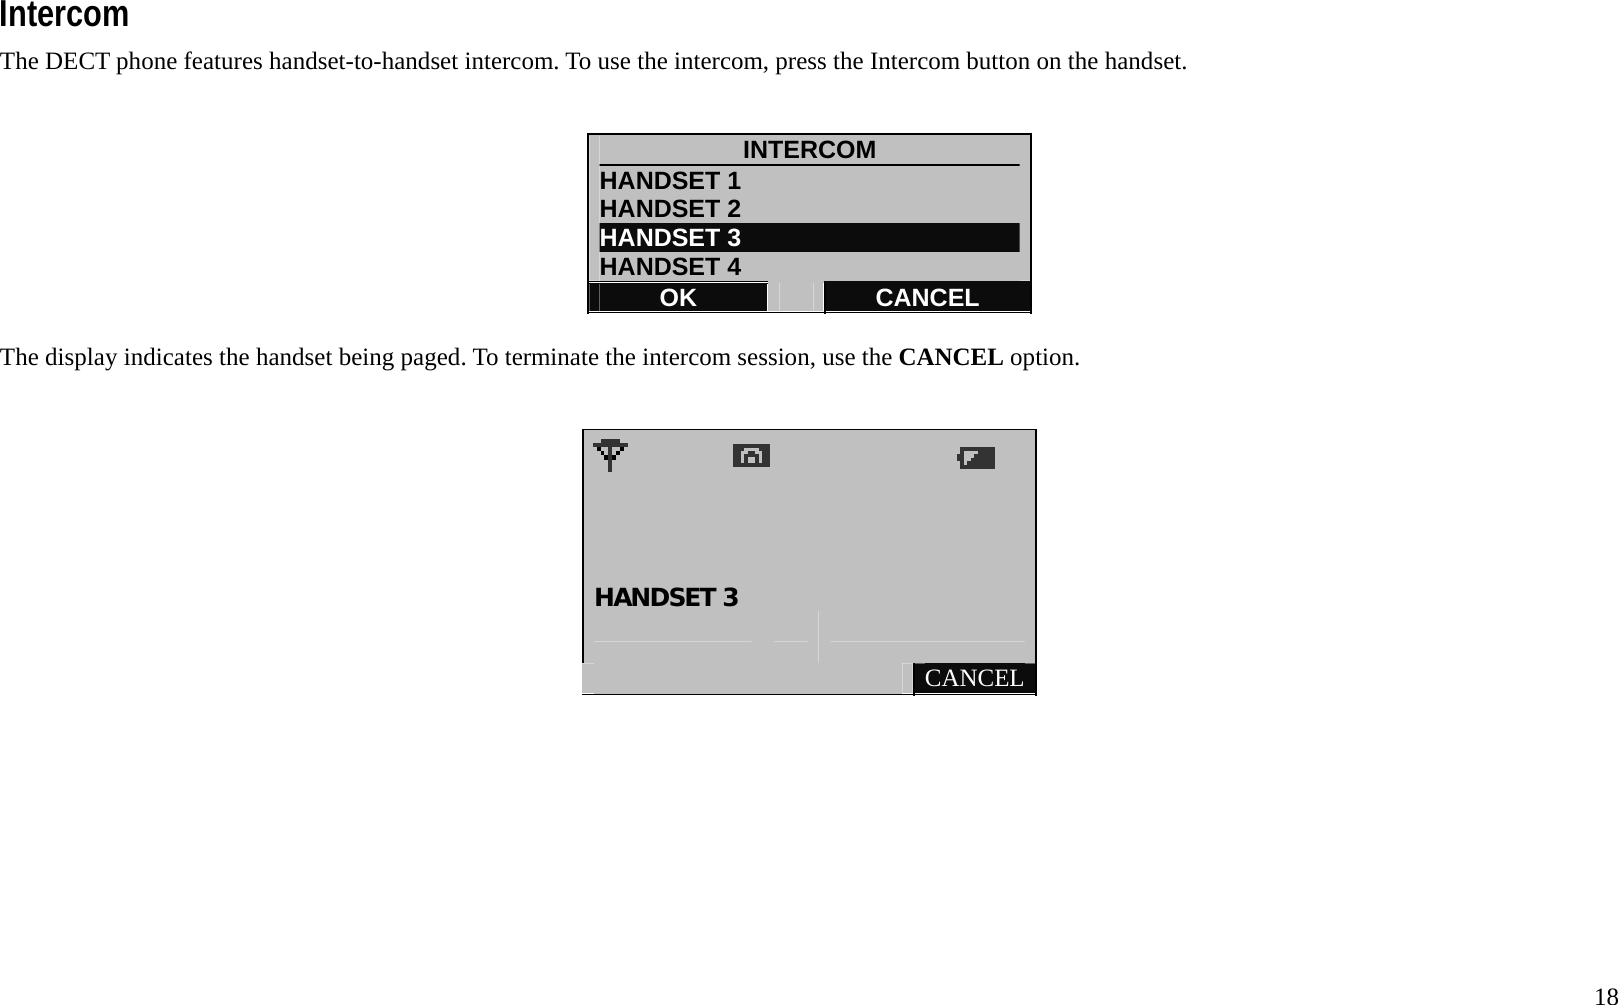
![11Incoming Calls The procedures used when answering calls from D-Life VoIP stations or PSTN calls are identical. The main difference is that the LCD display will indicate that the incoming call is a VoIP call or PSTN call. [i] 123456 04/03 12:15 ANSWER SILENT To answer the call immediately either press the Talk Key, or the Left Soft Key. Press the Right Soft Key to silence the ringer but not answer the call. When the call has been answered, a timer for the call appears, as well as OPTIONS that can be viewed using the Left Soft Key. The call can be muted so the call The number of the caller appears as well as the type of call ([i] for VoIP IP call and [P] for PSTN).](https://usermanual.wiki/Ascalade-Technologies/DT19R35H.USERS-MANUAL-1/User-Guide-922692-Page-14.png)
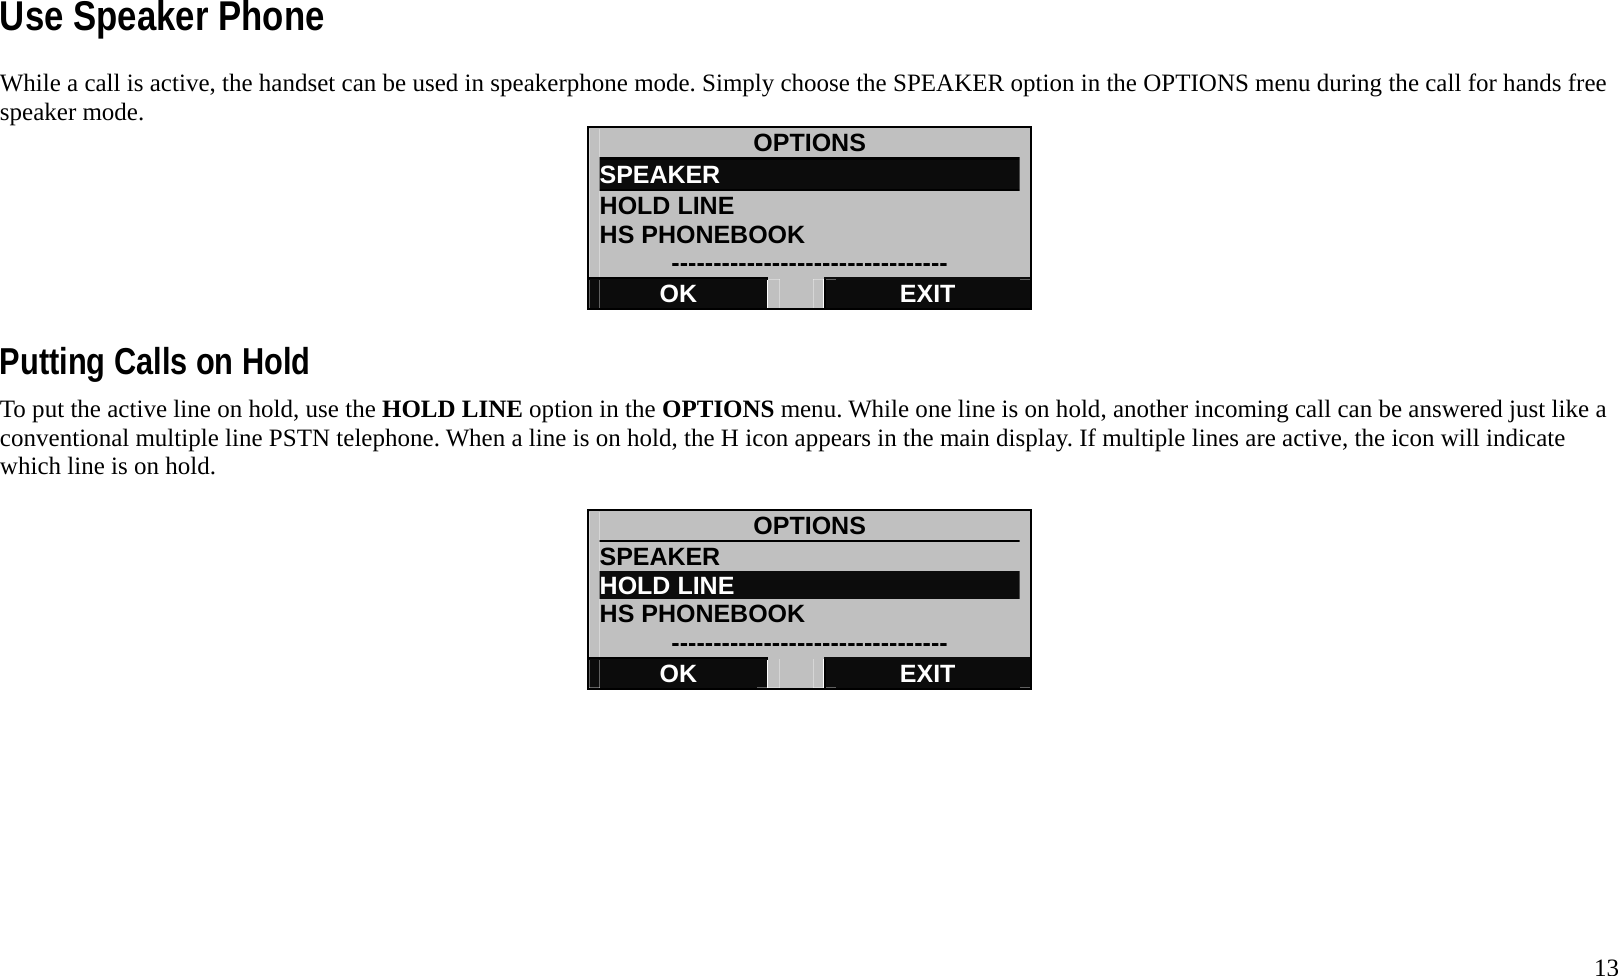
![12 is silenced from the handset while allowing voice and sound to still come through from the other end. To MUTE the handset, press the Right Soft Key while the call is active. [i] [i]: 123456 00:00:04 OPTIONS MUTE Use the Left Soft key to view the options available while the call is active. OPTIONS SPEAKER HOLD LINE HS PHONEBOOK --------------------------------- OK EXIT](https://usermanual.wiki/Ascalade-Technologies/DT19R35H.USERS-MANUAL-1/User-Guide-922692-Page-15.png)
![14 Call Waiting When an incoming call occurs while another call is active, the incoming call can be answered while placing the active call on hold automatically. [i] [P] [i]: 123456 [P]: 5558961 00:00:35 ANSWER MUTE To answer the incoming call and simultaneously place the active call on hold, press the Left Soft Key to ANSWER the incoming call. The original call will be on hold, this is indicated by the H1 icon indicating that line 1 is on hold. P [P]: 5558961 00:00:02 OPTIONS MUTE Use the Left Soft Key to view the options, including the option to switch back to the original caller. Incoming call indicated by flashing indicator (flashing [i] for VoIP, flashing [P] for PSTN) The name and number of the unanswered incoming call flashes. Current call information does not flash in the display.](https://usermanual.wiki/Ascalade-Technologies/DT19R35H.USERS-MANUAL-1/User-Guide-922692-Page-17.png)
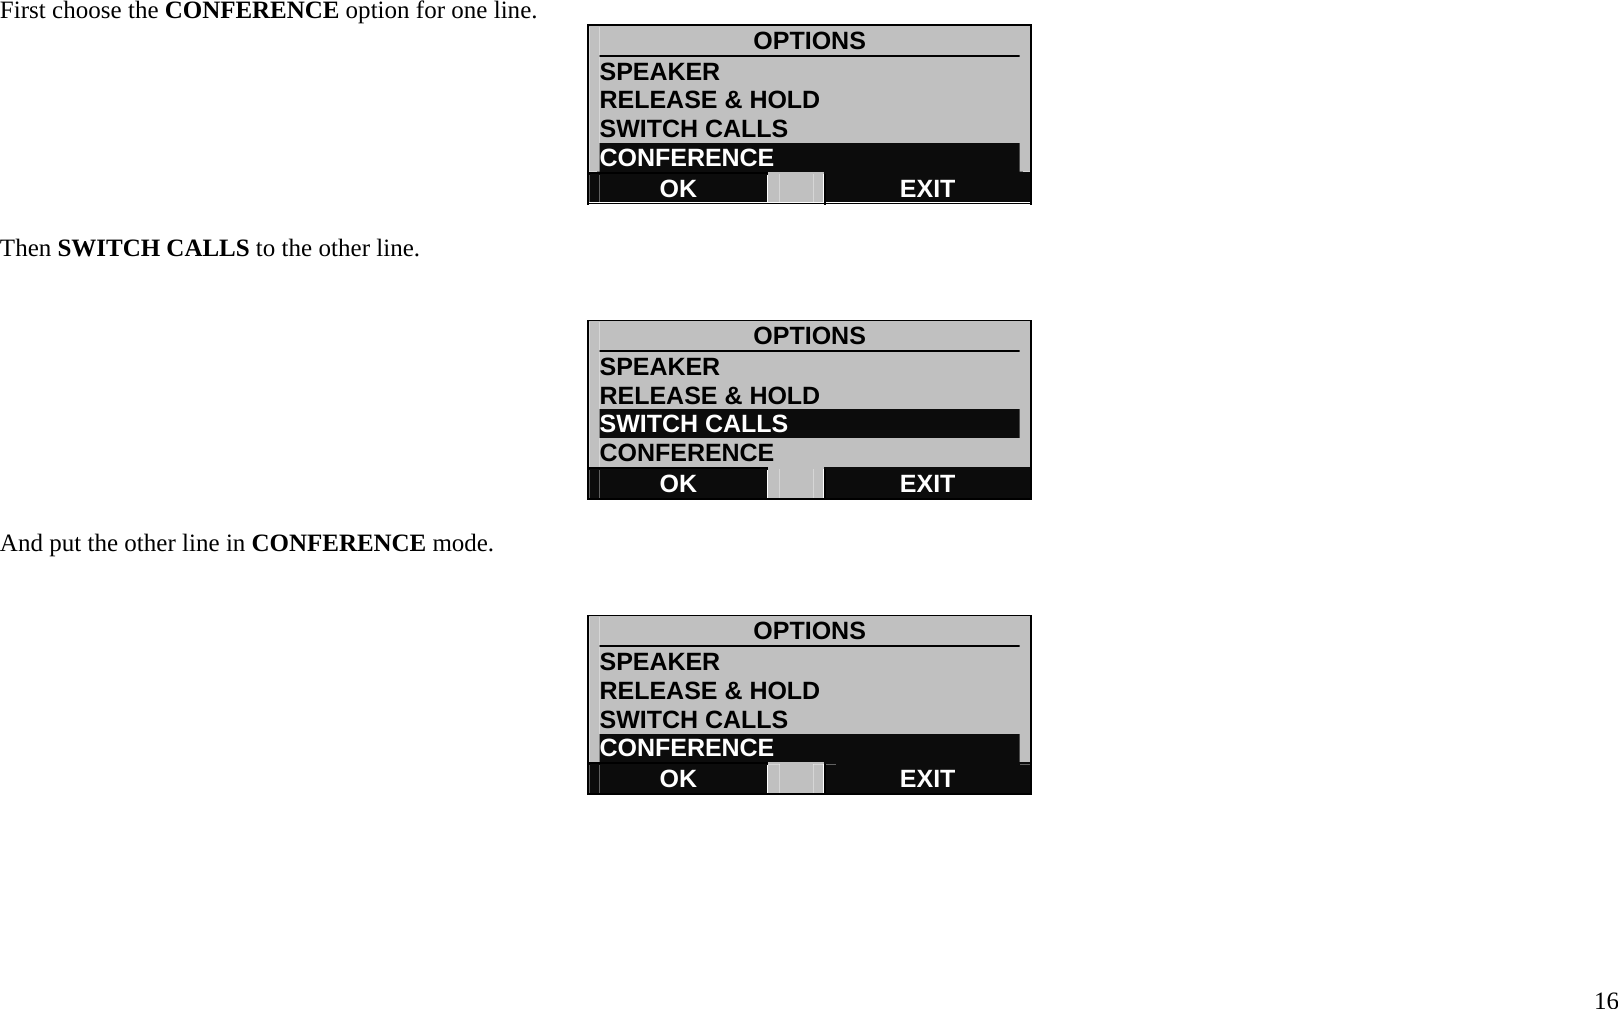
![15 To return to the original call, use the SWITCH CALLS option in the OPTIONS menu. Switching to the other line will put the second call on hold while taking the original call off hold. OPTIONS SPEAKER RELEASE & HOLD SWITCH CALLS CONFERENCE OK EXIT 3-Way Conference Calls Conference calls can be held when both lines have active calls. To use the 3-way conference call function, go the OPTIONS menu when both lines are connected (one or both lines can be on hold). [P] [i]: MOM/123456 [P]: BOB/5558961 00:00:35 OPTIONS MUTE It will be necessary to choose to put one call in conference mode, switch to the other line, then place that call in conference mode.](https://usermanual.wiki/Ascalade-Technologies/DT19R35H.USERS-MANUAL-1/User-Guide-922692-Page-18.png)
![17 The display indicates that the handset is in CONFERENCE mode. [i] [P] CONFERENCE 00:12:37 OPTIONS MUTE To end the conference call or select one line to leave the conference call, bring up the OPTIONS menu again. OPTIONS SPEAKER END CALL 1 END CALL 2 END ALL CALLS OK EXIT Select the option to END ALL CALLS if you want to terminate calls on both lines. Or choose to END CALL 1 or END CALL2 to return to single call mode with the remaining line.](https://usermanual.wiki/Ascalade-Technologies/DT19R35H.USERS-MANUAL-1/User-Guide-922692-Page-20.png)
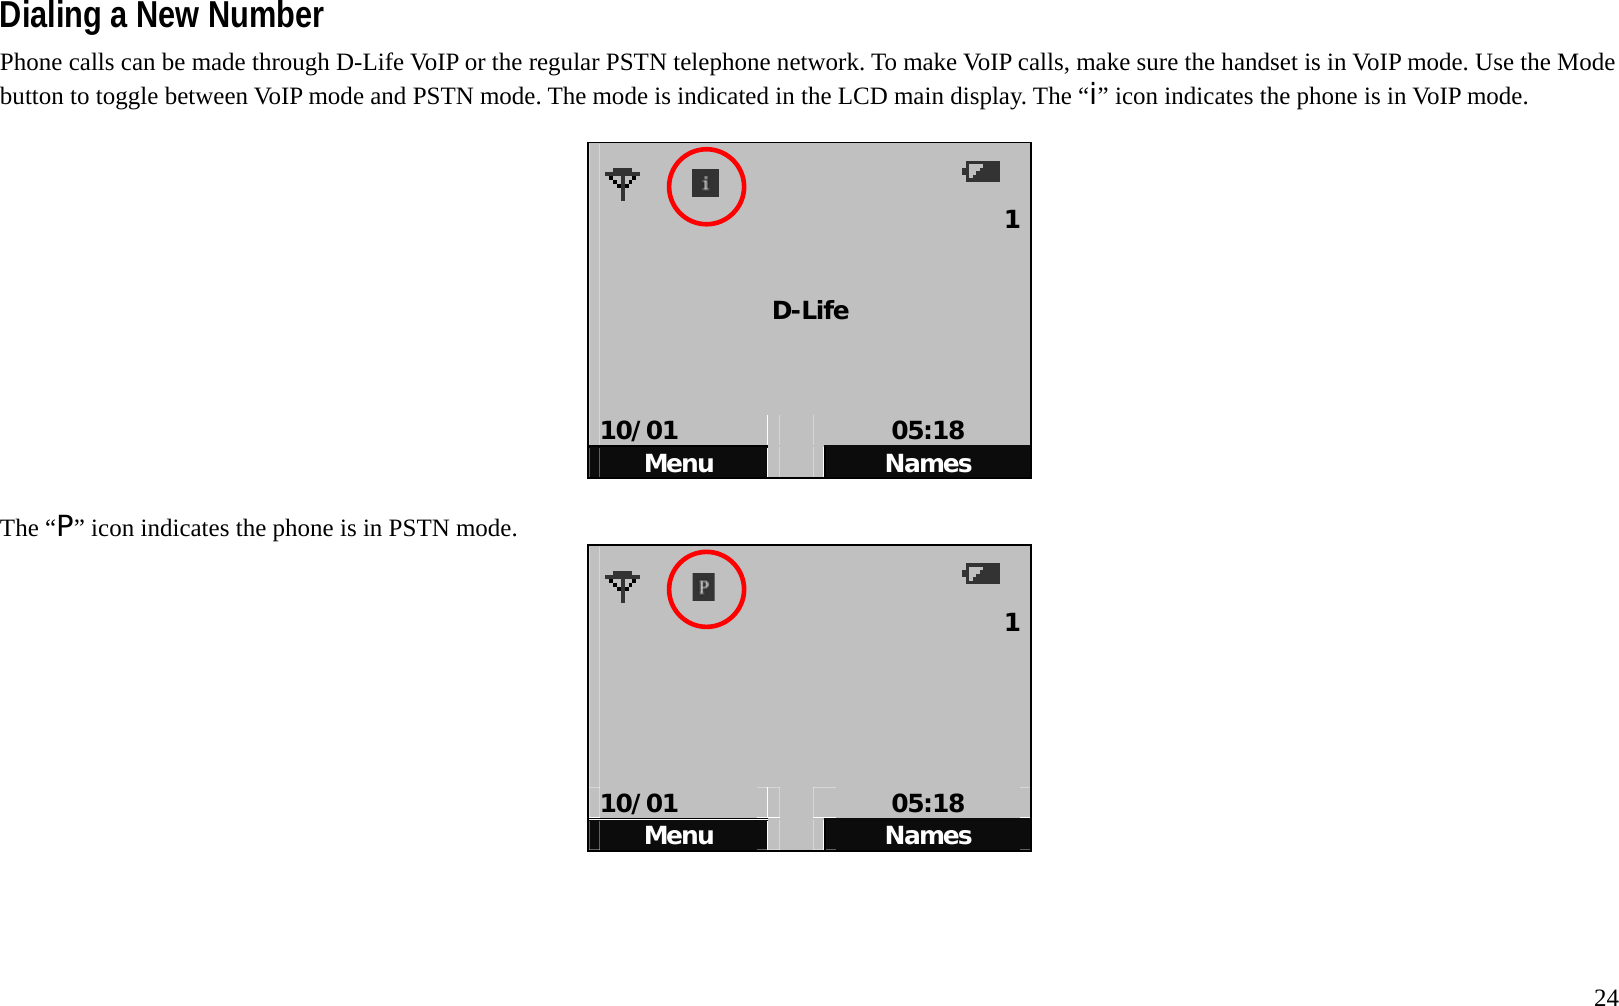
![19 Making Calls Calls can be made using phone book entries. Frequently used numbers can be added to the Quick Dial list. Calls can also be dialed if they do not appear in your logs or phone book. This section describes how to do all of these. Calling a Phone Book Entry 1. To call a number that is already in the phone book, simply choose NAMES from the desktop display. PHONE BOOK HANDSET D-Life ----------------------------------- OK EXIT 2. Choose the HANDSET or D-Life phonebook. HANDSET VIEW RECORD NEW ENTRY QUICK DIAL MEMORY STATUS OK EXIT 3. Select the number to call and choose DETAILS. HANDSET [i] ALICEB [P] BOBK [i]CAROLD [P]DENNYJ DETAILS EXIT](https://usermanual.wiki/Ascalade-Technologies/DT19R35H.USERS-MANUAL-1/User-Guide-922692-Page-22.png)
![20 4. Choose OPTIONS. DETAILS MOM [i]123456 OPTIONS EXIT 5. Choose the HANDSET or D-Life phonebook. OPTIONS USE NUMBER EDIT DELETE OK EXIT 6. Select DIAL to call the number. 123456 DIAL DELETE](https://usermanual.wiki/Ascalade-Technologies/DT19R35H.USERS-MANUAL-1/User-Guide-922692-Page-23.png)
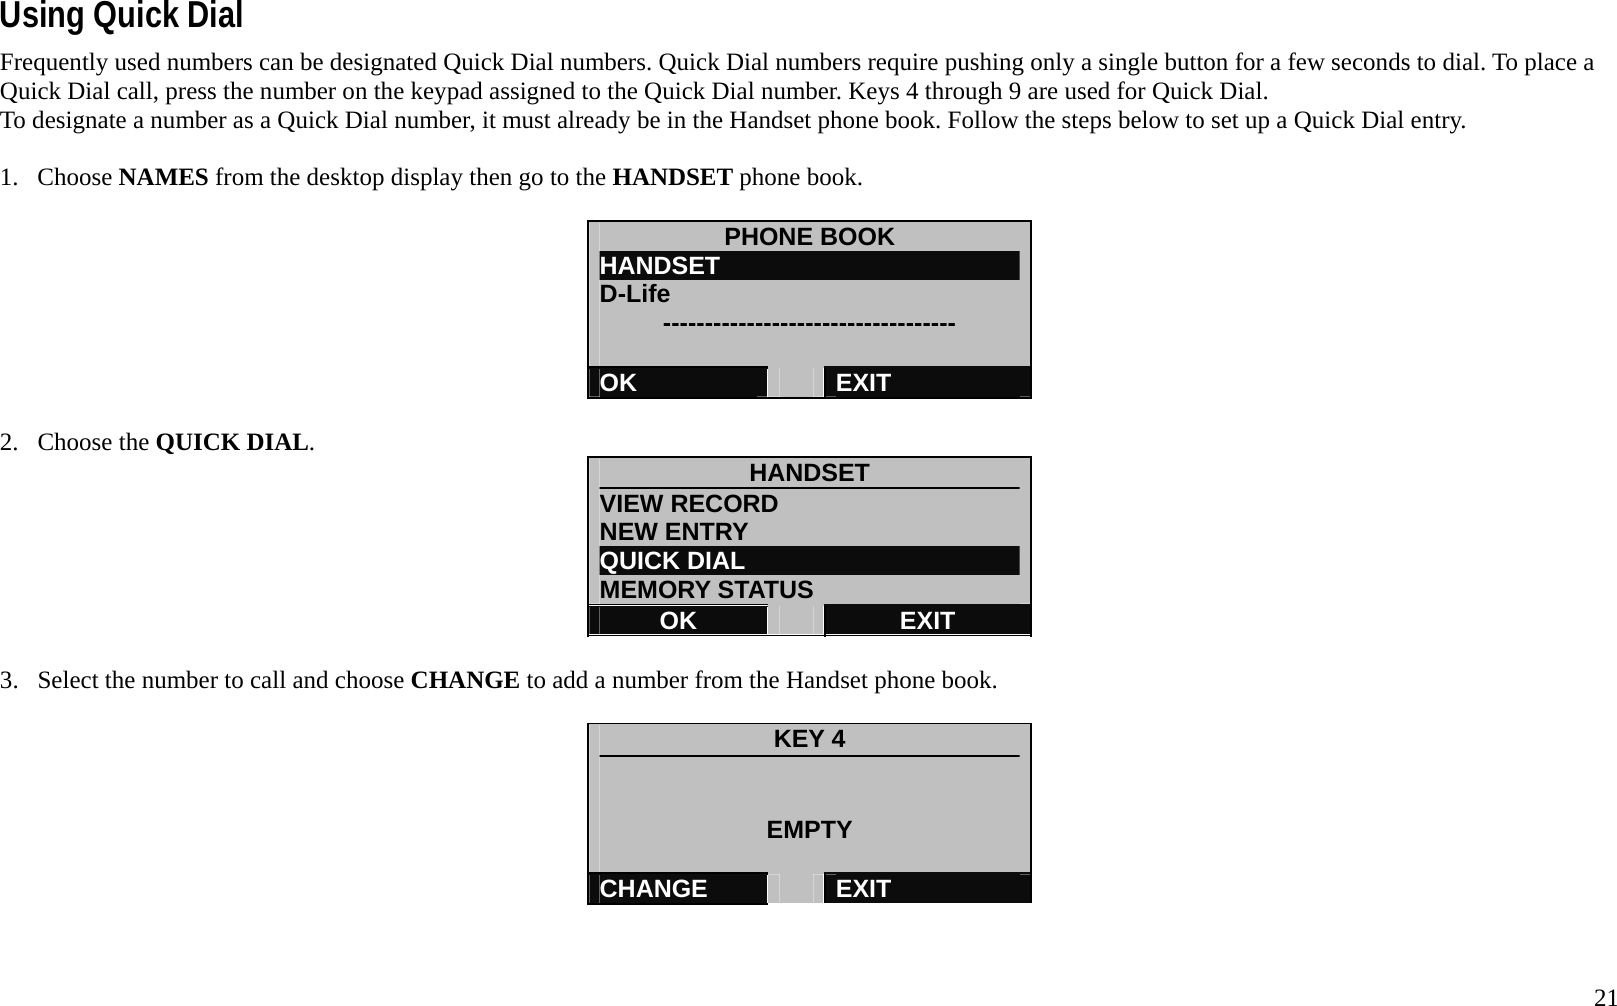
![22 4. The HANDSET phone book appears. Scroll to the name you want to add to the empty Quick Dial slot. HANDSET [P] BOBK [i]CAROLD [P]DENNYJ [i]MOM DETAILS EXIT 5. The HANDSET phone book appears. Choose OK to assign this number to the Quick Dial slot or choose LIST to go back to the HANDSET phone book. DETAILS MOM [i]123456 DEFAULT OK LIST 6. To add new Quick Dial numbers for the remaining keys (5 to 9), use the up and down navigation buttons on the handset to get to the remaining Quick Dial slots. KEY 4 EMPTY CHANGE EXIT 7. To edit or delete a Quick Dial entry, go to NAMES>HANDSET>QUICK DIAL and scroll to the key you want to edit or delete using the navigation button](https://usermanual.wiki/Ascalade-Technologies/DT19R35H.USERS-MANUAL-1/User-Guide-922692-Page-25.png)
![23 on the handset. The number appears listed as in the example below. Choose OPTIONS to edit or delete the Quick Dial entry. KEY 4 MOM [i]123456 OPTIONS EXIT 8. Select CHANGE to go to the Handset phone book listed entries and select a new number for the Quick Dial slot. Choose DELETE to remove the Quick Dial assignment, you will be asked to CONFIRM? The decision to delete in a new screen. OPTIONS CHANGE DELETE OK EXIT](https://usermanual.wiki/Ascalade-Technologies/DT19R35H.USERS-MANUAL-1/User-Guide-922692-Page-26.png)
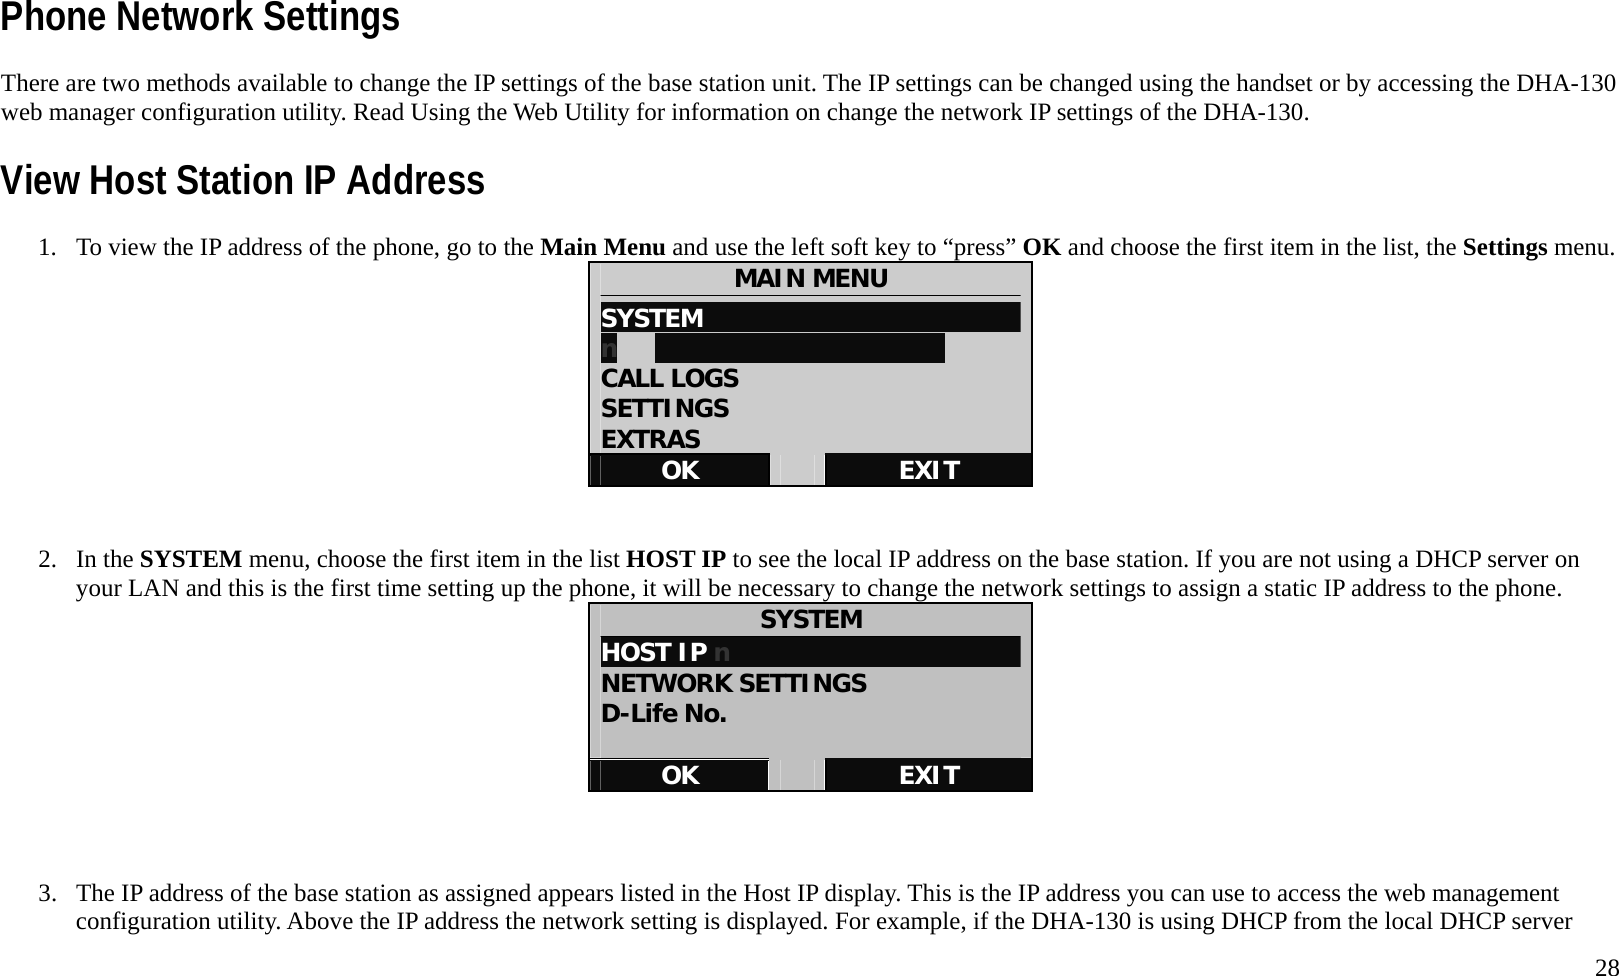
![29 (broadband or DSL router), the LCD display will look similar to this example: HOST IP [DHCP] 192.168.1.48 OK View Host Station IP Address – PPPoE Connection There are two methods to view the IP address if the phone is configured for PPPoE connection. Use either the SYSTEM menu and choose HOST IP, or use the NETWWORK SETTINGS menu and choose PPPoE to view a display similar to the example below. This only works if the phone is already configured for PPPoE. To configure the phone for PPPoE, please read 錯誤! 找不到參照來源。 below. HOST IP [PPPoE] 172.18.167.48 OK](https://usermanual.wiki/Ascalade-Technologies/DT19R35H.USERS-MANUAL-1/User-Guide-922692-Page-32.png)
![30 Using the Phonebook Phone numbers can be stored in the phonebook by entering them manually or after calling or receiving a call. Use Call Logs to store phone numbers you have dialed or received. See Using Call Logs for a description on how to store dialed and received numbers. Up to one hundred phonebook entries can be stored. To enter phone numbers manually, access the phonebook from the “desktop” D-Life display. There are two ways to access the phone book, use the navigation key or use the Left Soft Key to click Names option. This brings up the PHONE BOOK menu where you can select either the Handset phone records or the D-Life phone records. The navigation key arrows can be used to go directly to the D-Life phone book or the Handset phone book. From the desktop, use the navigation key to press the Down arrow to view the Handset Phone Book record menu, press the Up arrow to view the D-Life Phone Book record. PHONE BOOK HANDSET D-Life ----------------------------------- OK EXIT View Names in Phonebook If you have already entered phone numbers you can select the VIEW RECORD option to Handset view phone book entries. The phonebook entries are listed alphabetically. To dial a number in the phonebook, scroll to the name you want to call and press the call button with the name highlighted. NAMES > HANDSET > VIEW RECORD HANDSET VIEW RECORD NEW ENTRY QUICK DIAL MEMORY STATUS OK EXIT HANDSET [i] ALICEB [P] BOBK [i]CAROLD [P]DENNYJ DETAILS EXIT](https://usermanual.wiki/Ascalade-Technologies/DT19R35H.USERS-MANUAL-1/User-Guide-922692-Page-33.png)
![34 3. For example, go to the DIALED call log to see what numbers have been called using the handset. To view the time and date a number was dialed, scroll to select the number and use the DETAILS option. DIALED [i]0012125551234 [i]0012125550303 [i]0012125550022 [P]3125550011 DETAILS EXIT 4. The number dialed, time and date of the call are listed in the display. The number can then be saved. DIALED [i]0012125551234 18:00:00 2007/10/16 OPTIONS EXIT 5. To save the number in the phone book, use OPTIONS to go to the save or delete options menu. OPTIONS SAVE DELETE OK EXIT 6. Use the SAVE option to create a new phone book entry for this number. The procedure is similar to creating a new entry in the phone book, except you already have the number. Use DELETE to remove this single entry from the call log.](https://usermanual.wiki/Ascalade-Technologies/DT19R35H.USERS-MANUAL-1/User-Guide-922692-Page-37.png)


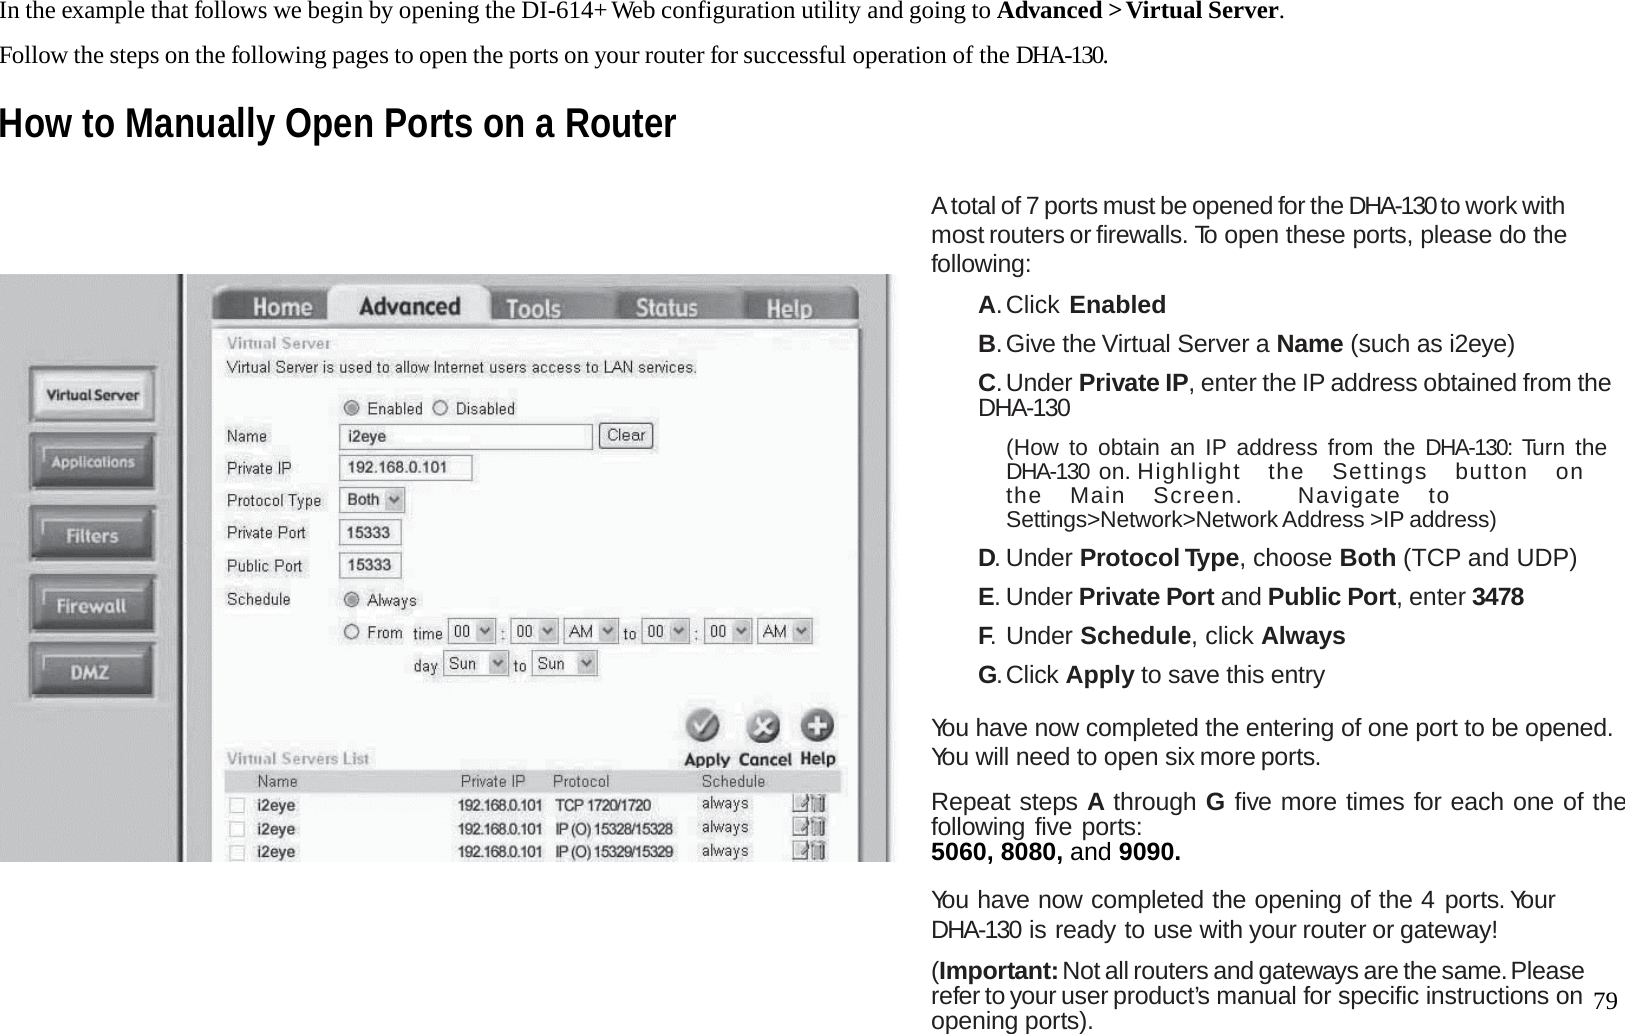
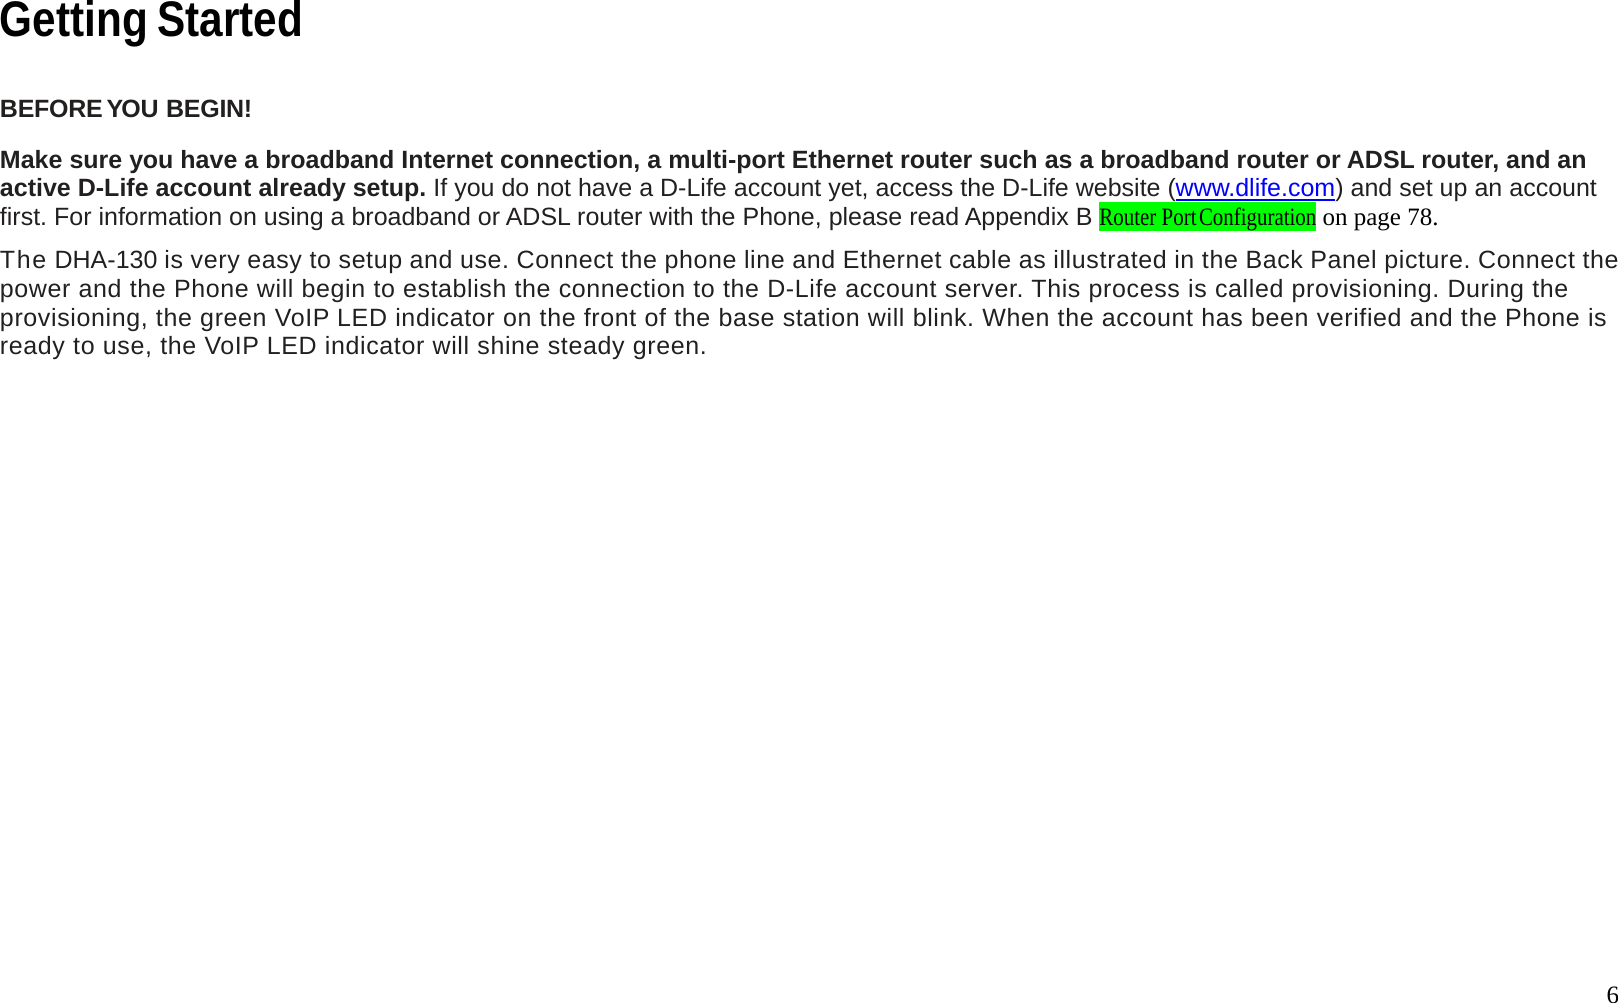
![78 Appendix B Router Port Configuration Most D-Link routers such as the [insert D-Link DSL and broadband router product numbers here] support a feature that allows easy one-click configuration of the DHA-130. So if you are using a D-Link router, chances are you will not need to manually configure the ports. If a one-click VoIP configuration is not supported on your router, check to make sure it is using the latest firmware. Upgrading your router to the latest firmware might be necessary to support this feature. If you have other routers or you are having difficulty with the DHA-130, read the information on the next below to learn how to open ports on routers. A D-Link router is used for the examples to illustrate how the port forwarding menus are used, but the example is typical of many small office routers. Opening Ports on Routers and Gateways The firewall security features built into most routers and gateways might prevent users from accessing the VoIP features of their DHA-130. A router connects to the Internet through a series of numbered ports. The ports used by the DHA-130 are often blocked from access over the Internet by the firewall features of the router. You may be able to connect to another VoIP telephone but not receive any audio. This is a typical scenario of a firewall blocking the ports needed by the DHA-130 to send audio. If this is the case, you need to open the ports on your router to the Internet to allow access to the DHA-130. The port numbers used by the DHA-130 are: 3478 5060 8080 9090 The router or gateway that you are using may be different from the D-Link DI-614+ wireless router example shown on the following pages. However, the general procedure for opening ports will be similar. (If you do not have a D-Link router, look for Virtual Server, Firewall Rules, Port Forwarding, Advanced or Firewall in your router’s configuration utility.)](https://usermanual.wiki/Ascalade-Technologies/DT19R35H.USERS-MANUAL-1/User-Guide-922692-Page-81.png)