Ascensia Diabetes Care US N2 Contour Next Link Blood Glucose Meter User Manual
Bayer HealthCare Diabetes Care Contour Next Link Blood Glucose Meter
Manual
LINK
WIRELESS BLOOD GLUCOSE
MONITORING SYSTEM
USES BAYER’S CONTOUR
®
OR CONTOUR
®
NEXT
BLOOD GLUCOSE TEST STRIPS
www.bayerdiabetes.com/us
USER GUIDE
18211 NE 68th Street,
E120 Redmond, WA 98052
T425-881-5454
Contour Next LINK User Guide Master English
Alt#1 - 2/15/11 - copy/image changes
Alt#2 - 2/17/11 - Copy changes
Alt#3 - 3/08/11 - Copy/image changes
Alt#3-1 - 3/09/11 - Copy/image changes
Alt#3-2 - 3/09/11 - Copy/image changes
Alt#3-3 - 3/09/11 - Copy changes
Alt#4 - 3/15/11 - Copy changes
Alt#5 - 3/18/11 - Copy changes
Alt# 6 - 5/18/11 Copy changes
DATE:
CLIENT:
DESCRIPTION:
SCHAWK JOB#:
BAN#:
SKU#:
DIMENSIONS:
PRINTER SPEC:
V-6 ENGLISH
PROCESS CYAN
PROCESS MAGENTA
PROCESS YELLOW
PROCESS BLACK
COLORS
Helvetica, Times,
Arial, Berthold
Akzidenz
Grotesk, Skinny
Mini, Frutiger,
Zapf Dingbats,
MiniMicra
FONTS
May 18, 2011
Bayer HealthCare
Contour Next LINK User Guide Master
English
905844
XXXXXXXX Rev. 02/11
N/A
6.0" (H) x 4.5" (W)
PUSG0494 REV F
MST_CntrNextLINK_UG_EN_FpBp_v6.indd ofc1MST_CntrNextLINK_UG_EN_FpBp_v6.indd ofc1 5/18/11 2:54 PM5/18/11 2:54 PM
INTENDED USE: The CONTOUR®NEXT LINK wireless blood
glucose monitoring system is an over the counter (OTC) device
utilized by persons with diabetes in home settings for the
measurement of glucose in whole blood, and is for single-
patient use only. The CONTOUR NEXT LINK blood glucose
monitoring system is indicated for use with fresh capillary
whole blood samples drawn from the fi ngertip and palm only.
The CONTOUR NEXT LINK wireless blood glucose monitoring
system may be used to transmit glucose values to compatible
Medtronic Minimed devices and facilitate transfer of
information to Medtronic’s CareLink® Therapy Management
software through use of radio frequency communication.
The CONTOUR NEXT LINK wireless blood glucose monitoring
system is not intended for the diagnosis of or screening for
diabetes mellitus and is not intended for use on neonates.
TABLE OF CONTENTS
Your Meter Features 2
Talking to Your Compatible Medtronic MiniMed Device 3
Bayer’s CONTOUR NEXT LINK Blood Glucose
Monitoring System 4
Meter Overview 6
Initial Setup 8
AutoLog Feature 10
Information for Safety 12
Getting Ready to Test 14
Getting the Blood Drop 17
Fingertip Testing 17
Alternative Site Testing (Palm) 21
Cleaning and Disinfecting 29
High and Low Blood Sugar Alert Screens 33
High and Low Blood Sugar Readings 34
Control Solution Testing 35
Menu Button/Logbook (Viewing Stored Results) 46
Trends 47
Setup: Pump Options 49
Date, Time and Sound 51
AutoLog On/Off 55
Target Range 56
Language 59
Transferring Data to Medtronic’s CareLink
Personal Therapy Management Software 60
Setting a Reminder 38
Turning Off a Reminder 42
Getting a Reminder 44
Adding Notes 45
Error Detection and Battery Status/Charging/Removal 62
Symptoms of High and Low Blood Sugar 67
System Performance Information 68
Service Information 73
Symbols Used 74
System Specifi cations 74
Caring for Your Meter 76
Supplies/References/Warranty 76
Information for Safety
WARNING:
• The meter and lancing device are for single patient use.
Do not share them with anyone including other family
members! Do not use on multiple patients!1,2
• All parts of the kit are considered biohazardous and can
potentially transmit infectious diseases, even after you
have performed cleaning and disinfection.
For complete instructions on cleaning and disinfecting your
meter and lancing device, please see page 29.
Important: Examine product for missing, damaged, or broken parts.
Contact Bayer Diabetes Care Customer Service at 1-800-348-8100
for replacement parts.
Read your CONTOUR NEXT LINK user guide, the MICROLET®2
lancing device insert and all instructional materials provided in your
meter kit before testing. Please follow all instructions for use and care
exactly as described to help avoid inaccurate results.
Wash and dry your hands well before testing.
Used test strips and lancets are possible biohazards and must be
disposed of as medical waste.
Main Menu
Functions
Technical,
Service & Care
Reminders
and Notes Testing Getting
Started
MST_CntrNextLINK_UG_EN_FpBp_v6.indd ifc2-1MST_CntrNextLINK_UG_EN_FpBp_v6.indd ifc2-1 5/18/11 3:01 PM5/18/11 3:01 PM
3
www.bayerdiabetes.com/us
Getting
Started
Talking to Your Compatible Medtronic MiniMed Device
“Talks” to Your Compatible Medtronic
MiniMed Device
Bayer’s CONTOUR NEXT LINK meter can automatically send
your blood glucose result directly to your compatible
Medtronic MiniMed device. This eliminates the need
to manually enter your blood glucose result into the
insulin pump’s Bolus Wizard® calculator, that calculates
and suggests a bolus or correction dose if needed. Bayer’s
CONTOUR NEXT LINK meter can also transmit your
fi ngertip blood glucose result directly to your compatible
Guardian REAL-Time CGM System, eliminating the need to
manually enter the result when calibrating the system.
See page 8 for initial setup options. Your compatible
Medtronic MiniMed device will only accept the glucose
result if the Meter Option in your device’s Utility Menu is set
to on and you have programmed the device with the meter’s
ID (serial) number. Up to three different meter ID numbers
can be accepted. See page 8 in “Initial Setup”. If you have
entered your meter’s ID number into your compatible
Medtronic MiniMed device, it can receive your blood
glucose result. No one else’s insulin pump or continuous
glucose monitoring system can receive your glucose result,
unless your meter ID number has been entered into that
device. The meter uses a wireless signal to send the blood
glucose result to the compatible Medtronic MiniMed device
when the Send option is set to Always or Ask. See page 9
of this user guide. Your CONTOUR NEXT LINK meter and
compatible Medtronic MiniMed device must be within 4 feet
of each other. If you are not using the meter link feature on
your compatible Medtronic MiniMed device, you may want to
turn the Send option off on your CONTOUR NEXT LINK
meter and Medtronic MiniMed device to save battery power.
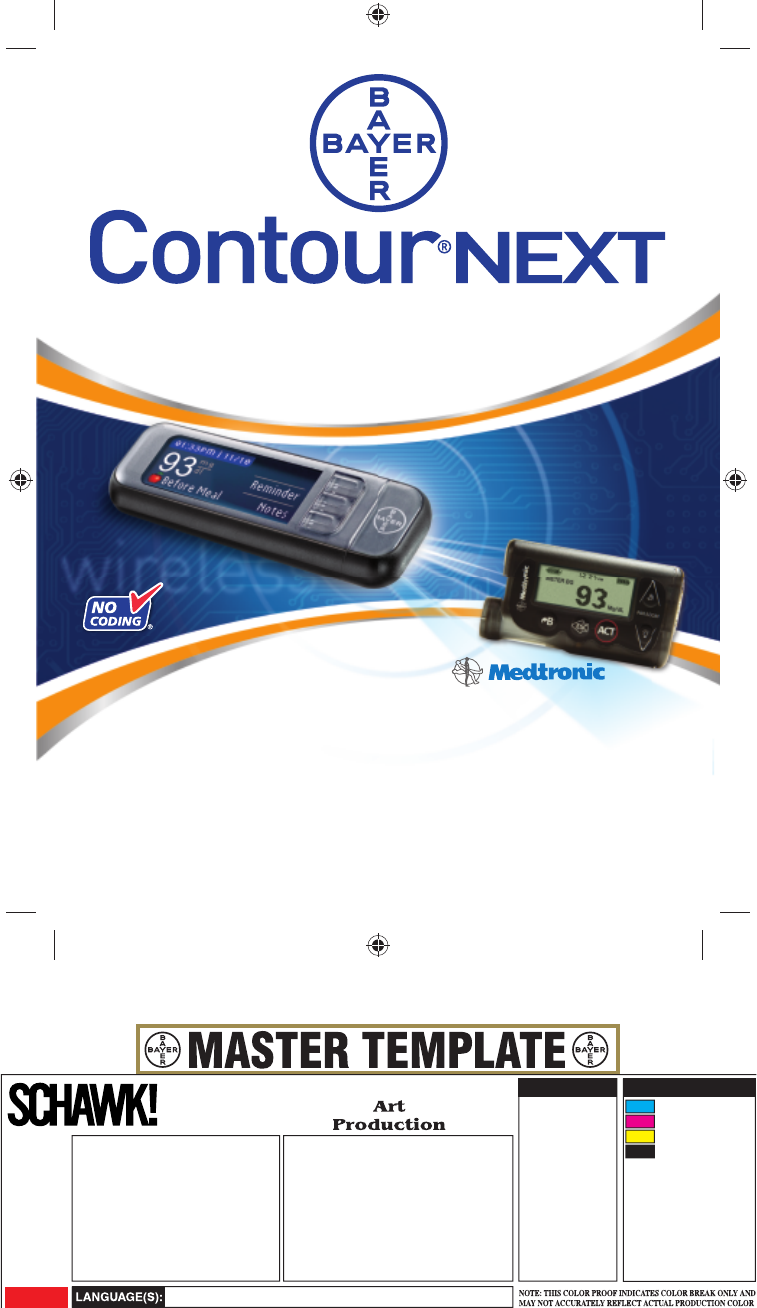
Thank you for choosing the CONTOUR®NEXT LINK blood glucose
monitoring system! We are proud to be your partner in helping you
manage your diabetes.
Bayer’s CONTOUR NEXT LINK meter automatically transmits blood
glucose results using a wireless, radio frequency transmission to your
compatible Medtronic MiniMed Paradigm® Insulin Pump (512/712,
515/715), Paradigm® REAL-Time System (522/722, 522K,722K),
Paradigm® REAL-Time RevelTM System (523/723, 523K/723K) or
Guardian® REAL-Time Continuous Glucose Monitoring System
(CS7002/CS7002K). (Hereafter, the compatibility with these model
numbers will be referred to as Medtronic MiniMed device.)
Bayer’s CONTOUR NEXT LINK meter will work with Medtronic’s
CareLink® Personal Therapy Management Software and Bayer’s
GLUCOFACTS® DELUXE diabetes management software.
Your Meter Features
Easy: The CONTOUR NEXT LINK blood glucose monitoring system is about
simplicity. You will notice its simple approach the fi rst time you see it.
Automatic: You no longer have to worry about coding your meter or
marking a control test result. Bayer’s CONTOUR NEXT LINK meter is
designed with No CodingTM technology, to automatically code itself every
time you insert a test strip. It will even tell you when a test strip is
underfi lled.
Programmed: Bayer’s CONTOUR NEXT LINK meter has been preset and
locked to display results in mg/dL (milligrams of glucose per deciliter). In
some countries, the meters are preset to display units in mmol/L (millimoles
of glucose per liter);
• Results in mg/dL will never have a decimal point;
• Results in mmol/L will always have a decimal point.
Example: or
Check your display to ensure that results are displayed in mg/dL. If they are
not, contact Bayer Diabetes Care Customer Service, 1-800-348-8100.
Customizable: Bayer’s CONTOUR NEXT LINK meter allows you to set
personal choices for some features. For more information, please see the
Set Up and Testing sections in this user guide.
2Need Help? Call toll free: 1-800-348-8100
MST_CntrNextLINK_UG_EN_FpBp_v6.indd 2-3MST_CntrNextLINK_UG_EN_FpBp_v6.indd 2-3 5/18/11 3:01 PM5/18/11 3:01 PM
4Need Help? Call toll free: 1-800-348-8100
Getting
Started
5
www.bayerdiabetes.com/us
Getting
Started
10:30 AM l 3/11
Reminder
Notes
127mg
dL
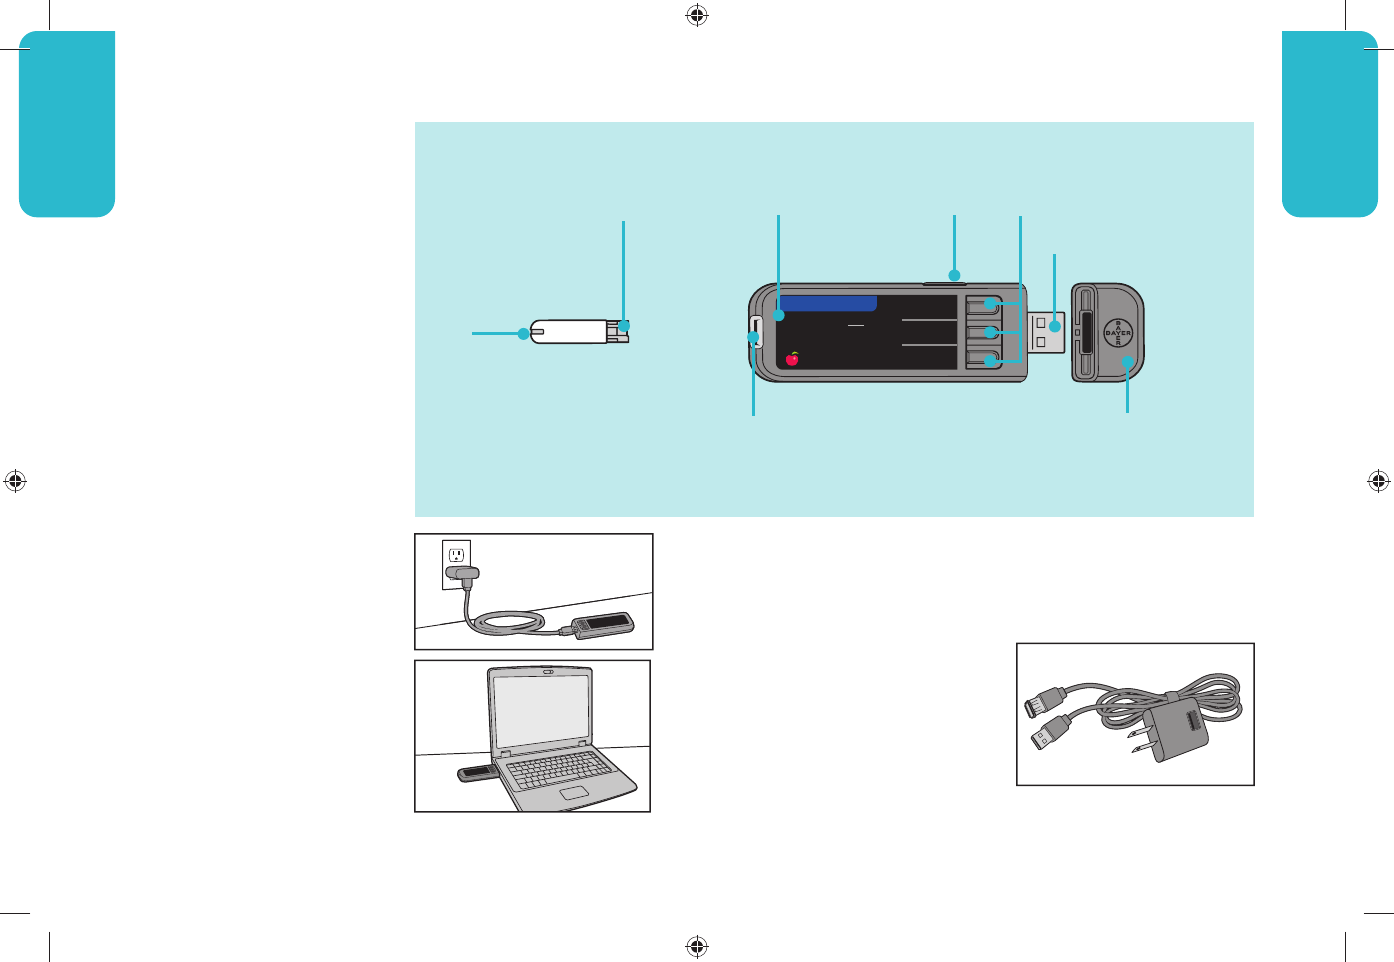
Bayer’s CONTOUR NEXT LINK
blood glucose monitoring
system works with Bayer’s
CONTOUR or CONTOUR NEXT
test strips.
Rechargeable Battery
Your Bayer’s
CONTOUR NEXT LINK
meter has a permanent
rechargeable battery. Before
you do anything else,
charge your meter with the
wall charger included with
your kit. You may also charge
your meter by plugging the
USB connector into a
computer. Be sure the
computer is turned on and
not in sleep, hibernate or
power saving mode. Your
meter will briefl y display “Do
Not Test-Charging” and the
test strip port light will fl ash.
For more details see page 65.
You cannot do a blood glucose test while the battery
is charging. When charging is fi nished, the test strip port
light will turn off. Unplug your CONTOUR NEXT LINK meter
to test.
A USB extension cable and a
wall charger are included for
your convenience.
For more information on
Battery Status Displays and
Charging see pages 63-65.
Bayer’s C
ONTOUR
N
EXT
LINK Blood Glucose Monitoring System
Bayer’s C
ONTOUR
N
EXT
LINK Blood Glucose Monitoring System
CONTOUR® or
CONTOUR®NEXT
Test Strip
Meter Front
Test Strip Port:
Insert the test strip here. To
turn on the port light, see
pages 7 and 24.
Display
Screen
Menu Button:
Provides access
to features.
See page 8.
Selection/Scrolling
Buttons: See page 6.
Protective USB Cap
CAUTION: Keep out of reach of
children. Accidental swallowing
could cause suffocation.
USB Connector
Bayer’s CONTOUR®NEXT LINK Blood Glucose
Monitoring System
Gray Electrode End:
Insert this end into test
strip port with gray end
face up.
Sample
Tip:
Blood is
drawn in here. Before Meal
CAUTION: Bayer’s
CONTOUR NEXT LINK meter
only works with CONTOUR or
CONTOUR NEXT test strips!
MST_CntrNextLINK_UG_EN_FpBp_v6.indd 4-5MST_CntrNextLINK_UG_EN_FpBp_v6.indd 4-5 5/18/11 3:01 PM5/18/11 3:01 PM
6Need Help? Call toll free: 1-800-348-8100
Getting
Started
7
www.bayerdiabetes.com/us
Getting
Started
Logbook
Trends
Setup
MENU Logbook
Trends
Setup
MENU
OK
▼
▲
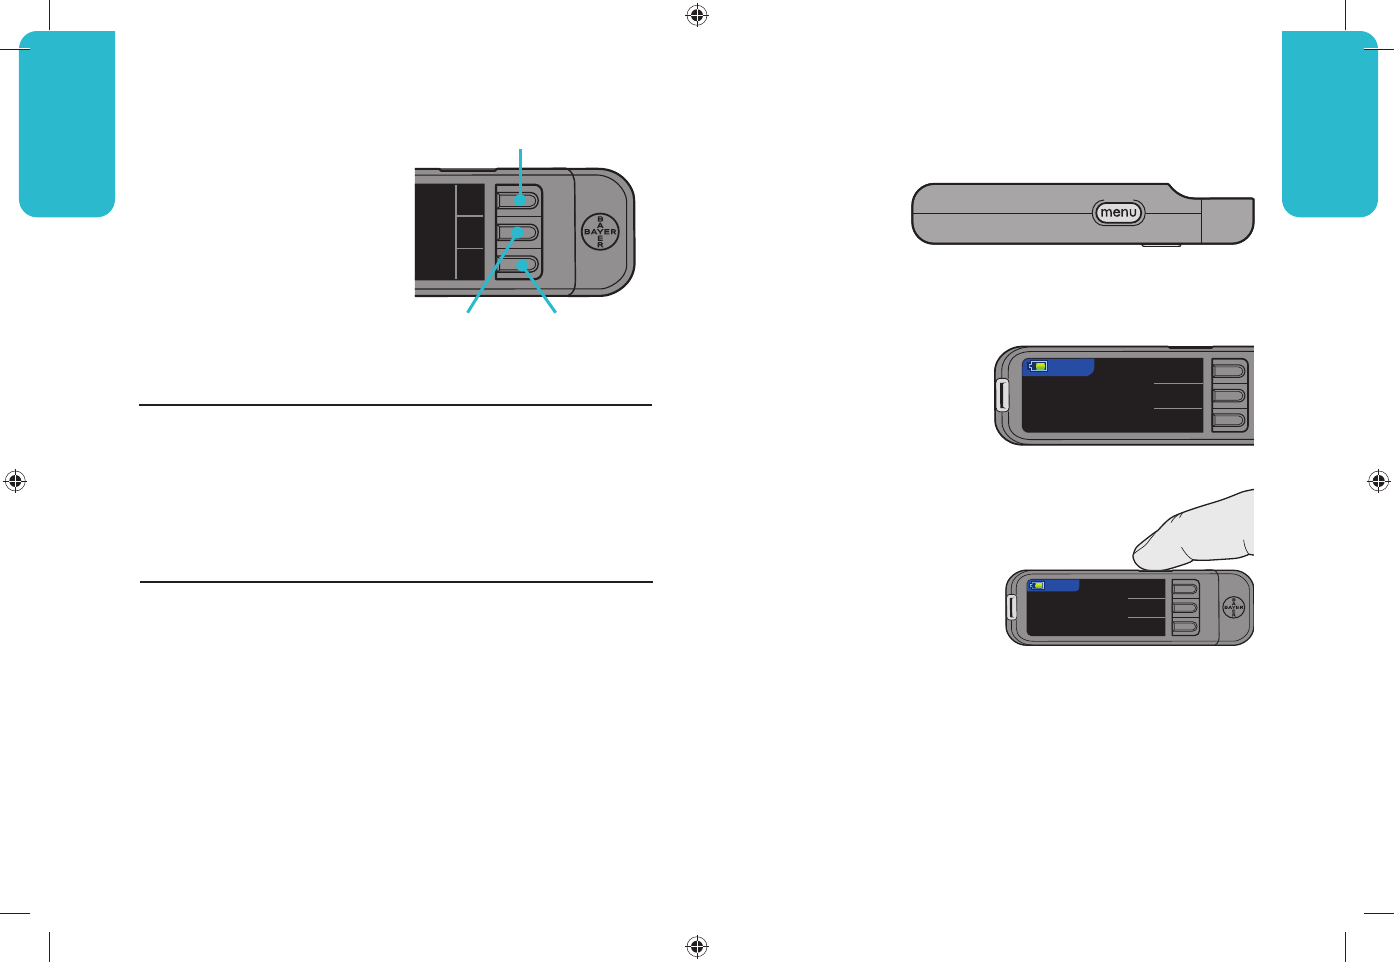
Meter Overview
Meter Overview
Using the Buttons
Bayer’s CONTOUR®NEXT LINK
meter is simple to use. Every
screen gives you choices. The
three buttons next to the
screen allow you to make your
selection by pressing the
button next to your choice.
Using the Selection/Scrolling Buttons –
When the ▲ or ▼ arrows appear on the screen, the buttons
are used for scrolling. When your choice is highlighted,
make a selection by pressing the OK button.
NOTE: Pressing and holding the ▲ or ▼ buttons will scroll
through the list faster.
▲ Button
(Selection/Scrolling)
▼ Button
(Selection/
Scrolling)
OK Button
Using the Menu Button
• To turn on the meter, press and hold the Menu
button until the meter turns on.
The Main Menu has 3 choices: Logbook, Trends and Setup.
• Select one by pressing
the button next to your
choice. See the following
pages for more details
on “Setup”.
• To go back to the
previous screen, press
the Menu button once.
• To turn the meter off, press
and hold the Menu button
for 2 seconds.
• To turn the test strip port
light on with the meter off,
give the Menu button two quick presses. Two quick
presses of the Menu button will also turn off the light.
Meter Overview
TOP VIEW
MST_CntrNextLINK_UG_EN_FpBp_v6.indd 6-7MST_CntrNextLINK_UG_EN_FpBp_v6.indd 6-7 5/18/11 3:01 PM5/18/11 3:01 PM
8Need Help? Call toll free: 1-800-348-8100
Getting
Started
9
www.bayerdiabetes.com/us
Getting
Started
Language Selected:
English
Connect to a
Medtronic Pump?
?
OK
Go Back
Enter this Meter ID
into your pump:
123456
?
OK
Go Back
CONNECT TO PUMP
CONNECT TO PUMP
IMPORTANT: Refer to the separate Medtronic
User Guide for instructions on connecting
Bayer’s CONTOUR NEXT LINK meter to your
compatible Medtronic MiniMed device.
Automatically send
results to the Pump?
Ask me
Always
Never
SEND OPTIONS
10/11/07
10:30 AM Accept
Change
CURRENT DATE & TIME
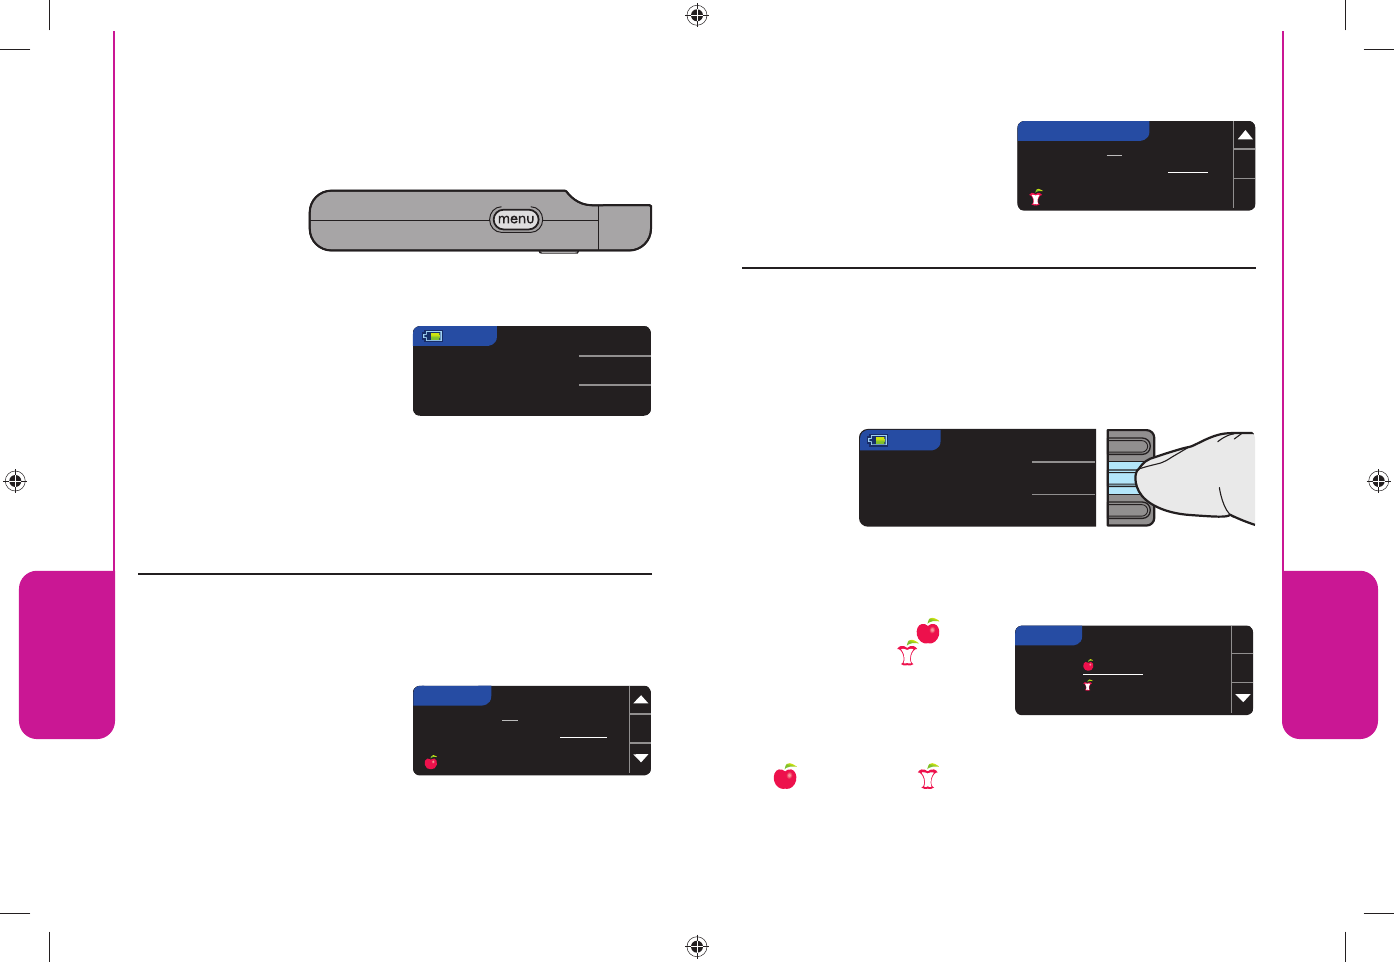
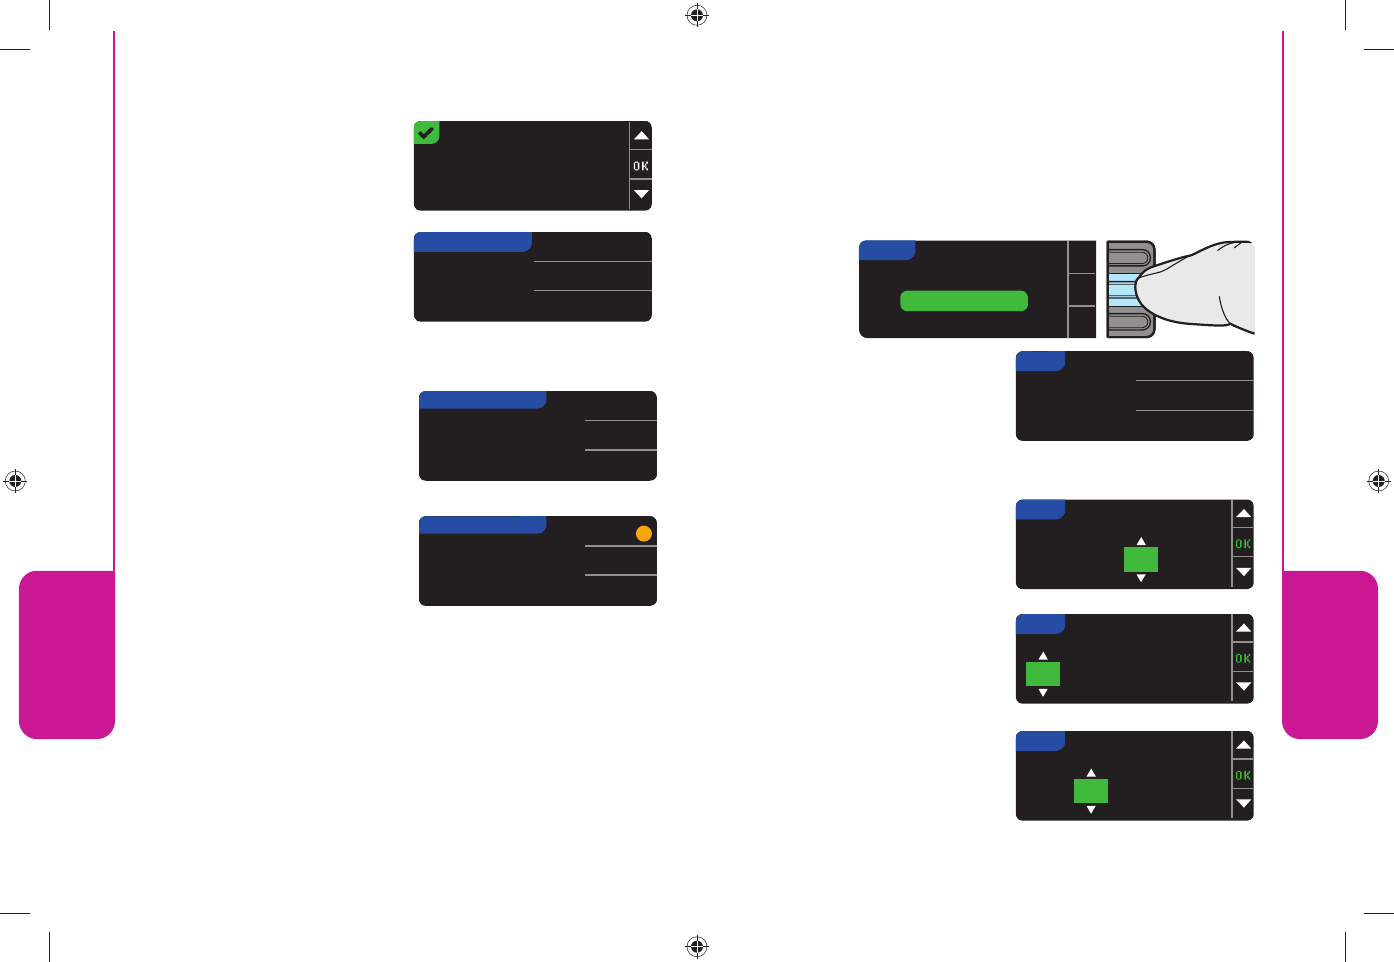
First charge your meter. You can use your computer or the
included wall charger to charge your meter. When you fi rst
turn on your CONTOUR®NEXT LINK meter, a setup sequence
begins. The Setup process walks you through the steps for
meter setup and allows your meter to connect to your
compatible Medtronic MiniMed device. Your compatible
Medtronic MiniMed device must be nearby.
1. Press and hold the Menu button until the meter
turns on. After a welcome screen, you will see the
Select Language screen.
2. Press the ▲ or ▼ button to select your desired language.
When highlighted, press the OK button.
A screen confi rms
your language.
4. The next screen on your
blood glucose meter
displays the meter ID
needed to complete the
connection steps. Do not
press OK on this screen until connection process is complete.
Initial Setup
English
Espanol
LANGUAGE
Initial Setup
3. Press OK on the next screen
to start the connection
process. Follow the steps on
your Medtronic MiniMed
Paradigm Insulin Pump or
Guardian REAL-Time CGM System.
NOTE: Pump on meter screen refers to your compatible
Medtronic MiniMed device.
TOP VIEW
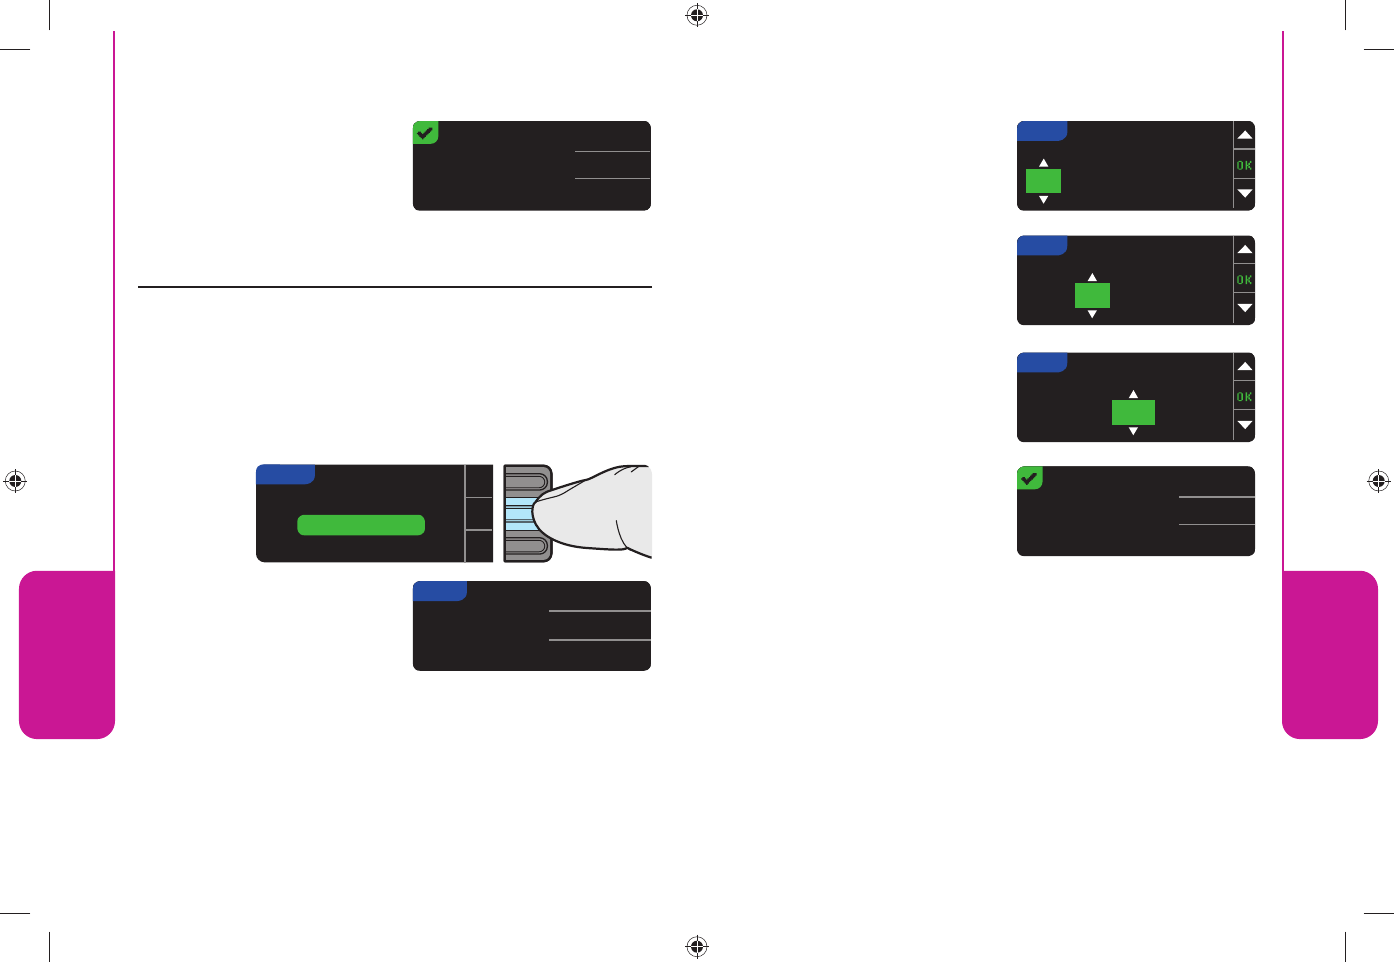
Initial Setup
Meter Send Options
5. After the meter and
compatible Medtronic
MiniMed device are
connected, you will set your
SEND options. This controls
how your meter will send blood glucose readings to your
compatible Medtronic MiniMed device. Choose the
SEND option that is best for you. A screen message will
confi rm the choice made (Ask Me = “Meter will ask you
before sending results,” Always = “Meter will always send
results,” Never = “Meter will never send results.”) If you
select Never, you can set up your choice later for sending
results to your pump.
Date and Time Should Match
6. The date and time on the
meter should match your
pump. If they match, press
Accept. If they do not match,
press Change. Follow the
meter instructions to change
the date and time.
MST_CntrNextLINK_UG_EN_FpBp_v6.indd 8-9MST_CntrNextLINK_UG_EN_FpBp_v6.indd 8-9 5/18/11 3:01 PM5/18/11 3:01 PM
10 Need Help? Call toll free: 1-800-348-8100
Getting
Started
11
www.bayerdiabetes.com/us
Getting
Started
Before Meal
After Meal
No Mark
70–130
70–180
?
Accept
Change
AutoLog is On.
?
Accept
Turn Off
High: 250 mg/dL
Low: 70 mg/dL
?
Accept
Change
High: 251 mg/dL
Low: 70 mg/dL
High: 251 mg/dL
Low: 69 mg/dL
High: 251 mg/dL
Low: 69 mg/dL
Done
Change
AUTOLOG
AUTOLOG
CURRENT TARGET
HIGH AND LOW LIMITS
HIGH AND LOW LIMITS
HIGH AND LOW LIMITS
Limits are set.
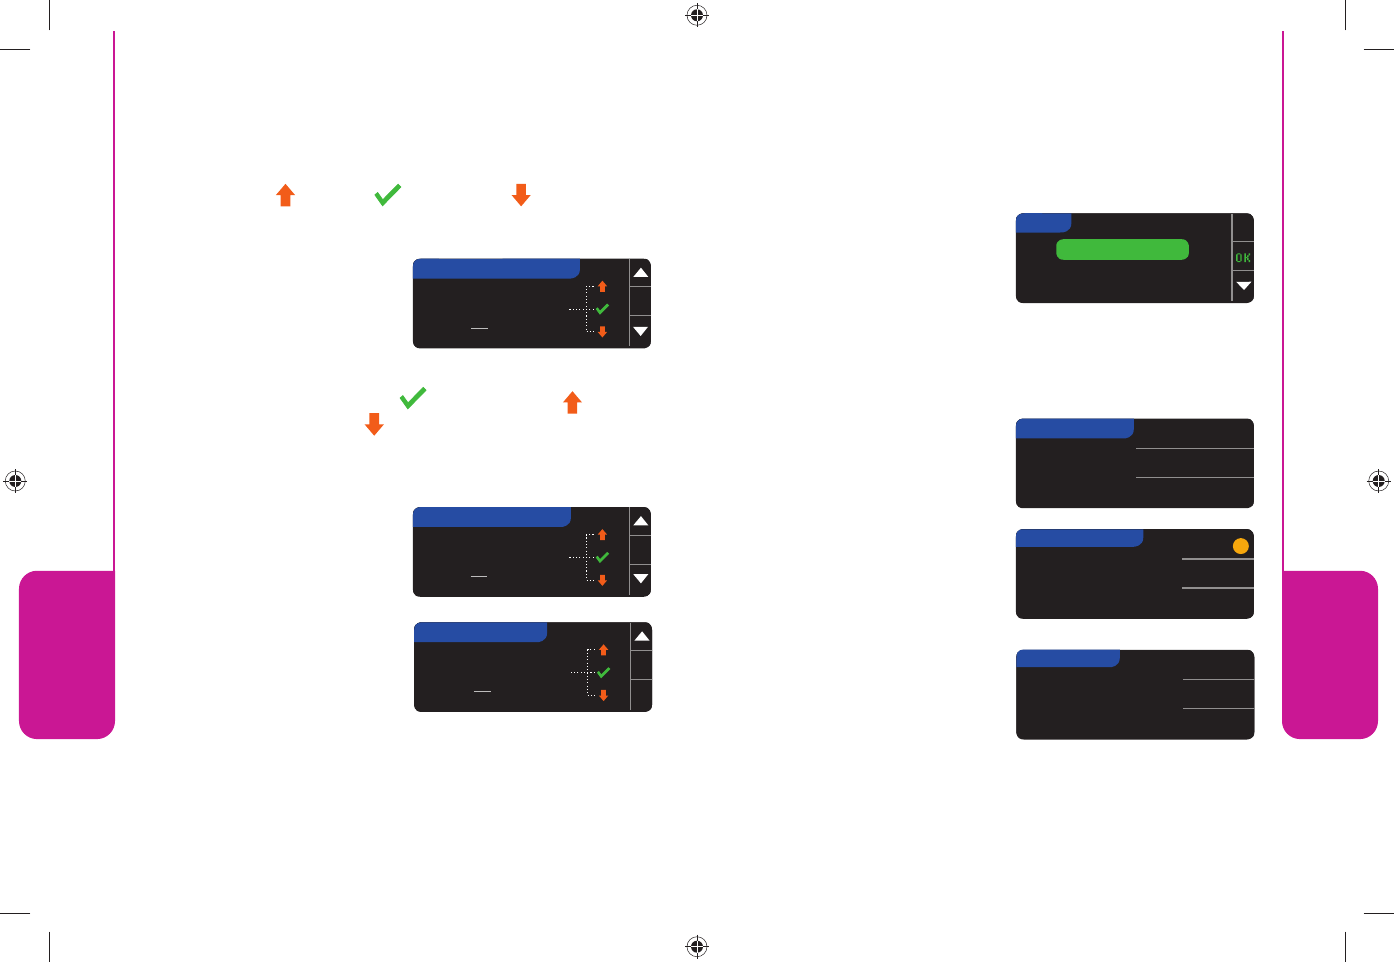
Initial Setup: AutoLog Feature
Initial Setup: AutoLog Feature
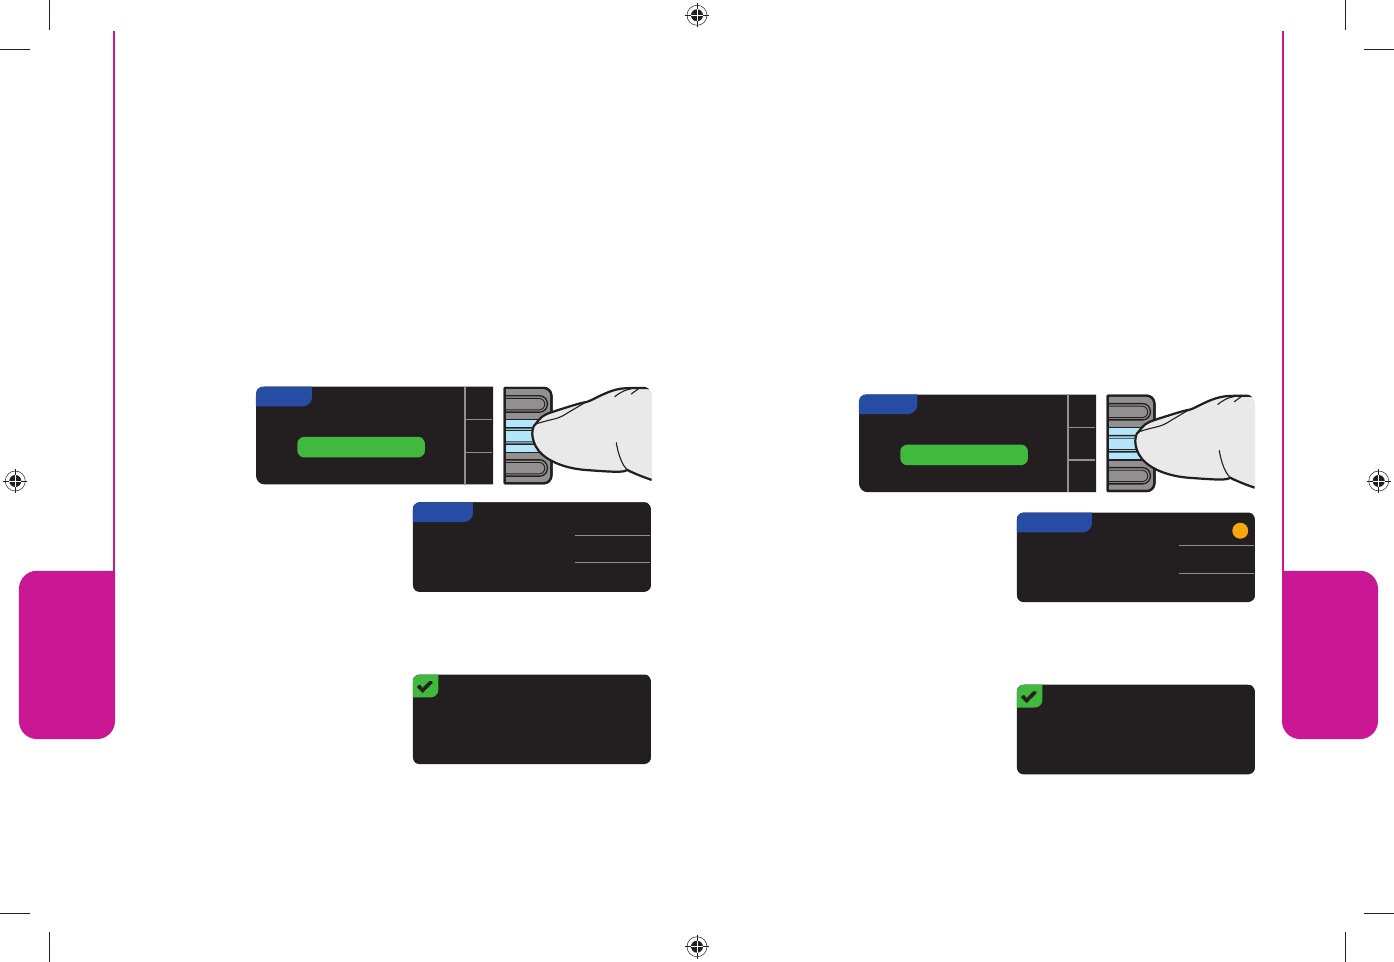
7. Accept or turn off the
AutoLog feature. See
pages 24–26 for details
about testing with AutoLog
on or off.
Additional Meter Settings
AutoLog Feature
Your meter comes with a
simple AutoLog feature that
lets you mark your test result
as Before Meal or After
Meal during the 5 second test
countdown. You can select No Mark if you are testing at
times other than before or after a meal.
Your meter comes with AutoLog turned on. We
recommend that you keep this feature turned on to get the
most benefi t from your meter features. AutoLog can be
turned off in Setup if you choose to do so at a later time
(see page 55).
Targets
8. The next screen displays
the default blood
sugar target range
for (Before Meal) and
(After Meal) blood sugar.
Before you change or accept the target ranges,
discuss with your healthcare professional what
target ranges are best for you.
High and Low Limits
The high and low limits feature alerts you when you go
above or below the settings you choose. Alerts appear as
large orange numbers (see page 34).
Before you change or accept the high and low limits,
discuss with your healthcare professional what high
and low limits are best for you.
9. Choose Accept to use the
default settings for high and
low limits. The default high
limit is 250 mg/dL and the
default low limit is 70 mg/dL.
10. Choose Change if you wish to use different limits.
11. Press the ▲ or ▼ button to select your high limit.
Press OK.
12. Press the ▲ or ▼ button to
select your low limit.
Press OK.
NOTE: Pressing and
holding the ▲ or ▼
buttons will scroll through the list faster.
13. The next screen confi rms
your choices. Press Done.
Initial Setup is complete. You may now check your
blood glucose.
MST_CntrNextLINK_UG_EN_FpBp_v6.indd 10-11MST_CntrNextLINK_UG_EN_FpBp_v6.indd 10-11 5/18/11 3:01 PM5/18/11 3:01 PM
12 Need Help? Call toll free: 1-800-348-8100
Testing
13
Testing
www.bayerdiabetes.com/us
Information for Safety
Always keep the test strips in the original
bottle. Tightly close the bottle immedi-
ately after removing a test strip. The bottle
is designed to keep the test strips dry. Exposure
to room humidity from leaving the bottle open or
not storing them in the original bottle can
damage your test strips. This could lead to
inaccurate results.
Wash and dry your hands well before testing.
Test strips are for single use only. Do not use a test
strip that appears damaged or has been used.
Your test strip is designed to easily “sip” the blood
into the sample tip. Do not drop blood directly on the fl at
surface of the test strip.
Do not press the test strip against your fi nger when
testing. This may block the sample tip.
Let the meter and test strips adjust to the tempera-
ture where you are testing. Whenever the meter is
moved from one location to another, allow approximately 20
minutes for the meter to adjust to the temperature of a new
location before performing a blood glucose test. The meter
has been designed to give accurate results at temperatures
between 41°F and 113°F. Please be aware that USB ports
in some computers and self-powered USB hubs can
become much warmer than the room. A USB cable has been
provided for your convenience. If you wish to test immedi-
ately after disconnecting from your computer, please use the
USB cable.
Check the expiration dates on your test strips and
control solution. It is important to not use the test strips or
control solution if the expiration date printed on the bottle
label and carton has passed. For the control solution, do not
use if it has been six months since you fi rst opened the
bottle. It will help to write the six month discard date on the
control solution label.
Information for Safety
Information for Safety
Have all the materials you will need ready
before you begin testing. This includes your
CONTOUR®NEXT LINK meter, CONTOUR® or CONTOUR®NEXT
test strips, and the MICROLET®2 lancing device and
MICROLET® lancets. You will also need control solution made
for your test strips to perform a quality control check.
The MICROLET 2 lancing device is intended for self
testing by a single patient. It must not be used on
more than one person due to the risk of infection.
Use a new MICROLET lancet each time you test
because it is no longer sterile after use.
See pages 29 – 32 for instructions on cleaning and
disinfecting your meter and lancing device.
Do not perform a blood glucose test when the
CONTOUR NEXT LINK meter is connected to an external
device, e.g., computer.
Use only approved equipment from the manufacturer or
certifi ed body such as UL or TUV.
MST_CntrNextLINK_UG_EN_FpBp_v6.indd 12-13MST_CntrNextLINK_UG_EN_FpBp_v6.indd 12-13 5/18/11 3:01 PM5/18/11 3:01 PM
14 Need Help? Call toll free: 1-800-348-8100
Testing
15
Testing
www.bayerdiabetes.com/us
Getting Ready to Test
Preparing Your Lancing Device
Read the MICROLET®2 lancing device insert for complete
instructions. For Alternative Site Testing instructions, see
page 21.
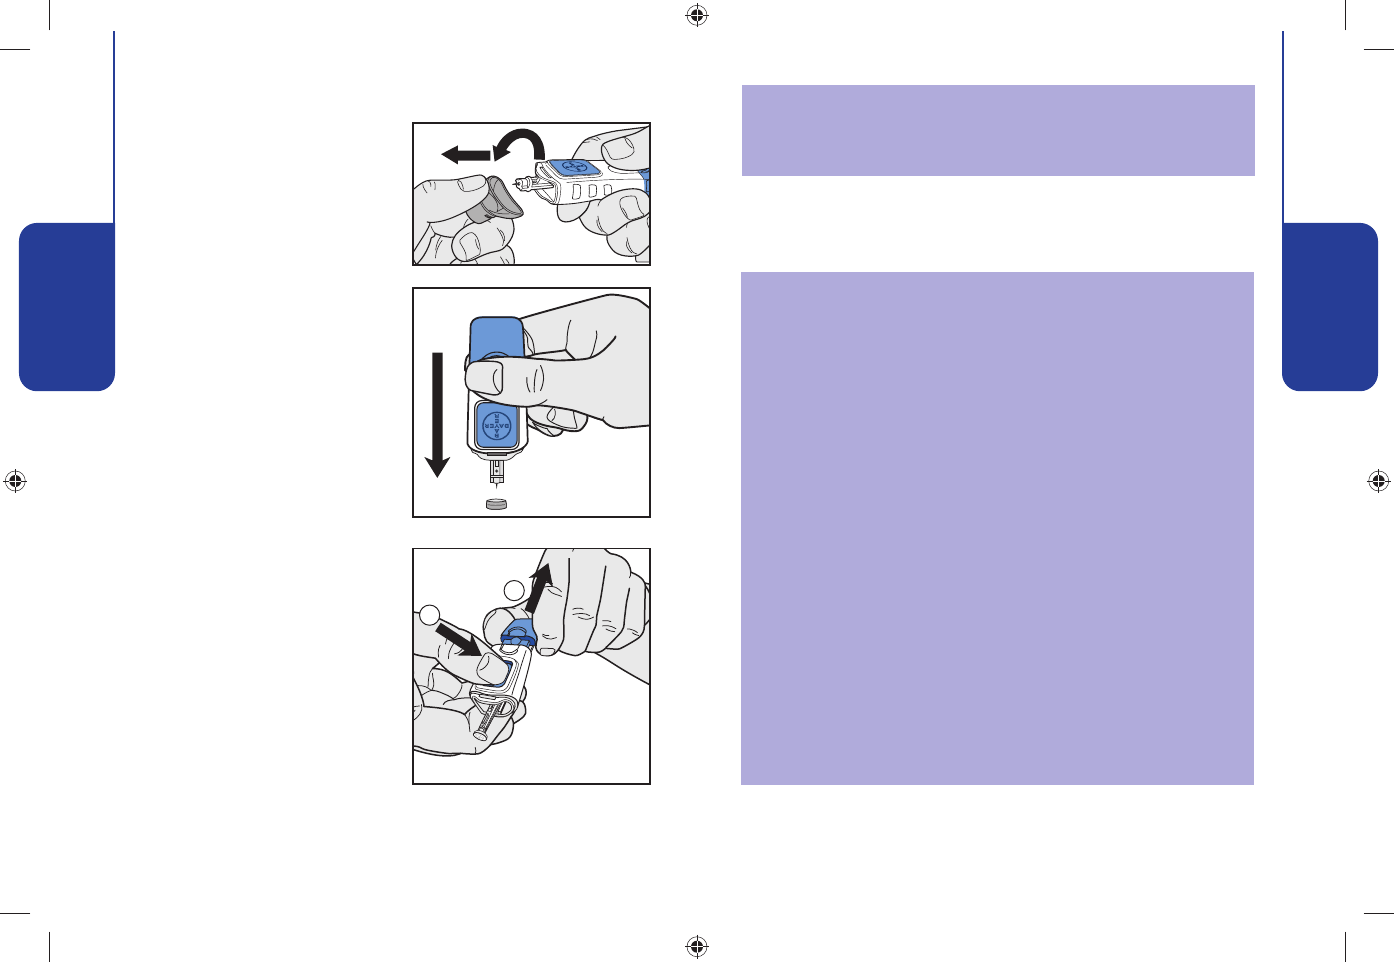
1. To remove the endcap, hold
the device with your thumb
on the grip indent and hold
the endcap dial in the other
hand. Snap the endcap off
from top to bottom.
Warning: Potential Biohazard
The MICROLET 2 lancing device is intended for single
patient use only. The MICROLET 2 device should not be
used for assisted blood draws by healthcare providers
or at healthcare provision sites, and should never be
shared with anyone else, even a family member due to
risk of infection. Use a new MICROLET® lancet each time
you test because it is no longer sterile after use.
Getting Ready to Test
After the meter turns on, a
solid gray screen with a
white border will appear for
one second to show that the
screen is working properly.
The logo screen will briefl y
appear before the Apply Blood
screen. The meter is now
ready to test a blood drop.
APPLY BLOOD
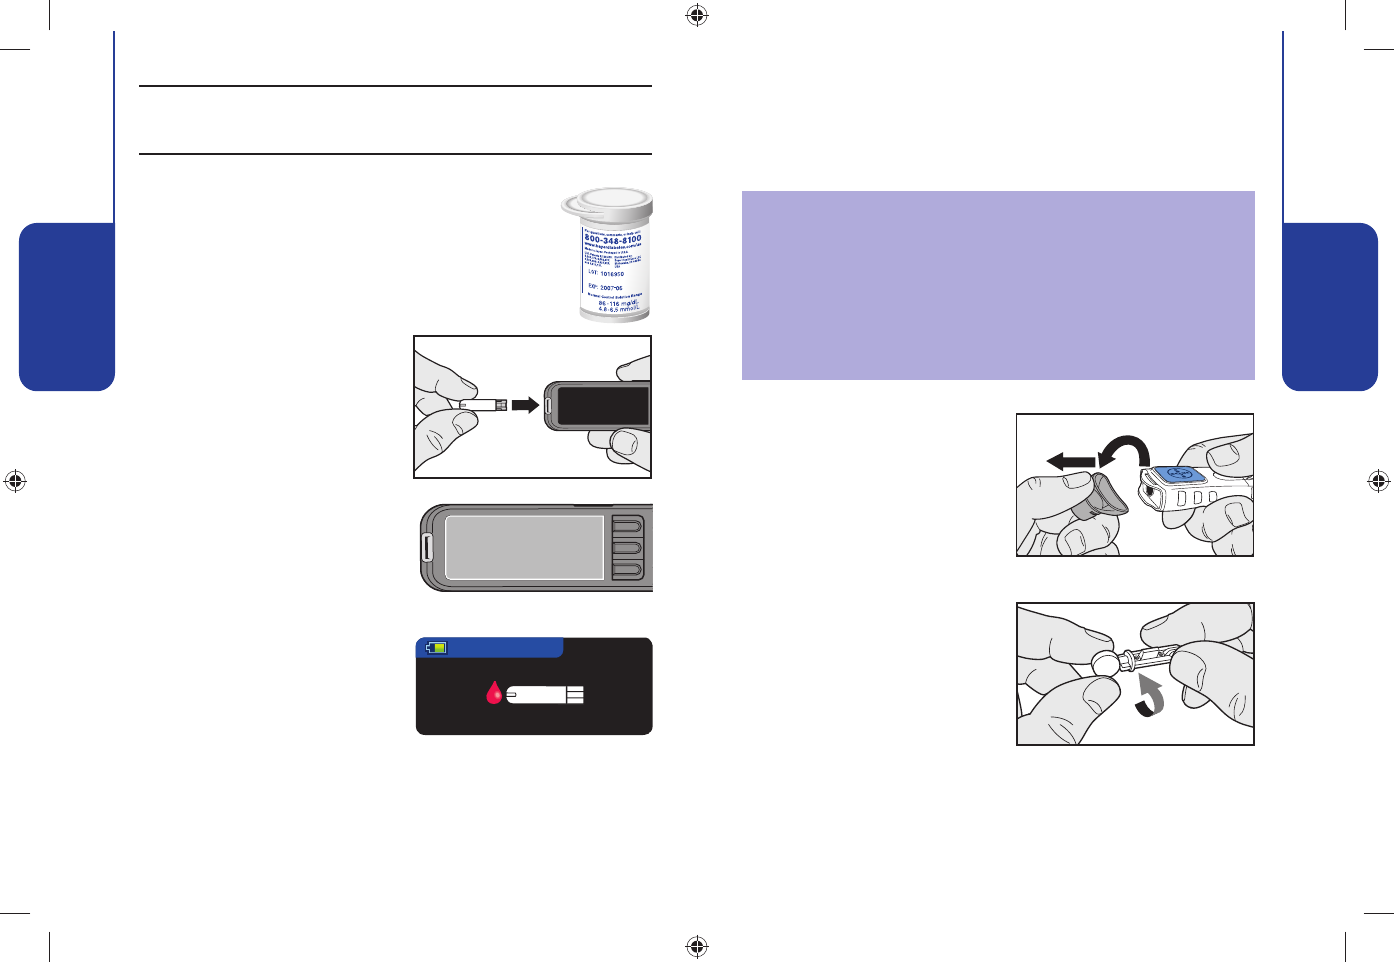
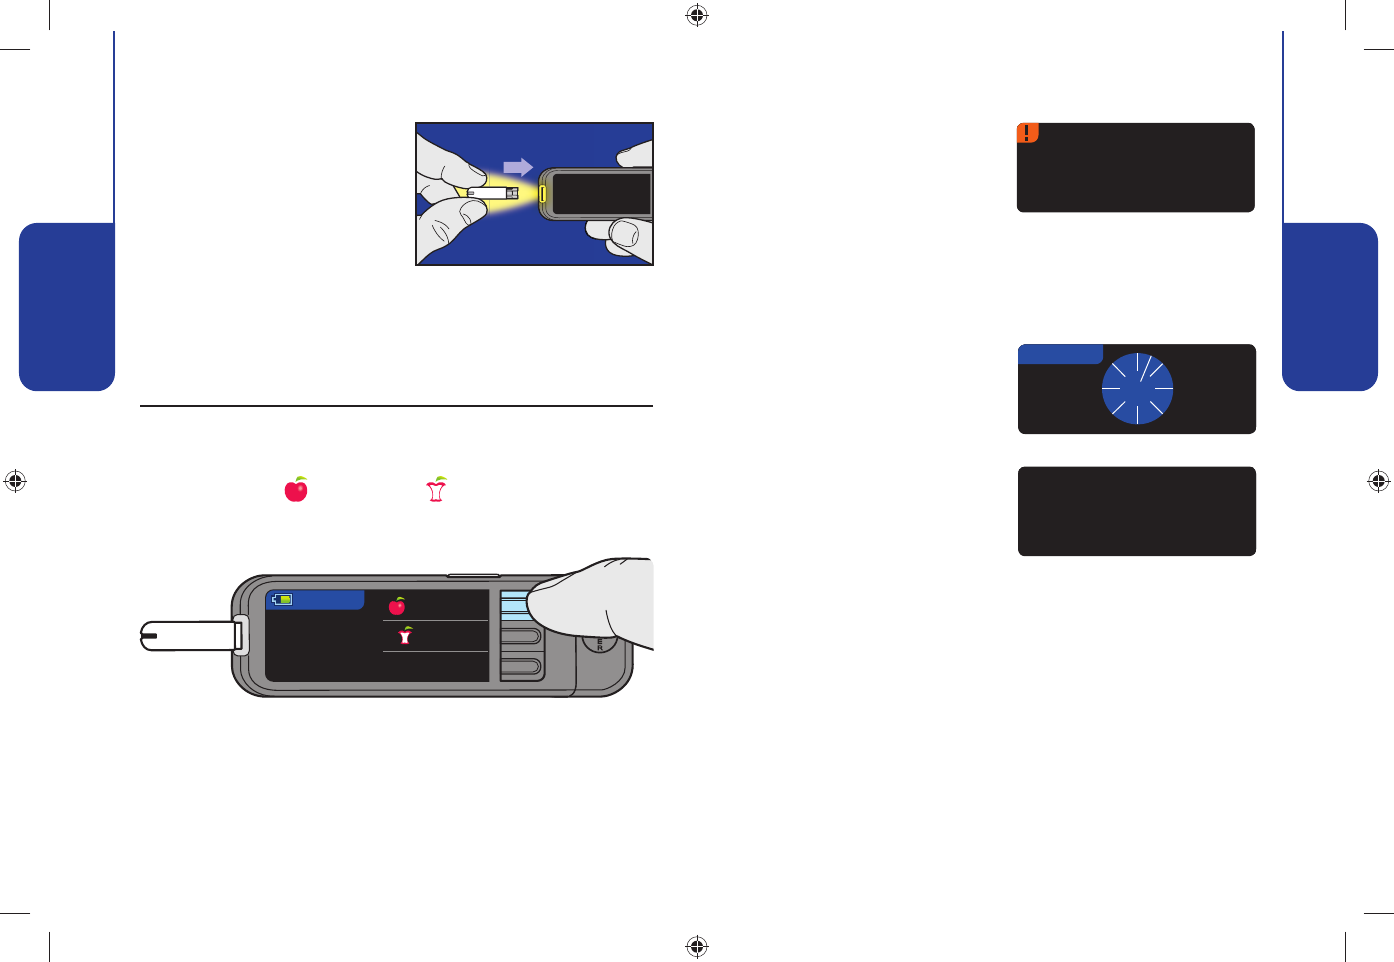
Preparing Your Test Strip
1. Wash and dry your hands well before testing.
2. Remove a test strip from CONTOUR®NEXT or
CONTOUR® bottle. Tightly close the bottle
lid immediately after you have removed
the test strip.
3. Hold the test strip with the
gray end facing up.
4. Insert the gray end into the
test strip port on the meter.
The following steps are shown in the proper order
for performing a blood glucose test (pages 14-28).
2. Loosen the round protective
cap on a lancet by rotating it
¼ turn, but do not remove it.
MST_CntrNextLINK_UG_EN_FpBp_v6.indd 14-15MST_CntrNextLINK_UG_EN_FpBp_v6.indd 14-15 5/18/11 3:01 PM5/18/11 3:01 PM
16 Need Help? Call toll free: 1-800-348-8100
Testing
17
Testing
www.bayerdiabetes.com/us
Suggested Drop Size
Getting Ready to Test
Getting the Blood Drop
Getting the Blood Drop
For fi ngertip testing
1. Press the endcap fi rmly
against the puncture site
and press the blue release
button with your thumb.
2. Stroke your hand and fi nger
towards the puncture site to
form a drop of blood. Do not
squeeze around the punc-
ture site.
3. Test immediately after you
have formed a small, round
blood drop (0.6 μl).
If the fi rst blood drop is not
enough, the meter may beep
twice and display “STRIP
UNDERFILLED.” You have 20
seconds to apply more blood onto the same strip.
4. Twist off the round
protective lancet cap.
Save it for disposing of
the used lancet.
3. Insert the lancet fi rmly into
the lancing device until it
comes to a full stop.
5. Replace the gray endcap.
6. Rotate the endcap dial to
adjust the puncture depth.
The amount of pressure
applied to the puncture site
also affects puncture depth. Shallow
Puncture Deep
Puncture If you selected fi ngertip testing, turn to page 18 to
continue reading testing instructions.
MST_CntrNextLINK_UG_EN_FpBp_v6.indd 16-17MST_CntrNextLINK_UG_EN_FpBp_v6.indd 16-17 5/18/11 3:01 PM5/18/11 3:01 PM
18 Need Help? Call toll free: 1-800-348-8100
Testing
19
Testing
www.bayerdiabetes.com/us
APPLY BLOOD
APPLY BLO
Too Little Blood
Remove used strip.
Repeat test with
new strip.
STRIP UNDERFILLED
APPLY MORE BLOOD NOW
EXX
EXX
APPLY BLOOD
Getting the Blood Drop
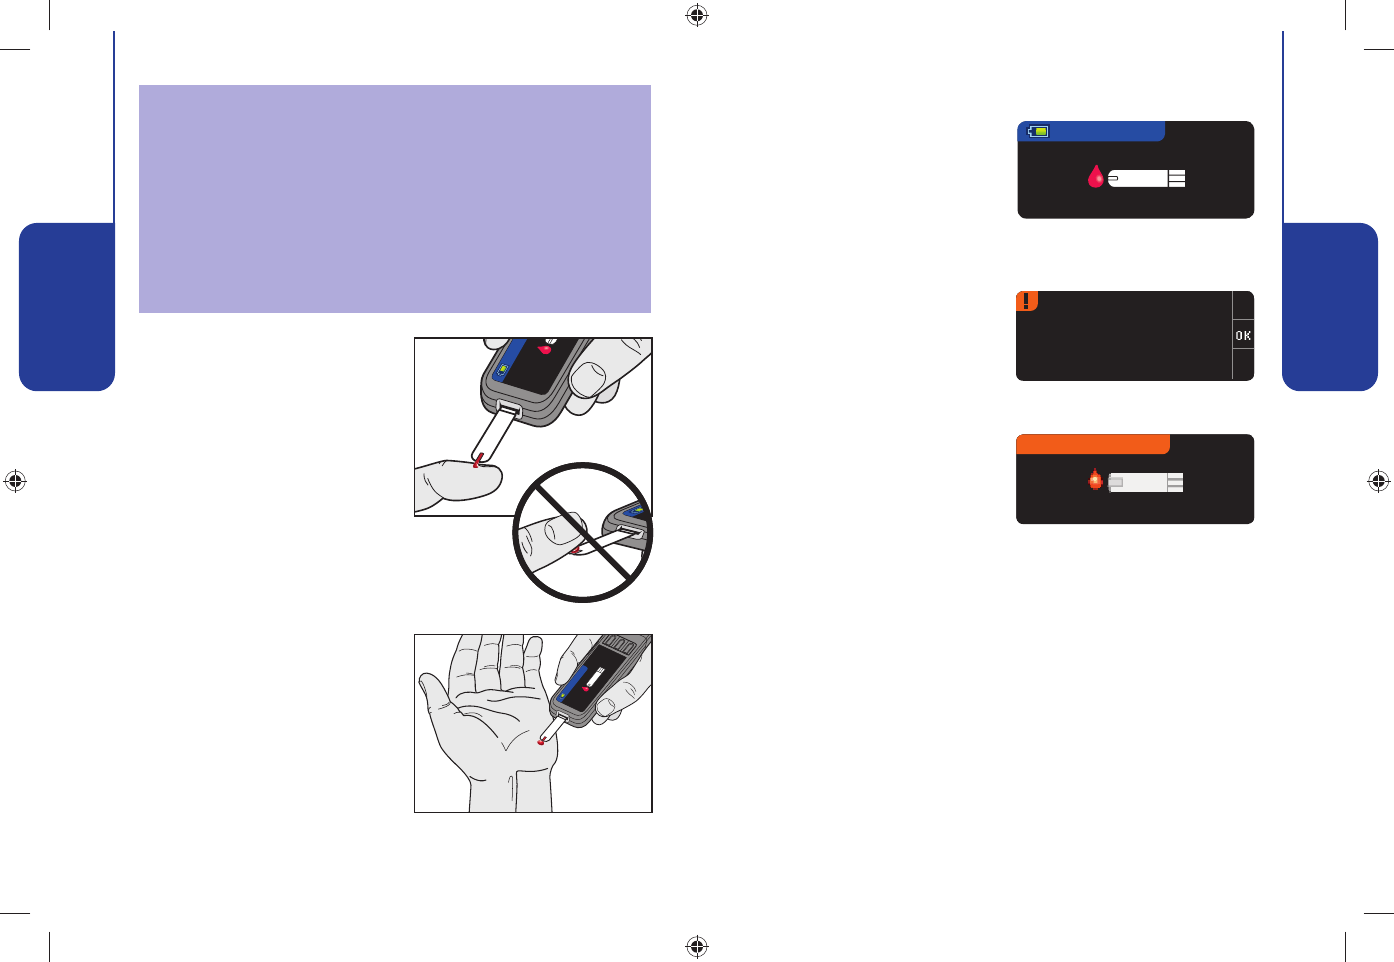
4. Immediately touch the tip of
the test strip to the drop of
blood.* The blood is pulled
into the test strip through
the tip.
Hold the tip of the test
strip in the blood drop
until the meter beeps.
Do not press the tip against the
skin or place the blood on top of
the test strip or you could get
inaccurate results or errors.
*NOTE: If you do not apply
blood to the test strip
within 1 minute, the meter
screen will dim and the meter
beeps. Press any button and
the Apply Blood screen will become active again. After a total
of 3 minutes of inactivity the meter turns off.
Getting the Blood Drop
If you are using a CONTOUR®
test strip, and your blood drop
is not enough, you will need to
remove the test strip and apply
more blood to a new test strip.
You will see the Too Little Blood screen.
If you are using a
CONTOUR®NEXT test strip,
you have 20 seconds to
apply more blood onto the
same strip. If you are not
able to provide more blood within that time, discard
that strip and start over with a new strip. Follow the
instructions on the meter screen.
Warning:
• The meter and lancing device are for single patient
use. Do not share them with anyone including other
family members! Do not use on multiple patients!1,2
• All parts of the kit are considered biohazardous and
can potentially transmit infectious diseases, even after
you have performed cleaning and disinfection.
For complete instructions on cleaning and disinfecting
your meter and lancing device, please see page 29.
MST_CntrNextLINK_UG_EN_FpBp_v6.indd 18-19MST_CntrNextLINK_UG_EN_FpBp_v6.indd 18-19 5/18/11 3:01 PM5/18/11 3:01 PM
20 Need Help? Call toll free: 1-800-348-8100
Testing
21
Testing
www.bayerdiabetes.com/us
Testing Your Blood
Alternative Site Testing
For Alternative Site Testing (palm only)
with CONTOUR®NEXT test strips
IMPORTANT: Do not use Alternative Site Testing
under the following conditions. Use fi ngertip
testing in any of these cases:
• If you think your blood glucose is low (hypoglycemia).
• When blood glucose is changing rapidly (after a meal,
insulin dose or exercise).
• If you have hypoglycemic unawareness (lack of
symptoms).
• If you get alternative site blood glucose results that do
not agree with how you feel.
• During illness or times of stress.
• If you will be driving a car or operating machinery.
• For calibration of CGM System.
AST testing should not be used for Bolus Wizard, to
calibrate a device or verify a low blood glucose level.
Consult your healthcare professional to determine if
alternative site testing is right for you.
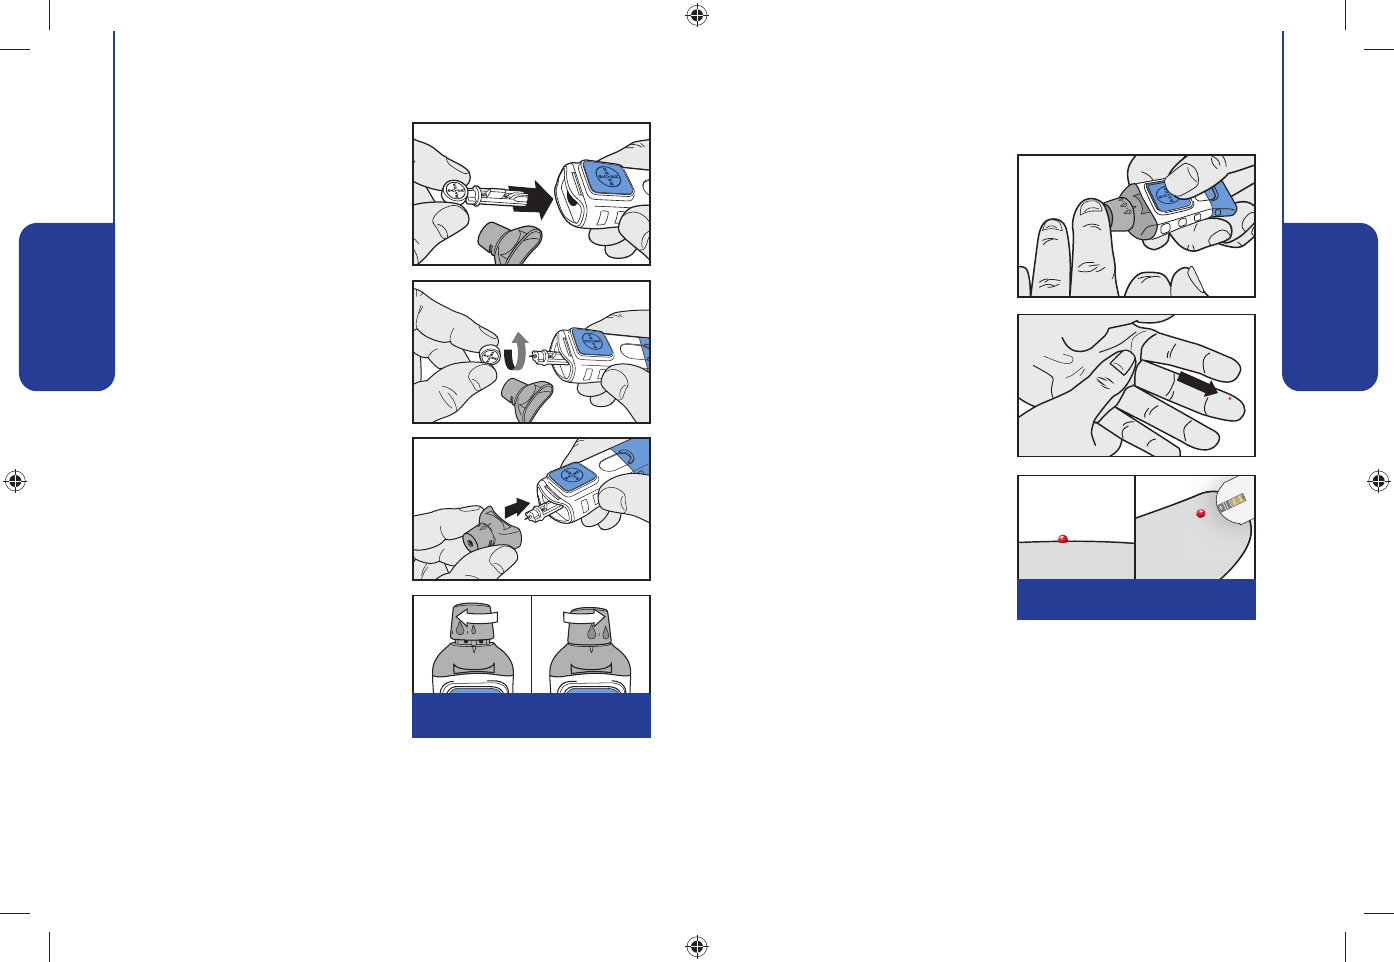
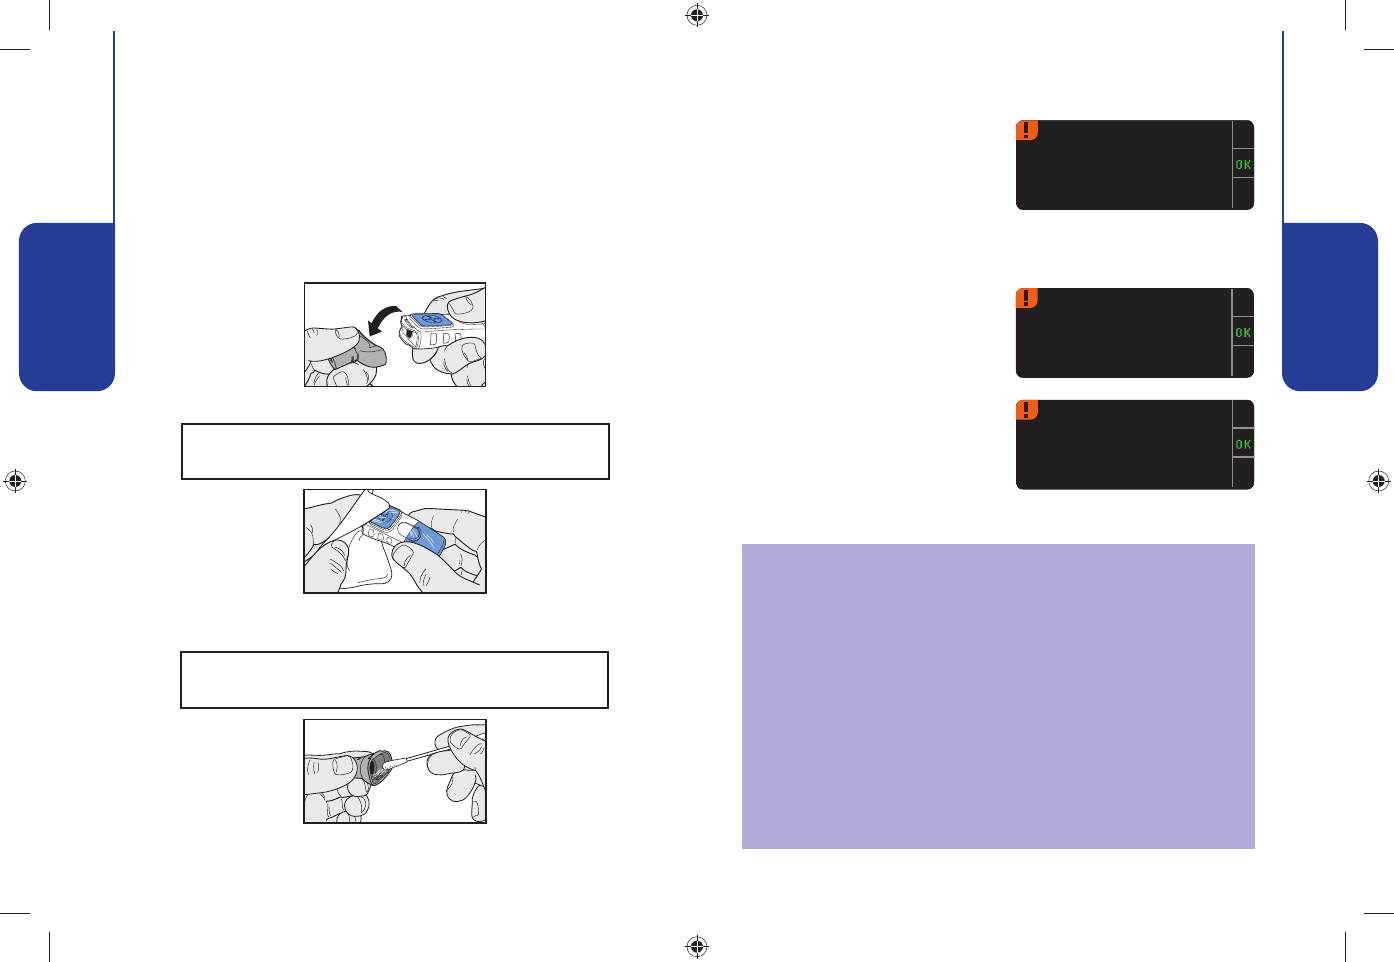
Removing the Used Lancet
2. Place the round protective
lancet cap on a fl at surface
with the Bayer logo facing
down.
1. In one hand, hold the
lancing device with your
thumb on the grip indent,
with your other hand, hold
the gray endcap dial as
shown, and gently snap off
the endcap.
3. With the used lancet still in
the lancing device, push the
lancet needle completely
into the middle of the
exposed side of the cap.
4. While pressing the release
button (a), pull the re-setting
handle (b), and the lancet
will drop into the container
you have selected.
5. Dispose of the used lancet
as medical waste.
Do not reuse lancets. Use a
new MICROLET® lancet each
time you test.
a
b
CAUTION: CONTOUR® test strips should not be
used for Alternative Site Testing (AST) with the
CONTOUR®NEXT LINK meter.
MST_CntrNextLINK_UG_EN_FpBp_v6.indd 20-21MST_CntrNextLINK_UG_EN_FpBp_v6.indd 20-21 5/18/11 3:01 PM5/18/11 3:01 PM

22 Need Help? Call toll free: 1-800-348-8100
Testing
23
Testing
www.bayerdiabetes.com/us
Alternative Site Testing
Alternative Site Testing
Alternative Site Testing on the palm can only be performed
using the CONTOUR®NEXT test strip. Alternative Site Testing
is recommended only when it is more than two hours after a
meal, diabetes medication, or exercise.
2. Select a puncture site from
a fl eshy area on the palm.
Avoid veins, moles, bones,
and tendons.
3. Wash your hands and the
puncture site with soap
and warm water. Rinse and
dry well.
1. Attach the clear AST
endcap to the MICROLET®2
lancing device.
For Alternative Site Testing (cont’d)
F
or
P
a
l
m
T
est
i
ng
NO
TE
:
AST testing (palm onl
y
) can onl
y
be done using a
C
ONTOU
R
NEX
T
test strip.
4
.
P
ress t
h
e c
le
ar en
d
ca
p
fi rml
y
against the puncture
site and then press the blue
r
e
l
ease
b
utton.
Do not test the blood sample from palm if you get:
Smeared blood • Clotted blood • Runny blood • Clear fl uid
mixed with the blood.
5. Maintain steady pressure
until a small, round blood
drop forms.
6. Lift the device straight up
and away from the skin
without smearing the blood.
MST_CntrNextLINK_UG_EN_FpBp_v6.indd 22-23MST_CntrNextLINK_UG_EN_FpBp_v6.indd 22-23 5/18/11 3:01 PM5/18/11 3:01 PM
24 Need Help? Call toll free: 1-800-348-8100
Testing
25
Testing
www.bayerdiabetes.com/us
INSERT STRIP
Testing Your Blood
Testing Your Blood
Testing in the Dark
Your meter has a lighted test
strip port to help you test in
the dark.
With the meter off, give the
Menu button two quick
presses to turn on the test
strip port light. Insert a test
strip and the display screen will appear. Once blood is
applied to the test strip the light will go off. Continue with
your test.
Two quick presses of the Menu button will turn the light off.
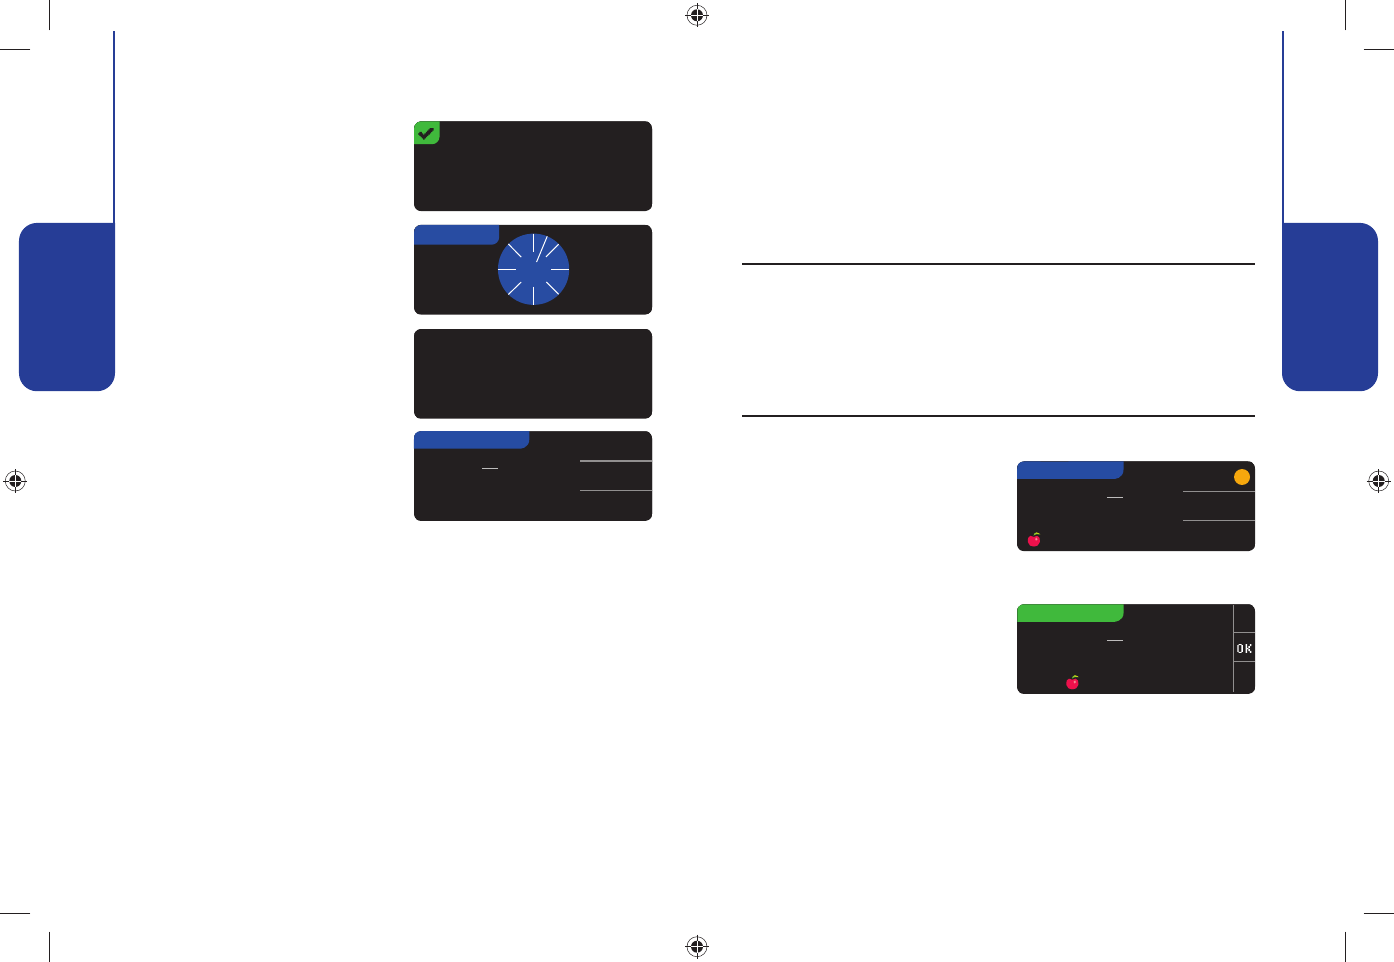
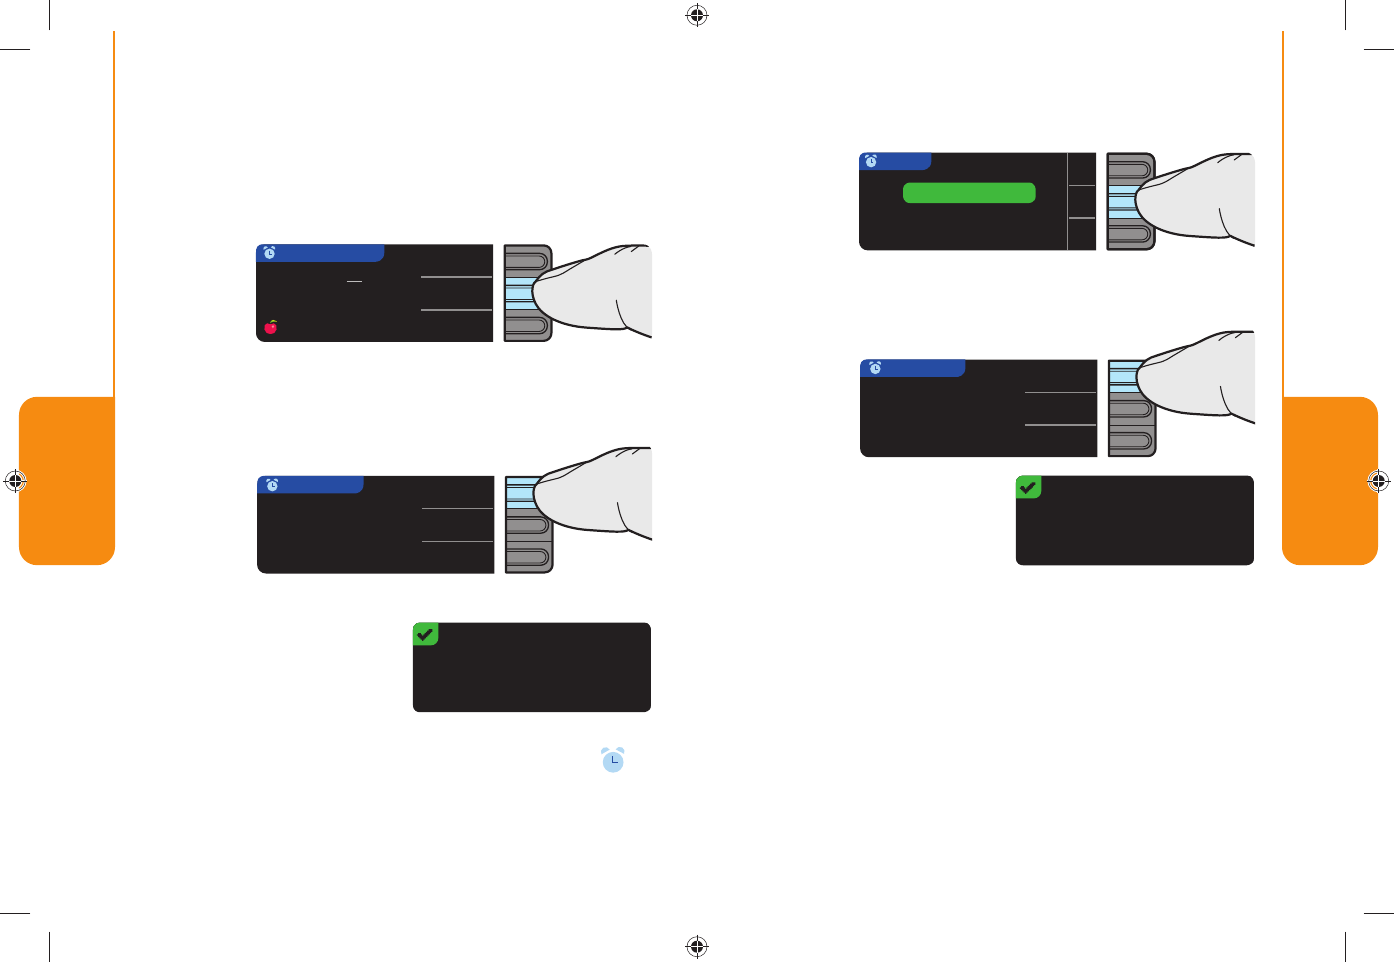
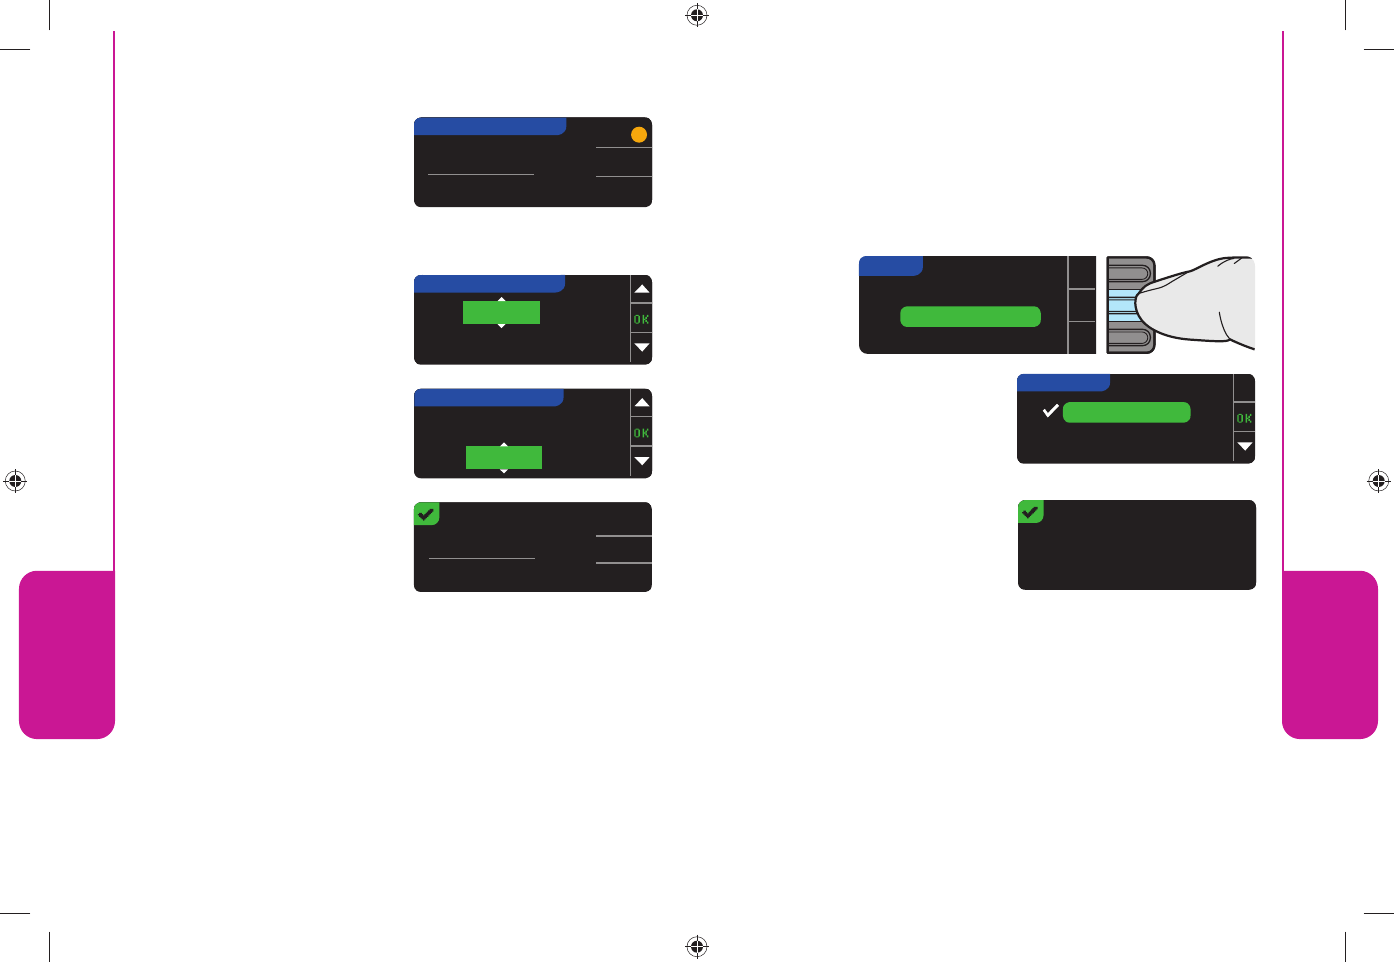
AUTOLOG Before Meal
After Meal
No Mark
Low Blood Sugar
69
Before your test result is displayed, the AutoLog screen
appears. Select Before Meal, After Meal or No Mark
by pressing the button next to it. Your test result will
not display until you make a selection.
Testing with AutoLog On
However, if your result is
below 70 mg/dL or above
250 mg/dL, you will always
see your result without
pushing a button. For a high or
low blood glucose result, you will always see your result
after a 5-second countdown.
NOTE: If you changed the default settings, your alerts will
be based on those settings.
TESTING...
5
92
Your meter features a count-
down timer. If you make your
selection very quickly, you may
see the remainder of the
testing countdown.
Your test result shows as large
numbers and then changes to
the normal test result screen.
MST_CntrNextLINK_UG_EN_FpBp_v6.indd 24-25MST_CntrNextLINK_UG_EN_FpBp_v6.indd 24-25 5/18/11 3:01 PM5/18/11 3:01 PM
26 Need Help? Call toll free: 1-800-348-8100
Testing
27
Testing
www.bayerdiabetes.com/us
Reminder
Notes
92mg
dL
10:30 AM l 3/11
Testing Your Blood
Testing Your Blood
Depending on what you have chosen in setup, you will have
the option to send your test result to your pump or it will
be sent automatically. For results under 20 mg/dL or over
600 mg/dL, see page 33.
You can now set an optional Reminder (see page 38) or add
a Note (see page 45).
Remove the test strip from the meter. Hold the menu button
to turn off the meter, or press the menu button to go to the
main menu.
Testing with AutoLog Off
After applying blood to the
test strip when AutoLog is
turned off, your result will
appear after the 5 second
countdown (see page 55).
NOTE: You will see the
Accepted screen only
when testing with a
CONTOUR®NEXT test strip.
You may add a Note
or Reminder.
Accepted
TESTING...
5
92
?
Send
Don’t Send
127mg
dL
Before Meal
127mg
dL
Sent, Before...
YOUR RESULTS
RESULTS SENT
Sending Test Results
Depending on how you have
set up your options, you can
send your test results or not.
If you have selected Ask Me,
you can always send or not
send.
If you have selected Always,
your test result will be sent
automatically to your
compatible Medtronic
MiniMed device.
Stopping a Result While it is Being Sent
If you want to stop the transmission of a result, press Cancel
immediately and the transmission will be cancelled. (The
transmission typically occurs in 5 seconds.) Be aware that
the result cannot be resent later.
Always dispose of test strip and lancet as medical
waste. All products that come in contact with human
blood should be handled as if capable of
transmitting infectious diseases.
Please refer to your MICROLET®2 package insert for
instructions on how to properly remove and dispose
of the lancet.
MST_CntrNextLINK_UG_EN_FpBp_v6.indd 26-27MST_CntrNextLINK_UG_EN_FpBp_v6.indd 26-27 5/18/11 3:01 PM5/18/11 3:01 PM
28 Need Help? Call toll free: 1-800-348-8100
Testing
29
Testing
www.bayerdiabetes.com/us
Testing Your Blood
Cleaning and Disinfecting
Cleaning and Disinfecting
Your CONTOUR®NEXT LINK system should be cleaned and
disinfected as recommended.
Cleaning is the removal of visible dirt and debris, but does
not reduce the risk for transmission of infectious diseases.
Your CONTOUR NEXT LINK system should be cleaned of dirt
and debris as needed.
Disinfecting (if performed properly) reduces the risk of
transmitting infectious diseases. It should be disinfected at
least once a month or when contamination with blood is
suspected or is visible and before anyone assists you with
the testing of your blood glucose.
For more assistance call: 1-800-348-8100
www.bayerdiabetes.com/us
More information can be found at:
http://www.fda.gov/MedicalDevices/Safety/
AlertsandNotices/ucm224025.htm
http://www.cdc.gov/injectionsafety/Fingerstick-
DevicesBGM.html
Cleaning your Meter
Supplies Necessary for Cleaning:
• Mild detergent • Paper towels
1. If the meter is soiled, clean with a drop of mild detergent
on a moist (not wet) paper towel. Do not allow cleaning
solution to run into the meter through areas such as the
data or strip ports or around the buttons. Wipe away any
detergent residue and dry as necessary with a clean
paper towel.
Expected Values: Blood sugar values will vary depending
on food intake, medication dosages, health, stress, or
activity. Non diabetic plasma glucose concentrations are
normally maintained within a relatively narrow range, roughly
70 – 110 mg/dL in the fasting state.3 You should consult
with your healthcare provider for expected values
specifi c to your needs.
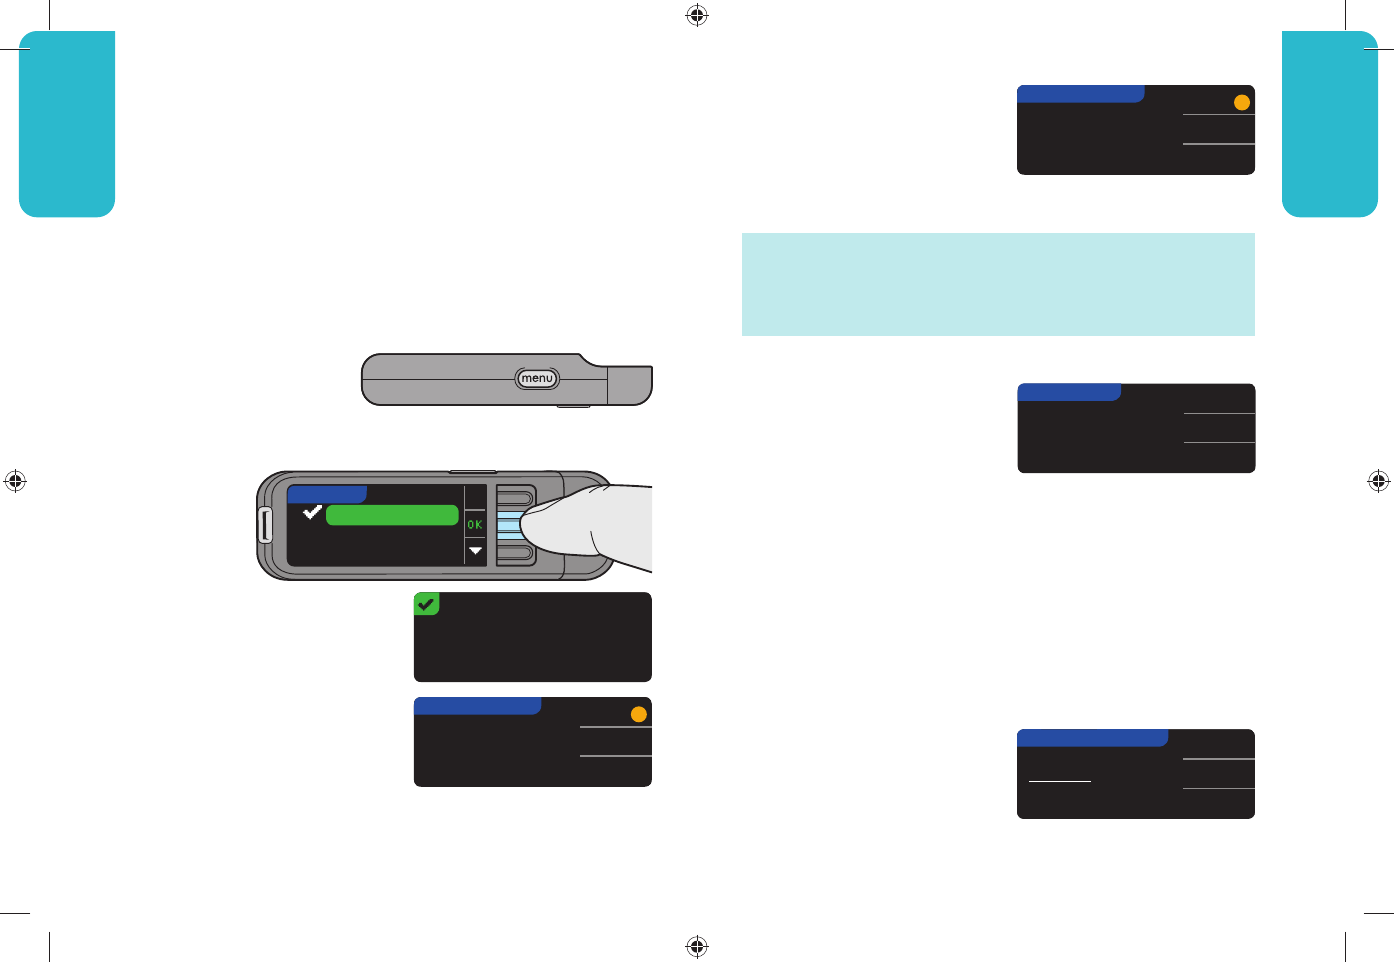
Test Results
IMPORTANT:
• You may want to test with Send Options set to off if you
do not want to create a wireless signal (for example, if
you have been asked to turn off all electronic devices on
an aircraft).
• Always check the display on your compatible Medtronic
MiniMed device to ensure that the glucose result shown
agrees with the meter display.
MST_CntrNextLINK_UG_EN_FpBp_v6.indd 28-29MST_CntrNextLINK_UG_EN_FpBp_v6.indd 28-29 5/18/11 3:01 PM5/18/11 3:01 PM

30 Need Help? Call toll free: 1-800-348-8100
Testing
31
Testing
www.bayerdiabetes.com/us
Cleaning and Disinfecting
Cleaning and Disinfecting
Disinfecting your Meter
Supplies Necessary for Disinfecting:
• Household bleach spray with 1.84% sodium hypochlorite
• Paper towels • Cotton swabs • Timing device
1. Before disinfecting, if the meter is soiled it must be
cleaned as described in CLEANING YOUR METER
(see page 29).
DO NOT SPRAY BLEACH DIRECTLY ON YOUR METER
2. To disinfect, spray a clean and dry paper towel with
bleach spray until wet but not dripping.
3. Wipe all exposed surfaces of the meter until wet. Do not
allow disinfecting solution to run into the meter through
areas such as the data or strip ports or around the
buttons.
WIPING CONTINUOUSLY, KEEP ALL METER
SURFACES WET FOR 60 SECONDS.
Disinfecting your Meter (cont’d)
4. To disinfect the test strip port, moisten a cotton swab with
bleach spray and wipe all strip port surfaces until wet.
Again, do not allow disinfecting solution to run into the
meter.
5. Dry all meter surfaces and test strip port using a clean
paper towel if needed.
KEEP ALL STRIP PORT SURFACES WET FOR
60 SECONDS, WIPING CONTINUOUSLY.
Cleaning your Lancing Device
Supplies Necessary for Cleaning:
• Mild detergent • Paper towels
1. If the MICROLET®2 is soiled, clean with a drop of mild
detergent on a moist (not wet) paper towel. Wipe away
any detergent residue and dry as necessary with a clean
paper towel.
Disinfecting your Lancing Device
Supplies Necessary for Disinfecting:
• Household bleach spray with 1.84% sodium hypochlorite
• Paper towels • Cotton swabs • Timing device
MST_CntrNextLINK_UG_EN_FpBp_v6.indd 30-31MST_CntrNextLINK_UG_EN_FpBp_v6.indd 30-31 5/18/11 3:01 PM5/18/11 3:01 PM
32 Need Help? Call toll free: 1-800-348-8100
Testing
33
Testing
www.bayerdiabetes.com/us
Result Under 20 mg/dL
Follow Medical Advice
Immediately.
E23
E23
Result Over 600 mg/dL
Wash hands or test
site. Repeat test with
new strip.
E21
E21
Over 600 mg/dL, Again
Follow Medical Advice
Immediately.
E22
E22
CAUTION:
• If your blood sugar reading is under
50 mg/dL, follow medical advice immediately.
• If your blood sugar reading is over
250 mg/dL, wash and dry your hands well and
repeat the test with a new strip. If you get a
similar result, call your healthcare professional
as soon as possible.
• Always consult your healthcare professional
before changing your medication based on
CONTOUR®NEXT LINK test results.
High and Low Blood Sugar Alert Screens
Cleaning and Disinfecting
Disinfecting your Lancing Device (cont’d)
1. Before disinfecting, if the lancing device is soiled it
must be cleaned as described in CLEANING YOUR
LANCING DEVICE (see page 31).
2. To disinfect, spray a clean and dry paper towel with
bleach spray until wet but not dripping.
3. Remove the end cap and lancet if present.
4. Wipe all exposed surfaces of the lancing device until wet.
5. Moisten a cotton swab with bleach solution and wipe all
internal and external surfaces of the end cap until wet.
6. Dry all lancing device surfaces and end cap with a clean
paper towel if needed.
WIPING CONTINUOUSLY, KEEP ALL LANCING
DEVICE SURFACES WET FOR 60 SECONDS.
WIPING CONTINUOUSLY, KEEP ALL END CAP
SURFACES WET FOR 60 SECONDS.
High and Low Blood Sugar Alert Screens
• If your blood sugar reading is
under 20 mg/dL, the “Follow
Medical Advice Immediately”
screen will display and the
meter will beep twice.
Contact your healthcare
professional.
• If your blood sugar reading is
over 600 mg/dL the next
screen will tell you to retest.
The meter will beep twice.
• If results are still over
600 mg/dL, “Follow Medical
Advice Immediately” is
displayed. Contact your
healthcare professional for
advice.
MST_CntrNextLINK_UG_EN_FpBp_v6.indd 32-33MST_CntrNextLINK_UG_EN_FpBp_v6.indd 32-33 5/18/11 3:01 PM5/18/11 3:01 PM
34 Need Help? Call toll free: 1-800-348-8100
Testing
35
Testing
www.bayerdiabetes.com/us
Low Blood Sugar
69
High Blood Sugar
251
High and Low Blood Sugar Readings
Control Solution Testing
High and Low Blood Sugar Readings
Your meter has been preset with a hypoglycemic (low blood
sugar) value of 70 mg/dL and a hyperglycemic (high blood
sugar) value of 250 mg/dL. These are the default values,
but can be customized by you and/or your healthcare
professional.
Low Blood Sugar
If your blood sugar reading is under 70 mg/dL:
• A screen with large orange
numbers will alert you that
your blood sugar is low.
High Blood Sugar
If your blood sugar reading is over 250 mg/dL:
• A screen with large orange
numbers will alert you that
your blood sugar is high.
• If AutoLog is on and you
were not able to mark it
before the high or low alert appeared, press the Notes
button. You may now select Before Meal, After Meal
or No Mark by pressing the button next to it.
Control Solution Testing
Use only Bayer’s control solutions
(Normal, Low and High) with Bayer’s
CONTOUR®NEXT LINK blood glucose
monitoring system. CONTOUR® control
solution should only be used with CONTOUR
test strips. CONTOUR®NEXT control solution
should only be used with CONTOUR NEXT
test strips. Using any other control solution or
any other combination of control solution and
strips could present incorrect results.
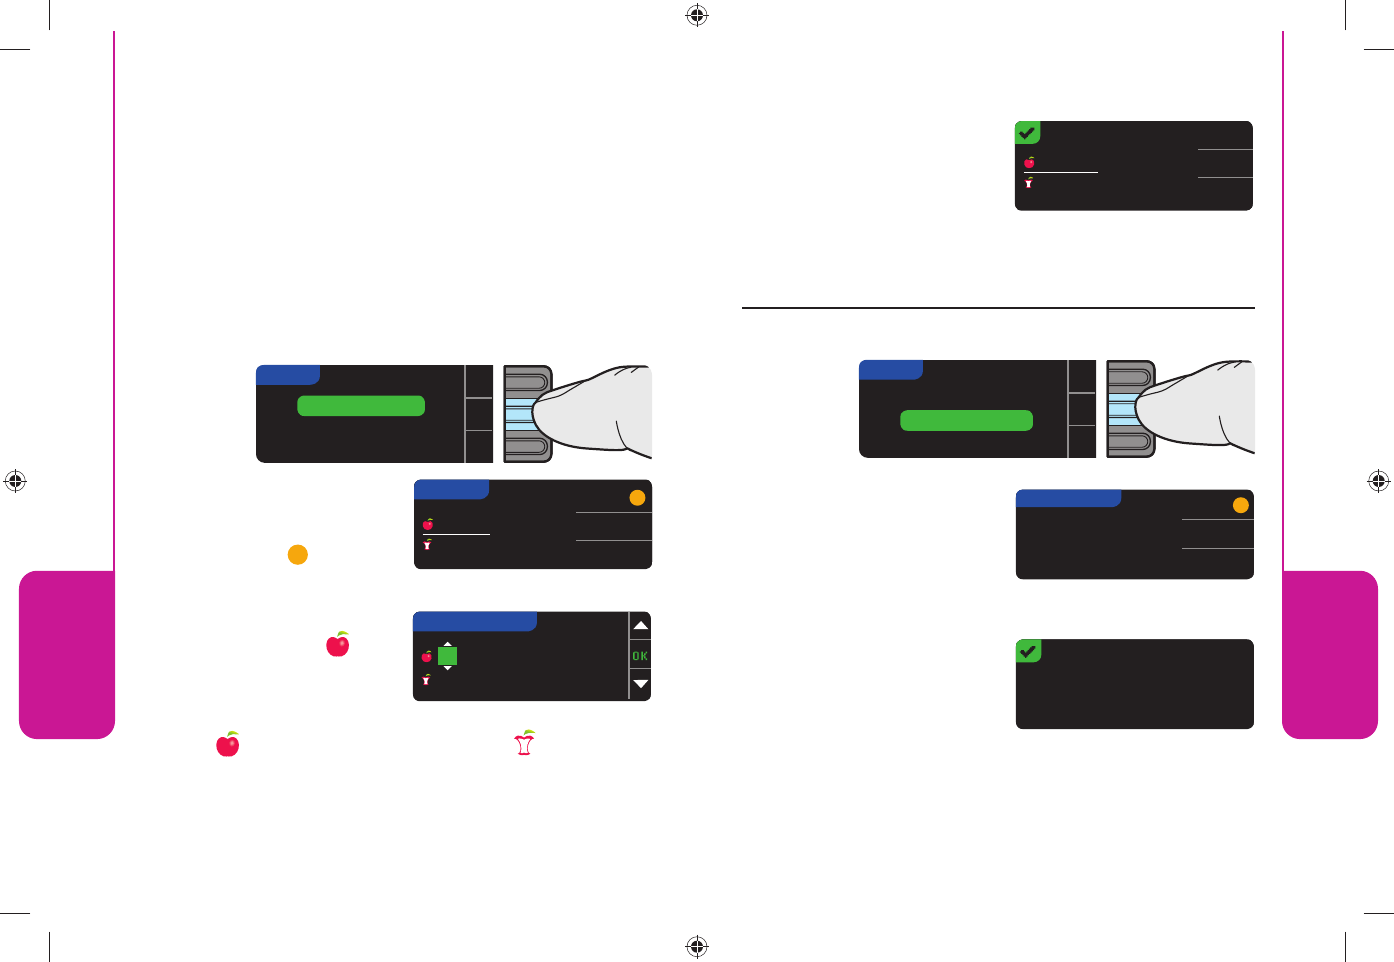
Perform a control test:
• When using your meter for the fi rst time
• When you open a new bottle or package of test strips
• If you think your meter may not be working properly
• If you have repeated, unexpected blood sugar results.
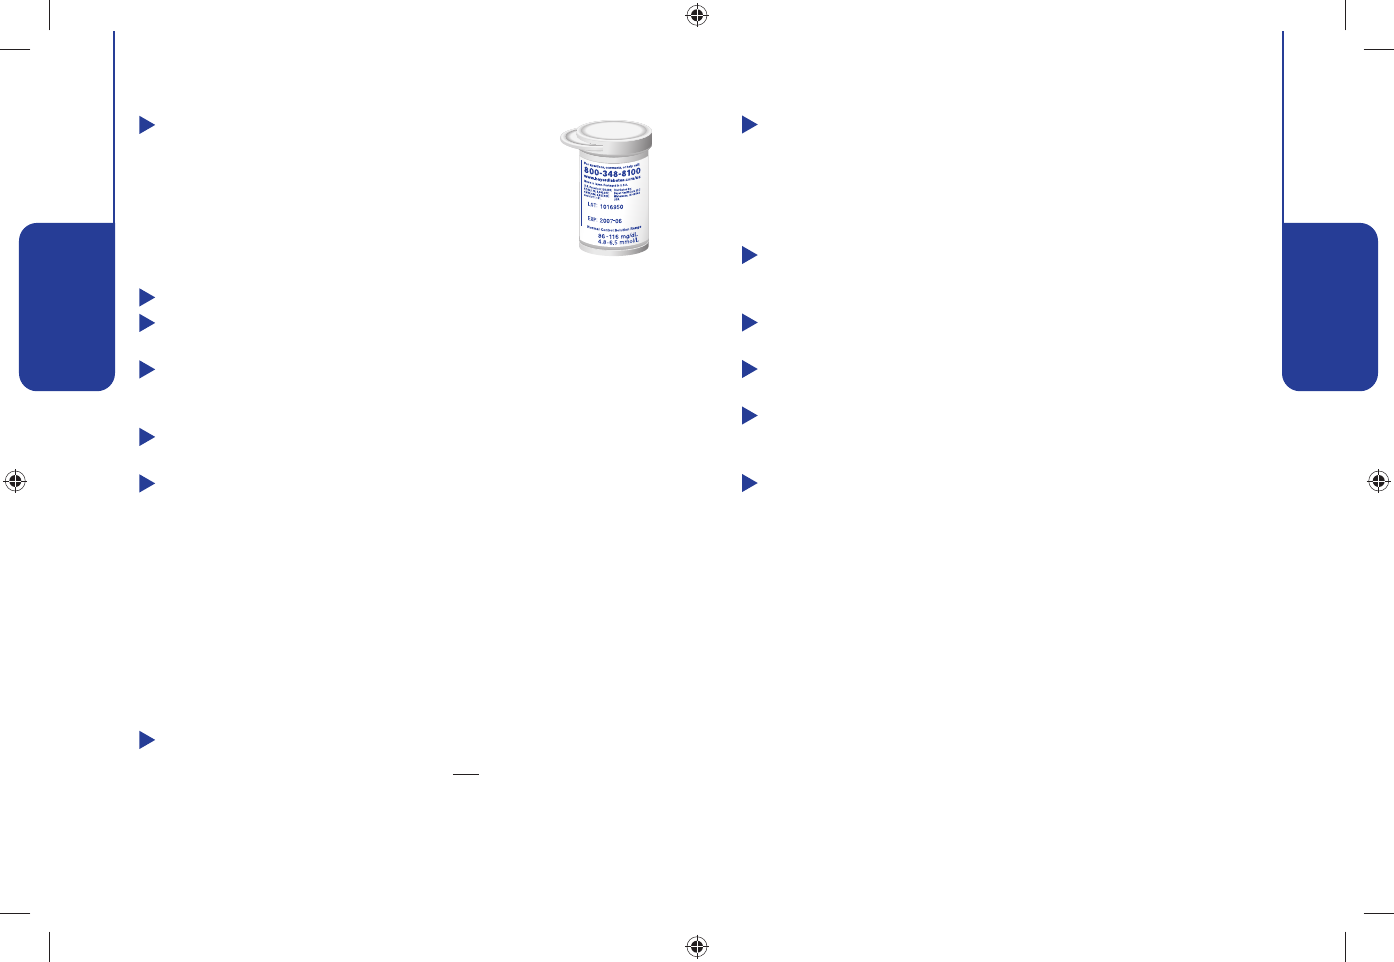
Normal, Low or High control solutions are available.
Always use Bayer’s control solutions specifi c to your
test strips. Other brands could present incorrect results.
If you need help locating Bayer’s CONTOUR or
CONTOUR NEXT control solutions, call Bayer Diabetes
Customer Service at 1-800-348-8100.
1. Wash and dry your hands well before testing.
2. Remove a test strip from the bottle and fi rmly snap the
lid closed.
NOTE: Check the expiration date on the test strip bottle and
the expiration and discard dates on the control solution. Do
not use expired materials. Make sure the test strip does not
appear torn or damaged.
MST_CntrNextLINK_UG_EN_FpBp_v6.indd 34-35MST_CntrNextLINK_UG_EN_FpBp_v6.indd 34-35 5/18/11 3:01 PM5/18/11 3:01 PM
36 Need Help? Call toll free: 1-800-348-8100
Testing
37
Testing
www.bayerdiabetes.com/us
10:30 AM l 3/11
121mg
dL
APPLY BLOOD
Control Solution Testing
Control Solution Testing
3. Prepare to run a control test by inserting a test strip into
the meter.
4. Gently rock the control bottle before opening to ensure it
is mixed well.
5. Squeeze a small drop of control solution onto a clean
non-absorbent surface, such as a piece of wax paper.
Do not apply control solution to the test strip directly
from the bottle.
6. Replace the cap
on the control
solution bottle.
7. Immediately touch the
tip of the test strip to
the drop of control
solution.
8. Hold it in the drop until the
meter beeps.
Accepted
Control Test
NOTE: The Accepted screen
displays only when using
CONTOUR®NEXT test strips.
9. Compare your control test result with the
Normal Control range printed on the test
strip bottle label or on the bottom of the
test strip box.
The result will automatically be marked as a control test and
stored in the meter memory. Control results will not be
included in your blood sugar average or sent to your pump.
To turn your meter off, hold down the menu button for 2
seconds.
The Low and High control range values can be found on the
bottom of the test strip box.
If your control test result falls out of the specifi ed
range, call Customer Service, 1-800-348-8100. Do not
use the meter for blood glucose testing until you
resolve this issue.
MST_CntrNextLINK_UG_EN_FpBp_v6.indd 36-37MST_CntrNextLINK_UG_EN_FpBp_v6.indd 36-37 5/18/11 3:01 PM5/18/11 3:01 PM
38 Need Help? Call toll free: 1-800-348-8100
Reminders
and Notes
39
Reminders
and Notes
Reminder
Notes
92mg
dL
Before Meal
Reminder in:
3 hours 15 minutes
3
hrs
COUNTDOWN
15
mins
3
hrs
COUNTDOWN
00
mins
Reminder
Notes
92mg
dL
Before Meal
Start
Change
Go Back
2
hrs
COUNTDOWN
Start
Change
Go Back
2
hrs
COUNTDOWN
10:30 AM l 3/11
REMINDER
REMINDER
REMINDER
REMINDER
10:30 AM l 3/11
www.bayerdiabetes.com/us
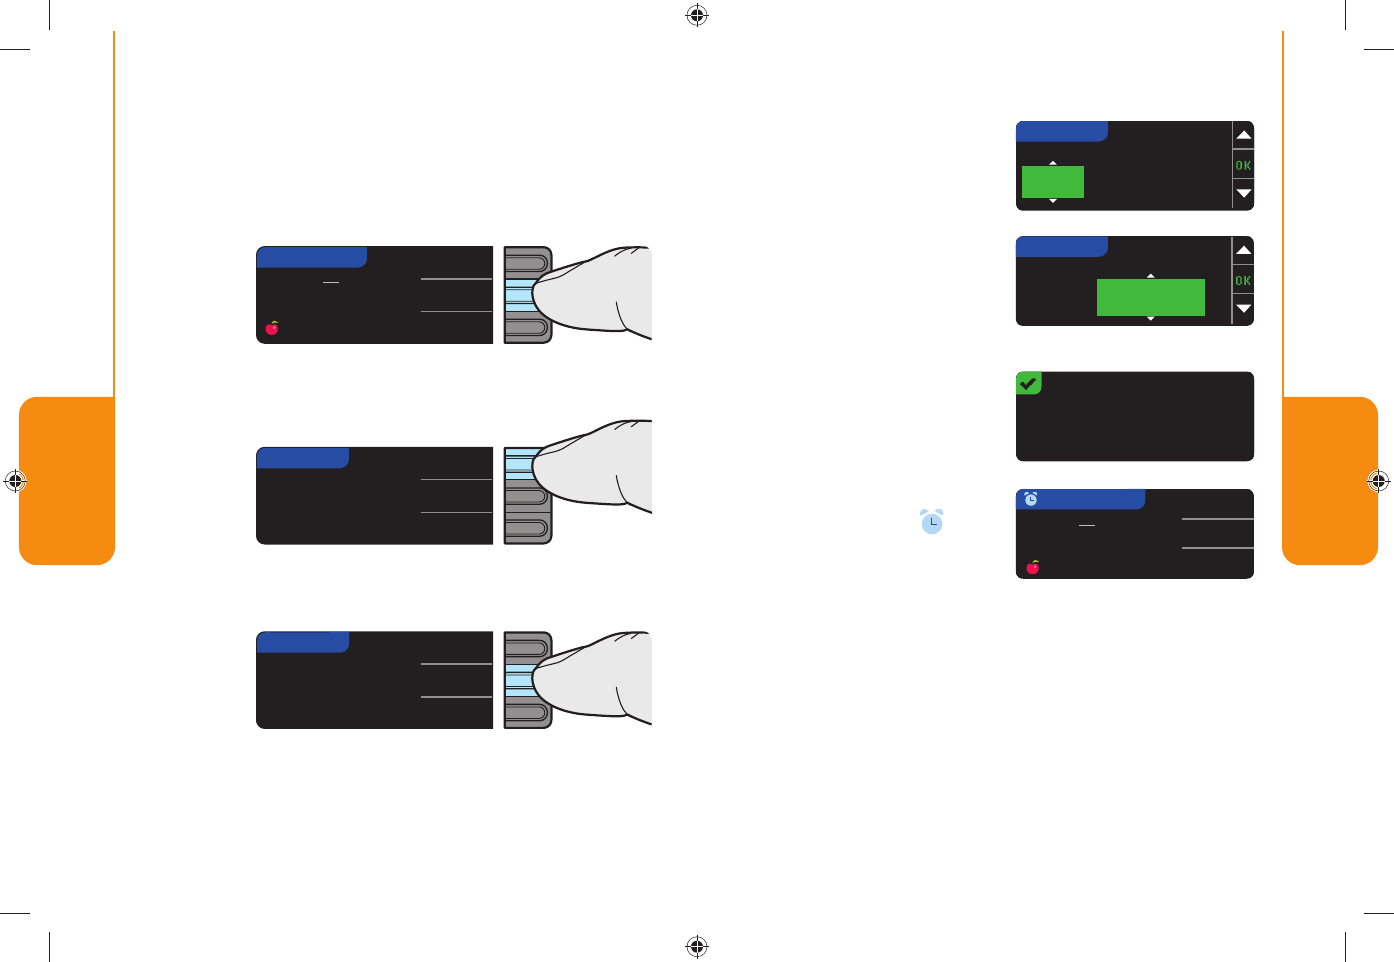
Setting a Reminder
Setting a Reminder
1. Press the ▲ or ▼
button to select the correct
hours. Press the OK button.
2. Press the ▲ or ▼
button to select the minutes
(in 15 minute increments).
Press the OK button.
A screen confi rms the
Reminder countdown time.
The meter will return to the
test result screen.
When the Reminder feature is
on, the clock symbol is in
the blue header.
3. Remove the test strip from
the meter.
The meter retains the Reminder time that you set as the
default.
You can change the Reminder countdown time to the time
you wish by pressing the Change button.
Setting a Reminder
A Reminder for your next test can be set after testing or from
the Setup menu.
After Testing
1. Press the Reminder button.
2. Press the Start button to begin the countdown. The
default time is 2 hours or the last reminder time that
was set.
MST_CntrNextLINK_UG_EN_FpBp_v6.indd 38-39MST_CntrNextLINK_UG_EN_FpBp_v6.indd 38-39 5/18/11 3:01 PM5/18/11 3:01 PM
40 Need Help? Call toll free: 1-800-348-8100
Reminders
and Notes
41
Reminders
and Notes
Reminder in:
2 hours
Reminder: On
Date
Time
OK
▼
▲
SETUP
Reminder: Off
Date
Time
MENU Logbook
Trends
Setup
Start
Change
Go Back
2
hrs
COUNTDOWN
REMINDER
SETUP
www.bayerdiabetes.com/us
Setting a Reminder
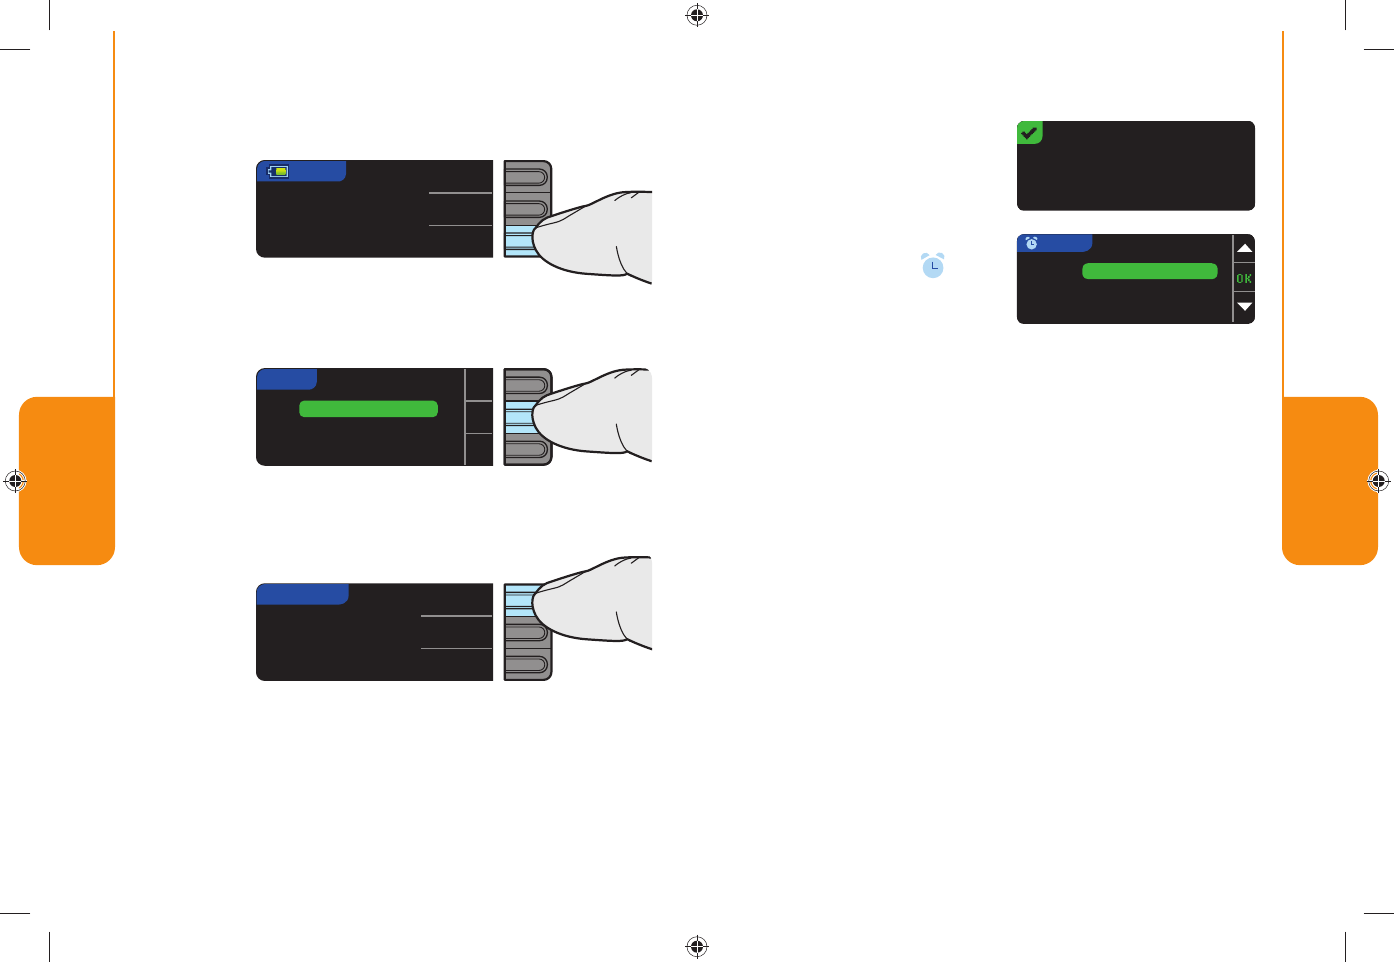
A screen confi rms the
Reminder time set.
When the Reminder feature is
on, the clock symbol is in
the blue header.
Setting a Reminder
From the Setup Menu
1. Go to the Main Menu. Press the Setup button.
2. If Reminder is set to off, press the OK button to change
the Reminder settings.
3. To start the countdown press the Start button or press
the Change button to scroll to a different countdown time.
Follow the instructions on the previous page.
MST_CntrNextLINK_UG_EN_FpBp_v6.indd 40-41MST_CntrNextLINK_UG_EN_FpBp_v6.indd 40-41 5/18/11 3:01 PM5/18/11 3:01 PM
42 Need Help? Call toll free: 1-800-348-8100
Reminders
and Notes
43
Reminders
and Notes
Reminder is stopped.
Reminder is stopped.
Reminder
Notes
167mg
dL
Before Meal
10:30 AM l 3/11
Stop
Change
Go Back
1
REMINDER IN
hr
40
mins
REMINDER
Stop
Change
Go Back
1
REMINDER IN
hr
40
mins
REMINDER
OK
▼
▲
SETUP
Reminder: On
Date
Time
www.bayerdiabetes.com/us
Turning Off a Reminder
Turning Off a Reminder
From the Setup Menu
1. Press the OK button.
A screen confi rms
your choice.
2. Press the Stop button. The countdown is now stopped.
The Reminder screen displays the remaining time.
Turning Off a Reminder
A Reminder can be turned off or changed after testing or
from the Setup menu.
After Testing
1. Press the Reminder button.
A screen confi rms
your choice.
The Countdown is now stopped and the clock symbol
will no longer appear on the screen.
If the countdown is currently on, the screen will read
“Reminder In:” with the remaining amount of time displayed.
2. To stop the Countdown press the Stop button.
MST_CntrNextLINK_UG_EN_FpBp_v6.indd 42-43MST_CntrNextLINK_UG_EN_FpBp_v6.indd 42-43 5/18/11 3:01 PM5/18/11 3:01 PM
44 Need Help? Call toll free: 1-800-348-8100
Reminders
and Notes
45
Reminders
and Notes
Reminder
Notes
167mg
dL
Before Meal
Sick is added to Notes.
NOTES Before Meal
After Meal
Don’t Feel Right
Sick
Stress
Activity
Go Back
Reminder
Notes
167mg
dL
Before Meal,
OK
Time for your next
test.
INSERT STRIP
10:30 AM l 3/11
10:30 AM l 3/11
Sick is removed from Notes.
NOTES
Don’t Feel Right
Sick
Stress
Adding Notes
Adding Notes
You may add Notes to your test result that may help explain
results. Your notes will be saved in the Logbook.
1. From the test result screen, press the Notes button.
2. Press the ▲ or ▼ button to
scroll through the choices.
Some may not be visible
until you scroll up or down.
Press the OK button when
your choice is highlighted.
A screen confi rms your choice.
After the confi rmation screen
disappears, you may remove
the note or add additional
Notes by repeating the steps
above. The notes will scroll
across the bottom so that you
can read them all.
Getting a Reminder
Getting a Reminder
When the Reminder time is reached, 20 beeps will sound.
The meter will turn on and a Reminder screen will appear.
You can stop the beeps by pressing the OK button or
inserting a test strip.
1. Press the OK button.
2. Proceed with testing
(see page 14).
If you are testing within 15 minutes of the reminder, neither
screen will appear and the countdown will be stopped.
MST_CntrNextLINK_UG_EN_FpBp_v6.indd 44-45MST_CntrNextLINK_UG_EN_FpBp_v6.indd 44-45 5/18/11 3:01 PM5/18/11 3:01 PM
46 Need Help? Call toll free: 1-800-348-8100
Main Menu
Functions
47
Main Menu
Functions
Logbook
Trends
Setup
140mg
dL
After Meal
10/13/10
2:12 PM
END OF LOGBOOK
Logbook
Trends
Setup
127mg
dL
Before Meal
3/11/10
10:30 AM
MENU
TARGET
TRENDS
70-130
70-180
LOGBOOK
MENU
www.bayerdiabetes.com/us
Menu Button/Logbook
Trends
Trends
Trends displays your averages and your results as they
compare to your targets, over a period of time that you
select.
1. Press the Trends button to view averages.
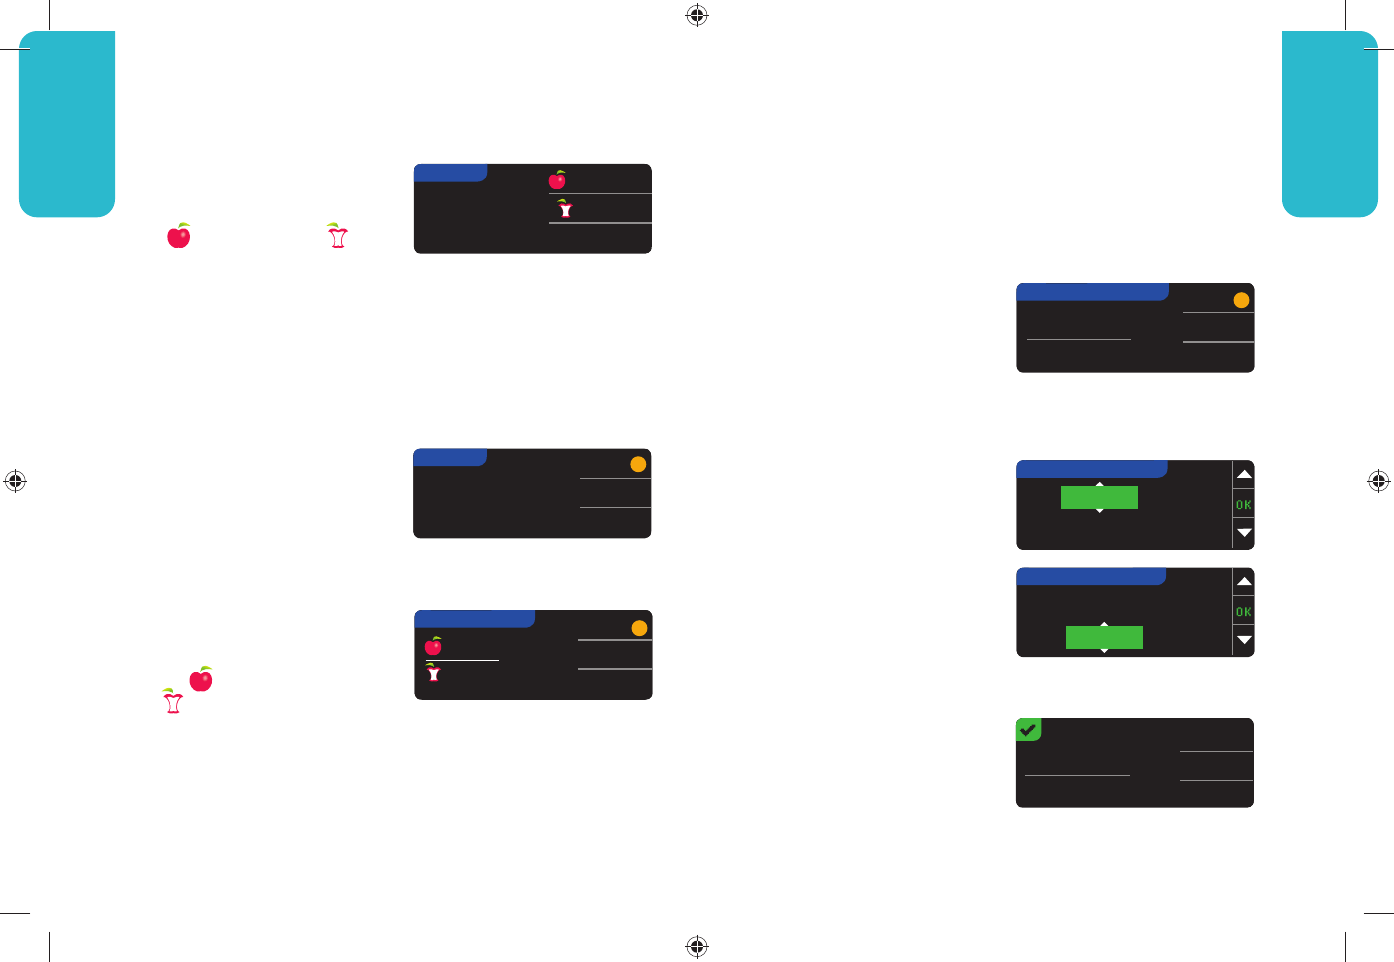
If AutoLog is on, the
(Before Meal) and (After
Meal) target ranges will
appear. To set personalized
target ranges, see page 56.
If AutoLog is off, you will only see one target range
(no Before Meal/ After Meal).
14 days is the default. You can change the Trends time
range to 7 or 30 days in Setup (see page 57).
The most recent result is
shown fi rst and the oldest
result last. When you reach the
oldest entry you will see the
End of Logbook screen. Your
meter will store 1000 test results.
Menu Button
• To turn on the meter, press and hold the Menu
button until the meter turns on.
The Main Menu has 3 choices: Logbook, Trends and Setup.
• Select one by pressing the
button next to your choice.
• To go back a screen, press
the Menu button once.
• To turn the meter off, press and hold the Menu button for 2
seconds.
• To turn the test strip port light on with the meter off, give
the Menu button two quick presses. Two quick presses of
the Menu button will also turn off the light.
Logbook
To access the Logbook, press the Logbook button from the
Main Menu.
In Logbook you can scroll
through all the stored test
results in memory by pressing
the ▲ or ▼ button.
TOP VIEW
MST_CntrNextLINK_UG_EN_FpBp_v6.indd 46-47MST_CntrNextLINK_UG_EN_FpBp_v6.indd 46-47 5/18/11 3:01 PM5/18/11 3:01 PM
48 Need Help? Call toll free: 1-800-348-8100
Main Menu
Functions
49
Main Menu
Functions
128
mg
dL
38
14 DAY BEFORE MEAL
8
26
4
AVERAGE
175
mg
dL
17
14 DAY AFTER MEAL
9
8
0
AVERAGE
151
mg
dL
74
14 DAY RESULTS
21
47
6
AVERAGE
SETUP
Pump Options
Reminder: Off
Date
PUMP OPTIONS
Send Options
Connection
Send is set to
Always
?
Change
Go Back
SEND OPTIONS
Automatically send
Blood Glucose Results
to the Pump?
Ask me
Always
Never
SEND OPTIONS
www.bayerdiabetes.com/us
Trends
Pump Options
Setup
3. Press the ▼ button to go to
the 14 Day After Meal
Average.
4. Press the ▼ button to go to
the 14 Day Results screen.
NOTE: If you turn off AutoLog, only the 14 Day Results total
will display. You will not see before and after meal averages.
2. Press the ▼ button to
display the 14 Day
Before Meal Average. This
example shows that your
Before Meal average is
128 mg/dL and 38 test results are included in the Before
Meal average with 26 in the target range, 8 over
your target range and 4 under the target range.
The next three screens will show 14 day Before Meal, 14
day After Meal and 14 day total average. Also shown are the
total number of test results included in the average, the
number of tests (above), (within) and (below)
target.
Pump Options
Go to the pump options in the setup menu if you want to
change your original choices.
1. Make your selection: Send
Options or Connection. Send
options controls when your
blood glucose readings are
sent to your compatible
Medtronic MiniMed device. Choosing Connection will
display steps to connect your CONTOUR®NEXT LINK
meter to your compatible Medtronic MiniMed device.
(Go to Step 6)
2. Press Send Options to
change your current setting.
3. Then press Change. Or
press Go Back if you do
not wish to change
Send Options.
4. Choose the setting that is
best for you. The choices
are: Ask Me, Always, or
Never.
MST_CntrNextLINK_UG_EN_FpBp_v6.indd 48-49MST_CntrNextLINK_UG_EN_FpBp_v6.indd 48-49 5/18/11 3:01 PM5/18/11 3:01 PM
50 Need Help? Call toll free: 1-800-348-8100
Main Menu
Functions
51
Main Menu
Functions
OK
▼
▲
Reminder
Date: 3/11/09
Time
SETUP
DATE
SELECT Month/Day/Year
Day.Month.Year
DATE
CHANGE YEAR
10 / 13 / 10
DATE
CHANGE MONTH
10 / 13 / 10
DATE
CHANGE DAY
10 / 13 / 10
Send Options set.
Meter will ask you
before sending results.
PUMP OPTIONS
Send Options
Connection
Enter this Meter ID
into your pump:
123456
?
OK
Go Back
CONNECT TO PUMP
Connect to a
Medtronic Pump? OK
Go Back
CONNECT TO PUMP
www.bayerdiabetes.com/us
1. Press the Menu button to go to the Main Menu.
2. Press the Setup button.
3. Press the ▲ or ▼ button to select Date. Press the
OK button.
4. To change the date, press
the Change button.
5. Select either the
Month/Day/Year or
Day.Month.Year button.
6. Press the ▲ or ▼ button to
select the correct year.
Press the OK button.
7. Press the ▲ or ▼ button to
select the correct month.
Press the OK button.
8. Press the ▲ or ▼ button to
select the correct day. Press
the OK button.
Setting the Date
Setup: Setting the Date
Pump Options
5. The next screen confi rms
your choice. Press OK.
6. Choose Connection
from the Pump Options
menu to connect your
CONTOUR®NEXT LINK
meter to your compatible
Medtronic MiniMed device.
7. Press OK to continue the
connection process. Press
Go Back if you do not wish to
continue the connection.
8. Follow the instructions on
your compatible Medtronic
MiniMed device to connect
with your meter (refer to the
separate Medtronic User
Guide.) Do not press OK on your meter screen until
connection process is complete.
NOTE: Pump on meter screen refers to your compatible
Medtronic MiniMed device.
MST_CntrNextLINK_UG_EN_FpBp_v6.indd 50-51MST_CntrNextLINK_UG_EN_FpBp_v6.indd 50-51 5/18/11 3:01 PM5/18/11 3:01 PM
52 Need Help? Call toll free: 1-800-348-8100
Main Menu
Functions
53
Main Menu
Functions
TIME
CHANGE HOURS
10 : 30 AM
TIME
CHANGE MINUTES
10 : 30 AM
TIME
CHANGE AM/PM
10 : 30 AM
Time is Set.
Change
Done
10:30 AM
OK
▼
▲
Date
Time: 10:30 AM
Sound
SETUP
TIME
SELECT FORMAT 12 Hour Clock
24 Hour Clock
Date is Set.
Change
Done
10/13/10
www.bayerdiabetes.com/us
Setup: Setting the Time
Setup: Setting the Time
6. Press the ▲ or ▼
button to select the correct
hour. Press the OK button.
7. Press the ▲ or ▼
button to select the correct
minute. Press the OK button.
8. Press the ▲ or ▼
button to select the correct
AM/PM. Press the OK
button.
A screen confi rms the time
you entered. If correct, press
the Done button and the
Setup menu will appear.
If you need to make changes,
press the Change button and repeat the process.
Setting the Time
1. Press the Menu button to go to the Main Menu.
2. Press the Setup button.
3. Press the ▲ or ▼ button to select Time. Press the OK
button.
4. To change the time, press
the Change button.
5. Select either the 12 hour
clock or 24 hour clock
button.
A screen confi rms the date you
entered. If correct, press the
Done button and the Setup
menu will appear.
If you need to make changes,
press the Change button and repeat the process.
MST_CntrNextLINK_UG_EN_FpBp_v6.indd 52-53MST_CntrNextLINK_UG_EN_FpBp_v6.indd 52-53 5/18/11 3:01 PM5/18/11 3:01 PM
54 Need Help? Call toll free: 1-800-348-8100
Main Menu
Functions
55
Main Menu
Functions
OK
▼
▲
Sound
AutoLog: On
Target
SETUP
AutoLog is Off.
AUTOLOG
AutoLog is On
?
Accept
Turn Off
OK
▼
▲
Time
Sound: On
AutoLog
SETUP
Sound is Off.
SOUND
Sound is On Accept
Turn Off
www.bayerdiabetes.com/us
Setup: Turning the Sound On/Off
Setup: Turning AutoLog On/Off
Turning AutoLog On/Off
The AutoLog feature lets you mark your test result as Before
Meal or After Meal during the test countdown. You can
select No Mark if you are testing at times other than before
or after a meal. Your meter comes with AutoLog turned on.
We recommend that you keep this feature turned on.
NOTE: When AutoLog is ON, a result will not appear unless
marked as Before Meal, After Meal, or No Mark; or if the
result is outside the High/Low limits.
1. Press the ▲ or ▼ button to select AutoLog. Press the OK
button.
2. To turn the AutoLog off,
press the Turn Off button.
To keep the AutoLog on,
press the Accept button.
A screen confi rms your choice.
The Setup menu will appear.
Turning the Sound On/Off
1. Press the Menu button to go to the Main Menu.
2. Press the Setup button.
3. Press the ▲ or ▼ button to select Sound. Press the OK
button.
Sound is turned ON when you receive your meter. It can be
turned off using the Setup menu. Some error messages and
the Reminder bell will override the Sound off setting. One
long beep indicates a confi rmation. Two beeps indicate an
error or situation that requires your attention.
4. To turn the sound off, press
the Turn Off button.
To keep the sound on, press
Accept.
A screen confi rms your choice.
The Setup menu will appear.
MST_CntrNextLINK_UG_EN_FpBp_v6.indd 54-55MST_CntrNextLINK_UG_EN_FpBp_v6.indd 54-55 5/18/11 3:01 PM5/18/11 3:01 PM
56 Need Help? Call toll free: 1-800-348-8100
Main Menu
Functions
57
Main Menu
Functions
80 - 120
120 - 150
Change
Done
Target is Set.
Trends Range Selected:
7 Day
OK
▼
▲
Target
Trends Range
High and Low Limits
SETUP
TARGET
?
Change
Go Back
70 - 130
70 - 180
CHANGE TARGET
70 - 130
70 - 180
14 day
DEFAULT RANGE
?
Accept
Change
TRENDS RANGE
OK
▼
▲
Target
Trends Range
High and Low Limits
SETUP
www.bayerdiabetes.com/us
Setup: Blood Glucose Target Range
A screen confi rms that all
target ranges are set. If
correct, press the Done button.
You will be returned to the
Setup menu.
To make changes, press the Change button and repeat the
process.
Setting Trends Range
1. The default setting for the
Trends Range is 14 days.
To choose another Trends
Range, press Change. The
other Trends Range options
are 7 or 30 days.
2. The next screen will confi rm
your selection.
Changing the Blood Glucose Target Range
Your CONTOUR®NEXT LINK meter comes preset with
70–130 mg/dL for Before Meal testing and 70–180 mg/dL
for After Meal testing. Ranges can be changed to personal
targets decided by you and/or your healthcare professional.
1. Press the Menu button to go to the Main Menu.
2. Press the Setup button.
3. Press the ▲ or ▼ button to select Target.
Press the OK button.
4. To make changes to your
target range, press the
Change button, otherwise
Go Back. Press
?
for Help.
5. Press the ▲ or ▼ button to
select your desired
(Before Meal) low target.
Press the OK button.
Repeat this process to set your
personal (Before Meal) high target and (After Meal)
low and high targets. Press the OK button after each
selection.
Setting Trends Range
MST_CntrNextLINK_UG_EN_FpBp_v6.indd 56-57MST_CntrNextLINK_UG_EN_FpBp_v6.indd 56-57 5/18/11 3:01 PM5/18/11 3:01 PM
58 Need Help? Call toll free: 1-800-348-8100
Main Menu
Functions
59
Main Menu
Functions
Limits are set.
High: 250 mg/dL
Low: 70 mg/dL
?
Accept
Change
High: 251 mg/dL
Low: 69 mg/dL
Done
Change
HIGH AND LOW LIMITS
HIGH AND LOW LIMITS
HIGH AND LOW LIMITS
OK
▼
▲
High and Low Limits
Language
Customer Service
SETUP
Language selected:
English
English
Espanol
LANGUAGE
High: 251 mg/dL
Low: 70 mg/dL
High: 251 mg/dL
Low: 69 mg/dL
www.bayerdiabetes.com/us
Setup: High and Low Limits
Setup: Setting the Language
High and Low Limits
1. Choose Accept to use the
default settings. The default
high limit is 250 mg/dL and
the default low limit is
70 mg/dL.
Choose Change if you wish to use different limits.
2. Press the ▲ or ▼ button to
select your high limit.
Press OK.
3. Press the ▲ or ▼ button to
select your low limit.
Press OK.
4. The next screen confi rms
your choices.
Press Done.
Setting the Language
1. Press the Menu button to go to the Main Menu.
2. Press the Setup button.
3. Press the ▲ or ▼ button to select Language. Press the OK
button.
4. Press the ▲ or ▼ button to
select the language you
prefer. Press the OK button.
A screen confi rms your choice.
The Setup menu will appear in
the language you selected.
MST_CntrNextLINK_UG_EN_FpBp_v6.indd 58-59MST_CntrNextLINK_UG_EN_FpBp_v6.indd 58-59 5/18/11 3:01 PM5/18/11 3:01 PM
60 Need Help? Call toll free: 1-800-348-8100
Main Menu
Functions
61
Main Menu
Functions
www.bayerdiabetes.com/us
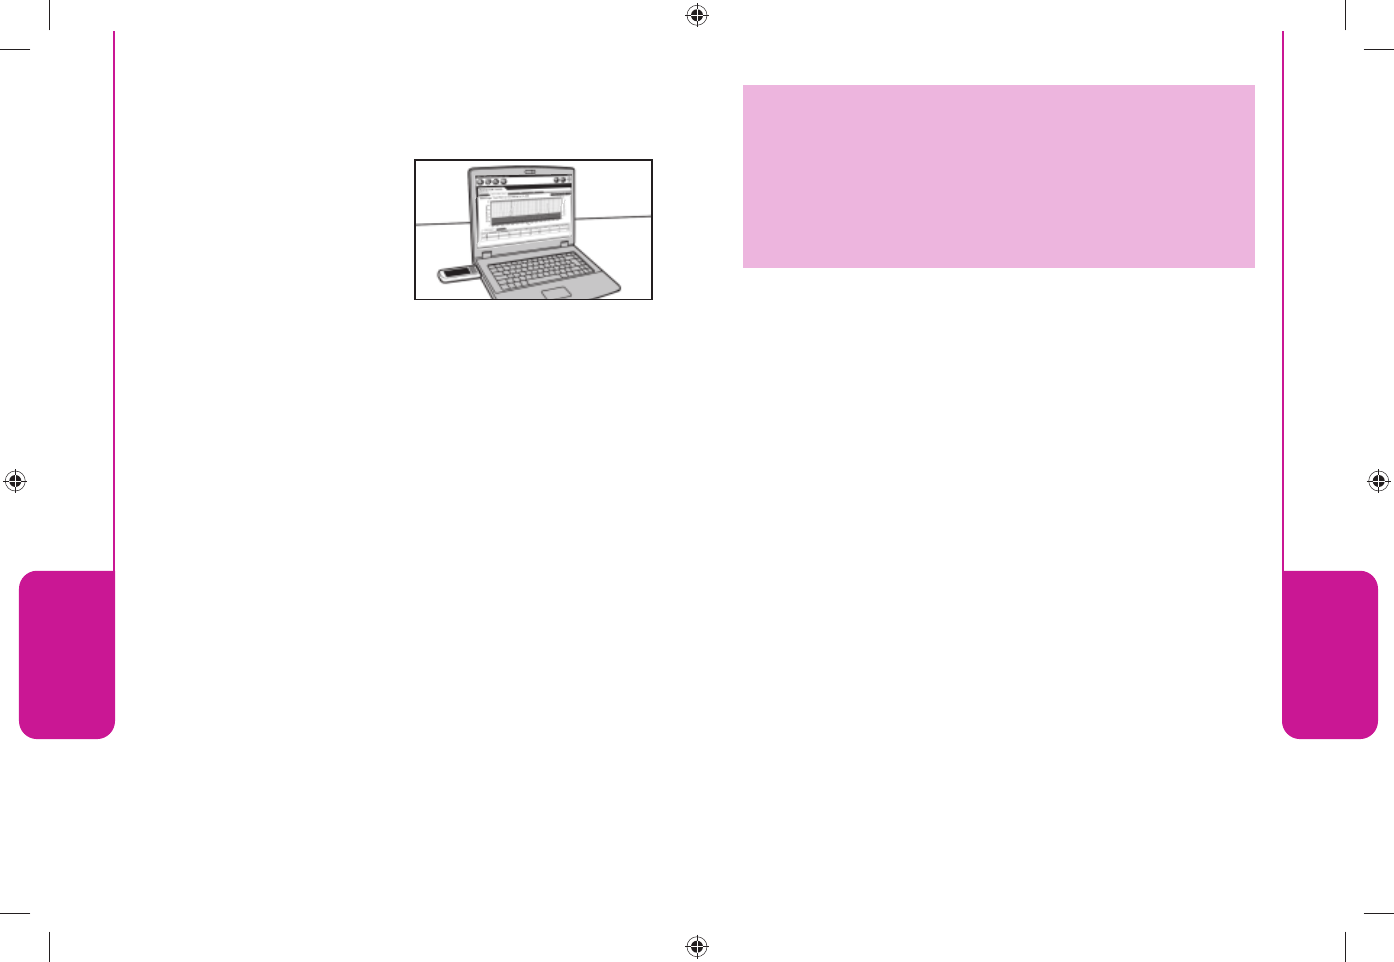
Transferring Data to Medtronic’s CareLink
Personal Therapy Management Software
Transferring Data to Medtronic’s CareLink®
Personal Therapy Management Software
You can easily transfer blood
glucose results from the
CONTOUR®NEXT LINK meter
to CareLink Personal Therapy
Management software. You
can also wirelessly transfer
data from your compatible
Medtronic MiniMed device to
CareLink Personal Therapy Management software using
your CONTOUR NEXT LINK meter.
1. Refer to the CareLink Personal Therapy Management
software user guide for instructions on how to set up
CareLink and load the required drivers onto your
computer.
2. If you are running Bayer’s GLUCOFACTS® DELUXE
diabetes management software on your computer, you
must close it.
3. Start up CareLink Personal. Follow the instructions on
each window, then, when instructed, plug your
CONTOUR NEXT LINK meter into a USB port on your
computer. CareLink Personal will automatically fi nd the
CONTOUR NEXT LINK meter and your compatible
Medtronic MiniMed device.
Your CONTOUR NEXT LINK meter is also compatible with
Bayer’s GLUCOFACTS DELUXE diabetes management
software.
IMPORTANT:
Bayer’s CONTOUR NEXT LINK meter has only been
tested for use with Medtronic’s CareLink Personal
Therapy Management Software and Bayer’s
GLUCOFACTS DELUXE diabetes management
software. Bayer is not responsible for any erroneous
results from the use of other software.
For more information, call our Customer Service
Department (1-800-348-8100), or visit our website
at www.bayerdiabetes.com/us.
Transferring Data to Medtronic’s CareLink
Personal Therapy Management Software
MST_CntrNextLINK_UG_EN_FpBp_v6.indd 60-61MST_CntrNextLINK_UG_EN_FpBp_v6.indd 60-61 5/18/11 3:01 PM5/18/11 3:01 PM
62 Need Help? Call toll free: 1-800-348-8100 63
www.bayerdiabetes.com/us
Logbook
Trends
Setup
Logbook
Trends
Setup
Used Test Strip
Remove used strip.
Repeat test with new
strip.
E02
E02
MENU
MENU
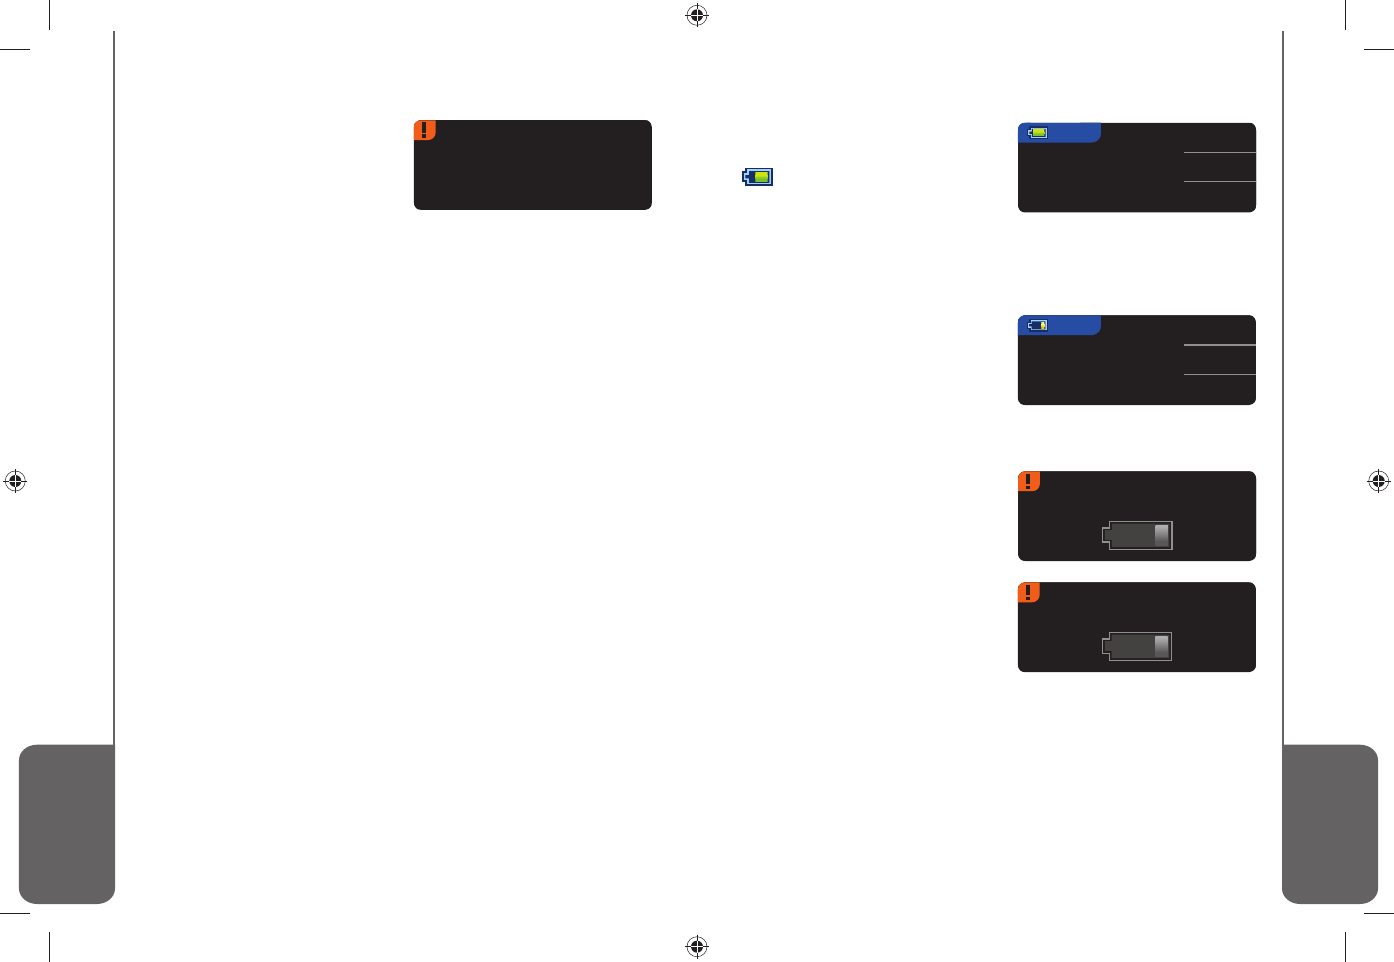
Charge Soon
Battery Low.
A40
A40
Charge Immediately
Battery is almost dead.
A41
A41
Technical,
Service & Care
Technical,
Service & Care
Error Detection and Battery Status/Charging/Removal
Error Detection and Battery Status/Charging/Removal
Battery Status Displays
The battery status will be
displayed with a battery symbol
on the Apply Blood screen
and the Main Menu screen. It
shows how much battery life is
left. This screen displays full battery.
As the battery is used, the
battery symbol on the screen
gradually shows less fi ll color.
The color of the battery fi ll
turns yellow when the battery is
low and then red when your battery is almost out of charge.
Error Detection Displays
An error screen will always
have an “E” with a number in
the lower left hand corner of
the display.
If there is an error (hardware,
software, testing errors) detected by your meter, your meter
will beep twice. You will see specifi c instructions to guide
you. The fi rst line of the error screen will tell you what the
error is. The next lines describe what you should do. When
an error screen has an OK shown, press the button next to it
to continue.
NOTE: If your screen displays a “connection error”, your test
result was not sent to your compatible Medtronic MiniMed
device. Make sure your CONTOUR®NEXT LINK meter is
within 4 feet of your compatible Medtronic MiniMed device
and the device is set to accept meter results. Your meter ID
must be programmed into the device. Refer to the separate
Medtronic User Guide.
Check the device display to see if your meter’s glucose
result has been received. If it has not, you can enter the test
result manually. If you continue to have problems, contact
Bayer Customer Service at 1-800-348-8100.
A series of low battery alerts
will tell you that the battery is
low and to charge soon.
MST_CntrNextLINK_UG_EN_FpBp_v6.indd 62-63MST_CntrNextLINK_UG_EN_FpBp_v6.indd 62-63 5/18/11 3:01 PM5/18/11 3:01 PM

64 Need Help? Call toll free: 1-800-348-8100 65
www.bayerdiabetes.com/us
Do Not Test
Rapid Charge
Shutting Down
Battery is dead.
A42
A42
Technical,
Service & Care
Technical,
Service & Care
Battery Charging
When you plug your meter into your wall charger or com-
puter, it will start to charge immediately. While the battery
charges, the strip port light fl ashes slowly.
Press the Menu button at any time to display the charging
status.
Rapid Charge
If the battery is low when you
plug in your meter, it will Rapid
Charge for about 1 minute.
You can run a blood glucose
test as soon as Rapid Charge is complete.
Normal Charging
When Rapid Charge ends, normal charging is expected to
last up to 2 hours. When the battery is full, the strip port light
turns off.
Error Detection and Battery Status/Charging/Removal
Error Detection and Battery Status/Charging/Removal
NOTES: CONTOUR®NEXT LINK requires a high-power
USB port. If the charging status displays “Low Power
Charging,” your CONTOUR NEXT LINK meter may be
plugged into a low-power USB port. Please try a different
USB port on your computer. If you are unsure whether your
computer has a high-power USB port, please check your
computer user manual or with the computer manufacturer.
You should only connect your meter to a computer with
current anti-virus software installed and running.
Wall Charger
For information about your wall charger please refer to the
insert contained in your meter kit.
Plug the meter into your wall charger or computer. Be sure
your computer is turned on and not in sleep, hibernate or
power save mode. Please be aware that USB ports in some
If you do not charge the
battery, a display will alert you:
“Shutting down, Battery is
dead.” Charge immediately.
computers and self-powered USB hubs can become much
warmer than the room. A USB cable has been provided for
your convenience. If you wish to test immediately after
disconnecting from your computer, please use the USB
cable.
The test strip port light will fl ash during charging and stop
fl ashing when charging is complete. Please remove the
meter and store in the wallet until you are ready to test.
MST_CntrNextLINK_UG_EN_FpBp_v6.indd 64-65MST_CntrNextLINK_UG_EN_FpBp_v6.indd 64-65 5/18/11 3:01 PM5/18/11 3:01 PM
66 Need Help? Call toll free: 1-800-348-8100 67
www.bayerdiabetes.com/us
Information for Safety
If you are experiencing any of these symptoms, test your
blood sugar. If your test result is under 50 mg/dL or
above 250 mg/dL, contact your healthcare professional
immediately.
Technical,
Service & Care
Technical,
Service & Care
Error Detection and Battery Status/Charging/Removal
A
B
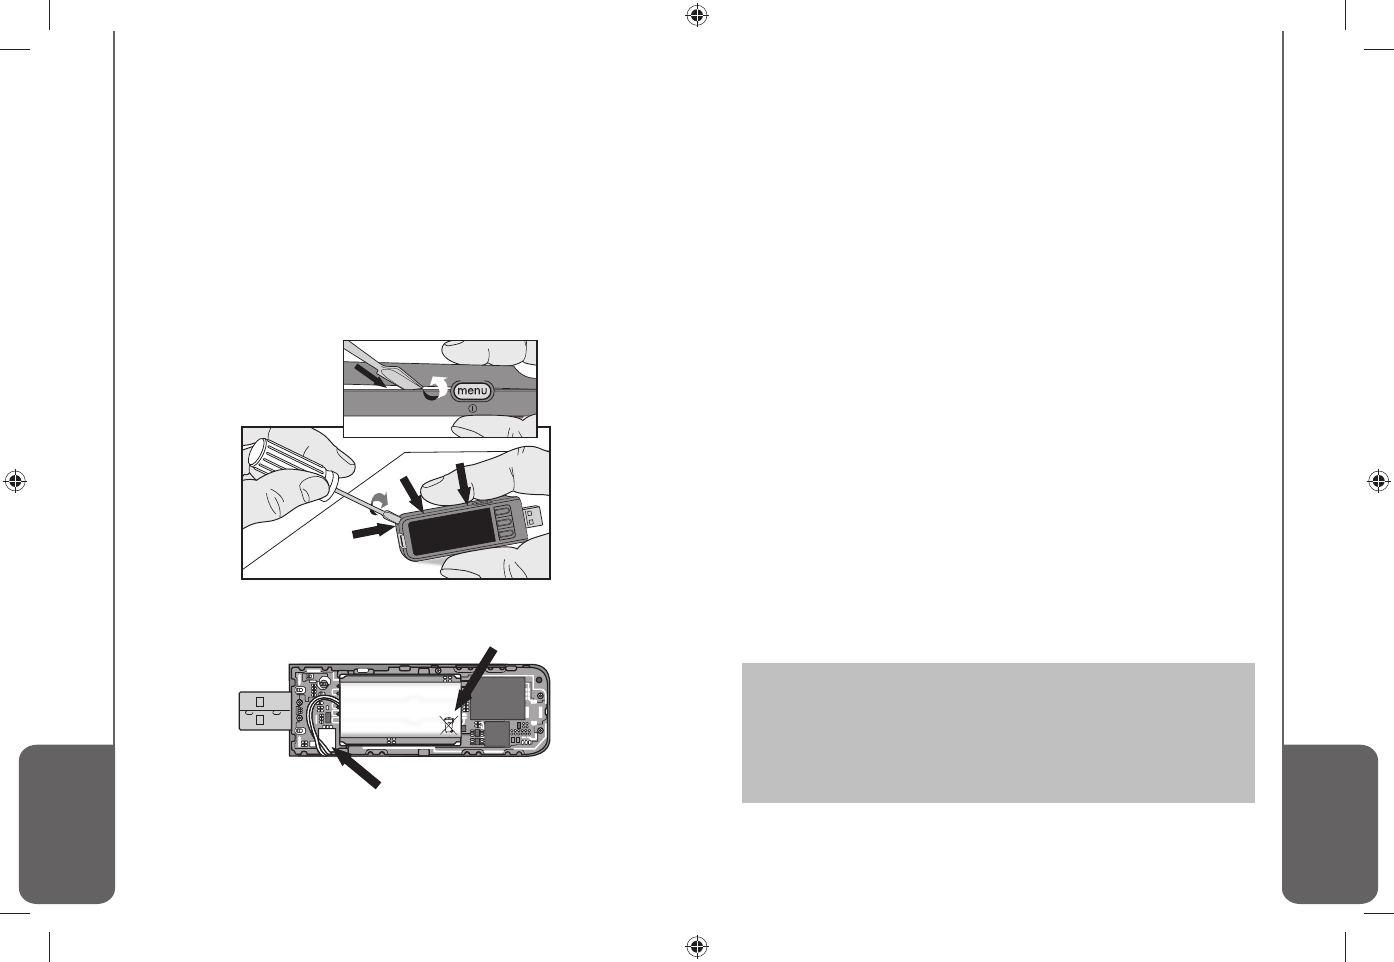
End of Meter Life/Battery Removal
NOTE: Carry out this process only when you no
longer intend to use the meter. Meter will not be
functional once opened to remove the battery.
To remove the battery for proper disposal, you will need to
pry the upper and lower cases apart.
With a screwdriver, beginning near the strip port, insert the
tip of the screwdriver and twist to pry the case loose.
Continue to do this down the side until the upper case
comes apart.
Pry up rechargeable battery here (A).
Disconnect battery by pulling battery connector (B).
Symptoms of High and Low Blood Sugar
Dispose of the meter and lithium polymer battery
in accordance with your local/country laws and
regulations.
Symptoms of High and Low Blood Sugar
You can better understand your test results by being aware
of the symptoms of high or low blood sugar.
According to the American Diabetes Association, some of
the most common symptoms are:
Low blood sugar
(Hypoglycemia):
• shakiness
• sweating
• fast heartbeat
• blurred vision
• confusion
• passing out
• irritability
• seizure
• extreme hunger
• dizziness
High blood sugar
(Hyperglycemia):
• frequent urination
• excessive thirst
• blurred vision
• increased fatigue
• hunger
Ketones (Ketoacidosis)
(often accompanied by
very high blood sugar):
• shortness of breath
• nausea and vomiting
• very dry mouth
For additional information and a complete list of symptoms,
contact your healthcare professional or refer to the website
of the American Diabetes Association: www.diabetes.org.
TOP VIEW
MST_CntrNextLINK_UG_EN_FpBp_v6.indd 66-67MST_CntrNextLINK_UG_EN_FpBp_v6.indd 66-67 5/18/11 3:01 PM5/18/11 3:01 PM
68 Need Help? Call toll free: 1-800-348-8100 69
www.bayerdiabetes.com/us
Technical,
Service & Care
Technical,
Service & Care
System Performance Information
System Performance Information
System Requirements
Computer with High-Power USB port
For latest compatibility: www.bayerdiabetes.com/us
System Performance Information
Capillary samples may be drawn from fi ngertip (CONTOUR®
strip) and fi ngertip and palm (CONTOUR®NEXT strip). The
test provides a quantitative measurement of glucose in
whole blood from 20 to 600 mg/dL.
Principles of the Procedure: The CONTOUR NEXT LINK blood
glucose test is based on measurement of electrical current caused
by the reaction of the glucose with the reagents on the electrode of
the strip. The blood sample is drawn into the tip of the test strip
through capillary action. Glucose in the sample reacts with FAD
glucose dehydrogenase (FAD-GDH) and the mediator. Electrons
are generated, producing a current that is proportional to the
glucose in the sample. After the reaction time, the glucose
concentration in the sample is displayed. No calculation is required.
Comparison Options: The CONTOUR NEXT LINK system is
designed for use with capillary whole blood. Comparison to a
laboratory method must be done simultaneously with aliquots of the
same sample. NOTE: Glucose concentrations drop rapidly due to
glycolysis (approximately 5–7% per hour).
Limitations
Unless specifi ed below, these limitations apply to the
CONTOUR NEXT LINK meter using CONTOUR NEXT test strips, as
well as the CONTOUR NEXT LINK meter using CONTOUR test strips.
Preservatives: Blood may be collected by healthcare
professionals into test tubes containing heparin. Do not use other
anticoagulants or preservatives.
Altitude:
CONTOUR NEXT test strips: Up to 20,673 feet (6301 meters)
does not signifi cantly affect results.
CONTOUR test strips: Up to 10,000 feet (3048 meters) does not
signifi cantly affect results.
Lipemic Specimen:
CONTOUR NEXT: Cholesterol concentrations >1168 mg/dL or
triglyceride concentrations >4709 mg/dL may produce
inaccurate results.
CONTOUR: Cholesterol concentrations >500 mg/dL or
triglyceride concentrations >3000 mg/dL may produce
inaccurate results.
Peritoneal dialysis solutions: Icodextrin does not interfere with
CONTOUR or CONTOUR NEXT test strips.
Xylose: Do not use during or soon after xylose absorption testing.
Xylose in the blood will cause an interference.
Contraindications: Capillary blood glucose testing may not be
clinically appropriate for persons with reduced peripheral blood
fl ow. Shock, severe hypotension, hyperosmolar hyperglycemia and
severe dehydration are examples of clinical conditions that may
adversely affect the measurement of glucose in peripheral blood.
4
Interference: Reducing substances occurring in the blood
naturally (uric acid, bilirubin) or from therapeutic treatments
(ascorbic acid, acetaminophen) will not signifi cantly affect results.
The limiting concentrations of these compounds are listed on your
test strip insert.
CAUTION:
• For in vitro diagnostic use only.
• Potential Biohazard:
The CONTOUR®NEXT LINK meter is intended for
use with only one person. All products or objects
that come in contact with human blood, even
after cleaning, should be handled as if capable
of transmitting infectious diseases.
MST_CntrNextLINK_UG_EN_FpBp_v6.indd 68-69MST_CntrNextLINK_UG_EN_FpBp_v6.indd 68-69 5/18/11 3:01 PM5/18/11 3:01 PM
70 Need Help? Call toll free: 1-800-348-8100 71
www.bayerdiabetes.com/us
Technical,
Service & Care
Technical,
Service & Care
System Performance Information
Technical Information
Precision and Accuracy Summary
Technical Information
The CONTOUR®NEXT LINK blood glucose monitoring
system was tested on 100 capillary blood samples using
CONTOUR®NEXT test strips. Results were compared to the
YSI® glucose analyzer, which is traceable to the CDC
hexokinase method. The tables below compare the
performance of the two methods.
Table 1 — System accuracy results for
CONTOUR NEXT LINK meter using CONTOUR NEXT
test strips at glucose concentration < 75 mg/dL
Within ± 5 mg/dL Within ± 10 mg/dL Within ± 15 mg/dL
84/90 (93.3%) 90/90 (100.0%) 90/90 (100%)
Table 2 — System accuracy results for
CONTOUR NEXT LINK meter using CONTOUR NEXT
test strips at glucose concentration ≥ 75 mg/dL
Within ± 5% Within ± 10% Within ± 15% Within ±20%
401/510
(78.6%)
504/510
(98.8%)
510/510
(100.0%)
510/510
(100.0%)
The CONTOUR NEXT LINK blood glucose monitoring
system also was tested on 100 capillary blood samples
using CONTOUR® test strips. Results were compared to
the YSI® glucose analyzer, which is traceable to the CDC
hexokinase method. The tables on the next page compare
the performance of the two methods.
Federal Communications Commission (FCC)
Certifi ed Device
This equipment has been tested and found to meet the
limits for a Class B digital device, pursuant to part 15 of the
FCC Rules. These limits are designed to provide reasonable
protection against harmful interference in a residential
installation. This equipment generates, uses and can
radiate radio frequency energy and, if not installed and
used in accordance with the instructions, may cause
harmful interference to radio communications. However,
there is no guarantee that interference will not occur in a
particular installation. If this equipment does cause harmful
interference to radio or television reception, which can be
determined by turning the equipment off and on, the user is
encouraged to try to correct the interference by one or more
of the following measures:
• Reorient or relocate the receiving antenna.
• Increase the separation between the equipment and
receiver.
This portable transmitter with its antenna complies with
FCC/IC RF exposure limits for general population /
uncontrolled exposure.
If you have questions, please contact Bayer Customer
Service at 1-800-348-8100.
Warning (Part 15.21)
Changes or modifi cations not expressly approved by
the party responsible for compliance could void the
user’s authority to operate the equipment.
MST_CntrNextLINK_UG_EN_FpBp_v6.indd 70-71MST_CntrNextLINK_UG_EN_FpBp_v6.indd 70-71 5/18/11 3:01 PM5/18/11 3:01 PM
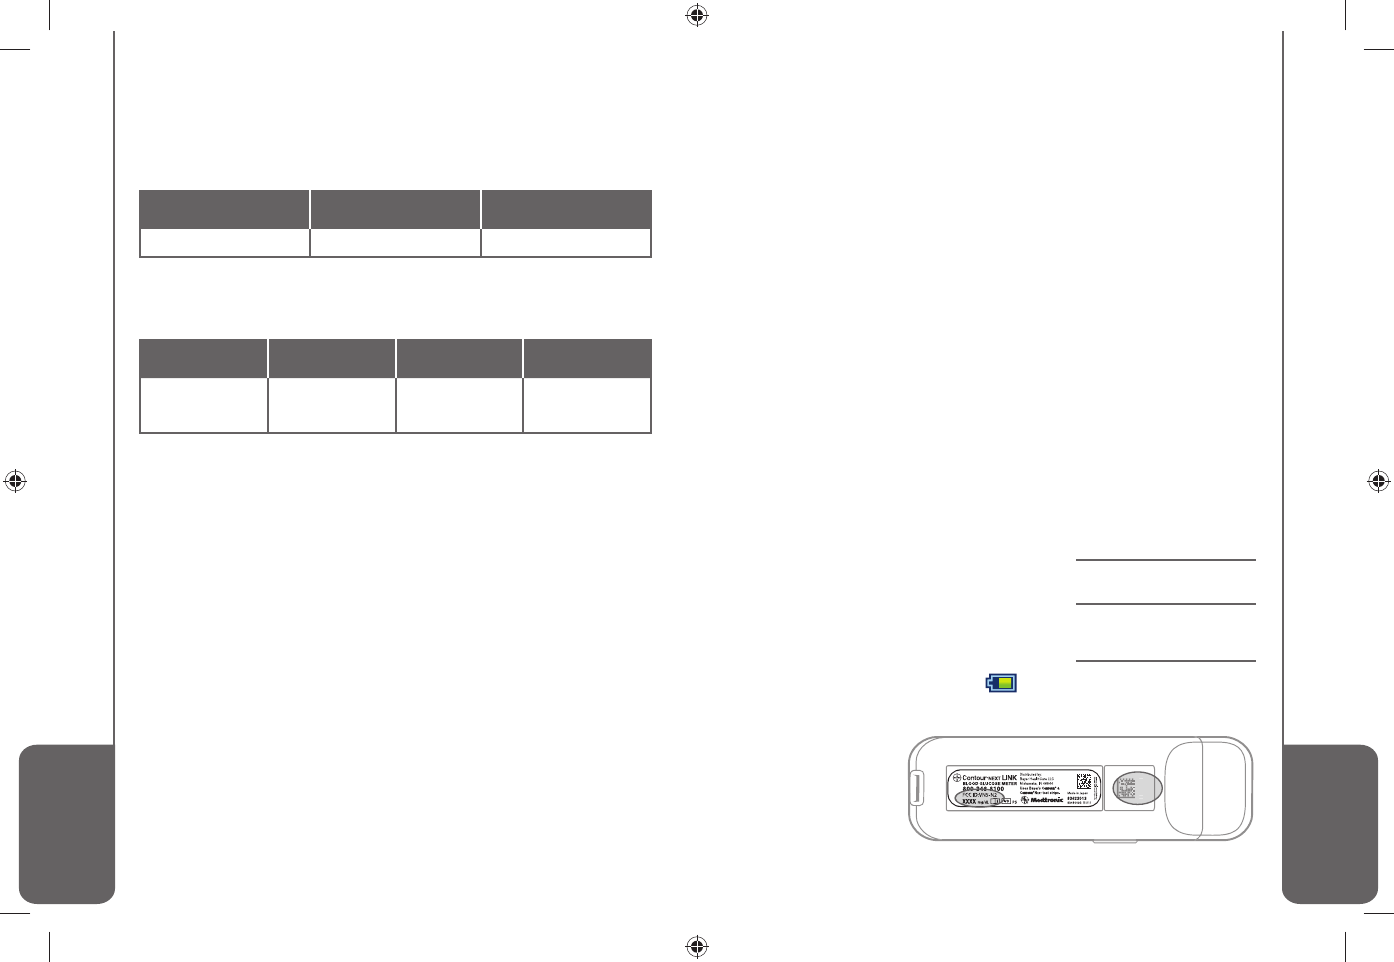
72 Need Help? Call toll free: 1-800-348-8100 73
www.bayerdiabetes.com/us
000
0
Technical,
Service & Care
Technical,
Service & Care
Technical Information
Service Information
Service Information
If you have a problem and none of the problem solving
messages on the meter help, call Bayer Diabetes Care
Customer Service. In the USA, call toll free:
1-800-348-8100 (7 days a week/24 hours a day). We
have trained specialists to help you.
Important:
Speak to a Bayer Diabetes Care Customer Service
Representative before returning your meter for any reason.
He/she will give you the information needed to handle your
problem correctly and effi ciently.
Have your CONTOUR NEXT LINK blood glucose meter and
CONTOUR or CONTOUR®NEXT test strips available when you
phone. It would also be helpful to have a bottle of control
solution suitable for your test strips nearby.
Check List:
This check list may be helpful when speaking with Bayer
Diabetes Care Customer Service:
1. Locate the model number (A)
and serial number (B) on the back
of the meter.
2. Locate the test strips’ expiration
date on the bottle.
3. Check the battery symbol on the screen. (See page
63, Battery Status Displays and Charging.)
Technical Information (cont’d)
Table 3 — System accuracy results for
CONTOUR®NEXT LINK meter using CONTOUR®
test strips at glucose concentration < 75 mg/dL
Within ± 5 mg/dL Within ± 10 mg/dL Within ± 15 mg/dL
47/90 (52.2%) 85/90 (94.4%) 89/90 (98.9%)
Table 4 — System accuracy results for
CONTOUR NEXT LINK meter using CONTOUR
test strips at glucose concentration ≥ 75 mg/dL
Within ± 5% Within ± 10% Within ± 15% Within ±20%
248/510
(48.6%)
419/510
(82.2%)
492/510
(96.5%)
507/510
(99.4%)
Acceptance criteria in ISO 15197 are that 95% of all
differences in glucose values (i.e., between reference
method and meter) should be within 15 mg/dL for glucose
values less than 75 mg/dL, and within 20% for glucose
values greater than or equal to 75 mg/dL.
METER BACK VIEW
S
erial No
.
1
2345
6
B
A
MST_CntrNextLINK_UG_EN_FpBp_v6.indd 72-73MST_CntrNextLINK_UG_EN_FpBp_v6.indd 72-73 5/18/11 3:01 PM5/18/11 3:01 PM
74 Need Help? Call toll free: 1-800-348-8100 75
www.bayerdiabetes.com/us
Technical,
Service & Care
Technical,
Service & Care
Symbols Used/System Specifi cations
System Specifi cations
System Specifi cations
Test Sample: Capillary whole blood
Test Result: Referenced to plasma/serum glucose
Sample Volume: 0.6 μL
Measuring Range: 20–600 mg/dL
Countdown Time: 5 seconds
Memory: Stores most recent 1000 test results
Battery Type: Non-serviceable, 310mAh rechargeable
lithium polymer battery, 3.4v – 4.2v (5V input voltage)
Meter/Battery Life: 5 years
Charging Current: 500mA
Strip Storage Temperature Range: 48º – 86ºF
Normal Control Storage Temperature Range: 59º – 86ºF
Meter Operating Temperature Range: 41º – 113ºF
Humidity: 10–93% RH
Dimensions: 3.8 in (H) x 1.2 in (W) x 0.8 in (T)
Weight: 48 grams
Symbols Used
The following symbols are used throughout the product
labeling for the CONTOUR®NEXT LINK blood glucose
monitoring system (meter packaging and labeling, and
reagent and control solution packaging and labeling).
Batch code
Consult instructions
for use
In Vitro Diagnostic
Medical Device
Sound: A beep sounds when the meter is turned on or off, a
test strip is inserted, when a test strip is fi lled with blood, or
when a test result appears on the screen. Two beeps sound
when a strip is removed and the meter is turned off, or to
alert the user. Twenty beeps will sound when a programmed
Reminder sounds.
Electromagnetic Compatibility (EMC):
The CONTOUR NEXT LINK meter complies with the
electromagnetic requirements specifi ed in ISO 15197.
Electromagnetic emissions are low and unlikely to interfere
with other nearby electronic equipment, nor are emissions
from nearby electronic equipment likely to interfere with the
CONTOUR NEXT LINK. Immunity to electrostatic discharge
meets the requirements of IEC 61000-4-2. It is advisable to
avoid use of electronic devices in very dry environments
especially if synthetic materials are present.
The CONTOUR NEXT LINK meter has been tested for radio
frequency interference at the frequency range and test levels
specifi ed by ISO 15197. To avoid radio frequency
interference do not use the CONTOUR NEXT LINK meter
near cellular or cordless telephones, walkie talkies, garage
door openers, radio transmitters or other electrical or
electronic equipment that are sources of electromagnetic
radiation, as these may interfere with the proper operation of
the meter.
MST_CntrNextLINK_UG_EN_FpBp_v6.indd 74-75MST_CntrNextLINK_UG_EN_FpBp_v6.indd 74-75 5/18/11 3:01 PM5/18/11 3:01 PM
76 Need Help? Call toll free: 1-800-348-8100 77
www.bayerdiabetes.com/us
Caring for Your Meter Technical,
Service & Care
Technical,
Service & Care References
References
1 FDA Public Health Notifi cation: Use of Fingerstick Devices
on More than One Person Poses Risk for Transmitting
Bloodborne Pathogens; Initial Communication (2010).
http://www.fda.gov/MedicalDevices/Safety/AlertsandNotices/
ucm224025.htm
2 CDC Clinical Reminder: Use of Fingerstick Devices on
More than One Person Poses Risk for Transmitting
Bloodborne Pathogens (2010).
http://www.cdc.gov.injectionsafety/Fingerstick-
DevicesBGM.html
3 Fauci, A. et al.: Harrison’s Principles of Internal Medicine-
17th Edition, 2008.
4 Atkin, S. et al.: Fingerstick Glucose Determination in Shock.
Ann. Int. Med. 114:1020-24; 1991.
Supplies
When calling or writing for supplies be sure to include
the number with the name of the replacement part or
accessory item.
Caring for Your Meter
• CAUTION: Only connect to a computer or charger that is
certifi ed to UL 60950-1, 5V maximum. A charging current
of 500 mAh minimum is required.
• If you use a cable, use the one provided in your meter kit.
• Store your meter in the carrying case provided whenever
possible.
• Wash hands and dry them well before handling to keep the
meter and test strips free of oils and other contaminants.
• Handle the meter carefully to avoid damaging the
electronics or causing other malfunctions.
• Avoid exposing meter and test strips to excessive humidity,
heat, cold, dust, or dirt.
• See page 29–32 for instructions on cleaning and
disinfecting your meter.
• The USB cap of your CONTOUR®NEXT LINK meter is
designed to protect the USB port. Should you lose the
cap, call 1-800-348-8100 for a replacement.
REPLACEMENT PARTS
Part Number* Item
XXXXXXXX CONTOUR NEXT LINK user guide
83480158 CONTOUR NEXT LINK quick reference guide
81363014 Bayer’s USB extension cable
81675369 USB cap
81675377 wall charger
06707261 CONTOUR® test strips
06707431 CONTOUR control solution
83624796 CONTOUR®NEXT test strips
83624818 CONTOUR NEXT control solution
*Part numbers are subject to change without notice.
These parts are available in the United States from:
Bayer HealthCare LLC
Customer Service Department
Order Entry P.O. Box 2004
Mishawaka, Indiana 46546
or call 1-800-348-8100 to order
MST_CntrNextLINK_UG_EN_FpBp_v6.indd 76-77MST_CntrNextLINK_UG_EN_FpBp_v6.indd 76-77 5/18/11 3:01 PM5/18/11 3:01 PM
78 Need Help? Call toll free: 1-800-348-8100 79
www.bayerdiabetes.com/us
Warranty
Technical,
Service & Care
Technical,
Service & Care
therefore makes no warranty of the performance of the
CONTOUR NEXT LINK meter when used with any test
strips other than CONTOUR or CONTOUR NEXT test
strips or when the CONTOUR or CONTOUR NEXT test
strip is altered or modifi ed in any manner.
5. Bayer Diabetes Care makes no warranty of the
performance of the CONTOUR NEXT LINK meter or
test results when used with any control solution other
than CONTOUR or CONTOUR NEXT control solution.
BAYER DIABETES CARE MAKES NO OTHER EXPRESS
WARRANTY FOR THIS PRODUCT. THE OPTION OF
REPLACEMENT, DESCRIBED ABOVE, IS BAYER
DIABETES CARE’S ONLY OBLIGATION UNDER THIS
WARRANTY.
IN NO EVENT SHALL BAYER DIABETES CARE BE
LIABLE FOR INDIRECT, SPECIAL OR
CONSEQUENTIAL DAMAGES, EVEN IF BAYER
DIABETES CARE HAS BEEN ADVISED OF THE
POSSIBILITY OF SUCH DAMAGES.
Some states do not allow the exclusion or limitation of
incidental or consequential damages, so the above
limitation or exclusion may not apply to you. This warranty
gives you specifi c legal rights and you may also have other
rights which vary from state to state.
For warranty service: Purchaser must contact the
Custom er Service Department of Bayer Diabetes Care, by
calling toll free 1-800-348-8100, for assistance and/or
instructions for the use of this instrument.
Warranty
Manufacturer’s Warranty: Bayer Diabetes Care warrants to
the original purchaser that this instrument will be free from
defects in materials and workmanship for 5 years from the
date of original purchase (except as noted below). During
the stated 5-year period, Bayer Diabetes Care shall, at no
charge, replace a unit found to be defective with an
equivalent or current version of the owner’s model.
Limitations of Warranty: This warranty is subject to the
following exceptions and limitations:
1. A 90-day warranty only will be extended for consumable
parts and/or accessories.
2. This warranty is limited to replacement due to defects in
parts or workmanship. Bayer Diabetes Care shall not be
required to replace any units which malfunction or are
damaged due to abuse, accidents, alteration,
modifi cation, misuse, neglect, maintenance by someone
other than Bayer Diabetes Care, or failure to operate the
instrument in accordance with instructions. Further, Bayer
Diabetes Care assumes no liability for malfunction or
damage to Bayer Diabetes Care instruments caused by
the use of reagents other than the appropriate reagents
(e.g., CONTOUR® or CONTOUR®NEXT test strips)
manufactured or recommended by Bayer Diabetes Care.
3. Bayer Diabetes Care reserves the right to make changes
in design of this instrument without obligation to
incorporate such changes into previously manufactured
instruments.
4. Bayer Diabetes Care has no knowledge of the
performance of the CONTOUR®NEXT LINK blood
glucose meter when used with any test strips other
than CONTOUR or CONTOUR NEXT test strips, and
Warranty
MST_CntrNextLINK_UG_EN_FpBp_v6.indd 78-79MST_CntrNextLINK_UG_EN_FpBp_v6.indd 78-79 5/18/11 3:01 PM5/18/11 3:01 PM

MST_CntrNextLINK_UG_EN_FpBp_v6.indd 80-81MST_CntrNextLINK_UG_EN_FpBp_v6.indd 80-81 5/18/11 3:01 PM5/18/11 3:01 PM
Bayer HealthCare LLC
Mishawaka, IN 46544 USA
Call Toll Free: 1-800-348-8100
www.bayerdiabetes.com/us
Bayer, the Bayer Cross, CONTOUR, GLUCOFACTS, MICROLET,
and the No Coding logo are registered trademarks and No Coding
is a trademark of Bayer.
Windows and Vista are registered trademarks of Microsoft. Mac OS
is a registered trademark of Apple, Inc. YSI is a registered trademark
of YSI Incorporated.
Paradigm, Guardian, Bolus Wizard and CareLink are registered
trademarks and Revel is a trademark of Medtronic MiniMed, Inc.
All other trademarks are the property of their respective owners.
©2011 Bayer. All rights reserved.
XXXXXXXX Rev. 02/11
MST_CntrNextLINK_UG_EN_FpBp_v6.indd 82ST_CntrNextLINK_UG_EN_FpBp_v6.indd 82 5/19/11 7:54 AM5/19/11 7:54 AM