Asia Vital Components TH600 Bluekite - Bluetooth USB 2.0 Pen Drive User Manual Bluekite UserGuide ENG
Asia Vital Components Co., Ltd. Bluekite - Bluetooth USB 2.0 Pen Drive Bluekite UserGuide ENG
User Manual

Bluekite
Bluetooth USB2.0 Pen Drive
User Guide
BLUEKITE USB2.0 Pen Drive – User Guide
1
Declaration
Product warranty or service will not be extended if: (1) the product is repaired, modified or
alt
ered, unless such repair, modification of alteration is authorized in writing
by us ; or (2)
the serial number of the product is defaced or missing.
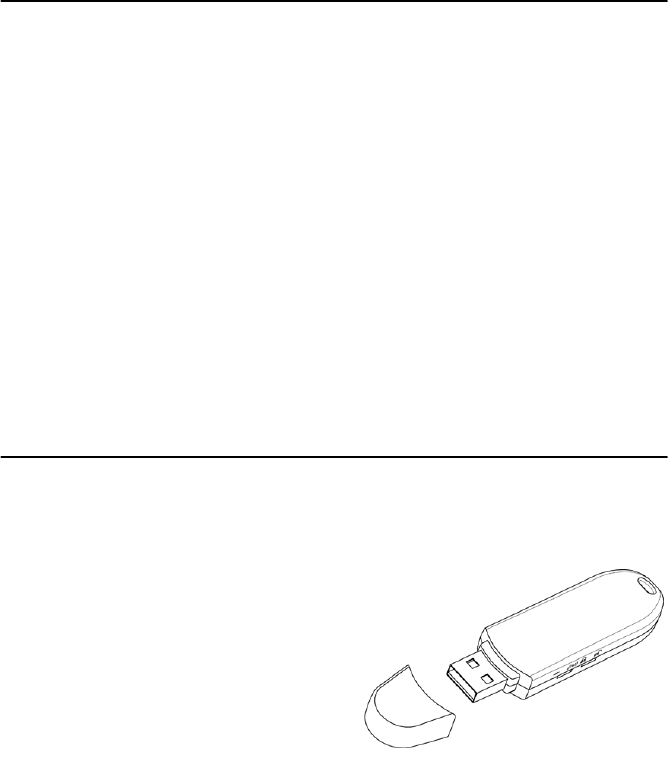
Package list:
- Bluetooth USB2.0 Pen Drive x 1
- USB Cable x1
- Neck Strap x1
- Utility CD x 1
. Mass storage driver for Windows 98SE only
. Bluetooth software/driver (BTW) for Windows XP/2000/ME/98SE
. mySecurity 2.5 Lite software for Windows XP/2000/ME/98SE
. WinRoute Lite software (30-day trial version) for Windows ME/98SE
only
. User Guide
. Multi-language Quick Setup Guide
- Quick Setup Guide x 1
- Warranty Card x 1
1. Introduction
TH600 Bluetooth USB2.0 Pen Drive
The Bluekite TH600 Bluetooth USB2.0
Pen Drive is a compact and
multipurpose product providing an
efficient and easy solution for wireless
applications
and data storage.
The built-in BluetoothTM wireless
BLUEKITE USB2.0 Pen Drive – User Guide
2
technology enables the Bluekite-installed computer to communicate with
other Bluetooth-enabled devices freely and effortlessly. Additionally, the
Bluekite USB2.0 Pen Drive also bundles a Bluetooth software for
performing wireless applications such as file transfer, network access,
dial-up, networking and so on. Moreover, an innovative Bluetooth profile
“Human Interface Device (HID)” is included to enable your computer to use
Bluetooth cordless keyboard and mouse. The Bluekite USB2.0 Pen Drive’s
generous storage capacity and USB2.0 high transfer speed allows users to
store, transfer, and carry the personal computer files easily. Alternatively,
they can choose transfer the files via high-speed and “plug & play” USB2.0
interface or the
Bluetooth wireless connection.
1.1 Safety Precautions
Please follow the safety precautions carefully before you use the “Bluekite
USB2.0 Pen Drive” device and the application software. Please make sure
that you use the product correctly.
Do not allow any child attempting to swallow the product.
Do not attempt to disassemble or alter any part of the product that is
not described in this guide.
Do not allow the product to come into contact with water or other
liquids. In the event that water or other liquids enter the interior,
immediately unplug the product from the computer. Continue use of
the wet product may result in fire or electrical shock. Please consult
your product distributor or the closest support center.
Do not handle the product to do the plug and unplug operation if your
hands are wet. Otherwise it will cause electrical shock.
Do not place the product near a heat source or expose them to direct
flame or heat.
Never place the product close to equipment generating strong
electromagnetic fields. Exposure to strong magnetic fields may cause
malfunctions or corrupt data.
BLUEKITE USB2.0 Pen Drive – User Guide
3
1.2 System Requirements
It is necessary to install corresponding application software before starting
to use the Bluekite USB2.0 Pen Drive. Therefore, please check your
system in advance and ensure it meets in the minimum requirements as
described below.
- Processor: Intel Celeron / Pentium III / Pentium 4;
AMD Duron / Athlon; or the higher class CPU
- Operating System: Windows 98SE / ME/ 2000 / XP;
Mac OS X 10.2.6; or the later version
- System Memory: 32MB at least
- Hard Drive Free Space: 18MB at least
1.3 Product Specification
Product Bluekite USB2.0 Pen Drive
General Radio Bluetooth Class II, 10 meters radio coverage
(in open space)
Carrier Frequency: 2.4 ~ 2.483GHz
Spread Spectrum FHSS (Frequency Hopping Spread Spectrum)
Bluetooth Data Rate Up to 1 Mbps
Antenna Ceramic Antenna
I/O Interface USB 2.0 (Backward compatible with USB 1.1)
Flash Memory Capacity: 128MB / 256 MB / 512MB
Reading Speed: Up to 9 MB/s (USB 2.0)
Writing Speed: Up to 8 MB/s (USB 2.0)
Input Power DV 5V (USB Power)
Switch Flash Memory: write protection on / off
Bluetooth: radio on /off
LED Indicator Flash Memory: power on / off
Bluetooth: radio on /off
Environmental Operating Temperature: -10℃~ +65℃
Storage Temperature: -30℃~ +80℃
Dimensions 78.9 x 22.1 x 10.2 mm, 14g
Bluetooth Wireless
Features
-HID (Bluetooth Mouse and Bluetooth Keyboard
compliant)
-Dial-up Networking
BLUEKITE USB2.0 Pen Drive – User Guide
4
-Network Access (1 master, 7 slaves)
-File Transfer
-Information Exchange
-Information Synchronization
-Send/Receive Fax (needs Fax software)
-Serial Port services
-Bluetooth Headset supported
Flash Memory Features -Write protect switch to prevent accidental erasure
-High-speed data reading/writing via USB 2.0
interface
-Erase cycles are up to 1,000,000 times
erase-rewrite
-Data retention are up to 10 years -No external
power supply needed
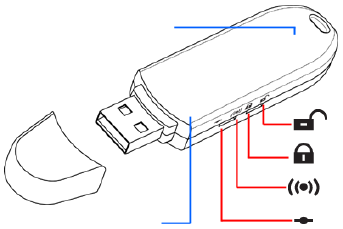
1.4 Hardware Introduction
Bluetooth radio switch: If you put the switch at “ON” position, the
Bluetooth wireless functions will be launched.
Write protection switch: If you put the switch at “ON” position, the Flash
memory will be in the write protection mode and
the stored files are enabled to read only.
Write protection switch-off
Write protection switch-on
Bluetooth radio switch-on
Bluetooth radio switch-off
Flash Memory LED
Bluetooth LED
BLUEKITE USB2.0 Pen Drive – User Guide
5
Bluetooth LED indicator: If the Bluetooth wireless functions are launched,
the Bluetooth LED indicator will flash blue light.
Flah memory LED
indicator:
Once the device is in proper operation, the LED
will flash.
CAUTION: Sometimes, you want to enable/disable the Bluetooth wireless
functions during the read/write operation, however, please unplug the
Bluekite USB2.0 Pen Drive at first to keep the completeness of your
computer data, and then switch on/off the Bluetooth radio. Afterward you
can plug the Bluetooth USB2.0 Pen Drive into the computer again to
continue using it.
Note. The default settings of the Bluekite USB2.0 Pen Driver are “Write
protection switch-off” and “Bluetooth radio switch-off”
BLUEKITE USB2.0 Pen Drive – User Guide
6
2. Pen Drive (Flash Disk) Usage
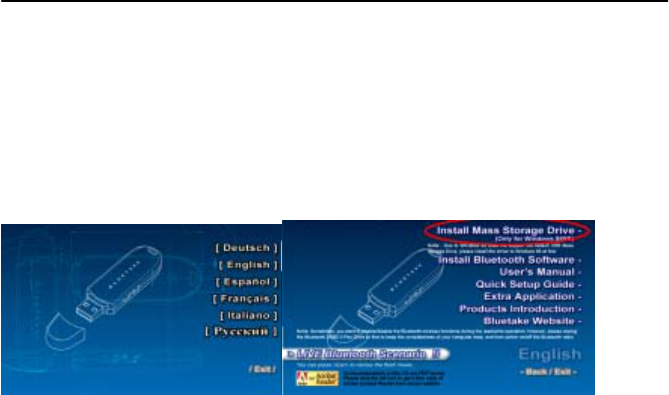
2.1 Install Mass Storage Drive (Windows 98SE only)
Due to Windows 98SE does not support the default USB Mass Storage
Drive, so you have to install the driver manually. To install Windows 98SE
driver, please insert the Utility CD into the CD-ROM drive. After the CD
menu launched, please select your language and then press on “Install
Mass Storage Drive” button to install the driver.
Note: If the Auto-Run function of CD-ROM is enabled (in Windows, the
default setting of this function is usually enabled), then installation program
will start automatically. If not, you can utilize the Windows Explorer to
browse CD content and execute Setup.exe manually.
After the installation finished, you can use the pen drive directly.
Figure 2.1.1 - My Bluetooth Places window
BLUEKITE USB2.0 Pen Drive – User Guide
7
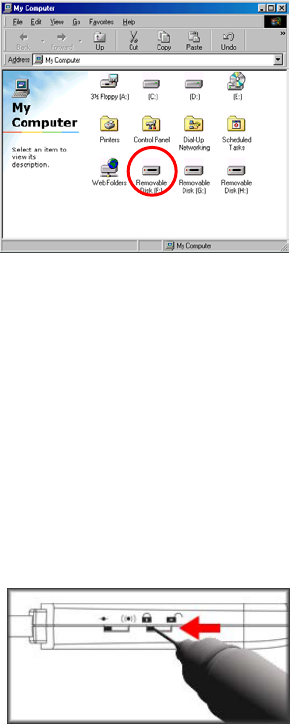
2.2 General Flash Disk Usages
2.2.1 Plug and Play
When you plug the Bluekite USB2.0 Pen Driver into the computer installed
Windows XP/2000/ME, you can see a “Removable Disk” icon in the file
manager window. Then, you can use the drive directly.
Windows 98SE does not support the default USB Mass Storage Drive, and
you have to install the driver manually based on “2.1 Install Mass Storage
Drive” of this user guide if you use Windows 98SE. After the installation
finished, you can use the pen drive directly and you will see the
“Removable Disk” icon.
2.2.2 Read/Write and Write Protection
You can store or delete files in the device as a hard disk. The read/write
operation of the device is the same as that of a hard disk. Moreover, you
can switch on the write protection to avoid overwriting or deleting the
important files.
Figure 2.2.1.1 - My Computer window
Figure 2.2.2.1 – Switch on the write protection function
BLUEKITE USB2.0 Pen Drive – User Guide
8
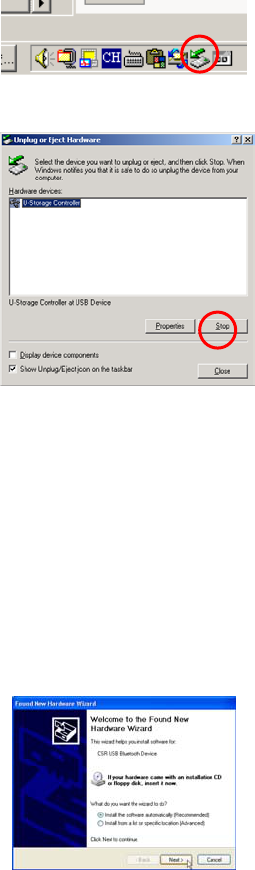
2.2.3 Unplug
You can remove the device directly after you
finish your job with the device in Windows
XP O.S.
However, in Windows 2000/ME/98SE O.S.,
please follow the safe removal procedure:
You can find a safe removal icon at the
Windows toolbar. Double click the safe
removal icon, and the Unplug or Eject
Hardware window will be popped up. You
can select the device you want to remove.
Then, click the “Stop” button. After that you
can unplug the device from the USB port of
your computer.
CAUTION: When you want to remove the “USB Flash Disk” device, make
sure the Flash Memory LED is not flashing. When the LED flashes quickly,
there are some traffic on going between the O.S. and the “USB Flash Disk”
device. Don’t remove the “USB Flash Disk” at this moment. Otherwise, it
will cause some damages to the data or even the “USB Flash Disk” device
itself.
2.2.4 Use with a computer without the Bluetooth software
- The read/write operation of the Bluekite USB2.0 Pen Driver is still
enabled if its Bluetooth radio is “switch-off”.
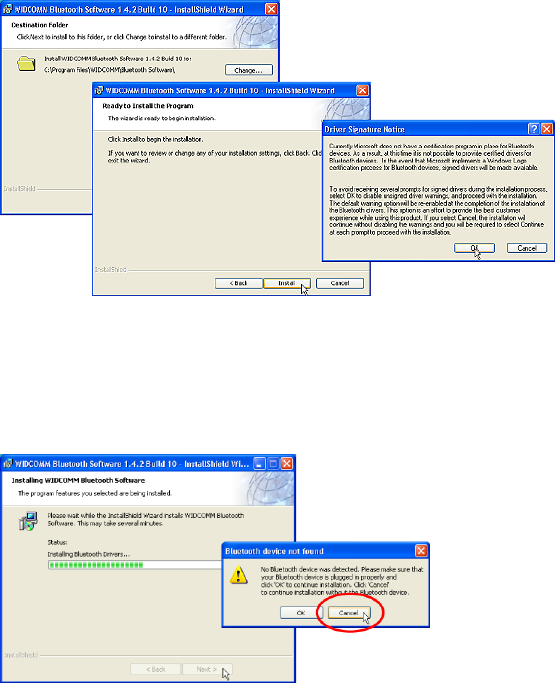
- You will encounter the Found New Hardware Wizard windows after you
plugged the Bluekite USB2.0 Pen Driver
in the computer if its Bluetooth radio
switch is “switch-on”. You can either click
“Cancel” button to ignore the request or
switch off the Bluetooth radio to continue
using the USB2.0 Pen Driver. If you want
to enable its Bluetooth functions for the
Figure 2.2.3.1 – Safe removal icon
Figure 2.2.3.2 – Unplug or Eject Hardware window
Figure 2.2.4.1 - Found New
Hardware Wizard window
BLUEKITE USB2.0 Pen Drive – User Guide
9
computer, please refer to the next section to install the Bluetooth
software.

BLUEKITE USB2.0 Pen Drive – User Guide
10
2.3 Install mySecurity 2.5 Lite software
Bluekite USB2.0 Pen Drive bundled with a file encryption software
“mySecurity 2.5 Lite”.
mySecurity file encryption manger offers tight and effective file protection
and e-mail encryption. With the file digital disguise, you may convert any
Word file into a BMP file; and the support of ZIP and various compression
formats allows you to enjoy safe and free communication over the Internet.
If you want to have more advanced functions, you may choose to purchase
the advanced version “mySecurity 2.5 Professional”.
Table-1: Function List of mySecurity 2.5 Lite and mySecurity 2.5
Professional
Functions mySecurity 2.5 Lite mySecurity 2.5
Professional
eLogon Function
Password Encrypt
Function
PKI Encrypt Function
Certificate Management
Disguise Function
Self-Extract Function
A
/B Key Encrypt
Function
Zip Compress Function
ZIP/TAR/RAR/ARJ
Decompress Function
Explorer Function
E-Mail Function
Multiple Cryptography
More information of mySecurity 2.5 Professional, please visit
http://www.ecosine.com.tw/English/Product/pro_mysecurity.htm
please insert the Utility CD into the CD-ROM drive. After the CD menu
launched, please select your language and then press on “Extra
BLUEKITE USB2.0 Pen Drive – User Guide
11
Application” button. Afterward you will see the following page, please press
on “Install mySecurity 2.5 Lite” button.
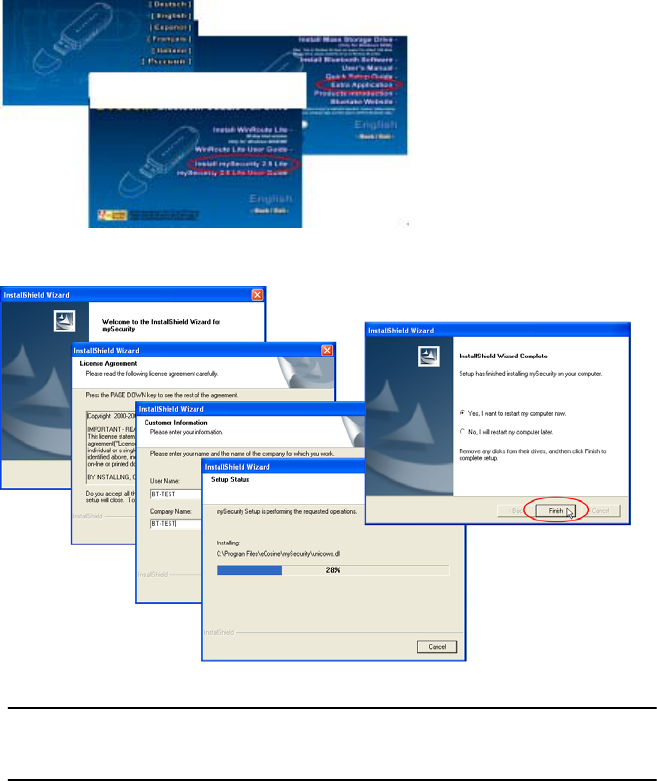
BLUEKITE USB2.0 Pen Drive – User Guide
12
The process of mySecurity 2.5 Lite installation is shown as below:
Note. The complete user guide of mySecurity 2.5 Lite is included in the
Utility CD.
Figure 2.5.1- mySecurity 2.5 Lite installation button
Figure 2.5.2- mySecurity 2.5 Lite installation process
BLUEKITE USB2.0 Pen Drive – User Guide
13
3. Bluetooth Software Installation
Through simplified installation of the Bluetooth software, you can now
easily establish wireless communication among all Bluetooth-enabled
devices. In the My Bluetooth Places window as figure 3.1.2, you can clearly
see all Bluetooth devices around you and easily gain further diverse
functions with them. Furthermore, you can get rid of those awkward cables
from now on.
Figure 3.1.1 - My Bluetooth Places window
(original status)
Figure 3.1.2 - My Bluetooth Places window
(found other bluetooth devices)
Windows XP Windows 2000/ME/98SE
Windows XP Windows 2000/ME/98SE
Note: Please close other running applications before installing Bluetooth software.
BLUEKITE USB2.0 Pen Drive – User Guide
14
3.1 System Requirements
It is necessary to install corresponding application software before starting
to use the Bluekite USB2.0 Pen Drive. Therefore, please check your
system in advance and ensure it meets in the minimum requirements as
described below.
- Processor: Intel Celeron/Pentium III/Pentium 4; AMD Duron/Athlon or the
higher class CPU
- Operating System: Windows XP/2000/ ME/98SE, Mac OS X 10.2.6 or the
later version
- System memory: 32MB at least
- Hard Drive Free Space: 18MB
3.2 Before Installing
To prevent potential problem during installing the software, please do not
plug in any Bluetooth Device (i.e. Bluekite USB Pen Drive) into the
computer until the software installation is finished.
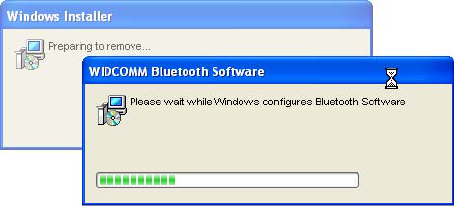
Once you load the Widcomm Bluetooth Software, the software
automatically removes any previous versions of Bluetooth software on your
computer.
To manually remove any previous Widcomm Bluetooth software version
that exists on your system, the remove procedure is as follows:
1. Click “Start/Settings”, then select “Control Panel”.
BLUEKITE USB2.0 Pen Drive – User Guide
15
2. In the Control Panel window, double click “Add/Remove” programs icon.
3. Find out the item “Widcomm Bluetooth Software x.x.x” and then remove
it by clicking the “Remove” button.

BLUEKITE USB2.0 Pen Drive – User Guide
16
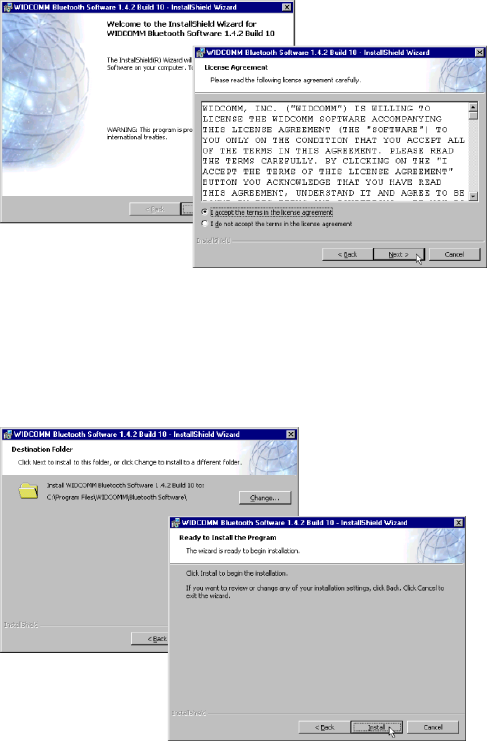
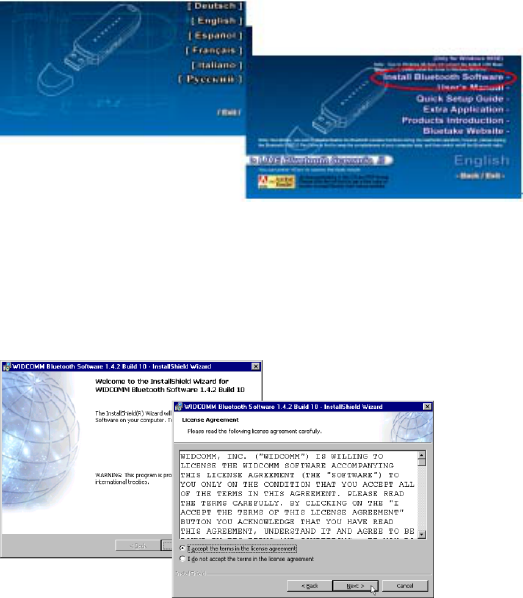
3.3 Install Widcomm Bluetooth software under Windows 2000/ME/98SE
Insert the Utility CD into CD-ROM drive. If the Auto-Run function of
CD-ROM is enabled (in Windows, the default setting of this function is
usually enabled), then a CD menu will appear automatically. If not, you can
still utilize the Windows Explorer to browse CD content and run “Setup.exe”
manually. Please select your language and then click “Install Bluetooth
Software to continue”.
Figure 3.2 - Removing Widcomm Bluetooth software previous version
Figure 3.3.1 - CD menu
BLUEKITE USB2.0 Pen Drive – User Guide
17
To ensure that the next window appears, please click the “Next” button to
continue the software installation. In Device Information window, check the
item “I accept the terms in the license agreement” and click the “Next”
button to continue.
The software default destination folder is located in C:\ Program Files \
Widcomm \ Bluetooth Software\.. If you want to change the folder, click
“Change...” button then select one. If everything is ready and done, please
click “Next” button to begin the installation.
Figure 3.3.2 - License Agreement window
Figure 3.3.3 - Destination folder select
BLUEKITE USB2.0 Pen Drive – User Guide
18
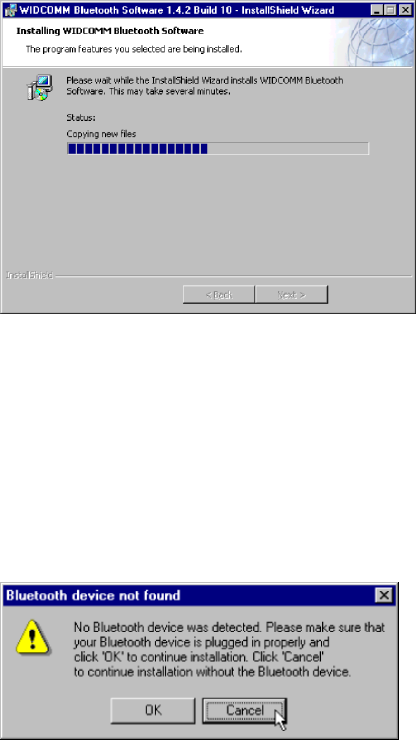
The software installation is now processing.
The InstallShield Wizard will prompt to ask if you have plugged in any
Bluetooth device, please click “Cancel” to continue. We strongly
recommend plugging Bluetooth device after the completion of the software
installation.
Figure 3.3.4 - Installation is running
Figure 3.3.5 - Installing Bluetooth Software.
BLUEKITE USB2.0 Pen Drive – User Guide
19
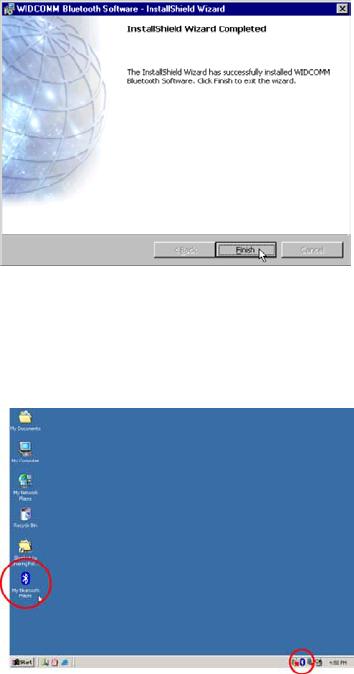
Please reboot your system after the software installation is finished.
There are two new Bluetooth icons appear on the desktop and the toolbar
respectively when logged in Windows operating system. For more
information on the BTW Console, please refer to Chapter 4.
Now you are ready to plug in your Bluetooth device.
Figure 3.3.6 - Installation finished window
Figure 3.3.7 - Bluetooth software icons
BLUEKITE USB2.0 Pen Drive – User Guide
20
3.4 Install Widcomm Bluetooth software under Windows XP
1. Insert the Utility CD into CD-ROM drive. If the Auto-Run function of
CD-ROM is enabled (in Windows, the default setting of this function is
usually enabled), then a CD menu will appear automatically. If not, you
can still utilize the Windows Explorer to browse CD content and run
“Setup.exe” manually. Please select your language and then click
“Install Bluetooth Software” to continue.
2. To ensure that the next window appears, please click “Next” button to
continue the software installation. In License Agreement window, check
the item “I accept the terms in the license agreement” and click “Next”
button to continue.
Figure 3.4.1 - CD menu
Figure 3.4.2 - License Agreement window
BLUEKITE USB2.0 Pen Drive – User Guide
21
3. Indicate the location of where you want Bluetooth Software to be stored;
if you do not change the default settings, it will be stored under
C:\Program Files\WIDDCOM\Bluetooth Software\.. (this is location is
recommended). Click on “Next” to continue.
4. Now click on Install to install the software to the location as appeared
on screen. Then click “OK” on the ”Driver Signature” window.
5. The software installation is processing now. When prompted for
bluetooth hardware installation click “Cancel” to continue. It is
recommended to finish installing your software before plugging in any
Bluetooth device.
Figure 3.4.3 Installation Location.
Figure 3.4.4 - Installation is running
BLUEKITE USB2.0 Pen Drive – User Guide
22
6. Click “Finish” button to complete the installation. Now you are ready to
install your hardware.
7. Now you can plug-in/install your USB Adapter into your computer.
8. As soon as hardware device is installed, Windows XP operating system
will prompt the Found New Hardware Wizard window and detects a
new device named “CSR USB Bluetooth device”.
9. Check ”Install the software automatically (Recommended)” option and
then click the “Next” button to continue.
Figure 3.4.5 - Installation finished window
Figure 3.4.6 - Found New Hardware Wizard window
BLUEKITE USB2.0 Pen Drive – User Guide
23
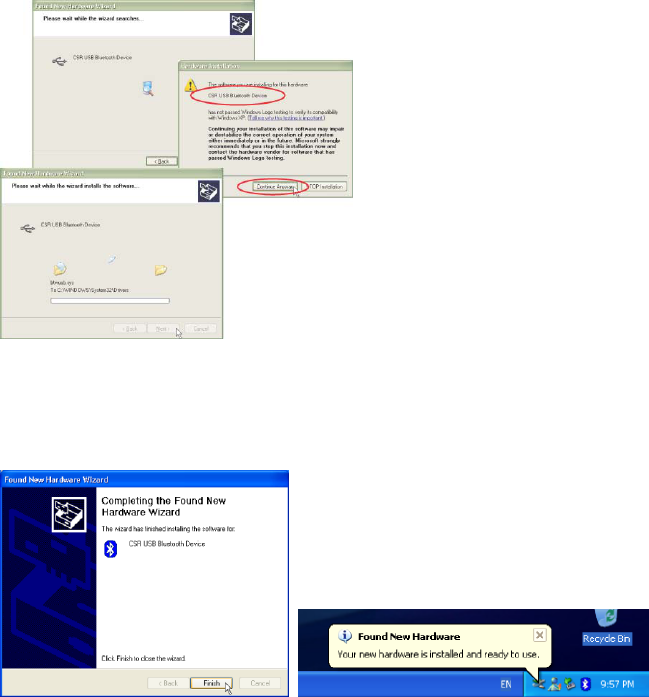
10. The wizard is automatically starts to search for the proper software for
the Bluetooth device and copy files into Windows XP system.
11. Press the “Finish” button to close New Device Wizard window after the
installation. Afterward the message from taskbar in Windows XP
informs you that the hardware is installed and ready to use.
12. Please remove the Software CD after the installation is complete.
Figure 3.4.7 - Searching and installing software
Figure 3.4.8 - Complete the wizard Figure 3.4.9 - Windows XP toolbar
BLUEKITE USB2.0 Pen Drive – User Guide
24
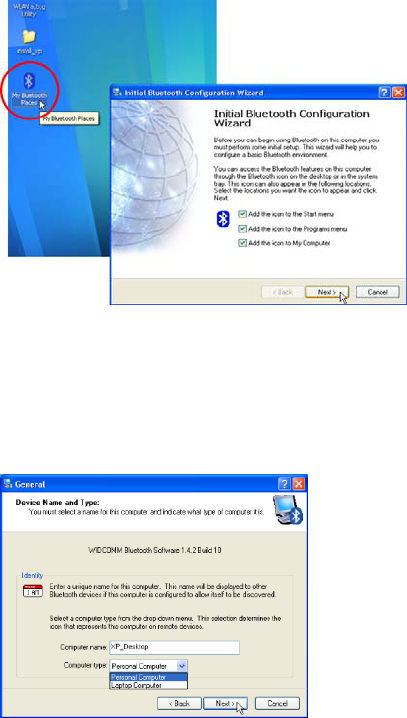
13. It is essential to setup Bluetooth Configuration in advance before using
all Bluetooth services. Please double-click on My Bluetooth Places and
then the Bluetooth Configuration Wizard will automatically pop-up.
Please press “Next“ button to continue.
14. Computer Name: Enter a name for your computer in order to be
recognized easily in Bluetooth environment.
Computer Type: Choose a particular type according to your computer.
Please click Next button when “Computer Name” and “Computer” Type
are selected.
Figure 3.4.10 - Initial Bluetooth Configuration Wizard
Figure 3.4.11 - Device Name and Type Configuration
BLUEKITE USB2.0 Pen Drive – User Guide
25
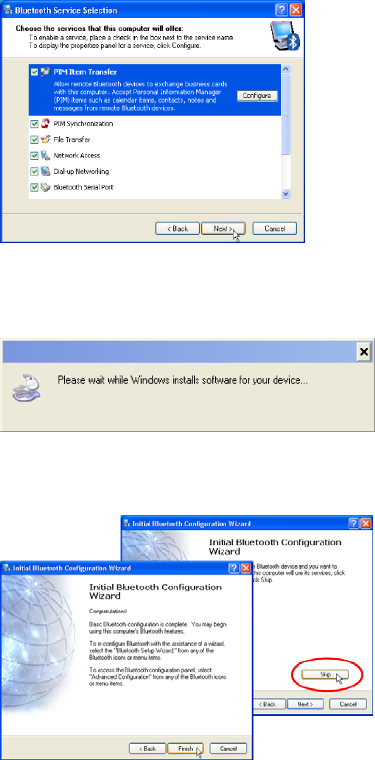
15. In the Bluetooth Service Selection window, all Bluetooth services that
can be used on your computer will be checked in advanced by the
wizard, please don’t change any default setting and click “Next” button
to continue.
16. The Bluetooth Configuration Wizard will occupy several minutes to
update every Bluetooth service’s configuration.
17. Please click “Skip” button and then click “Finish” button to complete the
Bluetooth Configuration Wizard.
Figure 3.4.12 Bluetooth Service Selection window
Figure 3.4.13 Updating Bluetooth Service Configuration window for example
Figure 3.4.14 Complete the Bluetooth Configuration Wizard

BLUEKITE USB2.0 Pen Drive – User Guide
26
3.5 Install WinRoute Lite software
Under Windows 98SE or Windows ME environment, it is indispensable to
use WinRoute Lite software to act as a router. Bluekite offers a 30-day trial
version of WinRoute Lite software, you can find and install it from Bluetooth
Software CD. In addition, you can also purchase a formal version of
WinRoute Lite from website at http://www.kerio.com
Please insert the Utility CD into the CD-ROM drive. After the CD menu
launched, please select your language and then press on “Extra
Application” button. Afterward you will see the following page, please press
on “Install WinRoute Lite”
button. The process of WinRoute Lite installation is shown as below:
Figure 3.5.2 - WinRoute Lite installation process
Figure 3.5.1 – WinRoute Lite
installation button

BLUEKITE USB2.0 Pen Drive – User Guide
27
Note. The complete user guide of WinRoute Lite is included in the Utility
CD.
BLUEKITE USB2.0 Pen Drive – User Guide
28
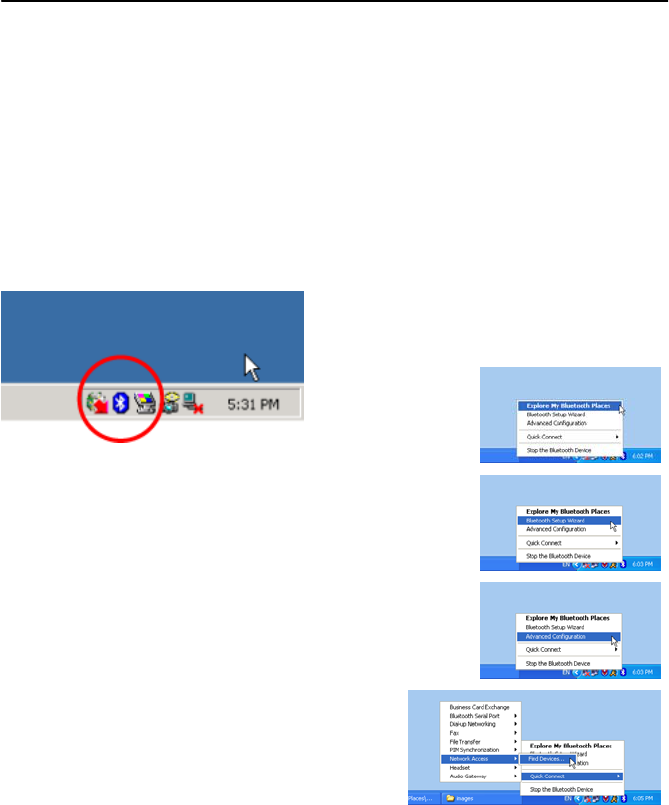
The BTTray provides several practical functions:
1. Explore My Bluetooth Places: opens M
y
Bluetooth Places window.
2. Bluetooth Setup Wizard: opens up the
Bluetooth Setup Wizard.
3. Advanced Configuration: opens up the
Bluetooth Configuration menu.
4. Quick Connect: Selects others Bluetooth
service directly and swiftly.
5. Stop the Bluetooth Device: disconnects
your Bluetooth device.
4. BTW Console
After BTW installed in your system, a shortcut called Bluetooth System
Tray(BTTray) function will automatically execute whenever system starts
and show it’s icon on the Windows toolbar. The BTTray provides several
practical functions:
- Unobtrusive notification when intervention is required to authorize
a security request or enter a Bluetooth passkey.
- Dialog boxes that prompt for security authorization and allow
passkey entry.
- Bluetooth ”pairing” support.
- Access to the Bluetooth Configuration window.
Bluetooth Console icon on toolbar
BLUEKITE USB2.0 Pen Drive – User Guide
29
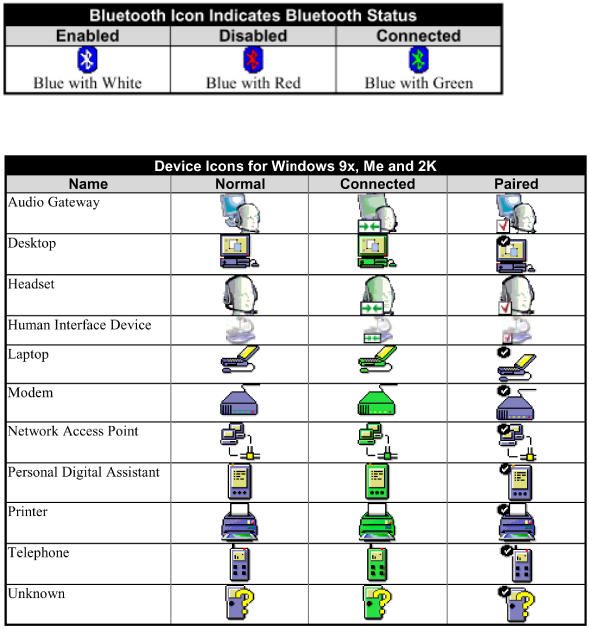
Icons Used for Bluetooth Devices and Services
Bluetooth icons provide at-a-glance feedback about a device or service’s
status by changing appearance.
The Bluetooth icon in the Windows system tray provides feedback about
Bluetooth status.
Bluetooth Icon on BTTray to provide Bluetooth Status
Service Icons for Windows 2000/ME/98SE
BLUEKITE USB2.0 Pen Drive – User Guide
30
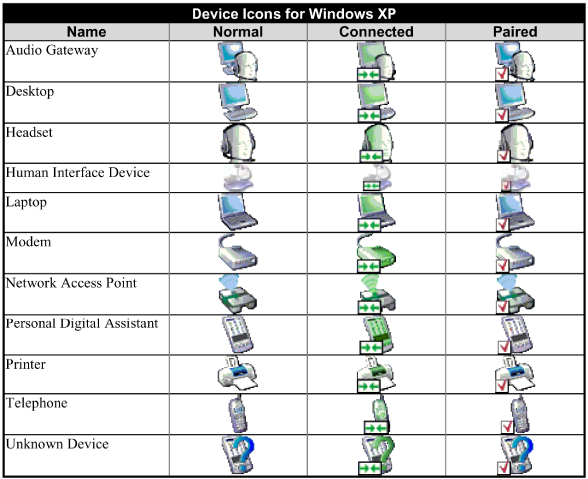
Device Icons for Windows XP
BLUEKITE USB2.0 Pen Drive – User Guide
31
4.1 Bluetooth Security Settings
After installation of your Bluetooth Software, the default security settings
are set to “Secure”. In Secure setting the system will prompt for passkey
confirmation every time a Bluetooth device is attempting to connect to your
system. To ensure that your software works easily with your system for
initial set up, it is best to switch the setting to unsecured.
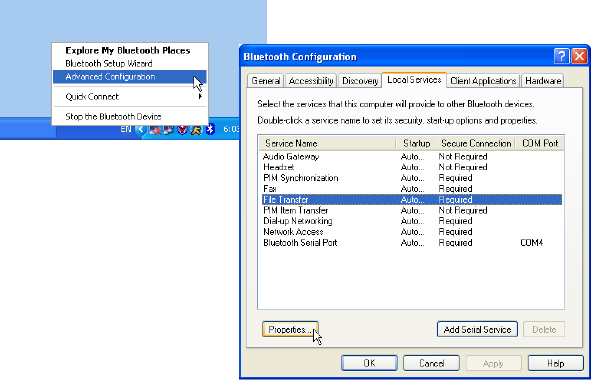
4.1.1 Local Service Tab
To turn off your Secure setting, go to your BTW Console located on the
bottom right hand corner of your Windows Toolbar. Right click and choose
the “Advance Configurations” option. Once the Configuration Window
opens, choose the “Local Services” tab key.
Figure 4.1.1.1 Local Services Window to change security settings.
BLUEKITE USB2.0 Pen Drive – User Guide
32
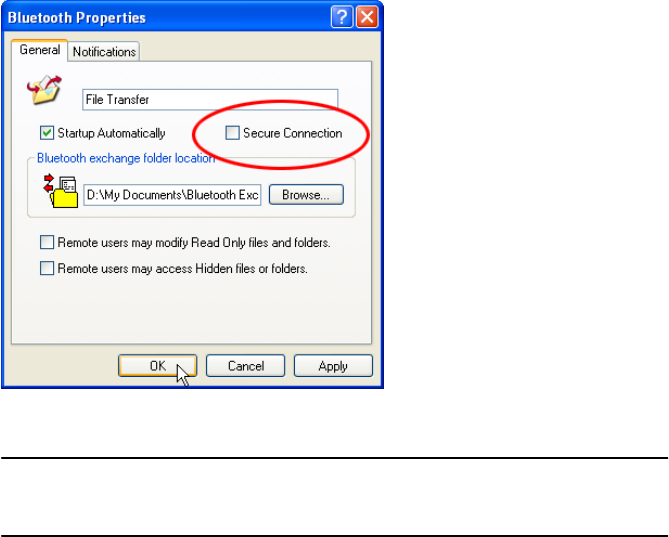
Right click on the service you would like to set unsecured. For example,
right click on File Transfer option, once the File Transfer properties window
opens, uncheck the secure connection option. Now you are allowing file
transfer to other computers without secure passkey.
Note: Once you have unchecked the secure connection option, all
Bluetooth devices are allow to connect to your system and use your
services.
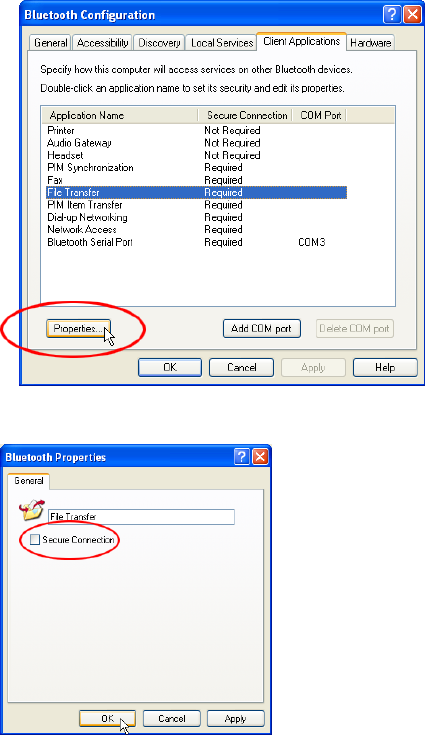
4.1.2 Client Application Tab
Once you have turned off the secure setting in the Local Services window
you must also turn it off in the Client Application tab. The secure setting in
the Client Application window prompts for passkey code every time you
attempt to connect to other computer or devices even if no security setting
is set on the remote computer. Thus, to ensure proper function it is best to
turn off the security setting on Client Application.
Figure 4.1.1.2 Properties window for File Transfer.
BLUEKITE USB2.0 Pen Drive – User Guide
33
First, select the Client Application tab. Then, right click on the service you
would like to turn off your security settings. In this case, File Transfer. Now,
uncheck “secure connection” on the window. Then click “OK”.
Figure 4.1.2.1 Client Application Window.
Figure 4.1.2.2 Client Application Properties window.
BLUEKITE USB2.0 Pen Drive – User Guide
34
4.2 Bluetooth Configuration
The Bluetooth Configuration window divides into six tabs:
General
- Identifies the computer name and computer type; desktop or
laptop.
Accessibility
- Determines which individual Bluetooth-enabled devices are
allowed to access to this computer.
Discovery
- Perform a periodic search for Bluetooth devices. The filters which
specify devices or classes and types within class of devices are
discovered.
Local Services
- Configures the properties of the local services. Properties include
Authorization, Authentication, Startup, Encryption, COM port, and
Modem type.
Client Applications
- Configures the properties of the client applications that your
computer will use to access Bluetooth services on a remote
device. Properties include Authentication, Encryption, add COM
port, and select COM port for Bluetooth Serial port.
Hardware
- Shows the hardware information.

BLUEKITE USB2.0 Pen Drive – User Guide
35
4.2.1 General Tab
In the Identity section, you can give a unique name for this computer in
Computer Name column to be identified by other Bluetooth-enabled
devices in Bluetooth Neighborhood. A valid computer name is between 1 to
247 characters.
As to the Computer Type column, there are Desktop and Laptop options
depends on the computer type you are using.
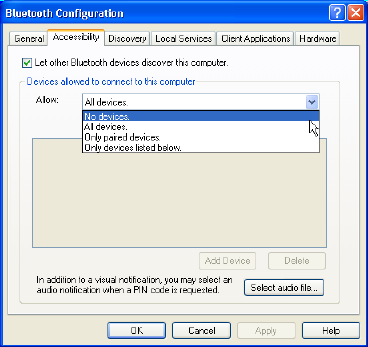
4.2.2 Accessibility Tab
The Accessibility tab includes several options:
- Let other Bluetooth devices discover this computer
The default is allowed remote devices to discover this computer. Note: this
function is ineligible when “No devices to connect” option is selected in
Allow option.
- Allow
This option has four configurations to select:
Figure 4.2.1.1 - General Tab
BLUEKITE USB2.0 Pen Drive – User Guide
36
# All devices to connect
Default setting. Let other devices discover this computer without any
restrictions.
# No devices to connect
This computer can still require a connection to a remote device, but a
remote device won’t be able to connect to this computer or use all services.
# Only paired devices to connect
Only the devices that have been paired are authorized to connect to
this computer.
# Only devices listed below to connect
Only the devices that have been added in Add Device box are
authorized to connect to this computer.
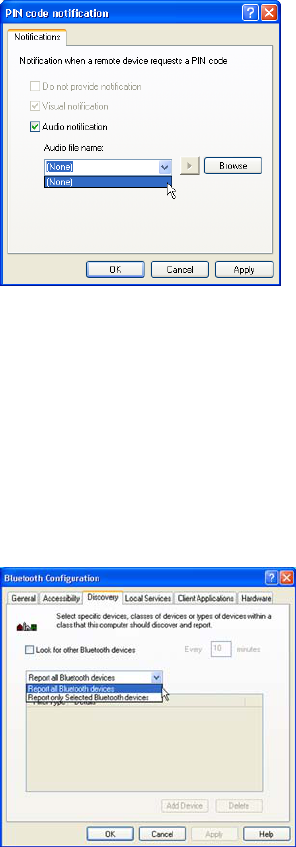
- Select an audio notification when pin code is requested.
Figure 4.2.2.1 - Accessibility Tab
BLUEKITE USB2.0 Pen Drive – User Guide
37
4.2.3 Discovery Tab
4.2.3.1 Periodic search for devices
The first option in Discovery tab allows this computer to perform periodic
search for remote devices in the background. To make continuous periodic
device searches:
1. Check the box labeled “Look for other Bluetooth devices”.
2. Enter a number between 1 and 60 to set the period of time in the “Every
minutes” box.
3. Press “OK” button to confirm the change.
Figure 4.2.3.1 - Discovery Tab
Figure 4.2.2.2 - Accessibility Tab
BLUEKITE USB2.0 Pen Drive – User Guide
38
4.2.3.2 Control device(s) display in Bluetooth Neighborhood
With the default option “Report all Bluetooth devices”, the Bluetooth
Neighborhood window displays all the devices found by your computer.
4.2.3.3 Report only Selected Bluetooth devices
The configuration can also be changed by choosing “Report only Selected
Bluetooth devices” option to control which devices are displayed by adding
one or more filters to the Discovery tab.
When you choose “Report only Selected Bluetooth devices” option, you
can add filter type by pressing “Add Device” button.
There are two options In the Discoverable devices... window:
1) Allow this computer to discover specific devices.
1. Make sure that the radio button labeled “Allow this computer to
discover specific devices” is selected.
2. Select remote device(s) through the dialog box (to select more than
one device, press the “Ctrl” or “Shift” keys while making the selections).
3. Click the dialog box “OK” button. Then selected devices will show in the
filter list on the Discovery tab.
4. Press “OK” button to confirm the change.
2) Allow this computer to discover specific classes or types of devices
within a class.
1. Make sure that radio button labeled “Allow this computer to discover
specific classes or types of devices within a class” is selected.
2. Click the “down-arrow” located at the right side of the Class field and
select a class from the list. All available classes and types are listed in
Table-1.

BLUEKITE USB2.0 Pen Drive – User Guide
39
Table-2: Class of Device and Type of Device
Class of Device Type of Device
Desktop Workstation
Server Class Computer
Laptop
Handheld PC/PDA
Palm PC/PDA
Computer
All
Cellular
Cordless
Smart Phone
Wired Modem or Voice
Phone
All
LAN Access Point All
Headset
Audio
All
Peripheral All
3. Click the “down-arrow” located at the right side of the Type field and
select a class from the list.
4. Press “OK” button. When go back to the Discovery Tab, there appears
the selected device class and type in the filter list.
5. Press “OK” button to confirm the change.
Note: Remember to select “Report all Bluetooth devices” option when you
delete all filters. Otherwise, an error message will display when you press
“OK” button.
BLUEKITE USB2.0 Pen Drive – User Guide
40
4.2.4 Local Service Tab
The Local Service tab is used for specifying the services that are provided
to other Bluetooth-enabled devices. Each service can be configured
respectively for name, security, and other settings. This tab also includes
options to add and delete user-defined serial services.
4.2.5 Client Application Tab
Client applications are the local software that allows your computer to
interact with other Bluetooth devices that provide a similar local service. For
example, the Bluetooth Serial Port client application on your computer
allows it to establish a virtual COM port with a remote device that provides
the Bluetooth specification Serial Profile service. Besides provides a means
to configure each client application respectively for name, security, and
other settings, the Client Application tab also has options to add a
user-defined COM port and/or delete applications.
The client applications share the same names as the local services, such
as Bluetooth Serial Port, Dial-Up Networking, Fax, File Transfer,
Information Exchange, Information Synchronization, and Network Access.
4.2.6 Hardware Tab
The Hardware tab shows the current properties of the Bluetooth device
installed on your computer. You can also enter the Advanced Settings to
change the Bluetooth device’s hardware configuration such as Country
Code and Maximum Transmission Power.
BLUEKITE USB2.0 Pen Drive – User Guide
41
4.3 Bluetooth Setup Wizard
The Bluetooth Setup Wizard is a quick and easy wizard to help you find
services on others’ computer, find services on a specific computer,
configure services to provide to remote clients, and change your name and
device type.
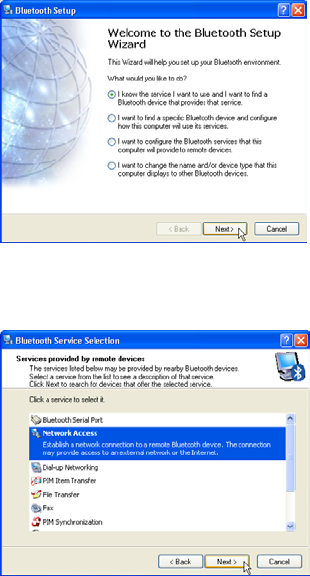
4.3.1 Finding other services
Choose option one when you would like to search for services on other
computers, such as network access, file transfer, etc...
To begin your search, go to your BTW
Console located on the bottom right
hand corner of your Windows Toolbar.
Right click and choose the ”Bluetooth
Setup Wizard” Once the Setup Wizard
windows open, choose option 1, then
click “Next”.
For example, to establish a network
access, choose the Network Access
option. Then, the computer will search
for network access availability from
other computers.
Figure 4.3.1 - Bluetooth Setup Wizard
Figure 4.3.2 - Bluetooth Setup Wizard
BLUEKITE USB2.0 Pen Drive – User Guide
42
After, you must choose which computer you would like to access the
network from.
Now the network access is established. You can also create a shortcut to
this network access by clicking the box next the “Create shortcut...?” this
way you can have access easily in the future.
Note: It is suggested that user create shortcut for easy access. Creating a
shortcut allows easy access to the Network without configuring it again.
Figure 4.3.3 - Bluetooth Setup Wizard
Figure 4.3.4 - Bluetooth Setup Wizard
BLUEKITE USB2.0 Pen Drive – User Guide
43
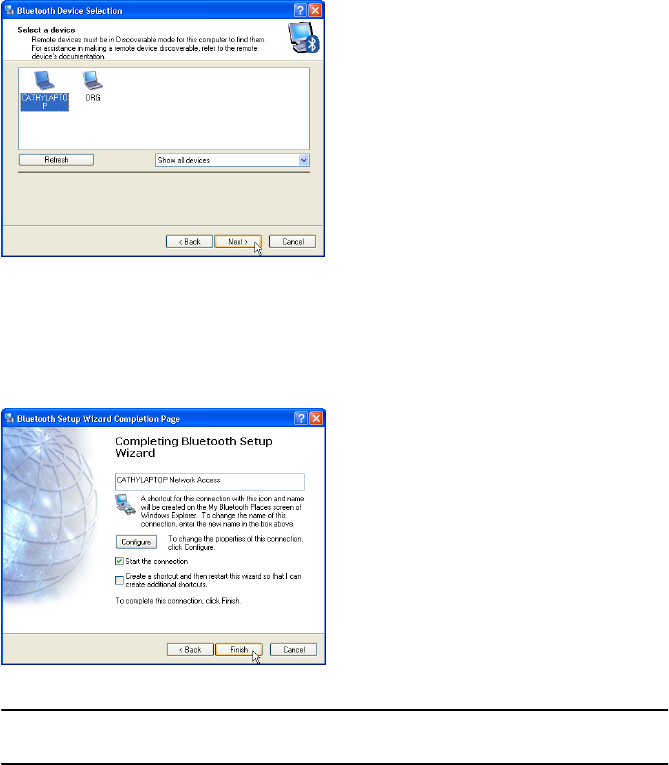
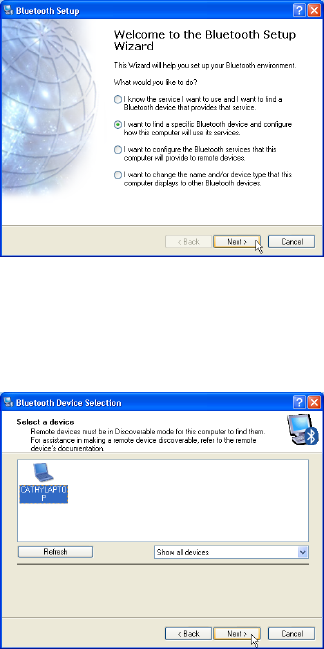
4.3.2 Finding services on specific computers
Choose option two when you would like to search for services on a specific
computer.
To begin to search for services on a particular computer, go to your BTW
Console located on the bottom right hand corner of your Windows Toolbar.
Right click and choose the “Bluetooth Setup Wizard” Once the Setup
Wizard windows open, choose option 2, then click “Next”.
The Setup Wizard will first search for all devices or computers around you.
Choose the specific computer you would like to find the service from. For
example, to establish a network access to the client computer, first, choose
the client computer you would like to access the network from it. Then click
“Next”.
Figure 4.3.5 - Bluetooth Setup Wizard
Figure 4.3.6 - Bluetooth Setup Wizard
BLUEKITE USB2.0 Pen Drive – User Guide
44
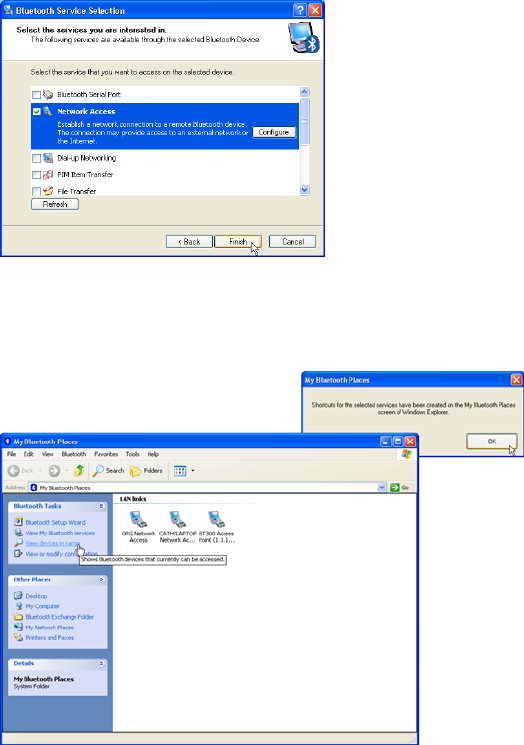
Then, choose the service you like, in this case, Network Access. Then click
“Finish”. Now network access is connected to the client computer.
Furthermore, a network access shortcut to the client computer is created in
My Bluetooth Places.
Figure 4.3.8 - Bluetooth Setup Wizard
Figure 4.3.7 - Bluetooth Setup Wizard
BLUEKITE USB2.0 Pen Drive – User Guide
45
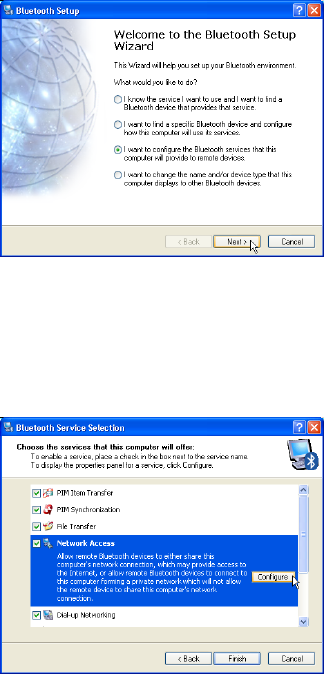
4.3.3 Configuring services to provide to remote clients
Choose option 3 when you would like to configure your services on your
computer.
To begin configuration, go to your BTW Console located on the bottom right
hand corner of your Windows Toolbar. Right click and choose the
“Bluetooth Setup Wizard” Once the Setup Wizard windows open, choose
option 3, then click “Next”.
The Setup Wizard will search for all services provided by your computer
and list them. Choose the service you would like to configure. For example,
by choosing “Configure your Network Access”, the Properties window for
network access service will appear.
Figure 4.3.9 - Bluetooth Setup Wizard
Figure 4.3.10 - Bluetooth Setup Wizard
BLUEKITE USB2.0 Pen Drive – User Guide
46
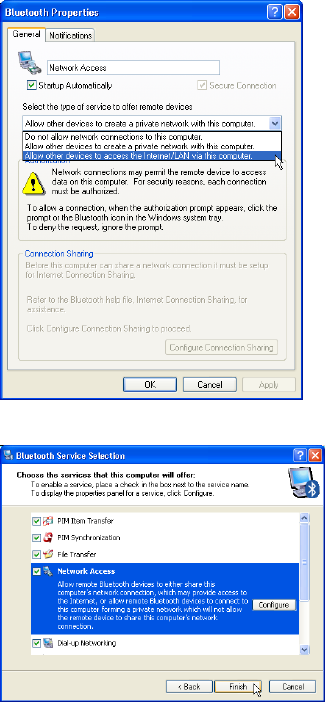
By picking the option “allow other devices to access the Internet/LAN via
this computer” you are providing network access to others through this
computer.
All other configurations can be set by choosing the other services.
Figure 4.3.11 - Bluetooth Setup Wizard
Figure 4.3.12 - Bluetooth Setup Wizard
BLUEKITE USB2.0 Pen Drive – User Guide
47
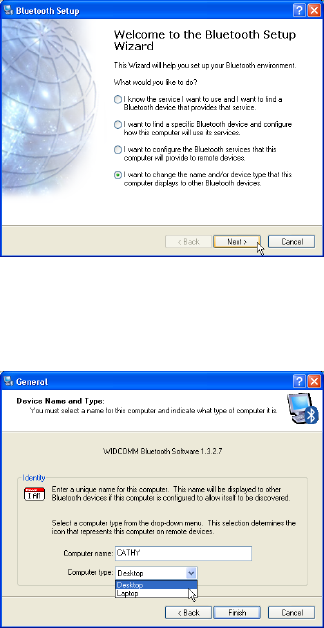
4.3.4 Changing your name and device type
Option 4 allows you to change your name and device type this computer
will display to others.
To begin, go to your BTW Console located on the bottom right hand corner
of your Windows Toolbar. Right click and choose the “Bluetooth Setup
Wizard” Once the Setup Wizard windows open, choose option 3, then click
“Next”.
You can type in the name you would like to call your computer and choose
if this is a “Desktop” or “Laptop”.
6.
Figure 4.3.13 - Bluetooth Setup Wizard
Figure 4.3.14 - Bluetooth Setup Wizard

BLUEKITE USB2.0 Pen Drive – User Guide
48
5. Bluetooth Service Usage
Bluetooth for Windows (BTW) is the solution for the seamless integration of
Bluetooth technology into personal computers.
Most Bluetooth-enabled devices have the capability to act as:
- A Bluetooth server: these devices provide one or more services, such as
access to the Internet, to the other Bluetooth devices.
- A Bluetooth client: these devices use the service(s) provided by Bluetooth
servers.
Bluetooth for Windows software provides:
- Clients
1) To locate other Bluetooth devices in the immediate vicinity (inquiry).
2) Discover the services that those devices offer(discovery).
3) Connect to, use, and disconnect from those devices.
- Servers
1) To include/exclude individual services in the list of services it provides to
clients.
-Extensive security, including:
1) Authorization.
2) Authentication.
3) Encryption.
BTW software supports:
Windows XP/ Windows 2000/ Windows ME/ Windows 98SE
BTW functions the same, regardless of the supported version of Windows it
is running on.
BLUEKITE USB2.0 Pen Drive – User Guide
49
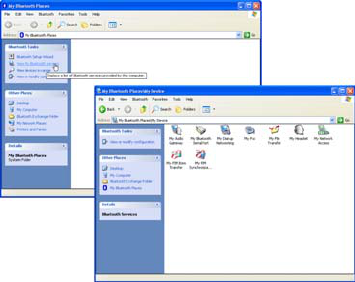
5.1 Local Device services
As figure 5.1.1 shows, double click on the “My Device” icon or “View My
Bluetooth Services”(for Window XP) and then go into the sub-window as
below:
My Device window shows all local services that a Bluetooth server is
capable of providing.
The services include:
- My Bluetooth Serial Port
- My Dial-Up Networking
- My Fax
- My Network Access
- My File Transfer
- My PIM Item Transfer (Personal Information Exchange)
- My PIM Synchronization (Personal Information Synchronization)
- My Audio Gateway
- My Headset
All services will automatically start when the Bluetooth software is initialized.
Auto start-up can also be disabled for individual service (by using Bluetooth
Configuration Console/Local Services tab, and double click on respective
service to change start-up property).
Figure 5.5.1 - My Device window
BLUEKITE USB2.0 Pen Drive – User Guide
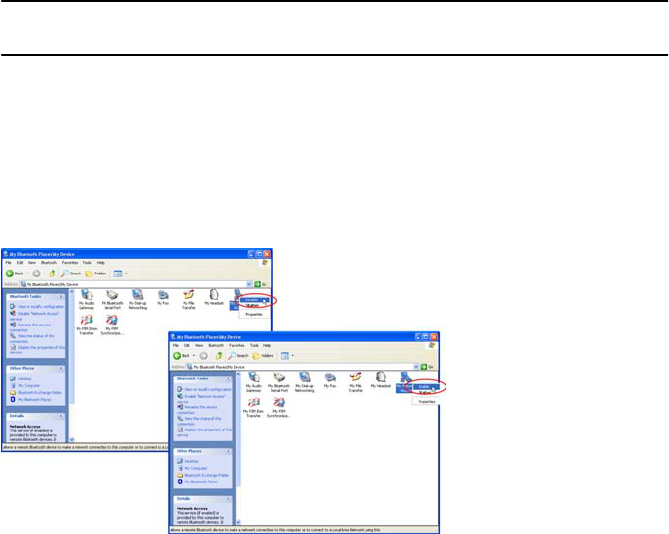
50
To stop a service that is in action, just right-click on the icon of service, and
choose stop from the pop-up menu. Not all services are available when you
start, the device you are using must be enabled in order for proper usage.
Note: Those services that you stopped are unavailable for clients unless
you restart them again.
Connections are usually established and disconnected by the client side.
However, if necessary, you can also interrupt the connection from server
side directly, or restart the service from stopped state.
In My Device window, right-click on the icon of service, and choose
stop/start from the pop-up menu.
Figure 5.5.2 - Start/Stop service from pop-up menu

BLUEKITE USB2.0 Pen Drive – User Guide
51
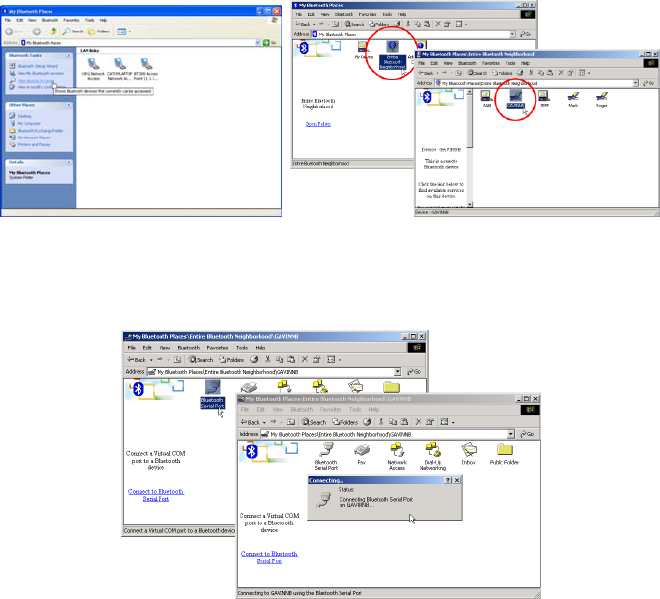
5.2 Bluetooth Neighborhood services
In the My Bluetooth Places window, you can click on “Entire
Bluetooth Neighborhood” icon to make the Bluekite USB2.0
Pen Drive to look for other Bluetooth-enabled devices in the
vicinity and display those devices it detected in the window.
The list below shows the entire services that remote
Bluetooth-enabled devices can provide:
- My Bluetooth Serial Port
Establishes a Bluetooth wireless connection between two
devices. The connection may be used by applications as
though a physical serial cable connected the devices.
- My Dial-Up Networking
Bluetooth client can dial-up to internet by using a modem
that is physically connected to the Bluetooth server.
- My Fax
Bluetooth client can send a fax wirelessly by using a Fax
machine that is physically connected to the Bluetooth server.
- My File Transfer
When File Transfer service is established between two
Bluetooth-devices, you can easily browse, drag/drop, open,
print, cut/copy, paste, delete, or rename files/folders in local
device and
remote device.
- My PIM Item Transfer (Information Exchange)
This service allows two Bluetooth-enabled devices
exchange personal information manager data such as
business cards,
calendar items, email messages, and notes.
- My PIM Synchronization ( Information Synchronization)
This service allows two Bluetooth-enabled devices to
synchronize Personal Information Manager data each other.
- My Network Access
Establishes a wireless connection between the client and a
server that is physically connected to the Local Area
Network(LAN). If the client has permission from the server,

BLUEKITE USB2.0 Pen Drive – User Guide
52
the wireless connection can be used as if the client were
hardwired to the LAN.
- My Audio Gateway
Allows the computer to use remote Bluetooth device
microphone and speakers as this computer input and output
devices. For example, if the computer has voice recognition
capabilities, a Bluetooth headset might be used as the audio
input
device.
- My Headset
A
llows the computer to provide audio input/output for remote
Bluetooth devices. For example, if the remote device is a
Bluetooth telephone, this computer microphone and
speakers can be used as
speakerphone input and output for that device
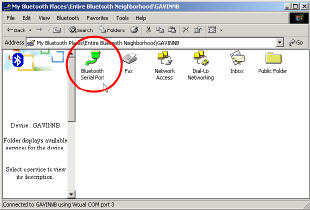
5.2.1 Bluetooth Serial Port
The Bluetooth Serial Port service allows two Bluetooth devices to establish
a wireless connection through virtual communications ports and then use
the connections as if it were a hardwired serial cable between the devices.
To establish a Bluetooth Serial Port connection between two devices, in My
Bluetooth Places window on the client:
1. Select a specific device you want to establish a connection, and then
double-click on it’s icon. (If you don’t see any devices in the Entire
Bluetooth Neighborhood window, click mouse’s right-button and then
choose “Refresh” from the pop-up menu to look for Bluetooth-enabled
devices) For Windows XP, click on “View Devices in Range”.
BLUEKITE USB2.0 Pen Drive – User Guide
53
2. When the services window of remote Bluetooth-enabled appears,
double-click on Bluetooth Serial Port service icon.
3. The Serial Port service is in action when you see the icon color has
changed from gray to green.
Figure 5.2.1.1 - Select the specific remote Bluetooth-enabled device
Windows XP Windows 2000/ME/98SE
Figure 5.2.1.2 - Double-click the Bluetooth Serial Port service icon
BLUEKITE USB2.0 Pen Drive – User Guide
54
Figure 5.2.1.3 - Bluetooth Serial Port service is active

BLUEKITE USB2.0 Pen Drive – User Guide
55
5.2.2 Dial-Up Networking
A local Bluetooth device can dial-up to internet by using a modem that is
physically connected to a remote Bluetooth device through Dial-Up
Networking service.
Possible Dial-Up Networking devices include:
- Bluetooth-enabled computers with a modem connected.
- Bluetooth-enabled mobile telephone.
- Stand-alone Bluetooth-enabled modems.
After the Bluetooth wireless connection is established the client can use the
remote device’s modem as if it were a local device on the client.
To establish a Dial-Up Networking connection, please follow the steps:
Part 1. Network setting
1. Select Start --> Settings --> Control Panel --> Network and Dial-up
Connections
2. Right-click on the “Bluetooth Connection” icon in the Network and
Dial-up Connections window as below, and then select the “Properties”
in the pop-up menu.
3. Switch to Networking tab from Bluetooth Connection window.
4. Select the item Internet Protocol (TCP/IP) from the list of Components
Figure 5.2.2.1 - Select Bluetooth Connection icon
Windows XP Windows 2000/ME/98SE

BLUEKITE USB2.0 Pen Drive – User Guide
56
checked are used by this connection, and then press the “Properties”
button.
5. In “General” tab of Internet Protocol (TCP/IP) Properties, make sure
“Use the following DNS server addresses” item is checked, and input a
DNS server address.
6. Press “OK” button to save the changes.
Note: The DNS server address which you inputted must be a existing and
active in internet. Otherwise, it may occur to get a null response from
internet. If you encounter such a situation, we recommend changing
another DNS server address.
This device complies with part 15 of the FCC rules. Operation
Figure 5.2.2.2 - Bluetooth Connection settings
Windows XP Windows 2000/ME/98SE
Figure 5.2.2.3 - Bluetooth Connection settings
Windows XP Windows 2000/ME/98SE

BLUEKITE USB2.0 Pen Drive – User Guide
57
is subject to the following two conditions.
1) This device may not cause harmful interference.
2) This device must accept any interference received,
including interference that may cause undesired operation.
Per FCC 15.21, you are cautioned that changes or
modifications not expressly approved by the part responsible
for compliance could void the user’s authority to operate the
equipment.
15.105 Federal Communications Commission (FCC) Requirements, Part 15
This equipment has been tested and found to comply with the limits
for a class B digital device, pursuant to part 15 of the FCC Rules.
These limits are designed to provide reasonable protection against
harmful interference in a residential installation.
This equipment generates, uses and can radiate radio frequency
energy and, if not installed and used in accordance with the
instructions, may cause harmful interference to radio
communications. However, there is no guarantee that interference will
not occur in a particular installation. If this equipment does cause
harmful interference to radio or television reception, which can be
determined by turning the equipment off and on, the user is
encouraged to try to correct the interference by one or more of the
BLUEKITE USB2.0 Pen Drive – User Guide
58
following measures:
---Reorient or relocate the receiving antenna.
---Increase the separation between the equipment and receiver.
---Connect the equipment into an outlet on a circuit different from that
to which the receiver is connected.
---Consult the dealer or an experienced radio/TV technician for help.
Installation and use of this Bluetooth USB2.0 Pen Drive must be in
strict accordance with the instructions included in the user
documentation provided with the product. Any changes or
modifications (including the antennas) made to this device that are
not expressly approved by the manufacturer may void the user’s
authority to operate the equipment. The manufacturer is not
responsible for any radio or television interference caused by
unauthorized modification of this device, or the substitution of the
connecting cables and equipment other than manufacturer specified.
It is the responsibility of the user to correct any interference caused
by such unauthorized modification, substitution or attachment.
Manufacturer and its authorized resellers or distributors will assume
no liability for any damage or violation of government regulations
arising from failing to comply with these guidelines.
BLUEKITE USB2.0 Pen Drive – User Guide
59
FCC RF Radiation Exposure Statement: This equipment complies with
FCC RF radiation exposure limits set forth for an uncontrolled
environment. This device and its antenna must not be co-located or
operating in conjunction with any other antenna or transmitter.