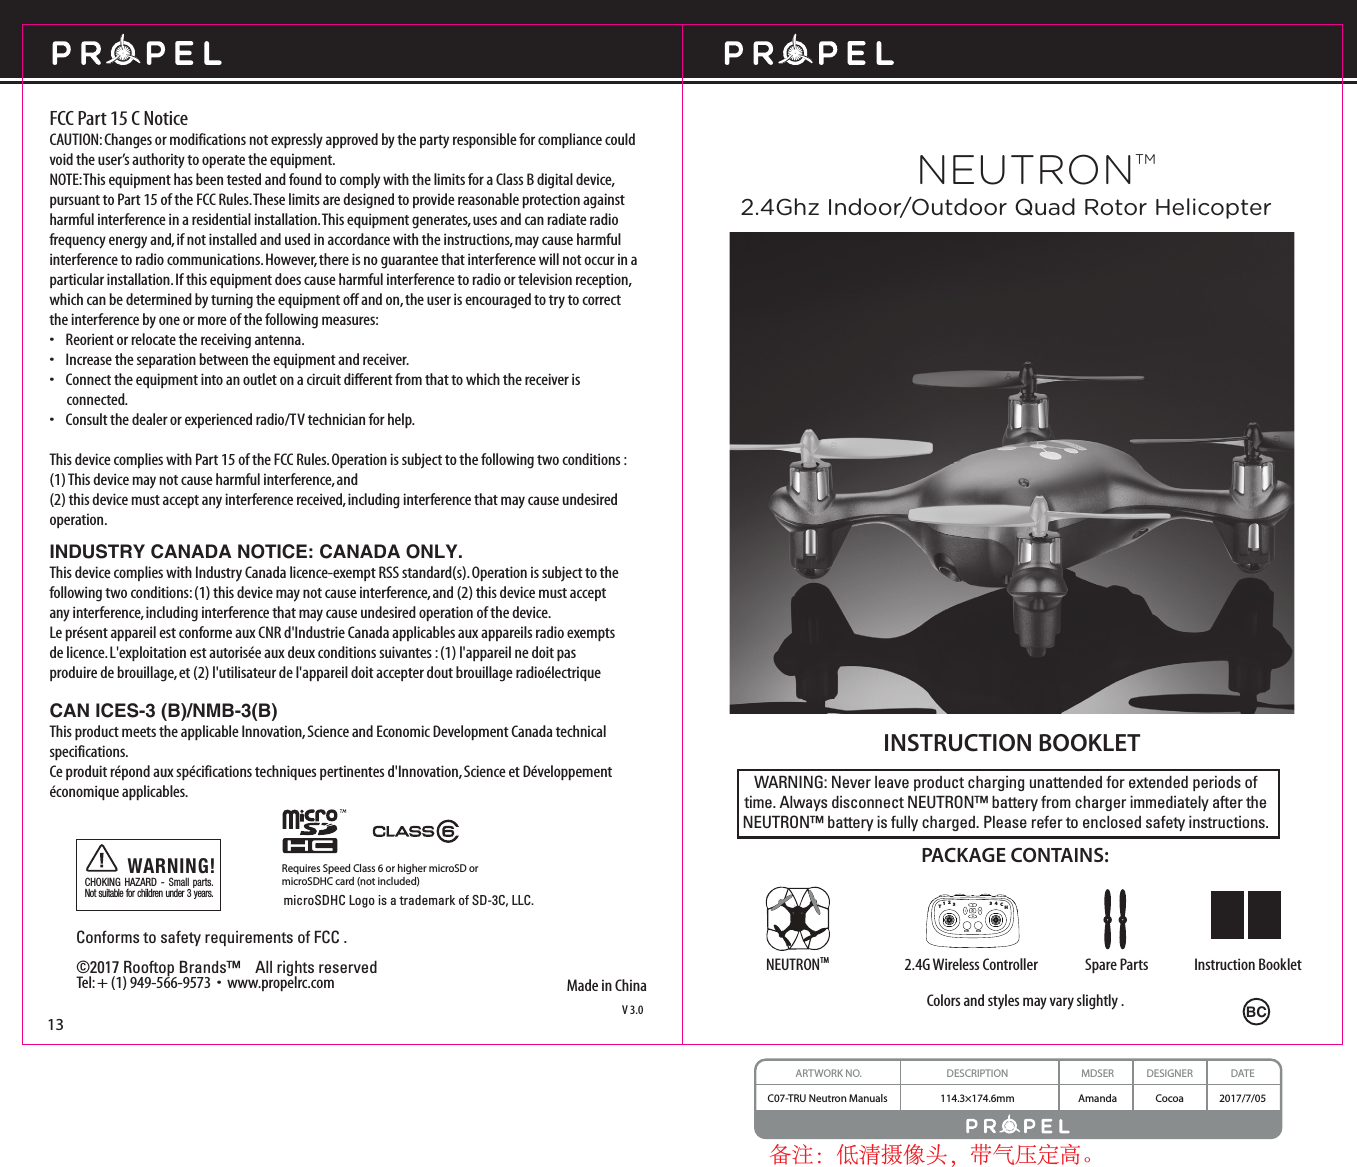
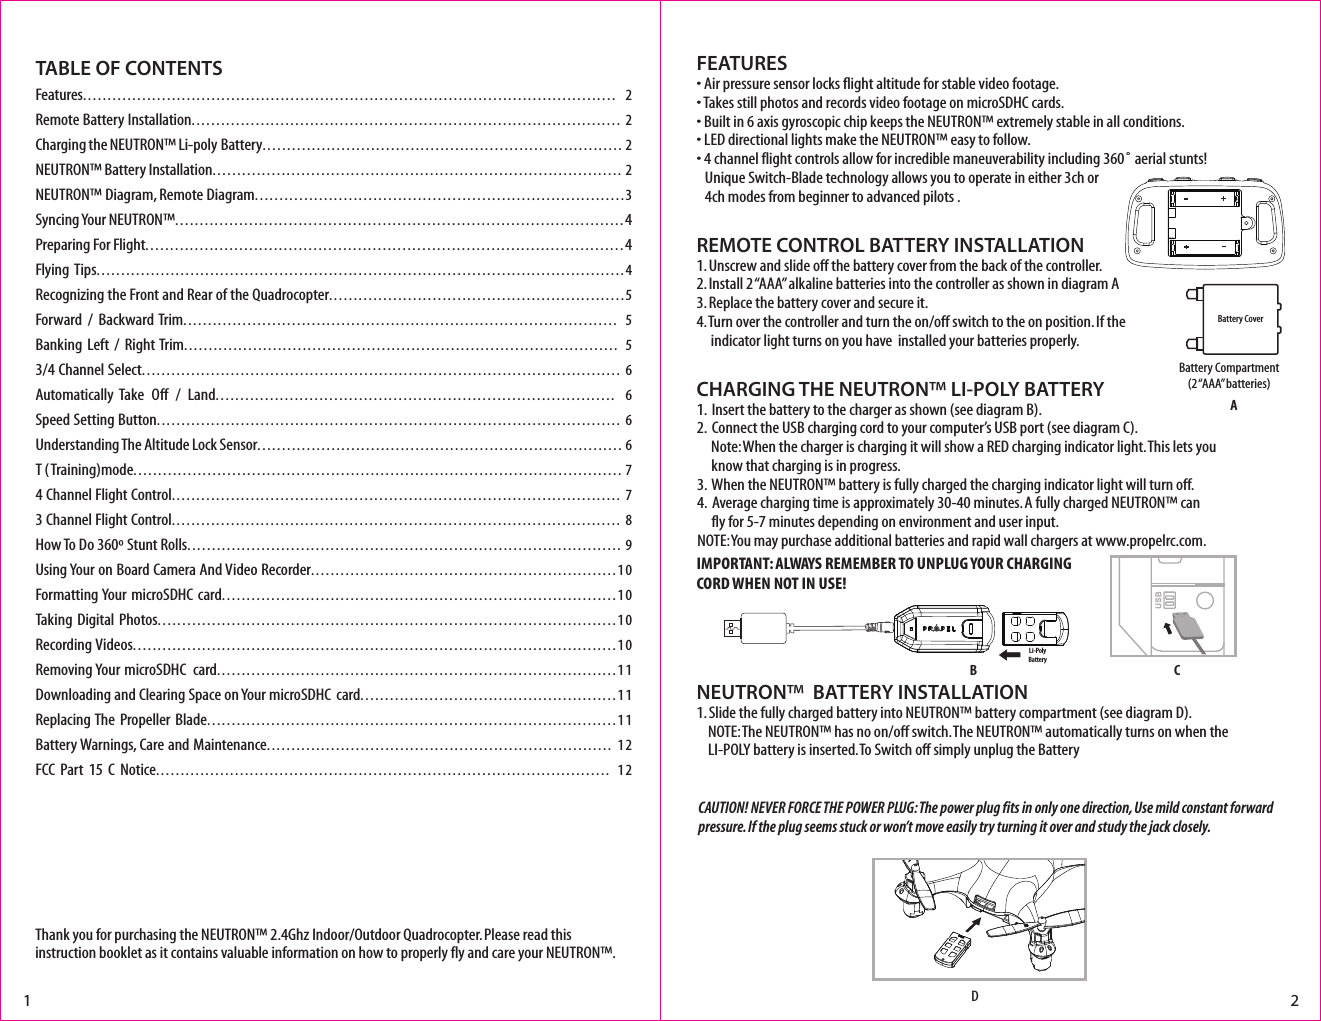
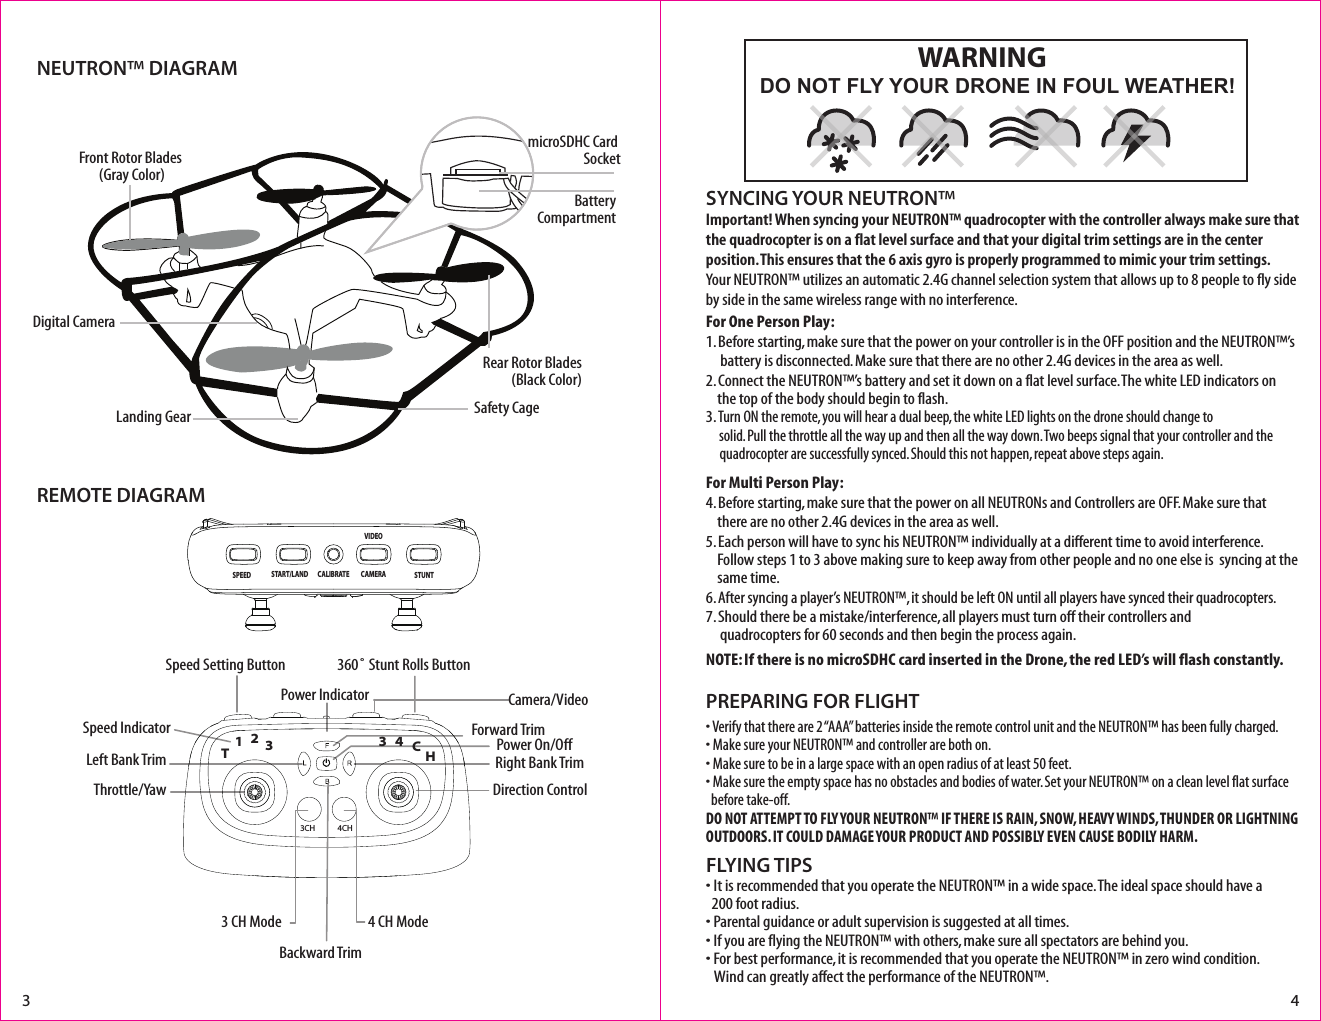
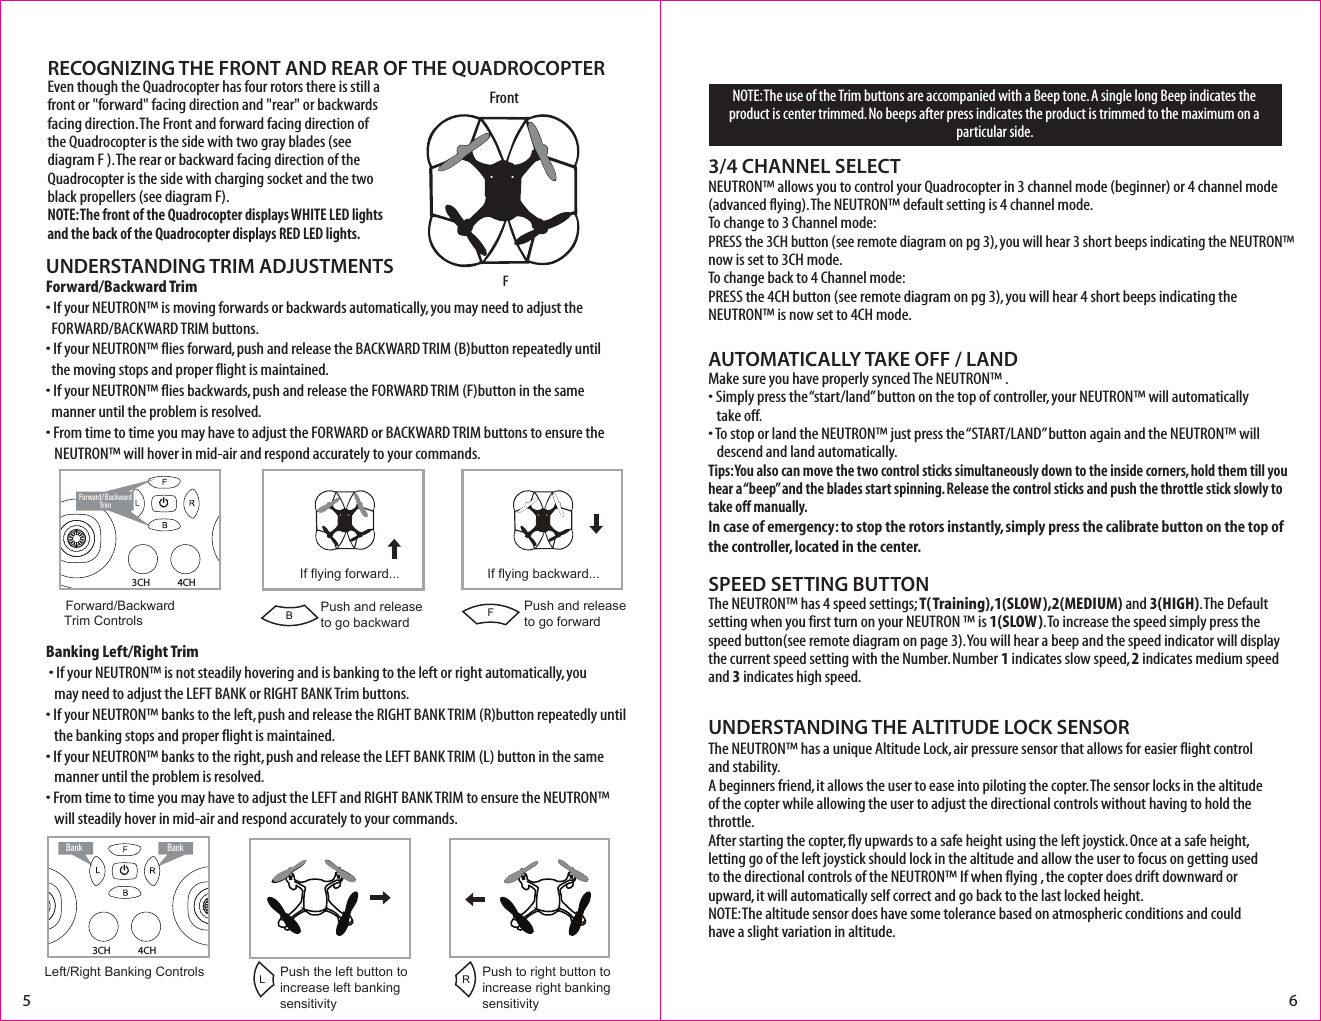
Asian Express PL-1330T Neutron Palm Drone With 480P Camera User Manual C07 Neutron IM 20170705

Asian Express Holdings Limited Neutron Palm Drone With 480P Camera C07 Neutron IM 20170705

User Manual

WARNING: Never leave product charging unattended for extended periods of time. Always disconnect NEUTRON™ battery from charger immediately after the NEUTRON™ battery is fully charged. Please refer to enclosed safety instructions.INSTRUCTION BOOKLETColors and styles may vary slightly .Made in ChinaV 3.0PACKAGE CONTAINS:2.4G Wireless Controller Instruction BookletSpare PartsNEUTRONTMFCC Part 15 C NoticeCAUTION: Changes or modifications not expressly approved by the party responsible for compliance could void the user’s authority to operate the equipment.NOTE: This equipment has been tested and found to comply with the limits for a Class B digital device, pursuant to Part 15 of the FCC Rules. These limits are designed to provide reasonable protection against harmful interference in a residential installation. This equipment generates, uses and can radiate radio frequency energy and, if not installed and used in accordance with the instructions, may cause harmful interference to radio communications. However, there is no guarantee that interference will not occur in a particular installation. If this equipment does cause harmful interference to radio or television reception, which can be determined by turning the equipment off and on, the user is encouraged to try to correct the interference by one or more of the following measures:•    Reorient or relocate the receiving antenna.•    Increase the separation between the equipment and receiver.•    Connect the equipment into an outlet on a circuit different from that to which the receiver is       connected.•    Consult the dealer or experienced radio/TV technician for help.This device complies with Part 15 of the FCC Rules. Operation is subject to the following two conditions : (1) This device may not cause harmful interference, and(2) this device must accept any interference received, including interference that may cause undesired operation.13NEUTRONTM2.4Ghz Indoor/Outdoor Quad Rotor Helicopter©2017 Rooftop Brands™    All rights reserved Tel: + (1) 949-566-9573  •  www.propelrc.com CHOKING HAZARD - Small parts. Not suitable for children under 3 years.WARNING!Conforms to safety requirements of FCC . 4CH3CH12T3H34CRequires Speed Class 6 or higher microSD ormicroSDHC card (not included)microSDHC Logo is a trademark of SD-3C, LLC.BCARTWORK NO. DESCRIPTION MDSER DESIGNER DATEC07-TRU Neutron Manuals  114.3×174.6mm Amanda Cocoa 2017/7/05备注:低清摄像头,带气压定高。INDUSTRY CANADA NOTICE: CANADA ONLY.This device complies with Industry Canada licence-exempt RSS standard(s). Operation is subject to the following two conditions: (1) this device may not cause interference, and (2) this device must accept any interference, including interference that may cause undesired operation of the device.Le présent appareil est conforme aux CNR d'Industrie Canada applicables aux appareils radio exempts de licence. L'exploitation est autorisée aux deux conditions suivantes : (1) l'appareil ne doit pas produire de brouillage, et (2) l'utilisateur de l'appareil doit accepter dout brouillage radioélectrique CAN ICES-3 (B)/NMB-3(B) This product meets the applicable Innovation, Science and Economic Development Canada technical specifications. Ce produit répond aux spécifications techniques pertinentes d'Innovation, Science et Développement économique applicables.
Thank you for purchasing the NEUTRON™ 2.4Ghz Indoor/Outdoor Quadrocopter. Please read this instruction booklet as it contains valuable information on how to properly fly and care your NEUTRON™.FEATURES• Air pressure sensor locks flight altitude for stable video footage.• Takes still photos and records video footage on microSDHC cards.• Built in 6 axis gyroscopic chip keeps the NEUTRON™ extremely stable in all conditions.• LED directional lights make the NEUTRON™ easy to follow.• 4 channel flight controls allow for incredible maneuverability including 360˚ aerial stunts!  Unique Switch-Blade technology allows you to operate in either 3ch or   4ch modes from beginner to advanced pilots .REMOTE CONTROL BATTERY INSTALLATION1. Unscrew and slide off the battery cover from the back of the controller.2. Install 2 “AAA” alkaline batteries into the controller as shown in diagram A3. Replace the battery cover and secure it.4. Turn over the controller and turn the on/off switch to the on position. If the       indicator light turns on you have  installed your batteries properly. Battery Compartment(2 “AAA”  batteries)TABLE OF CONTENTSFeatures............................................................................................................ 2Remote Battery Installation....................................................................................... 2Charging the NEUTRON™ Li-poly Battery......................................................................... 2NEUTRON™ Battery Installation................................................................................... 2NEUTRON™ Diagram, Remote Diagram...........................................................................3Syncing Your NEUTRON™...........................................................................................4Preparing For Flight.................................................................................................4Flying Tips...........................................................................................................4Recognizing the Front and Rear of the Quadrocopter............................................................5Forward  /  Backward Trim........................................................................................ 5Banking  Left /  Right Trim........................................................................................ 53/4 Channel Select................................................................................................. 6Automatically Take  Off  /  Land................................................................................. 6Speed Setting Button.............................................................................................. 6Understanding The Altitude Lock Sensor.......................................................................... 6T (Training)mode................................................................................................... 74 Channel Flight Control........................................................................................... 73 Channel Flight Control........................................................................................... 8How To Do 360º Stunt Rolls........................................................................................ 9Using Your on Board Camera And Video Recorder..............................................................10Formatting Your microSDHC card................................................................................10Taking Digital Photos.............................................................................................10Recording Videos..................................................................................................10Removing Your microSDHC  card.................................................................................11Downloading and Clearing Space on Your microSDHC card....................................................11Replacing The Propeller Blade...................................................................................11Battery Warnings, Care and Maintenance...................................................................... 12FCC Part 15 C Notice............................................................................................ 12Battery CoverLi-PolyBattery1 2CHARGING THE NEUTRON™ LI-POLY BATTERY1.  Insert the battery to the charger as shown (see diagram B). 2.  Connect the USB charging cord to your computer’s USB port (see diagram C).     Note: When the charger is charging it will show a RED charging indicator light. This lets you         know that charging is in progress.3.  When the NEUTRON™ battery is fully charged the charging indicator light will turn off.4.  Average charging time is approximately 30-40 minutes. A fully charged NEUTRON™ can             fly for 5-7 minutes depending on environment and user input. NOTE: You may purchase additional batteries and rapid wall chargers at www.propelrc.com.AB CNEUTRON™  BATTERY INSTALLATION1. Slide the fully charged battery into NEUTRON™ battery compartment (see diagram D).    NOTE: The NEUTRON™ has no on/off switch. The NEUTRON™ automatically turns on when the      LI-POLY battery is inserted. To Switch off simply unplug the BatteryDIMPORTANT: ALWAYS REMEMBER TO UNPLUG YOUR CHARGING CORD WHEN NOT IN USE!CAUTION! NEVER FORCE THE POWER PLUG: The power plug fits in only one direction, Use mild constant forward pressure. If the plug seems stuck or won’t move easily try turning it over and study the jack closely.
NEUTRON™ DIAGRAMREMOTE DIAGRAMFLYING TIPS• It is recommended that you operate the NEUTRON™ in a wide space. The ideal space should have a    200 foot radius. • Parental guidance or adult supervision is suggested at all times.• If you are flying the NEUTRON™ with others, make sure all spectators are behind you.• For best performance, it is recommended that you operate the NEUTRON™ in zero wind condition.     Wind can greatly affect the performance of the NEUTRON™.Important! When syncing your NEUTRON™ quadrocopter with the controller always make sure that the quadrocopter is on a flat level surface and that your digital trim settings are in the center position. This ensures that the 6 axis gyro is properly programmed to mimic your trim settings. Your NEUTRON™ utilizes an automatic 2.4G channel selection system that allows up to 8 people to fly side by side in the same wireless range with no interference.For One Person Play:1. Before starting, make sure that the power on your controller is in the OFF position and the NEUTRON™’s       battery is disconnected. Make sure that there are no other 2.4G devices in the area as well. 2. Connect the NEUTRON™’s battery and set it down on a flat level surface. The white LED indicators on      the top of the body should begin to flash.3. Turn ON the remote, you will hear a dual beep, the white LED lights on the drone should change to         solid. Pull the throttle all the way up and then all the way down. Two beeps signal that your controller and the      quadrocopter are successfully synced. Should this not happen, repeat above steps again. For Multi Person Play: 4. Before starting, make sure that the power on all NEUTRONs and Controllers are OFF. Make sure that      there are no other 2.4G devices in the area as well.5. Each person will have to sync his NEUTRON™ individually at a different time to avoid interference.       Follow steps 1 to 3 above making sure to keep away from other people and no one else is  syncing at the      same time. 6. After syncing a player’s NEUTRON™, it should be left ON until all players have synced their quadrocopters. 7. Should there be a mistake/interference, all players must turn off their controllers and             quadrocopters for 60 seconds and then begin the process again. NOTE: If there is no microSDHC card inserted in the Drone, the red LED’s will flash constantly.SYNCING YOUR NEUTRON™ • Verify that there are 2 “AAA” batteries inside the remote control unit and the NEUTRON™ has been fully charged.• Make sure your NEUTRON™ and controller are both on. • Make sure to be in a large space with an open radius of at least 50 feet. • Make sure the empty space has no obstacles and bodies of water. Set your NEUTRON™ on a clean level flat surface   before take-off.DO NOT ATTEMPT TO FLY YOUR NEUTRON™ IF THERE IS RAIN, SNOW, HEAVY WINDS, THUNDER OR LIGHTNING OUTDOORS. IT COULD DAMAGE YOUR PRODUCT AND POSSIBLY EVEN CAUSE BODILY HARM.PREPARING FOR FLIGHT 3 4Safety CageFront Rotor Blades (Gray Color)Landing GearDigital CameraRear Rotor Blades(Black Color)microSDHC Card SocketBatteryCompartmentDO NOT FLY YOUR DRONE IN FOUL WEATHER!WARNING Speed Setting Button Speed IndicatorThrottle/Yaw360˚ Stunt Rolls ButtonDirection ControlPower On/Off4 CH Mode3 CH ModeLeft Bank Trim Right Bank TrimForward TrimCamera/VideoPower IndicatorBackward TrimCALIBRATEVIDEOCAMERA STUNTSTART/LANDSPEED4CH3CH12T3H34C
NOTE: The use of the Trim buttons are accompanied with a Beep tone. A single long Beep indicates the product is center trimmed. No beeps after press indicates the product is trimmed to the maximum on a particular side.UNDERSTANDING TRIM ADJUSTMENTSUNDERSTANDING THE ALTITUDE LOCK SENSORForward/Backward Trim• If your NEUTRON™ is moving forwards or backwards automatically, you may need to adjust the     FORWARD/BACKWARD TRIM buttons. • If your NEUTRON™ flies forward, push and release the BACKWARD TRIM (B)button repeatedly until    the moving stops and proper flight is maintained. • If your NEUTRON™ flies backwards, push and release the FORWARD TRIM (F)button in the same    manner until the problem is resolved.• From time to time you may have to adjust the FORWARD or BACKWARD TRIM buttons to ensure the   NEUTRON™ will hover in mid-air and respond accurately to your commands.Banking Left/Right Trim�• If your NEUTRON™ is not steadily hovering and is banking to the left or right automatically, you    may need to adjust the LEFT BANK or RIGHT BANK Trim buttons. • If your NEUTRON™ banks to the left, push and release the RIGHT BANK TRIM (R)button repeatedly until    the banking stops and proper flight is maintained. • If your NEUTRON™ banks to the right, push and release the LEFT BANK TRIM (L) button in the same      manner until the problem is resolved. • From time to time you may have to adjust the LEFT and RIGHT BANK TRIM to ensure the NEUTRON™    will steadily hover in mid-air and respond accurately to your commands.AUTOMATICALLY TAKE OFF / LANDMake sure you have properly synced The NEUTRON™ .• Simply press the “start/land” button on the top of controller, your NEUTRON™ will automatically   take off. • To stop or land the NEUTRON™ just press the “START/LAND” button again and the NEUTRON™ will     descend and land automatically. Tips: You also can move the two control sticks simultaneously down to the inside corners, hold them till you hear a “beep” and the blades start spinning. Release the control sticks and push the throttle stick slowly to take off manually.In case of emergency: to stop the rotors instantly, simply press the calibrate button on the top of the controller, located in the center. SPEED SETTING BUTTONThe NEUTRON™ has 4 speed settings; T(Training),1(SLOW),2(MEDIUM) and 3(HIGH). The Default setting when you first turn on your NEUTRON ™ is 1(SLOW). To increase the speed simply press the speed button(see remote diagram on page 3). You will hear a beep and the speed indicator will display the current speed setting with the Number. Number 1 indicates slow speed, 2 indicates medium speed and 3 indicates high speed.3/4 CHANNEL SELECTNEUTRON™ allows you to control your Quadrocopter in 3 channel mode (beginner) or 4 channel mode (advanced flying). The NEUTRON™ default setting is 4 channel mode. To change to 3 Channel mode: PRESS the 3CH button (see remote diagram on pg 3), you will hear 3 short beeps indicating the NEUTRON™ now is set to 3CH mode. To change back to 4 Channel mode: PRESS the 4CH button (see remote diagram on pg 3), you will hear 4 short beeps indicating the NEUTRON™ is now set to 4CH mode. Forward/Backward  Trim ControlsPush and release to go backwardIf flying forward...5 6BFrontFIf flying backward...Push and releaseto go forwardF4CH3CHForward/ BackwardTrimRECOGNIZING THE FRONT AND REAR OF THE QUADROCOPTERLeft/Right Banking Controls Push the left button to increase left bankingsensitivityPush to right button to increase right bankingsensitivityLRBank Bank4CH3CHThe NEUTRON™ has a unique Altitude Lock, air pressure sensor that allows for easier flight control and stability.  A beginners friend, it allows the user to ease into piloting the copter. The sensor locks in the altitude of the copter while allowing the user to adjust the directional controls without having to hold the throttle.After starting the copter, fly upwards to a safe height using the left joystick. Once at a safe height, letting go of the left joystick should lock in the altitude and allow the user to focus on getting used to the directional controls of the NEUTRON™ If when flying , the copter does drift downward or upward, it will automatically self correct and go back to the last locked height.NOTE: The altitude sensor does have some tolerance based on atmospheric conditions and could have a slight variation in altitude. Even though the Quadrocopter has four rotors there is still a front or "forward" facing direction and "rear" or backwards facing direction. The Front and forward facing direction of the Quadrocopter is the side with two gray blades (see diagram F ). The rear or backward facing direction of the Quadrocopter is the side with charging socket and the two black propellers (see diagram F). NOTE: The front of the Quadrocopter displays WHITE LED lights and the back of the Quadrocopter displays RED LED lights.
4 CHANNEL FLIGHT CONTROLBelow is a list of basic flight functions for your long-range remote control NEUTRON™. While learning to fly your NEUTRON™ it is best to start with a large space until you get used to the basic controls. As you master flying your NEUTRON™ you can move to more advanced maneuvering techniques. Practice makes perfect! When you have these basic steps down you can move to the next level.Move the left Throttle stick up to increase the speed and the NEUTRON™ will accelerate and ascend.Move the left Throttle stick down to decrease the speed and the NEUTRON™ will decelerate and descend.Move the left Throttle stick left and the NEUTRON™ will turn/spin left. Move the left Throttle stick right and the NEUTRON™ will turn/spin right.Move the right Direction Stick up and the NEUTRON™ will move forward.Move the right Direction Control down and the NEUTRON™ will move backward.3 CHANNEL FLIGHT CONTROL Below is a list of basic flight functions for your long-range remote control NEUTRON™. While learning to fly your NEUTRON™ it is best to start with a large space until you get used to the basic controls. As you master flying your NEUTRON™ you can move to more advanced maneuvering techniques. Practice makes perfect! When you have these basic steps down you can move to the next level.Move the right Direction Control left and the NEUTRON™ will bank to the left.Move the right Direction Control right and the NEUTRON™ will bank to the right.7 8Move the Left Throttle Stick up to increase the speed and the NEUTRON™ will accelerate. Move the Left Throttle Stick down to decrease the speed and the NEUTRON™ will descend.Move the Right Directional Stick LEFT to spin/turn left.Move the right directional stick RIGHT to spin/turn Right.Move the Right Direction Stick forwards and the NEUTRON™ will move forward.Move the Right Direction Stick backwards down and the NEUTRON™ will move backwards. T (Training)MODESimply press and hold the Speed Setting Button; you will hear a long beep and the speed indicator will change to "T." Now you are in T mode. T mode allows you to learn how to operate your NEUTRON™ at a very slow speed.Also in T mode a minimum and maximum height limit is set to help avoid crashing into the ground or ceiling while learning. To exit T mode just press the speed setting button again.
J9 10KYour NEUTRON™ comes equipped with an onboard digital camera that takes both video and still photographs. Now you can have hours of fun creating aerial photography and videos for family and friends. WHAT YOU WILL NEED TO GET STARTED USING YOUR CAMERA1. One microSDHC card (not included).2. One microSDHC card reader (included).3. One Computer with USB port and Windows Media Player or other Media player that can play AVI files    (not included).FORMATTING YOUR microSDHC CARDBefore you can begin to take videos or digital photographs you must first format your microSDHC card. To format your microSDHC card simply place the microSDHC card into the included USB card reader and plug it into your computers USB port (See diagram 1 and 2 below). After a few moments an icon will appear on your desktop. Right click on the Icon and follow instructions to format your microSDHC card.INSTALLING THE microSDHC CARD IN YOUR NEUTRONTM QUADROCOPTER• Do not install the battery or take it out first. • Place the formatted microSDHC card into the back of the quadrocopter’s digital camera port(see diagram 3    below). Push gently and consistently until you hear and feel the microSDHC card “ click ”  into the digital camera slot. • Reconnect the quadrocopter battery and make sure that it is both fully charged and properly synced to the      controller (see HOW TO SYNC YOUR DRONE on page 4 ). • When you have successfully installed your microSDHC card and your quadrocopter is powered up, you          will see solid red LED lights on the quadrocopter belly.    NOTE: If you see the red LED lights keep flashing ,it means you have not installed your microSDHC     card correctly or there is a problem with your card. If this happens first make sure that the product is not in       video Record mode and if not then please reformat and try again. If you continue to encounter problems call    our customers service line at 949.566.9573 Ext 1 for assistance.TAKING DIGITAL PHOTOSTo take photographs simply press and release the CAMERA/VIDEO button on the top of the controller (refer to CONTROLLER DIAGRAM on pg. 3), when you push the button you will here a "beep" and the red LED tail lights will flash one time indicating that a picture has been taken.  When the camera ready light becomes solid and hold again you are ready for your next photograph.RECORDING VIDEOS To record a video first make sure that your quadrocopter is fully charged and that you have correctly installed the microSDHC card in the quadrocopters camera port. Begin recording a video by pressing the CAMERA/VIDEO button for a few seconds (see CONTROLLER DIAGRAM on page 3). The red LED lights on the NEUTRON will flash constantly to indicate that you are in video mode and the camera is recording. To stop the video recording, press the button again. The red LED lights on the belly of the camera will change to solid indicating that video recording has stopped and the Camera is in ready mode again.USING YOUR ON BOARD CAMERA AND VIDEO RECORDERRed LED LightmicroSDHC card facing upmicroSDHC card  goes in back slotDiagram 4Diagram 3Diagram 2Diagram 1IMPORTANT NOTICE: You can not take photos and videos at the same time. When you are in video mode,if you want to take photos you must first exit video mode,you can’t take still photos.360˚Stunt-RollHOW TO DO 360º STUNT ROLLS1. In order to make your NEUTRON™ do 360º rolls you must fully charge your battery.        Note: The NEUTRON™ will not do 360º stunt rolls in T-Mode, Mode 1 or the drone battery is running      low(The LED lights on the drone will be flashing). 2. Once you are ready to attempt a 360º roll, simply depress and let go of the "STUNT" button on the top      right hand side of your controller (see Remote Diagram on page 3); you will hear a sound. This means      you are now in “STUNT MODE."3. Now quickly move your right control stick in any of 4 directions; up, down, left or right. Your NEUTRON™      copter will instantly roll in the associated direction. See diagram below.
LNEUTRON™ WARNING:The NEUTRON™ is designed for INDOOR or OUTDOOR. The NEUTRON™ blades revolve at high speeds and can cause damage to the user, spectators and animals. Stand away from the NEUTRON™ to reduce the risk of getting into the flight path. Warn spectators that you will be flying your NEUTRON™ so that they are aware of its position. Before flight, inspect the rotor blades to make certain that the blades are securely fastened to the NEUTRON™.WARNING!• Choking/Cutting Hazard. Small Parts/Sharp Rotor Blades.• Keep hands, hair and loose clothing away from the propeller when the battery is plugged into the drone.• Turn off the transmitter and unplug NEUTRON™ battery when not in use.• The included charger is built specifically for the NEUTRON™ Li-Poly battery. Do not use it to charge any other    battery.• New alkaline batteries are recommended for maximum performance.• Parental supervision recommended when flying NEUTRON™.BATTERY WARNINGSRECHARGEABLE BATTERY:This NEUTRON™ uses a Li-Poly rechargeable battery. If battery  can no longer be charged, dispose of battery properly according to local disposal requirements.CONTROLLER BATTERIES:Remote control requires 2 “AAA” batteries (not included). Please read the important battery safety warning below.• Do not mix alkaline, standard (carbon-zinc) and rechargeable batteries (Nickel Metal Hydride).• Do not mix old and new batteries.• Non-rechargeable batteries are not to be recharged.• Rechargeable batteries are to be removed from the item before being charged (if removable).• Rechargeable batteries are only to be charged under adult supervision.• Exhausted batteries should be removed immediately and must be recycled or disposed of properly    according to state or local government ordinances and regulations.• The supply terminals are not to be short-circuited.• Only batteries of the same or equivalent type as recommended are to be used.• Batteries are to be inserted with the correct polarity (see inside booklet for diagram).• Do not dispose batteries in a fire - batteries may leak or explode.CARE AND MAINTENANCE• Always remove the batteries from the wireless infrared remote control when it is not being used for an     extended period of time.• To clean, gently wipe the remote control and NEUTRON™ with a clean damp cloth.• Keep the toy away from direct heat or sunlight.• Do not submerge the toy into water. This can damage the unit beyond repair.• Parental guidance recommended when installing or replacing the batteries.11 12REMOVING YOUR microSDHC CARDTo remove your microSDHC card, push in gently on the back of the card until you hear and feel a “clicking ”.  The microSDHC card will “pop out” slightly and is ready for removal. Simply grab and pull gently away from the quadrocopter camera port to remove the card. Always store your microSDHC card in a clean, safe and cool environment.DOWNLOADING AND CLEARING SPACE ON YOUR microSDHC CARDPlug your microSDHC card into microSDHC card reader and connect to your computer. It is best to always download all your videos and pictures on to your computer and not store this data on your microSDHC card. After downloading your photos and videos , follow your computers instructions to “delete” files on your microSDHC card.IMPORTANT NOTICE: When  your microSDHC card is full the indicator light on the bottom of your quadrocopter will not flashing when you press the photographs or video record button. This indicates that its time to put a new SD card in your quadrocopter or download files and clear space for new photos and videos.REPLACING THE PROPELLER BLADEGray Blade Front Left = AGray Blade Front Right = BBlack Blade Rear Left = BBlack Blade Rear Right = AAABBFrontRearYour NEUTRON™ propeller system is a precision instrument that may need repair or replacement from time to time for optimal flight function. Crash landing from high-speed aerial flights may cause damage to your NEUTRON™’s propellers.1. NEUTRON™ have four blades, two gray propellers on the front, and two black propellers on the back.     Please note that the blades are labeled with an embossed A or B (see the diagram L).2. When replacing the propeller blades, gently remove the blade from the rotor shaft. Make sure to match     both the color of the blade and the indication letter on the blade to the diagram L. 3. Replace the damaged blade with the correct blade.

Navigation menu