Asian Express PL-1440W cloud rider drone with air pressure sensor, cloud rider drone with camera, cloud rider drone, cloud rider drone with 480P User Manual C60 WMC X18 Cloud Rider WiFi IM ENG 20180730
Asian Express Holdings Limited cloud rider drone with air pressure sensor, cloud rider drone with camera, cloud rider drone, cloud rider drone with 480P C60 WMC X18 Cloud Rider WiFi IM ENG 20180730
User Manual
ARTWORK NO. DESCRIPTION MDSER DESIGNER DATE
C60 X18+WiFi IM 114×174mm JerryVicky 2018/7/30
备注: 低清,带气压定高,带WiFi。
Made in China
V3.0
15
WARNING: Never leave product charging unattended for extended periods of
time. Always disconnect the battery from charger immediately after the battery
is fully charged. Please refer to enclosed safety instructions.
INSTRUCTION BOOKLET
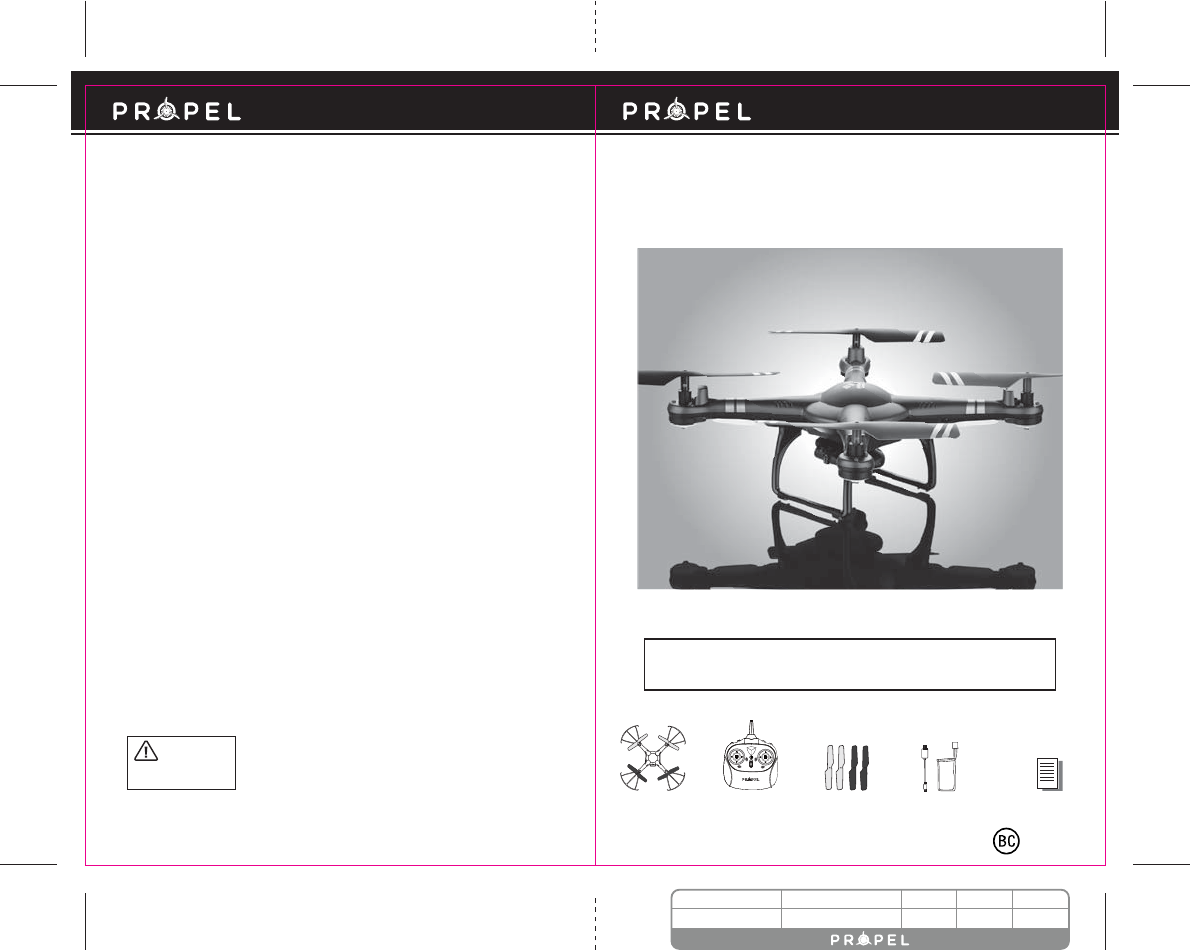
PACKAGE CONTAINS:
Colors and styles may vary slightly .
FCC Part 15 C Notice
CAUTION: Changes or modifications not expressly approved by the party responsible for compliance could
void the user’s authority to operate the equipment.
NOTE: This equipment has been tested and found to comply with the limits for a Class B digital device,
pursuant to Part 15 of the FCC Rules. These limits are designed to provide reasonable protection against
harmful interference in a residential installation. This equipment generates, uses and can radiate radio
frequency energy and, if not installed and used in accordance with the instructions, may cause harmful
interference to radio communications. However, there is no guarantee that interference will not occur in a
particular installation. If this equipment does cause harmful interference to radio or television reception,
which can be determined by turning the equipment off and on, the user is encouraged to try to correct the
interference by one or more of the following measures:
s2EORIENTORRELOCATETHERECEIVINGANTENNA
s)NCREASETHESEPARATIONBETWEENTHEEQUIPMENTANDRECEIVER
s#ONNECTTHEEQUIPMENTINTOANOUTLETONACIRCUITDIFFERENTFROMTHATTOWHICHTHERECEIVERISCONNECTED
s#ONSULTTHEDEALEROREXPERIENCEDRADIO46TECHNICIANFORHELP
This device complies with Part 15 of the FCC Rules. Operation is subject to the following two conditions :
(1) This device may not cause harmful interference, and
(2) this device must accept any interference received, including interference that may cause undesired
operation.
2.4G Wireless
Controller
Instruction
Manual
Spare Parts
X18 +
WiFi
X18
2.4GHz Outdoor Drone With Streaming Video
PROPEL
USB Charger
& Li-Poly
Rechargeable Battery
INDUSTRY CANADA NOTICE: CANADA ONLY.
This device complies with Industry Canada licence-exempt RSS standard(s). Operation is subject to the following two conditions: (1) this
device may not cause interference, and (2) this device must accept any interference, including interference that may cause undesired
operation of the device.
Le présent appareil est conforme aux CNR d'Industrie Canada applicables aux appareils radio exempts de licence. L'exploitation est
autorisée aux deux conditions suivantes : (1) l'appareil ne doit pas produire de brouillage, et (2) l'utilisateur de l'appareil doit accepter
dout brouillage radioélectrique subi, même si le brouillage est susceptible d'en compromettre le fonctionnement.
CHOKING HAZARD
-
Small parts.
Not suitable for children under 3 years.
WARNING!
Conforms to safety requirements of FCC, RSS210 and RSS247.
©2018 Rooftop Brands™ All rights reserved
www.propelrc.com
CAN ICES-3 (B)/NMB-3(B)
This product meets the applicable Innovation, Science and Economic Development Canada technical specifications.
Ce produit répond aux spécifications techniques pertinentes d'Innovation, Science et Développement économique applicables.
IC Radiation Exposure Statement:
This equipment complies with IC radiation exposure limits set forth for an uncontrolled environment. This equipment should be
installed and operated with minimum distance 20cm between the radiator & your body.
'pFODUDWLRQG·H[SRVLWLRQDX[UDGLDWLRQV
Cet équipement est conforme aux limites d’exposition aux rayonnements IC établies pour un environnement non contrôlé. Cet
équipement doit être installé et utilisé avec un minimum de 20 cm de distance entre la source de rayonnement et votre corps.
IMPORTANT: ALWAYS REMEMBER TO DISCONNECT YOUR BATTERY CHARGER WHEN NOT IN USE!
TABLE OF CONTENTS
Features . . . . . . . . . . . . . . . . . . . . . . . . . . . . . . . . . . . . . . . . . . . . . . . . . . . . . . . . . . . . . . . 2
Remote Control Battery Installation. . . . . . . . . . . . . . . . . . . . . . . . . . . . . . . . . . . . . . . . 2
Charging the X18 Li-Poly Battery . . . . . . . . . . . . . . . . . . . . . . . . . . . . . . . . . . . . . . . . . . 2
X18 Battery Installation . . . . . . . . . . . . . . . . . . . . . . . . . . . . . . . . . . . . . . . . . . . . . . . . . . 2
X18 Diagram . . . . . . . . . . . . . . . . . . . . . . . . . . . . . . . . . . . . . . . . . . . . . . . . . . . . . . . . . . . 3
Control Diagram . . . . . . . . . . . . . . . . . . . . . . . . . . . . . . . . . . . . . . . . . . . . . . . . . . . . . . . . 3
Flight Preparation. . . . . . . . . . . . . . . . . . . . . . . . . . . . . . . . . . . . . . . . . . . . . . . . . . . . . . . 4
Syncing Your X18 . . . . . . . . . . . . . . . . . . . . . . . . . . . . . . . . . . . . . . . . . . . . . . . . . . . . . . . 4
Now You Are Ready To Fly . . . . . . . . . . . . . . . . . . . . . . . . . . . . . . . . . . . . . . . . . . . . . . . . 5
Recognizing The Front & Rear Of The X18 . . . . . . . . . . . . . . . . . . . . . . . . . . . . . . . . . . . 5
3TARTING3TOPPING4HE2OTORS
-ANUAL3TART3TOP
!UTO3TART,AND
Understanding The Altitude Lock Sensor. . . . . . . . . . . . . . . . . . . . . . . . . . . . . . . . . . . . 5
Speed Select Button . . . . . . . . . . . . . . . . . . . . . . . . . . . . . . . . . . . . . . . . . . . . . . . . . . . . . 6
3 Channel VS 4 Channel Flying . . . . . . . . . . . . . . . . . . . . . . . . . . . . . . . . . . . . . . . . . . . . 6
3 Channel Flight Control . . . . . . . . . . . . . . . . . . . . . . . . . . . . . . . . . . . . . . . . . . . . . . . . . 6
4 Channel Flight Control . . . . . . . . . . . . . . . . . . . . . . . . . . . . . . . . . . . . . . . . . . . . . . . . . 7
Flight Practice . . . . . . . . . . . . . . . . . . . . . . . . . . . . . . . . . . . . . . . . . . . . . . . . . . . . . . . . . . 7
Adjusting The Trim . . . . . . . . . . . . . . . . . . . . . . . . . . . . . . . . . . . . . . . . . . . . . . . . . . . . . . 8
Calibrating The X18. . . . . . . . . . . . . . . . . . . . . . . . . . . . . . . . . . . . . . . . . . . . . . . . . . . . . . 9
How To Perform 360º Stunt Rolls . . . . . . . . . . . . . . . . . . . . . . . . . . . . . . . . . . . . . . . . . . 10
Using Your On-Board Camera and Video Recorder. . . . . . . . . . . . . . . . . . . . . . . . . . . . 11
Propel X18 WiFi APP Installation . . . . . . . . . . . . . . . . . . . . . . . . . . . . . . . . . . . . . . . . . . 11
Pairing X18 to Your Compatible Device s. . . . . . . . . . . . . . . . . . . . . . . . . . . . . . . . . . . . 11
Quick Start . . . . . . . . . . . . . . . . . . . . . . . . . . . . . . . . . . . . . . . . . . . . . . . . . . . . . . . . . . . . . 12
Detailed APP Overview. . . . . . . . . . . . . . . . . . . . . . . . . . . . . . . . . . . . . . . . . . . . . . . . . . . 12
Troubleshooting Your X18 . . . . . . . . . . . . . . . . . . . . . . . . . . . . . . . . . . . . . . . . . . . . . . . . 13
Replacing The Propeller Blades. . . . . . . . . . . . . . . . . . . . . . . . . . . . . . . . . . . . . . . . . . . . 13
Warnings . . . . . . . . . . . . . . . . . . . . . . . . . . . . . . . . . . . . . . . . . . . . . . . . . . . . . . . . . . . . . . 14
Battery Warnings . . . . . . . . . . . . . . . . . . . . . . . . . . . . . . . . . . . . . . . . . . . . . . . . . . . . . . . 14
Care and Maintenance . . . . . . . . . . . . . . . . . . . . . . . . . . . . . . . . . . . . . . . . . . . . . . . . . . . 14
FCC Information . . . . . . . . . . . . . . . . . . . . . . . . . . . . . . . . . . . . . . . . . . . . . . . . . . . . . . . . 15
Thank you for purchasing the X18 2.4 Ghz Quadrocopter. Please read this instruction booklet as it contains
valuable information on how to properly fly and care for your X18.
1 2
4×1.5 volt “AA” Alkaline Batteries
A
LED Indicator
FEATURES
s7IDEANGLELENSPROVIDESGREATAERIALPHOTOGRAPHY
s!IRPRESSURESENSORLOCKSFLIGHTALTITUDE
s3TREAMLIVEVIDEODIRECTLYTOYOURMOBILEDEVICE
s0STANDARDDEFINITIONCAMERARECORDSHIGHQUALITYVIDEOANDSTILLPICTURES
s6IBRATIONDAMPENEDMOTORSPROVIDESQUIETERFLIGHTANDIMPROVESIMAGEQUALITY
sDIFFERENTSPEEDSETTINGSFORSLOWTOHIGHSPEEDFLYING
s,%$DIRECTIONALLIGHTSMAKESTHE87I&IEASYTOFOLLOW
s0USHBUTTONAERIALSTUNTS
sGRADIOALLOWSFORAFEETOPERATIONALRANGE
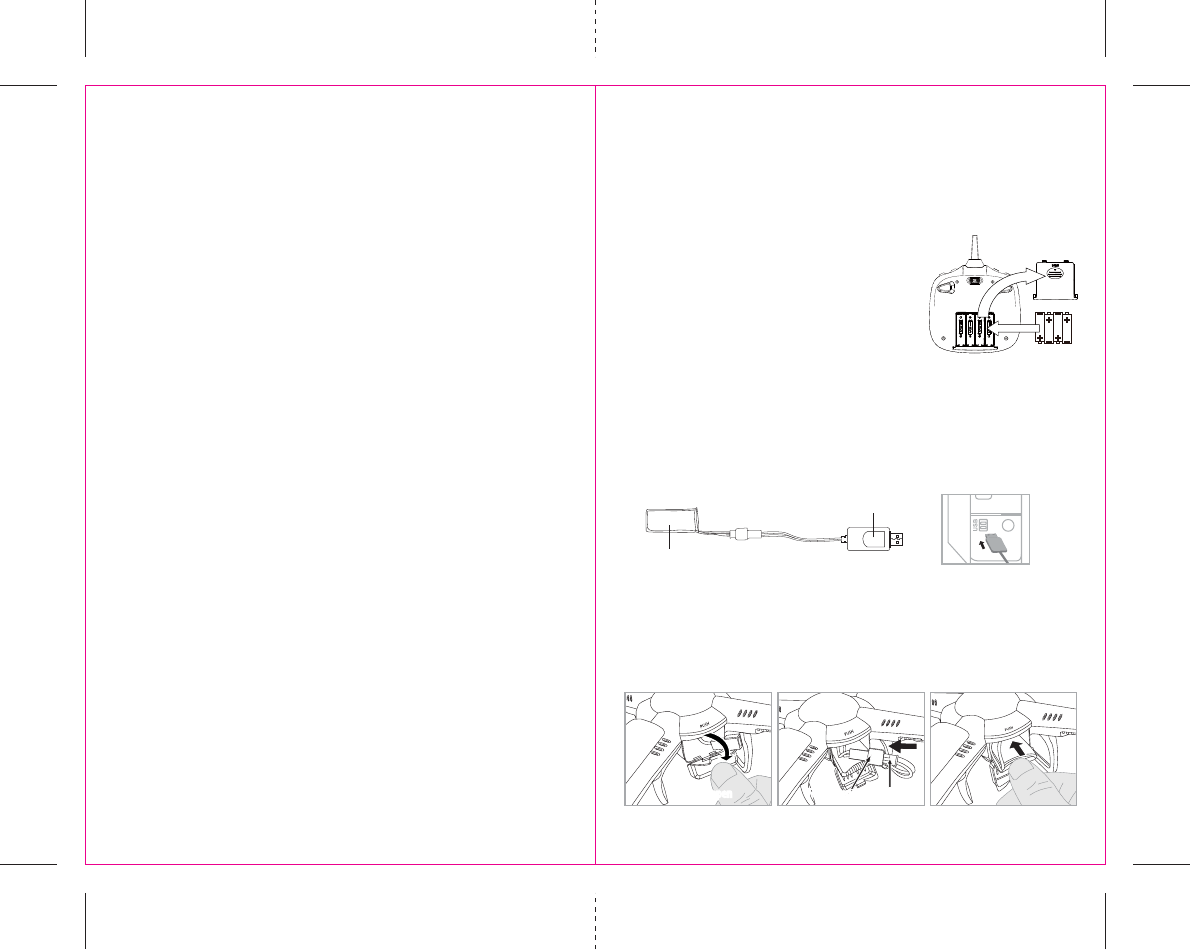
REMOTE CONTROL BATTERY INSTALLATION
1. Slide off the battery cover from the back of the controller.
2. Install 4 fresh “AA” alkaline batteries into the controller as
shown in diagram A. Replace the battery cover.
4URNOVERTHECONTROLLERANDTURNTHEONOFFSWITCHTOTHEON
position. If the power indicator turns on you have installed your
batteries properly.
CHARGING THE X18 LI-POLY BATTERY
1. Connect your USB charging cord to your computer USB port.
2. Connect your battery to the USB charging cord;
3.
The red charging indicator light will turn on. After the battery is charged fully, the indicator light will turn off.
4. Average charging time is approximately 120 minutes. A fully charged drone can fly for
approximately 5-7 minutes depending on environment and user input.
NOTE: You may purchase additional batteries and chargers at www.propelrc.com
X18 BATTERY INSTALLATION
1. Connect the battery to the female and of the wire inside the battery compartment.
You will see the lights on the drone start flashing rapidly.
2. Silde the battery into the lower part of the battery compartment. Make sure the wire side out.
3. Push all wire into the compartment then close the battery compartment door.
B.
C. D. E.
Li-Poly Battery
Flip to open Flip to open Male endFemale end Female end
34
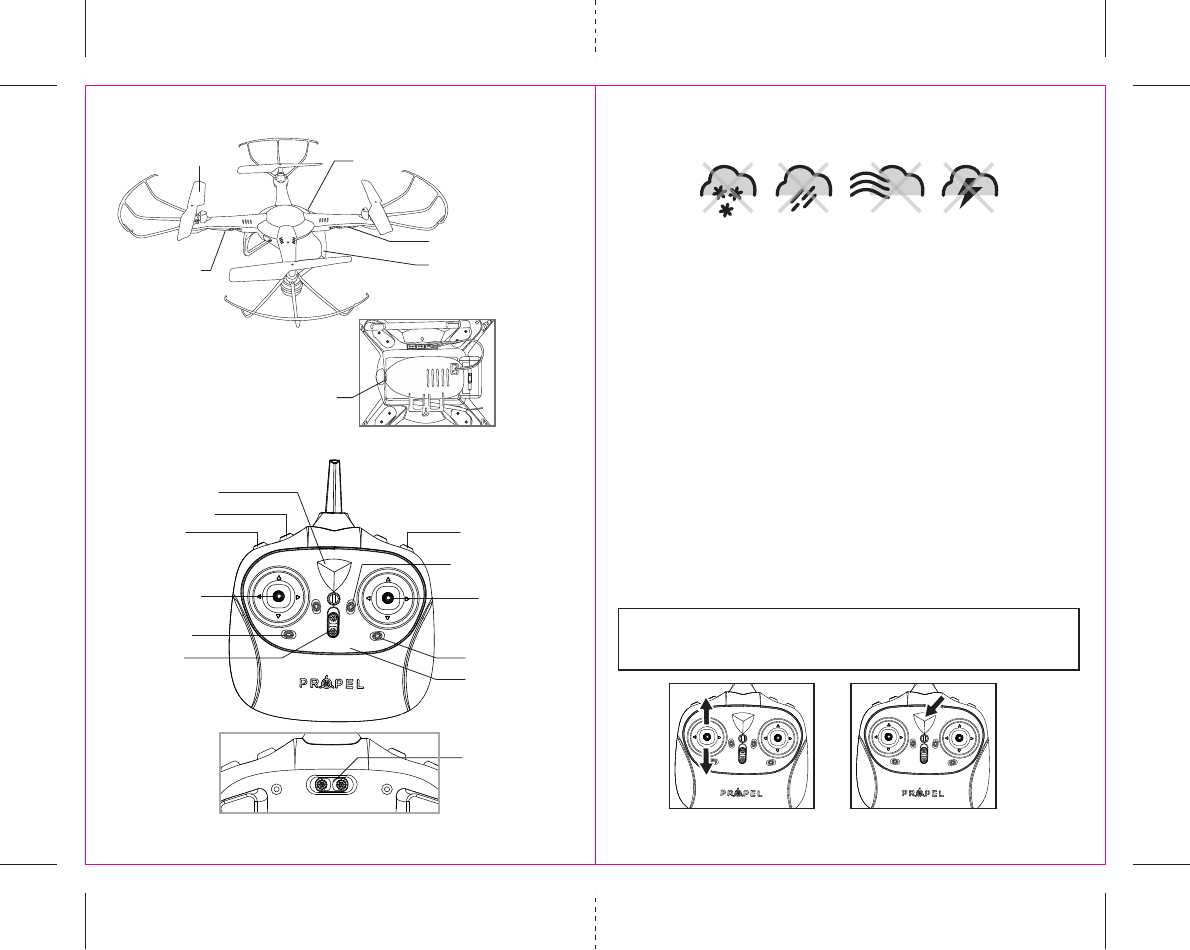
DO NOT FLY YOUR X18 IN FOUL WEATHER!
WARNING
CONTROLLER DIAGRAM
Power Indicator Light
Throttle Stick
!UTO3TART,AND"UTTON
&ORWARD"ACKWARD4RIM
Direction Stick
0OWER/N/FF
,EFT2IGHT
Turn Trim
,EFT2IGHT"ANK4RIM
Speed Button 360˚ Stunt Roll Button
#(-ODE#(-ODE
Back of Remote-Controller
X18 DIAGRAM
FLIGHT PREPARATION
s6ERIFYTHATTHEREAREh!!vBATTERIESINSIDETHEREMOTECONTROLUNITANDTHE8HASBEEN
fully charged.
s-AKESURETOBEINALARGEOPENSPACEPREFERABLYAFIELDORAPARKWITHANOPENRADIUSOFATLEASTFEET
s-AKESURETOSTARTYOURDRONEONACLEANFLATLEVELSURFACEBEFORETAKEOFF
s
IMPORTANT! Until you have experience in flying your X18, it is not advised to use in any rate of wind.
Pick a day with zero wind day or extremely light wind condition when learning how to fly.
SYNCING YOUR X18
Important! When syncing your X18 with the controller always make sure that the drone is on a flat
level surface and that your digital trim settings are in the center position. This insures that the 6 Axis
gyro is properly programmed to respond to your trim settings. Your X18 utilizes an automatic 2.4G
channel selection system that allows up to 8 people to fly side by side in the same wireless range with no
interference.
1. Before starting, make sure that the power switch on your controller is off and the battery is removed
from the X18. Make sure that there are no other 2.4G devices in the area.
2. Insert the battery into the X18 and set it down on a flat level surface. The red and green LED lights on the
drone should begin to flash rapidly.
3. Quickly turn ON the remote and you will notice that the top red LED light on the face of the controller
should also be flashing.
4. Push the throttle stick all the way up until it stops and then pull it back all the way down to the
bottom(see diagram below). When pushing the stick up or pulling the stick down you should hear a
high-pitched beep both ways and the indicating lights on the drone and contoller will stop flash and stay
solid on.
You have successfully synced your X18 and are ready to fly. If this doesn’t happen repeat steps 1-4
again.
s
TIP 1: Try not to leave too much time between putting your battery into the drone
and turning on the controller or your syncing window will time-out.
s4)03YNCINGYOURDRONEINDOORSORINTHESHADEWILLMAKEITEASIERTOSEETHE
LED light indicators on both the controller and the drone.
Move the control stick all the way
up and all the way down, you
should hear two beeps.
The flashing red LED light will
become solid when you are synced.
1 2 3
4CH3CH
Speed Indicator
Rotor Blades
Front(Green Light)
Back (Red LED Light)
Landing Gear
Battery
Compartment
Digital Camera
5 6
E
NOW YOU ARE READY TO FLY!
If you have successfully synced your X18 to your controller as explained on page 4 then you are now ready
to fly. Before beginning to fly your drone you should familiarize yourself with how to start and stop the
rotors, how to use your auto land feature and how the controls work so please carefully read and
familiarize yourself with various control features explained in the next few pages. Once again as a beginner
pilot you should learn how to control your drone in a large open field or park on a day with zero or very
light wind. Do not try to fly your X18 too high until you become a more experience pilot.
3 CHANNEL VS 4 CHANNEL FLYING
Propels unique “switch-blade” technology allows you to choose between 3ch or 4ch flight control modes.
Most people with no experience in flying multi copters may find 3ch easier to learn at first as controls are
set up to simply move forward, back, turn left and turn right. 4channel flying gives the operator ultimate
control by adding two more dimensions of flight, banking left and banking right.
To change to 3 Channel mode:
3WITCHTHE#(BUTTONTOLEFTSIDEONTHEBACKOFCONTROLLERSEEREMOTEDIAGRAMONPGYOUWILLHEAR
3 “beeps” indicating the X18 now is set to 3 CH mode.
To change to 4 Channel mode:
3WITCHTHE#(BUTTONTORIGHTSIDEONTHEBACKOFCONTROLLERSEEREMOTEDIAGRAMONPGYOUWILLHEAR
4 “beeps” indicating the X18 now is set to 4 CH mode.
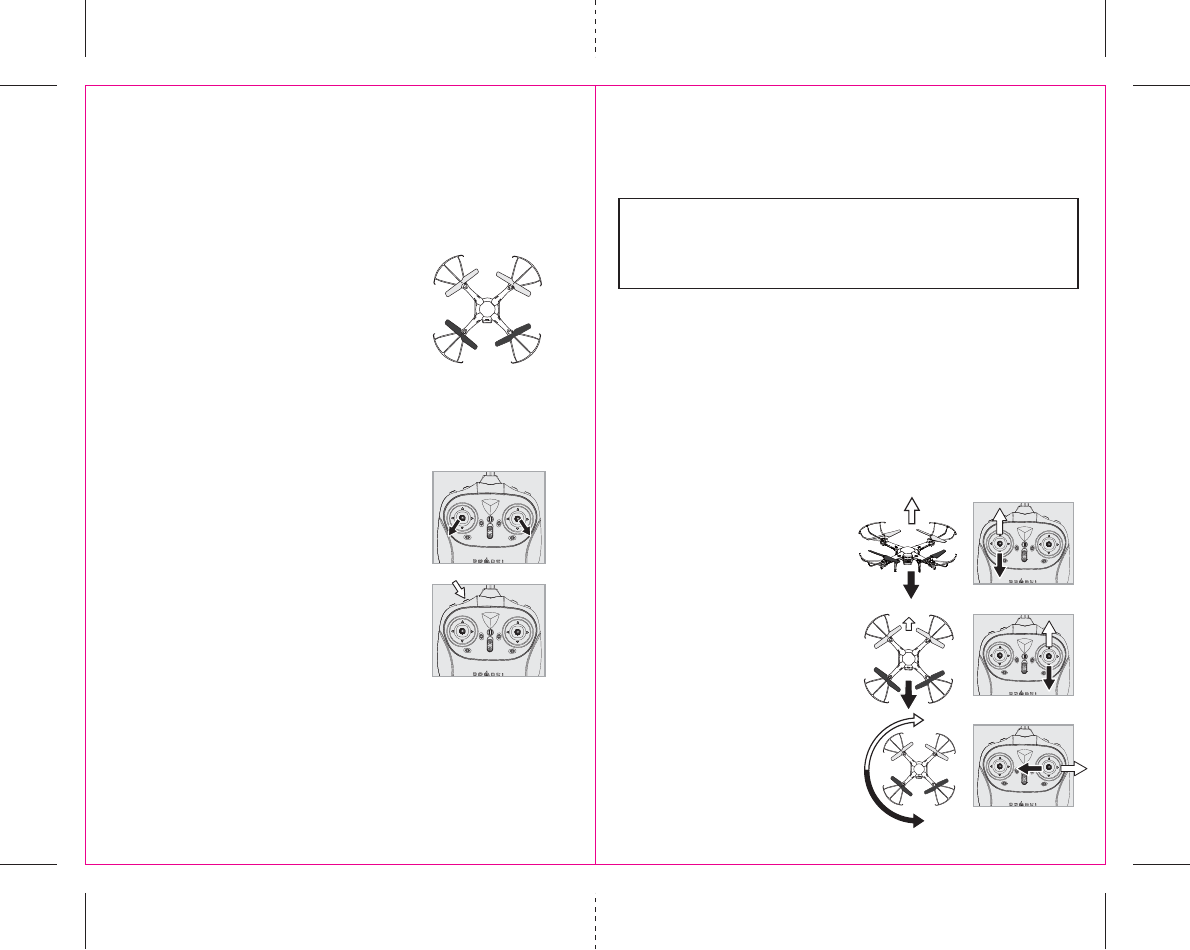
Even though the X18 has four rotors there is still a front or "forward"
facing direction and "rear" or backwards facing direction. The front
and forward facing direction of the X18 is the side with grey
propellers
(see diagram E ). The rear and backward facing direction of
the Quadrocopter is the side with black propellers (see diagram E).
NOTE: The front of the Quadrocopter also displays running Green LED
light and the back of the Quadrocopter displays running RED LED lights.
FRONT
REAR
SPEED SELECT BUTTON
The X18 has 3 speed settings; 1 (SLOW), 2 (MEDIUM) and 3 (HIGH). The Default setting when you first turn
on your X18 is the 1 (SLOW) speed mode. To increase the speed simply trigger the speed setting button (see
remote diagram on pg 3) you will hear a beep and the speed setting indicator on the face of the controller
will show you what speed setting you are on. Speed settings can be set before flight or during the flight.
RECOGNIZING THE FRONT & REAR OF THE X18
F
G
H
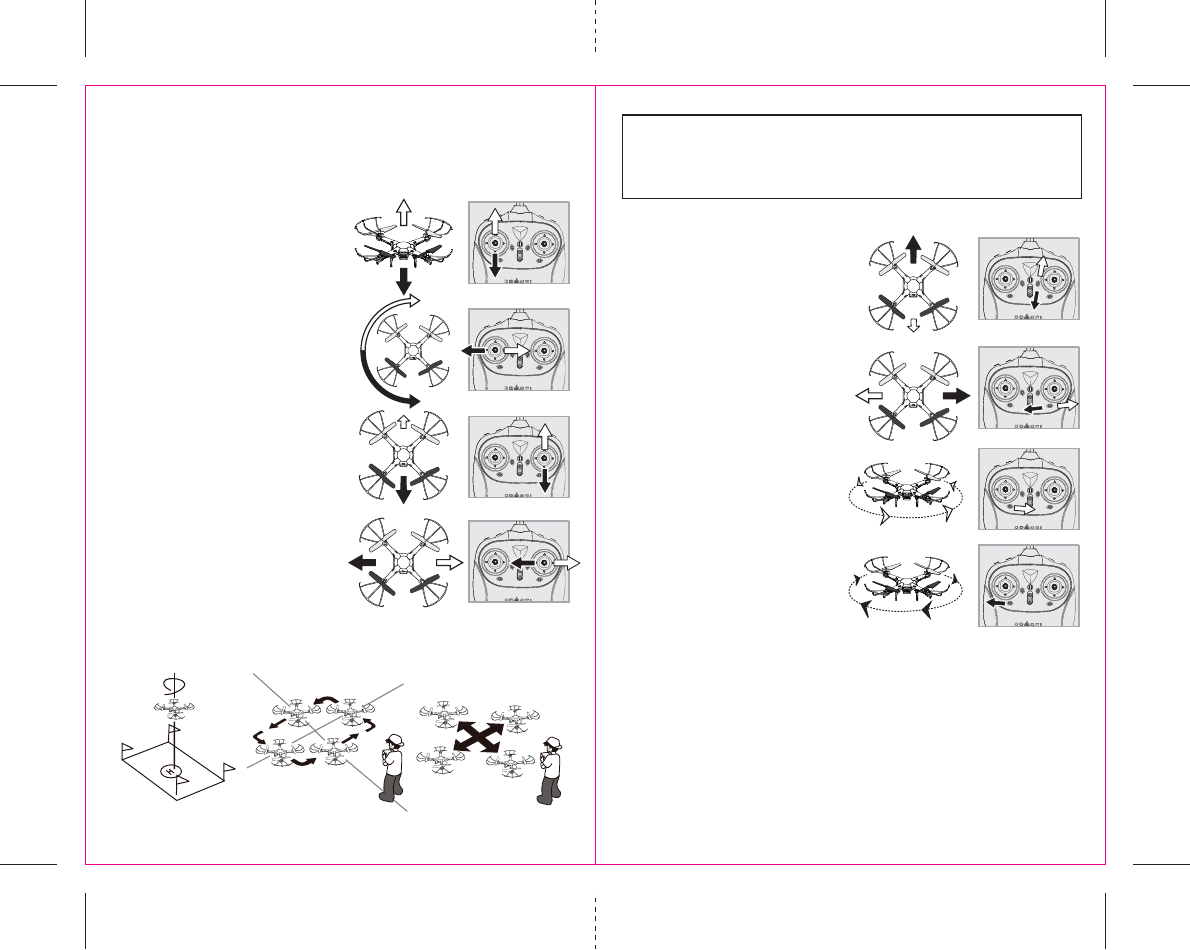
3 CHANNEL FLIGHT CONTROL
Below is a list of basic flight functions for your long-range remote to control the X18. While learning to fly
your X18 it is best to start in a large space with the drone facing away from you until you get used to the
basic controls. As you master flying your X18 you can move to more advanced maneuvering techniques.
Practice makes perfect! When you have these basic steps down you can move to the next level.
Move the left Throttle stick up to increase the
propeller speed and the X18 will accelerate and
ascend.
Move the left Throttle stick down to decrease the
propeller speed and the X18 will decelerate and
descend (see diagram F).
While in the air, move the right Direction Stick up
and the X18 will move forward.
Move the right Direction Control down and the
X18 will move backward (see diagram G).
While in the air, move the right Direction Control left
and the X18 will spin to the left.
Move the right Direction Control right and the X18
will spin to the right (see diagram H).
UNDERSTANDING THE ALTITUDE LOCK SENSOR
The X18 has a unique Altitude Lock function, air pressure sensor that allows for easier flight control and
stability. A beginner’s friend, it allows the user to ease into piloting the copter. The sensor locks in the altitude
of the copter while allowing the user to adjust the directional controls without having to hold the throttle.
After starting the copter, fly it upwards to a safe height. Once at a safe height, release the throttle to the
neutral position. Now your X18 should be locked in the altitude and you can focus on getting used to the
directional controls of the X18. The copter will always tend to self correct and go back to the last locked
height after moved up or down by outside forces.
Note: The altitude sensor does have some tolerance based on atmospheric conditions and could have a
slight variation in altitude.
STARTING/STOPPING THE ROTORS
AUTO START/LAND
The 8HASANAUTOSTARTLANDFEATUREWHICHALLOWSYOUTOSTARTLAND
automatically. Simply press the AUTO START / LAND button on the top of
the controller and your 8WILLBEGINTAKINGOFFLANDINGSEEDIAGRAM
below).
NOTE: 9OUCANSTILLCONTROLTHEDIRECTIONWHILEAUTOSTARTINGLANDINGto
avoid obstacles.
.OTE9OUCANSTARTSTOPYOUR8MANUALLYORAUTOMATICALLY
0LEASEFOLLOWONEOFTHESTEPSBELOWTOOPERATEACCORDINGLY-AKESUREYOU
HAVEPROPERLYSYNCEDTHE8ANDTHEPOWERSTAYSON
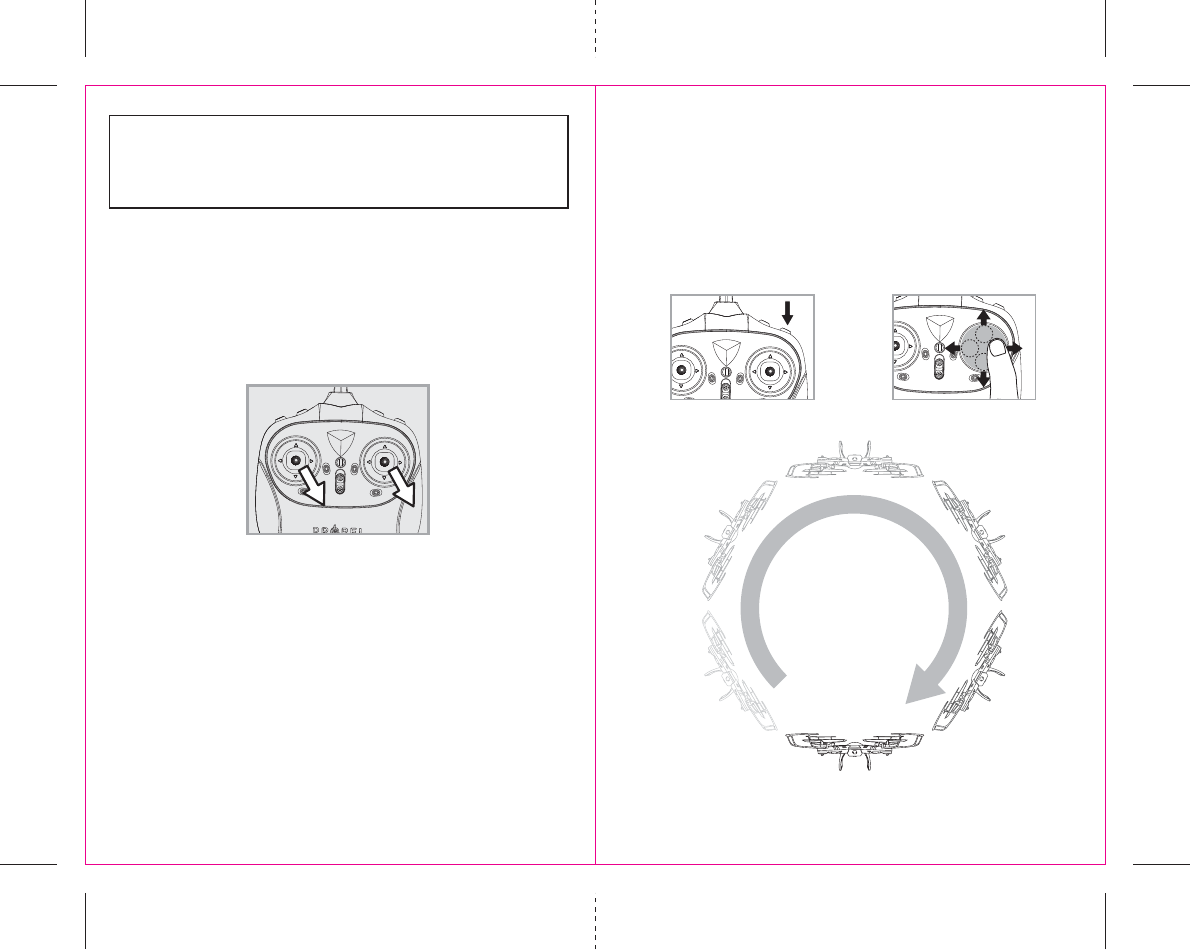
MANUAL START/STOP
sTo start the rotors simply move the two control sticks both down and out
(see diagram), hold until the rotors start spinning. Now release both
sticks to the neutral position and push the throttle up to take off.
s4OSTOPTHEROTORSAFTERSTARTINGTHEMYOUCANSIMPLYWAITABOUT
seconds, and they will stop automatically. Or move both sticks down and
out again to stop immediately. After take off, you can simply pull the
throttle all the way down and land .
7 8
M
N
I
J
K
L
4 CHANNEL FLIGHT CONTROL
Below is a list of basic flight functions for your long-range remote to control the X18. While learning to
fly your X18 it is best to start in a large space with the drone facing away from you until you get used to the
basic controls. As you master flying your X18 you can move to more advanced maneuvering techniques.
Practice makes perfect!
Move the left Throttle stick up to increase the
propeller speed and the X18 will accelerate and
ascend.
Move the left Throttle stick down to decrease the
propeller speed and the X18 will decelerate and
descend (see diagram I).
While in the air, move the left Throttle stick left
and the X18 will rotate left.
Move the left Throttle stick right and the
X18 will rotate right (see diagram J).
While in the air, move the right Direction Stick up
and the X18 will move forward.
Move the right Direction Control down and the
X18 will move backward (see diagram K).
While in the air, move the right Direction Control left
and the X18 will bank to the left.
Move the right Direction Control right and the X18
will bank to the right (see diagram L).
FRONT
REAR
Forward/Backward Trim
s)FYOUR8DRIFTSFORWARDWHILEINTHEAIRPUSH
ANDRELEASETHE&/27!2$"!#+7!2$42)-BUTTON
backward repeatedly until the motion
stops and
proper flight is maintained (see diagram M).
s)FYOUR8DRIFTSBACKWARDSPUSHANDRELEASE
THE&/27!2$"!#+7!2$42)-BUTTONFORWARDIN
the same manner until the problem is resolved.
Bank Right/Left Trim
s)FYOUR8DRIFTSBANKSLEFTWHILEINTHEAIR
push and release the BANKS TRIM button to the
rightside repeatedly until the motion stops and
proper flight is maintained (see diagram N).
s)FYOUR8DRIFTSRIGHTPUSHANDRELEASETHE
BANKS TRIM button to leftside in the same manner
until the problem is resolved.
Spin Left Trim
s)FYOUR8SPINSLEFTWHILEINTHEAIRPUSHAND
RELEASETHE,%&42)'(4452.42)-BUTTONTOTHE
rightside repeatedly until the motion stops and
proper flight is maintained (see diagram O).
Spin Right Trim
s)FYOUR8SPINSRIGHTWHILEINTHEAIRPUSHAND
RELEASETHE,%&42)'(4452.42)-BUTTONTOTHE
leftside until the problem is resolved (see diagram
P).
ADJUSTING THE TRIM
NOTE: The X18 is already properly trimmed and calibrated right out of the box and should not require any
trim adjustments before flying. Some more experienced pilots may want to adjust trim settings for their
style of flying. After several crashes you may need to adjust trim settings for the X18 to be more balanced.
NOTE: The use of the Trim buttons utilizes sounds. A single long Beep indicates the product is
center trimmed. Long beeping when press the trim button indicates the product is trimmed to
the maximum on a particular side.
Fixed-Point Landing Square Pattern Maneuver Cross Pattern Maneuver
FLIGHT PRACTICE
To master flying your aircraft try practicing the excersizes shown below. Start with simple vertical takeoffs,
LANDINGSANDLEFTRIGHTTURNINGANDROTATING/NCETHOSEAREMASTEREDMOVEONTOSQUAREANDCROSS
maneuvers. Good luck and have fun!
O
P
910
3TUNT2OLL"UTTON
T
S
R
NOTE: To exit the stunt roll mode without flip, you can press the button again. The beeping
sound will stop.
HOW TO PERFORM 360º STUNT ROLLS
Performing 360º stunt rolls with the X18 is as easy as 1-2-3:
1. Hover the X18 in still position making sure that you have at least 5 feet of clearance above and below
the quadrocopter, then set the speed settings to mode 2 or 3.
2. Press the 360 stunt button down and you will enter the stunt roll mode which is indicated by rapid
beeping (see diagram S) sounds.
3. Determine which direction you want it to flip and quickly push the right control stick in the direction
you want to flip your X18 (see diagram T).
You have 4 choices a) Forward roll, b) Backwards roll, c) Right side roll, d) Left side roll.
CALIBRATING THE X18
NOTE: Your X18 comes pre-calibrated out of the box so you are ready to fly.
After several crashes and shocks to your gyro sensors, you may notice that your drone is drifting and can
not hold its center position as well as it used to.
This most likely means that you need to recalibrate your X18. Please follow the simple instructions
below.
1. Place the X18 on a flat level surface
2. Make sure the X18 is on and that the controller is synced (refer to syncing pg 4). Do not start the blades!
Move both the throttle and control stick down to the right corners (see diagram R). You will hear a long
beep and see the lights on the drone rapidly flash for a few seconds then stop. Once the lights stop
flashing you have completed your calibration and are ready to fly!
TROUBLE SHOOTING: If you do not see the lights flash, first remove the battery from the drone then turn off
your controller and start again. Always make sure to put your battery in first, then turn on your controller.
Push the left throttle stick up all the way and then pull back down again. When you hear the beep the
X18 is
synced to the controller and you are ready to calibrate.
11 12
PROPEL X18 WiFi APP INSTALLATION
1. Make sure you are using a compatible Android™ or Apple® iOS device.
2. Make sure your device has access to the Internet.
3. For Apple® iOS devices, within the App Store, search and select “Propel1450”. Hit the Install button and
the “Propel1450” App should download and install automatically.
4. For Android™ OS devices, visit the Google Play store and search for “Propel1450”. Selecting the
“Propel1450” App will download the App and automatically install it on your device.
5. After the “Propel1450” App is installed, it should create an icon on your screen. Click the “Propel1450”
icon to run the App to make sure that it has installed correctly on your device. If not, please delete and
repeat the process again.
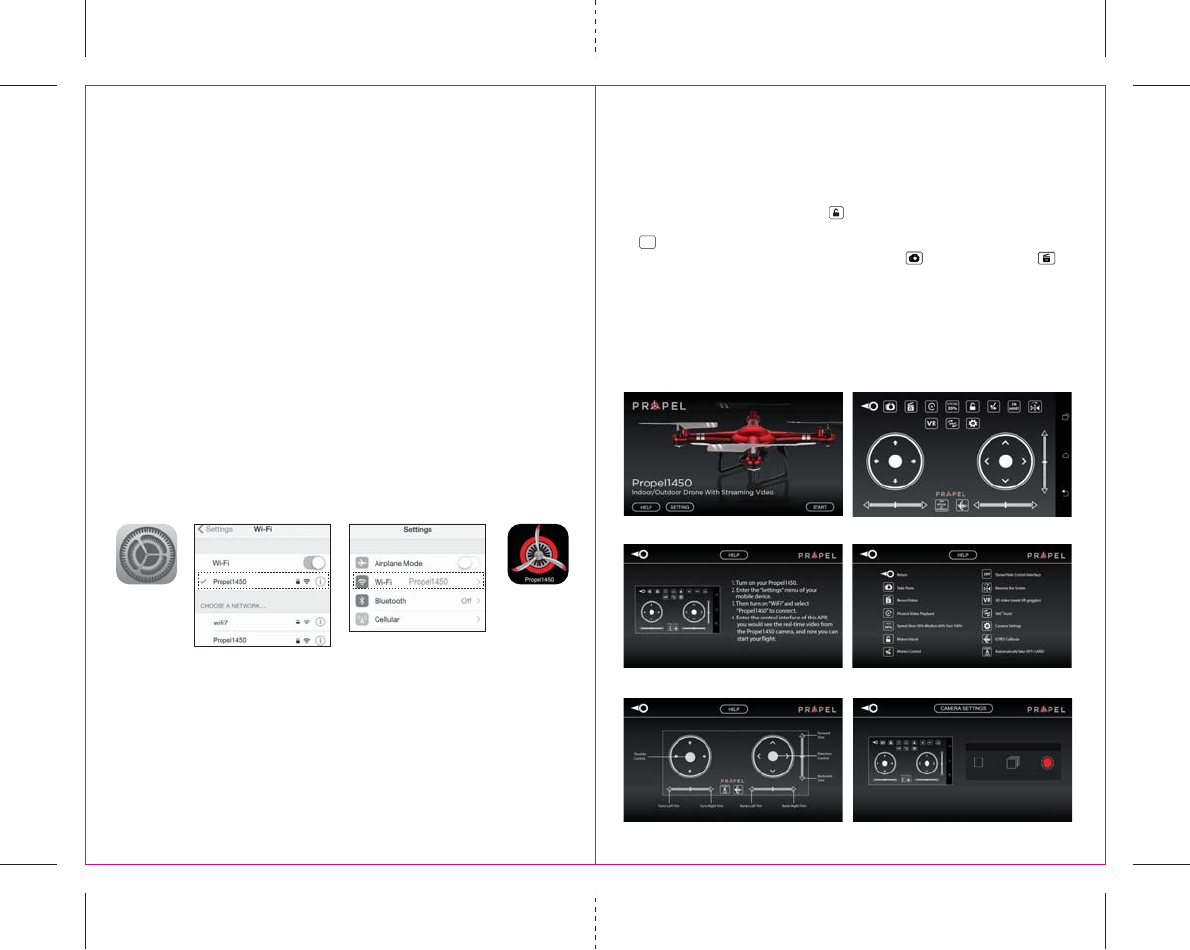
PAIRING X18 TO YOUR COMPATIBLE DEVICE
1. After completely charging your X18 battery, install the battery to your X18 (refer to the user manual).
2. In the Settings menu of your device, locate the Wi-Fi option.
3. Turn ON the Wi-Fi option.
4.
Select “
Propel1450
” from the Wi-Fi list. Wait for your X18 to be connected. Return to the Main Menu.
Settings
Propel1450
Note: Apple® devices require the use of iOS 7.0 or higher.
ANDROID™
devices require the use of OS 4.2.2 or higher.
HOME PAGE
HELP PAGE 1
HELP PAGE 3
HELP PAGE 2
CONTROL STICKS
CAMERA SETTINGS
QUICK START
1. After you install the App correctly and have paired to the drone successfully, you can open the “
Propel1450”
App icon. Tap “START” on the bottom right hand side of the screen. You should see the real-time video
streaming from your X18 ‘s camera.
2. This App also allows you to control your X18 by your mobile device. To activate the control sticks, tap the
“ON” button at the top right hand side of the screen. This will switch the control from your traditional
controller to your compatible device. Now click” “to start the motors. The control sticks will show up in
the screen for your fly control and you can now use your device as a traditional controller. Or you can click
” ” to auto launch your X18 in the air and then use your device as a traditional controller. Click this
button again, your X18 will automatically land on the floor. Click “ ” to take photos and click ” ” to
record videos.
Note: In order for you to control the flight of X18 via APP by your mobile device, you will need to connect
your X18 with your mobile device only or turn off the controller before tap the "ON" button on the APP
control panel.
DETAILED APP OVERVIEW
3. Please see images below for a detailed App overview. This overview is also available under the “HELP” icon
in the home screen of the App.
LAUNCH
A
LAND
USING YOUR ON-BOARD CAMERA AND VIDEO RECORDER
Your X18 comes equipped with an onboard digital camera that takes both video and still photographs. You
can have hours of fun creating aerial photography and videos for family and friends.
X18 WARNING:
The X18 is designed for OUTDOOR use. The X18’s blades revolve at high speeds and can cause damage to
the user, spectators and animals. Stand away from the X18 to reduce the risk of getting into the flight
path. Warn spectators that you will be flying your X18 so that they are aware of its position. Before flight,
inspect the rotor blades to make certain that the blades are securely fastened to the X18.
WARNING!
s#HOKING#UTTING(AZARD3MALL0ARTS3HARP2OTOR"LADES
s+EEPHANDSHAIRANDLOOSECLOTHINGAWAYFROMTHEPROPELLERWHENTHEPOWERSWITCHISTURNEDTOTHE
ON position.
s4URNOFFTHETRANSMITTERAND8POWERSWITCHESWHENNOTINUSE
s4HEINCLUDEDCHARGERISBUILTSPECIFICALLYFORTHE8,I0OLYBATTERY$ONOTUSEITTOCHARGEANYOTHER
battery.
s.EWALKALINEBATTERIESARERECOMMENDEDFORMAXIMUMPERFORMANCE
s0ARENTALSUPERVISIONRECOMMENDEDWHENFLYINGX18.
BATTERY WARNINGS
RECHARGEABLE BATTERY:
This X18 uses a Li-Poly rechargeable battery. If battery no longer stays charged, dispose of battery properly
according to local disposal requirements.
CONTROLLER BATTERIES:
Remote control requires 4 “AA” batteries (not included).
Please read the important battery safety warning below.
s$ONOTMIXALKALINESTANDARDCARBONZINCANDRECHARGEABLEBATTERIES.ICKEL-ETAL(YDRIDE
s$ONOTMIXOLDANDNEWBATTERIES
s.ONRECHARGEABLEBATTERIESARENOTTOBERECHARGED
s2ECHARGEABLEBATTERIESARETOBEREMOVEDFROMTHEITEMBEFOREBEINGCHARGEDIFREMOVABLE
s2ECHARGEABLEBATTERIESAREONLYTOBECHARGEDUNDERADULTSUPERVISION
s%XHAUSTEDBATTERIESSHOULDBEREMOVEDIMMEDIATELYANDMUSTBERECYCLEDORDISPOSEDOFPROPERLY
according to state or local government ordinances and regulations.
s4HESUPPLYTERMINALSARENOTTOBESHORTCIRCUITED
s/NLYBATTERIESOFTHESAMEOREQUIVALENTTYPEASRECOMMENDEDARETOBEUSED
s"ATTERIESARETOBEINSERTEDWITHTHECORRECTPOLARITYSEEINSIDEBOOKLETFORDIAGRAM
s$ONOTDISPOSEBATTERIESINAFIREBATTERIESMAYLEAKOREXPLODE
CARE AND MAINTENANCE
s!LWAYSREMOVETHEBATTERIESFROMTHEWIRELESSREMOTECONTROLWHENITISNOTBEINGUSEDFORANEXTENDED
period of time.
s4OCLEANGENTLYWIPETHEREMOTECONTROLAND8WITHACLEANDAMPCLOTH
s+EEPTHETOYAWAYFROMDIRECTHEATORSUNLIGHT
s$ONOTSUBMERGETHETOYINTOWATER4HISCANDAMAGETHEUNITBEYONDREPAIR
s0ARENTALGUIDANCERECOMMENDEDWHENINSTALLINGORREPLACINGTHEBATTERIES
V
Front
Blade Front Left = A
Blade Front Right = B
Blade Back Left = B
Blade Back Right = A
13 14
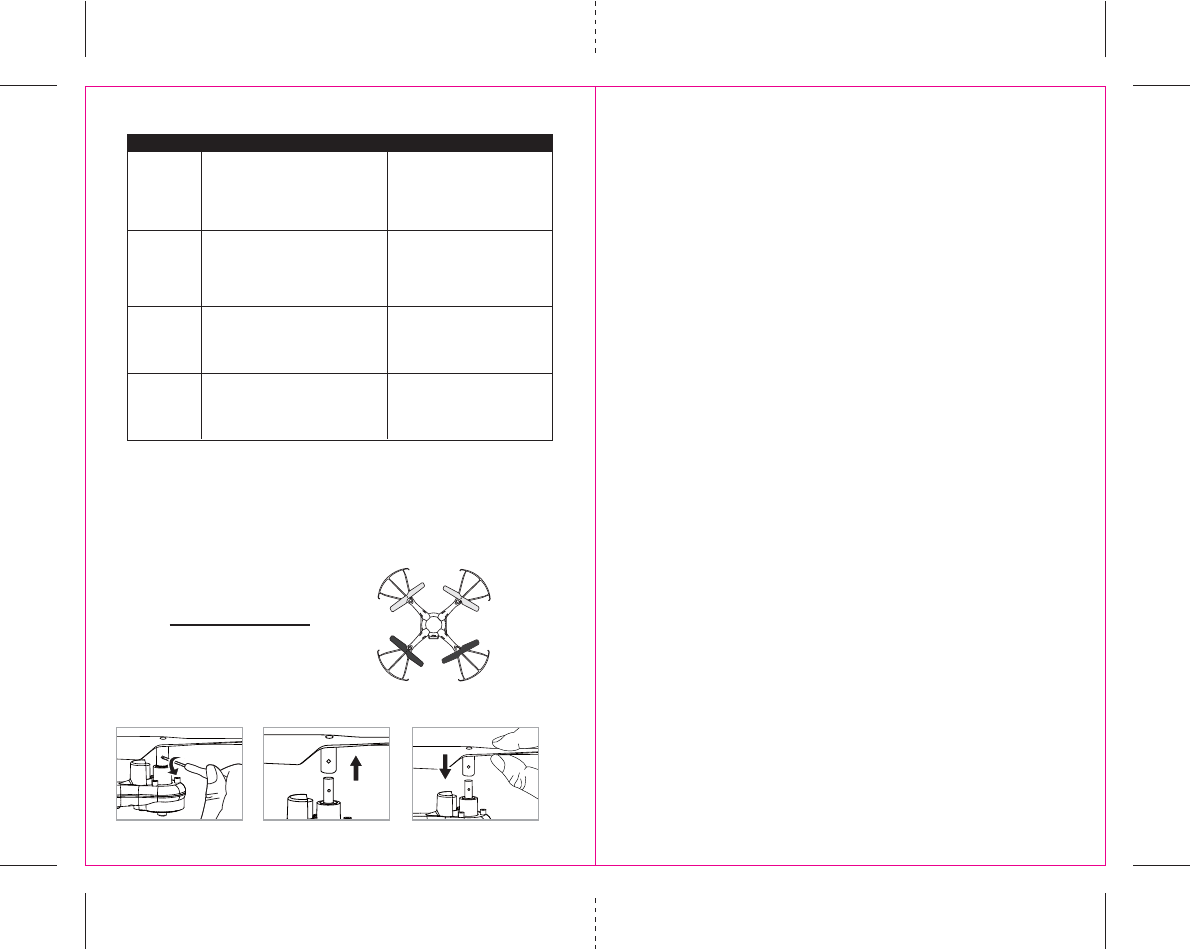
REPLACING THE PROPELLER BLADES
Your
X18’s
propeller system is a precision instrument that may need repair or replacement from time to time
for optimal flight function. Crash landing at high-speed may cause damage to your X18’s propellers.
1. The X18 has four blades, two blades with indication letter A & B on front, and two blades with
indication number B & A on back (see the diagram V).
2. When replacing the propeller blades, make sure to match the indication letter on the blade.
3. Replace the damaged blade with the correct blade.
PROBLEM POSSIBLE CAUSE POSSIBLE SOLUTION
0OWERSWITCHEDOFF 3WITCHTHE/./&&SWITCHTO/.
No Power 2. Polarity is reversed 2. Make sure all batteries are installed
correctly (see diagram A)
3. Batteries may be low or in need of charging 3. Replace batteries
2EMOTEISSWITCHEDOFF 3WITCHTHE/./&&SWITCHTO/.
Aircraft Not 2. Battery power in remote is too weak 2.Replace remote batteries
Responding 3. The remote is not properly synced 3. Re-sync the remote
4. Out of control range 4. Do not fly beyond 300 feet
Aircraft Won’t 1. Rotor speed too slow 1. Push throttle lever forward
lift off 2. Aircraft not fully charged 2. Recharge your X18
3. Obstruction of rotors
3. Check rotors for hair or other obstructions
Aircraft
Descends 1. Moving the throttle down too quickly
1.
#ONTROLTHETHROTTLESLOWERUSEAUTOLANDFEATURE
Too Fast 2. Flying in high wind or bad weather 2.Do not fly in bad weather
TROUBLESHOOTING YOUR X18
A
A
B
B
1. The X18 has four blades, each marked with an indication letter(on the underside).
2. When replacing the propeller blades, make sure to match with diagram V.
3. Unscrew from the side, then pull out the damaged one from the top.
4. Install the correct one, make sure to line up the hole on the propeller to the one on the motor shaft.
Then put the screw back to secure the blade on the motor shaft.
NOTE : When install the new propeller, make sure to push it down all the way.
NOTE: The “A” and “B” marks are embossed on the bottom side of the propellers.
Rear