Askey Computer RT410W 802.11 a/b/g Wireless Module User Manual revised by char
Askey Computer Corp 802.11 a/b/g Wireless Module revised by char
user manual

RT410W series
S
St
ta
at
ti
io
on
n
O
Op
pe
er
ra
at
ti
io
on
n
M
Ma
an
nu
ua
al
l
All other product names and
trademarks in this document
are trademarks of their
respective companies.
2003/08/25

No part of this publication may be reproduced in any form by any means without the prior written permission. Other
trademarks or brand names mentioned herein are trademarks or registered trademarks of their respective companies.
2003/08/25
Rev:01
Safety Notes
For Installation
n Use only the type of power source indicated on the marking labels.
n Use only the power adapter supplied with the product.
n Do not overload wall outlet or extension cords as this may increase the risk of electric shock or file. If the
power cord is frayed, replace it with a new one.
n Proper ventilation is necessary to prevent the product overheating. Do not block or cover the slots and
openings on the device, which are intended for ventilation and proper operation. It is recommended to
mount the product with a stack.
n Do not place the product near any source of heat or expose it to direct sunshine.
n Do not expose the product to moisture. Never spill any liquid on the product.
n Do not attempt to connect with any computer accessory or electronic product without instructions from
qualified service personnel. This may result in risk of electronic shock or file.
n Do not place this product on an unstable stand or table.
For Using
n Power off and unplug this product from the wall outlet when it is not in use or before cleaning. Pay
attention to the temperature of the power adapter. The temperature might be high.
n After powering off the product, power on the product at least 15 seconds later.
n Do not block the ventilating openings of this product.
n When the product is expected to be not in use for a period of time, unplug the power cord of the product to
prevent it from the damage of storm or sudden increases in rating.
For Service
Do not attempt to disassemble or open covers of this unit by yourself. Nor should you attempt to service the product
yourself, which may void the user’s authority to operate it. Contact qualified service personnel under the following
conditions:
n If the power cord or plug is damaged or frayed.
n If liquid has been spilled into the product.
n If the product has been exposed to rain or water.
n If the product does not operate normally when the operating instructions are followed.
n If the product has been dropped or the cabinet has been damaged.
n If the product exhibits a distinct change in performance.
Warning
n This equipment must be installed and operated in accordance with provided instructions and a minimum
20 cm spacing must be provided between computer mounted antenna and person’s body (excluding
extremities of hands, wrist and feet) during wireless modes of operation.
n This device complies with Part 15 of the FCC Rules. Operation is subject to the following two conditions:
(1) this device may not cause harmful interference, and (2) this device must accept any interference
received, including interference that may cause undesired operation.
Caution
n Any changes or modifications not exp ressly approved by the party responsible for compliance could void
the authority to operate equipment.

Federal Communication Commission Interference Statement
This equipment has been tested and found to comply with the limits for a Class B digital
device, pursuant to Part 15 of the FCC Rules. These limits are designed to provide
reasonable protection against harmful interference in a residential installation. This
equipment generates, uses and can radiate radio frequency energy and, if not installed and used
in accordance with the instructions, may cause harmful interference to radio communications.
However, there is no guarantee that interference will not occur in a particular installation. If
this equipment does cause harmful interference to radio or television reception, which can be
determined by turning the equipment off and on, the user is encouraged to try to correct the
interference by one of the following measures:
- Reorient or relocate the receiving antenna.
- Increase the separation between the equipment and receiver.
- Connect the equipment into an outlet on a circuit different from that
to which the receiver is connected.
- Consult the dealer or an experienced radio/TV technician for help.
This device complies with Part 15 of the FCC Rules. Operation is subject to the following two
conditions: (1) This device may not cause harmful interference, and (2) this device must accept
any interference received, including interference that may cause undesired operation.
FCC Caution: Any changes or modifications not expressly approved by the party responsible
for compliance could void the user's authority to operate this equipment.
IMPORTANT NOTE:
FCC Radiation Exposure Statement:
This equipment complies with FCC radiation exposure limits set forth for an uncontrolled
environment. This equipment should be installed and operated with minimum distance 20cm
between the radiator & your body.
ASKEY declare that RT410W-D92(LF) is limited in CH1~CH11 by specified firmware are
controlled in USA.

This device is intended only for OEM integrators under the following conditions:
1) The antenna must be installed such that 20 cm is maintained between the antenna and users,
and
2) The antenna should be integral if the end device is intended to be operated in 5.15 ~
5.25GHz frequency range.
As long as 2 conditions above are met, further transmitter test will not be required. However, the
OEM integrator is still responsible for testing their end-product for any additional compliance
requirements required with this module installed (for example, digital device emissions, PC
peripheral requirements, etc.).
IMPORTANT NOTE: In the event that these conditions can not be met (for example certain
laptop configurations or co-location with another transmitter), then the FCC authorization is no
longer considered valid and the FCC ID can not be used on the final product. In these
circumstances, the OEM integrator will be responsible for re-evaluating the end product
(including the transmitter) and obtaining a separate FCC authorization.
End Product Labeling
This transmitter module is authorized only for use in device where the antenna may be installed
such that 20 cm may be maintained between the antenna and users (for example :Access Point).
The final end product must be labeled in a visible area with the following: “Contains TX FCC ID:
H8NRT410W”.
Manual Information That Must be Included
The OEM integrator has to be aware not to provide information to the end user regarding how to
install or remove this RF module in the users manual of the end product which integrate this
module.
The users manual for end users must include the following information in a prominent location
“ IMPORTANT NOTE: To comply with FCC RF exposure compliance requirements, the
antenna used for this transmitter must be installed to provide a separation distance of at least 20
cm from all persons and must not be co-located or operating in conjunction with any other
antenna or transmitter”.
If the end product integrating this module is going to be operated in 5.15 ~ 5.25GHz frequency
range, the warning statement in the user manual of the end product should include the restriction
of operating this device in indoor could void the user’s authority to operate the equipment.

Contents
Chapter 1: Introduction..........................................................................................................................................................................6
System Requirements................................................................................................................................................................. 6
Unpacking .................................................................................................................................................................................... 6
Physical Outlook......................................................................................................................................................................... 8
Chapter 2: Connection.............................................................................................................................................................................9
LAN Connection......................................................................................................................................................................... 9
Connecting the power adapter.................................................................................................................................................. 9
Setting up a Host PC .................................................................................................................................................................. 9
Wireless Network Connection.................................................................................................................................................. 9
Chapter 3: Configuration via Web Browser................................................................................................................................................12
Using the Web Configuration................................................................................................................................................. 12
Home Page ................................................................................................................................................................................. 13
Status........................................................................................................................................................................................... 13
Configuration............................................................................................................................................................................. 15
Clone MAC................................................................................................................................................................................ 20
Wireless LAN Mode ................................................................................................................................................................ 20
Appendix: Specifications.......................................................................................................................................................................21
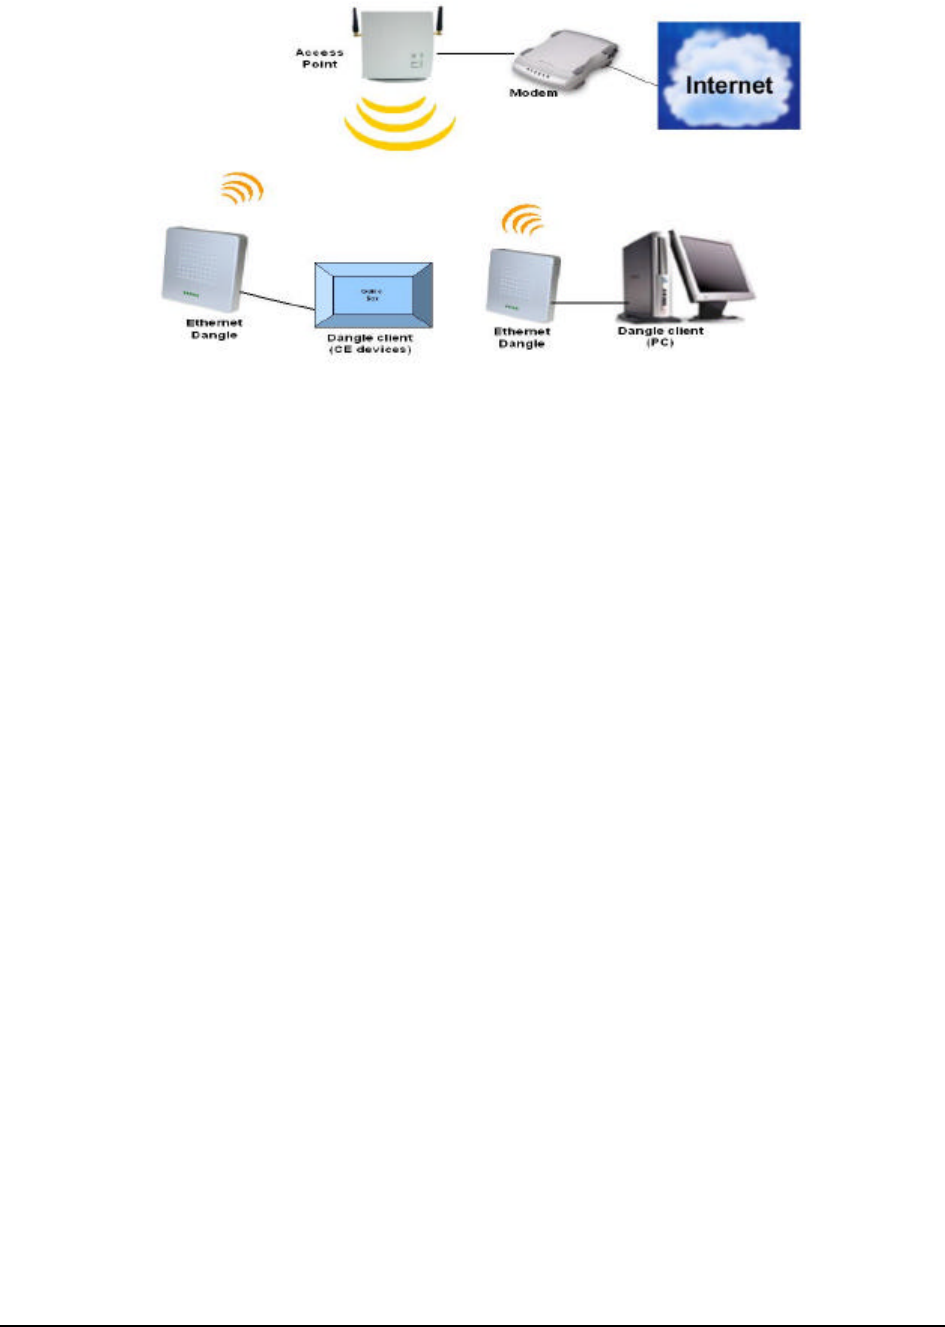
Chapter 1: Introduction
RT410W is 802.11a or 802.11b/g dual band wireless Ethernet dangle device. Below figure shows
the general constitution of the system that uses the Ethernet dangle.
An Ethernet dangle is a device that connected to a client (e.g., PC, CE - Consumer Electronics
devices) with one to one with Ethernet. The Ethernet dangle uses the MAC address of the dangle
client / PC to communicate with remote 2.4/5 GHz wireless device (complied with IEEE
802.11a/b/g). The Ethernet dangle let your PC or CE (Game box, Set-top box) devices
communicates with wireless access point device that extent your existing home/CE entertainment
network to surf the Internet.
System Requirements
To use this device, you have a RJ-45 connector on your Ethernet network device. Except that,
you will need a directly-connected computer or a wireless client to access its web-based
configuration page for proper configuration. Please make sure that you have the following in
your system.
Ø Windows 98/98SE/ME/2000/XP
Ø Internet Explore 5.0 or above
Ø Ethernet interface with 10/100-Base-T RJ-45 port
Ø TCP/IP protocol is set up
Unpacking
Check the contents of the package against the pack contents checklist below. If any of the items
is missing, then contact the dealer from whom the equipment was purchased.

Ø This device
Ø 12V Power Adapter and power cord
Ø One Ethernet cable
Ø Manual

Physical Outlook
Front Panel
It is equipped with five LEDs on the front panel as described in the table below (from left to
right):
LED Color Status Description
Active White Slowly Blinking RF work normally
Blinking Blinking when firmware upgrade, production
test indicate.
Status RED
Solid Hardware Failed.
Power: 12VDC power connector.

Chapter 2: Connection
LAN Connection
Attach one end of the Ethernet cable with RJ-45 connector to the LAN port on a computer, and
the other end to this device directly or through a hub.
Connecting the power adapter
Please connect the Station to the power connector port of the Power Adaptor and the other end of
the Power Adaptor to a power outlet.
Setting up a Host PC
To configure the Station via web browser, at least one properly configured PC must be connected
to the network (either connected directly or through an external hub to the LAN port of the
device). The host PC must meet the following requirements:
l With Ethernet network interface.
l Must have TCP/IP installed.
l With a web browser installed: Internet Explorer 5.x or later.
For Ethernet interface: With Ethernet network interface card installed.
For WLAN client: The SSID setting will be the last 6 codes of the MAC address of your Station.
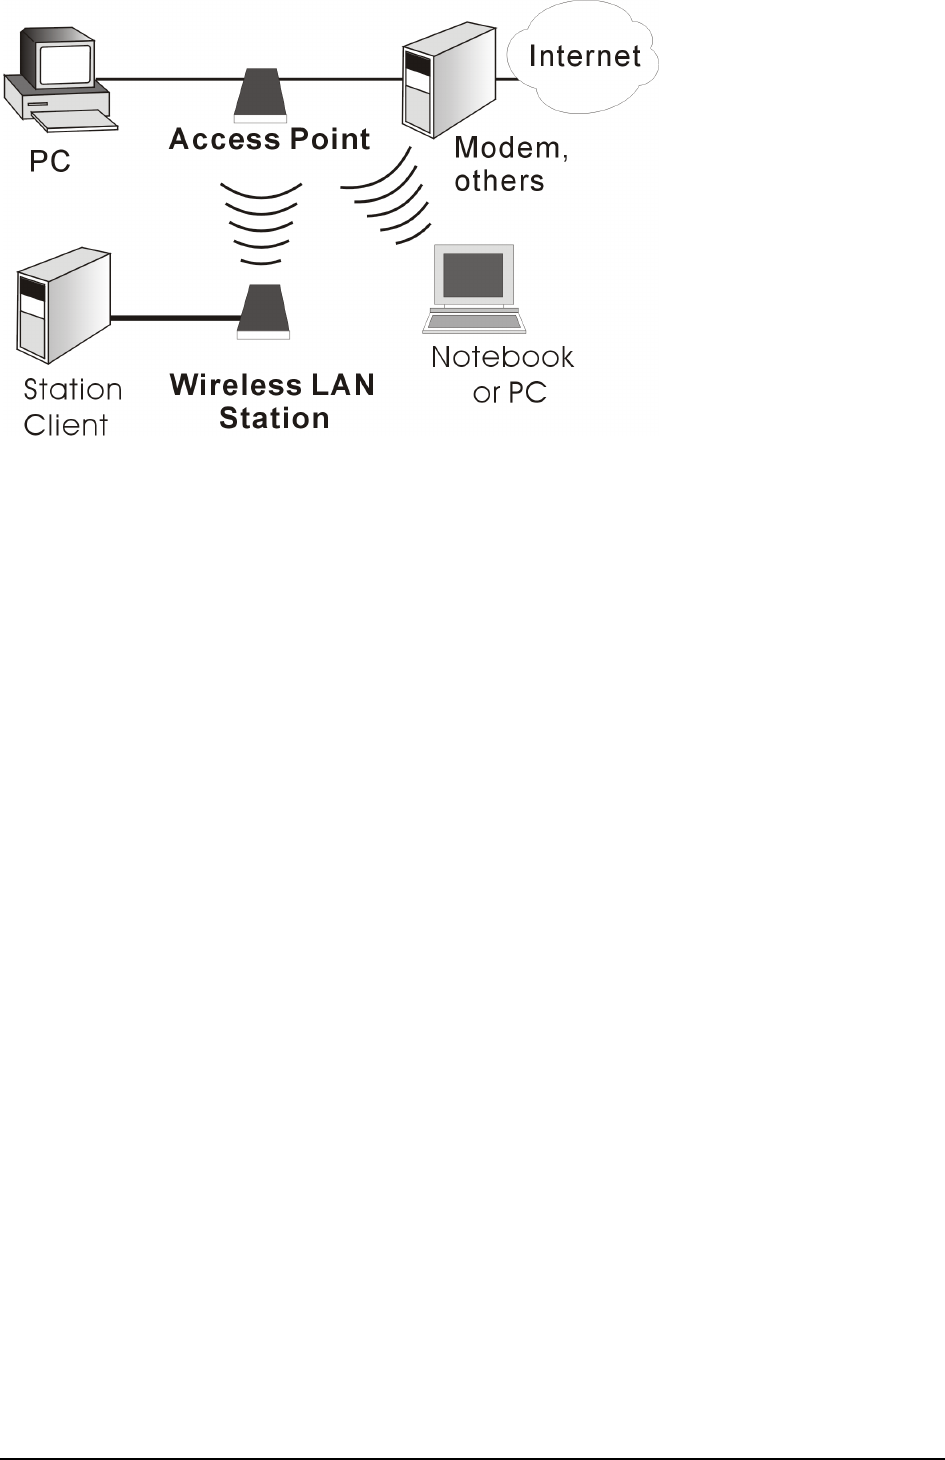
Wireless Network Connection
This station is a device which connected to a client (such as PC or any CE device) with Ethernet.
It uses the MAC address of the station’s client and communicates with a wireless device (e.g.,
access point) which is complied with IEEE 802.11a,b,g. It communicates with a wireless device
on Infrastructure and Ad-Hoc mode. The following picture shows a common constitution of the
system that used a station.


Chapter 3: Configuration via Web Browser
Using the Web Configuration
Once your host PC is properly configured, start the web browser and type the URL
192.168.1.200 to enter the Web configuration page.
You will be prompted to enter username and password. By default, the username and password
are left blank.
Note: The Station uses the Apply button to enable new settings. After the Apply button is
clicked, your customized configuration will be stored and effective to the Station.
Home Page
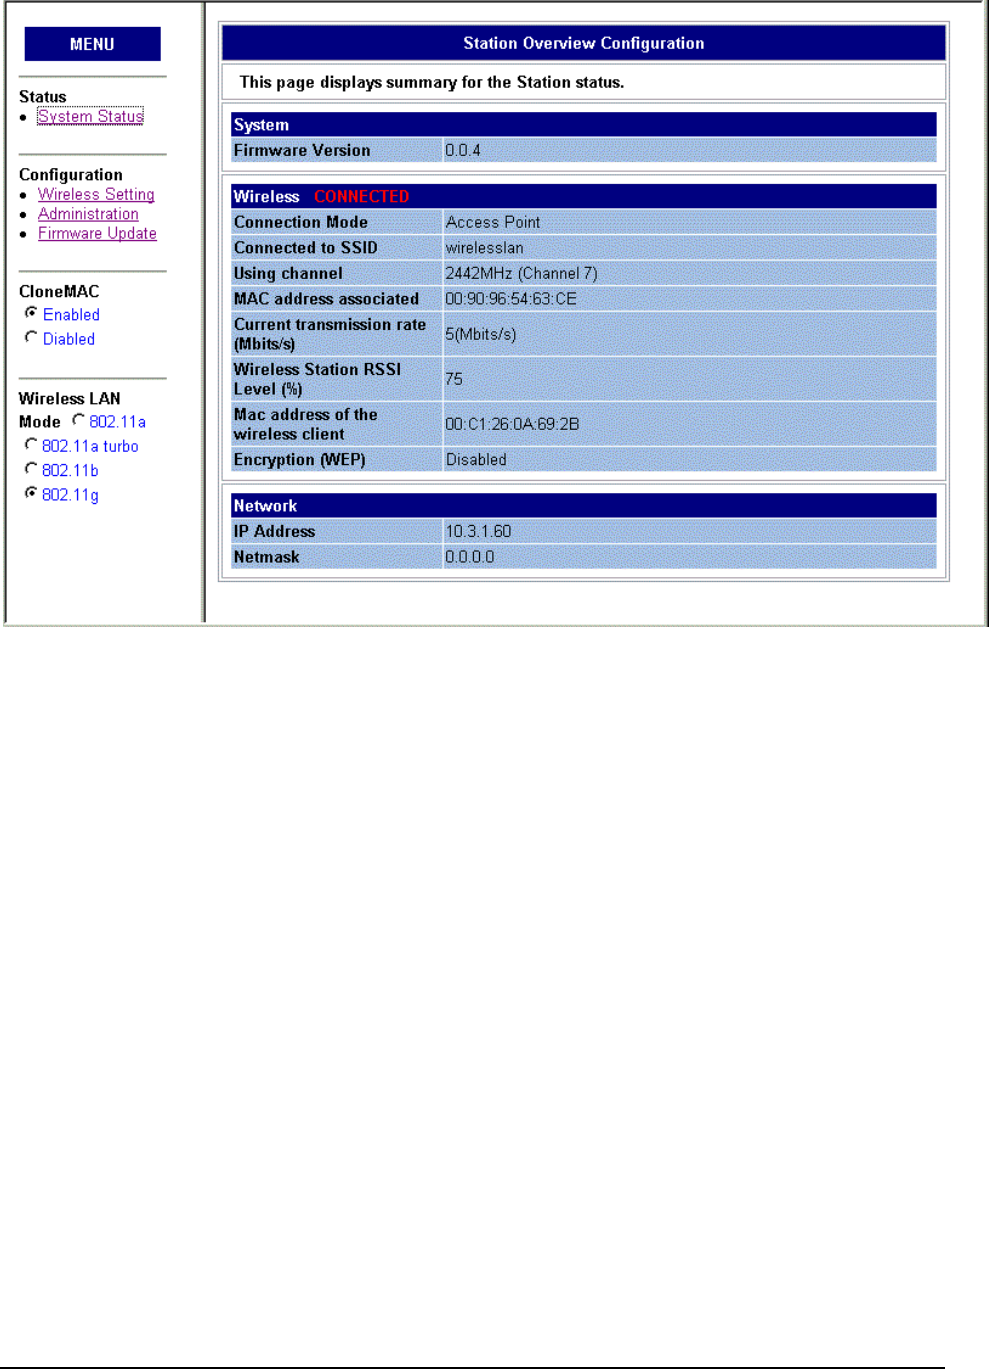
The Station comes with the default IP address of 192.168.1.200 and subnet mask of
255.255.255.0.
Status
This is the web page for the system information. It lists the firmware, MAC address and IP
address for this Station.
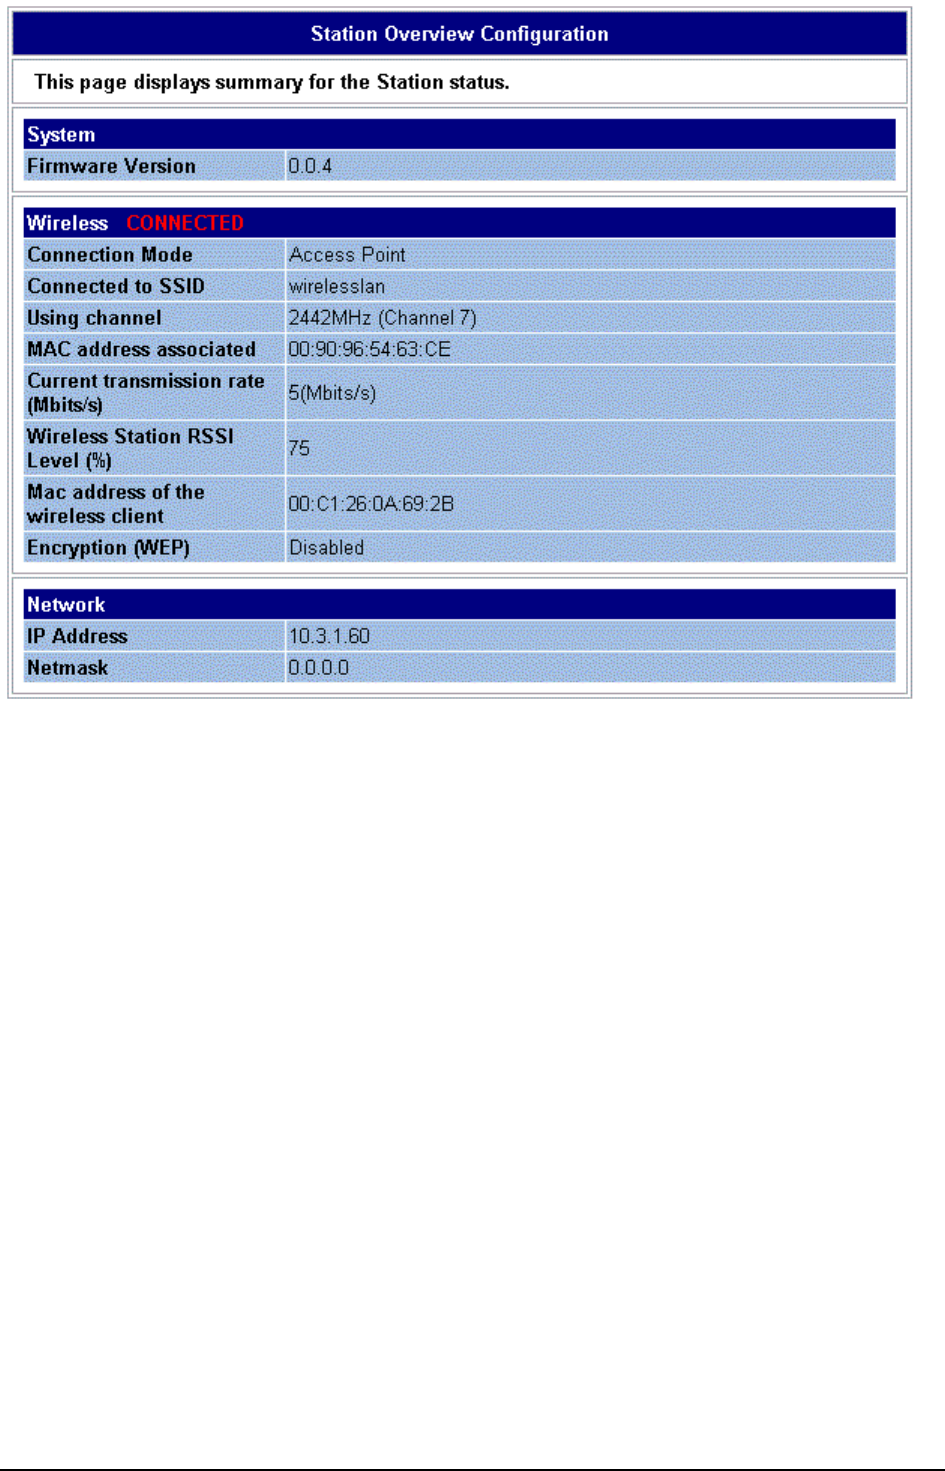
Firmware Version: It displays the version number of this device’s firmware.
Connection Mode: It displays the connection mode such as Ad-Hoc or Infrastructure.
Connected to SSID: It displays the SSID of the device that associated with this device.
Using Channel: It displays the frequency that you selected for this device.
MAC address associated: It displays the MAC address of the Ad-Hoc or the Infrastructure that
this device has associated with. If you have enabled the Clone MAC
setting, the MAC address shown here is the one associated to this device.
Yet if you disable the Clone MAC setting, then the MAC address shown
here will be the one of the station itself.
Current transmission rate (Mbits/s): It displays current data transmission rate.
Wireless Station RSSI Level(%): It displays the link quality for this device.
MAC address of the wireless client: It indicates the MAC address for the wireless card
connecting to this device.
Encryption(WEP): It displays the settings status that you set on the wireless setting page.
IP Address: It displays the IP address of this device.
Netmask: It displays the Netmask of this device.
Configuration
Wireless Setting
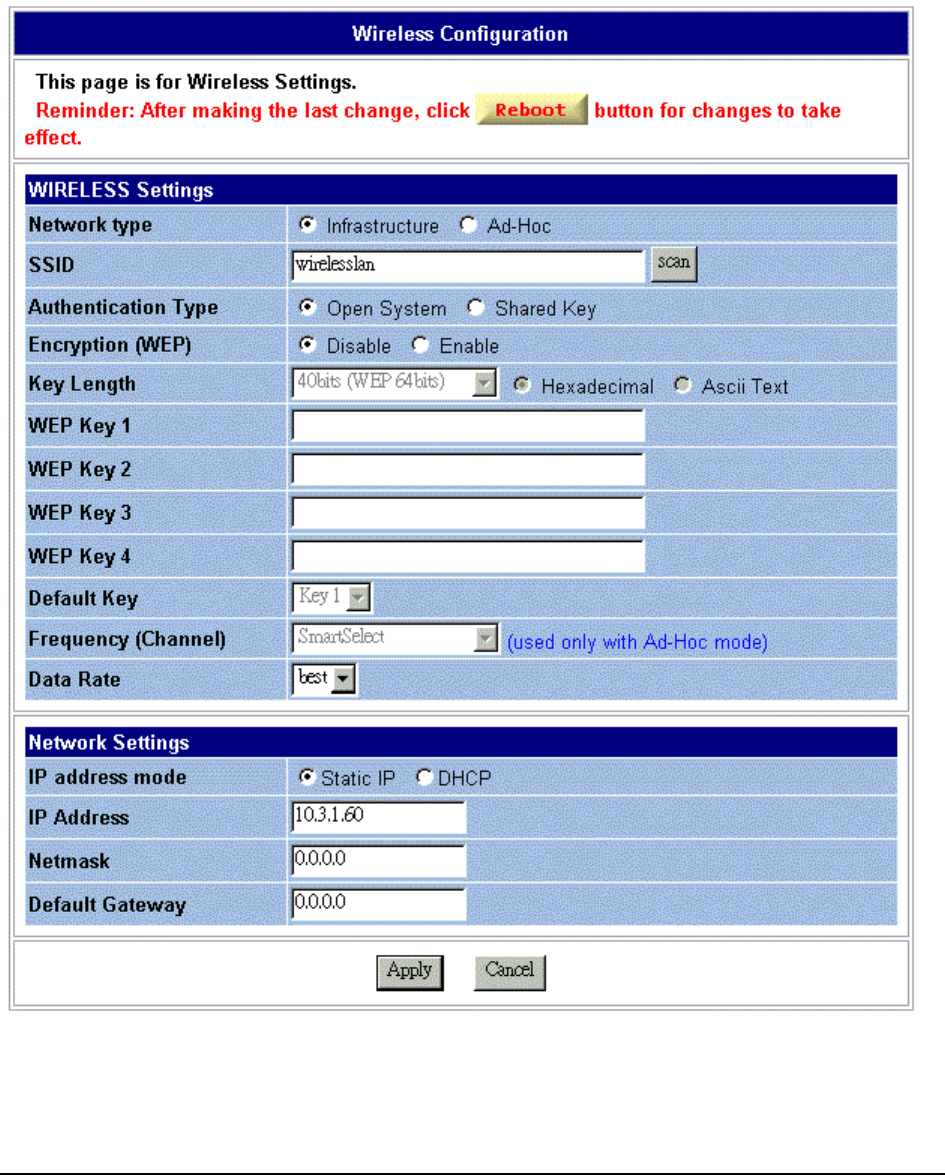
To set the 802.11g security and encryption options for this AP, please open the Wireless
Configurtion page. Any new setting will become effective after the Station is rebooted.
Network Type: Select the one that the Station will be used to connect to.
The Ad-Hoc mode offers communication between wireless stations with
the limited range of each other, eliminating the need for an AP. Without
an AP connecting to a wired LAN, the clients in a Ad-Hoc network can
only share resources with the peers but not be able to access resources
on a wired network.
When this device is configured as a Station and operates in
Infrastructure mode, it will associate with an available AP installed on
Ethernet network. Thus the device that equipped with this Station can
access to the wired LAN via the associated AP.
To successfully associate with an AP, this device must be configured in
Infrastructure mode and use the same SSID and security settings with
the AP. It does not need to configure a channel since it will automatically
receive the channel assignment from the AP.
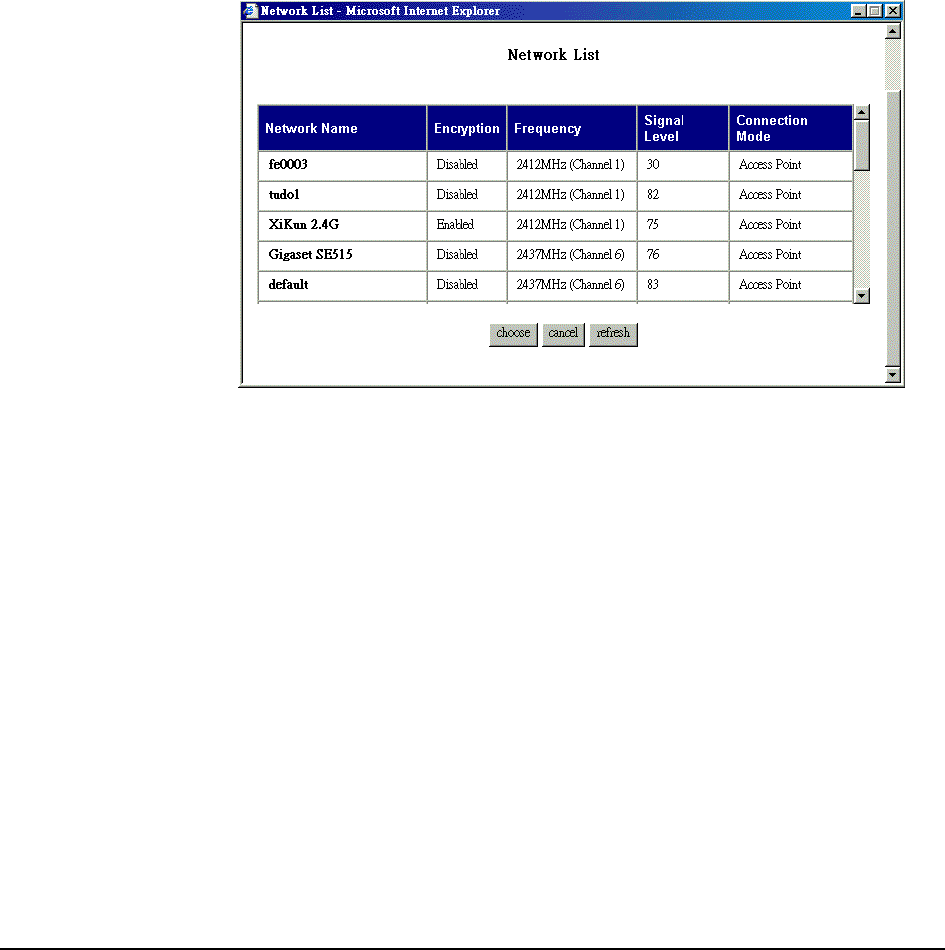
SSID: Enter a network name with a maximum limit of 32 characters. Also, you
can click Scan button to get a network list as below.
From this dialog box, please choose any one that is available and click
Choose. The name of the one that you selected will be shown on the
SSID box.
Authentication Type: This is a process in which the AP validates if wireless clients are
qualified to access the AP’s service. It happens prior to any wireless
client can associate to an AP. The option – Shared Key, utilizes WEP
capability to further verify if the wireless client is authorized to share
this AP’s resource. If the client has the wrong key or no key, it will fail
the authentication and will not be allowed to associate with this AP.
Open System makes the authentication be done through a pseudo
process, accepting all kinds of requests, and is mainly used in cases
where connectivity is more important than security.
WEP Enabled: Click Enable to enable the function setting box. Click Disable to close

this function.
WEP Key Lengths: Select the WEP mode for the WEP key function. You can choose 40, 104
or 128-bit for your necessity. Choose the typing method of encryption
key. You have to click either Hexadecimal digits or ASCII Text
characters.
Hexadecimal ASCII
40 bits
(WEP 64 bits) 10 hexadecimal digits 5 ASCII characters
104 bits
(WEP 128 bit) 26 hexadecimal digits 13 ASCII characters
128 bits
(WEP 152 bit) 32 hexadecimal digits 16 ASCII characters
WEP Key 1 to 4: Type the encryption key length and fill out WEP keys. The system
allows you to type in 4 kinds of the WEP key.
Default Key: Select one of network key that you set on the Key boxes as default one.
After you entering your WEP keys, you should select one of the four
keys to encrypt the data before being transmitted. The AP always
transmits data encrypted using the WEP key. The receiving station will
use the key number to determine which key to use for decryption. If the
key value does not match with the transmitting station, the decryption
will fail. To ensure successful decryption, make sure to have your
wireless stations set identical key tables.
Frequency (Channel): This function is active only in Ad-Hoc connection type. The frequency
you selected in which the radio links are about to be established. Select a
channel that you want. Usually the wireless clients will scan the whole
operable channels and then select the desired communications channel
automatically.
Data Rate: It decides the speed of data transmission. Choose any one of it by using
the drop-down menu.
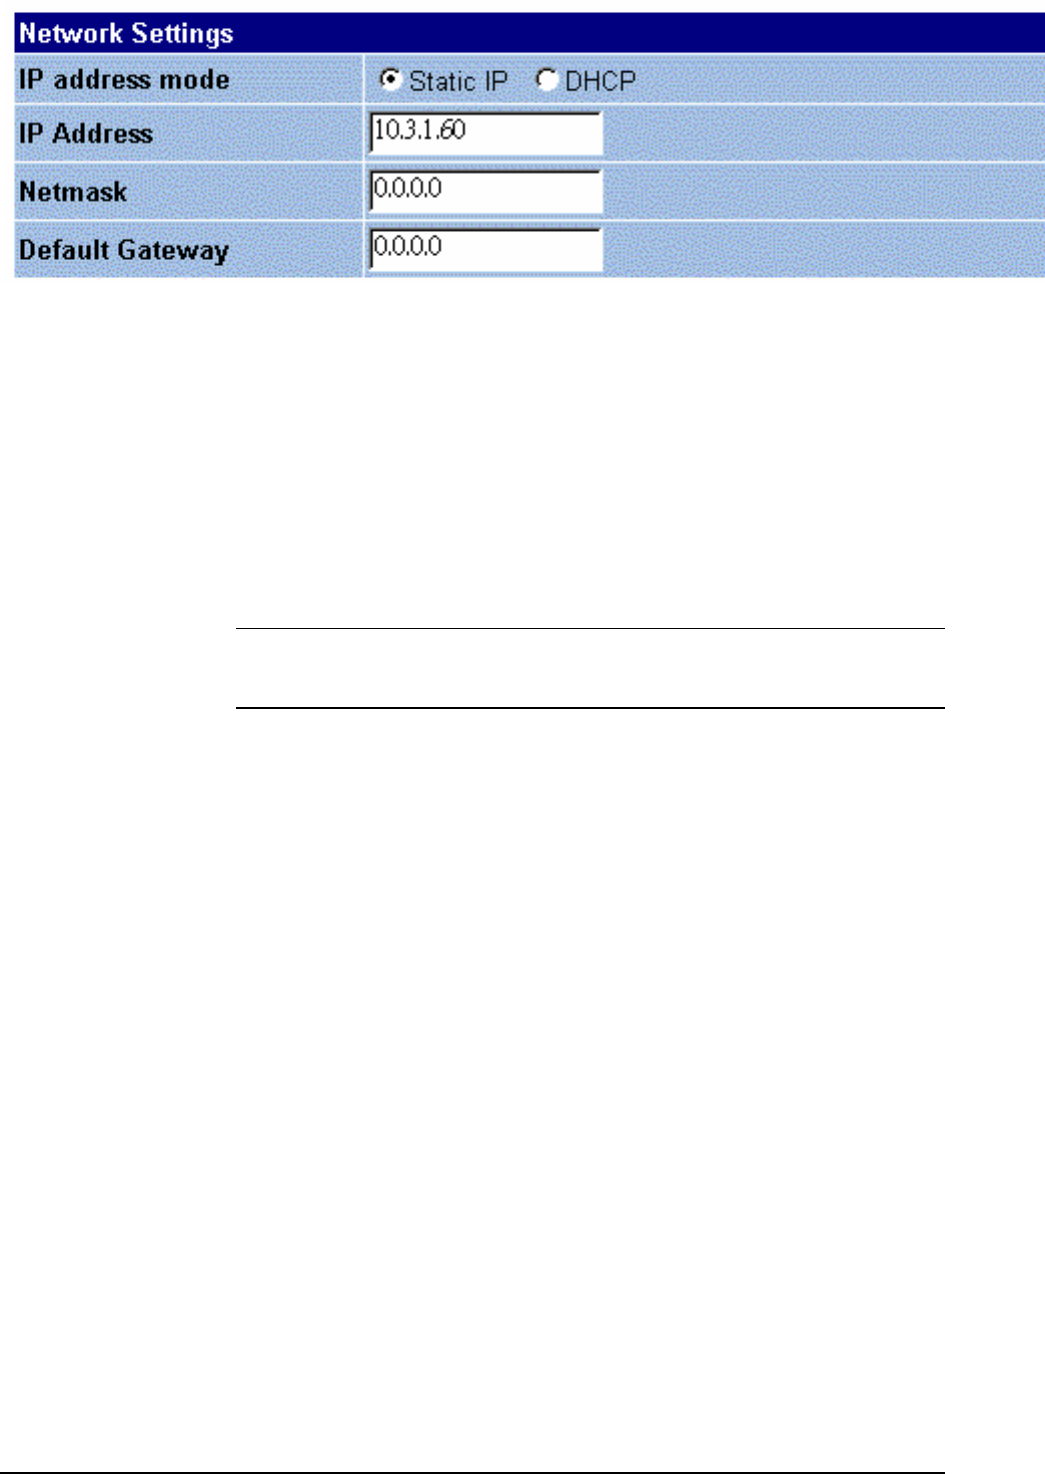
IP address mode: If your network had implemented a DHCP server to assign an IP to this
AP, you can select DHCP as the IP Address mode. And you don’t need
to type the IP address below, subnet mask and gateway for the DHCP
server will provide the required IP information for this device.
If you want to assign a static IP address to your AP, you can select Static
IP option. Then you have to type in the IP address, subnet mask,
gateway in the boxes respectively.
Note: When the DHCP function is enabled, you may need a third-party
tool to identify the AP’s IP address for the IP address assigned to the
AP could come from a large DHCP address tool.
IP address: Type in the IP address that you got from your ISP.
Netmask: Type in the netmask address that you got from your ISP.
Default Gateway: Type in the gateway address that you got from your ISP.
Apply: Click this button to save and make the configuration effective.
Administration
This page allows you to change the username and password for some reason. Please open
Administration web page to change it as you desired.
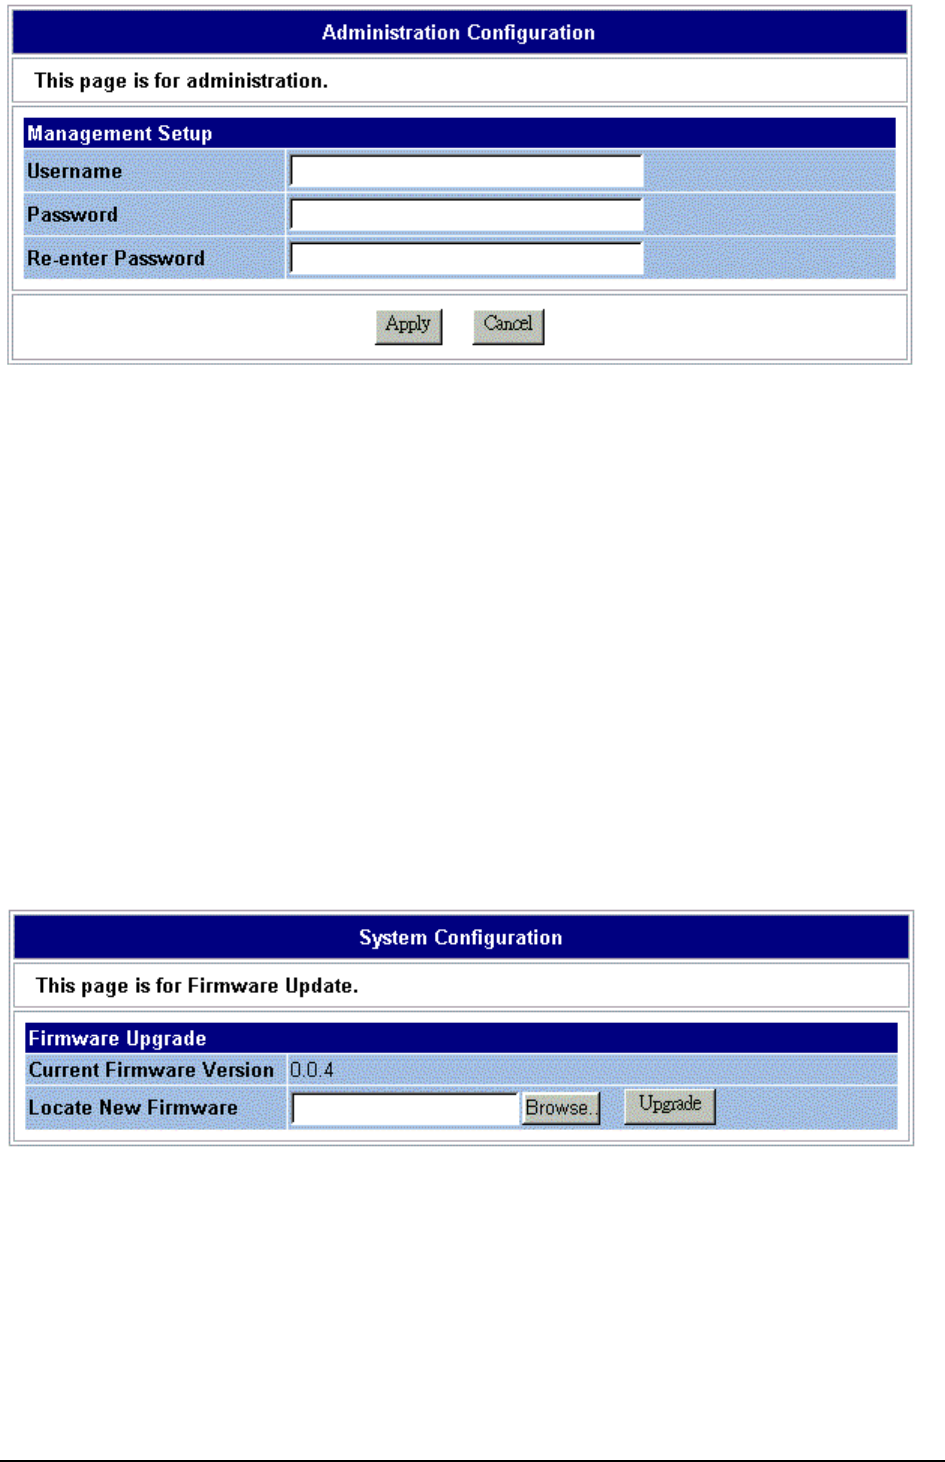
Username: You can change the username for your necessity. Please type in the new
username on this box.
Password: Please enter the new password on this box.
Re-enter Password: You have to retype the new password on this box for confirmation. After
you click Apply, you have to enter the new password when you want to
get into this web browser next time. This setting limits the web-based
manager with the correct credentials. It is recommended that you enter
the settings for both default values are blank.
Firmware Update
The Station supports the upgrading by using HTTP. To update the firmware that you get from
your distributor, please click the Upgrade button. The following screen will appear.
Follow the steps below to finish the firmware upgrade:
1. Download and unzip the new software file from vendor.
2. In the Locate New Firmware field, click Browse to locate the upgrade file.
3. Click the Upgrade button.
4. Wait for the system to finish the updating.
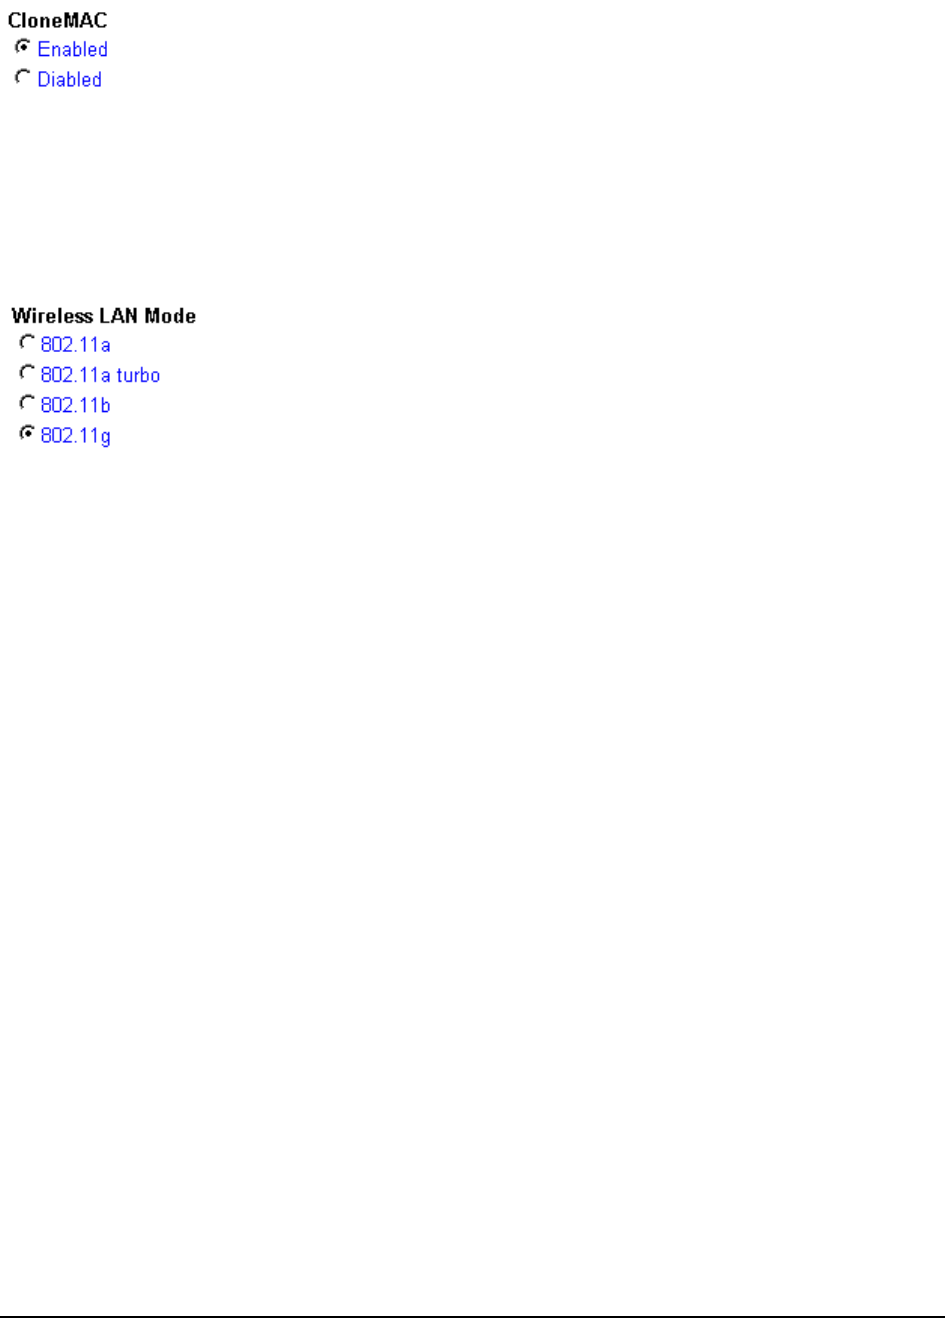
Clone MAC
If you want to connect to more than one PC through this Station, choose Disabled. Otherwise,
click Enabled.
Wireless LAN Mode
Choose one of the wireless LAN mode listed below as the wireless communication way.
802.11a: The transmission speed is fast. Most countries support this function.
802.11a turbo: Faster than 802.11a, yet not all countries support this one.
802.11b: If the frequency rate is up to 2.4G, please choose this one.
802.11g: It supports the same speed with 802.11a. Yet it support different frequency rate
with 802.11a.
There are two ways to take the mode change effective.
Ø After change the mode setting, unplug the power cord and re-plug it. Then restart the station.
Ø After change the mode setting, go to Wireless Setting Page and click the Reboot button.

Appendix: Specifications
Appendix: Specifications
Frequency Bands
Feature Description
Frequency & bands 2.4GHz : 2.412 to 2.462 GHz
2.412GHz(1ch),2.417GHz(2ch),2.422GHz(3ch),2.42
7GHz(4ch),2.432(5ch),2.437GHz(6ch),2.442GHz(7c
h),2.447GHz(8ch),2.452GHz(9ch),2.457GHz(10ch),
2.462GHz(11ch)
5GHz
Japan: 5.15 to 5.25 GHz
USA: Band I : 5.18GHz(36ch),5.20GHz(40ch),
5.22GHz(44ch),5.24GHz,(48ch),
Band II :5.26GHz(52ch),5.28GHz(56ch),
5.30GHz(60ch),5.32GHz(64ch)
The wireless bands are factory preset.
Standard IEEE 802.11a/g
IEEE 802.3 and IEEE 802.3u
Wireless Speed
(11a mode)
54, 48, 36, 24, 18, 12, 9, 6 Mbps is automatically
falling back
Wireless Speed
(11g mode)
1. 802.11g OFDM standard. Data Rate: 54, 48, 36,
24, 18, 12, 9 and 6 Mbps.
2. Interoperable with IEEE 802.11b DSSS 2.4
GHz
compliant equipment. Data Rate: 11, 5.5, 2.2,
and 1 Mbps
Ethernet Speed 10/100 Mbps Half/Full duplex
Range and Throughput
Feature Description
Distance Range (Indoor)
(Estimate)
54 Mbps @ 40 feet (10m)
6 Mbps @ 300 feet (90m)
Distance Range (Outdoor)
(Estimate)
54 Mbps @ 100 feet (30m)
6 Mbps @ 1000 feet (300m)

Wireless Features
Feature Description
11a/g selection Configuration from Web page or HTTP commands
SSID Name of the WLAN group. The same SSID can form
the WLAN group
Architecture Infrastructure (default) or Ad-Hoc mode
Scan Scan the available AP list on the air, so dongle can
choose which AP to associated.
Also, could provide by HTTP commands
Channel What channels available are depends on regulatory
domain
Data Security 1. WEP Key Enable / Disable (Disabled by
default)
2. 64-bit, 128-bit, 152-bit WEP
3. WEP key is able to set by ASCII characters or
Hexadecimal digits
4. WPA (PSK + TKIP)
Access Control Allow one client device connect to dongle (Mac
address filter).
Certification Wi-Fi
Network Feature
Feature Description
IP Address (Subnet Mask,
Gateway) 1. DHCP Client
2. Manual IP / Default Fixed IP (192.168.1.20 /
255.255.255.0)
Management
HTTP Web-based GUI
Telent (CLI commands)
HTTP commands while client didn’t have GUI
Upgrade
Firmware upgradeable from Web page
By HTTP commands
Certification and Safety
Feature Description
Japan VCCI, TELEC, JATE
United States FCC Part15
Korea MIC / RRL
European CE Mark

Appendix: Specifications

Physical Characteristics
Feature Description
PoE Port One 8-pin connector, including power and Ethernet
LED(s) 2 LEDs
Active – Slowly blinking while RF work normally
(White)
Status – Diagnostic and system states (RED)
Dimensions PWB 77 x 78 mm
Housing Palm-size housing
Weight TBD
Humidity 10 to 90% non-condensing
Temperature Operating: 0 to 50 Celsius
Power Adaptor Input: 100~240 VAC, 50~60Hz
Output: 12 VDC, 1A
000510w-rt