Askey Computer RTW026D31 Broadband Wireless Router User Manual
Askey Computer Corp Broadband Wireless Router Users Manual
Users Manual
i
Broadband Wireless Router
User’s Manual
Rev:01
2002/10/17

Wireless Broadband Router User’s Manual
ii
No part of this publication may be reproduced in any form by any means without the prior written permission. Other
trademarks or brand names mentioned herein are trademarks or registered trademarks of their respective companies.
2002/07/11-10/17
Rev:01
000026-rtw

Safety Notes
iii
Safety Notes
For Installation
Use only the type of power source indicated on the marking labels.
Use only the power adapter supplied with the product.
Do not overload wall outlet or extension cords as this may increase the risk of electric shock or file. If the power
cord is frayed, replace it with a new one.
Proper ventilation is necessary to prevent the product overheating. Do not block or cover the slots and openings
on the device, which are intended for ventilation and proper operation. It is recommended to mount the product
with a stack.
Do not place the product near any source of heat or expose it to direct sunshine.
Do not expose the product to moisture. Never spill any liquid on the product.
Do not attempt to connect with any computer accessory or electronic product without instructions from
qualified service personnel. This may result in risk of electronic shock or file.
Do not place this product on an unstable stand or table.
For Using
Power off and unplug this product from the wall outlet when it is not in use or before cleaning. Pay attention to
the temperature of the power adapter. The temperature might be high.
After powering off the product, power on the product at least 15 seconds later.
Do not block the ventilating openings of this product.
When the product is expected to be not in use for a period of time, unplug the power cord of the product to
prevent it from the damage of storm or sudden increases in rating.
Please choose a flat place surface to locate this device in level. If you put the device vertically, it might be
unsteady and might fall down. We are not responsible for such happening.
For Service
Do not attempt to disassemble or open covers of this unit by yourself. Nor should you attempt to service the product
yourself, which may void the user’s authority to operate it. Contact qualified service personnel under the following
conditions:
If the power cord or plug is damaged or frayed.
If liquid has been spilled into the product.
If the product has been exposed to rain or water.
If the product does not operate normally when the operating instructions are followed.
If the product has been dropped or the cabinet has been damaged.
If the product exhibits a distinct change in performance.
Warning
This equipment must be installed and operated in accordance with provided instructions and a minimum 20 cm
spacing must be provided between computer mounted antenna and person’s body (excluding extremities of
hands, wrist and feet) during wireless modes of operation.
This device complies with Part 15 of the FCC Rules. Operation is subject to the following two conditions: (1)
this device may not cause harmful interference, and (2) this device must accept any interference received,
including interference that may cause undesired operation.
Caution
Any changes or modifications not expressly approved by the party responsible for compliance could void the
authority to operate equipment.

Wireless Broadband Router User’s Manual
iv
FCC Information
The Federal Communication Commission Radio Frequency Interference Statement includes the following paragraph:
The equipment has been tested and found to comply with the limits for a Class B Digital Device, pursuant to part 15
of the FCC Rules. These limits are designed to provide reasonable protection against harmful interference in a
residential installation. This equipment generates, uses and can radiate radio frequency energy and, if not installed
and used in accordance with the instruction, may cause harmful interference to radio communication. However, there
is no grantee that interference will not occur in a particular installation. If this equipment does cause harmful
interference to radio or television reception, which can be determined by turning the equipment off and on, the user is
encouraged to try to correct the interference by one or more of the following measures:
Reorient or relocate the receiving antenna.
Increase the separation between the equipment and receiver.
Connect the equipment into an outlet on a circuit different from that to which the receiver is connected.
Consult the dealer or an experienced radio/TV technician for help.

Contents
v
Contents
Before you use ................................................................................ vii
Features ...............................................................................................vii
System Requirements............................................................................ viii
Unpacking............................................................................................ viii
Chapter 1: Overview .........................................................................1
Physical Outlook ..................................................................................... 1
Front Panel ................................................................................... 1
Rear Panel .................................................................................... 2
Chapter 2: Installation......................................................................3
Chapter 3: Concepts for Connection ..................................................5
On Ethernet Client................................................................................... 5
On Wireless Client................................................................................... 6
xDSL/ATU-R Connection........................................................................... 7
Connecting to Your xDSL Modem...................................................... 7
Chapter 4: Configuration...................................................................9
Setting TCP/IP on Client PC ...................................................................... 9
For Windows 98............................................................................. 9
For Windows ME ...........................................................................13
For Windows NT............................................................................13
For Windows 2000 ........................................................................17
For Windows XP............................................................................19
Configure PC to get IP address from DHCP.................................................20
For Windows 98............................................................................20
For Windows ME ...........................................................................21
For Windows NT............................................................................21
For Windows 2000 ........................................................................21
For Windows XP............................................................................22
Renew IP Address on Client PC.................................................................22
For Windows 98............................................................................22
For Windows ME ...........................................................................23
For Windows NT............................................................................23
For Windows 2000 ........................................................................24
For Windows XP............................................................................24
Chapter 5: Web Configuration.........................................................25
Using the Web-Based Manager.................................................................25
Outline of Web Manager..........................................................................25
To Have the New Settings Take Effect..............................................25
Setup Wizard.........................................................................................26
WAN Type....................................................................................26
WAN Setting ................................................................................26
WLAN Settings..............................................................................28
DNS............................................................................................29
Advanced Setup.....................................................................................30

Wireless Broadband Router User’s Manual
vi
System.................................................................................................30
Administrator Settings...................................................................30
Firmware Update ..........................................................................31
Configuration Tools .......................................................................31
Status .........................................................................................33
System Log..................................................................................34
Reset Wireless Broadband Router....................................................34
WAN ....................................................................................................35
Dynamic IP Address ......................................................................35
Static IP Address ..........................................................................35
PPPoE..........................................................................................36
DNS............................................................................................37
Bridge .........................................................................................37
LAN......................................................................................................37
LAN Settings ................................................................................37
DHCP Client List............................................................................38
WLAN...................................................................................................39
Wireless LAN Settings....................................................................39
WLAN MAC Control........................................................................40
NAT .....................................................................................................41
Virtual Server...............................................................................41
NAT Link Table .............................................................................42
Firewall.................................................................................................43
MAC Control.................................................................................43
DMZ(Demilitarized Zone) ...............................................................43
Routing.................................................................................................44
Static Routing...............................................................................44
Dynamic Routing ..........................................................................44
Routing Table...............................................................................45
Chapter 6: Troubleshooting.............................................................46
Chapter 7: Glossary.........................................................................49
Software......................................................................................51
Hardware.....................................................................................52

Before You Use
vii
B
Be
ef
fo
or
re
e
y
yo
ou
u
u
us
se
e
The Wireless Broadband Router is a long-range, high performance wireless LAN product, which provides Access
Point services to a 2.4 GHz RF network and bridges to an Ethernet backbone and routes to an Ethernet WAN port.
The Wireless Broadband Router performs all the necessary inter-networking, bridging and routing functions. It
receives data from both networks, stores them locally for further processing, installs and maintains connections, and
transmits the packets to the proper destination.
The Wireless Broadband Router connects computers and laptops to your local network through wireless connection.
The Radio Frequency (RF) waves link the wireless clients to the Access Point, and the Access Point works as a
bridge between the wireless clients and the wired LAN or Ethernet clients.
The Wireless Broadband Router is compliant with the IEEE 802.11 / IEEE 802.11b DSSS specification and is Wi-Fi
certified. Thus all wireless clients, even from different vendors, that meet the 802.11b standard can access your
Ethernet network through this Wireless Access Point. Also, with throughput performance of up to 11 Mbps, the
wireless connection is as efficient as the wired connection. The wireless LAN security is provided through its WEP
(Wireless Equivalent Privacy) support.
Wireless Broadband Router has 4 10/100 Mbps switch ports. This switching automatically detects the speed of the
device that you plug into it and routes it to the appropriate port.
Features
Router Features
NAT let multiple users on LAN to access the Internet for the cost of only one IP address and enjoy various
multimedia applications.
ALGs(Application Level Gateways) such as NetMeeting, FTP, RealPlayer, ICQ, CuSeeMe, mIRC, Quake,
Internet Games, etc.
DMZ hosting, Multiple Virtual Servers (e.g., Web, FTP, Mail servers) can be setup in local network.
Static Route, RIP v1, v2
Multiple kind of broadband WAN connection: PPPoE, DHCP Client, Fixed IP
DHCP Server, DNS Relay
Bridging Features
Supports self-learning bridge specified in IEEE 802.1 D Transparent Bridging
Transparent Bridging between 4-port 10/100 MB Ethernet switch and 802.11b Wireless LAN interface.
Security Features
PAP(RFC1334), CHAP(RFC1994) for PPPoE session
Wireless support WEP (Wired Equivalent Privacy) uses RC4 with 40/64 and 128 bit key length
Block WAN Ping and Client MAC control
Wireless LAN Features
Fully compatible to 802.1lb standard, allowing up to 11Mbps wireless rate with distance up to 300 feet/90
meters.
The 2.4 GHz Direct Sequence Spread Spectrum (DSSS) technology is exploited.
Seamless roaming within wireless LAN infrastructure.
Low power consumption via efficient power management.

Wireless Broadband Router User’s Manual
viii
System Requirements
For using Wireless Broadband Router, you have to make sure you have the following that installed on the clients:
For Wireless Clients
Operating System must be Windows98/2000/NT/ME/XP
Wireless card installed
Wireless card driver
For Ethernet Clients
Operating System must be Windows98/2000/NT/ME/XP
10/100 Base-T NIC
10/100 Base-T(UTP) network cable
A Hub
Note: Be aware that Cable/DSL Modem service registered from your Internet service provider
is required for Internet access.
Unpacking
After unpack the Broadband Cable/DSL Wireless Router package, please check the contents of the package with the
checklist stated below. If you find any item is missing, please contact the dealer directly.
Broadband Cable/DSL Wireless Router
Power Adapter
Power Cord
RJ-45 Ethernet Cable
Quick Start Guide
User’s Manual
Driver & Utility Software CD
Subscription for Router Service
To use the Cable/DSL Wireless Router, you have to subscribe for ADSL service from your broadband service
provider. According to the service type you subscribe, you will get various IP addresses:
Dynamic IP: If you apply for dial-up connection, you will be given an Internet account with username and
password. You will get a dynamic IP by dialing up to your service provider.
Static IP address: If you apply for full-time connectivity, you may get either one static IP address or a range of IP
addresses from your service provider. The number of IP addresses varies according to different
ADSL service provider.
Chapter 1: Overview
1
C
Ch
ha
ap
pt
te
er
r
1
1:
:
O
Ov
ve
er
rv
vi
ie
ew
w
Before installing the Router, please take a look at the front panel and rear panel of the router. Getting acquainted with
both panels will be helpful for installation later.
Physical Outlook
F
Fr
ro
on
nt
t
P
Pa
an
ne
el
l
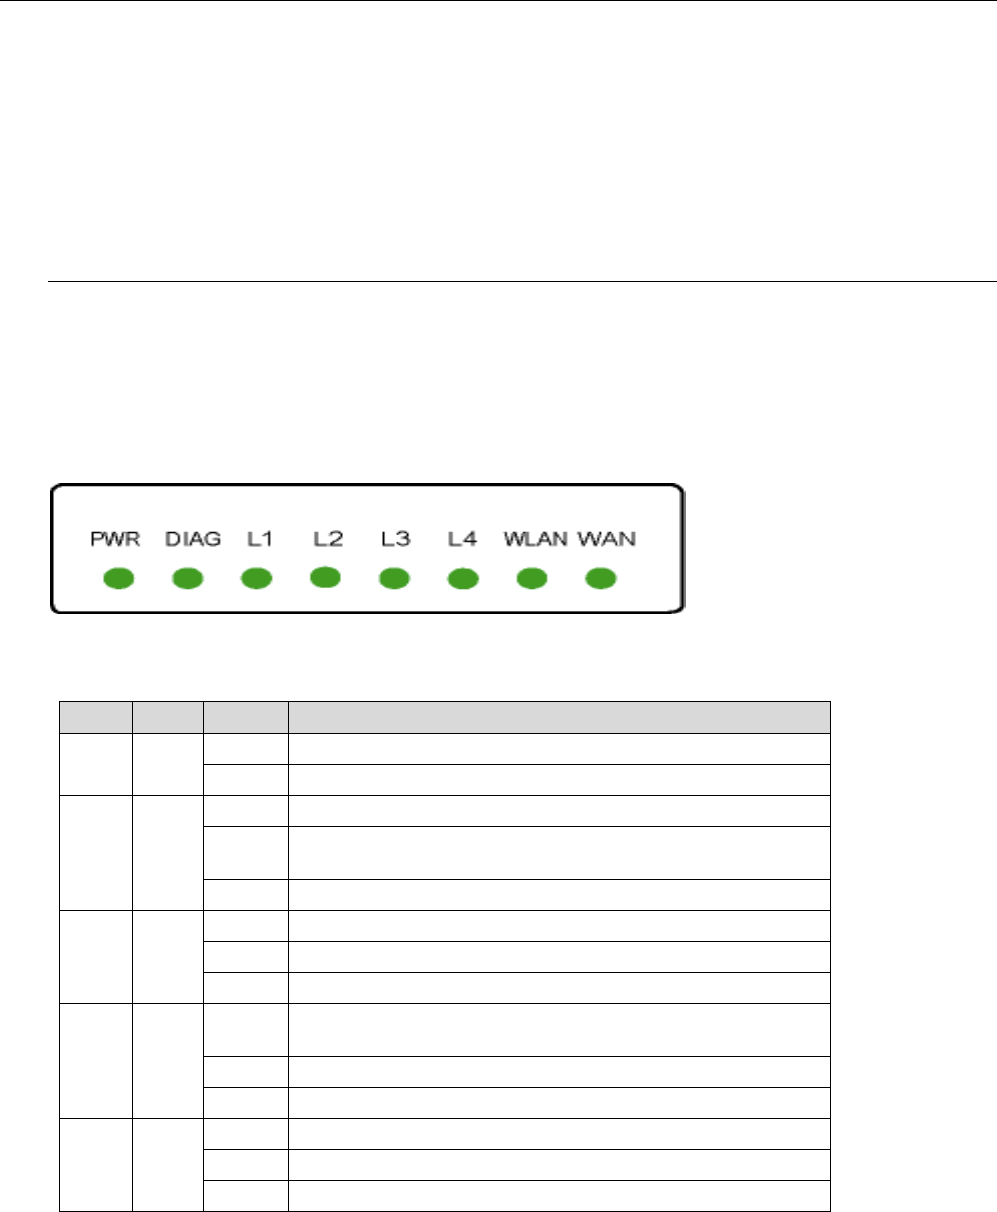
The figure below illustrates the front panel of the Broadband Cable/DSL Wireless Router. It indicates the status of
the router in.
After powering on the router, the PWR LED will be on till powering off. These LEDs will not be on simultaneously.
When this device is transferring data, the LED will be blinking to indicate that which port that you are using.
LED Indicators
The ADSL Router is equipped with eight LEDs on the front panel as described in the table below (from left to right):
LED Color Status Description
Unlit Power off.PWR Green
Solid Power on.
Unlit Power off or initial self-test of the unit is OK.
Blinking When software downloading or updating operation parameters located
in FLASH memory is in progress.
DIAG Green
Solid Initial self-test failure or programming FLASH memory failure.
Unlit Power off or no Ethernet carrier is present.
Blinking Ethernet carrier is present and user data is going through Ethernet port.
LAN Green
Solid Ethernet carrier is present.
Unlit Power off or no radio signal (WLAN card is not present or fails to
function).
Blinking Traffic is going through Wireless LAN interface.
WLAN Green
Solid Wireless LAN interface ready to work.
Unlit Power off or line connection is handshaking or training is in progress.
Blinking User data is going through WAN port.
WAN Green
Solid Line connection is OK.

Wireless Broadband Router User’s Manual
2
R
Re
ea
ar
r
P
Pa
an
ne
el
l
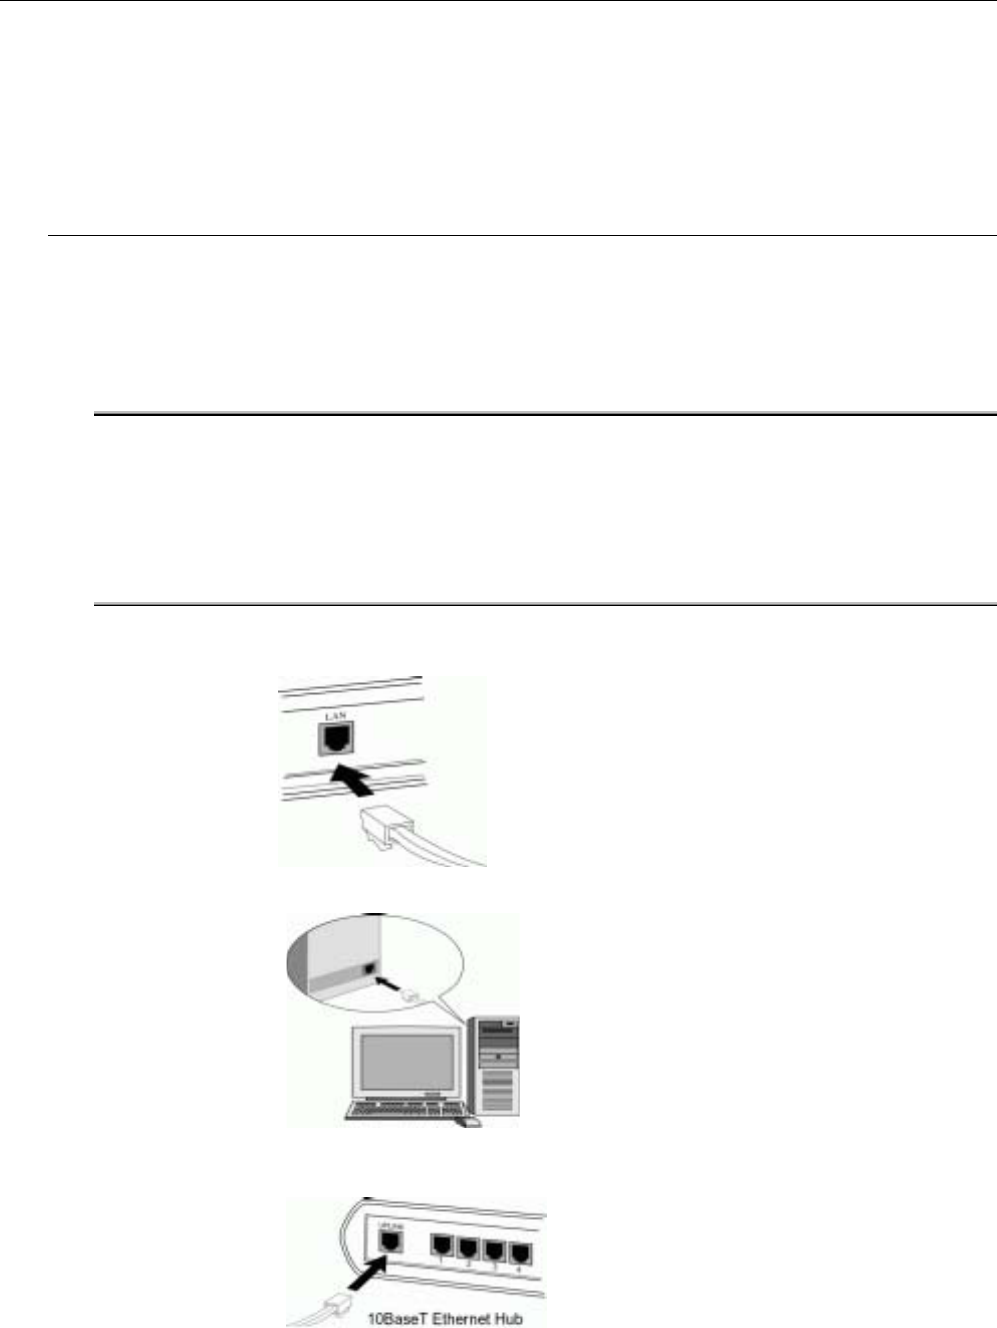
Take a look at the rear panel of this wireless router.
WAN - It is used to connect to an Ethernet port of Cable/DSL modem broadband device.
L1 ~ L4 - LAN port. 10/100 Base-TX, 4 ports auto-sensing & crossover Ethernet switching hub.
RST - A switch to reset to the default settings.
PWR - Power switch.
12VDC - Power connector.
Chapter 2: Installation
3
C
Ch
ha
ap
pt
te
er
r
2
2:
:
I
In
ns
st
ta
al
ll
la
at
ti
io
on
n
Connecting the Wireless Broadband Router
The Broadband Wireless Router incorporates a four-port switch for connection to your local Ethernet network. The
Ethernet ports are capable of operation at either 10Mbps (10Base-T) or 100Mbps (100Base-Tx), depending on the
Ethernet interface of the attached PC, hub or switch. For any connection which will operate at 100 Mbps, you must
use a Category 5 rated cable, such as the Ethernet cable included with the Broadband Wireless Router.
1. Connect the Ethernet cable with your xDSL/ATU-R to the 10Base-T Ethernet WAN port on your Broadband
Wireless Router.
Note:
The attached xDSL/ATU-R must provide a standard 10Base-T Ethernet connection. Please
use the Ethernet cable comes with your broadband device or any other standard 10Base-T
Ethernet cable.
The Ethernet cable supplied by your ISP for connecting to your xDSL/ATU-R may be an
Ethernet crossover or a straight-through cable. It is important to use the cable provided by
your ISP to connect the modem to your Broadband Wireless Router.
2. Please attach one end of the Ethernet cable with RJ-45 connector to the LAN port of your Wireless Broadband
Router.
3. Connect the other end of the cable to the Ethernet port of the client PC.
4. If you want to connect to a hub for used by many devices, please connect the other end to the uplink port of
the hub.
5. Connect the supplied power adapter to the PWR port of your Router, and plug the other end to a power outlet.

Wireless Broadband Router User’s Manual
4
6. Turn on the power switch.

Chapter 3: Concepts for Connection
5
C
Ch
ha
ap
pt
te
er
r
3
3:
:
C
Co
on
nc
ce
ep
pt
ts
s
f
fo
or
r
C
Co
on
nn
ne
ec
ct
ti
io
on
n
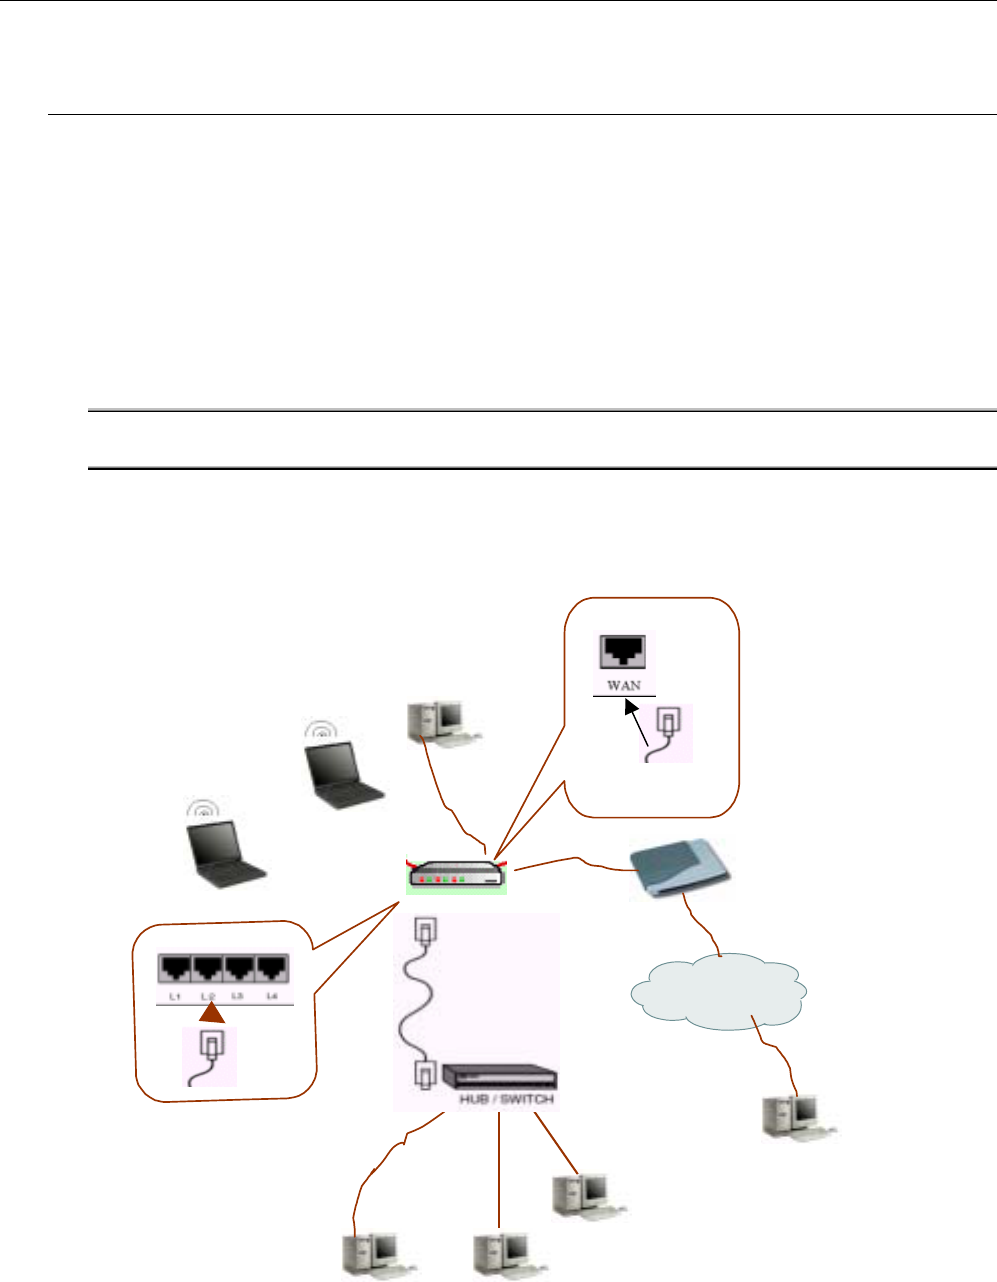
To configure the device via web browser, at least one properly-configured PC must be connected to the LAN port
(connected directly or through an external hub/switch to the LAN port of the device). The configuration can also be
performed on a wireless client station.
On Ethernet Client
To access the Broadband Wireless Router (AP) via the Ethernet interface, the host computer must install
TCP/IP protocol:
1. Choose a client PC and configure it to get a dynamic IP from the Broadband Wireless Router (AP).
2. Start up your browser and type 192.168.1.1 as the address to enter the web-based manager.
3. Enter the default password - admin.
4. Go to Setup Wizard to finish basic configuration. Select your WAN connection type. Available options include:
Cable Modem,Fixed-IP xDSL, Dial-Up xDSL(PPPoE). Follow the onscreen instructions to finish the basic
setting procedure. Finally, click Finish to exit basic setting web page.
Note: You should contact your ISP for the correct connection type and its corresponding
configuration information.
5. When the connection is established, the client PCs can access the Internet or remote network through the
Broadband Wireless Router.
Wireless Broadband Router User’s Manual
6
On Wireless Client
1. Install the wireless card driver and verify the wireless setting is as below:
The default SSID: IEEE 802.11 LAN
WEP encryption is disabled. Authentication Type is Open Key (or Open System according to your Wireless
LAN Card).
Use Infrastructure connection mode.
2. Check that the TCP/IP protocol is installed on your wireless client PC. Configure it to get a dynamic IP from the
Broadband Wireless Router.
3. Enter the default password - admin.
4. Go to Setup Wizard to finish basic configuration. Select your WAN connection type. Available options include:
Cable Modem,Fixed-IP xDSL, Dial-Up xDSL(PPPoE). Follow the onscreen instructions to finish the basic
setting procedure. Finally, click Finish to exit basic setting web page.
Note: You should contact your ISP for the correct connection type and its corresponding
configuration information.
5. When the connection is established, the client PCs can access the Internet or remote network through the
Broadband Wireless Router.
For the wireless-interfaced station, you need to set its SSID to the Broadband Wireless Router (AP)’s default SSID
value and disable the WEP encryption.
xDSL /ATU-R
Internet
Remote client
Network 1Network 2
Chapter 3: Concepts for Connection
7
xDSL/ATU-R Connection
The Broadband Wireless Router provides continuous and high-speed access between your wireless and Ethernet
devices. In addition, it can connect your entire network to the Internet through an external broadband access device.
Note:
The attached xDSL/ATU-R must provide a standard 10Base-T Ethernet connection. Please use
the Ethernet cable comes with your broadband device or any other standard 10Base-T Ethernet
cable.
The Ethernet cable supplied by your ISP for connecting to your xDSL/ATU-R may be an Ethernet crossover cable or
a straight-through cable. It is important to use the cable provided by your ISP to connect the modem to your
Broadband Wireless Router.
C
Co
on
nn
ne
ec
ct
ti
in
ng
g
t
to
o
Y
Yo
ou
ur
r
x
xD
DS
SL
L
M
Mo
od
de
em
m
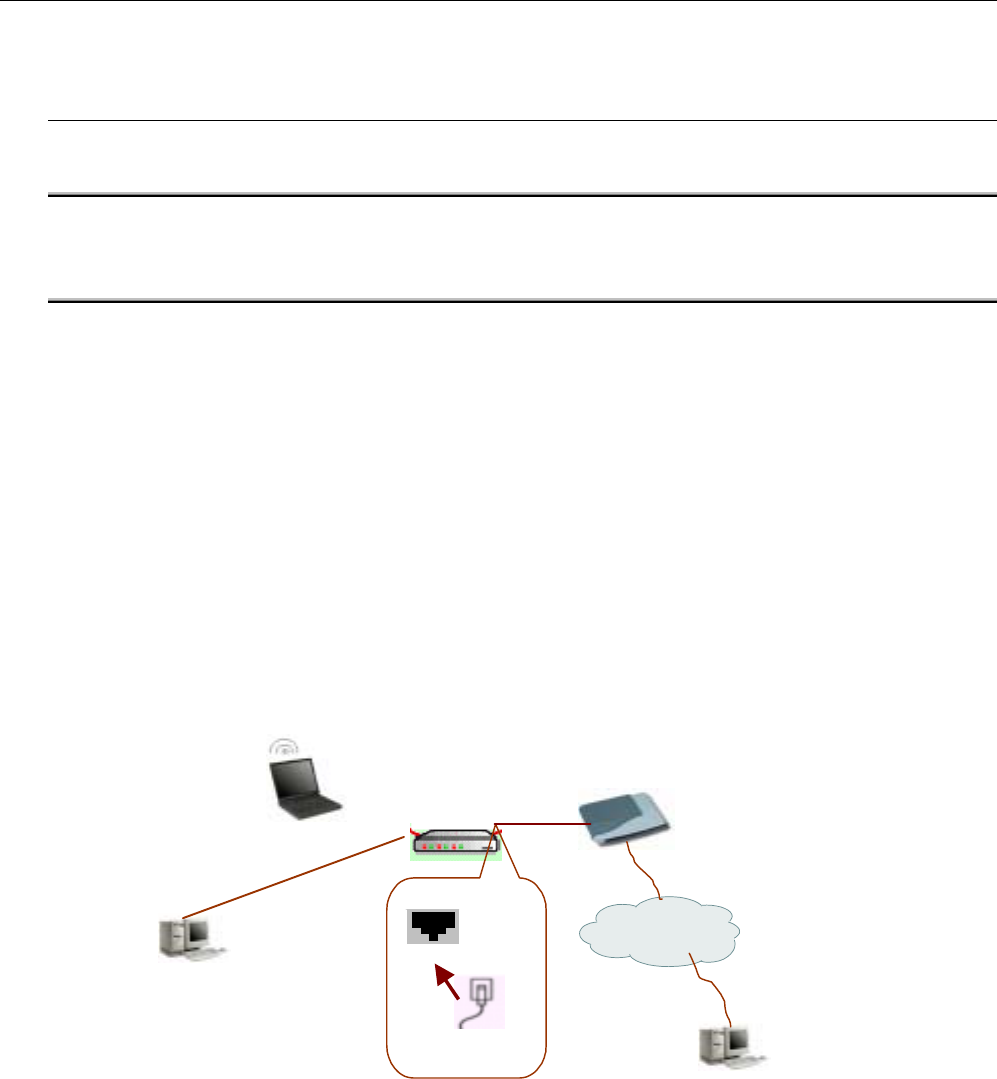
If you are going to connect the WAN port to a DSL modem, follow the steps below:
1. Use the Ethernet cable comes with your DSL modem. Plug one end to the 10Base-T Ethernet port of the
modem, and the other end to the WAN port on your Broadband Wireless Router.
2. Attach one end of the Ethernet cable with RJ-45 connector to the LAN port of your Broadband Wireless Router,
and the other end to a hub or a client PC.
3. At the LAN side, you also can use wireless client at the same time.
4. Set the DSL Modem’s connection mode as bridge mode.
5. Enter the web-based Configuration Manager to configure the WAN setting. Choose the connection type that
you registered from your ISP.
Network 1
Internet
xDSL Modem
Broadband Wireless Router(AP)
Wireless LAN
Ethernet LAN Network 2
WAN

Wireless Broadband Router User’s Manual
8
Chapter 4: Configuration
9
C
Ch
ha
ap
pt
te
er
r
4
4:
:
C
Co
on
nf
fi
ig
gu
ur
ra
at
ti
io
on
n
In order to access the Internet through the router, each host on your network must install/setup TCP/IP. Please follow
the steps below for select a network adapter.
Setting TCP/IP on Client PC
To access the Router via Ethernet, the host computer must meet the following requirements:
With Ethernet network interface.
Must have TCP/IP installed.
Set client PC with obtain an IP address automatically or set fix IP address.
With a web browser installed: Internet Explorer 5.x or later.
The Router is configured with the default IP address of 192.168.1.1 and subnet mask of
255.255.255.0. As the DHCP server is Enable by default, the DHCP clients should be able to access the
Router. Or you could assign an IP address to the host PC first for initial configuration.
You also can manage the Router through a web browser-based manager. The Router manager uses the HTTP protocol
via a web browser to allow you to set up and manage the device.
To configure the device via web browser, at least one properly-configured PC must be connected to the network
(either connected directly or through an external hub/switch to the LAN port of the device).
If TCP/IP is not already installed, follow the steps below for installation.
F
Fo
or
r
W
Wi
in
nd
do
ow
ws
s
9
98
8
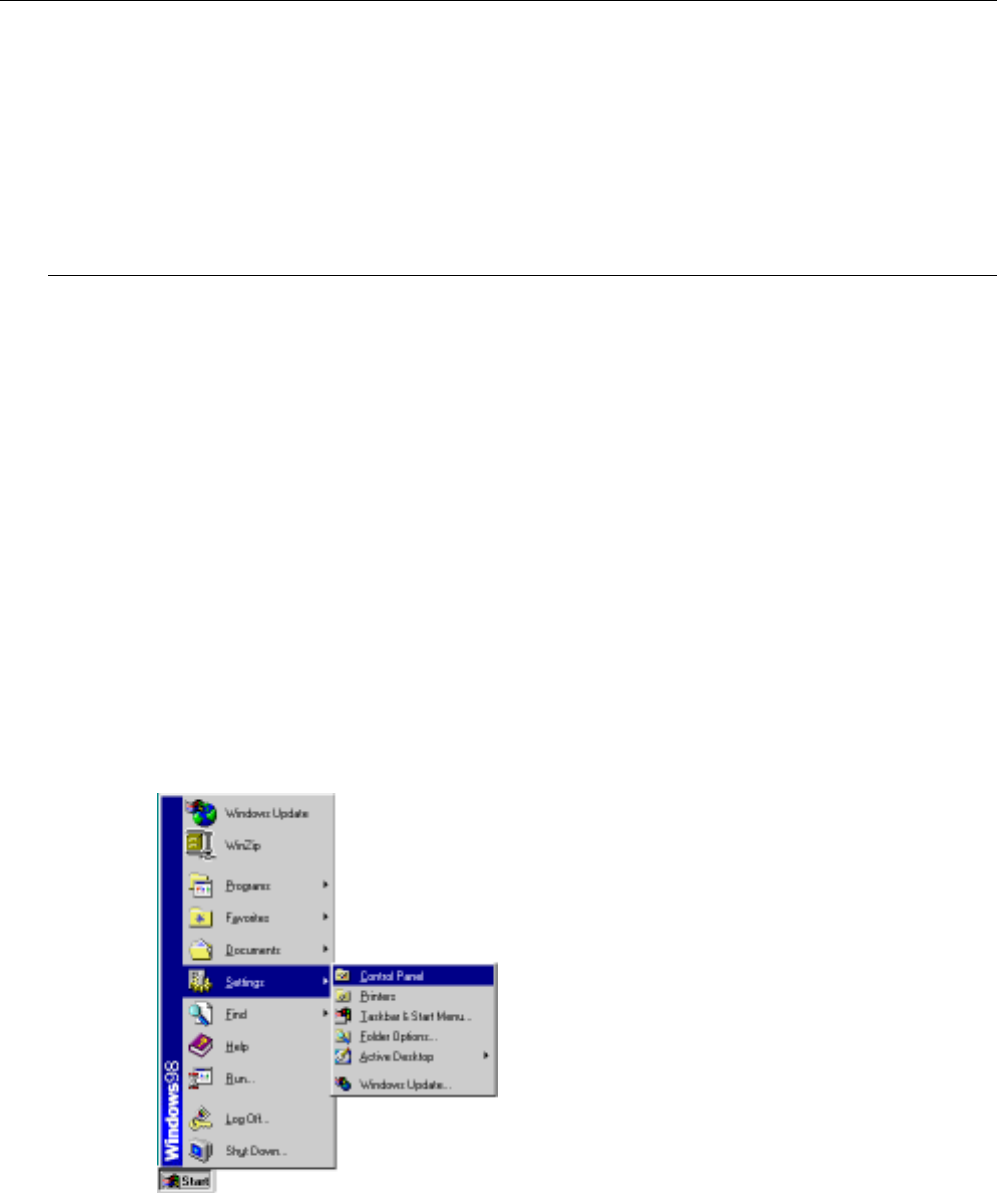
1. Click on the Start menu, point to Settings and click on Control Panel.
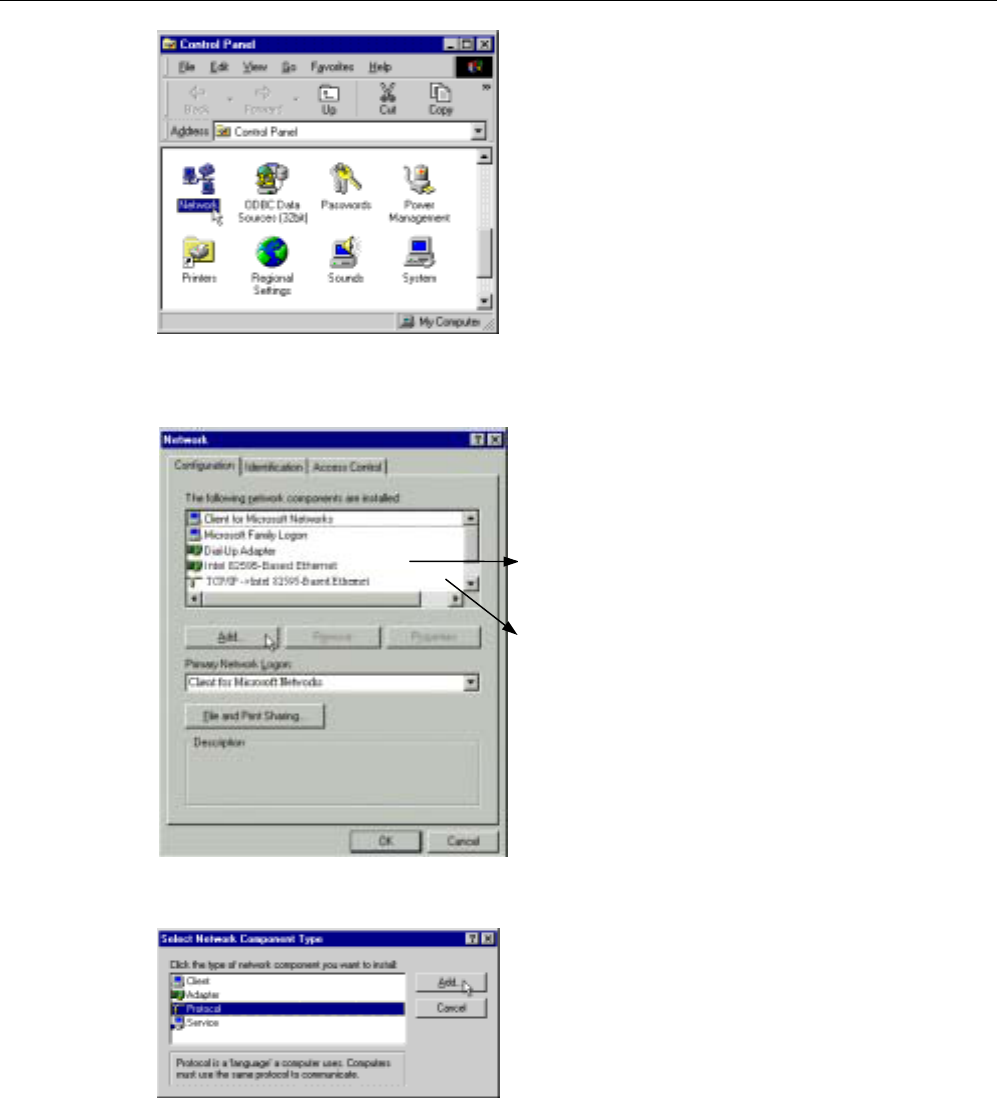
2. Double-click the Network icon.
Wireless Broadband Router User’s Manual
10
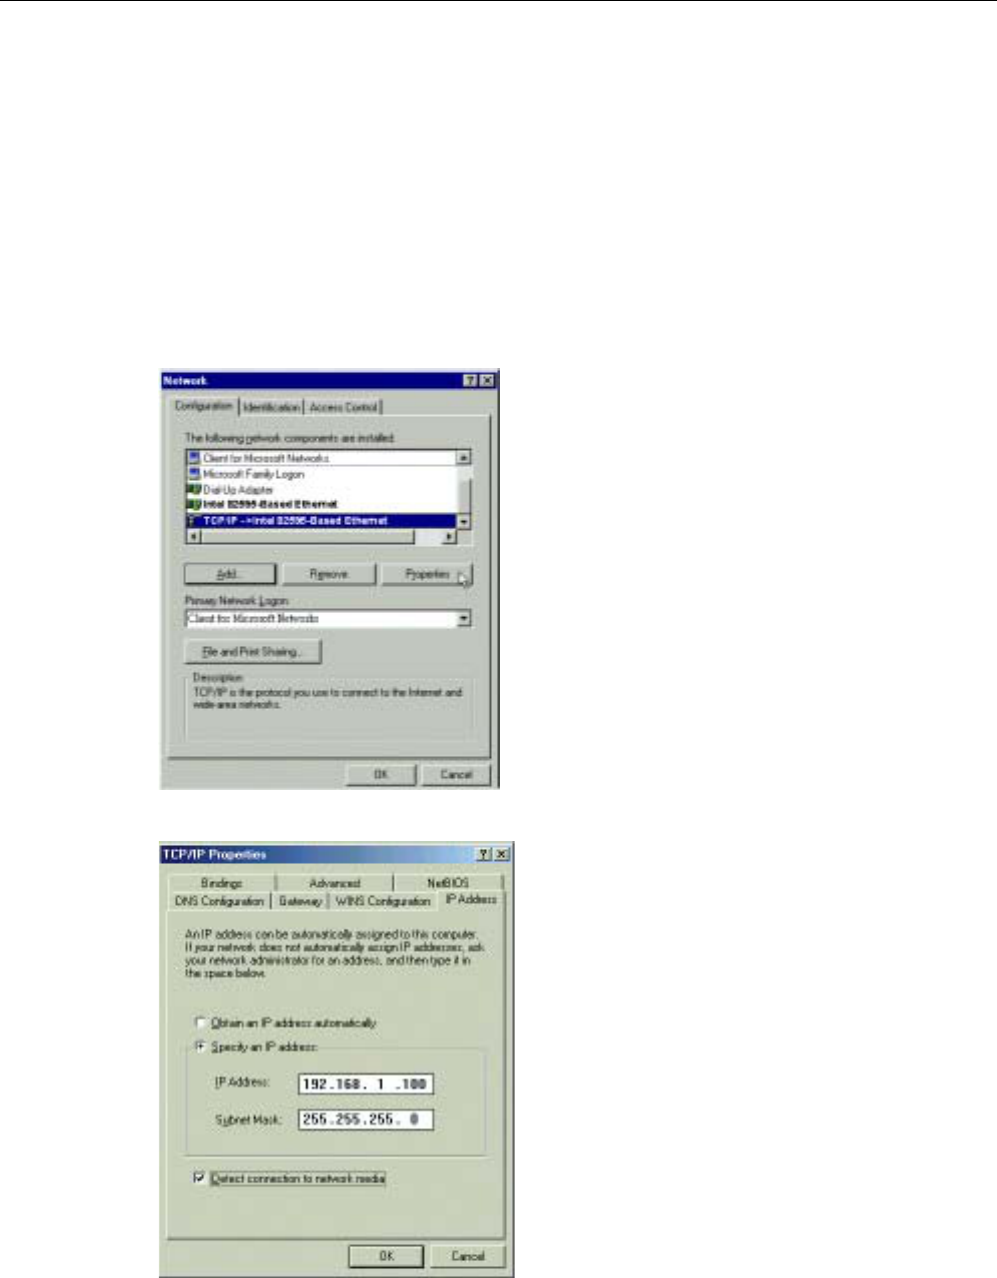
3. The Network window appears. On the Configuration tab, check out the list of installed network components.
Option 1: If you have no TCP/IP protocol, click Add.
Option 2: If you have TCP/IP protocol, go to Step 6.
Your network
interface card.
Check out if TCP/IP
for your NIC is
installed or not.
4. Highlight Protocol and click Add.
Chapter 4: Configuration
11
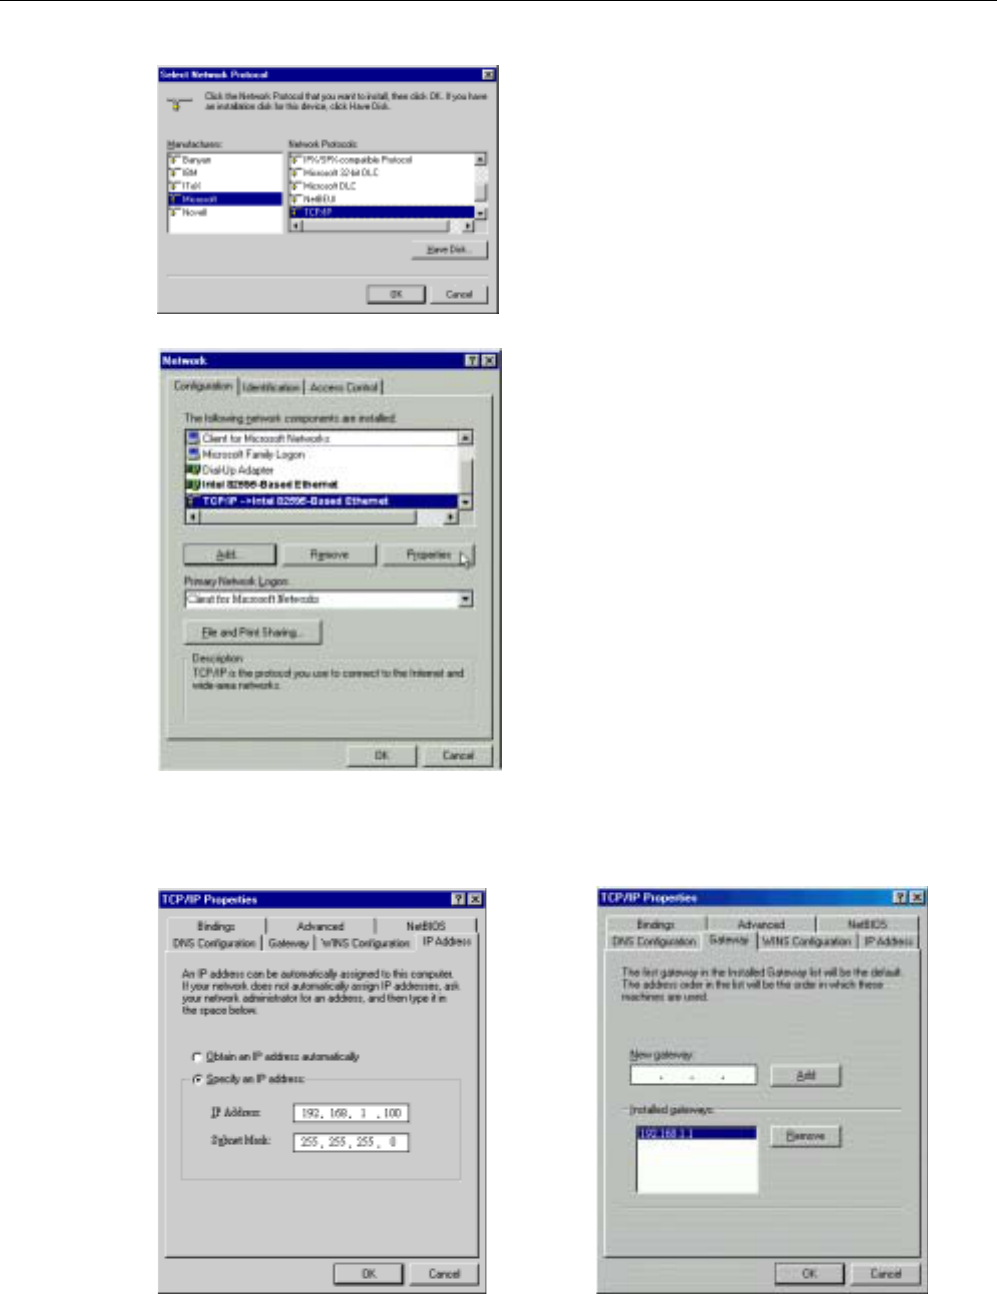
5. On the left side of the windows, highlight Microsoft and then select TCP/IP on the right side. Then click OK.
6. When returning to Network window, highlight TCP/IP protocol for your NIC and click Properties.
7. On IP Address tab:
Enable Specify an IP address option. Enter the IP Address: 192.168.1.x (x is between 2 and 254) and Subnet
Mask: 255.255.255.0 as in figure below. On Gateway tab: Add a gateway IP address: 192.168.1.1. And click
OK.
8. When returning to Network window, click OK.
Wireless Broadband Router User’s Manual
12
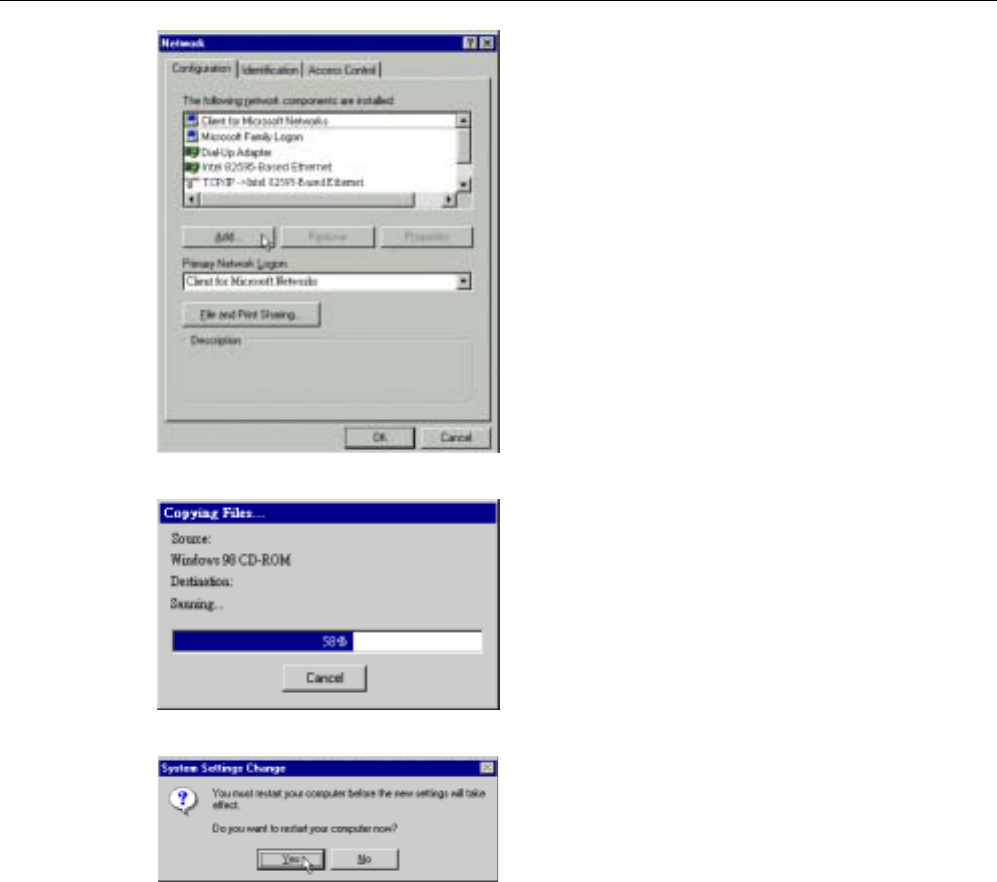
9. Wait for Windows copying files.
10. When prompted with System Settings Change dialog box, click Yes to restart your computer.
Chapter 4: Configuration
13
F
Fo
or
r
W
Wi
in
nd
do
ow
ws
s
M
ME
E
Step 1 Click on the Start menu, point to Settings and click on Control Panel.
Step 2 Double-click the Network icon.
Step 3 The Network window appears. On the Configuration tab, check out the list of installed network
components.
Option 1: If you have no TCP/IP protocol, click Add.
Option 2: If you have TCP/IP protocol, go to Step 6.
Step 4 Highlight Protocol and click Add.
Step 5 On the left side of the windows, highlight Microsoft and then select TCP/IP on the right side. Then click
OK.
Step 6 While returning to Network window, highlight TCP/IP protocol for your NIC and click Properties.
Step 7 On the IP Address tab, select Specify an IP address. Enter the IP address: 192.168.1.x (x is between 2 and
254), Subnet Mask: 255.255.255.0 and Default gateway: 192.168.1.1. Then click OK.
Step 8 While returning to the Network window, click OK.
Step 9 Wait for Windows copying files.
Step 10 When prompted with the System Settings Change dialog box, click Yes to restart your computer.
F
Fo
or
r
W
Wi
in
nd
do
ow
ws
s
N
NT
T
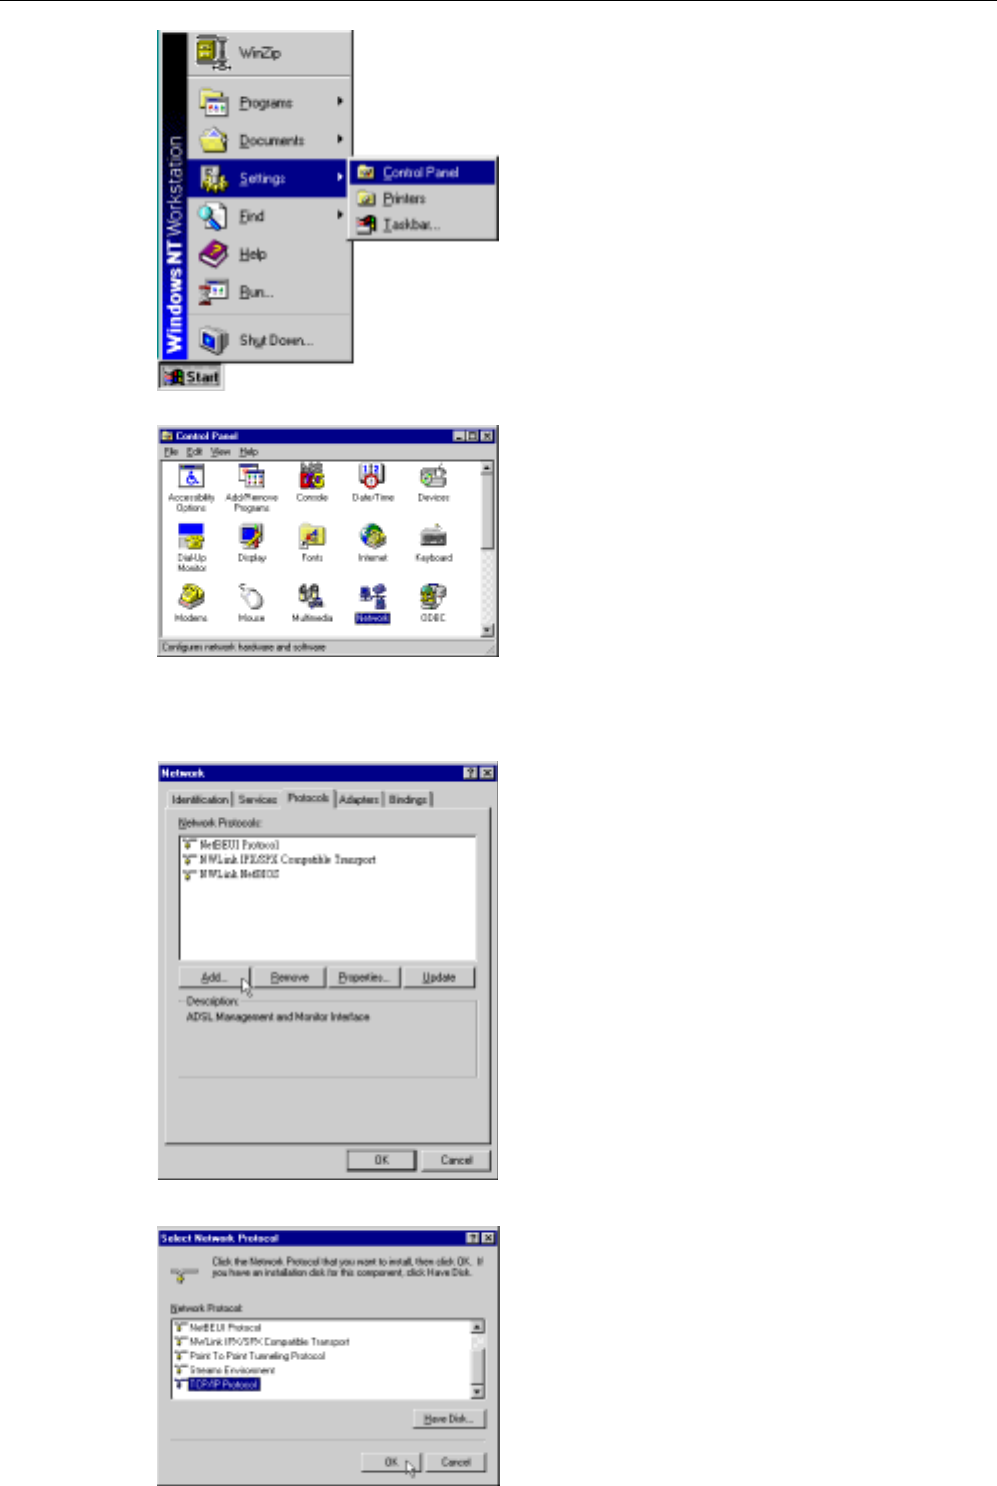
1. Click Start, point to Settings, and then click Control Panel.
Wireless Broadband Router User’s Manual
14
2. Double-click the Network icon.
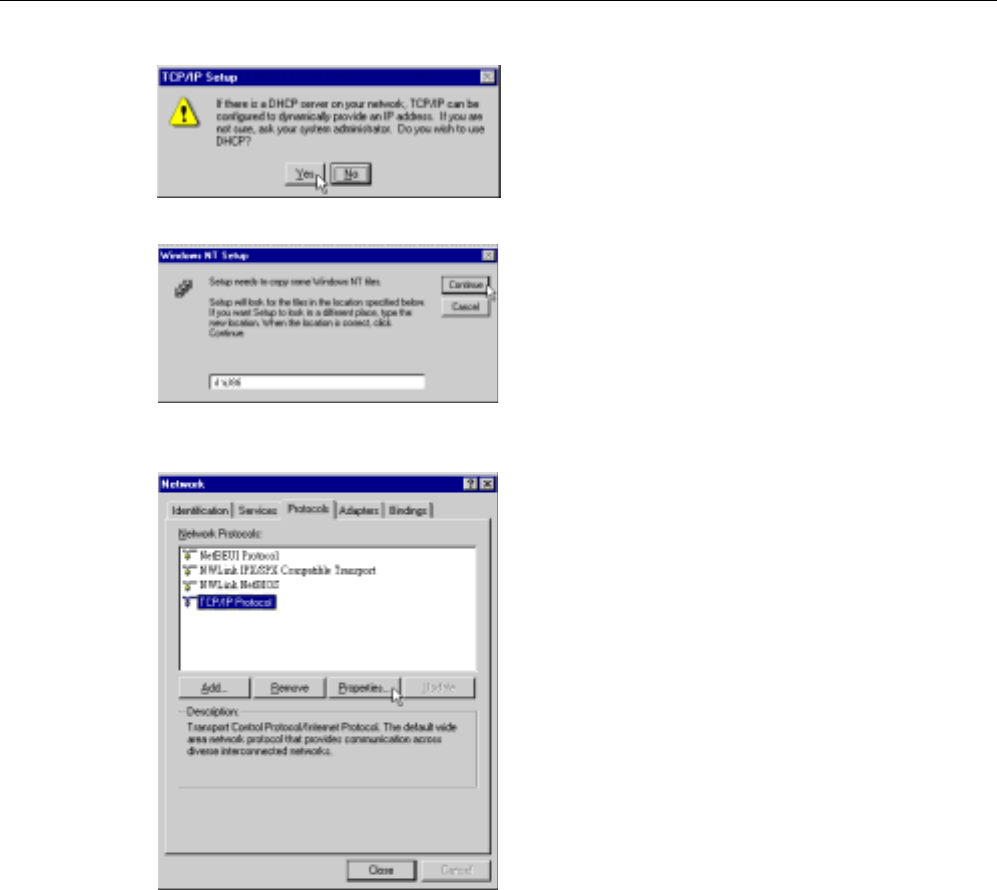
3. The Network window appears. On the Protocols tab, check out the list of installed network components.
Option 1: If you have no TCP/IP Protocol, click Add.
Option 2: If you have TCP/IP Protocol installed, go to Step 7.
4. Highlight TCP/IP Protocol and click OK.
Chapter 4: Configuration
15
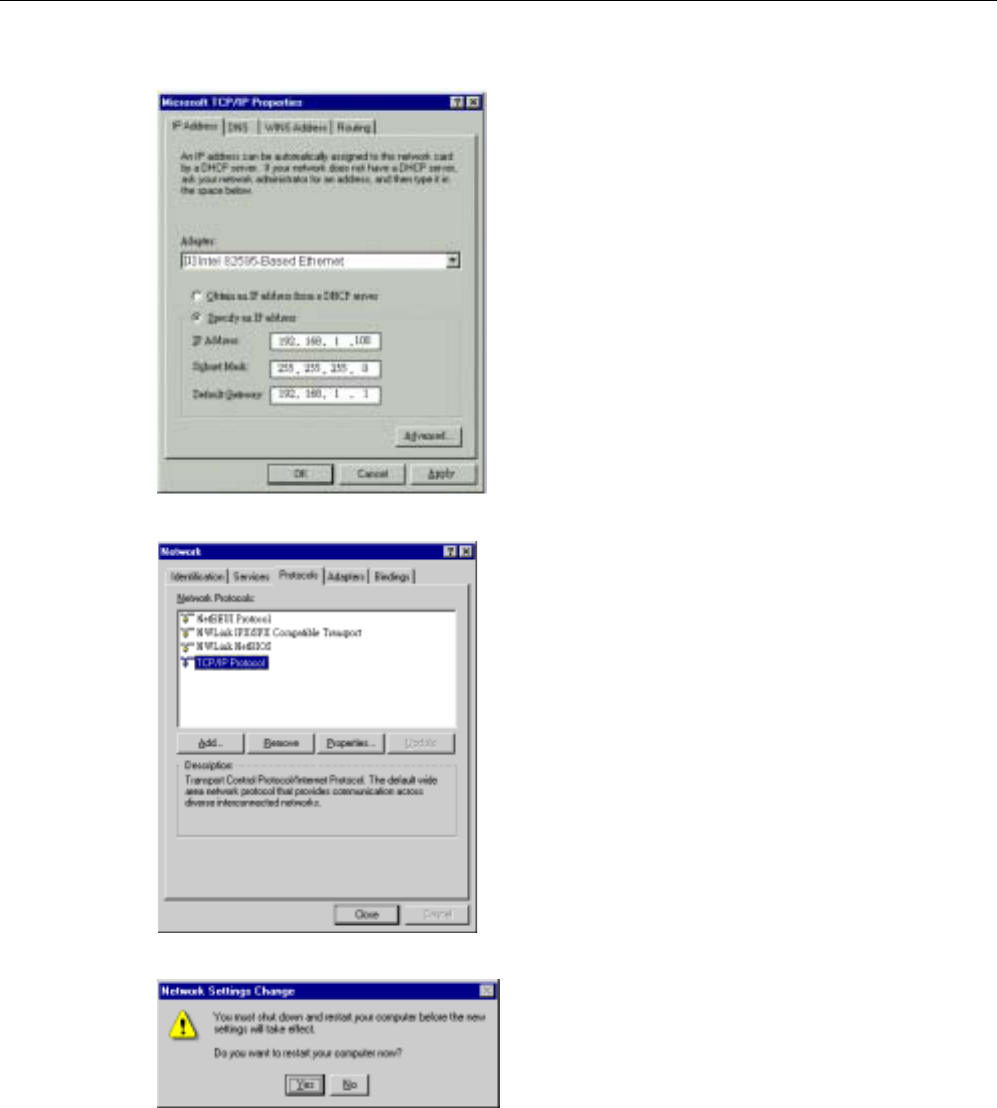
5. Click Yes to use DHCP.
6. Insert the Windows NT CD into your CD-ROM drive and type the location of the CD. Then click Continue.
7. Returning to the Network window, you will find the TCP/IP Protocol among the list. Select TCP/IP Protocol
and click Properties.
Wireless Broadband Router User’s Manual
16
8. Enable Specify an IP address option. Enter the IP Address: 192.168.1.x (x is between 2 and 254) and Subnet
Mask: 255.255.255.0 and Default Gateway: 192.168.1.1 as in figure below.
9. When returning to Network window, click Close.
10. When prompted with Network Settings Change dialog box, click Yes to restart your computer.
Chapter 4: Configuration
17
F
Fo
or
r
W
Wi
in
nd
do
ow
ws
s
2
20
00
00
0
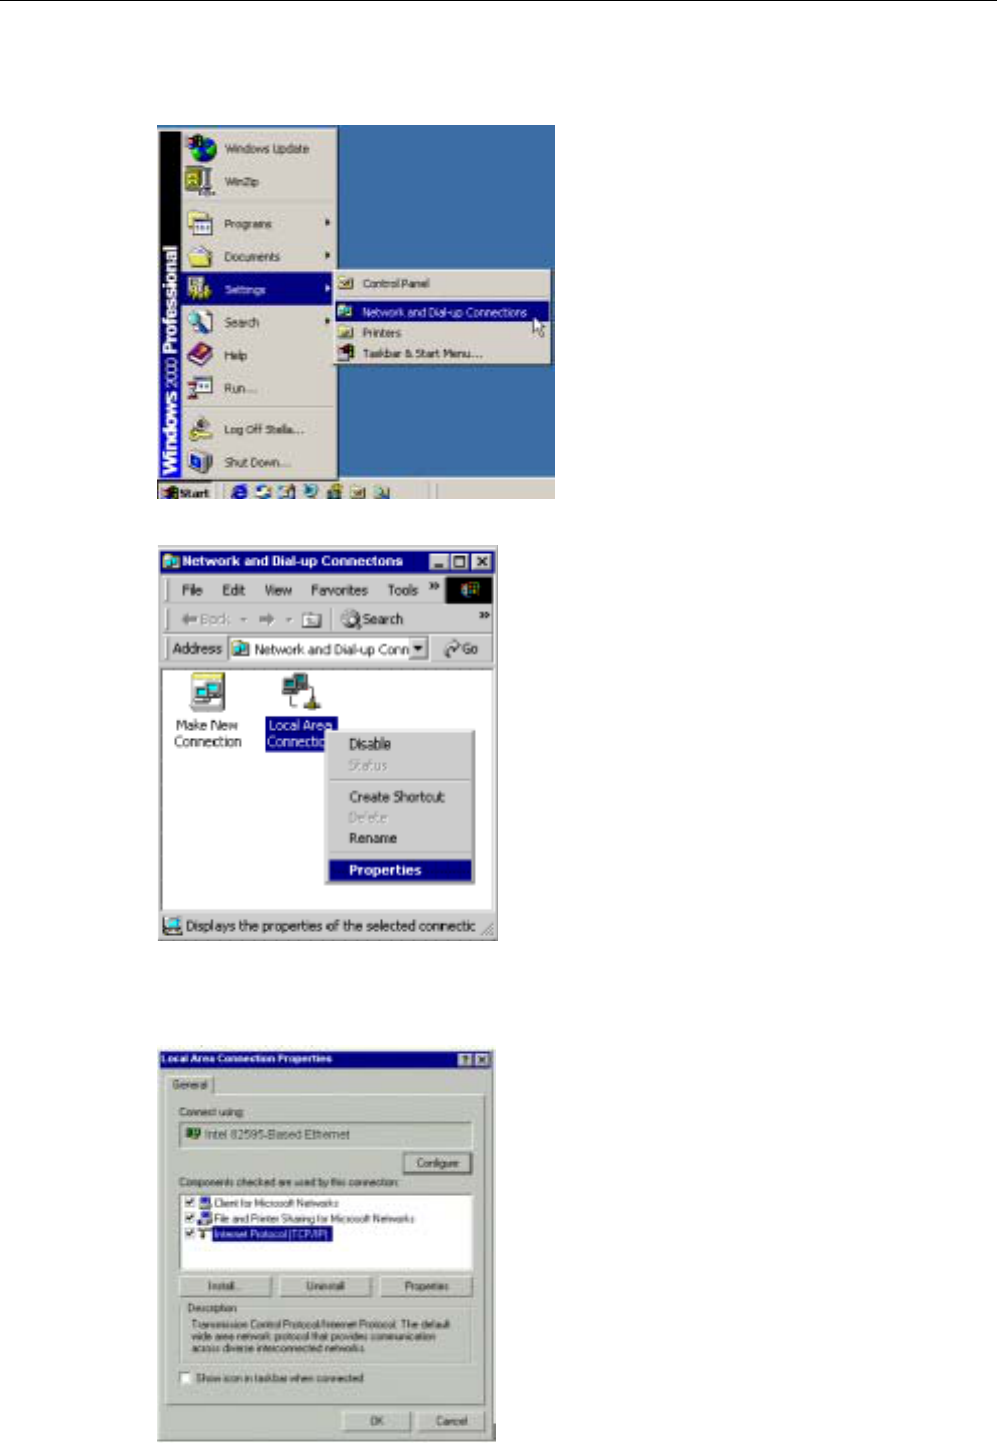
1. From the Start menu, point to Settings and then click Network and Dial-up Connections.
2. Right-click the Local Area Connection icon and then click Properties.
3. On the General tab, check out the list of installed network components.
Option 1: If you have no TCP/IP Protocol, click Install.
Option 2: If you have TCP/IP Protocol, go to Step 6.
4. Highlight Protocol and then click Add.
Wireless Broadband Router User’s Manual
18
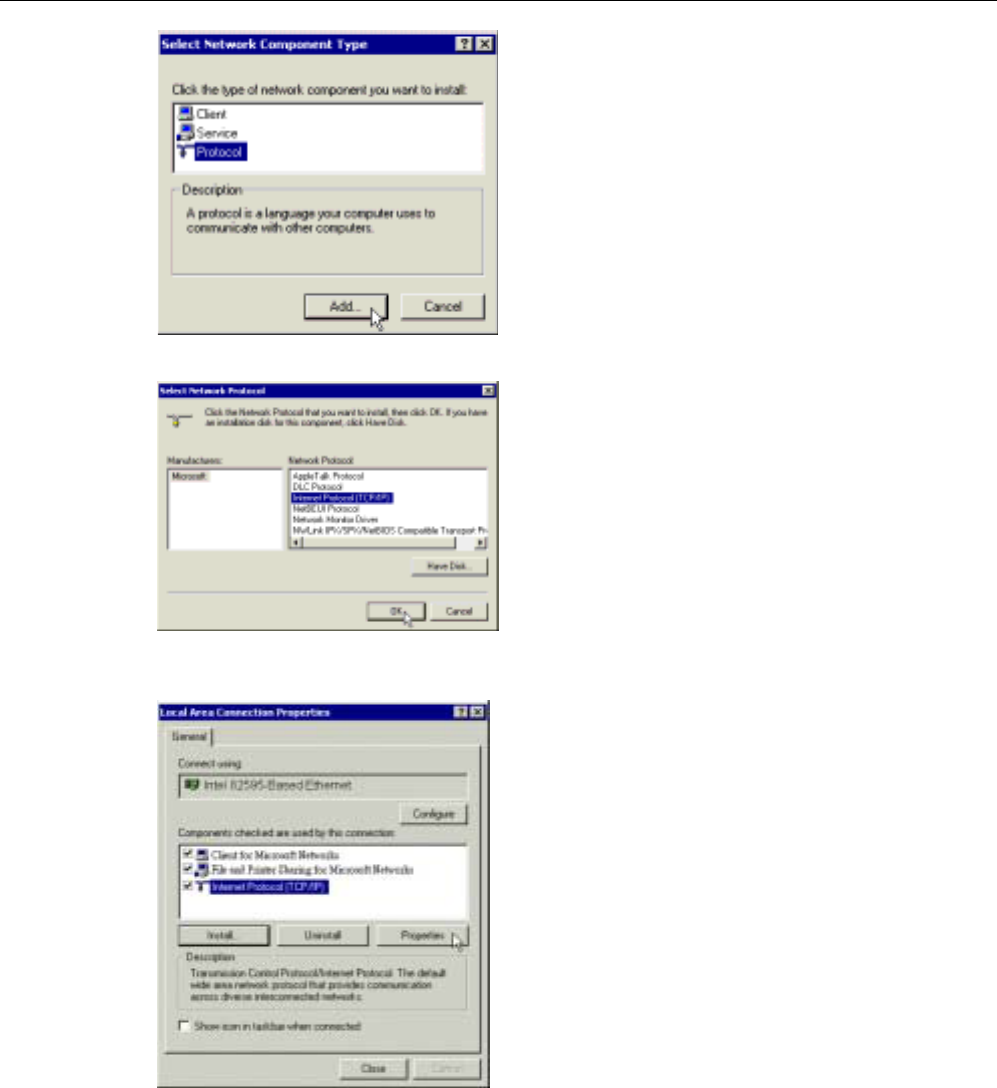
5. Click Internet Protocol (TCP/IP) and then click OK.
6. When returning to Local Area Connection Properties window, highlight Internet Protocol (TCP/IP) and then
click Properties.
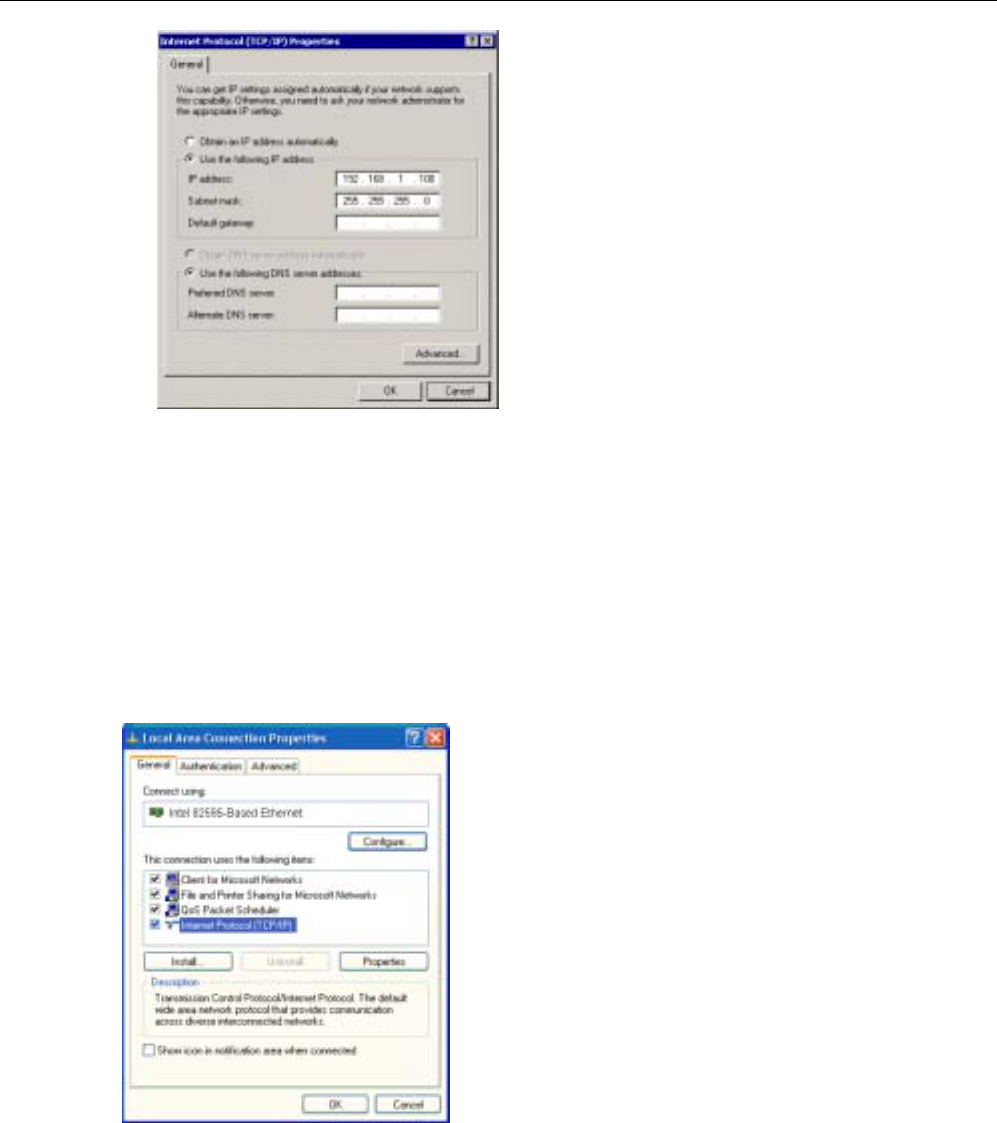
7. Under the General tab, enable Use the following IP Address. Enter the IP address: 192.168.1.x (x is between
2 and 254), Subnet Mask: 255.255.255.0 and Default gateway: 192.168.1.1. Then click OK. When prompted
to restart your computer, reboot it to enable the settings.
Chapter 4: Configuration
19
F
Fo
or
r
W
Wi
in
nd
do
ow
ws
s
X
XP
P
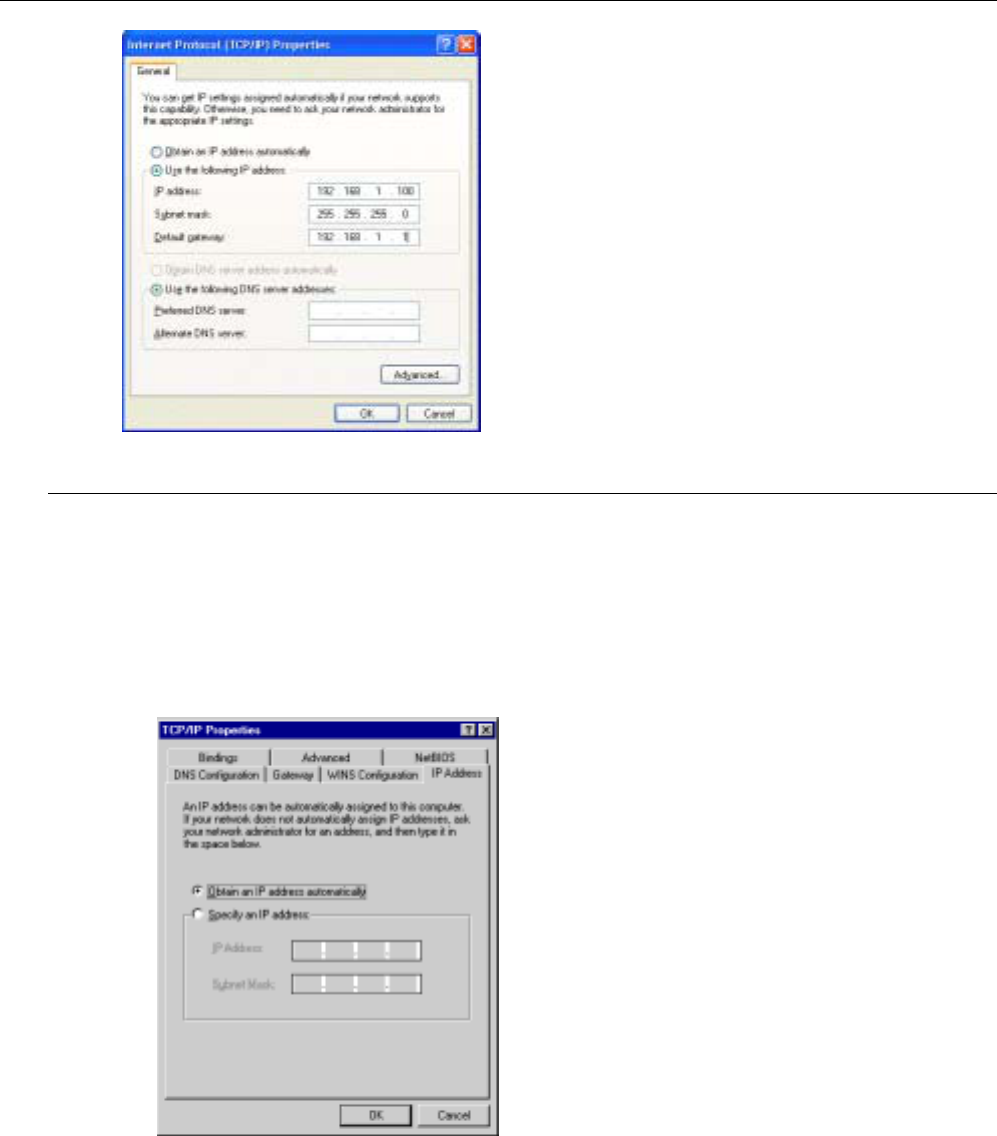
Step 1 From the Start menu, point to Control Panel and then click Network and Internet Connections.
Step 2 Click Network Connection and then click Properties.
Step 3 On the General tab, check out the list of installed network components.
Option 1: If you have no TCP/IP Protocol, click Install.
Option 2: If you have TCP/IP Protocol, go to Step 6.
Step 4 Highlight Protocol and then click Add.
Step 5 Click Internet Protocol(TCP/IP) and then click OK.
Step 6 On the Local Area Connection Properties window, highlight Internet Protocol (TCP/IP) and then click
Properties.
Step 7 Under the General tab, enable Use the following IP address. Enter the IP address: 192.168.1.x (x is
between 2 and 254), Subnet Mask: 255.255.255.0 and Default gateway: 192.168.1.1. Then click Ok
Wireless Broadband Router User’s Manual
20
Configure PC to get IP address from DHCP
If your ADSL Router operates as a DHCP server for the client PCs on the LAN, you should configure the client PCs
to obtain a dynamic IP address. Please follow the previous section to install TCP/IP component. Only that you do not
need to specify an IP address when configuring TCP/IP properties.
The following section describe the procedures for CPEs to get IP address:
F
Fo
or
r
W
Wi
in
nd
do
ow
ws
s
9
98
8
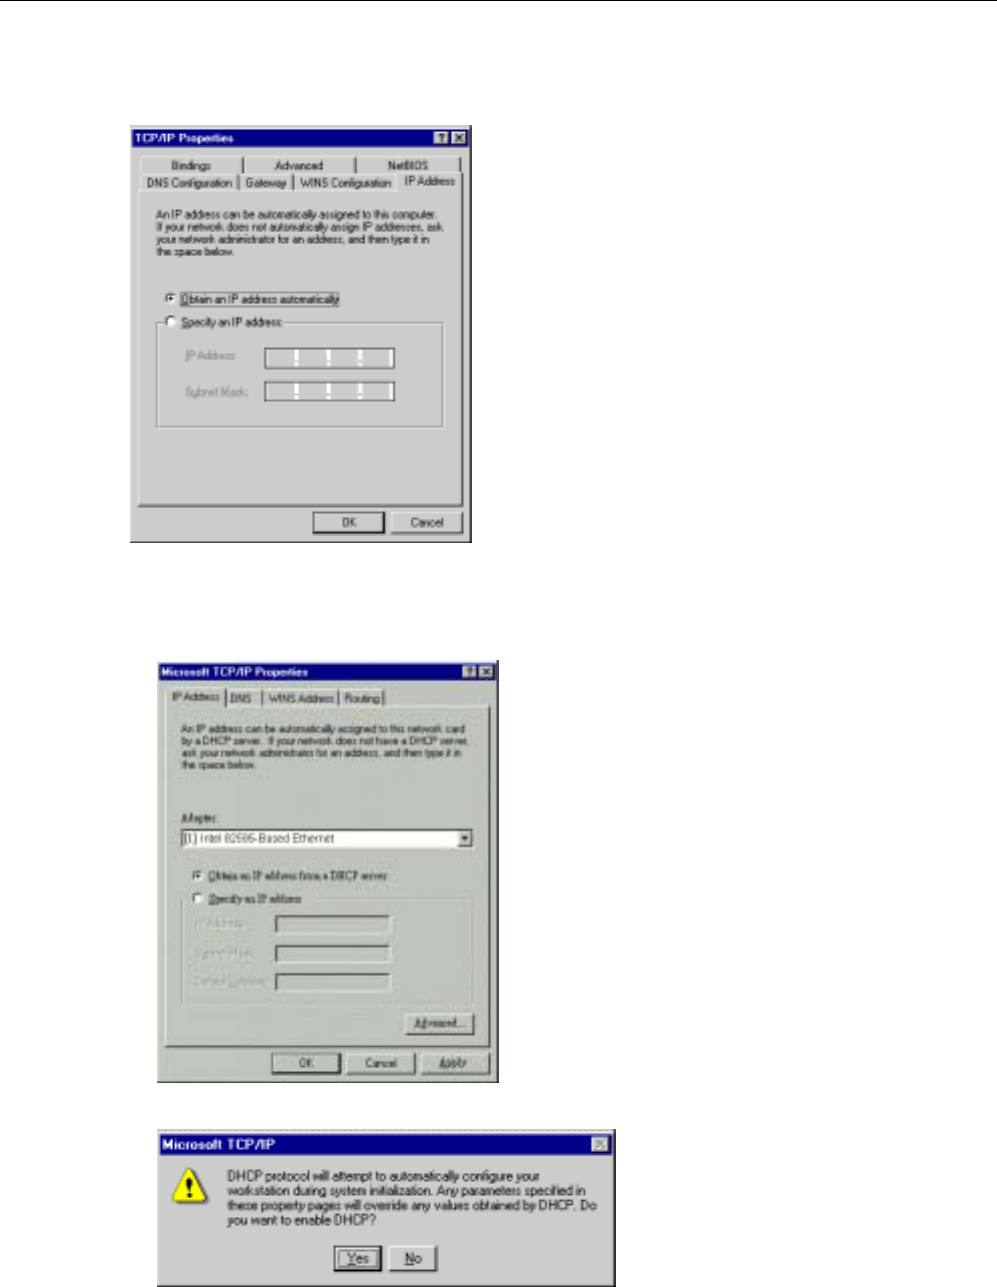
On the IP Address tab, select Obtain an IP address automatically. Then click OK.
Chapter 4: Configuration
21
F
Fo
or
r
W
Wi
in
nd
do
ow
ws
s
M
ME
E
On the IP Address tab, select Obtain an IP address automatically. Then click OK.
F
Fo
or
r
W
Wi
in
nd
do
ow
ws
s
N
NT
T
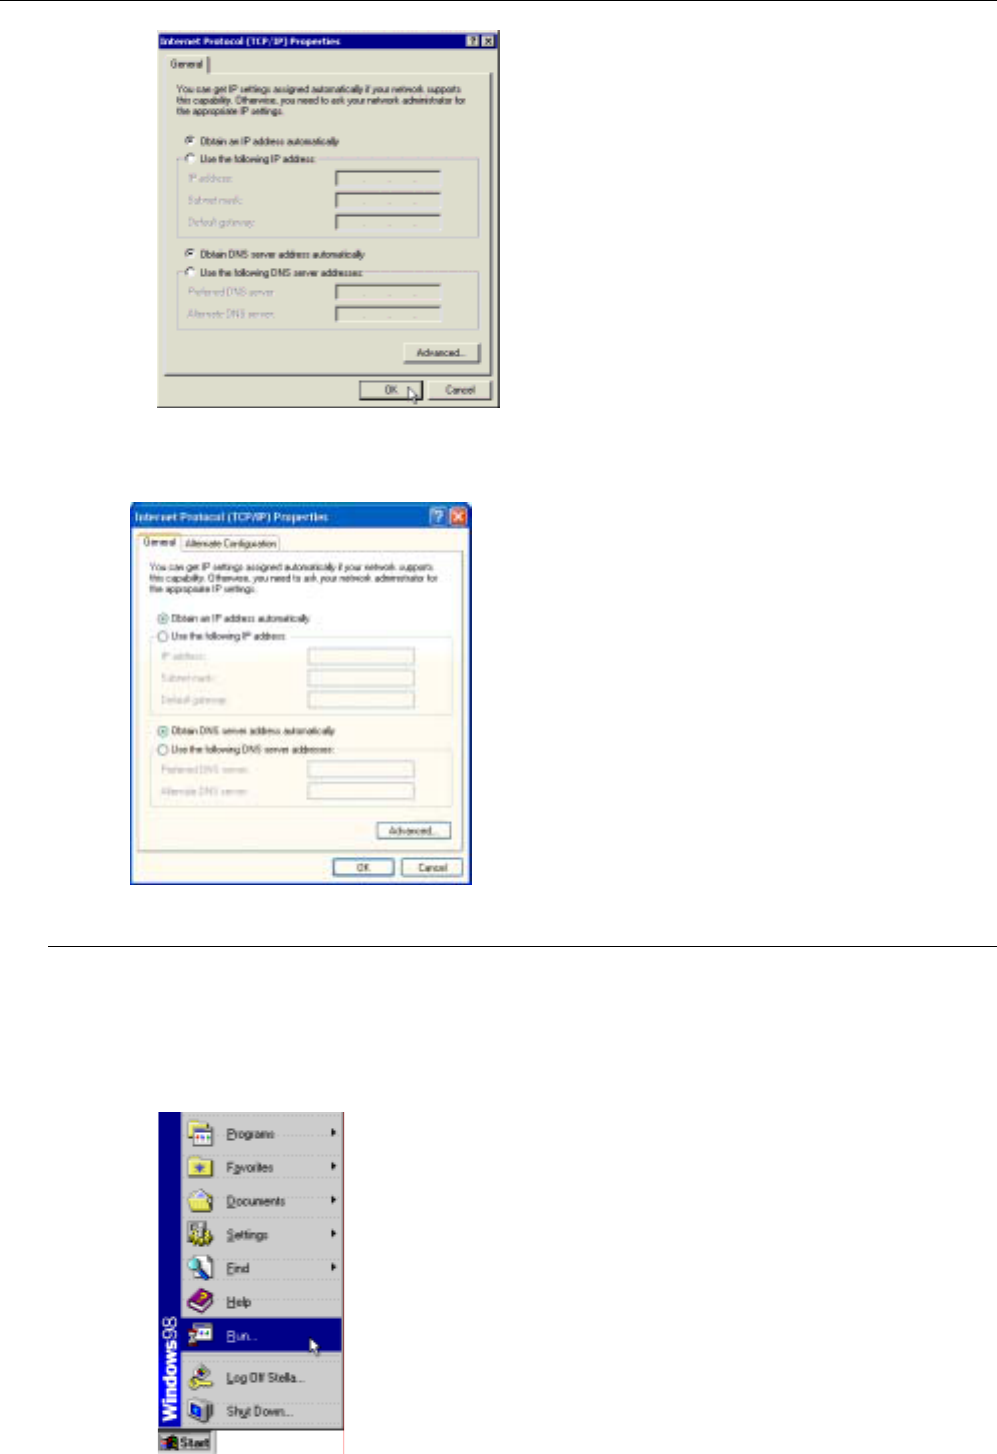
On the IP Address tab, click on the drop-down arrow of Adapter to select required adapter. Enable Obtain an IP
address from a DHCP server and then click OK.
When prompted with the message below, click Ye s to continue.
F
Fo
or
r
W
Wi
in
nd
do
ow
ws
s
2
20
00
00
0
Enable Obtain an IP address automatically and then click OK.
Wireless Broadband Router User’s Manual
22
F
Fo
or
r
W
Wi
in
nd
do
ow
ws
s
X
XP
P
On the IP Address tab, select Obtain an IP address automatically. Then click OK.
Renew IP Address on Client PC
There is a chance that your PC does not renew its IP address after the ADSL Router is on line and the PC can not
access the Internet. Please follow the procedures below to renew PC’s IP address.
F
Fo
or
r
W
Wi
in
nd
do
ow
ws
s
9
98
8
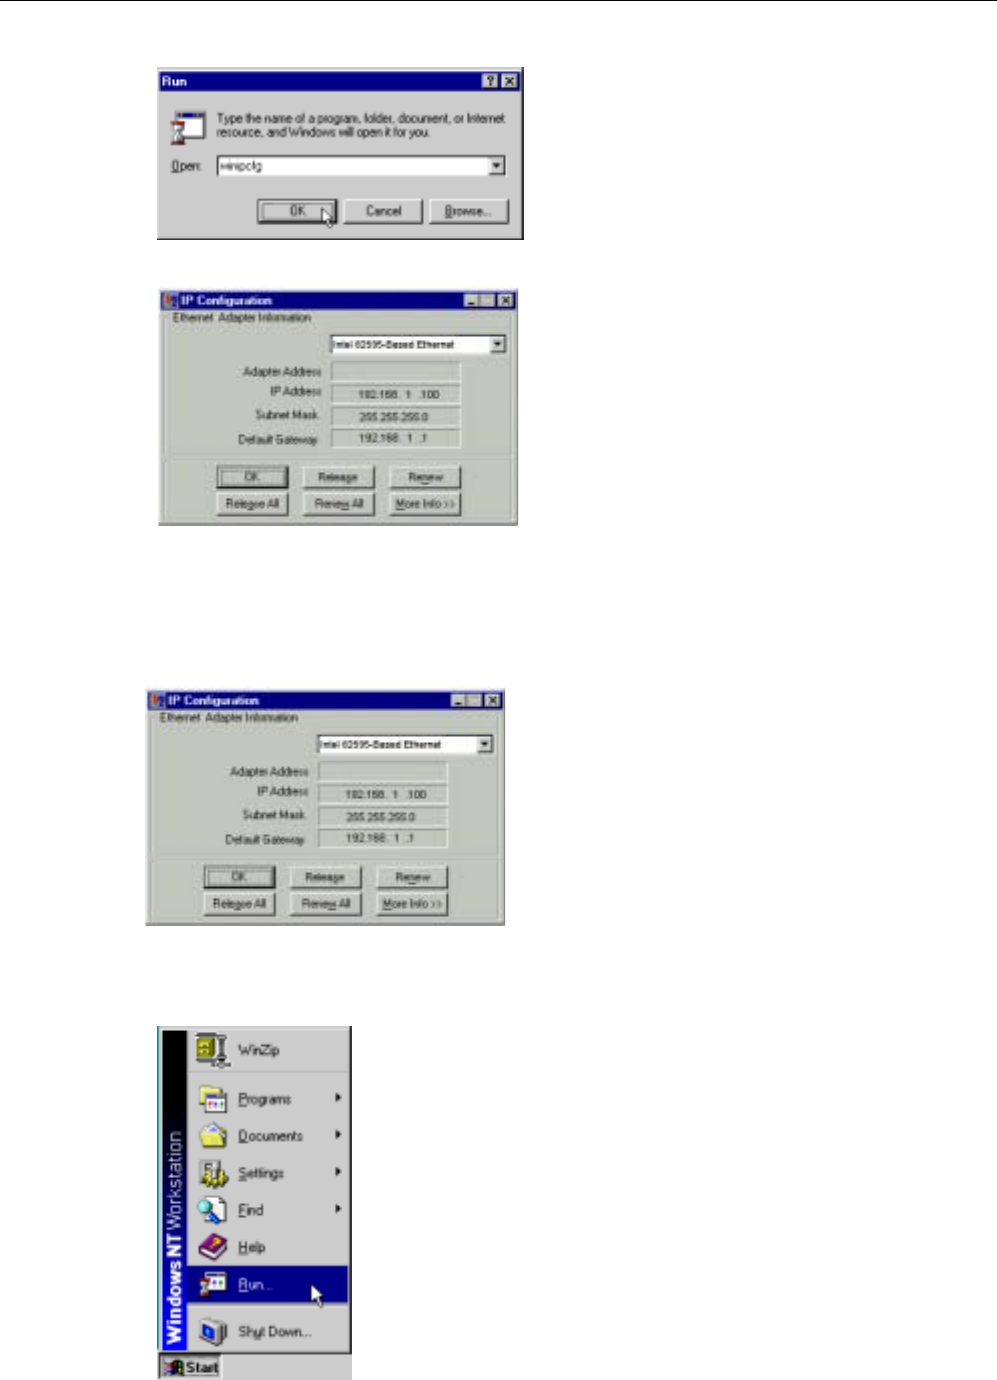
1. Select Run from the Start menu.
Chapter 4: Configuration
23
2. Type winipcfg in the dialog box and the click OK.
3. When the figure below appears, click Release and then Renew to get an IP address.
F
Fo
or
r
W
Wi
in
nd
do
ow
ws
s
M
ME
E
1. Select Run from the Start menu.
2. Type winipcfg in the dialog box and the click OK.
3. When the figure below appears, click Release and then Renew to get an IP address.
F
Fo
or
r
W
Wi
in
nd
do
ow
ws
s
N
NT
T
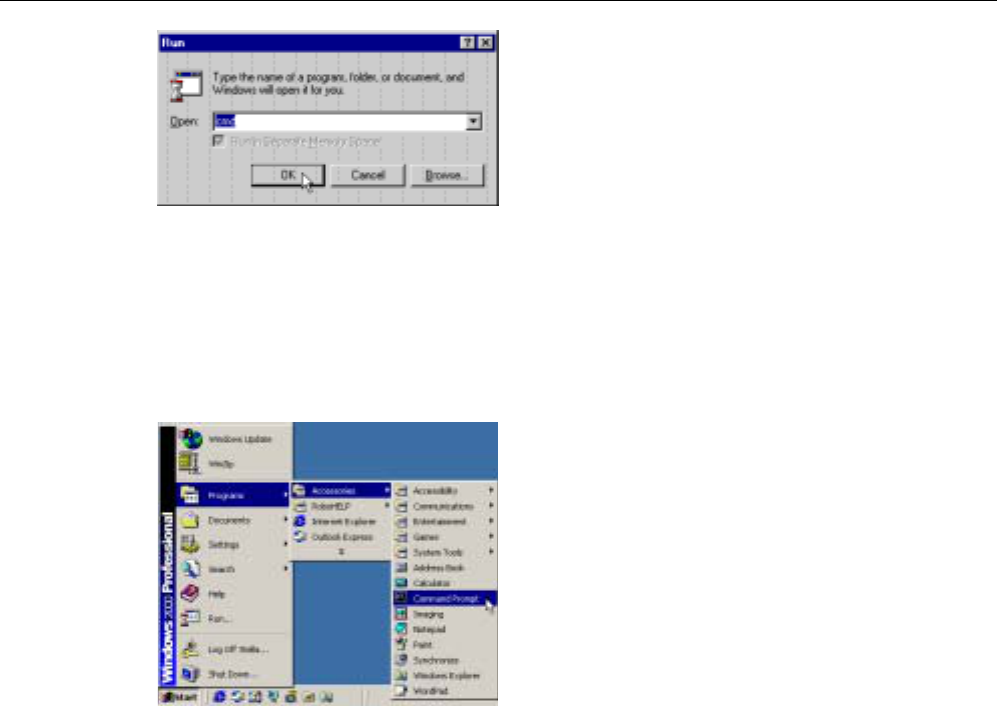
1. Select Run from the Start menu.
2. Type cmd in the dialog box and the click OK.
Wireless Broadband Router User’s Manual
24
3. Type ipconfig at prompt. Then you will see the IP information from DHCP server.
4. If you want to get a new IP address, type ipconfig /release to release the previous IP address and then
type ipconfig /renew to get a new one.
F
Fo
or
r
W
Wi
in
nd
do
ow
ws
s
2
20
00
00
0
1. From the Start menu, point to Programs, Accessories and then click Command Prompt.
2. Type ipconfig at prompt. Then you will see the IP information from DHCP server.
3. If you want to get a new IP address, type ipconfig /release to release the previous IP address and then
type ipconfig /renew to get a new one.
F
Fo
or
r
W
Wi
in
nd
do
ow
ws
s
X
XP
P
1. From the Start menu, point to Programs, Accessories and then click Command Prompt.
2. Type ipconfig at prompt. Then you will see the IP information from DHCP server.
3. If you want to get a new IP address, type ipconfig /release to release the previous IP address and then
type ipconfig /renew to get a new one.
Chapter 5: Web Configuration
25
C
Ch
ha
ap
pt
te
er
r
5
5:
:
W
We
eb
b
C
Co
on
nf
fi
ig
gu
ur
ra
at
ti
io
on
n
Using the Web-Based Manager
Once your host PC is properly configured as described in previous chapters, please proceed as follows:
1. Start your web browser and type the private IP address of the Wireless Broadband Router in the URL field:
192.168.1.1.
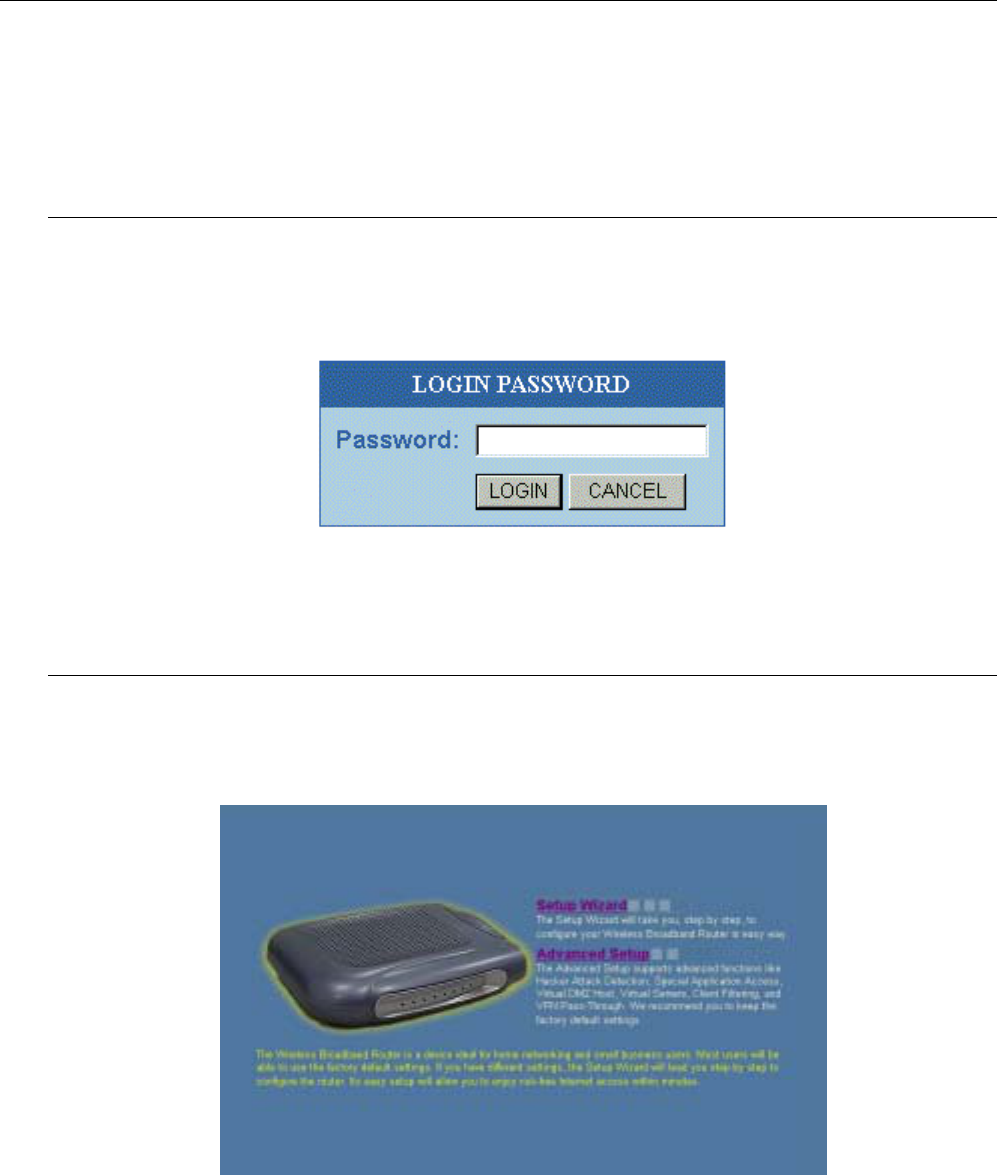
2. After connecting to the device, you will be prompted to enter password. By default, it is admin.
If the login is successfully, the main web page appears. From now on the Wireless Broadband Router acts as a web
server sending HTML pages/forms on your request. Please fill out these pages/forms and apply them to the Wireless
Broadband Router.
Outline of Web Manager
The home page is composed of two areas:
Setup Wizard: It guides you to set WAN Type, WAN Settings, and WLAN for the Wireless Broadband
Router.
Advanced Setup: Includes advanced settings for System, WAN, LAN, WLAN, NAT, Firewall, and Routing.
For Setup Wizard and Advanced Setup page, there are two buttons that you have to know.
Home: It allows you to go back to the home page of this web configuration page.
Logout: It allows you to exit web configuration page and makes you get into with another user.
T
To
o
H
Ha
av
ve
e
t
th
he
e
N
Ne
ew
w
S
Se
et
tt
ti
in
ng
gs
s
T
Ta
ak
ke
e
E
Ef
ff
fe
ec
ct
t
The Wireless Broadband Router uses Apply button to enable new settings. That’s to say, when the Apply button is
clicked, your customizations take effect at the same time.
Wireless Broadband Router User’s Manual
26
Setup Wizard
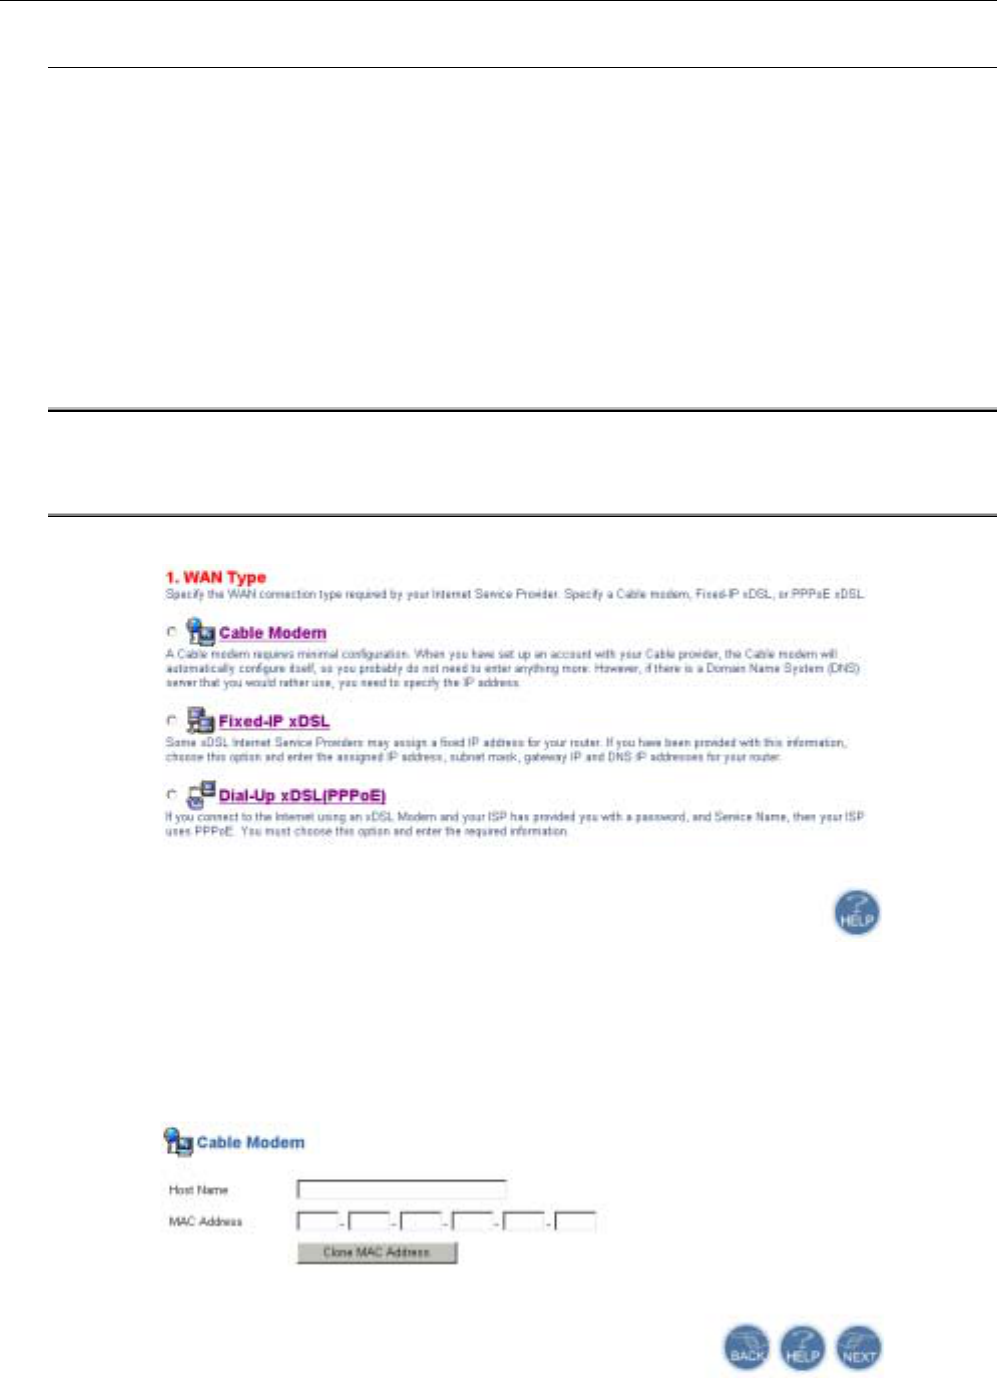
Now you are getting onto the web page for proceeding setting up for your router. To configure your Wireless
Broadband Router in easy way, please press Setup Wizard.
There are five items that you have to take notice, WAN Type, WAN Setting, WLAN Settings and DNS. These
setting will be executed one after one. That’s, after you finish setting WAN Type, you can press Next button to get
into next page. The whole setting is done after finished DNS setting.
W
WA
AN
N
T
Ty
yp
pe
e
Some types for WAN connection are provided here. Specify a Cable modem, Fixed-IP xDSL and Dial-Up
xDSL(PPPoE) as the WAN connection type. Next pages will be changed slightly according to the connection type
you choose here. It allows you to specify how the WAN port of the router connects to your service provider’s server.
Please choose your connection mode by clicking on the radio button as required by your service provider. The
default setting is PPPoE.
PPPoE: PPP over Ethernet is a protocol for connecting remote hosts to the Internet over an
always-on connection by simulating a dial-up connection. With PPPoE the client does not set a
static IP address, instead an IP address is assigned dynamically whenever the client access to
the Internet. For detailed settings please refer to advanced “WAN Setting”.
W
WA
AN
N
S
Se
et
tt
ti
in
ng
g
The WAN setting differs according to different WAN Type that you choose. After you type all the necessary
information on this web page, please click Next button to get into next page.
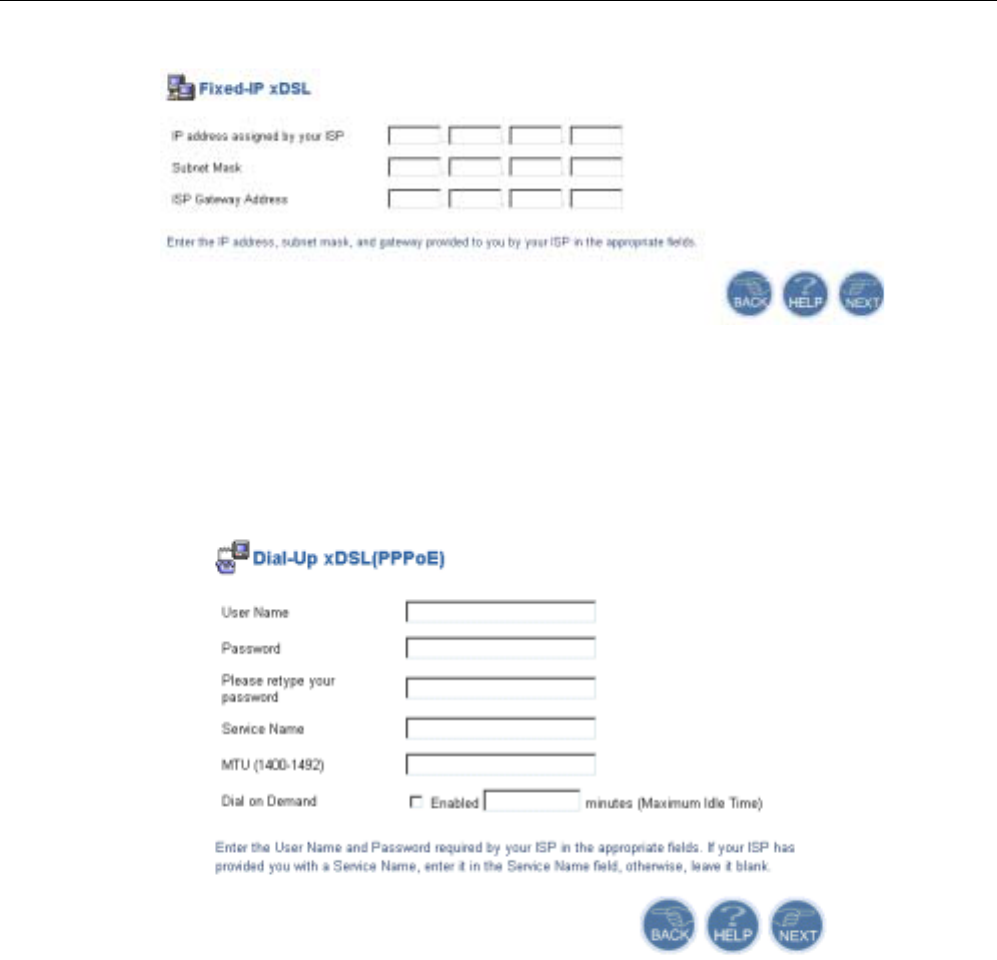
For Cable Modem, the settings will be:
Host Name: Type in your host name.
MAC Address: Type in the MAC address.
Clone MAC Address: Makes each set of MAC Address to be the same.
Chapter 5: Web Configuration
27
For Fixed-IP xDSL, the settings will be:
IP address assigned by your ISP: Type in the fixed IP address if your service provider has assigned a fixed
permanent IP address.
Subnet Mask: Type in the Subnet Mask address that your service provider assigned for
you.
ISP Gateway Address: Type in the gateway address that your service provider assigned for you.
For PPPoE xDSL, the settings will be:
User Name: Type in the user name to access the remote server or your service
provider.
Password: Type in the password to access the remote server or your service provider.
Please retype your password: Type your password again for confirmation.
Service Name: Enter the name of your PPPoE service.
MTU (1400-1492): Enter the maximum transmission rate for the data transferring. The
default setting is 1492.
Dial on Demand: Check on this item to make the system reconnect automatically after
disconnected by unknown reason.
Maximum Idle Time: This value specifies the idle minutes that elapse before the Home Route
automatically disconnects the PPP session. If no traffic is passing through
during the span of time your specified, the PPP session is terminated.
Wireless Broadband Router User’s Manual
28
W
WL
LA
AN
N
S
Se
et
tt
ti
in
ng
gs
s
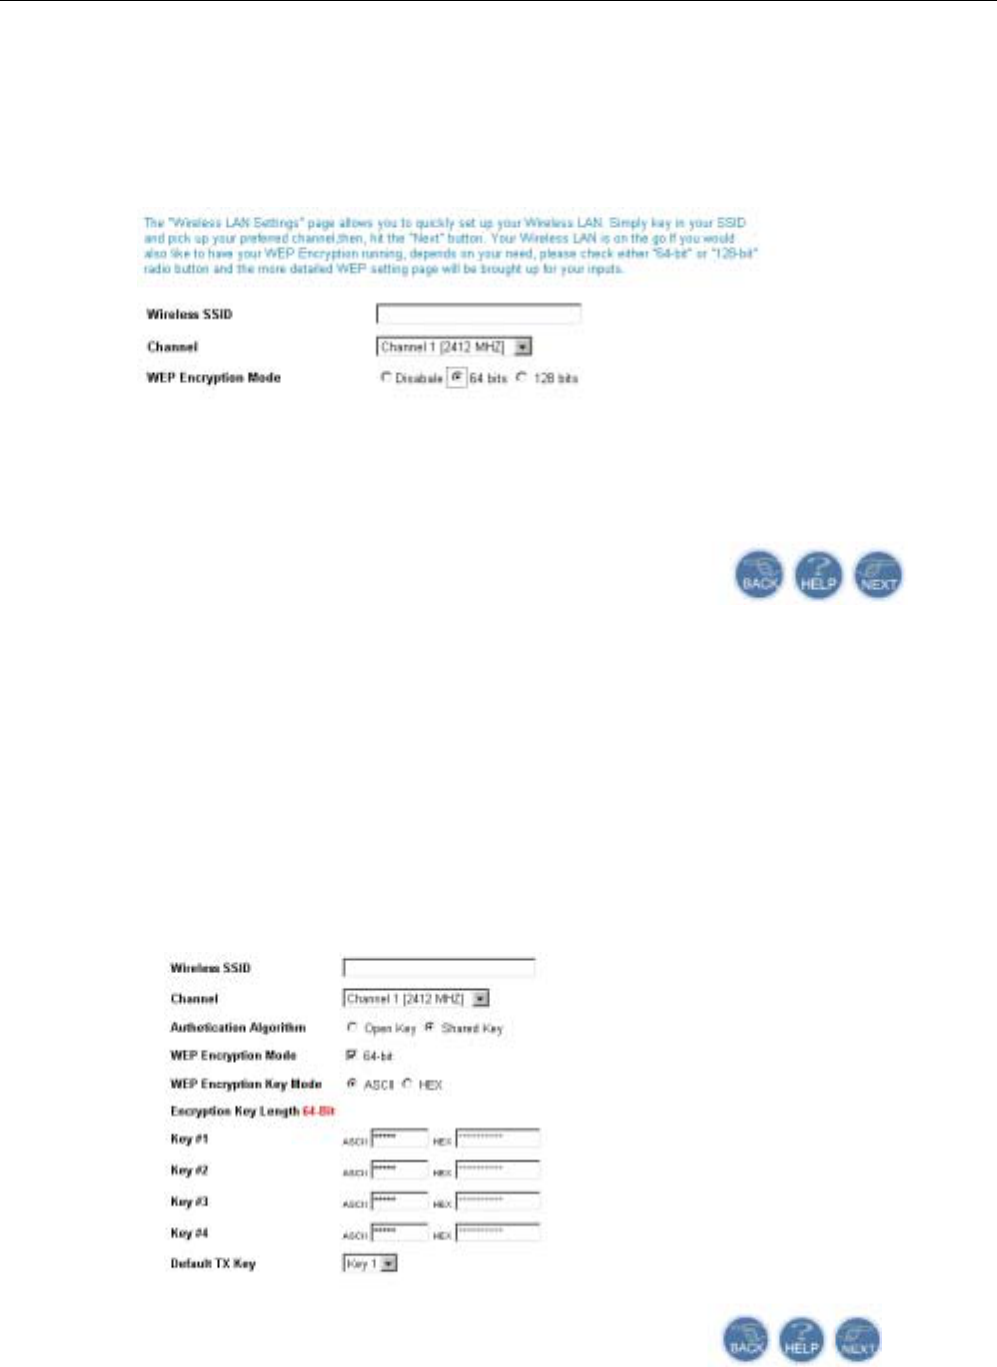
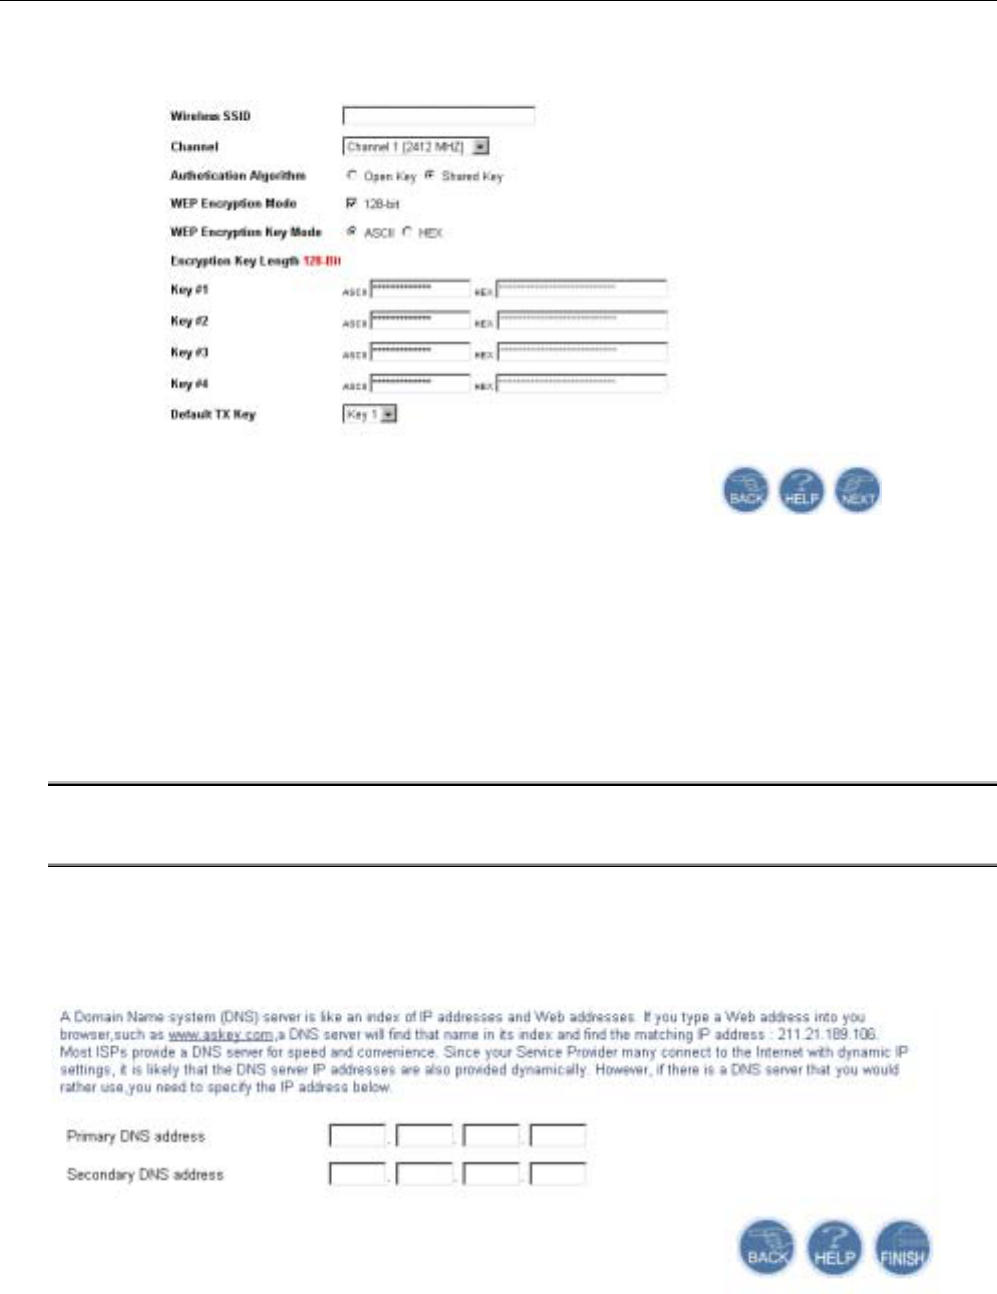
This section shows you how to configure the wireless LAN setting.
Wireless SSID (Service Set Identity): A name that uniquely identifies a domain. All clients that want to
communicate with the Wireless Broadband Router must have the same SSID as it.
Channel: The frequency in which the radio links are about to be established. Usually the clients
will scan the whole operable channels and then select the desired communications
channel automatically. Here provided 14 types of channel.
WEP Encryption Mode: To enable WEP encryption function, select your encryption length as 64-bit or 128-bit.
Either 64-bit or 128-bit WEP keys can be generated from user-defined characters or
manual entry.
Authetication Alogorithm: The Router supports two authentication types: Open System and Shared key. This
should be considered with the WEP(Wired Equivalent Privacy) mechanism.
64-bit WEP keys
Chapter 5: Web Configuration
29
128-bit WEP keys
Wired Equivalent Privacy Mechanism
The privacy security function can enhance wireless media security by encryption technology. All wireless clients
must set the same encryption key to maintain the tightened communication with the ADSL Router properly. The
Authenticate Algorithm options are:
When the wired Equivalent Privacy Mechanism is Turns off. Using Open-key as authentication algorithm, you are
running the risk of allowing some unauthorized wireless LAN cards that have the capability of eavesdropping your
SSID to associate itself to the device.
Turns on encryption. Wired Equivalent Privacy Mechanism is Turns on. You should select the encryption key length
as 64- or 128- bit key. Then enter the encryption key in Key Entry fields.
Note: When Wired Equivalent Privacy Mechanism is enabled, the wireless client must be
configured with exactly the same encryption level (64 or 128-bit) and encryption key as
identified in the ADSL Router, so that access to the unit is allowed.
D
DN
NS
S
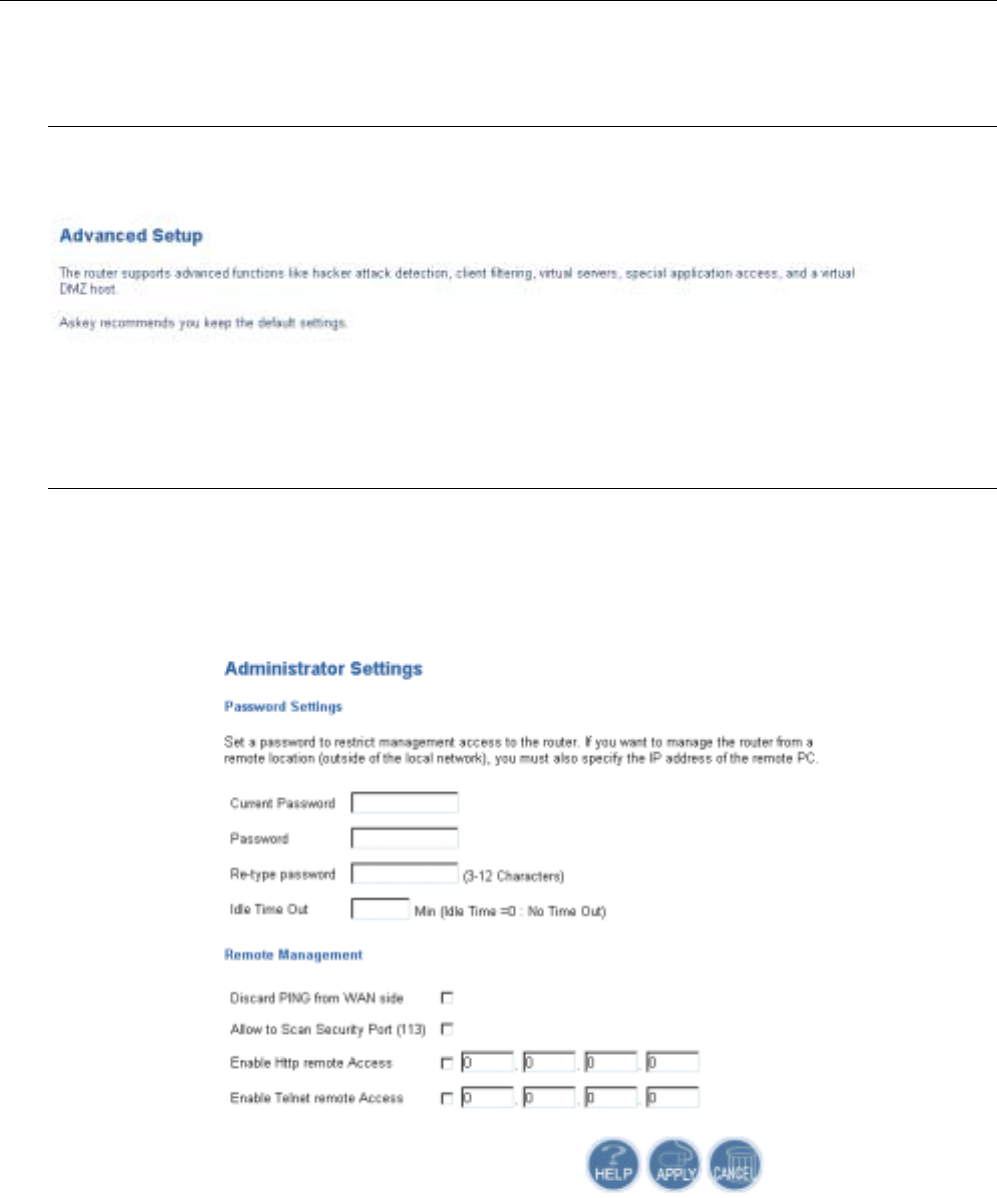
On this page you can choose to disable or enable DNS function. To enable DNS, simply enter the value for Primary
and Secondary DNS address and click Finish.
Primary DNS address: Type in the DNS address that you get from your service provider.
Secondary DNS address: Type in the secondary DNS address that you get from your service provider.
Click Finish button to quit the setup page.
Wireless Broadband Router User’s Manual
30
Advanced Setup
Click on Advanced Setup to get into the Advanced Setup screen for further configuration.
System
The System page includes all the configuration tools for the router such as Administrator, Firmware Upgrade,
Configuration Tools, Status, System Log, and Reset.
A
Ad
dm
mi
in
ni
is
st
tr
ra
at
to
or
r
S
Se
et
tt
ti
in
ng
gs
s
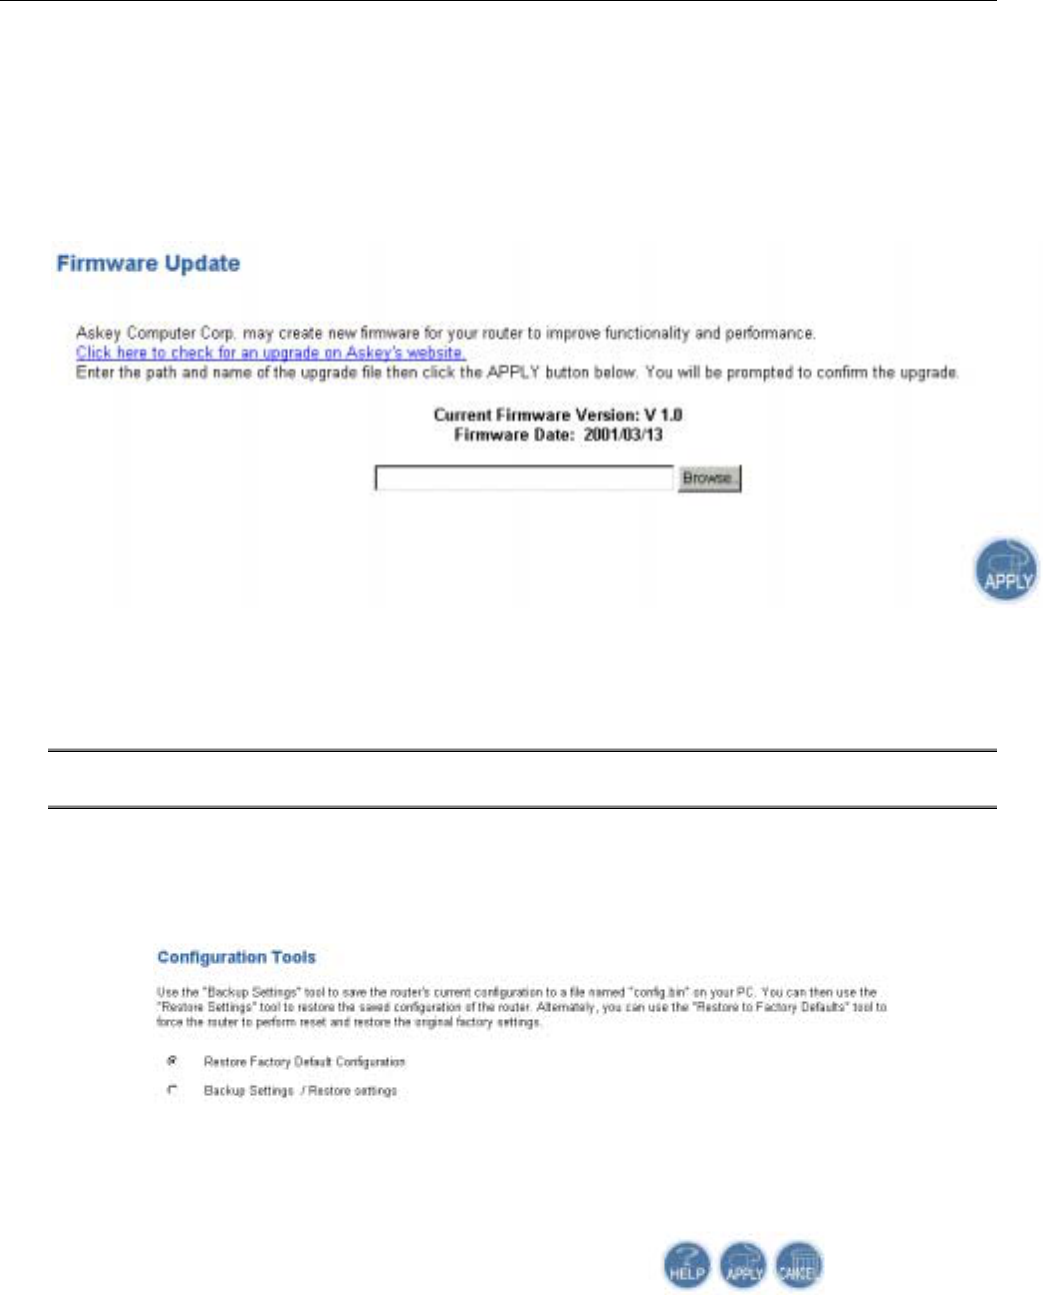
This setting allows you to set for password and activate the remote management.
Current Password: Type in the password that you use for login.
Password: Type another new password if you don’t want to use current one.
Re-type password: Type the new password again for confirmation.
Idle Time Out: Type the idle minutes that elapse before the device disconnected automatically.
Discard PING from WAN side: Check this box can discard PING from WAN side.
Allow to San Security Port(113): Check this box for scanning security port.
Enable Http remote Access:Check the box and type in the IP address for http remote access that is assigned by your
service provider.
Chapter 5: Web Configuration
31
Enable Telnet remote Access: Check the box and type in the IP address for Telnet remote access that is assigned by
your service provider.
F
Fi
ir
rm
mw
wa
ar
re
e
U
Up
pd
da
at
te
e
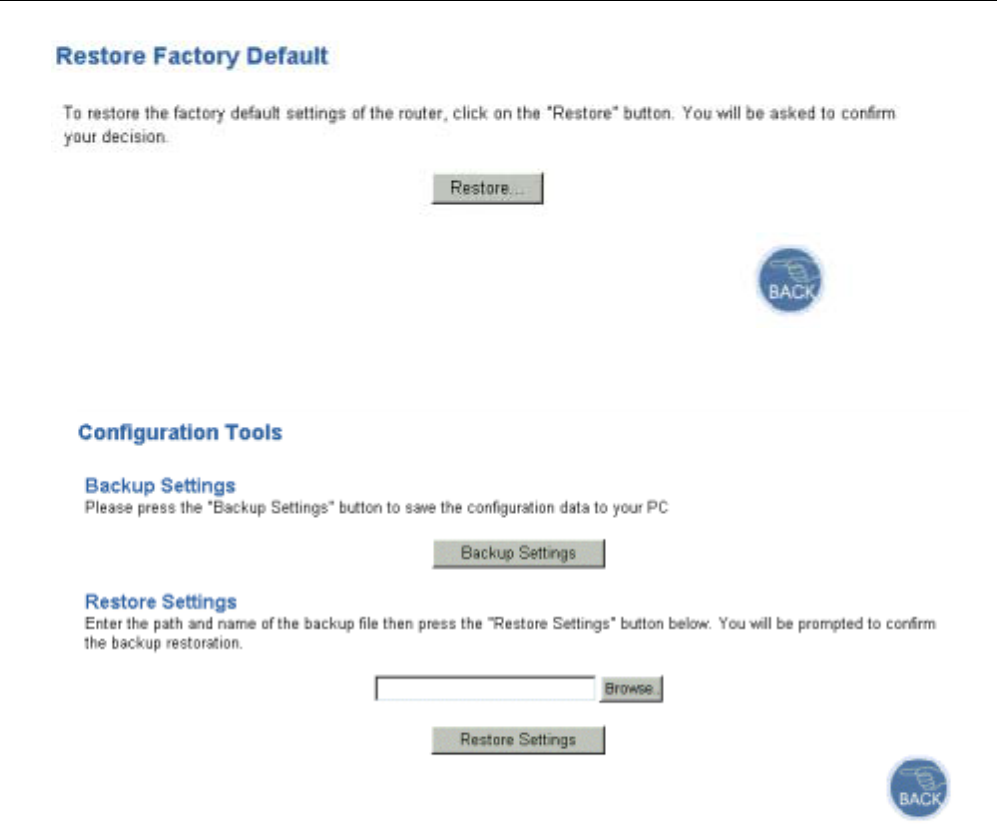
The Wireless Broadband Router supports the upgrading by using web page. The original configuration will still exist
and not reset to the factory defaults.
To transfer the firmware file, follow the steps below:
1. Enter the name and the path of the firmware upgrade file onto the input box or use the Browse button to locate
the file.
2. Click Apply.
Note:
1. Do not interrupt the upgrade process otherwise it might cause damage to your Router.
C
Co
on
nf
fi
ig
gu
ur
ra
at
ti
io
on
n
T
To
oo
ol
ls
s
This page provides you some tools of configuration for your wireless broadband router.
Restore Factory Default Configuration: You can use the Restore to Factory Defaults tool to force the router
performing reset and restore the original factory settings. If you choose this item, the page
will guide you to next page for clicking Restore button to execute the settings.
Wireless Broadband Router User’s Manual
32
Backup Settings/Restore settings: Allows you to backup settings or restored saved settings. Choose this button and
click Apply, you will be guide to next page as below.
Backup Settings button allows you to save the router's current configuration to a file named config.bin on your PC.
Restore Settings tool allows you to restore the saved configuration of the router by entering the path and the name of
the file and click the Restore Settings button.
Chapter 5: Web Configuration
33
S
St
ta
at
tu
us
s
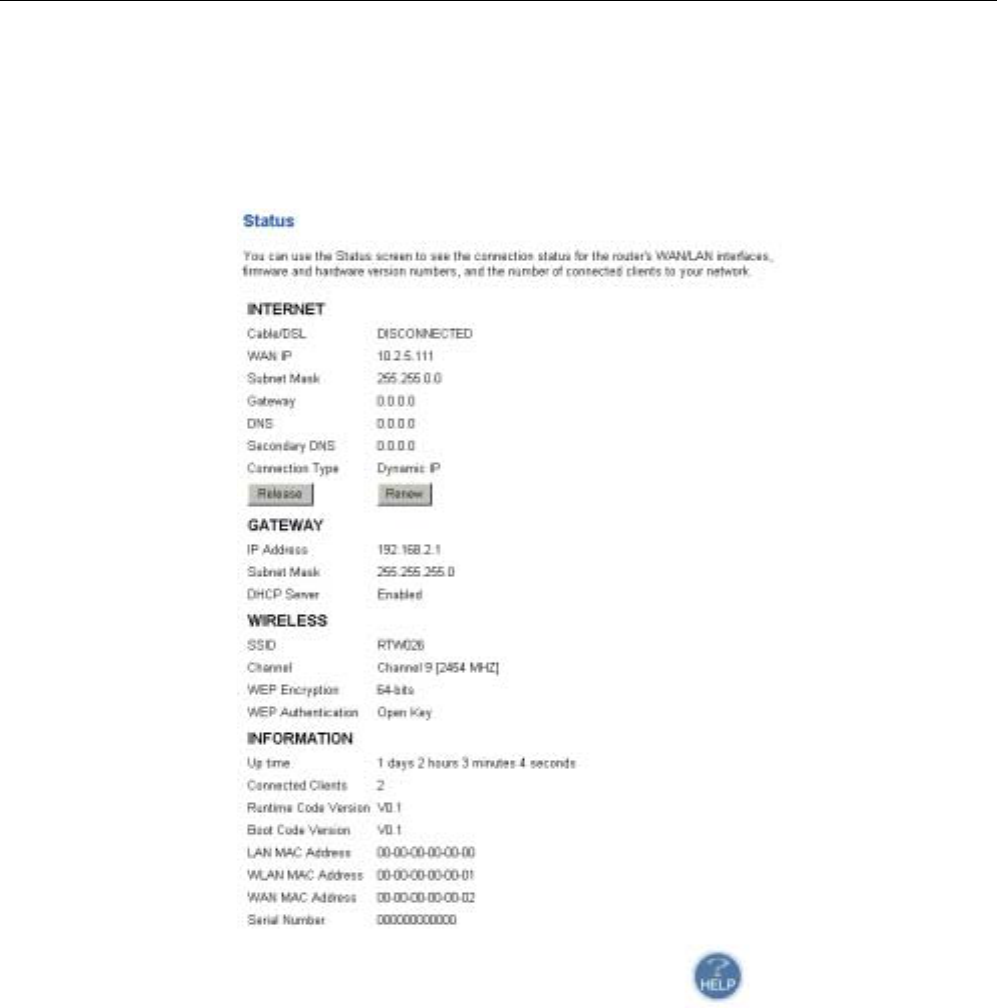
This page shows the basic information of your Wireless Broadband Router including the software version, WAN
MAC address, LAN MAC address, Wireless LAN MAC address etc. It provides a general overview of your Wireless
Broadband Router.
Wireless Broadband Router User’s Manual
34
S
Sy
ys
st
te
em
m
L
Lo
og
g
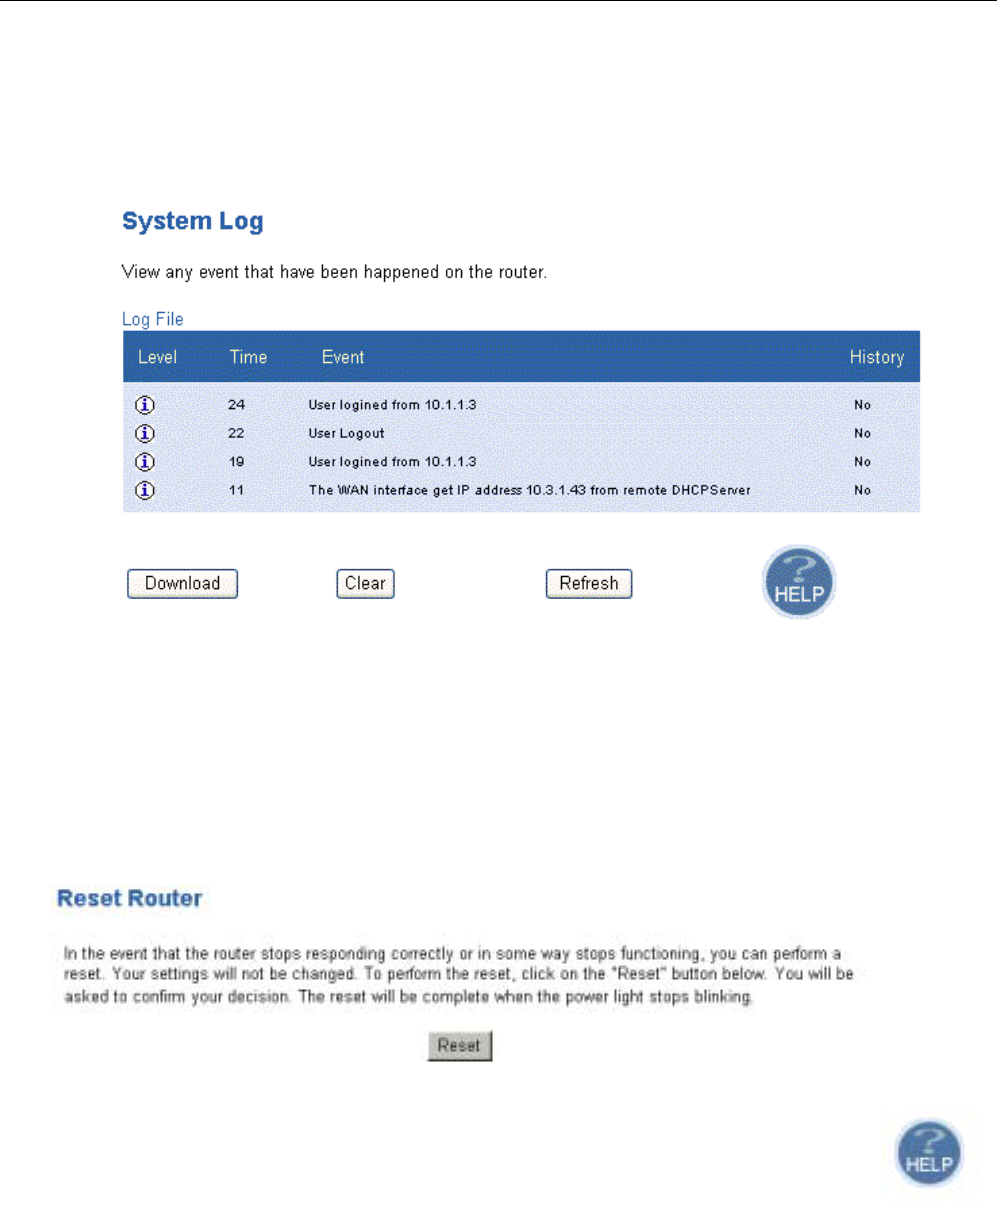
System Log your service provider lays a running record of your router, including information, warning and error log.
The information provided here is useful in working with your service provider or system administrators when
troubleshooting.
Download: Download the log file information.
Clear: Erase current log files information.
Refresh: Renew current log files information.
R
Re
es
se
et
t
W
Wi
ir
re
el
le
es
ss
s
B
Br
ro
oa
ad
db
ba
an
nd
d
R
Ro
ou
ut
te
er
r
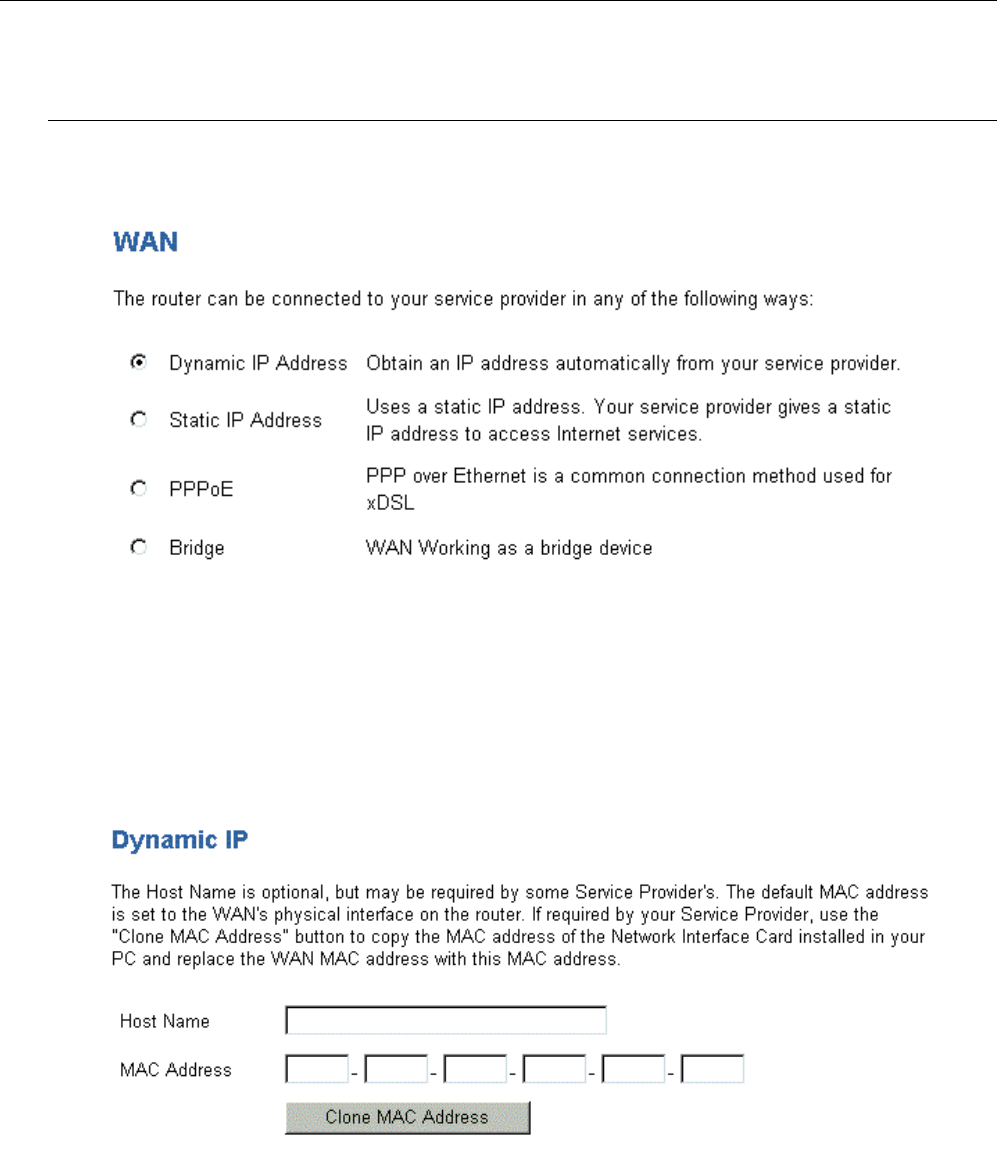
This page allows you to restart your router for invoking new configuration. After restarting, you should wait for
several seconds to let the system come up. When restarting the system, your brower session will be disconnected.
Please wait until the device finish restarting.
Chapter 5: Web Configuration
35
WAN
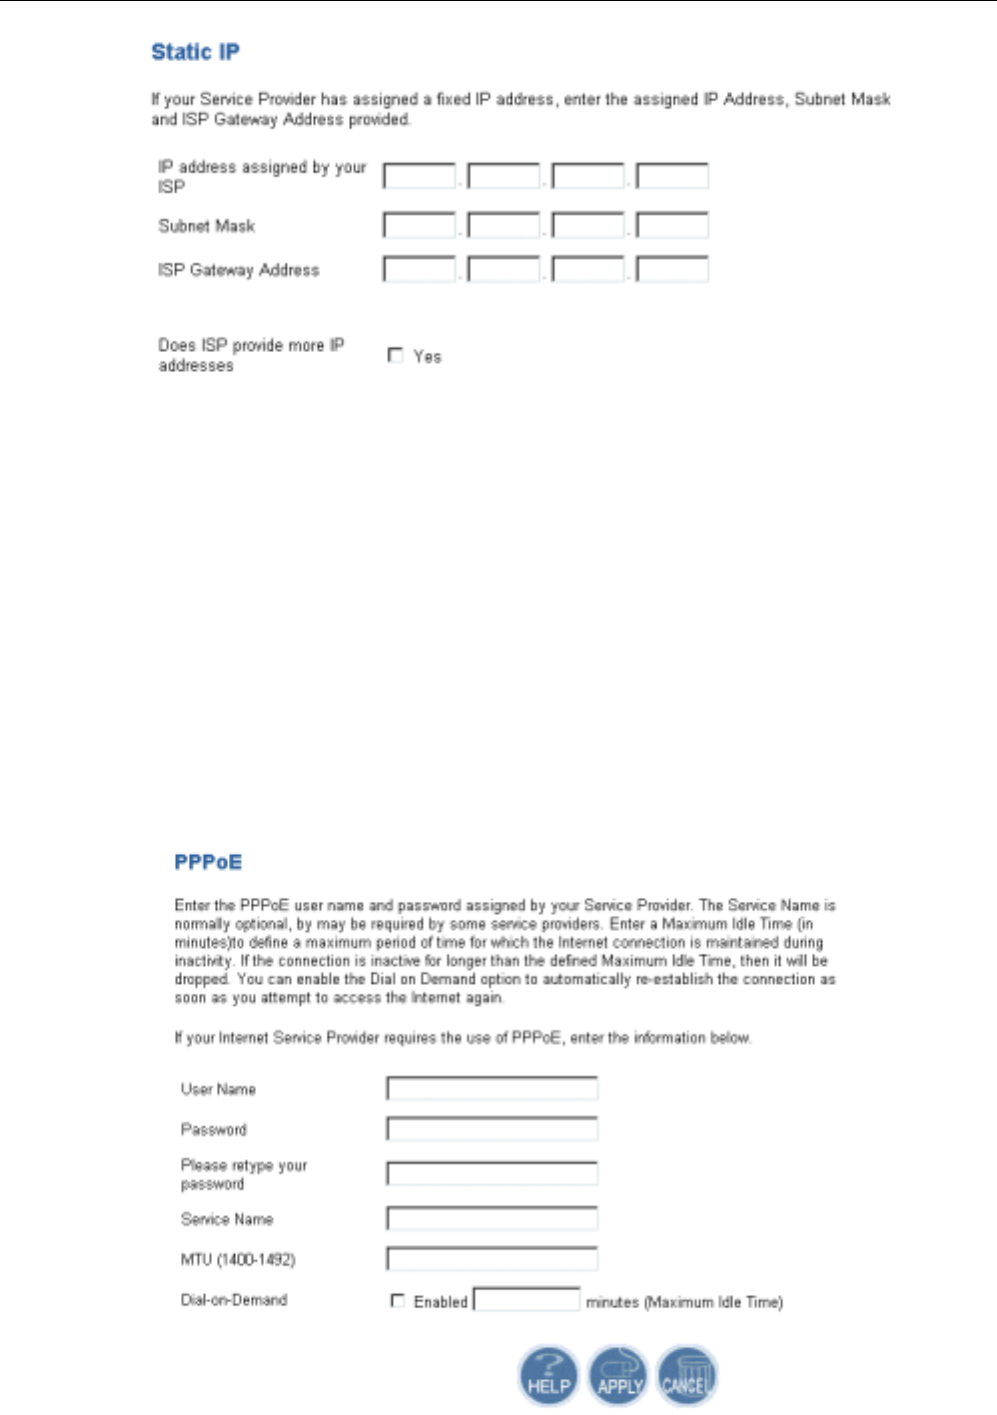
The Broadband Wireless Router provides three WAN connections: Dynamic IP Address, Static IP Address and
PPPoE. Each connection you have to do specific configuration, otherwise you cannot access into Internet properly.
Please choose the one you want to connect and click APPLY.
D
Dy
yn
na
am
mi
ic
c
I
IP
P
A
Ad
dd
dr
re
es
ss
s
This connection will obtain an IP address automatically from your service provider.
The Host Name is optional, but may be required by some Service Provider's. The default MAC address is set to the
WAN's physical interface on the router. If required by your service provider, use the Clone MAC Address button to
copy the MAC address of the Network Interface Card installed in your PC and replace the WAN MAC address with
this MAC address. The BigPond login is optional, commonly used in Australia. If your service provider need you to
do the BigPond login, please enable it and fill the user name, password and the server name.
Host Name: Enter the name of your host.
MAC Address: Enter the MAC address that you get from your service provider.
S
St
ta
at
ti
ic
c
I
IP
P
A
Ad
dd
dr
re
es
ss
s
This page allows you to use a static IP address. Your service provider gives a static IP address to access Internet
services. If your service provider has assigned a fixed IP address, enter the assigned IP Address, Subnet Mask and
your service provider Gateway Address provided.
Wireless Broadband Router User’s Manual
36
IP address assigned by your ISP: Type in the fixed IP address if your service provider has assigned a fixed
permanent IP address.
Subnet Mask: Type in the subnet mask that you get from your service provider.
ISP Gateway Address: Type in the gateway address that you get from your service provider.
Does ISP provide more IP addresses: If your service provider gives you more than one IP address, please check
Yes box here.
P
PP
PP
Po
oE
E
PPP over Ethernet is a protocol for connecting remote hosts to the Internet over an always-on connection by
simulating a dial-up connection.
Enter the PPPoE user name and password assigned by your service provider. The Service Name is normally optional,
may be required by some service providers. Enter a Maximum Idle Time (in minutes) to define a maximum period of
time for which the Internet connection is maintained during inactivity. If the connection is inactive for longer than the
defined Maximum Idle Time, then it will be dropped. You can enable the Auto-reconnect option to automatically re-
establish the connection as soon as you attempt to access the Internet again.
User Name: Type in the user name to access the remote server or your service provider.
Password: Type in the password to access the remote server or your service provider.
Chapter 5: Web Configuration
37
Please retype your password: Type your password again for confirmation.
Service Name: Enter the name of your PPPoE service.
MTU (1400-1492): Enter the maximum transmission rate for the data transferring. The default setting is
1492
Maximum Idle Time: This value specifies the idle minutes that elapse before the Router automatically
disconnects the PPP session. If no traffic is passing through during the span of time
your specified, the PPP session is terminated.
D
DN
NS
S
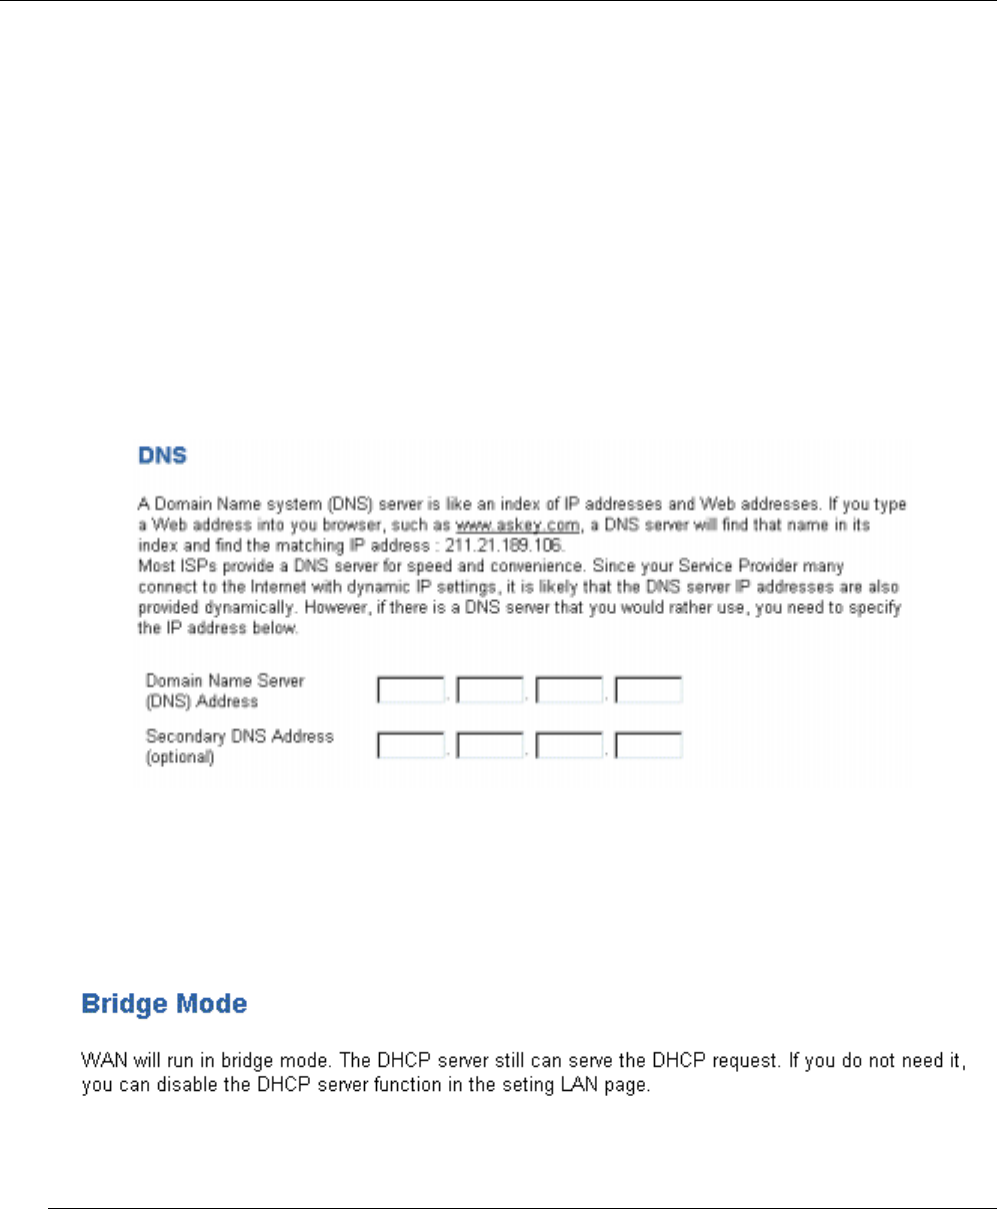
A Domain Name system (DNS) server is like an index of IP addresses and Web addresses. If you type a Web address
into you browser, a DNS server will find that name in its index and find the matching IP address.
Most ISPs provide a DNS server for speed and convenience. Since your Service Provider may connect to the Internet
with dynamic IP settings, it is likely that the DNS server IP addresses are also provided dynamically. However, if
there is a DNS server that you would rather use, you need to specify the IP address below.
Domain Name Server (DNS) Address: Type in the DNS address that you get from your service provider.
Secondary DNS Address (optional): Type in the secondary DNS address that you get from your service
provider.
B
Br
ri
id
dg
ge
e
The router acts like a 5-port switch on this mode for transmitting the packets between LAN and WAN interface.
LAN
L
LA
AN
N
S
Se
et
tt
ti
in
ng
gs
s
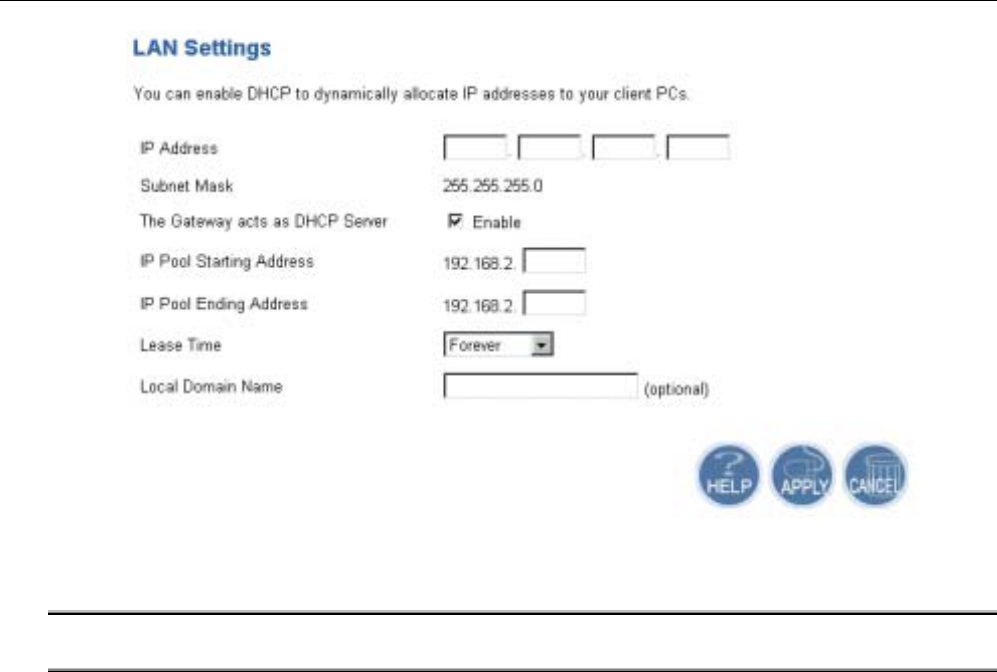
This setting allows you to define the IP address over the LAN interface.
Wireless Broadband Router User’s Manual
38
IP Address: Allows you to specify the private IP address on the device’s LAN interface.
By default, the IP address and subnet mask is 192.168.1.1 and 255.255.255.0. It is
recommended NOT to change the default settings.
Note: If you have changed the LAN IP address for the router, you have to renew or reassign
the LAN IP for client’s PC. Otherwise, the client’s PC will not be able to access the router.
Subnet Mask: Type in the subnet mask address that you get from your service provider.
The Gateway acts as DHCP Server: Check Enable to make gateway be able to act as DHCP server.
IP Pool Starting Address: Make the IP address you enter here to be the starting point.
IP Pool Ending Address: Make the IP address you enter here to be the ending point.
Lease Time: Specify the time that a network device can lease a private IP address before the Wireless
Broadband Router reassigning the IP address. By default, it is 1 day/ 0 hour/ 0 minutes.
Local Domain Name: You can check the Report this host as the DNS server box to use this host as the default
DNS. Or you can uncheck the box and manually set up the DNS IP address in the
Primary/Secondary DNS IP address fields. The DNS server addresses will be passed to
the DHCP clients along with the IP addresses. The DHCP clients use the DNS to map a
domain name to its corresponding IP address and vice versa.
D
DH
HC
CP
P
C
Cl
li
ie
en
nt
t
L
Li
is
st
t
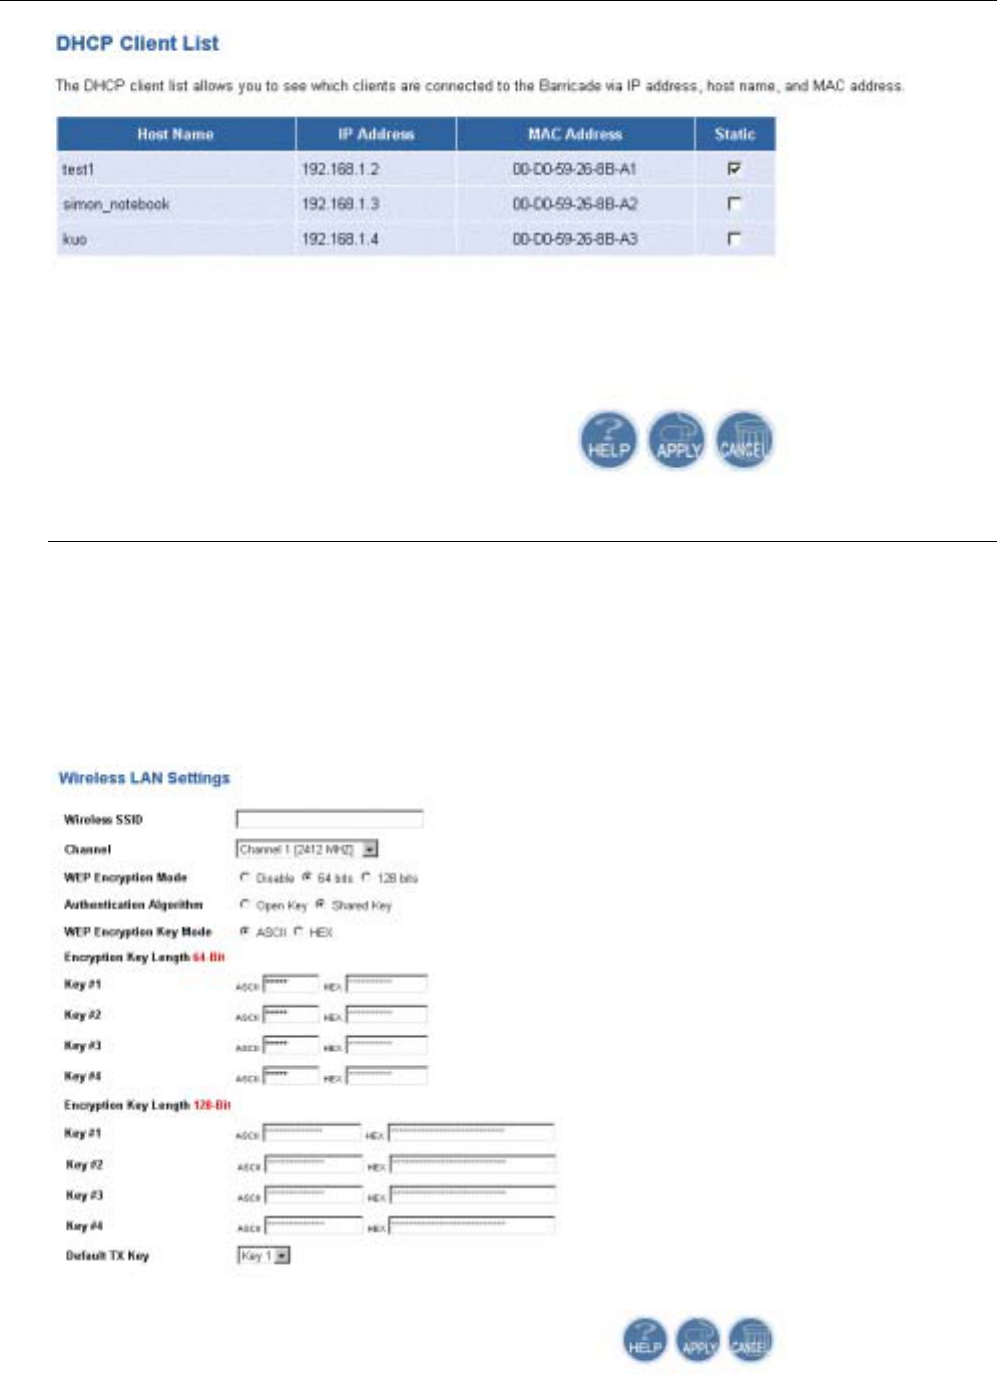
DHCP Clent List shows the IP address, host name and MAC address of the clients which connected to the Barricade.
Chapter 5: Web Configuration
39
WLAN
W
Wi
ir
re
el
le
es
ss
s
L
LA
AN
N
S
Se
et
tt
ti
in
ng
gs
s
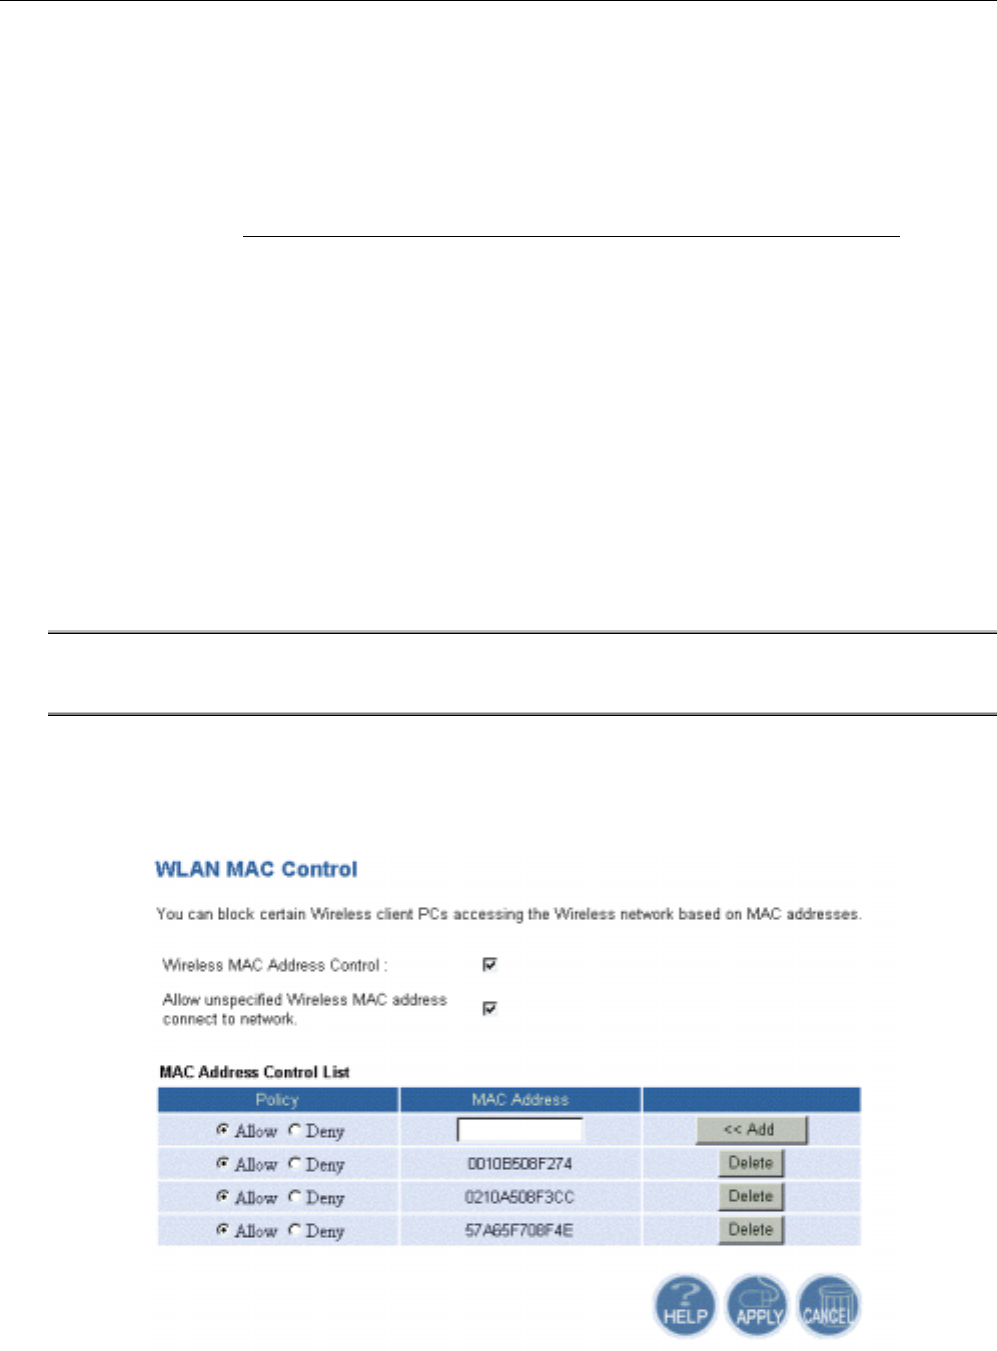
This page shows you how to configure the wireless LAN setting.
WLAN is short for Wireless Local Area Network. To get the wireless broadband router quick working for your
wireless LAN, basically, you must have your wireless SSID and your preferred channel set up. If the network
security is your great concern, you can enable the WEP Encryption functionality and type in your encryption key for
set-ups in appropriate fields.
Wireless SSID (Service Set Identity): A name that uniquely identifies a wireless domain. All wireless clients that
want to communicate with the ADSL Router must have the same SSID as it.
Desired Channel: The frequency in which the radio links are about to be established. Select channel that you
Wireless Broadband Router User’s Manual
40
want. Usually the wireless clients will scan the whole operable channels and then select the
desired communications channel automatically.
WEP Encryption Key Mode: Select ASCII or Hex as the calculation standard.
If using HEX format, the utility converts two entered characters into its corresponding ASCII
code and vice versa. Note that when using HEX format, only digits 0-9 and letters A-F are
allowed. Valid key length for each encryption type is as below:
HEX Format ASCII Format
64 Bit 10 hexadecimal digits 5 ASCII characters
128 Bit 26 hexadecimal digits 13 ASCII characters
Authetication Algorithm: Choose Open Key or Shared Key as the Authentication Type.
Default TX Key: Select one WEP key from the four keys to encrypt the data you transmit.
Wired Equivalent Privacy Mechanism
The privacy security function can enhance wireless media security by encryption technology. All wireless clients
must set the same encryption key to maintain the tightened communication with the ADSL Router properly. The
Authenticate Algorithm options are:
When the wired Equivalent Privacy Mechanism is Turns off. Using Open-key as authentication algorithm, you are
running the risk of allowing some unauthorized wireless LAN cards that have the capability of eavesdropping your
SSID to associate itself to the device.
Turns on encryption. Wired Equivalent Privacy Mechanism is Turns on. You should select the encryption key length
as 64- or 128-bit key. Then enter the encryption key in Key Entry fields.
Note: When Wired Equivalent Privacy Mechanism is enabled, the wireless client must be
configured with exactly the same encryption level (64 or 128-bit) and encryption key as
identified in the Router, so that access to the unit is allowed.
W
WL
LA
AN
N
M
MA
AC
C
C
Co
on
nt
tr
ro
ol
l
To block certain wireless client PC accessing your wireless network based on the MAC address, you can use WLAN
MAC Control page to do it.
Policy: “Allow” means to allow the MAC address for the wireless device listed below to be
connected to your router (AP). “Deny” means the MAC address for the wireless device listed
below cannot be connected to your router (AP).
MAC Address: Type in the MAC Address.
Chapter 5: Web Configuration
41
Add and Delete: Click Add to add a new MAC address on the list. Click Delete to remove the MAC address
that you do want to.
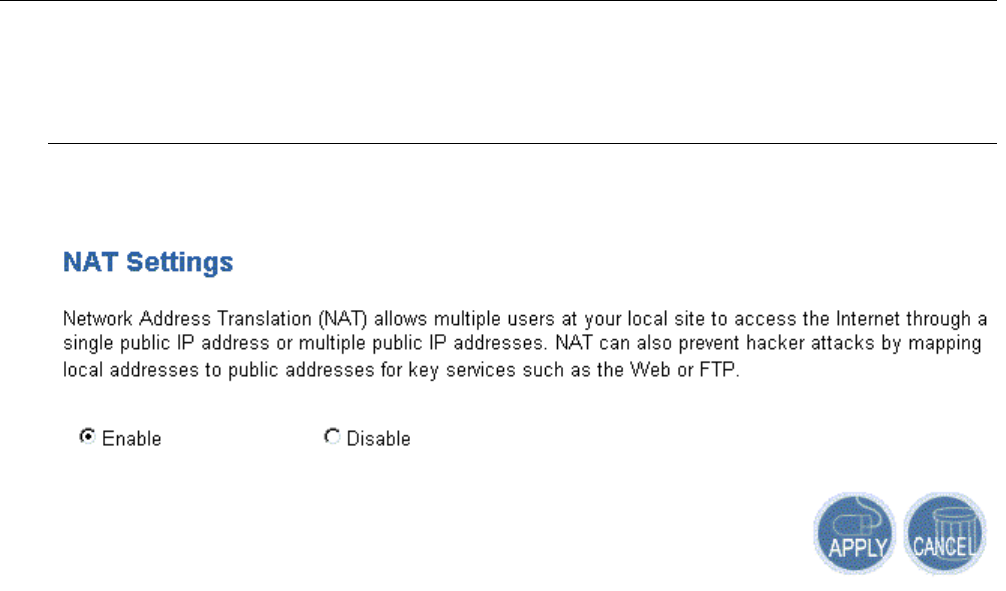
NAT
NAT allows multiple users at your local site to access the Internet through a single public IP address or multiple
public IP addresses. NAT can also prevent hacker attacks by mapping local addresses to public addresses for key
services such as the Web or FTP.
V
Vi
ir
rt
tu
ua
al
l
S
Se
er
rv
ve
er
r
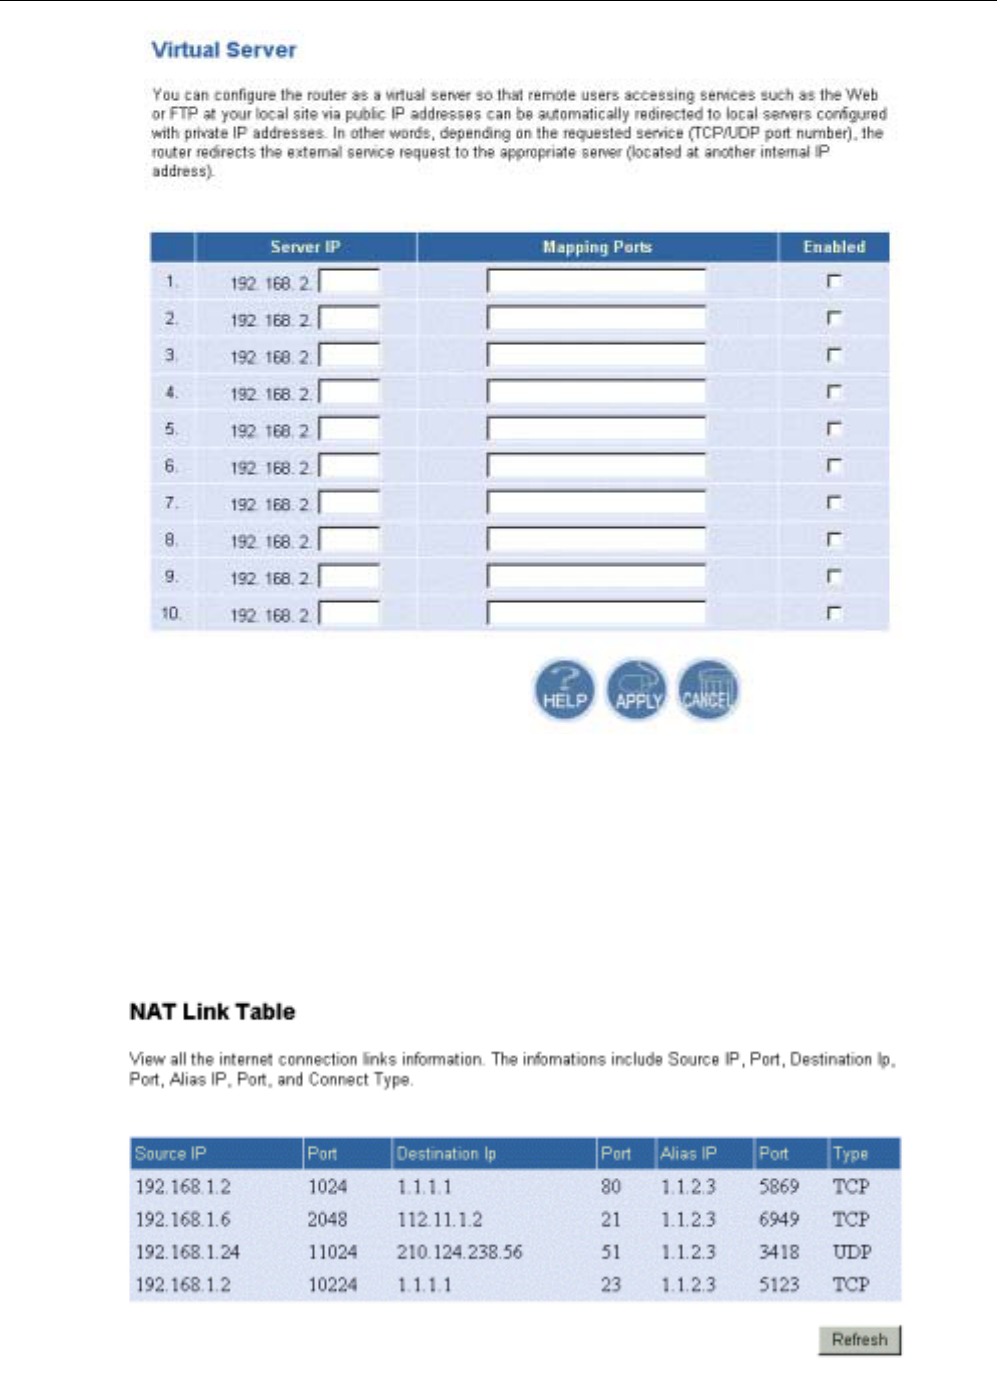
This page shows all virtual server rules configured in your ADSL Router.
The Router implements NAT to let your entire local network appear as a single machine to the Internet. The typical
situation is that you have local servers for different services and you want to make them publicly accessible. With
NAT applied, it will translate the internal IP addresses of these servers to a single IP address that is unique on the
Internet. NAT function not only eliminates the need for multiple public IP addresses but also provides a measure of
security for your LAN.
When the router receives an incoming IP packet requesting for access to your local server, the router will recognize
the service type according to the port number in this packet (e.g., port 80 indicates HTTP service and port 21
indicates FTP service). By specifying the port number, you tell the router which service should be forwarded to the
local IP address you specify.
After you setting the virtual server you should modify the filter rule whichever port and service you set on virtual
server. Because the firewall has protect the route by filter rule so that you should update the filter rule after you set up
virtual server.
Wireless Broadband Router User’s Manual
42
Server IP: Specify the server IP address.
Mapping Ports: Enter the mapping port for the IP address.
IP addresses can be automatically redirected to local servers configured with private IP addresses. In other words,
depending on the requested service (TCP/UDP port number), the router redirects the external service request to the
appropriate server (located at another internal IP address).
N
NA
AT
T
L
Li
in
nk
k
T
Ta
ab
bl
le
e
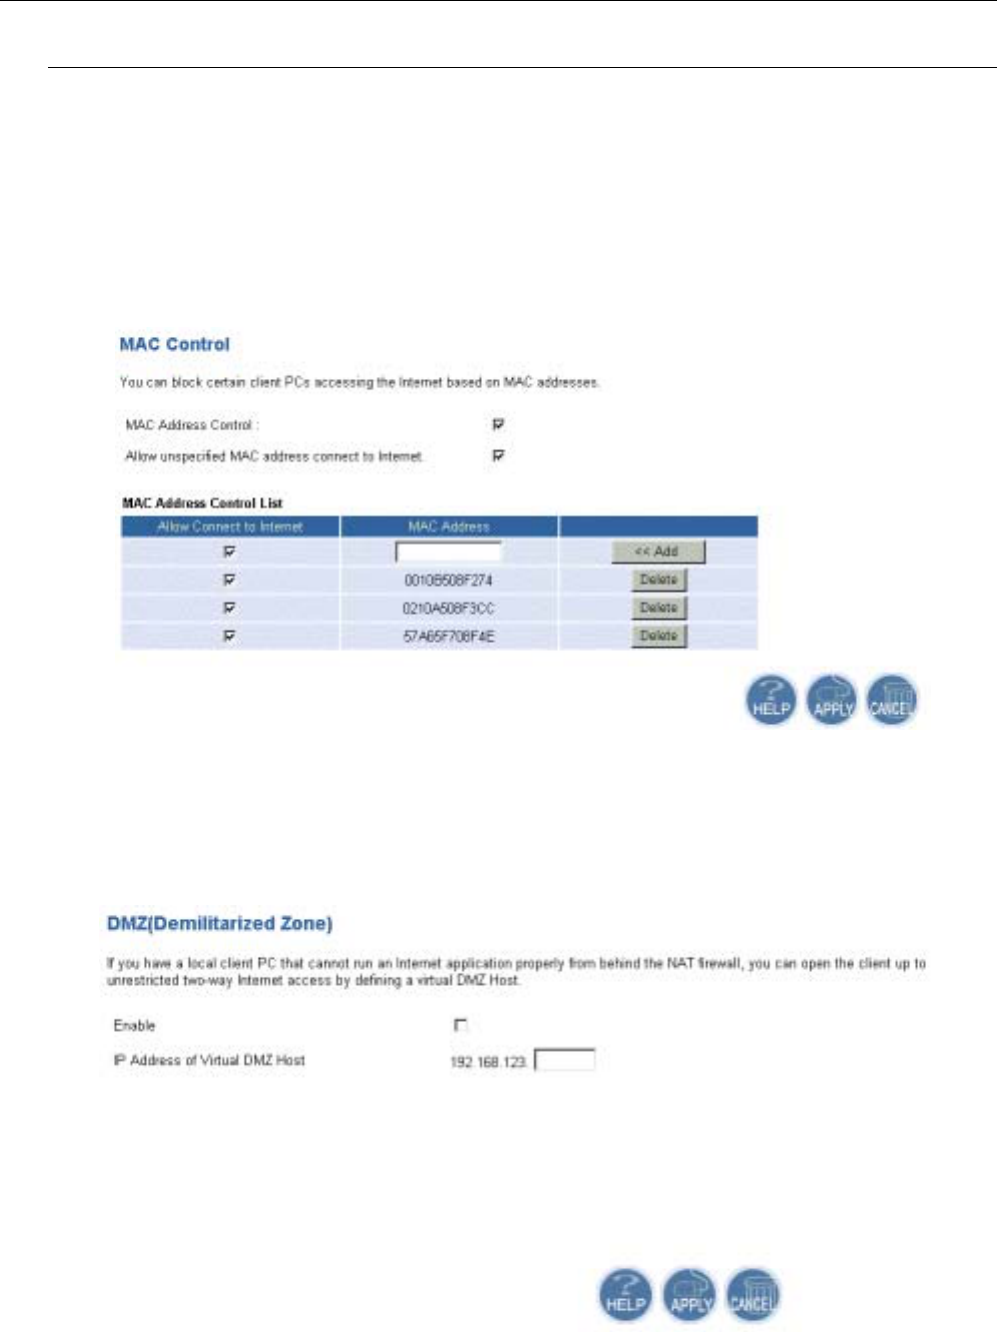
The table list below shows the status for current internet connection links information.
Chapter 5: Web Configuration
43
Firewall
This page is used to set the firewall for your system. Please choose one from the provided items and click Apply to
enable it.
M
MA
AC
C
C
Co
on
nt
tr
ro
ol
l
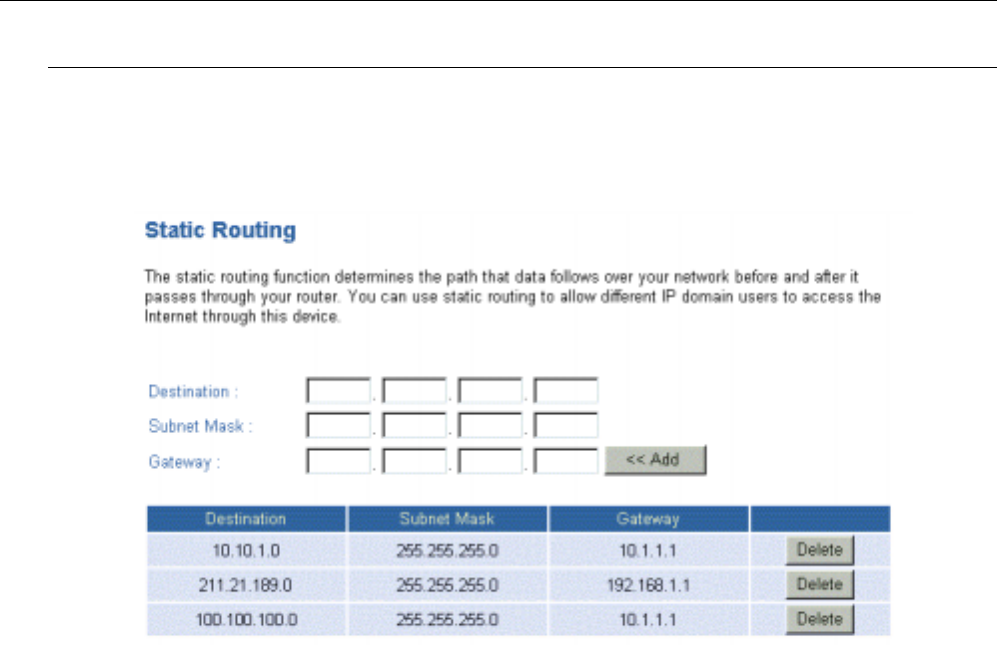
You can block certain client PCs accessing the Internet based on MAC addresses.
MAC Address Control: Enable the MAC address control by checking the box.
Allow unspecified MAC address connect to Internet: Make unspecified MAC address to connect to the
Internet with any difficulty, please check this box.
D
DM
MZ
Z(
(D
De
em
mi
il
li
it
ta
ar
ri
iz
ze
ed
d
Z
Zo
on
ne
e)
)
A DMZ (De-Militarized Zone) separates an external network from directly referencing an internal network. With
DMZ configuration, a DMZ host acts as a neutral zone between the private network and the outside network. For
example, if you have a host providing online games or videoconferencing applications which are incompatible
through NAT, you can specify its IP address here and then click Apply button.
Enable: Enable the DMZ function.
IP Address of Virtual DMZ Host: Type in the last IP address.
Wireless Broadband Router User’s Manual
44
Routing
For multiple routers that installed on your network, please configure each unit's routing functions for proper using.
S
St
ta
at
ti
ic
c
R
Ro
ou
ut
ti
in
ng
g
This setting allows different IP domain users to access the Internet through this device.
This page shows all the routing rules of data packets going through your Wireless Broadband Router if it runs in
routing mode. Under normal circumstances, the router has adequate routing information after it has been configured
for Internet access, and you don’t need to configure additional static routes. Unless your network is unusual case such
as multiple routers or multiple IP subnets and you must configure static routes.
For example, if the circumstances below apply to your network:
You have another subnet network in your network.
Your another network is 10.1.1.x.
Then you need to create a static route. You should enter the destination IP address 10.3.1.x and gateway IP address
192.168.1.1 to commit the setting.
At the first time you have to configure your router, you will find a default route created with your service provider as
the gateway, and the second static route was created to your local network for all 192.168.1.1 addresses.
Destination LAN IP: Type in the destination LAN IP address.
Subnet Mask: Type in the subnet mask of the destination IP address that your service provider gives
you.
Gateway: Type in the gateway address.
D
Dy
yn
na
am
mi
ic
c
R
Ro
ou
ut
ti
in
ng
g
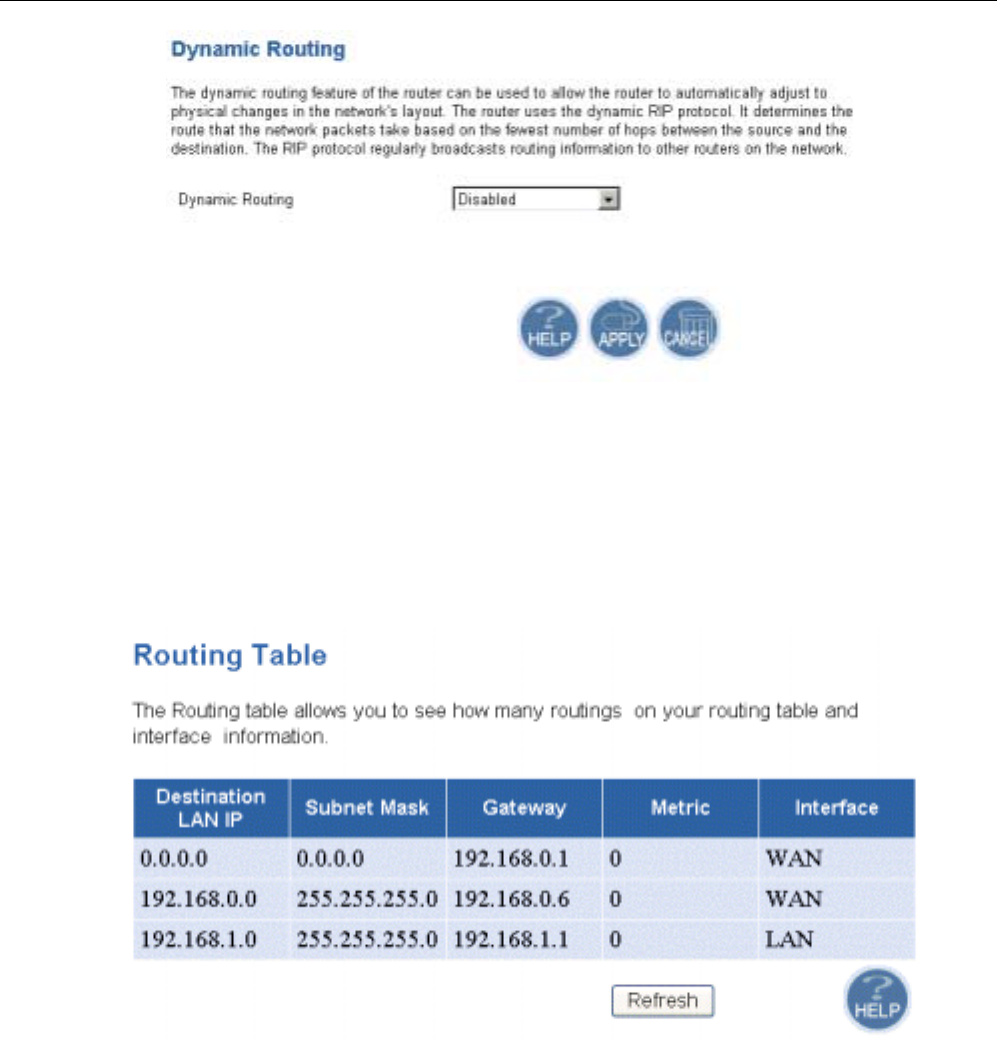
Routing Information Protocol (RIP) is utilized as a means of exchanging routing information between routers. It
helps the routers to determine optimal routes. This page allows you to enable/disable this function.
Chapter 5: Web Configuration
45
Dynamic Routing: Make the router automatically adjusts to physical changes in the network's layout. The
settings include RIP1,RIP Compatible and RIP2. By default, RIP is disabled with Disable
selected. To disable RIP, just select Disable from the drop-down list.
R
Ro
ou
ut
ti
in
ng
g
T
Ta
ab
bl
le
e
This page shows a table about routing information, such as Destination LAN IP, Subnet Mask, Gateway, Metric,
Interface and so on.
Destination LAN IP: It shows the destination address of the network where data packets are to be sent.
Subnet mask: The subnet mask of the destination address.
Gateway: It shows the IP address of Gateway.
Metric: The number of the routers which connect to the destination.
Interface: The interface that access point use for routing.
Refresh: Click this button to refresh the routing information.

Chapter 6: Troubleshooting
46
C
Ch
ha
ap
pt
te
er
r
6
6:
:
T
Tr
ro
ou
ub
bl
le
es
sh
ho
oo
ot
ti
in
ng
g
If the suggested solutions in this section do not resolve your problem, contact your system administrator or Internet
service provider.
Problems with LAN
PCs on the LAN can not get IP addresses from the Wireless Broadband Router.
The chances are that the interface used as DHCP server is modified and the client PCs do not renew IP addresses.
If your DHCP server is enabled on Private IP Address previously and you modify the interface to Public IP Address,
the client PCs should renew IP addresses.
The PC on the LAN cannot access the Web page of the Wireless Broadband Router.
Check that your PC is on the same subnet with the Wireless Broadband Router.
The virtual server can’t be access after setting virtual server.
Check the filter rule of the port that virtual server service setting for example, the virtual server service set FTP 21
you need update the filter rule of the ftp 21 Direction setting: Choose filter the packets that incoming action (In
Bound) are Allow on the interface.
Can’t access the Router’s Web Configuration interface from a PC on your local
network.
Make sure you are using the correct login information, the default password is admin (small letters).
Make sure your PC’s IP address is on the same subnet as the router. If you are using the recommended addressing
scheme, your PC’s address should be in the range of 192.168.1.2 to 192.168.1.254.
Note:
1. If you use DHCP server and your PC’s IP address is shown as 169.254.x.x: please renew
the IP address and check the connection from the PC to the router.
2. If you are using a wireless LAN card equipped PC, check that the SSID and WEP settings are
the same for the router and PC.
3. If your router’s IP address has been changed and you don’t know the current IP address,
clear the router’s configuration to factory defaults. This will set the router’s IP address to
192.168.1.1.
Problems with WAN
If you router can’t access the Internet.
You should first determine whether the router is able to obtain a WAN IP address from the ISP. Or you have
been assigned a static IP address.
Check the IP address for the WAN port.
If your ISP requires a login program as PPP over Ethernet (PPPoE), ensure the user name and password you
enter are correctable.
If your Broadband Wireless Router is set to routing mode and you use private IP addresses on the LAN, make
sure Network Address Translation (NAT) is enabled.
Your PC may not recognize any DNS server address. Check your DNS setting on the Broadband Wireless
Router.
Chapter 7: Troubleshooting
47
Check the physical connection between the Wireless Broadband Router and the LAN.
At the DOS prompt, ping the IP address of the Wireless Broadband Router, e.g, ping 192.168.1.1. If the
following response occurs:
Relay from 192.168.1.1 bytes=32 time=100ms TTL=253
Then the connection between the Wireless Broadband Router and the network is OK.
If you get a failed ping with the response of:
Request time out
Then the connection is fail. Check the cable between the Wireless Broadband Router and the network.
Check the DNS setting of the Wireless Broadband Router.
At the DOS prompt, ping the IP address of the DNS provided by your ISP. For example, if your DNS IP is
168.95.1.1, then ping 168.95.1.1. If the following response occurs:
Relay from 168.65.1.1 bytes=32 time=100ms TTL=253
Then the connection to the DNS is OK.
If you get a failed ping with the response of:
Request time out
Then the DNS is not reachable. Check your DNS setting on the Wireless Broadband Router.
Problems with Upgrading
The following lists the error messages that you may see during upgrading and the action to take.
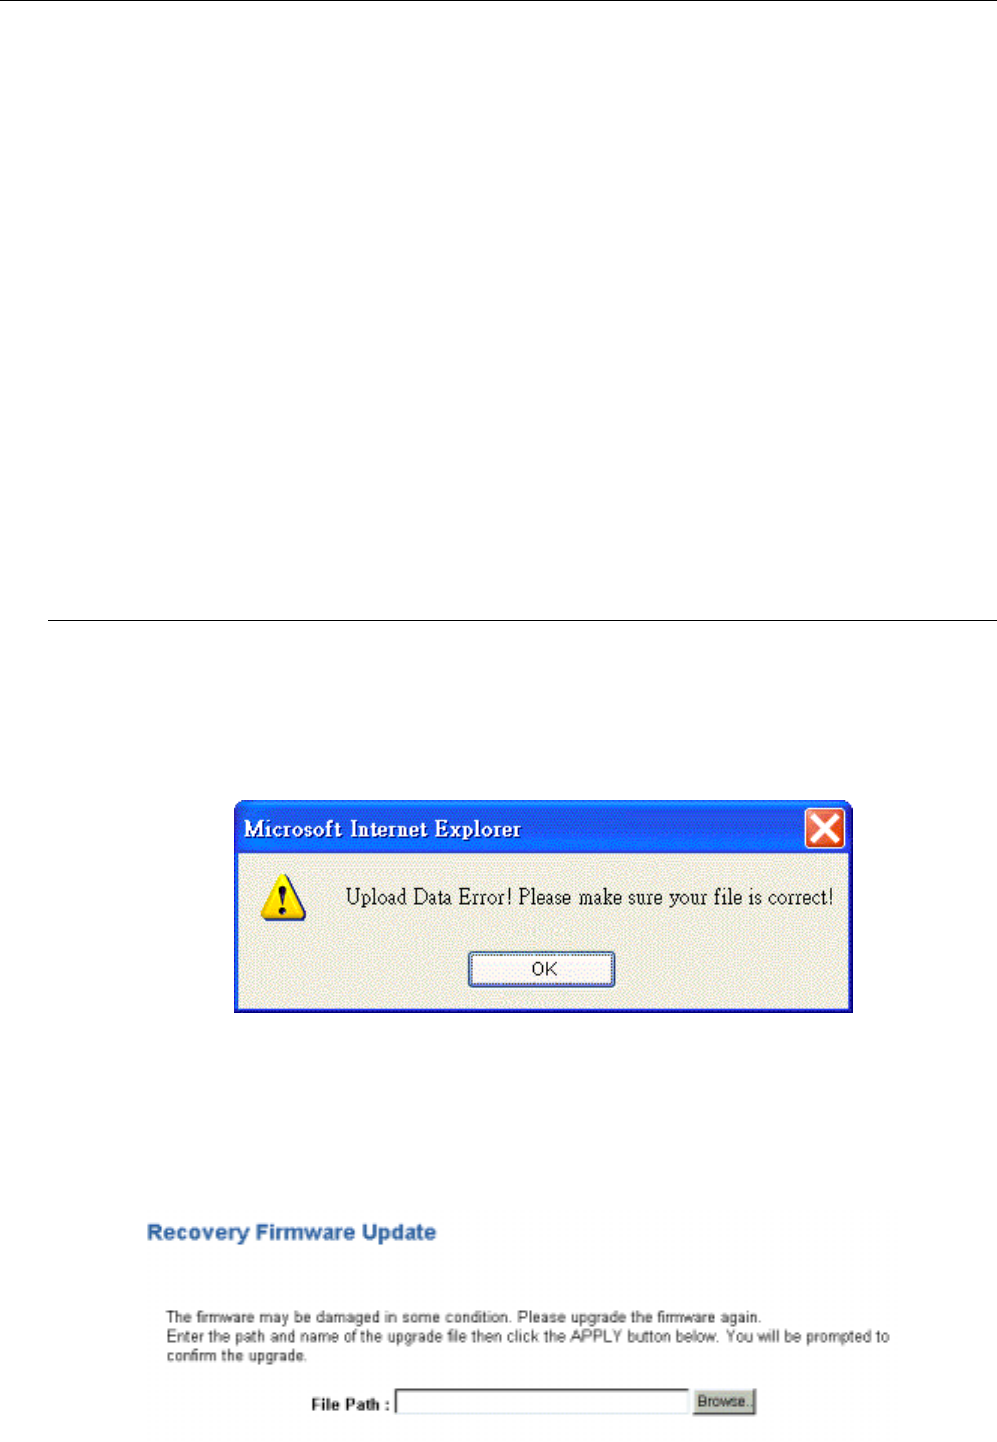
Error Message: Upload Data Error!Please make sure your file is correct!
Possible cause: The firmware file format is invalid.
Action: Check the file format is correct, otherwise download a firmware file with correct format.
Error: The router shut down for some unknown reason and the web page got problem
Possible cause: The firmware might be damaged.
Action: Execute recovery firmware update. Simply type 192.168.0.1 on URL line to open the page. Choose the
proper file and click Apply to execute the recovery process.
When the file is copied, a successful web page appears as follows. Now the router’s firmware is upgraded. It

Wireless Broadband Router User’s Manual
48
can be used again.

Chapter 7: Glossary
49
C
Ch
ha
ap
pt
te
er
r
7
7:
:
G
Gl
lo
os
ss
sa
ar
ry
y
Authentication and WEP Encryption
The absence of a physical connection between nodes makes the wireless links vulnerable to
eavesdropping and information theft. To provide a certain level of security , the IEEE 802.11
standard has defined two types of authentication methods, open system and shared key. With
open system authentication a wireless PC can join any network and receive any messages that
are not encrypted. With shared key authentication, only those PCs that possess the correct
authentication key can join the network. By default IEEE 802.11 wireless devices operate in an
Open system network.
DHCP (Dynamic Host Configuration Protocol)
When operates as a DHCP server, the Wireless Broadband Router assign IP addresses to the
client PCs on the LAN. The client PCs “leases” these Private IP addresses for a user-defined
amount of time. After the lease time expires, the private IP address is made available for
assigning to other network devices.
The DHCP IP address can be a single, fixed public IP address, an your service provider assigned
public IP address, or a private IP address.
If you enable DHCP server on a private IP address, a public IP address will have to be assigned
to the NAT IP address, and NAT has to be enabled so that the DHCP IP address can be
translated into a public IP address. By this, the client PCs are able to access the Internet.
Infrastructure mode
A backbone to extend the service provided by network. This mode provides wireless
connectivity to multiple wireless network devices within a fixed range or area of coverage,
interacting with wireless nodes via an antenna.
LAN (Local Area Network) & WAN (Wide Area Network)
A LAN is a computer network limited to the immediate area, usually the same building or floor
of a building. A WAN, on the other hand, is an outside connection to another network or the
Internet.
The Ethernet side of the Wireless Broadband Router is called the LAN port. It is a twisted-pair
Ethernet 10Base-T interface. A hub can be connected to the LAN port. More than one
computers, such as server or printer, can be connected through this hub to the Wireless
Broadband Router and composes a LAN.
The WAN port of the Wireless Broadband Router composes the WAN interface, which supports
PPP or RFC 1483 connecting to another remote DSL device or cable modem.
MAC Address
Media Access Code Address. A unique, 48-bit number assigned to every network interface card
by the manufacturer.
NAT (Network Address Translation) IP Address
NAT is an Internet standard that translates a private IP within one network to a public IP
address, either a static or dynamic one. NAT provides a type of firewall by hiding internal IP
addresses. It also enables a company to use more internal IP addresses.
If the IP addresses given by your your service provider are not enough for each PC on the LAN
and the Wireless Broadband Router, you need to use NAT. With NAT, you make up a private IP
network for the LAN and assign an IP address from that network to each PC. One of some public
addresses is configured and mapped to a private workstation address when accesses are made
through the gateway to a public network.
For example, the Wireless Broadband Router is assigned with the public IP address of
168.111.1.1. With NAT enabled, it creates a Virtual LAN. Each PC on the Virtual LAN is assigned

Wireless Broadband Router User’s Manual
50
with a private IP address with default value of 192.168.1.2 to 192.168.1.254. These PCs are
not accessible by the outside word but they can communicate with the outside world through
the public IP 168.111.1.1.
Private IP Address
Private IP addresses are also LAN IP addresses, but are considered “illegal” IP addresses to the
Internet. They are private to an enterprise while still permitting full network layer connectivity
between all hosts inside an enterprise as well as all public hosts of different enterprises.
The Wireless Broadband Router uses private IP addresses by assigning them to the LAN that
cannot be directly accessed by the Internet or remote server. To access the Internet, private
network should have an agent to translate the private IP address to public IP address.
RIP (Routing Information Protocol)
RIP is a routing protocol that uses the distance-vector routing algorithms to calculate least-
hops routes to a destination. It is used on the Internet and is common in the NetWare
environment. It exchanges routing information with other routers. It includes V1, V2 and
V1&V2, which controls the sending and receiving of RIP packets over Ethernet.
SSID
SSID is a thirty-two character(maximum) alphanumeric key identifying the wireless local area
network.
Service Set Identity. A group name shared by all members of an IEEE 802.11b network. Only
devices with the same SSID are allowed to establish connections. For the wireless devices in a
network to communicate with each other, all device must be configured with the same SSID.
UDP (User Data gram Protocol)
UDP is a connectionless transport service that does not own the reliability services provided by
TCP. UDP gives applications a direct interface with IP and the ability to address a particular
application process running on a host via a port number without setting up a connection
session.
Virtual Server
You can designate virtual servers, e.g., a FTP, web, telnet or mail server, on your local network
and make them accessible to the outside world. A virtual server means that it is not a dedicated
server -- that is, the entire computer is not dedicated to running on the public network but in
the private network.

Appendix: Specifications
51
A
Ap
pp
pe
en
nd
di
ix
x:
:
S
Sp
pe
ec
ci
if
fi
ic
ca
at
ti
io
on
ns
s
S
So
of
ft
tw
wa
ar
re
e
Standards Compliance
IEEE 802.11 / 802.11b Standard
IEEE 802.3 / IEEE 802.3u Standard
IEEE 802.1d MAC Bridges Standard
Wireless LAN Features
Fully compliant with IEEE 802.11 / IEEE 802.11b DSSS devices
Provide 11 / 5.5 / 2 / 1 Mbps wireless connectivity to the wireless clients
Auto fallback data rate under noisy environment
IEEE 802.11 Wireless Access Point function
Distributed Coordination Function (DCF)
z CSMA/CA
z Backoff Procedure
z NAV Management
z ACK Procedure
z Retransmission of unacknowledged frames
RTS/CTS Handshake
Duplicate Detection and Recovery
Beacon Generation
Probe Response
Fragmentation and Reassembly
Wired Equivalent Privacy Algorithm
Authentication Algorithm
Power Management
Short Preamble and Long Preamble
Association / Re-association / De-association
Home Gateway Controller Features
1K MAC look-up table
MAC security
Auto-sense 10Base-T / 100Base-TX operation modes
Wire speed reception and transmission for Ethernet Port
Upper Layer Applications
DHCP Server
DHCP Client
HTTP Server
PPP over Ethernet
NAT (IP Sharing)
DNS Proxy

Wireless Broadband Router User’s Manual
52
Virtual Server
RIP v1&v2
Operation Modes
802.11/802.11b Access Point
Roaming
Seamless roaming within the same IP subnet
Access Point Bridging Features
Support self-learning transparent bridge specified in IEEE 802.1d between wired LAN and Wireless LAN
Support up to 256 wireless MAC learning addresses
Automatic Learning Process
Forwarding Process
Aging Function
Filtering Database
Security Features
Support ESSID network identification for security
Support 64-bit and 128-bit WEP Data Encryption and Decryption
Support Authentication: Open System, Shared Key
Access Control by MAC Address
Configuration and Management
Web-based browser configuration management.
Using HTTP to upgrade firmware or configuration setting
Support DHCP Client function to obtain an IP configuration from a DHCP Server
Clear LED Indicators for real time monitor current network status
H
Ha
ar
rd
dw
wa
ar
re
e
Interface
2.4GHz RF interface for Wireless LAN connection
Four switch ports for 10/100 Mbps Ethernet LAN connection
Radio Characteristics
Frequency Band: 2.400 ~ 2.4835 GHz ISM Band (subject to local regulations)
Spreading: Direct Sequence Spread Spectrum
Modulation: CCK: 11Mbps and 5.5Mbps
DQPSK: 2Mbps
DBPSK: 1Mbps
Number of Channels: 11 Channels (US, Canada)
13 Channels (Europe)
14 Channels (Japan)
Data Rate: 11Mbps / 5.5Mbps / 2Mbps / 1Mbps
Antenna: Dual antenna supporting diversity
Transmit Power: 17dBm (typical)

Chapter 7: Troubleshooting
53
Receiver Sensitivity: -82dBm @ FER < 8%
Regulatory Approvals and Compliance
EMI/Immunity: FCC part 15 and Class B
Safety: VCCI, TELEC, CE, UL/cUL
Power Requirement and Operation Environment Requirement
Power Adaptor: Input 120/60 VAC; Output 12 VDC, 1A
Ambient Temperature: Operating - 0°C to 40°C, Storage - -20°C to 70°C
Relative Humidity: 20% to 90% (non-condensing)
Ethernet Interface
4 port 10/100 Integrated Switch with Physical Layer Transceivers
Hardware based 10/100, full/half, flow control and auto negotiation
LED Indicators (from left to right in front panel)
Power (Green)
Diagnose (Green)
10Mbps / 100Mbps Ethernet Link (Green)
WLAN(Green)
WAN(Green)
Physical
Dimensions: 152 mm (L) × 113 mm (W)
Weight: 282g
Certification
Wi-Fi Certified