Askey Computer WLP020 Ethernet Dongle User Manual
Askey Computer Corp Ethernet Dongle Users Manual
Users Manual
i
ASR-102 / ACR-201 Ethernet Dongle
User’s Manual
Rev:01
2002/09/19

Wireless LAN Card User’s Manual
ii
Information in this document is subject to change without notice. No part of this document may be reproduced or
transmitted in any form or by any means, electronic or mechanical, for any purpose, without the express written
permission of the seller.
The seller provides this documentation without warranty, term, or condition of any kind. The seller may make
improvements or changes in the product(s) and/or the program(s) described in this documentation at any time.
Other product and company names herein may be trademarks of their respective owners.
2002/09/19
Rev:01
000020-wlp
iii
Safety Notes
For Installation
Use only the type of power source indicated on the marking labels.
Use only the power adapter supplied with the product.
Do not overload wall outlet or extension cords as this may increase the risk of electric shock or file. If the power
cord is frayed, replace it with a new one.
Proper ventilation is necessary to prevent the product overheating. Do not block or cover the slots and openings
on the device, which are intended for ventilation and proper operation. It is recommended to mount the product
with a stack.
Do not place the product near any source of heat or expose it to direct sunshine.
Do not expose the product to moisture. Never spill any liquid on the product.
Do not attempt to connect with any computer accessory or electronic product without instructions from
qualified service personnel. This may result in risk of electronic shock or file.
Do not place this product on an unstable stand or table.
For Using
Power off and unplug this product from the wall outlet when it is not in use or before cleaning. Pay attention to
the temperature of the power adapter. The temperature might be high.
After powering off the product, power on the product at least 15 seconds later.
Do not block the ventilating openings of this product.
When the product is expected to be not in use for a period of time, unplug the power cord of the product to
prevent it from the damage of storm or sudden increases in rating.
For Service
Do not attempt to disassemble or open covers of this unit by yourself. Nor should you attempt to service the product
yourself, which may void the user’s authority to operate it. Contact qualified service personnel under the following
conditions:
If the power cord or plug is damaged or frayed.
If liquid has been spilled into the product.
If the product has been exposed to rain or water.
If the product does not operate normally when the operating instructions are followed.
If the product has been dropped or the cabinet has been damaged.
If the product exhibits a distinct change in performance.
Warning
This equipment must be installed and operated in accordance with provided instructions and a minimum 20 cm
spacing must be provided between computer mounted antenna and person’s body (excluding extremities of
hands, wrist and feet) during wireless modes of operation.
This device complies with Part 15 of the FCC Rules. Operation is subject to the following two conditions: (1)
this device may not cause harmful interference, and (2) this device must accept any interference received,
including interference that may cause undesired operation.
Caution
Any changes or modifications not expressly approved by the party responsible for compliance could void the
authority to operate equipment.

Wireless LAN Card User’s Manual
iv

Contents
v
Contents
Before you use ................................................................................ vii
Wireless LAN Basics................................................................................ vii
Local Area Network (LAN) .............................................................. vii
Ad Hoc Network ............................................................................ vii
Infrastructure Network .................................................................. vii
Roaming ...................................................................................... vii
System Requirements............................................................................ viii
Unpacking............................................................................................ viii
Chapter 1: Overview ......................................................................... 1
Physical Outlook ..................................................................................... 1
Front Panel ................................................................................... 1
Real Panel..................................................................................... 1
Chapter 2: Installation ...................................................................... 3
Install the Wireless LAN Card .................................................................... 3
Uninstall the Wireless LAN Card................................................................. 3
Chapter 3: Configuration................................................................... 5
Setting TCP/IP on Client PC ...................................................................... 5
For Windows 98 ............................................................................. 5
For Windows ME ............................................................................ 9
For Windows NT............................................................................. 9
For Windows 2000 ........................................................................13
For Windows XP............................................................................15
Renew IP Address on Client PC.................................................................16
For Windows 98 ............................................................................16
For Windows ME ...........................................................................17
For Windows NT............................................................................17
For Windows 2000 ........................................................................18
For Windows XP............................................................................18
Chapter 4: Web Configuration ......................................................... 19
Using the Web-Based Manager.................................................................19
To Have the New Settings Take Effect ..............................................19
Info......................................................................................................19
Wireless................................................................................................19
IP Address ............................................................................................21
Stations ................................................................................................21
Admin ..................................................................................................22
Chapter 5: Troubleshooting............................................................. 23
Radio Interference..................................................................................23
Card Not Detected..................................................................................23
Cannot Connect to Another Wireless LAN Card ...........................................23
Poor Link Quality....................................................................................23
Cannot Connect to Access Point................................................................23

Wireless LAN Card User’s Manual
vi
Chapter 6: Glossary......................................................................... 25
Appendix: Specifications ................................................................. 27
Software......................................................................................27
Hardware.....................................................................................28

Before You Use
vii
B
Be
ef
fo
or
re
e
y
yo
ou
u
u
us
se
e
This Wireless LAN Card is an IEEE 802.11b Wireless LAN adapter. It allows your computer to connect to a wireless
network and to share resources, such as files or printers without being bound to the network wires. Operating in
2.4GHz Direct Sequence Spread Spectrum (DSSS) radio transmission, the Wireless LAN Card transfers data at
speeds up to 11Mbps. Both Ad-Hoc and Infrastructure mode are supported. For network security concern, 64/128-bit
Wired Equivalent Protection (WEP) algorithm is used. In addition, its standard compliance ensures that it can
communicate with any 802.11b networks.
This User’s Manual contains information on how to install and configure your Wireless LAN Card. Your Wireless
LAN Card will allow you to connect your computer to other Wireless LAN Card equipped computers.
Wireless LAN Basics
This section conations some Wireless LAN basics to help you better understand how the product work together to
create a wireless network.
L
Lo
oc
ca
al
l
A
Ar
re
ea
a
N
Ne
et
tw
wo
or
rk
k
(
(L
LA
AN
N)
)
Simply put, a LAN is a network that exists in a relatively limited area. A network is two or more computers
connected together sharing files and peripheral devices such as printers.
The Wireless LAN Card allows you to interact with other computers without having to run cables normally
associated with networks. This lets you move your computer around while staying connected to your network.
There are two ways to use the Wireless LAN Card. One way is to connect directly to one or more Wireless LAN
Card equipped computers, forming an Ad Hoc wireless network. The second way is to connect to an Access Point
that gives you access to an existing wired LAN, forming an Infrastructure wireless network.
A
Ad
d
H
Ho
oc
c
N
Ne
et
tw
wo
or
rk
k
The Ad Hoc network offers peer to peer connections between workstations, allowing communication between
computers within range that have an 802.11b DSSS compatible PC card installed. A wireless Ad Hoc network can
also access a wired LAN’s TCP/IP service (such as e-mail and the Internet) by using a TCP/IP software on an
Ethernet equipped PowerBook or notebook.
I
In
nf
fr
ra
as
st
tr
ru
uc
ct
tu
ur
re
e
N
Ne
et
tw
wo
or
rk
k
The infrastructure network uses an access point (or several access points) as a gateway, linking the wireless network
to a wired LAN. As a result, portable workstations or desktops on your wireless network have access to all of the
features of your wired LAN including e-mail, Internet access, network printers and files server.
R
Ro
oa
am
mi
in
ng
g
Multiple Access Points can be installed to extend the wireless service coverage area for seamless wireless access.
Within an extended service area, all Access Points and wireless clients must have the same Service Set Identity
(SSID). Roaming among different Access Points is controlled automatically to maintain the wireless connectivity at
all times.

Wireless LAN Card User’s Manual
vii
System Requirements
To use the Wireless LAN Card, your computer must meet the following minimum requirements:
Windows 98/98(SE)/Me/2000/XP
32 MB of RAM, additional memory recommended
Unpacking
After unpack the Wireless LAN Card, please check the contents of the package with the checklist stated below. If you
find any item is missing, please contact the dealer directly.
Wireless LAN Card
5V Power Adapter and power cord
Chapter 1: Overview
1
C
Ch
ha
ap
pt
te
er
r
1
1:
:
O
Ov
ve
er
rv
vi
ie
ew
w
Before installing the card, please take a look at the front panel and real panel of the card. Getting acquainted with
both panels will be helpful for installation later.
Physical Outlook
F
Fr
ro
on
nt
t
P
Pa
an
ne
el
l
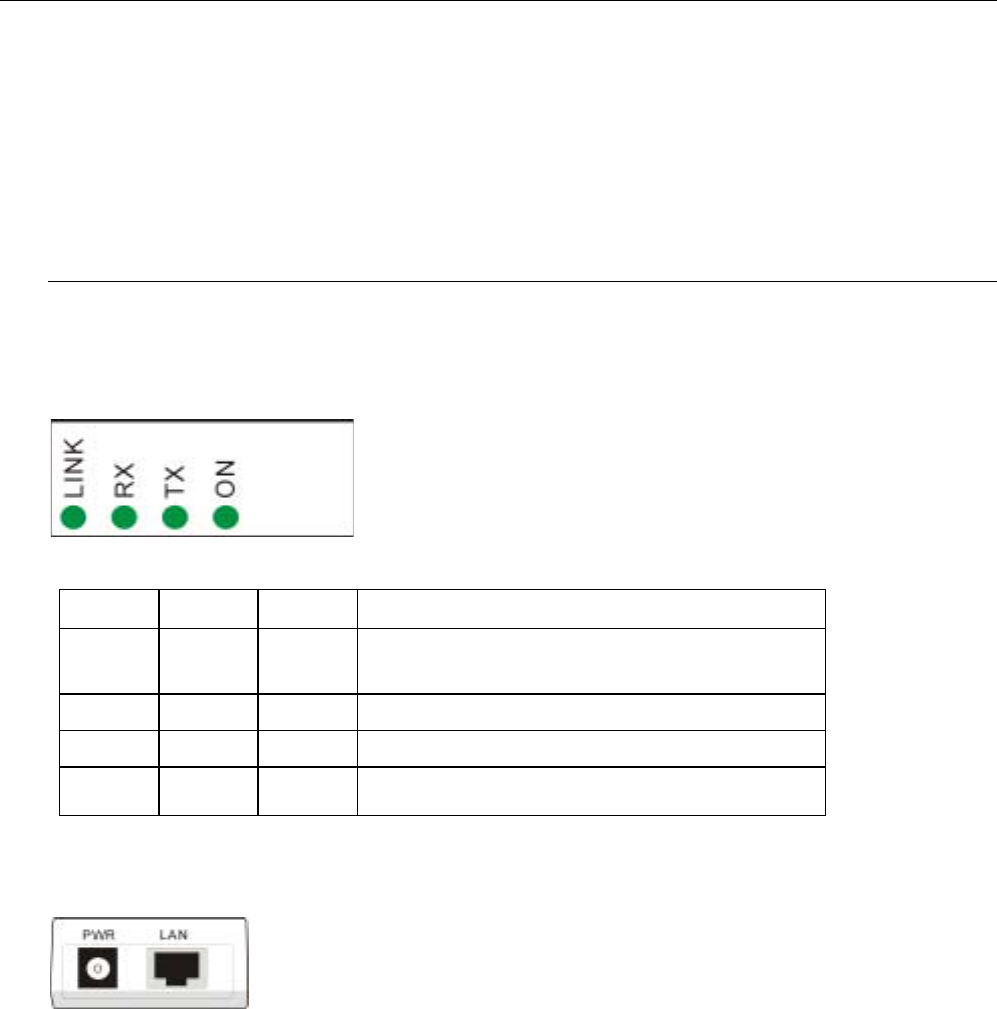
The LEDs on the Wireless LAN Card indicate connection status and data transfer operation status, as described
below:
LED Indicators
LED Color State Description
Link Red Blinking Transmission mode. The faster the LED blinks, the
higher the data exchange rate.
RX Green Blinking Indicates that the data is receiving from outside.
TX Green Blinking Indicates that the data is transferring to remote side.
On Green On The adapter is plugged into your computer.
R
Re
ea
al
l
P
Pa
an
ne
el
l
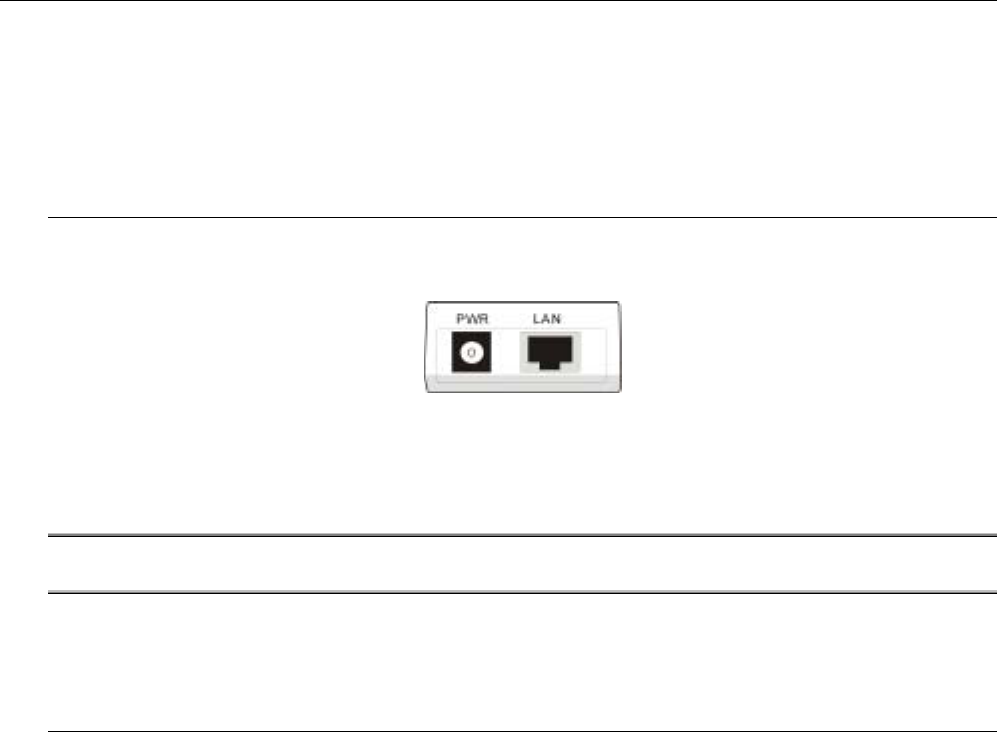
Take a look at the real panel of this wireless LAN card.
PWR - Power connector.
LAN - LAN port. 10/100 Base-TX.

Wireless LAN Card User’s Manual
2
Chapter 2: Installation
3
C
Ch
ha
ap
pt
te
er
r
2
2:
:
I
In
ns
st
ta
al
ll
la
at
ti
io
on
n
Install the Wireless LAN Card
To install the wireless LAN card onto your computer, please do the following:
1. Plug one end of the Ethernet cable to the Ethernet port (LAN) on the wireless LAN card.
2. Insert the other end of the cable to the Ethernet port on the Network card of your computer.
3. Connect the supplied power adapter to the PWR port of the wireless LAN card, and plug the other end to a
power outlet.
4. Turn on the power and then go to do the web configuration for the wireless LAN card.
Note: The red LED on the Wireless LAN Card will light when the Wireless LAN Card is connected
to your computer.
To set up the TCP/IP address or the subnet mask, refer to Setting Up TCP/IP section for details.
Uninstall the Wireless LAN Card
Should you need to uninstall the Wireless LAN Card and application software for any reason,, you should remove the
hardware from your computer and then uninstall the associated software. Please proceed as follows.
1. Turn off the power of your computer.
2. Disconnect the supplied power adapter to the PWR port of the wireless LAN card.
3. Unplug the cable to the Ethernet port on the Network card of your computer.
4. Unplug the cable to the Ethernet cable to the Ethernet port (LAN) on the wireless LAN card.
5. The card is removed successfully.

Wireless LAN Card User’s Manual
4
Chapter 3:Configuration
5
C
Ch
ha
ap
pt
te
er
r
3
3:
:
C
Co
on
nf
fi
ig
gu
ur
ra
at
ti
io
on
n
This section contains instructions for configuring the TCP/IP protocol of the Wireless LAN Card. The IP address
policy depends on your wireless network. You should configure your TCP/IP protocol as instructed by your network
administrator.
Setting TCP/IP on Client PC
F
Fo
or
r
W
Wi
in
nd
do
ow
ws
s
9
98
8
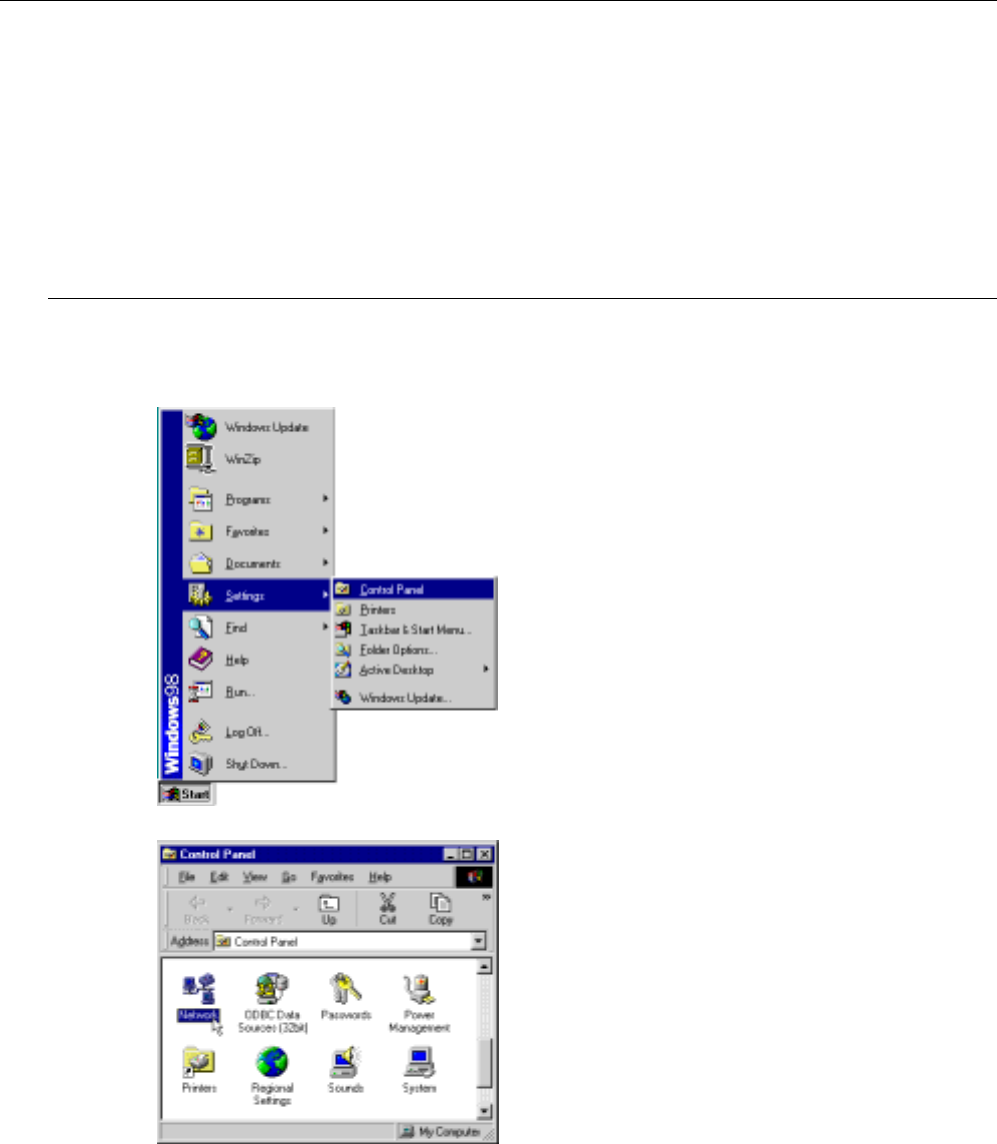
1. Click on the Start menu, point to Settings and click on Control Panel.
2. Double-click the Network icon.
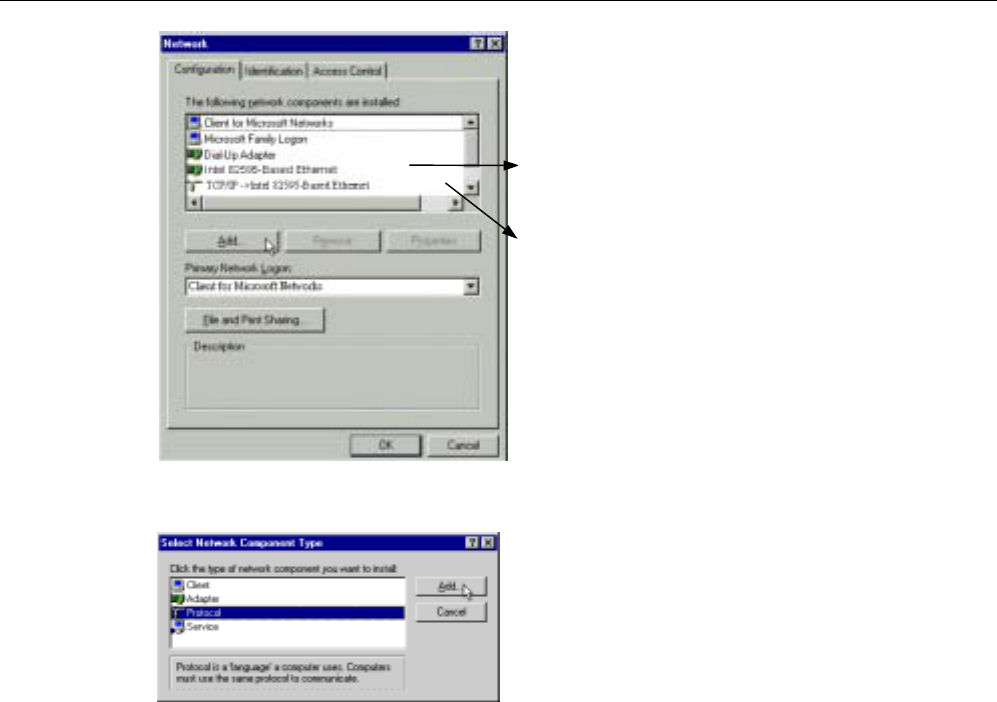
3. The Network window appears. On the Configuration tab, check out the list of installed network components.
Option 1: If you have no TCP/IP protocol, click Add.
Option 2: If you have TCP/IP protocol, go to Step 6.
Wireless LAN Card User’s Manual
6
Your network
interface card.
Check out if TCP/IP
for your NIC is
installed or not.
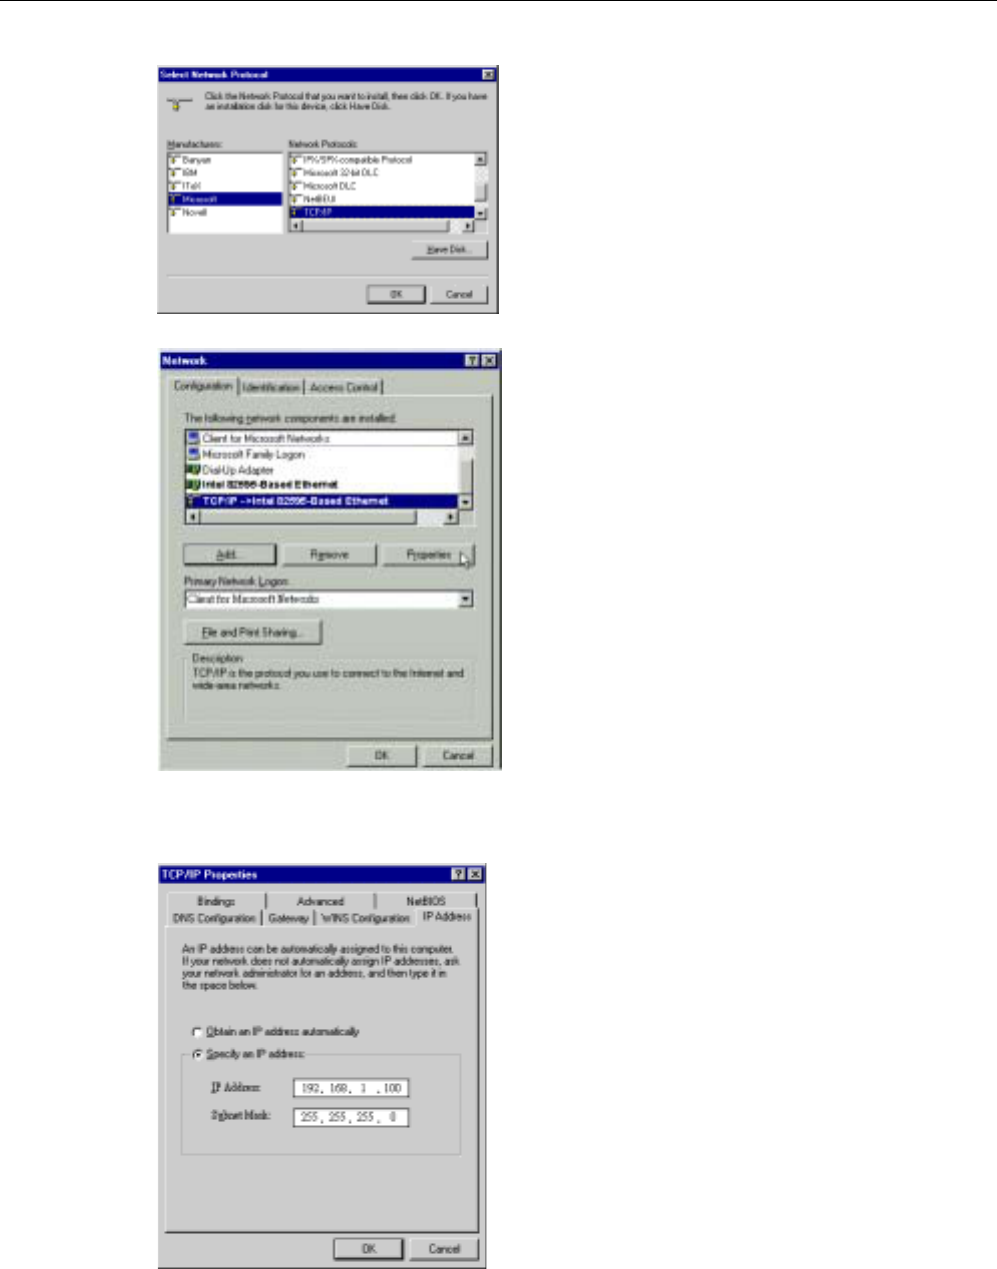
4. Highlight Protocol and click Add.
Chapter 3: Configuration
7
5. On the left side of the windows, highlight Microsoft and then select TCP/IP on the right side. Then click OK.
6. When returning to Network window, highlight TCP/IP protocol for your NIC and click Properties.
7. On IP Address tab:
Enable Specify an IP address option. Enter the IP Address: 192.168.1.x (x is between 2 and 254) and Subnet
Mask: 255.255.255.0 as in figure below.
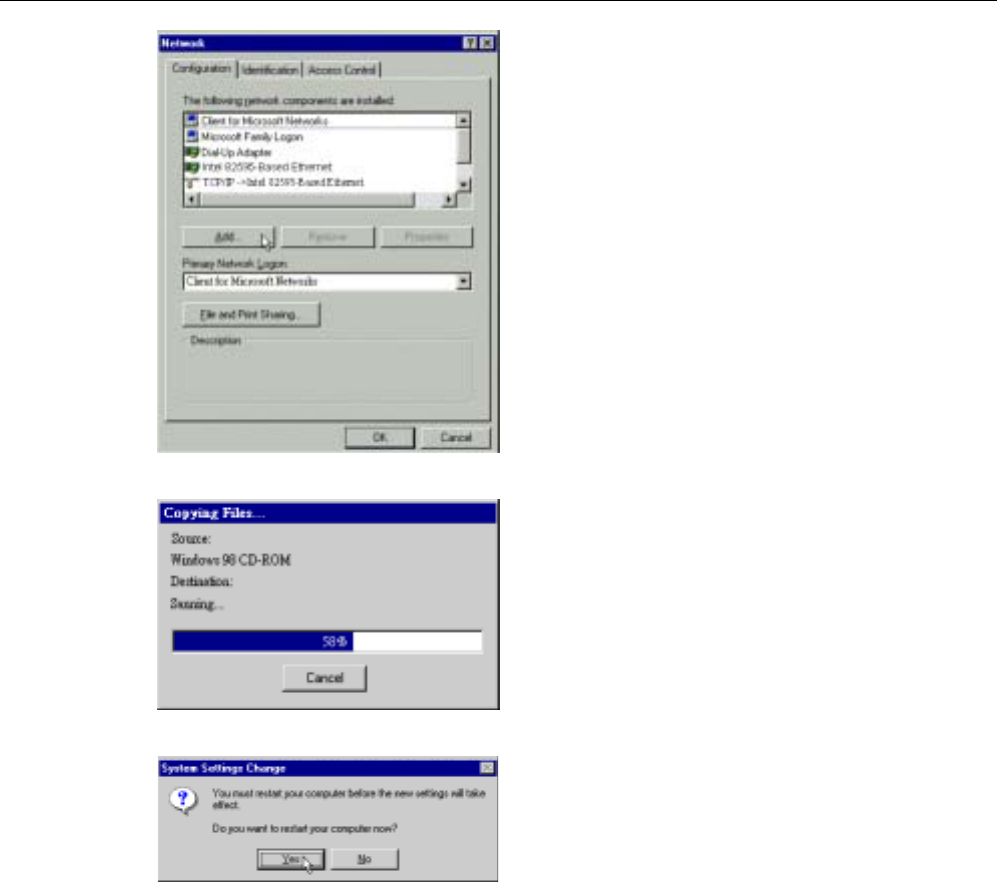
8. When returning to Network window, click OK.
Wireless LAN Card User’s Manual
8
9. Wait for Windows copying files.
10. When prompted with System Settings Change dialog box, click Ye s to restart your computer.
Chapter 3: Configuration
9
F
Fo
or
r
W
Wi
in
nd
do
ow
ws
s
M
ME
E
Step 1 Click on the Start menu, point to Settings and click on Control Panel.
Step 2 Double-click the Network icon.
Step 3 The Network window appears. On the Configuration tab, check out the list of installed network
components.
Option 1: If you have no TCP/IP protocol, click Add.
Option 2: If you have TCP/IP protocol, go to Step 6.
Step 4 Highlight Protocol and click Add.
Step 5 On the left side of the windows, highlight Microsoft and then select TCP/IP on the right side. Then click
OK.
Step 6 While returning to Network window, highlight TCP/IP protocol for your NIC and click Properties.
Step 7 On the IP Address tab, select Specify an IP address. Enter the IP address: 192.168.1.x (x is between 2 and
254) and Subnet Mask: 255.255.255.0. Then click OK.
Step 8 While returning to the Network window, click OK.
Step 9 Wait for Windows copying files.
Step 10 When prompted with the System Settings Change dialog box, click Yes to restart your computer.
F
Fo
or
r
W
Wi
in
nd
do
ow
ws
s
N
NT
T
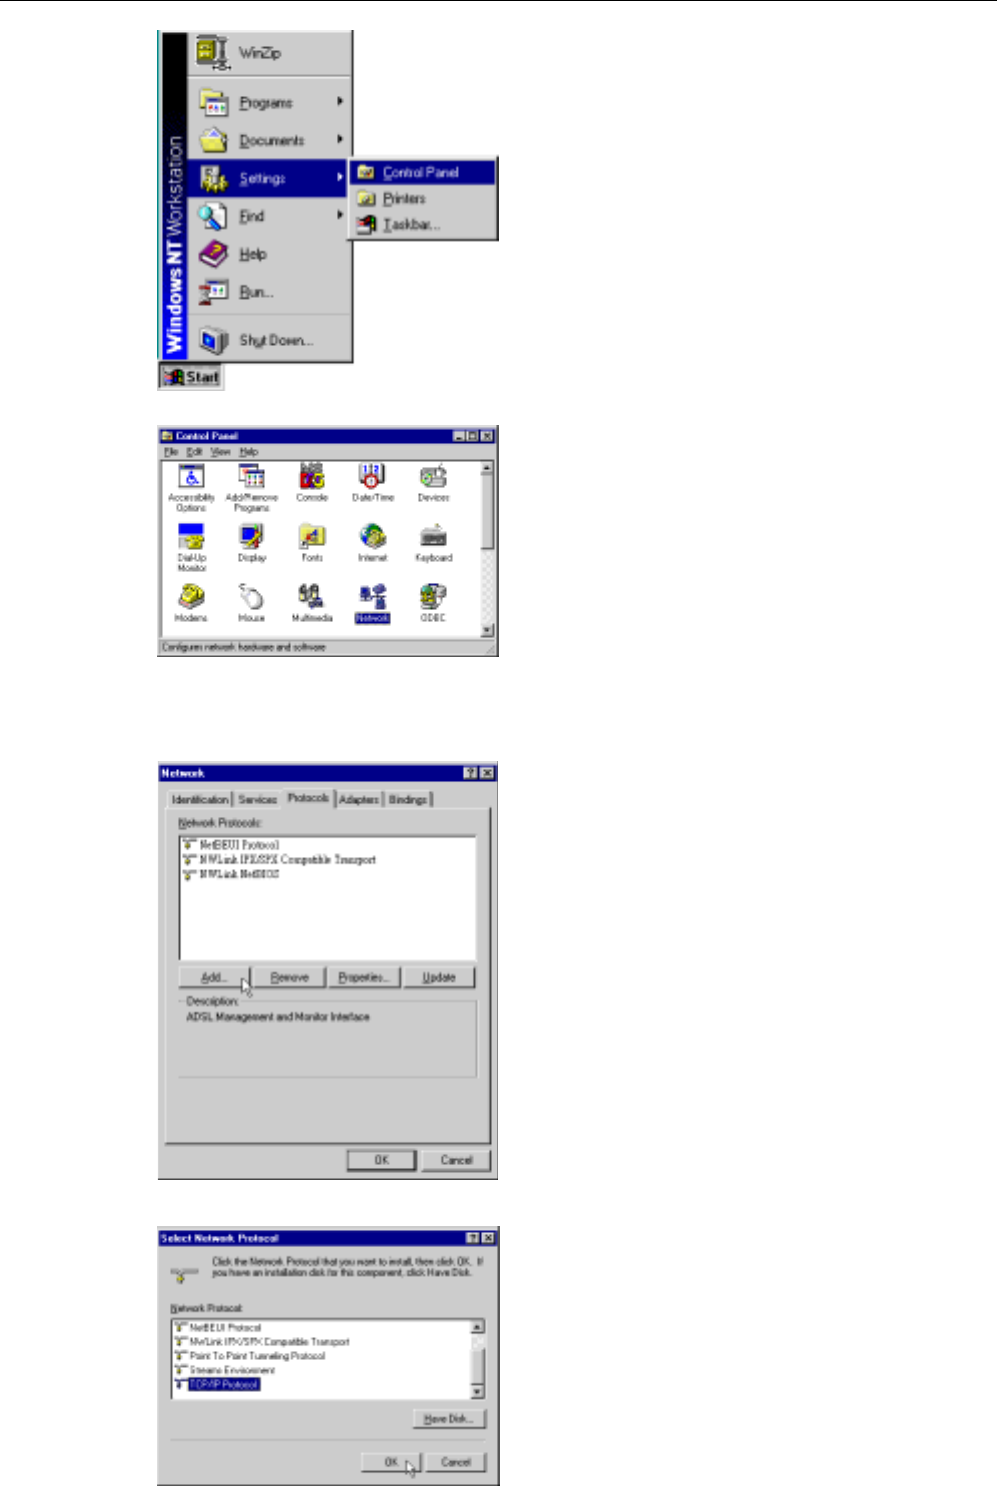
1. Click Start, point to Settings, and then click Control Panel.
Wireless LAN Card User’s Manual
10
2. Double-click the Network icon.
3. The Network window appears. On the Protocols tab, check out the list of installed network components.
Option 1: If you have no TCP/IP Protocol, click Add.
Option 2: If you have TCP/IP Protocol installed, go to Step 7.
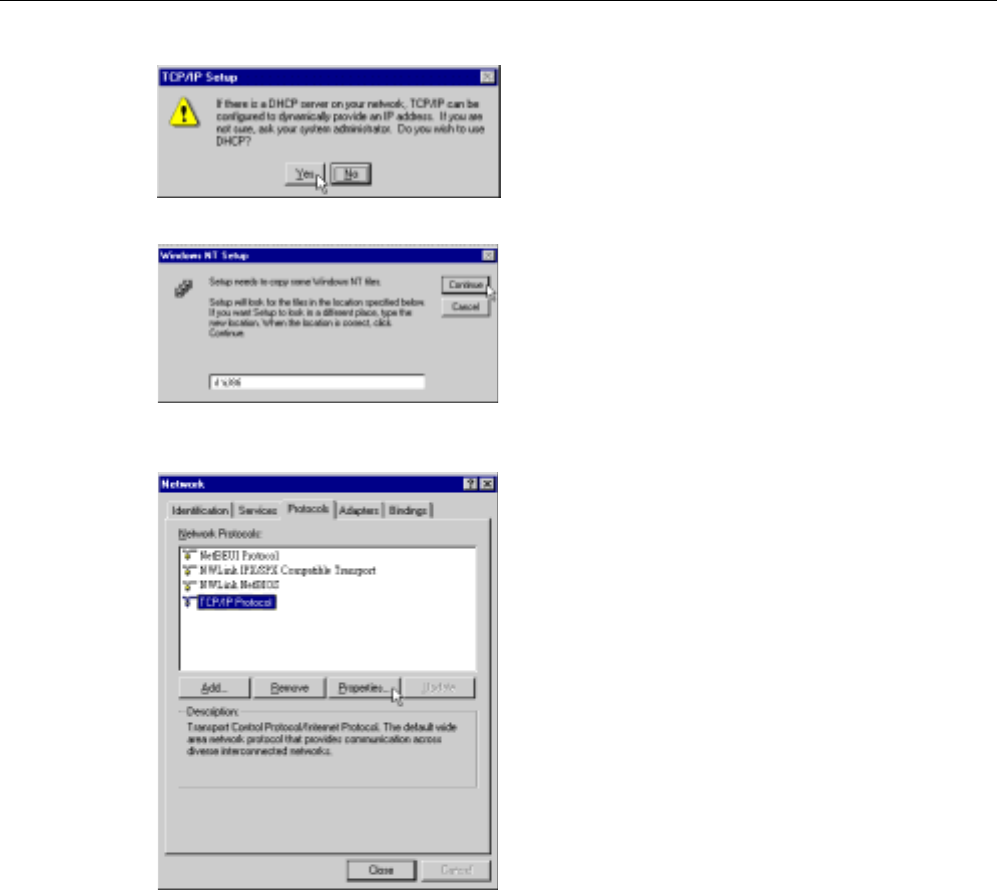
4. Highlight TCP/IP Protocol and click OK.
Chapter 3: Configuration
11
5. Click Ye s to use DHCP.
6. Insert the Windows NT CD into your CD-ROM drive and type the location of the CD. Then click Continue.
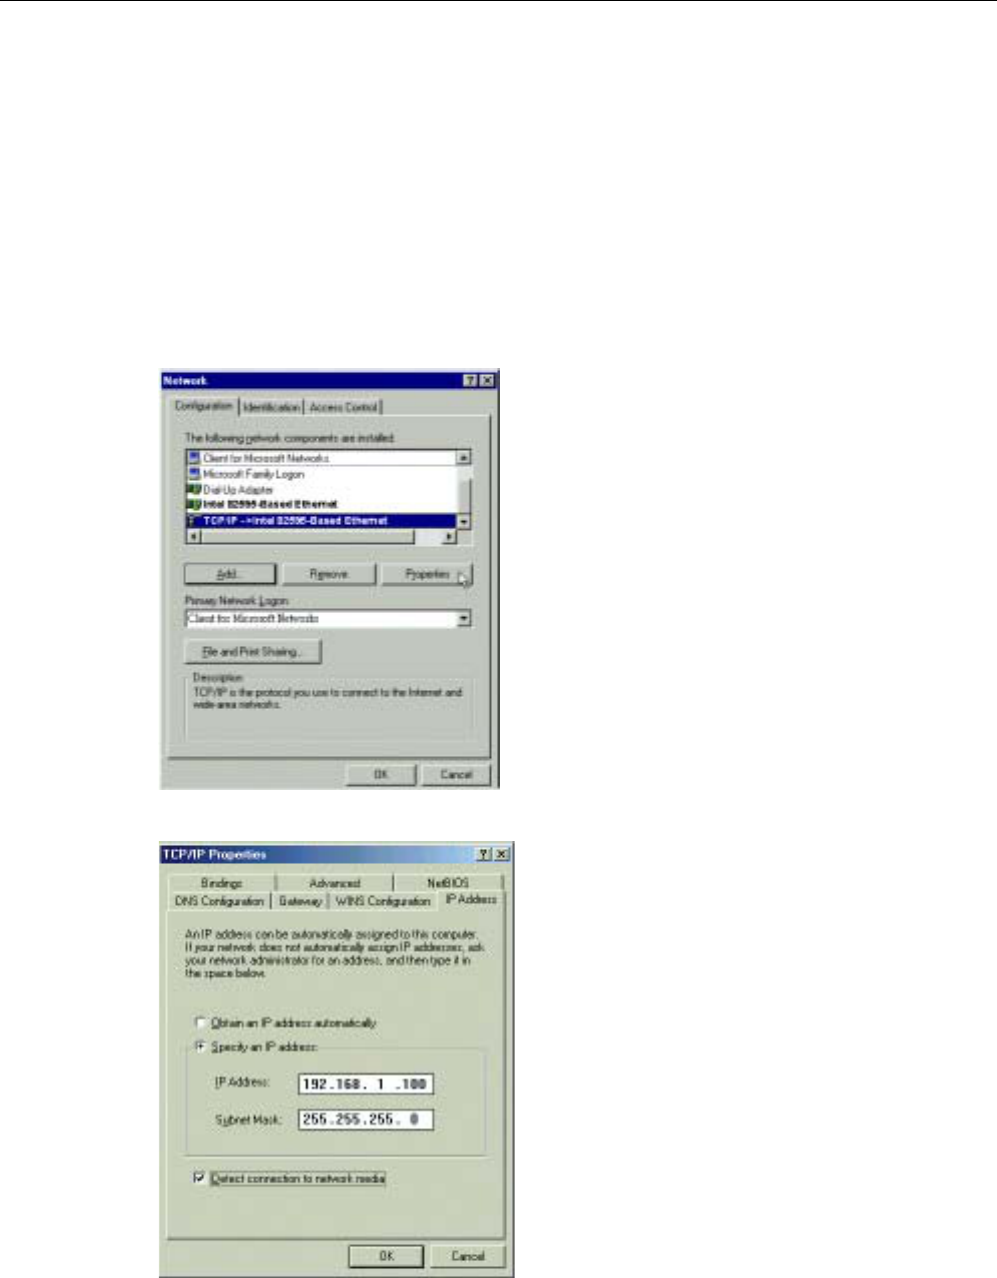
7. Returning to the Network window, you will find the TCP/IP Protocol among the list. Select TCP/IP Protocol
and click Properties.
Wireless LAN Card User’s Manual
12
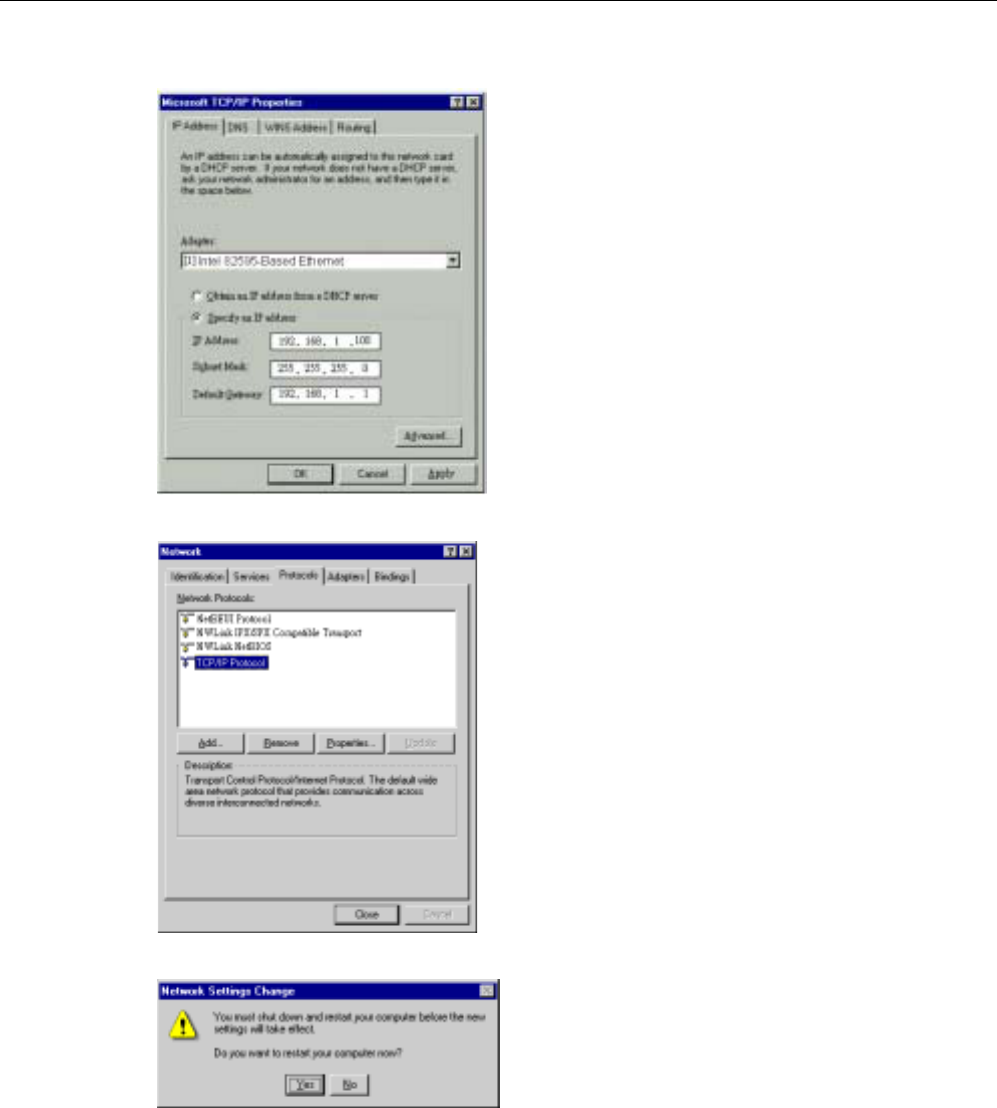
8. Enable Specify an IP address option. Enter the IP Address: 192.168.1.x (x is between 2 and 254) and Subnet
Mask: 255.255.255.0 as in figure below.
9. When returning to Network window, click Close.
10. When prompted with Network Settings Change dialog box, click Ye s to restart your computer.
Chapter 3: Configuration
13
F
Fo
or
r
W
Wi
in
nd
do
ow
ws
s
2
20
00
00
0
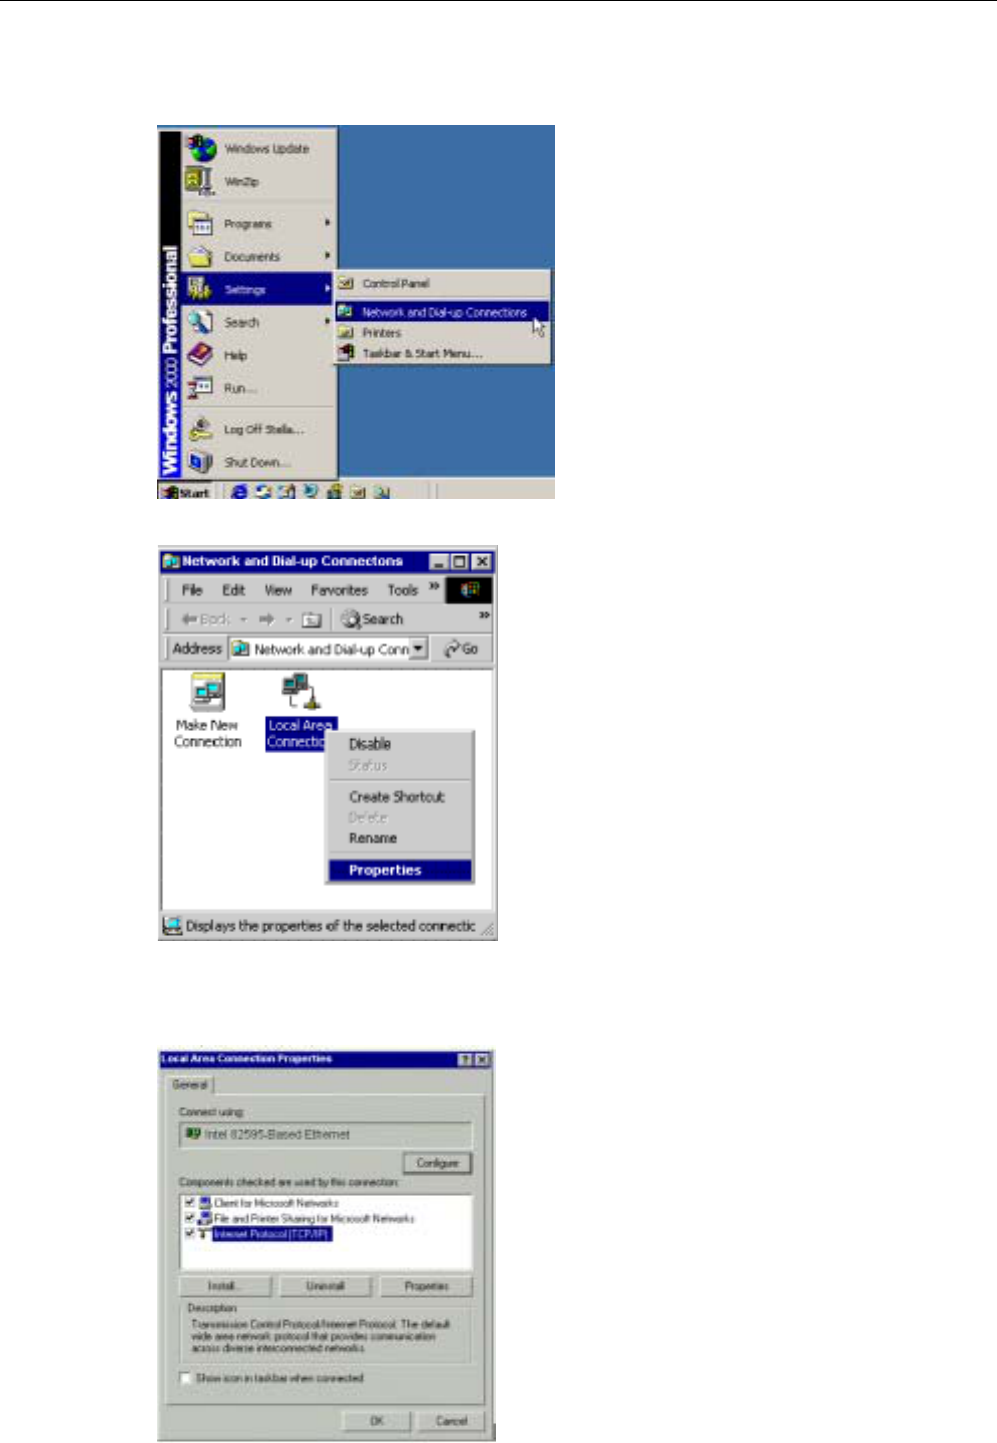
1. From the Start menu, point to Settings and then click Network and Dial-up Connections.
2. Right-click the Local Area Connection icon and then click Properties.
3. On the General tab, check out the list of installed network components.
Option 1: If you have no TCP/IP Protocol, click Install.
Option 2: If you have TCP/IP Protocol, go to Step 6.
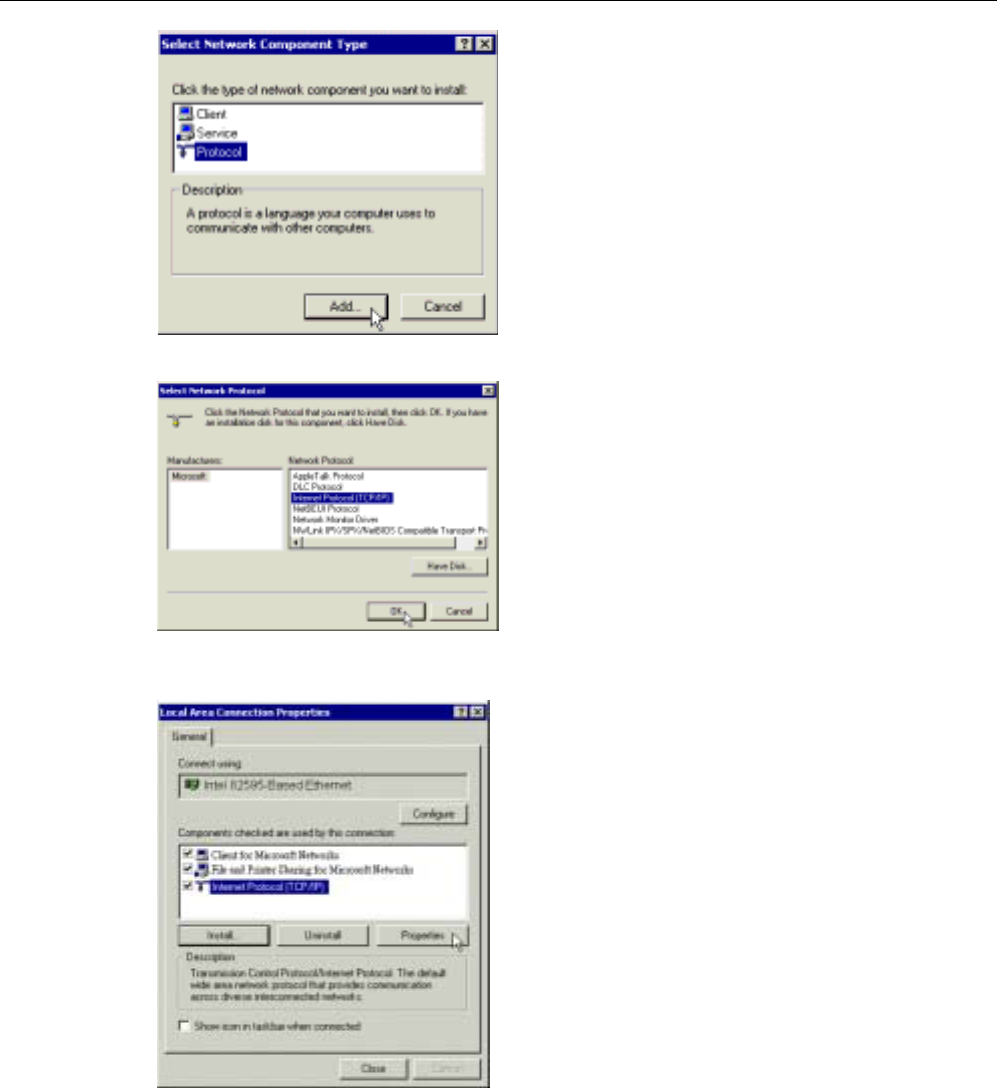
4. Highlight Protocol and then click Add.
Wireless LAN Card User’s Manual
14
5. Click Internet Protocol (TCP/IP) and then click OK.
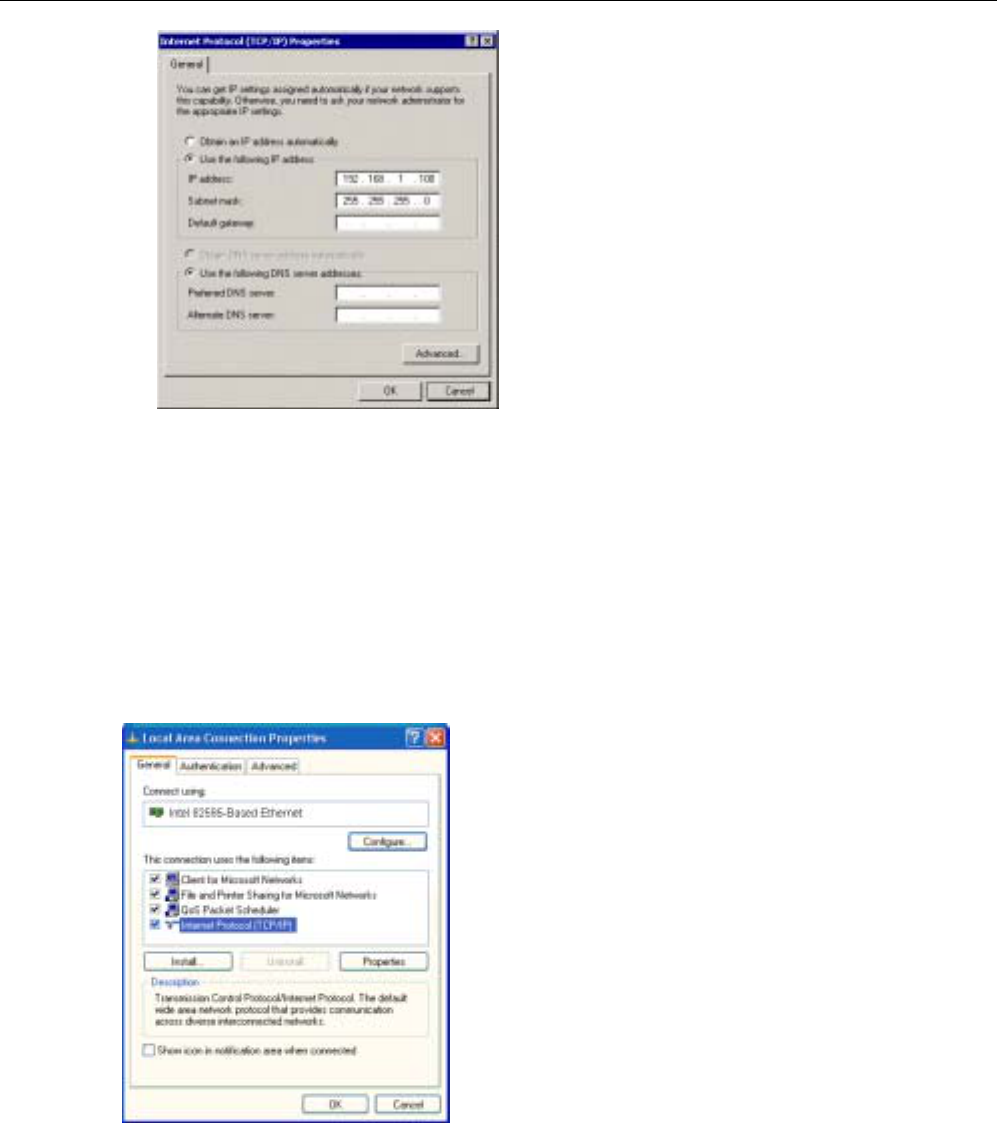
6. When returning to Local Area Connection Properties window, highlight Internet Protocol (TCP/IP) and then
click Properties.
7. Under the General tab, enable Use the following IP Address. Enter the IP address: 192.168.1.x (x is between
2 and 254) and Subnet Mask: 255.255.255.0. Then click OK. When prompted to restart your computer, reboot
it to enable the settings.
Chapter 3: Configuration
15
F
Fo
or
r
W
Wi
in
nd
do
ow
ws
s
X
XP
P
Step 1 From the Start menu, point to Control Panel and then click Network and Internet Connections.
Step 2 Click Network Connection and then click Properties.
Step 3 On the General tab, check out the list of installed network components.
Option 1: If you have no TCP/IP Protocol, click Install.
Option 2: If you have TCP/IP Protocol, go to Step 6.
Step 4 Highlight Protocol and then click Add.
Step 5 Click Internet Protocol(TCP/IP) and then click OK.
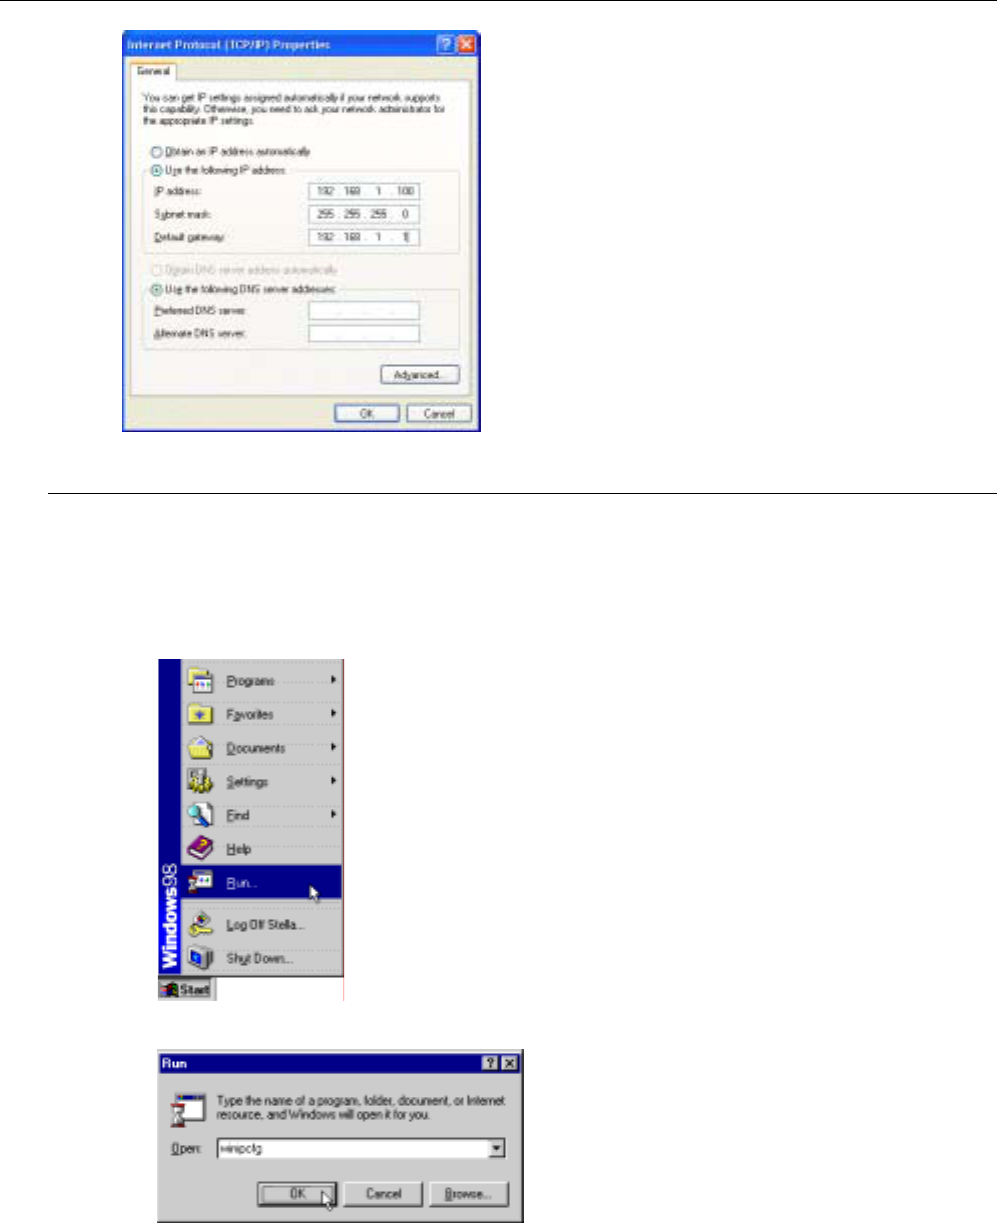
Step 6 On the Local Area Connection Properties window, highlight Internet Protocol (TCP/IP) and then click
Properties.
Step 7 Under the General tab, enable Use the following IP address. Enter the IP address: 192.168.1.x (x is
between 2 and 254) and Subnet Mask: 255.255.255.0. Then click Ok
Wireless LAN Card User’s Manual
16
Renew IP Address on Client PC
There is a chance that your PC does not renew its IP address after the wireless LAN card is on line and the PC can
not access the Internet. Please follow the procedures below to renew PC’s IP address.
F
Fo
or
r
W
Wi
in
nd
do
ow
ws
s
9
98
8
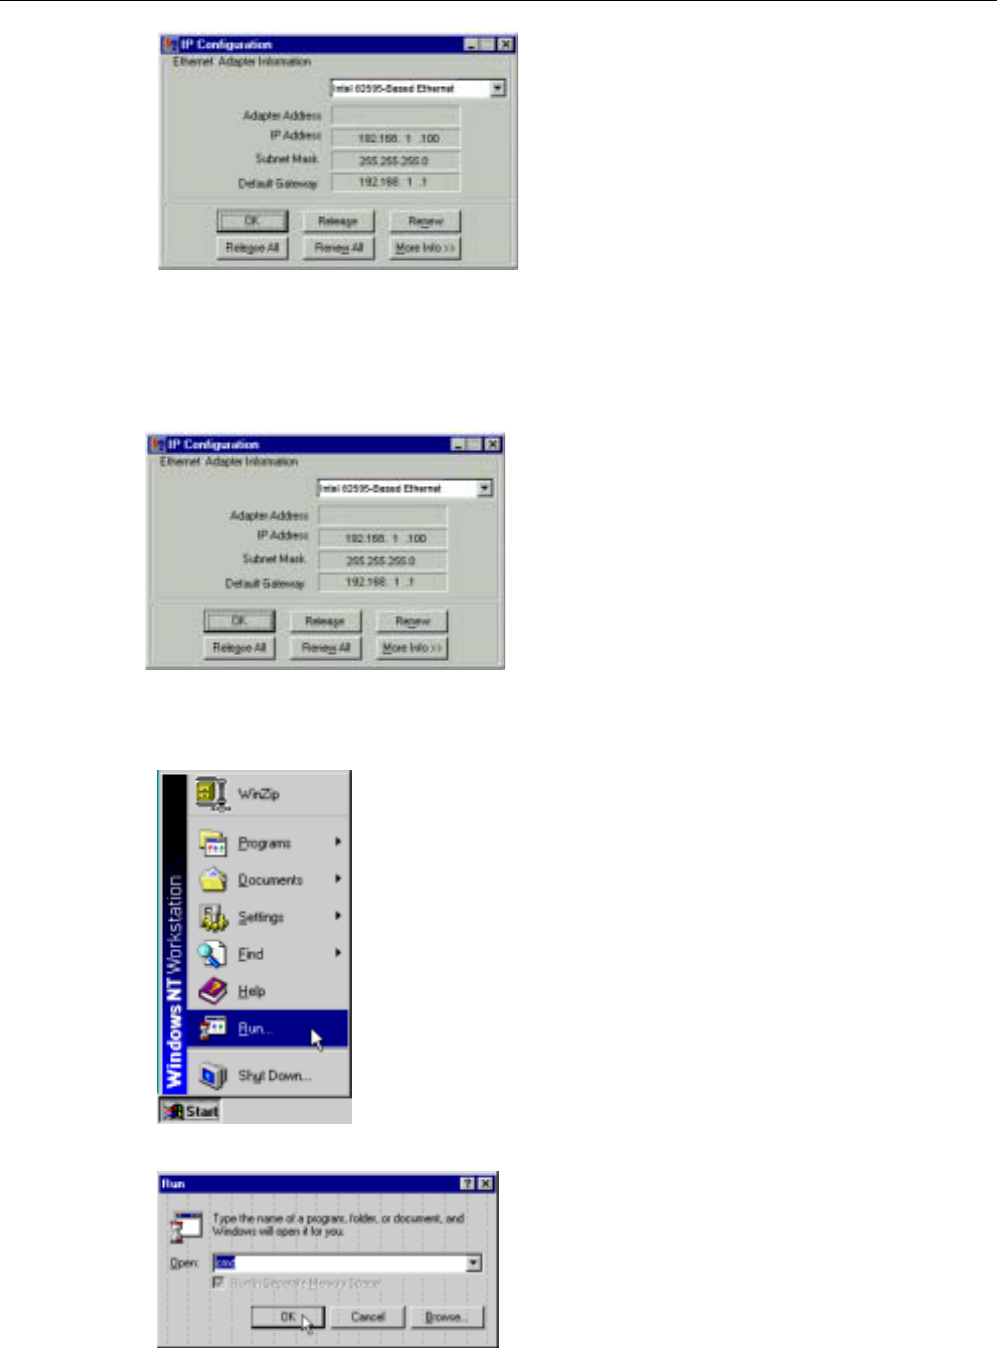
1. Select Run from the Start menu.
2. Type winipcfg in the dialog box and the click OK.
3. When the figure below appears, click Release and then Renew to get an IP address.
Chapter 3: Configuration
17
F
Fo
or
r
W
Wi
in
nd
do
ow
ws
s
M
ME
E
1. Select Run from the Start menu.
2. Type winipcfg in the dialog box and the click OK.
3. When the figure below appears, click Release and then Renew to get an IP address.
F
Fo
or
r
W
Wi
in
nd
do
ow
ws
s
N
NT
T
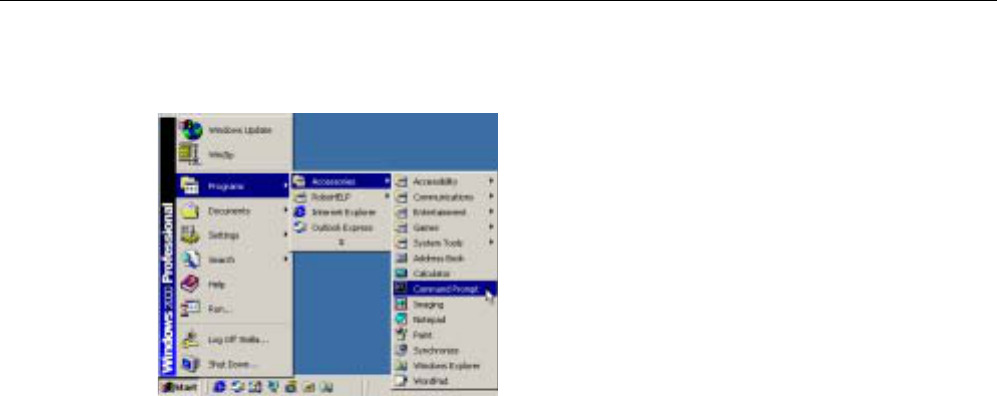
1. Select Run from the Start menu.
2. Type cmd in the dialog box and the click OK.
3. Type ipconfig at prompt. Then you will see the IP information from DHCP server.
4. If you want to get a new IP address, type ipconfig /release to release the previous IP address and then
type ipconfig /renew to get a new one.
Wireless LAN Card User’s Manual
18
F
Fo
or
r
W
Wi
in
nd
do
ow
ws
s
2
20
00
00
0
1. From the Start menu, point to Programs, Accessories and then click Command Prompt.
2. Type ipconfig at prompt. Then you will see the IP information from DHCP server.
3. If you want to get a new IP address, type ipconfig/release to release the previous IP address and then
type ipconfig/renew to get a new one.
F
Fo
or
r
W
Wi
in
nd
do
ow
ws
s
X
XP
P
1. From the Start menu, point to Programs, Accessories and then click Command Prompt.
2. Type ipconfig at prompt. Then you will see the IP information from DHCP server.
3. If you want to get a new IP address, type ipconfig /release to release the previous IP address and then
type ipconfig /renew to get a new one.
Chapter 4 Web Configuration
19
C
Ch
ha
ap
pt
te
er
r
4
4:
:
W
We
eb
b
C
Co
on
nf
fi
ig
gu
ur
ra
at
ti
io
on
n
Using the Web-Based Manager
Once your host PC is properly configured as described in previous chapters, please proceed as follows:
1. Start your web browser and type the private IP address of the Wireless LAN Card in the URL field:
192.168.1.3.
2. When connecting to the device, you will be prompted to enter username and password. Simply keep the
username and the password to be blank and Click Ye s.
If the login is successfully, the main web page appears. From now on the Wireless LAN Card acts as a web server
sending HTML pages/forms on your request. Please fill out these pages/forms and apply them to the Wireless LAN
Card.
T
To
o
H
Ha
av
ve
e
t
th
he
e
N
Ne
ew
w
S
Se
et
tt
ti
in
ng
gs
s
T
Ta
ak
ke
e
E
Ef
ff
fe
ec
ct
t
After you finished the web configuration and save the settings, you have to click Reboot under Admin web page to
reboot your Wireless LAN Card. Then the new settings can take effect.
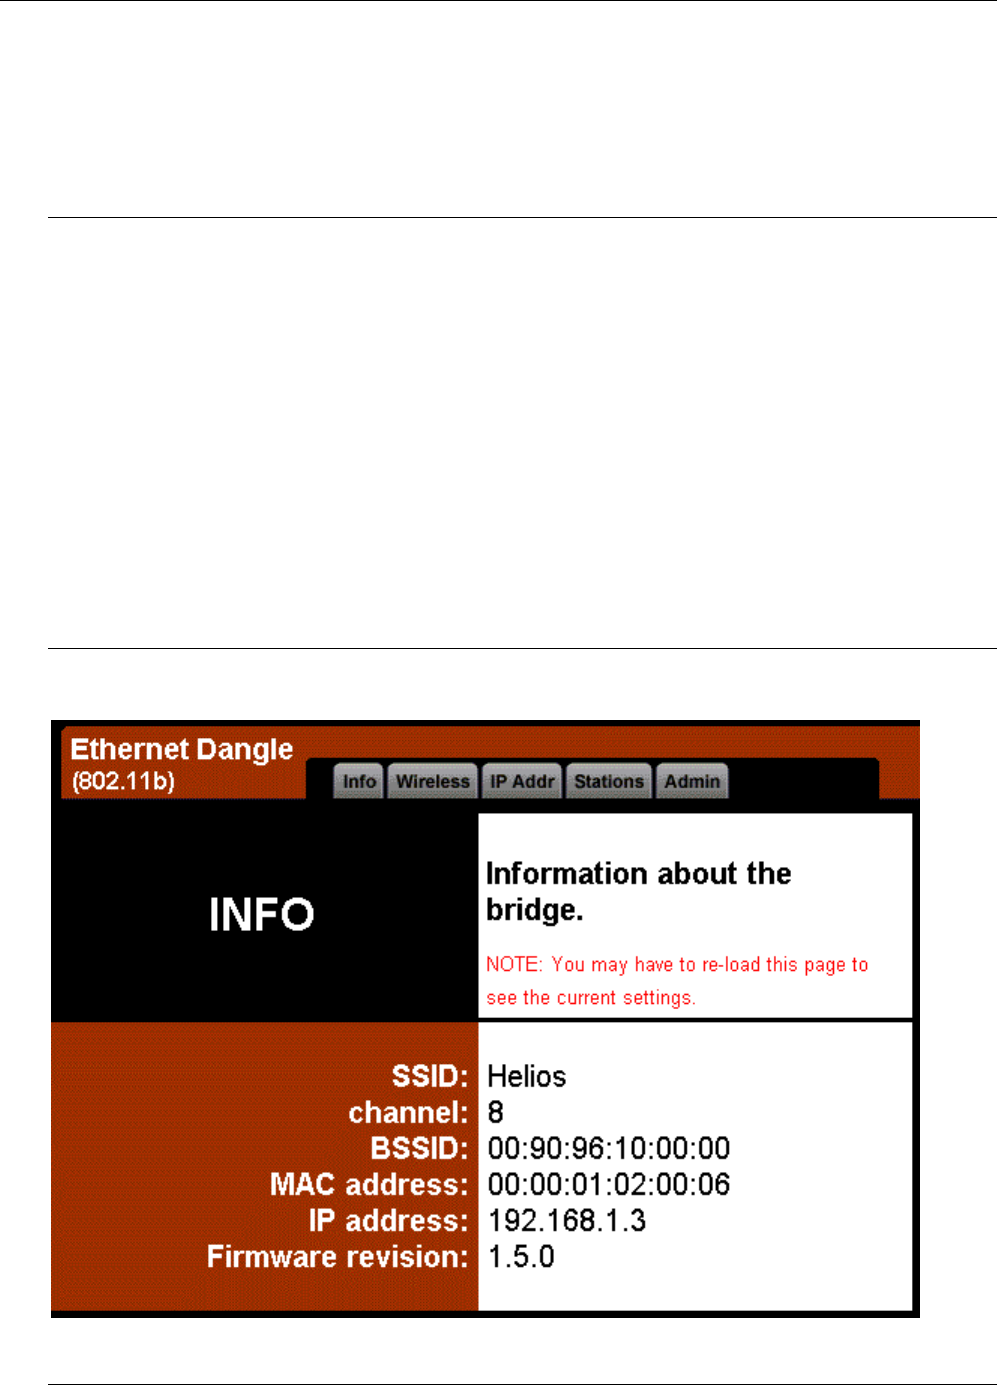
Info
Info shows the basic information about wireless LAN card such as SSID, channel using, BSSID, MAC address of the
card, IP address, firmware revision and so on. This page gives you an overview for the LAN card.
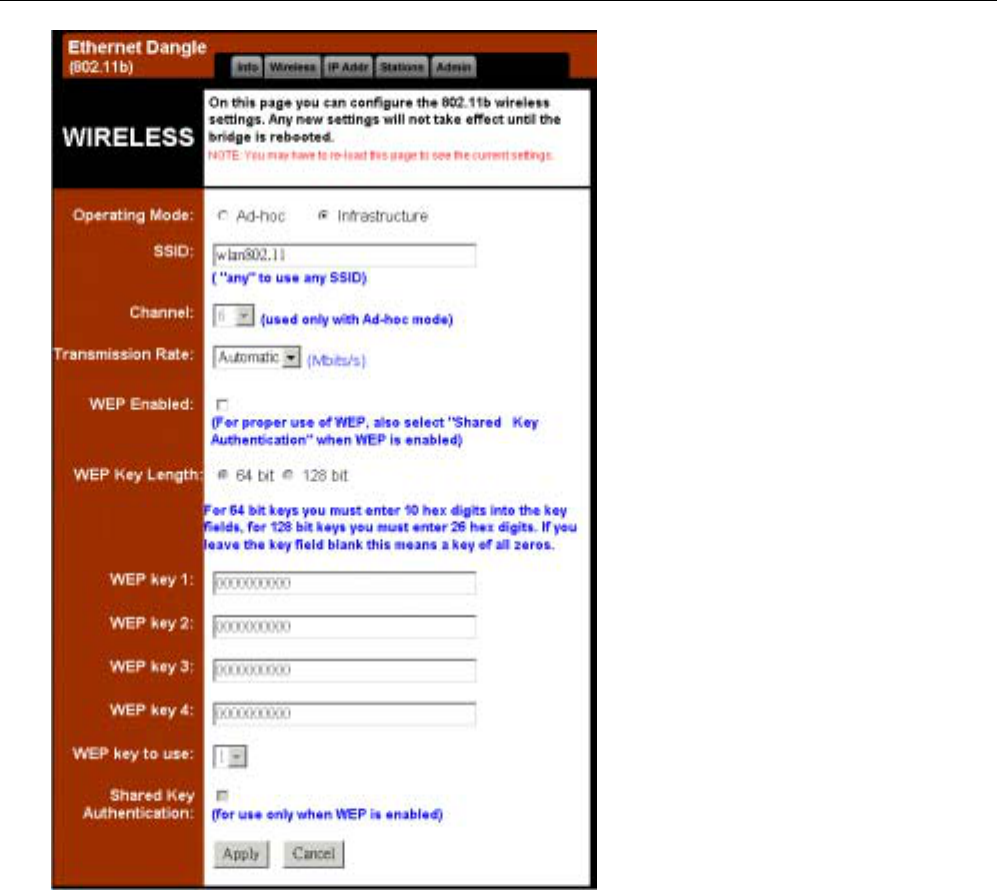
Wireless
This page allows you to configure the wireless settings for wireless LAN card.
Wireless LAN Card User’s Manual
20
Operation Mode: You can connect your computer to a network in one of the following two ways.
Ad-Hoc, Connecting to other Wireless LAN Card equipped computers, forming a wireless network.
Infrastructure, Connecting to a wired/wireless network through an Access Point.
SSID: Service Set ID. Displays the current SSID of the Access Point/wireless station (Ad-hoc
mode).
Channel: The operating radio channel number.
Transmission Rate: Decides the speed of the data transmission. Choose the rate that you want to use.
WEP Enabled: Allows you to enable WEP key for using. Please check the box for activating the function.
WEP Key Length: To enable WEP encryption function, select your encryption length as 64-bit or 128-bit.
Either 64-bit or 128-bit WEP keys can be generated from user-defined characters or manual
entry.
WEP key to use: Because you can set WEP key 1 to 4 at the same time, yet you can use only one at one time.
Choose the WEP key that you want to use.
Shared Key Authentication: Check this item to use Shared Key function. If you do not check the box, the
wireless LAN card will use Open Key function automatically.
Wired Equivalent Privacy Mechanism
The privacy security function can enhance wireless media security by encryption technology. All wireless clients
must set the same encryption key to maintain the tightened communication with the wireless LAN card properly. The
Authenticate Algorithm options are:
When the wired Equivalent Privacy Mechanism is Turns off. Using Open-key as authentication algorithm, you are
Chapter 5: Web Configuration
21
running the risk of allowing some unauthorized wireless LAN cards that have the capability of eavesdropping your
SSID to associate itself to the device.
Turns on encryption. Wired Equivalent Privacy Mechanism is Turns on. You should select the encryption key length
as 64- or 128- bit key. Then enter the encryption key in Key Entry fields.
Note: When Wired Equivalent Privacy Mechanism is enabled, the wireless client must be
configured with exactly the same encryption level (64 or 128-bit) and encryption key as
identified in the wireless LAN card, so that access to the unit is allowed.
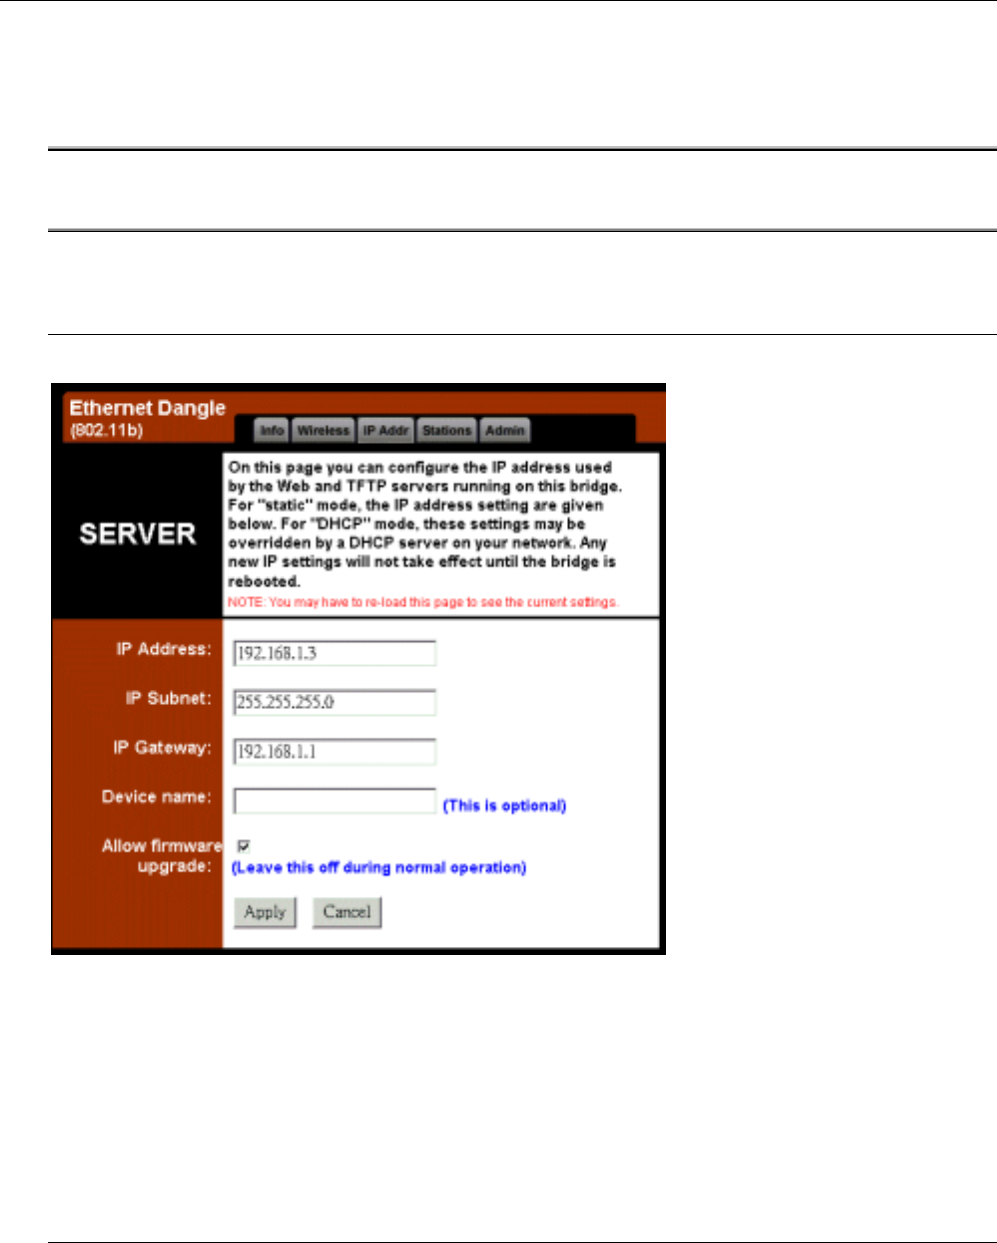
IP Address
This page allows you to set the IP address for wireless LAN card for connecting to the network.
IP Address: Enter the IP address for the wireless LAN card..
IP Subnet: Enter the IP Subnet address that you get from your ISP.
IP Gateway: Enter the IP Gateway address that you get from your ISP.
Device name: Enter the name for the wireless LAN card for identification while connecting to some
other wireless access points. This is an optional setting.
Allow firmware upgrade: This is use to update firmware by using this web page, simply check the box and click
Apply. For normal operation, please uncheck this item.
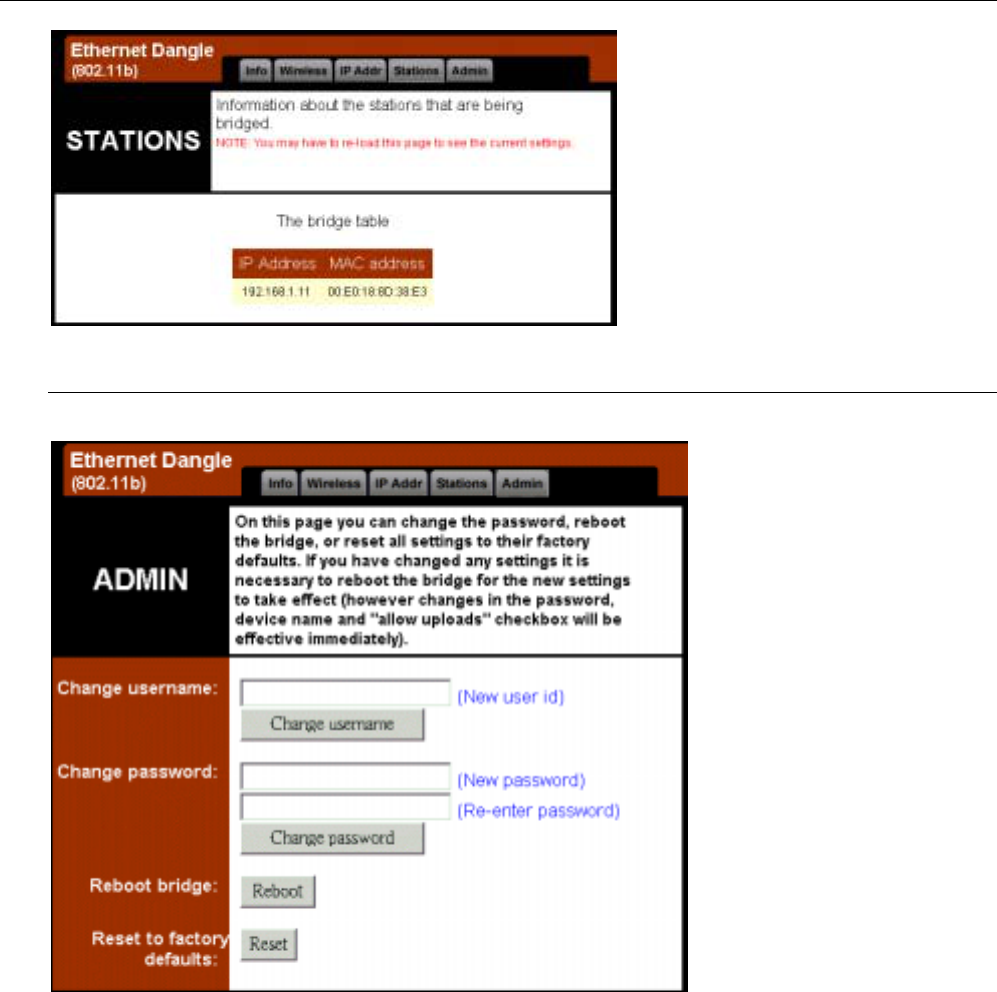
Stations
This page shows the information of the devices, stations that the wireless LAN card is connected. It is just for
reference. You can refresh this page for getting the newly information at any time.
Wireless LAN Card User’s Manual
22
Admin
This setting allows you to set for password and activate the remote management.
Change username: Type in the username that you want to use for login. After you typed in, please press
Change username button to activate it for next time.
Change Password: Type another new password in the first box if you don’t want to use current one.
Type the new password again in the second box for confirmation. After you make sure the
modification, please press Change password button to activate it.
Reboot bridge: After you finished all the configuration, please press the Reboot button to reboot the
wireless LAN card.
Reset to factory defaults: If you are not satisfied with the new settings and want to use the factory settings
instead, please press Rest button to return to the default status.

Chapter 5 Troubleshooting
23
C
Ch
ha
ap
pt
te
er
r
5
5:
:
T
Tr
ro
ou
ub
bl
le
es
sh
ho
oo
ot
ti
in
ng
g
Radio Interference
You may be able to eliminate any interference by trying the following:
Reseat the Wireless LAN Card.
Increase the distance between the wireless computers and the device causing the radio interference.
Plug the computer equipped with the Wireless LAN Card into an outlet on a different branch circuit from that
used by the affecting device.
Consult the dealer or an experienced radio technician for help.
Keep the computer with the Wireless LAN Card away from the microwave oven and large metal objects.
Card Not Detected
If the Wireless LAN Card is not detected, try the following:
Make sure the Wireless LAN Card is properly installed.
Contact your dealer for additional testing if there is a hardware problem with the Wireless LAN Card.
Cannot Connect to Another Wireless LAN Card
If you cannot make a connection to another Wireless LAN Card from your computer, it could be due to one of the
following reasons:
Incorrect SSID. Make sure the SSID is the same for all computers that have a Wireless LAN Card.
Changes are not being recognized by your computer. Please restart your computer.
If in Ad Hoc mode, make sure the Log on to Windows NT domain check box is not selected in the Client for
Microsoft Networks Properties dialog box in the Network Configuration tab.
Incorrect IP Address or Subnet Mask. Check these settings in the TCP/IP Properties dialog box in the
Network Configuration tab.
Poor Link Quality
If the Link Quality display stays in the Poor range, it could be due to one of the following reasons:
Radio interference.
Distance between Wireless LAN Card and Access Point is too far. Decrease the distance between the Wireless
LAN Card and Access Point (or another card).
Cannot Connect to Access Point
If you cannot make a connection to the Access Point, it could be due to one of the following reasons:
Make sure the Wireless LAN Card and Access Point have no physical connection problems.
Make sure the SSID for the Wireless LAN Card is the same as the Access Point.
Make sure the privacy type is the same as that of Access Point. Also, make sure the Default Key is the same for
both computers.

Wireless LAN Card User’s Manual
24

Chapter 6: Glossary
25
C
Ch
ha
ap
pt
te
er
r
6
6:
:
G
Gl
lo
os
ss
sa
ar
ry
y
10BaseT
An IEEE standard (802.3) for operating 10 Mbps Ethernet networks (LANs) with twisted pair
cabling and a wiring hub.
Access Point
An internetworking device that seamlessly connects wired and wireless networks. Access
Points combined with a distributed system support the creation of multiple radio cells that
enable roaming throughout a facility.
Ad Hoc
A network composed solely of stations within mutual communication range of each other (no
Access Point connected).
BSS
Basic Service Set. A set of stations controlled by a single coordination function.
Channel
A medium used to pass protocol data units that can be used simultaneously in the same volume
of space by other channels of the same physical layer, with an acceptably low frame error ratio
due to mutual interference.
Encapsulated
An Ethernet address mode that treats the entire Ethernet packet as a whole and places it inside
an 802.11 frame along with a new header.
ESS
Extended Service Set. A set of one or more interconnected Basic Service Sets (BSSs) and
integrated Local Area Networks (LANs) can be configured as an Extended Service Set.
Ethernet
The most widely used medium access method, which is defined by the IEEE 802.3 standard.
Ethernet is normally a shared media LAN; i.e., all the devices on the network segment share
total bandwidth. Ethernet networks operate at 10Mbps using CSMA/CD to run over 10BaseT
cables.
Gateway
A network component that acts as an entrance to another network.
IEEE 802.11
The IEEE 802.xx is a set of specifications for LANs from the Institute of Electrical and Electronic
Engineers (IEEE). Most wired networks conform to 802.3, the specification for CSMA/CD-based
Ethernet networks or 802.5, the specification for token ring networks. 802.11 defines the
standard for wireless LANs encompassing three incompatible (non-interoperable) technologies:
Frequency Hopping Spread Spectrum (FHSS), Direct Sequence Spread Spectrum (DSSS), and
Infrared. IEEE standards ensure interoperability between systems of the same type.
Infrastructure
A wireless network centered about an Access Point. In this environment, the Access Point not
only provides communication with the wired network but also mediates wireless network traffic
in the immediate neighborhood.
IP
Internet Protocol. The standard protocol within TCP/IP that defines the basic unit of information
passed across an Internet connection by breaking down data messages into packets, routing

Wireless LAN Card User’s Manual
26
and transporting the packets over network connections, then reassembling the packets at their
destination. IP corresponds to the network layer in the ISO/OSI model.

Appendix: Specifications
27
A
Ap
pp
pe
en
nd
di
ix
x:
:
S
Sp
pe
ec
ci
if
fi
ic
ca
at
ti
io
on
ns
s
S
So
of
ft
tw
wa
ar
re
e
Standards Compliance
IEEE 802.11 / 802.11b Standard
IEEE 802.3 Standard
IEEE 802.1d MAC Bridges Standard
Wireless LAN Features
Fully compliant with IEEE 802.11 / IEEE 802.11b DSSS devices
Provide 11 / 5.5 / 2 / 1 Mbps wireless connectivity to the wireless clients
Auto fallback data rate under noisy environment
IEEE 802.11 Wireless function
Distributed Coordination Function (DCF)
z CSMA/CA
z Backoff Procedure
z NAV Management
z ACK Procedure
z Retransmission of unacknowledged frames
RTS/CTS Handshake
Duplicate Detection and Recovery
Beacon Generation
Probe Response
Fragmentation and Reassembly
Wired Equivalent Privacy Algorithm
Authentication Algorithm
Power Management
Short Preamble and Long Preamble
Association / Re-association / De-association
Operation Modes
Wireless Station
Roaming
Seamless roaming within the 802.11 and 802.11b wireless LAN infrastructure
Security Features
Support ESSID network identification for security
Support 64-bit and 128-bit WEP Data Encryption and Decryption
Support Authentication: Open System, Shared Key and Both
Configuration and Management
Clear LED Indicators for real time monitor current network status
Web-based Management function running on Win98/SE, WinME, Win2K, WinXP and other platforms

Wireless LAN Card User’s Manual
28
H
Ha
ar
rd
dw
wa
ar
re
e
Interface
One 2.4GHz RF interface for Wireless LAN connection
One 10 Mbps Ethernet LAN connection
Radio Characteristics
Frequency Band: 2.400 ~ 2.4835 GHz ISM Band (subject to local regulations)
Spreading: Direct Sequence Spread Spectrum (11-chip Barker sequence)
Modulation
z CCK: 11Mbps and 5.5Mbps
z DQPSK: 2Mbps
z DBPSK: 1Mbps
Number of Channels
z 11 Channels (US, Canada)
z 13 Channels (Europe)
z 14 Channels (Japan)
Data Rate: bps / 5.5Mbps / 2Mbps / 1Mbps
Antenna: internal antenna and one external antenna supporting diversity
Transmit Power: dBm (typical)
Receiver Sensitivity: 80dBm @ FER < 8%
Power Requirement and Operation Environment Requirement
Power Adapter Input: 100V~240V / 50Hz~60Hz, DC Output: 5V / 2A (L-Type)
Power Consumption Rx: 1.75W, Tx: 2W
Temperature Operating 0°C to 40°C, Storage -10°C to 65°C
Relative Humidity 5% to 80% (non-condensing)
Regulatory Approvals and Compliance
EMI/Immunity FCC part 15
Safety UL/cUL, CE, VCCI Class B, TELEC, JATE
Physical
Dimensions 116.77 mm (L) × 75.47 mm (W)
Certification
Wi-Fi Certified