Aspenta FZ CIT-001 GPS Tracker User Manual
Aspenta international FZ-LLC GPS Tracker
User Manual
© Aspenta 2014 Revision 1.1
All rights reserved September, 2014
SECTION 1
Aspenta UbTrack 301
Permanently Installed Vehicle Locator
Quick Start Guide
SECTION 2 UbTrack™ 301 Overview
Note: Your UbTrack™ wireless key fob has to paired with your device after installation and activation.
UbTrack™ key fob automates arming and disarming of the
UbTrack™ 301 security feature. Please keep it with you on your
keychain.
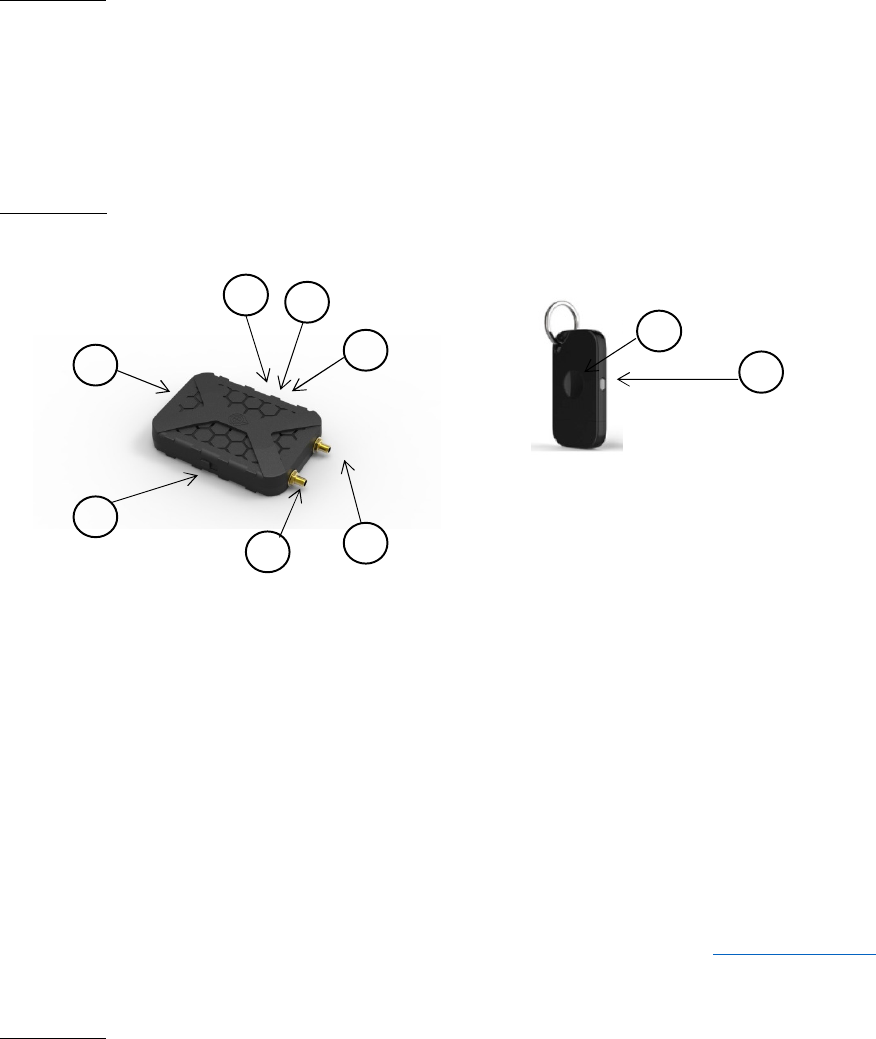
1- Power button
2- GSM LED
3- GPS LED
4- Reset Button
5- SMA Adapter for GPS Antenna
6- SMA Adapter for GSM Antenna
7- Two-PIN Power Connector
8- Functional button
9- 9-Status Light
For a complete UbTrack user rmanual, FAQs and troubleshooting tips please go to http://aspenta.com/
SECTION 3
It is strongly recommended that you record and save the 12 character device ID number below the
barcode on the back of your UbTrack™ 101 locator. It is also recommended that you read the owner’s
manual thoroughly prior to operating your device.
1
2
3
4
5
6
7
8
9
© Aspenta 2014 Revision 1.1
All rights reserved September, 2024
Device ID:
_ _ _ _ - _ _ _ _ - _ _ _ _
SECTION 4
To begin using your UbTrack™ locator, please follow these easy steps:
STEP 1
Install
It is recommended that an automotive service center perform this work for you following the instructions
within the enclosed Installation Guide. This guide can also be downloaded at
www.aspenta.com/installation
STEP 2
Connect
Next you need to create a free UbWall™ account to register, activate, program, and monitor your
UbTrack™ 301 locator. This can be done online from your computer, or via your smartphone. For your
security, establishing your UbWall™ account is a two-step process, requiring verification of your email
address.
STEP 3
Activate
Once you have created and verified your UbWall™ account, you can now log in and select the “Add a
Device” option to add and activate your new UbTrack™ 301 device and configure it.
STEP 4
Adjust
Control from your Computer
www.UbWall.com
Download the UbWall
™
Mobile
App & access your connected
devices on the go!

© Aspenta 2014 Revision 1.1
All rights reserved September, 2034
You are now ready to begin using your device. If you have chosen to track the device continuously, then
simply click on your device within UbWall™ to see its’ location or location history displayed on a map.
If, for privacy reasons, you have chosen to configure your device to transmit your location information
only in the event of an alarm, you can still use UbWall™ to manage and adjust the device settings,
program your email and SMS notifications, share your device with other UbWall users, etc.
SECTION 5
Key Fob Pairing
SECTION 6
Warranty
Your UbTrack™ Locator has a Limited Warranty for 12 months from the date of purchase against all
defects in materials and workmanship. For full details regarding our Limited Warranty please visit
www.aspenta.com/warranty
SECTION 7
© Copyright 2014 Aspenta. All rights reserved.
Aspenta and Aspenta UbTrack are trademarks or registered trademarks of Aspenta, LLC. in the U.S., Canada, and/or other countries.
V1.0
FCC ID:
2ADTO-
CIT-001
changes or modifications not expressly approved by the party responsible for compliance could void the user’s
authority to operate the equipment.
This equipment has been tested and found to comply with the limits for a Class B digital device, pursuant to Part 15
of the FCC Rules. These limits are designed to provide reasonable protection against harmful interference in a
residential installation. This equipment generates, uses and can radiate radio frequency energy and, if not installed
and used in accordance with the instructions, may cause harmful interference to radio communications. However,
there is no guarantee that interference will not occur in a particular installation.
If this equipment does cause harmful interference to radio or television reception, which can be determined by turning
the equipment off and on, the user is encouraged to try to correct the interference by one or more of the following
measures:
-- Reorient or relocate the receiving antenna.
-- Increase the separation between the equipment and receiver.
-- Connect the equipment into an outlet on a circuit different from that to which the receiver is connected.
-- Consult the dealer or an experienced radio/TV technician for help.

© Aspenta 2014 Revision 1.1
All rights reserved September, 2044
This device complies with Part 15 of the FCC Rules. Operation is subject to the following two conditions: (1) this
device may not cause harmful interference, and (2) this device must accept any interference received, including
interference that may cause undesired operation.
UbTrack™ 301
Installation Guide

QSG UbTrack™ 301
Installation
Required Time
For best results, it is recommended that installation of the UbTrack 301 product be performed by a
professional installer. Installation requires approximately 30 to 90 minutes.
Required Tools
Need list of tools + materials installer will need to perform the installation.
• Power connection harness?
• Electrical tape
• Wire cutter/stripping tool
• 2 small wrenches
• Drill + bit sizes?
• Mounting hardware/tools
Connections
Need Photos/drawings with connectors clearly visible and labeled.
The UbTrack has:
• Two wires (red and black) for primary input power (from the vehicle battery).
• One gold SMA connector for the external GSM antenna
• One gold SMA connector for the external GPS antenna
Mounting
It is recommended that the device is securely mounted in a location that makes it difficult for car thieves
to find or disable, yet easily accessible for any future service. Typically under the dashboard, within the
front panel, or within a door panel are popular locations.
Question from Tim – Do the wires give thieves the location of the tracker?
Question from Tim – How is the UbTrack 301 securely mounted? Competitors offer mounting bracket.
If no bracket, do we have footprint drawing of mounting holes? Do we have mounting holes?
Wiring
Prior to wiring power to the UbTrack™ 301, please disconnect the negative connection to the vehicle’s
battery.

QSG UbTrack™ 301
The UbTrack™ 301 has 2 wires for connecting power. The red wire is fused internally and is to be
connected to the positive +12VDC terminal. An external fuse is not required. The black wire is then
connected to a vehicle ground wire (or chassis ground).
Power for your tracking device should be taken directly off of the ignition column, where you will find
constant power and ignition. This is the cleanest source of power for the device. Do not use the radio as a
source of power for any of the power leads. Never connect the black and red wire together and attach
them to a constant power source. The black wire must be attached to an ignition/accessory wire.
The UbTrack 301 consumes approximately xx mA of current at 12VDC. This is a small current draw,
and is not sufficient to drain the vehicle’s batter provided that the vehicle is driven regularly.
The external GSM antenna comes with a 2 meter long cable, and is easily attached directly to the GSM
SMA connector on the UbTrack™ 301 device. The GSM antenna is typically mounted inside the car, and
is not particularly sensitive to location, but you should avoid mounting enclosed within metal, if possible.
The external GPS antenna is typically mounted outside the car, and functions best with direct, line-of-
sight access to GPS satellites overhead. It also comes with a comes with a 2 meter long cable which can
be easily attached directly to the GPS SMA connector on the UbTrack™ 301 device.
Once the UbTrack™ 301 wiring is completed, please re-connect the negative connection to the vehicle’s
battery.
Battery Backup
The UbTrack™ 301 has an internal rechargeable backup battery. In the case that the primary power line
is cut, the UbTrack™ 301, continues to function, and continues transmitting its location for up to 24 hours
after power interruption.
Coverage
Once UbTrack™ device is activated, it begins receiving signals from both GPS satellites and GSM cell
phone towers.
GPS Coverage
GPS devices require a clear, unobstructed view of the sky in order to have a clear line of sight to satellites
overhead.
GPS signal strength can be viewed either on your UbWall™ web portal or UbWall™ Smartphone App.
GSM Coverage
The UbTrack™ 301 device includes a SIM card, which is already installed and works right out of the box
in over 200 countries, for a flat, low monthly rate, no contracts, no roaming charges, and absolutely no
hidden costs.
QSG UbTrack™ 301
Proper functioning requires only that the device be registered at the UbWall.com web site. For further
instructions, please read the UbWall section of this manual.
GSM cellular signal strength can be viewed either on your UbWall™ web portal or UbWall™
Smartphone App.
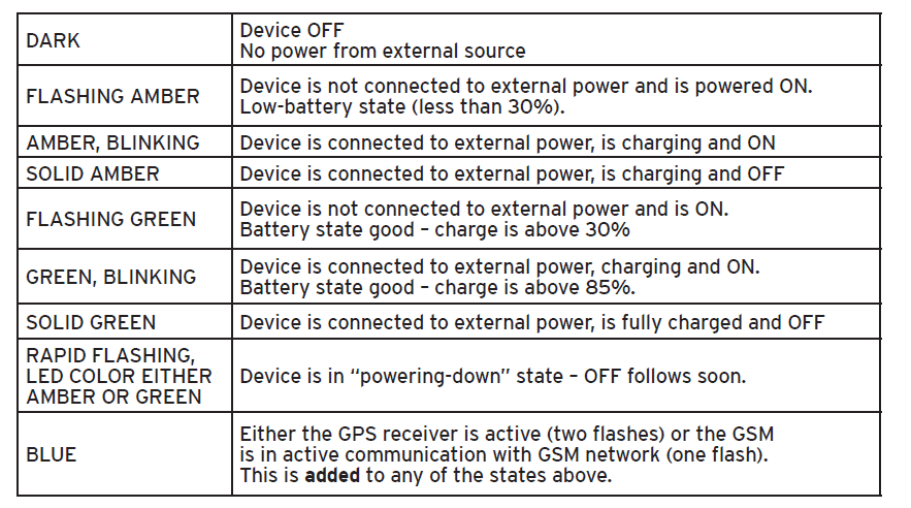
LEDs
Need input on exactly how LEDs work
The UbWall™ Account
Once the UbTrack™ is installed in the automobile, it may be configured and tested by accessing the
associated UbWall™ account.
• Configuring Personal Info
o Name
o Address
o Phone Number
o Email Address
o Contact info
o Time Zone
o Units
o Device info
o Password
• Software Features
• Application
• Type of Tracking
QSG UbTrack™ 301
• Map Options
Please consult owner’s manual for instructions to set up UbWall, product configuration, setting alerts,
delegates etc.
Pairing the Key Fob
Need instructions
Verifying Installation
Question from Tim – How does the installer see this working? What is the installation and operation
quality control checklist?