Atoms Labs AWF08 Wireless IP Camera User Manual
Atoms Labs LLC Wireless IP Camera
User Manual
$:)
—
—
———
—
—
—— ——
—
—
(2) (3) (4)
(5) (7) (8)
—
—
(1)
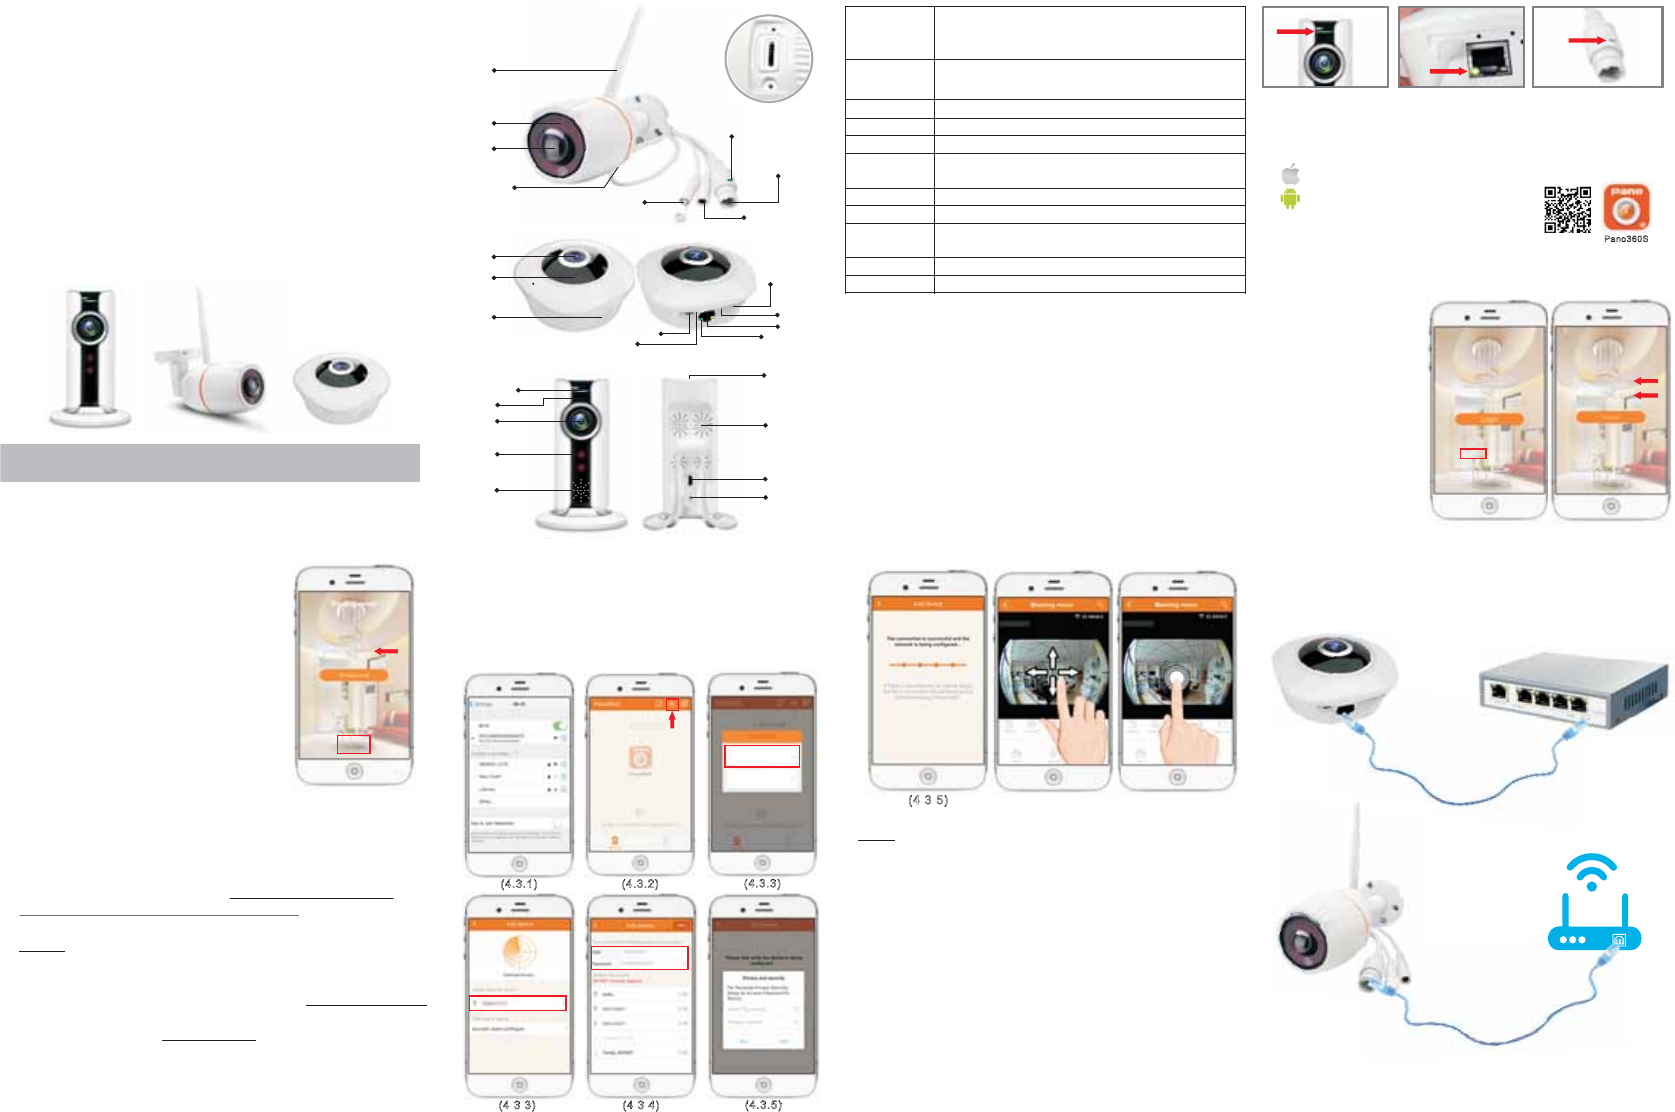
1. Packing content
Quick Start Guide of Wireless IP Camera
Leds
●IPC186: 2pcs Leds, with 10m night vision
●IPC369: 8pcs Leds, with 15m night vision
●IPC218: 12pcs Leds, with 15m night vision
Power Port ●()
●()
IPC186/IPC369:Mini USB Power Port DC5V 1A
IPC218:Power interface DC12V 1A
Reset Button Reset Button (
(see bellow 2.2)
Antenna Antenna ( for IPC218 only )
LENS 720P /960P /1080P: 1.44mm
1536P(3.0mega pixel): 1.45mm
3. Get the APP and register an account
(1) iPhone: . search“Pano360S”in Apple Store
Android System:
.
search“Pano360S”.
in Google play
(2) scan the QR code.
3.1 You have 2ways to get an APP
Pano360S
3.2 Open the APP
(1).
.
(see 3.2.1)
(2).
.(see 3.2.2)
Power on the camera and wait about 60s for camera stand-by.
** For Android phone users, in order to connect the camera
more fast,App will get the
wifi information around
you. Please click “allow”
to obtain permissions.
Choose “register” to
register an account
Input an user name
and password
4.1 If you want to record videos, ensure
you have inserted TF card or SD card into the
camera (camera maximum support 128GB TF card).
Note: Camera works well without TF card, but recording/
playback function is disable.
4.2 Before wifi configuration, make sure your mobile phone has
connected to wifi. (**Note: camera DO NOT support 5.8G wifi,
please use a 2.4G wifi router**). Please go to the area with
stronger wifi signal to configure the camera.
(3).The system will ask if you want to blind
your email address,If you blind your
email address, you can get back your
password in case you forget the
password.If you don't need, you can
click “skip” for next step.(see 3.2.3)
(3.2.1) (3.2.2)
4. Add and Configure camera
6)
(4) Network config . Choose your WIFI and enter password.
The camera start config. (see 4.3.4)
(5)
(see 4.3.5)
Pan-tilt-Zoom. (see 4.3.6)
Input a password. If you don’t need to setup a password,
you can “skip” for next step.
( You can see the camera live view. it support Digital
—
(6)
●IP camera * 1
●Power adaptor 1
(DC5V 1A for IPC186 / IPC369
DC12V 1A for IPC218)
●Power cable 1
●Reset pole 1
RJ45 Network Cable 1 (for IPC218 only)
●Manual,screws
*
)
(
*
*
● *
(3
21
)
Register
Forget?
(3 2 2)
NET RJ45 Network Port (IPC186 do not have )
(3.2.3)
he
(3 2 3)
Skip
Radiator Radiator IPC369 / IPC218 do not have()
Video save in TF card,Support Max128G for
Video storage(TF card not included in package)
TF card port
Way2:(Only for IPC369,IPC218)
1) Connect the camera with network cable.(4.3.7)
2) Click “+” in right top corner in APP,and choose “adding
networking device”. (4.3.8)
3) Choose“Cloud ID” to scan camera Barcode,you can see
the live view. (4.3.9)
4)
Wired Configuration
(
(
(
( Before unplug the network cable, you need to setup
wireless configuration.(4.3.10) (4.3.11)
(5) Enter into “setting”, choose “network configure”.
(6) Choose your wifi name and password.
(7) Please wait about 10s for camera setup, you will see the
LED Indicator flash every 0.5s and then keeps on. You
need to wait 1-2minutes for camera re-start, when the
image comes out, you can unplug the network cable.
Wireless configuration is successful.
2. Diagram
Speaker
LED
Lens
TF card port
Lens
LED
Speaker
LED
Lens
Reset
Power port
Radiator
LED Indicator
Power port NET
TF Card port
LED Indicator
NET
Power interface
IPC186 IPC218 IPC369
Antenna
TF card port
Reset
Reset
MIC
TF card port
Speaker Speaker (IPC218 )do not have
LED Indicator LED Indicator (
(see bellow 2.1)
MIC For two way audio ( IPC218 do not have )
LED Indicator
MIC
QR Code
(4
.
3
.
5)
(
4
3
5
)
(4.3.1) (4.3.2)
(4
.
3
.
4)
(
4
3
2
)
(4
.
3
.
3)
(
4
3
1
)
Tap to a dd devi ce
(4.3.5)
(
4
3
3
)
(
4
3
4
)
(
4
3
5
)
2.1 LED Indicator
●LED Indicator flashes every 2seconds (2s)-- AP Mode, means camera
ready to be connect. Need to wait this step before you add a camera
into the APP. ● LED Indicator flashes every 0.5s--Network Switching
or Sound matching mode. ● LED Indicator lights keeps on–
Configure Successfully, Camera is working well.
●Poke the reset button at 3-5s,camera enter“sound matching mode”,this
step can be neglected.● for Indoor camera with audio: Poke the reset
button at 10-15s,camera sounds: “ restore to factory setting”.
●For IPC218 without audio: Poke the reset button at 20s until you see the
LED Indicator OFF, the Indicator will Off for 10s and then will star on, it
means the camera “restore to factory setting”sucessfully.
2.2 Reset button
●Poke the reset button at 6-10 seconds , camera enter to “AP mode”.
4.3 Here we suggest 2 ways to connect camera.
Way 1: Wireless Configuration(AP Configuration)
*Before you add a camera,make sure the camera LED indicator
is flashing every 2seconds.
(1) Open the wifi setting in your mobile phone:For Android System,
you just need to make sure the camera ID is in the list ,do not
need to choose it ; for IOS System, find the camera ID in the
wifi list and need to choose it . (see 4.3.1)
(2) Click “+” in right top corner in APP. (see 4.3.2)
(3) Choose “add a new device”, you will see camera ID in
the list. click “ next ”. (see 4.3.3)
+
(4.3.6) (4.3.6)
(4.3.7)
IPC186 IPC369 IPC218
(4.3.3)
(
4
3
3
)
Add a New Device
After configuring the new Device and
replacement of Device
Adding networking device
Added ID LAN IP DDNS,/
Add device
—
—
—
—
—
—
(13) (14) (15)
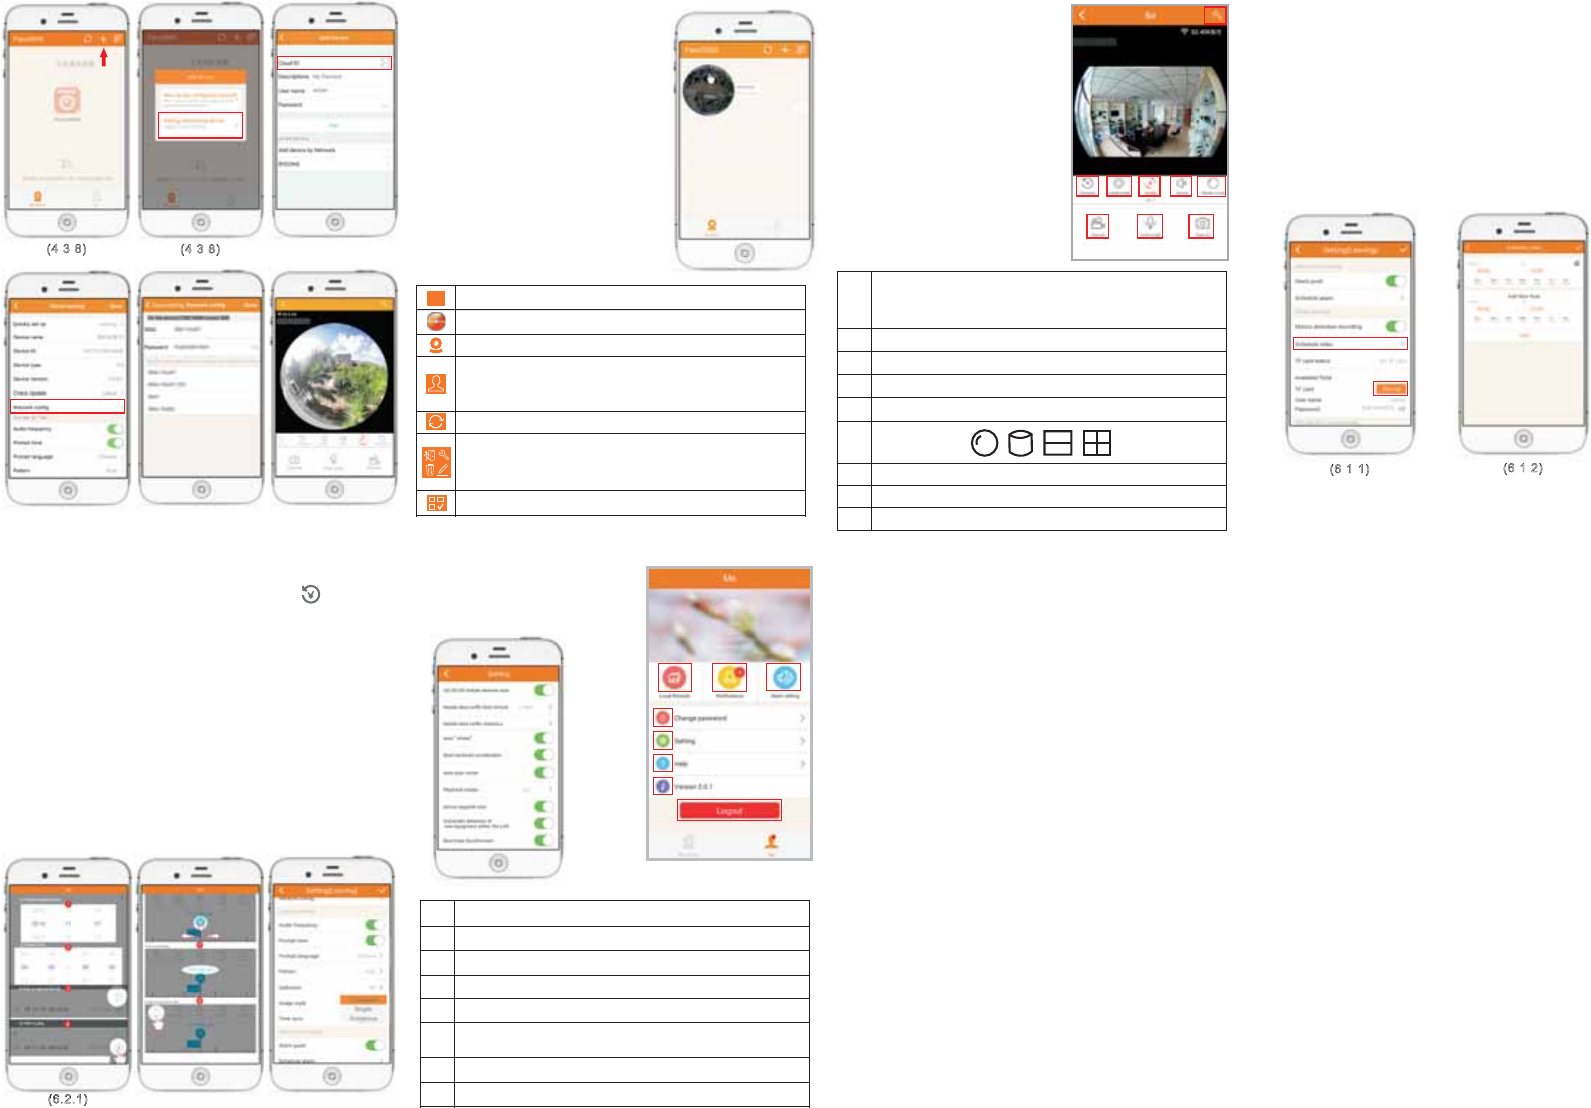
6.APP main function (See6.1)
6.3. Motion Detection & Alarm (See 6.3)
(1) Enter “setting”→start the “motion detection recording” and
“Alarm push”
(2) When there is motion, system will push messages to your
mobile phone, and start recording in TF card.
8. '$$4UBUFNFOU
5. APP main menu (See 5.1)
Add cameras
Play online Video
Cameras list
Me: more setting of App (including Local Records,
Notifications, Alarm setting, Change password, version、
help、etc)
Refresh
Leaving / at home 、Edit、more setting of single camera
(including device name 、version、language、alarm
setting、video setting etc )、delete camera
Change arrangement mode
(6
.
1
.
1)
7.APP Setting
User can setup the function of
APP- (see 7.1)Choose “me”.
—
—
(16)
(6
.
1
.
2)
(6.2.1)
①
②③
④⑤⑥
⑦⑧⑨
Camera setting ( Device name、ID、version、language、
Alarm Push、Motion detection recording、TF card、
User name、Password etc )
①
②
③
④
⑤
⑥
⑦
⑧
Playback videos
Installation mode includes 2 types: (1) Ceiling ( Wall 2)
Start it and the image will rotate automatically
Open or close the voice
Display mode
Record
Press to talk ❉(IPC218 do not have this function )
Screenshot
⑨
6.1 Video record
(1) Insert TF card to camera,system need to Format the TF
card first.Enter “setting TF Card” click “Format”.
(See 6.1.1).
2) Choose“setting” Schedule video you can set the
recording time and repeat day. (See 6.1.2)
3) When there is motion, system will push message to
mobile phone, and start recording in TF card.
”→“
(→
(
(1) Play the video, then Choose “playback”, to choose
the exact date and time as you want.
2) Playback modes:
two mode: timeLine mode, and list mode. This setting can
be modified on the main interface “Me--setting--playback
modes. List mode : Choose play back date and time,
click to play. ( See 6.2.1)
TimeLine mode : move the time icon to choose the exact
time as you want,click to play. ( See 6.2.2)
(
●
●
Local Records:Check /recording fileScreenshot
①
②
③
④
⑤
⑥
⑦
⑧
Notifications:View the Alarm messages
Alarm setting:Setup to push alarm message
Change password:Change password
More Settings (see 7.1.1)
Help:※full manual of how to add devices, how to preview
and playback,video trouble shooting, Q&A .
Version:current version
Log in/out
①②③
④
⑤
⑥
⑦
⑧
(7.1.1)
(7.1)
(6.3)
(
6
2
1
)
(6.2.2)
+
(4.3.10) (4.3.11)
(4.3.9)
(4
.
3
.
8)
(
4
3
8
)
Tap to a dd dev ice
+
(4
.
3
.
8)
(
4
3
8
)
(4.3.12)
C
&KDQJHVRUPRGLILFDWLRQVQRWH[SUHVVO\DSSURYHGE\WKHSDUW\UHVSRQVLEOHIRUFRPSOLDQFHFRXOG
YRLGWKHXVHUVDXWKRULW\WRRSHUDWHWKHHTXLSPHQW
7KLVHTXLSPHQWKDVEHHQWHVWHGDQGIRXQGWRFRPSO\ZLWKWKHOLPLWVIRUD&ODVV%GLJLWDOGHYLFH
SXUVXDQWWR3DUWRIWKH)&&5XOHV7KHVHOLPLWVDUHGHVLJQHGWRSURYLGHUHDVRQDEOHSURWHFWLRQ
DJDLQVWKDUPIXOLQWHUIHUHQFHLQDUHVLGHQWLDOLQVWDOODWLRQ7KLVHTXLSPHQWJHQHUDWHVXVHVDQGFDQ
UDGLDWHUDGLRIUHTXHQF\HQHUJ\DQGLIQRWLQVWDOOHGDQGXVHGLQDFFRUGDQFHZLWKWKHLQVWUXFWLRQV
PD\FDXVHKDUPIXOLQWHUIHUHQFHWRUDGLRFRPPXQLFDWLRQV+RZHYHUWKHUHLVQRJXDUDQWHHWKDW
LQWHUIHUHQFHZLOOQRWRFFXULQDSDUWLFXODULQVWDOODWLRQ,IWKLVHTXLSPHQWGRHVFDXVHKDUPIXO
LQWHUIHUHQFHWRUDGLRRUWHOHYLVLRQUHFHSWLRQZKLFKFDQEHGHWHUPLQHGE\WXUQLQJWKHHTXLSPHQW
RIIDQGRQWKHXVHULVHQFRXUDJHGWRWU\WRFRUUHFWWKHLQWHUIHUHQFHE\RQHRUPRUHRIWKH
IROORZLQJPHDVXUHV
5HRULHQWRUUHORFDWHWKHUHFHLYLQJDQWHQQD
,QFUHDVHWKHVHSDUDWLRQEHWZHHQWKHHTXLSPHQWDQGUHFHLYHU
&RQQHFWWKHHTXLSPHQWLQWRDQRXWOHWRQDFLUFXLWGLIIHUHQWIURPWKDWWRZKLFKWKHUHFHLYHULV
FRQQHFWHG
&RQVXOWWKHGHDOHURUDQH[SHULHQFHGUDGLR79WHFKQLFLDQIRUKHOS
7KLVGHYLFHFRPSOLHVZLWKSDUWRIWKH)&&UXOHV2SHUDWLRQLVVXEMHFWWRWKHIROORZLQJWZR
FRQGLWLRQVWKLVGHYLFHPD\QRWFDXVHKDUPIXOLQWHUIHUHQFHDQGWKLVGHYLFHPXVWDFFHSWDQ\
LQWHUIHUHQFHUHFHLYHGLQFOXGLQJLQWHUIHUHQFHWKDWPD\FDXVHXQGHVLUHGRSHUDWLRQ
The distance between the product and body is more than 20cm