Atoms Labs AWSC25 DIGITAL WIRELESS WEATHER PROOT CAMERA User Manual QSG DWS S761X 20140603
Atoms Labs LLC DIGITAL WIRELESS WEATHER PROOT CAMERA QSG DWS S761X 20140603
User Manual
QUICK START GUIDE
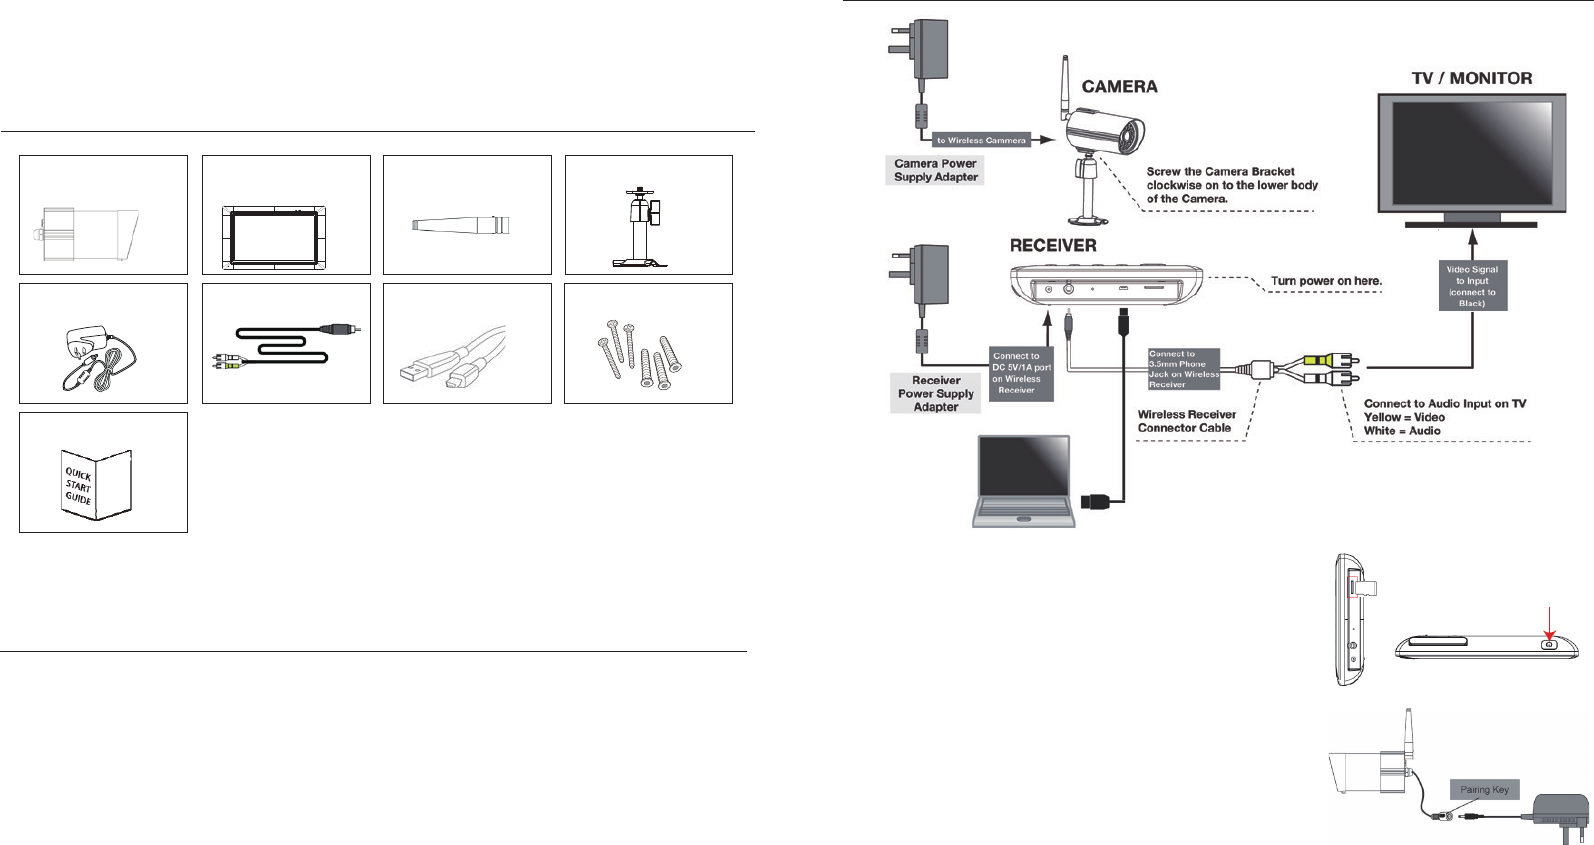
KIT CONTENT
Digital Wireless
Camera
Digital Wireless
Receiver
x 2 x 1
Camera Antenna
x 2 x2
Camera Stand
x 3
Power Adapter
Press and hold the reset button on the power cable for 5 seconds and the system will start the
reset process. The system will restore to factory default and you may start the Wi-Fi setup.
FACTORY DEFAULT SETTING
CONNECTION DIAGRAM
USB Cabel
x 1
Screw Pack
x 1
AV Cable
x 1
Powering on/o the System
Insert the memory card into the receiver if it’s not inserted.
Press and Hold the POWER button for one second to power on the
system. Press and hold the POWER button for two seconds to power
o the system. After the system powers on, adjust the camera’s
viewing position again if necessary.
Pairing the Camera to Receiver (optional)
The camera is paired to preset channel by default. The system supports
up to 4 wireless cameras. If you are adding another camera to the
system, please ensure its channel is set to a dierent channel to the
existing camera(s).
1. Go to the Main Menu > Camera Setup(specify channel 1/2/3/4)
> Press the Camera Pairing button
2. Press the pairing key ONCE on the camera
Setting the Camera Channel (optional)
The wireless camera is preset to channel 1 by default. You can also use the steps above to change the camera
channel if necessary.
Quick Start Guide
x 1
FCC and IC Note:
THIS DEVICE COMPLIES WITH PART 15 OF THE FCC RULES AND INDUSTRY CANADA LICENSE-EXEMPT
RSS STANDARD(S). OPERATION IS SUBJECT TO THE FOLLOWING TWO CONDITIONS: (1) THIS DEVICE
MAY NOT CAUSE HARMFUL INTERFERENCE, AND (2) THIS DEVICE MUST ACCEPT ANY INTERFERENCE
RECEIVED, INCLUDING INTERFERENCE THAT MAY CAUSE UNDESIRED OPERATION.
THE MANUFACTURER IS NOT RESPONSIBLE FOR ANY RADIO OR TV INTERFERENCE CAUSED BY
UNAUTHORIZED MODIFICATIONS OR CHANGE TO THIS EQUIPMENT. SUCH MODIFICATIONS OR
CHANGE COULD VOID THE USER’S AUTHORITY TO OPERATE THE EQUIPMENT.
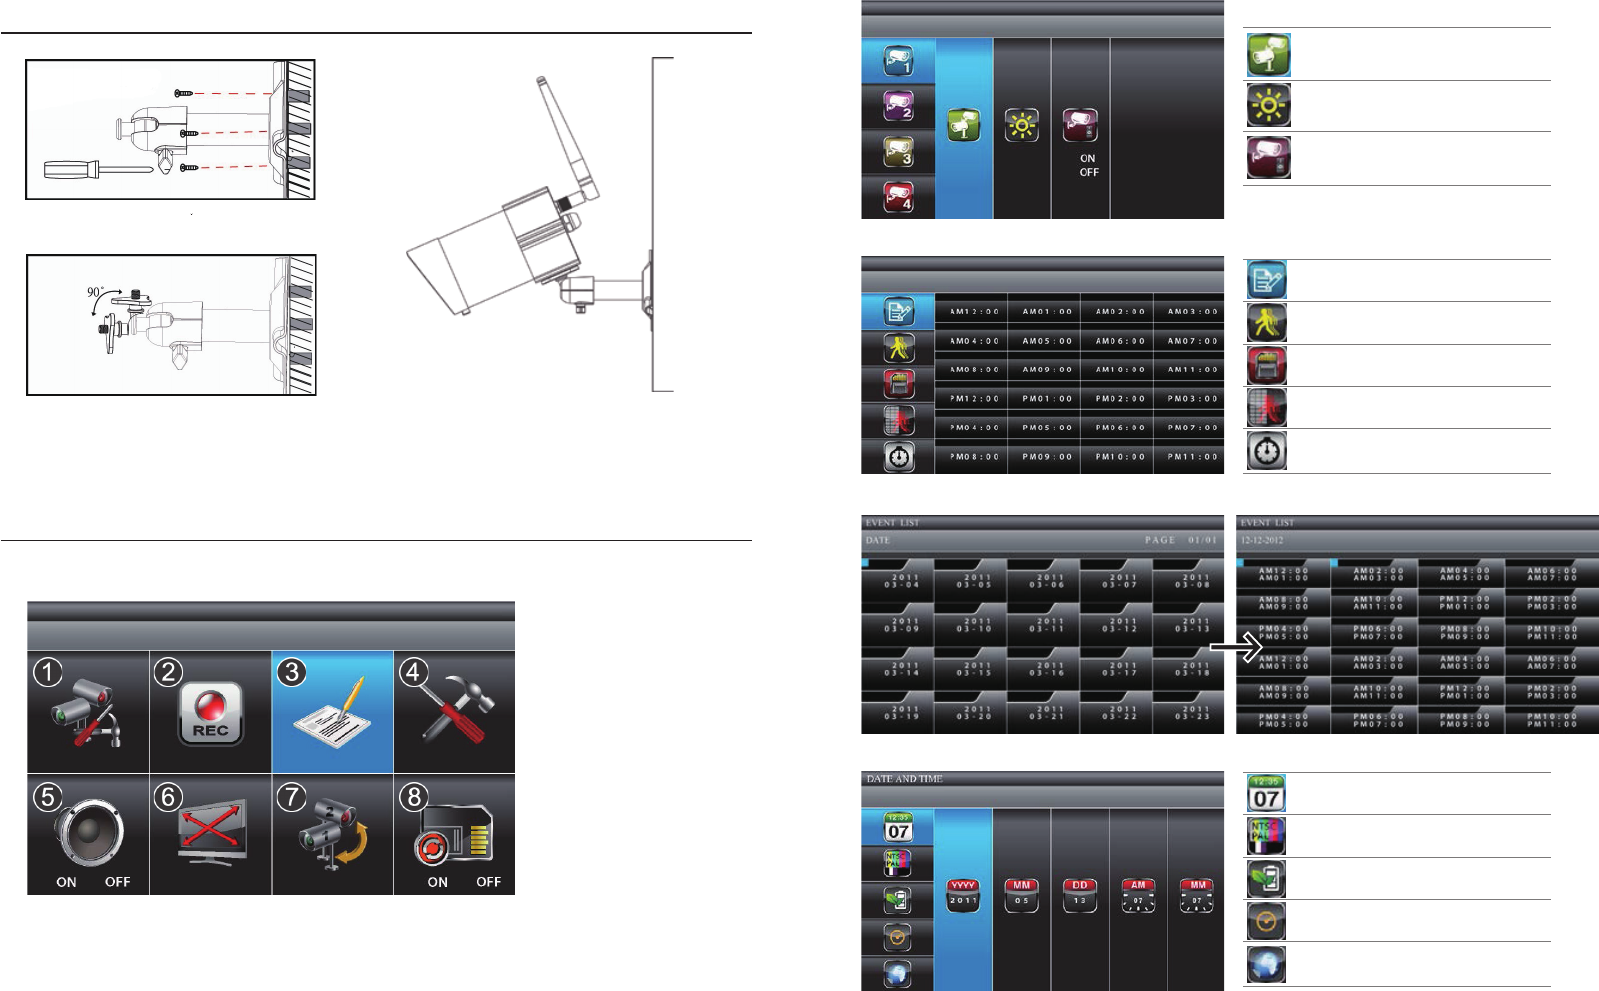
CAMERA INSTALLATION
OPERATION SCREEN
Main Menu
Loosen up the thumb screw
2Adjust proper view angle, then
secure the joint with T-bolt.
3
RECORDER SETUP
Camera Pairing
Camera Brightness Adjustment
Camera Activation
Record Schedule
Motion Detection Sensitivity
Format Memory Card
Setup Masking Area
Record Time
Date and Time
TV Output
Power Saving
Multi Channels Idle Display
Default
1. CAMERA SETUP
2. RECORDER SETUP
3. EVENT LIST
4. SYSTEM SETUP
5. ALARM BUZZER
6. PAN TILT ZOOM
7. SCAN ACTIVATED CAMERAS
8. MEMORY CARD OVERWRITE
CAMERA SETUP
EVENT LIST
SYSTEM SETUP
Press the MENU button to enter the MAIN MENU. The system highlights EVENT LIST by default.
Tap the screen to navigate through the menus; the system highlights the EVENT LIST by default.
The system will automatically exit the Main Menu when it is idle for 2 minutes.
Secure the camera stand on a stable surface
1