Attenti US XT06418 Criminal Offenders GPS Tracker User Manual User s Manual
3M Electronic Monitoring Criminal Offenders GPS Tracker User s Manual
Contents
- 1. User Manual Part 1
- 2. User Manual Part 2
- 3. User Manual Part 3
User Manual Part 2
Pro Tech Monitoring Inc. Issue Date: 2/14/2011 Please check online for the most up to date version.
17
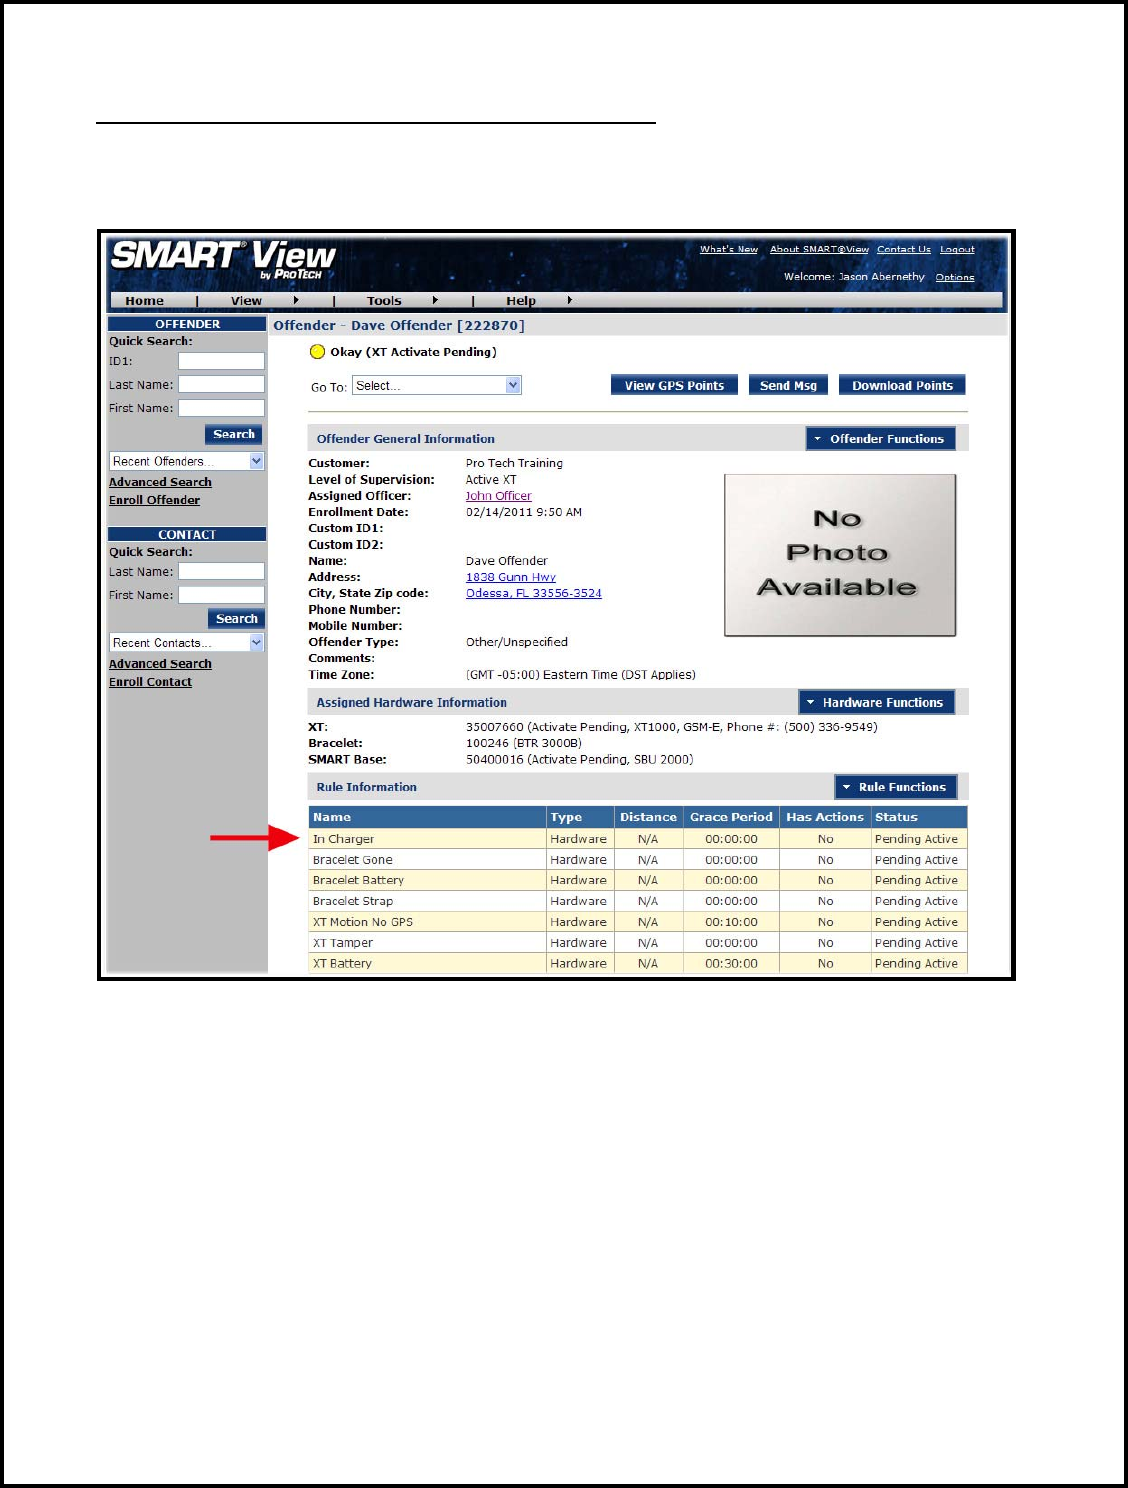
Create Schedule for Home Inclusion Zone
1. Click on the In Charger Rule (see below).

Pro Tech Monitoring Inc. Issue Date: 2/14/2011 Please check online for the most up to date version.
18
Create Schedule for Home Inclusion Zone, Cont.
2. Move your mouse cursor over the Rule Functions dropdown menu and left click Edit.

Pro Tech Monitoring Inc. Issue Date: 2/14/2011 Please check online for the most up to date version.
19
Create Schedule for Home Inclusion Zone, Cont.
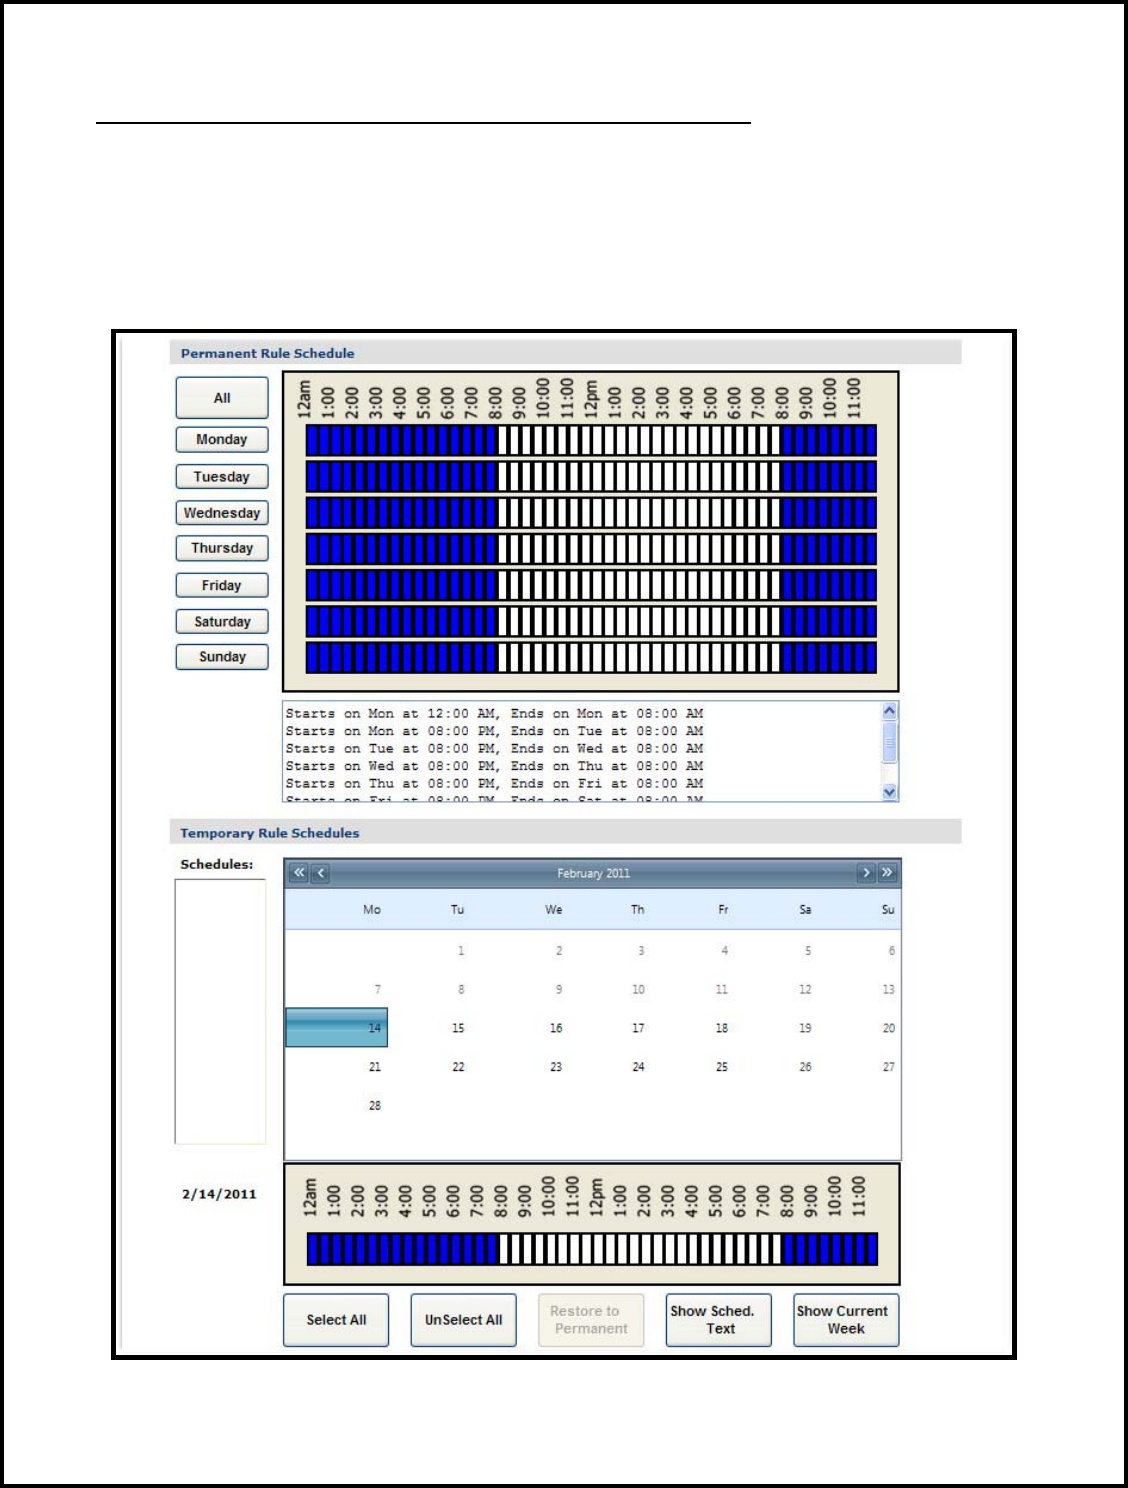
3. You will be redirected to the Edit Rule page. Scroll down to the Permanent Rule
Schedule.
Pro Tech Monitoring Inc. Issue Date: 2/14/2011 Please check online for the most up to date version.
20
Create Schedule for Home Inclusion Zone, Cont.
4. Each block represents a 30 minute increment of time. Left-click and drag the cursor
along the blocks during the times that the offender is required to be home. As you move the
cursor, the blocks will turn blue. The white blocks that remain equal the times that the
offender is allowed to be out of the home (see below).
5. Click the Save button.
Pro Tech Monitoring Inc. Issue Date: 2/14/2011 Please check online for the most up to date version.
21
Create Exclusion Zone
You can create an Exclusion Rule to ensure that the offender is not entering areas which are
forbidden – such as schools, playgrounds, and victims’ residences.
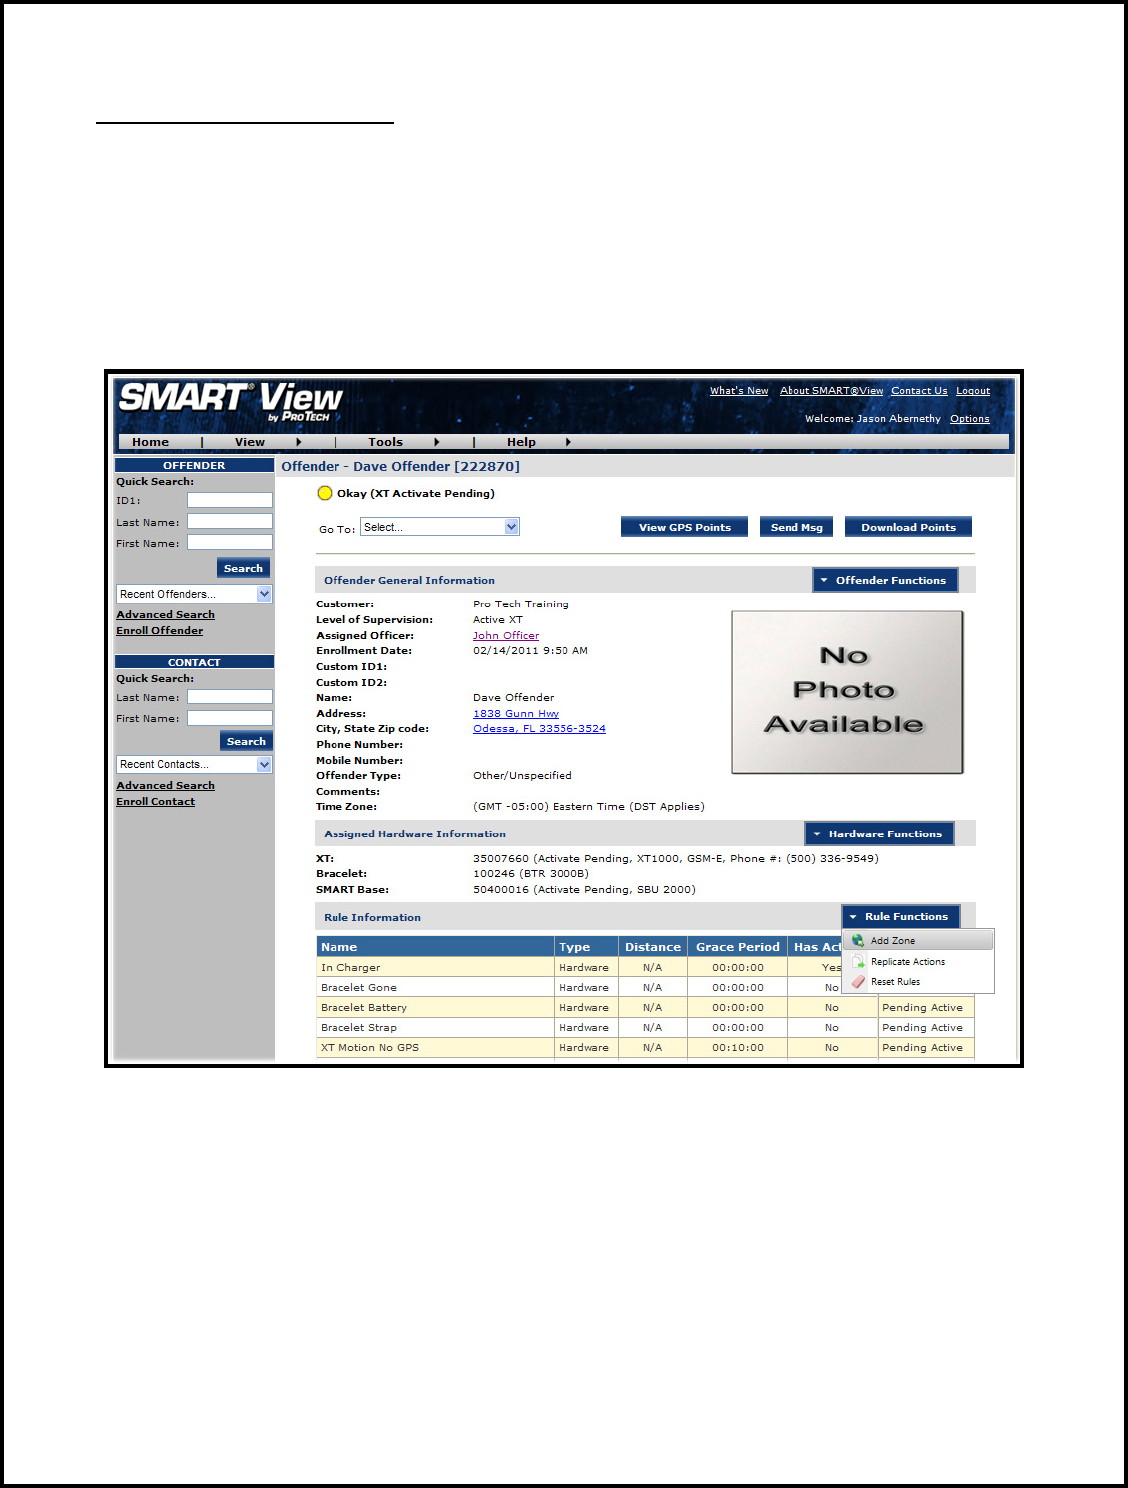
1. Move your cursor over the Rule Functions menu (see below).
2. Left click Add Zone.
Pro Tech Monitoring Inc. Issue Date: 2/14/2011 Please check online for the most up to date version.
22
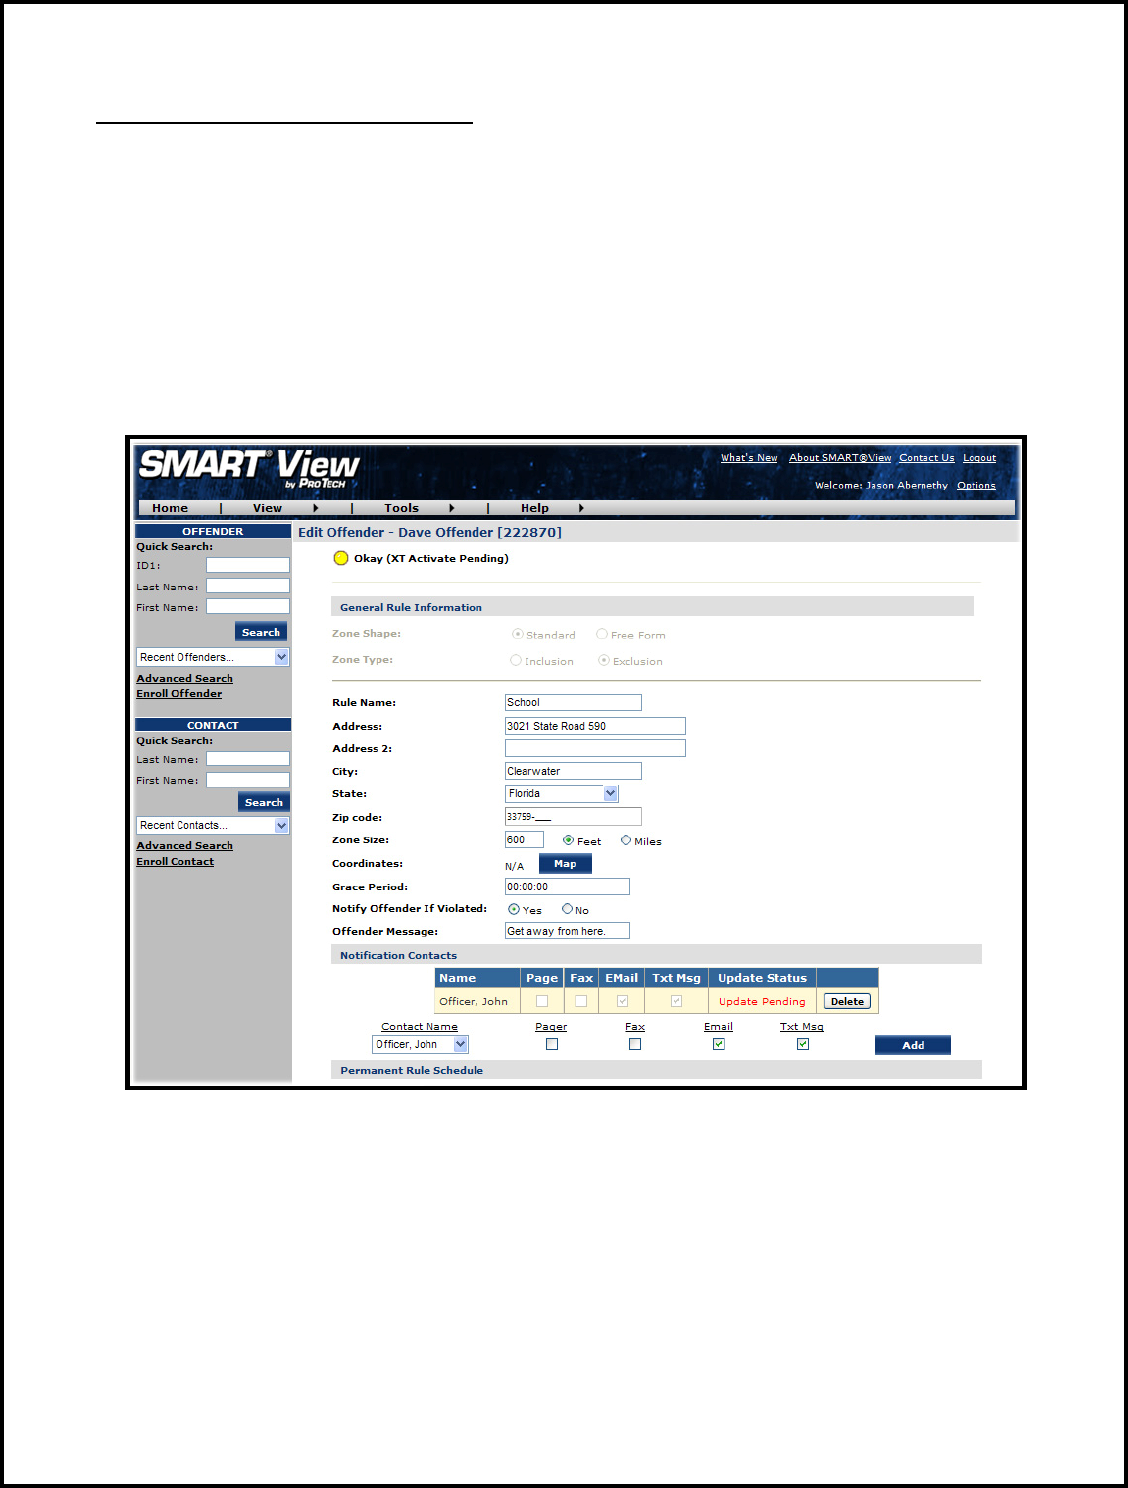
Create Exclusion Zone, Cont.
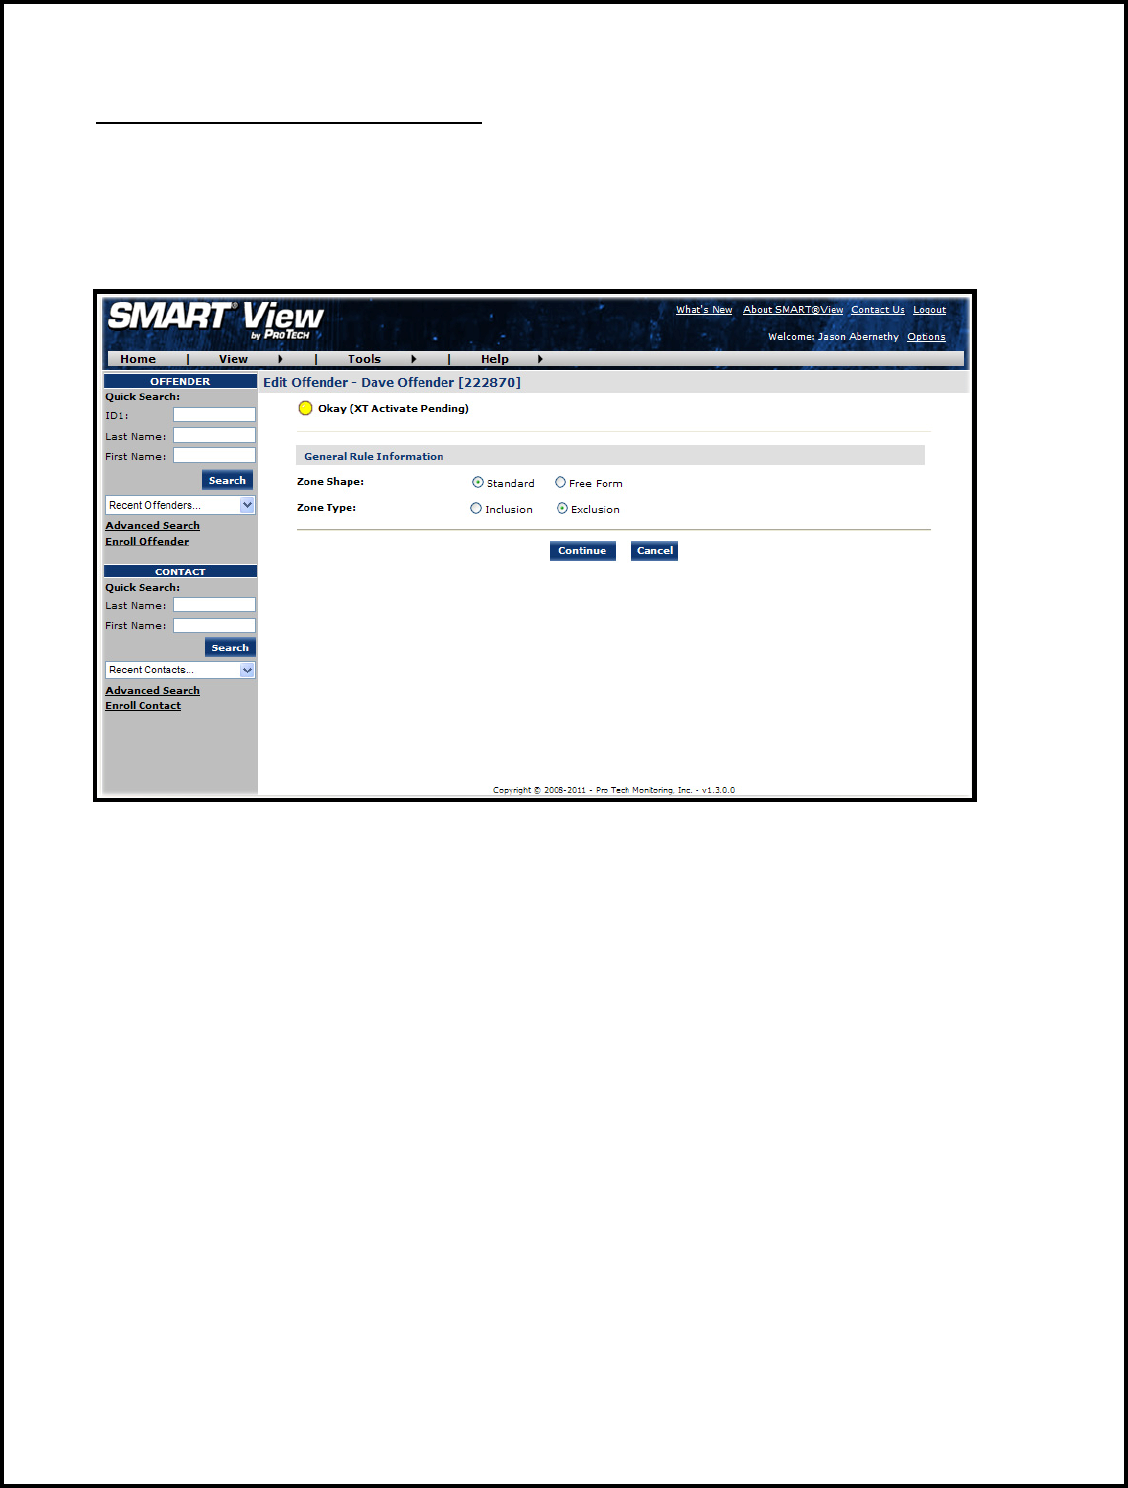
3. Choose a Zone Shape.
4. Choose Exclusion as the Zone Type.
5. Click the Continue button.
Pro Tech Monitoring Inc. Issue Date: 2/14/2011 Please check online for the most up to date version.
23
Create Exclusion Zone Cont.
6. Enter the Rule Name (school, playground, etc.).
7. Enter the address information and the zone size. The default is 600 ft.
8. Select Yes or No if you want to notify the offender upon violation.
9. If you selected Yes to notify the offender upon violation, type the message you want
displayed on the XT screen in the Offender Message field.
10. Choose the appropriate Contact from the Notification Contact drop down list. The
contact’s default notification method will appear selected.
11. Click the Add button.
12. Click the Map button.
Pro Tech Monitoring Inc. Issue Date: 2/14/2011 Please check online for the most up to date version.
24
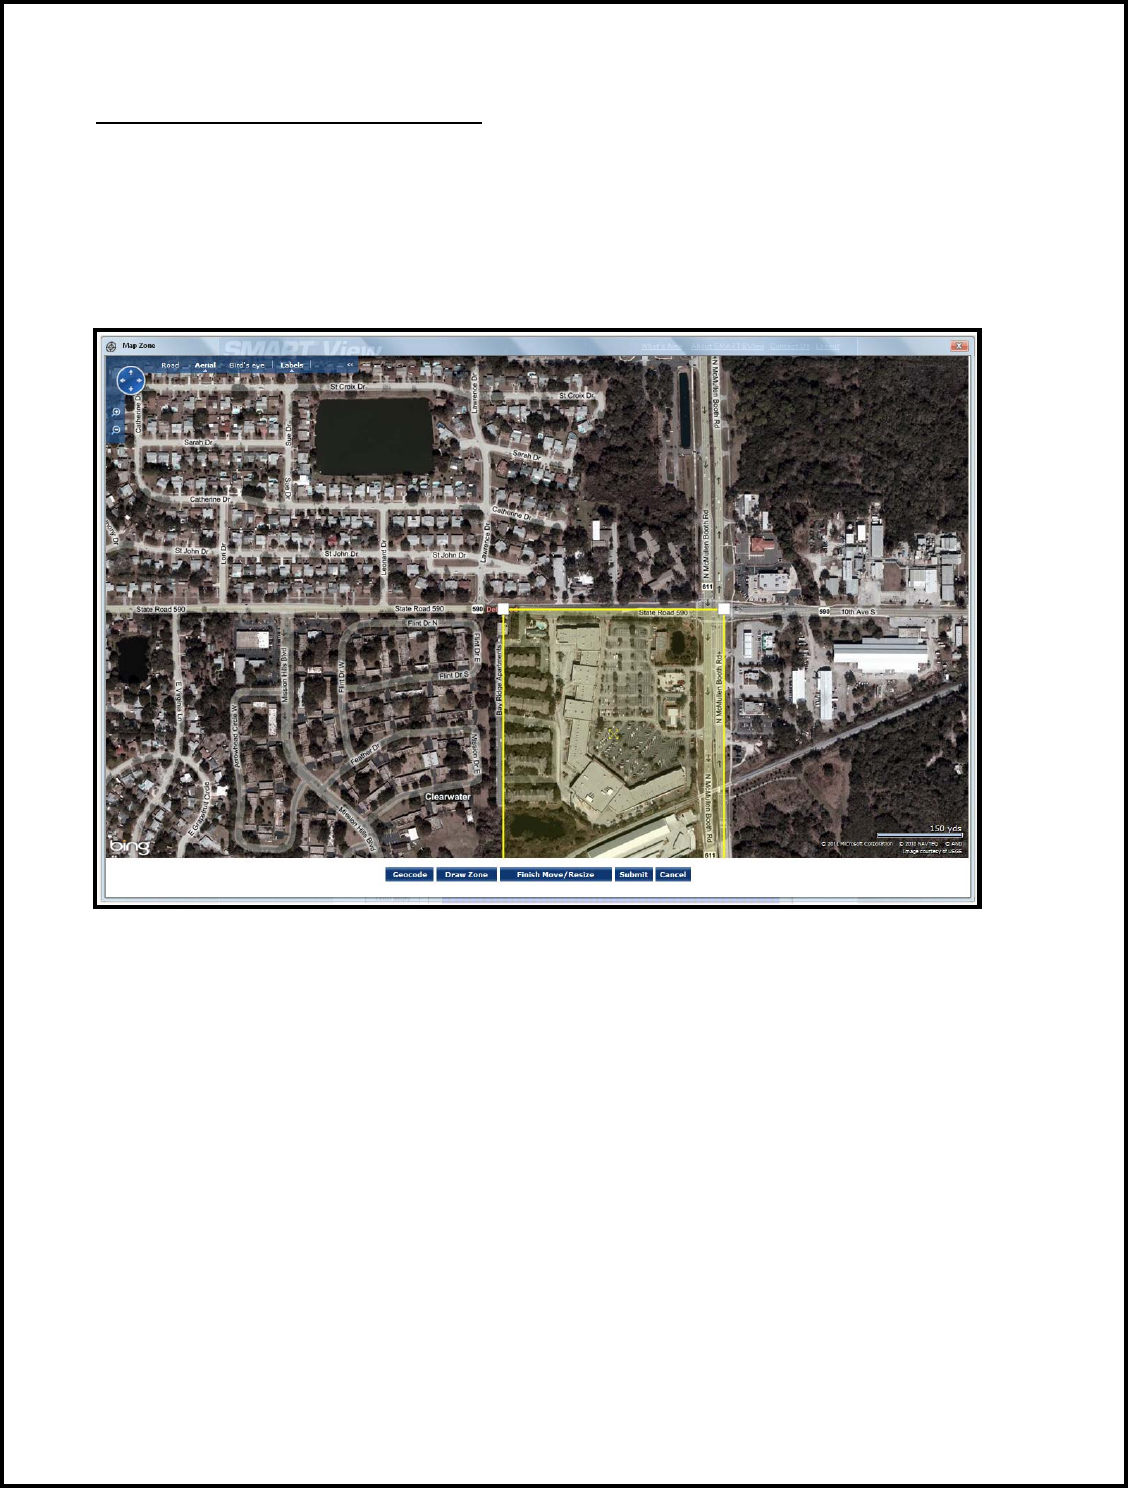
Create Exclusion Zone, Cont.
13. Ensure that the address and zone size is correct.
14. If you want to resize or move the zone, click the Move/Resize button.
15. If you move or resize the zone, click the Finish Move/Resize button.
16. Click the Submit button.
Pro Tech Monitoring Inc. Issue Date: 2/14/2011 Please check online for the most up to date version.
25
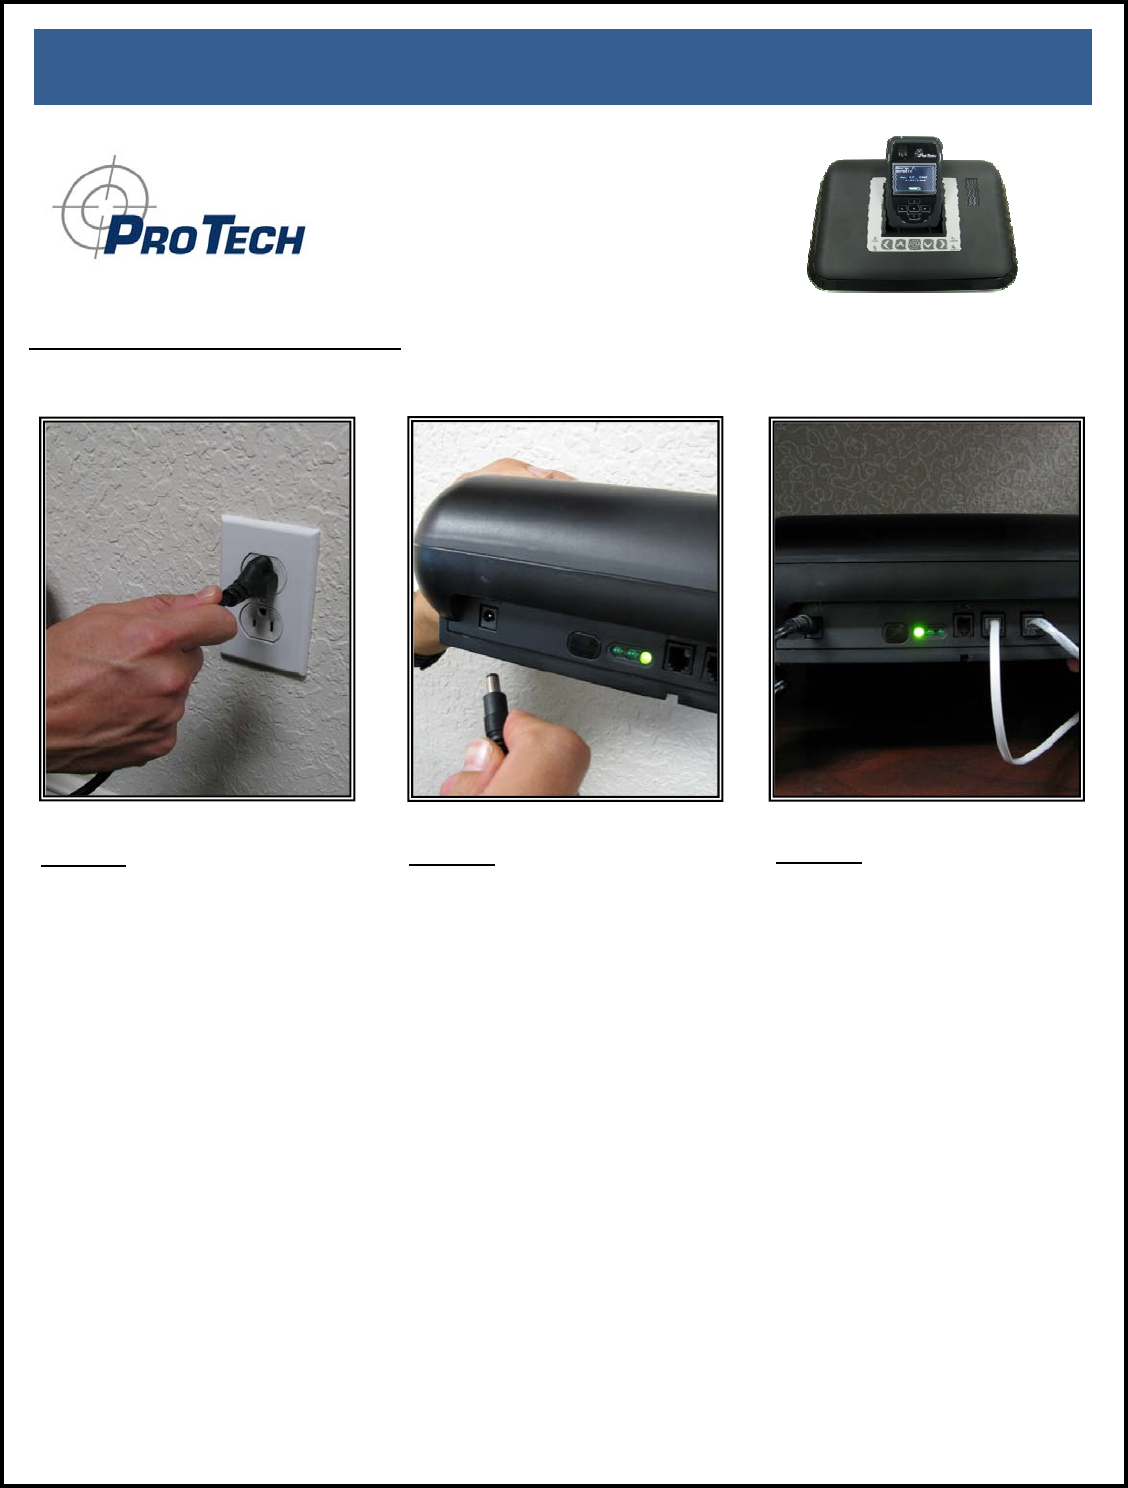
STEP 1:
Plug A/C adapter into a wall
outlet.
ActivatingtheSMART®XTwithSMART®Base
ConnectingtheSMART®Base
STEP 2:
Plug A/C adapter into the back
of the SMART® Base where
12VDC is located. The green
power light will light up on the
front of the unit.
STEP 3:
If offender has a phone line:
A: Remove phone line from
telephone and plug into the
back of the SMART® Base
marked PHONE.
B: Take extra phone cord and
plug one end back into the
telephone and the other end
into the SMART® Base marked
LINE.
Pro Tech Monitoring Inc. Issue Date: 2/14/2011 Please check online for the most up to date version.
26
ConnectingtheSMART®Base,cont.
STEP 4:
If activating at office:
A: Remove phone line from
facsimile machine.
B: Plug facsimile phone line into
the SMART® Base.
SMART® Base -
Violation Status Lights:
Power: The SMART® Base
has lost power.
Line: The phone line has
been disconnected.
Curfew: The XT is not in
the SMART® Base when the
schedule is in effect.
Message: The offender
needs to contact the
officer.
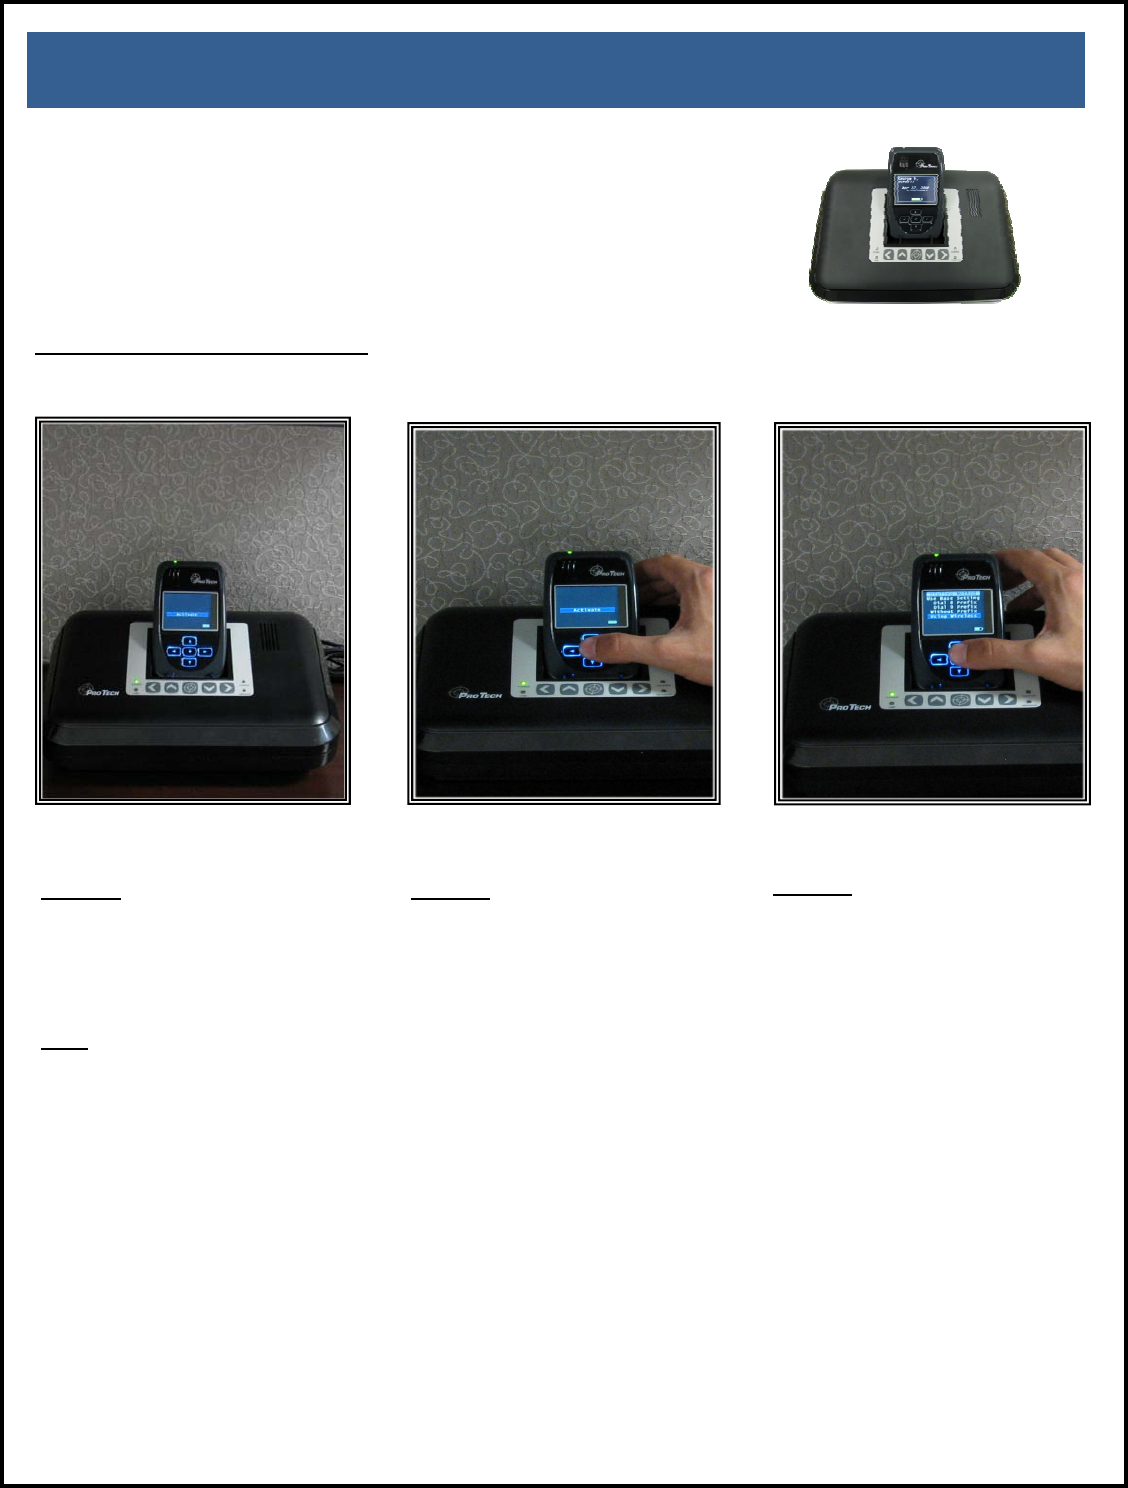
ActivatingtheSMART®XTwithSMART®Base
Pro Tech Monitoring Inc. Issue Date: 2/14/2011 Please check online for the most up to date version.
27
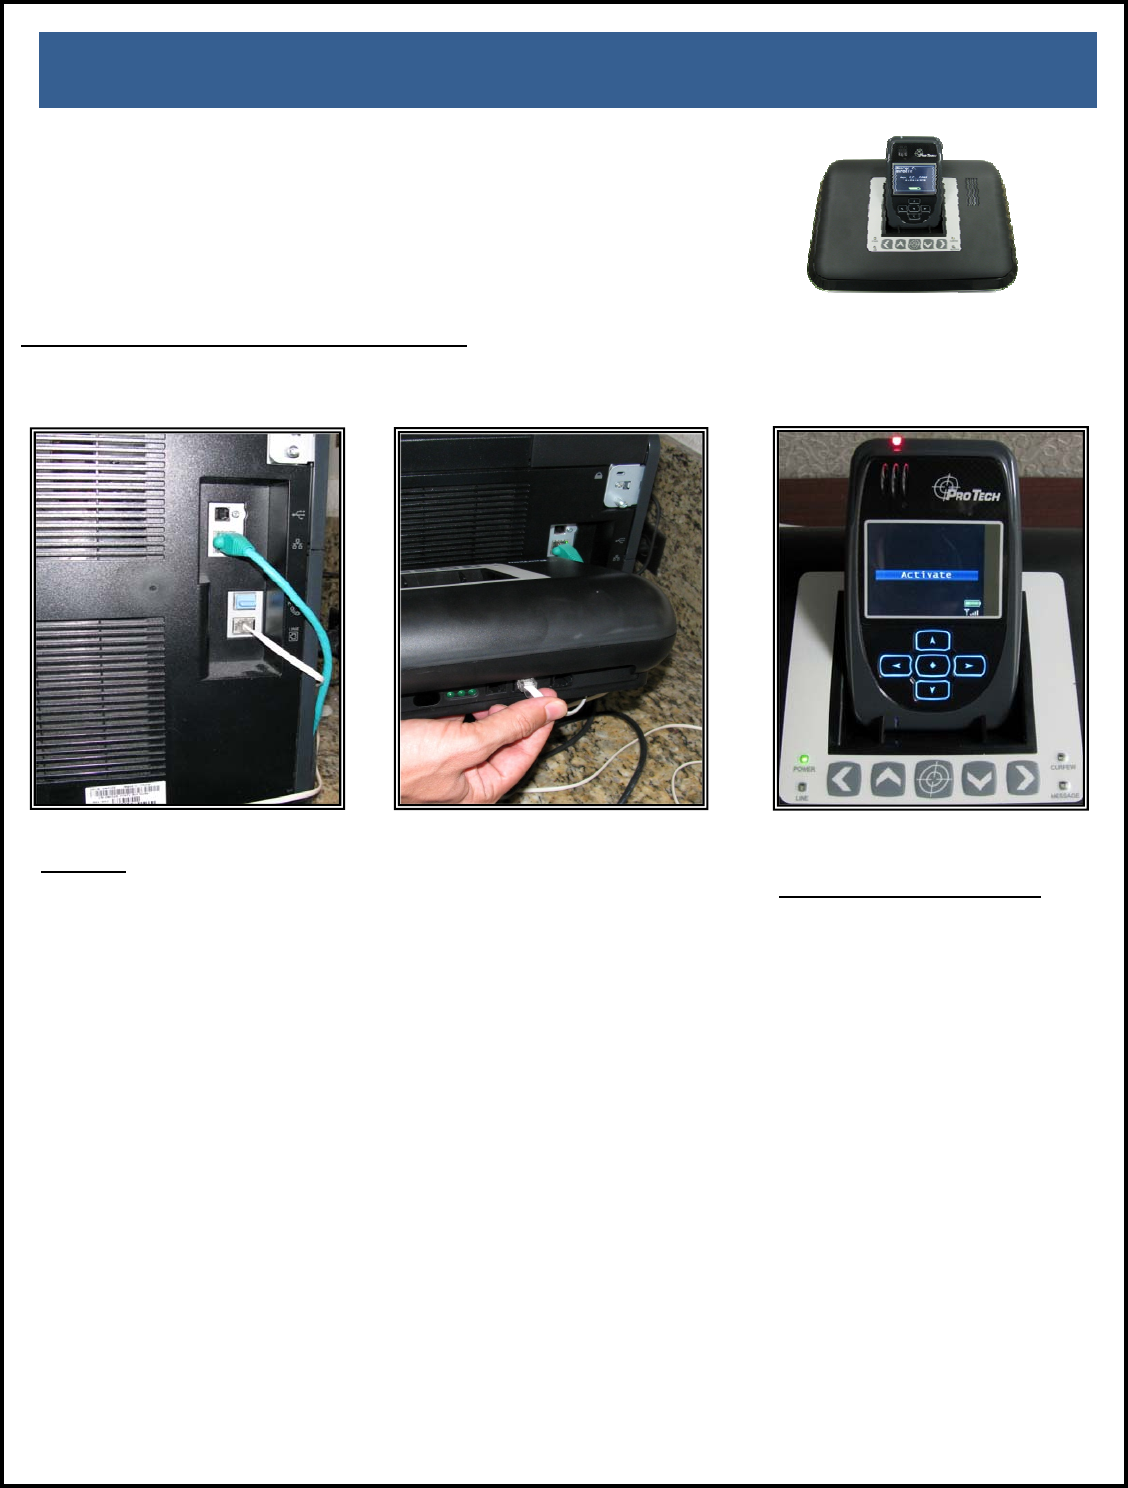
Step 1:
Place the XT into the
SMART® Base. Ensure the
SMART® Base is connected
to the A/C power cord.
Note: Ensure the hardware
has been assigned and
saved to the offender’s
profile.
Step 2:
Press the Activate button
(center button).
Step 3:
Press the Scroll button
(bottom button) to select
“Using Wireless” to activate
using the cellular network.
If activating via the
SMART® Base, select which
prefix (if any) the SMART®
Base must dial to complete a
call.
Refer to Connecting the
SMART Base STEP 3 for
additional instructions.
ActivatingtheSMART®XT
Activating the SMART®
XT with
SMART® Base
Pro Tech Monitoring Inc. Issue Date: 2/14/2011 Please check online for the most up to date version.
28
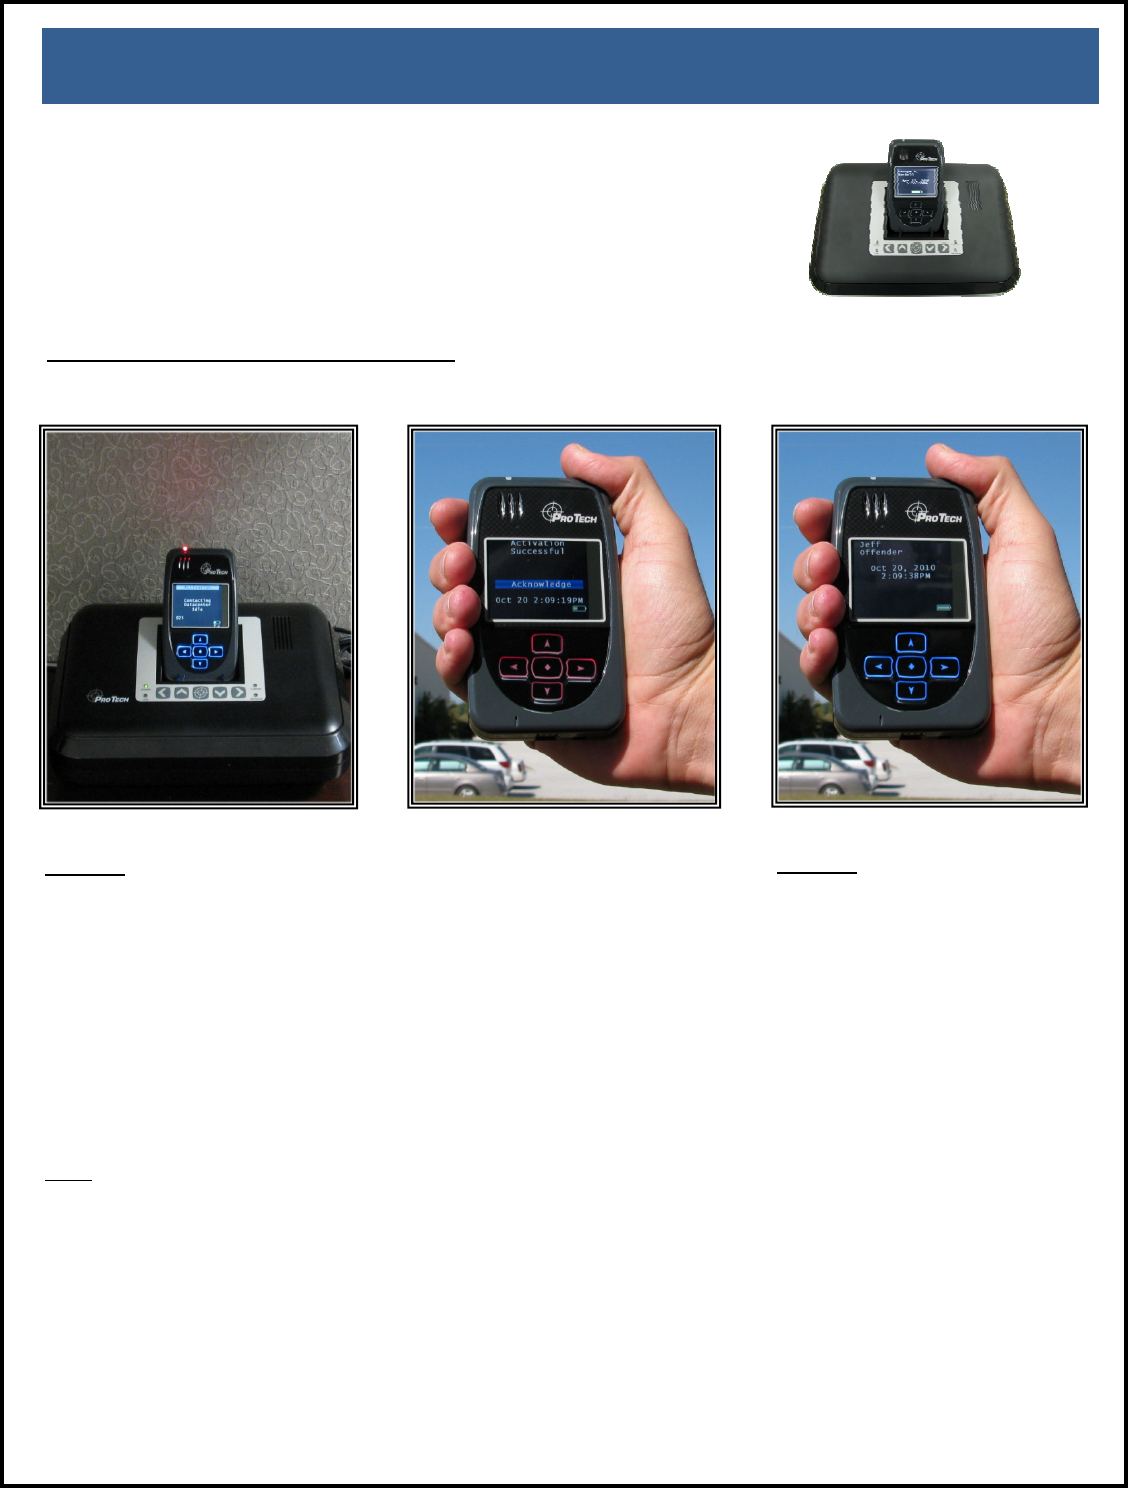
ActivatingtheSMART®XT,cont.
Step 4:
Press the Activation button to begin
dialing. The XT will begin to
contact the Pro Tech Data Center.
“Contacting Data Center” will be
displayed on the screen.
Once contact is complete, the XT
will begin to search for the
bracelet. “Searching for Bracelet
will be displayed on the screen.
Note: Both sides of the strap must
be connected to the bracelet and it,
the bracelet, must be in range of
the XT.
Once the XT recognizes the
bracelet, it will display “Waiting for
GPS.” Remove the XT from the
SMART® Base.
Step 5:
Walk the XT outside, holding
it upright in an area with a clear
view of the sky.
Once GPS has been acquired,
the XT will beep and display the
message “Activation Successful.”
Click on the Activation button
to acknowledge.
After the Activation button has
been clicked, the XT will display
the offender’s name, date and
time.
ActivatingtheSMART®XTwithSMART®Base
Pro Tech Monitoring Inc. Issue Date: 2/14/2011 Please check online for the most up to date version.
29
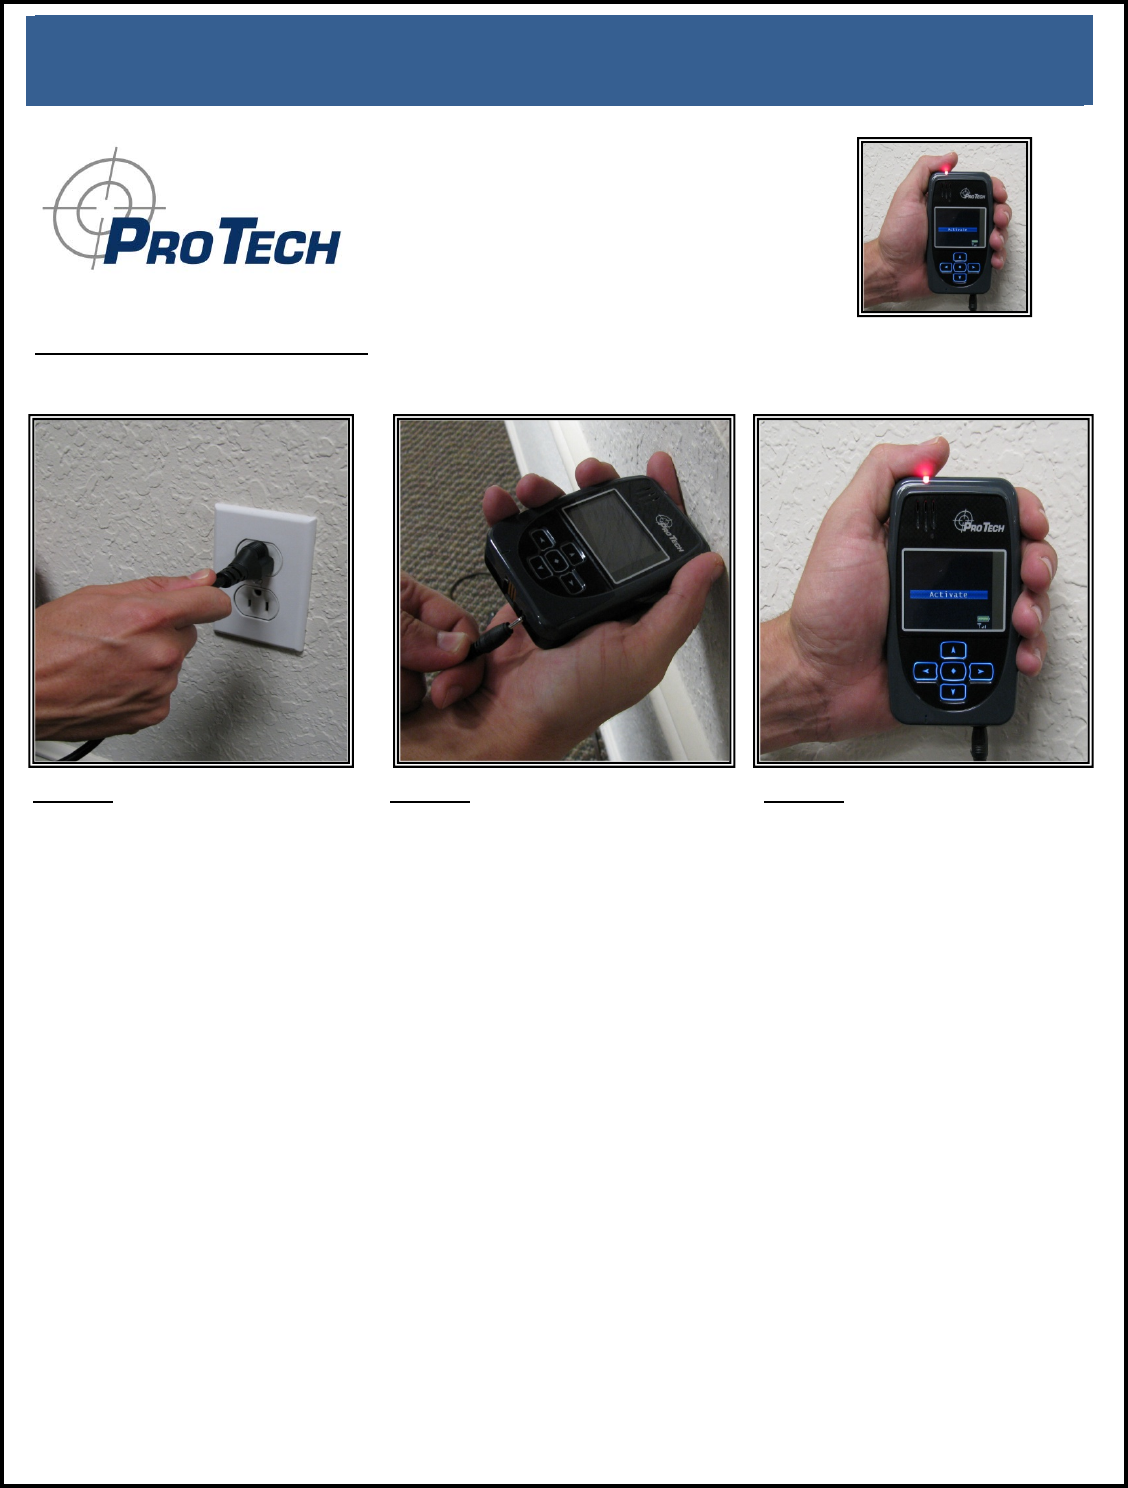
ActivatingtheSMART®XTwithoutSMART®Base
ActivatingtheSMART®XT
Step 1:
Plug A/C adapter into a wall
outlet.
ActivatingtheSMART®XTwithoutSMART®Basecont.
Step 3:
Press the Activate button
(center button).
Step 2:
Plug A/C adapter into the back
of the SMART® XT where
12VDC is located. The red
power light will light up on the
front of the unit.
Pro Tech Monitoring Inc. Issue Date: 2/14/2011 Please check online for the most up to date version.
30
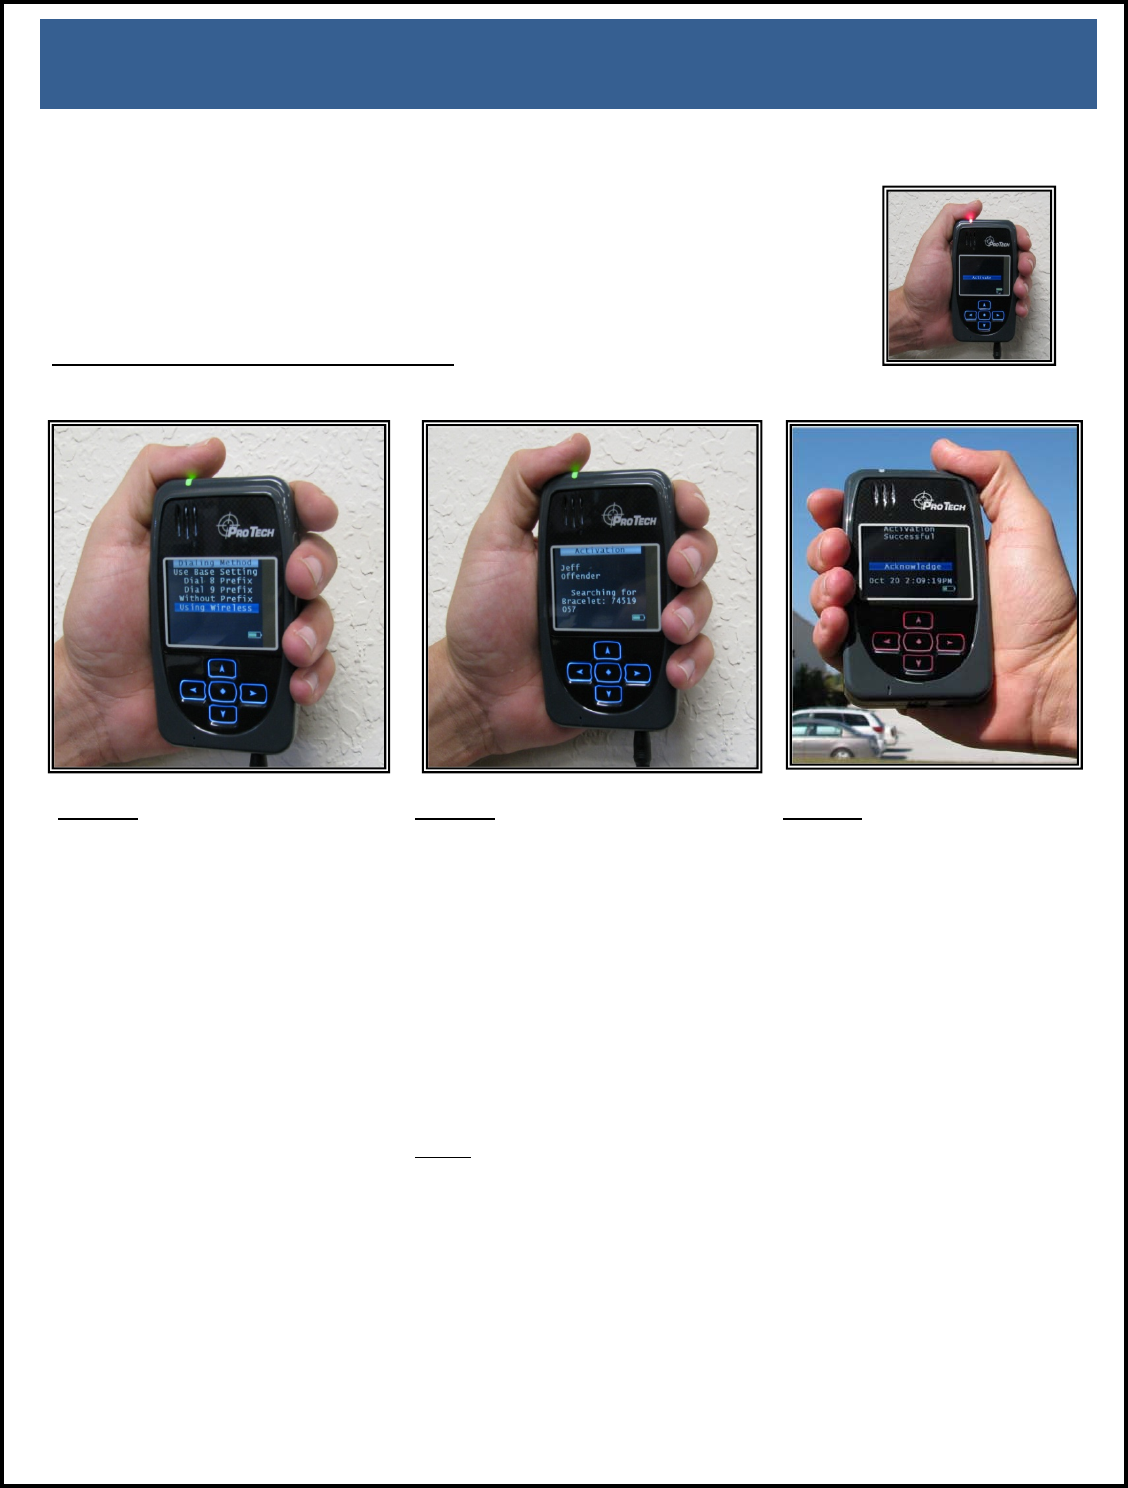
ActivatingtheSMART®XTcont.
Step 6:
Walk the XT outside, holding
it upright in an area with a clear
view of the sky.
Once GPS has been acquired,
the XT will beep and display the
message “Activation Successful.”
Click on the Activation button
to acknowledge.
After the Activation button has
been clicked, the XT will display
the offender’s name, date and
time.
Step 5:
Press the Activation button
(center button) to begin
dialing.
The XT will begin to contact
the Pro Tech data center.
“Contacting Data Center” will
be displayed on the screen.
Once contact is complete, the
XT will begin to search for the
bracelet. “Searching for
Bracelet will be displayed on
the screen.
Note: Both sides of the strap
must be connected to the
bracelet and it, the bracelet,
must be in range of the XT.
Once the XT recognizes the
bracelet, it will display
“Waiting for GPS.”
Step 4:
Press the Scroll button (bottom
button) to select “Using
Wireless” to activate using the
cellular network.
ActivatingtheSMART®XTwithoutSMART®Basecont.