Attenti US XT40318 Offender Tracking Device User Manual User s Manual
3M Electronic Monitoring Offender Tracking Device User s Manual
User Manual

Pro Tech Monitoring Inc. Issue Date: 4/14/2011 Please check online for the most up to date version.
0

Pro Tech Monitoring Inc. Issue Date: 4/14/2011 Please check online for the most up to date version.
1
Table of Contents
Overview........................................................................................................................................ - 2 -
XT Details ...................................................................................................................................... - 3 –
XT Features .................................................................................................................................... - 5 –
Bracelet Details ............................................................................................................................... - 6 -
SMART Base Details ......................................................................................................................... - 7 -
Enrollment ....................................................................................................................................... -8-
Enroll a Contact ............................................................................................................................ - 9-
Contact Information Page ........................................................................................................... ..- 12 -
Enroll an Offender ....................................................................................................................... - 13 -
Supervision Level .......................................................................................................................... -14-
Map Offender’s Address ................................................................................................................ - 17-
Offender General Information Page ................................................................................................. - 18-
Create Schedule for Home Inclusion Zone .......................................................................................... - 19-
Create Exclusion Zone ..................................................................................................................... - 23-
Activating the XT with the SMART Base .............................................................................................. - 27-
Deactivating Hardware .................................................................................................................... - 31 -
Removing the Bracelet .................................................................................................................... - 35–
Accessing the Officer Menu ............................................................................................................. - 37 –
Accessing the Offender Menu ........................................................................................................... - 38 -
Appendix ....................................................................................................................................... - 39–
Violation Definitions ........................................................................................................................ - 39–
XT Status Icons ............................................................................................................................ - 41 –
Safety and Precautions .................................................................................................................. - 42 –
Pro Tech Monitoring Inc. Issue Date: 4/14/2011 Please check online for the most up to date version.
2
Overview
Pro Tech’s SMART® XT utilizes GPS satellites to establish an offender’s location and uses
cellular networks to transmit the location data to Pro Tech. The SMART® XT transmits all
GPS data wirelessly at the agency’s contract specific call-in intervals.
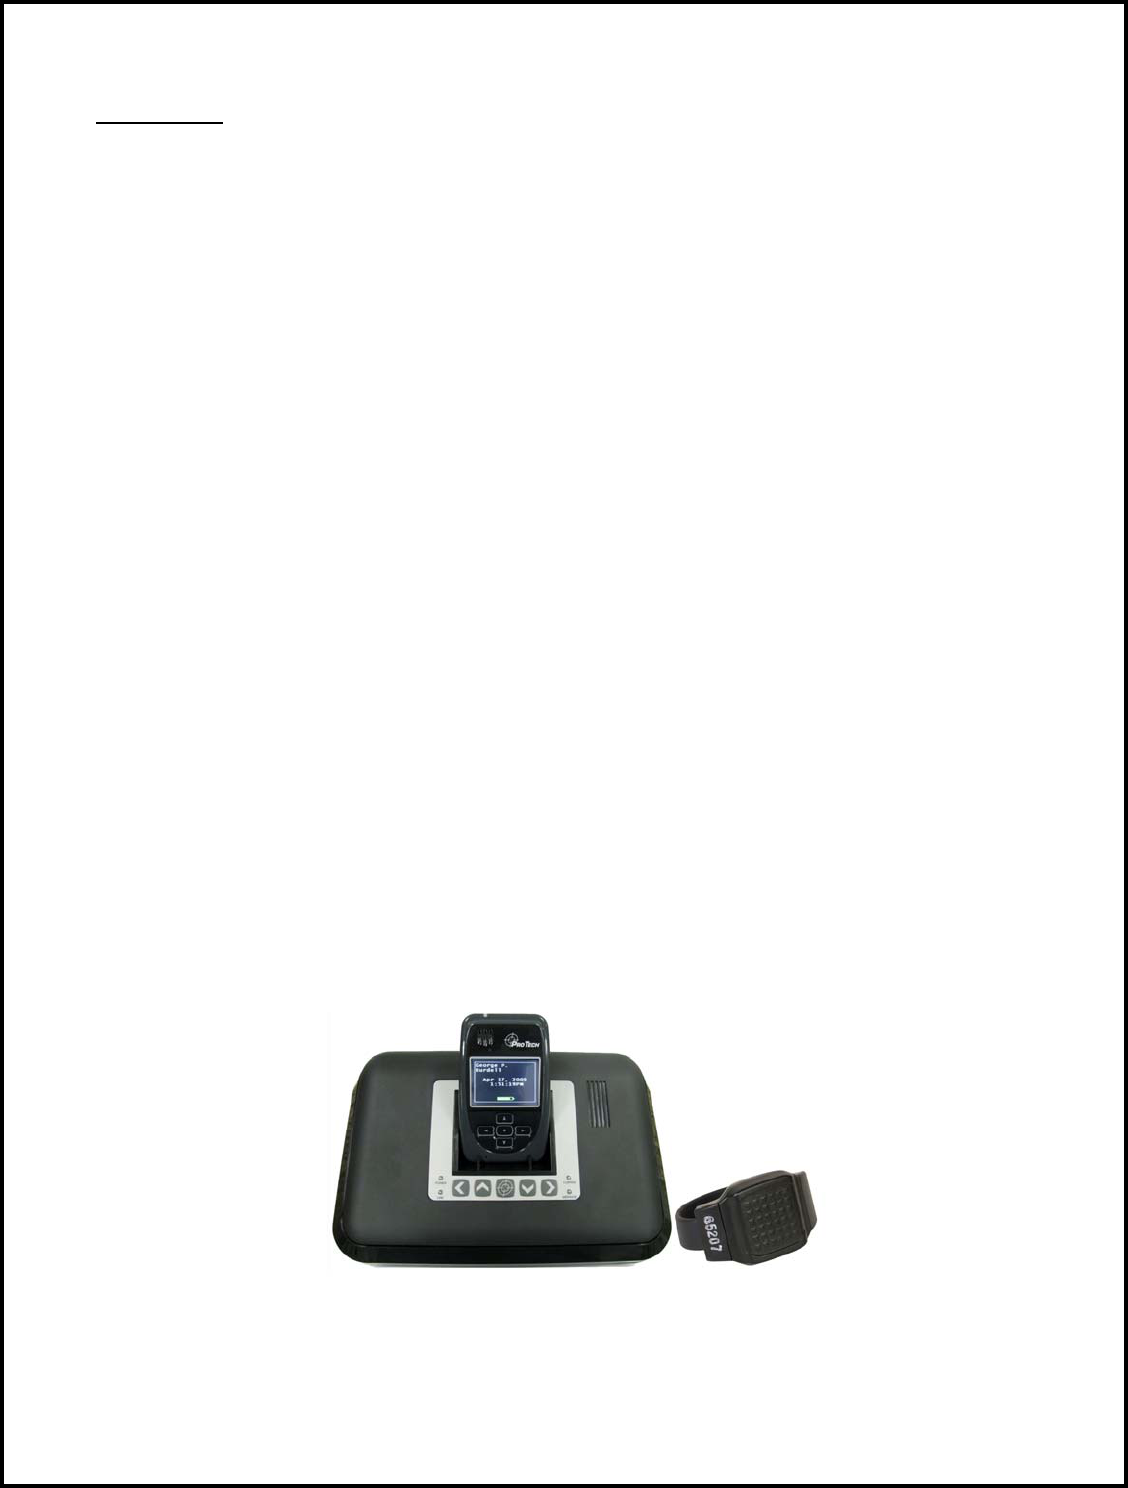
The SMART® XT consists of four components: The Ankle Bracelet, the XT, the SMART® Base,
the optional carrying pouch accessory, and the SMART® View software.
Ankle Bracelet
• Serves as an electronic tether to the SMART® XT.
SMART® XT
• A 6 oz. device, approximately the size of a Blackberry. The SMART® XT
receives transmitted information from GPS Satellites and Pro Tech’s ankle
bracelet, and then uses its modem to transmit the data to Pro Tech by using
the cellular network.
SMART® Base
• A stationary device used to recharge the XT and transmits all information via
a landline, if available. It also monitors the Ankle Bracelet when the SMART®
XT is placed in the SMART® Base (docked).
SMART® View
• The tracking and monitoring software that can be installed on almost any
computer with Internet access. SMART® View provides access to maps,
offender information, and reports.

Pro Tech Monitoring Inc. Issue Date: 4/14/2011 Please check online for the most up to date version.
3
XT Details
Storing GPS Points: The storage of GPS points is based on an offender’s mobility. The XT
will record and store GPS points based on the offender’s amount of activity. The XT will
store an offender’s location, point, when it is in motion (moving) every minute. If the XT is
left in the same place for 10 consecutive minutes without any motion, the XT will go to
“Rest” and collect a point at the top of every hour instead of every minute. If the offender
causes a Zone violation, the XT will store a point every 15 seconds.
At Rest: If the XT is left in the same place for 10 consecutive minutes without any motion,
the XT will go to “Rest” and collect a point at the top of every hour instead of every minute.
This feature is designed to conserve the battery life. While the XT is at rest, it will still be
communicating with the bracelet and ensuring that the offender is in range of the XT.
Sim Card: The XT has a SIM card, which is similar to the data transmitter/receiver found in
most cellular phones. The XT uses the SIM card to transmit and download the GPS points it
has generated to Pro Tech’s servers. The call-in intervals are determined by the agency’s
contract specifications. Examples may be hourly, every six hours, or immediately upon
violation.
Battery Life:The device should be given a full charge (4.2 volts) to supply a full day of
battery life. It takes approximately 4 hours to acquire a minimum of 20 hours. The daily life
of the battery is dependent upon the call-in interval of the device, how often it goes to rest,
and how many violations are created. The battery must be charged each day in order to
continue to track your offender’s locations.
Range: When not in the SMART® Base, or undocked, the XT has a transmittal range to the
bracelet of 75-100 feet. When in the SMART® Base, or docked, the transmittal range to the
bracelet will increase to 125- 150 feet.
Vibrate feature: Officers can choose to enable the vibration mode to alert the offender of
any violations and/or messages. The vibration will continue periodically until the offender
has acknowledged the violation and/or message.
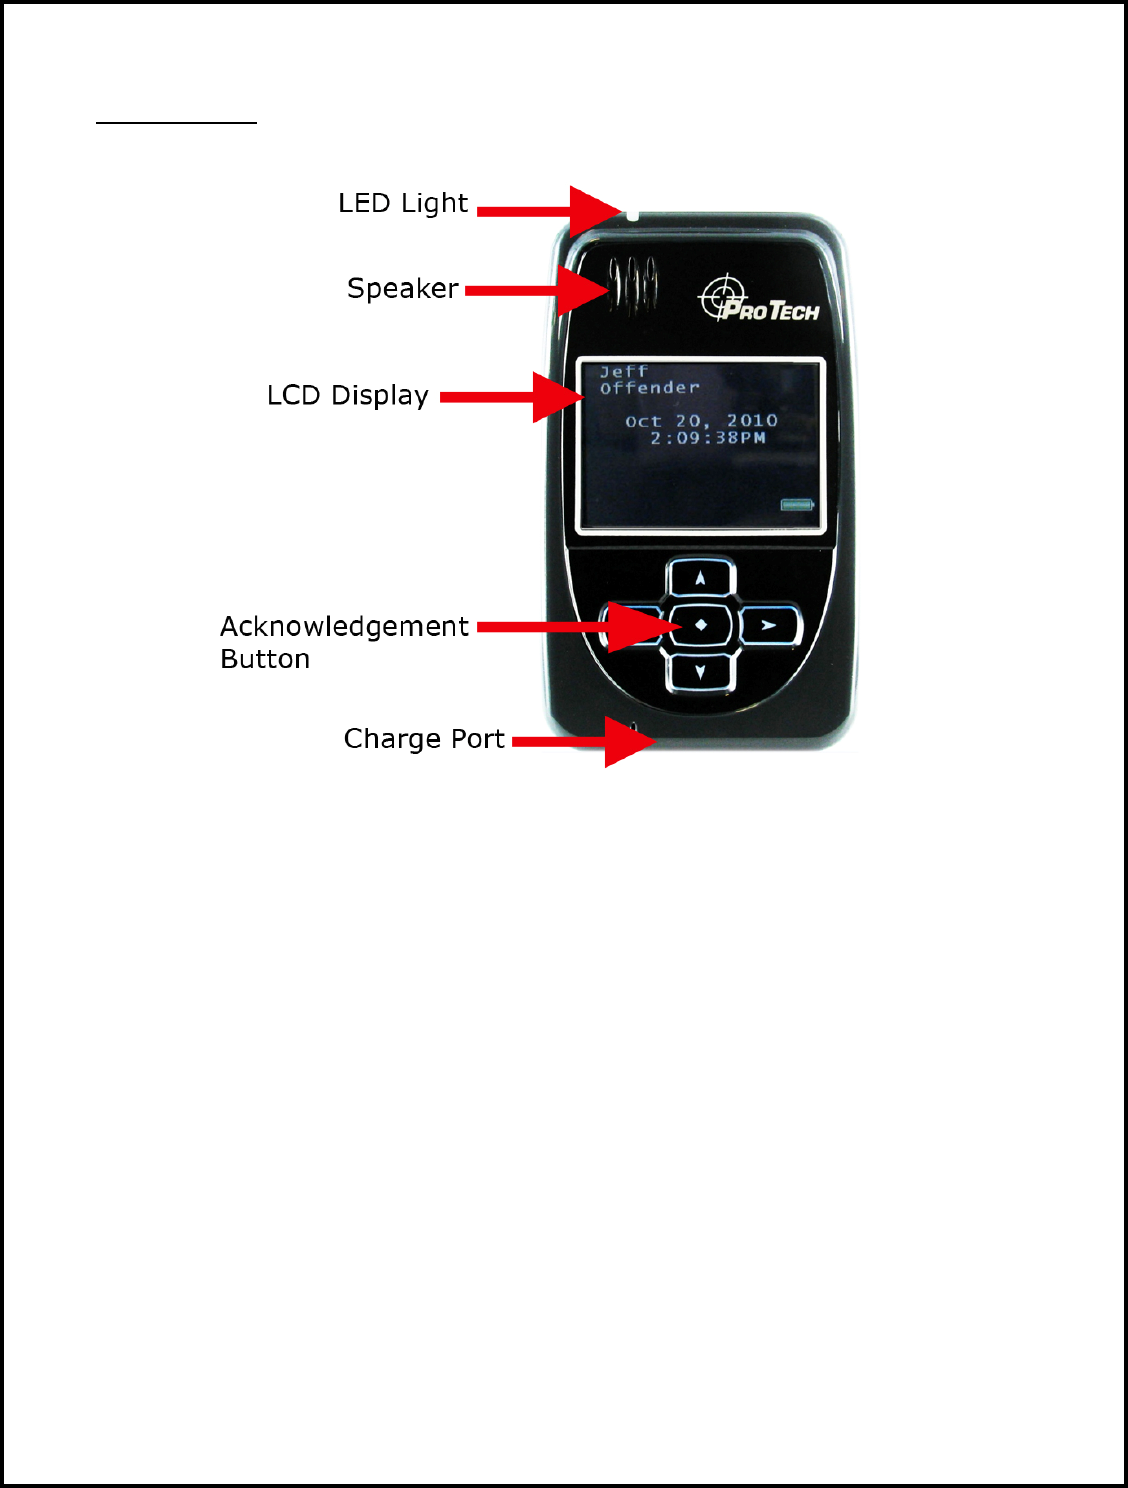
LCD Display: The XT has an LCD screen that displays the offender name, date, time,
battery level, violation information, and messages.
LED Light: The LED light is used to notify the offender that there is a message and/or a
violation that needs to be acknowledged. It will flash red until the message and/or violation
has been acknowledged.
Speaker: Officers can choose to enable the speaker feature to alert the offender of any
violations and/or messages that need to be acknowledged.
Automatic Redial: If the XT is unable to communicate with Pro Tech because of poor
cellular coverage, it will continue calling until it is successful.

Pro Tech Monitoring Inc. Issue Date: 4/14/2011 Please check online for the most up to date version.
4
Carrying Pouch Accessory: In order to maintain compliance to RF exposure requirements
for body worn use, the XT must be carried in the belt clip pouch to provide a minimum
1.5cm separation from the body.
Magnetized Charger: The XT has a magnetized charger to prevent accidental disconnect
while the battery is being recharged.
Pro Tech Monitoring Inc. Issue Date: 4/14/2011 Please check online for the most up to date version.
5
XT Features

Pro Tech Monitoring Inc. Issue Date: 4/14/2011 Please check online for the most up to date version.
6
Bracelet Details
Electronic Tether
The bracelet serves as an electronic tether to the XT. The bracelet communicates with the
XT via a UHF radio communication link.
Waterproof
The bracelet is waterproof down to 66 feet.
Battery Life
The bracelet battery is designed to last 9-12 months while in use and has a 2 year shelf life.
Tamper Detection
If an offender tampers with the bracelet by cutting the strap or breaking the tamper plugs
and/or pin trays, a violation will occur.
Hypoallergenic Rubber Straps
The bracelet comes with a hypoallergenic rubber strap that contains a fiber optic cable
designed to prevent tampering. The bracelet sends an infrared light through the fiber-optic
cable to complete a circuit. If the offender does anything to cause an interruption in the
infrared light running through the fiber-optic cable, a strap violation will occur.
Pro Tech Monitoring Inc. Issue Date: 4/14/2011 Please check online for the most up to date version.
7
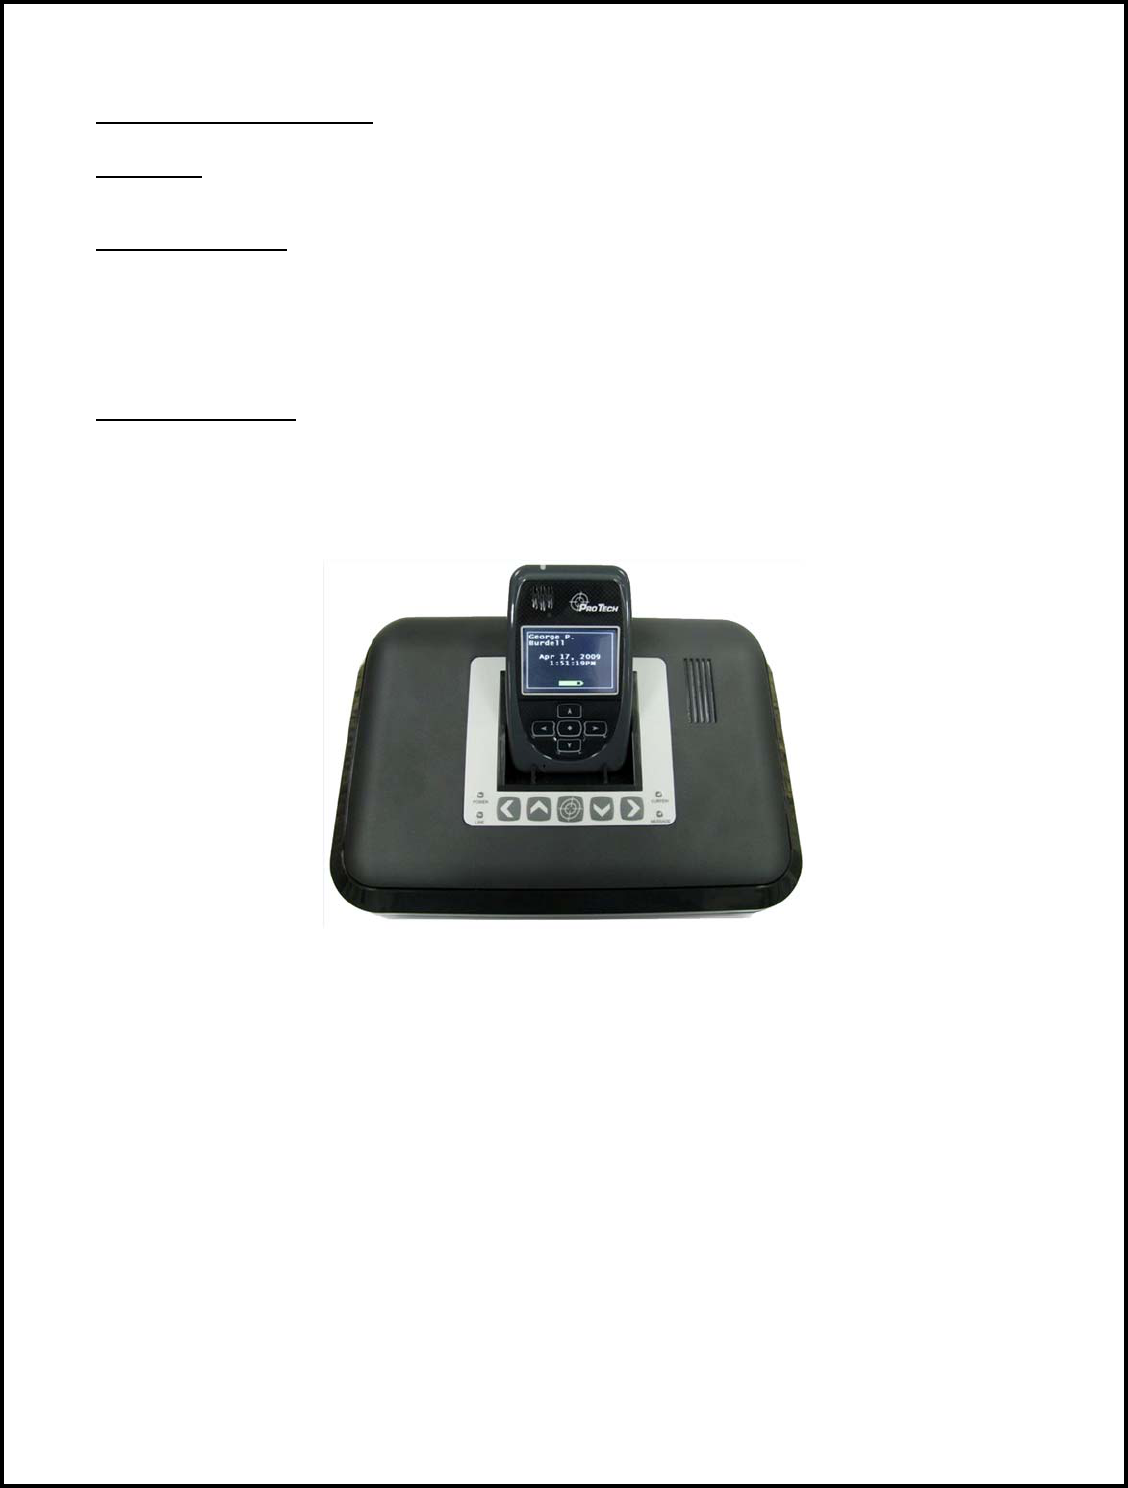
SMART® Base Details
Charger: The SMART® Base acts as a charger for the XT. It takes approximately 4 hours to
fully charge the XT. The charge will last a minimum of 20 hours.
Communication: If the offender has a phone line, it is recommended that an analog phone
line be plugged into the device. A digital phone line can be used, but the features must be
removed. Every six hours, the SMART® Base will transmit the XT’s GPS data to Pro Tech.
Note: When the XT is docked or undocked from the SMART® Base, the SMART® Base will
transmit the most recent GPS points to Pro Tech.
Caller ID Feature: The SMART® Base notifies the assigned officer if an offender’s SMART®
Base makes a call from a telephone number that differs from the offender’s home number.

Pro Tech Monitoring Inc. Issue Date: 4/14/2011 Please check online for the most up to date version.
8
Enrollment
SMART® View Log In
To access the secure website, go to https://smartview.ptm.com. You will be required to
enter a user ID and password. When using SMART® View for the first time, you will create
your own password. Enter your User ID (often your three initials and last four digits of your
social security number), the temporary password that was emailed to you, and click OK.
The next screen will tell you that your password has expired. Create your password, (the
password you select must contain at least 8 characters), and click OK. You will now be
logged into SMART® View.
Note: If you forget your password, click the Forgot your Password link. A new
temporary password will be emailed to you. To create your new password, follow
the instructions contained within the email.
Pro Tech Monitoring Inc. Issue Date: 4/14/2011 Please check online for the most up to date version.
9
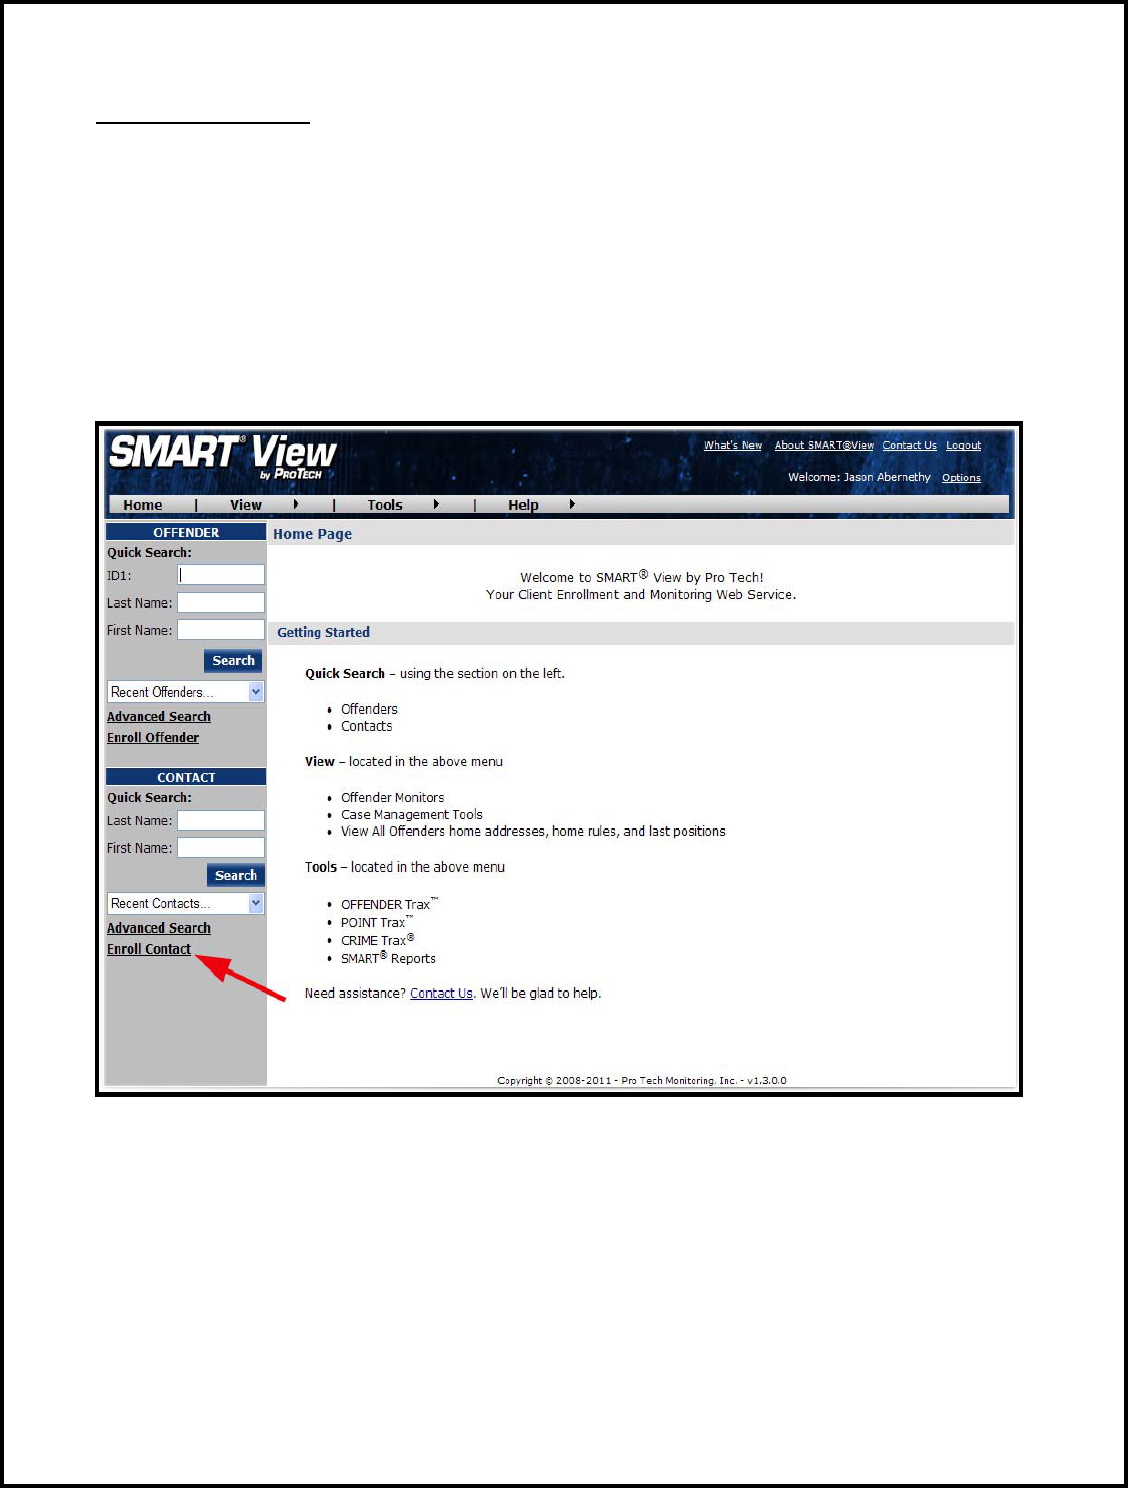
Enroll a Contact
The Enroll Contact link is located on the left side of the Home page (see below). It is here
that you will enter the officer’s information (name, address, phone number, etc.), report
types, and default notification settings.
1. Click the Enroll Contact link on the left side of the Home page.
2. You will be redirected to the Enroll Contact page (see below). Enter all Contact
information.
3. Click Save.
Pro Tech Monitoring Inc. Issue Date: 4/14/2011 Please check online for the most up to date version.
10
Enroll a Contact, Cont.

Pro Tech Monitoring Inc. Issue Date: 4/14/2011 Please check online for the most up to date version.
11
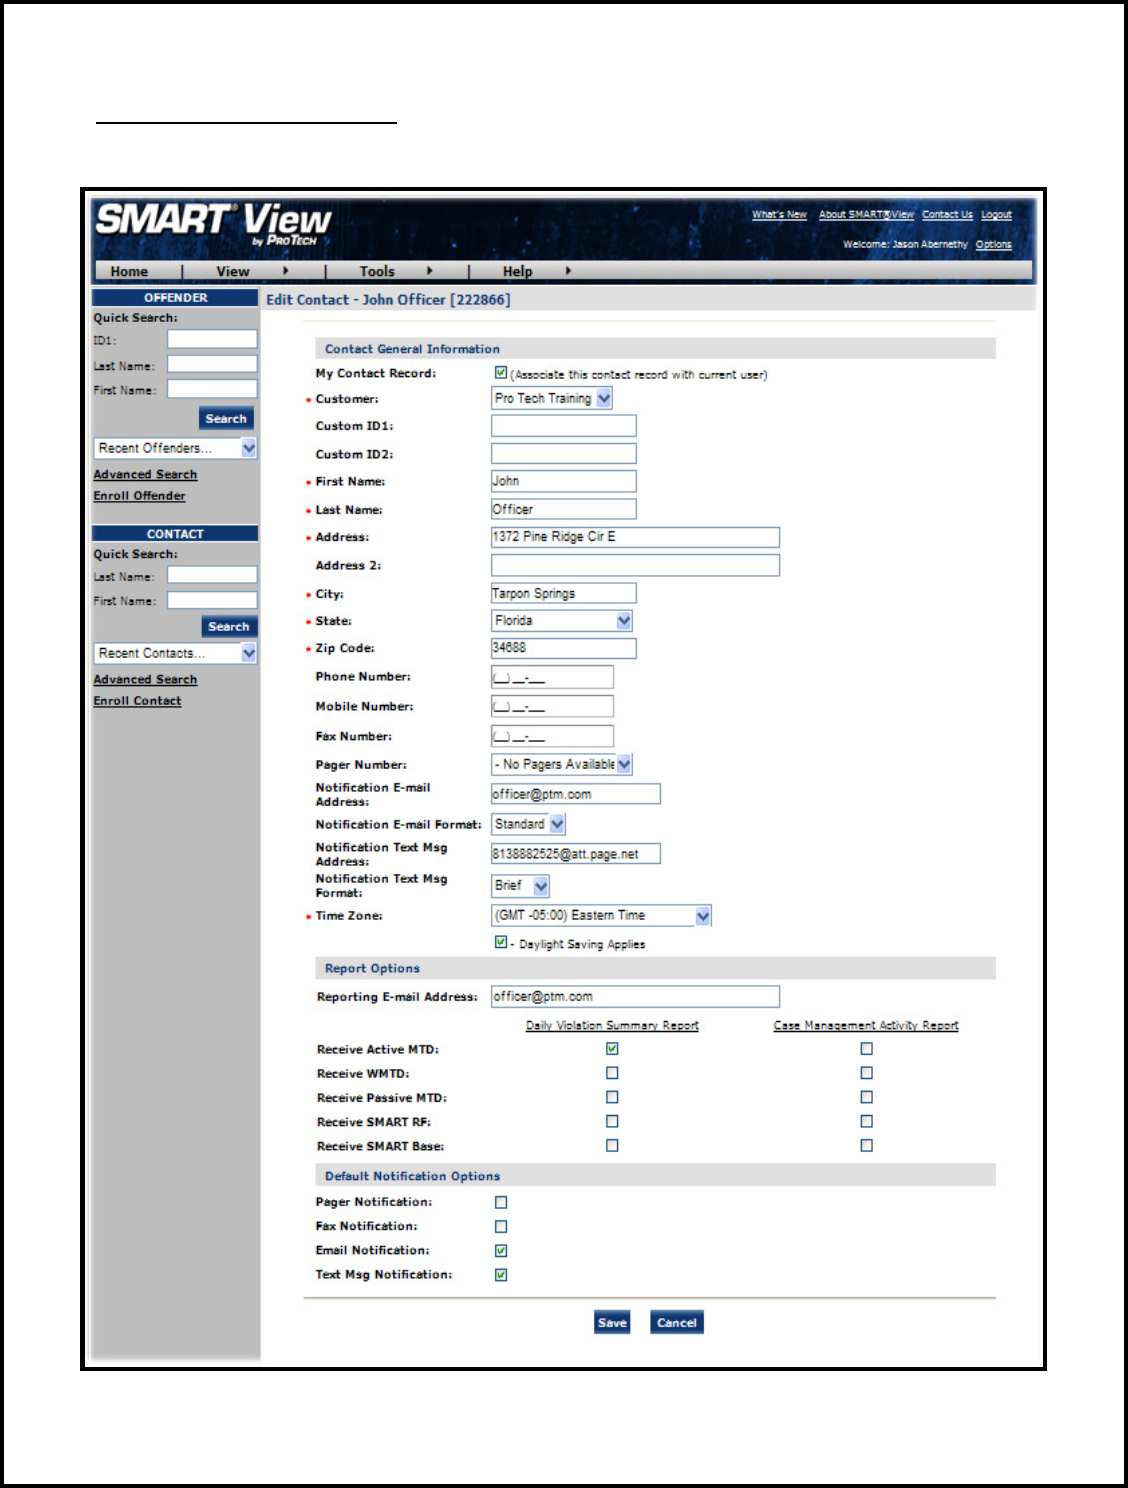
Enroll a Contact, Cont.
Demographic Data
1. Enter the Contact’s information.
• All fields with red asterisks (*) are required fields.
Report Options
2. Enter an email address where the selected reports will be sent.
3. Choose Daily Violation Summary Report and/or Case Management Activity
Report.
Default Notification Options
4. Select the type of Notification you would like to be your default method. The
notification method is dependent upon the information that you enter into the
Notification Email or Text Message fields.
• Pager
• Fax
• E-mail
• Text Message
Finish Enrollment
5. When you have completed the form, click Save.
Pro Tech Monitoring Inc. Issue Date: 4/14/2011 Please check online for the most up to date version.
12
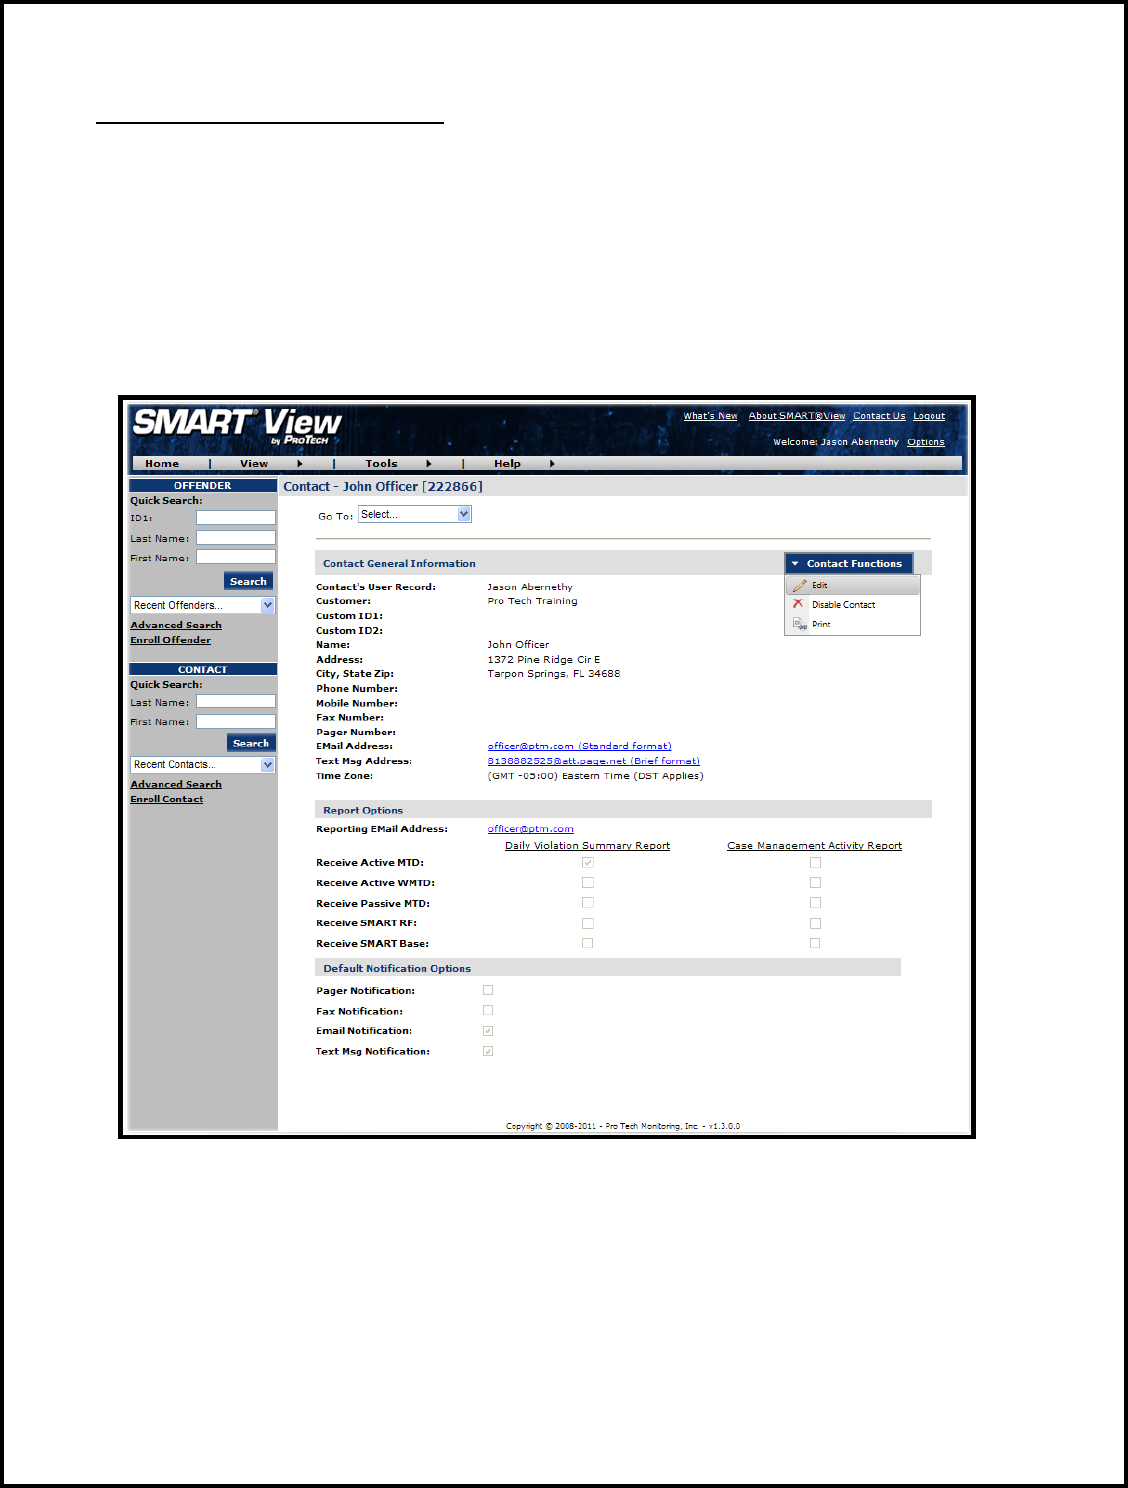
Contact Information Page
When you click Save, you will be taken to the Contact Information page (see below). Here,
you can edit the contact information, as well as disable the contact.
1. To edit the contact information, move your mouse cursor over the Contact Functions
dropdown menu and left click Edit.
2. To disable the contact, move your mouse cursor over the Contact Functions
dropdown menu and left click Disable Contact.
Pro Tech Monitoring Inc. Issue Date: 4/14/2011 Please check online for the most up to date version.
13
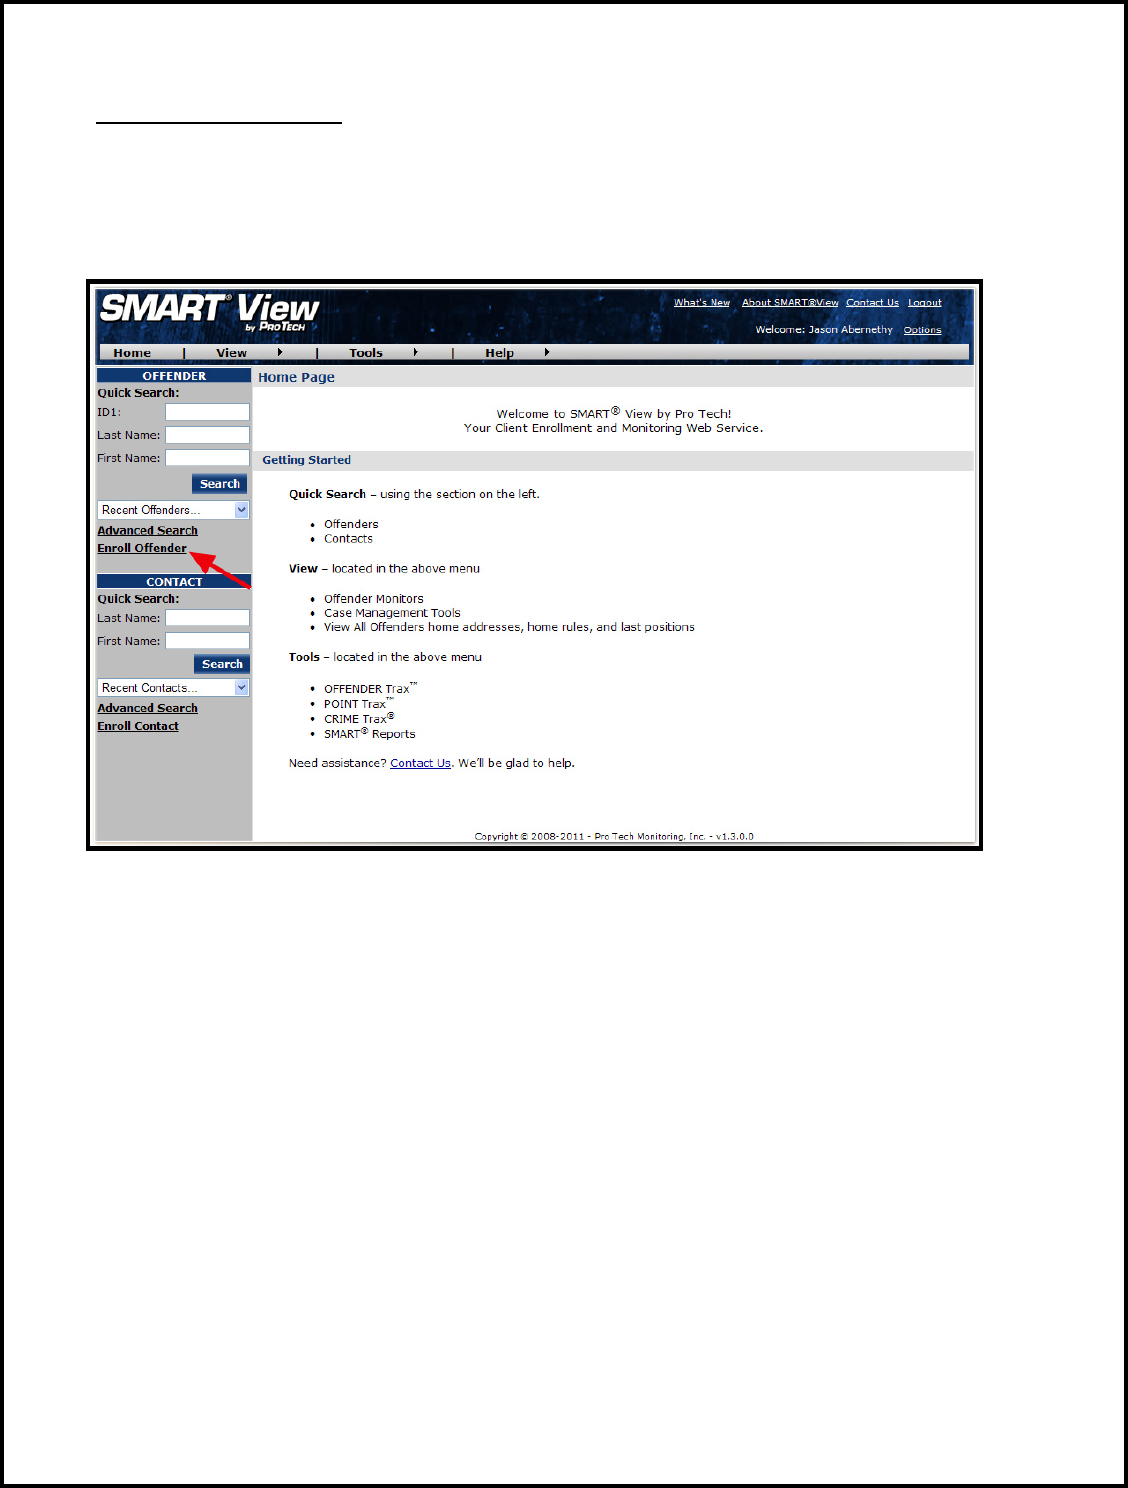
Enroll an Offender
The Enroll Offender link is located on the left side of the Home page (see below).
1. Click the Enroll Offender link.
Pro Tech Monitoring Inc. Issue Date: 4/14/2011 Please check online for the most up to date version.
14
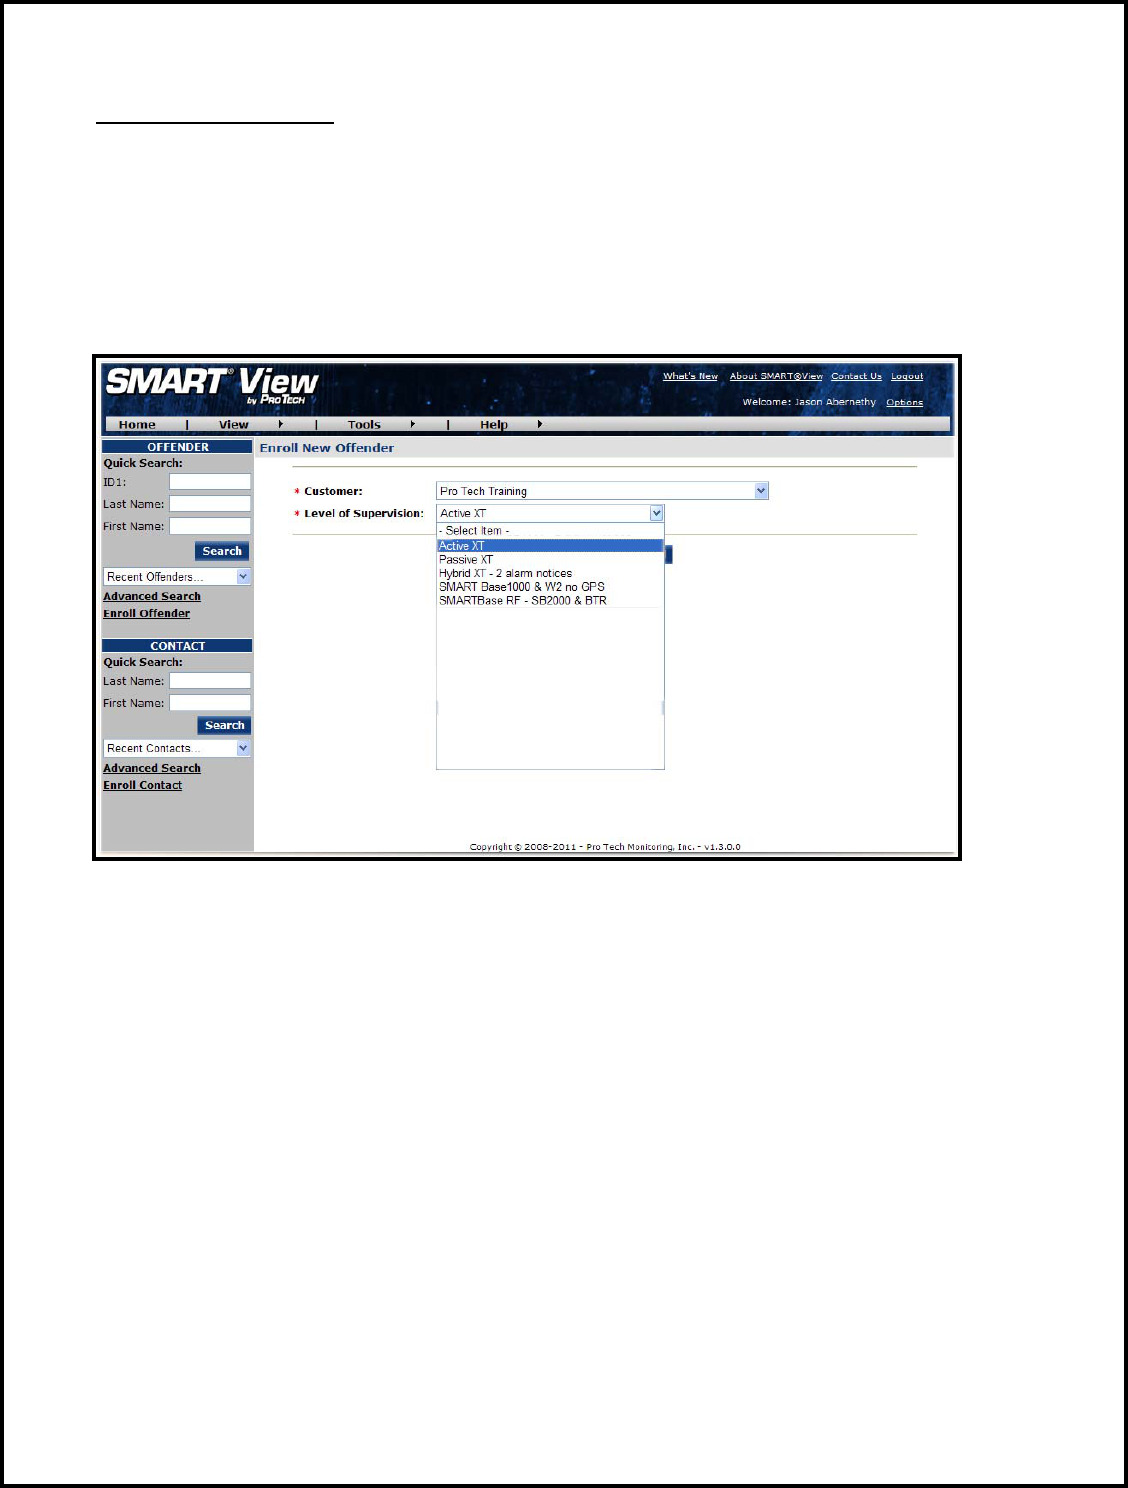
Supervision Level
Clicking on the Enroll Offender link will redirect you to the Level of Supervision page (see
below).
1. Click on the Level of Supervision drop down menu.
2. Select your Level of Supervision (see below).
3. Click the Continue button.
Pro Tech Monitoring Inc. Issue Date: 4/14/2011 Please check online for the most up to date version.
15
Offender Enrollment
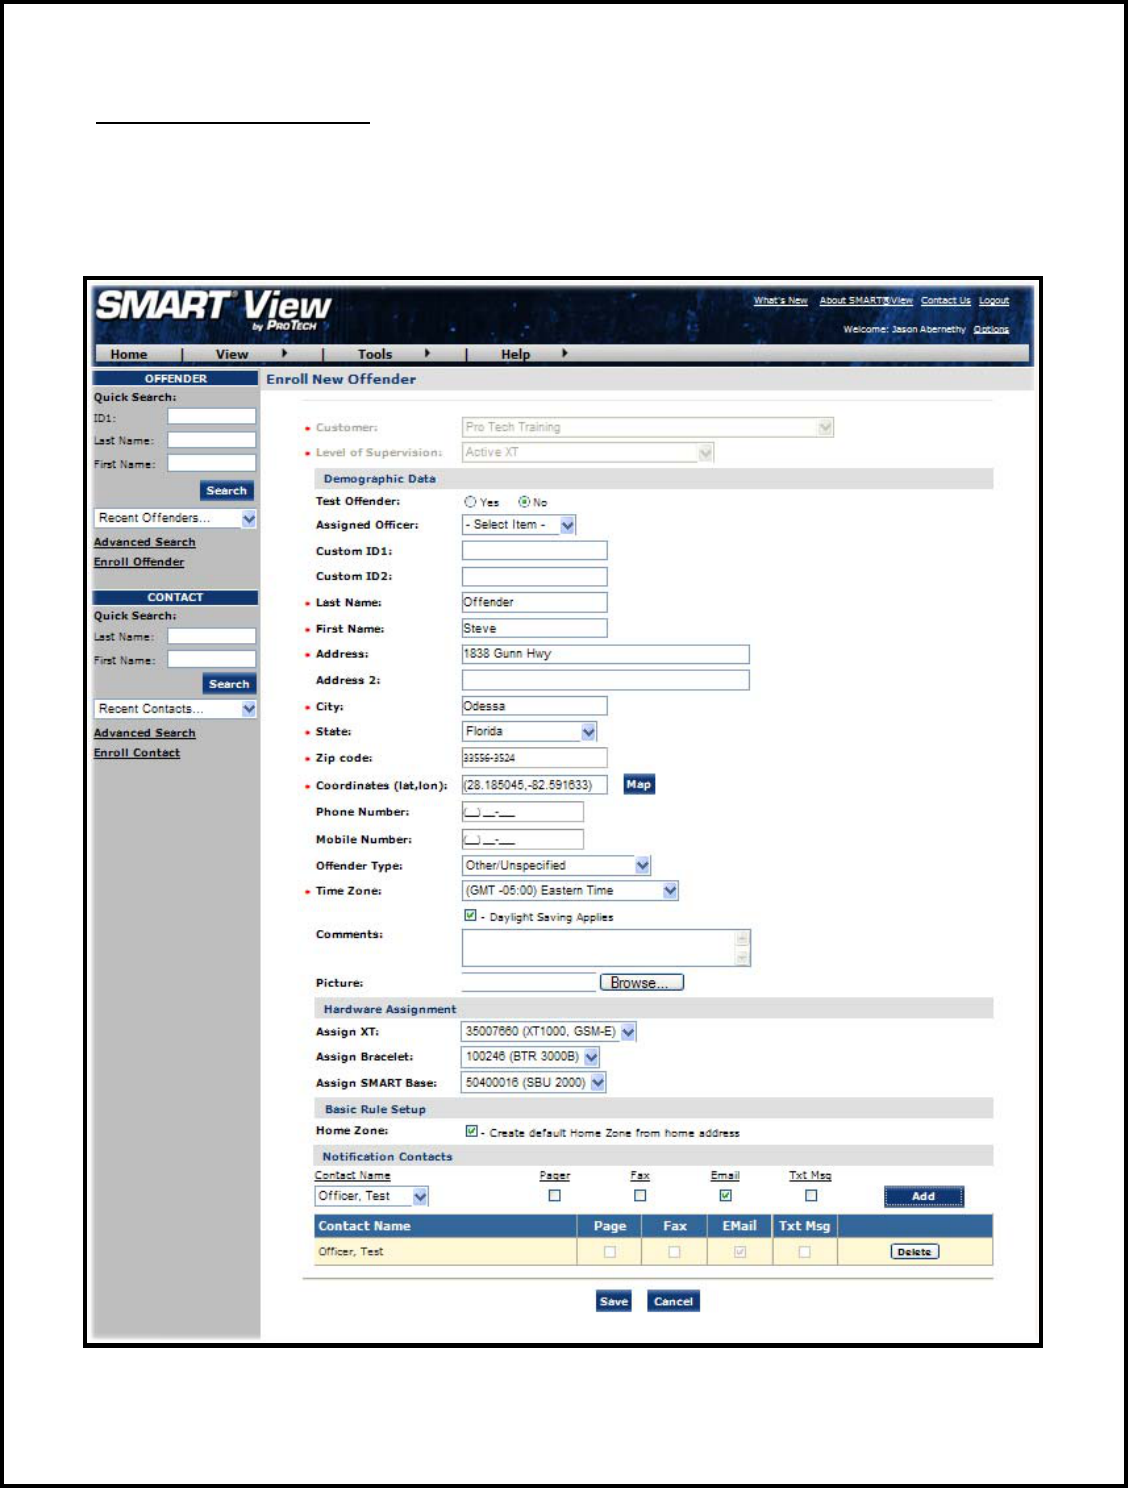
After selecting the Level of Supervision, you will be redirected to the Enroll Offender page
(see below). It is here that you will select an Assigned Officer, enter the Offender’s
Information, select the Notification Contact and Method, Assign Hardware, and select the
Basic Rule Setup.

Pro Tech Monitoring Inc. Issue Date: 4/14/2011 Please check online for the most up to date version.
16
Offender Enrollment, Cont.
Demographic Data
1. Enter the Offender's Information.
• All fields with red asterisks (*) are required fields
2. Click the Map button to geo-code the offender’s address. This is required if
you are creating a Home Inclusion Zone for the offender (see page 16 for
more information).
3. Enter the offender’s home number, if available.
4. Select the Offender Type.
5. Select the Time Zone.
Hardware Assignment
6. Locate the serial number on the device(s).
7. Click on the drop down menu and select that serial number for the device.
Basic Rule Setup
8. Click the box next to Create Default Home Zone from Home Address. For
information on how to edit the schedule for the Home Rule, refer to page 18.
9. Choose the appropriate Contact from the Notification Contact drop down list.
The selected Contact will be notified for all rules.
10. Click the Add button.
11. Select the type of Notification (if you haven’t chosen your Default Notification
Method on your Contact record)
• Pager
• Fax
• E-mail
• Text Message
Finish Enrollment
12. When you have completed entering the information, click Save.
Pro Tech Monitoring Inc. Issue Date: 4/14/2011 Please check online for the most up to date version.
17
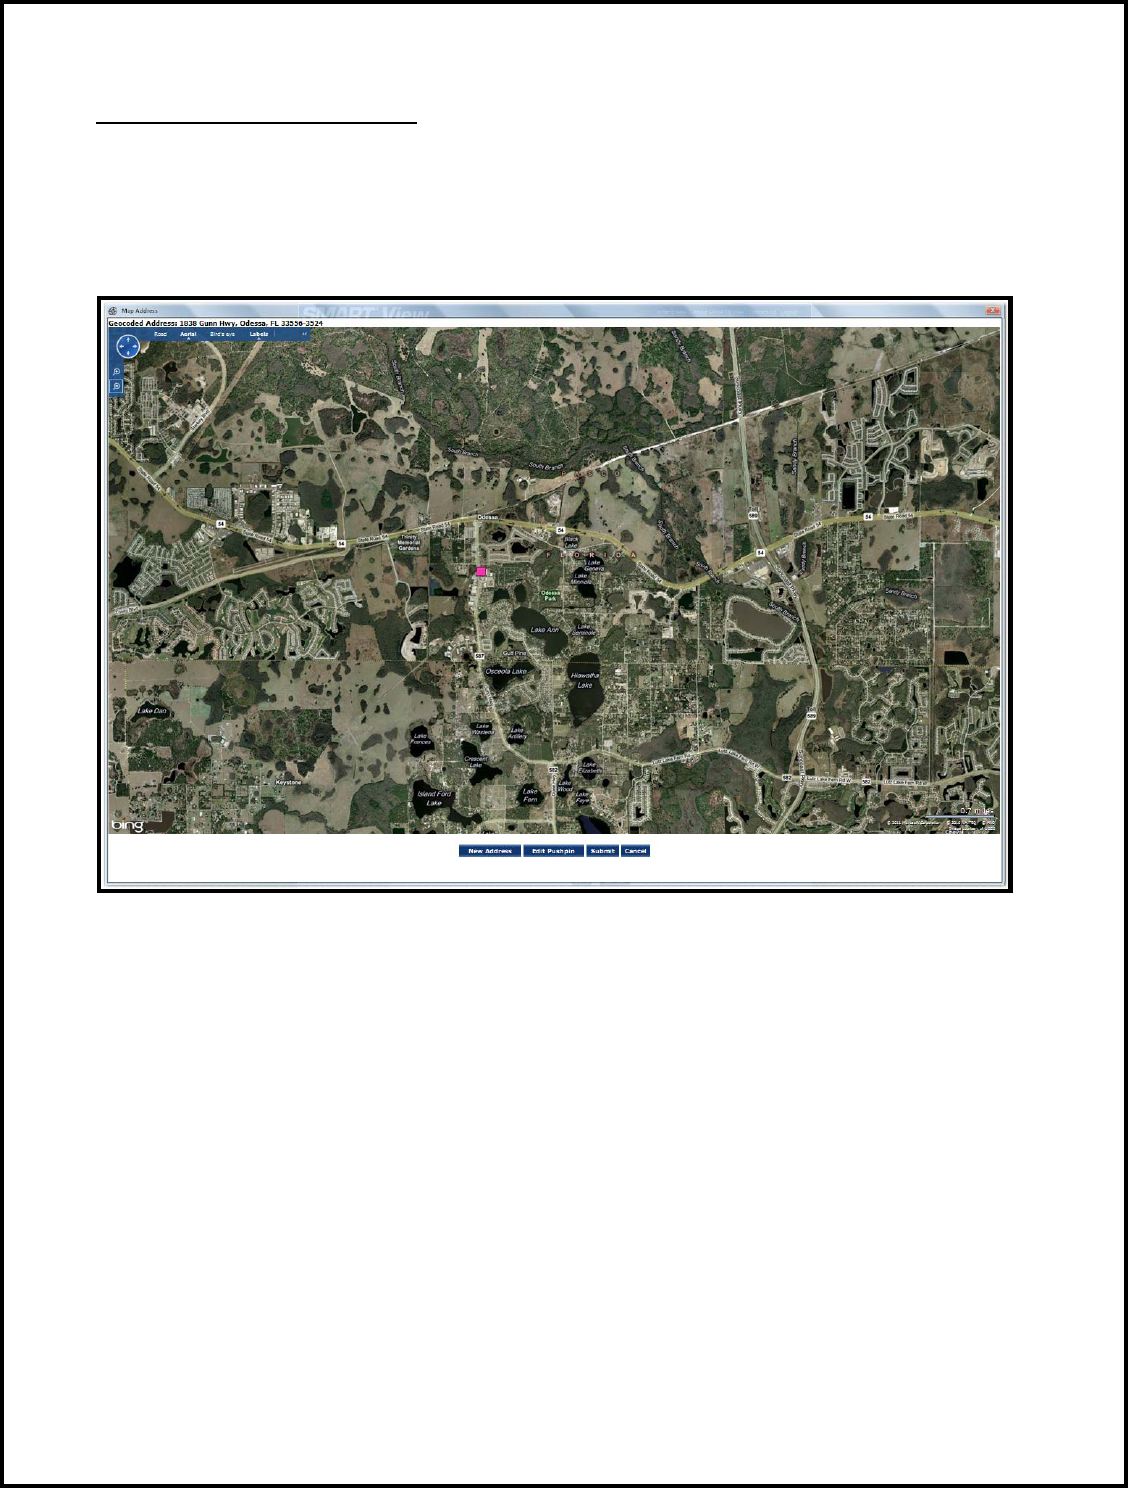
Map Offender’s Address
Clicking the Map button on the Offender Enrollment screen will generate a map that
displays a pushpin at the offender’s residence. Ensure that the pushpin location is correct
and click the Submit button. It is also possible to edit the location by clicking the Edit
Pushpin button.
Pro Tech Monitoring Inc. Issue Date: 4/14/2011 Please check online for the most up to date version.
18
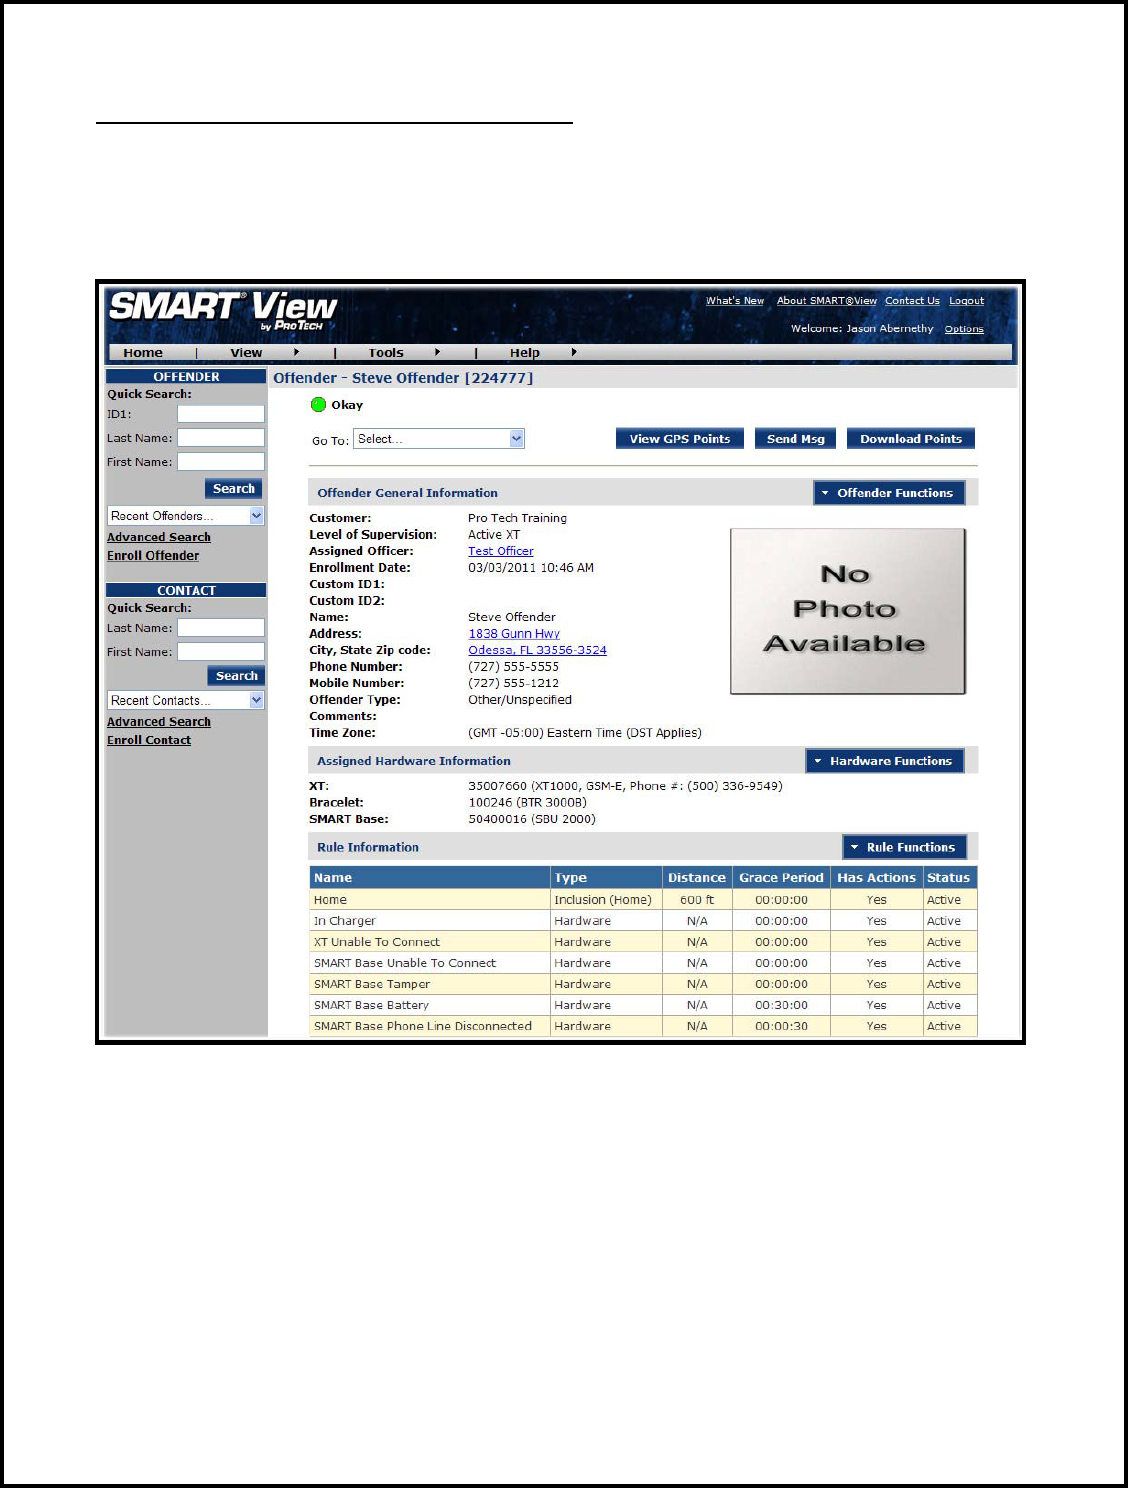
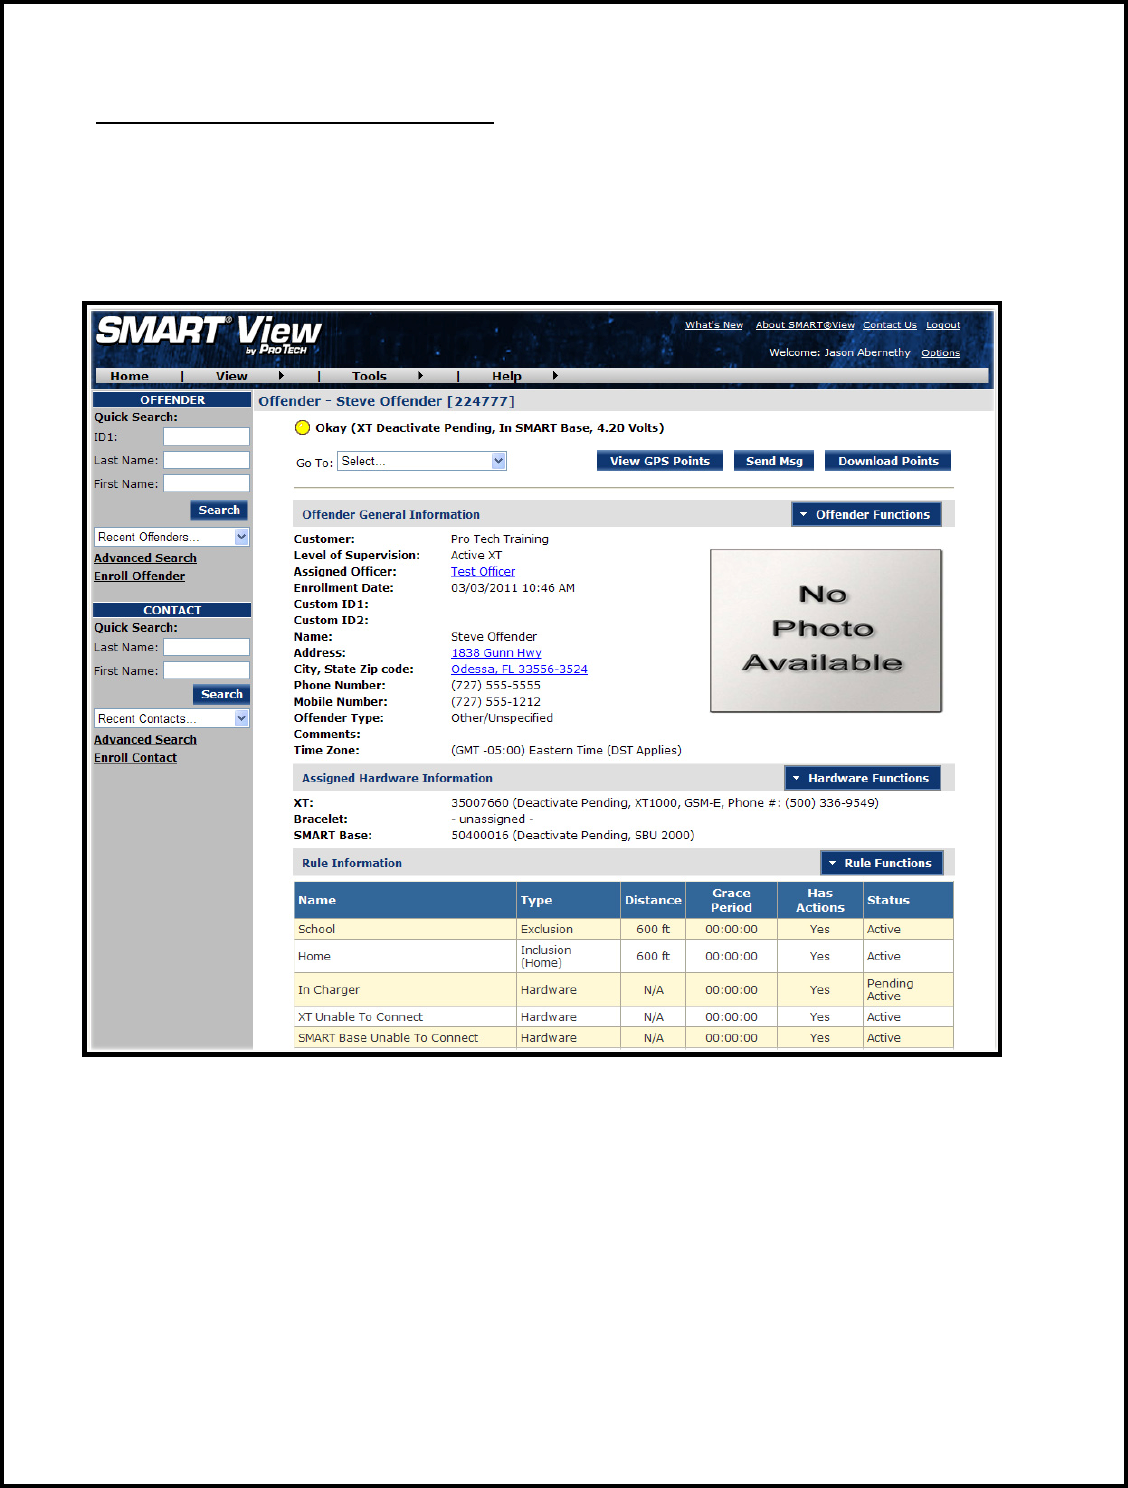
Offender General Information Page
When Enrollment has been completed, you will be redirected to the Offender General
Information page (see below). Here, you can Edit Offender Information, Disable the
Offender, View GPS Points, Deactivate Hardware, Edit Rules, Send Alerts, and Download
Points.
Pro Tech Monitoring Inc. Issue Date: 4/14/2011 Please check online for the most up to date version.
19
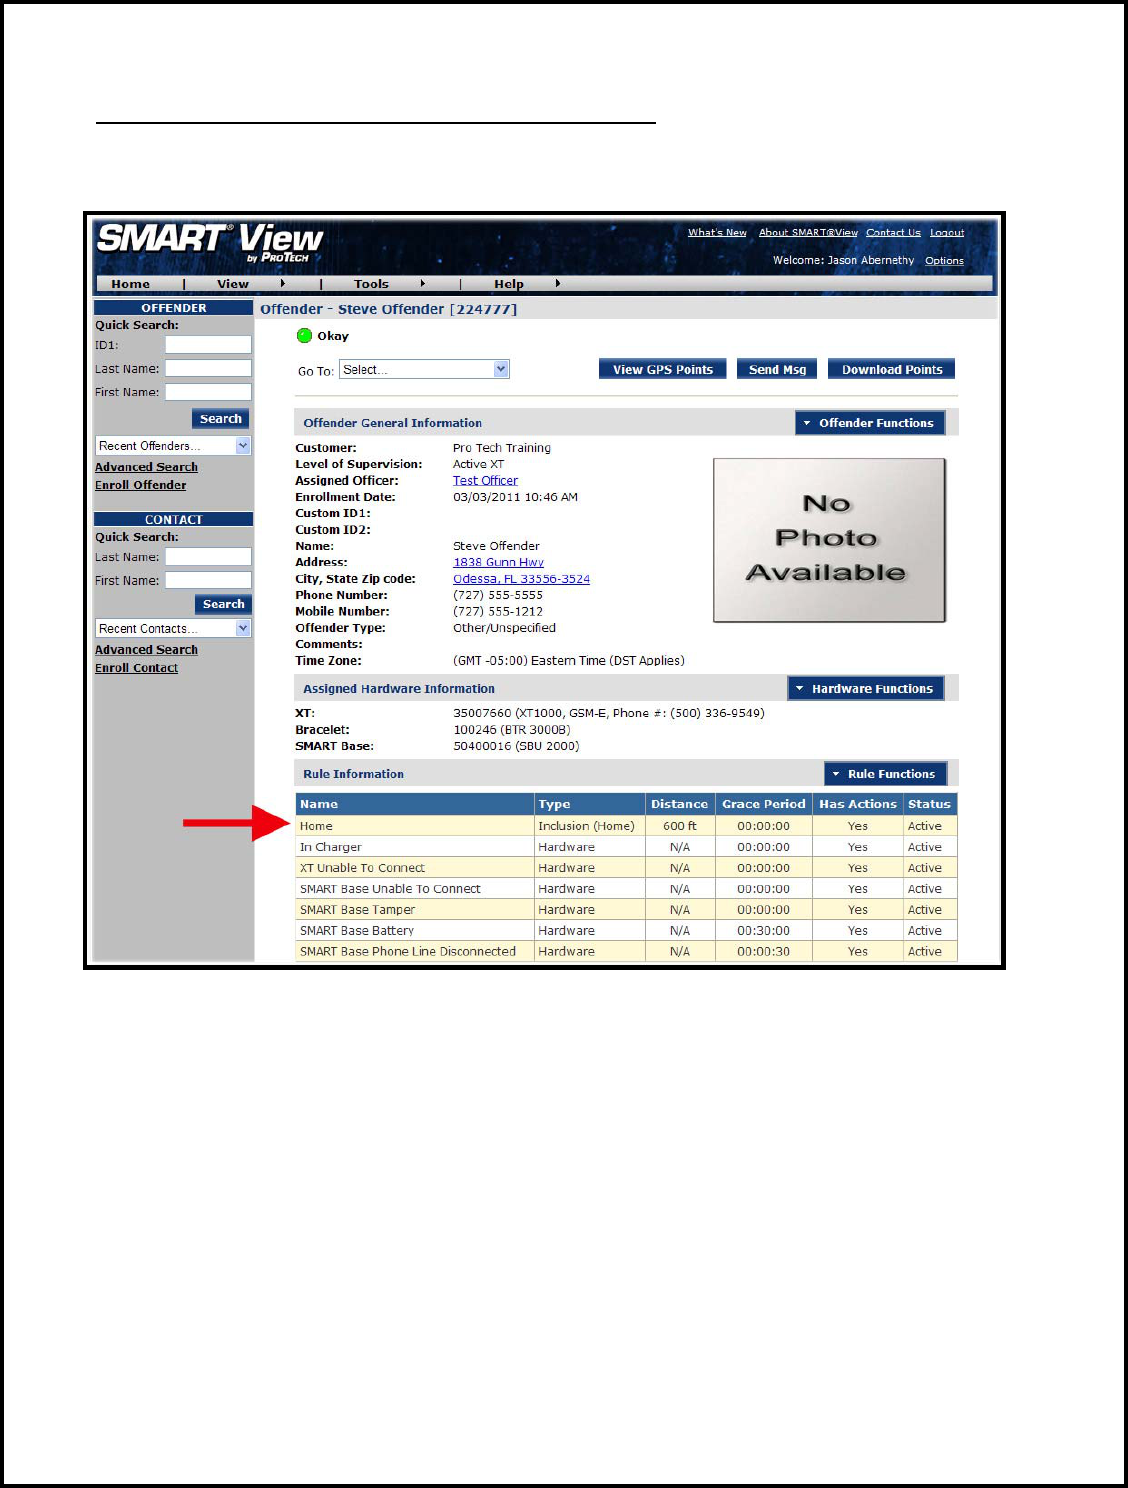
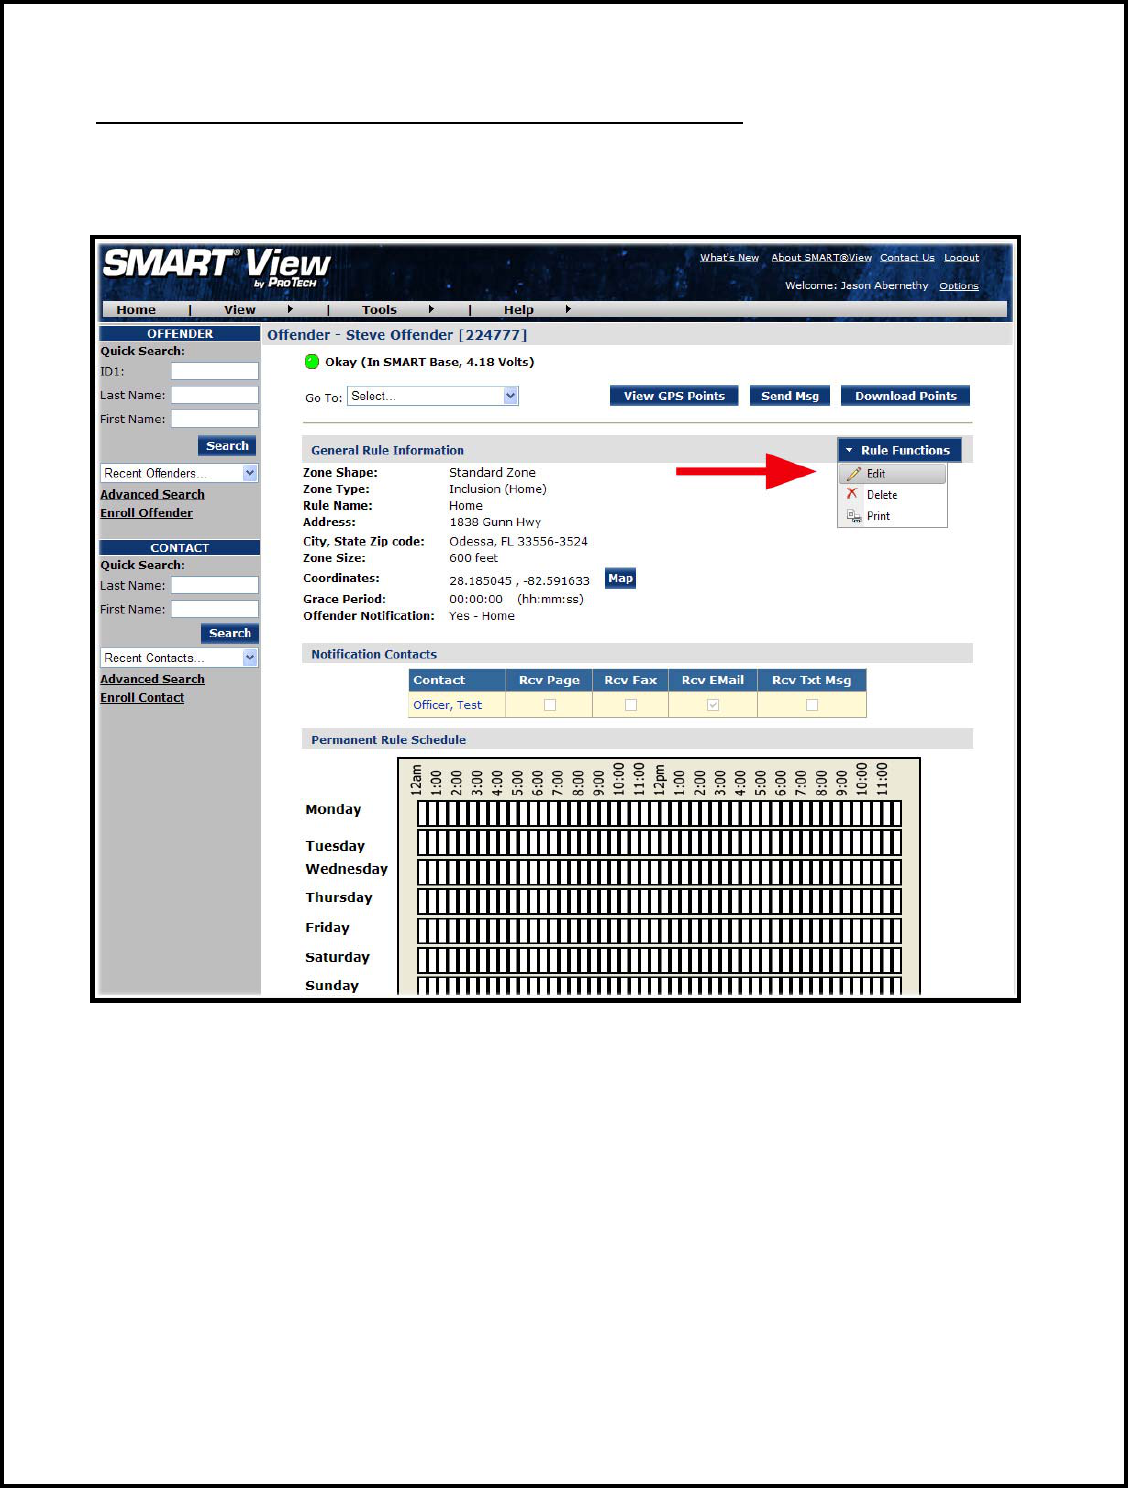
Create Schedule for Home Inclusion Zone
1. Click on the Home Rule (see below).
Pro Tech Monitoring Inc. Issue Date: 4/14/2011 Please check online for the most up to date version.
20
Create Schedule for Home Inclusion Zone, Cont.
2. Move your mouse cursor over the Rule Functions dropdown menu and left click Edit.
Pro Tech Monitoring Inc. Issue Date: 4/14/2011 Please check online for the most up to date version.
21
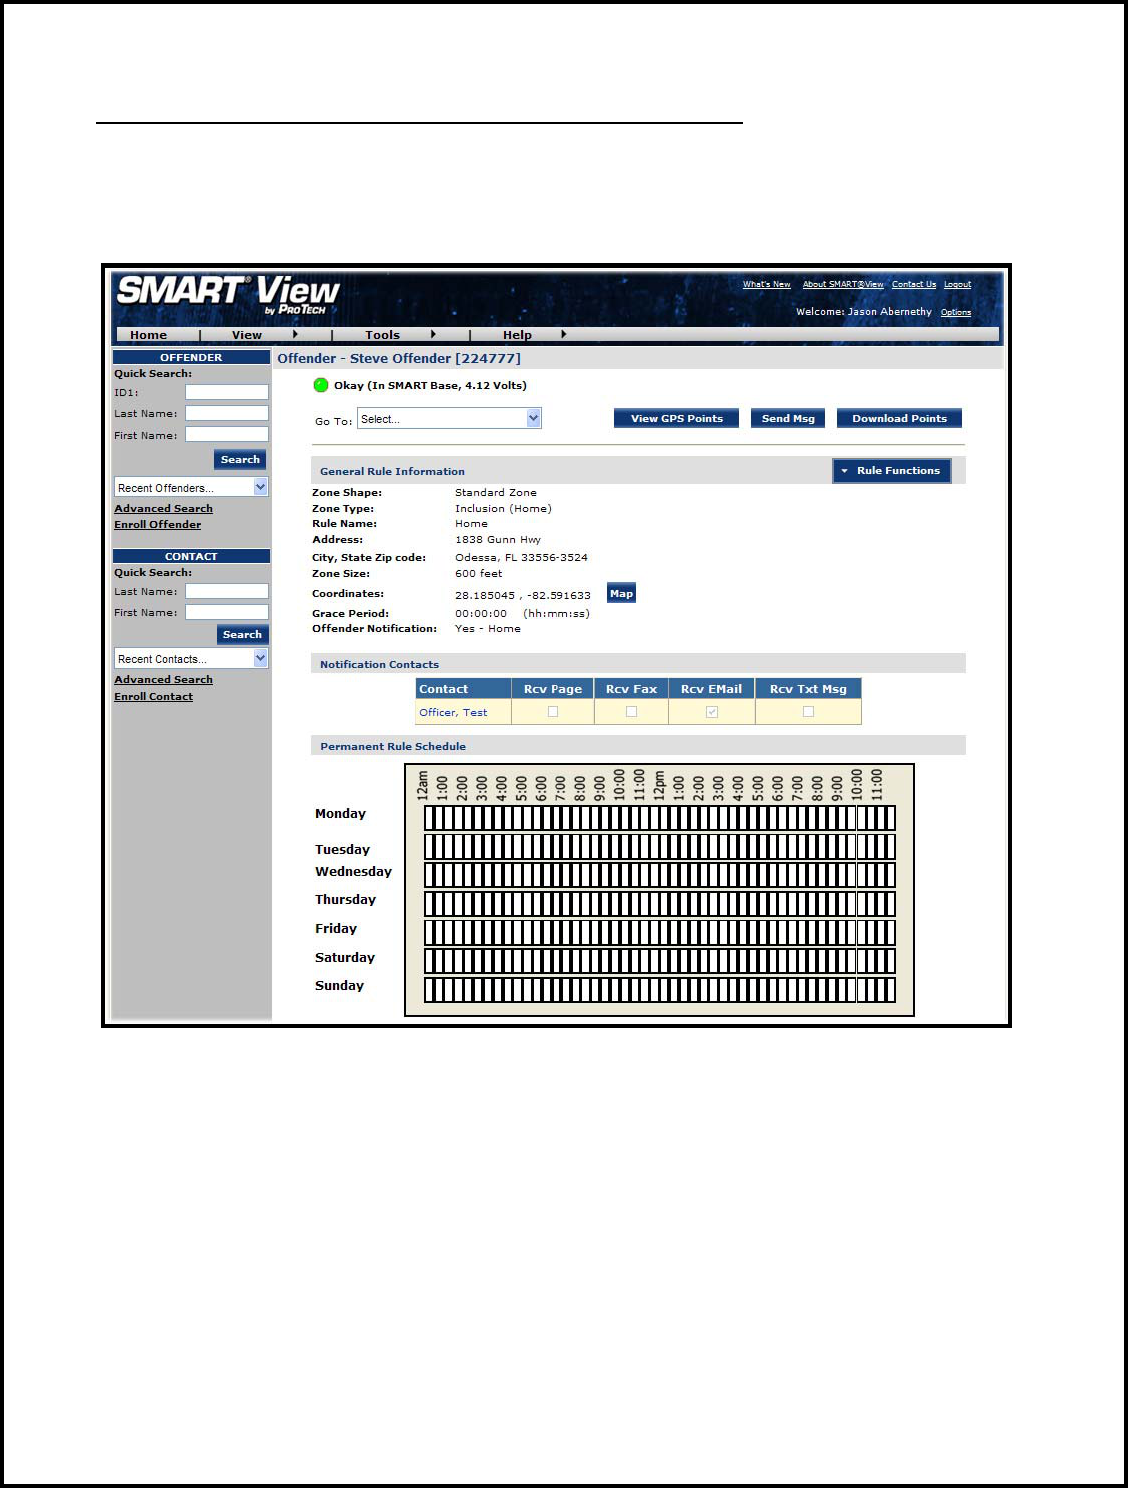
Create Schedule for Home Inclusion Zone, Cont.
3. You will be redirected to the Edit Rule page. Scroll down to the Permanent Rule
Schedule.
Pro Tech Monitoring Inc. Issue Date: 4/14/2011 Please check online for the most up to date version.
22
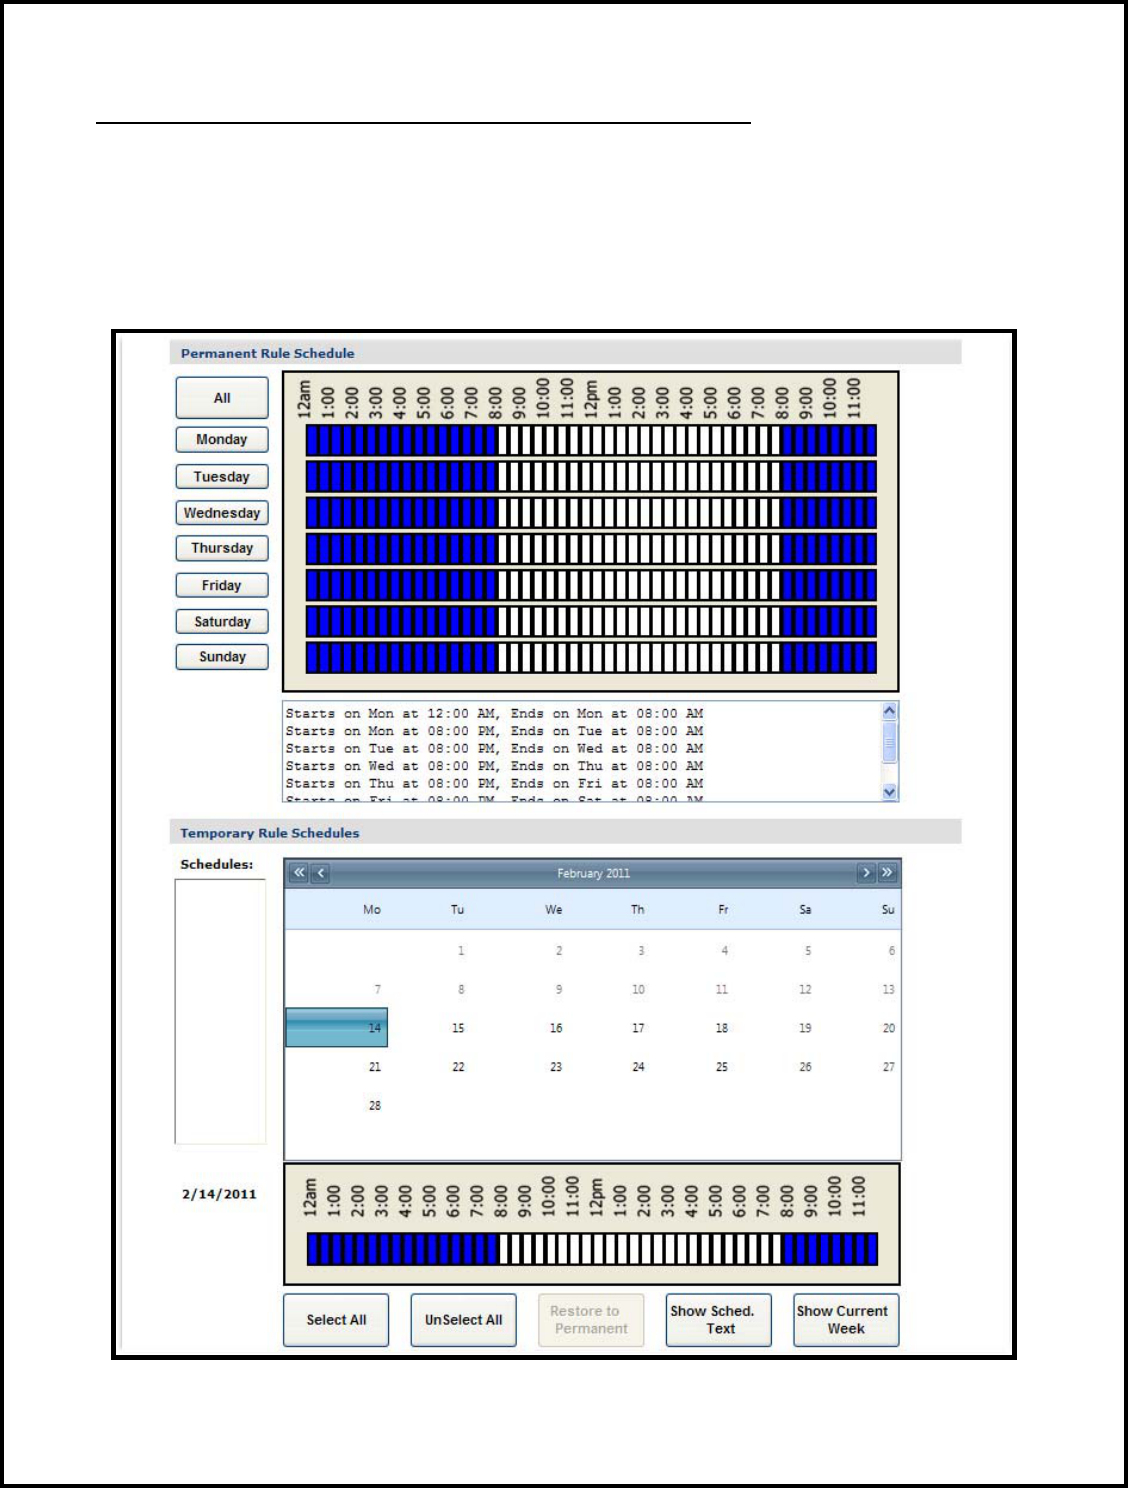
Create Schedule for Home Inclusion Zone, Cont.
4. Each block represents a 30 minute increment of time. Left-click and drag the cursor
along the blocks during the times that the offender is required to be home. As you move the
cursor, the blocks will turn blue. The white blocks that remain equal the times that the
offender is allowed to be out of the home (see below).
5. Click the Save button.
Pro Tech Monitoring Inc. Issue Date: 4/14/2011 Please check online for the most up to date version.
23
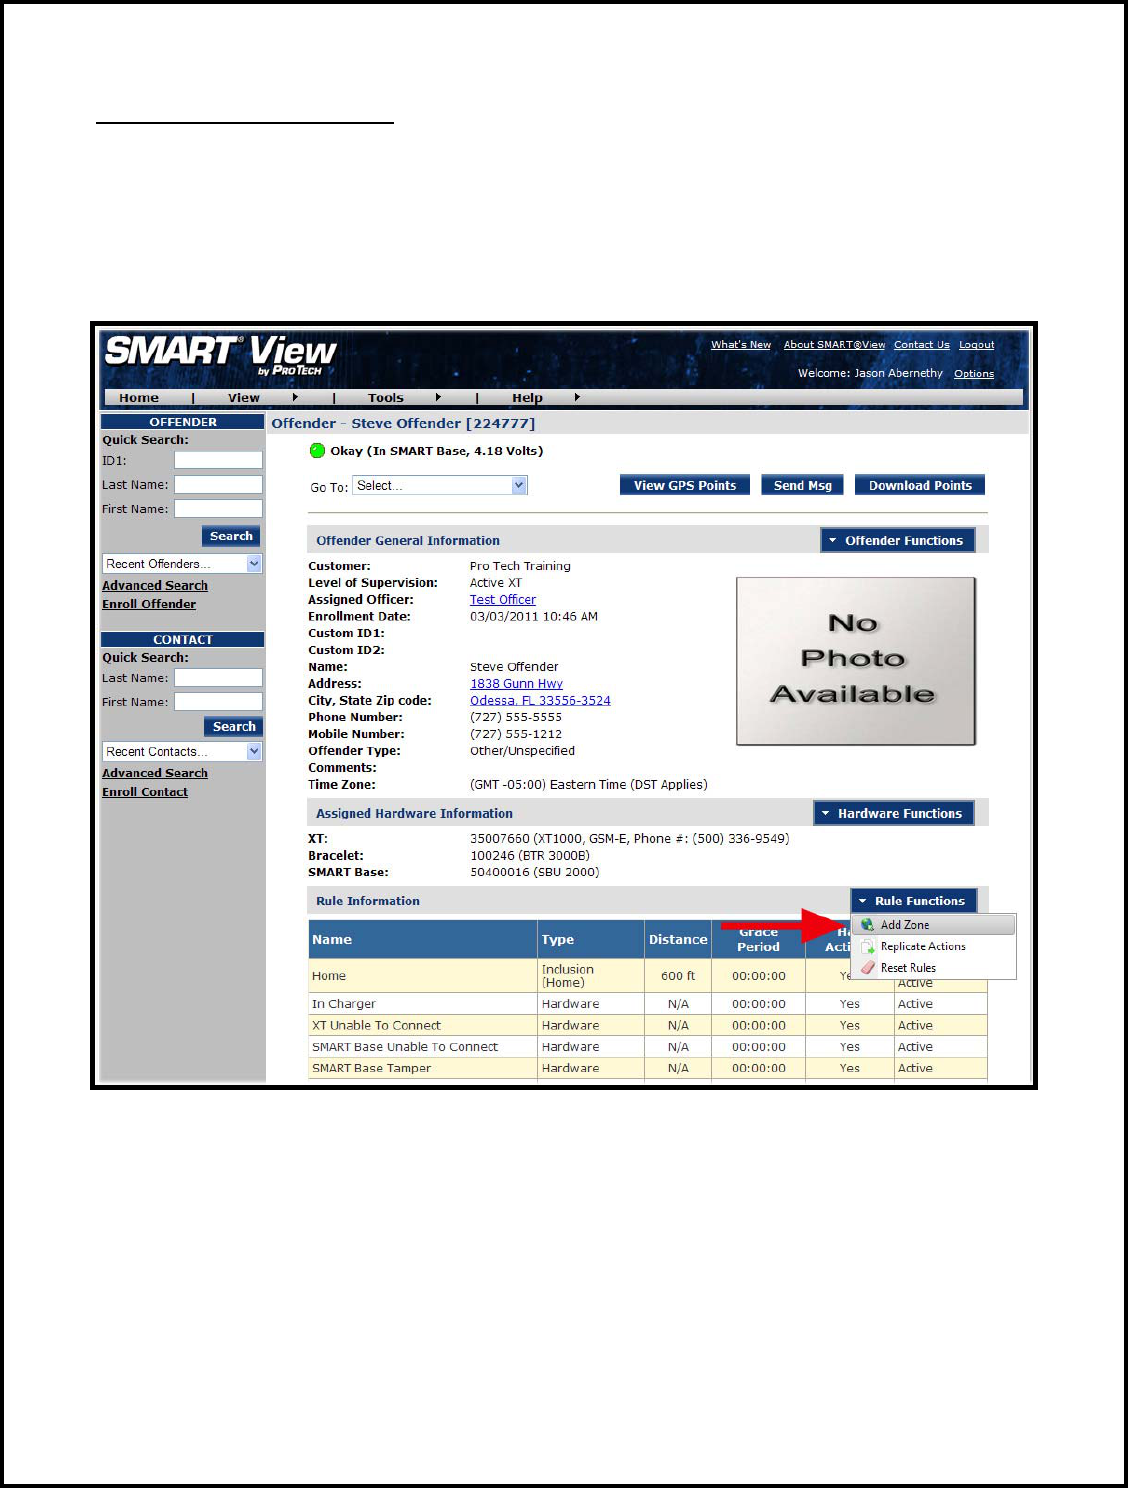
Create Exclusion Zone
You can create an Exclusion Rule to ensure that the offender is not entering areas which are
forbidden – such as schools, playgrounds, and victims’ residences.
1. Move your cursor over the Rule Functions menu (see below).
2. Left click Add Zone.

Pro Tech Monitoring Inc. Issue Date: 4/14/2011 Please check online for the most up to date version.
24
Create Exclusion Zone, Cont.
3. Choose a Zone Shape.
4. Choose Exclusion as the Zone Type.
5. Click the Continue button.
Pro Tech Monitoring Inc. Issue Date: 4/14/2011 Please check online for the most up to date version.
25
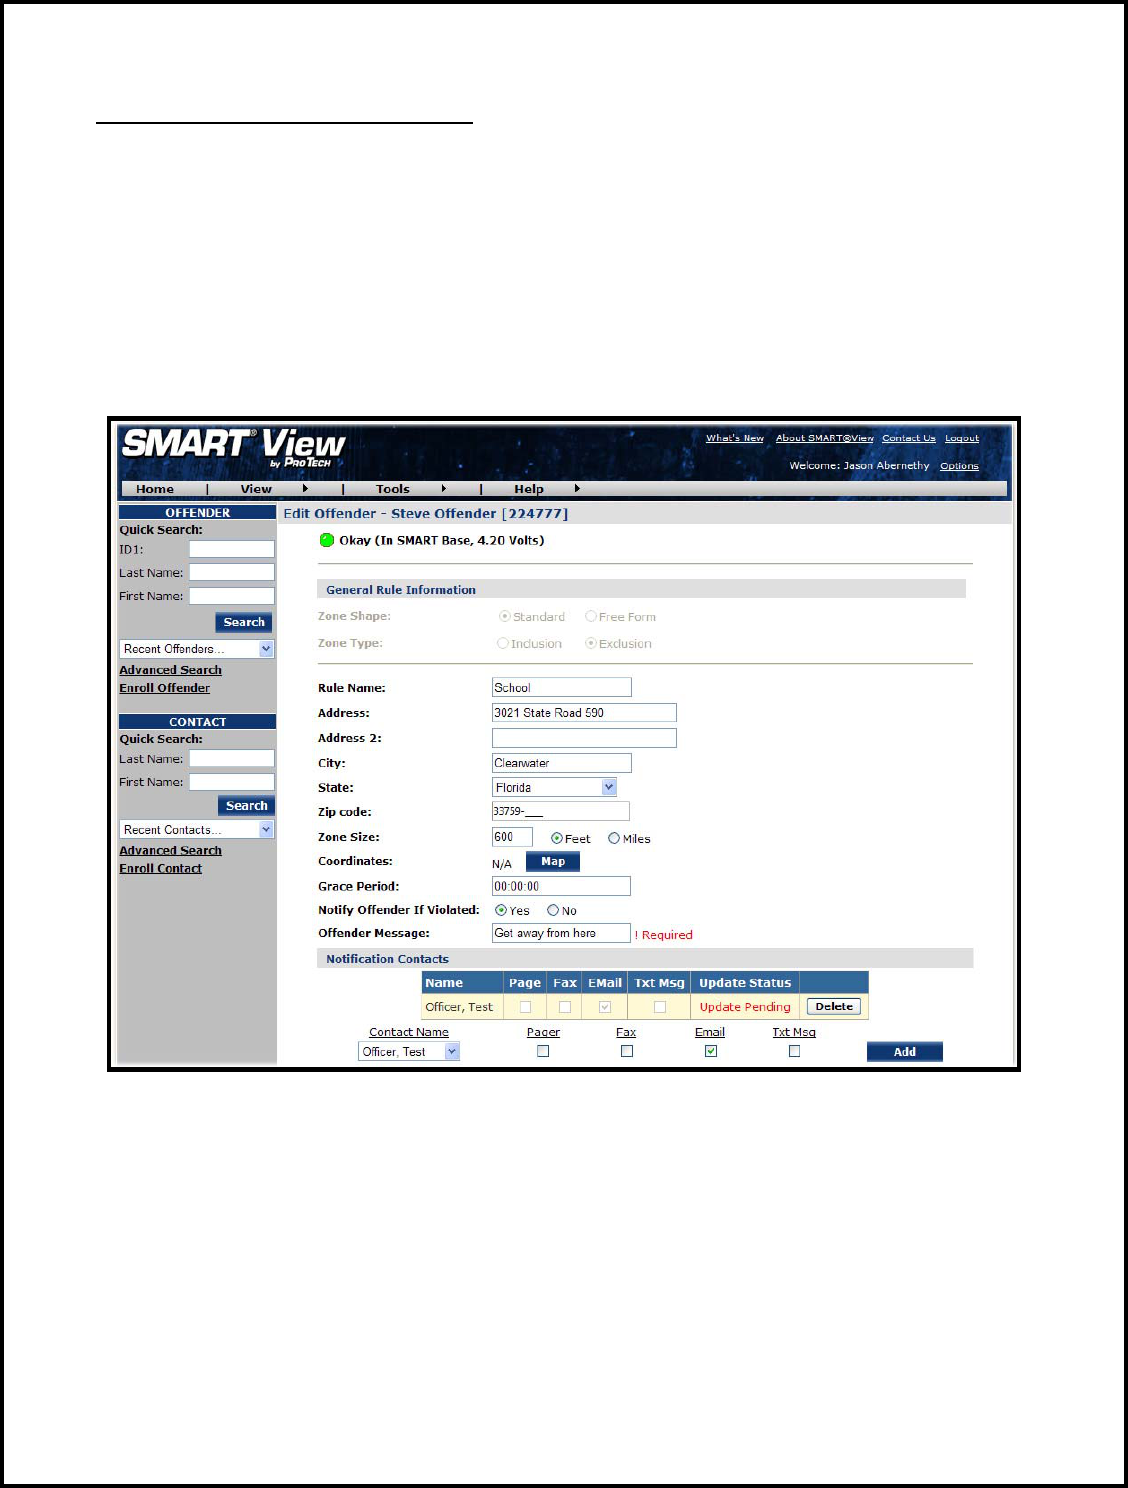
Create Exclusion Zone Cont.
6. Enter the Rule Name (school, playground, etc.).
7. Enter the address information and the zone size. The default is 600 ft.
8. Select Yes or No if you want to notify the offender upon violation.
9. If you selected Yes to notify the offender upon violation, type the message you want
displayed on the XT screen in the Offender Message field.
10. Choose the appropriate Contact from the Notification Contact drop down list. The
contact’s default notification method will appear selected.
11. Click the Add button.
12. Click the Map button.
Pro Tech Monitoring Inc. Issue Date: 4/14/2011 Please check online for the most up to date version.
26
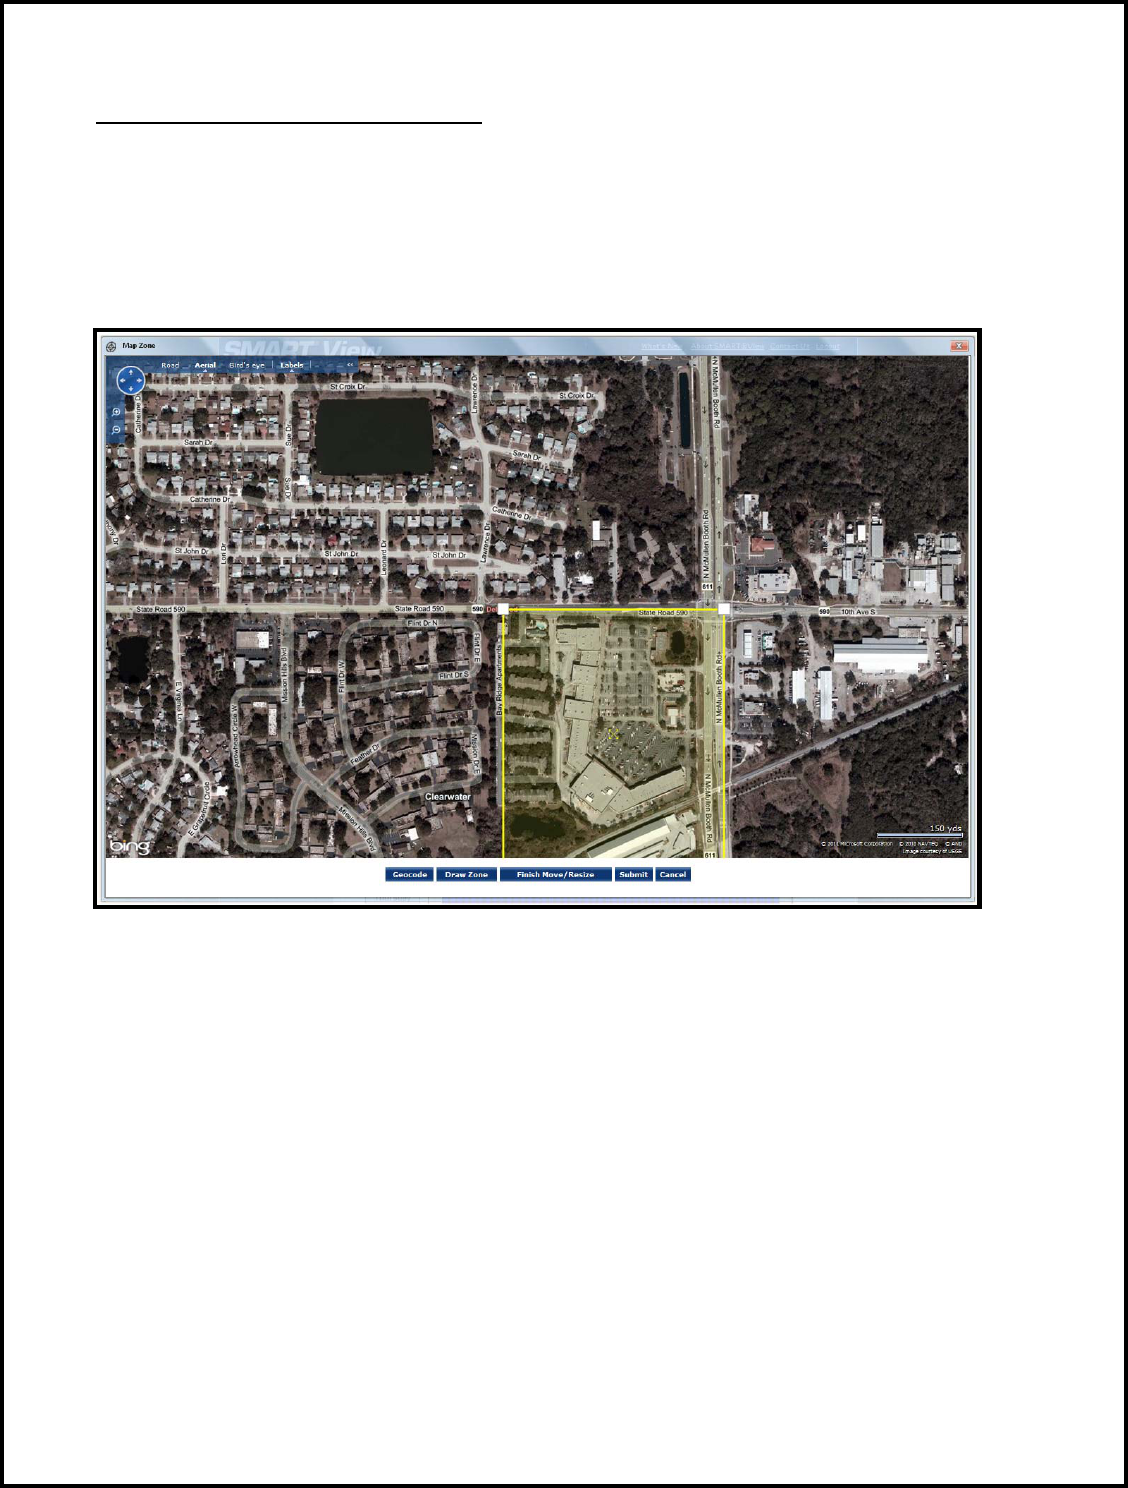
Create Exclusion Zone, Cont.
13. Ensure that the address and zone size is correct.
14. If you want to resize or move the zone, click the Move/Resize button.
15. If you move or resize the zone, click the Finish Move/Resize button.
16. Click the Submit button.
Pro Tech Monitoring Inc. Issue Date: 4/14/2011 Please check online for the most up to date version.
27
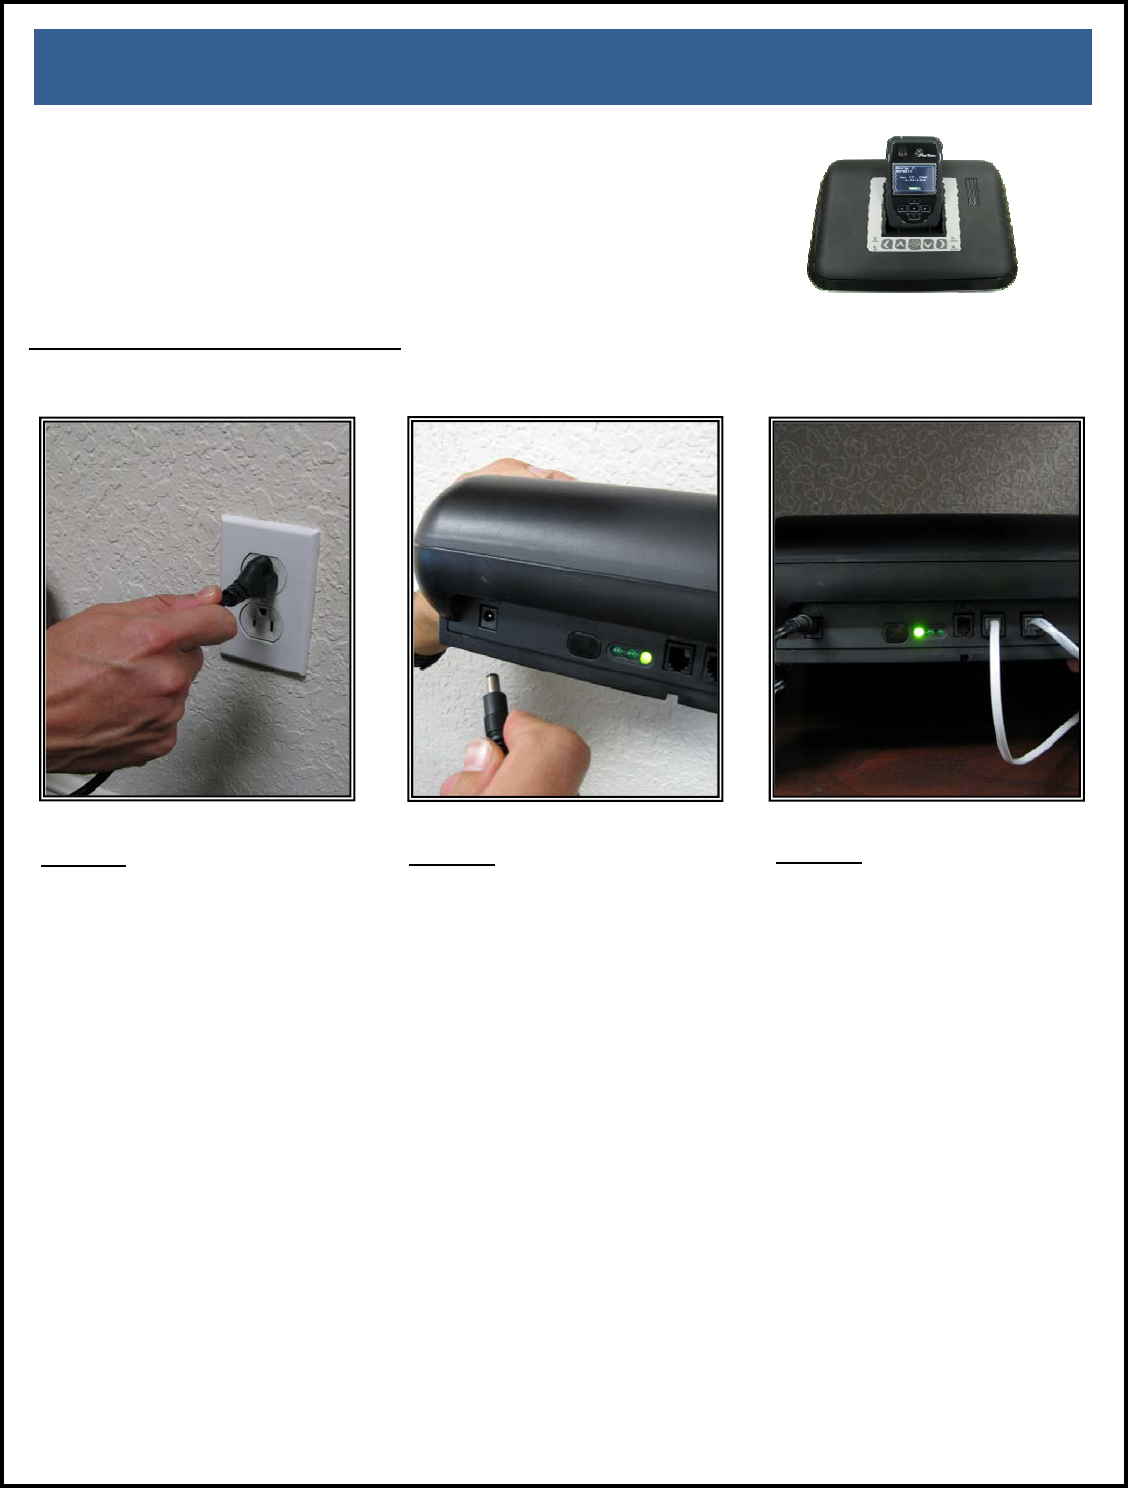
STEP 1:
Plug A/C adapter into a wall
outlet.
ActivatingtheSMART®XTwithSMART®Base
ConnectingtheSMART®Base
STEP 2:
Plug A/C adapter into the back
of the SMART® Base where
12VDC is located. The green
power light will light up on the
front of the unit.
STEP 3:
If offender has a phone line:
A: Remove phone line from
telephone and plug into the
back of the SMART® Base
marked PHONE.
B: Take extra phone cord and
plug one end back into the
telephone and the other end
into the SMART® Base marked
LINE.
Pro Tech Monitoring Inc. Issue Date: 4/14/2011 Please check online for the most up to date version.
28
ConnectingtheSMART®Base,cont.
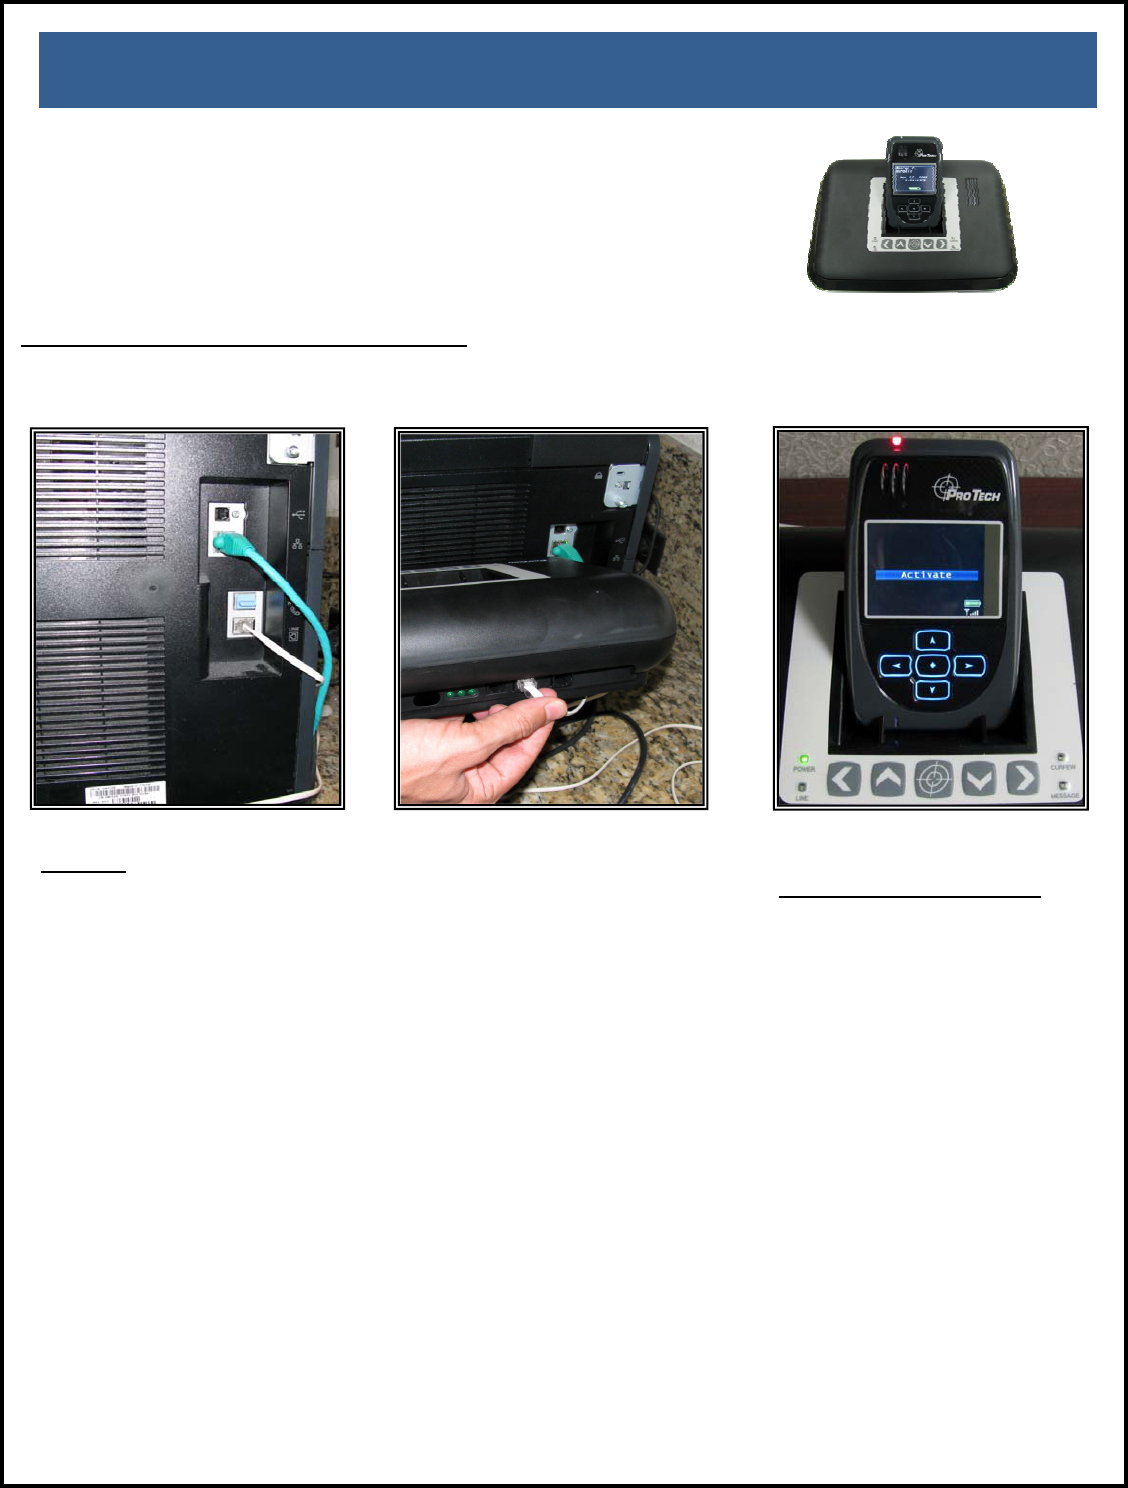
STEP 4:
If activating at office:
A: Remove phone line from
facsimile machine.
B: Plug facsimile phone line into
the SMART® Base.
SMART® Base -
Violation Status Lights:
Power: The SMART® Base
has lost power.
Line: The phone line has
been disconnected.
Curfew: The XT is not in
the SMART® Base when the
schedule is in effect.
Message: The offender
needs to contact the
officer.
ActivatingtheSMART®XTwithSMART®Base
Pro Tech Monitoring Inc. Issue Date: 4/14/2011 Please check online for the most up to date version.
29
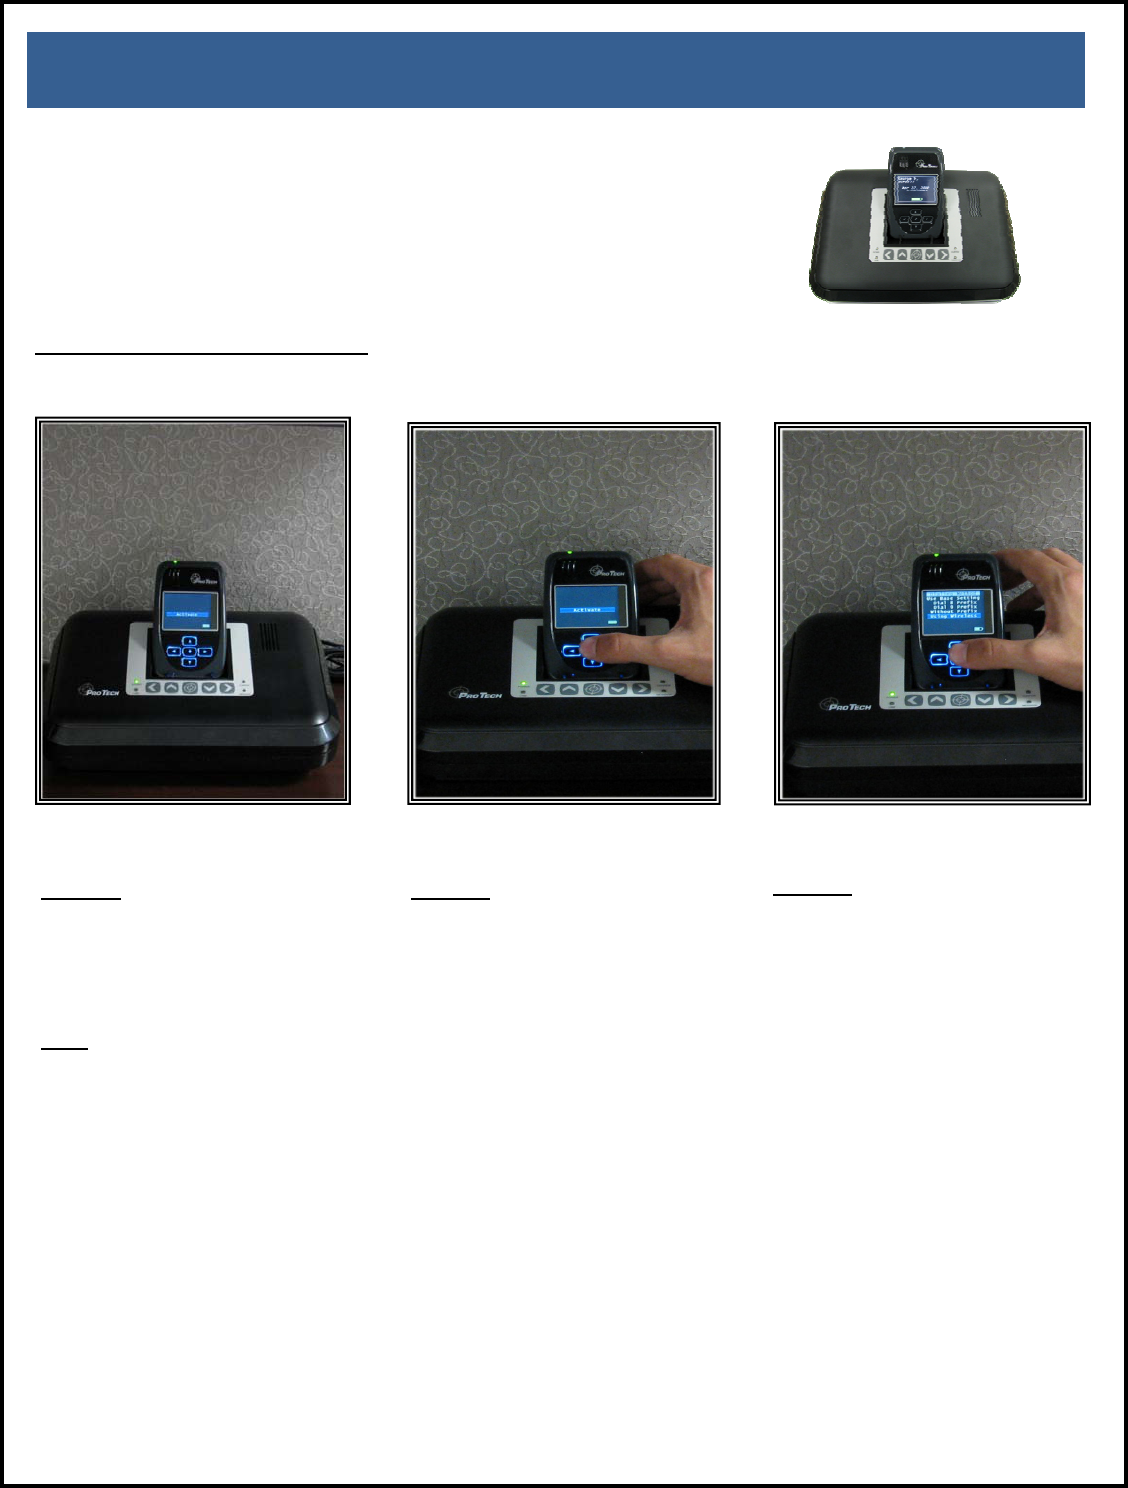
Step 1:
Place the XT into the
SMART® Base. Ensure the
SMART® Base is connected
to the A/C power cord.
Note: Ensure the hardware
has been assigned and
saved to the offender’s
profile.
Step 2:
Press the Activate button
(center button).
Step 3:
Press the Scroll button
(bottom button) to select
“Using Wireless” to activate
using the cellular network.
If activating via the
SMART® Base, select which
prefix (if any) the SMART®
Base must dial to complete a
call.
Refer to Connecting the
SMART Base STEP 3 for
additional instructions.
ActivatingtheSMART®XT
Activating the SMART®
XT with
SMART® Base
Pro Tech Monitoring Inc. Issue Date: 4/14/2011 Please check online for the most up to date version.
30
ActivatingtheSMART®XT,cont.
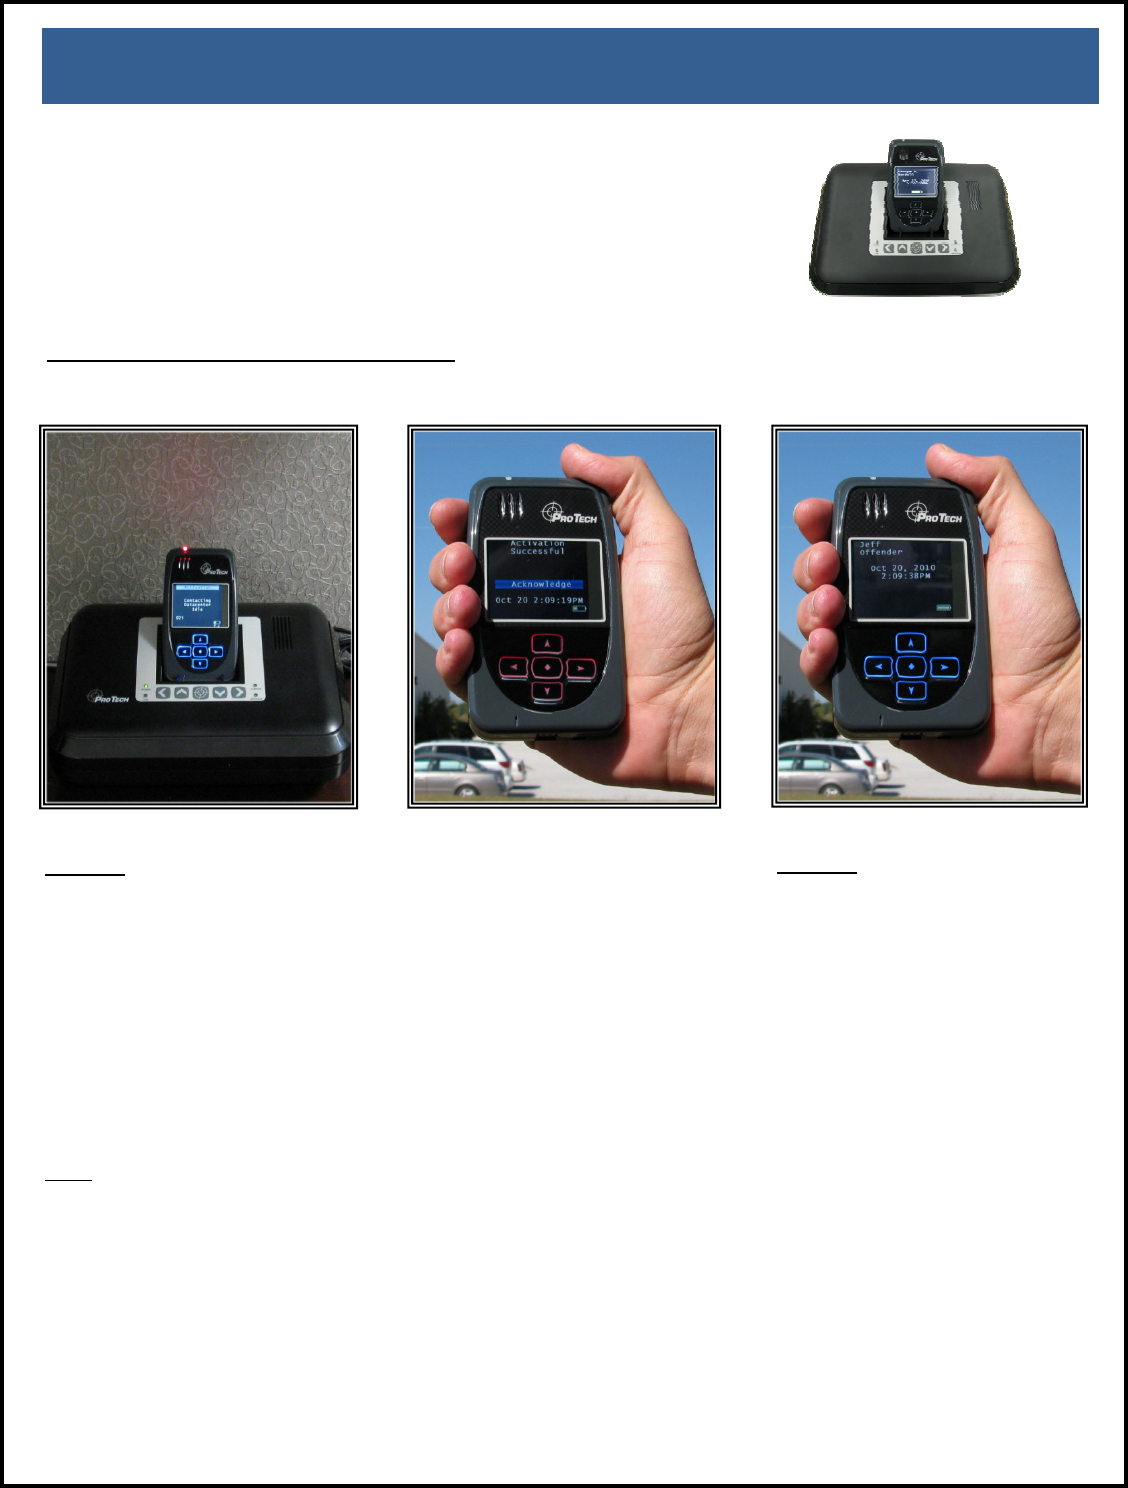
Step 4:
Press the Activation button to begin
dialing. The XT will begin to
contact the Pro Tech Data Center.
“Contacting Data Center” will be
displayed on the screen.
Once contact is complete, the XT
will begin to search for the
bracelet. “Searching for Bracelet
will be displayed on the screen.
Note: Both sides of the strap must
be connected to the bracelet and it,
the bracelet, must be in range of
the XT.
Once the XT recognizes the
bracelet, it will display “Waiting for
GPS.” Remove the XT from the
SMART® Base.
Step 5:
Walk the XT outside, holding
it upright in an area with a clear
view of the sky.
Once GPS has been acquired,
the XT will beep and display the
message “Activation Successful.”
Click on the Activation button
to acknowledge.
After the Activation button has
been clicked, the XT will display
the offender’s name, date and
time.
ActivatingtheSMART®XTwithSMART®Base
Pro Tech Monitoring Inc. Issue Date: 4/14/2011 Please check online for the most up to date version.
31
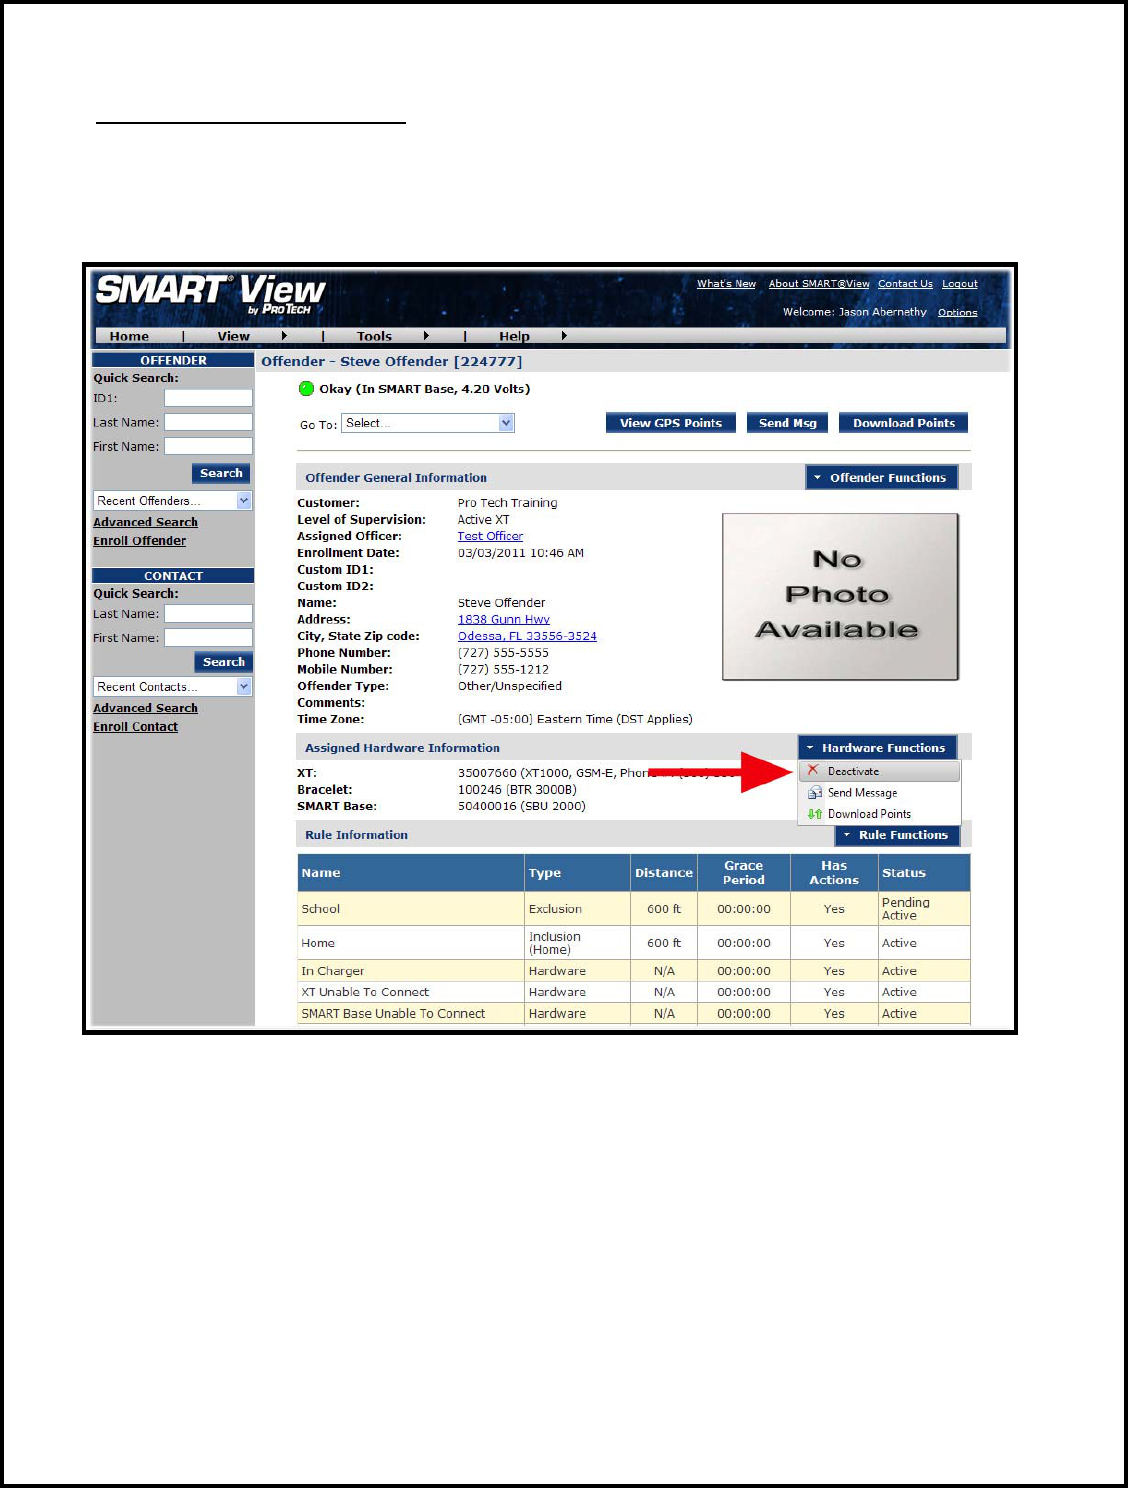
Deactivating Hardware
1. Move your mouse cursor over the Hardware Functions dropdown menu and left click
Deactivate.
Pro Tech Monitoring Inc. Issue Date: 4/14/2011 Please check online for the most up to date version.
32
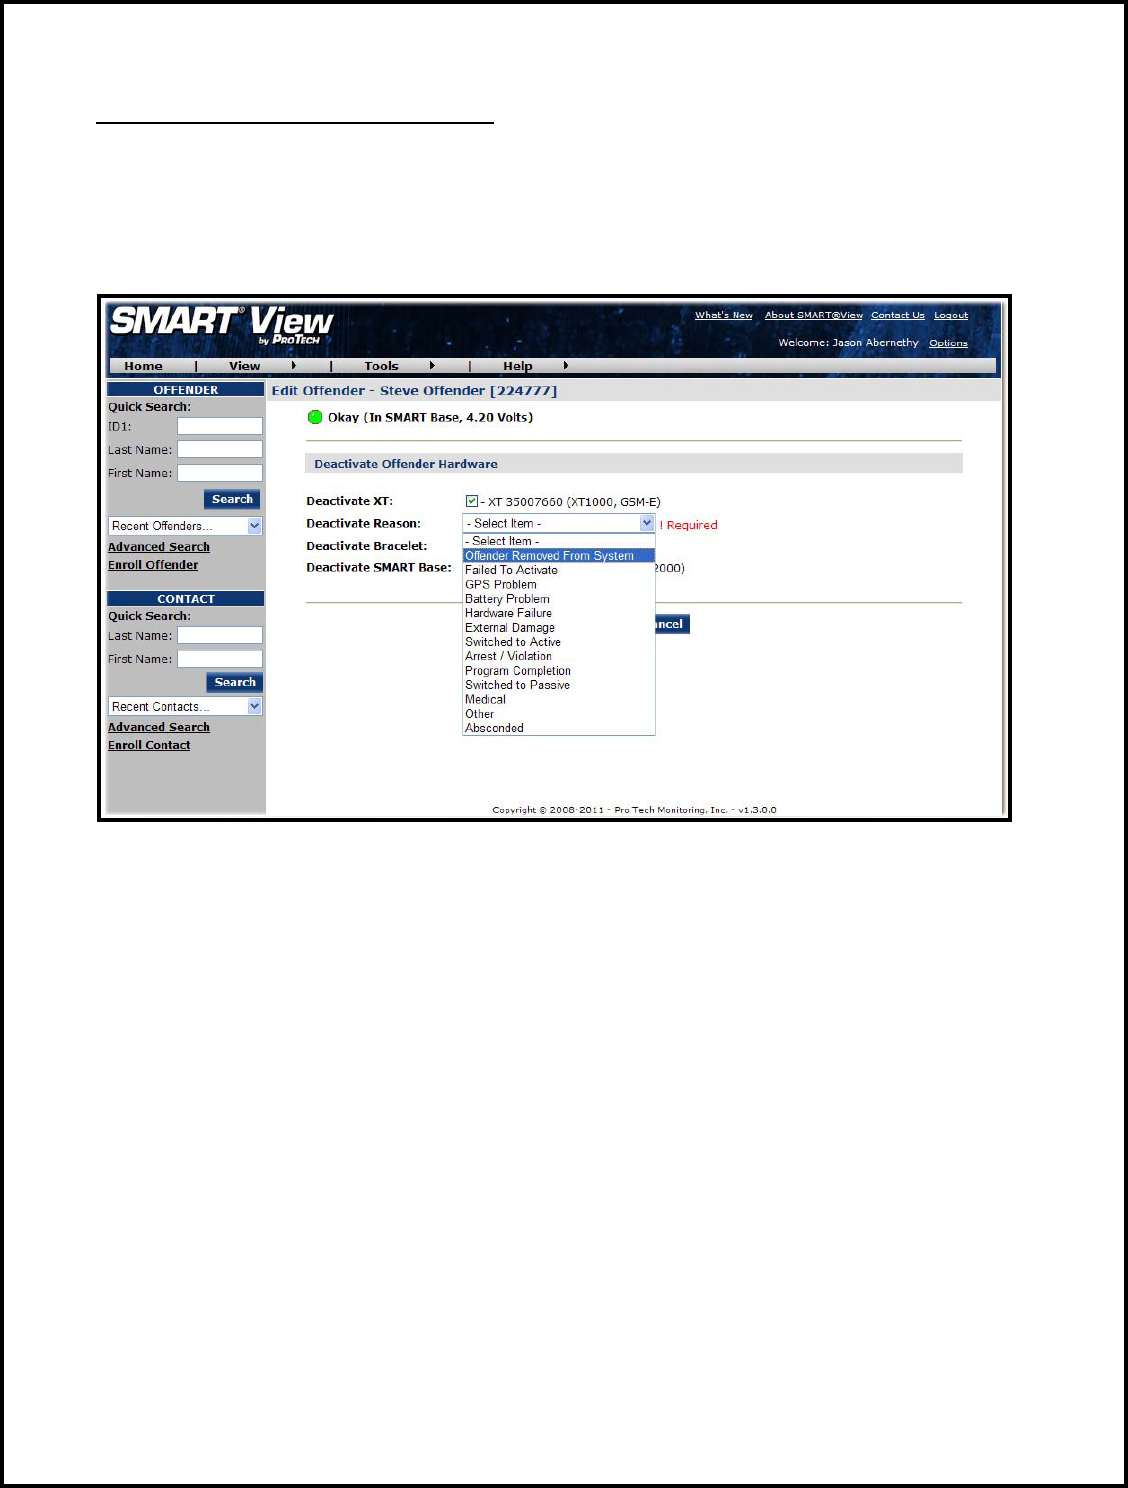
Deactivating Hardware, Cont.
2. Click the checkbox next to the XT, Bracelet, and SMART Base. (see below).
3. Click on the drop-down menu and select a reason for deactivation. This is required.

Pro Tech Monitoring Inc. Issue Date: 4/14/2011 Please check online for the most up to date version.
33
Deactivating Hardware, Cont.
4. Click the Save button. A popup will generate with a warning that the deactivation is
immediate.
5. Click OK.
Pro Tech Monitoring Inc. Issue Date: 4/14/2011 Please check online for the most up to date version.
34
Deactivating Hardware, Cont.
6. You will be returned to the Offender Information page, where the hardware will be
pending deactivation. The device is now required to call Pro Tech and transmit its final
data. The hardware will only be unassigned once this final call has occurred.
Pro Tech Monitoring Inc. Issue Date: 4/14/2011 Please check online for the most up to date version.
35
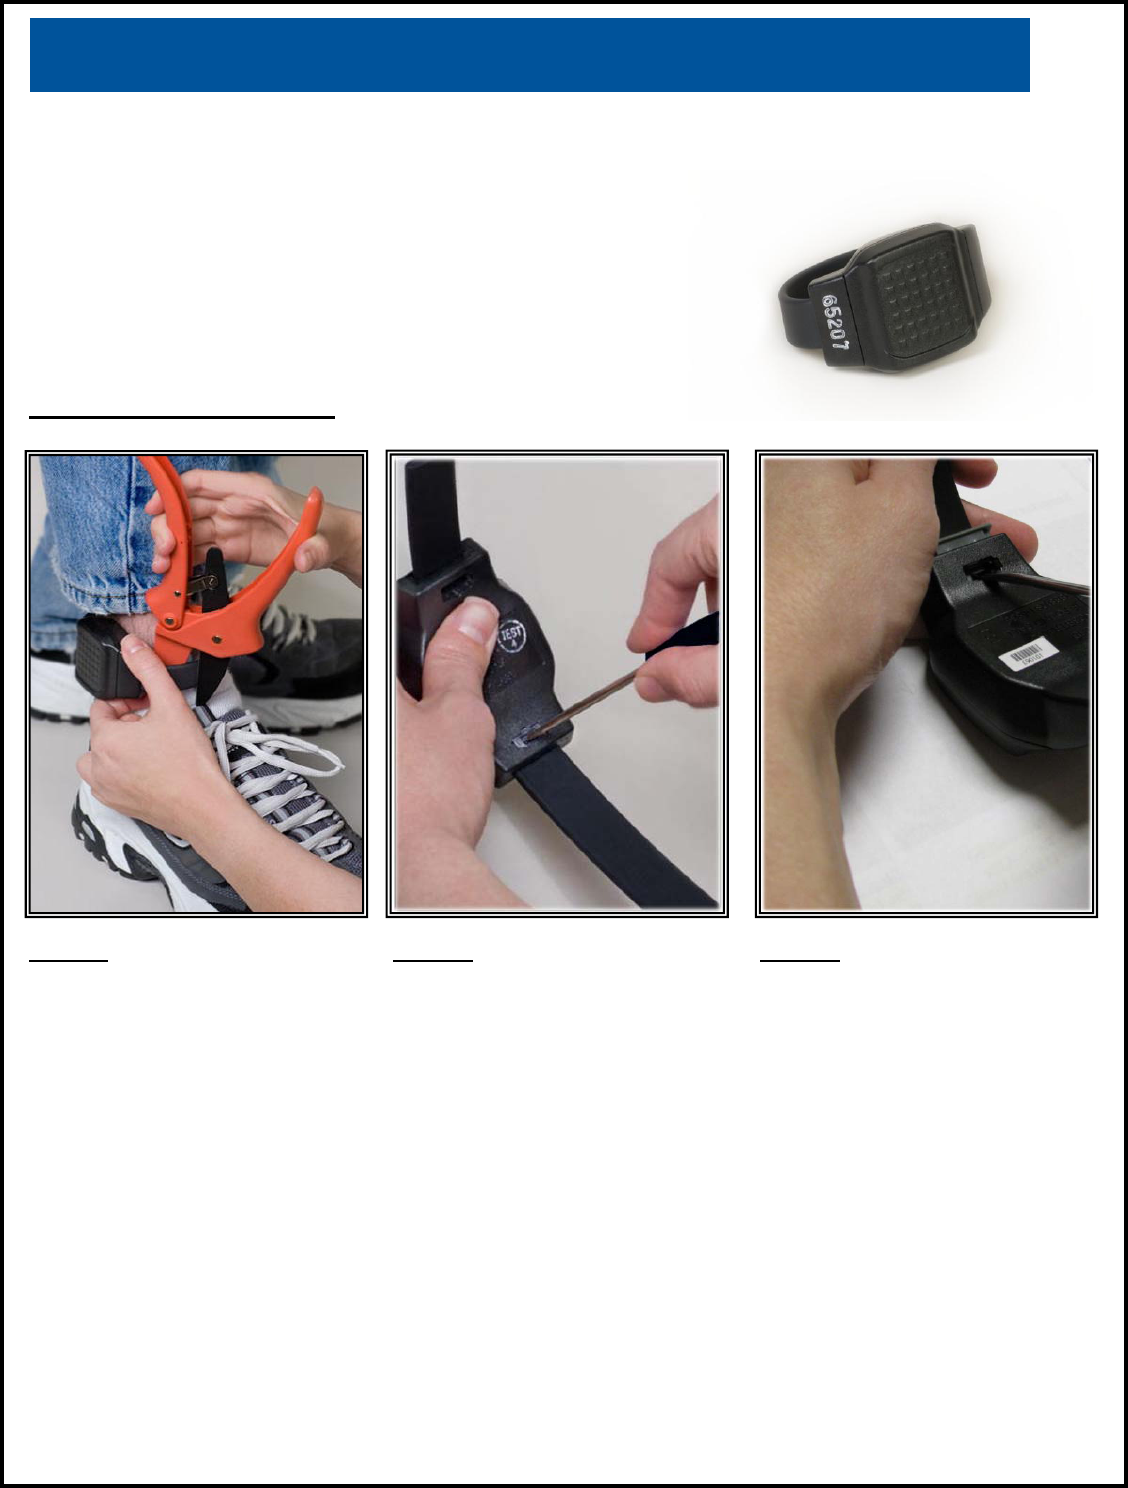
Removing the Bracelet
Removing the Bracelet
Step 1:
Cut the strap by using the strap
cutters and remove the Bracelet
from the offender’s leg.
Step 2:
Using a Pro Tech flathead
screwdriver, push on the tamper
plugs to break them.
Step 3:
Use the screwdriver to
remove the tamper plugs
from the brackets.
Pro Tech Monitoring Inc. Issue Date: 4/14/2011 Please check online for the most up to date version.
36
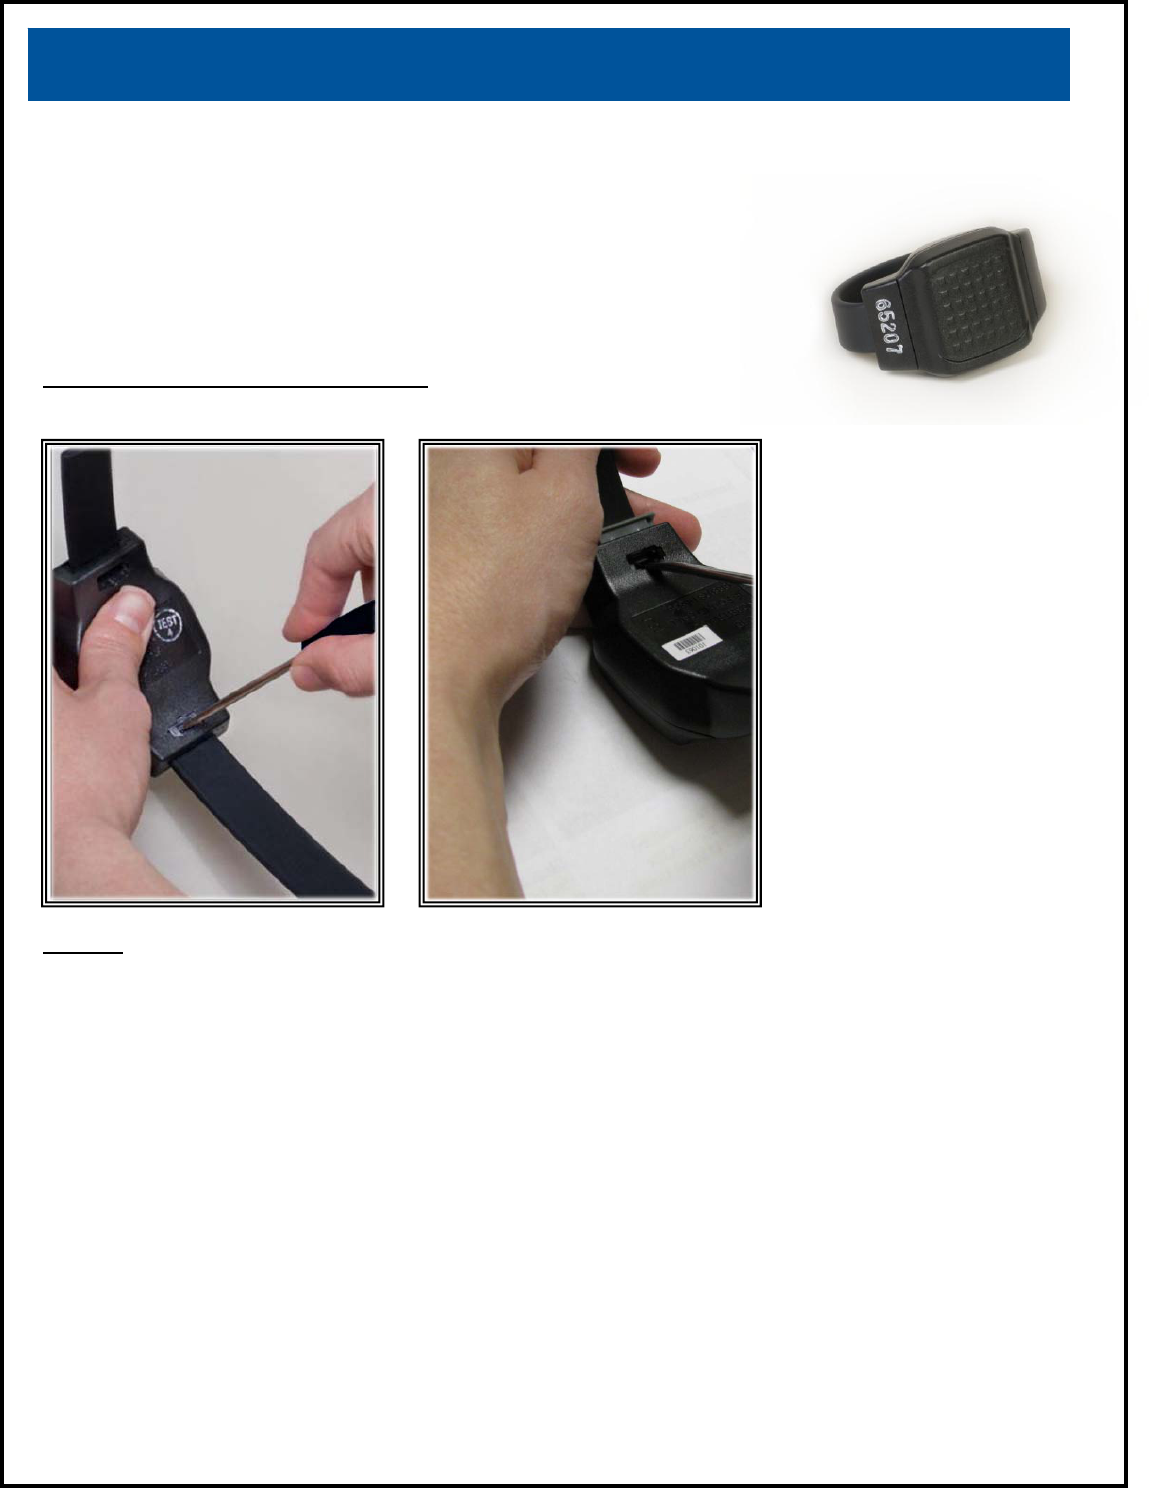
Removing the Bracelet cont.
Removing the Bracelet Cont.
Step 4:
While keeping the latch depressed, pull the strap with the
attached pin trays out of each bracket.
Discard the tamper plugs and straps.
Note: Do NOT reuse the tamper plugs.
Note: Do NOT remove tamper plugs from the brackets of
the Bracelet unless there is a strap with an attached pin
tray inside
the bracket.
Pro Tech Monitoring Inc. Issue Date: 4/14/2011 Please check online for the most up to date version.
37
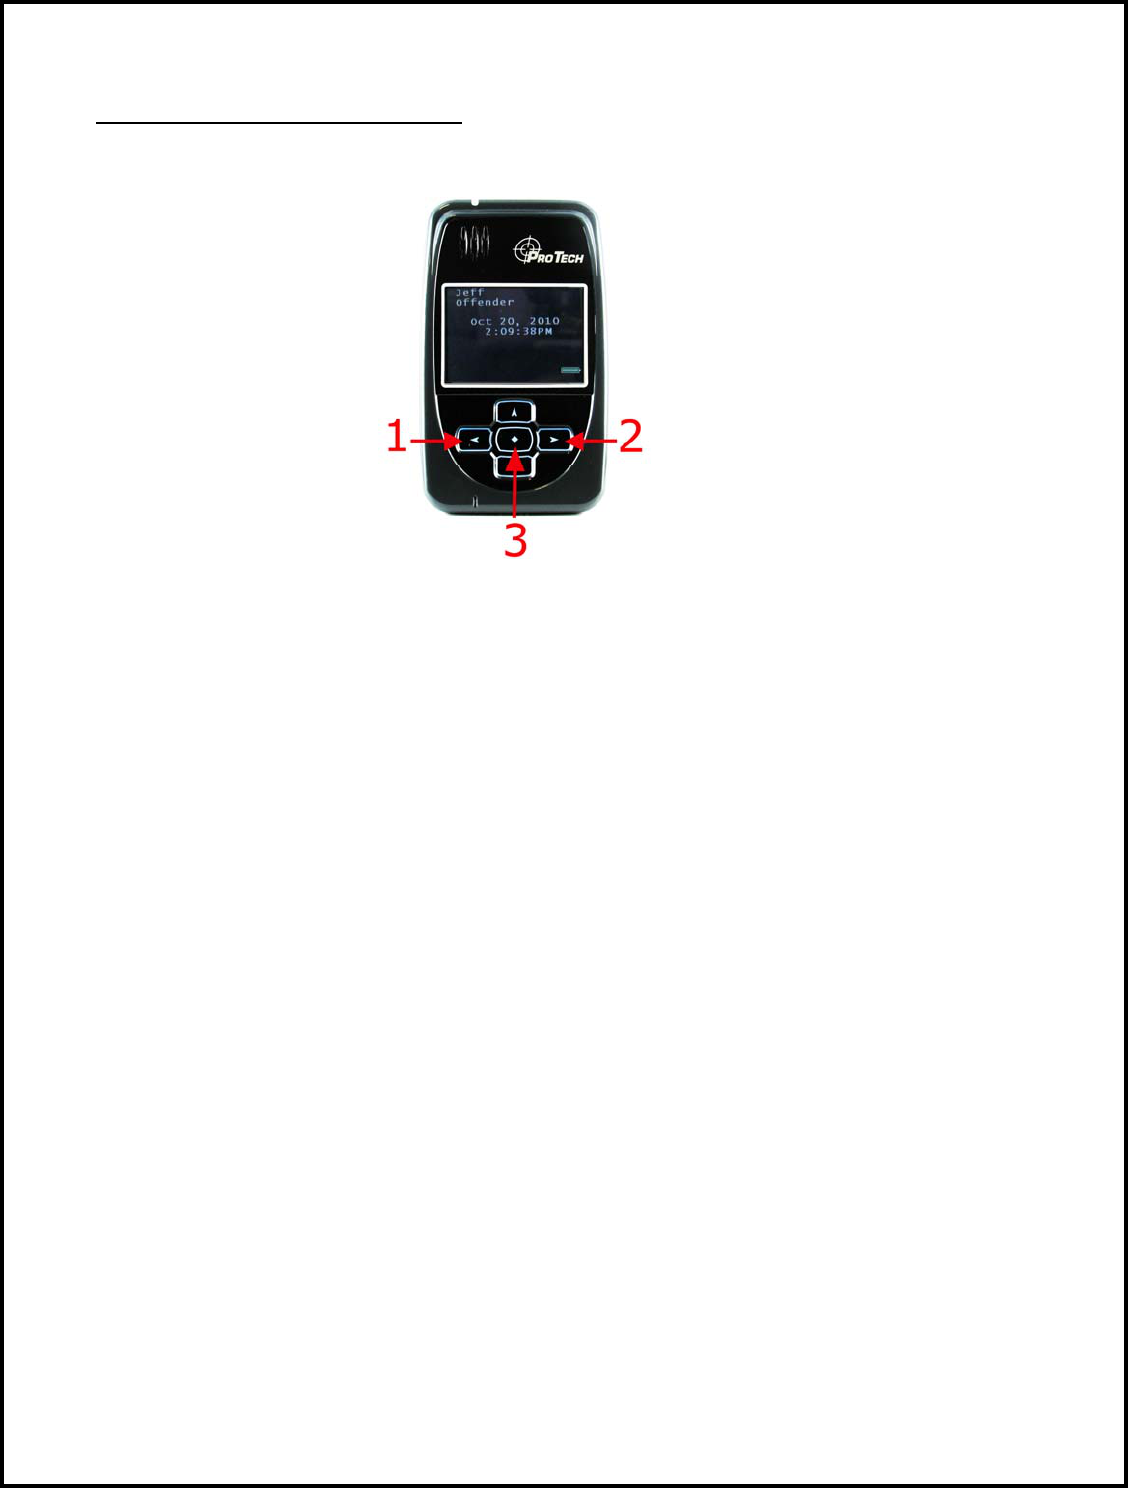
Accessing the Officer Menu
To access the Officer’s Menu from an XT, follow the button sequence below:
BUTTON SEQUENCE: 1,1 / 2 / 1/ 2,2 / 3
Messages: Displays messages sent to the device.
Vibrate Beep: Changes XT alert mode.
Id Numbers: Displays ID numbers of assigned hardware.
Alarm Set: Accesses alarm clock function.
Call List: Displays the phone numbers that the XT can dial.
Icon Glossary: Displays the icons that appear when the XT is in violation.
Phone # Prefix: Changes dialing prefix for Base Unit calls.
Beep Volume: Changes volume of alert tone.
Time Format: Changes the way the time is displayed.
Firmware Ver.: Displays current version of software in XT.
Bracelet Test: Displays the receipt of the signal from the bracelet.
Set Brac S/N: Allows you to temporarily assign a bracelet to an unassigned XT.
De-Activate: Allows you to power down the XT.
Modem Info: Allows you to force the device to call Pro Tech immediately.
Assigned SBS: Shows you the SMART Base that is assigned to the offender.
Satellite Bar: Displays the receipt of GPS signals from the GPS satellites.
Pro Tech Monitoring Inc. Issue Date: 4/14/2011 Please check online for the most up to date version.
38
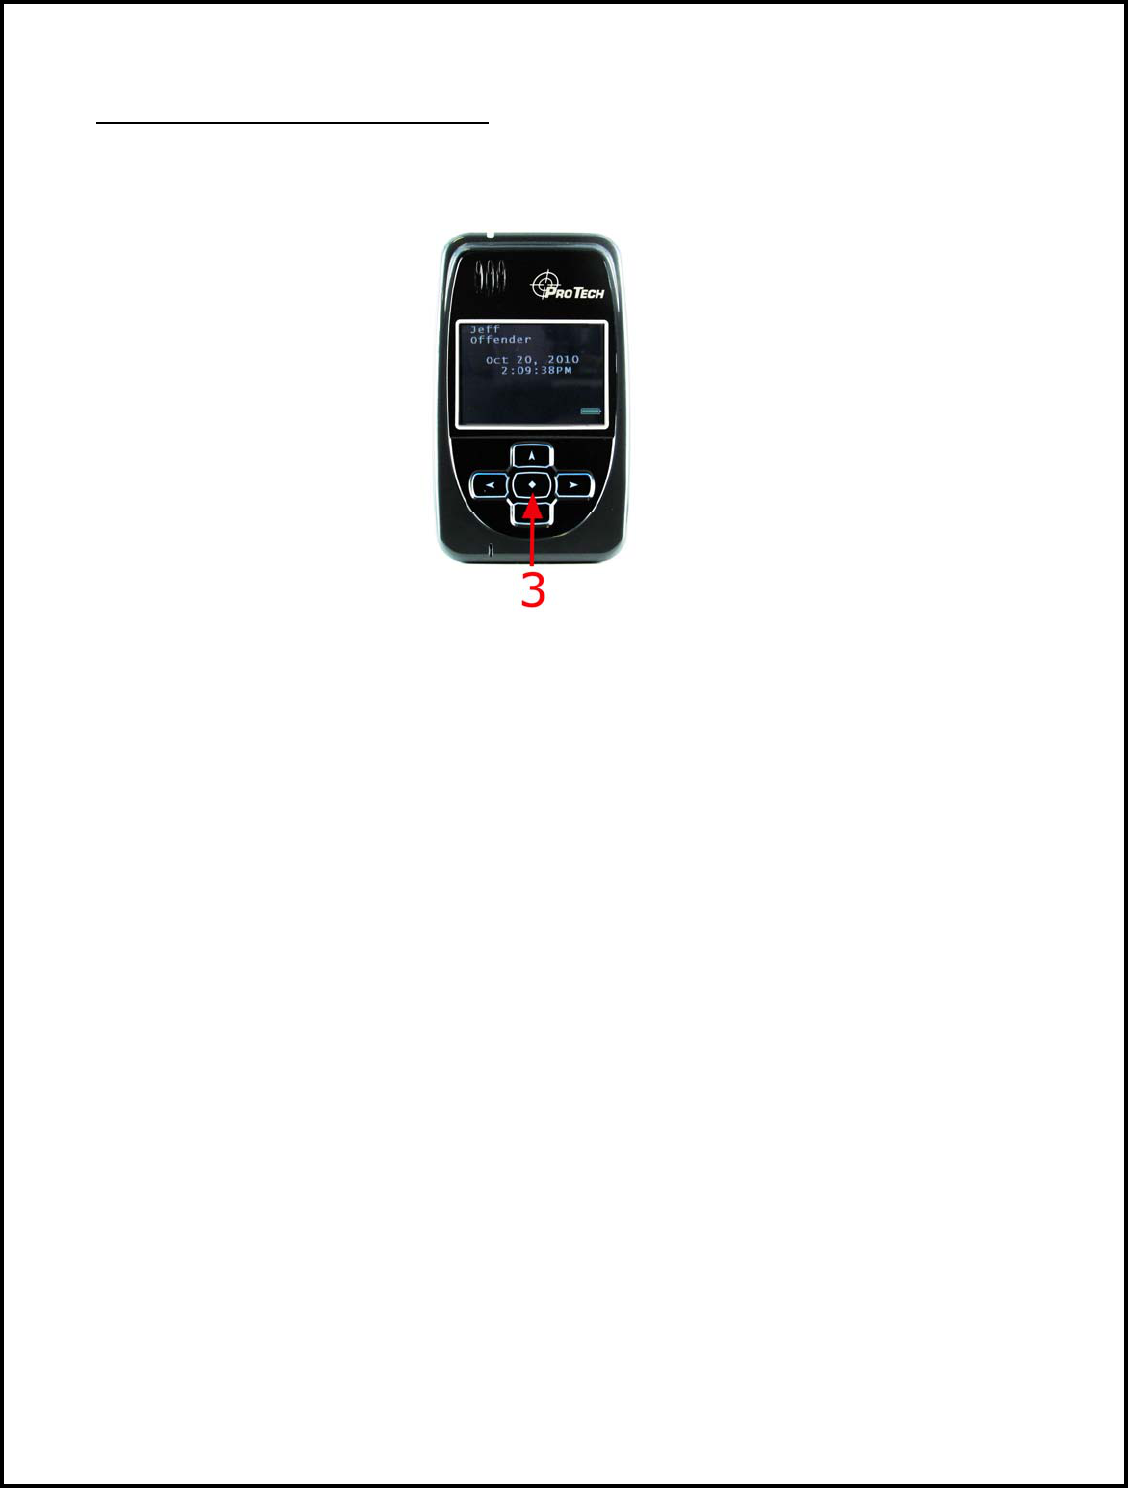
Accessing the Offender Menu
The offender will be allowed to access a menu within the XT that will allow them to view
and/or edit options. To access the offender menu, press button 3, which is also the
acknowledgement button.
Messages: Displays messages sent to the device.
Vibrate Beep: Changes XT alert mode.
Id Numbers: Displays ID numbers of assigned hardware.
Alarm Set: Accesses alarm clock function.
Call List: Displays the officer-defined phone numbers that the offender is allowed to
dial using the XT.
Icon Glossary: Displays the icons that will appear with each violation.

Pro Tech Monitoring Inc. Issue Date: 4/14/2011 Please check online for the most up to date version.
39
Appendix
Rule Definitions
Bracelet Battery:
• The Bracelet battery is getting low; the bracelet must be replaced within seven days.
Bracelet Gone:
• Occurs when the offender is out of range of the XT. Therefore the location of the
offender is unknown.
• If the “Notify Offender” box is checked in SMART View, the offender will receive the
automatic message “Bracelet Gone- Stay Closer to the XT.”
• The range of the bracelet to the XT.
o 75 to 100 ft (clear line of sight) the offender is away from XT while it is out of
the SMART Base; OR
o 125 to 150 ft (clear line of sight) the offender is away from XT while it is in
the SMART Base
• Pro Tech adds a 5 minute buffer period to all Bracelet Gone violations.
This is not a Grace Period. During this time, the offender is not notified of
the Bracelet Gone. Only after five minutes have passed will the Bracelet
Gone Rule go into violation. If you add a Grace, it will apply after five
minute buffer has passed. For example, if a one minute grace is set, the
bracelet will have to be out of range for 6 minutes before notifications are
sent out.
Bracelet Strap:
• The bracelet strap has been compromised or removed from the bracelet.
In Charger:
• The XT is NOT in the assigned SMART® Base when the In Charger schedule is in
effect.
Motion No GPS:
• Occurs when the XT has accumulated 10 minutes of motion in a 60-minute period
without receiving a signal from the GPS satellites.
• If the “Notify Offender” box is checked in SMART® View the offender is sent the
automatic message “GPS Warning-Go Outside”. The offender has 10 minutes (grace
period) from this point to clear the Motion No GPS warning message before it
becomes a violation and notifications are sent out.
• When GPS is reacquired, the offender is notified with the automatic message “GPS
Warning Cleared”.
• If the offender does NOT regain GPS at the end of the 10 minute grace period, a
Motion No GPS violation is created.
Phone Number Caller ID:
• Signals the offender may have moved the SMART® Base to a new phone line or
home.
• The number cannot be “private” or “unlisted.”

Pro Tech Monitoring Inc. Issue Date: 4/14/2011 Please check online for the most up to date version.
40
Appendix
Rule Definitions cont.
SMART Base A/C Power:
• The SMART® Base has lost A/C power and is running on the battery back-up.
SMART Base Battery:
• The SMART® Base has been running on the back-up battery and is about to lose
power. With a full charge (24 hours) the back-up battery will last 24 hours. While
running on the back-up battery, the SMART® Base will not charge the XT. If the XT is
in the SMART® Base, and the SMART® Base can call in, the XT will still be able to
successfully download its information.
SMART Base Phone Line Disconnect:
• The phone line has been removed from the SMART® Base. You will not get this alert
until the phone line has been re-connected because the SMART® Base requires a
phone line to report violations.
SMART Tamper:
• The SMART® Base has been compromised and/or tampered with.
SMART Unable to Connect:
• The SMART® Base has not called Pro Tech in 6.5 hours.
XT Battery:
• The XT battery is low and needs to be charged. The offender receives the automatic
message “Battery Low-Place in Charger” approximately an hour before the battery
will die.
XT Tamper:
• The XT has been compromised and/or tampered with.
XT Unable to Connect:
• It has been over 2.5 hours since the XT has called in. The offender is not notified of
the Unable to Connect and a message cannot be sent to the device.
Zone:
• The offender has violated a Zone set up by the supervising officer or agency. This
could be an Exclusion (forbidden area) Zone or an Inclusion (required area) Zone.
Pro Tech Monitoring Inc. Issue Date: 4/14/2011 Please check online for the most up to date version.
41
Appendix
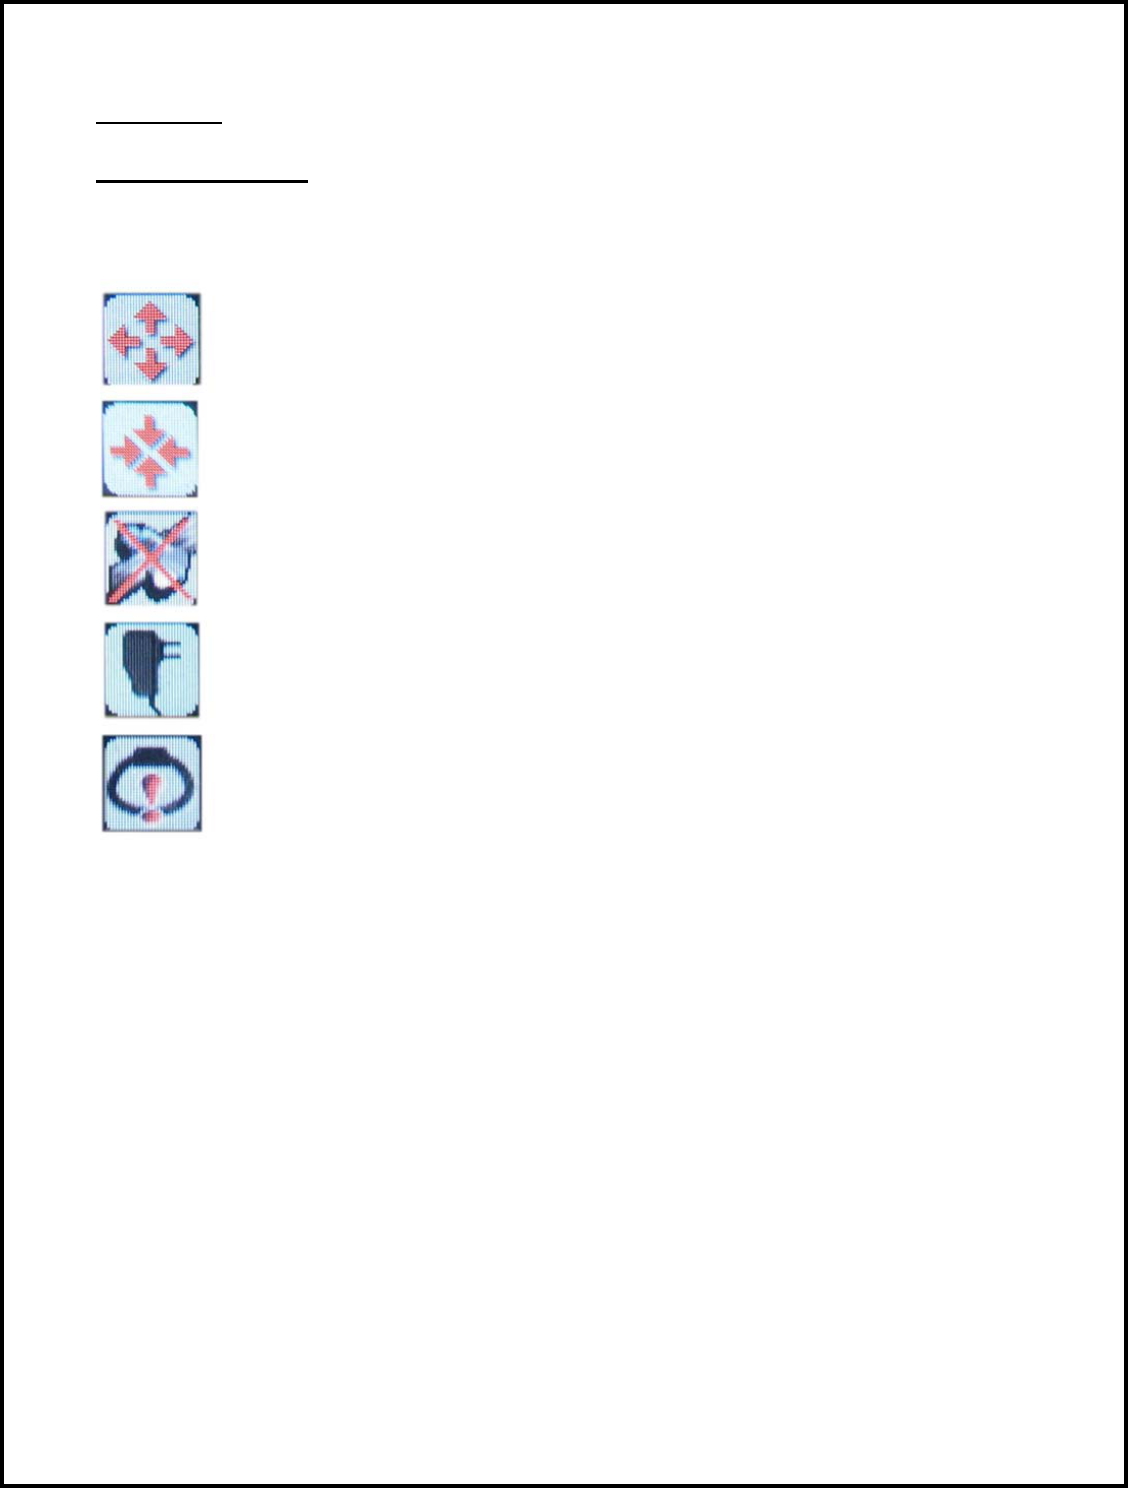
XT Status Icons
When an offender generates a violation, the XT will display the violation information, along
with an icon. The icons are as follows:
Exclusion Zone
Inclusion Zone
Motion No GPS
In Charger
Bracelet Gone

Pro Tech Monitoring Inc. Issue Date: 4/14/2011 Please check online for the most up to date version.
42
Appendix
Safety and Precautions
Important safety instructions
Please read and follow the safety instructions listed below:
• Carry the XT in the provided belt clip pouch
• Use only a clean, soft, dry cloth to clean the XT and SMART® Base
• Do not spill or place any liquid on or in proximity of the XT or SMART® Base
• Do not connect the A/C Power to the XT or SMART® Base while in or near any water
• Place the SMART® Base on a solid surface. Do not place the SMART® Base on an
unstable surface, stand or table
• Do not place the XT or SMART® Base on any vibration prone-surface

Pro Tech Monitoring Inc. Issue Date: 4/14/2011 Please check online for the most up to date version.
43
Certifications
The XT complies with Part 15 of the FCC Rules.
Operation is subject to the following two conditions:
1.) This device may not cause harmful interference and
2.) This device must accept any interference received, including interference that may
cause undesired operation.
FCC ID: NC3XT40418, NC3XT40318, NC3XT40433,
NC3XT41433
PRO TECH MONITORING IS NOT RESPONSIBLE FOR ANY RADIO OR TV INTERFERENCE CAUSED BY
UNAUTHORIZED MODIFICATIONS TO THIS EQUIPMENT. SUCH MODIFICATIONS COULD VOID THE USER'S
AUTHORITY TO OPERATE THE EQUIPMENT.
FCC Radio Frequency Exposure
The XT radio device has been evaluated under FCC Bulletin OET 65C and found to be
compliant with the requirements as set forth in evaluating compliance with FCC Guidelines
for Human Exposure to Radio frequency Electromagnetic Fields. This device is to be used
solely by law enforcement agencies for tracking purposes.
In order to maintain compliance to RF exposure requirements for body worn use this device
must be carried in a suitable belt clip pouch to provide a minimum 1.5cm separation from
the body.
The antenna(s) used for this transmitter must not be co- located or operating in conjunction
with any other antenna or transmitter except in accordance with FCC multi-transmitter
product procedures.
Bracelet Transmitter
The radiation output power of the bracelet transmitter falls below the FCC radio frequency
exposure limits.