Attenti ODU-830-2 Remote Control / Officer Duress Unit User Manual ODU 830 2
3M Electronic Monitoring, Inc. Remote Control / Officer Duress Unit ODU 830 2
Attenti >
User Manual
ODU Installation & Operational Guide
1-1
1 Introduction
The Elmo-Tech TRaCE system is a multi-featured electronic monitoring
system designed to locate, identify and observe moving people (inmates,
security staff or guests) in a geographically limited area that can be used in
various types of correctional facilities and their surrounding areas. The
Officer Duress Unit (ODU) is one of the many unique elements of this
system.
The Officer Duress Unit is a small, lightweight, belt mounted device that is
generally carried by the staff officer that can be used to audio-visually alert
other officers’ whenever the built-in distress button is pressed, if the device
is pulled away from the officer’s belt (lanyard), or if the officer is pushed
down to the ground (man-down). The Officer Duress Unit also provides
continuous monitoring of the officer’s location.
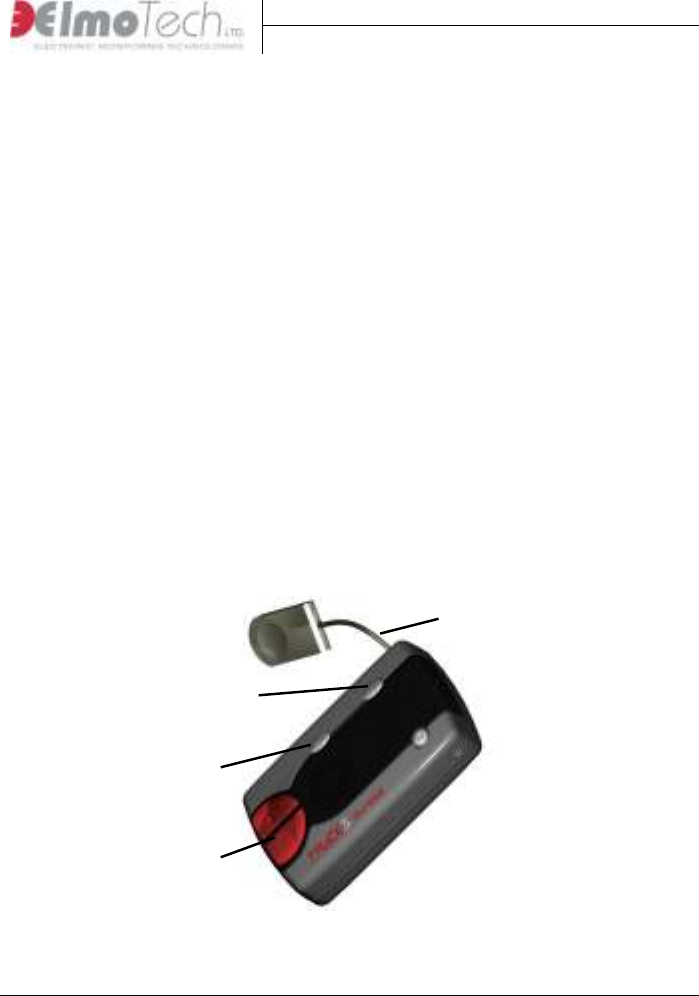
1.1.1 Parts of the Officer Duress Unit
Figure 1-1 Officer Duress Unit (ODU)
Mode button
Clear button
Scrolling
buttons
Lanyard cord

ODU Installation & Operational Guide
1-2
1.2 Activating the Officer Duress Unit
The Officer Duress Unit is turned off by the manufacturer before shipment
and must be activated before use.
To activate the Officer Duress Unit, press the Mode, Clear and both Scroll
buttons in for a period of at least two (2) seconds. The LED will blink three
(3) times in quick succession and three (3) short beeping sounds will be
heard. The orange LED will blink. The Officer Duress Unit is now in
standby mode.
In standby mode the Officer Duress Unit sends a transmission (every 20
seconds) to the monitoring system. This transmission is used by the
monitoring system to verify location. If the lanyard cord is pulled out of its
connection socket or any of the scrolling (panic) buttons are pressed, a
strong audible alarm will be heard, the red LED will flash and an alarm
message will be sent to the monitoring system.
Note that in standby mode the man-down detector is not yet active and can
be activated during to the attachment of the Officer Duress Unit.
To deactivate the Officer Duress Unit, press the Mode, Clear and both Scroll
buttons in for a period of at least two (2) seconds. One (1) long beeping
sound will be heard. The Officer Duress Unit is deactivated.
1.2.1 Attaching the Officer Duress Unit
Generally the Officer Duress Unit is attached to the staff officer’s belt, but
can also be attached or placed inside a pouch.
To attach the Officer Duress Unit, clip the unit onto the belt or pouch using
the attachment clip. The Officer Duress Unit must be in a vertical position
with the scrolling buttons facing downwards. Connect the lanyard cord to

ODU Installation & Operational Guide
1-3
the belt or pouch ensuring that, if the Officer Duress Unit is pulled off the
belt or pouch, the lanyard cord will remain attached.
1.2.2 Activating the Man-down Detector
Once you have attached the Officer Duress Unit, you can activate the man-
down detector.
To activate the man-down detector, press the Mode button and any of the
Scrolling buttons for at least two (2) seconds. The green LED will blink. The
Officer Duress Unit is now in active mode.
In active mode the Officer Duress Unit sends a transmission (every 20
seconds) to the monitoring system. This transmission is used by the
monitoring system to verify location. If the lanyard cord is pulled out of its
connection socket, any of the scrolling buttons are pressed (panic), or if the
man-down detector is activated and the Officer Duress Unit is tilted more
than 60° from its vertical position (for more than 8 seconds) an audible
alarm will be heard, the red LED will blink and an alarm message will be
sent to the monitoring system.
If the Officer Duress Unit is tilted more than 60° from its vertical position
(for more than 2 seconds) an audible buzzer will be heard and the green
LED will blink. This indicates that the Officer Duress Unit is in warning
mode. You have eight (8) seconds to return the Officer Duress Unit to active
mode, before the unit automatically moves into alarm mode.
To return the Officer Duress Unit to active mode, return the Officer Duress
Unit to its vertical position and press the Mode button in for two (2)
seconds.
To deactivate the man-down detector, press the Mode button and any of the
Scrolling buttons for at least two (2) seconds. The orange LED will blink.
The Officer Duress Unit is now in standby mode.

ODU Installation & Operational Guide
1-4
1.2.3 Manually Activating a Panic Alarm
If the lanyard cord is pulled out of its connection socket or if the man-down
detector is activated and the Officer Duress Unit is tilted more than 60° from
its vertical position (for more than 8 seconds) an audible alarm will be heard,
the red LED will blink and an alarm message will be sent to the monitoring
system. The staff officer also has the capability to manually activate a panic
alarm.
To manually activate a panic alarm, press any of the Scrolling buttons. An
audible alarm will be heard, the red LED will blink and an alarm message
will be sent to the monitoring system.
1.2.4 Deactivating an Alarm
Once an alarm is activated, you can use any of the following methods to
deactivate the alarm:
To deactivate a lanyard alarm, return the lanyard cord to its connection
socket and press the Mode, Clear, Scroll Down and then the Scroll Up
buttons in quick succession (in less than 2 seconds).
To deactivate a panic alarm, press the Mode, Clear, Scroll Down and then
the Scroll Up buttons in quick succession (in less than 2 seconds).
To deactivate a man-down alarm, return the Officer Duress Unit to its
vertical position and press the Mode, Clear, Scroll Down and then the Scroll
Up buttons in quick succession (in less than 2 seconds).
1.2.5 Changing the Officer Duress Unit to Silent Mode
The Officer Duress Unit has the capability to operate in audible mode (beep)
or silent mode (vibrate).
To change the Officer Duress Unit to silent mode, press the Mode and Clear
buttons in for at least two (2) seconds. Three (3) short vibrations will be felt.

ODU Installation & Operational Guide
1-5
To return the Officer Duress to audible mode, press the Mode and Clear
buttons in for at least two (2) seconds. Three (3) audible beeping sounds will
be heard.
1.3 Testing the Officer Duress Unit
The Officer Duress Unit has the capability to perform a self-test. This self-
test can be used to check the performance of the unit.
To test the Officer Duress Unit, hold the Clear button down, press the Scroll
Up button and then press the Scroll Down button. The following tests will
occur:
Green LED lights up
Red LED lights up
Orange LED lights up
Unit vibrates
Audible buzzer is activated
If all the above tests are performed, the Officer Duress Unit is operating
correctly.

ODU Installation & Operational Guide
2-6
2 FCC Notices
This note is applicable to the American Officer Duress Unit (ODU)
NOTE - The Officer Duress Unit (ODU) complies with Part 15 of the FCC
Rules. Operation is subject to the following two conditions:
(1) This device may not cause harmful interference, and
(2) This device must accept any interference received, including interference
that may cause undesired operation.
This device has been tested and found to comply with the limits of the Class
B digital device, pursuant to Part 15 of the FCC rules. These limits are
designed to provide reasonable protection against harmful interference in a
residential installation. This device generates, uses and can radiate radio
frequency energy and, if installed and used in accordance with the
instruction, may cause harmful interference to radio communications.
However, there is no guarantee that interference will not occur in a
particular installation. If this device does cause harmful interference to radio
or television reception, which can be determined by turning the equipment
off and on, the user is encouraged to correct the interference by one or more
of the following measures
• Reorient or relocate the receiving antenna
• Increase the separation between the equipment and the receiver.
• Consult the dealer or an experienced radio/TV technician for help.
CAUTION – Any changes or modifications not expressly approved by the
grantee of this device could void the user’s authority to operate the
equipment.