Audio Partnership PLC TT-030 Direct Drive Turntable User Manual
Audio Partnership PLC Direct Drive Turntable
User Manual
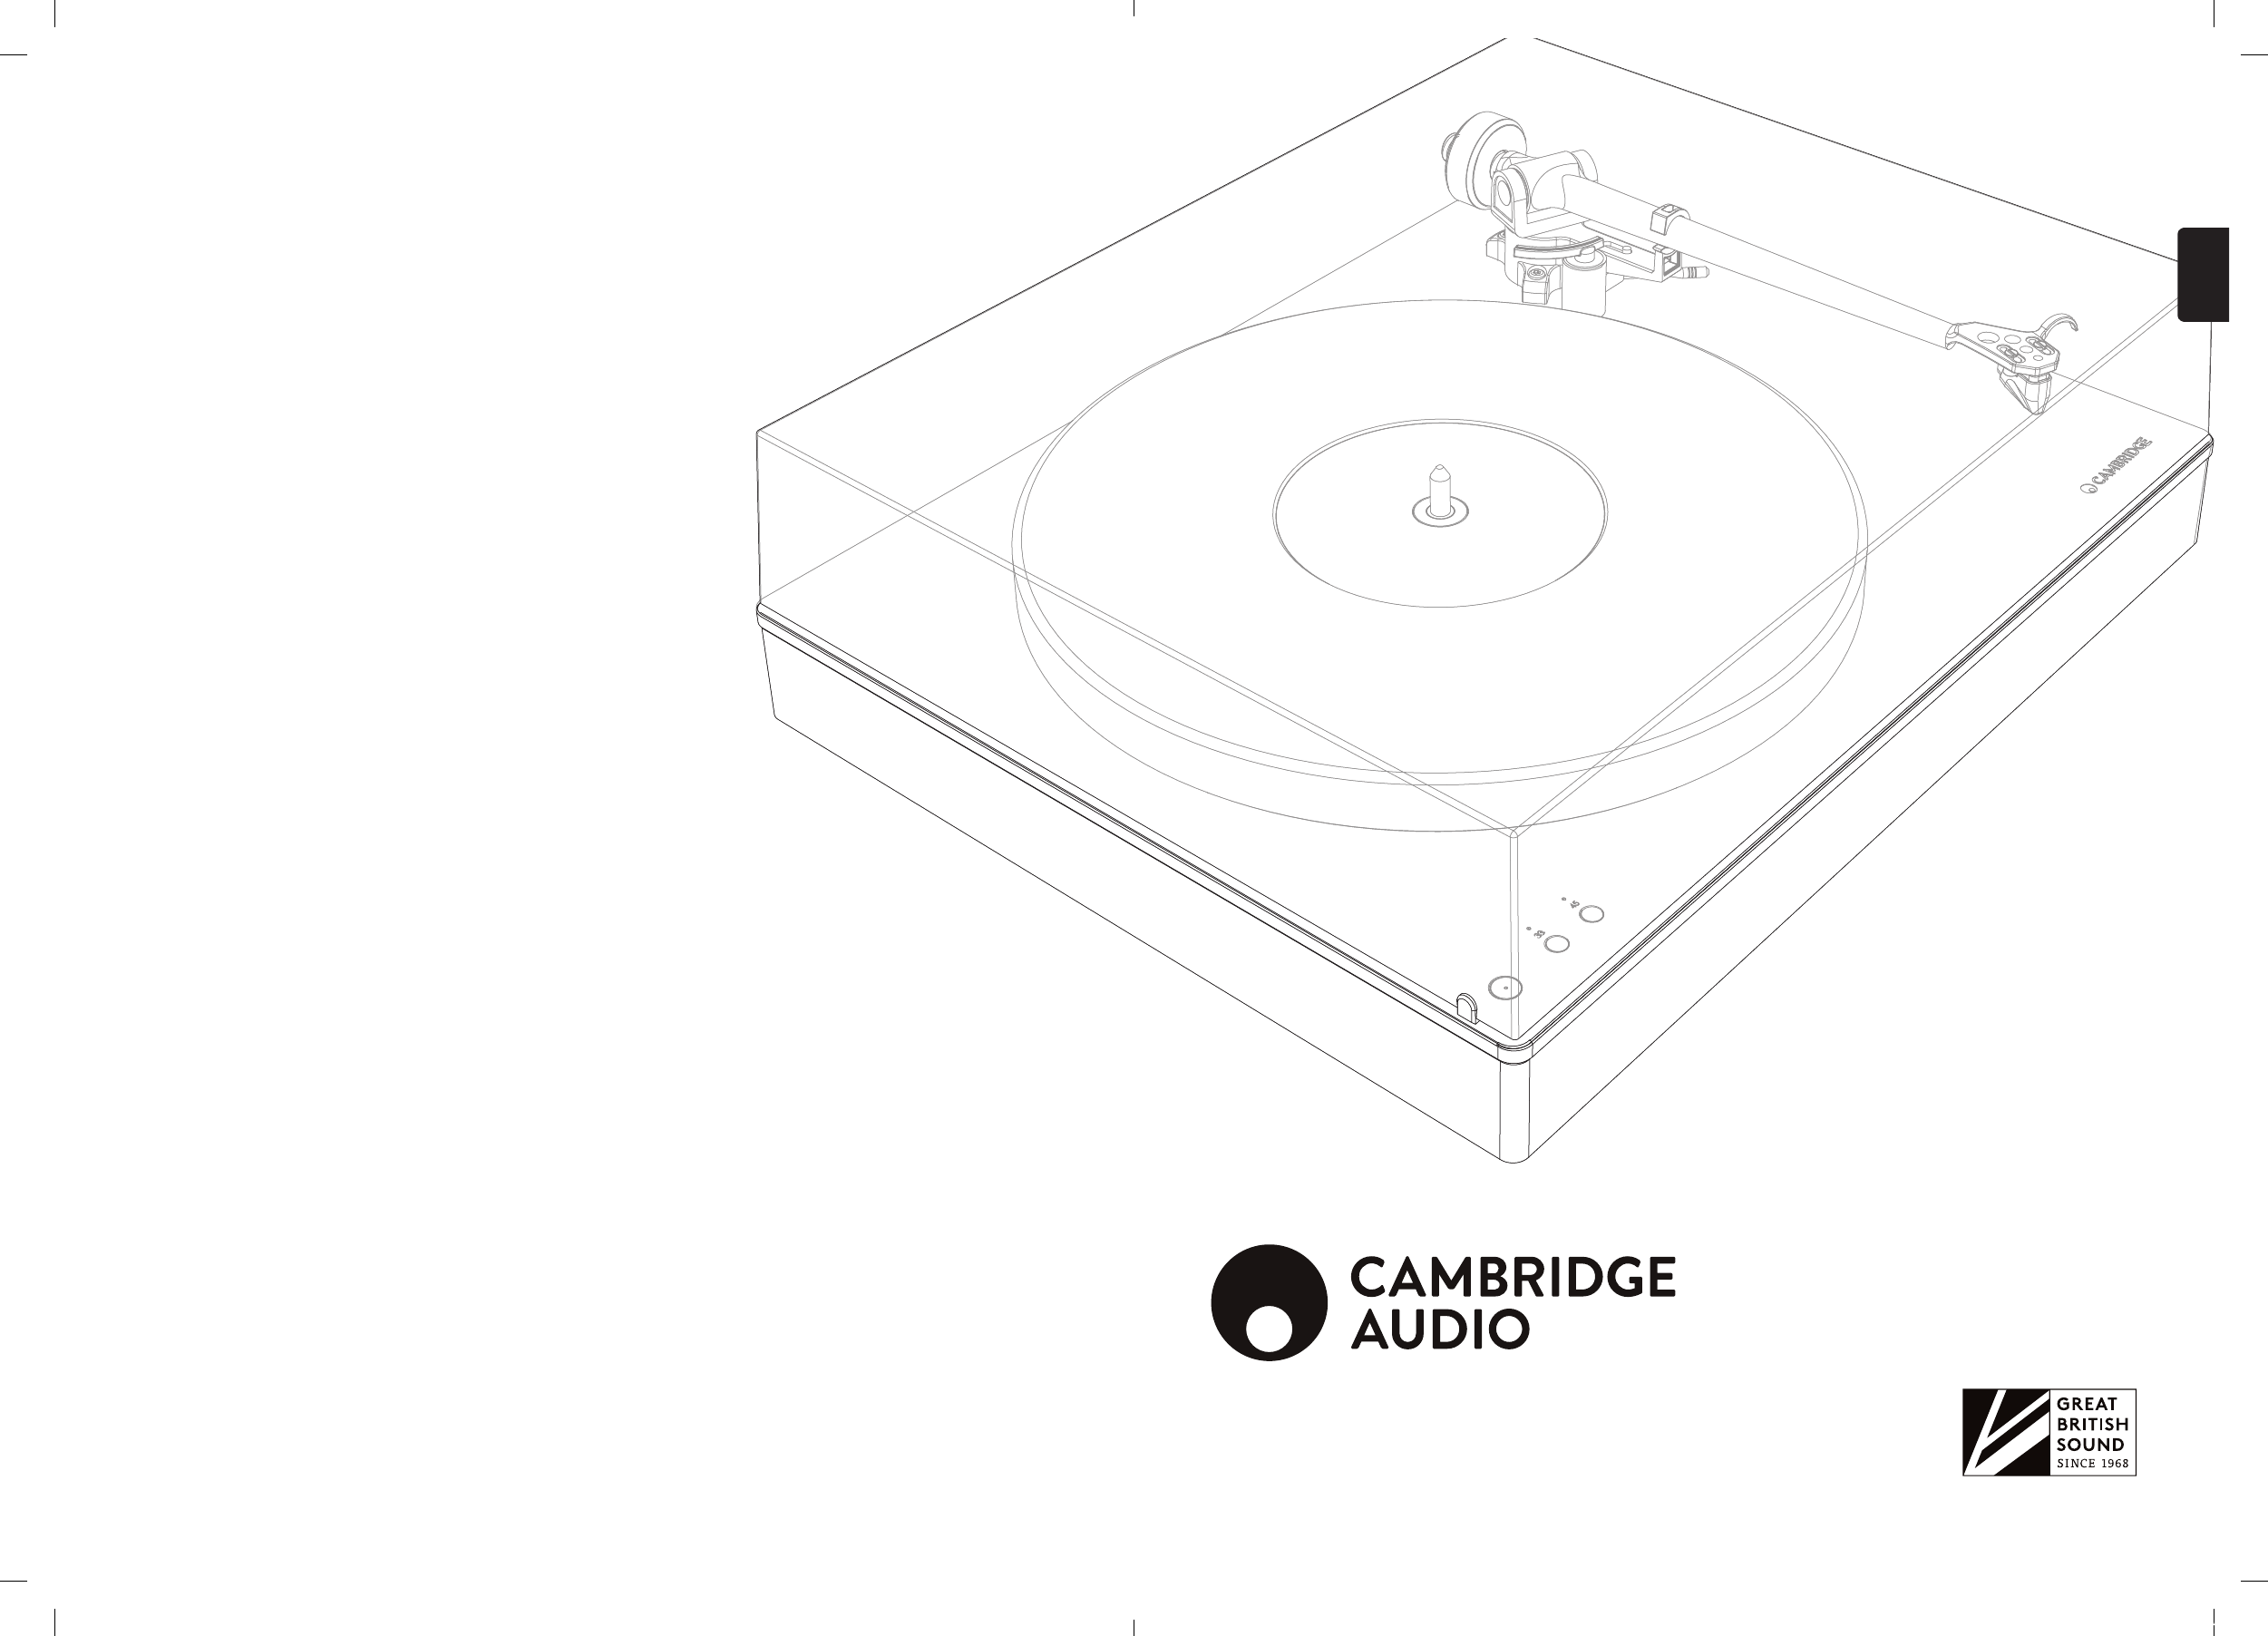
ALVA TT
DIRECT DRIVE TURNTABLE
ENGLISH
Gallery Court, Hankey Place
London SE1 4BB
United Kingdom
Cambridge Audio is a brand of Audio Partnership Plc.
Registered in England No. 2953313
AP36043/B
WWW.CAMBRIDGEAUDIO.COM
AP360431 CA0858 USERS MANUAL ARTWORK - Cover.indd All Pages 15/05/2018 11:21 AM
2
Contents
This guide is designed to make installing and using this product as easy as possible. Information in
this document has been carefully checked for accuracy at the time of printing; however, Cambridge
Audio’s policy is one of continuous improvement, therefore design and specications are subject to
change without prior notice.
This document contains proprietary information protected by copyright. All rights are reserved. No
part of this manual may be reproduced by any mechanical, electronic or other means, in any form,
without prior written permission of the manufacturer. All trademarks and registered trademarks are
the property of their respective owners.
© Copyright Cambridge Audio Ltd 2018.
Qualcomm is a trademark of Qualcomm Incorporated, registered in the United States and other
countries, used with permission. aptX is a trademark of Qualcomm Technologies International, Ltd.,
registered in the United States and other countries, used with permission.
Qualcomm aptX is a product of Qualcomm Technologies International, Ltd.
The Bluetooth® word mark and logos are registered trademarks owned by the Bluetooth SIG, Inc. and
any use of such marks by Audio Partnership Plc is under license. Other trademarks and trade names
are those of their respective owners.
Make sure you register your product at:
WWW.CAMBRIDGEAUDIO.COM/REGISTER
For upcoming news on future products, software updates and exclusive oers.
IMPORTANT SAFETY INSTRUCTIONS 3
ASSEMBLY/SETUP 5
TOP VIEW 8
REAR PANEL 9
OPERATING INSTRUCTIONS 10
TECHNICAL SPECIFICATIONS 12
TROUBLESHOOTING 13
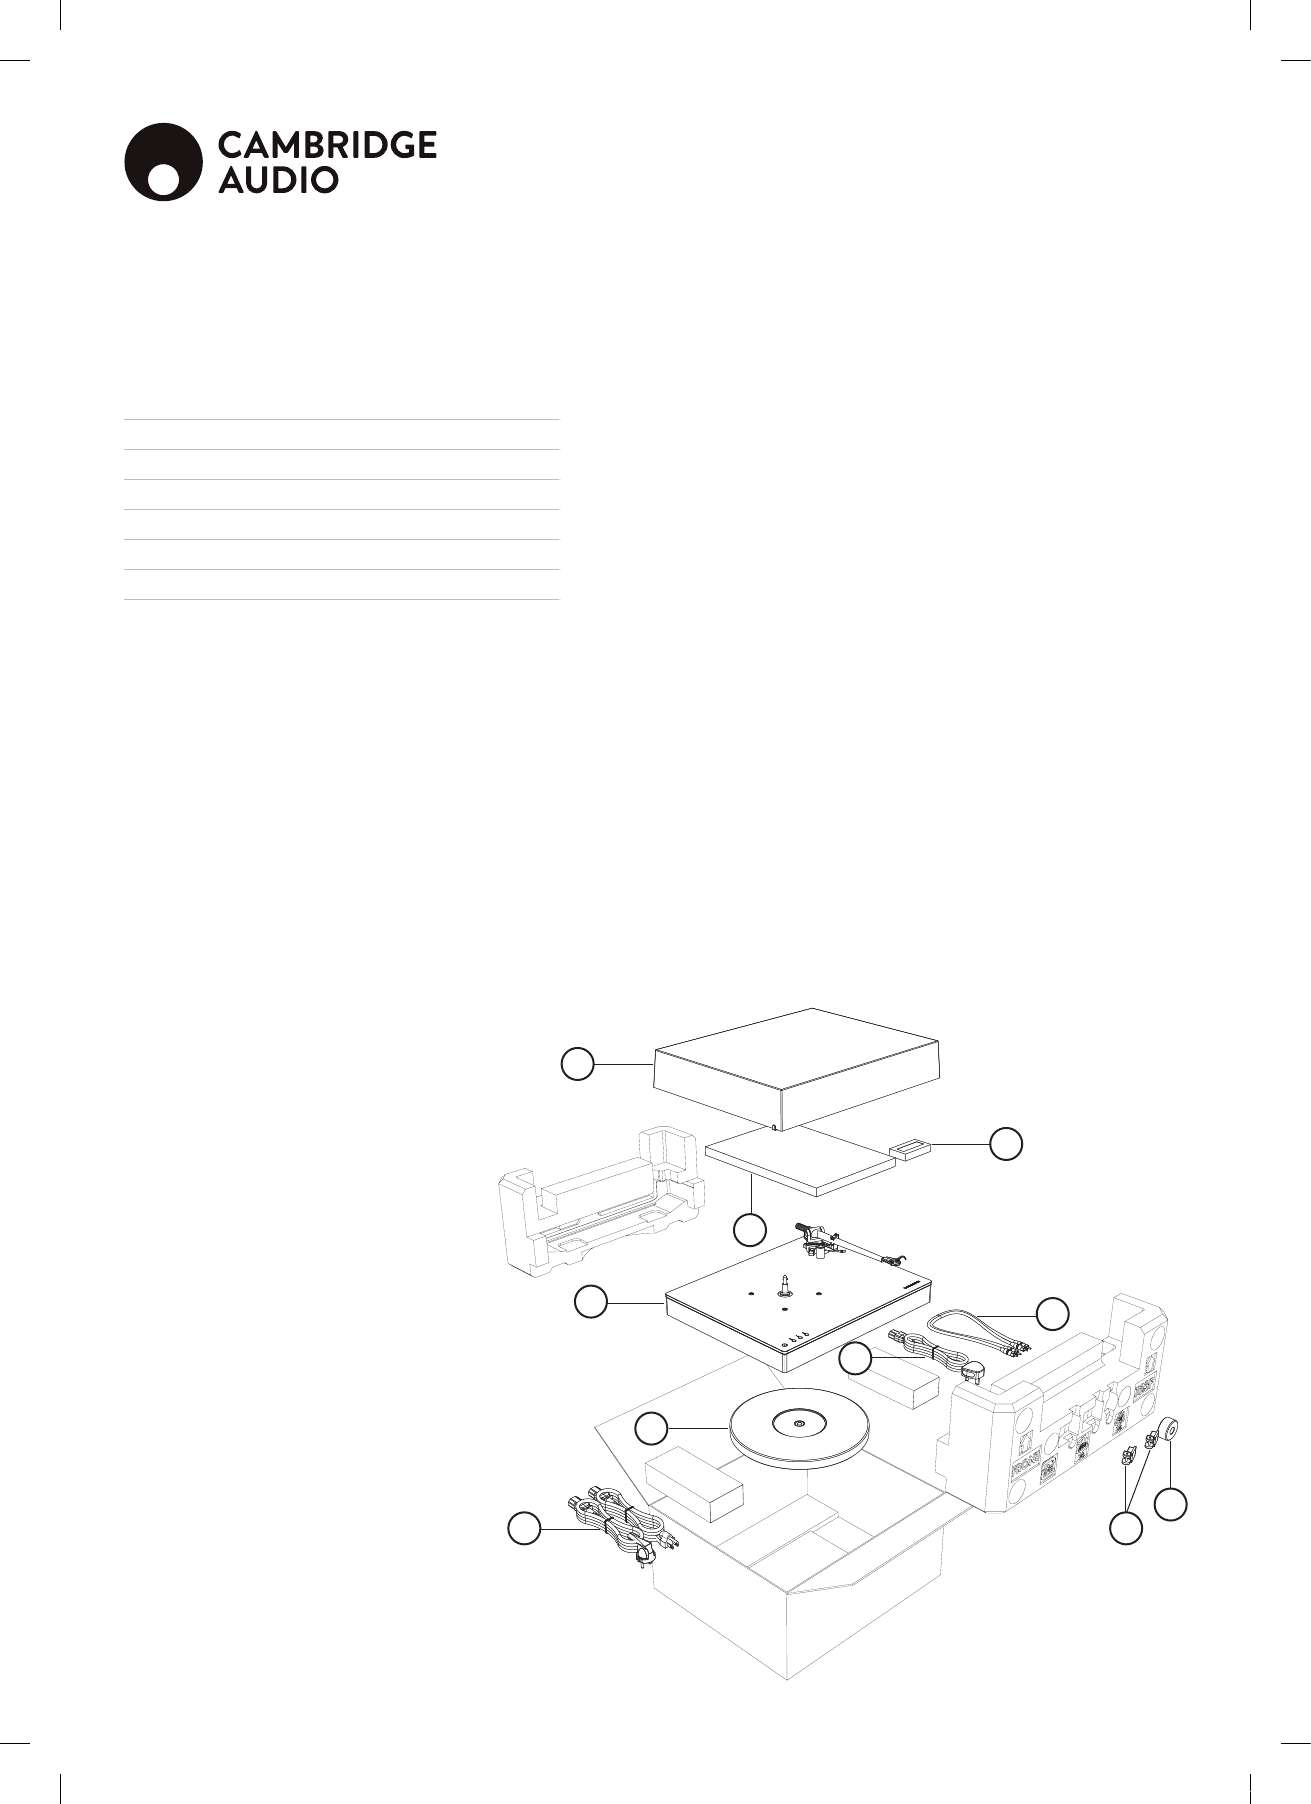
What's in the box
1. Turntable lid
2. Documentation
3. Tonearm force gauge
4. Turntable
5. Platter
6. Power cable
7. Analogue interconnect
8. Turntable lid hinges
9. Counterweight
1
3
2
4
6
7
6
5
8
9
AP360431 CA0858 USERS MANUAL ARTWORK.indd 2 15/05/2018 11:19 AM
3
ALVA TT
ENGLISH
For your own safety please read the following important safety instructions
carefully before attempting to connect this unit to the mains power supply.
They will also enable you to get the best performance from and prolong the life
of the unit:
1. Read these instructions.
2. Keep these instructions.
3. Heed all warnings.
4. Follow all instructions.
5. Do not use this apparatus near water.
6. Do not block any ventilation openings. Install in accordance with the
manufacturer’s instructions.
7. Do not install near any heat sources such as radiators, heat registers, stoves,
or other apparatus (including ampliers) that produce heat.
8. Do not defeat the safety purpose of the polarized or grounding-type plug. A
polarized plug has two blades with one wider than the other. A grounding-
type plug has two blades and a third grounding prong. The wide blade or the
third prong are provided for your safety. If the provided plug does not t into
your outlet, consult an electrician for replacement of the obsolete outlet.
9. Protect the power cord from being walked on or pinched, particularly at
plugs, convenience receptacles and the point where they exit from the
apparatus.
10. Only use attachments/accessories specied by the manufacturer.
11. Unplug this apparatus during lightning storms or when unused for long
periods of time.
12. Refer all servicing to qualied service personnel. Servicing is required when
the apparatus has been damaged in any way, such as the power-supply cord
or plug having been damaged, liquid has been spilled or objects have fallen
into the apparatus, the apparatus has been exposed to rain or moisture, does
not operate normally, or has been dropped.
Warning:
To reduce the risk of re or electric shock, do not expose this apparatus to rain
or moisture and objects lled with liquids, such as vases, should not be placed
on this apparatus.
Batteries (battery pack or batteries installed) shall not be exposed to excessive
heat such as sunshine, re or the like.
To completely disconnect this apparatus from the ac mains, disconnect the
power supply cord plug from the ac receptacle.
Pour deconnecter completement l’appareil du reseau d’alimentation,
deconnecter le cordon d’alimentation de la prise murale.
The mains plug of the power supply cord shall remain readily accessible. La
prise du reseau d’alimentation doit demeurer aisement accessible”
Only use the mains cord supplied with this unit.
Use of the apparatus in tropical climates (the equipment shall be used at
maximum 45 degree c ambient temperature)
Warning: please refer the information on exterior bottom enclosure for
electrical and safety information before installing or operating the apparatus.
To prevent injury, this apparatus must be securely attached to the oor/wall in
accordance with the installation instructions.
Important safety instructions
The lightning ash with the arrowhead symbol within an equilateral triangle
is intended to alert the user to the presence of un-insulated ‘dangerous voltage’
within the product’s enclosure that may be of sucient magnitude to constitute
a risk of electric shock to persons.
The exclamation point within an equilateral triangle is intended to alert the user
to the presence of important operating and maintenance instructions in the
service literature relevant to this appliance.
WEEE SYMBOL
The crossed-out wheeled bin is the European Union symbol for
indicating separate collection for electrical and electronic equipment.
This product contains electrical and electronic equipment which
should be reused, recycled or recovered and should not be disposed
of with unsorted regular waste. Please return the unit or contact the authorised
dealer from whom you purchased this product for more information.
CE MARK
This product complies with European Low Voltage (2014/35/EU),
Electromagnetic Compatibility (2014/30/EU) and Environmentally-
friendly design of Energy-related Products (2009/125/EC) Directives when used
and installed according to this instruction manual. For continued compliance
only Cambridge Audio accessories should be used with this product and
servicing must be referred to qualied service personnel.
RCM (REGULATORY COMPLIANCE
MARK)
This product meets Australia, New Zealand Safety, EMC and Radio
Communications requirements of the ERAC and ACMA.
CU-TR MARK
This product meets Russia, Byelorussia and Kazakhstan electronic
safety approvals.
VENTILATION
Important – The unit will become hot when in use. Do not stack multiple units
on top of each other. Do not place in an enclosed area such as a bookcase or in a
cabinet without sucient ventilation.
Ensure that small objects do not fall through any ventilation grille. If this
happens, switch o immediately, disconnect from the mains supply and contact
your dealer for advice.
Please ensure there is ample ventilation (at least 20cm clearance on the top, side
and rear). Do not put any objects on top of this unit. Do not situate it on a rug or
other soft surface and do not obstruct any air inlets or outlet grilles. Do not cover
the ventilation grilles with items such as newspapers, tablecloths, curtains, etc.
POSITIONING
Choose the installation location carefully. Avoid placing it in direct sunlight
or close to a source of heat. No naked ame sources, such as lighted candles,
should be placed on the unit. Also avoid locations subject to vibration and
excessive dust, cold or moisture. The unit can be used in a moderate climate.
This unit must be installed on a sturdy, level surface. Do not place in a sealed
area such as a bookcase or in a cabinet. Do not place the unit on an unstable
surface or shelf. The unit may fall, causing serious injury to a child or adult as
well as serious damage to the product. Do not place other equipment on top of
the unit.
AP360431 CA0858 USERS MANUAL ARTWORK.indd 3 15/05/2018 11:19 AM

4
Due to stray magnetic elds, turntables or CRT TVs should not be located nearby
due to possible interference.
Electronic audio components have a running in period of around a week (if used
several hours per day). This will allow the new components to settle down and
the sonic properties will improve over this time.
POWER SOURCES
The unit should be operated only from the type of power source indicated on
the marking label. If you are not sure of the type of power-supply to your home,
consult your product dealer or local power company.
If you do not intend to use this unit for a long period of time, unplug it from the
mains socket.
OVERLOADING
Do not overload wall outlets or extension cords as this can result in a risk of re
or electric shock. Overloaded AC outlets, extension cords, frayed power cords,
damaged or cracked wire insulation and broken plugs are dangerous. They may
result in a shock or re hazard.
Be sure to insert each power cord securely. To prevent hum and noise, do not
bundle the interconnect leads with the power cord or speaker leads.
SERVICING
These units are not user serviceable. Never attempt to repair, disassemble or
reconstruct the unit if there seems to be a problem. A serious electric shock
could result if this precautionary measure is ignored. In the event of a problem
or failure, please contact your dealer.
FCC STATEMENT
This device complies with Part 15 of the FCC Rules. Operation is subject to the
following two conditions: (1) this device may not cause harmful interference,
and (2) this device must accept any interference received, including interference
that may cause undesired operation.
Caution: Exposure to radio frequency radiation.
The device shall be used in such a manner that the potential for human contact
during normal operation is minimized.
FEDERAL COMMUNICATIONS
COMMISSION NOTICE
This equipment has been tested and found to comply with the limits for a Class
B digital device, pursuant to Part 15 of the FCC Rules. These limits are designed
to provide reasonable protection against harmful interference in a residential
installation.
This equipment generates, uses, and can radiate radio frequency energy, and if
not installed and used in accordance with the instructions, may cause harmful
interference to radio communications. However, there is no guarantee that
interference will not occur in a particular installation. If this equipment does
cause harmful interference to radio or television reception, which can be
determined by turning the equipment o and on, the user is encouraged to try
and correct the interference by one or more of the following measures:
• Reorient or relocate the receiving antenna.
• Increase the distance between the equipment and the receiver.
• Connect the equipment to an outlet on a circuit dierent from that to which
the receiver is connected.
• Consult the dealer or an experienced radio/TV technician for help.
FCC Caution: Any changes or modications not expressly approved by the
party responsible for compliance could void the user’s authority to operate this
equipment.
FCC RADIATION EXPOSURE STATEMENT:
This equipment complies with FCC radiation exposure limits set forth for an
uncontrolled environment. This equipment should be installed and operated
with a minimum distance of 20cm between the radiator and your body.
This transmitter must not be co-located or operating in conjunction with any
other antenna or transmitter.
MODIFICATIONS
The FCC requires the user to be notied that any changes or modications to
this device that are not expressly approved by Cambridge Audio, may void the
user’s authority to operate the equipment.
CANADA-INDUSTRY CANADA (IC)
This radio transmitter has been approved by Industry Canada.
This Class B digital apparatus complies with Canadian standard ICES-003.
This device complies with Industry Canada License exempt RSS standard(s).
Operation is subject to the following two conditions.
(1) this device may not cause interference and (2) this device must accept any
interference, including interference that may cause undesired operation of the
device.
This equipment complies with FCC RF radiation exposure limits set forth for an
uncontrolled environment. This equipment should be installed and operated
with a minimum distance of 20 centimeters between the radiator and your body
INDUSTRIE CANADA (IC)
Le présent appareil est conforme aux CNR d’Industrie Canada applicables
aux appareils radio exempts de licence. L’exploitation est autorisée aux deux
conditions suivantes :
(1) l’appareil ne doit pas produire de brouillage, et (2) l’utilisateur de l’appareil
doit accepter tout brouillage radioélectrique subi, même si le brouillage est
susceptible d’en compromettre le fonctionnement.
ce matériel est conforme aux limites d’exposition aux rayonnements rf de fac
énoncés dans un autre environnement. ce matériel doit être installé et exploité
à une distance minimale de 20 cm entre le radiateur et votre corps. .
EUROPE-EUROPEAN UNION NOTICE
Radio products with the CE alert marking comply with the RED Directive
(2014/53/EU) issued by the Commission of the European Community.
Radio Frequency: 2.402GHz-2.48GHz
The Max. transmit power: 10 dBm
This product can be used across EU member states
Compliance with this directive implies conformity to the following European
Norms.
• EN 62368-1 – Product Safety.
• EN 300 328 – Technical requirement for radio equipment.
• EN 301 489 – General EMC requirements for radio equipment.
AP360431 CA0858 USERS MANUAL ARTWORK.indd 4 15/05/2018 11:19 AM
5
ALVA TT
ENGLISH
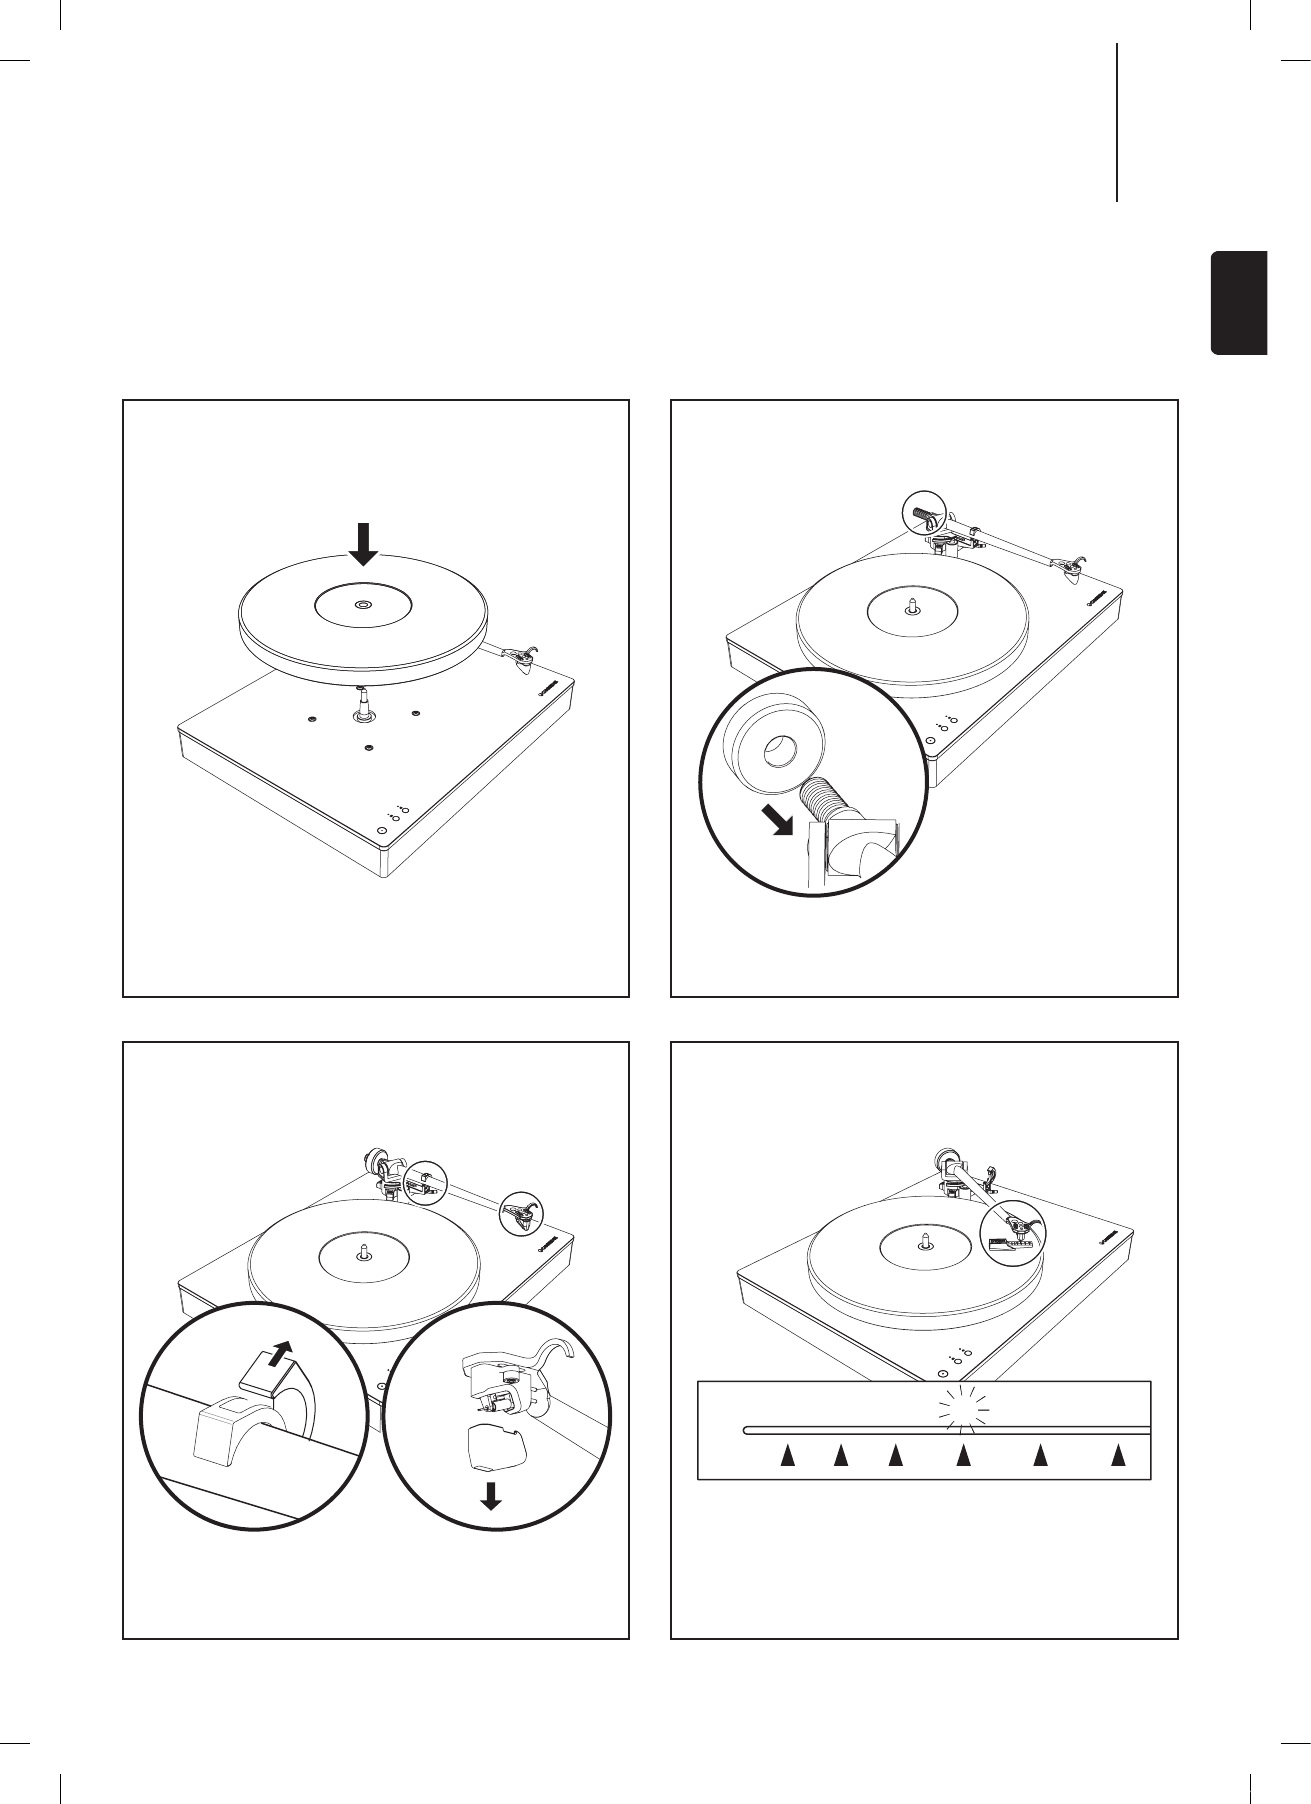
Assembly/setup
1 2
43
34
Gr 2.5 1.5 1.252
AP360431 CA0858 USERS MANUAL ARTWORK.indd 5 15/05/2018 11:19 AM
6
5
Assembly/setup
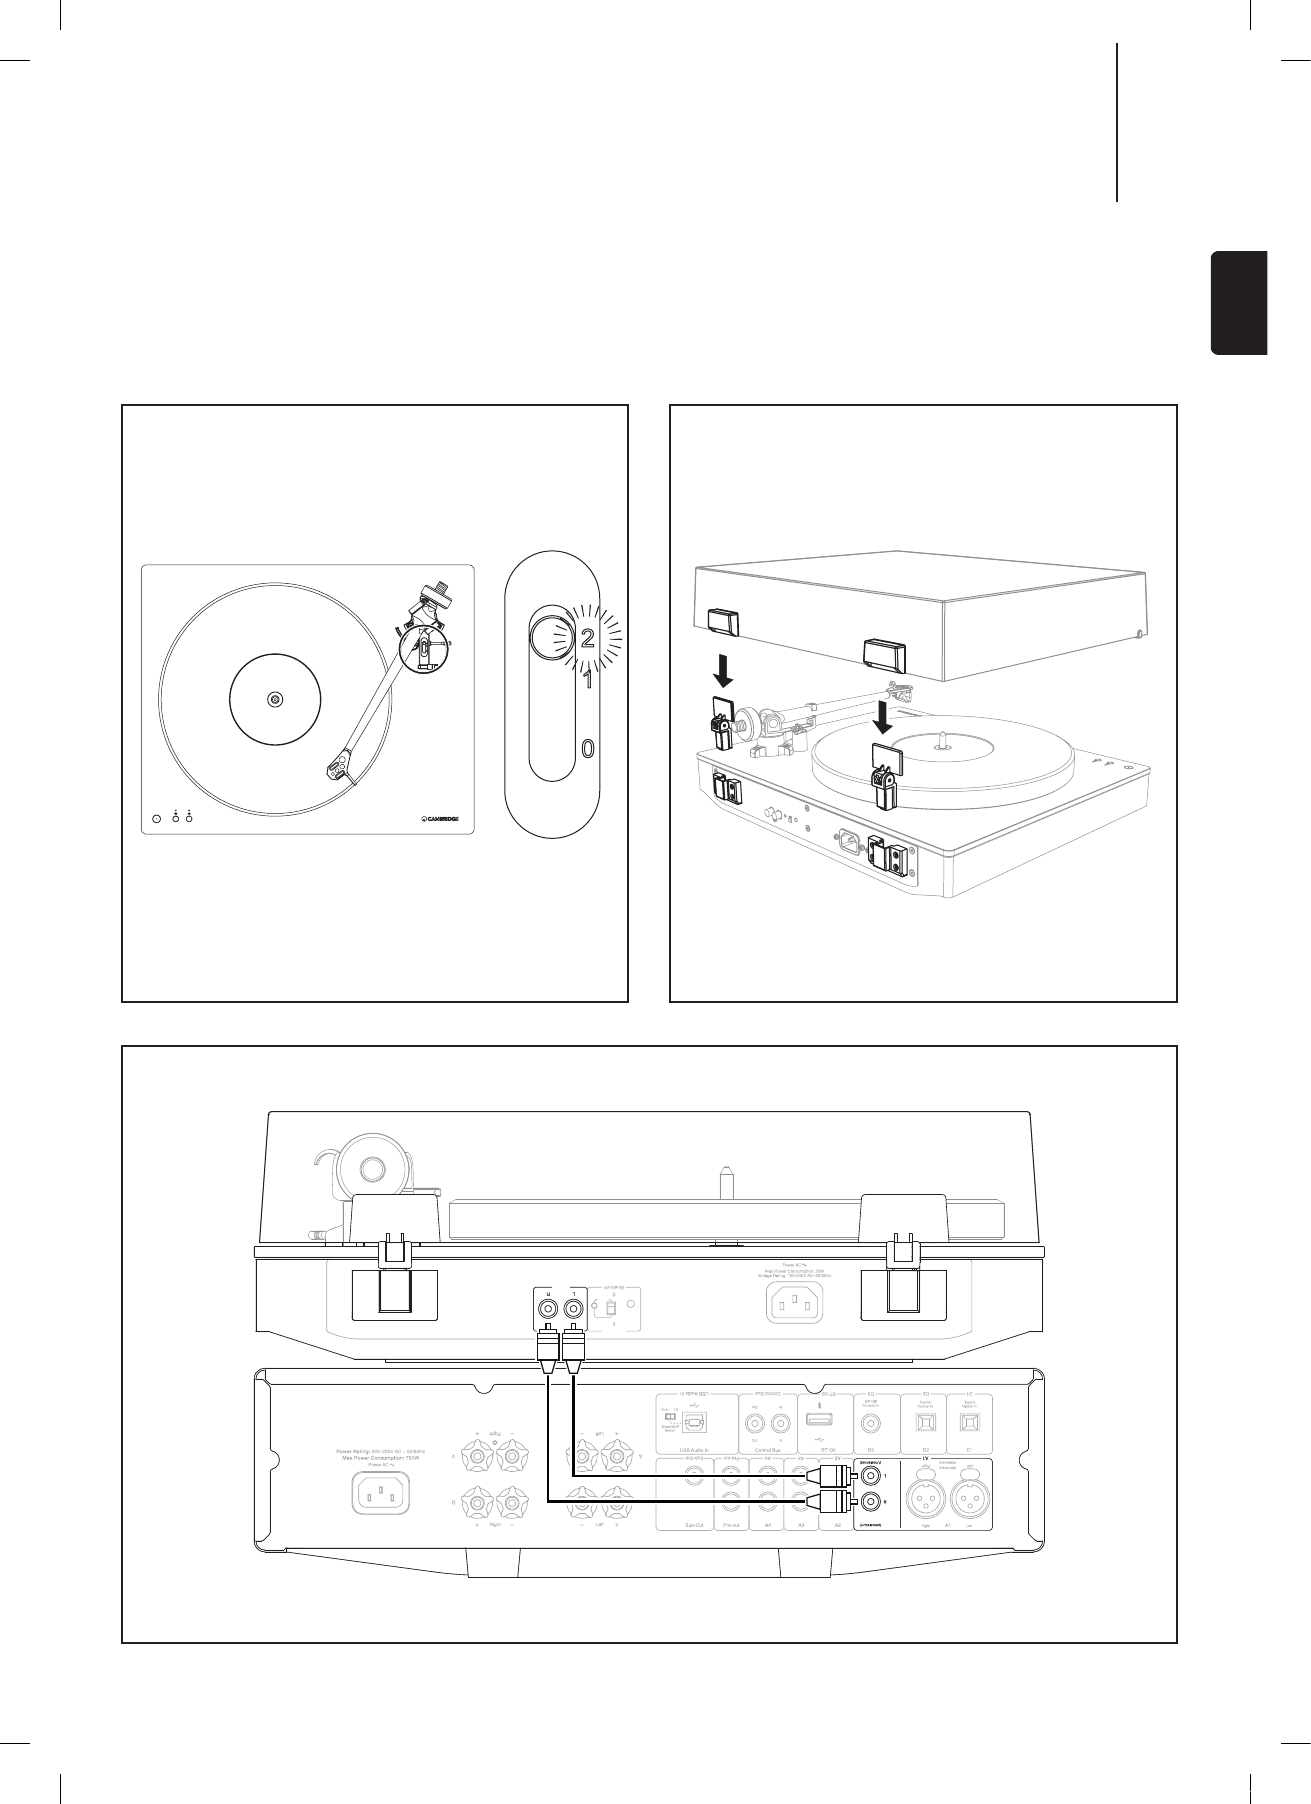
With the tonearm on the stylus force gauge, adjust the counterweight until the stylus force gauge
is parallel to the surface of the platter.
Counterweight
adjustment
This indicates that the tonearm is heavy and the counter-
weight should be adjusted accordingly.
This indicates that the tonearm is too light and the counter-
weight should be adjusted accordingly.
Return the arm to its arm rest to adjust the counterweight.
This part of the process requires care and patience
AP360431 CA0858 USERS MANUAL ARTWORK.indd 6 15/05/2018 11:19 AM
7
ALVA TT
ENGLISH
7
8
6
Output
Output Bluetooth
LED
On
Off Pairing
Output
Output
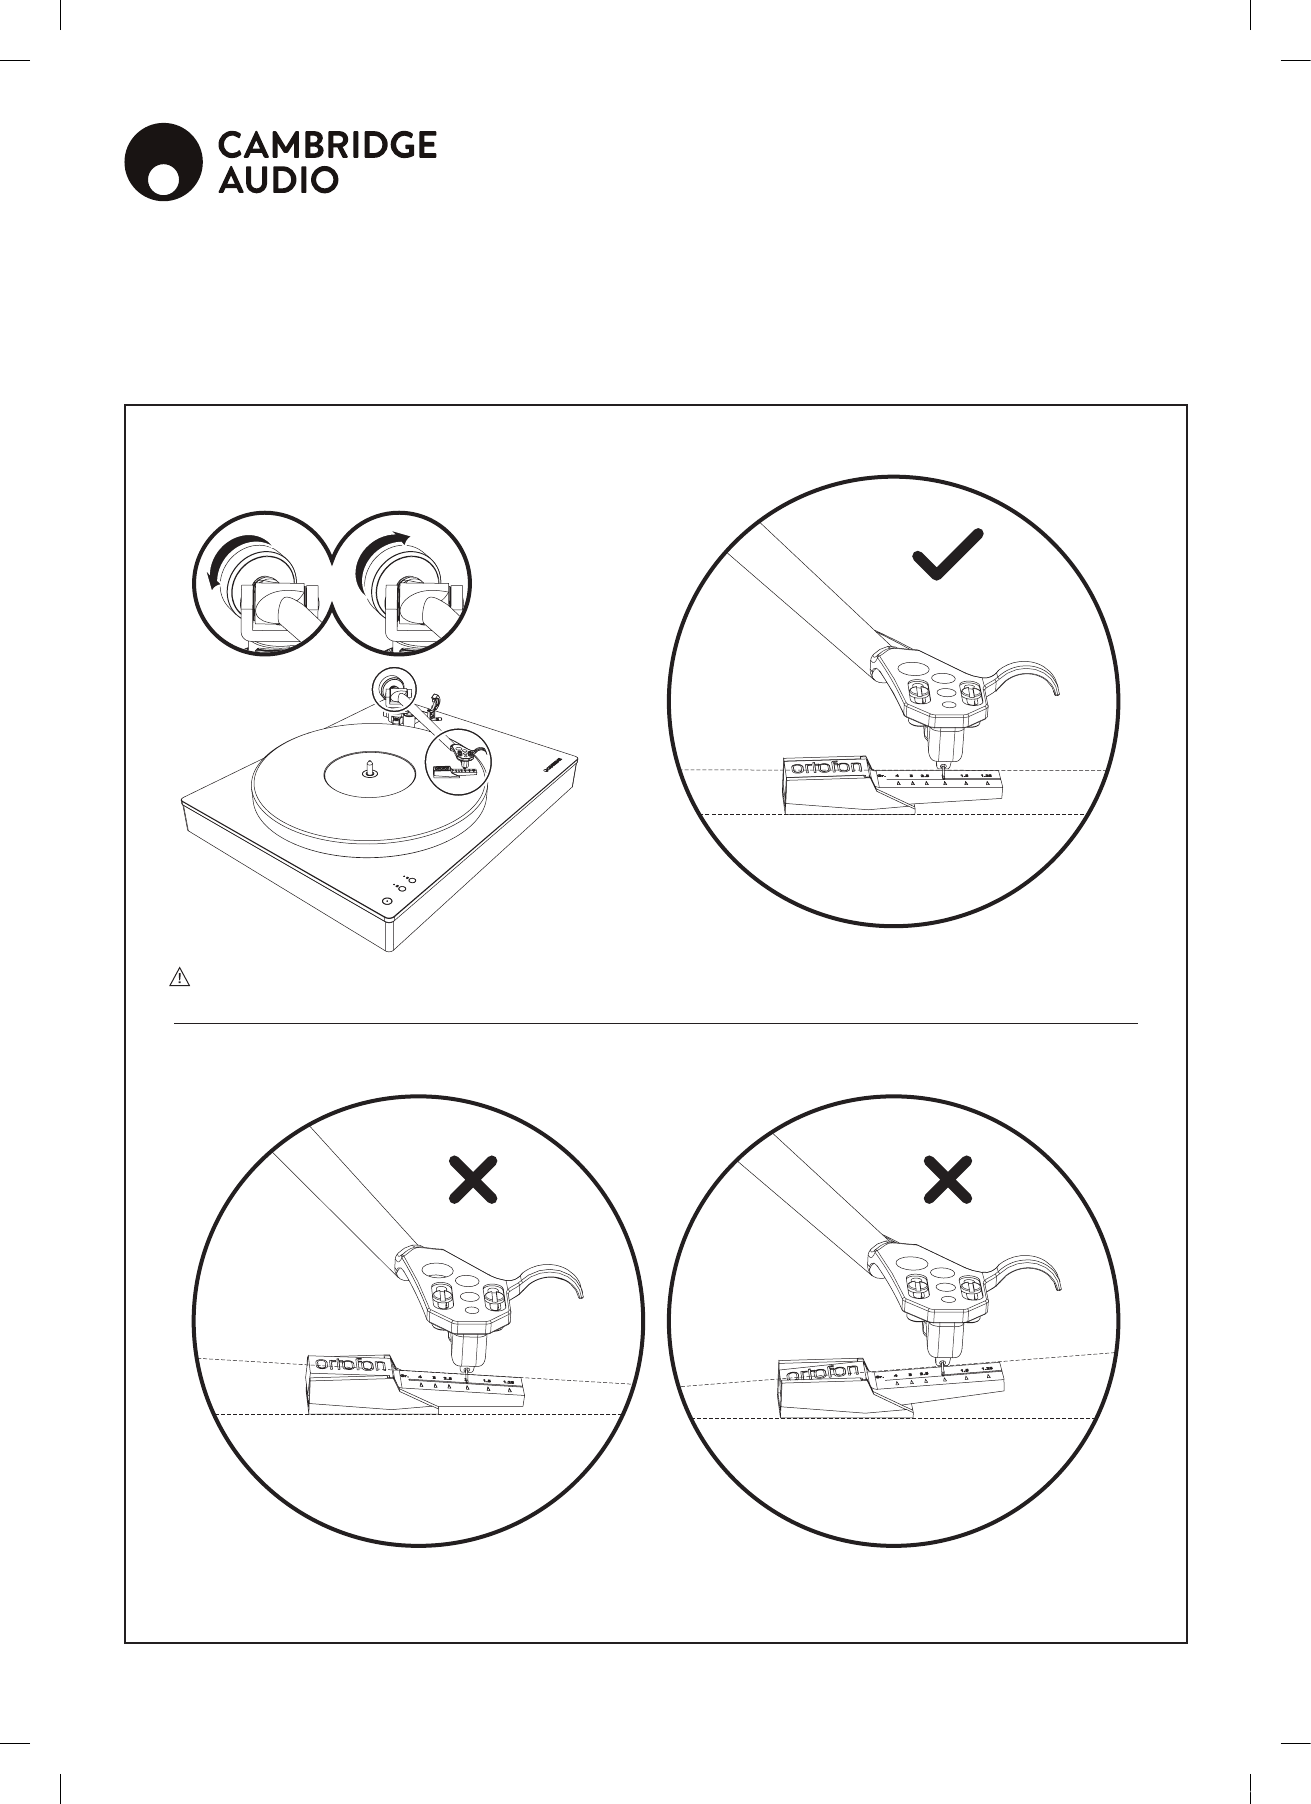
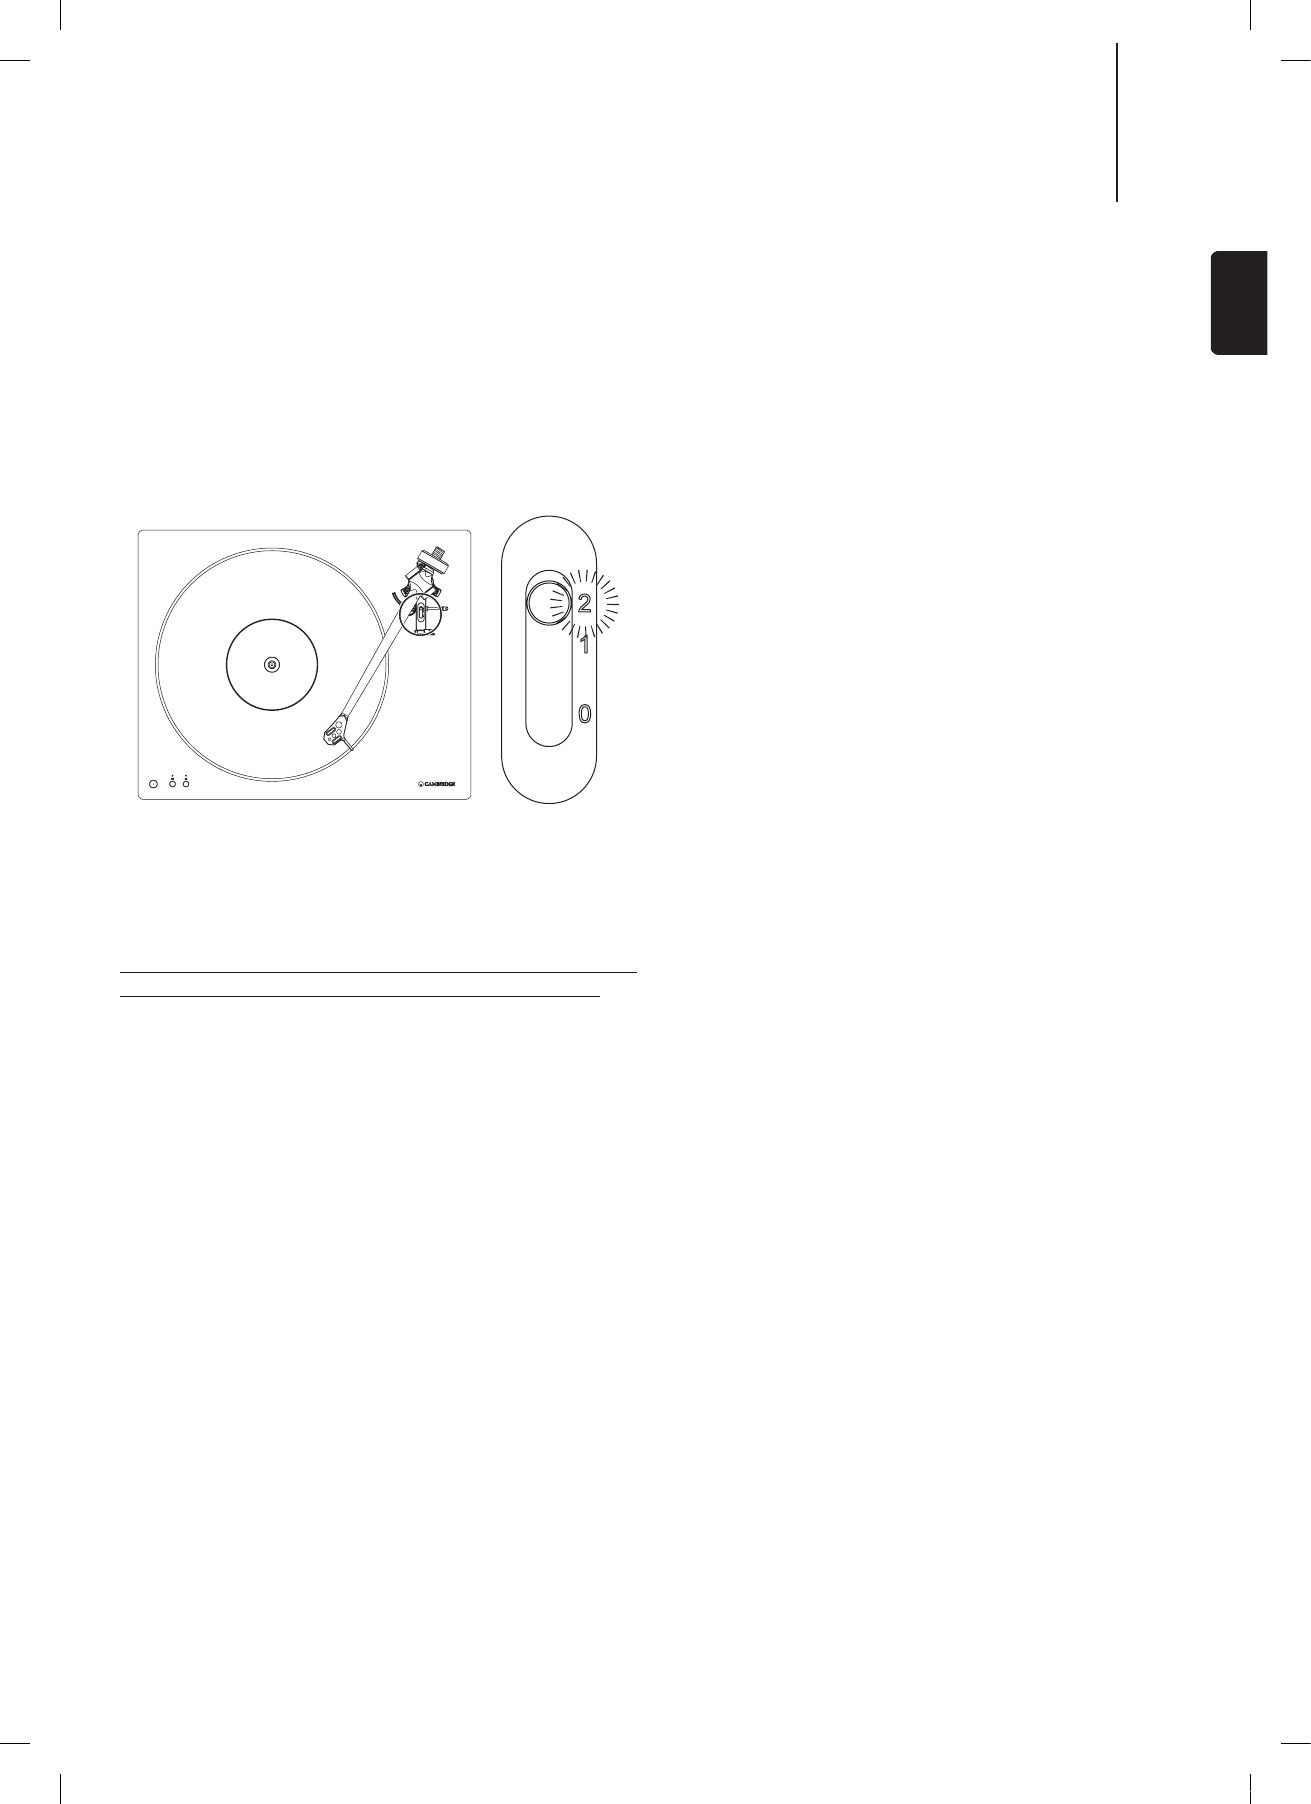
The bias should be adjusted to match the tracking force.
For the Cambridge Audio Moving Coil cartridge, the bias should be set to 2.
Anti-skating (bias)
adjustment
AP360431 CA0858 USERS MANUAL ARTWORK.indd 7 15/05/2018 11:20 AM
8
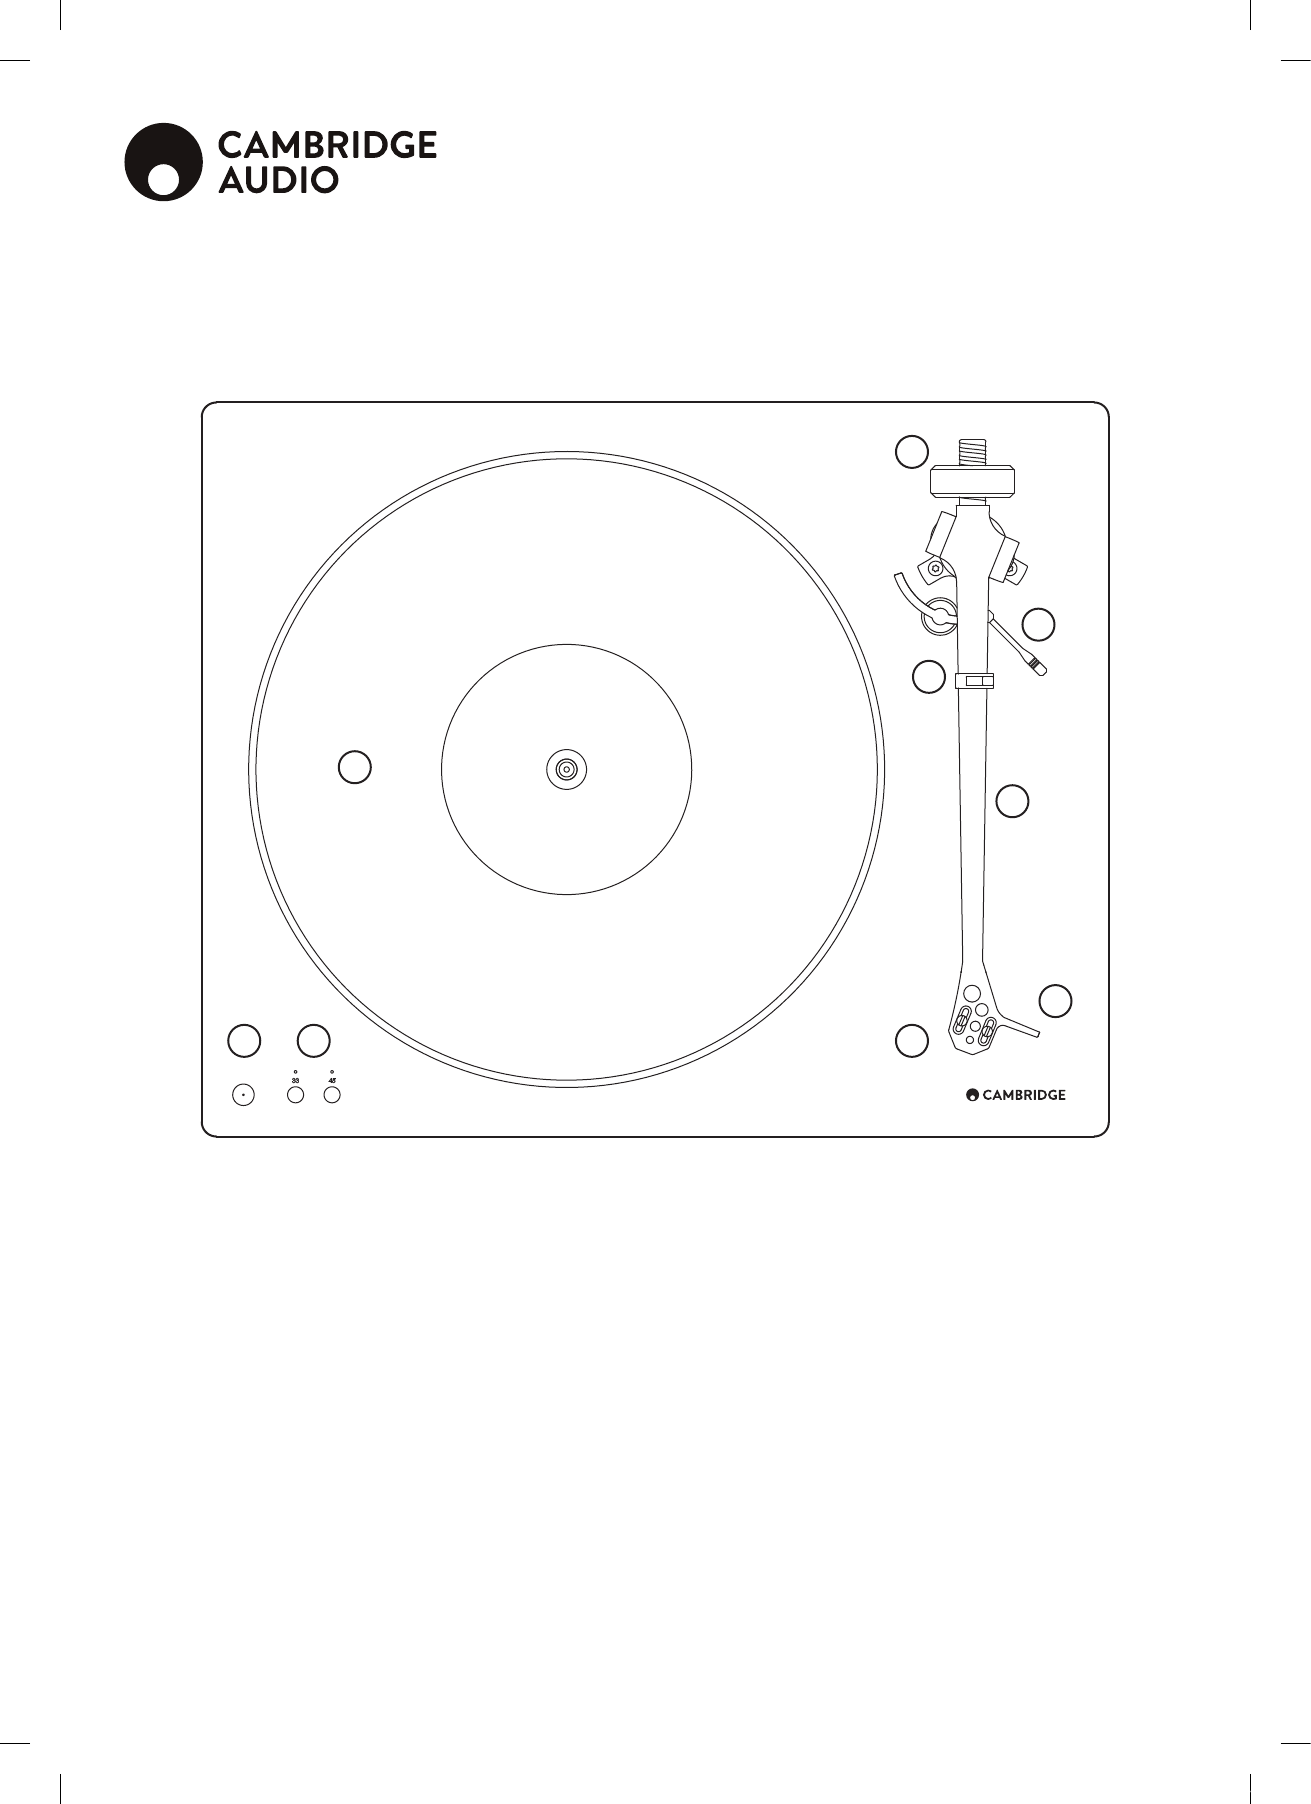
Top view
1. STANDBY/ON
Switches the unit between Standby mode (indicated by dim LED)
and On (indicated by bright LED). Standby mode is a low power
mode where the power consumption is less than 0.5 Watts.
2. RECORD SPEED BUTTONS AND START/
STOP
To start the motor running, press the speed button according to the
record being played. Press again to stop.
3. MAIN PLATTER
4. TONEARM COUNTERWEIGHT
Used to adjust tracking force (downforce).
5. TONEARM REST
6. TONEARM LIFT LEVER
Raises and lowers the arm onto the record to be played.
7. TONEARM
8. FITTED CAMBRIDGE AUDIO MC
CARTRIDGE
9. HEADSHELL WITH FINGER LIFT
3
1 2 8
7
9
4
5
6
AP360431 CA0858 USERS MANUAL ARTWORK.indd 8 15/05/2018 11:20 AM
9
ALVA TT
ENGLISH
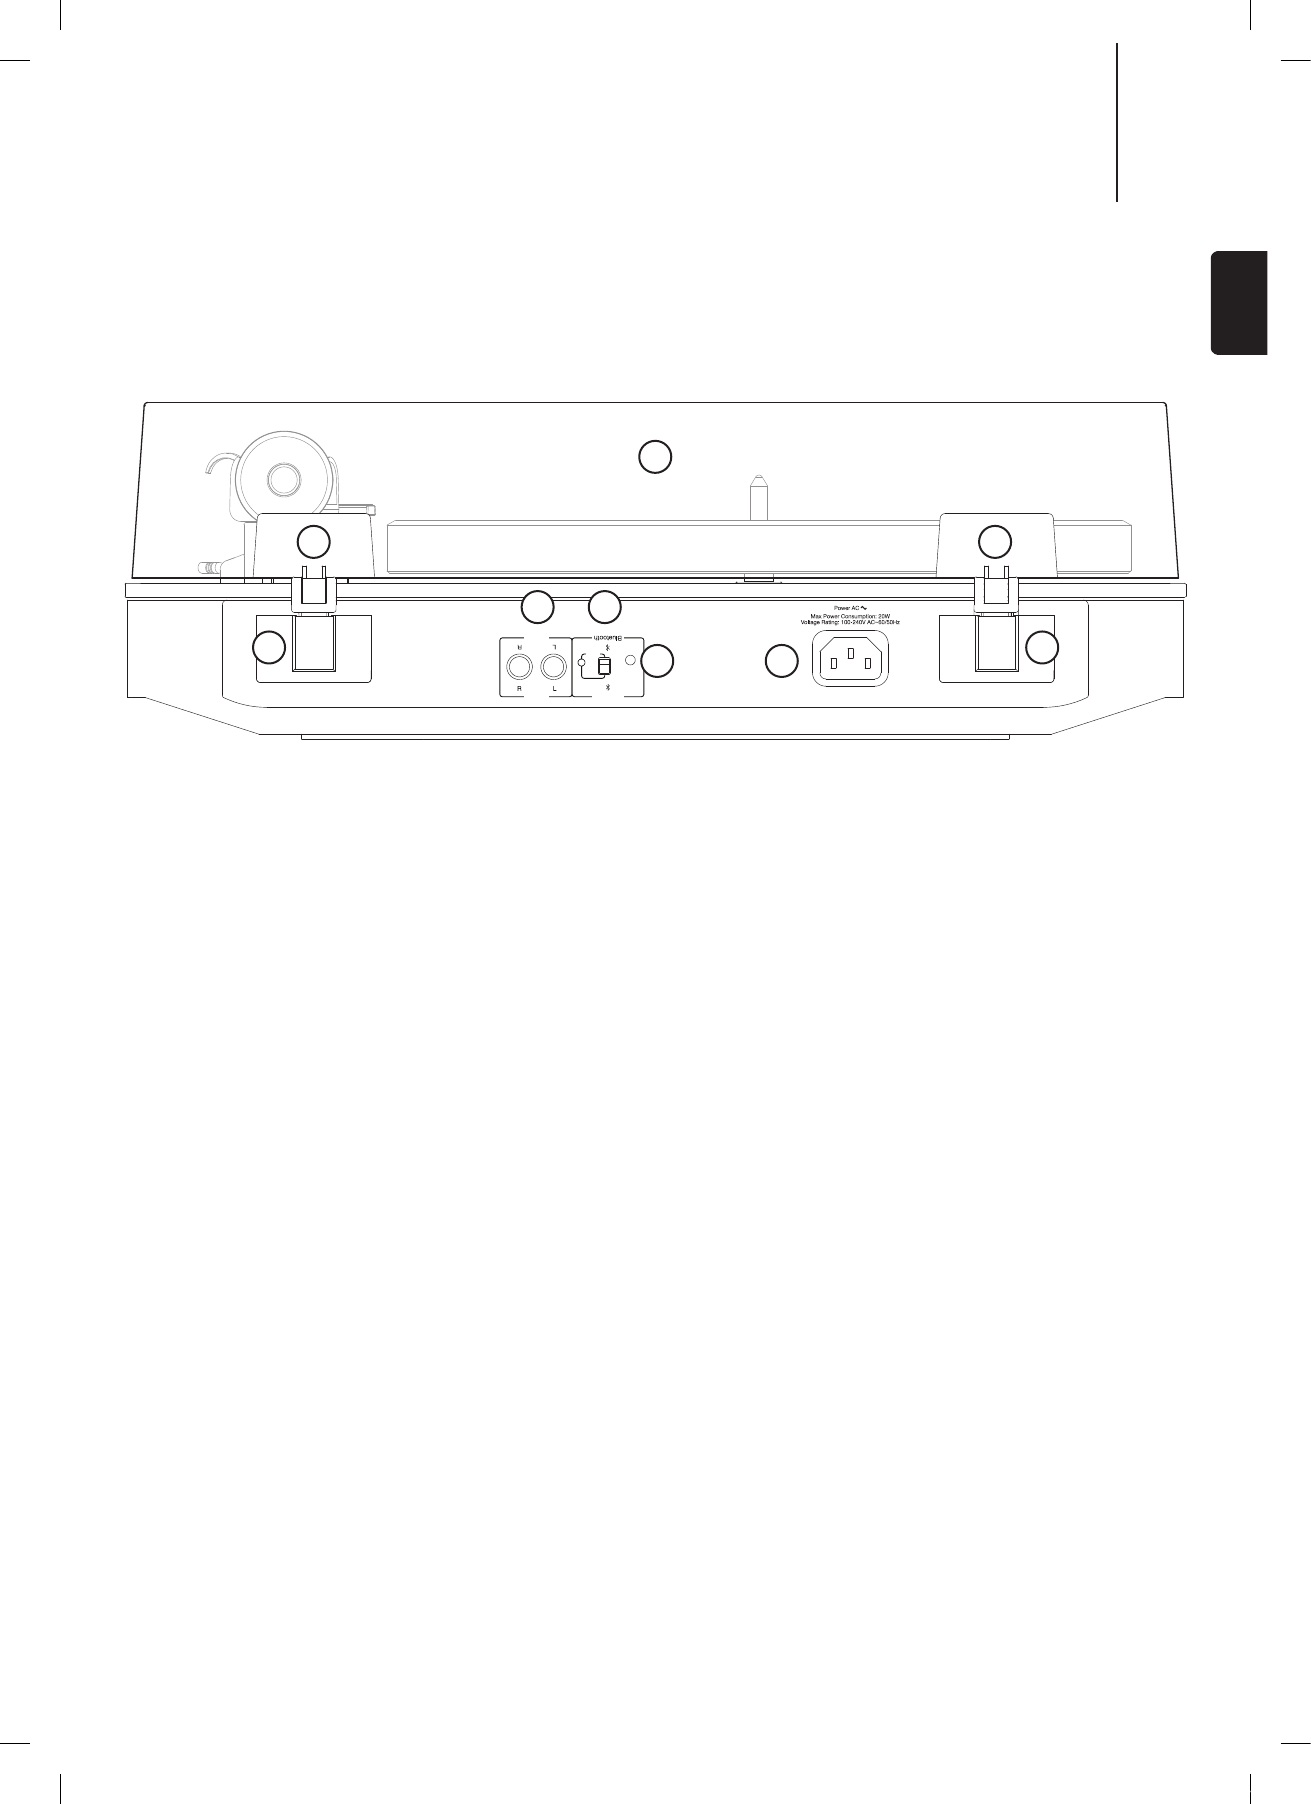
Rear panel
1. LID
Turntable cover.
2. LID HINGES
3. HINGE FASTENERS
4. SIGNAL OUTPUT SOCKETS
The turntable must be connected to the line in of an amplier using
the supplied RCA cable.
5. BLUETOOTH STATUS LED WITH ON/
OFF SWITCH
To turn the Bluetooth LED light o or on, set the LED switch to your
desired position.
6. BLUETOOTH PAIRING BUTTON
7. AC POWER SOCKET
Output
Output Bluetooth
LED
On
Off Pairing
1
2
3 3
2
76
4 5
AP360431 CA0858 USERS MANUAL ARTWORK.indd 9 15/05/2018 11:20 AM

10
Operating instructions
AUTO POWER DOWN (APD)
This unit has an Auto Power Down function. The product will
automatically switch to standby mode after inactivity of 20 minutes.
DISABLING THE AUTO POWER DOWN
If you wish to disable the APD function, then press and hold the
standby button for 5 seconds when in standby. This can then be
reset to factory defaults by plugging in the mains lead with the
standby button held down.
PLAYING RECORDS
The record player is compatible with 33 1/3rpm and 45rpm records.
Place the record over the spindle holding the record only by its
outermost edge.
Note: Before playing, it is a good idea to clean the record using
an appropriate cleaning brush designed specically for use with
records. We particularly recommend the type with soft carbon bre
bristles which also reduce static charge on the record surface.
Move the tonearm so that the stylus is over the start of the record
and then switch the motor on. Now use the tonearm lift lever to
lower the stylus onto the record.
When nished, lift the stylus from the record using the tonearm lift
lever before turning the motor o. Return the arm to the tonearm
rest.
Note: To prevent dust on the record, always return records to their
sleeves.
CHANGING REPLAY SPEED
Turn on the unit. Press the appropriate speed button according to
the record being played. Press the speed button again to stop the
platter.
MAINTENANCE AND CLEANING
Your record player requires little or no regular maintenance.
Remove dust with a slightly moistened antistatic cloth. Never use
a dry cloth because this will create static electricity which attract
more dust. Antistatic cleaning uids are available at specialist
stores. It is recommended to t the stylus cover before cleaning or
maintenance is carried out to avoid damage.
CARTRIDGE REPLACEMENT/
ADJUSTMENT
The record player is supplied with a factory tted and adjusted
Cambridge Audio high output moving coil cartridge fully aligned
and setup at the factory. The following instructions for adjusting the
cartridge are provided in case the cartridge is replaced by a dierent
model at a later date.
Note: It is not necessary to adjust the factory tted cartridge.
The supplied cartridge has a lifespan of approximately 1000-2000
hours.
CARTRIDGE FITTING
Only use a Moving Magnet (MM) or high output Moving Coil (MC)
cartridge. All cartridges with half inch mounting holes can be tted.
Leaving the needle's protection cover on, t the cartridge to the
headshell using the screws supplied with the cartridge by passing
one screw through each slot in the headshell. Do not tighten the
nuts yet.
Connect the tonearm wires to the cartridge pins as follows:
White – Left channel positive (L+)
Red – Right channel positive. (R+)
Green – Right channel return (R –)
Blue – Left channel return (L –)
CARTRIDGE ALIGNMENT
Because a normal tonearm pivots about its bearing point as it
traverses a record, the angle between the cartridge body and record
groove will gradually vary as the record is played.
The idea of cartridge alignment is to minimise this inherent error. A
simple alignment protractor is included. Follow the instruction on
the Alignment Protractor.
Note: The record player is fully aligned at the factory for the
supplied Cambridge Audio MC cartridge and does not require this
adjustment to be made.
CARTRIDGE DOWNFORCE ADJUSTMENT
Refer to the 'Assembly/setup' section of this manual.
AP360431 CA0858 USERS MANUAL ARTWORK.indd 10 15/05/2018 11:20 AM
11
ALVA TT
ENGLISH
ANTI-SKATING (BIAS) ADJUSTMENT
The bias should be adjusted to match the tracking force. For the
Cambridge Audio Moving Coil cartridge, the bias should be set to 2.
See below diagram.
BLUETOOTH
This product is a Bluetooth transmitter only and transmits high
denition Bluetooth audio. Supports SBC, Qualcomm® aptX™ and
aptX™ HD audio codecs.
Note: Do not pair this product with your portable devices such as
smartphones or tablets, as these devices are also transmitters.
BLUETOOTH PAIRING
Note: Before pairing this product, It is highly recommended to
only turn on the Bluetooth device you want to pair and activate its
pairing mode.
To start pairing with your Bluetooth device such as a pair of wireless
Bluetooth headphones, press the Bluetooth paring button located
on the rear of the unit for 2 seconds. Once successful, the Blue
LED will stop ashing and will enter paired mode. Refer to your
Bluetooth device for more information.
BLUETOOTH LED STATUS
Note: Please make sure that the LED switch is set to 'on' position.
Slowly ashing – Searching for a paired device.
Fast ashing – In pairing mode.
Solid – Paired to a device using SBC codec.
Long solid intervals – Paired to a device using aptX/aptX HD codec.
REMOVING PAIRED DEVICES
To clear all paired devices, press and hold the Bluetooth pairing
button for approximately 20 seconds. Once successful, the Bluetooth
LED will go o for approximately 3 seconds before reverting back to
'searching' mode.
AP360431 CA0858 USERS MANUAL ARTWORK.indd 11 15/05/2018 11:20 AM
12
Technical specications
TURNTABLE
Type Direct Drive
Turntable Speeds 33 1/3, 45rpm
Motor Torque 1.6kg/cm
Wow & Flutter 0.06%
Turntable Platter POM
(Polyoxymethylene)
Diameter 305mm
TONEARM
Type One piece aluminium
casting
Eective Length 238mm
Overhang 17.2mm
Eective mass 11g
INTERNAL PHONO STAGE
Gain @ 1kHz 42dB
Nominal output (with CA cartridge) 250mVrms
Equivalent input noise (A-Weighted) 0.1uVrms
RIAA Curve Accuracy +/-0.3dB 30Hz-20kHz
Signal/Noise ratio >90dB
(ref 1V out, 20-20K BW)
THD+N 1kHz 0.0025%
Input Impedance 47kΩ
Input Capacitance 320pF
OUTPUTS
Audio Output RCA line level
Bluetooth SBC/aptX/aptX HD
GENERAL
Power Supply 100-240V
Power Consumption 5W Approx., 20W
max, <0.5W (Standby)
Dimensions (W x H x D) 435 x 138 x 370mm
Weight 10 kg
CARTRIDGE
Type High Output Moving
Coil
Frequency response +/- 1dB 30Hz-20kHz
Stylus Elliptical
Cantilever Aluminium
Output level 2mV @ 1kHz
Tracking force 2g
Recommended load 47kΩ
AP360431 CA0858 USERS MANUAL ARTWORK.indd 12 15/05/2018 11:20 AM

13
ALVA TT
ENGLISH
NO SIGNAL THROUGH ONE OR OTHER
CHANNEL OR BOTH CHANNELS
Possible Wiring fault. Check that there are connections from the
cartridge to the internal tonearm wiring.
Amplier not switched on.
Amplier or speakers defective or muted.
No connection to the loudspeakers.
DISTORTED OR INCONSISTENT SOUND
FROM ONE OR BOTH CHANNELS
Record player is connected to wrong input of amplier.
Stylus/needle or cantilever damaged.
Wrong rpm used for record.
Bad connections, plugs not fully pushed home.
Tracking force and/or anti-skate incorrectly adjusted.
Record player is connected to phono input or phono stage.
If you experience any trouble with your product, visit the help
section on our webpage at http://techsupport.cambridgeaudio.com
Troubleshooting
AP360431 CA0858 USERS MANUAL ARTWORK.indd 13 15/05/2018 11:20 AM