Audio Technica CK200BT Wireless Headphones User Manual
Audio-Technica Corporation Wireless Headphones
User Manual
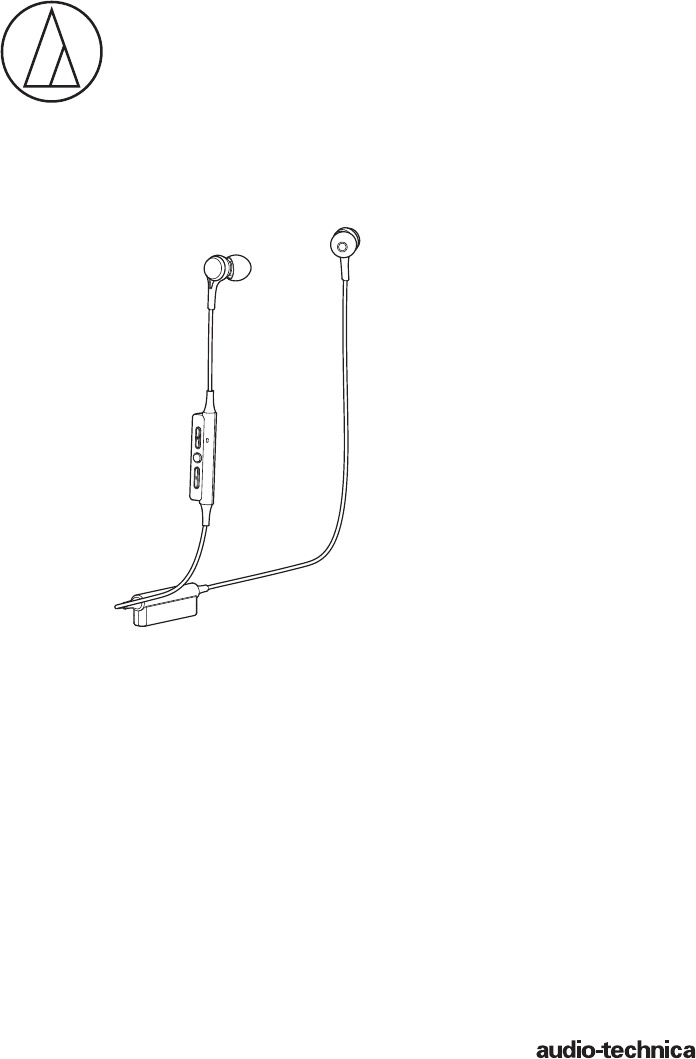
User Manual
Wireless Headphones
ATH-CK200BT

1
Thank you for purchasing this Audio-Technica product.
Before using the product, please read through the Quick Start Guide and Caution Guide, as well as this user
manual when necessary, to ensure that you will use the product correctly.
Although this product was designed to be used safely, failing to use it correctly may result in an accident. To
ensure safety, observe all warnings and cautions while using the product.
Introduction
Safety precautions
Cautions for the product
• Do not use the product near medical equipment. Radio waves
may affect cardiac pacemakers and medical electronic
equipment. Do not use the product inside medical facilities.
• When using the product in aircraft, follow airline instructions.
• Do not use the product near automatic control devices such
as automatic doors and fire alarms. Radio waves may affect
electronic equipment and cause accidents due to malfunction.
• Do not disassemble, modify or attempt to repair the product
to avoid electric shock, malfunction or fire.
• Do not subject the product to strong impact to avoid electric
shock, malfunction or fire.
• Do not handle the product with wet hands to avoid electric
shock or injury.
• Disconnect the product from a device if the product begins to
malfunction, producing smoke, odor, heat, unwanted noise or
showing other signs of damage. In such a case, contact your
local Audio-Technica dealer.
• Do not allow the product to get wet to avoid electric shock or
malfunction.
• Do not put foreign matter such as combustible materials,
metal, or liquid in the product.
• Do not cover the product with a cloth to avoid fire or injury by
overheating.
• Follow applicable laws regarding mobile phone and
headphone use if using headphones while driving.
• Do not use the product in places where the inability to hear
ambient sound presents a serious risk (such as at railroad
crossings, train stations, and construction sites).
• The product effectively shields external sound, so you may
not hear sound around you clearly while wearing the product.
Adjust the volume to a level where you can still hear
background sound and monitor the area around you while
listening to music.
• Store the eartips out of the reach of small children.
• When charging, make sure to use the included USB charging
cable.
• Do not charge with devices that have quick-charge
functionality (with a voltage of 5 V or more). Doing so may
cause the product to malfunction.
• To prevent damage to your hearing, do not raise the volume
too high. Listening to loud sound for an extended period may
cause temporary or permanent hearing loss.
• Discontinue use if skin irritation results from direct contact
with the product.
• If you begin to feel unwell while using the product,
discontinue use immediately.
• When removing the product from your ears, check to make
sure the eartips are still attached to the main unit. If the
eartips become lodged in your ears and you are unable to
remove them, consult a physician at once.
• Temporarily discontinue use if you experience itchiness from
wearing the product.
Introduction
Safety precautions
Cautions for the product
Cautions for rechargeable battery
Notes on use
Part names and functions
Charging the battery
Connecting via Bluetooth wireless technology
About pairing
Pairing a Bluetooth device
Using the product
Power supply ON/OFF
Wearing the product
Listening to audio
Talking on the phone
Auto power o function
Reset function
Cleaning
Eartips
Eartip size
Replacing the eartips
Troubleshooting
Indicator lamp display
Specifications

2
Safety precautions
Cautions for rechargeable battery
The product is equipped with a rechargeable battery (lithium polymer battery).
• If battery fluid gets into eyes, do not rub them. Rinse
thoroughly with clean water such as tap water and consult a
doctor immediately.
• If battery fluid leaks, do not touch fluid with bare hands. If
fluid remains inside the product, it may cause malfunction. If
battery fluid leaks, contact your local Audio-Technica dealer.
– If fluid gets in your mouth, gargle thoroughly with clean
water such as tap water and consult a doctor immediately.
– If your skin or clothing comes in contact with fluid,
immediately wash the affected skin or clothing with water.
If you experience skin irritation, consult a doctor.
• To avoid leakage, generation of heat or explosion:
– Never heat, disassemble or modify the battery, nor dispose
of it in a fire.
– Do not attempt to pierce with a nail, hit with a hammer or
step on the battery.
– Do not drop the product or subject it to strong impact.
– Do not get the battery wet.
• Do not use, leave or store the battery in the following places:
– Area exposed to direct sunlight or high temperatures and
humidity
– Inside of a car under the blazing sun
– Near heat sources such as heat registers
• Charge only with the included USB cable to avoid malfunction
or fire.
• The internal rechargeable battery of this product cannot be
replaced by the user. The battery may have reached the end
of its service life if the usage time becomes significantly
shorter even after the battery has been fully charged. If this is
the case, the battery needs to be repaired. Contact your local
Audio-Technica dealer for repair details.
• When the product is disposed of, the built-in rechargeable
battery needs to be discarded properly. Contact your local
Audio-Technica dealer to learn how to properly dispose of the
battery.
For customers in the USA
FCC Notice
Warning
This device complies with Part 15 of the FCC Rules.
Operation is subject to the following two conditions: (1)
This device may not cause harmful interference, and (2) this
device must accept any interference received, including
interference that may cause undesired operation.
Caution
You are cautioned that any changes or modifications not
expressly approved in this manual could void your authority
to operate this equipment.
Note: This equipment has been tested and found to
comply with the limits for a Class B digital device, pursuant
to part 15 of the FCC Rules. These limits are designed to
provide reasonable protection against harmful interference
in a residential installation. This equipment generates, uses
and can radiate radio frequency energy and, if not installed
and used in accordance with the instructions, may cause
harmful interference to radio communications. However,
there is no guarantee that interference will not occur in a
particular installation. If this equipment does cause harmful
interference to radio or television reception, which can be
determined by turning the equipment off and on, the user
is encouraged to try to correct the interference by one or
more of the following measures:
– Reorient or relocate the receiving antenna.
–
Increase the separation between the equipment and receiver.
– Connect the equipment to an outlet on a circuit different
from that to which the receiver is connected.
– Consult the dealer or an experienced radio/TV technician for
help.
RF Exposure Statement
This transmitter must not be co-located or operated in
conjunction with any other antenna or transmitter used in
other systems. This device complies with FCC radiation
exposure limits set forth for an uncontrolled environment
and meets the FCC radio frequency (RF) Exposure
Guidelines. This equipment has very low levels of RF
energy that is deemed to comply without testing of specific
absorption rate (SAR).
For customers in Canada
IC statement
CAN ICES-3 (B)/NMB-3(B)
This device complies with INDUSTRY CANADA R.S.S. 247.
Operation is subject to the following conditions: (1) This
device may not cause harmful interference, and (2) this
device must accept any interference received, including
interference which may cause undesired operation.
Under Industry Canada regulations, this radio transmitter
may only operate using an antenna of a type and maximum
(or lesser) gain approved for the transmitter by Industry
Canada. To reduce potential radio interference to other
users, the antenna type and its gain should be so chosen
that the equivalent isotropically radiated power (e.i.r.p.) is
not more than that necessary for successful
communication.
This device complies with RSS-102 radiation exposure
limits set forth for an uncontrolled environment.
3
Notes on use
• Be sure to read the connected device’s user manual before use.
• Audio-Technica will not be liable in any way for any loss of data
in the unlikely event that such losses should occur while using
the product.
• On public transportation or in other public places, keep the
volume low so as not to disturb other people.
• Minimize the volume on your device before connecting
theproduct.
• When using the product in a dry environment, you may feel a
tingling sensation in your ears. This is caused by static electricity
accumulated on your body, not by product malfunction.
• Do not subject the product to strong impact.
• Do not store the product in direct sunlight, near heating devices,
or in hot, humid, or dusty places. Additionally, do not allow the
product to get wet.
• When the product is used for a long time, the product may
become discolored due to ultraviolet light (especially direct
sunlight) and wear.
• Make sure to hold the plug when connecting and disconnecting
the included cable or USB charging cable. The included cable or
USB charging cable may become severed or an accident may
occur if you pull on the cable itself.
• When you are not using the included cable or USB charging
cable, disconnect it from the product.
• If the product is placed in a bag while the included cable or USB
charging cable is still connected, the included cable or USB
charging cable may become caught, severed, or broken.
• This product can be used to talk on the phone only when using a
mobile telephone network. Support for telephony apps that use
a mobile data network is not guaranteed.
• If you use the product near an electronic device or transmitter
(such as a mobile phone), unwanted noise may be heard.
In this case, move the product away from the electronic device
or transmitter.
• If you use the product near a TV or radio antenna, noise may be
seen or heard in the television or radio signal. In this case, move
the product away from the TV or radio antenna.
• To protect the built-in rechargeable battery, charge it at least
once every 6 months. If too much time passes between charges,
the life of the rechargeable battery may be reduced, or the
rechargeable battery may no longer be able to be charged.
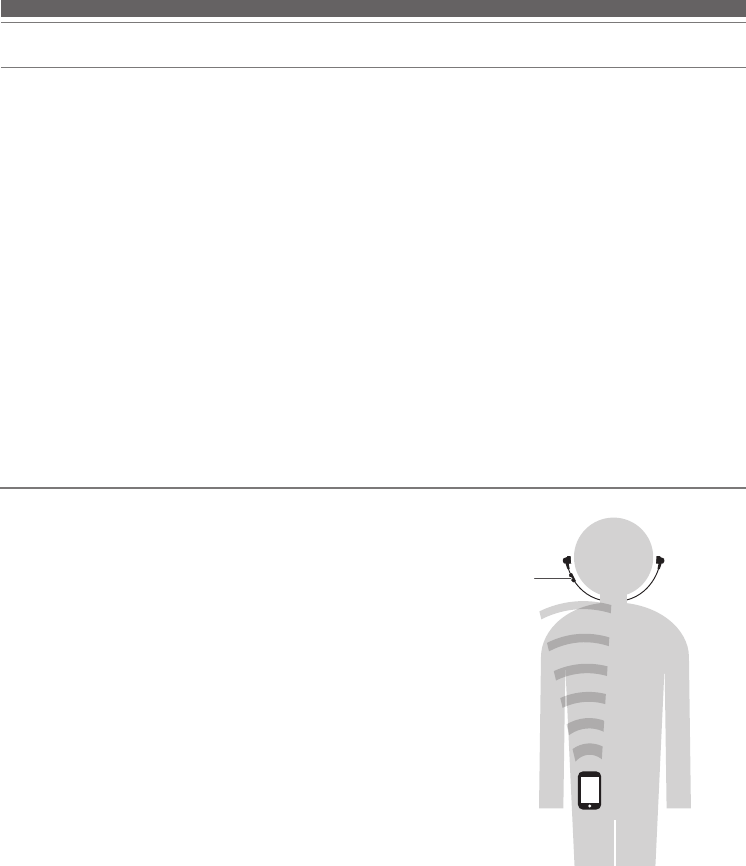
For a more comfortable Bluetooth communication experience
The eective communication range of this product varies
depending on obstructions and radio wave conditions.
For a more enjoyable experience, please use the product as close
as possible to the Bluetooth device. To minimize noise and sound
disruptions, avoid placing your body or other obstacles between
the product’s remote and the Bluetooth device.
Remote
4
Part names and functions
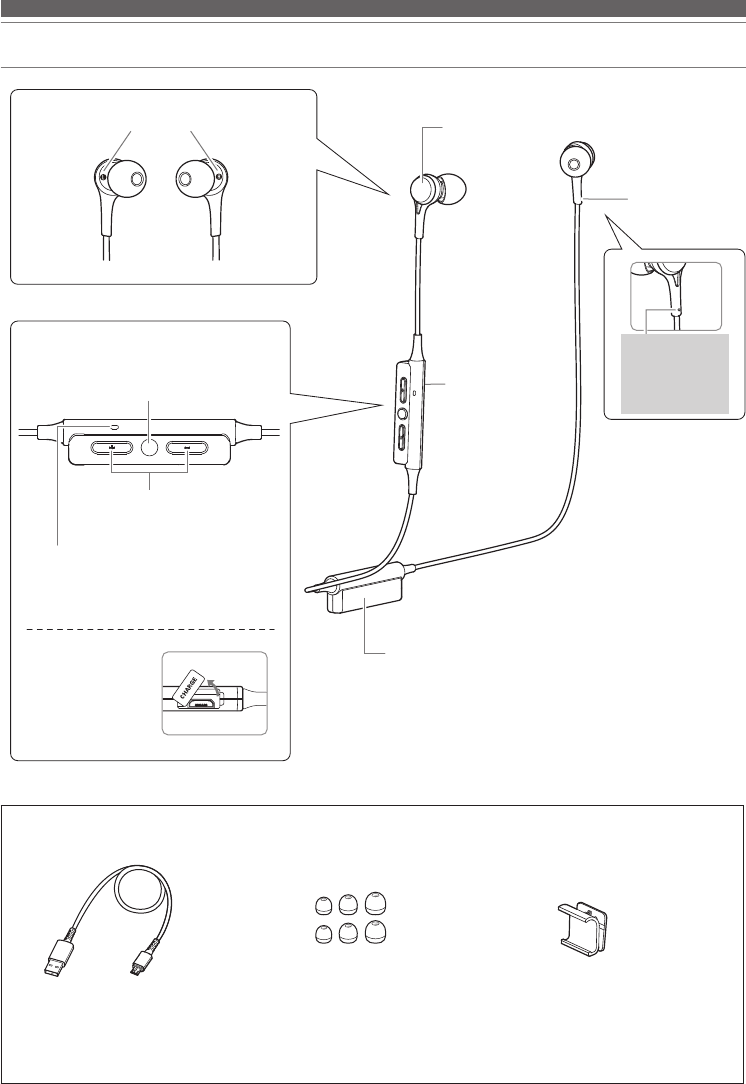
■Accessories
• USB charging cable
(30 cm (1'))
• Eartips* (XS, S, M, L) • Clip
*At the time of purchase, the M-size eartips are attached to the main unit.
Left/right (L/R) indicator
Bushing
Microphone
Use this part
when talking on
the phone with
this product.
Power supply/control button
Use to turn the power supply ON/OFF, play/
pause music and videos, and answer/end
phone calls.
Volume buttons
Adjust the volume using + and –.
Battery jack
Used to connect the
included USB charging
cable and charge the
product.
Housing
Battery case
Indicator lamp
Displays the operating status and battery
level of the product.
The left bushing
has a protrusion
for distinguishing
between the left
and right.
5
Charging the battery
• Fully charge the battery when using for the first time.
• When the rechargeable battery is running low, the product will sound 2 sets of 2 beeps through the headphones,
and an indicator lamp will flash in red. When these beeps sound, charge the battery.
• It takes about 3 hours to charge the battery fully. (This time may vary depending on usage conditions.)
• While the battery is charging, the product's Bluetooth connection remains disabled and therefore the product
cannot be used.
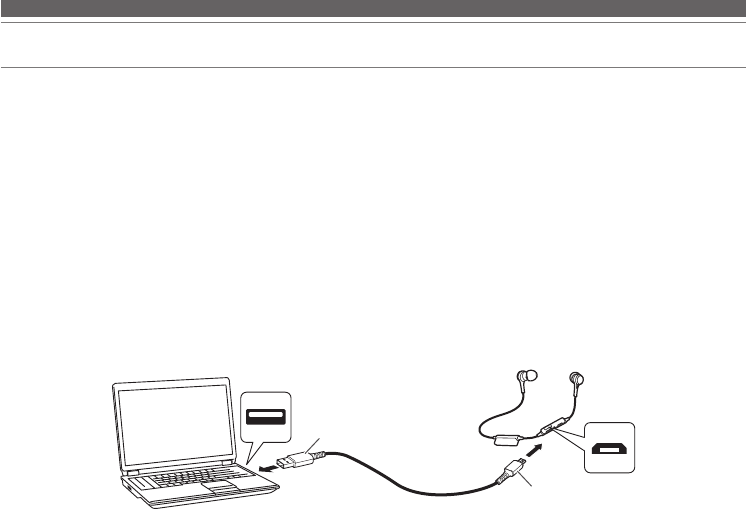
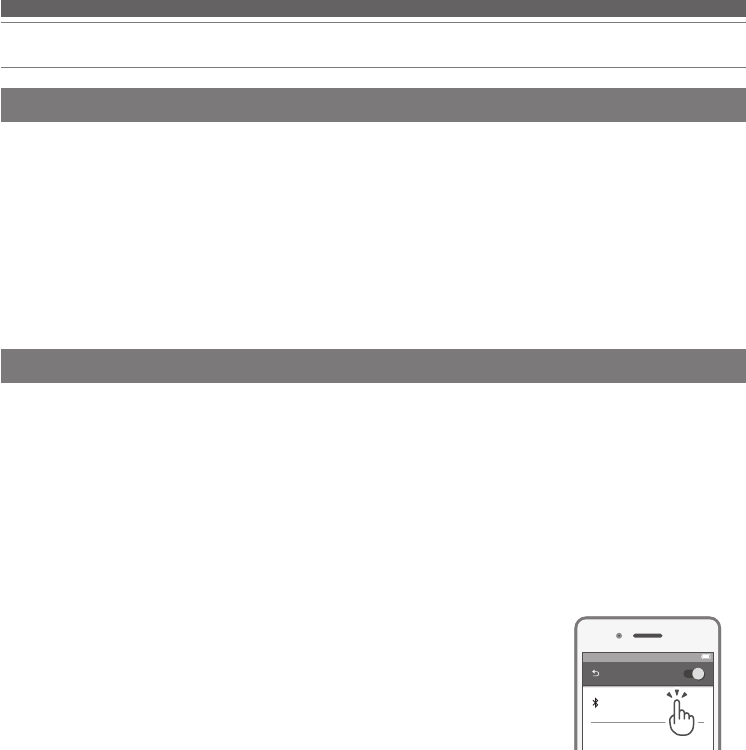
1. Open the battery jack cover.
2. Connect the included USB charging cable (micro USB Type B side) to the battery jack.
• The included USB charging cable is designed for exclusive use with the product. Do not use other cables to
charge the product.
• When inserting the USB charging cable into the USB port or battery jack,
check that the jack is facing in the correct direction before inserting it directly (horizontally).
3. Connect the included USB charging cable (USB Type A side) to the computer to start charging.
• During charging, the indicator lamp lights as follows: *
Lit in red: When charging
Lit in blue: Charging complete
* It may take several seconds for the indicator lamp to light.
4. When charging is complete, disconnect the USB charging cable (USB Type A side) from the computer.
5. Disconnect the USB charging cable (Micro USB Type B) from the battery jack and close the cover firmly.
Battery jack
USB port
USB Type A
USB charging cable
(included)
Micro USB Type B
Computer
6
Connecting via Bluetooth wireless technology
About pairing
Pairing a Bluetooth device
To connect the product to a Bluetooth device, the product needs to pair (register) with the device. Once they are
paired, you do not need to pair them again.
However, you will need to pair again in the following cases:
• If the product is deleted from the Bluetooth device’s connection history.
• If the product is sent out for repair.
• If nine or more devices are paired.
(This product can save the pairing information of up to eight devices. If you attempt to pair a new device when
eight devices have already been paired, the pairing information of the new device will overwrite the information of
the device within the eight paired devices that has the oldest date and time for connection to the product.)
• Read the user manual for the Bluetooth device.
• Place the device within 1 m (3.3') of the product to perform pairing correctly.
• To confirm the progress of the pairing process, wear the product while performing this procedure and listen for
the confirmation tone.
1. Starting with the product turned off, slide the power switch to the “ON” position.
• The indicator lamp will light in purple, and then flash in red and blue.
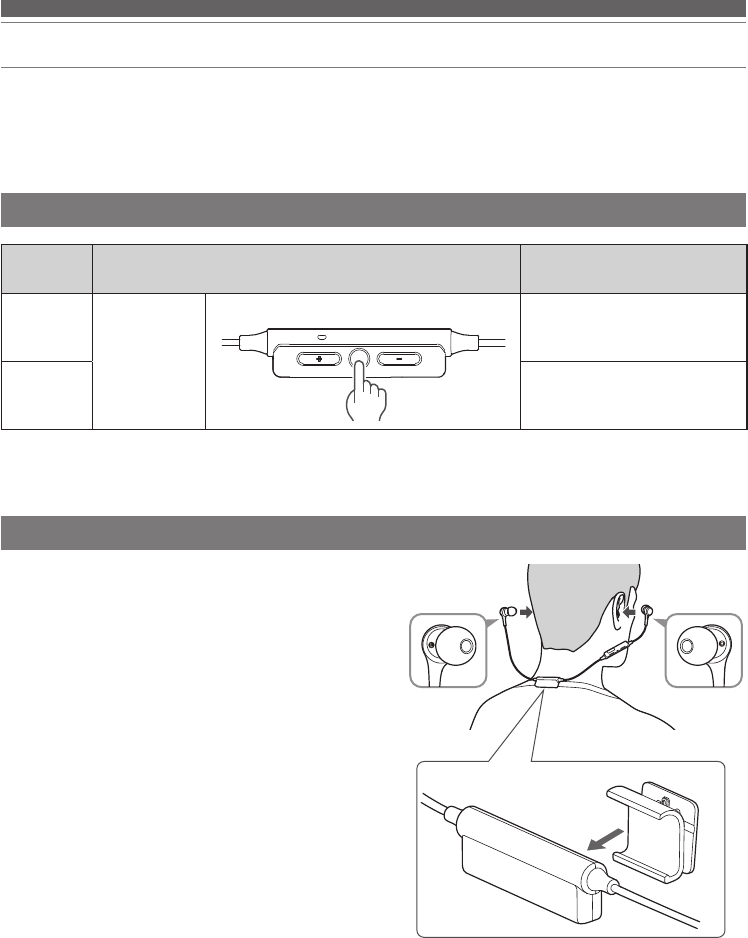
2. Use your Bluetooth device to begin the pairing process and search for the product.
When your Bluetooth device finds the product, "ATH-CK200BT" will be displayed on the device.
• For information about using your Bluetooth device, refer to the device’s user manual.
3. Select "ATH-CK200BT" to pair the product and your Bluetooth device.
• Some devices may ask for a passkey. In this case, enter “0000”. The passkey
may also be called a passcode, PIN code, PIN number, or password.
• The product sounds a confirmation tone when pairing is complete. 100%12:00
Bluetooth ON
ATH-CK200BT
7
Using the product
The product can use Bluetooth wireless technology to connect to your device and play music, receive phone calls,
etc. Use the product for whichever of these purposes suits your needs.
Note that Audio-Technica cannot guarantee the operation of displays, such as the battery level display, or applications
via Bluetooth devices.
Power supply ON/OFF
Wearing the product
Power
supply Power switch operation Indicator lamp
ON
Press and hold
Lights in purple, then flashes in
red and blue*1*2
OFF Lights in purple, then turns off*2
*1 It may take several seconds for the indicator lamp to light.
*2 For details, please refer to “Indicator lamp display” (p. 13).
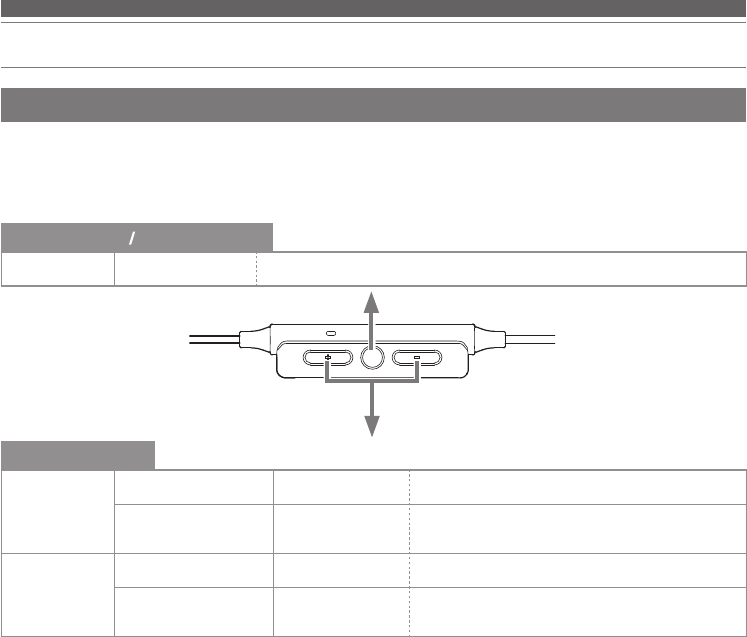
• Insert the side of the product marked "L" (LEFT) into the
left ear and the side marked "R" (RIGHT) into the right
ear, and then adjust the eartips.
• Wear the product so that the battery case rests on your
back.
• Attach the included clip to the battery case as shown in
the figure. It can be used by affixing to a shirt collar, etc.*
* Do not forcibly attach the clip to something that is too thick for it.
Doing so may damage the clip.
8
Using the product
Listening to audio
• To connect for the first time, pair the product and your device by Bluetooth wireless technology. If you have
already paired the product and your Bluetooth device, turn on the Bluetooth device’s Bluetooth connection and
turn on the product.
• Use your Bluetooth device to start playback, referring to the device’s user manual as necessary.
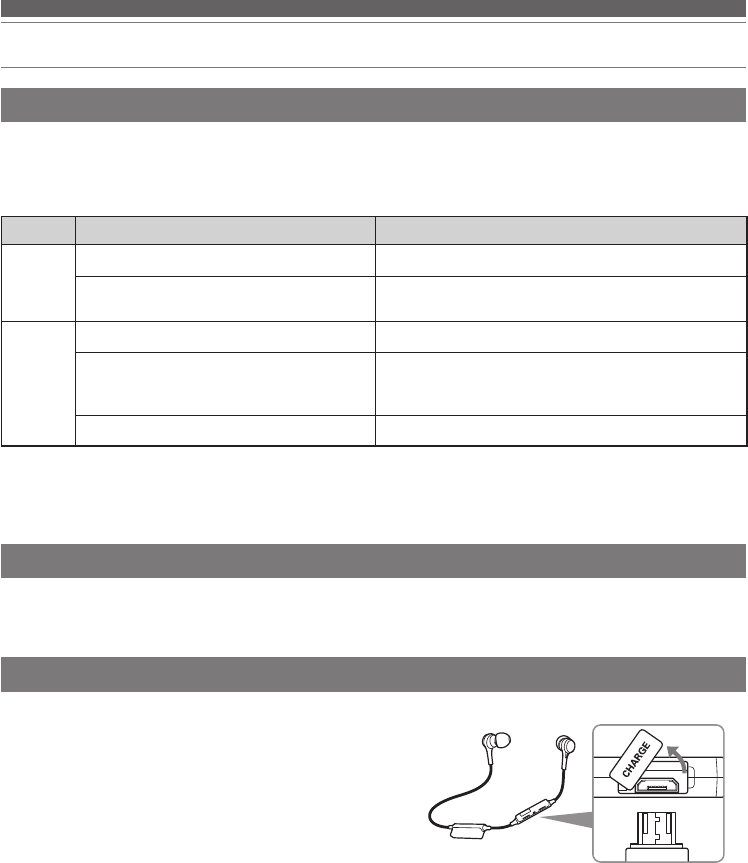
Power supply / Control button
Press Play/pause Plays or pauses music and video playback.*1
Volume buttons
+ button
Press Volume up Increases the volume by 1 level.*2
Press and hold
(for about 2 seconds) Skip forward Plays the next track.*1
- button
Press Volume down Decreases the volume by 1 level.*2
Press and hold
(for about 2 seconds) Skip back Plays the previous track.*1
*1 Some controls may not be available for music and video playback on some smartphones.
*2 A confirmation tone is heard each time you press the button. A low beep is heard when the volume is at the maximum or minimum
level.
• The volume control of some devices may not work well with the product.
9
Using the product
Reset function
If the product does not work or other malfunctions occur,
refer to “Charging the battery” (p. 5) and connect the USB
charging cable. Make sure the cable is carrying power.
Disconnecting and then reconnecting the USB charging cable
will reset the product and should resolve any problem you are
experiencing. If the problem persists, please contact your local
Audio-Technica dealer.
Pressing the reset button does not change any of your
settings (pairing information, volume setting, etc.).
Talking on the phone
• If your Bluetooth device supports telephone features, you can use the product to talk on the phone.
• When your Bluetooth device receives a phone call, the product sounds a ring tone.
• If a call is received while you are listening to music, music playback is paused. When you finish the call, music
playback resumes.*1
When Operation Function
Receiving
a call
Press the power supply/control button. Answers the call.
Press and hold the power supply/control
button (for about 2 seconds). Rejects the call.
Talking on
a call
Press the power supply/control button. Ends the call.
Press and hold the power supply/control
button (for about 2 seconds).*2
Each time you press and hold the button (about 2
seconds), you switch the call to your mobile phone or
to the product.*2
Press a volume button (+ or -). Adjusts the volume (+ or -) of the call.
*1 Depending on your Bluetooth device, music playback may not resume.
*2 When you hear a confirmation tone, release the power supply/control button.
• The phone call controls explained above may not be available on some smartphones.
Auto power o function
The product automatically turns off after 5 minutes of not being connected to a device that has its power turned on.
10
Cleaning
Get into the habit of regularly cleaning the product to ensure that it will last for a long time. Do not use alcohol, paint
thinners or other solvents for cleaning purposes.
• To clean, wipe with a dry cloth.
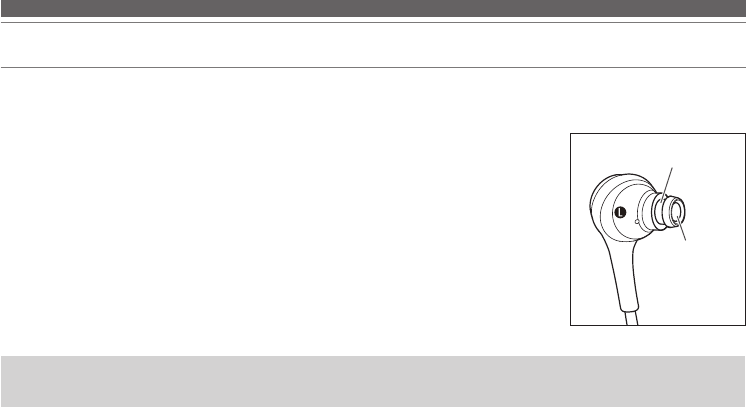
• Natural oils from the skin are particularly likely to build up on the areas where
the eartips attach to the headphones (see figure at right). If these areas are not
cleaned, the eartips can become detached. Clean them regularly. Do not touch
the areas where sound is produced as they are delicate. Doing so may result in
malfunction.
• Wipe away any perspiration or dirt from the cable with a dry cloth immediately
after use. Failure to clean the cable may cause it to deteriorate and harden over
time, resulting in malfunction.
• Wipe the cable's USB plug with a dry cloth if dirty.
• Clean the eartips by removing them from the headphones and manually cleaning
them with a diluted mild detergent. After cleaning, dry before using again.
• If the product will not be used for an extended period of time, store it in a well-ventilated place free from high
temperatures and humidity.
Eartip attachment
part
Sound
reproduction
part
11
Eartips
Eartip size
The product includes silicone eartips in 4 sizes (XS, S, M, and L). At the time of purchase, the M-size silicone eartips
are attached.
To ensure the best sound quality, select the eartip size that is best suited for you, and adjust the eartips inside your
ears for a snug fit. It may be difficult to hear bass sounds if the eartips do not fit snugly in your ears.
Replacing the eartips
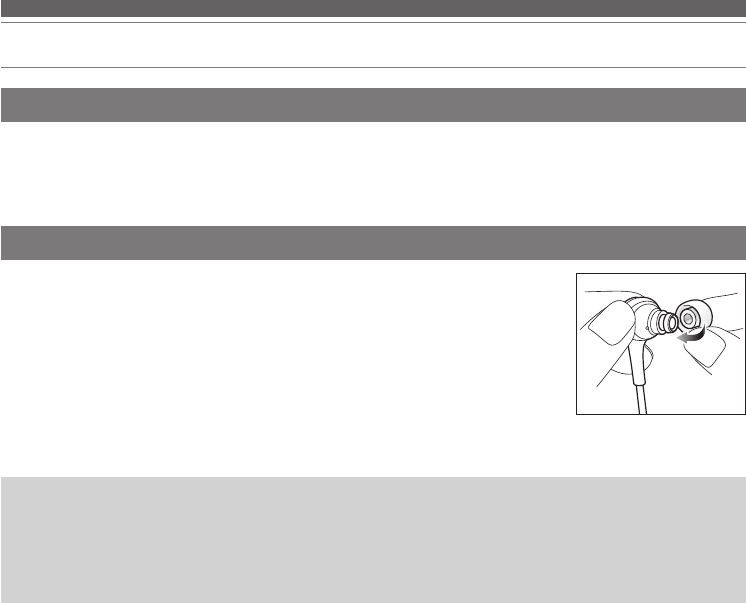
Remove the old eartip and attach the new eartip by pushing it onto the headphone at an
angle (see figure).
Push firmly on the eartip so that the inside of the eartip expands, and push the eartip
onto the post as far as it will go.
• The eartips are designed to be difficult to remove, therefore the fit is very tight when
attaching them.
• Periodically remove and clean the eartips as they become dirty easily. Using dirty eartips may cause the
headphones themselves to become dirty, resulting in deteriorated sound quality.
• Eartips are consumable parts that degrade through storage and use. If the eartips are loose and easily
removed or if they appear to have degraded, purchase replacements.
• When reattaching eartips that were previously removed, be sure to check that they are securely attached.
Injury or illness may occur if the eartips become detached and are left inside the ear.

12
Troubleshooting
Problem Solution
Power is not supplied. • Charge the product.
Unable to pair. • Visit our website for information on compatible models.
• Confirm that the Bluetooth device communicates using Ver. 2.1+EDR or higher.
• Place the product and the Bluetooth device within 1 m (3.3') of each other.
• Set the profiles for the Bluetooth device. For procedures on how to set profiles,
refer to the Bluetooth device’s user manual.
No sound is heard / Sound is
faint.
• Turn on the power of the product and the Bluetooth device.
• Turn up the volume of the product and the Bluetooth device.
• If the Bluetooth device is set to the HFP/HSP connection, switch to the A2DP
connection.
• Move away from obstacles between the product and the Bluetooth device,
such as people, metal or walls, and place them closer together.
• Switch the output of the Bluetooth device to the Bluetooth connection.
Sound is distorted / Noise is
heard / Sound cuts out.
• Turn down the volume of the product and the Bluetooth device.
• Keep this product away from devices that emit radio waves such as
microwaves and wireless routers.
• Keep TVs, radios, and devices with built-in tuners away from the product.
These devices can also be affected by the product.
• Turn off the equalizer settings of the Bluetooth device.
• Remove obstacles between the product and the Bluetooth device and place
them closer together.
Cannot hear the voice of the
caller / Voice of the caller is too
quiet.
• Turn on the power of the product and the Bluetooth device.
• Turn up the volume of the product and the Bluetooth device.
• If the Bluetooth device is set to the A2DP connection, switch to the HFP/HSP
connection.
• Switch the output of the Bluetooth device to the Bluetooth connection.
The product cannot be charged. • Securely connect the included USB charging cable and charge the product.
• For details about how to operate your Bluetooth device, refer to the device’s user manual.
• If the problem still remains, reset the product. To reset the product, refer to “Reset function” (p. 9).
13
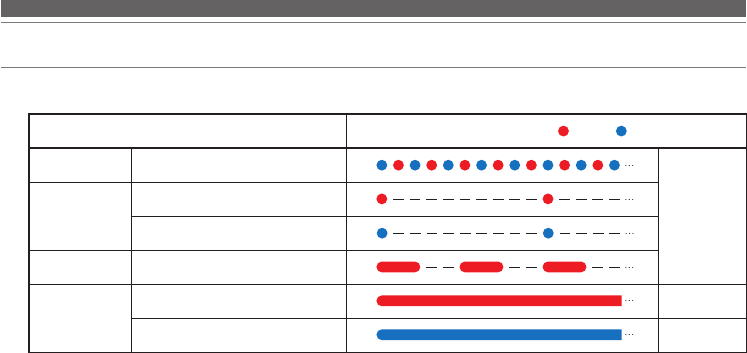
Indicator lamp display
The indicator lamp of the product indicates the product's status as explained below.
Status
Indicator lamp display pattern Red Blue
Pairing Searching for device
FlashingConnection
Waiting to be connected
Connecting
Battery level Battery level low
Charge
Charging Lit
Fully-charged Lit

14
Headphones
Type Dynamic
Driver 9 mm
Sensitivity 100 dB/mW
Frequency response 20 to 24,000 Hz
Impedance 16 ohms
Microphone
Type Electret condenser
Polar pattern Omnidirectional
Sensitivity -44 dB (1 V/Pa, at 1 kHz)
Frequency response 100 to 10,000 Hz
Communication specifications
Communication system Bluetooth version 4.1
RF output 3.0 mW EIRP
Maximum communication range Line of sight - approx. 10 m (33')
Frequency band 2.402 GHz to 2.480 GHz
Modulation method FHSS
Compatible Bluetooth profiles A2DP, AVRCP, HFP, HSP
Support codec SBC
Supported content protection method SCMS-T
Transmission band 20 to 20,000 Hz
Other
Power supply DC 3.7 V lithium polymer battery
Charging time Approx. 3 hours*
Operating time Continuous transmission time (music playback): Max. approx. 7 hours*
Continuous standby time: Max. approx. 200 hours*
Weight 14 g (0.49 oz)
Operating temperature 5°C to 40°C (41° F to 104°F)
Accessories • USB charging cable (30 cm (1') USB Type A / Micro USB Type B)
• Eartips (XS, S, M, L)
• Clip
Sold separately • Eartips
* The above figures depend on operating conditions.
For product improvement, the product is subject to modification without notice.
• The Bluetooth® word mark and logos are owned by Bluetooth SIG, Inc. and any use of such marks by Audio-Technica Corporation is
under license. All other trademarks are property of their respective owners.
Specifications
ver.1 2017.09.30
132416210-02-01
Audio-Technica Corporation
2-46-1 Nishi-naruse, Machida, Tokyo 194-8666, Japan
©2017 Audio-Technica Corporation
Global Support Contact: www.at-globalsupport.com