Audio TXP Professional Body-Worn Wireless Microphone Transmitter User Manual
Audio Limited Professional Body-Worn Wireless Microphone Transmitter
Audio >
User Manual

User guide for the En2 TXPH Transmitter
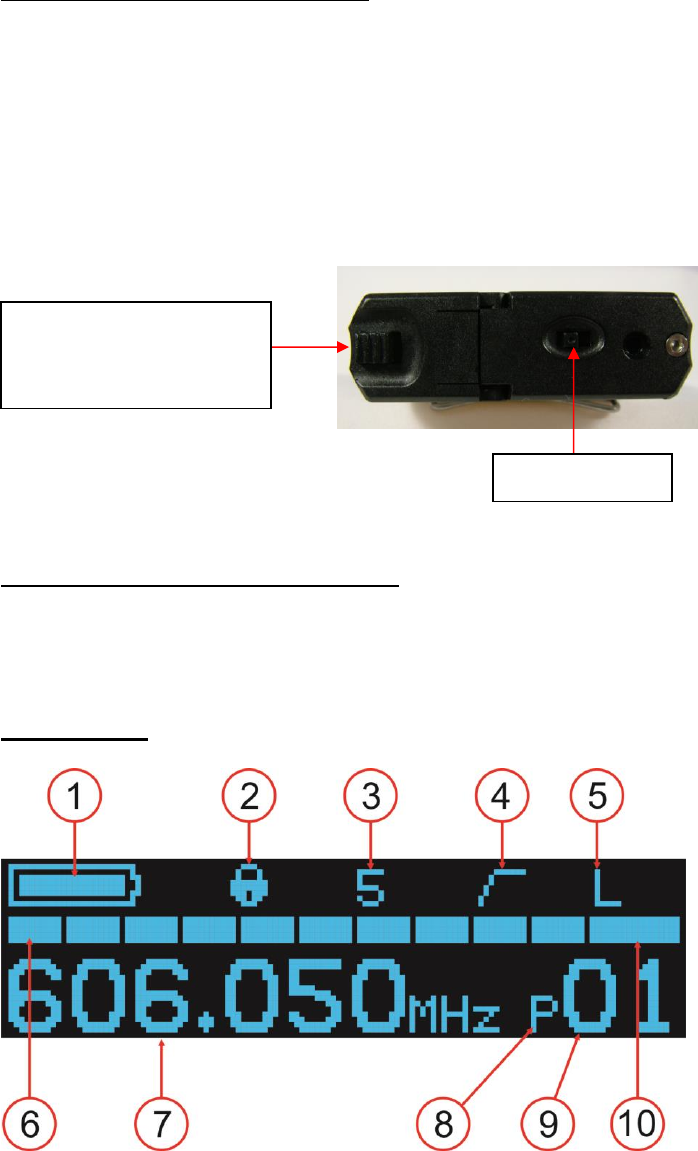
Installing and removing batteries
To open the battery compartment, slide the grip to the right. This will unlock it and
the battery can be placed inside with the positive end uppermost.
To close the battery compartment, gently push down the flap until you hear a
clicking sound. The transmitter is now ready to use.
Switching the transmitter on and off
To turn the transmitter on, slide the switch to the left. To turn it off, slide the switch
to the right. The TXP will turn on and the OLED screen will display the following:
Default screen
Slide grip to the right
to open the battery
compartment.
On/Off Switch
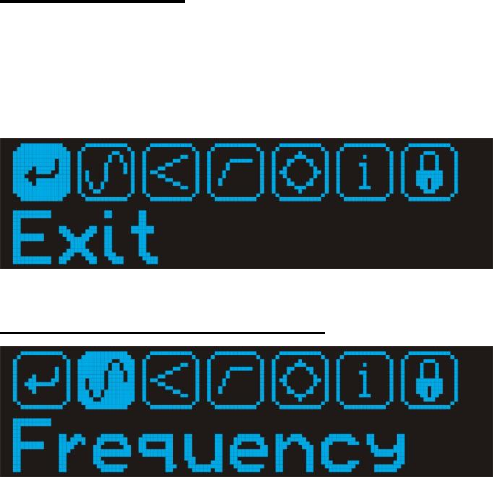
Key
1 Battery level icon (displays ‘EXT’ when externally powered).
2 Menus Locked icon.
3 Current gain setting.
4 LF Cut active icon.
5 RF Output Power icon (Only displayed when ‘Low’ setting selected).
6 AF level indicator
7 Frequency
8 Frequency selection mode (P = PRESET, U = USER, TUNE = TUNE
mode).
9 Selected channel number (PRESET or USER modes only).
10 Overload indicator.
Enter Main Menu
To access the various transmitter parameters press and hold the navigation switch
located on the top of the transmitter, for 2 seconds to enter the menu. The main menu
will be displayed.
Accessing the Frequency option
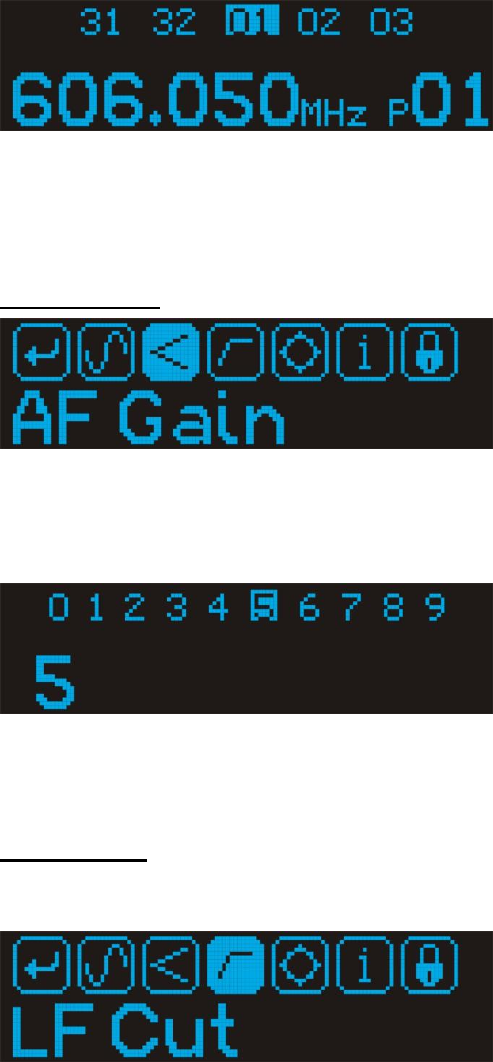
After accessing the main menu, use the navigation switch to scroll to the Frequency
option. Once the frequency option is highlighted, press down on the nav switch to
enter the frequency menu to view the range of frequencies.
A range of frequencies will be displayed and the desired one can be highlighted using
the scroll. To confirm the desired frequency press down on the navigation switch to
make the selection. The transmitter will then return to the main menu.
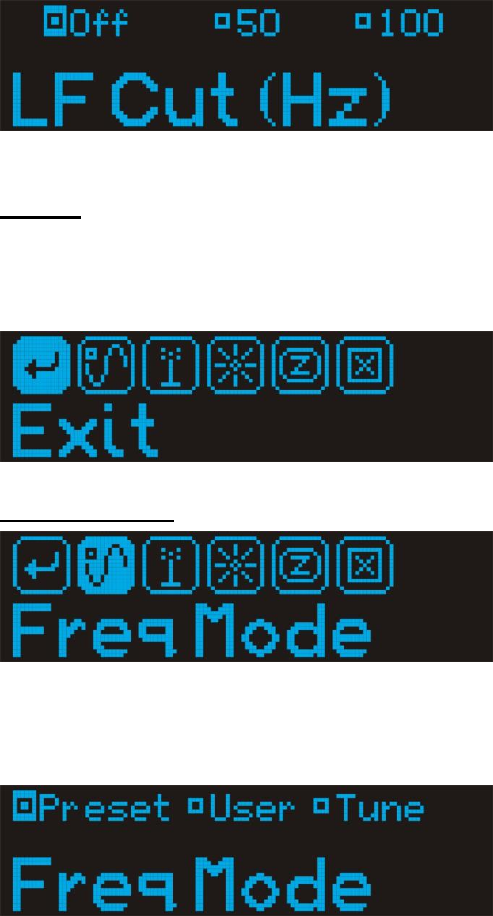
AF Gain option
After accessing the main menu, use the navigation switch to scroll to the AF gain
option. Once the AF gain option is highlighted, press the nav switch to select one of
10 AF gain settings.
Use the navigation switch to highlight the desired AF Gain option. To confirm this
choice press navigation switch and the transmitter will save the setting and return to
the main menu.
LF Cut option
After accessing the main menu, use the navigation switch to scroll to the LF Cut
option.
Select the required filter setting.
Options
After accessing the main menu, use the navigation switch to scroll to the Options
menu. When the Options icon is highlighted, press the navigation switch.
On doing so, the Options menu will be displayed as shown below:
Frequency Mode
In selecting the frequency mode the user can select one of three frequency modes,
Factory set Preset, User, or manual Tune.
In Tune mode the user can select any frequency within the switching bandwidth of
the frequency table in 25kHz steps and then save them to the User memory. The User
memory is initially programmed with a copy of the Preset frequencies until the user
selects and saves a frequency in Tune mode.

Frequency tables
Units which are programmed with multiple tables will show frequency table selection
on the menu. Entering the frequency table selection screen will show the frequency
table number. The user can select any one of up to 10 tables.
RF Power
In selecting the RF Power from the Options menu the user can select High or Low
power settings. In selecting the low power setting the user will extend the battery life
of the transmitter.
Brightness
The brightness menu selection allows the user to set the brightness of the OLED
display. There are 5 selectable levels available.

Screensaver
The OLED display can be placed into screen saver mode to extend battery life and
also reduce light emission from the transmitter when it is bodyworn. There are 4
settings available :–
X - display on all the time
5 - screen enters screen saver after 5 seconds
20- screen enters screen saver after 20 seconds
60 - screen enters screen saver after 60 seconds
Restore
If for any reason, the user wants to restore the transmitter to the original factory
supplied settings then the user can use the restore function. Please note this will
overwrite any user memory settings and gain settings.
Information option
From the top level menu the Info provides the serial number, Firmware revision and
frequency table information.
After accessing the main menu, use the navigation switch to scroll to the Info option.
Once the Information option is highlighted, press the navigation switch to view the
options.
To view the information for any of these, there is no need to press down the middle
button. Simply scrolling from left to right will enable you to view the data for any of
the three headings. Pressing down on the navigation switch will instantly take the
transmitter back to the Main Menu.
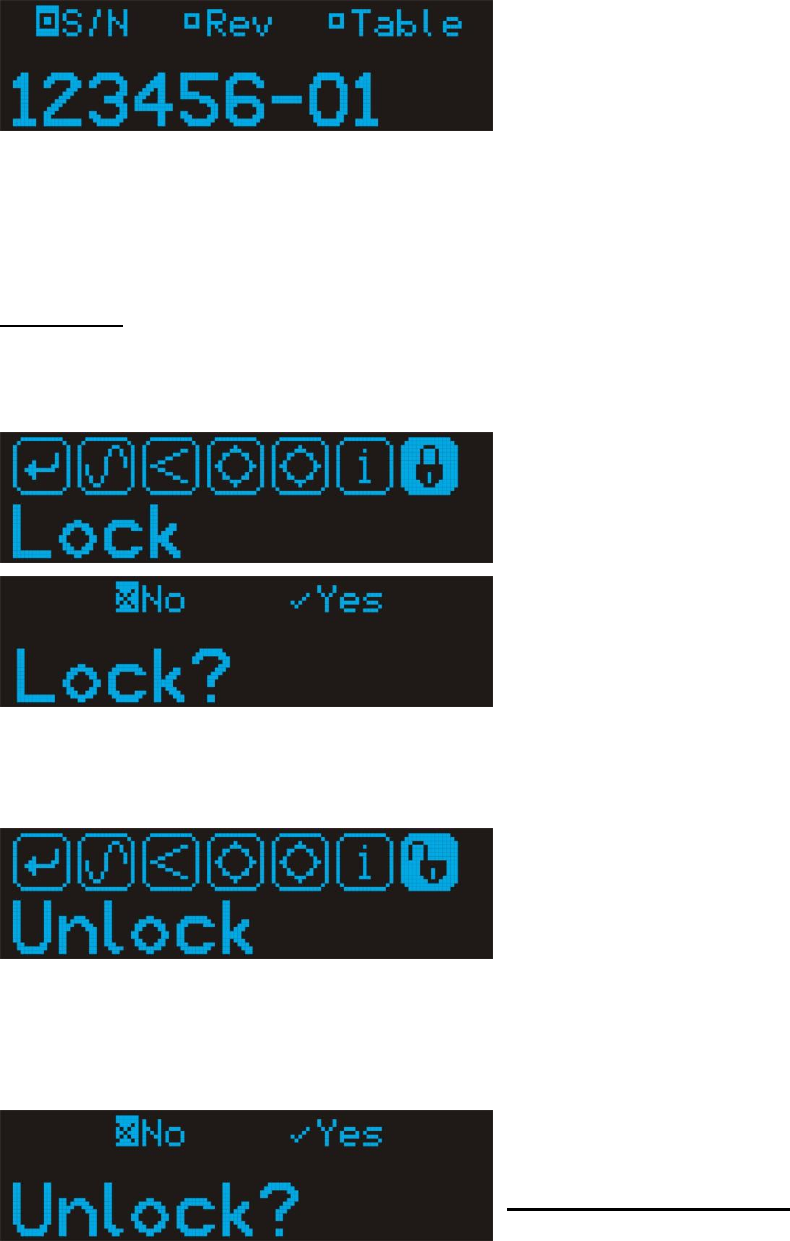
Lock option
After accessing the main menu, use the navigation switch to scroll to the Lock option.
Once the Lock option is highlighted, press the middle part of the navigation switch to
view the options:
To lock the transmitter, scroll using the navigation switch to the Yes option. The
transmitter will then return to the main menu, with an unlock symbol to replace the
lock symbol.
To unlock the transmitter, scroll to the unlock symbol and use the middle part of the
navigation switch to select the Yes option. The transmitter will then return to the main
menu.
Recommended mounting of

TXP(H) transmitter
The TXPH transmitter is supplied with a wire belt-clip allowing the transmitter to be
attached to a belt or waist line of trouser or skirt. This is to ensure that the
transmitter is orientated in a vertical plane at the correct height and separation
from the body.
Placing the transmitter in a pocket of a shirt or trousers is not allowed in order to
avoid that the separation distance between the device, antenna, and the body of the
user will be less than the separation distance which is guaranteed by using the belt
clip.
Batteries
Upon finishing with any used batteries please dispose of them as special waste. In
order to protect the environment, only dispose of exhausted batteries.
TXP(H) Frequency ranges supplied for use in USA
The TXP transmitter can tune over a switching bandwidth of up to 40MHz. The
frequency ranges are listed below:
470.1-495.9MHz
496.1-523.9MHz
512.1-541.9MHz
542.1-571.9MHz
572.1-607.9MHz
614.1-653.9MHz
654.1-693.9MHz
Please note that frequency range 608 – 614MHz is forbidden for use in US.
Warning!
Any modifications or changes made to this device, unless explicitly approved by
Audio Ltd., may invalidate the authorisation of this device. Operation of an
unauthorised device is prohibited under Section 302 of the Communications act of
1934, as amended, and Subpart 1 of Part 2 of Chapter 47 of the Code of Federal
Regulations”.
Technical Specifications
Switching Bandwidth
Up to 40MHz in 25kHz steps
Number of frequency tables
Up to10
Number of Factory Pre-set
Frequencies
32 in each table
Number of User Selectable
Frequencies
32 in each table (selectable in 25kHz steps)
Channel bandwidth
200kHz
Modulation Mode
Wideband FM
Emission designator
F3E
Frequency Tolerance
35ppm
Audio Frequency Response
50 – 18kHz
Signal-to-Noise Ratio
>100dB (±45kHz deviation)
Total Harmonic Distortion
<0.3% typ.
Output Power
100mW or 50mW nominal, selectable
Audio Gain control
0-35dB in 8 steps plus 2 steps for line input
LF Cut
3 settings; flat, 80Hz, 120Hz
Input connector
Binder™ 5 pin screw-locking
Display
OLED blue, 128x32 pixels
Control
3 position navigation switch
Battery Type
1 x 1.5V LR6 AA size
Battery Life
4 to 6 hours depending on battery type
Audio Ltd recommend use of NiMh
External Supply Voltage
6 – 18V DC (80mA @ 12V)
Operating Temperature Range
-20º C to +55º C
Weight
118grams (without batteries)
Dimensions
63mm (W) x 82mm (H) x 20mm (D)