Aukey E Business BR-C9 Wireless Audio Receiver User Manual BR C9
SHENZHEN AUKEY E BUSINESS CO., LTD. Wireless Audio Receiver BR C9
15_AUKEY BR-C9 UserMan
- 06 -
You have now maintained an active connection with 2 smartphones at the same time. You can now make /
answer phone calls or listen to the music from both smartphones.
5. Using the BR-C9 with your home or car stereo system
1. Locate the AUX line-in port on your speaker system. Most can be found on the back next to the indications
“AUX” or “Line-in”. You may also find the AUX line-in port on the front of some systems.
2. Connect the AUX line-in port and the receiver using the 3.5mm audio cable or connector provided.
3. If your system requires it, switch the audio input settings to play from the AUX line-in port. System settings may
vary, so if you are having trouble please consult your system’s user manual.
4. Adjust volume and play audio from your paired smartphone, tablet or computer. You will hear the audio come
through your sound system speakers. Sound can be regulated by both your audio device and sound system
independently.
6. Using the BR-C9 with headphones and compact speaker systems
1. Connect the receiver with your headphone or speaker through the 3.5mm audio plug.
2. Your headphones are now ready to receive a wireless audio signal from your smartphone, tablet or computer.
7. Music playback
1. While the BR-C9 is connected to a music player and it’s playing music, a single press of the multi-function button
will pause the music and press again will resume.
2. Pressing and holding +/- button for 2 seconds to move to the next or previous track. And adjust the volume by
short pressing the +/- button.
- 07 -
Remarks:
● The music will automatically pause when making or taking phone calls.
● The music will resume when the phone call is finished.
8. Calls Control
Once successfully paired with smartphone, you are able to control the calls from the receiver:
1. Press the multi-function button once to answer a call, press again will end the call.
2. When a call is coming, hold and press the multi-function button for 2 seconds will reject the incoming call.
3. Double press the multi-function button to redial the last number called.
4. Call Switching: During a call, double press the multi-function button to keep the existing call and answer the
new call.
9. Reset
Turn the receiver on, simultaneously press and hold the V+ and multi-function button for 5 seconds or until you
hear a voice prompt. This will clear all setting/memory.
If the following happens, you can try to reset the receiver.
● The LED stays on even when you try to turn off the unit.
● The unit is not responding to any button or control.
- 09 -
Q: Can I use my receiver while it is charging?
A: Yes, definitely! But we recommend you use the receiver after fully charging it for longer battery life.
Q: The music sometimes cuts off while playing.
A: The operation range of the receiver may be influenced by obstructions, such as walls, pillars, etc. To ensure a stable
connection, we recommend avoiding such obstructions whenever possible and/or shortening the distance
during use.
Q: The unit is not responding no matter what I do.
A: Please try to reset the receiver. Turn the headset on, simultaneously press and hold the V+ and multi-function
button for 5 seconds or until you will hear a voice prompt. This will clear all setting/memory. After that you can
try again to restart the receiver.
Q: My receiver will not switch on.
A: Please recharge it and make sure the BR-C9 has enough battery power. If it is fully charged and still nothing
happens or if you are not able to charge the unit, please contact our customer support for warranty cover.
Care and Maintenance
1. Keep the receiver away from heat and humidity.
2. Do not put the product under direct sunlight or hot areas. High temperatures will shorten lifespan of the receiver,
battery and the internal circuit board.
3. Power off the receiver when not in use and before storing.
4. Do not drop or knock your receiver.
- 10 -
5. Do not use chemicals or detergents to clean the product.
Warranty and Support
Customer Support
If you need any assistance or support, please email support@aukey.com with details. We will answer your email
within 24 hours. We will do our best to provide you with a viable solution.
Warranty
We warrant this device for 24 MONTHS from date of the original purchase for manufacturer defects. If the device
fails due to a manufacturing defect, please contact seller directly to initiate return and warranty process.
Please do not return the product without seller / Aukey authorization.
Statement
We can only provide after sale service for products purchased directly from Aukey or Aukey authorized
distributor. If you have purchased from a different seller, please contact them for any exchange or request.
Contact Us
For additional assistance or warranty cover claim, please contact us:
Web: www.aukey.com
E-mail: support@aukey.com (all enquires)
- 08 -
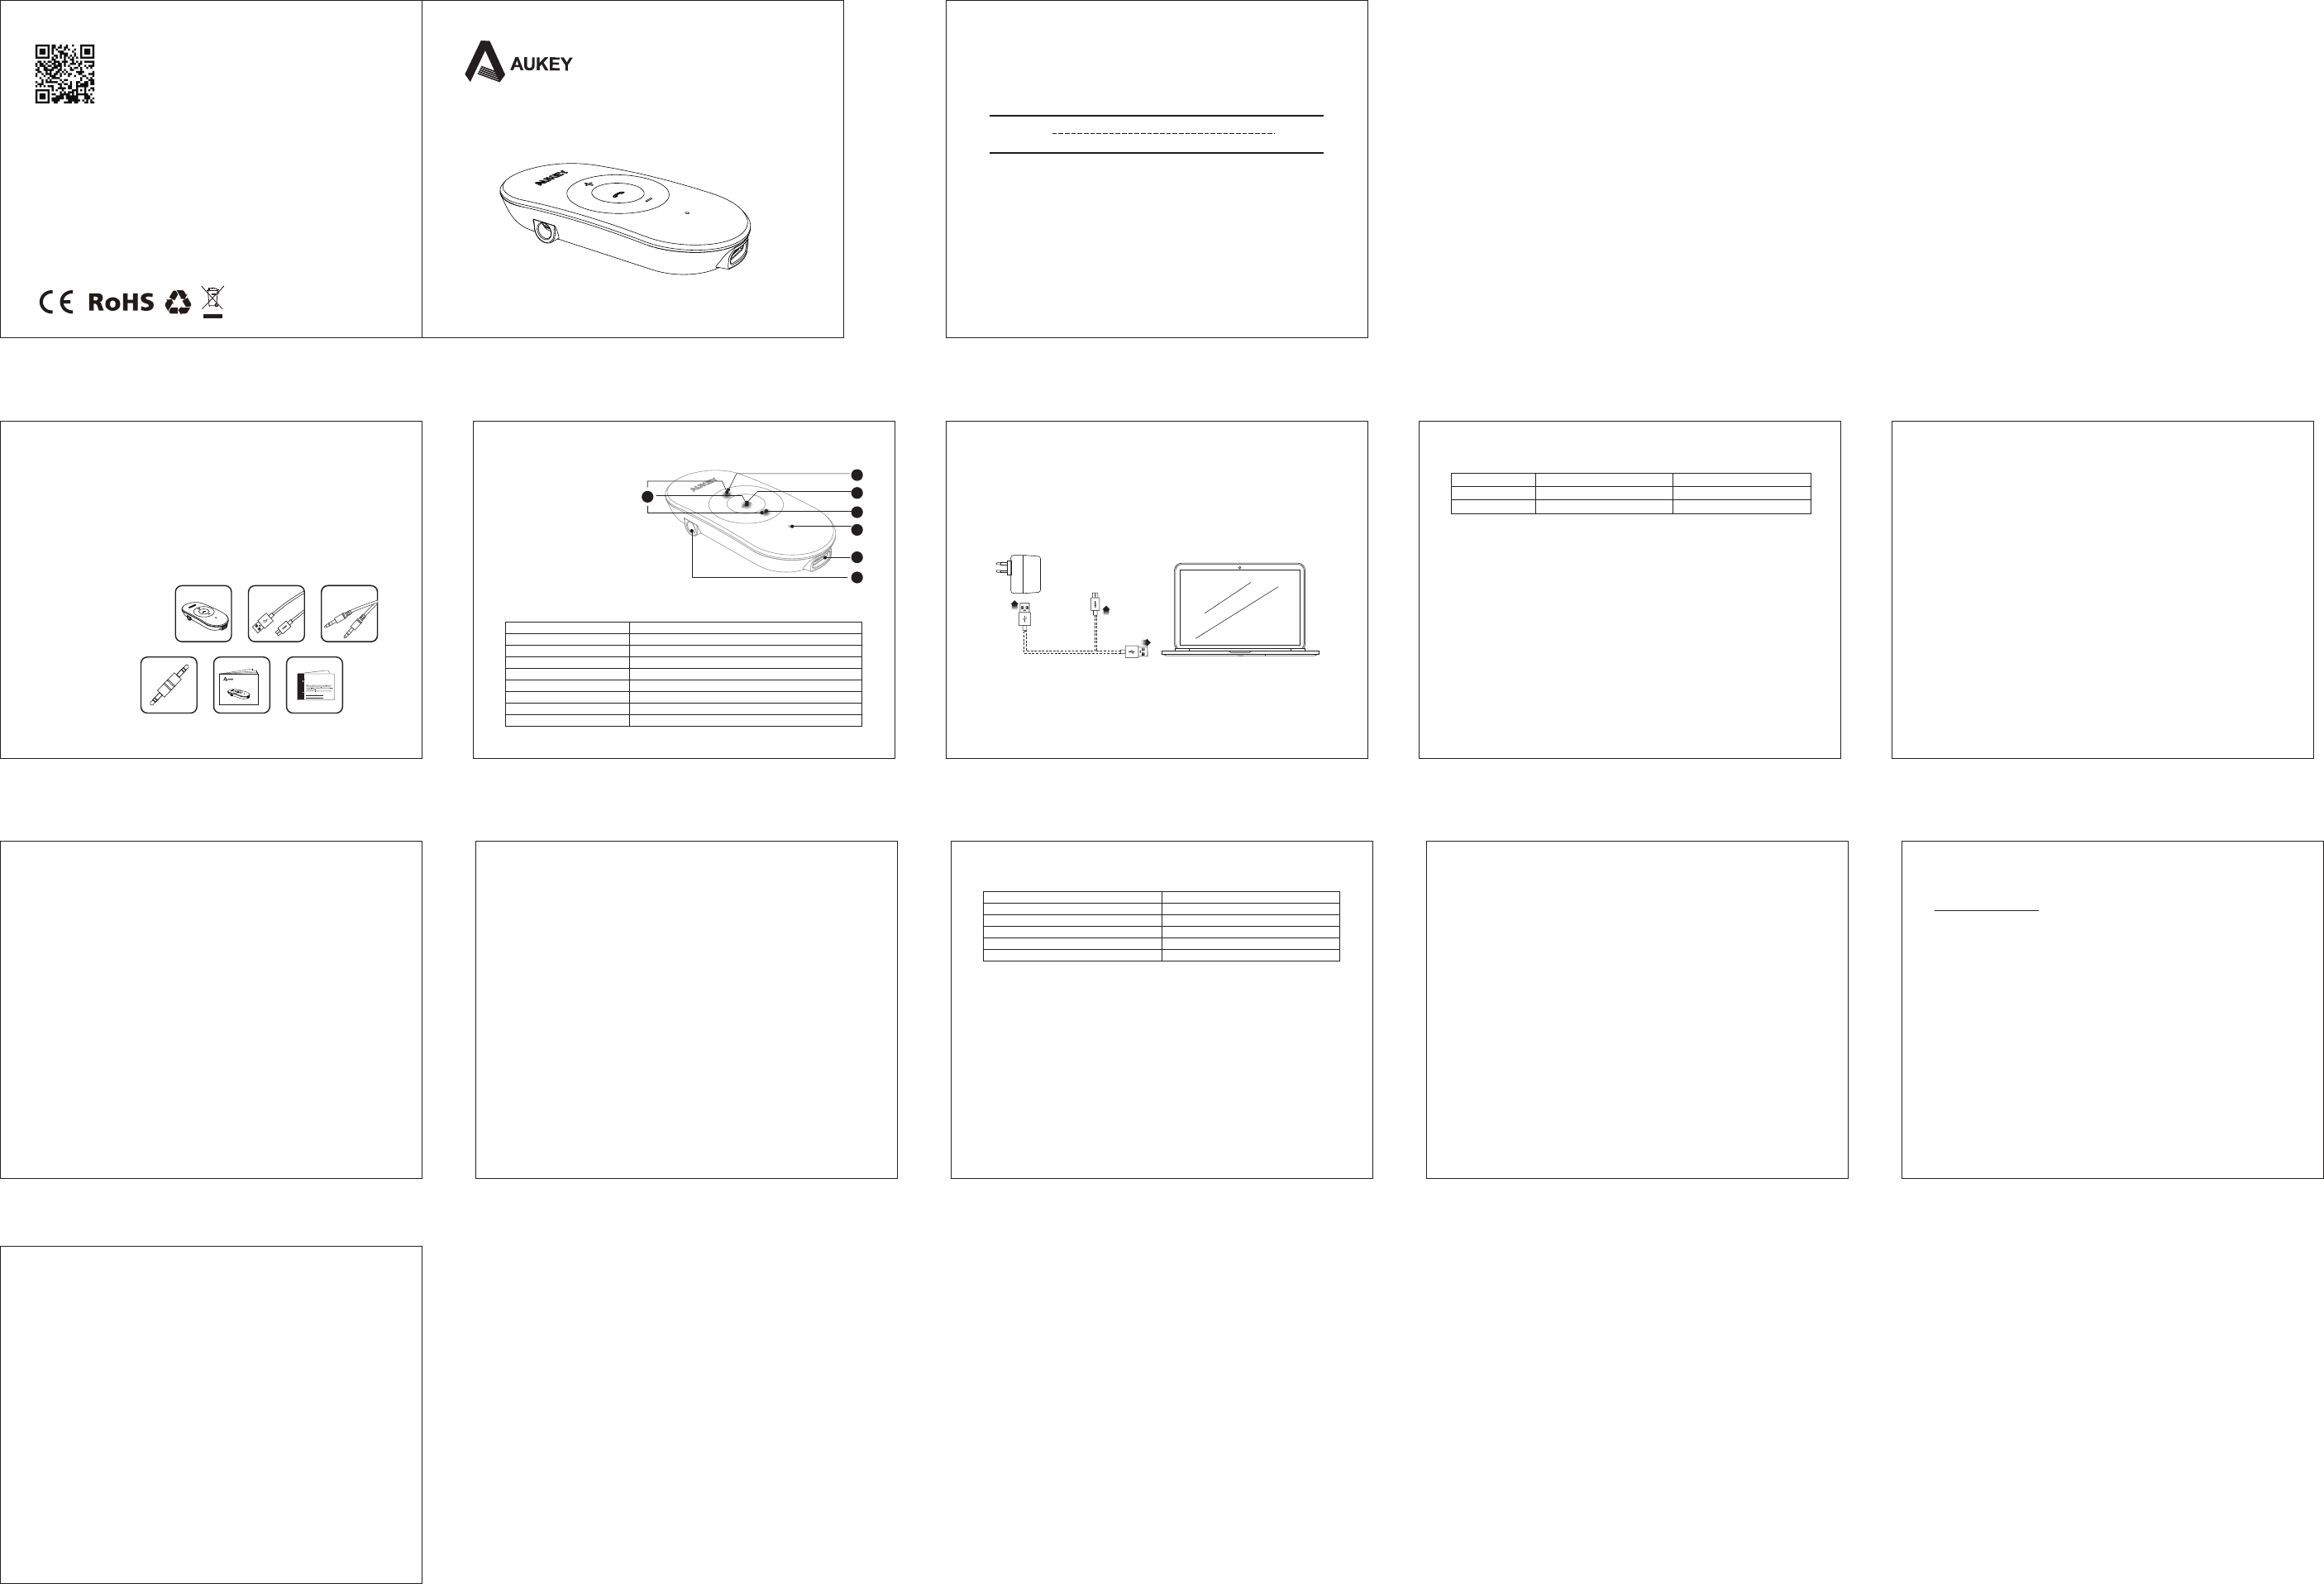
LED indicator Instruction
LED indicator
White LEDs flash constantly
White LEDs flash once every 5 seconds
White LEDs flash twice every 7 seconds
White LEDs flash once every 8 seconds
White LEDs go off
The status of receiver
Paring mode
Standby mode
Connected
The battery is low
Fully charged
FAQ & Trouble Shooting
Q: I am having trouble pairing and connecting to my Wireless pairing device.
A: a) Make sure your wireless device supports A2DP.
b) Put both devices within 1m (3 ft) of each other while pairing and make sure there are no other wireless
devices within range.
c) Press and hold the multi-function button until you see the white LED light flashing constantly, which means
the device is in pairing mode.
d) Make sure both devices are in pairing mode.
e) If your device is asking for a “PIN” or “Code”, please enter “0000”.
Q: I cannot hear any music from my sound system.
A: a) Make sure the receiver is connected well with the player.
b) Make sure the player is playing music and the volume is at an audible level on both your wireless audio device
and on your sound system. Audio is independently controlled by each device.
c) Check your sound system settings to ensure that you have selected “AUX” or “Line-in” settings.
d) Please check your audio device output settings. It should indicate that it is providing wireless audio.
说明书尺寸:90x72mm
材质:封面105g内页80g铜版纸
印刷:单黑
装订方式:胶装
English 01~11
Contents
Model: BR-C9
AUKEY INTERNATIONAL LIMITED
Web: www.aukey.com E-mail: support@aukey.com
Add: No.102, Building P09, Electronic Trade Center
Huanan City, Pinghu Town, Longgang District
Shenzhen, Guangdong 518111 CN
Aukey Wireless Audio Receiver
User Manual
Model: BR-C9
- 05 -
7. Connect your Aukey BR-C9 receiver to your headphone or speaker using the 3.5mm jack and start enjoying
your music!
Notes:
● When the receiver is switched on, it will automatically connect with the last paired device.
● The BR-C9 will stay in pairing mode for 10 minutes at most if no pairing device is found. Afterwards, it will power
off automatically.
● The BR-C9 will switch to standby mode if pairing devices is switched off or disconnected for 10 minutes.
Afterwards, it will power off automatically.
● The BR-C9 is able to be used while charging.
● Maximum operating range for the BR-C9 receiver is 33ft (10m). If you move out of range, the receiver will lose
connection and go into standby mode. You will need to move back to within range and reconnect to your
wireless audio device.
4. Pairing with two smartphones
The BR-C9 wireless audio receiver is capable of simultaneously connects to two smartphones. To do this:
1. Follow the instructions in the “Pairing” section to connect the receiver to smartphone 1.
2. Once connection is successfully established, disable the wireless pairing function on smartphone 1, and turn
off the receiver.
3. Follow the instructions in the “Pairing” section to connect the receiver to smartphone 2.
4. Once connection between smartphone 2 and the receiver is established, go back to smartphone 1, bring the
smartphone 1 into paring mode.
5. The receiver should appear in the connection list, simply tab it to connect if it doesn’t connect automatically.
- 02 -
Specifications
Standard
Supported Profile
Operation Range
Power Input
Battery Type
Working / Standby Time
Charging Time
Dimension
Weight
4.1
A2DP
33 ft / 10m
DC 5V 500mA
Li- Polymer battery (130mAh)
8 Hours / 100 Hours
2 Hours
65×30×10 mm /2.56×1.18×0.39inch
13g / 0.46oz
Product Overview
1. Volume + (short press)
/ Next Track (long press)
2. Multi-function Button
3. Volume – (short press)
/ Previous Track (long press)
4. LED Indicator
5. Mic
6. 3.5mm Audio-out Jack
7. Micro USB Charging Port
1
2
3
4
6
7
5
- 04 -
2. Turning the receiver On/Off
3. Pairing with smartphones, tablets, laptops
Before pairing, please make sure your smartphones, tablets, laptops support Wireless A2DP (Advanced Audio
Distribution Profile). Please follow the steps below to bring the BR-C9 into pairing mode:
1. Starting with the BR-C9 turned off. If the LED indicator is flashing, please press and hold the multi-function button for
5 seconds until the White LED turns off, which means the receiver has been turned off.
2. Keep the receiver and your smartphone, tablet or laptop within 1 meter (3 feet) while paring and make sure
there are no other wireless devices within range.
3. Press and hold the multi-function button for about7 seconds or until you see the white light flashing constantly.
This means the device is in pairing mode and ready to be paired.
4. Bring your smartphone, tablet or laptop into pairing mode and search for the receiver.
5. Once the receiver has been located by your device you should see “Aukey BR-C9”, simply select the device
name to connect. If a code or pin is required for pairing, please enter “0000”.
6. When devices are paired successfully, the white LED light on the BR-C9 will Flash twice every 7 seconds.
Function
Turning on the receiver
Turning off the receiver
Operation
Press multi-function button for 5 seconds
Press multi-function button for 5 seconds
LED Indicator
The White LED will be flashing constantly
The white LED stops flashing and turns off
- 03 -
Getting Started
1. Charging your receiver
The receiver is partially charged at the factory. Please make sure that you fully charge it before using it for
the first time.
To charge the unit, simply connect the receiver to any active USB port or adapter using the USB charging
cable. The receiver can be fully charged in around 2 hours. When fully charged, the white LED indicators turn off.
* If the White LED flashes once every 8 seconds with voice prompt, it means the battery is running low and
should be charged.
Now that your device is charged, it is ready to go!
- 01 -
Introduction
Thank you for choosing Aukey BR-C9 Wireless Audio Receiver. Please read the user manual carefully and save it
for future reference. If you need assistance, please contact Aukey support by email to support@aukey.com with
details.
System Requirements
● An audio speaker or output device with a 3.5mm audio-in jack.
● Any wireless audio transmitting device that supports the A2DP profile, such as smartphones, tablets, etc.
Package Content
1 x BR-C9 Wireless Audio Receiver
1 x USB Charging Cable
1 x 3.5mm Audio Cable
1 x 3.5mm Audio Connector
1 x User Manual
1 x Warranty Card
Register
Now!
WARRANTY CARD
www.aukey.com
To register, please like us on our Facebook:
https://www.facebook.com/Auk ey.Life
and go to our website to leave your order inf o:
www.aukey.com - support - re gister product
Aukey Wireless Audio Receiver
User Manual
Model: BR-C9
- 11 -
NOTE: This eq uipment has been tested and found to comply with the limits for a Class B digital device, pursuant to
part 15 of the FCC Rules. These limits are designed to provide reasonable protection against harmful interference in a
residential installation. This equi pment generates uses and can radiate radio frequency energy and, if not installed
and used in accordance with the instructions, may cause harmful interference to radio communications. However,
there is no guarantee that interference will not occur in a par ticular installation. If this equipment does cause harmful
interference to radio or television reception, which can be determined by turning the equipment off and on, the user
is encouraged to try to correct the interference by one or more of the following measures:
- Reorient or relocate the receiving antenna.
- Increase the separation between the equipment and receiver.
-Connect the equipment into an outlet on a circuit different from that to which the receiver is connected.
-Consult the dealer or an ex perienced radio/TV technician for help
Changes or modifications not expressly approved by the party responsible for compliance could void the user's
authority to operate the equipment. This device complies with Part 15 of the FCC Rules. Operation is subject to the
following two conditions:
(1) this device may not cause harmful interference, and
(2) this device must accept any interference received, including interference that may cause undesired operation.
FCC ID: 2AFHPBR-C9