Autel Intelligent Tech 301SDCHD1 Wireless Camera User Manual X Memo v1 0
Autel Intelligent Tech. Corp., Ltd. Wireless Camera X Memo v1 0
Users Manual

i
User Manual

ii
Trademark
Autel®X-MemoTMis the trademark of Autel Intelligent Technology
Corp., Ltd., registered in China, the United States and other
countries. All other marks are trademarks or registered trademarks
of their respective holders.
Copyright Information
No part of this manual may be reproduced, stored in a retrieval
system or transmitted, in any form or by any means, electronic,
mechanical, photocopying, recording, or otherwise, without the prior
written permission of Autel.
Disclaimer of Warranties and Limitation of Liabilities
All information, specifications and illustrations in this manual are
based on the latest information available at the time of printing.
Autel reserves the right to make changes at any time without notice.
While information of this manual has been carefully checked for
accuracy, no guarantee is given to the completeness and
correctness of the contents, including but not limited to the product
specifications, functions, and illustrations.
Autel will not be liable for any direct damages or for any special,

iii
incidental, or indirect damages or for any economic consequential
damages (including lost profits).
IMPORTANT:Before operating or maintaining this unit, please read
this manual carefully, paying extra attention to the safety warnings
and precautions.
Service Info
http://pro.autel.com
www.autel.com
1-855-288-3587/1-855-AUTELUS (North America)
0086-755-86147779 (China)
Support@autel.com
For technical assistance in all other markets, please contact your local
selling agent.

Safety Information
iv
Safety Information
For your own safety and the safety of others, and to prevent
damage to the X-memo camera, it is important that the safety
instructions herein presented throughout this manual be read and
understood by the user.
Exercise caution when using the batteries. Batteries may leak
or explode if products with batteries are not properly handled.
Handle with extra care in the following situations to avoid a battery
explosion or fire:
Do not use the camera or the battery if damage is observed - for
example, if cracked, punctured or damaged by water.
Do not disassemble, bend or deform, puncture or shred.
Do not dry camera or battery with an external heat source such
as hair dryer or microwave oven.
Do not put the camera or battery in damp environment. Secure
the camera and battery with the provided housing.
Do not turn on the camera if it is wet. If the camera is already on,
turn it off and remove the battery immediately. Allow the camera
to dry thoroughly before use again.
Always use brand name or good quality charger to secure safe
charging.
Apply to clean and smooth surface when attaching the adhesive

Safety Information
v
mounts.
When operating the camera, always keep hands clean and dry.
If the camera is over heat, turn it off to cool down the camera.
The safety messages herein cover situations Autel is aware of. Autel
cannot know, evaluate or advise you as to all of the possible
hazards. You must be certain that any condition or service
procedure encountered do not jeopardize your personal safety.

vi
TRADEMARK...........................................................................II
COPYRIGHTINFORMATION.....................................................II
DISCLAIMEROFWARRANTIESANDLIMITATIONOFLIABILITIES..
SAFETYINFORMATION...........................................................IV
CHAPTER1USINGTHISMANUAL.........................................1
1.1CONVENTIONS............................................................1
1.1.1BoldText.........................................................................1
1.1.2Terminology....................................................................1
1.1.3NotesandImportantMessages.....................................1
1.1.4Hyperlinks.......................................................................2
1.1.5Procedures......................................................................2
CHAPTER2GENERALINTRODUCTION..................................3
2.1FUNCTIONALDESCRIPTION.............................................3
2.1.1LEDIndicatorLights........................................................6
2.2POWERSOURCES.........................................................7
2.3TECHNICALSPECIFICATIONS............................................8
2.4ACCESSORIESKIT.........................................................9
CHAPTER3GETTINGSTARTED.............................................11
3.1UNPACKINGTHEX‐MEMO...........................................11
3.2USINGTHEMICROSDCARD.........................................11
3.2.1InsertingtheMicroSDCard..........................................12
3.2.2RemovingtheMicroSDCard.........................................13

vii
3.3USINGTHEBAT TE RY ...................................................13
3.3.1InsertingtheBattery.....................................................13
3.3.2ChargingtheBattery....................................................14
3.3.3UsingtheCameraWhileCharging...............................14
3.4ASSEMBLINGTHEMOUNTS..........................................15
3.5POWERINGUP..........................................................16
3.5.1ScreenLayouts..............................................................16
3.6POWERINGDOWNS....................................................18
CHAPTER4CAMERAOPERATIONS.......................................19
4.1CAMERADEFAULTSETTINGS.........................................19
4.2CAMERAMODES.......................................................19
4.2.1Video............................................................................20
4.2.2Photo............................................................................21
4.2.3BurstPhoto...................................................................22
4.2.4TimeLapse....................................................................22
4.3CAMERASETTINGS.....................................................23
4.3.1GeneralSettings...........................................................25
4.3.2VideoSettings...............................................................28
4.3.3PhotoSettings..............................................................29
4.3.4CaptureSettings...........................................................30
4.4PLAYBACK................................................................31
4.5TRANSFERRINGFILES...................................................33
CHAPTER5X‐MEMOAPPOPERATIONS...............................34

viii
5.1WI‐FICONNECTION...................................................34
5.2X‐MEMOAPP...........................................................34
CHAPTER6MAINTENANCEANDSERVICES..........................36
6.1MAINTENANCEINSTRUCTIONS......................................36
6.2TROUBLESHOOTINGCHECKLIST......................................38
6.3ABOUTBAT TE RYUSAGE..............................................40
CHAPTER7COMPLIANCEINFORMATION.............................42
CHAPTER8WARRANTY.......................................................43

Chapter 1 Using This Manual
1
1
Chapter 1 Using This Manual
This manual contains device usage instructions.
Some illustrations shown in this manual may contain modules and
optional equipment that are notincluded in your system. Contact
your sales representative for availability of other modules
andoptional tools or accessories.
1.1 Conventions
The following conventions are used.
1.1.1 Bold Text
Bold emphasis is used to highlight selectable items such as
buttons and menu options.
Example:
Tap OK.
1.1.2 Terminology
The term “select” means highlighting a button or menu item
and tapping it to confirm the selection.
1.1.3 Notes and Important Messages
The following messages are used.
Notes
A NOTE provides helpful information such as additional
explanations, tips, and comments.

Chapter 1 Using This Manual
2
2
Important
IMPORTANT indicates a situation which, if not avoided, may
result in damage to the device.
1.1.4 Hyperlinks
Hyperlinks, or links, that take you to other related articles,
procedures, and illustrations areavailable in electronic
documents. Blue colored text indicates a selectable hyperlink.
1.1.5 Procedures
An arrow icon indicates a procedure.
Example:
Toinsertthe microSD card
1. Turn off the camera (if powered on).
2. Open the SD card slot from the side of camera.
3. Slide the memory card into card slot with the printing side
facing front of camera. Slide gently until it clicks into place.
Chapter 2 General Introduction
3
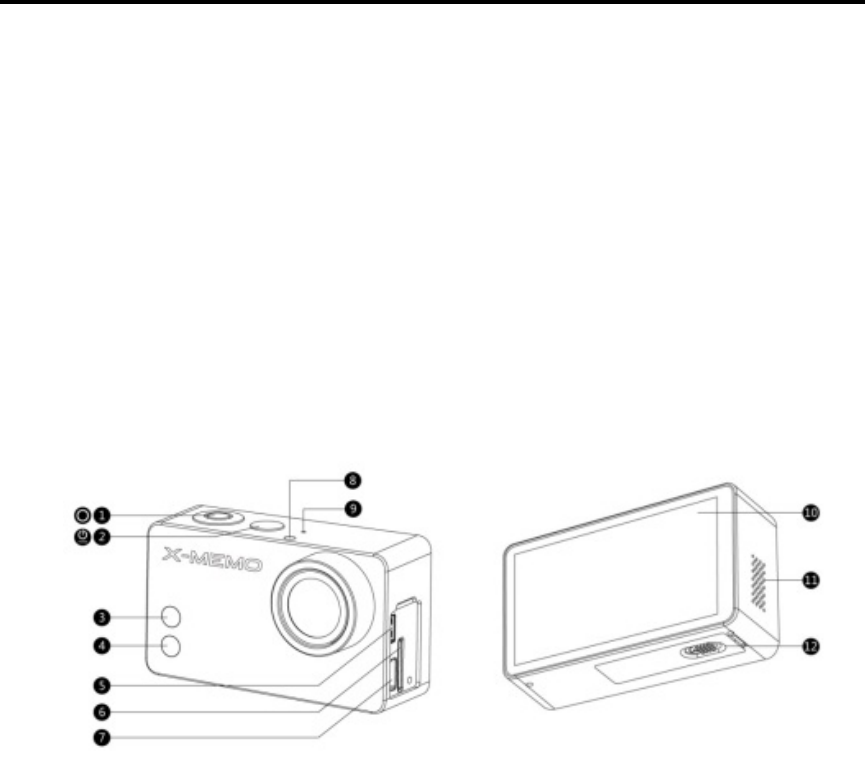
7. Mini USB Port
8. LED Status Light
9. Microphone
10. Touch Screen
11. Audio Speaker
12. Battery Compartment Lock
Chapter 2 General Introduction
The X-MemoTM is a smart action camcorder specially designed to
capture still and motion pictures, supporting full HD 1080p60 shoots
with a built-in 12MP sensor. Featured by the intuitive UI design and
a sensitive capacitive touch screen, this camera is extremely easy
to use. The integrated WiFi and X-Memo App make capturing and
sharing easily anywhere at any time.
2.1 Functional description
Figure 2-1Camera Six Side View
1. Shutter/Select Button
2. Power/Mode Button
3. Wi-Fi Status Light (blue)
4. Camera Status Light (red)
5. Micro HDMI Port
6. MicroSD Card Slot

Chapter 2 General Introduction
4
Table 2-1Camera Buttons
Name Description
1. Shutter/Select Button
Press this button to:
A. Take photos or videos.
B. Make selections on menus.
2. Power/Mode Button
A. Press this button once to turn on the
camera.
B. Press and hold for 3 seconds to turn
off the camera.
C. When the camera is powered on,
pressing this button allows you to
switch among the camera Modes, the
Settings menu and the Playback in
sequence.
3. Wi-Fi Status Light
(blue) Indicates the Wi-Fi communication status.
4. Camera Status Light
(red)
Indicates the working status of the camera
when taking photos or videos.

Chapter 2 General Introduction
5
Name Description
5. Micro HDMI Port
Connects the camera to a compatible
computer monitor, digital television, or
video projector for high definition video file
transfer.
6. MicroSD Card Slot Stores camera files.
7. Mini USB Port Connects the camera to a PC for file
transfer.
8. LED Status Light Synchronizes with the Camera and Wi-Fi
Status lights for convenient identification.
9. Microphone Records sound when taking videos.
10. Touch Screen Works as the display monitor featuring
intuitive touch control.
11. Audio Speaker Makes alert sounds and plays audios.
12. Battery
Compartment Lock Locks or unlocks the Battery Compartment.

Chapter 2 General Introduction
6
2.1.1 LED Indicator Lights
The table below gives brief definitions of LED Indicator Lights.
Table 2-2LED Indicator Lights
Indicator Lights LED
Status
Camera Status
Front solid red
ON
Charging
Top and front
LEDsflash red and
blink 3 times.
ON/OFF
Power On/Off
Formatting
Stop recording
Top and front
LEDsflash red and
blinkonce
ON/OFF
Taking a single photo
Taking a burst photo
Taking a series of time
lapse photos
Top and front
LEDsflash red and
blink every Second
ON/OFF
Recording
Top and front LEDs
flash blue and blink
every second
ON/OFF
Wi-Fi is on
Top and front LEDs
flash blue and blink
once
OFF
Turn off Wi-Fi

Chapter 2 General Introduction
7
2.2 Power Sources
The X-Memo receives power from any of the following
sources:
AC Charging adapter ( 1.5 hours for full charging)
PC USB Port ( 2 hours for full charging) or other USB
devices

Chapter 2 Technical Specifications
8
2.3 Technical Specifications
Main features Description
LED
2.45’
Video Resolution
1080P/60fps;960P; 720P;WVGA
Wi-Fi
Built-in Wi-Fi antenna
Maximum Burst Photo
10 photos/ per second
File format
Video: MP4/MOV;
Photo: JPEG.
Battery
Rechargeable Li-ion battery
(3.8V, 940mAh)
Recharging Time
2 hours by USB
1.5 hours by AC adapter
Waterproof housing
40m
Operating Environment
Temperature
-10
℃
-50
℃(
14
℉
-122
℉)
System Requirements
Compatible with Windows XP (Service
Pack 2 or later) or Vista;
Mac OS® X 10.4.11 or later.
SD Card Requirements
Compatible with microSD card
(* Storage capacity: from 8GB to 64GB;
Class level: 10 speed rating or higher)
Chap
t
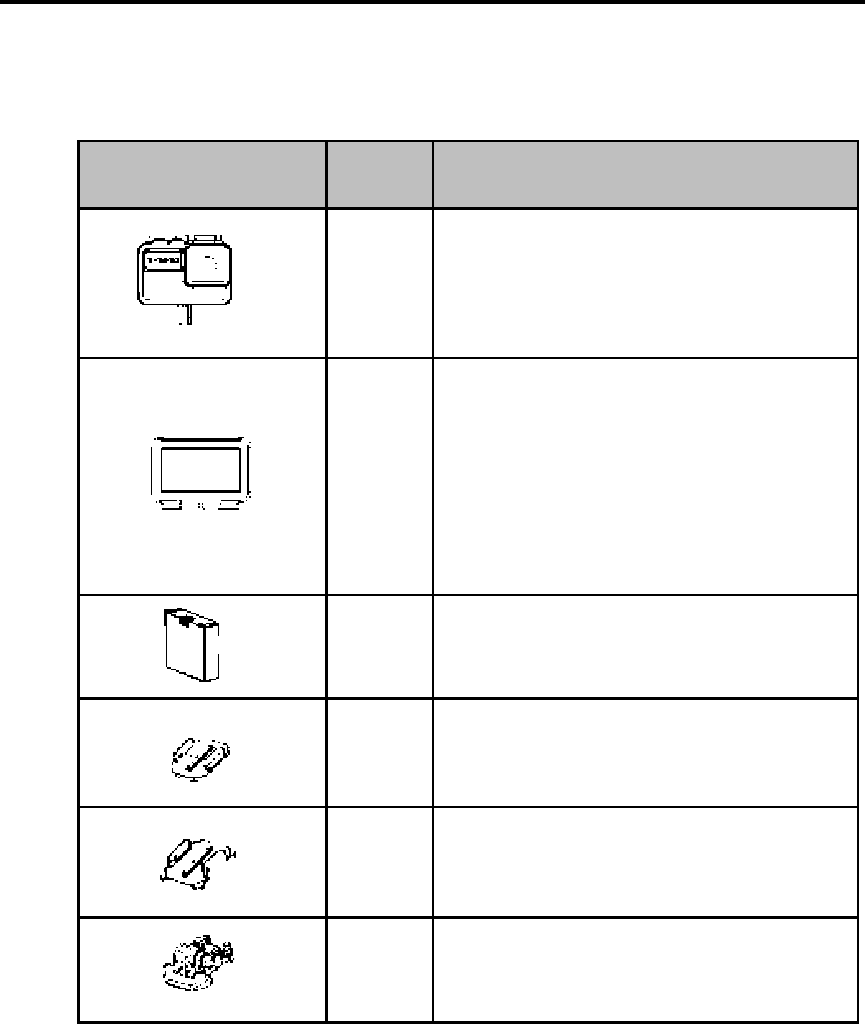
2.4
A
C
t
er 2
A
ccess
o
C
amera
A
Image
o
ries Kit
A
ccessori
e
e
s Kit
Qty.
X1
X2
X1
X1
X1
X2
9
Des
c
Wat
e
A
llo
w
grap
h
Bac
k
C
s
O
w
Cam
e
Rech
Flat
M
Curv
Shor
t
c
ription
e
rproof Ho
u
w
s underw
a
h
ing.
k
door
C
overed
s
creen pr
o
O
pened (
w
w
aterproo
f
e
ra Batter
y
argeable L
i
M
ount
ed Mount
t
Connect
o
A
ccess
u
sing
a
ter phot
o
(with
t
o
tector, wa
w
ithout c
f
)
y
i
-Po Batter
y
o
rs
ories Ki
t
o
-and-video
t
ouchable
terproof)
over, not
y
t

Chap
t
t
er 2
X1
X1
X1
X1
X2
10
Lon
g
90
°
C
90
°
C
Con
n
Con
n
g
Connect
o
Rotate C
o
Rotate C
o
n
ecting Sc
r
n
ecting Sc
r
A
ccess
o
r
o
nnector (l
o
o
nnector (
S
r
ew (long)
r
ews (shor
t
ories Ki
t
o
ng)
S
hort)
t
)
t
Chapter 3Getting Started
11
Chapter 3 Getting started
3.1 Unpacking the X-Memo
Figure 3-1Unpacking the X-Memo
To unpack the X-Memo
1. Lift the front latch up to release the camera housing.
2. Pull to open the backdoor and take out the camera.
3.2 Using the MicroSD Card
The X-Memo camera is compatible with microSD,
microSDHC and microSDXC memory cards, of which
storage capacity ranges from 8GB to 64GB. You must use a
microSD card with class level 10 or higher.Important
MicroSD card messages are shown below.
Message Description
NO SD
No card in camera.A microSD card is required.
Chapter 3Getting Started
12
SD Full
Memory card is full.
Delete files or swap card.
SD Error
Camera unable to read card.
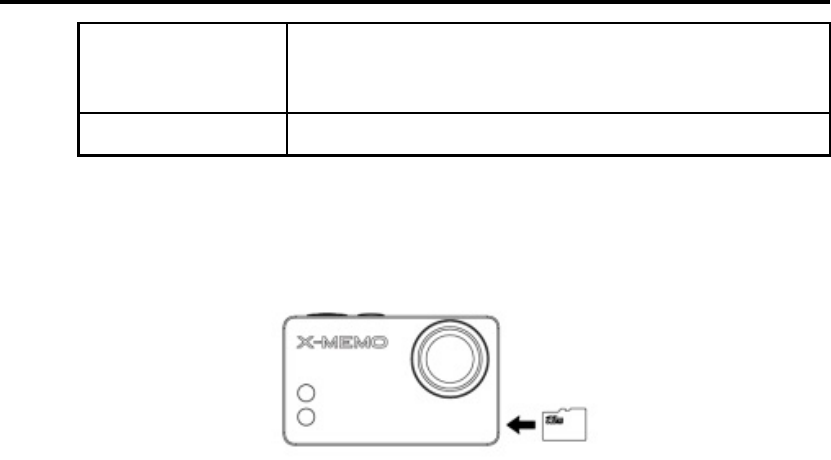
3.2.1 Inserting the MicroSD Card
Figure 3-2Inserting the MicroSD Card
Toinsertthe microSD card
1. Turn off the camera (if powered on).
2. Open the SD card slot from the side of camera.
3. Slide the memory card into card slot with the printing
side facing front of camera. Slide gently until it clicks
into place.
Chapter 3Getting Started
13
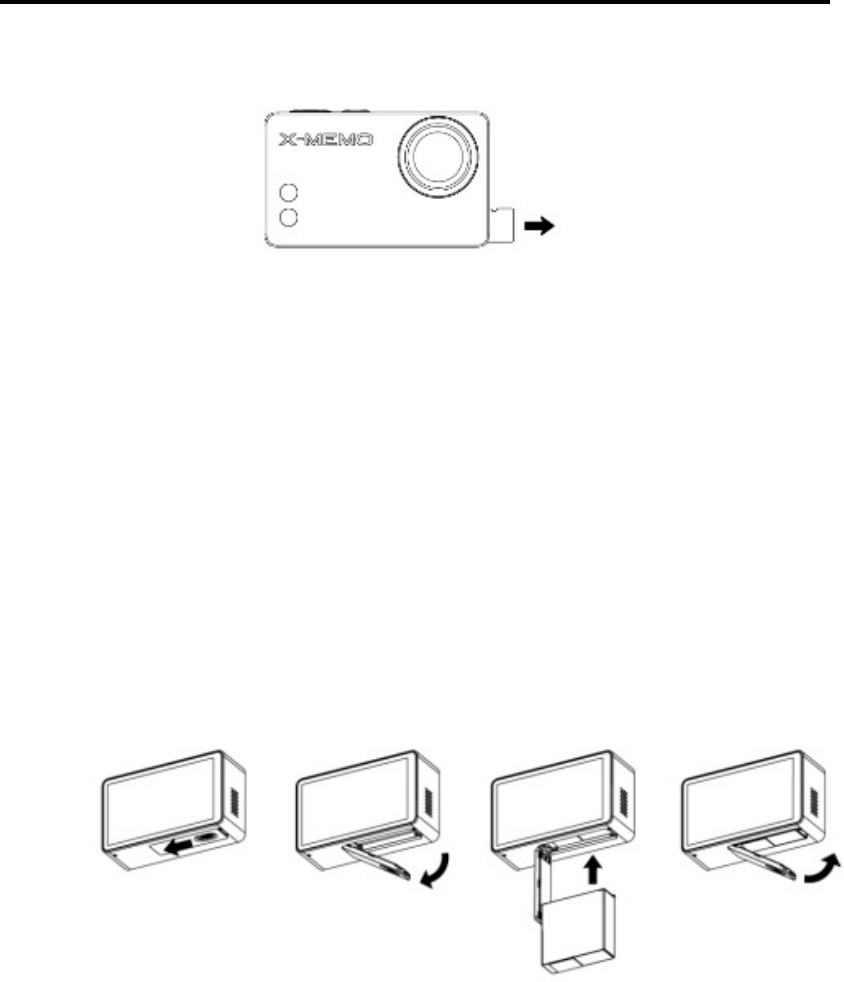
3.2.2 Removing the MicroSD Card
Figure 3-3Removing the MicroSD Card
Toremovethe microSD card
1. Turn off the camera(if powered on).
2. Open the SD card slot from the side of camera.
3. Place fingernail on the edge of the card and gently
press further into camera.
4. The card will be ejected to be removed.
3.3 Using the Battery
3.3.1 Inserting the Battery
Figure 3-4Inserting the Battery

Chapter 3Getting Started
14
Toinsertthe battery
1. Slide to unlock the battery compartment.
2. Insert the supplied battery with the arrow side facing
the LCD screen.
3. Slide back to lock the battery compartment.
3.3.2 Charging the Battery
The red battery icon will be displayedon the camera’s LCD
when the battery drops below 4%. When battery is close to
shutdown level during recording, the camera will save the
file and then turn OFF.
To charge the battery
1. Press Power/Mode button and hold for 3 seconds to
turn OFF your camera.
2. Connect the camera to your computer or any USB
devices via USB cable. Camera Status Light shows
solid Redwhile charging.
3. RedCamera Status Light will turnOFFwhen charging
is complete.
3.3.3 Using the Camera While Charging
You can shoot photos or videos while charging the camera’s
battery with an AC adapter. When the camera is connected
to a PC, it only allows charging and transferring files.

Chapter 3Getting Started
15
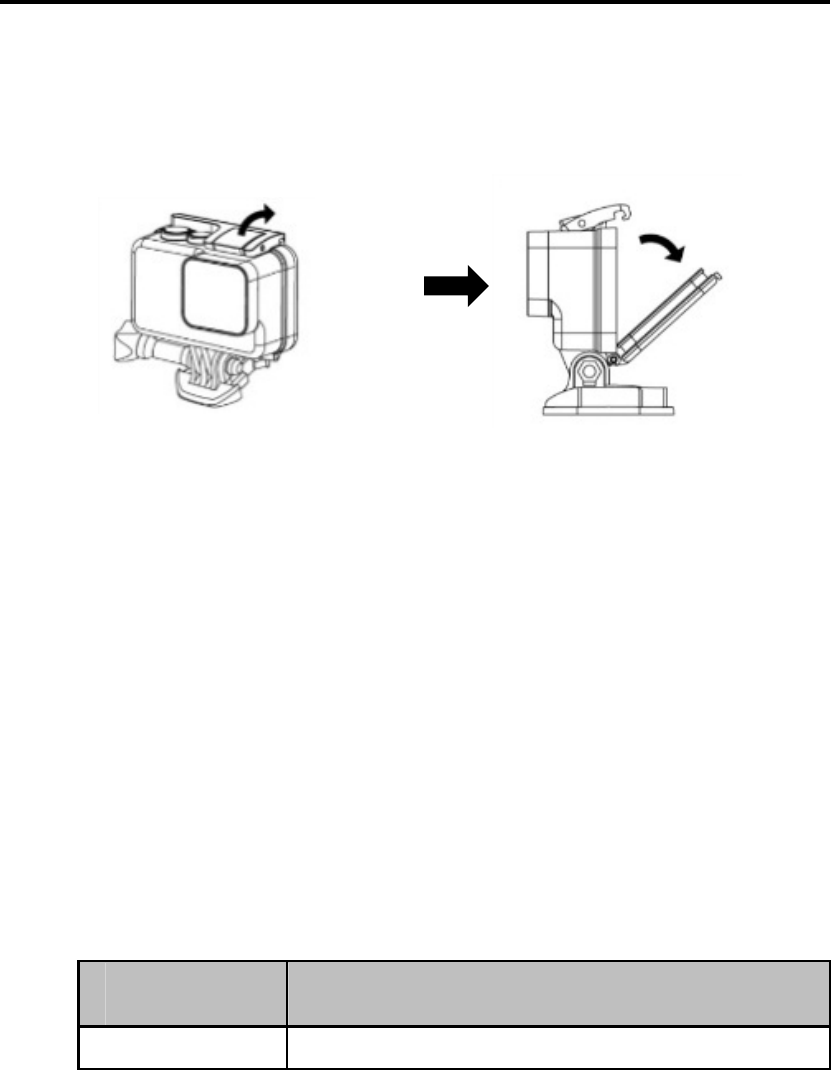
3.4 Assembling the Mounts
The X-Memo provides thumb screw, quick release buckle
and housing for users to quickly assemble a complete unit.
Toassemble a complete unit
Thumb Screw Quick Release Buckle Housing Complete Unit
Figure 3-5Assembling a complete unit
With the assembled complete unit, the curved and flat
adhesive mounts allows you to easily attach your camera
to flat or curved surfaces of helmets, gear and vehicles.
To attach flat or curved adhesive mounts
Slide the adhesive mounts.to connectthe camera
housing as shown in the picture.

Chapter 3Getting Started
16
Flat Adhesive Mount Curved Adhesive Mount
Figure 3-6Attaching adhesive mounts
Toremove flat or curved adhesive mounts
Use a hair dryer to heat the mount and then remove it.
NOTE: Attach the adhesive mounts at least 24 hours in
advance of use. Follow the requirements below:
Apply to smooth surfaces. Avoid porous or abrasive
surfaces, which will reduce adhesion.
Apply to clean surfaces. Remove heavy dirt, oil, wax or
other debris that will reduce adhesion.
Operate in room temperature. Avoid cold or damp
environment that will reduce adhesion.
3.5 Powering Up
Press once the Power/Mode button. The red Camera
Status Lights flash three times and the Sound Indicator
plays a ringtone.
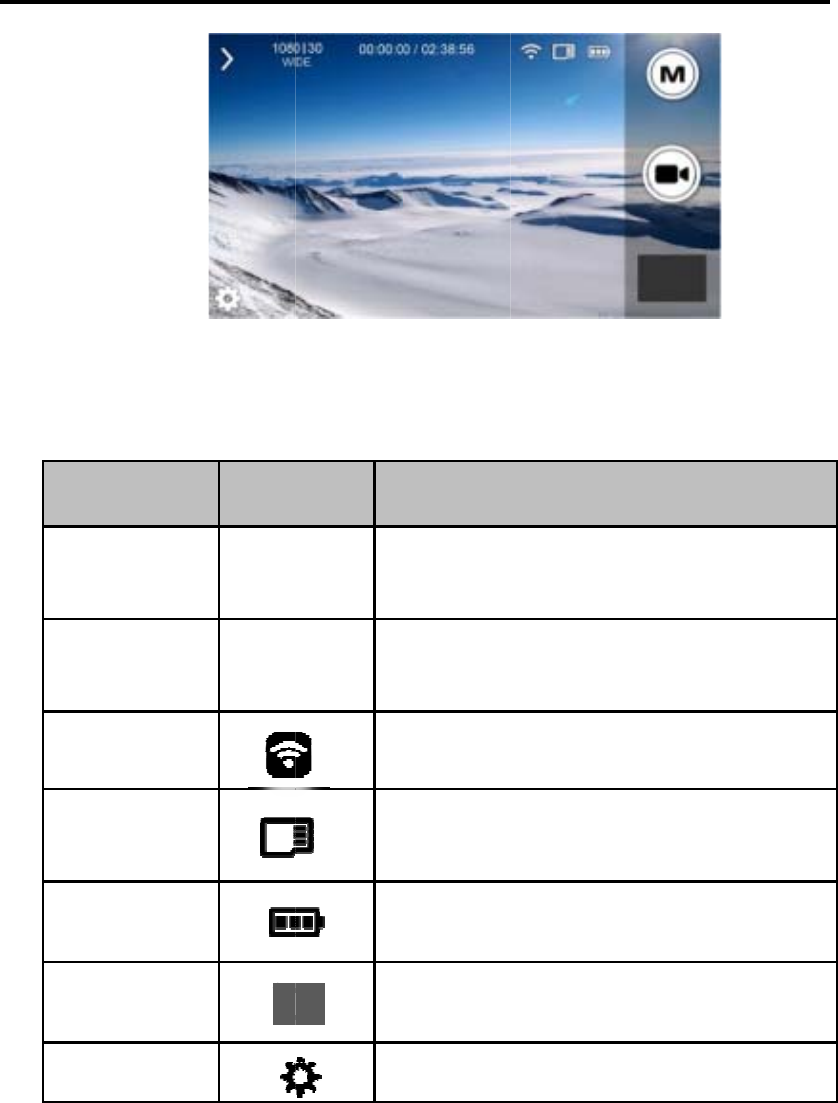
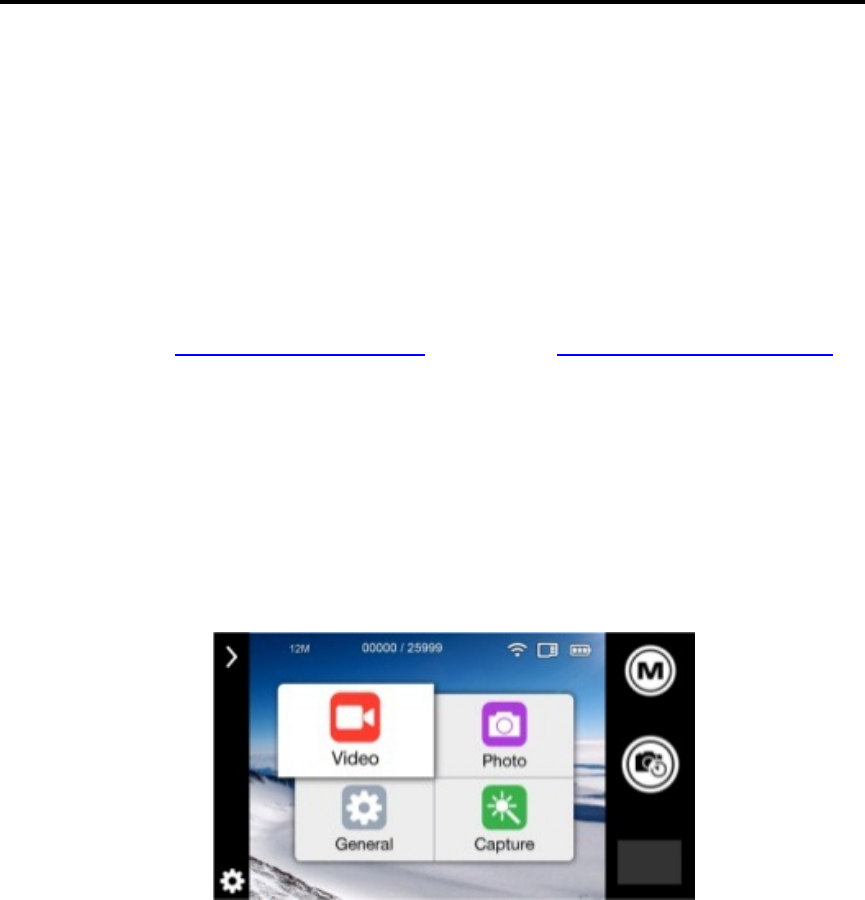
3.5.1 Screen Layouts
After powering up your camera for the first time, the screen
displays the default video mode as below.
Chap
t
F
V
R
R
T
W
M
C
B
T
S
t
er 3Get
t
F
unction
V
ideo
R
esolution
R
ecording
T
ime
W
i-Fi
M
emory
C
apacity
B
attery
T
humbnail
S
ettings
t
ing Star
t
Fi
g
Table
3
But
t
10
8
W
00:0
0
02:3
8
t
ed
g
ure 3-7
D
3
-1Defaul
t
t
on
8
0/30
W
IDE
0
:00/
8
:56
S
a
S
S
S
S
A
17
D
efault
V
t
Video
M
Descrip
t
1080p/30 f
r
S
hows us
e
a
vailable r
e
S
hows Wi-
F
S
hows usa
b
S
hows batt
S
hows the
A
llows to a
d
V
ideo Mo
d
M
ode But
t
t
ion
r
ame per s
e
e
d recordi
e
cording ti
m
F
i connecti
v
b
le memor
y
ery capacit
y
thumbnail
o
d
just came
r
d
e
t
ons
e
cond; Wid
e
ng time
/
m
e.
v
ity (Wi-Fi
o
y
capacity.
y
status.
o
f current fil
r
a settings.
e
angle.
/
Shows
o
n or off).
e.

Chapter 3Getting Started
18
See 4.2 Camera Modesfor instructions on how to set the
mode.
NOTE: When turning on your camera again, the LCD screen
will display the last setting record.
3.6 Powering Downs
Press the Power/Mode button and hold for 3 seconds. The
red Camera Status Lights flash three times and the Sound
Indicator plays a ringtone.
Chap
t
Chap
t
4.1
C
T
d
4.2
C
P
T
a
s
s
t
er 4
t
er 4
C
amera
T
he tabl
e
d
efault s
e
Main Fe
Video R
e
Photo
R
Burst P
h
Time La
Wi-Fi
C
amera
P
ress th
e
T
he follo
w
a
s the ta
b
s
ettings
s
creen.
C
a
Came
r
Default
S
e
below
e
ttings.
Table 4
-
atures
e
solution
R
esolution
h
oto
pse
Modes
e
Power
/
w
ing six
c
b
le belo
w
of that
m
a
mera O
r
a Oper
a
S
ettings
provides
-
1Camer
a
Butt
o
/
Mode b
u
c
amera
m
w
.
A
fter o
m
ode by
peration
19
a
tions
a brief
d
a
Default
o
n D
1
0
1
2
1
0
5
O
u
tton to
m
odes ap
p
ne mode
tapping
s
d
escripti
o
Settings
escription
0
80P (16:9
)
2
M
0
photos in
seconds
O
FF
cycle thr
p
ear in th
e
is set, y
at t
h
o
n of th
e
Buttons
)
1 second
ough th
e
e
same
s
ou can a
h
e upper
e
camera
e
modes.
s
equence
djust the
right o
f
f
Chap
t
4.2.1
V
T
m
d
t
er 4
Mode
Video
Photo
Burst P
h
Time La
Setting
s
Playba
c
V
ideo
T
he
V
id
e
m
ode. If
d
ifferent
m
To st
a
Press
C
a
Ta
b
h
oto
pse
s
c
k
e
o icon
w
not, pre
s
m
odes.
a
rt recor
d
the Sh
u
a
mera O
b
le 4-2Ca
Butto
n
w
ill be d
s
s the P
o
d
ing
u
tter/Sel
e
peration
20
mera M
o
n
Des
c
Rec
o
Capt
u
Capt
u
seco
n
Capt
u
defin
e
A
dju
s
gene
setti
n
View
isplayed
o
wer/Mo
d
e
ctbutto
n
s
o
des Butt
o
c
ription
o
rds
Video.
u
res a singl
u
res up to
n
d.
u
res a se
r
e
d inte
r
val
s
s
ts camer
a
ral, video,
n
gs.
the files in
on LC
D
d
e butto
n
n
or tap
t
o
ns
e
Photo.
10
photo
s
r
ies of
P
h
s
.
a
settings
i
photo and
camera.
D
screen
n
to cycl
e
t
he
V
ide
s
in one
h
otos
at
i
ncluding
capture
in video
e
through
o button

Chapter 4 Camera Operations
21
onscreen. The red Camera Status Lights flash every
second while recording.
To stop recording
Press the Shutter/Select button or tap the Video button
onscreen. The red Camera Status Lights flash three
times before stopping recording.
NOTE: When your camera is running out of power, the files
will be automatically saved before the camera powers off.
See 4.3.2 Video Settingsmenu and 4.3.4 Capture Settings
menu for more details.
4.2.2 Photo
The Photo icon will be displayed on LCD screen in photo
mode.If not, press the Power/Mode button to cycle through
different modes.
To take a Photo
Press and release the Shutter/Select button or tap the
Photo button onscreen. The camera clicks and the red
Camera Status Lights flash when taking each photo.
See 4.3.3 Photo Settings menu and4.3.4 Capture Settings
menu for more setting details.

Chapter 4 Camera Operations
22
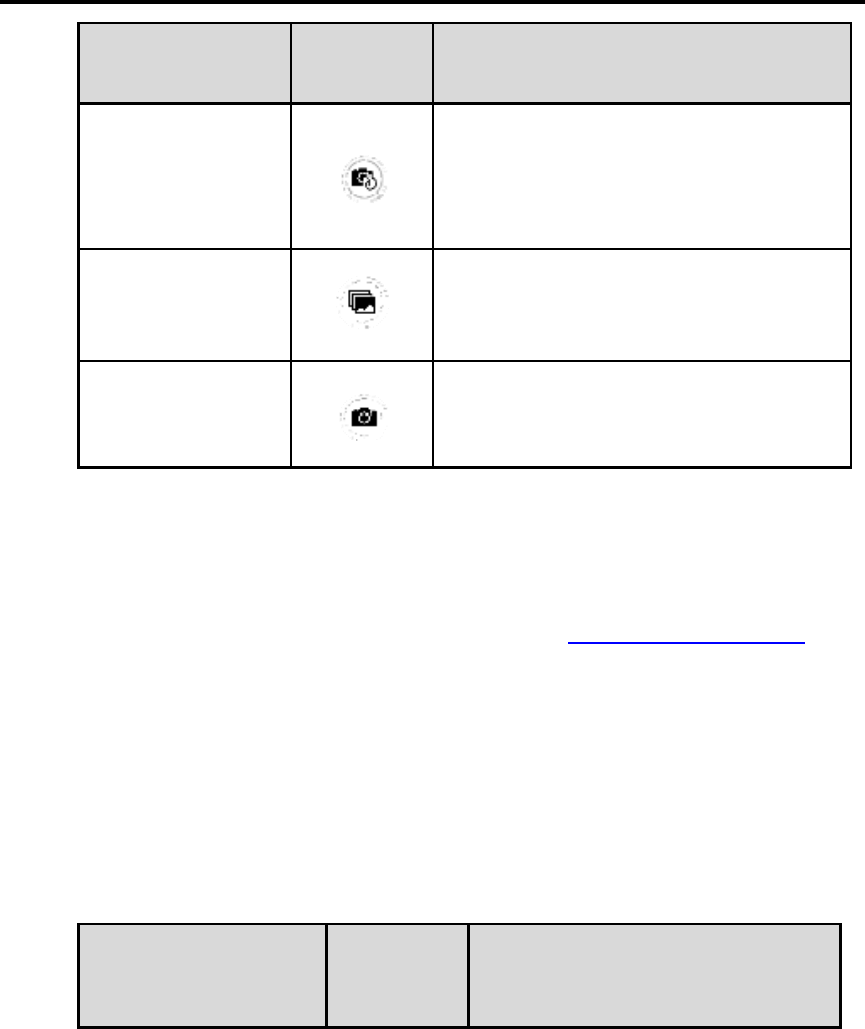
4.2.3 Burst Photo
The Burst Photo icon will be displayed on LCD screen in
photo burst mode.If not, press the Power/Mode button to
cycle through different modes. In Burst Photo mode, you can
capture a series of photos at various speeds including 3
photos/1 second, 5 photos/1 second, 8 photos/1 second and
10 photos/1 second (default).
To Start Burst Photo
Press and release the Shutter/Select button or tap the
Burst Photobutton onscreen. The camera clicks and the
red Camera Status Lights flash when taking eachburst
photo.
See 4.3.3 Photo Settings menu and 4.3.4 Capture Settings
menu for more details.
4.2.4 Time Lapse
The Time Lapse icon will be displayed on LCD screen in time
lapse mode.If not, press the Power/Mode button to cycle
through different modes.In Time Lapse mode, you can
capture photos with various defined time intervals, including
0.5, 1, 2, 5 (default), 10, 30 and 60 seconds.
To start Time Lapse
Chapter 4 Camera Operations
23
Press the Shutter/Select button or tap the Time Lapse
button onscreen. The camera clicks, while the red Camera
Status Lights blink.
To stop Time Lapse
Press the Shutter/Select button or tap the Time Lapse
button onscreen.
See 4.3.3 Photo Settingsmenu and 4.3.4 Capture Settings
menu for more details.
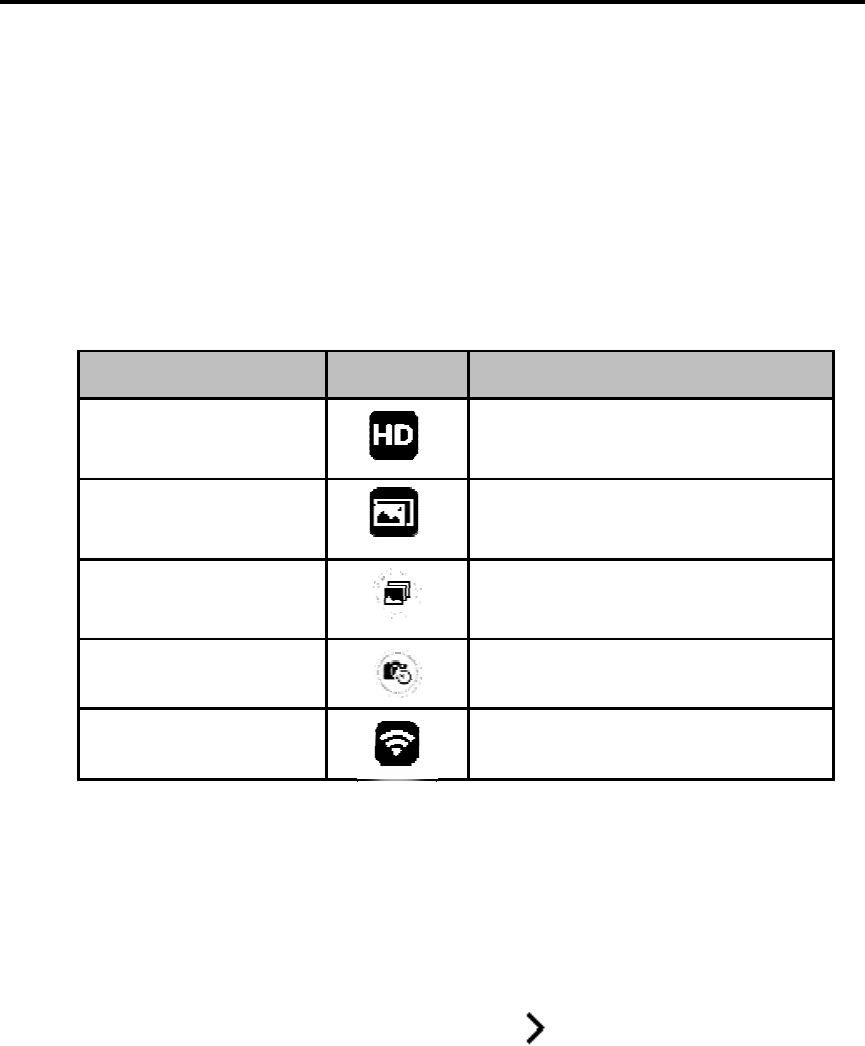
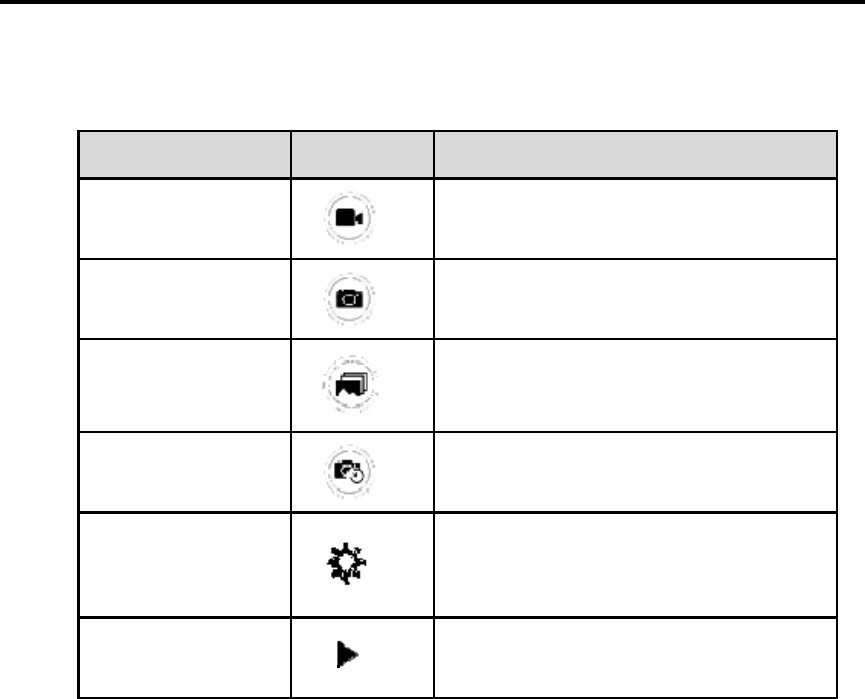
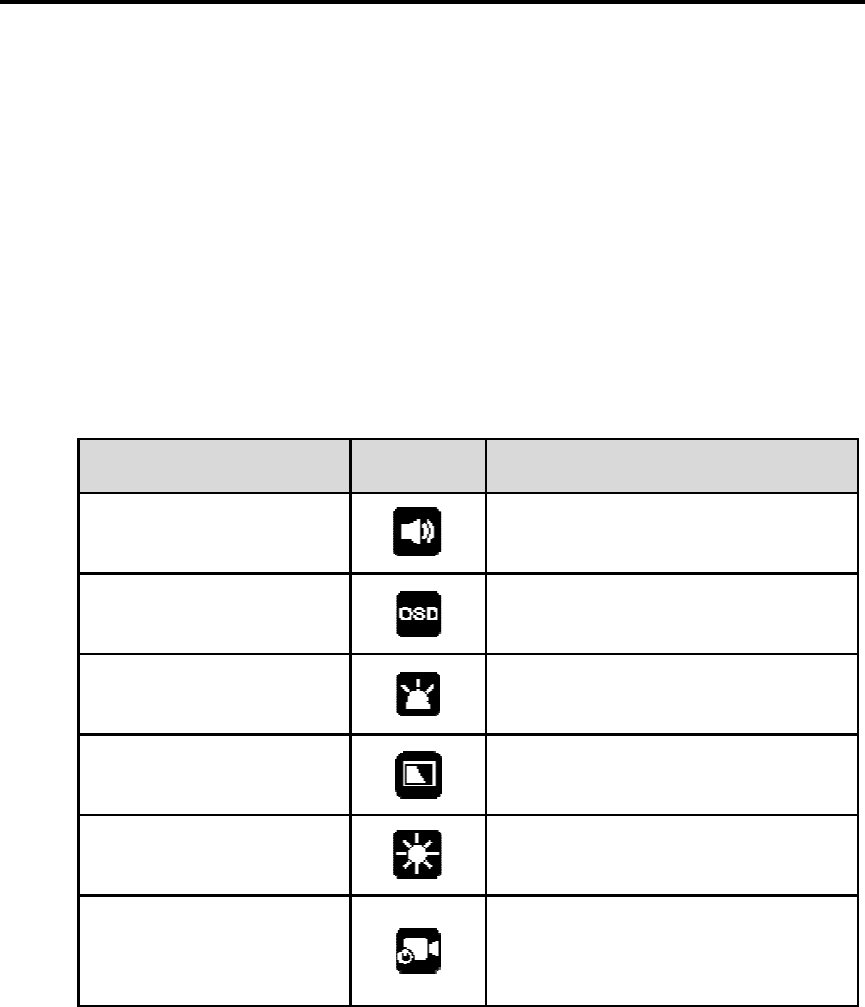
4.3 Camera Settings
The X-Memo camera allows four kinds of camera settings as
detailed in the figure and table below.
Figure 4-1Settings Screen
Table 4-3 Camera SettingsButtons

Chap
t
t
er 4
Camera
Ge
n
V
i
d
P
h
Ca
p
To en
t
Tap t
h
scree
n
the li
s
To exi
Tap t
h
scree
n
C
a
Settings
n
eral
d
eo
h
oto
p
ture
t
er the S
e
h
e Setti
n
n
, or pre
s
s
t.
t the Se
t
h
e Setti
n
n
, or sim
p
a
mera O
Butto
n
e
ttings
m
n
gs icon
s
s the P
o
t
tings m
e
n
gs icon
p
ly tap a
n
peration
24
n
De
A
d
j
e.
g
an
d
A
d
j
FP
Se
c
Vi
d
vie
w
A
d
j
Ti
m
A
d
j
W
B
M
e
m
enu
from th
e
o
wer/Mo
d
e
nu
from th
e
n
y place
o
s
scription
j
usts gene
r
g
.
B
d
Brightne
s
j
usts Vi
d
S
(Frame
c
ond),
Loo
p
d
eo),
Form
a
w
).
j
usts Phot
o
m
e Lapse
o
j
usts phot
B
(White Ba
e
ter
or
Exp
o
e
bottom
d
e butto
n
e
bottom
o
n scree
n
r
al camera
B
ootup
s
s
.
d
eo
Re
s
p
ing
,
PIV
(
P
a
t
or
Angl
e
o
Resolutio
n
o
r
Single
.
o
Rotate
,
lance),
Sh
a
o
sure
.
left corn
e
n
to cycl
e
left corn
e
n
.
settings,
Rec
s
olution
,
Per
P
icture in
e
(field of
n
,
Burst
,
Color
,
a
rpness
,
e
r of the
e
through
e
r of the
Chap
t
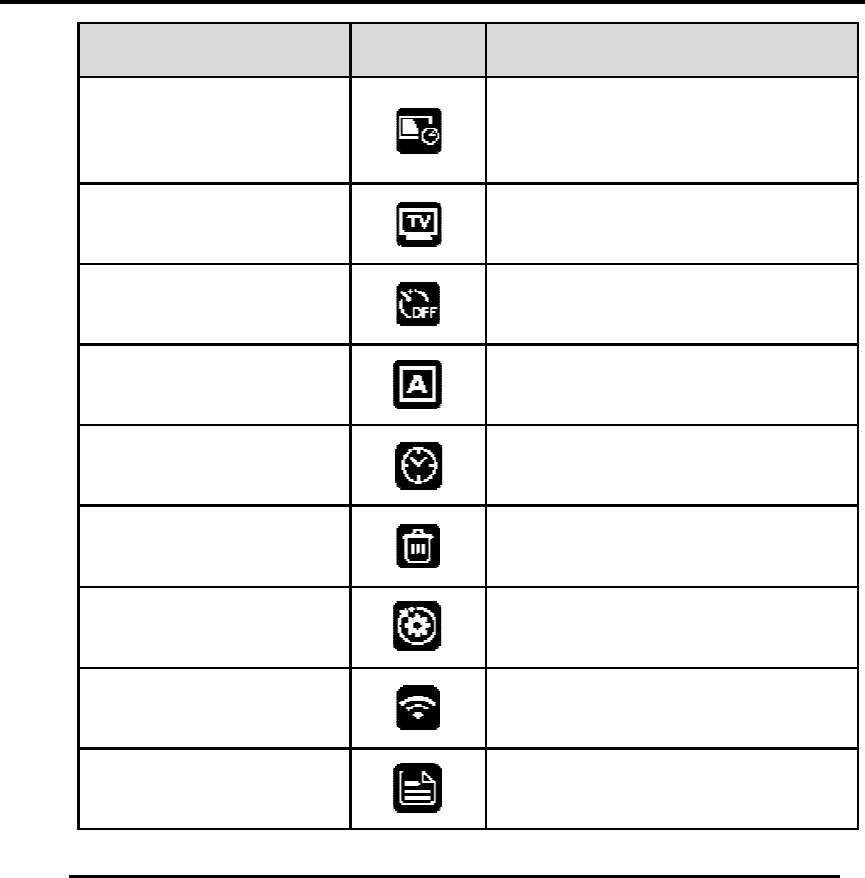
4.3.1
G
Y
O
D
p
L
t
er 4
G
eneral
Y
ou can
a
O
SD (O
n
D
isplay),
p
owering
L
angua
g
General
V
On Scree
L
E
Auto tur
n
Bri
Bo
o
Starts r
e
turning o
C
a
Setting
s
a
djust th
e
n
Scree
n
Bright
n
up), Ti
m
g
e, Day/
T
Tab
l
Settings
V
olume
OSD
n Display.
E
D Blink
LCD
n
s off the LC
D
ghtness
o
tup Rec
e
cording wh
e
n your came
r
a
mera O
s
e
followin
g
n
Displa
y
n
ess, B
o
m
e Stam
p
T
ime, Del
e
e 4-4Ge
n
B
u
D
.
e
n
r
a.
peration
25
g
general
y
), LED
o
otup
R
p
, Syste
m
e
te, Res
e
n
eral Set
t
u
tton
s
camera
Blink,L
C
R
ec(start
s
m
(NTS
C
e
t, Wi-Fi
t
ings But
t
Options
OFF; 70%;
OFF; ON (
D
OFF; ON (
D
1min; 3mi
n
Never (De
f
High (Defa
OFF (Defa
settings:
C
D (Liqui
d
s
recordi
C
/PAL),
A
and
V
er
s
t
ons
100% (De
f
D
efault).
D
efault).
n
; 5min;
f
ault).
ult); Mediu
m
ult); ON.
Volume,
d
Cristal
ng after
A
uto Of
f
,
s
ion.
f
ault).
m
; Low.
Chap
t
N
c
S
W
t
er 4
General
Ti
m
Stam
p
TV
A
Auto t
u
La
D
a
De
Restor
e
N
OTE:
W
c
ard will
b
S
D card.
W
hen yo
u
C
a
Settings
m
e Stamp
p
s on the Fil
e
System
uto Of
f
u
rns off came
r
nguage
a
te/Time
Delete
lete all files.
Reset
e
default setti
n
Wi-Fi
Version
W
hen yo
u
b
e forma
u
select
T
a
mera O
B
u
e
s.
r
a.
gs.
u
select
D
t
ted. Ma
k
T
V syste
m
peration
26
u
tton
D
elete i
n
k
e sure t
o
m
to vie
w
s
Options
OFF (De
Date/Time.
PAL; NTS
C
1min; 3mi
n
OFF (Defa
English (D
e
Yes; No (D
√
;
×
(D
e
√
;
×
(D
e
OFF (Defa
Displays t
h
n
general
o
create
a
w
a TV/H
D
fault); D
a
C
(Default).
n
; 5min;
ult).
e
fault).
efault).
e
fault).
e
fault).
ult); App; F
l
h
e current v
e
settings
a
back-u
p
D
TV, sel
e
a
te; Time;
l
y Mode.
e
rsion.
, the SD
p
copy o
f
e
ct NTSC
f

Chapter 4 Camera Operations
27
for North American televisions; for those outside of North
America, select PAL in most cases.
To adjust the General Settings
1. Tap the Settings icon from the bottom left corner of the
screen, or press the Power/Mode button to cycle
through the list.
2. Tap to selectGeneralfrom the Settings menu.Use the
Power/Mode button to cycle through the list.
3. Tap to select or press the Shutter/Selectbutton to
select the desired option.
4. Tap Backto exit.
To Start Bootup Rec
1. Tap the Settings icon from the bottom left corner of the
screen, or press the Power/Mode button to cycle
through the list.
2. Tap to selectGeneralfrom the Settings menu.Use the
Power/Mode button to cycle through the list.
3. Tap to select or press the Shutter/Selectbutton to
select Bootup Rec.
4. Tap Back to exit.
Chap
t
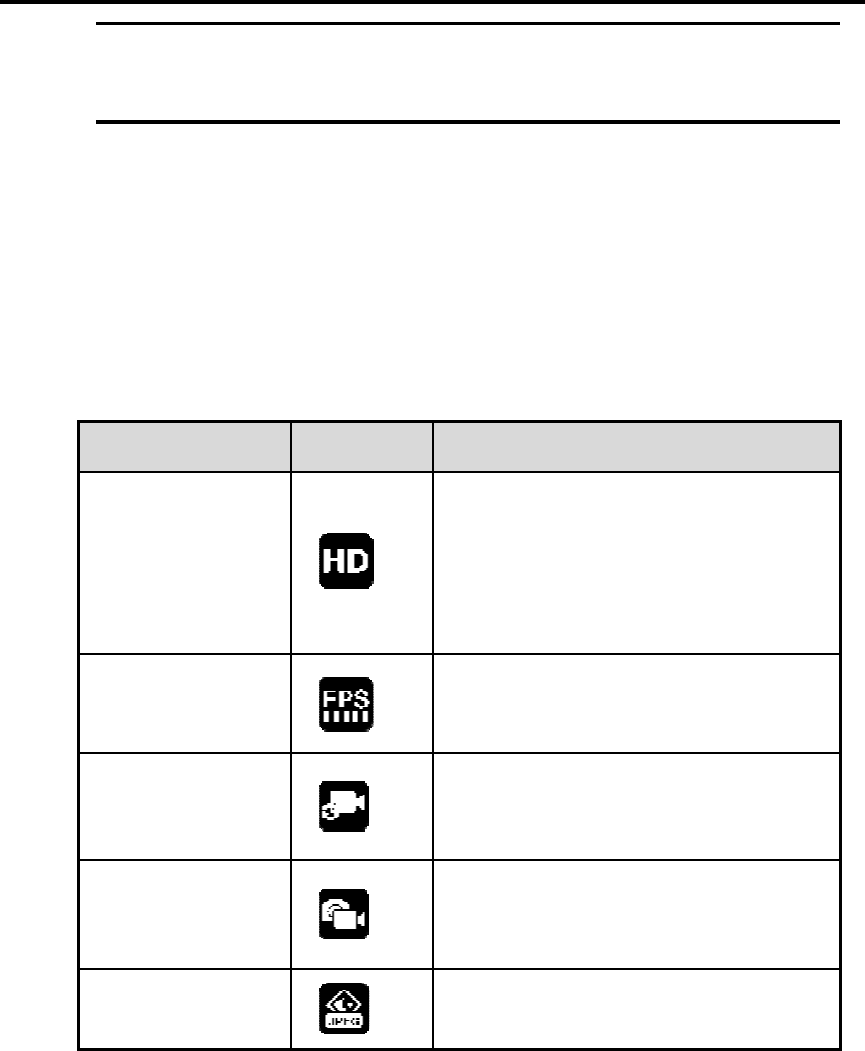
4.3.2
V
Y
S
F
t
er 4
NOTE:
make
s
V
ideo S
e
Y
ou ca
n
S
econd),
F
ormata
n
V
ideo S
Resol
F
P
Frame Pe
Loo
p
Cyclic r
e
PI
V
Picture i
For
m
C
a
When
y
s
ure the
c
e
ttings
n
adjus
t
Looping
n
dAngle
a
Ta
b
ettings
ution
P
S
r Second
p
ing
e
cording
V
n Video
m
at
a
mera O
y
our sele
c
c
amera is
t
Video
,
P
a
ccordin
g
b
le 4-5 V
i
Button
peration
28
c
t Boot
u
in video
Resol
u
P
IV(Pictu
g
to the f
o
i
deo Sett
i
Opti
o
1080
P
960P
720P
WV
G
24, 3
0
*PAL
OFF
1, 5,
OFF
5, 10
,
MOV
s
u
p Recin
mode b
e
u
tion,
F
re
o
llowing t
i
ngs Butt
o
o
ns
P
(16:9) (D
e
(4:3);
(16:9);
G
A (16:9).
0
, 48, 60 fp
Default: 5
0
(Default);
15, 30 min/
v
(Default);
,
30, 60 se
c
; MP4 (Def
a
general
e
fore po
w
F
PS(Fra
m
in
able.
o
ns
e
fault)
s(NTSC D
e
0
fps.
v
ideo.
c
.
a
ult).
settings,
w
ering off.
m
es per
Video),
e
fault)

Chap
t
4.3.3
P
Y
i
t
er 4
V
ideo S
A
n
g
Field o
f
To ad
j
1. T
a
s
c
th
2. S
e
3. T
a
s
e
4. T
a
NOTE
time in
Photo S
e
Y
ou can
c
i
n the foll
o
Photo S
Resoluti
o
C
a
ettings
g
le
f
View
j
ust the
V
a
p the Se
t
c
reen, o
r
rough th
e
e
lect
V
ide
a
p to se
l
e
lect the
d
a
p Backt
o
: PIV (Pi
tervals
w
e
ttings
c
hange t
h
o
wing ph
Tabl
e
ettings
o
n
a
mera O
Button
V
ideo S
e
t
tings ic
o
r
press
t
e
list.
ofrom th
e
ect or
p
d
esired o
o
exit.
cture in
V
w
hile reco
h
e settin
g
oto setti
n
e
4-6Pho
t
Button
peration
29
Opti
o
Wide
Medi
u
e
ttings
o
n from t
h
t
he Po
w
e
Settin
g
p
ress th
e
ption.
V
ideo) c
a
rding.
g
s of Ph
o
n
gs of yo
u
t
o Settin
g
Opti
o
12M(
s
o
ns
(Default);
u
m; Narro
w
h
e botto
m
w
er/Mode
g
s menu.
e
Shutte
a
ptures
p
o
to Burs
t
u
r X-Me
m
g
s Button
o
ns
Default); 7
M
w
.
m
left cor
n
button
r/Select
b
p
ictures a
t
and Ti
m
m
o camer
a
s
M
; 5M.
n
er of the
to cycle
b
utton to
t various
m
e Lapse
a
.
Chap
t
4.3.4
C
T
S
t
er 4
Photo S
Time La
p
Burst
Single
To ad
j
You
Burs
t
C
apture
T
he X-M
e
S
ettings
Captur
e
C
a
ettings
p
se
j
ust the
P
can a
d
t
andSing
Setting
s
e
mo allo
w
menu.
Tab
l
e
Settings
a
mera O
Button
P
hoto S
e
d
just Ph
le in the
s
s
w
s a vari
e
e 4-7Ca
p
Butt
o
peration
30
Opti
o
0.5,
1
5 se
c
10, 3
0
3, 5,
8
10 p
h
OFF
3, 5,
e
ttings
oto Re
s
s
ame wa
y
e
ty of ad
v
p
ture Set
t
o
n
O
s
o
ns
1
, 2 sec
c
(Default),
0
, 60 sec.
8
photos/1
s
h
otos/1 sec
o
(Default);
10 sec.
s
olution
,
y
as 4.3.
2
v
anced s
e
t
ings But
t
O
ptions
s
econd
o
nd (Defau
l
,
Time
2
video s
e
ttings in
t
ons
l
t).
Lapse,
ettings.
Capture
Chap
t
4.4
P
T
a
t
er 4
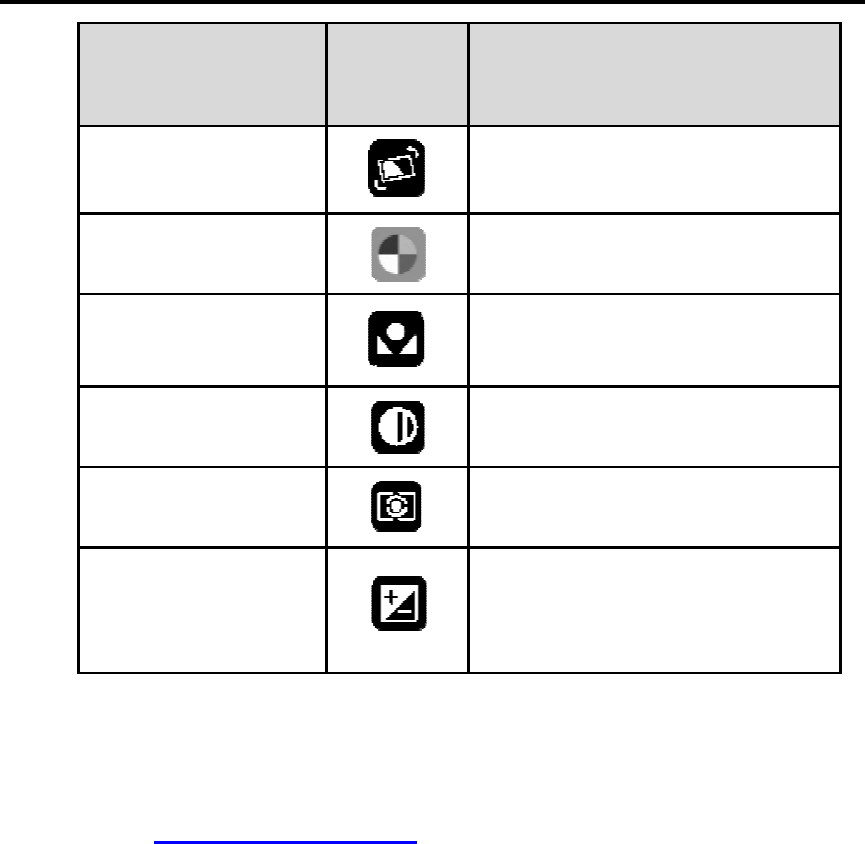
Captur
e
Rotate
Color
WB
Sharpne
Meter
Exposur
e
To ad
j
You c
a
as 4.
3
Playbac
k
T
he X-M
e
a
nd phot
o
C
a
e
Settings
ss
e
j
ust the
C
a
n adjus
t
3
.2 Video
k
e
mo ca
m
o
s on ca
m
a
mera O
Butt
o
C
apture
S
t
the abo
v
settings.
m
era allo
w
m
era or c
peration
31
o
n
O
O
A
A
5
5
H
C
-
2
+
0
S
ettings
v
e captu
r
w
s you t
o
onnect it
s
O
ptions
O
FF (Defaul
t
uto (Defaul
t
uto (Defaul
t
5
00k; 6500
k
igh; Mediu
m
enter (Def
a
2
.0; -1.5; -1
.
0
.5; +1.0; +
r
e setting
o
directl
y
to a TV/
H
t
); ON; Aut
o
t
); Autel.
t
); 300k;
k
.
m
(Default);
a
ult); Avera
g
.
0; -0.5; 0 (
D
1.5; +2.0.
sin the s
a
y
view th
H
DTV.
o
.
Low.
g
e; Spot.
D
efault)
a
me way
e videos

Chapter 4 Camera Operations
32
To playback on X-Memo
1. Press the Power/Mode button to cycle through the list,
or tap the thumbnail at the right bottom corner of screen.
2. Tap to select the desired photos or videos, you can
zoom in or zoom out the photos on touchscreen.
3. While viewing the selected files, tap the screen or press
the Power/Mode button to display the menu. Select the
square icon to display the thumbnail preview.
4. Tap Backto exit.
To playback on TV/HDTV
1. Connect the camera to a TV/HDTV with a Micro HDMI
Cable.
2. Turn on the camera.
3. Press the Power/Mode button to cycle through the list,
or tap the thumbnail at the lower right corner of screen.
4. The X-Memo displays the thumbnail previews of all the
files on your SD card. Use the Power/Mode button to
cycle through thumbnails and then press the
Shutter/Selectbutton or simply tap to view the desired
photos.
5. Press the Power/Mode button to select. Press the
Shutter/Selectbutton or simply tap the arrows to
navigate through the files.

Chapter 4 Camera Operations
33
6. While viewing the selected file, tap the screen or press
the Power/Mode button to display the menu, and then
select to display the thumbnail preview.
7. Tap Backto exit.
4.5 Transferring files
To transfer photo and video files to a PC
1. Plug the camera into a computer via the USB cable
supplied.
2. Press the Power/Mode button to turn the camera ON.
3. Double click“My Computer” and select “Removable
Disk”.
4. Double click “Removable Disk” icon.
5. Double click “DCIM”icon.
6. Double click “100 media”to view all the files on
microSD card.
7. Copy files to your computer or other storage devices.
To transfer photo and video files to a Mac
Follow the same steps as transferring files to a PC.

Chapter 5 X-Memo App Operations
34
Chapter 5 X-Memo App Operations
5.1 Wi-Fi Connection
To turn on the Wi-Fi on camera
1. Turn on the camera.
2. Long press the Shutter/Selectbutton to enter the Wi-Fi
settings menu.
3. Tap to select “App” or “Fly mode”, then the top and
front LED indicator lights will flash every second.
4. Tap “Back” to exit.
5.2 X-memo App
To use the X-memo App on smartphone or tablet
1. Download the X-memo App from Google Play or Apple
Store.
2. Press the Power/Mode button to turn on the camera.
3. Long press the Shutter/Selectbutton to enter the Wi-Fi
settings menu.
4. Tap to select “App” option.
5. Pair your smartphone or tablet with the“autel_camera”
Wi-Fi network.
6. Enter the default password “123456789”. You can
customize the network name and password at AP

Chapter 5 X-Memo App Operations
35
Setting. If you have already changed the password,
enter the new password.
7. Tap the “X-memo” app on your smartphone or tablet.
You can control the camera through the smartphone or
tablet.
8. Tap “Back” to exit.

Chapter 6 Maintenance and Services
36
Chapter 6 Maintenance and Services
To ensure that the X-Memo performs at its optimum level, we advise
that the product maintenance instructions covered in this section are
read and followed.
6.1 Maintenance Instructions
The following shows how to maintain your camera, together
with precautions to take.
Use a soft cloth and alcohol or a mild window cleaner to
clean the touch screen of the camera.
Do not use any abrasive cleansers, detergent or chemicals
on the camera.
Keep the devices in dry conditions within normal operating
temperatures.
Dry your hands before using the devices. The touch screen
of the camera may not work if the touch screen is moist, or
if you tap the touch screen with wet hands.
Do not store the devices in humid, dusty or dirty areas.
Do not attempt to disassemble your devices.
Avoid dropping the camera. If the camera is dropped,
especially on a hard surface, the user shall take it to a
service center for inspection.

Chapter 6 Maintenance and Services
37
Use only authorized battery chargers and accessories. Any
malfunction or damage caused by the use of unauthorized
battery charger and accessories will void the limited
product warranty.
Ensure that the battery charger does not come in contact
with conductive objects.

Chapter 6 Maintenance and Services
38
6.2 Troubleshooting Checklist
A. When you cannot turn on the camera:
Make sure the battery is properly inserted in the camera.
Make sure the battery has enough power to turn on the
camera.
B. When the camera does not work properly:
Check if your SD card is compatible with the X-Memo
camera.
Make sure your SD card has been formatted before
inserting in the camera.
C. When you cannot transfer the files to PC:
Make sure the connection between the X-Memo camera
and your PC is established.
Check if the USB cable is usable.
Make sure your SD card is properly inserted into the SD
card slot.
Make sure the files in SD card can be recognized by
your PC.
D. When you are unable to charge the camera:
Make sure the battery is properly installed in the
camera.

Chapter 6 Maintenance and Services
39
Your device may have not been connected to the
charger properly. Check the connector.
Your charger may be malfunctioning.
E. When Wi-Fi network cannot be found in your mobile
device:
Make sure you have turned on the AP mode or Station
mode.
Check your smart device.
NOTE: If your problems persist, please contact Autel’s
technical support personnel or your local selling agent.

Chapter 6 Maintenance and Services
40
6.3 About Battery Usage
Your camera is powered by a non-built-in Lithium-ion Polymer
battery. This means that you shall insert the battery in camera
for first time use.
DANGER: Incorrect operations or tampering with
the battery pack may cause an explosion.
Do not use a damaged battery charger.
Do not disassemble or crush, bend or deform, puncture or
shred the battery.
Do not modify, remanufacture or attempt to insert foreign
objects into the battery, or expose it to fire, explosion or
other hazards.
Make sure to only use the USB cable that comes together
in the package. If you use the other USB cable, you might
incur malfunction or failure of the device.
Only use the charging device that has been qualifiedwith
the device per this standard. Use of an unqualified battery
or charger may present risks of fire, explosion, leakage, or
other hazards.
The battery recharging time varies depending on the
remaining battery capacity.

Chapter 6 Maintenance and Services
41
Battery life inevitably shortens over time.
Since over charging may shorten battery life, remove the
camera from its charger once it is fully charged. Unplug the
charger once charging is complete.
Promptly dispose of used batteries in accordance with local
regulations.

Chapter 7 Compliance Information
42
Chapter 7 Compliance Information
FCC ID WQ8301SDCHD1
IC 10826A-SDCHD1

Chapter 8 Warranty
43
Chapter 8 Warranty
12-Month Limited Warranty
Autel Intelligent Technology Corp., Ltd. (the Company) warrants
to the original retail purchaser of this X-Memo action camera, that
should this product or any part thereof during normal consumer
usage and conditions be proven defective in material or
workmanship that results in product failure within twelve (12)
months period from the date of delivery, such defect(s) will be
repaired, or replaced (with new or rebuilt parts) with Proof of
Purchase, at the Company’s option, without charge for parts or
labor directly related to the defect(s).
The Company shall not be liable for any incidental or
consequential damages arising from the use, misuse, or
mounting of the device. Some states do not allow limitation on
how long an implied warranty lasts, so the above limitations may
not apply to you.
This warranty does not apply to:
a) Products subjected to abnormal use or conditions, accident,
mishandling, neglect, unauthorized alteration, misuse, improper
installation or repair or improper storage;
b) Products whose mechanical serial number or electronic

Chapter 8 Warranty
44
serial number has been removed, altered or defaced;
c) Damage from exposure to excessive temperatures or
extreme environmental conditions;
d) Damage resulting from connection to, or use of any
accessory or other product not approved or authorized by the
Company;
e) Defects in appearance, cosmetic, decorative or structural
items such as framing and non-operative parts.
f) Products damaged from external causes such as fire, dirt,
sand, battery leakage, blown fuse, theft or improper usage of any
electrical source.
IMPORTANT: All contents of the product may be deleted during
the process of repair. You should create a back-up copy of any
contents of your product before delivering the product for
warranty service.
cameral a minimum of 0
Contains no metal and that positions the
Warning:
Any Changes or modifications not expressly approved by the party responsible for compliance
could void the user's authority to operate the equipment.
This device complies with part 15 of the FCC Rules. Operation is subject to the following two
conditions: (1) This device may not cause harmful interference, and (2) this device must
accept any interference received, including interference that may cause undesired operation.
Note: This equipment has been tested and found to comply with the limits for a Class B digital
device, pursuant to part 15 of the FCC Rules. These limits are designed to provide
reasonable protection against harmful interference in a residential installation. This
equipment generates, uses and can radiate radio frequency energy and, if not installed and
used in accordance with the instructions, may cause harmful interference to radio
communications. However, there is no guarantee that interference will not occur in a
particular installation. If this equipment does cause harmful interference to radio or television
reception, which can be determined by turning the equipment off and on, the user is
encouraged to try to correct the interference by one or more of the following measures:
—Reorient or relocate the receiving antenna.
—Increase the separation between the equipment and receiver.
—Connect the equipment into an outlet on a circuit different from that to which the receiver is
connected.
—Consult the dealer or an experienced radio/TV technician for help.
For body worn operation, this model cameral has been tested and meets the FCC RF exposure
guidelines when used with an accessory designated for this product or when used with an accessory that
Non-compliance with the above restrictions may result in violation of RF exposure guidelines.
CM from the body and head.