Authinx DS11A Door/Window Sensor User Manual 49 1001 UG pmd
Authinx Inc. Door/Window Sensor 49 1001 UG pmd
Authinx >
Exhibit D Users Manual per 2 1033 b3

Initializing Door/Window Sensors
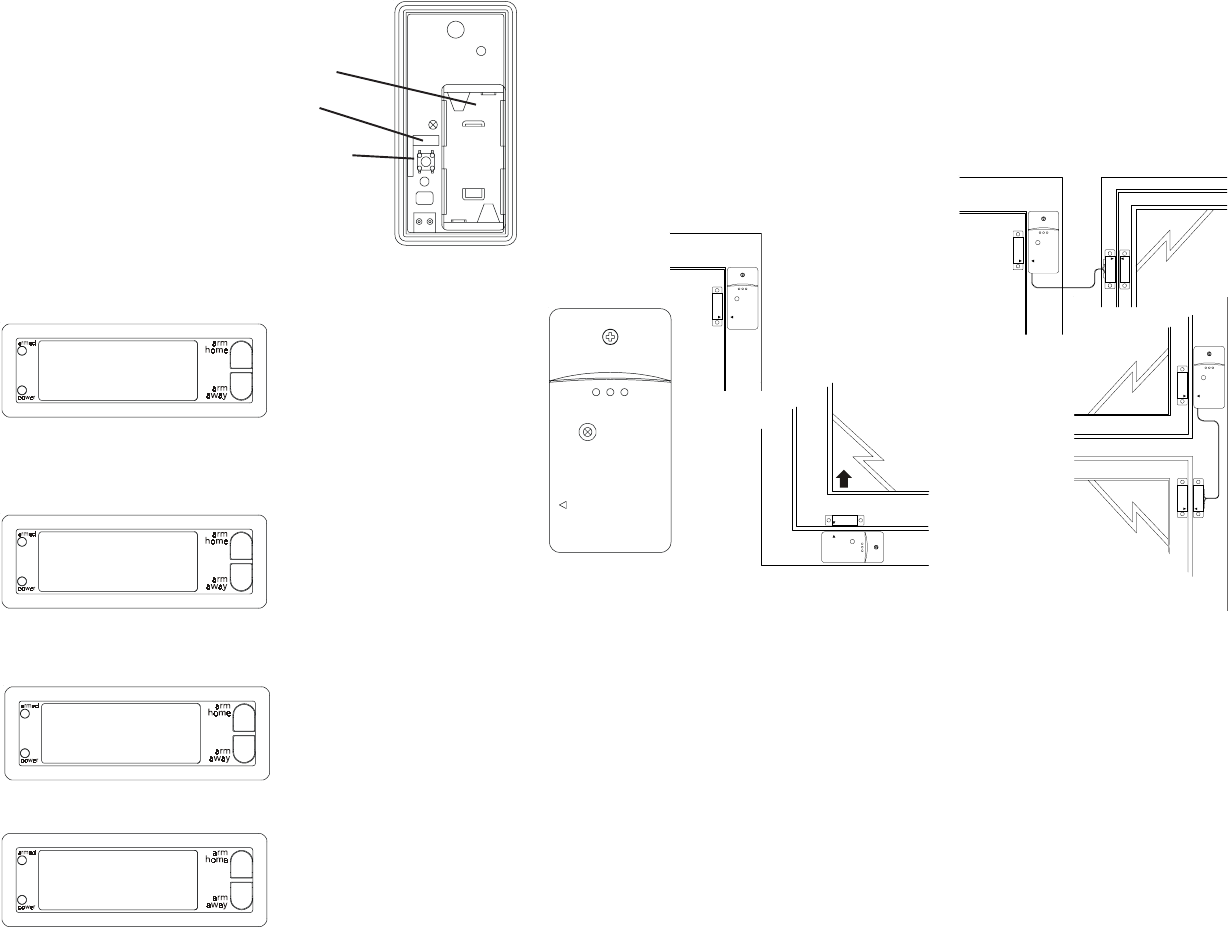
Remove the screw from the front of the Door/Window Sensor and
install 2 AAA alkaline batteries inside.
Set switch to MAX (left) for windows, or MIN (right) for doors.
Press and hold the TEST button on the Sensor for a second and then
release it. This initializes the Sensor and picks a random code that is
used when it is registered with the Console.
ENTER PIN
12:00 am
****
12:00 am
1. INSTALL
Entering the PIN clears the top line and shows * for each number entered. The
default PIN is 0000, you’ll find out later how you can change this, but for now press
0000 on the keyboard under the Console’s flip up lid.
This takes you to the first level of the menu at step 1. This is the INSTALLATION
level. The display looks like this:
Press OK and the display looks like this:
Registering Door/Window Sensors
Press either of the Console’s 2 Menu up/down buttons (to the right of the display).
The display then shows ENTER PIN (Personal Identification Number) in the top
line.
1. INSTALL
ZONE
Now simply press the TEST button on the Door/Window Sensor. The Console will
acknowledge that it has been registered by displaying ZONE 1 SET.
Repeat this for any other Door/Window Sensors you want to register. The display
increments to ZONE 2 SET, etc. as you install more Door Window Sensors.
If desired, you can specify what zone you want the Door Window Sensor to be
installed into. Just press the number of the zone you want on the Console’s keypad,
and then press the TEST button on the Door Window Sensor.
Press Clear to back out of the menu. After a short delay the display reverts to
showing HOME CONTROL on the top line and the time of day on the bottom line.
• Attach the Door/Window Sensor to the wall using the mounting screws provided.
• Fit the Door/Window Sensor as high as possible at the top of the door/window.
• Make sure the arrows on the magnetic and the Door/Window Sensor are facing
each other and that they separate cleanly when the door or window is opened.
• To protect two doors or windows close to each other, use the Door/Window
Sensor with an additional set of magnetic switch contacts as show in the diagrams
above.
• Set the DELAY slide switch to MIN (to the right) to always trigger the alarm
instantly (for windows), or to MAX (to the left) to trigger the alarm after a preset
entry delay when the system is armed in DELAY mode (for doors).
The numbers 1 –32 in the display refer to up to 32 “zones.” These represent the
Door/Window Sensors (and/or Motion Detectors) you install. The numbers show
open zones, problem zones and bypassed zones by being displayed as steady on
(door or window open), slow flash (there’s a problem with that zone) or fast flash
(that zone has been bypassed). Attempting to arm with an open or problem zone
makes the unit beep continuously and the unit will display in words on the display
what the cause is, but only for one zone at a time. Bypassing that zone (by pressing
the Clear button) moves on to the next problem zone, if there is one.
Two doors or
windows (requires
accessory magnetic
switch pair)
Ideal location
Sliding window
Installing the Door/Window Sensor

Battery Replacement
If any zone shows LOW BATT on the Console’s display, the Door/Window Sensor
for that zone will need its batteries replacing. Also, if a zone has not reported in
during the last four hours, the display will show PROBLEM. This is most likely
caused by dead batteries.
As long as the batteries have not completely failed they may be replaced with fresh
batteries without the need to reinstall the sensor. After removing the old batteries
fresh batteries must be fitted within 30 seconds to ensure that the security code is
retained.
Testing the Door/Window Sensor
Once the batteries have been replaced, the Door/Window Sensor should be tested as
follows:
• Make sure the system is NOT armed.
• Open the door or window with the sensor attached. The Console chimes to
acknowledge and the zone # is displayed on the LCD.
FCC Statement
This equipment generates and uses radio frequency energy, and if not installed and
used properly, that is, in strict accordance with the manufacturers instructions, may
cause interference to radio and television reception. It has been type tested and found
to comply with the limits for remote control security devices in accordance with the
specifications in Sub-Parts B and C of Part 15 of FCC Rules, which are designed to
provide reasonable protection against such interference in a residential installation.
However, there is no guarantee that interference will not occur in a particular
installation. If this equipment does cause interference to radio or television recep-
tion, which can be determined by unplugging the equipment, try to correct the
interference by one or more of the following measures.
• Reorient the antenna of the radio/TV experiencing the interference.
• Relocate the Console with respect to the
radio/TV.
• Move the Console away from the radio/TV.
• Plug the Console into an outlet on a different electrical circuit from the radio/TV
experiencing the interference.
If necessary, consult your local RadioShack store for additional suggestions.
Door/Window Sensor Cat. No 49-1001
The plug ‘n power Supervised Security System Cat. No 49-1000 includes a Security
Console with an automatic dialer that calls neighbors or friends in the event of a
break in. A battery powered RF Door/Window Sensors and battery powered RF
Motion Detector to trigger the alarm, and an RF and Keychain Remote control for
arming and disarming the system. All sensors and remotes incorporate random
digital security coding.
The system may be configured with any combination of the following items:
• Up to 16* Keychain Security Remotes with arm/disarm and panic functions, and
buttons to control security lights in and around the home.
• Up to 32* magnetic switch operated wireless Door/Window Sensors.
• Up to 32* wireless PIR Motion Detectors.
• Additional plug ‘n power Home Automation modules such as plug-in lamp and
appliance modules and wired-in replacement wall switches can be added to the
system (one Lamp Module included).
This manual for the 49-1000 system describes the installation process for the
security elements of the system, and should be referred to as a supplement to this
instruction booklet.
*Note: Door/Window Sensors and Motion Detectors may be added in any
combination up to a total of 32.
RadioShack Corporation, Ft. Worth, TX 76102.