User Manual
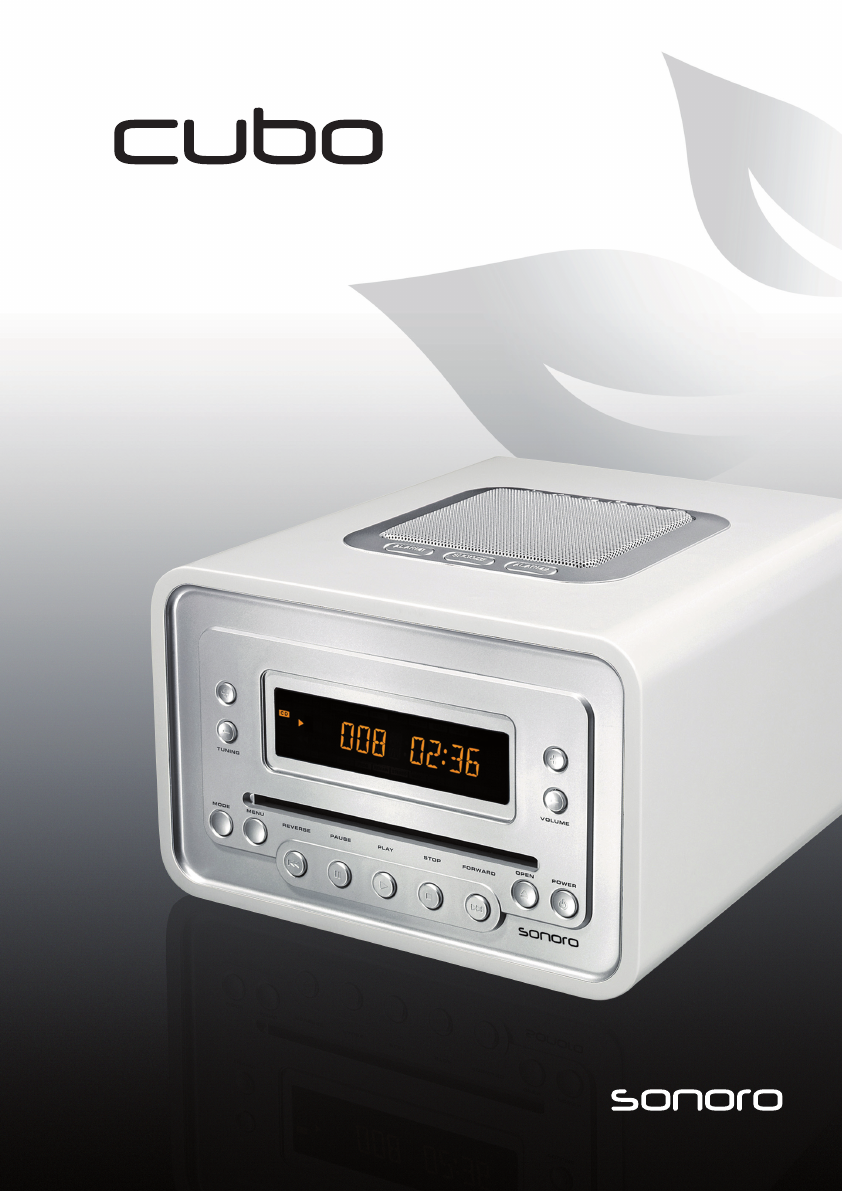
Instruction Manual
sonoro audio GmbH & Co. KG
Unter Goldschmied 6
50667 Köln
Germany
fon +49 221 - 16 79 29 - 0
fax +49 221 - 16 79 29 - 290
info@sonoro-audio.com
www.sonoro-audio.com
05/09
The manufacturer continuously works on the further development of all types and models.
We ask for your understanding that changes of the scope of delivery in regard to form, components and technology are
therefore possible at any time. The information, illustrations and descriptions in this manual therefore shall not
constitute an entitlement to any claims.
Replication, copying or translation, even in parts, is not permitted without the written consent of the manufacturers.
The manufacturer explicitly reserves all rights pursuant to the law governing the copyright.
Subject to changes.

4
Safety Instructions
Place the cubo design cd-radio on a rm, level surface.
Make sure that
the cd-radio is not covered, so as to ensure there is always an adequate circulation of air;•
there are no direct sources of heat (e.g. radiators) radiating onto the product;•
the cd-radio is not subjected to direct sunlight;•
contact with moisture, water or spray is avoided (e.g., never place a ower vase on •
the cd-radio);
the cd-radio does not stand in the vicinity of magnetic elds – e.g., close to televisions •
or loudspeakers;
no naked ames (e.g., burning candles) are permitted to stand either on or near •
the product.
Never allow children to use electrical products unless under supervision. Also keep the
packaging away from children as the foil can cause suffocation.
Only connect the cd-radio to a 230 V ~ 50 Hz socket which is within easy reach of where the
product is placed, in case it is necessary to remove the cd-radio from the power supply in a hurry.
Never attempt to repair it yourself
On observing that the cd-radio or its power lead is damaged, you should
immediately pull the plug out of the power supply socket. In no circumstances
should you try to open the product, or repair it yourself. There is grave danger
of electric shock. In case of a technical issue, you should refer to our Service
Centre or to another suitably-qualied specialist workshop.
The CD player
The CD Player is a Class 1 laser product. The device is tted with a safety system,
which eliminates dangerous laser emissions during normal usage. To avoid any
eye injury, do not attempt to open or damage the laser safety device.
Cleaning and care of your cubo cd-radio
Before cleaning the cd-radio, please pull the plug out of the power supply socket. For cleaning,
use a soft, dry cloth. The use of chemical solvents and cleaners should be avoided, as these are
likely to damage the surface and / or the lettering. If you are not expecting to use the cd-radio for
The CD Player is a Class 1 laser product. The device is tted with a safety system, which elimi-
nates dangerous laser emissions during normal usage. To avoid any eye injury, do not attempt to
open or damage the laser safety device. Sometimes it is advisable to unplug it from the socket.
LASER KLASSE 1
CLASS 1 LASER
PRODUCT
APPAREIL LASER
DE CATEGORIE 1
5
English
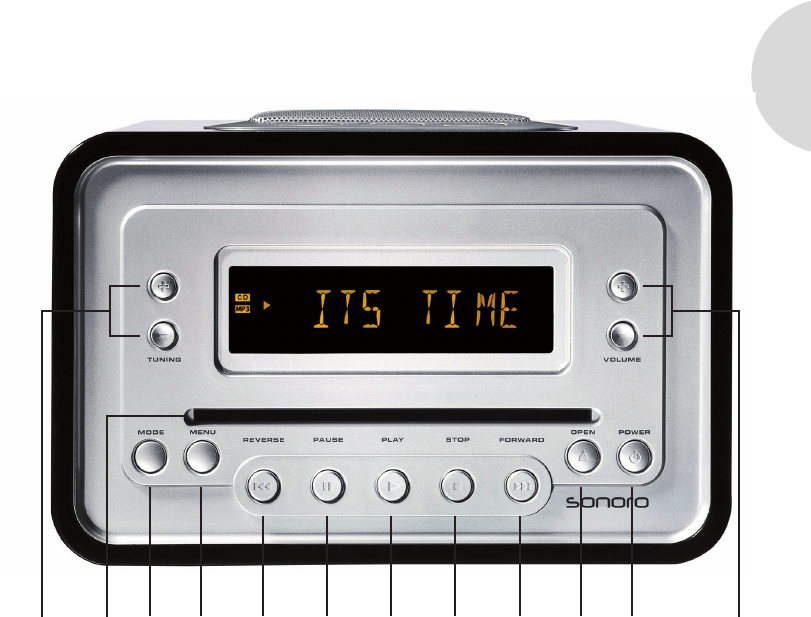
1 Tuning station search +/-
2 CD slot
3 Mode operating mode
4 Menu settings
5 Skip Reverse
6 Pause CD pause
7 Play CD playback
Controls
8 Stop CD playback stop
9 Skip Forward
10 Open eject CD
11 Power switch cd-radio into
standby mode
12 Volume volume control +/-
1 2 3 4 5 678910 11 12
6
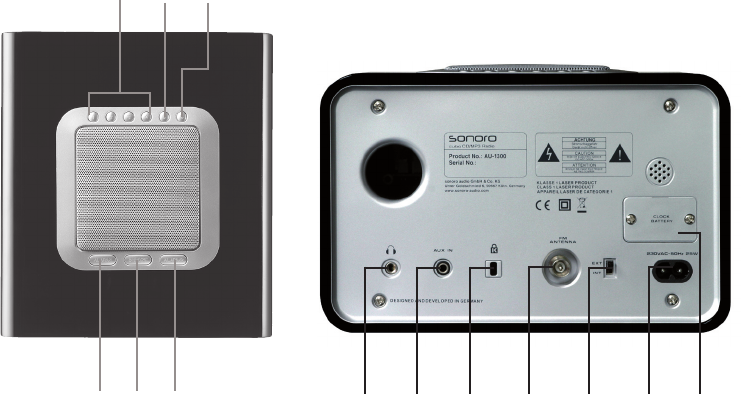
16 17 18
For radio mode
13, 14, 15 Preset radio station buttons
For CD mode
14 -10 Skip 10 tracks forward
15 +10 Skip 10 tracks back
16 Alarm 1
17 Snooze
18 Alarm 2
19 Headphone connector
20 AUX-IN connector
21 Security-lock connector
22 FM antenna VHF antenna
23 EXT/INT antenna selector (external/internal)
24 Power supply connector
25 Battery compartment
13 14 15
19 20 232221 24 25
Controls
7
English
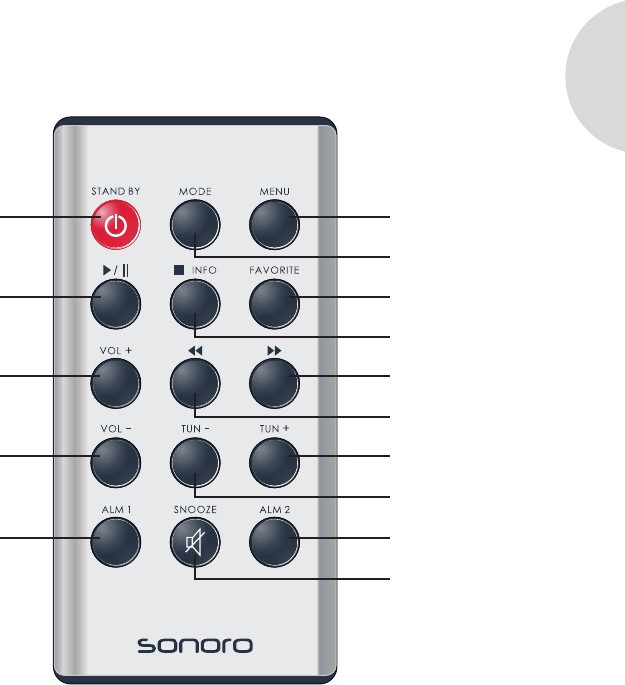
1 Alarm 1
2 Volume volume control -
3 Volume volume control +
4 Play CD playback /
Pause CD pause
5 Standby switch cd-radio into
standby mode
6 Menu settings
7 Mode operating mode
Remote control
8 Favorite press to switch between preset
radio stations 1 - 6
9 Stop CD playback stop
10 Skip Forward
11 Skip Reverse
12 Tuning station search +
13 Tuning station search -
14 Alarm 2
15 Snooze
1
2
3
4
56
7
8
9
10
11
12
13
14
15
8
Operation
The cd-radio must be plugged into an easily-accessible socket (230 V ~ 50 Hz).
Standby/switching on/switching off
The device is now in standby operation. The time display lights up. To switch cubo on and off,
use the Power button.
Connecting headphones
Headphones may be connected to the device. Connect the headphones to the connector at the
rear of the device.
Connecting an audio device
External audio devices such as an MP3 player, iPod, Laptop or similar devices may be
connected. Please use the supplied audio cable to connect an external device to the AUX-IN
socket located at the rear of the Cubo. Press the MODE button to Select AUX mode
(AUX appears on the display screen).
Connecting the antenna
Your device has a built-in VHF antenna. To select this, set the antenna selector to the
“INT” position. To improve radio reception, connect the supplied dipole antenna to the
FM antenna socket (FM-ANTENNA) and set the antenna selector to the „EXT“ position.
If you have a house antenna you can connect that to the FM antenna socket. An antenna
connection cable is required, this can be obtained from specialist dealers.
Setting the time
Switch cubo to standby mode.1.
Press 2. Menu, the time will ash.
Press 3. Menu again, the hours display will ash.
Use the volume controls to set the desired hour.4.
Press one of the 5. Skip buttons, the minutes display will ash.
Use the volume controls to set the desired minutes.6.
To save, press 7. Menu again.

9
English
Selecting 12- or 24-hours time display
Switch cubo to standby mode.1.
Press 2. Menu, the time will ash.
Press one of the 3. Skip buttons until Set-AP appears in the display.
Press 4. Menu again and select with the Skip buttons the desired AM/PM format.
Store the input with 5. Menu.
Setting display screen brightness
Switch on the device.1.
Press the 2. Menu button.
Press one of the skip buttons until you see DISPLAY on the screen.3.
Press the 4. Menu button again, then use the Volume button to select the desired brightness.
HIGH, LOW or OFF is displayed on screen.
Save your selection by pressing the 5. Menu button.
Alarm function
The alarm can be set to go off at 2 different times.
Put the device in standby mode, then press one of the two alarm buttons until the time 1.
starts ashing.
Use the volume control to set the hours.2.
Press the SKIP button, then use the volume control to set the minutes. 3.
Save your setting by pressing the corresponding ALARM button. 4.
Next, use the MODE button to select the mode to be triggered by the alarm: FM radio, 5.
CD or buzzer.
If you use FM (radio) as the alarm: press one of the preset radio station buttons (1-6) 6.
to select the desired radio station.
If you use the CD as the alarm: press the SKIP buttons to select the desired track number. 7.
A shortcut to the CD track number can also be selected with the 6 preset radio station
buttons (1-6).
Save your setting by pressing the corresponding ALARM button. 8.
Select the desired volume using the volume control buttons. 9.
Save the alarm mode by pressing the corresponding ALARM button. 10.
To switch the alarm on or off press and hold down the ALARM button for a couple of seconds.
To stop the alarm, press the SNOOZE button.
10
Snooze function (SNOOZE)
The SNOOZE timer can be customised. When switched off, press and hold down the SNOOZE
button. Select the desired snooze length and save your selection by pressing the SNOOZE button.
Battery Compartment
This cubo model has a replaceable battery (CLOCK BATTERY) to back up the clock memory.
This means if the power supply is interrupted, for example in the event of a power failure, the alarm
and clock settings are saved. The entire display lighting and alarm functions are switched off. As
soon as the power returns, the correct time will be displayed and the alarm function reactivated.
The battery has a plastic cover when you purchase the unit. Remove the piece of plastic to
activate the backup battery.
Note: If no backup battery is inserted you will have to set the clock and alarm times after the
power supply has been interrupted. Where the power supply is seldom interrupted, the life of
the battery will depend to a large degree on the battery service life. The battery should be
replaced approximately every three years to avoid leaks. To do this unscrew the screws on the
rear of the device (see illustration), replace the battery and then replace the screws. The battery
is not included in the guarantee.
Batteries contain chemicals and should be disposed of properly.
Caution! Risk of explosion if the wrong battery is used. Please replace with a battery of the same
or similar type (3V Lithium battery, CR2032).
Radio operation
Select radio operation with the MODE button while the equipment is switched on. The UKW
radio frequency is shown in the display.
Setting the stations
Press the Tuning+ or Tuning- button to manually search for a radio station. To automatically
scan for stations, press and hold the button for two seconds until the scanning begins.
If you nd the radio reception unsatisfactory, you can either connect the cubo to your house
antenna or try to improve the reception by redirecting your wire antenna.
The tuner is very sensitively adjusted and it may therefore sufce for you to alter the frequency
of your desired station upwards or downwards by 0.05 MHz.

11
English
Storing and calling up stations
Find your desired station.1.
Hold one of the station buttons over the loudspeaker pressed until you hear a short “beep“. 2.
The station is now stored at this position.
To call up the station again, you only need to press the corresponding station button.3.
Adjusting tone (bass/treble)
Press the 1. Menu button.
Press 2. Skip until “Set tone” appears in the display.
Press the 3. Menu button and set the bass response with the loudspeaker buttons.
Press 4. Skip again to set the treble response.
Conrm your selection by pressing 5. Menu.
Insertion and removal of disks
Push a CD with the label facing upwards into the CD slot. To remove the CD again, press the
Open button.
Warning: Never insert a mini CD / MD-CD (8-cm diameter) into the CD slot.
CD/MP3-playback
When you insert a CD the device automatically switches to CD mode and playback begins
automatically. The CD player plays audio discs as well as CD-R and CD-RW discs. CD-ROM,
CD-I, CDV, VCD, DVD or computer CDs cannot be used. The disc lead-in time can exceed 10
seconds depending on the number of songs on a disc.
“-- -- --“ appears on the display as the CD player reads the contents of the CD. The display 1.
shows the total number of tracks and total playback time (or the total number of albums and
tracks for MP3 CDs).
Press the 2. Tuning+ or Tuning- button to select the desired album.
Press one of the 3. Skip buttons to nd the desired track.
Press 4. Pause to pause playback. Press Pause again to resume playback.
Press 5. Stop to stop playback.
12
Title skip function
To select a specic track from the CD press one of the Skip buttons until you reach the desired
track number. This can be done during playback or in Stop mode.
If you have many tracks on an MP3 CD you can press the preset radio station buttons 5 and 6
to skip forward or backward 10 tracks at a time.
Title search function
During playback, hold down one of the Skip buttons, and the search will start. Let go of the
button at the desired position. Repeat function
Repeat function
While playing back the 1. CD, press the MENU button twice.
Select with the 2. Skip Forward button REP 1 (the title currently playing will be repeated
endlessly) or Rep All (all titles will be repeated).
Conrm the input with 3. Menu.
To stop the function, press 4. Menu twice and then press Skip Forward, as often as necessary
until the display at the lower edge of the screen goes out.
Finally press 5. Menu again, to conrm the input.
Random playback
While playing back, press the 1. Menu button twice.
Select 2. Shufe with the Skip Forward button.
Conrm the input with 3. Menu. All titles will now be played back in random order.
To stop the function, press 4. Menu twice and then press Skip Forward, as often as necessary
until the display at the lower edge of the screen goes out.
Finally press 5. Menu again, to conrm the input.
In
troduction playback
While playing back, press the 1. Menu button twice.
Select 2. Intro with the Skip Forward button.
Conrm the input with 3. Menu. All titles on the CD will now play for 10 seconds.
To stop the function, press 4. Menu twice and then press Skip Forward, as often as necessary
until the display at the lower edge of the screen goes out.
Finally press 5. Menu again, to conrm the input.

13
English
Programmed playback
In the 1. Stop mode, press the Menu button twice.
With the 2. Skip Forward button select PROG.
Conrm the input with 3. Menu.
Now, select the rst title with the 4. Skip button.
Conrm the chosen title with 5. Play.
Repeat the last two steps until all titles are stored. 6.
To start the programmed playback, press 7. Menu again.
To interrupt the programmed playback, press 8. Stop.
To stop the function, press 9. Menu twice and then press Skip Forward, as often as necessary
until the display at the lower edge of the screen goes out.
Finally press 10. Menu again, to conrm the input.
Muting function
While playing back the CD, press the Snooze button to turn off the sound. Press the same button
again to turn the sound back on.
Automatic switch off
In CD operation, press 1. Menu and then Skip, as often as necessary until Sleep appears.
After pressing the 2. Menu button again, you can use the volume button to set the number of
minutes until the playback function is to switch off.
At the setting 3. Off, the function is deactivated.
Conrm the input with 4. Menu.
Pairing the remote control
Please remove the battery protection plastic tab.1.
Switch the radio into 2. Stand By mode.
Press and hold 3. Mode and Tun+ to pair the remote control.
Press and hold 4. Mode and Tun- to unpair the remote control.
14
Disposal
Packaging
Your cubo design cd-radio is protected against transport damage by adequate
packaging. Packaging is a raw material which can be re-used or recycled in order to
return to the circulation of raw materials.
The product
When cubo has reached the end of its useful life, on no account should you throw
the cd-radio in the normal household debris. Enquire where it may be disposed of
in an environmentally-conscious manner.
Technical data
Power supply: 230 V ~ 50 Hz
AUX input: 3.5mm latched plug
CD player: Laser class 1
RF remote control, type : RC-3,
Operating frequency: 433,92 MHz
Battery: Lithium battery, Type: CR 2032
Subject to technical modications.
LASER KLASSE 1
CLASS 1 LASER
PRODUCT
APPAREIL LASER
DE CATEGORIE 1

15
English
Troubleshooting
Warning! Do not attempt to repair the device yourself, this will invalidate any claims under
guarantee. Do not open the casing as there is a risk of electric shock. In the case of a fault, please
try the steps outlined below before bringing the device in for repair. If you are unable to resolve a
failure by following these steps please contact your dealer or our customer service department.
“NO DISC” displayed on screen
Insert a CD.•
Check that the CD has been inserted the right way up.•
Wait for any possible condensation to evaporate from the lens. •
Swap for another CD or clean the CD.•
Use a nalised CD-RW or MP3 disc (in the correct format described above).•
Poor radio reception
If the signal is very weak realign the antenna or connect an outdoor antenna to improve •
reception.
Check the position of the antenna selector switch. Use the EXT setting when using an •
external antenna, and use the INT setting when using the built-in antenna.
Move the Cubo away from other interfering devices such as a TV or video recorder.•
No sound or poor playback quality
Adjust the volume•
Unplug the headphones•
Make sure that the MP3 CD was recorded at a bit rate of between 32 and 256 kbps, and •
sampled at 48 kHz, 44.1 kHz or 32 kHz.
Alarm does not work
Set the correct time.•
Alarm volume•
Note: For our products, we exclusively use veneers made of genuine wood, which guarantee
a natural appearance and high quality. Veneer is a natural product. Irregularities in the surface
structure give it a natural appearance. They have no effect on the functionality and quality of our
products and will therefore not represent a cause for complaint.

16
Declaration of Conformity
Manufacturer: sonoro-audio GmbH & Co. KG
We herewith declares that the sonoro eklipse is in conformity with the EMC
directive 2004/108/EC, the LVD directive 2006/95/EC and R&TTE directive
1999/5/EC; with respect to its conception and style of construction as well as
its performance as issued by us.
FCC declaration of conformity statement
This device complies with Part 15 of the FCC Rules. Operation is subject to the following two
conditions:
(1) This device may not cause harmful interference; and
(2) this device must accept any interference received, including interference
that may cause undesired operation.
Radio and television interference
This equipment has been tested and found to comply with the limits for a Class B digital
device, pursuant to Part 15 of the FCC Rules. These limits are designed to provide reasonable
protection against harmful interference in a residential installation. This equipment generates,
uses and can radiate radio frequency energy and, if not installed and used in accordance with
the instructions, may cause harmful interference to radio communications. However, there is
no guarantee that interference will not occur in a particular installation. If this equipment does
cause interference to radio or television reception, which can be determined by turning the
equipment off and then on, the user is encouraged to try to correct the interference by one or
more of the following measures:
• Increase the separation between the equipment and receiver.
• Connect the equipment to a different outlet so that the equipment and receiver are on
different branch circuits.
• Consult the dealer or an experienced radio/TV technician for help.
In the case of a modication, unauthorized by sonoro audio GmbH & Co. KG being made to
the device, the declaration losses its validity automatically.
The full description of conformity can get from sonoro@aixtema.de.
Guarantee claims
The following applies when making a claim under this guarantee, this does not affect your
statutory rights:
Claims under guarantee can only be made within a maximum of 2 years from date of •
purchase.
Within this period of guarantee we reserve the right to repair or replace the device free of •
charge in the event of material or manufacturing defects.
Please send the faulty device along with the guarantee card and purchase receipt to the •
service address. The period of guarantee is not extended where devices are repaired or
replaced. The period of guarantee is determined as 2 years from date of purchase.
This guarantee excludes damages caused by improper use, normal wear and tear and •
defects which insignicantly reduce usability or value of the device. Any repairs which have
not been carried out at a service address authorised by us will invalidate the guarantee.
Serial number
Statement of defect
Signature of customer
Guarantee card
Last name
First name
Street address
Town and postcode
Phone
E-mail
AU-1310