Autodesk Water System Civil 3D Users Manual CAD Managers Guide_
2015-02-06
: Autodesk Autodesk-Water-System-Civil-3D-Users-Manual-501006 autodesk-water-system-civil-3d-users-manual-501006 autodesk pdf
Open the PDF directly: View PDF ![]() .
.
Page Count: 33

www.autodesk.com/civil3d
Autodesk®
Civil 3D®
CAD Manager’s Guide
Autodesk® Civil 3D® 2007 software is a powerful,
mature, civil engineering application designed to
significantly increase productivity, save time, and
decrease costs. It uses an industry-proven
dynamic engineering model that maintains
intelligent object relationships, so a change made
in one place instantly updates your entire project
to help you work faster and more accurately.
This document is designed for CAD and IT
Managers responsible for deploying Autodesk Civil
3D in their organizations. For the existing
Autodesk® Land Desktop customers, there are a
number of new technologies introduced in
Autodesk Civil 3D. With these new technologies,
there are likely to be questions on how best to
prepare for using them in a production
environment. This document identifies those areas
of consideration, and provides some guidance for
your decision making process, as well as where to
find additional information.
AUTODESK CIVIL 3D CAD MANAGER’S GUIDE
2
Contents
Chapter 1: Autodesk Civil Technology Overview.......................................................... 3
Civil 3D and Land Desktop Compared.......................................................................... 3
The Importance of Civil 3D for Design Staff.................................................................. 4
Chapter 2: Deployment Considerations and Options ................................................... 6
Installation Issues ......................................................................................................... 6
Single-Site and Multisite Issues.................................................................................... 7
Installation Options: Network or Stand-Alone License Models ..................................... 8
Chapter 3: Civil 3D Configuration and Content Management .................................... 12
An Introduction to Styles............................................................................................. 12
Developing Styles....................................................................................................... 13
Managing Styles and Templates................................................................................. 14
Chapter 4: Multiuser Considerations............................................................................ 16
Managing Data with Civil 3D....................................................................................... 16
Sharing Civil 3D Data with AutoCAD and Land Desktop Users.................................. 21
Chapter 5: Training Considerations ............................................................................. 23
Developing a Plan to Address Required Skills............................................................ 23
Selecting a Consultant................................................................................................ 24
Finding Help ............................................................................................................... 24
Chapter 6: Pilot Project Strategies ............................................................................... 26
Selecting a Pilot Project.............................................................................................. 26
Pilot Project Training and Knowledge Disbursement.................................................. 26
Metrics of Your Pilot Project ....................................................................................... 27
Chapter 7: Deployment Strategies for Civil 3D 2007 ................................................... 28
Deployment Considerations........................................................................................ 28
Outside Assistance..................................................................................................... 30
Chapter 8: Support Resources...................................................................................... 31
Free Support Resources............................................................................................. 31
Fee-Based Support Resources .................................................................................. 32
AUTODESK CIVIL 3D CAD MANAGER’S GUIDE
3
Chapter 1: Autodesk Civil Technology
Overview
Autodesk® Civil 3D® 2007 software is a powerful, mature, civil engineering application
designed to significantly increase productivity, save time, and decrease costs. It uses an
industry-proven dynamic engineering model that maintains intelligent object relationships,
so a change made in one place instantly updates your entire project to help you work
faster and more accurately.
Civil 3D and Land Desktop Compared
If you’ve never seen or tried Civil 3D, your first questions might be, Why bother? Isn’t Civil
3D just the “next version” of Autodesk® Land Desktop software? If not, how is it different
from Land Desktop?
Land Desktop (and its predecessors) has been the workhorse civil engineering design and
drafting application for engineering designs for more than a decade. And although it was
an integral part of countless numbers of successful projects, it had reached the limits of
what it could do based on the technical foundation on which it was built. Therefore,
Autodesk decided to create a new model-based tool for design professionals.
Unlike previous technology from Autodesk, Bentley, EaglePoint, and others, Civil 3D was
built from the ground up as a model-based, multiuser production tool that can help users
overcome the technical and industry challenges that most organizations face. These
challenges include the following:
• Synchronizing design elements and labels across many pages and among many
users
• The time-consuming task of revising designs and drafting
• Constant industry pressure to do more work with less staff
• Competition with other firms for the best people
• Lack of integration of engineering design applications and drafting tools for
creating final construction plan sets
Dynamic Model and Automated Annotation: As a project moves through the design
process, certain adjustments may be required that affect related elements in the project.
For example, if after designing a subdivision road, you determine that a fill slope
encroaches on a wetland area, you may need to adjust the horizontal and vertical
alignments to limit the affect on the wetlands. Using traditional software, this change
would require several tedious rework steps: erase original design; create new design;
draft new design; review for impact on wetlands; repeat as needed until design criteria are
satisfied.
Dynamically linked models in Civil 3D greatly reduce the time required to accomplish
these tasks. Civil 3D lets you create dynamically linked models of your project element
and annotation. In the simplest terms, dynamically linked models are related entities in a
drawing that automatically update when changes are made to one of the entities. These
entities include drawing objects that constitute the model itself (such as digital terrain
models, alignments, and corridors) and the annotation or labels associated with the
objects. The appearance and behavior of these objects and labels are controlled by
AUTODESK CIVIL 3D CAD MANAGER’S GUIDE
4
styles. Through styles, Civil 3D gives users great flexibility in the presentation of design
elements.
The Importance of Civil 3D for Design Staff
The Civil 3D application was created for both drafters and designers. Although Civil 3D is
valuable as a drafting tool, the greatest benefit is achieved when it is used as an
integrated part of the design process from which the final drafting can be extracted.
Civil 3D for Engineers
One of the challenges that engineers face during the initial design process is evaluating
several possible design configurations and selecting the best solution. Often time and
budget constraints limit the engineer’s ability to examine multiple design options, resulting
in a “good-enough” design. Because of its powerful design tools, dynamically linked
model, and easy-to-use interface, Civil 3D lets the engineer examine many possible
solutions and select the best, resulting in better overall designs. In addition, the nature of
the dynamic model means that design elements are always synchronized, eliminating
costly errors before they even happen. Simply put, Civil 3D helps engineers create better
designs in less time with fewer errors.
Another huge challenge is the effort involved in revising designs. Again, the dynamic
model makes the engineer’s tasks easier. Changes to one component of the model are
automatically reflected in associated elements, accelerating the process and reducing the
chances for error. For example, after the initial layout of an alignment, the alignment may
need to be moved. Because of the dynamic link between the alignment and its labels,
graphical changes to the alignment (for example, by grip edit) result in immediate changes
to the station and geometry point labels. There is no need to redefine and relabel the
alignment. Both are done automatically.
Civil 3D for Drafters
The purpose of a set of construction plans is to convey the engineering design intent to
jurisdictional authorities and the contractor so the project can be approved and built. It is
the drafter’s job to create a set of plans that achieves these objectives. Civil 3D object and
label styles make the drafter’s tasks much easier.
First, object styles provide a simple yet powerful method for creating design elements that
look the way they should, adhering to an organization’s standards. Elements of the design
object are automatically set to the correct linetype, color, layer reference, and so forth.
Changes to the design are immediately reflected in the object’s appearance. For example,
various styles for surface objects can be created and used to change the display of the
existing ground at various stages of the project. For presenting the topographic survey,
the surface contours may be presented as heavy, continuous lines. As an underlay to the
proposed grading design, those same surface contours can be shown as light, dashed
lines. It’s easy to achieve this effect simply by changing the surface style applied to the
surface object.
Second, label styles make the labeling and annotation of design elements much easier
than in the past. Simply create label styles to match your organization’s standards. When
design elements change, the labels update automatically. For example, if a surface is
modified, all contour and spot elevation labels automatically update to reflect the changes.
In addition, all labels on associated design elements, such as profiles and cross sections,
also update automatically. This functionality is the same for all design elements: points,
AUTODESK CIVIL 3D CAD MANAGER’S GUIDE
5
surfaces, grading, parcels, alignments, profiles, sample lines and cross sections, pipe
networks, and corridors.
Civil 3D for Your Entire Organization
In addition to these significant benefits for engineers and drafters, Civil 3D is important to
the entire organization, addressing other areas of concern in the industry:
Owners, principals, and managers:
• Get more work done with fewer resources
o Save time across the board as a result of synchronized design data and
drawings
• Minimize cycle time to integrate design iterations
o Make even late-stage revisions quickly and easily
o Minimize schedule delays, and keep projects profitable
• Correct the balance of time spent on projects
o Minimize need for dedicated drafting support staff
• Prepare for emerging trends such as GPS machine guidance
o Gain all the benefits of 3D modeling
o Generate 3D models automatically, requiring no additional time
CAD managers and IT personnel:
• Use a powerful standards implementation and enforcement tool
o Easily deploy updated organization standards via styles and templates
o Use styles to make it easier to do things right than to do things wrong
AUTODESK CIVIL 3D CAD MANAGER’S GUIDE
6
Chapter 2: Deployment
Considerations and Options
Installation Issues
This chapter covers planning issues related to the deployment of Autodesk Civil 3D
software. Issues to consider include what software needs to be installed, how the
installation will be performed (network deployment or individual machines), and who will
perform the installation (you or an outside consultant).
Software to Be Installed
The first consideration is to determine what software to install. In the civil/survey sector,
software could include the following:
• Autodesk Civil 3D/Autodesk® Survey add-ons (Trimble® Link, Leica® X-Change,
Carlson Connect)
• Autodesk Vault and Autodesk Vault Explorer
• Autodesk® Land Desktop Companion/Survey Extensions (Trimble Link, Leica X-
Change, Carlson Connect)
• Autodesk® Civil Design Companion
• Autodesk® Raster Design
• Autodesk service packs, updates, and fixes
• Third-party applications that run on top of Civil 3D or Land Desktop
• Autodesk® DWF™ Viewer; DWG TrueView™
• Autodesk Express Tools
New Autodesk Civil 3D users may want to install Land Desktop Companion, Civil Design
Companion, or both. These applications can be installed in a manner similar to that used
for Autodesk Civil 3D, either stand-alone or as a network deployment.
Once you have determined what to install, document the order in which the software
needs to be installed. Be sure to document any patches, service packs, or fixes installed.
Finally, document what machines the software will be installed on. This documentation
helps you determine hardware requirements in the next section.
Autodesk Civil 3D includes a Network Installation wizard. This wizard enables you to
create either a multiseat stand-alone or network deployment file so you can push the
installation to the workstations rather than use the installation CD at each machine. This
wizard drastically reduces installation time if you need to install on multiple machines.
Network installations provide many benefits, especially for large deployments, including
the following:
• Flexibility in how the application is delivered to the workstations (either “pushed”
from the server or “pulled” by the workstation)
• Standardization of the initial application settings, such as user interface and
support path configuration
AUTODESK CIVIL 3D CAD MANAGER’S GUIDE
7
• The addition of user-defined or third-party add-ons
In addition to the benefits at the time of initial deployment, network installations make it
easy to add updates, service packs, and extensions to the original image when creating
new deployments.
It is important to note that you can also use the Network Installation wizard to create
installation images for use in stand-alone installations. This is called a multiseat stand-
alone deployment. In these environments, the client workstations won’t use the license
manager but can still take advantage of the benefits listed previously.
IT Coordination
After you have determined what software to install, and which machines that software will
be installed on, you need to coordinate the installation with your IT department (if this
involves personnel other than yourself). Items to consider include the following:
• What operating system are you using on the client and server? Only Microsoft®
Windows® systems are supported (Novell®, Unix®, and Linux® systems are not
supported).
• Who will perform the installation? The CAD manager or the IT department?
• Who will authorize the software (obtain licenses, activate software, and so forth)?
• Who will download and install updates and service packs?
• Do you have administrator access to the workstations?
• Do you have administrator access to the server?
• Can you reboot the server (if installing FLEXlm® license management software)?
• When will the installation take place? After hours? On weekends?
• How long will the installation take?
• Will the software be installed in stages or simultaneously to all users?
• What must happen before the installation? Hardware upgrades, new computers,
and so forth?
• Do you have antivirus software? Can you temporarily disable it?
• Has your key data been backed up, and risk to data minimized?
Single-Site and Multisite Issues
Your organization may have multiple locations where Civil 3D is to be used. There are
generally no problems with this type of configuration, unless you have specific needs,
such as employees from multiple offices working on the same project at the same time. A
multisite configuration may experience poor system performance, legal issues, or both,
relating to which license structure you choose. Whether you have a single site, multiple
individual sites, or multiple sites that act as one, you need to consider the following:
• Will you share licenses between sites?
• Do you have enough licenses to meet all users’ needs in all offices?
• Do you require licensing reporting (SAMreport)?
• Do you want to create license restrictions?
AUTODESK CIVIL 3D CAD MANAGER’S GUIDE
8
• How reliable is the connection to the license server? On the local area network
(LAN)? On the wide area network (WAN)?
• Do you need the ability to check out licenses from the license pool?
• What kind of network hardware do client workstations encounter when
communicating with the server? Certain ports have to be opened by the network
administrator for FLEXlm software to work.
• What is your WAN uptime?
The answers to these questions help determine what FLEXlm tools to install and use for
training. Answers also help determine any hardware upgrades that may be required. You
also need to examine how you would like to share data.
• Do multiple people need simultaneous live connections to the project data?
• If so, how fast and reliable is the network connection?
• Dropped packets of data can cause irrecoverable model files. Are you
experiencing anything like this with any other application?
The answers here also help determine hardware requirements.
Installation Options: Network or Stand-Alone License
Models
The next installation consideration is licensing. If your organization has stand-alone
licenses, you need to authorize each workstation individually. You also need a unique
license for each workstation running Civil 3D. If you have multiseat stand-alone licenses,
the products can be installed via a network deployment using a single serial number. The
first time the application is run, it is authorized via the Internet. If no Internet connection is
available, the software must be authorized manually. This step takes extra time, so be
sure to plan for it. Although installed via the network, multiseat stand-alone installations
share the same licensing characteristics as single-seat installations in that each
workstation installation requires a license.
Network licenses enable your organization to “pool” licenses, making them available to
workstations upon request. Each workstation has Civil 3D installed, but the software
functions only after a valid license has been obtained from the license server. The concept
behind floating licenses is that not all users are using Civil 3D simultaneously, and
therefore every workstation does not need its own license all the time (which is what
happens in single- and multiseat stand-alone installations). By pooling licenses, your
organization can purchase only the number of licenses needed. If the need for more
licenses later arises (for example, if employees are added to your organization), they can
be purchased and easily added to the license pool.
If using network licensing, you have a few more considerations and options than in the
stand-alone configurations. First, you need to schedule the installation of FLEXlm on the
license server. If you are already using FLEXlm for license management, determine the
version and upgrade the software if necessary. When scheduling the installation or
upgrade, be sure that you have administrator rights to the server, and verify that you can
reboot the server. You should also determine whether your organization requires FLEXlm
reporting tools. Finally, obtain a license file from your reseller or from the Autodesk
Business Center. This step requires the server name and MAC address of the license
server.
AUTODESK CIVIL 3D CAD MANAGER’S GUIDE
9
Also determine which licensing server option best suits your organization’s needs—single
server, distributed server, or redundant server. For more information about these servers,
see the next section.
Stand-Alone License Options
Stand-alone installations are those that are licensed for use of the application locally on
the workstation. There are two ways to deploy Civil 3D for a stand-alone installation:
single-seat stand-alone (commonly referred to simply as stand-alone) and multiseat
stand-alone.
Single-Seat Stand-Alone: This is the simplest installation. Simply install the software on
the workstation using the installation discs. The discs come with a serial number that is
used to authorize the application either automatically online or via the Autodesk Business
Center. Use this option for small deployments of five or fewer users.
Multiseat Stand-Alone: This stand-alone installation makes deployment easier by
enabling you to create an installation image on a network server one time and then install
the application on the workstations from the image. The advantages over the single-seat
option are that you do not need the physical discs. Users in your organization can install
the software themselves by clicking the deployment shortcut on the server. In addition,
you can use a single serial number for all deployments. This deployment method is best
for situations with many mobile users who are disconnected from your organization’s
network for extended periods of time and or with remote computers (desktop or laptop)
that have limited or no Internet connectivity.
Contact the Autodesk Business Center or your reseller to have them issue a multiseat
serial number. This method of deployment is similar to a licensed deployment but does
not require a continuous connection to the license manager (see below), and it does
require a separate license for each workstation.
Network License Options
In a stand-alone deployment, each installed instance of Civil 3D requires a license for the
application to run. Network installations pool licenses on a license server and distribute
them on an as-needed basis to the workstations on the network. Therefore, each
workstation does not have its own license, but rather requests one when a user launches
Civil 3D. If a license is available, one is issued. If not, the user must wait until a license
becomes available. Civil 3D uses FLEXlm to manage licenses, which must be installed
before Civil 3D will function on the workstations.
Single Server: With the single-server model, license management takes place on one
server. The license file is created and resides on that server, which represents the total
number of licenses available.
For most firms this is the recommended configuration.
The single-server model has the following characteristics:
• Easy to install
• Requires the least amount of maintenance.
• Requires only one server
• Can be used across WAN (assuming reliable WAN connection)
AUTODESK CIVIL 3D CAD MANAGER’S GUIDE
10
• No built-in redundancy (This limitation can be overcome by having another
server, even the CAD manager’s workstation, set up as a license manager and
have the workstations look to it as the secondary server. This is done more or
less automatically in the distributed server model.)
Distributed Server: With the distributed server model, the Network License Manager is
distributed across more than one server. To create a distributed server pool, you must
install the Network License Manager on each server that is part of the distributed server
network. At a minimum, you must install the Network License Manager on each server
that you want to manage licenses.
When Civil 3D is deployed to the workstation, the server installation adds a new
environment variable on each workstation that identifies the license server that the client
communicates with to obtain a network license. This environment variable includes a
pointer to each of the distributed servers on the network.
The distributed server model requires a unique license file for each server.
This configuration is commonly used in larger organizations with multiple offices,
segmented networks, or both.
The distributed server model has the following characteristics:
• Easy to install
• Requires more maintenance compared to single server
• Requires at least two servers with different license files
• Can be used across WAN (assuming reliable WAN connection)
• Flexible in configuration: automatically establishes search paths on workstations
for primary and secondary license servers
• Allows sharing of licenses among offices or departments
• Some built-in redundancy with workstations looking for primary and secondary
license servers
Redundant Server: With the redundant server model, you must use at least three servers
to authenticate a single license file. One server acts as the master, while the other two
provide backup if the primary server fails. Using this configuration, the system continues
to monitor and issue licenses as long as at least two servers are functional.
For organizations that cannot afford for their CAD systems to be down for any length of
time (even a few minutes), the redundant server model provides uninterrupted license
management in the event of a primary server failure.
However, there are easier ways to provide server backup and redundancy using the other
two configuration models. Work with your reseller or independent CAD consultant to
review these other methods.
The redundant model is not recommended for most customers.
The redundant server model has the following characteristics:
• Built in fault-tolerant redundancy: if the primary license server fails, the others
automatically assume license management duties
• Works only with Windows 2000 Server and Windows 2003 Server
AUTODESK CIVIL 3D CAD MANAGER’S GUIDE
11
• Requires a minimum of three separate servers
• Difficult to implement and maintain
• Requires more planning and expertise than other configurations
Combining Licenses: In environments with licensed seats of both Land Desktop 2007
and Civil 3D Land Desktop Companion, network licensing has been simplified compared
to previous releases. Both Land Desktop 2007 and Civil 3D Land Desktop Companion
now use the same feature code. Civil 3D 2007 has its own feature code, separate from
Civil 3D Land Desktop Companion.
Land Desktop and Civil 3D licenses cascade in the following manner:
• If a user has Land Desktop 2007 and Civil 3D 2007 on a single workstation and
launches Land Desktop 2007 when there are no Land Desktop licenses
available, Land Desktop consumes a Civil 3D license.
• The server keeps looking for an available Land Desktop license. If it finds one, it
returns the Civil 3D license and takes the Land Desktop license.
• If a user tries to launch Civil 3D and a Civil 3D license is not available, Civil 3D
will not take a Land Desktop license.

AUTODESK CIVIL 3D CAD MANAGER’S GUIDE
12
Chapter 3: Civil 3D Configuration and
Content Management
A successful implementation of Autodesk Civil 3D requires an appraisal of current
hardware and software, careful planning of user training, and preparation of necessary
background support customization and templates. A successful CAD manager
understands not just the software features but also the effort that goes into making
software use as effortless as possible for the end user. This chapter introduces Civil 3D
styles, discusses strategies for developing styles, and looks at management techniques
for keeping a company’s expanding collection of styles and content in check.
An Introduction to Styles
Civil 3D works with on a collection of custom elements representing alignments, surfaces,
profiles, and other design objects. Display of Civil 3D objects is based entirely on styles.
Styles control the color, linetype, lineweight, and linetype scale of Civil 3D objects and
their nested components. Learning how to use, develop, and manage styles in Civil 3D
can mean the difference between a successful transition from other CAD platforms or a
frustrating, costly experience that results in the firm reverting to its original design
package. This chapter provides background information on Civil 3D styles needed to plan
a strategy for their development and management within the CAD organization.
Styles apply not only to objects, but also to labels for those objects. In Civil 3D, display of
the Civil 3D objects can take either a ByStyle or ByLayer approach. The following table
summarizes key differences in these two approaches.
Advantages Disadvantages
ByStyle
Approach
• Hard-coded display helps
ensure that standards are
followed.
• Style-level display control
means fewer layers to manage.
• A single dialog box controls the
display of most Civil 3D objects.
• Difficult to manage
downstream data.
• Not obvious to layer-trained
users.
• Requires a new style for every
display permutation.
ByLayer
Approach
• Comfortable to end users.
• Works well with others using
Civil 3D content as background
or xref data.
• Fewer styles to manage.
• AutoCAD users can manipulate
display using familiar layer
controls.
• Requires layering and Civil 3D
standards for adequate
control.
• Difficult to track down various
component controls.
Because Civil 3D styles cannot be modified in any other version of AutoCAD® software,
most Civil 3D implementations currently use the ByLayer approach. That approach allows
the creation of styles in Civil 3D that are the most flexible for more users.
In addition to the main Civil 3D objects having their own styles associated, many
subcomponents have a style as well. For example, contour labels are a subcomponent of
the surface object, and major station styles are a subcomponent of alignments. In the
entire Civil 3D model, more than 100 types of styles can be defined. Thankfully, you don’t
have to create them all from scratch.
AUTODESK CIVIL 3D CAD MANAGER’S GUIDE
13
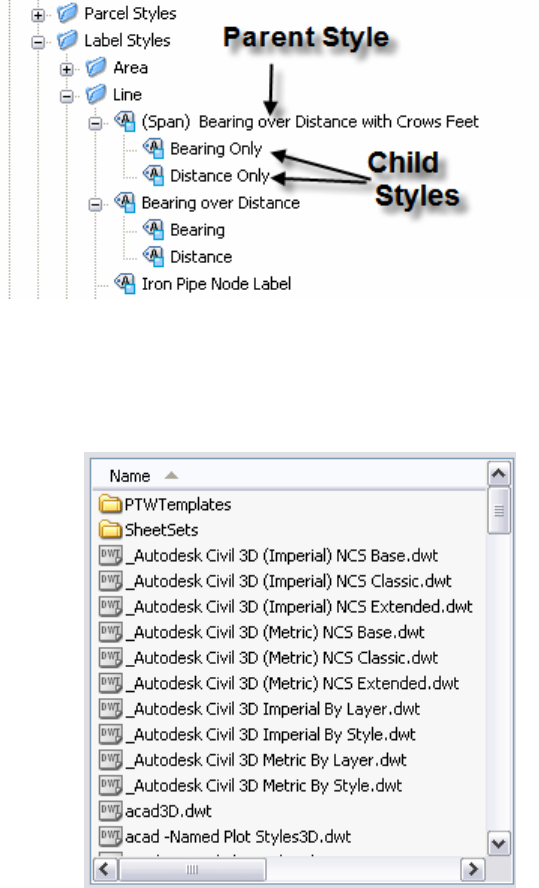
Label styles also have a parent-child relationship that
merits more understanding for a CAD manager directing
the deployment across a production team. The parent-
child relationship in Civil 3D acts much as it does in
standard AutoCAD dimensions. The child inherits all the
properties and functionality of the parent, but allows for
changes at its own level. This concept is important
because it can be used to quickly and simply modify a
large number of labels depending on client or agency
CAD standards.
Developing Styles
Civil 3D ships with several templates for designs using both imperial and metric units.
These templates represent typical use cases in the land development field. In addition to
ByLayer and ByStyle templates, Civil 3D 2007 includes some requested and more
expansive templates. They are as follows (with references to imperial and metric for
clarity):
• NCS Base: This template contains a basic style for every
element, and little else. It is designed for the CAD
manager who wants to build from scratch with little
overhead. This template should be used only by
experienced Civil 3D users because there is little material
in the template file to modify.
• NCS Classic: This template contains styles that reflect
the built-in appearance of the Autodesk Land Desktop
program. This template allows a user to move easily to
Civil 3D and get acceptable results quickly and easily.
• NCS Extended: This template contains multiple styles for
almost every Civil 3D object. The variety of use cases
and permutations in this template makes it a good place
to start. The less experienced CAD manager can use it to
explore how styles and labels are built. Plus it gives more
experienced CAD managers a wide variety of use cases.
This template is the most fleshed out.
By using one of these templates as a starting point, you can begin to understand the
wealth of display and labeling options that Civil 3D offers.
The templates that come with Civil 3D provide many styles that work out of the box with
little customization. In addition, they provide a large repertoire of samples that CAD
managers who want a more custom approach can modify. Creating styles is an important
part of managing the product during a successful deployment. Consideration should be
given to how your firm will develop its catalog of styles. Two approaches can be taken:
bringing in outside help, or doing the work in-house. The merits of both are discussed in
the following section.
Bringing in Outside Help
Outside help, whether resellers, professional consultants, or even temporary technicians,
can help alleviate the pressure on a CAD manager to create and understand styles, while
maintaining an existing system and in many cases remaining billable. (For the sake of
AUTODESK CIVIL 3D CAD MANAGER’S GUIDE
14
simplicity, this document refers to all of these team members as consultants.) This
approach works best when a well-defined CAD standards system is already in place,
enabling the CAD manager to instruct the consultant to base the styles on an existing
body of work. In cases where a firm has typical plan sheets that can be used as reference
material, this process is even simpler. Outside consultants have generally mastered
styles, helping to ensure that template creation is a not a delaying factor in the
implementation. Their experience also enables them to create more complicated styles
and make the styles closely match existing layering and display standards.
Complications from using consultants can include a lack of institutional control, poor-
quality deliverables, and miscommunication of desired deliverables. In the case of only
loosely defined CAD standards, it can be difficult to achieve a satisfactory template
because the consultant must simply guess or assume your needs. In this case, the work
might be more efficiently performed in-house.
The Do-It-Yourself Approach
Performing the work yourself is the best way to learn the program, but not necessarily the
most efficient. If your firm wants you to be a guru, however, this is the way to proceed. By
building styles, you develop a series of styles that match your standards with no chance
for miscommunication, you learn the minutiae of the Civil 3D interface to be a better
technical resource, and you create a complete body of work for your end users. Another
ancillary benefit of creating styles is the power of standardization that comes from creating
a complete palette of styles.
The obvious drawback is opportunity cost, which should be considered before you decide
to create styles for your firm. The time involved is significant, and the learning time can be
lengthy. Creating styles for things such as profile vertical curves or sanitary sewer
manholes is complicated, and typically requires several iterations to achieve the desired
result. Many CAD managers have taken on this task only to get too bogged down to make
good progress.
Combo: You work with Consultant
One approach that has been successful is a combination of these two methods. While not
leaving the entire template creation to a consultant, neither should you do it all yourself.
By bringing in a qualified consultant for training and implementation work, you get the best
of both worlds. Ask your consultant to work with you and your team to make the first few
styles that your training or pilot project will use. Make these styles with the consultant’s
guidance so you understand how styles are built and edited. Then, give the rest of the
styles creation work to a consultant and reap the benefits of expert-level efficiency and
knowledge of the software.
It’s important to understand that your styles collection will be organic, changing and
growing as standards change. Every project requires at least one or two new styles to be
created or modified. Users should have the basic knowledge to modify styles, but the CAD
manager should be in charge of maintaining the template that new drawings are created
from. With the knowledge you acquire during the initial training, you can manage and edit
styles as needed and be ready to create new styles to address future needs.
Managing Styles and Templates
Standards and styles go hand in hand. Many firms use Civil 3D styles as a convenient and
practical point in their CAD standardization process to bring order out of chaos.
AUTODESK CIVIL 3D CAD MANAGER’S GUIDE
15
Maintenance of the firm template file should be considered during deployment and
implementation planning.
The power of Civil 3D templates is that they can be created by a few people and then
shared throughout the company. Using AutoCAD options, users can be directed to a
company template every time they click the New button. This template file can also be
used after the creation stage to verify and enforce crucial appearance issues that make a
plan set usable.
Currently, styles can be modified in every Civil 3D drawing. This functionality enables the
user to modify styles to provide a specific appearance, but it also means that it’s easy to
modify a style away from the standard. CAD managers can use the tools in Civil 3D so
that the styles being used match the standard. In addition you should implement a
procedure for adding new styles to the company template.
User creation of new styles to address specific needs is an important part of the workflow
process for a design team using Civil 3D. As users work through real-world problems, they
need new permutations of styles and entirely new ones as well. Realizing this, the CAD
manager must act as the guardian of the template, adding new material and keeping out
styles that don’t reflect company standards or good plan production.
A successful approach should include vetting new styles as they are created. Ask users to
let you know when they modify a style or make a new one. Then find out why they did so.
A unique use case or labeling requirement should be investigated, understood, and added
to the template. By letting users in on the creation and development of the Civil 3D
template, you help others to feel involved in the process. As a result, they may be more
willing to invest their skills and time to make it as complete as possible. If the user didn’t
need a new style, but created one anyway, you have an opportunity to educate and find
out how you can make your styles easier to understand and use.
Your Civil 3D template should be in a read-only location for most users. This allows you to
vet any change to the template file before adding it. New style content can be dragged
from users’ production drawings back to the template using the Toolspace in Civil 3D,
allowing for convenient and simple updating of the template.
AUTODESK CIVIL 3D CAD MANAGER’S GUIDE
16
Chapter 4: Multiuser Considerations
As explained in the first chapter, Autodesk Civil 3D technology is different from Autodesk
Land Desktop technology in that Civil 3D users approach the project from a 3D model
point of view as opposed to a series of steps that they must complete. Project design and
drafting data are no longer stored externally from drawings, but instead are saved in the
drawings themselves. This capability allows true, real-time dynamic relationships among
objects and labels, and means that drawings exist without the need for a “project.” It also
enables users to open multiple drawings at the same time in a single Civil 3D session.
However, lacking the centralized, external project database of Land Desktop and with
object data stored in individual drawings, how do you share this data among drawings and
among users? This chapter addresses this topic as well as sharing data with team
members who don’t use Civil 3D.
It is likely that you and your users are making the transition to Civil 3D from Land Desktop
and are therefore quite familiar with the Land Desktop concept of projects. Land Desktop
projects are a disparate collection file folders, databases, text files, and proprietary files
that keep track of project data. Each drawing created using Land Desktop must be
assigned to a project and can therefore access this external project data. However, since
this data is external to the drawings themselves, there is limited real-time connection
between changes in the drawing, the project databases, and other project drawings
accessing (or “consuming”) the project data.
Managing Data with Civil 3D
There are two methods for sharing drawings and data in a multiuser environment. The first
method uses the drawing as data stores. The second uses an external file management
system called Autodesk® Vault.
Drawing Data Stores: Data Shortcuts and Data References
The first method uses the drawing files as data stores and provides sharing of certain data
via data shortcuts and data references. Read, write, and modify access to the drawings
and the data in the drawings is controlled by access to the drawings themselves. This
access control is exercised via Microsoft Windows Explorer folder permissions and via the
file-locking mechanisms built into AutoCAD software and, by extension, Civil 3D. The
concepts behind this method are as follows:
1. A drawing containing project data, such as surfaces and alignments, is attached
to a Civil 3D project.
2. You share data by creating a data shortcut to the objects you want to share with
others and then notify them (via email, phone, and so forth) of the drawing name
and location where it was saved.
3. Another user creates a drawing and attaches it to the same Civil 3D project as
your drawing.
4. The other user consumes data by creating data references to shortcut objects
you created in the first step.
5. An object referenced by the consuming drawings can be used as if the object
existed in the drawing itself, with the exception that it cannot be edited. However,
the object styles and label styles for the object can be changed.
AUTODESK CIVIL 3D CAD MANAGER’S GUIDE
17
6. Design changes to the original objects in the source drawing are reflected in the
consuming drawings, similar to how linework changes in xrefs are reflected in
other drawings.
Data sharing and consumption are managed in Civil 3D. However, access permission to
data is ultimately controlled by end users’ access to the drawing files containing the data
objects. If they have full access to the drawing file itself, they have full access to edit the
objects in the drawing. Therefore, data protection relies on drawing file protection, which is
controlled via Windows file permissions.
The advantages of sharing project data via shortcuts and references are as follows:
• Ease of Use: Data shortcuts and references are easy to use and require no
external application.
• Familiarity: Drawings, and associated data, are created, shared, and accessed
in a familiar manner via the Open, Save, and Save As commands.
• Simple Permissions: File and data access is controlled simply by controlling
user rights to the folders in which the drawings are saved.
There are also some disadvantages to using drawings as data stores:
• Lack of Version Tracking: Data shortcuts and references provide no specific
method for communicating the changes made to a given version of a drawing or
data object. Communicating these changes among users is a manual process.
• Data Types: Surfaces, alignments, profiles, and pipe networks are the only data
types available.
Autodesk Vault
The second method of sharing data with Civil 3D uses the Autodesk Vault project
management application. Although Vault interaction with Civil 3D does require training
users to approach the data in a new way, the powerful data management tools and
increased data sharing functionality make it an invaluable part of a successful Civil 3D
2007 implementation.
In this section you learn the key concepts regarding Autodesk Vault, Autodesk Civil 3D
Vault add-in, and the stand-alone application, Vault Explorer.
Autodesk Vault is a data management system for sharing design data across project
teams. Autodesk Vault consists of two components: Server and Client.
Vault Server: Vault Server is a secure repository for project data external to Civil 3D. It
has two components: the relational database and the file store. The relational database
stores crucial information about project data, including version history, purpose and
content of revisions, and user and group access privileges. The file store stores the
physical copies of all versions of all files.
The following Civil 3D data types can be added directly to the Vault:
Survey Data Points
Surfaces Alignments
Profiles Pipe Networks
Design data can encompass many different types of files, from drawings created in
Autodesk Civil 3D or other AutoCAD-based products, to Microsoft® Word documents and
AUTODESK CIVIL 3D CAD MANAGER’S GUIDE
18
Microsoft® Excel® spreadsheets. Autodesk Vault manages any data associated with a
design project, no matter what its type. As with Civil 3D and AutoCAD drawings, the
version history of these supporting files can be fully tracked. Plug-ins are available for
AutoCAD and Autodesk Land Desktop that allow drawings from these applications to be
checked in, checked out, and opened in read-only mode in a Vault. Vault can manage all
of the following document types:
• Drawing files (Civil 3D or others)
• Image files (JPG, BMP, or others)
• Microsoft Office files (DOC, XLS, or others)
• Civil 3D project data
• Microsoft Database files (MDB)
The Vault database can be installed in two ways:
• Microsoft SQL Server™ Desktop Engine (MSDE): This software is included on
the Civil 3D installation discs and requires no separate license. You can install
unlimited instances of Vault. Each Vault relational database can be up to 2 GB.
The size of the file store is limited only by the capacity of the server. This
installation typically works well for project teams of fewer than 20 members.
• Microsoft SQL Server: This software requires a separate license for the server
application, runs on a dedicated server, and is intended for large companies or
teams.
You may use the Vault Server directly for a variety of administrative and security tasks,
including creating, modifying, and deleting projects and project folders, restoring files to
prior versions, and managing backups and user access for individuals and groups.
Vault Clients: There are two distinct interfaces for the client component of Autodesk
Vault. The Vault add-in for Civil 3D is built into Civil 3D and is accessed via the Prospector
tab. Vault Explorer is a separate stand-alone application with a Windows Explorer-like
interface. Both are used to check data in and out of Vault.
• Autodesk Civil 3D Components: The Vault add-in for Civil 3D offers a fully
integrated way to manage your Civil 3D data, DWG™ files, and xrefs. When you
are working on files that are managed by Autodesk Vault, it is important to
understand that you are checking out a copy of a file that is stored in the Vault.
Vault users never directly edit the master copies. When you view a file, the
server sends a copy of the file to the client's workspace. Until they are checked
out, these files are read-only. Only one user at a time may check out a file.
Changes that have been made to checked-out files are sent back to the server
when the file is checked in.
• Autodesk Vault Explorer: Autodesk Vault Explorer is a stand-alone client
providing full access to Vault functionality. Vault Explorer enables you to add all
supported types of data, such as image files, Microsoft® Office documents, and
more. Using Vault Explorer, you are not limited to working with only Autodesk
Civil 3D files and objects.
Installing Vault
The client component (Vault Explorer) is installed automatically when you install Civil 3D
and so is the Vault add-in for Civil 3D. The Vault server components, both MSDE and MS
AUTODESK CIVIL 3D CAD MANAGER’S GUIDE
19
SQL must be installed separately, regardless of whether the Vault is located on the local
workstation with Civil 3D or on a separate server. MSDE can be installed on the same
computer after installing and registering Autodesk Civil 3D as explained in the previous
sections.
Using Civil 3D and Vault
Vault and Civil 3D are integral to creating and managing Civil 3D projects. All the drawings
and related data for Civil 3D projects are managed and checked into the Vault located in a
specific directory on the server. Other team members can access the Vault and use this
data on their projects.
Without doubt, users are accustomed to accessing drawings using the Open command,
editing the drawings and drawing objects, and then using the Save and Save As
commands to store those edits. In addition, if your organization uses Land Desktop, you
also access project data from an external project database.
Using Civil 3D 2007 requires a fundamental shift in how users save and retrieve project
data, and in how and where data is saved. The most common method for working with
project data in Civil 3D is using Prospector to access Vault.
Logging into Vault: To create and manage projects and project data, you need to access
Vault. You can log into Vault locally if the server is installed on your machine, or from a
network server. Do this via the Prospector tab of the Toolspace in Civil 3D.
Creating New Projects: A project is a database directory that contains all the drawings
and related data for an engineering project. To set up a new project in Civil 3D, use the
Toolspace to first log in to the Vault, and then create the project.
Adding Project Data: Once you’ve created a project, you add data to it by first attaching
a drawing. At the time a drawing is attached to the project, you can also add the data
objects within the drawing. Adding drawings is done via the Prospector tab, which
launches a wizard to guide you through the process.
Working with Project Data: Working with project data involves checking drawings in and
out, and more.
• Check Out: If you want to open a drawing in a project and edit that drawing, you
need to check out that drawing. This step gives you write access to the drawing
and locks the drawing to prevent others from using it. It is important to note that
there is a process change here, in that you need to use the Check Out function
from the Prospector tab to properly open and edit a drawing file from a project.
Once you have done so, you can continue to work on that file with Civil 3D as
you always have.
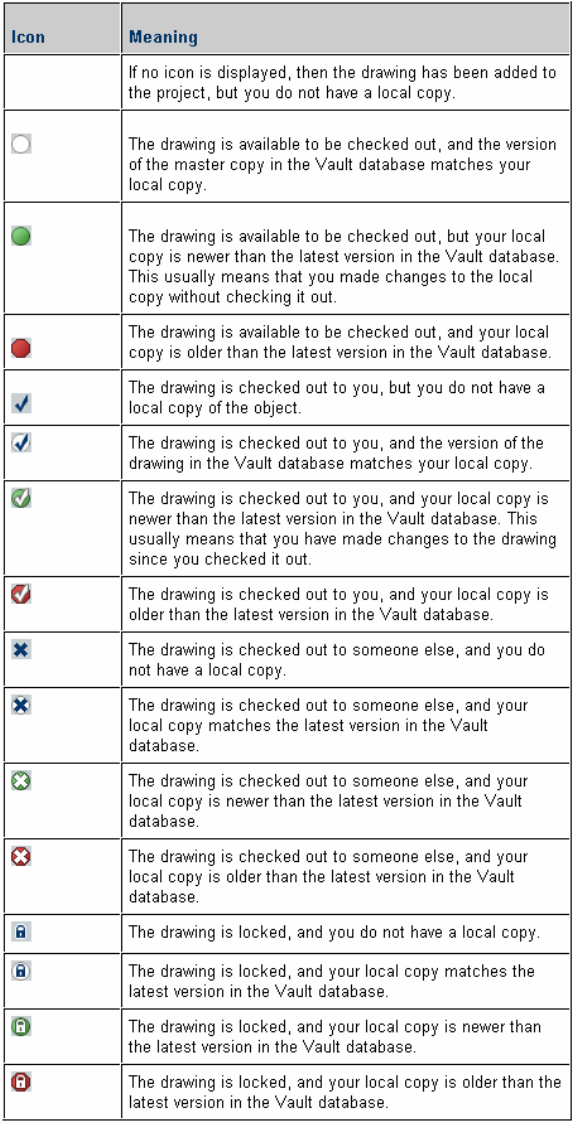
To communicate the various states of the data, Civil 3D uses a set of icons.
These icons are shown in the following table:
AUTODESK CIVIL 3D CAD MANAGER’S GUIDE
20
AUTODESK CIVIL 3D CAD MANAGER’S GUIDE
21
• Check In: When you want to add your drawings and later your drawing changes
to the project, you check the drawing in from the Prospector tab and Civil 3D
takes care of adding the changes and the data to the Vault behind the scenes.
• Open (Read Only): It is likely that at some time you will need to view a file that is
either in use (checked out) or that you have not checked out yourself. (You might
not want to check out the drawing so that others still have the ability to check it
out while you are viewing it.) In these situations, you can open the file in read-
only mode. This can be done from the Prospector tab on Toolspace by right-
clicking the drawing file and choosing Open (read-only).
• Creating References: To work with the data that is added to the project, you
need to create a reference of the object from the project. This provides a read-
only copy of the object in the current drawing, but allows you to use the object to
create design elements, as well as display it as needed.
Configuring Civil 3D
When working with projects in Civil 3D, be aware of configuration settings. Of particular
importance are the working folder, the active project, and the display of projects.
Working Folders: The working folder contains local copies of project drawings and
points. Drawings that you check out of the database are copied to the working folder.
From the working folder you can troubleshoot any problems with drawings and their
versions. By default the working folder is set during installation.
Active Project: The active project setting enables you to pick a current project and make
all project-related functions refer to that project without having to select it every time.
Display of Projects: You can also set a list of projects to display in Prospector. This
helps in situations where many projects exist and where users can make a subset of the
projects that they work with most often. When an active project has been set, the name of
the active project does not display in the list.
Sharing Civil 3D Data with AutoCAD and Land
Desktop Users
As you move to Civil 3D you may still need to exchange files with outside consultants and
users in your organization who are still using other design applications. Fortunately, Civil
3D provides several tools for doing this.
Sharing Data with Land Desktop Users
Sharing data with Land Desktop is important when implementing Civil 3D. There are
several methods for doing so, including reading and writing directly to a Land Desktop
project database, transferring data between Land Desktop and Civil 3D via LandXML, and
using Vault plug-ins. Also, you can share Civil 3D drawings with Land Desktop using the
Civil 3D object enabler.
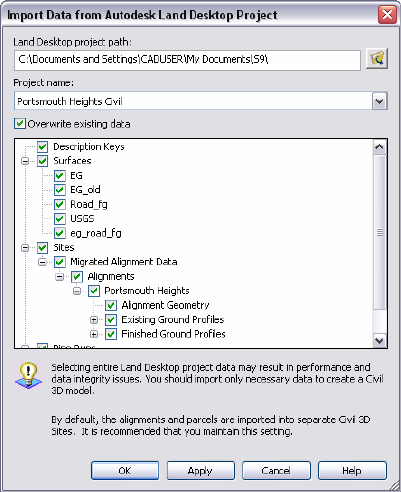
Land Desktop Database: Civil 3D has two commands you can use to transfer data
directly to and from a Land Desktop database: ImportLdtData and ExportLdtData. As the
names imply, these commands import data from Land Desktop into Civil 3D and export
data from Civil 3D to Land Desktop, respectively.
AUTODESK CIVIL 3D CAD MANAGER’S GUIDE
22
The ImportLdtData command can be accessed from the File menu in Civil 3D or by typing
the command name at the command prompt. You can then select
the project path and project, and import the data.
The ExportLdtData command is accessible only from the command
line and can be run only after the ARX for the ImportLdtData
command has been loaded. The easiest way to do this is to simply
launch the ImportLdtData command and then cancel it. You can
then type ExportLdtData at the command prompt to execute the
export function. It works like the import command, enabling you to
select a Land Desktop project and the data to be exported. A similar
command can also be executed from Land Desktop.
LandXML: Since its first release, Civil 3D has supported data
transfer via LandXML. Civil 3D 2007 provides data transfer with
Land Desktop and other applications that can create and parse
LandXML data.
From the File menu, select either the Import LandXML or Export
LandXML command.
Vault Plug-Ins: Plug-ins are available for AutoCAD and Land
Desktop that allow drawings from these applications to be checked
in, checked out, or opened in read-only mode in a Vault.
Sharing Data with AutoCAD Users
Sharing data with AutoCAD is also important when implementing Civil 3D. There are two
main mechanisms for sharing data with AutoCAD users: exporting to AutoCAD and using
object enablers.
Civil 3D data can be exported to AutoCAD using the Export to AutoCAD command. This
step explodes the Civil 3D objects into standard AutoCAD entities. The advantage is that
recipients of this file can then use the linework, text, and other entities as they see fit. This
solution is generally better for subcontractors and other recipients where you cannot
control their working environment or ask that they install additional software to use your
original Civil 3D objects. These objects lose all intelligence and relationship information
during the export.
Within your own firm and for users with whom you share data frequently, an object
enabler is a better solution. The object enabler for Civil 3D installs on top of AutoCAD or
another AutoCAD-based product and allows users to view Civil 3D objects in their native
format. Users can modify layers as needed to control the display of the Civil 3D objects,
without destroying the intelligence and relationships between objects. This is the preferred
solution.
AUTODESK CIVIL 3D CAD MANAGER’S GUIDE
23
Chapter 5: Training Considerations
A training plan is a crucial part of your Autodesk Civil 3D software implementation. When
developing your training plan, consider your users’ experience, the types of projects your
organization works on, schedules, and budgets. In addition to training core users of Civil
3D, consider a plan to train other people such as managers, people who need to view
data, or IT personnel who need to maintain the software.
Developing a Plan to Address Required Skills
Training can be grouped into three general categories: basic training, advanced
(sometimes referred to as targeted) training, and mentored (or “on-the-job”) training.
There are also various combinations of these categories, including advanced custom
training and targeted mentored training.
The type of training your organization needs depends on the type of projects you work on,
the number of users, and the departmental structure of your organization. For example, if
you only design highways, the training you get should focus on the software’s road design
features, covering other features only briefly.
In addition, specific tasks may be performed by specific people. Therefore, each user may
have different responsibilities (designer, surveyor, drafter, and so forth) that require
different training. Plan to address the required skills and accommodate training for various
skill levels and tasks. Whatever the case, create an outline for the training and work with
the people in your departments to ensure that the tasks they are required to perform are
covered in the training you propose.
When creating a training plan, consider the following:
• Who will deliver the training? Will it be you? Will you bring in an outside
consultant? Will you go to your reseller?
• Where will the training take place? Will it be at your site? If so, do you have the
appropriate resources available? These include a quiet training area with
workstations, network access, projector, and possibly a microphone.
• If needed, are you prepared to grant the instructor network access so files can be
shared easily between instructor and students?
• Identify a sample data set to be used in training that represents your project
types.
• It is important that the students are able to focus on the training during class
time. You might require that attendees be “off limits” during the training or that
they not have Internet or email access. Interruptions can drastically reduce the
effectiveness of training.
• Request that the instructor tailor the training to account for different skill levels.
• Request that the instructor tailor the training to account for different tasks and
responsibilities within your organization. Training might include separate
sessions for engineers, surveyors, and drafters.
• You might also request a combination of formal training and on-the-job training.
This approach gives users a good knowledge base of the product’s features as
well as access to an expert while they work on real-world projects. The benefit is
AUTODESK CIVIL 3D CAD MANAGER’S GUIDE
24
that you and your users can look at issues specific to your design environment.
One preferred method of knowledge transfer follows this sequence: classroom
training, mentoring (on-the-job training), reviewing and making adjustments to
training, followed by ongoing support.
Selecting a Consultant
The skill level and experience of your instructor is crucial to the success of your training
experience. Specifically, make sure a consultant meets the following two qualifications:
Real-World Production Project Experience
A consultant should have experience with your type of business. In the construction and
engineering industries, look for someone who has designed a project or worked in the
field on a project, or both. Preferably, look for a technology consulting firm with recent
experience and references that relate to the construction industry (not just the
technology).
Expert Knowledge on Product
It may seem obvious, but be sure that your consultant has thorough knowledge of the
product. He or she should at least have expert knowledge of your version of Civil 3D. In
addition to expertise with the software, the consultant must also have experience using
the software to complete a real-world project. This requirement is directly connected to the
first item. Knowing what works and what doesn’t work in a production environment is
essential.
In addition to these two crucial requirements, also consider these criteria when choosing
consultants:
• Make sure the consultant has the availability and capacity to meet your training
needs.
• Ask about the individual consultant(s) who will provide your training. Don’t
assume that because the consulting firm has a good reputation that the individual
consultant meets the two main criteria.
• If a prospective consultant’s fees seem too good to be true (very low), then they
probably are. Expect to pay for high-quality consulting. The flip side, of course, is
to be wary of consulting firms that charge overly high fees without providing
expertly qualified consultants.
Finding Help
Finding a qualified consultant is the first step in getting the most out of Civil 3D 2007.
Several resources are available to you.
Resellers
The first place to look for training services is the reseller who sold you the software.
Nearly all resellers offer training on standard features to get you familiar with Civil 3D
basics. Several offer advanced training and consulting. Many resellers maintain a regular
schedule of classes on various topics and also offer custom classes that can be
scheduled at any time and filled with attendees only from your organization. Instructors for
classes presented by the resellers are often Autodesk Civil 3D Implementation Certified
Experts (ICE). The ICE program was designed to provide advanced training to reseller
Application Engineers and to test their implementation knowledge with an in-depth exam.
AUTODESK CIVIL 3D CAD MANAGER’S GUIDE
25
For more information on reseller training, call or visit the reseller’s website or visit
www.autodesk.com/reseller to locate a reseller near you.
Autodesk Consulting
Autodesk Consulting professionals help you get started quickly and effectively with your
new Autodesk software by providing assistance and direction so that you can meet your
business goals and objectives. Autodesk Consulting provides a full range of services,
including process and productivity, migration and translation, software customization, and
customized training.
For more information on Autodesk Consulting, go to www.autodesk.com/civil3d and select
Consulting on the left side.
Technology Consulting Firms and Independent Consultants
Another source of consulting services are individuals and firms that specialize in providing
training and consulting on Civil 3D. These consultants have deep knowledge of the
product. More important, qualified firms have extensive, relevant industry experience and
understand your organization’s business beyond the product on which they train. Industry
experience is crucial to understanding what your firm does and how technology fits into its
process. This expertise on software and hardware features combined with their industry
experience make them uniquely qualified to help you improve your business efficiency
and profits. These individuals and firms are often more difficult to locate, but with a little
research on the web you can find what you need. Start by asking your reseller for a
referral and read discussion groups for names and contact information.
Following is a short list of qualified consulting firms:
• APW Engineering, Inc. (http://apwengineering.com)
• Engineered Efficiency, Inc. (www.eng-eff.com)
AUTODESK CIVIL 3D CAD MANAGER’S GUIDE
26
Chapter 6: Pilot Project Strategies
Implementation of Autodesk Civil 3D software into your production environment occurs
when you begin your pilot project. All the research, planning, training, and preparation
come together in a single project that may determine the success of your overall
implementation project. This chapter looks at pilot project selection, strategies for pilot
project training, and how to measure the success of your pilot project.
Selecting a Pilot Project
There are two approaches to selecting a pilot project. The advantages and disadvantages
of each are discussed here. The first is to select an existing job that was done in your
previous design package and redo the work using Civil 3D. The second is to select a new
project and perform it using Civil 3D as your design platform.
Using an existing project for your pilot has several advantages. There is no timeline on the
job, no client to satisfy with design changes, no budgetary restraint (except what you allot
for training), and less pressure on team members. In addition, once a component of the
design has been figured out, you can move to the next portion instead of completing the
construction documents. This means that the overall time to completion is lower.
The disadvantages of using an existing project are similar. Without a timeline and the rush
of client and city demands, many end users find it hard to work effectively and with their
usual level of detail. Some portions of the design might not be fully explored during this
type of pilot, leading to a false sense of security. Finally, using an existing project does not
allow you to gather real-world metrics to measure the success of Civil 3D in your project
environment.
A new pilot project brings in the full host of issues that all new projects bring, in addition to
time spent learning the new software. However, a live project allows you and your team to
learn how to better deal with the design process, plan production, change orders, and plan
reviews. If you choose this approach, selecting the right project is crucial.
A good candidate for a pilot project has the following characteristics: straightforward
design that your company is familiar with; an understanding client with whom you have a
good relationship; and a smaller job. Your Civil 3D pilot project is not the time to test a
large master-planned community for a new client in city where you’ve never worked.
Using a live project also allows your team to measure improvements in plan production, a
crucial part of selling Civil 3D to executive management for support of future expansion of
the product through your design teams.
Pilot Project Training and Knowledge Disbursement
Your Civil 3D pilot project also leads the way in how you train and bring other users onto
Civil 3D as a design platform. Some suggested methods are as follows:
• Rotating Pilots: Each design team is trained in turn, one after another. This
allows you to train a group of users and work through a project with them before
moving to the next. Each team should complete a basic level of training before
beginning a project. This typically means training to various levels and covering
the full extent of the product in every pilot project since the team will be rookies
for each one. This process can be expensive because expert-level trainers
should be used for each team.
AUTODESK CIVIL 3D CAD MANAGER’S GUIDE
27
• Viral Pilots: The initial project team consists of users who have been through
basic training and for whom the pilot project acts as advanced training. This team
completes the first project at your firm, developing standards, operating
practices, and templates along the way. After this project is complete, this group
disseminates knowledge to the next group. These team members then become
responsible for teaching the basics to the next generation of users, honing their
own skills in the process. This method can be the least expensive, but often
results in a slower adoption and more uncertainty that users are learning best
practices and techniques.
• Hybrid Methodology: This method combines aspects of the other two methods.
The hybrid training plan typically includes basic training for the initial group of
users from an outside expert-level trainer. This group completes a project,
working with the expert to build styles and standards in preparation of more
widespread user base. After this project is complete, these users are then used
with the expert as a training core, rotating through teams and acting as the
mentor for their peers. This approach allows the first generation of users to train
while having the expert immediately available for assistance if needed. Because
this method allows local users to be more involved in the training of the next
generation of users, more customization based on skill levels is possible.
By reviewing your goals for implementation speed and cost, you can decide on a pilot and
training methodology and begin detailed planning for your user-base training.
Metrics of Your Pilot Project
Most engineers enjoy the challenge of their work and the feeling of solving a tough
problem. With that in mind, engineering is still a business, and part of your job is to make
the design staff and CAD technicians in your firm as successful as possible. Part of that
success is understanding the measurement of success for your pilot project and
implementation.
Firms measure success in many different ways. Some firms base team or process
success purely on the change in the bottom line. Many firms use a multiplier to
understand the rewards of adopting new technology. In land development, cost per lot or
acre developed is a common metric, as is designer or technician hours on a specific
component of the work. Before beginning a pilot project, it is important that you
understand the metric used to measure your success.
Your goal might be to make your users’ lives easier and send them home with fewer
headaches; reduce errors and omissions due to inconsistent annotation; or help your
designer explore more options to deliver value engineering. Your users might simply want
to spend less time at work. Or maybe they dislike labeling or redline markups. Making end
users happy helps to increase their respect for you as a leader of the CAD team. No
matter what metric you use to measure success, it’s important that it is understood up
front as part of the pilot project.
By being clear on this from the outset, you can focus on what matters to all interested
parties. By delivering results to all stakeholders on their own terms, you can make your
pilot project a success.
AUTODESK CIVIL 3D CAD MANAGER’S GUIDE
28
Chapter 7: Deployment Strategies for
Civil 3D 2007
As you approach the deployment of Autodesk Civil 3D software into your production
environment, consider whether you want to do it yourself or bring in professional help.
Many firms think nothing of installing a new AutoCAD software package, with all the
changes in customization, drivers, hardware requirements, and so forth, but would never
dream of installing new asset management software without outside help. Even if you are
comfortable moving from one version of Autodesk Land Desktop to the next, the change
from Land Desktop to Civil 3D is dramatic enough at the user and support level that you
should carefully consider your approach to this upgrade. This chapter focuses on a
process that organizations can use during the deployment, and then on the two main
options for outside help: ICE resellers and professional consultants.
Deployment Considerations
Autodesk recommends a deployment process that consists of these four phases:
• Assess
• Plan
• Solve
• Confirm
The following sections cover the decisions you will need to consider in each phases.
Assess
By understanding pain points in the design process, you can better address them with
new software. Reviewing your firm’s current workflow and infrastructure is the first step.
This assessment should include project data storage strategies, libraries of blocks and
other common data sources, backup plans, and bottlenecks in the design process.
In addition, a crucial review of in-place standards gives you a better feel for how long it
takes to create the templates and styles that give Civil 3D its power. If you do not have a
full CAD standard in place, the implementation of Civil 3D can help you make order from
chaos.
Finally, comprehensive inventory of software and hardware in the organization helps you
understand whether your firm is ready to begin installing an advanced engineering
application. Many workstations that work well for Land Desktop production use are not
adequate for the Civil 3D model-based approach.
Plan
After completing an assessment of your current situation, plan for where you want to be
with a successful Civil 3D implementation. By considering all the issues, you will be ready
to address questions as they arise from users or executives regarding your
implementation.
Installation issues have been addressed in a previous section of this primer, but based on
the review of in-place hardware and software, you should plan for how coordination within
the IT infrastructure will take place. Work closely with your firm’s IT or IS department to
AUTODESK CIVIL 3D CAD MANAGER’S GUIDE
29
make sure they understand what demands Civil 3D will place on the infrastructure. By
doing so, you improve your chance of a smooth deployment. Discuss any RAM, video, or
other hardware upgrades with that group. Once infrastructure issues have been
addressed, you must also plan on how to deal with requests for Civil 3D drawings from
other users, internal and external to your organization. This can include making object
enablers available, or simply being sure to cover the Export to AutoCAD functions during
training.
In addition, consider any file management issues you found during the assessment;
security concerns and how you will maintain privileges for users who can modify your
templates, and which users those will be; what to do with current project files; and whether
and how you will port existing data to Civil 3D.
Finally, planning how Civil 3D will work in your environment is a major component of a
complete deployment. Consider how the creation of templates and styles will be
accomplished; the workflow of Civil 3D data; and how to approach training for all users.
These Civil 3D–specific tasks are the most challenging, but there are many resources
available to help you take them on and make your plan complete.
Solve
After reviewing the current state of your firm and planning for your Civil 3D deployment, it
is time to put your work to the test. It is important to take the same methodical approach to
the solving phase as you have in earlier work.
Begin with a punch list that includes the work done to date as well as the major milestones
to come. Some of the items on your list will be installation, training, customization,
meetings with key personnel (both behind-the-scenes users and end users) and follow-up.
A punch list makes it easy to stay on track and review your progress. In addition, it’s a
clear display of your commitment to the project.
Next, consider the resources you need to complete those tasks, and where you will find
those resources. It’s important that you decide what should and must be done by you or
members of your firm, and what could possibly be outsourced, working with a value-added
reseller (VAR) or consultant to make the punch list more manageable. Many of the
customization and configuration tasks can be done off site and are easily delegated to
other team members. In-house tasks typically include backup plans, network optimization,
hardware upgrades, and data migration.
Now that you’re almost ready to put the software into use, it’s time to train your users. The
importance of this step cannot be emphasized enough. Whether you use an in-house
professional, your reseller, or a qualified consultant, good training is essential. The best
trainers are enthusiastic about the product, knowledgeable, helpful, and know where to
look for answers to questions they can’t answer themselves. Their enthusiasm and
knowledge can infect your users and make their transition to Civil 3D much easier.
Finally, keep up with your project. Maintain your schedule and punch list. Make notes of
deviations and why you changed from the original plan. Document your work so that your
users and your firm understand what has happened within the system and can follow your
work.
Confirm
You should now look back at your implementation and review your work critically. Have
you succeeded? Are end users working in production efficiently? What course corrections
are necessary?
AUTODESK CIVIL 3D CAD MANAGER’S GUIDE
30
The success of this project is based on the metrics you set in the original assessment
stage. You learned then how your users, peers, and superiors would measure success
and can now use their scale to judge your project. If there were problems, be honest
about them, document them, and start planning how to resolve them.
In addition to troubleshooting, it’s also time to start the cycle over, with refinement in mind.
What areas are users having trouble with? What opportunities exist for customization of
tools to deliver greater productivity? What tasks can be made simpler? These questions
lead you to the ongoing training that should be a part of using Civil 3D in a real-world
environment. There are always new ways to use the tools and areas of the program that
your users haven’t gotten into yet but will want to. Ongoing training creates an
atmosphere of learning, keeping users up to date and leading to higher productivity.
Now that you’ve outlined the steps of deployment, the next section considers some ways
to get there.
Outside Assistance
The addition of any new technology to a firm’s infrastructure should include research,
planning, documentation, troubleshooting, and training. In the case of Civil 3D, bringing in
outside help can reduce the burden on CAD managers still trying to maintain productivity
as they prepare for a significant change in design software. In addition, more experienced
implementation experts can reduce the opportunity cost by limiting downtime and
accelerating deployment and learning time. There are two main sources for outside
assistance: Implementation Certified Experts (ICE) in the reseller channel, and
independent professional consultants.
Implementation Certified Experts
The ICE program is a four-day classroom training developed by Autodesk to train reseller
Application Engineers (AEs) in the full gamut of issues presented in this primer. These
classes were developed by industry leaders with real-world experience to train AEs to
help CAD managers implement Civil 3D. Your reseller should have ICE AEs on staff,
trained in the four-phase implementation approach. The ICE should be able to examine
your firm from top to bottom, ask the right questions, give you clear answers, and address
the concerns of your organization’s management.
Professional Consultants
Professional consultants are typically longtime users and CAD managers who have
decided to build a career on their technical expertise. The best of these consultants are
licensed in their field (PE or AIA) and have spent many years in industry. Their licensure
gives them a level of credibility in the eyes of senior management that a technician turned
Application Engineer simply doesn’t have. Licensed or not, the consultant you choose
should have solid references, connections with known industry leaders, and experience in
training. A consultant who regularly teaches at Autodesk University, for example, will have
the experience and skills to deliver the training and knowledge your deployment requires.
AUTODESK CIVIL 3D CAD MANAGER’S GUIDE
31
Chapter 8: Support Resources
This chapter lists resources supporting Autodesk Civil 3D software. The amount of
support you need depends on your level of in-house technical expertise, the nature of the
problems, and the personnel and time resources you can commit to support. For many
issues, you can easily find the answers using these resources
Free Support Resources
Knowledge Base
The Autodesk Knowledge Base is the first place to look for support. Refer your clients to
the Autodesk Civil 3D main Support page. This site lists current hot topics and has a
searchable database of past issues and resolutions.
To access the Knowledge Base, go to www.autodesk.com/civil3d and click Support.
Discussion Groups
Autodesk-sponsored discussion groups provide an environment where Autodesk product
users and industry partners can ask questions and share information about Autodesk
products. Discussion group topics are publicly available worldwide. Autodesk encourages
you to participate by posting questions or providing input or answers to questions from
other users.
To participate in discussion groups, go to: http://discussion.autodesk.com.
Webcasts
Weekly Autodesk Civil 3D webcasts highlight Civil 3D features, tips, and tricks. Presenters
include members of Autodesk Civil product management and development teams. Civil
3D webcasts take place every Friday from 12 noon to 1 p.m. Eastern time. All sessions
are recorded and archived on the Civil 3D website.
For more information about Civil 3D webcasts, go to www.autodesk.com/civil3d and click
View Free Webcasts.
White Papers
As you move to Autodesk Civil 3D software, check out the variety of white papers that
address key questions, discuss the options, recommend procedures for using Autodesk
Civil 3D, and show compelling return on investment (ROI) findings. You’ll also find several
comparative analysis white papers.
For more information about Civil 3D white papers, go to www.autodesk.com/civil3d and
click White Papers.
Autodesk Civil 3D 2007 Readme
Located on the installation disc, the Readme file contains important information about the
release of Autodesk Civil 3D 2007 that may not be included in the printed documentation
or help file. Because Civil 3D is built on AutoCAD and Autodesk Map® 3D software
platforms, items about those products are also included in this file.
AUTODESK CIVIL 3D CAD MANAGER’S GUIDE
32
Fee-Based Support Resources
In addition to free resources, Autodesk provides a number of customer, reseller, and
consulting programs to support customers’ migration needs.
Enterprise Support
Autodesk® Enterprise Support links your support staff directly to the experts at Autodesk,
available to provide support 24 hours a day, 7 days a week, in your choice from among 10
languages. With 14 support centers worldwide, you can easily get support for multiple
sites. And everything is connected by a single web-based tracking system, so you can
keep track of all your queries online. With Autodesk Enterprise Support, you get fast,
accurate help straight from the source, helping to ensure maximum productivity and
reduce costly downtime.
Support Request
Support Request is a web interface you can use to submit queries directly to Autodesk
support experts. You can review and update your support queries and attach files or other
relevant information. You automatically receive an email notification each time an
Autodesk support expert responds to one of your queries.
Support Request is available to customers of the following Autodesk support programs:
• Autodesk Enterprise Support
• Autodesk Store warranty program
• Autodesk Partner support programs
Autodesk Consulting
Whatever your business, you face constant change, fierce competition, and customers
who demand more. Choosing the right products is only part of the story. You need
complete solutions that help you implement those products for maximum competitive
advantage.
Autodesk Consulting professionals help you get started quickly and effectively with your
new Autodesk software by providing assistance and direction so that you can meet your
business goals and objectives.
Authorized Training Centers
You perform faster, smarter, and better with Autodesk software products when you turn to
the Autodesk Authorized Training Center (ATC) network. There are more than 1,100
ATC® sites located worldwide that meet the needs of design professionals for discipline-
specific, locally based training. ATC training providers are authorized by Autodesk to
deliver hands-on, instructor-led training to design professionals using Autodesk software
and are recognized by Autodesk for their rigorous standards of excellence.
Autodesk Resellers
Most Civil 3D resellers provide fee-based training and support. Talk to your reseller to
determine if they offer the services you need. Also, review the reseller resources on the
Autodesk website at www.autodesk.com/reseller.

AUTODESK CIVIL 3D CAD MANAGER’S GUIDE
33
Independent Consulting Firms
Call on the professional experience and software expertise of a professional Civil 3D
consultant. These independent firms are often the best source for real-world knowledge
on using Civil 3D in a production environment. Check the web to find one that meets your
needs.
Autodesk, AutoCAD, Autodesk Map, Civil 3D, DWF, DWG, and DWG TrueView are registered trademarks or trademarks of Autodesk,
Inc., in the USA and/or other countries. FLEXlm is a registered trademark of Macrovision Corporation, licensed for use by Autodesk,
Inc. All other brand names, product names, or trademarks belong to their respective holders. Autodesk reserves the right to alter
product offerings and specifications at any time without notice, and is not responsible for typographical or graphical errors that may
appear in this document.
© 2006 Autodesk, Inc. All rights reserved.
