Avante Technology VT-EVC308-FF42 Electronic Voting Machine User Manual
Avante International Technology, Inc. Electronic Voting Machine
User Manual

Full-Face Polling Official’s Manual Version 2.0 January 31, 2007
©2001-2007 Avante International Technology, Inc.
Polling Official’s
Manual
Avante International Technology, Inc.
VOTE-TRAKKER™Full-Face Voting Unit
Version 2.0
January 31, 2007
© 2001-2007 Avante International Technology, Inc.

Full-Face Polling Official’s Manual Version 2.0 January 31, 2007
©2001-2007 Avante International Technology, Inc.
Table of Contents
1 IMPORTANT SAFETY INSTRUCTIONS .................................................................................... 4
2 ABOUT THIS MANUAL.................................................................................................................. 8
3 BASIC KNOWLEDGE ABOUT THE VOTING MACHINE ......................................................8
4 SETTING UP THE VOTING UNIT................................................................................................9
4.1 GETTING FAMILIAR WITH THE VOTING UNIT.............................................................................. 9
4.2 TURNING ON THE VOTETRAKKER™......................................................................................... 15
5 OPENING THE POLL.................................................................................................................... 25
6 ENCODING SMART CARDS .......................................................................................................28
6.1 CARD ENCODING UNIT ............................................................................................................... 28
6.2.1 SPECIAL CARDS ................................................................................................................31
6.2.2 ISSUE A VOTING SMART CARD ......................................................................................... 32
7 ASSISTING VOTERS DURING VOTING .................................................................................. 34
7.1 ACTIVATING A BALLOT .............................................................................................................34
7.2 VOTING VIA THE TOUCHSCREEN...............................................................................................35
7.2.1 WRITING IN A CANDIDATE ............................................................................................... 37
7.2.2 SKIP CHOICE(S)................................................................................................................ 39
7.2.3 CHANGING YOUR SELECTIONS.........................................................................................39
7.2.4 CHANGING DISPLAY SETTINGS ........................................................................................ 40
7.2.5 VOTING FOR A REFERENDUM OR INITIATIVE .................................................................. 41
7.3 CAST YOUR BALLOT AND REVIEW THE VVPB ............................................................................42
7.3.1 DO NOT PRINT VVPB .........................................................................................................43
7.3.2 PRINT A FINAL VVPB ONLY............................................................................................... 44
7.3.3 ALLOW REJECTION OF THE VVPB.................................................................................... 45
7.4 VOICE-ASSISTED VOTING .......................................................................................................... 46
7.5 PROVISIONAL VOTING ...............................................................................................................49
7.6 UNLOCKING A FLEEING VOTER SCREEN ................................................................................... 50
Full-Face Polling Official’s Manual Version 2.0 January 31, 2007
©2001-2007 Avante International Technology, Inc.
8 CLOSING THE POLL....................................................................................................................53
8.1 EXITING THE VOTING SCREEN................................................................................................... 53
8.2 CLOSING THE POLL ON EACH VOTING UNIT..............................................................................54
8.3 SHUTTING DOWN THE SYSTEM .................................................................................................. 57
8.4 DELIVERING THE TALLY RESULT .............................................................................................. 60
9 OTHER DUTIES .............................................................................................................................61
9.1 VOTING DEMONSTRATION (‘TEST VOTING’MODE).................................................................. 61
9.2 CHANGING THE PAPER ROLL.....................................................................................................63
Full-Face Polling Official’s Manual Version 2.0 January 31, 2007
©2001-2007 Avante International Technology, Inc.
1 IMPORTANT SAFETY INSTRUCTIONS

Full-Face Polling Official’s Manual Version 2.0 January 31, 2007
©2001-2007 Avante International Technology, Inc.
THIS IS THE ELECTRICAL HAZARD SYMBOL. IT INDICATES THAT THERE ARE
DANGEROUS HIGH VOLTAGES PRESENT INSIDE THE VOTE TRAKKER. TO
REDUCE THE RISK OF FIRE OR ELECTRIC SHOCK, DO NOT ATTEMPT TO OPEN THE
ENCLOSURE OR GAIN ACCESS TO AREAS WHERE YOU ARE NOT INSTRUCTED TO
DO SO. REFER SERVICING TO QUALIFIED SERVICE PERSONNEL ONLY.
THIS IS THE USER CAUTION SYMBOL. IT INDICATES A CONDITION WHERE
DAMAGE TO THE EQUIPMENT OR INJURY TO THE OPERATOR COULD OCCUR IF
OPERATIONAL PROCEDURES ARE NOT FOLLOWED. TO REDUCE THE RISK OF
DAMAGE OR INJURY, FOLLOW ALL STEPS OR PROCEDURES AS INSTRUCTED.

Full-Face Polling Official’s Manual Version 2.0 January 31, 2007
©2001-2007 Avante International Technology, Inc.
READ USER’S GUIDE – After installation, read the User’s Guide carefully before operating.
Follow all instructions carefully.
POWER SOURCES – This product should be operated only from the type of source indicated on
the manufacturer’s ID label. Installation should be in compliance with applicable sections of the
National Electric Code. Consult your local building code before installing.
VENTILATION – Slots and openings in the cabinet are provided for ventilation and to ensure
reliable operation of the product. To protect the unit from overheating, those openings must not
be blocked or covered. This product should not be placed in a built-in installation, such as a wall
cutout unless proper ventilation is provided.
WATER AND MOISTURE – Do not place containers with liquids such as coffee, water, sodas,
etc. on this unit. Do not operate this machine in a wet environment.
CLEANING – If it should become necessary to clean this equipment, disconnect the unit from its
power source first. Do not use liquid cleaners, aerosols, abrasive pads, scouring powders or
solvents, such as benzene or alcohol. Use a soft cloth lightly moistened with a mild detergent
solution. Ensure that the surface is fully dry before reconnecting power.
HEATING – Do not install this product near heat sources such as radiators, air ducts, areas
subject to direct intense sunlight, or other products that produce heat.
LIFT TABLE WARNING – WARNING! Hazardous Moving Parts. Keep fingers and other body
parts away.

Full-Face Polling Official’s Manual Version 2.0 January 31, 2007
©2001-2007 Avante International Technology, Inc.
POWER CORD PROTECTION – The power supply cord for this product should be routed or
installed in such a manner to protect it from being walked on or pinched. The unit should be
powered down completely before connecting or disconnecting the power cable. The power cord
should be removed before moving the unit. The power cord must be placed into an easily
accessible unobstructed socket outlet.
SERVICING – Do not attempt to service this unit unless specifically instructed to do so. Do not
attempt to gain access to areas of the unit where dangerous voltages are present. Refer servicing
to qualified service personnel.
DAMAGE REQUIRING SERVICE – Unplug this product from the wall outlet and refer
servicing to qualified service personnel under the following conditions:
When the power supply cord is damaged.
If liquid has been spilled into the enclosure of the unit.
If the product does not function normally by following the instructions in this guide. Adjust
only those controls that are covered by the operating instructions. Improper adjustment of
other controls may result in damage and will often require rework by a qualified technician to
restore the product to its normal operation.
If the product has been damaged in any way.
When the unit displays a distinct negative change in performance.
BATTERY REPLACEMENT WARNING – CAUTION! Danger of explosion if battery is
incorrectly replaced. Replace only with same or equivalent type recommended by the
manufacturer. Dispose of used batteries according to the manufacturer’s instructions and regards
to local law.
Full-Face Polling Official’s Manual Version 2.0 January 31, 2007
©2001-2007 Avante International Technology, Inc.
2 ABOUT THIS MANUAL
This manual contains instructions for polling officials on how to operate the VOTE-
TRAKKER™full-face touchscreen voting machine at a polling place. You may find detailed
information about the following operations:
Setting up the voting machine and confirm the proper operation
Opening the Poll
Issuing Voting Cards
Monitoring the voting process
Closing the Poll
3 BASIC KNOWLEDGE ABOUT THE VOTING MACHINE
A VOTE-TRAKKER™full-face touchscreen voting machine contains two major components –
a 42-inch LCD monitor with integrated processing unit, and a printer unit – that are mounted on
a height-adjustable cart. The 42-inch LCD monitor, which has an embedded touchscreen,
displays the ballot to the voter and reacts to physical contact as the voter makes his or her
selections. The printer unit prints the data sent to it by the monitor, such as a Voter Verifiable
Paper Audit Trail (VVPB) and the ‘Open Poll’ or ‘Close Poll’ tally report.
Each VOTE-TRAKKER™unit works independently. They are not networked to each other.
Every voting unit contains a card reader that controls access to the voting machine functions.
Polling officials need to have their own specially made smart cards for access to specific
functions on the machine, and a voter card is also required to display the proper ballot on the
voting unit.
This voting machine is designed to be user-friendly for handicapped voters. Each voting
machine can provide audio assistance for visually impaired and illiterate voters so that they may
vote independently via a specially modified keyboard.
Full-Face Polling Official’s Manual Version 2.0 January 31, 2007
©2001-2007 Avante International Technology, Inc.
4 SETTING UP THE VOTING UNIT
4.1 GETTING FAMILIAR WITH THE VOTING UNIT
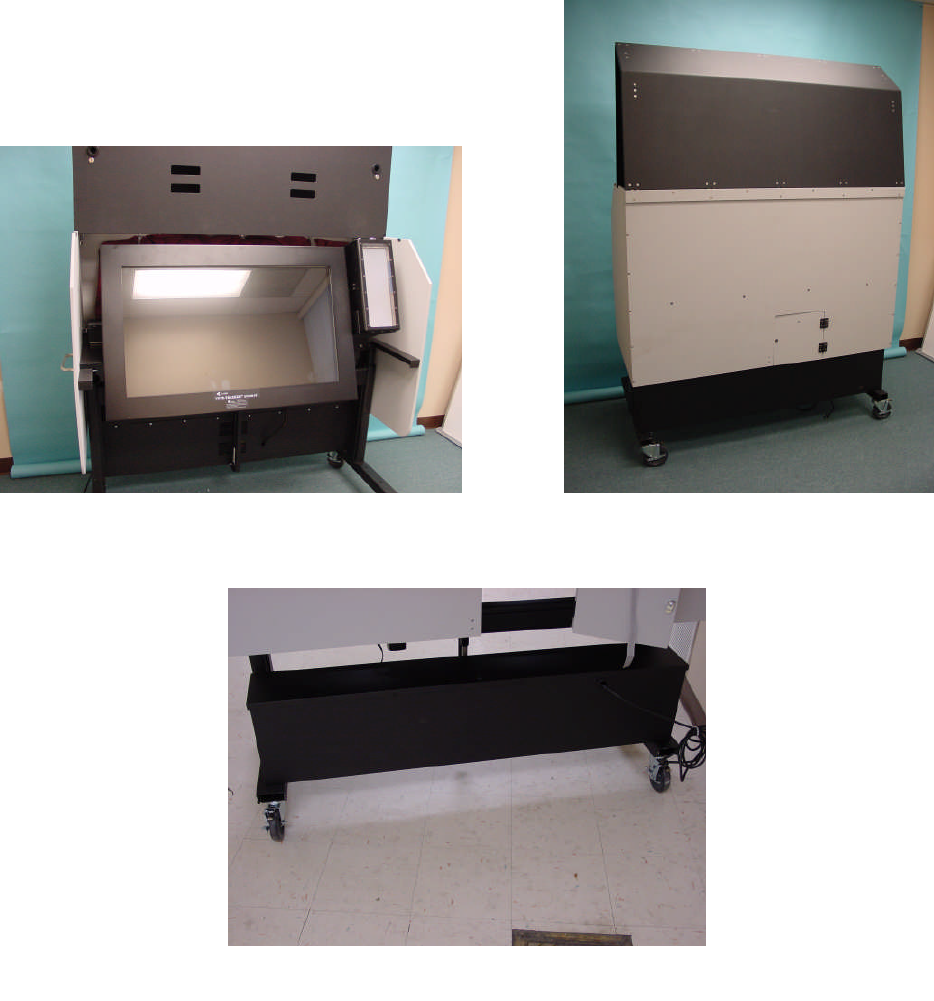
Figure 4.1A shows the front view of a full-face voting unit, figure 4.1B shows the rear view, and
figure 4.1C shows a close-up of the battery box.
Figure 4.1A
Figure 4.1C
Figure 4.1B
Full-Face Polling Official’s Manual Version 2.0 January 31, 2007
©2001-2007 Avante International Technology, Inc.
The voting unit is attached to an electric-powered height-adjustable table with four articulating
wheels (omni-directional). A compartment that contains power-control components and
batteries sits at the bottom of the table. Depending on the required duration of power backup,
batteries may also be mounted in a front compartment as well.
Visible from the front side of the voting machine is the monitor and the printer unit, which is
mounted to the right of the monitor. A headphone jack is located at the lower left corner of the
monitor, as seen in figure 4.1D. The printer unit is used to print all the reports (including the
Voter-Verifiable Paper Audit Trail) that are required during the voting session. The power and
data wiring for the printer has been pre-installed so that you do not need to plug in anything to
the printer. The left side panel of the monitor has the CD drive, which is visible through the
corresponding opening in the plastic shell, as seen in figure 4.1E.
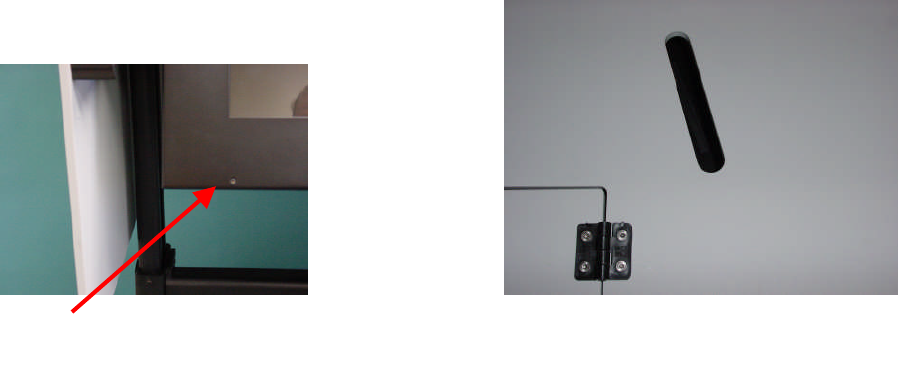
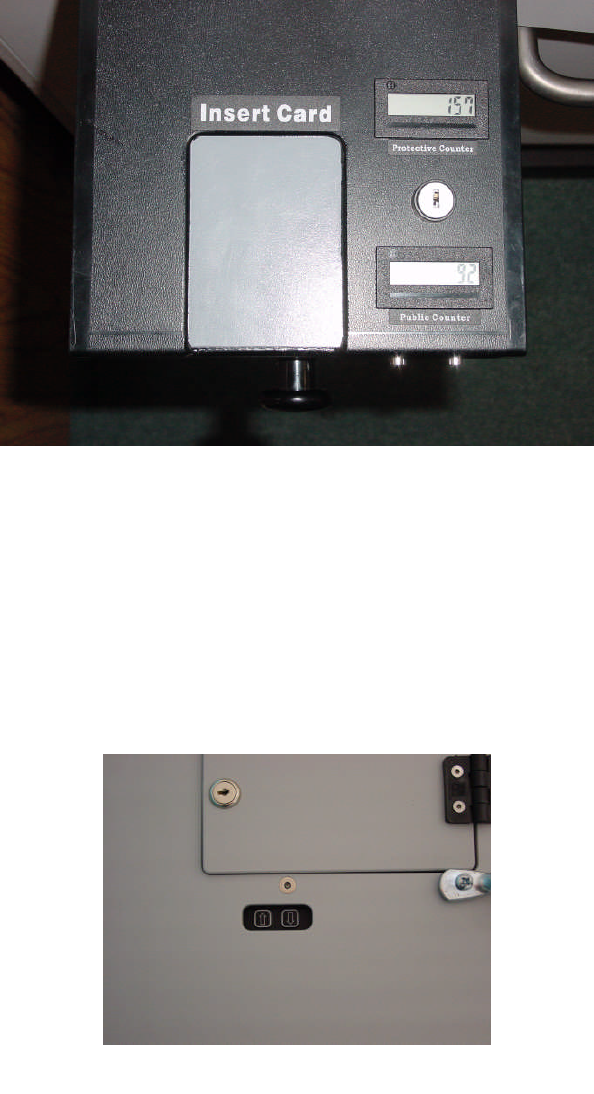
There is a voting machine access control unit mounted on a slide at the left side of the machine,
pictured in figure 4.1F. The poll worker uses this box to control access to the ballots on the
voting machine. There is a card reader, a counter-reset lock, and two counters: a non-resettable
‘Protective Counter’ and a resettable ‘Public Counter’. The ‘Protective Counter’ shows how
many ballots have been cast since the machine was built, while the “Public Counter” tells you
how many voters have cast a ballot in this election.
Figure 4.1E
Figure 4.1D
Full-Face Polling Official’s Manual Version 2.0 January 31, 2007
©2001-2007 Avante International Technology, Inc.
The table height adjustment switch is also located at the left side of the voting unit, underneath
the access control unit, seen in figure 4.1G. The table moves upward when you hold down the
‘’ arrow and stops automatically when it reaches the maximum height. Pressing and holding
the ‘’ button lowers the table. Release the button at any time to stop the movement.
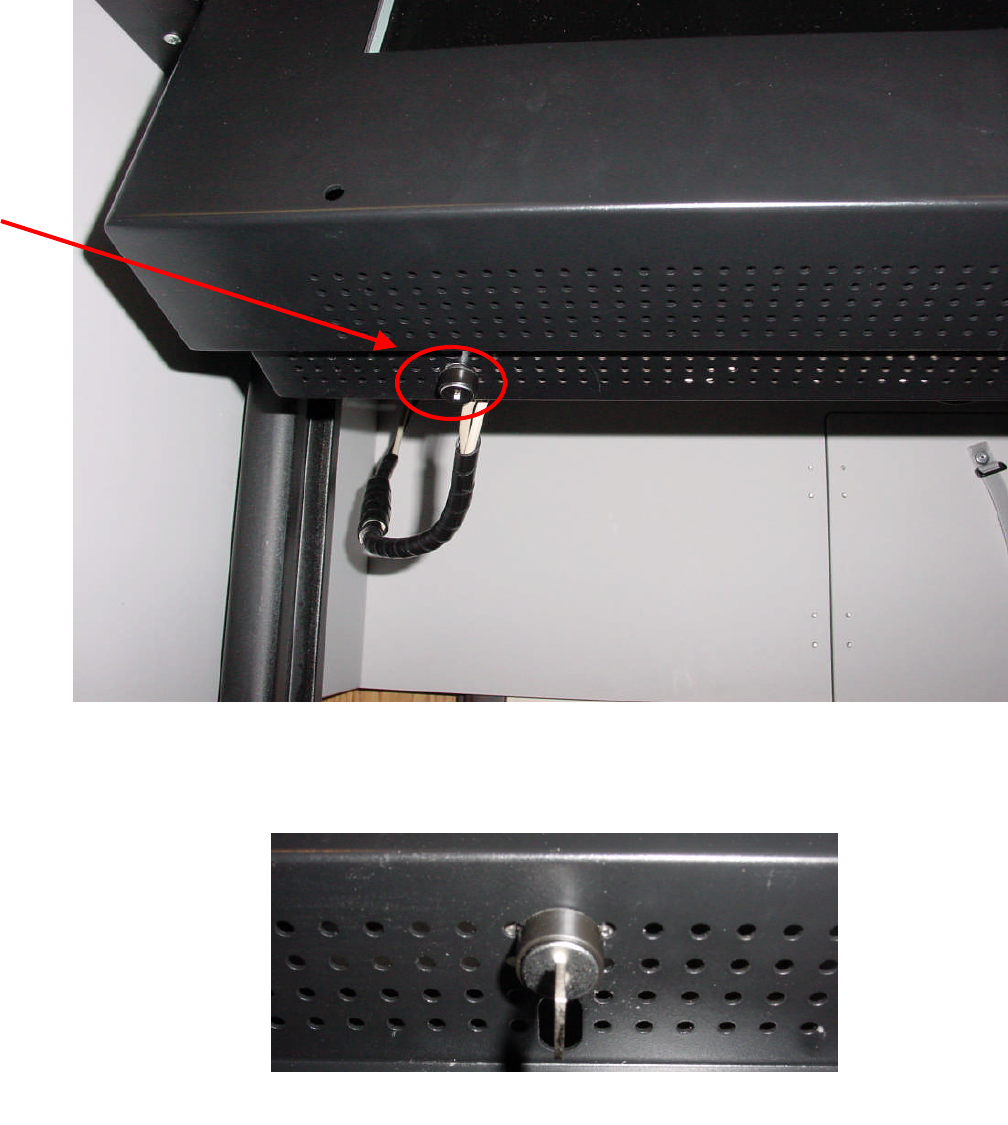
Underneath the monitor, there is a power switch that requires a key to operate, as seen in figures
4.1H(1) and 4.1H(2). Using the key in the switch turns the machine on and off.
Figure 4.1F
Figure 4.1G
Full-Face Polling Official’s Manual Version 2.0 January 31, 2007
©2001-2007 Avante International Technology, Inc.
Figure 4.1H(2)
Figure 4.1H(1)
Full-Face Polling Official’s Manual Version 2.0 January 31, 2007
©2001-2007 Avante International Technology, Inc.
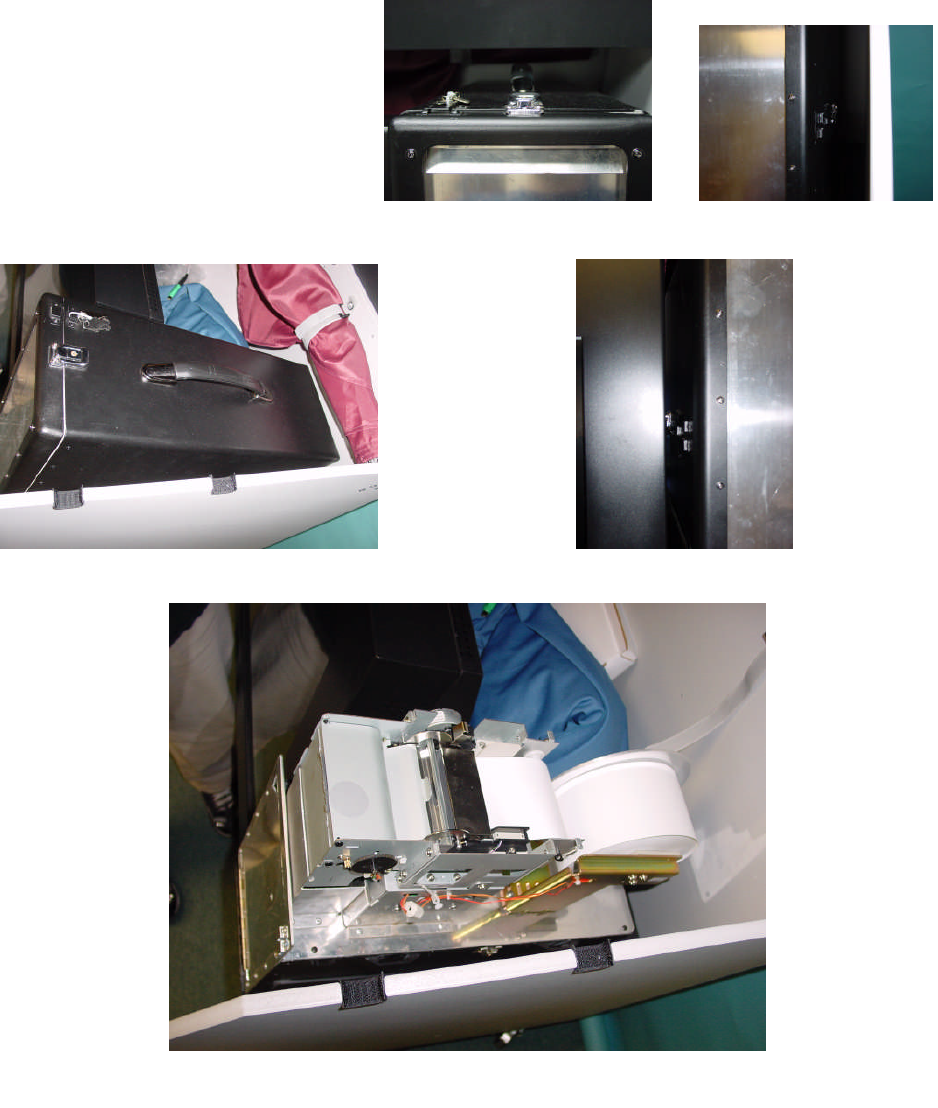
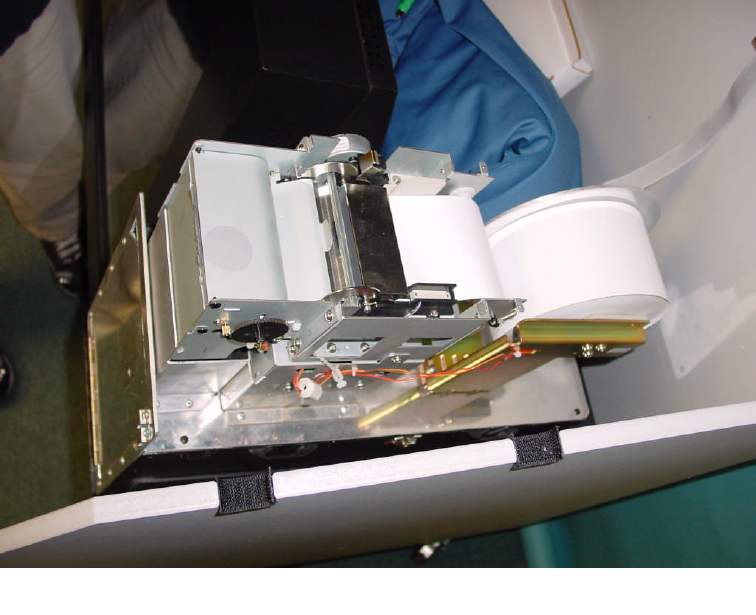
Now let’s look at the printer unit, pictured closed in figure 4.1I. Open the latches at the top and
sides of the printer unit, pictured in figures 4.1J(1), 4.1J(2), and 4.1J(3), and remove the top
cover. Figure 4.1K shows you the inside of the printer unit.
Figure 4.1K
Figure 4.1I Figure 4.1J(3)
Figure 4.1J(2)Figure 4.1J(1)
Full-Face Polling Official’s Manual Version 2.0 January 31, 2007
©2001-2007 Avante International Technology, Inc.
The printer is a thermal printer, which means that it does not use ink. Instead, it prints by heating
up a special type of paper to make it black.
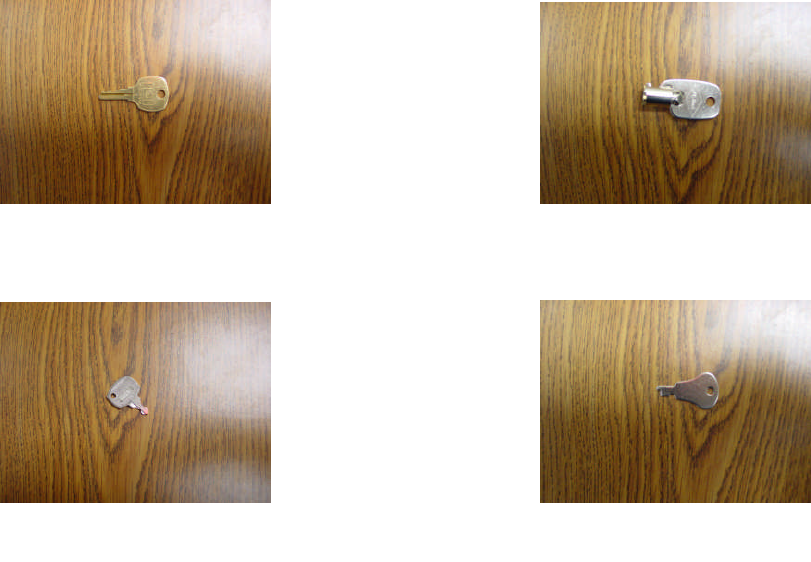
Lastly, there are several keys that come included with this machine. The first is a brass key
(figure 4.1L(1)), which is used to open the battery door, the battery box, the access control
module door, and the front locks on the machine. The second is a circular key (figure
4.1L(2)), which opens the back of the monitor. This key is only used for maintenance
purposes, and is not necessary for normal election-day operation. The third is a small, silver
key (figure 4.1L(3)), which both turns on the machine and resets the public counter. The last
key is a very flat silver key (figure 4.1L(4)), which can be used to access the printer in the
event that the paper needs to be changed or the ballot box needs to be opened.
Figure 4.1L(3)
Figure 4.1L(2)Figure 4.1L(1)
Figure 4.1L(4)
Full-Face Polling Official’s Manual Version 2.0 January 31, 2007
©2001-2007 Avante International Technology, Inc.
4.2 TURNING ON THE VOTE-TRAKKER™
If the voting machines have been kept in a freezing environment, you MUST let the system
warm up to room temperature before turning it on.
Unlock the back door of the voting machine, depicted in figure 4.2A, to access the power cord
that extends from the battery compartment cover at the rear bottom of the table, shown in figure
4.2B. Plug it into a power outlet. You can have up to three Full-Face VOTE-TRAKKER™
machines connected to each 110V circuit.
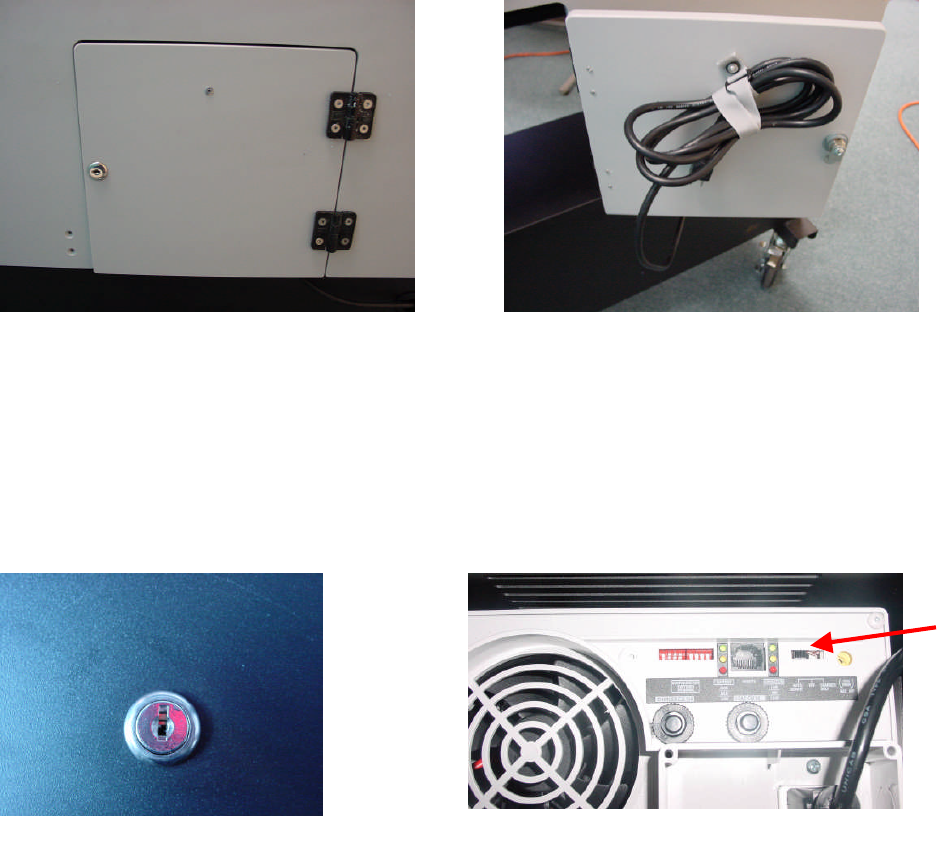
Unlock the cover of the battery box (figure 4.2C) to access the TrippLite inverter (figure 4.2D).
Turn the system power on by moving the black switch, located on the upper right corner of the
inverter, to the LEFT position on the battery charger. Two columns of lights will light up.
Figure 4.2DFigure 4.2C
Figure 4.2A Figure 4.2B
Full-Face Polling Official’s Manual Version 2.0 January 31, 2007
©2001-2007 Avante International Technology, Inc.
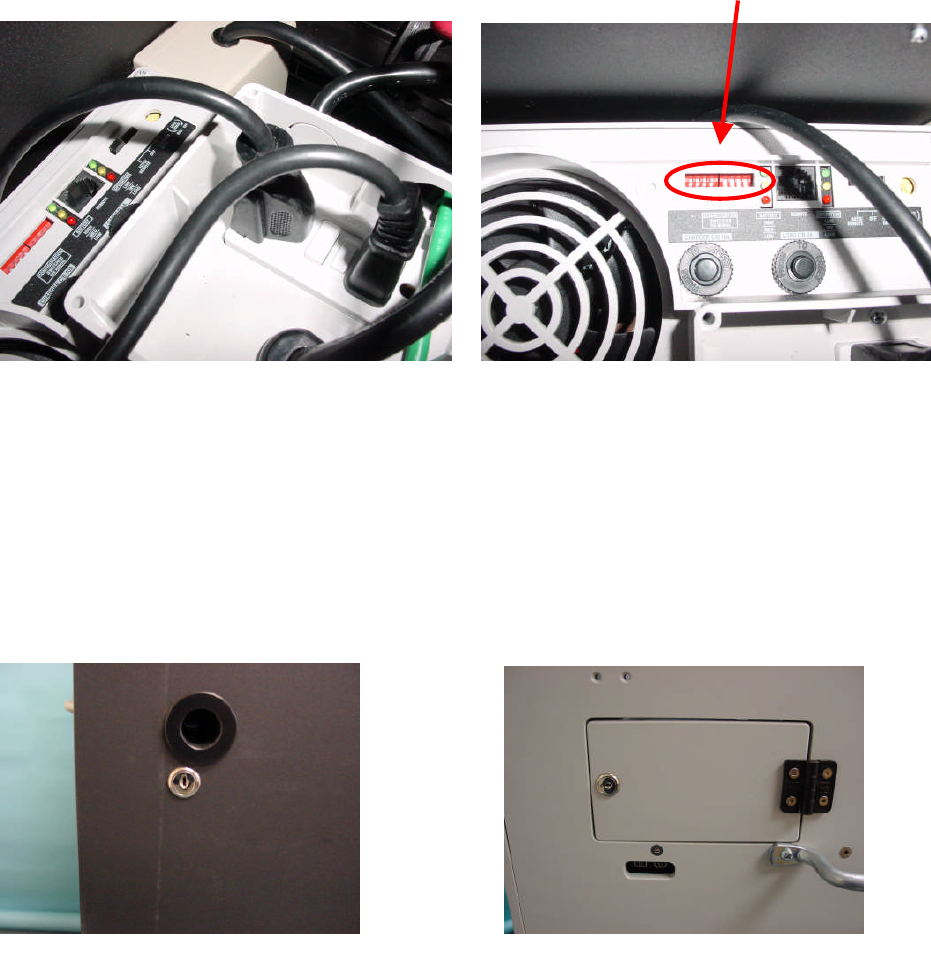
If the machine is not receiving power, there are several things you should check. First, between
the two outlets on top of the TrippLite is a small circuit breaker, pictured in figure 4.2D(1).
Make sure that the ‘Reset’ button is pushed all the way down. If there was a short circuit in the
system, that button will pop up, and the TrippLite will stop working. Second, there is a set of
eight very small switches, shown in figure 4.2D(2). Make sure that the four on the left are in the
‘up’ position, and the four on the right are in the ‘down’ position.
Unlock the two locks on the front cover and the one on side door, seen in figures 4.2E and 4.2F,
respectively. Make sure the machine is at its lowest level. Lift the front cover and slide it into
place so that it fits into the rear set of grooves on top of the voting machine cabinet, depicted in
figure 4.2G.
Figure 4.2D(2)Figure 4.2D(1)
Figure 4.2E Figure 4.2F
Full-Face Polling Official’s Manual Version 2.0 January 31, 2007
©2001-2007 Avante International Technology, Inc.
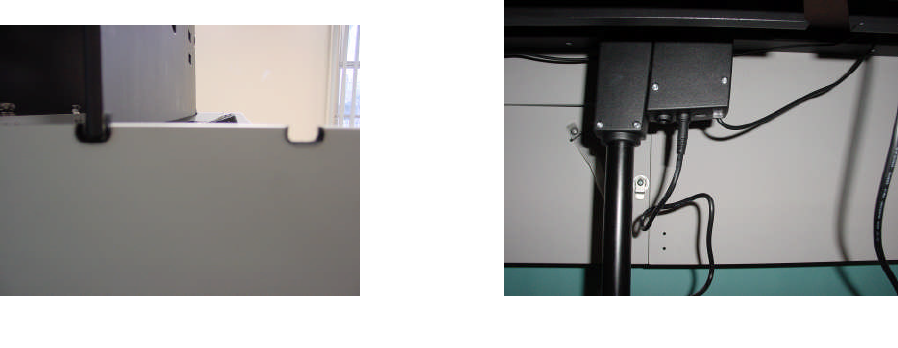
If the lift table is not working, there are two things you can check. First, make sure that the table
is securely connected to the TrippLite (the lift table plug is the one with only two prongs). Also,
there is a control box mounted on the lift table with two plugs coming out from the bottom, as
seen in figure 4.2G(1). Reach toward the box and firmly push both plugs up into the box. There
is a chance that one or both of them may have come loose.
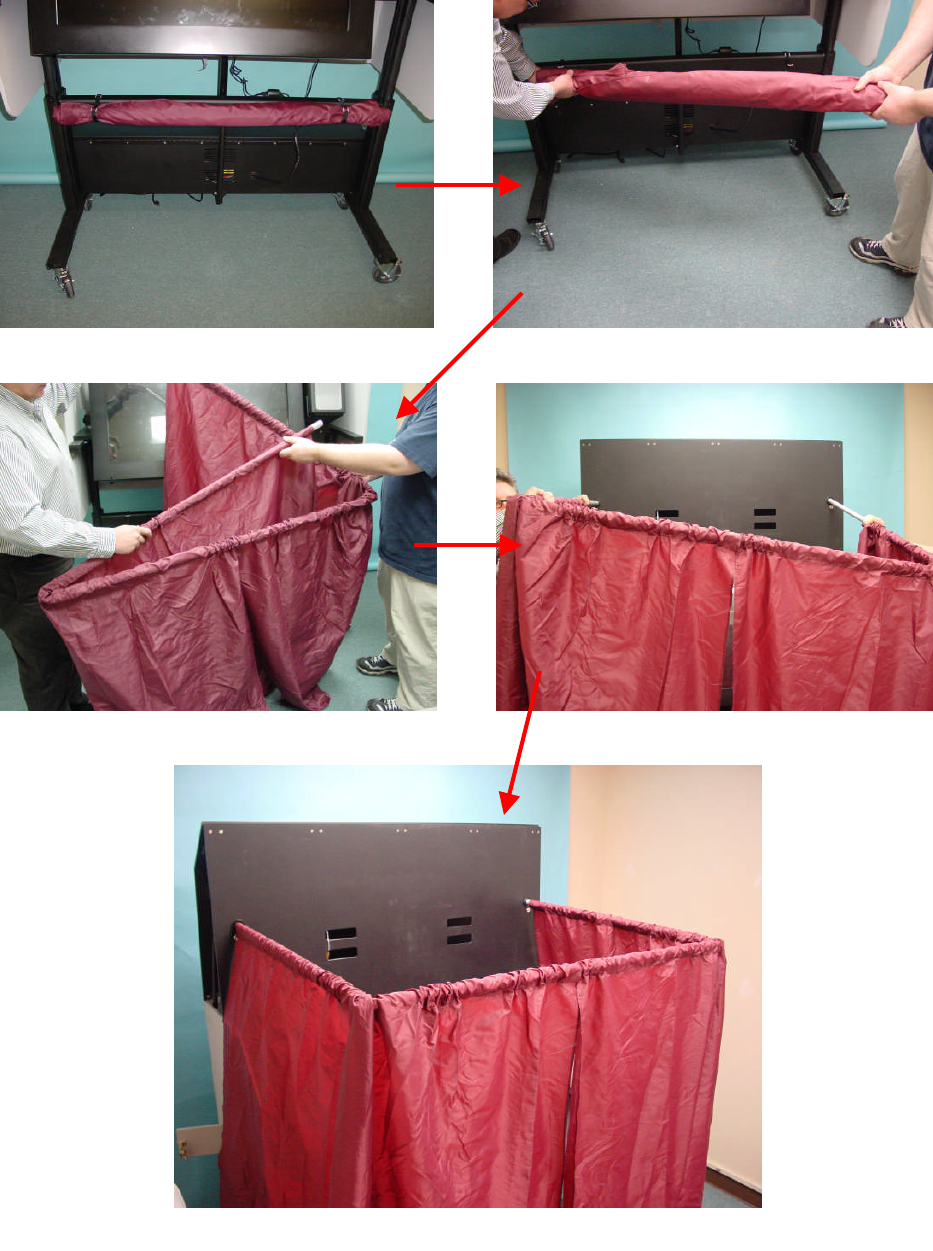
Now you must attach the privacy curtain to the voting machine (this process is pictured in figure
4.2H on the next page). First, raise the machine to its highest level. The privacy screen is made
up of the large purple curtain and attached rods mounted below the monitor. Remove the curtain
from the frame by releasing the Velcro loops at both ends of the machine. Next, lower the
machine as much as possible. Unfold the three rods so that the curtain resembles three sides of a
square. Lift the curtain and insert the two ends into the two openings in the top of the machine.
Slide them in as far as they can go. The privacy curtain has now been attached.
Figure 4.2G Figure 4.2G(1)
Full-Face Polling Official’s Manual Version 2.0 January 31, 2007
©2001-2007 Avante International Technology, Inc.
Figure 4.2H

Full-Face Polling Official’s Manual Version 2.0 January 31, 2007
©2001-2007 Avante International Technology, Inc.
Using the height adjustment button on side of the machine, raise the VOTE-TRAKKER to a
comfortable level. Insert the small silver key into the power switch keyhole and turn the key
clockwise to turn on the monitor. Release the key after the display turns on. If the screen does
not turn on, check to make sure the monitor is connected to the TrippLite (the monitor is the
three-pronged plug).
There are several tamper evident seals that need to be secured onto the voting machine, an
example of which is shown in figure 4.2I. There is a slot inside the printer on the door for the
ballot box, shown in figure 4.2I(1). In addition, there are two slots on the sides of the printer:
one on the left side (figure 4.2I(2)), and one on the right side (figure 4.2I(3)).
Figure 4.2I Figure 4.2I(1)
Figure 4.2I(2) Figure 4.2I(3)
Full-Face Polling Official’s Manual Version 2.0 January 31, 2007
©2001-2007 Avante International Technology, Inc.
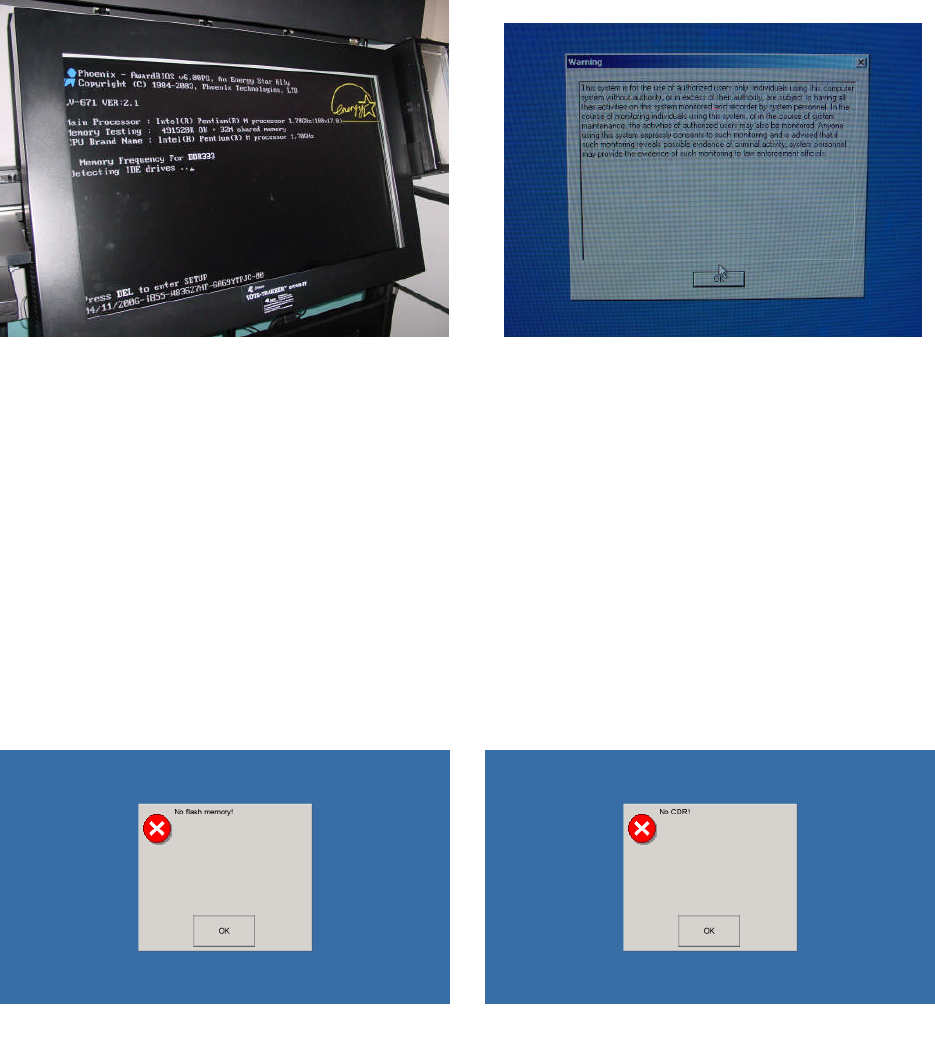
Once the computer screen is turned on, allow up to 2 minutes for the system to boot up. If the
screen freezes at figure 4.2J, turn off the TrippLite and unplug it from the wall for five minutes
before trying again. Wait until you see the following screen shown in Figure 4.2J(1).
Simply press the ‘OK’ button to continue to the next screen.
At this point, there are two error messages that you might get. The first one will let you know
that there is no flash drive inserted into the computer (figure 4.2K(1)). The second, that there is
no CDR in the CD drive (figure 4.2K(2)). If this message appears, make sure that there is a CDR
in the drive by pressing on the eject button next to the drive. If there is a CDR there, reinsert it
into the machine and reboot the system.
Figure 4.2J(1)Figure 4.2J
Figure 4.2K(1) Figure 4.2K(2)
Full-Face Polling Official’s Manual Version 2.0 January 31, 2007
©2001-2007 Avante International Technology, Inc.
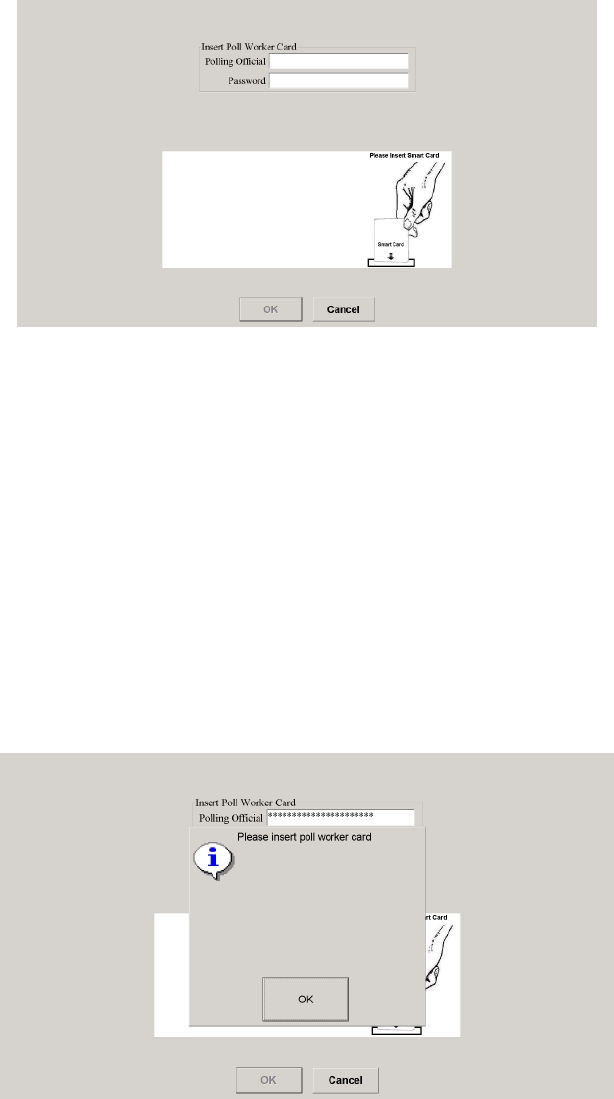
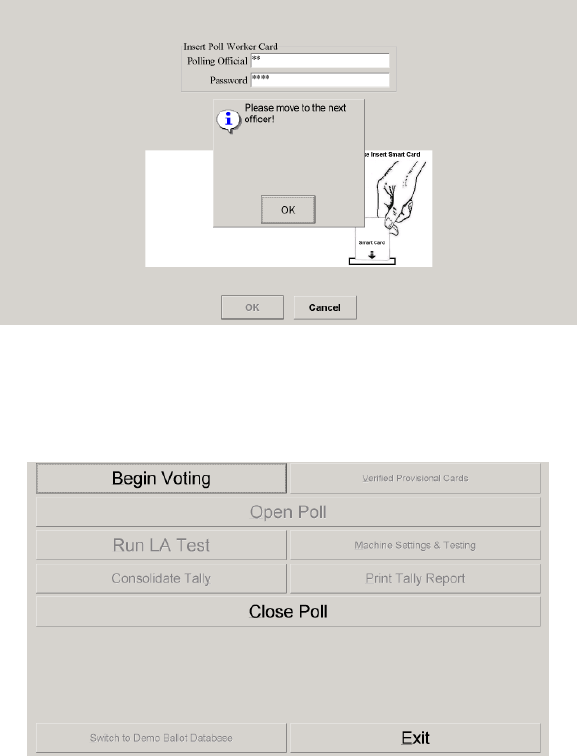
Wait until you see a screen resembling figure 4.2L appear, asking for a poll worker card.
Insert your poll worker card. If more than one poll worker is required to activate the voting unit,
the screen will prompt for another card after the first one is accepted. Remove the first card from
the machine, place the second card on the card reader, and press the OK button to continue.
If you put an invalid card onto the card reader at this time, you will get the screen shown in
figure 4.2N. For security protection, three consecutive failed login attempts will cause the
system to shut down.
Figure 4.2M

Full-Face Polling Official’s Manual Version 2.0 January 31, 2007
©2001-2007 Avante International Technology, Inc.
When the login is successful, the system will print a self-diagnostic report like the one shown in
figure 4.2O.
Figure 4.2N

Full-Face Polling Official’s Manual Version 2.0 January 31, 2007
©2001-2007 Avante International Technology, Inc.
Figure 4.2O
Election Type: New York General Election
Test Time: 1/11/2007 17:01:41
Vote-Trakker: VTF0300611
Software Version 1.2.2(Full Face)
Hardware Version 1.4.0
-----------------------------------------------------------------------------
-----------------------------------------------------------------------------
Machine ID: 644
Machine Code: HW
Allocated Name: VTF0300611
Machine Status: Begin
Paper Record: On Line
-----------------------------------------------------------------------------
-----------------------------------------------------------------------------
Raw Data File is OK!
-----------------------------------------------------------------------------
-----------------------------------------------------------------------------
Device Test Status
Battery: UNKNOWN
Counter: NOT TESTED!
Printer: PASSED!
Smart Card: NOT TESTED!
Sound: PASSED!
-----------------------------------------------------------------------------
-----------------------------------------------------------------------------
Store Media Size (Available) Test
C:\Hard Drive 74275236 K AVAILABLE
D:\Hard Drive 34951808 K AVAILABLE
E:\CD-Writer 675400 K AVAILABLE
F:\Flash Mem 63568 K AVAILABLE
-----------------------------------------------------------------------------
-----------------------------------------------------------------------------
Beginning Public Counter Number
-----------------------------------------------------------------------------
Ending Public Counter Number
-----------------------------------------------------------------------------
Beginning Protective Counter Number
-----------------------------------------------------------------------------
Ending Protective Counter Number
-----------------------------------------------------------------------------
Polling Officials Signature
X---------------------------------------------------------------------------
_______________________________________
X---------------------------------------------------------------------------
_________________________________________
Observers: X-------------------------------------------------------------
__________
_________________________
Description of the Test Report:
Election Type: Primary or General.
Test Time: Time the report was printed.
Vote-Trakker: The network identification of the
VOTE-TRAKKER™.
Software Version: The version of the voting
software.
Hardware Version: The version of the VOTE-
TRAKKER™hardware.
Machine ID: Unique number assigned during ballot
generation.
Machine Code: Used for the paper records.
Allocated Name: The name assigned to this
particular VOTE-TRAKKER™.
Machine Status: Begin (prior to opening poll), Open
or Closed.
Paper Record: Online or Offline.
Raw Data File: Checks raw data file(s) for
availability and to make sure they are the same.
- Times are listed for opening, closing, first and last
vote.
- Each major device is checked for its operational
status.
- Each storage media is checked for available
memory size. If the storage media is missing, (e.g.
no floppy in drive) the system will not run as all 3
storage media are required for redundancy and tally.
All of the media storage should also be totally
empty.
On the printout shown in Figure 4.2O, spaces are
provided for the signatures and countersignatures of
all parties that observed the testing of the voting
machine.
Full-Face Polling Official’s Manual Version 2.0 January 31, 2007
©2001-2007 Avante International Technology, Inc.
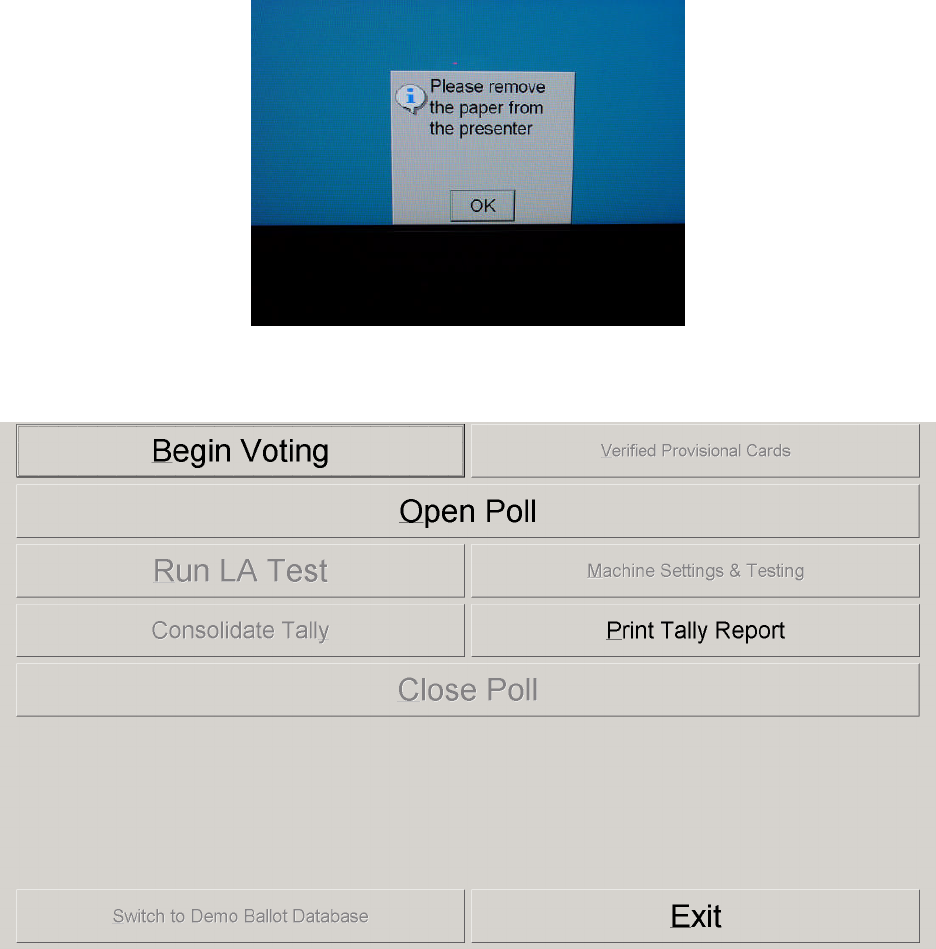
Unlock the printer’s top latch and open the printer’s front plastic cover to remove the report and
save it for audit purposes. There will be a small popup box, shown in figure 4.2P, instructing
you to do this. After you remove the printout, you should see Figure 4.2Q. The voting machine
is now ready to be activated for voting.
Figure 4.2Q
Figure 4.2P

Full-Face Polling Official’s Manual Version 2.0 January 31, 2007
©2001-2007 Avante International Technology, Inc.
5 OPENING THE POLL
Before a voting machine is ready for public voting, you must complete the ‘Open Poll’
procedure. The ‘Open Poll’ procedure is required only once during the entire election process.
Press the ‘Open Poll’ button on the screen depicted in figure 5A.
Figure 5B will appear, requesting that you reset the public counter back to zero. The counter
reset switch is located between the two counters. Turn the clockwise and return the key to its
original position. Check the zero reading of the public counter and press ‘Yes’ to confirm. The
machine will ask you one more time if you want to open the poll. Press ‘Yes’ to continue.
Figure 5B
Figure 5A
Full-Face Polling Official’s Manual Version 2.0 January 31, 2007
©2001-2007 Avante International Technology, Inc.
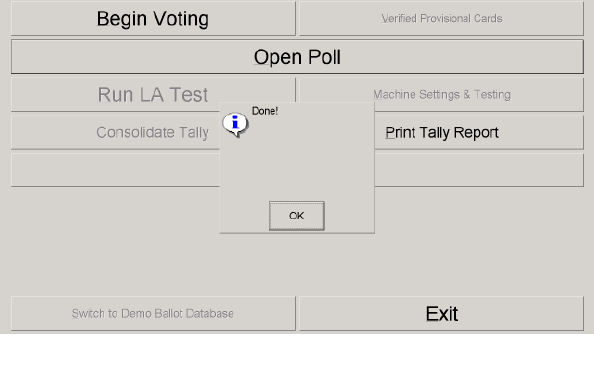
The printer will print a zero-count verification report. Remove each page manually when it is
fully presented. Do not pull the paper until it comes out fully from the printer. Normally you
will have one set of zero reports for “Regular Voting”. There may also be additional reports for
‘Provisional’ and ‘After-hour Provisional’. When the printer finishes printing the zero report,
you will see a ‘Done’ confirmation screen, shown in Figure 5C.
If more than one page is printed, staple the reports together for this voting machine. Follow your
procedures for signing and maintaining this zero report. Press the ‘OK’ button on the screen,
depicted in Figure 5C.
This will bring you back to Figure 5A. Press the ‘Begin Voting’ button. The voting unit is now
ready for real voting. From this point until the poll is closed, the two counters will increase their
readings only when a ballot is cast. After every voting unit finishes printing the zero report, you
need to complete the following final checklist to finish the ‘Open Poll’ process.
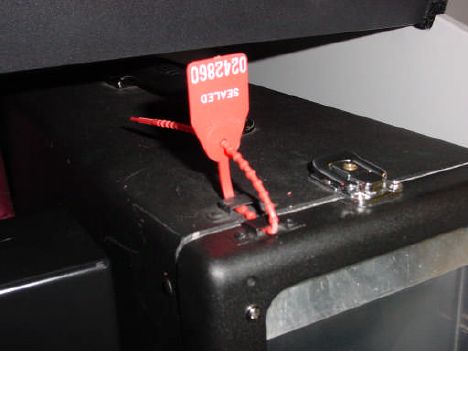
Close the front cover of the printer unit and lock the latch at the top. Use a numbered security
seal to lock the display case on the printer, shown in figure 5D, to prevent access to the VVPB.
Figure 5C
Full-Face Polling Official’s Manual Version 2.0 January 31, 2007
©2001-2007 Avante International Technology, Inc.
The zero-count verification report for each machine should be collected and properly stapled.
The current reading of the public counter for each voting unit stays at zero and the current
reading for the protective counter is documented accordingly.
If you have completed the above checklist, your machine is ready for public voting. Once you
have the voter cards ready for voters, they can vote on these machines.
Figure 5D
Full-Face Polling Official’s Manual Version 2.0 January 31, 2007
©2001-2007 Avante International Technology, Inc.
6 ENCODING SMART CARDS
A voter card is required to activate a ballot. One option is that each voter gets assigned a card
after signing in at the check-in desk. Another procedure for activating ballots is that a polling
official with a universal smart card can activate the ballots as needed (this option does not
require issuing separate cards for each voter at the polling location). Below are the instructions
for how to set up the encoding system to issue a voting card for each voter.
6.1 CARD ENCODING UNIT
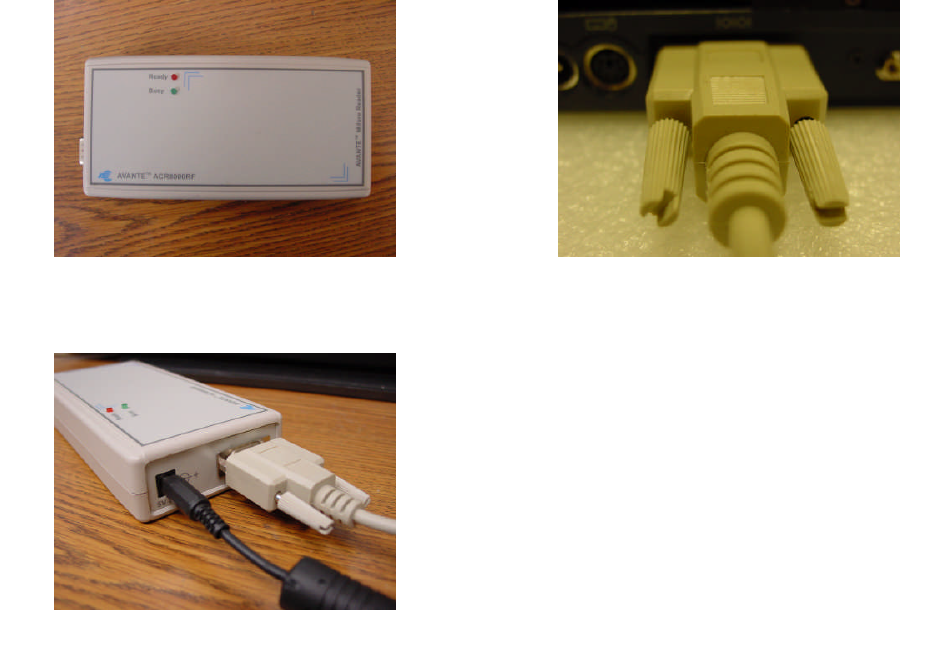
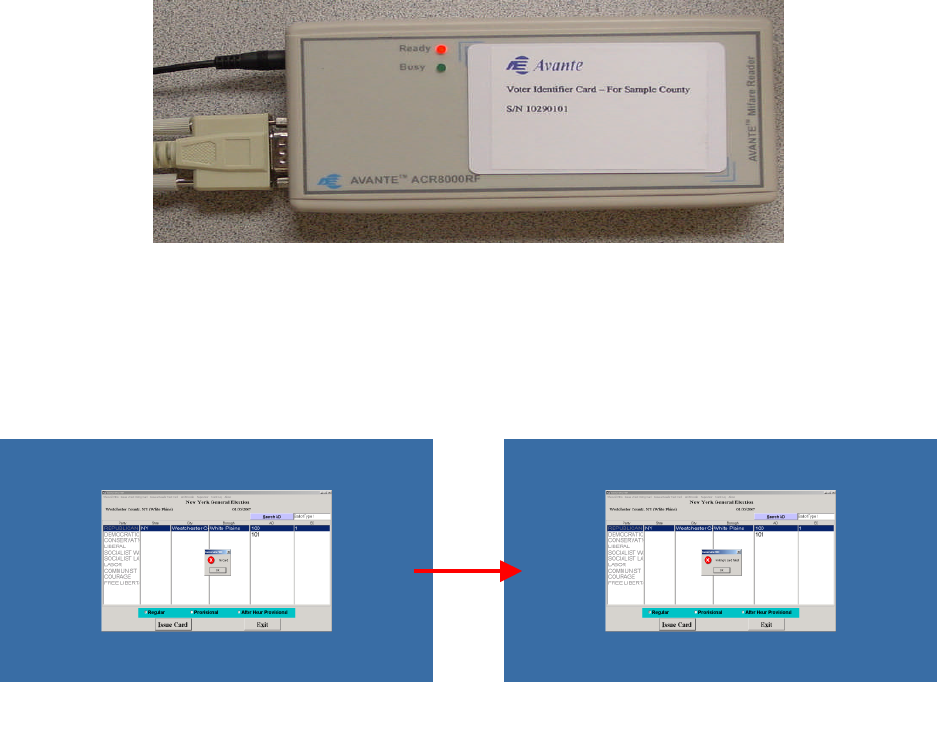
A standard card-encoding unit consists of a notebook computer and a smart card encoder.
The smart card encoder is connected to the computer via a serial cable (as seen in figure 6.1A).
There is a separate cable that supplies power to the encoder, also shown in figure 6.1A.
Card Encoding Unit
Figure 6.1A
Serial connection to the computer
Power and serial connections to the encoder
Full-Face Polling Official’s Manual Version 2.0 January 31, 2007
©2001-2007 Avante International Technology, Inc.
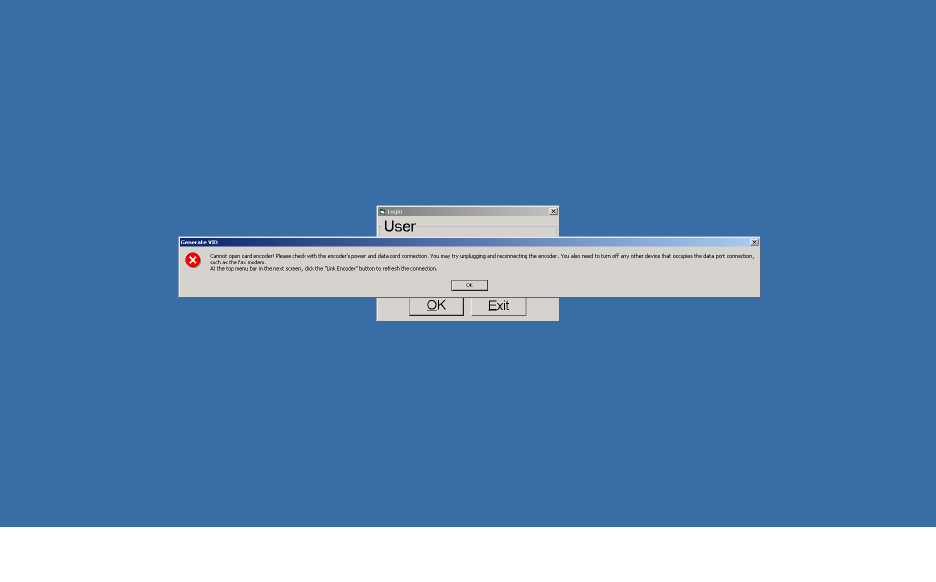
After you have connected the encoder, turn on your computer. When power is supplied to the
encoder, you should hear a beep and the red LED on the top panel of the encoder should be on.
Your computer will run the ‘Generate VID’ module automatically when it is turned on (you will
see figure 6.1B displayed on the computer screen).
Enter the appropriate username and password in Figure 6.1B. Click ‘OK’ to proceed or ‘Exit’ to
cancel the operation. After the correct login username and password are entered, you will see
Figure 6.1C.
Figure 6.1B
Figure 6.1C
Full-Face Polling Official’s Manual Version 2.0 January 31, 2007
©2001-2007 Avante International Technology, Inc.
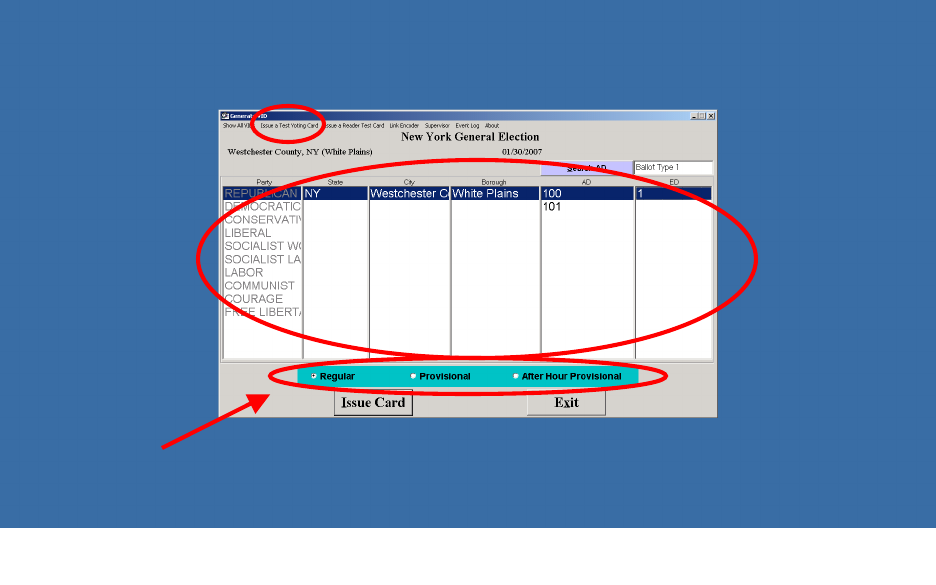
If the message shown in figure 6.1C(1) comes up, disconnect the encoder from the computer,
shut down the computer, reconnect the encoder, and then restart the computer.
Figure 6.1C(1)
Full-Face Polling Official’s Manual Version 2.0 January 31, 2007
©2001-2007 Avante International Technology, Inc.
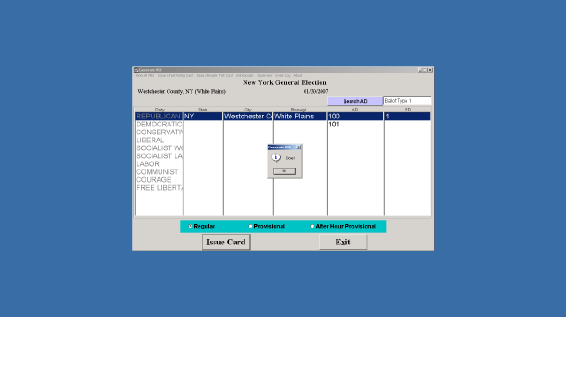
6.2 ENCODING A SMART CARD
To issue smart cards, a card encoder must be connected to the computer before the ‘Generate
VID’ program runs. If the ‘Issue Card’ button in Figure 6.2A is grayed out, the card encoder is
not properly connected with the computer. Use the ‘Link Encoder’ button in the top menu bar to
reset the encoder connection after you connect a smart card encoder to the computer.
Figure 5.2A shows a sample interface screen.
6.2.1 SPECIAL CARDS
Item No. ①: A ‘test voting’ card is issued for a particular ballot when the voting machine is not
opened for actual voting. This card is frequently used during pre-election logic and accuracy
testing or for educating voters in the use of the voting machine. To issue a ‘test voting’ card,
choose from the selections in area ②to indicate the desired ballot to be used (political party
selection is required for Primary elections only), place a smart card on the encoder (seen in
Figure 6.2A
1
2
3
Full-Face Polling Official’s Manual Version 2.0 January 31, 2007
©2001-2007 Avante International Technology, Inc.
figure 6.2B), and click the ‘Issue a Test Voting Card’ button on the top menu. Once encoded,
this card can be reused until the voting machine is loaded with a new ballot database.
If the computer gives you an error message like the one in figure 6.2B(1), try either re-orienting
the card on the encoder, or using a different smart card.
6.2.2 ISSUE A VOTING SMART CARD
As voters check in at the poll book desk, they should be given voter cards according to their
jurisdictions. In area ②, select the correct information (from Jurisdiction down to Sub-Precinct)
and choose a political party (primary election only) that is applicable to the voter. The ‘Search
Precinct’ button on top of the ‘Precinct’ column allows you to find a certain precinct from a large
number of available precincts.
Figure 6.2B
Figure 6.2B(1)
Full-Face Polling Official’s Manual Version 2.0 January 31, 2007
©2001-2007 Avante International Technology, Inc.
In area ③, select the proper type of smart card to be issued. The following are the three types of
voting cards:
Regular: For properly registered voters. This is the most commonly used option.
Provisional: For voters whose registration cannot be verified at the polling place.
After Hour Provisional: For properly registered voters who have to cast their ballots after the
official time of poll-closing, because a court judge or other voting officials have demanded that
the poll hours be extended due to unusual circumstances.
After you have chosen the correct settings in areas ②and ③, place a smart card on the encoder
(a la figure 6.2B), and click the “Issue Card” button. You will see a ‘Done’ screen when the card
is successfully encoded, pictured in figure 6.2C. Give the encoded voter card to the voter.
Since provisional and after hour provisional ballots will be counted later, the randomly generated
session identifier (or VID number) will be used as a tracking number when counting the ballot.
Once a provisional card is issued, the VID number will be shown on the screen. The number
needs to be recorded onto the voter’s provisional ballot envelope. You may also need to tell the
provisional voter to seal the smart card into the envelope after the vote is cast in order to be
counted during the canvassing process (the election administrator will decide whether this step is
required).
Figure 6.2C
Full-Face Polling Official’s Manual Version 2.0 January 31, 2007
©2001-2007 Avante International Technology, Inc.
7 ASSISTING VOTERS DURING VOTING
As a polling official, you may need to assist voters who have questions about using the voting
machine. Therefore, you need to be familiar with how to vote on the voting unit.
7.1 ACTIVATING A BALLOT
Each voter receives a card allowing them to vote. Once getting a voter card, the voter should go
to any voting unit that has completed the ‘Open Poll’ procedure.
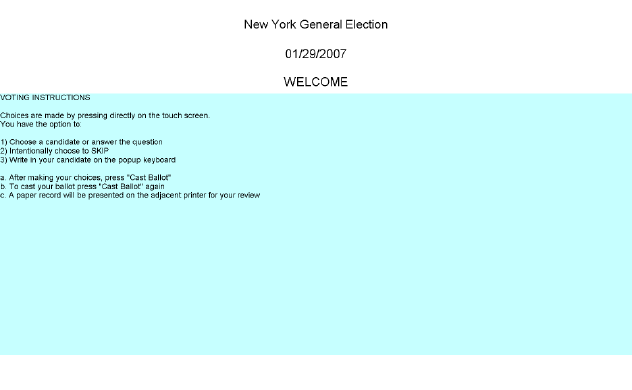
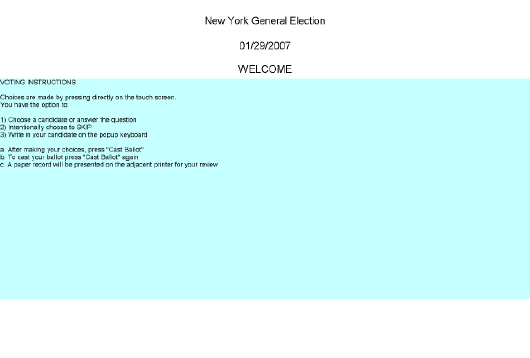
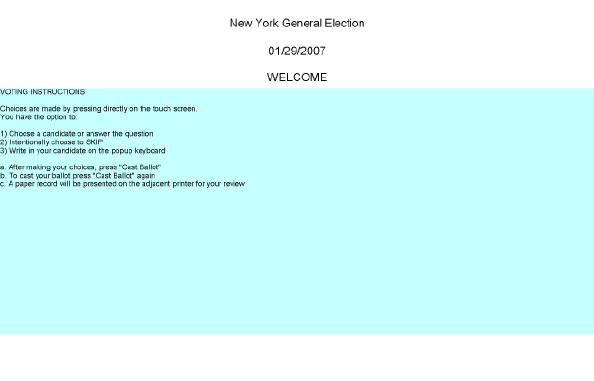
Figure 7.1A shows the first screen that a voter will see. This screen provides simplified voting
instructions for the voter.
When the voter arrives at the machine, the poll worker should take his or her card and lay it on
the card reader. The first screen you see may ask you to confirm that the card was encoded for
the correct Assembly District and Election District, as pictured below in figure 7.1B. If this is
not the first screen, skip this paragraph. Otherwise check to make sure that this information is
correct. If it is not, press the ‘Cancel Voting’ button, which will return you to figure 7.1A. If
this information is correct, press the ‘Continue Voting’ button to proceed to the next screen.
Figure 7.1A
Full-Face Polling Official’s Manual Version 2.0 January 31, 2007
©2001-2007 Avante International Technology, Inc.
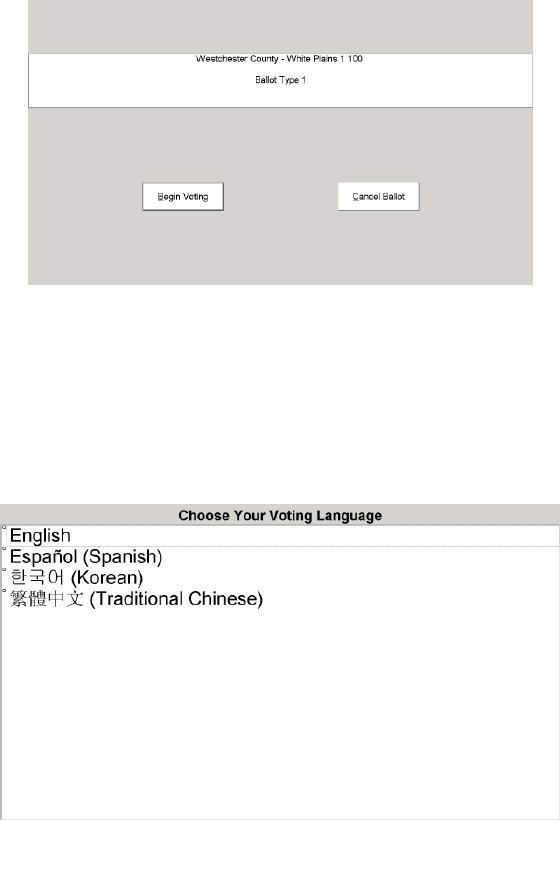
If the election provides ballots in multiple languages, the voter first needs to choose one by
pressing directly on the screen, as shown in Figure 7.1C.
7.2 VOTING VIA THE TOUCHSCREEN
For voters who have no problem seeing the ballot screen and using their hands or any stylus to
press the touchscreen, voting via the touchscreen the quickest and easiest option available to
them. Selections are made by touching on the screen.
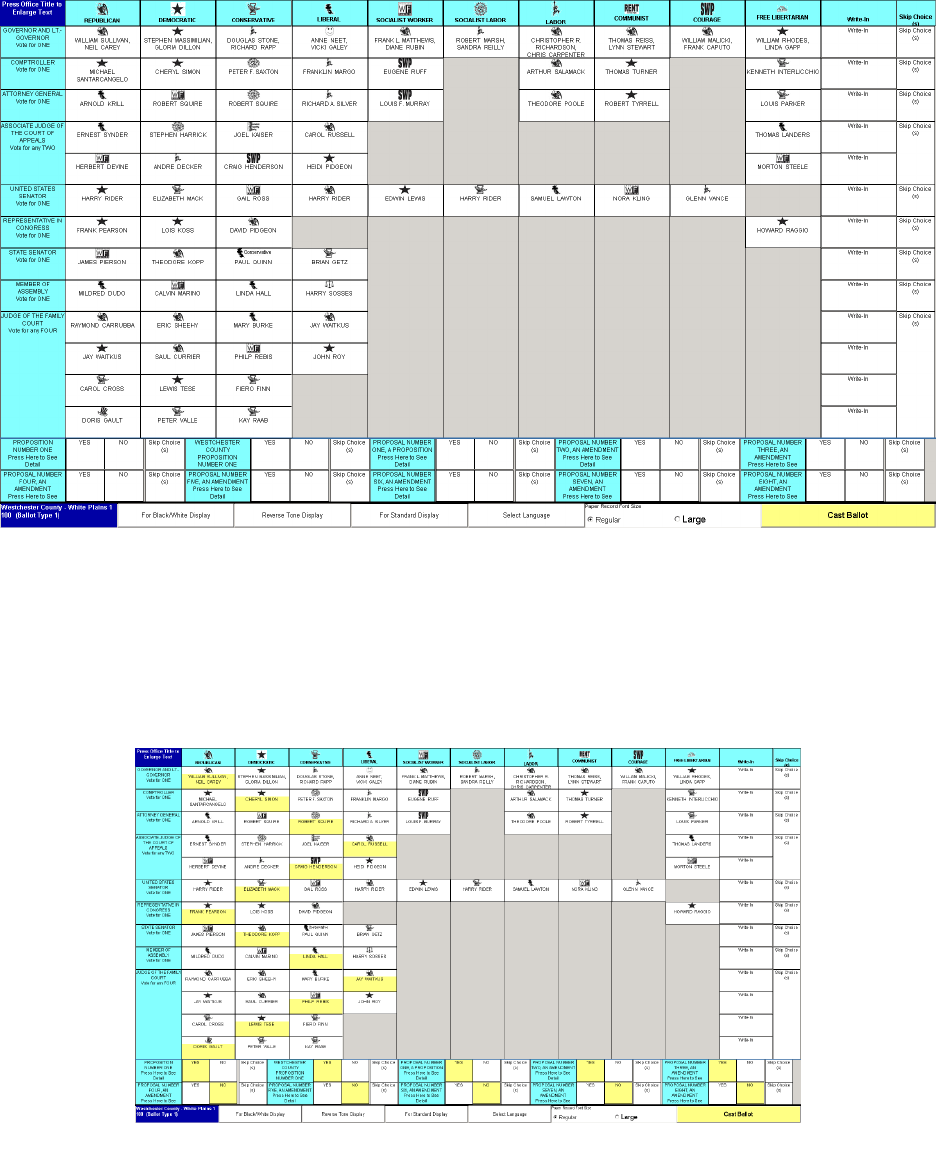
Figure 7.2A shows a sample full-face ballot.
Figure 7.1C
Figure 7.1B
Full-Face Polling Official’s Manual Version 2.0 January 31, 2007
©2001-2007 Avante International Technology, Inc.
Press anywhere inside a box to select that choice. The selection will be highlighted to
differentiate it from others. See figure 7.2B.
Figure 7.2B
Figure 7.2A

Full-Face Polling Official’s Manual Version 2.0 January 31, 2007
©2001-2007 Avante International Technology, Inc.
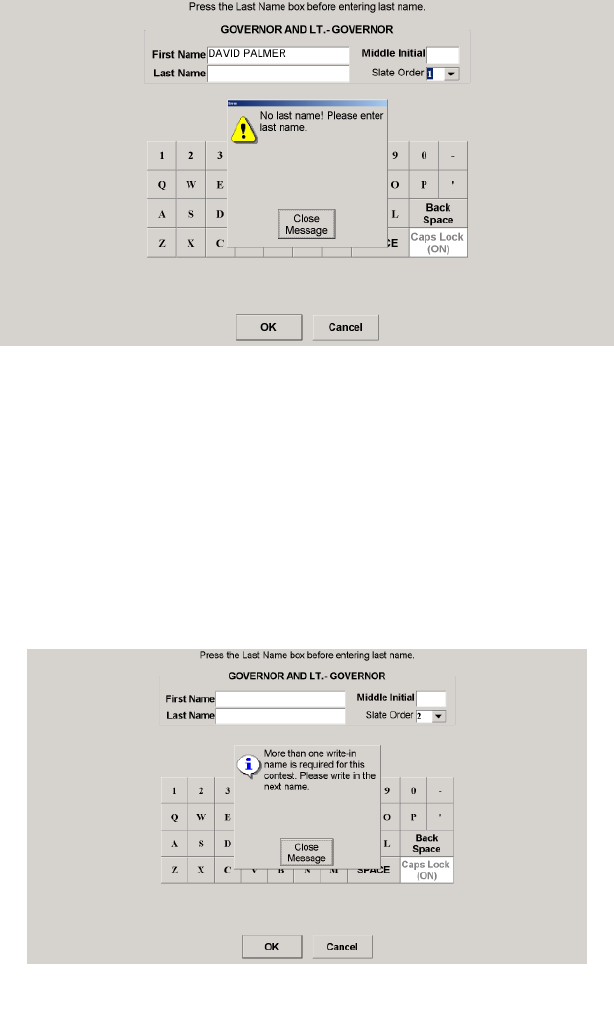
7.2.1 WRITING IN A CANDIDATE
When choosing to enter a write-in candidate, a voter should press the ‘Write-in Candidate’
button for that contest. The screen depicted in figure 7.2.1A will appear. First name and last
name are required.
Press inside the white box next to the ‘First Name’ heading, and enter the candidate’s first name
using the on-screen keypad. Enter the ‘Last Name’ and ‘Middle Initial’ in the same manner to
complete your entry (middle initial is optional). Press the ‘OK’ button to record this write-in
entry. The voter can press ‘Cancel’ at any time to return to the full-face display.
One mistake the voter can make is to try and enter the candidate’s first and last names into the
same box. If this happens, the voter will receive the message shown in figure 7.2.1B. Simple
press the ‘OK’ button and correct the mistake to continue.
Figure 7.2.1A
Full-Face Polling Official’s Manual Version 2.0 January 31, 2007
©2001-2007 Avante International Technology, Inc.
The ‘Slate Order’ box appears only if the write-in is for a ‘Slate’ contest (i.e. President and Vice
President). When you finish entering the first candidate’s name, you will be asked to write-in the
‘Vice Candidate’, as seen in figure 7.2.1C. Press the ‘OK’ button after you complete your entry
for the vice candidate.
You will now see your write-in displayed in the full-face screen, similar to figure 7.2.1D. You
may press the write-in box again to cancel that write-in.
Figure 7.2.1B
Figure 7.2.1C

Full-Face Polling Official’s Manual Version 2.0 January 31, 2007
©2001-2007 Avante International Technology, Inc.
7.2.2 SKIP CHOICE(S)
If you decide to under-vote in a contest, use the ‘Skip Choice(s)’ button. For example, if you
only want to select one candidate in a ‘Vote for 3’ contest, you may select your candidate and
then press the ‘Skip Choice(s)’ button. The machine will retain every candidate that you have
selected for this contest and fill in the rest as ‘Skip Choice(s)’.
7.2.3 CHANGING YOUR SELECTIONS
If you want to change your selections at any time during the voting process, press on your new
choice in a ‘Vote For One’ contest, and you will see that the new choice is highlighted to replace
the existing one for that contest. If the contest requires more than one choice, you need to de-
select an existing choice before a new choice can be registered. The machine indicates this to a
voter by displaying the message depicted in figure 7.2.3A. This is because the voting machine
does not know which existing choice you want to replace. To de-select an existing choice, press
that choice again so that the highlight is removed.
Figure 7.2.1D

Full-Face Polling Official’s Manual Version 2.0 January 31, 2007
©2001-2007 Avante International Technology, Inc.
7.2.4 CHANGING DISPLAY SETTINGS
To help those voters who are color-blind or vision impaired, the system provides two
color/contrast options in addition to the ‘Standard Display’, which are shown in Figure 7.2.4A.
Voters may press on the corresponding buttons at the bottom of the screen for ‘Black/White
Display’, ‘Reverse Tone Display’ or ‘Standard Display’ to choose the display option that is most
comfortable.
If the voter desires to increase the font size in full-face display because the font is too small, he
or she would press directly on the contest title to use the entire screen to display that contest in a
larger font size. See Figure 7.2.4B as a sample.
Figure 7.2.4A
Figure 7.2.3A

Full-Face Polling Official’s Manual Version 2.0 January 31, 2007
©2001-2007 Avante International Technology, Inc.
After the voter makes the required number of selections in Figure 7.2.4A, the screen will
automatically return to the full-face display
7.2.5 VOTING FOR A REFERENDUM OR INITIATIVE
All referenda/initiatives are grouped together and separated from the other contests. You may
choose ‘Yes’, ’No’ or ‘Skip Choice(s)’ for each question. To see the details about a referendum
or initiative, press directly on the question title and the details will be shown in the entire screen.
After you make a selection, the screen will return to the full-face mode automatically.
Figure 7.2.4B
Figure 7.2.5A

Full-Face Polling Official’s Manual Version 2.0 January 31, 2007
©2001-2007 Avante International Technology, Inc.
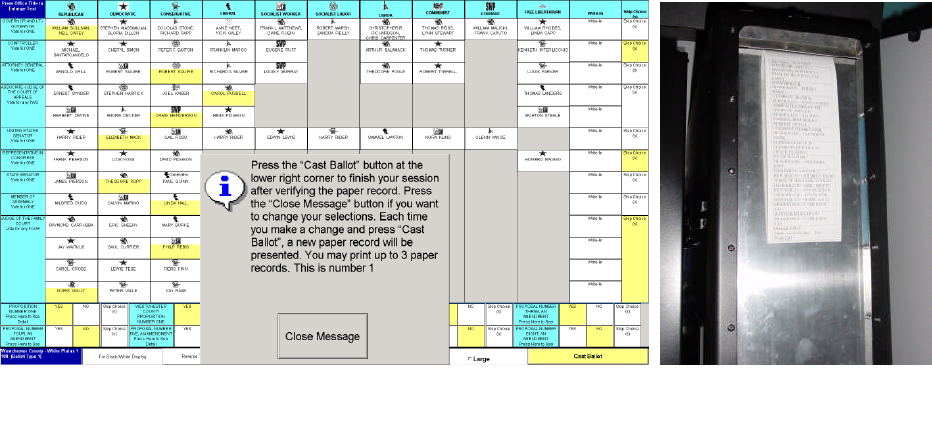
7.3 CAST YOUR BALLOT AND REVIEW THE VVPB
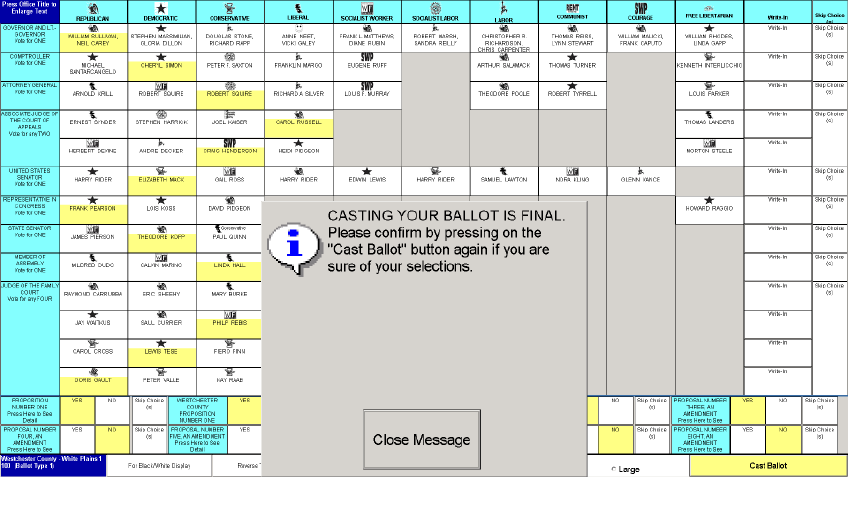
Once the voter has made all of his or her selections, press the ‘Cast Ballot’ button to cast the
ballot. If you do not vote for the required number of selections in any contest or referendum, you
will see the title of such contest/referendum highlighted with an under-vote alert message, as
shown in figure 7.3A.
You can press the ‘Make Change’ button and modify your selections. When you make the
required number of choices for each highlighted contest/referendum, the under-vote highlight on
the contest title will be removed automatically.
If you do not want to make any changes to your selections, press the ‘Cast As Is’ button to
proceed with casting your ballot.
Depending on your jurisdiction’s decision on how to implement the Voter Verified Paper Audit
Trail (VVPB), there are three possible scenarios for completing the voting process. Check with
your election administrator to see which scenario applies to your polling place. Once the voting
Figure 7.3A
Full-Face Polling Official’s Manual Version 2.0 January 31, 2007
©2001-2007 Avante International Technology, Inc.
session is finished and the ballot is cast, the poll worker should return the voter card to the
encoding table.
Sections 7.3.1, 7.3.2 and 7.3.3 will show you the three possible scenarios.
7.3.1 DO NOT PRINT VVPB
If your jurisdiction has chosen not to print the VVPB or the printer has been turned off
temporarily to conserve power consumption during a power outage, you will see Figure 7.3.1A
after the first time that you press the ‘Cast Ballot’ button.
This is your last chance to change your selections. You can still press the ‘Close Message’
button and change anything you want. If you press the ‘Cast Ballot’ button again in Figure
6.3.1A, your voting session will be completed. You will see a ‘Thank you for voting!’ message
briefly displayed before the screen returns to Figure 7.1A, and is ready for the next voter.
Figure 7.3.1A
Full-Face Polling Official’s Manual Version 2.0 January 31, 2007
©2001-2007 Avante International Technology, Inc.
7.3.2 PRINT A FINAL VVPB ONLY
If your jurisdiction has chosen to print a final VVPB after the voter has cast the ballot, you will
see the same screen as shown in Figure 7.3.1A after you press the ‘Cast Ballot’ button the first
time. If you press this button again to confirm casting the ballot, you will see Figure 7.3.2A
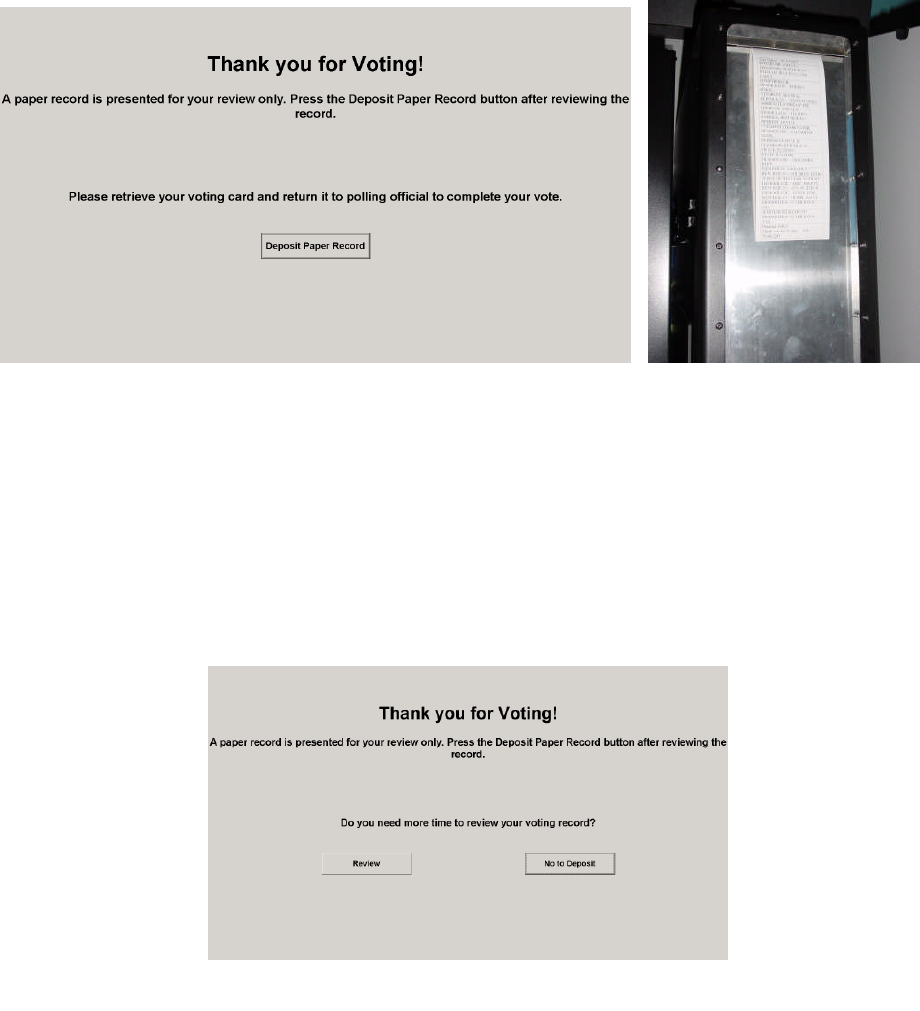
shown on the screen. Meanwhile, the printer will print the VVPB and present it for the voter to
review, as shown in Figure 7.3.2B.
The VVPB is presented behind the printer’s plastic cover to prevent the voter from retrieving it.
The voter can check that each selection is correctly listed on the VVPB. In this case, the voter
cannot change or reject this final VVPB. If the voter does not press the ‘Retract Paper Record’
button to deposit the VVPB within the preset time limit, the screen will change to Figure 7.3.2C
to ask the voter whether he/she needs more time to review the VVPB.
Figure 7.3.2A
Figure 7.3.2B
Figure 7.3.2C
Full-Face Polling Official’s Manual Version 2.0 January 31, 2007
©2001-2007 Avante International Technology, Inc.
If the voter chooses to continue reviewing the VVPB, the screen will change back to Figure
7.3.2A and the VVPB will remain in the display area. If the voter choose to deposit the VVPB
or does not make any selection within a preset time limit, the printer will withdraw the VVPB
and deposit it into the VVPB compartment at the bottom of the printer unit.
7.3.3 ALLOW REJECTION OF THE VVPB
If your jurisdiction has chosen to print a VVPB and allow voters to reject it, figure 7.3.3A will
appear after you press the ‘Cast Ballot’ button the first time. Meanwhile, the VVPB is presented
by the printer, as shown in Figure 7.3.3B.
After reviewing the VVPB, if you press the ‘Cast Ballot’ button again, the VVPB will be
withdrawn and deposited into the printer unit. You have finished voting and you can leave the
voting booth.
If you decide to change your selection after reviewing the VVPB, you can change the selection
on the touchscreen. When you press the ‘Cast Ballot’ button after you make the change, the
current VVPB will be withdrawn and another VVPB will be printed to reflect any changes and
presented for your review. Your voting session is completed when you press the ‘Cast Ballot’
Figure 7.3.3BFigure 7.3.3A
Full-Face Polling Official’s Manual Version 2.0 January 31, 2007
©2001-2007 Avante International Technology, Inc.
button to accept the VVPB or when you have reached the maximum number of changes to the
VVPB as set by your jurisdiction.
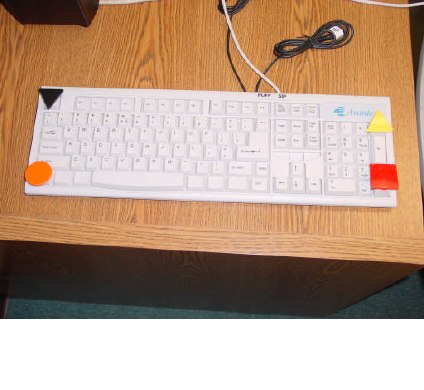
7.4 VOICE-ASSISTED VOTING
If a voter cannot vote via the touchscreen or cannot read, he or she can vote independently using
voice-assisted voting. As a polling official, you may help a visually impaired voter find the
keyboard and the headphones and select his or her desired language if multiple language ballots
are available. Once the ballot is presented on the screen, you need to press the “F9” key on the
keyboard to start the voice-assisted voting feature. If the headphones have a built-in volume
control, you may inform the voter of how to adjust the volume. You can now step away from the
voting machine and come back only if the voter needs any help.
The voter will hear the voting instructions through the headphones. First, the voter will get
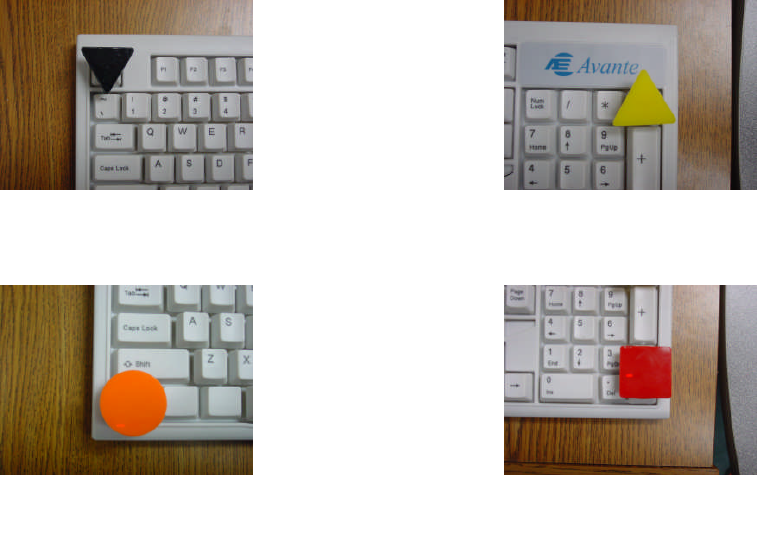
familiar with the keyboard, pictured in figure 7.4A. There are four specially shaped buttons on
the keyboard, one at each corner of the keyboard unit.
Lower Right Corner Button (Red Square): Press this button when you hear your candidate’s
name to select it (figure 7.4A(1)).
Figure 7.4A
Full-Face Polling Official’s Manual Version 2.0 January 31, 2007
©2001-2007 Avante International Technology, Inc.
Upper Right Corner Button (Yellow ‘Up’ Triangle): Press this button to repeat the reading of the
current contest from the beginning (figure 7.4A(2)).
Lower Left Corner Button (Orange Circle): Press this button when you are ready to cast your
ballot (figure 7.4A(3)).
Upper Left Corner Button (Black ‘Down’ Triangle): Press this button to skip the current
candidate or instruction (figure 7.4(4)).
The voter will be asked to press each button. As they do so, the function of each button will be
explained. Besides these four basic buttons, several option keys will be introduced for advanced
voters who are familiar with the layout of a keyboard.
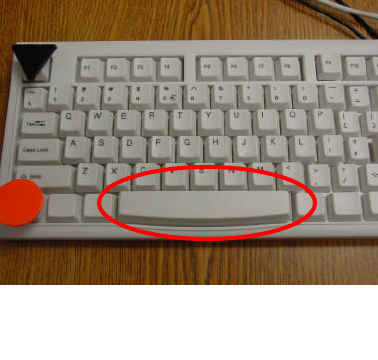
If the voter wants to listen to the instructions again, all they have to do is press the long narrow
‘Space Bar’ on the bottom row of the keyboard, shown in figure 7.4A(5).
Figure 7.4A(4)
Figure 7.4A(3)
Figure 7.4A(2)
Figure 7.4A(1)
Full-Face Polling Official’s Manual Version 2.0 January 31, 2007
©2001-2007 Avante International Technology, Inc.
For each contest, the system will read the first candidate’s name, wait for the voter’s response,
and move on to the next candidate if the voter did not select the previous one, until all candidates
are read. If a write-in option is allowed, this option will be read after all candidates are read.
‘Skip Contest’ will be the last choice provided for each contest.
The voter simply presses the ‘square button’ when the desired candidate’s name is read. The
system will immediately confirm that the voter has selected this candidate for the current contest.
The voter will be directed to vote for the next choice or contest.
If the voter knows how to type on a keyboard, he or she can write-in a candidate by typing with
the QWERTY keyboard. If the voter does not know how to type, he or she can press the ‘up
triangle button’ to scroll through the alphabet list and press the ‘square button’ to select letters
one at a time. Once a name is completely entered, the voter should press the ‘circle button’ to
continue.
For public questions, the voter will hear the options ‘Yes’, ‘No’ and ‘Skip Choices’ after the
question has been read.
When the voter has made his or her choices for every contest and question on the ballot, the
system will read back every selection, one by one, for the voter to review or change. To change
Figure 7.4A(5)
Full-Face Polling Official’s Manual Version 2.0 January 31, 2007
©2001-2007 Avante International Technology, Inc.
a selection, press the ‘square button’ after you hear that selection. You will be brought back to
that contest to make another choice.
If you are satisfied after you hear every selection, press the ‘circle button’ twice to confirm
casting your ballot. If printing the VVPB is required by your jurisdiction, after the voter casts
the ballot successfully, a VVPB will be printed and withdrawn immediately if the voter used the
voice-assisted voting because the system assumes that the voter is not able to visually review the
VVPB. Instead, the system will read what has been printed on the VVPB back to the voter
giving a chance to ‘review’ it.
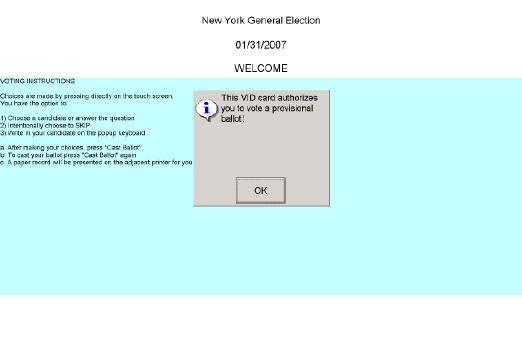
7.5 PROVISIONAL VOTING
When a voter needs to vote provisionally, a polling official needs to issue a provisional voter
card. After the card is encoded, the polling official records the VID number shown on the
computer screen onto the voter’s provisional envelope. After receiving the provisional voting
card from the polling official, the card can be used on any voting unit. A message will appear on
the touchscreen notifying the voter that he or she will be voting on a provisional ballot, as shown
in figure 7.5A.
Figure 7.5A
Full-Face Polling Official’s Manual Version 2.0 January 31, 2007
©2001-2007 Avante International Technology, Inc.
The provisional voter can vote on the touchscreen voting unit exactly the same as a registered
voter would. When the ballot is cast, the voting unit will encode the result onto the smart card
and voting machine. Check with your election administrator about whether you need to tell the
voter to seal the smart card inside the envelope after the ballot is cast.
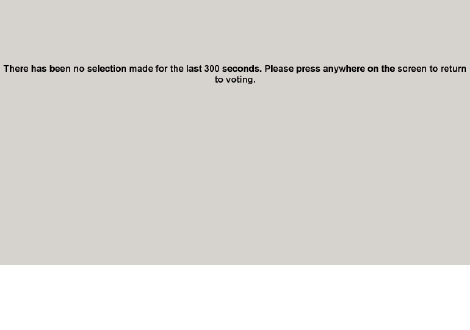
7.6 UNLOCKING A FLEEING VOTER SCREEN
A fleeing voter refers to a voter who has left the polling place without casting the activated ballot
on the touchscreen voting unit. The voting system has a built-in feature to protect the privacy of
such a voter and reset the machine to be ready for the next voter.
After a ballot has been activated and presented on the touchscreen, a warning message will
appear if no one touches the screen within the preset time limit (adjustable by your election
administrator), asking the voter to touch anywhere on the touchscreen to turn off the warning
message. This is shown in figure 7.6A.
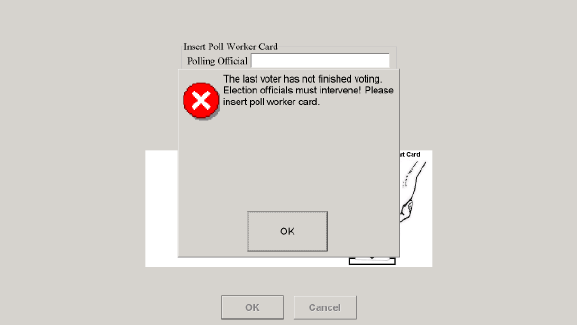
If there is still no response within the next 10 seconds, figure 7.6B will appear to lock down the
system.
Figure 7.6A
Full-Face Polling Official’s Manual Version 2.0 January 31, 2007
©2001-2007 Avante International Technology, Inc.
Insert the poll worker cards. Once the required number of cards has been read, you will have the
chance to unlock the screen.
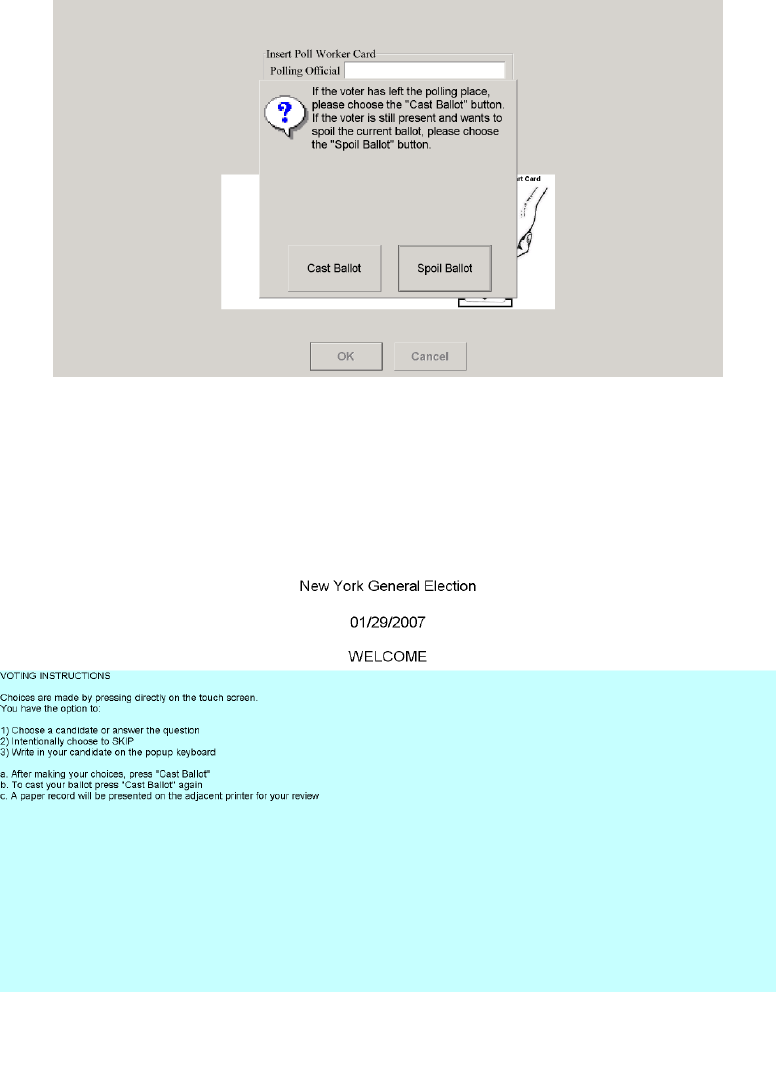
If your state law stipulates that a fleeing voter’s ballot should not be counted, you should
see figure 7.6D displayed on the screen, meaning the previous ballot has been spoiled
automatically and the machine is ready for the next voter.
If your state law requires that a fleeing voter’s ballot be counted, you should see figure
7.6C after the polling official login has been accepted. Please check around to see
whether the voter is still present and make your selection in figure 7.6C accordingly.
You will be asked to confirm your choice. If you confirm to cast the ballot, both counters
will increase their reading by one count and the computer will record the ballot ‘As Is’.
If you confirm to spoil the ballot, the current ballot will be deleted from the computer’s
database and the counter reading will not change.
Figure 7.6B
Full-Face Polling Official’s Manual Version 2.0 January 31, 2007
©2001-2007 Avante International Technology, Inc.
Once you see the screen return to figure 7.6D, the machine is ready for the next voter.
Figure 7.6C
Figure 7.6D
Full-Face Polling Official’s Manual Version 2.0 January 31, 2007
©2001-2007 Avante International Technology, Inc.
8 CLOSING THE POLL
The ‘Close Poll’ procedure is the last step that you need to complete at the polling place. After
this step, all voting machines will no longer accept ballots and generate a tally result in the forms
of a paper report and a CD. The tally results from each voting machine may be consolidated at
the polling place to form a polling place tally total. Polling officials will shut down each voting
unit and transport the tally result to the tabulation center.
8.1 EXITING THE VOTING SCREEN
After the last voter has finished voting, figure 8.1A should be displayed on the touchscreen.
To exit figure 8.1A and go back to the administrative screen where you can perform the ‘Close
Poll’ function, insert a poll worker card. Figure 8.1B will appear on the screen asking for
additional poll worker cards if necessary.
Figure 8.1A
Full-Face Polling Official’s Manual Version 2.0 January 31, 2007
©2001-2007 Avante International Technology, Inc.
Figure 8.1C will appear when the required number of poll worker cards has been inserted.
8.2 CLOSING THE POLL ON EACH VOTING UNIT
Since every voting unit runs independently, you need to close each machine individually.
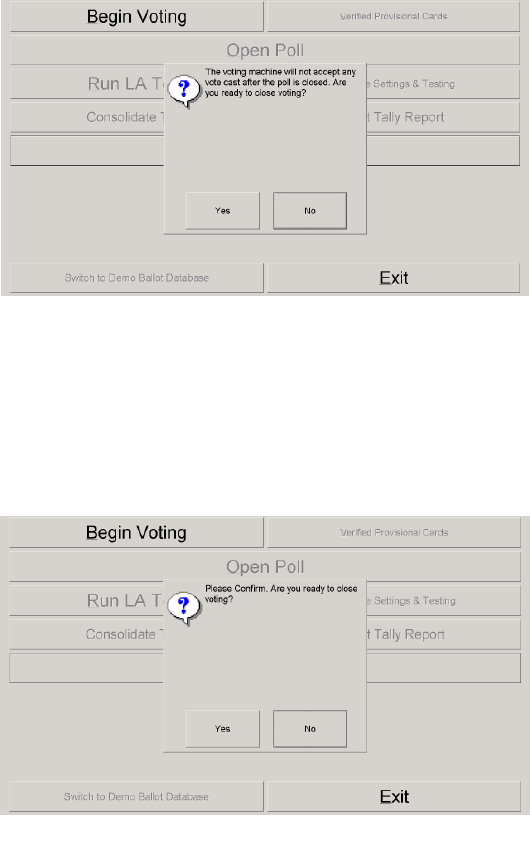
Unlatch and open the front of the printer unit. Choose the ‘Close Poll’ button from figure 8.1C.
Figure 8.2A will appear asking you whether you are ready to close the poll.
Figure 8.1B
Figure 8.1C
Full-Face Polling Official’s Manual Version 2.0 January 31, 2007
©2001-2007 Avante International Technology, Inc.
If you choose the ‘Yes’ button, figure 8.2B will appear asking you to confirm that you want to
close the poll.
Press the ‘Yes’ button in Figure 8.2B to continue. When the computer starts to close the poll,
there will be a status bar informing you of the current task being processed. Wait for the printer
to start printing. If the voting unit has any fleeing voter’s ballot casts or any offline paper
records, the printer will print and withdraw such records, one by one. After that, the system will
begin generating and printing the tally report. Do not pull the paper out of the printer before it is
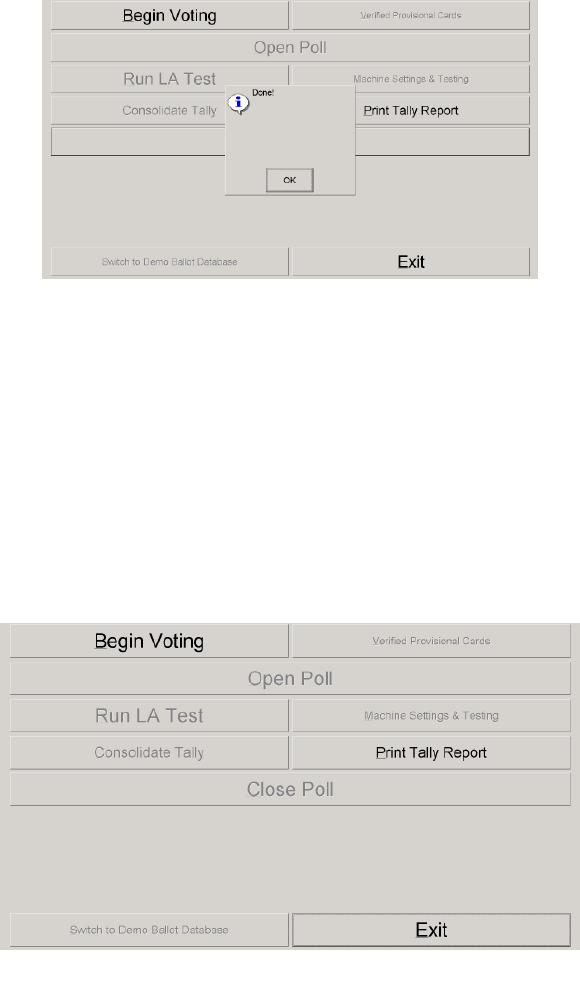
fully presented. Remove the paper tally report. Staple the report together if there are multiple
pages printed. The computer will complete copying data onto the CD. You will see a ‘Done!’
Figure 8.2A
Figure 8.2B
Full-Face Polling Official’s Manual Version 2.0 January 31, 2007
©2001-2007 Avante International Technology, Inc.
message when the computer has successfully completed the ‘Close Poll’ procedure, shown in
figure 8.2C.
The CD should be ejected automatically. Remove the CD from the CD drive. If the CD has not
been properly labeled to identify the source (at least showing the serial number of the voting
unit), please do so immediately after you get hold of the CD.
Press the ‘OK’ button shown in figure 8.2C. The computer screen will now show figure 8.1D.
If you need additional copies of the tally report, you can press the ‘Print Tally Report’ button to
print additional copies of the tally report.
Figure 8.2C
Figure 8.2D
Full-Face Polling Official’s Manual Version 2.0 January 31, 2007
©2001-2007 Avante International Technology, Inc.
8.3 SHUTTING DOWN THE SYSTEM
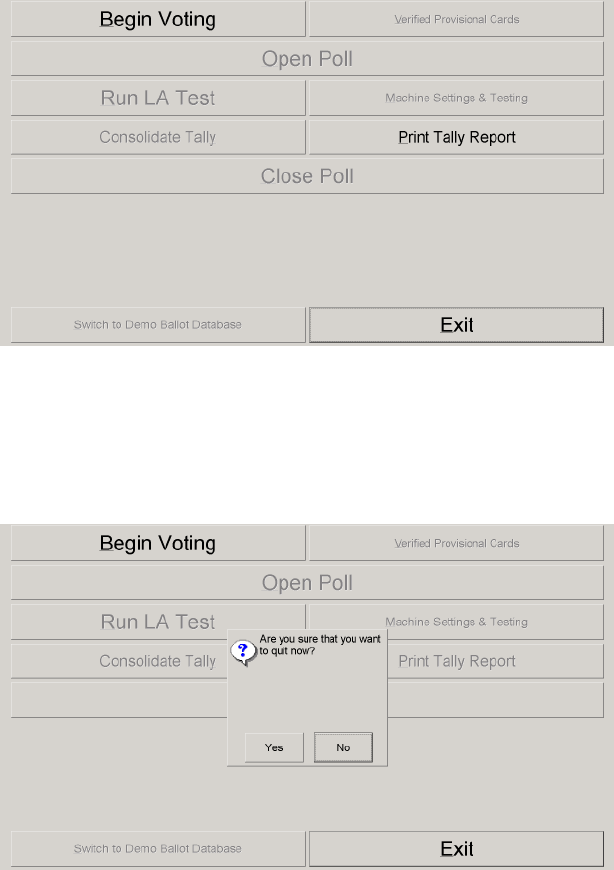
When you want to shut down the system, press the ‘Exit’ button shown in figure 8.3A
You need to confirm in Figure 8.3B to shut down the system
After you press the ‘Yes’ button in Figure 8.3B, the system will start to shut down. When you
see the computer screen turn black, you can lower the machine to its minimum height. Unplug
Figure 8.3B
Figure 8.3A
Full-Face Polling Official’s Manual Version 2.0 January 31, 2007
©2001-2007 Avante International Technology, Inc.
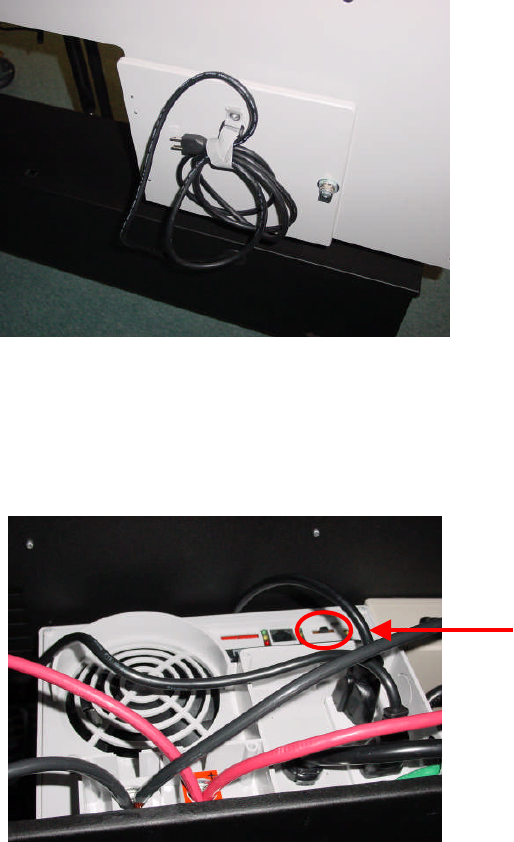
the power cord from the wall outlet and put it back in the battery compartment, shown in figure
8.3C.
Turn off the TrippLite unit by moving the power switch back to the center as demonstrated in
figure 8.3D. Lock the battery box and the back service door.
You may leave the seal of the VVPB compartment door intact. The seal will be broken later if a
manual recount is required. Now you must remove and stow the privacy curtains (a process
illustrated in figure 8.3E). To do so, first lower the machine as much as possible. Pull the
curtain rods out of the top of the voting machine. Fold the three rods so that they lie parallel to
each other. Next, roll up the curtain around the rods. Now raise the voting machine up as high
Figure 8.3C
Figure 8.3D
Full-Face Polling Official’s Manual Version 2.0 January 31, 2007
©2001-2007 Avante International Technology, Inc.
Close the front cover of the machine. Lock the two locks on the front of the machine and the one
on the side.
8.4 DELIVERING THE TALLY RESULT
After the machine is shut down, polling officials are responsible for delivering the tally result to
the tabulation center. Make sure that you have the CD from every voting unit, the ‘total’ CD if
you have consolidated your polling place’s tally, and the paper tally reports for each voting unit.
Each CD should be properly labeled to identify the source of tally result, and be packaged to
keep it from physical damage. The tally report from each voting unit should be stapled
separately. Follow your election procedure and bring all of the required items with you for
delivery.
Full-Face Polling Official’s Manual Version 2.0 January 31, 2007
©2001-2007 Avante International Technology, Inc.
9 OTHER DUTIES
Besides the regular polling official duties explained in the previous sections, there may be other
responsibilities as explained below.
9.1 VOTING DEMONSTRATION (‘TEST VOTING’ MODE)
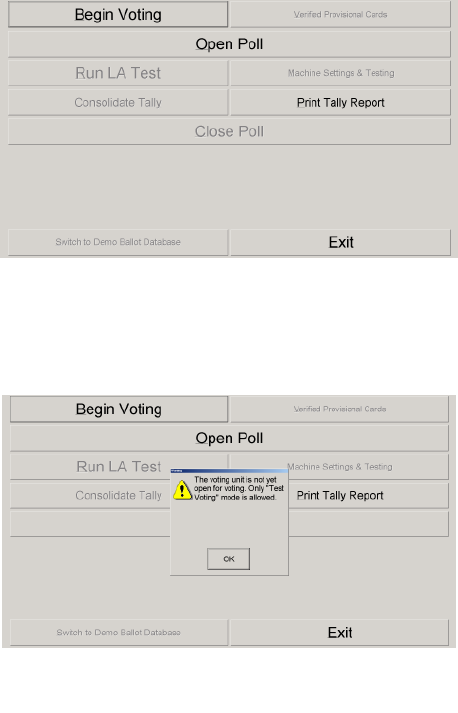
Any voting unit can be used as a demo machine to train voters on how to vote on the touchscreen
system. You must NOT perform the ‘Open Poll’ procedure on the demo-voting unit unless you
want to turn this demo unit into a real voting unit.
To set up a demo machine, follow the instructions in section 3. Once you get to the
administrative screen as shown in figure 9.1A, press the ‘Begin Voting’ button.
You will see figure 9.1B appear confirming that you are running the ‘Test Voting’ mode.
Figure 9.1B
Figure 9.1A
Full-Face Polling Official’s Manual Version 2.0 January 31, 2007
©2001-2007 Avante International Technology, Inc.
Press the ‘OK’ button in figure 9.1B. You will see figure 9.1C appear, indicating that the
machine is ready for you to use the ‘Test Voting’ feature. Please refer to section 6 for
instructions on how to vote on the voting unit.
To get a ‘Test Voting’ ballot, you need a ‘Test Voting’ card. Please refer to section 6.2.1 for
how to get a ‘Test Voting’ card. This card is reusable for repetitive test voting.
To exit the ‘Test Voting’ mode and return to the administrative screen (figure 9.1A), insert as
many poll worker cards as the machine requires.
Figure 9.1C
Full-Face Polling Official’s Manual Version 2.0 January 31, 2007
©2001-2007 Avante International Technology, Inc.
9.2 CHANGING THE PAPER ROLL
This task should rarely be rarely necessary during an election. Each printer will have a new,
1,000 ft. roll of paper when it arrives at a polling location. In case the paper runs out during an
election, it needs to be changed. To remove the paper, unlock the top and side locks on the
printer, shown in figures 3.1J(1), 3.1J(2), and 3.1J(3). Lower the front panel of the printer and
lift up the top, exposing the printer inside, re-pictured here in figure 9.2A.
The first thing you must do is remove the remaining paper from the printer. To do so, you must
unlock the paper from the printer, and then remove the paper roll from the printer. To unlock the
paper from the printer, press on the metal tab shown in figure 9.2B(1) until the adjacent metal
plate flips up (figure 9.2B(2)). Pull the paper out from the printer (figure 9.2B(3)) until the paper
completely wrapped around the roll (figure 9.2B(4)).
Figure 9.2A