Avantech Mobile ATTITUDEE310 GSM/GPRS Cellular mobile phone User Manual Attitude v1 0 handout
Avantech Mobile GSM/GPRS Cellular mobile phone Attitude v1 0 handout
UserManual.wiki
>
Avantech Mobile
>
ATTITUDEE310 User Manual
User manual
Navigation menu
Upload a User Manual
Namespaces
Wiki Guide
HTML
PDF
Info
Views
User Manual
Discussion / Help
Navigation
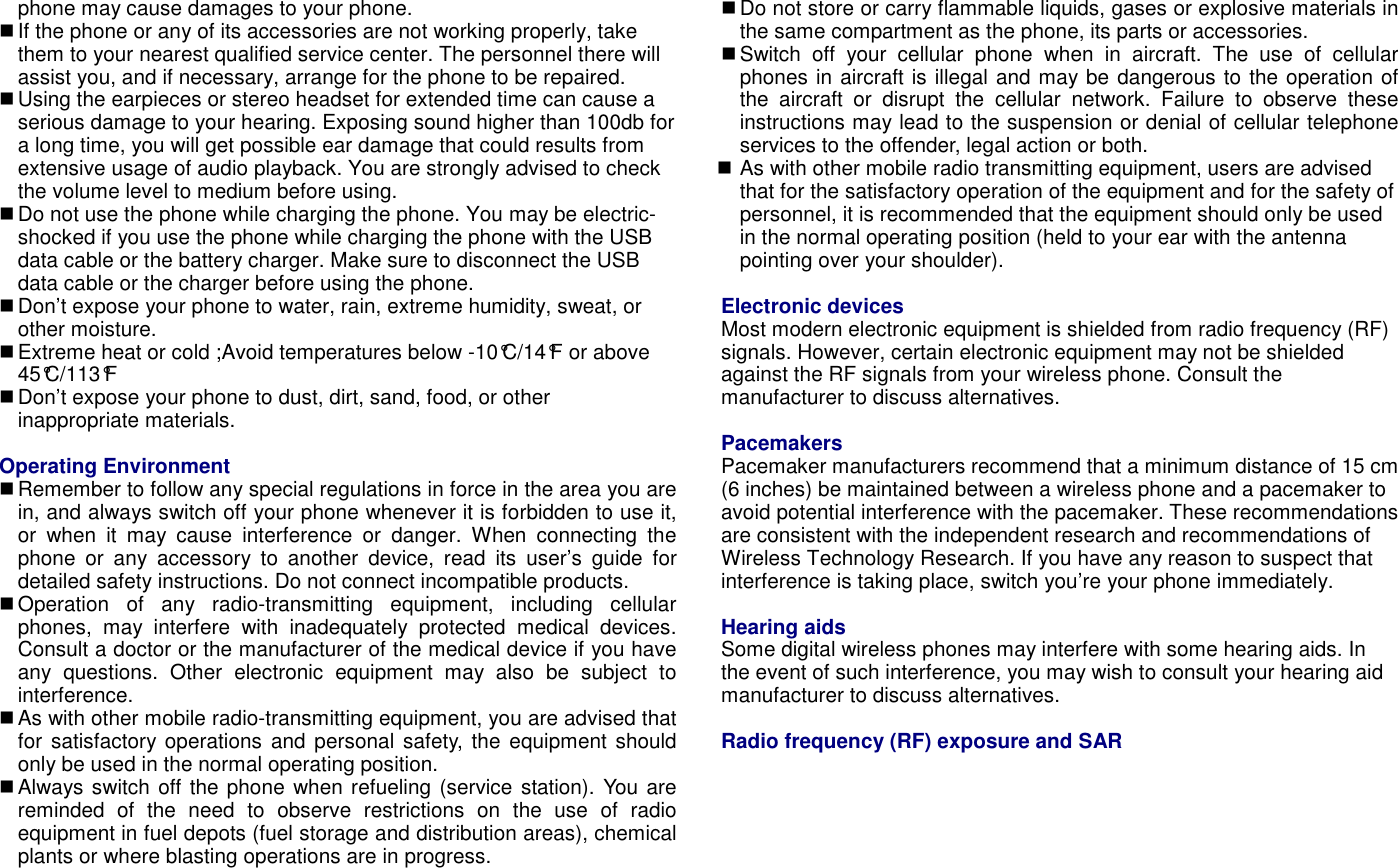

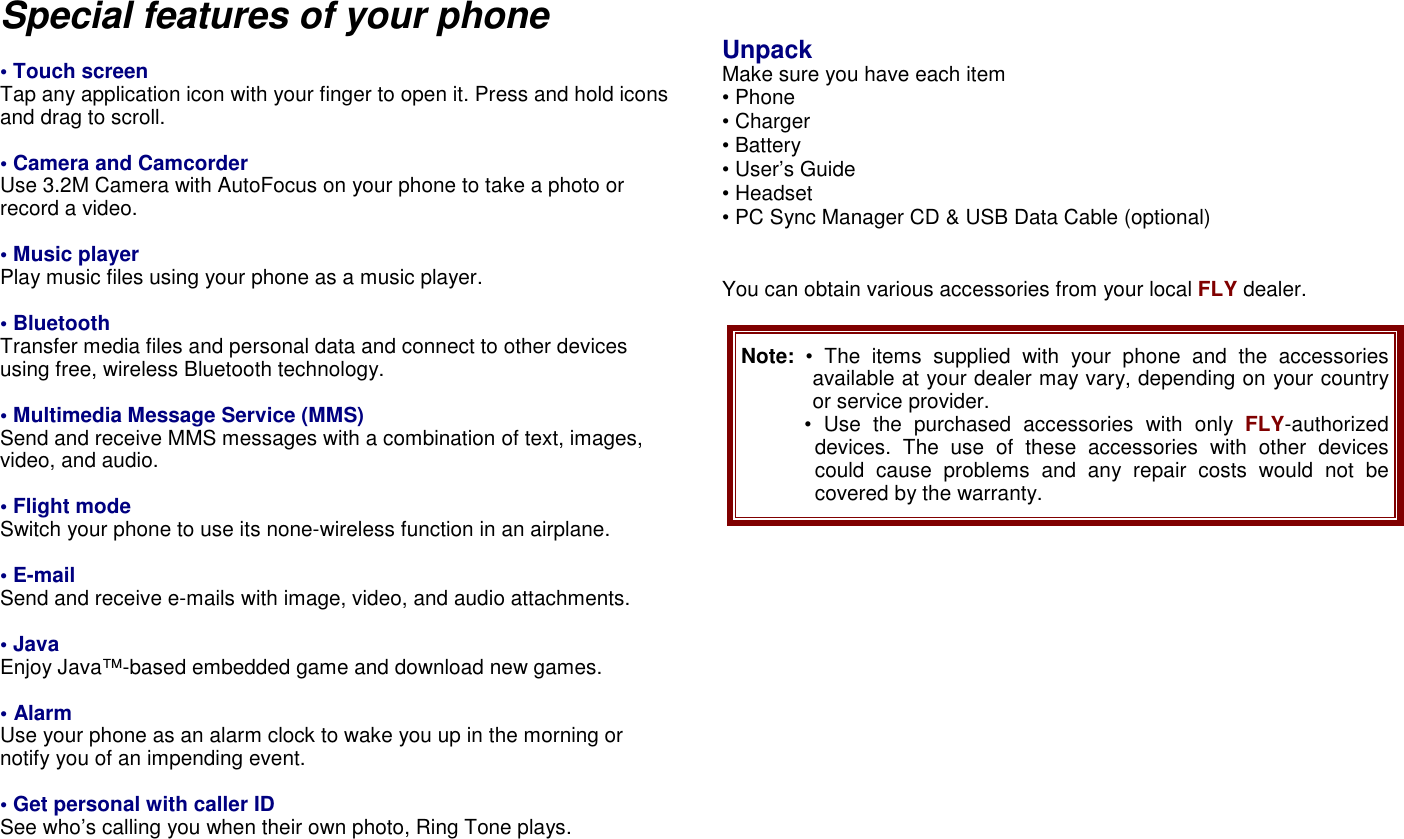
![Power On or Off Press and hold Power On/Off button to turn it on and off Enter your SIM card PIN, if requested. Access Codes There are access codes for your SIM card. These codes help you to protect the phone against unauthorized use. When requested for any of the code explained below, key-in the appropriate code (displayed as asterisks) and press the OK key. PIN The Personal Identification Number or PIN (4-8digits) protects your SIM card against unauthorized use. The PIN comes with the SIM card; see the SIM card instruction provided with your card. If you enter an incorrect PIN three times in succession, the code will be disabled and cannot be used until you re-enable it by entering the PUK. PUK The 8-digit PUK (Personal Unblocking Key) is required to change a disabled PIN. The PUK may be supplied with the SIM card. If not, or in case you have lost it, please contact your service provider. To re-enable your PIN, proceed as follows. 1. Key-in the PUK and press the OK key. 2. Enter a new PIN of your choice and press the OK key. 3. When the Confirm New PIN message is displayed, key-in the same code again and press the OK key. If you enter an incorrect PUK ten times in succession, the SIM card becomes invalid. Please contact your service provider for a new card. Pin Password The 4 ~ 8 digits of password is required when you use the Call barring function. You can obtain the password from your service provider when you subscribe to this function. Customize your phone Display language Select the language for your phone menus. [Menu] [10.Settings] [10.2 Phone Setup] [10.2.3. Language] Time and Date Set time and date for your phone [Menu] [10.Settings] [10.2 Phone Setup] [10.2.1. Time and Date] Incoming call melody [Menu] [4.User profile] [4.1 General] [4.1.2. Customize] [4.1.2.1 Tone set up] [Incoming call] Idle mode Wallpaper Set wallpaper for the idle screen on the display. [Menu] [10.Settings] [10.3 Phone Setup] [10.3.1. Display Settings] Phone lock Protect the phone against unauthorized use with a phone password. The phone will require the password on power-up. [Menu] [10.Settings] [10.4 Security Setup] [10.4.2 Phone Lock] Set Dedicated Key Set up a menu for your own favorite menu items. [Menu] [10.Settings] [10.2 Phone Setup] [Dedicated key]](https://usermanual.wiki/Avantech-Mobile/ATTITUDEE310/User-Guide-991674-Page-11.png)
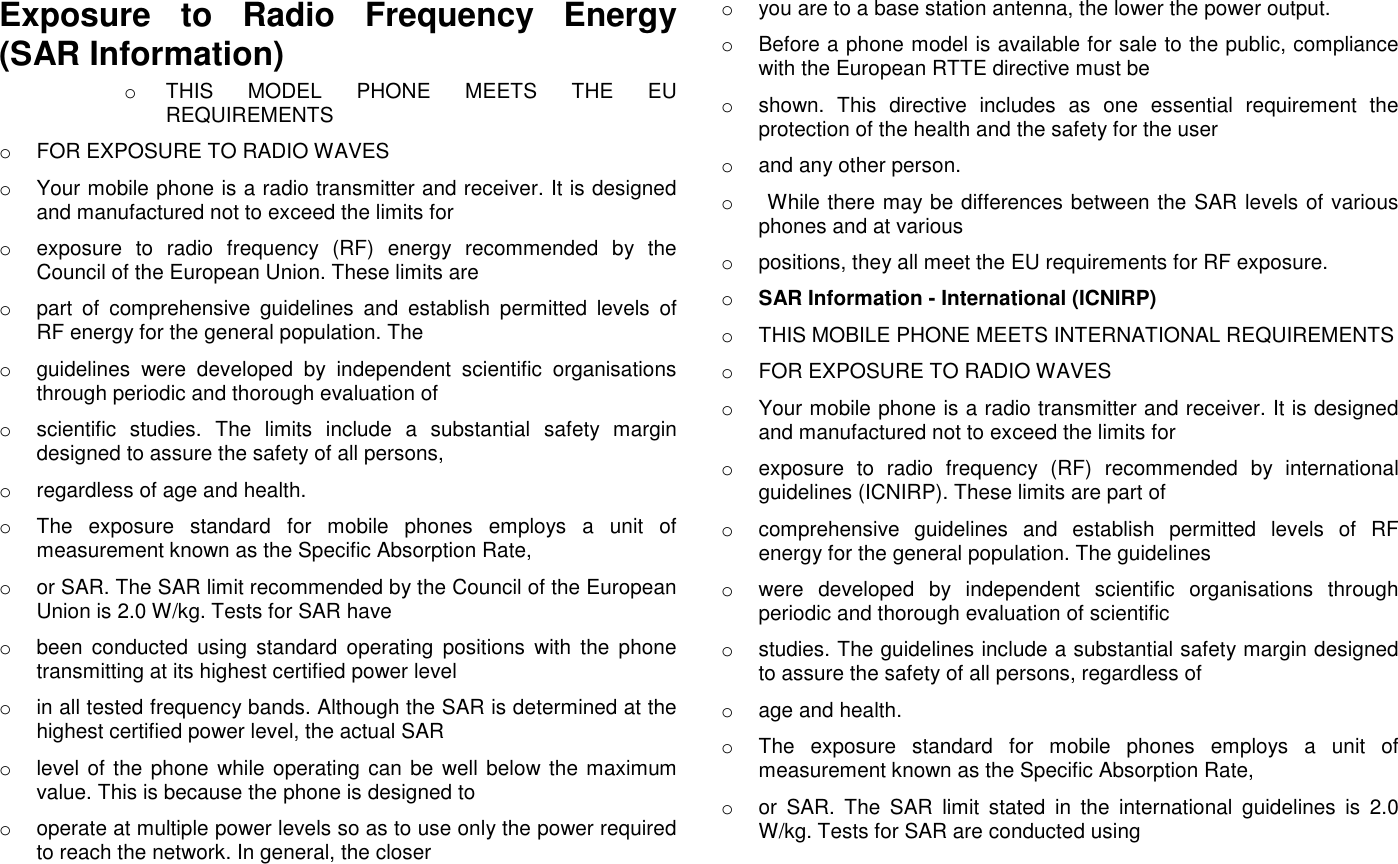
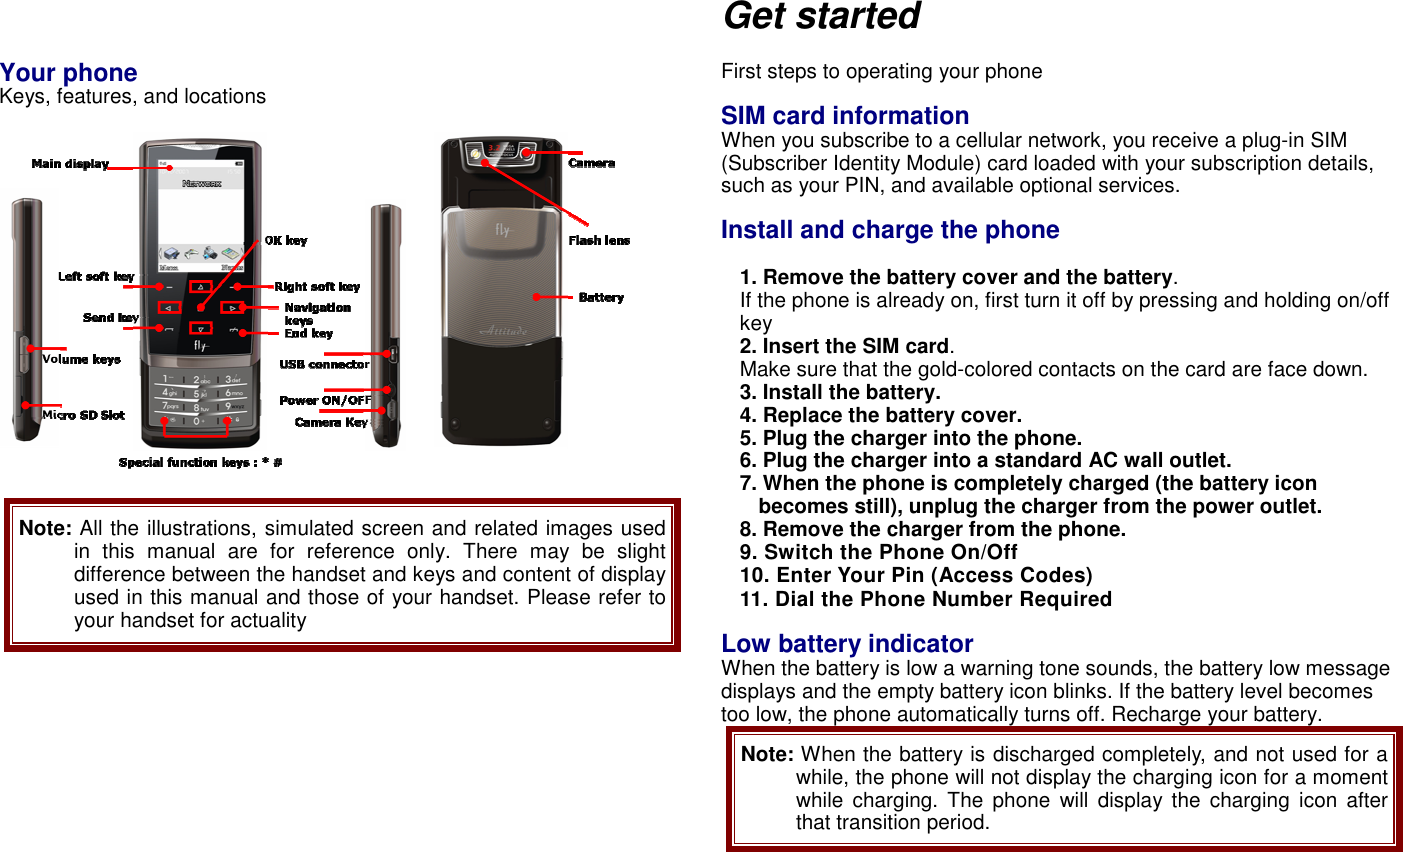
![Keys and display Key Definition Soft Keys Perform functions identified on the bottom line of the display. OK Key Send Key Dial or answer a call. In the Idle Mode, Recall the recently dialed, missed, or received calls. End Key End a call. In Menu mode, cancel input and return the phone to the Idle mode. Navigation keys To Scroll menu Alphanumeric Keys Enter numbers, letters and special characters. In Idle mode, press and hold [1] to access your Voice Mail. Special Function Keys Enter Special Characters Perform Various Functions. Power on/off Key Press and hold to switch the phone on and off. Side Key (On the left side of your phone) In idle mode, with the phone open, Adjust the Keypad Tone volume. Start “voice recording” during a call by pressing and holding the side key (up). Stop “voice recording” by pressing the [Stop] soft key. Adjust the earpiece volume during a call by pressing briefly. Adjust the Audio Player volume. Move through months in calendar mode. In Menu mode, scroll through the menu options. A. The special function key performs various functions 1. Make the “International Call” Press and hold the [*] key to display “+” character. Input the country code, area code (without the leading zero), and the phone number. Then press the Send Key. The “+” informs the network that it is an international call. 2. Enter the “Pause or Wait” You may enter a pause (“PPPP”) or a wait (“W”) character into a dial string by pressing and holding the [*] key. 3. Activate or deactivate the “Silent mode” To activate the “Silent Mode” option, press and hold [#] key in the idle mode. 4. Activate the “Keypad Lock” option Short press ON/OFF. To unlock keypad, short press ON/OFF also.](https://usermanual.wiki/Avantech-Mobile/ATTITUDEE310/User-Guide-991674-Page-12.png)
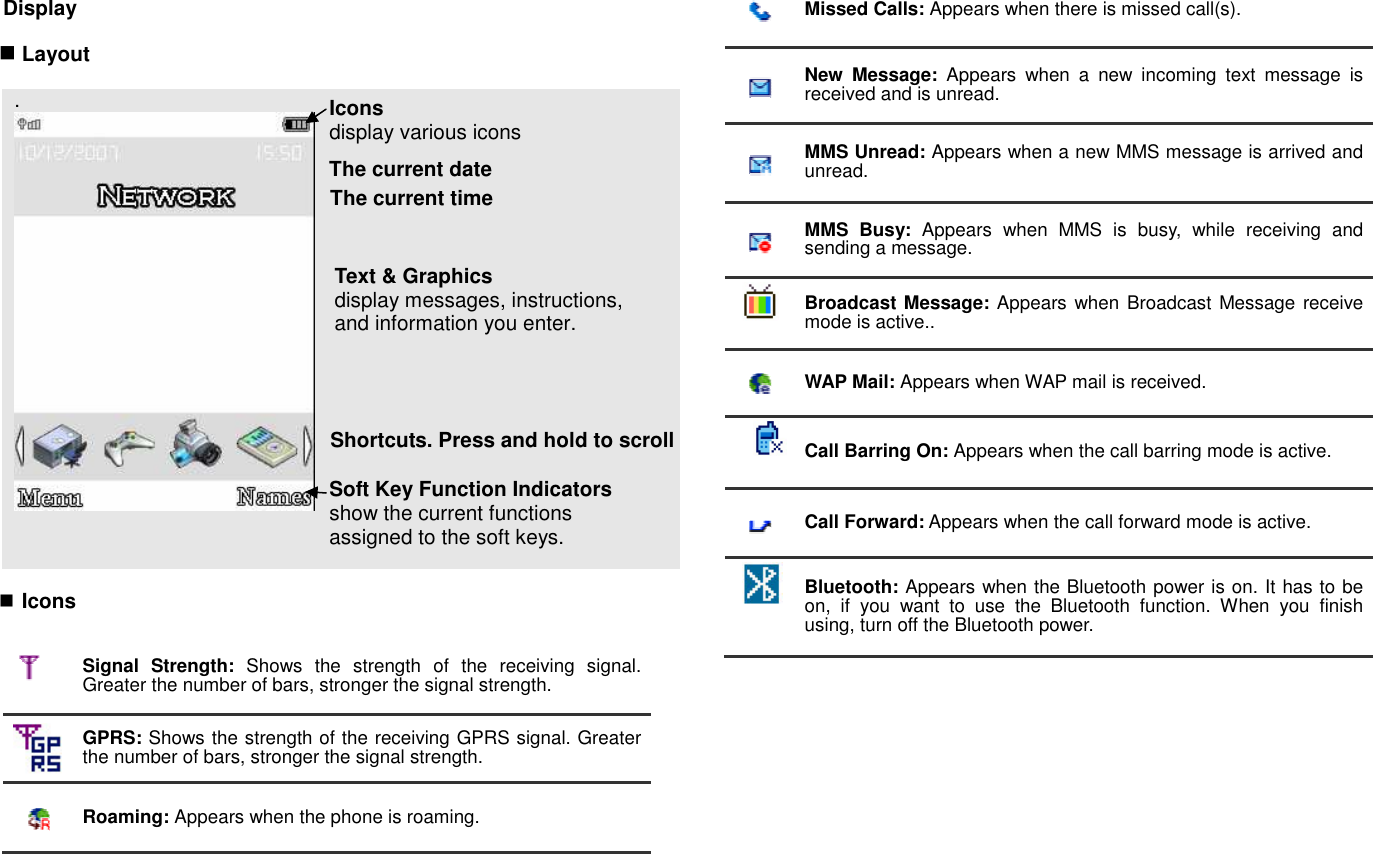
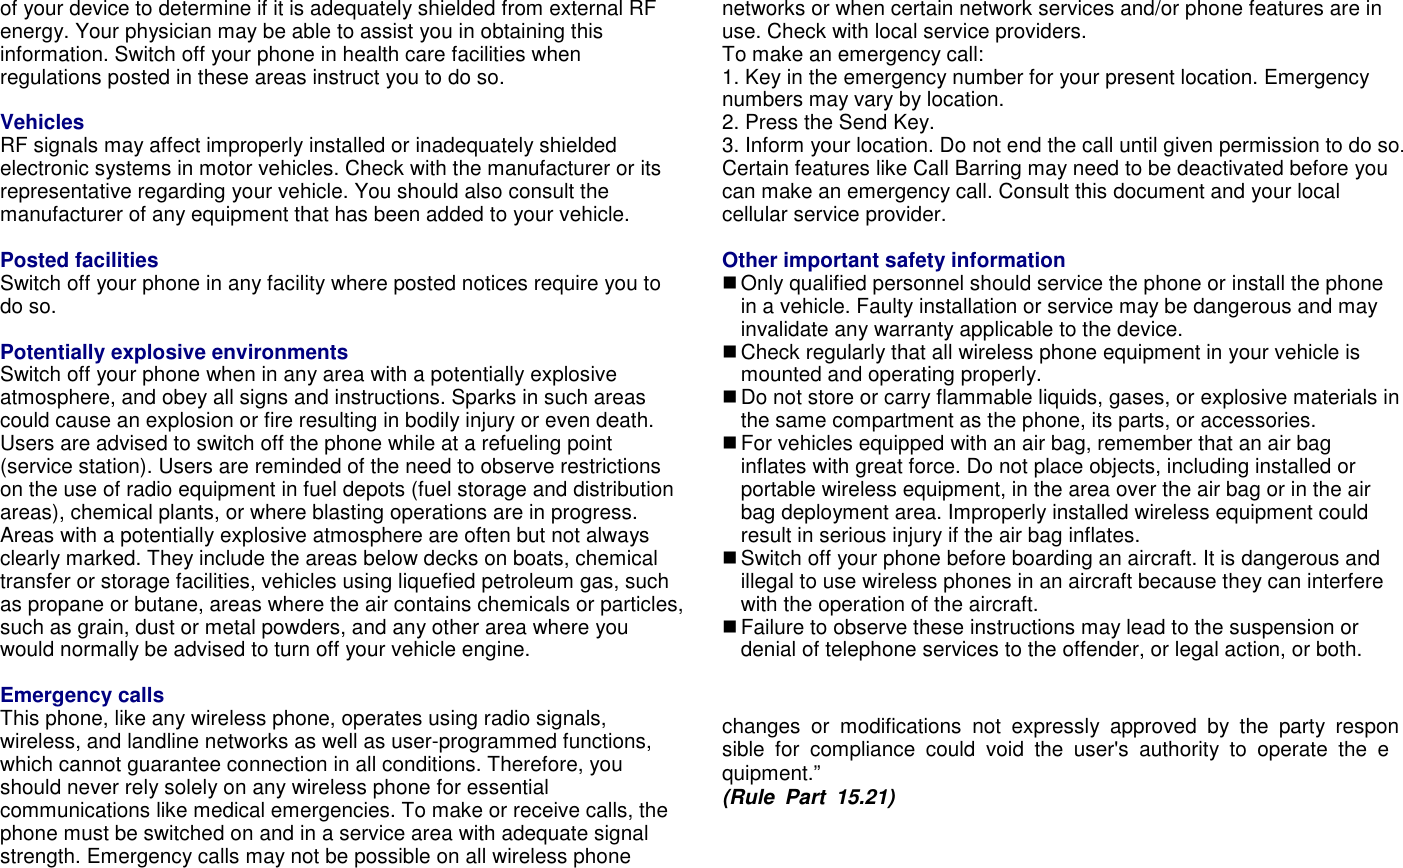
![Bluetooth Headset: Appears when the Bluetooth hands-free headset is connected. Bluetooth Connected: Appears when the Bluetooth device is connected. Vibrate and Ring: Appears when the Vibrate and Ring mode is active. Vibrate then Ring: Appears when the Vibrate then Ring mode is active. Vibrator On: Appears when the Vibration mode is active. Silent Mode: Appears when the silent mode (manner mode) is active. Alarm On: Appears when you set the alarm. Lock: Appears when you set the phone lock. Battery Strength: Shows the level of your battery. The more bars you see, the more power you have left. Headset: appears when you set the Profiles as Headset. * Depending on your country or service provider, the icons shown on the display may vary. Access menu functions Use the soft keys The roles of the soft keys vary depending on the function you are using. The bottom line of the display indicates their current role. By tapping on the touch screen: Your phone’s display is a touch screen which can recognize when you touch items displayed on it. 1. Tap a desired soft key indicator. 2. To scroll in lists: • Press and hold the up or down arrow to scroll up or down. • Press and hold then drag the scroll bar to scroll up or down. • For Idle shortcuts icons, Press and hold then drag icon to scroll left or right. 3. Tap a desired option or function. By pressing the soft keys and Navigation key: 1. Press a desired soft key. 2. Press the Navigation key to move to the next or previous option. 3. Choose [Select] soft key or press the [OK] key to confirm the function displayed or option highlighted. 4. To exit, choose either of the following methods. • Select [Back] to move up one level. • Press and hold [End] to return to Idle mode.](https://usermanual.wiki/Avantech-Mobile/ATTITUDEE310/User-Guide-991674-Page-14.png)
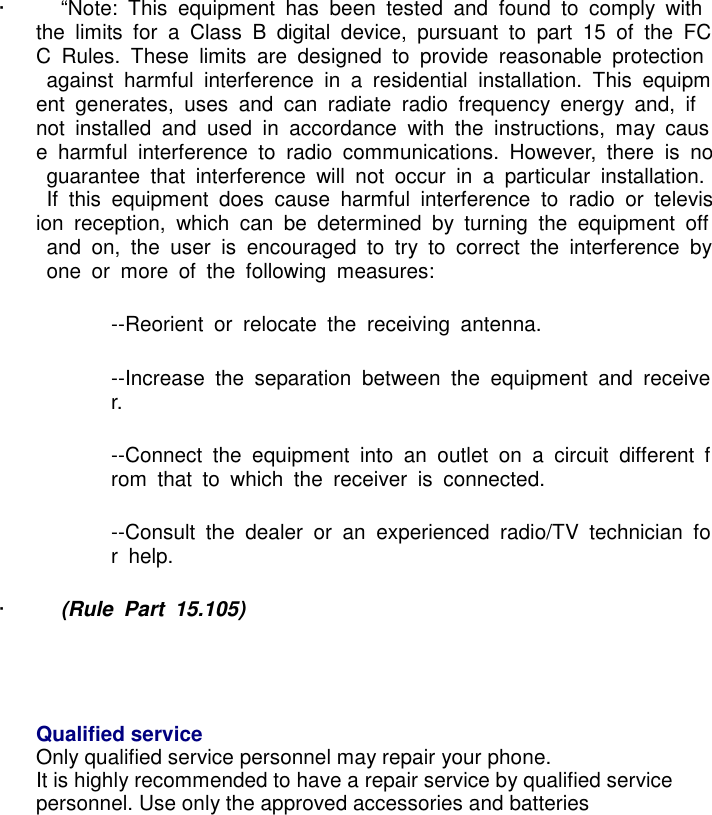
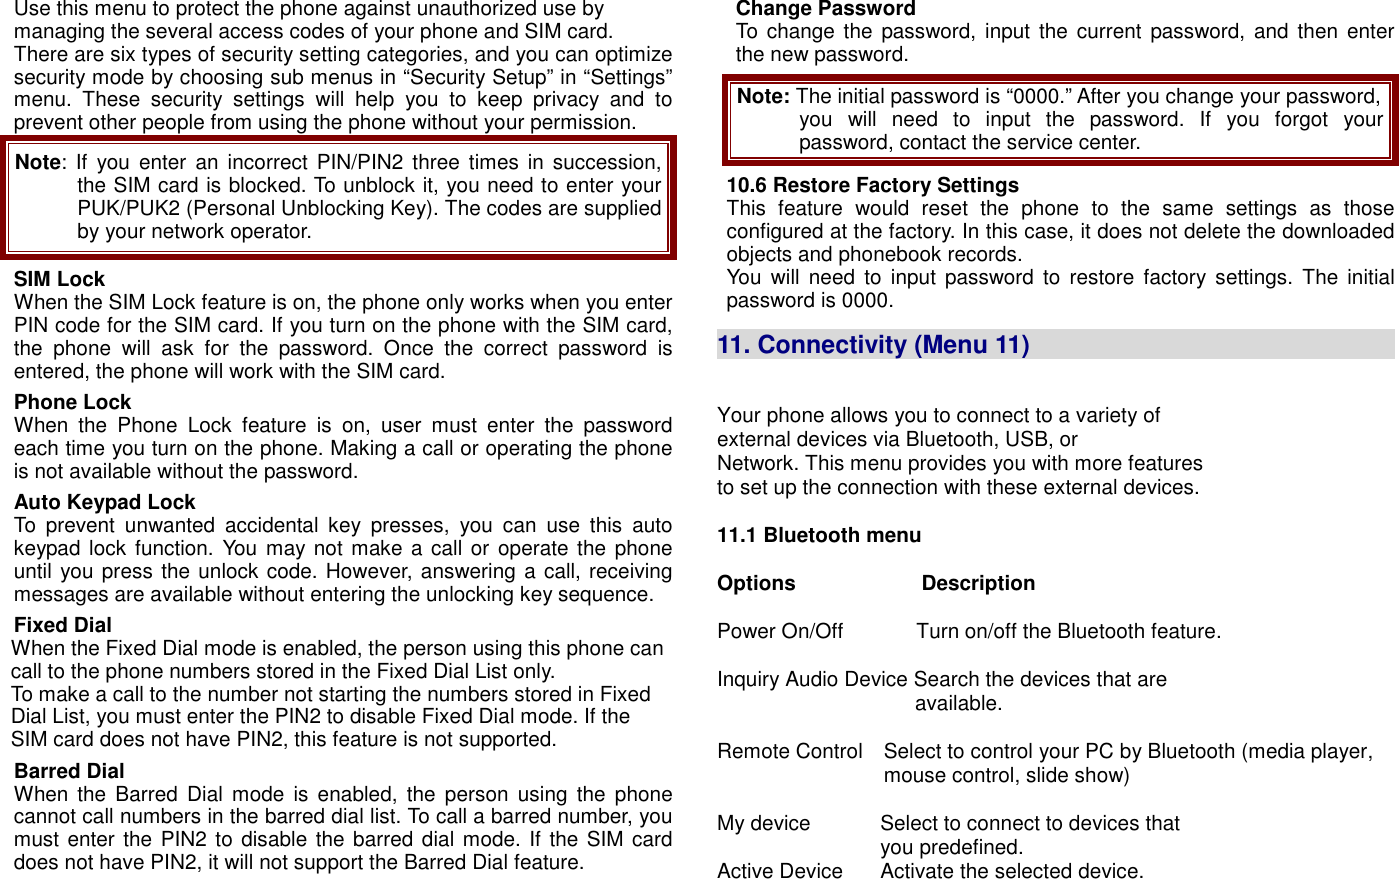
![Enter text Keypad and Touchscreen modes . Using Keypad Writing languages Before entering text, make sure you have selected the correct writing language. ABC, T9, Number, and Symbol modes You can enter text in some features such as Messages, Phonebook, or Calendar, using ABC mode, T9 mode, Number mode, and Symbol mode. You can enter text by pressing the alphanumeric keys on the phone. Press the appropriate key until the character or the word you want appears on the screen. Text Input Options: While you are in text editing mode, you will be in several modes. When you see [Option] and [Clear] in the soft key, press the soft key (left) for option: you can save the entry or change the Text Input Method. To erase a character, press the soft key (right) next to the character you want to erase. T9 Text Editing Mode T9 Text Editing Mode is a predictive text input mode that allows you to key in any character using single keystrokes. While you are in T9 editing mode, press the alphanumeric key once for one character. You will see T9 suggested words. For example, press 4,3,5,5 and 6 key to enter “hello” in English word mode. T9 predicts the word that you are typing, and it may change with each key that you press. And press the [Select] soft key (left) to select the word you want to write. You can define the default Input Method of your phone and change input methods time to time. To define your preferred input method, go to Phone Setup sub menu in Settings menu. Then select Preferred Input Method. Once you set the preferred input method, next time you edit in text input mode, the setting will be applied until you change to another. If you want to change the text input method temporarily, in the text input mode, press [Option] soft key, and select “Input Method” from the option. • You can change the text input method with the [#] key; the input methods will swap when you press the [#]. • Press and hold the [*] key to select Symbols. • Press the [*] key to toggle select cases of abc, Abc, and ABC. • Press [1] to enter periods or apostrophes automatically. • Press [0] to insert a space. Using Touchscreen Writing languages Before entering text, make sure you have selected the correct writing language. Text Text can be written with slider closed. A multitap/T9 touch keyboard is available. Big keys allow you to edit text by finger press in the same way as with classical keyboard.](https://usermanual.wiki/Avantech-Mobile/ATTITUDEE310/User-Guide-991674-Page-15.png)

![Overview of menu functions To access Menu mode, press [Menu] in Idle mode. 1. Phonebook ▶p. 1.1 Quick Search ▷p. 1.2 Search Entry ▷p. 1.3 Add New Entry ▷p. 1.4 Copy All ▷p. 1.5 Delete ▷p. 1.6 Caller Group ▷p. 1.7 Speed Dial ▷p. 1.8 Quick call ▷p. 1.9 Extra Number ▷p. 1.10 Settings ▷p. 2. Messaging ▶p. 2.1 Messages ▷p. 2.2 E-Mail ▷p. 2.3 Voice Mail ▷p. 2.4 Broadcast Message ▷p. 3. Call History ▶p. 3.1 Missed Calls ▷p. 3.2 Dialed Calls ▷p. 3.3 Received Calls ▷p. 3.4 Delete Call Log ▷p. 3.5 Call Time ▷p. 3.6 Call Cost ▷p. (depends on SIM) 3.7 SMS Counter ▷p. 3.8 GPRS Counter ▷p. 4. User Profiles ▶p. 4.1 General ▷p. 4.2 Meeting ▷p. 4.3 Outdoor ▷p. 4.4 Indoor ▷p. 4.5 Headset ▷p. 4.6 Bluetooth ▷p. 4.7 Flight Mode ▷p 5. Camera ▶p. 5.1 Camera ▷p. 5.2 Image Viewer ▷p. 5.3 Download pictures ▷p. 5.4 Video Recorder ▷p. 5.5 Video Player ▷p. 5.6 Download Video ▷p. 5.7 Photo Editor ▷p. 6. Music ▶p. 6.1 Music Player ▷p. 6.2 Audio Equalizer ▷p. 6.3 Sound Recorder ▷p. 6.4 FM Radio ▷p. 6.5 Schedule FM record ▷p. 6.6 Download music ▷p. 6.7 Download funny sounds▷p. 7. Organizer ▶p. 7.1 Calendar ▷p. 7.2 To Do List ▷p. 7.3 Alarm ▷p. 7.4 World Clock ▷p. 7.5 Calculator ▷p. 7.6 Units Converter ▷p. 7.7 Currency Converter ▷p. 7.8 Countdown ▷p. 7.9 Stopwatch ▷p. 8. Services ▶p. 8.1 Opera Mini ▷p. 8.2 WAP ▷p. 8.3 Data Account ▷p. 8.4 SIM Toolkit ▷p. (depends on SIM) 9. Entertainment ▶p. 9.1 Java ▷p. 9.2 Java Settings ▷p. 9.3 E-Book Reader ▷p 9.4 Games ▷p. 10. Settings ▶p. 10.1 Touchscreen settings ▷p 10.2 Phone Setup ▷p. 10.3 Display Setup ▷p. 10.4 Call Setup ▷p. 10.5 Security Setup ▷p. 10.6 Restore Factory Settings ▷p. 11. Connectivity ▶p. 11.1 Bluetooth ▷p. 11.2 Network Setup ▷p. 11.3 USB ▷p. 12. File Manager ▶p 12.1 Phone Storage ▷p. 12.2 Memory Card ▷p. • Some menus are operator-, network- and subscription-dependent](https://usermanual.wiki/Avantech-Mobile/ATTITUDEE310/User-Guide-991674-Page-17.png)
![1. Phonebook (Menu 1) You can store phone numbers on your SIM card and in your phone’s memory. The SIM card and phone’s memory are physically separate, but they are used as a single entity called Phonebook. To access this menu, press [Menu] in Idle mode and select Phonebook. 1.1 QUICK SEARCH Use this menu to search for numbers in Phonebook. Finding an entry 1. Enter the first few letters of the name that you want to find. 2. Select the name you want from the list. 3. Scroll to a number and press [Send] to dial, or press [Option] to edit the contact information. 1) IP Dial: allows you to call by IP Dial as you saved at IP Number 2) Send SMS: allows you to send SMS to selected name, number of your phonebook. 3) View: allows you to view the entry’s contents such as name, number and so on. 4) Edit: allows you to edit the entry items. 5) Delete: allows you to delete the entry. 6) Copy: allows you to copy the entry from SIM to Phone or Phone to SIM. You will have the same entry in a different storage. (SIM + Phone) 7) Move: allows you to move the entry from SIM to Phone or Phone to SIM. The entry will be stored in the original storage. (SIM to Phone, Phone to SIM) 8) Duplicate: allows you to duplicate the entry in the same storage. You will have the same data in the same storage. (SIM+SIM, Phone+Phone) 9) Send vCard: allows you to send the phonebook entry by SMS/MMS/Bluetooth or save as file. 10) Print: allows you to print data via Bluetooth 1.2 SEARCH ENTRY When you select the Search Entry, after storing numbers to the phonebook, you can search them by Name. 1. Enter a name you want to search in the text input box. Input full name or even a start letter and press the [Option] soft key (left). 2. If there is a name, you want to call, choose the name by using the Navigation key. 3. Press the Send Key to make a call. However, if there is more than one entry in the selected name, it will display a list. Then you may simply select one entry and press the Send Key to make a call. 1.3 ADD NEW ENTRY Use this menu to add a new contact to Phonebook. Storing a number on the SIM card 1. Enter information about the contact: • Name: add a name. • Phone number: add a number. 2. Press [Save] to save the contact. Storing a number in the phone’s memory 1. Enter information about the contact: • Name: add a name • Phone number: add a number. • Mobile/Home/Office/Fax/: add a number in any category. You can change the number type, or set the number as the default for the contact by pressing [Option] and selecting Change type or Mark as default number. • Company Name: add a company name. • E-mail: add an e-mail address. • Birthday: add a birthday. • Associate Picture assign a caller ID image to alert you to a call from the person. • Associate Sound: assign a sound to alert you to a call from the person. The settings specified in Associate Picture, and Sound are given priority over group settings. • Caller Group: assign the number to a caller group. 2. Press [Save] 1.4 COPY ALL](https://usermanual.wiki/Avantech-Mobile/ATTITUDEE310/User-Guide-991674-Page-18.png)
![You can copy all phonebook data from SIM card to Phone or from Phone to SIM. It is a useful function if you want to back up your phonebook data from a SIM card to your phone and vice versa. 1.5 DELETE You can delete all phonebook data in SIM card or Phone. In addition, you can delete the phonebook data one by one. 1.6 CALLER GROUP Use this menu to organize your contacts in caller groups. Adding members to a caller group 1. Select a caller group. 2. You can modify caller group details: • Group Name: edit the group name to change it Press [Edit]-[Option]-[Input Method] to select input method, you can then change group name, press [Option] and select “Done” to save. • Melody: Allows you to select the ring tone to be used when you receive a call from a person in the group. Select your ringtone by pressing Navigation key. • Picture: Allows you to select incoming call picture when you receive a call from a person in the group. Press Navigation key to change the picture and go to the next line to select. If you want to view and select images, select the [View] soft key (left) and scroll the Navigation key. To select the picture, press the [OK] soft key (left). • Member List You can add or delete group member(s) Press [OK] and select [Add] It will display a phonebook list excluding the members already in the group. It is possible to set a member in multiple groups. Press [Save] 1.7 SPEED DIAL Use this menu to assign speed dial numbers (2 to 9) for 8 of your most frequently called numbers. Assigning speed dial entries 1. Enable speed dial “On” and go into “Set Number” 2. Select a key location from 2 to 9. Key 1 is reserved for your voice-mail server. 3. Press [Option] soft key, and select ‘Edit’ and select the entry from the phonebook list by pressing the [Add] soft key. Managing speed dial entries • Edit: assign a different number to a key. • Delete: clear the speed dial setting for a key. Dialing speed dial numbers In Idle mode, press and hold the appropriate key. 1.8 QUICK CALL Allows you to call someone pressing on his picture. 1.9 EXTRA NUMBER You can view and edit your mobile phone number (owner number), Service Dial number and SOS number. • Owner Number: Use this feature to check your phone numbers, or to assign a name to each of the numbers. • Service Dial Number: lists up the SIM SDN (Service Dial Number) and allows you to access to the number by pressing the [Dial] soft key (left) or the Send key. • SOS Number: lists up the SOS Number. 1.10 SETTINGS You can view and edit the settings for the Phonebook as following. Memory Status You can check how many names and numbers are stored in the phone book (SIM card and phone memories) or how much free space is remained. Preferred Storage You can set your preferred storage either to SIM or to Phone as default storage in the phonebook. Fields There are fields that you can set on or off in your phonebook entry. (Home Number, Company Name, E-mail Address, Office Number, Fax Number, Birthday, Associate Picture, Associate Sound and Caller Group). Press the [On] or [Off] left soft key (left) to turn on or off the field. My vCard You can edit, save and send My vCard. You can utilize My vCard as your mobile business card. • Edit My vCard](https://usermanual.wiki/Avantech-Mobile/ATTITUDEE310/User-Guide-991674-Page-19.png)
![In the My vCard you can edit Name, Number, Home Number, Company Name, E-mail Address, Office Number, and Fax Number. • Send My vCard You can send My vCard by SMS, MMS, Bluetooth and File. Caller Picture When the Caller Picture is activated, the phone will prompt the phone number in the phonebook entry list, by picture. Caller Ring Tone When the Caller Ring Tone is activated, the phone will prompt the phone number in the phonebook entry list, by selected ring tone. 2. Messaging (Menu 2) Use the Messaging menu to send and receive short messages and multimedia messages, and e-mails. You can also use a voice-mail, and cell broadcast message features. To access this menu, press [Menu] in Idle mode and select Messaging. Message functions are available depending on network services that your service provider supports. 2.1 MESSAGES The SMS (Short Message Service) function is a network service and your network may or may not support the service. You can send messages in Fax, Page, e-mail and Text format. To send text messages by phone, you must obtain the SMS center number from your service provider, and enter it on the SC Address option in Profile Settings menu. Note: • The Message service may not be available on all networks. Some network allows it only within its own network. • The maximum number of characters allowed in a short message varies by service provider. If your message exceeds the maximum number of characters, the phone will split the message. Multimedia Message Service (MMS) delivers messages containing a combination of text, image, video, and audio, from phone to phone or from phone to e-mail. Note: • The maximum size allowed for a message can differ, depending on your service provider. • Depending on the file type or DRM (Digital Rights Management) system, some files may not be able to be forwarded. Write Message Text Message Use this menu to create and send a message as following 1. Select [Text Message] menu in the [Write Message] menu. 2. Make a message. 3. After you complete the message, press the [Option] soft key (left) and then select “Done.” Choose one of following options. 1) Send Only: Sends the message to the recipient phone number. It will not save the message. 2) Save and Send: Saves the message, and send it to the required recipient. 3) Save to Drafts: Saves the message so that you can send it later. 4) Send to Many: Send the message to multiple recipients. Select Edit List to add up to 10 recipient(s). 5) Send by Group: Sends the message to the Caller Group. Select a Caller Group from the list. 4. You can input the number directly or get from the phonebook by pressing the [Search] soft key (left). 5. The phone will display the Message sending Success or Fail message on the screen for all recipients. Note: If you receive a call while you are writing a message, the message will be backed-up and after the call finishes, the phone will display [write message] mode. You can finish the message without losing the data Multimedia Message Use this menu to create and send a message as following 1. Select [Multimedia Message] menu in the [Write Message] menu.](https://usermanual.wiki/Avantech-Mobile/ATTITUDEE310/User-Guide-991674-Page-20.png)
![2. Compose a message. You can edit To, CC, BCC, Subject, and Content. You can input the number directly or get from the phonebook by pressing the [Search] soft key. 3. After you complete the message, press the [Done] soft key (right). Choose one of following options. 1) Send Only: Sends the message. It will not save the message. 2) Save and Send: Saves the message, and send it to required recipient(s). 3) Save to Drafts: Saves the message to Drafts. You may send it later. 4) Send Options: Validity Period, Delivery Report, Read Report, Priority 5) Exit: Exits the Write Message, the phone will ask if you want to save the message. The phone will display the Message sending Success or Fail message on the screen for all recipients. Inbox This folder stores all of the messages you have received, except for e-mails. You can view the new text messages or the read messages. It will display the sender’s phone number or name (if stored in the Phonebook) on the list. If you choose the [Ok] soft key, you can view the message contents. Outbox You can view the messages that the phone has failed to send. Send, Edit, Delete, Delete All and Use Number options are available. Sent You can view the sent messages you have saved. Send, Edit, Delete, Delete All and Use Number options are available. Drafts This folder stores messages you have saved to send at a later time. When you select an SMS or e-mail message, it opens in Edit mode so that you can edit and/or send the message. SIM Message You can view messages originally stored on your SIM. Delete Folder This folder helps you to delete all mails in selected folder as Inbox, Outbox, Sent, Draft and Delete All Folders. Template Use this menu to make and use templates of frequently used messages. You can create the templates with the sentences you use frequently so that you can retrieve and insert them when composing a message. Message Settings Within the Message Settings sub-menu, you can define default values on common parameters for mobile-originated messages. By setting default values for the messages, you can experience a more comfortable service. You can set up the related parameters for sending and retrieving the messages. 2.2 E-MAIL The E-Mail application allows you to send and receive e-mails. The application supports text and attachments. The e-mail application could be either normal POP3 e-mail client or IMAP4 based e-mail service. When highlighting on Inbox, Sent, Unsent and Draft, the number of mails shall be displayed as a popup hint, e.g., “10 mails”. Note: If current incoming protocol is set to IMAP4, and the phone is not currently connected to the network, when before entering this screen, shall popup a confirmation screen for the user with message “Do you want to connect to the network?”. If the user selects “Yes”, then can send list folder request to network; otherwise, directly enter this screen, and all popup hint displays “0 mails.” Send and Receive In order to exchange the email, the user has to provide appropriate settings (described in section Email Profile). Write Email This menu allows you to write an email. • To – contain the recipient’s list of the e-mail. • CC – contain the carbon copy list of the e-mail. • Subject – contain the subject of the mail.](https://usermanual.wiki/Avantech-Mobile/ATTITUDEE310/User-Guide-991674-Page-21.png)
![• Attachment – display attachment states of the email. At most 3 attachments can be added in a mail. • Priority – the priority of the mail. You can use inline selection to change the priority. There are “Low”, “Normal” and “High.” options. • Encoding Type – the encoding type of email body, including ASCII, BIG5, GB, UTF8 • Content – contain the content of the mail. The whole content shall be display in a multi-line box. At most 7 lines can be displayed in this field. Inbox This folder stores the list of emails you have received. Unsent This folder displays the list of unsent e-mails. Sent This folder displays the list of sent mails. According to flash/ram size, the maximal number of mails to be displayed shall be dynamic. Drafts This folder displays the list of e-mail Draft you saved. Delete All Folder This folder helps you to delete all mails in selected folder. Email Profile This folder helps you to configure various servers and Profile related settings. All the configurable items are grouped into entities called Profiles. 2.3 VOICE MAIL Your phone is capable of dialing with voice-mail server number (if provided by your network). If you receive any voice-mail, your phone displays New Message in the idle screen. Select the Voice Mail from the list and press [Option] soft key (left). You can Edit the Voice Mail server number. By selecting the Connect to Voice, your phone will dial to the configured number that has been stored in Voice Mail list. You can then listen to the voice-mail. Note: Voice mail is a network feature. Please contact your service provider for more information. 2.4 Broadcast Message This network service allows you to receive the broadcast messages on various topics such as weather, traffic, local district code, local hospitals, taxis or pharmacy in your area. For more information about broadcast message topics, please contact your service provider. The phone will display the Broadcast Messages immediately when received, on the following condition: 1) When the phone is in the idle mode 2) When the Receive Mode (2.4.1) option is set to On 3) When the message channel is currently active in the channel list. Note: This service may not be available on all networks. For more information about the available subjects, please contact your network service provider. The following options are available: 1) Receive Mode: You can turn the receive mode on and off by pressing the soft key (left). Allows you to enable or disable the reception of the broadcasted text messages. 2) Read Message: With this menu, you can read all the broadcasted text messages received. The title area of the screen will display the name of the message subject item. Whenever the phone receives new contents, the phone will update the contents of the message subject. 3) Languages: Allows you to select your preferred language for displaying cell broadcast messages. The number of languages you can select depends on your SIM card. 4) Channel Settings: Allows you to indicate the channels from which you wish to receive broadcast messages. This menu allows you to read, add and delete the list by using Select, Add, Edit and Delete option. The number of items in the list depends on your SIM card. It will display all items you selected.](https://usermanual.wiki/Avantech-Mobile/ATTITUDEE310/User-Guide-991674-Page-22.png)
![Note: For more information about the available subjects, please contact your network service provider. 3. Call History (Menu 3) Use this menu to view the calls you have dialed, received, or missed, and the length of the calls. You can also check the cost of your calls, if the SIM card supports this function. To access this menu, press [Menu] in Idle mode and select Call History. 3.1 Missed Calls This menu displays the most recent received calls that you did not answer. In the missed calls list, you can view the details of the record by pressing the [Ok] soft key (left). In the view screen, you can make a call to the number by pressing the Send Key. The following options are available: 1) Delete: Allows you to delete the record 2) Save to Phone Book: Allows you to save the record to the phonebook 3) Dial: Allows you to call back to the recorded number 4) Edit: Allows you to edit the number and save to the phonebook 5) Send SMS: Allows you to send SMS to the recorded number 6) Send MMS: Allows you to send MMS to the recorded number 3.2 Dialed Calls This menu displays the most recent calls you have dialed. In the dialed calls list, you can view the details of the record by pressing the [Ok] soft key (left). In the view screen, you can make a call to the number by pressing the Send Key. 3.3 Received Calls This menu displays the most recent calls you have received. In the list of received calls, you can view the details of the record by pressing the [Ok] soft key (left). In the view screen, you can make a call to the number by pressing the Send Key. 3.4 Delete Call Log This menu lets you delete all call data of each category at once. The following categories are available:. • Missed Calls: Allows you to delete all missed call data • Dialed Calls: Allows you to delete all dialed call data • Received Calls: Allows you to delete all received call data • Delete All: Allows you to delete all call logs. 3.5 Call Time This menu displays the time log for calls made and received. The actual time invoiced by your service provider will vary. • Last call time: check the length of your last call. • Total sent: check the total length of all the calls you have dialed since the last reset. • Total received: check the total length of all the calls you have received since the last reset. • Total Time: total length of all calls made and received since the last reset. • Reset All Time: Allows you to reset the call timers You need to enter the phone password. Note: The actual time invoiced for calls by your service provider may vary, depending on network features, rounding-off for billing purposes and so forth. 3.6 Call Cost This network feature displays the cost of calls. This menu is available only if your SIM card supports this feature. Note that this is not intended to be used for billing purposes. • Last Call Cost: check the cost of your last call. • Total Cost: Allows you to check the cost of all calls • Reset Cost: reset the cost counters. • Max Cost: Enter PIN2 and input a limitation of the Max Cost. • Price Per Unit: Enter PIN2 and input a limitation of the price per unit. Set the price per unit that is applied when the cost of your calls is calculated. Note: Not all SIM cards support this feature. The number of items in these lists depends on the contents of your SIM card. 3.7 SMS Counter You can view the numbers of sent and received SMS. 3.8 GPRS Counter You can view how many GPRS message has been sent and received, and reset the counter.](https://usermanual.wiki/Avantech-Mobile/ATTITUDEE310/User-Guide-991674-Page-23.png)
![4. User Profiles (Menu 4) This menu allows you to set the ring tone, alert type, ring volume, answer mode and backlight, etc when you receive an incoming call or a new message so that you can adapt the use of your phone to different types of call environments. Select 1. General 2. Meeting 3. Outdoor 4. Indoor 5. Headset 6. Bluetooth 7. Flight mode and press [Option] soft key (left) to access the following options: Activate Activate the selected profile. Customize Allows you to set the selected mode including Tone Setup (Incoming Call, Power On, Slider Open/close, Message Tone and Keypad Tone), Volume (Ring Tone and Key Tone), Alert Type (Ring, Vibration Only, Vibra and Ring or Vibra Then Ring), Intelligent Call alert (on/off), Ring Type (Single, Repeat or Ascending), Extra Tone (Warning, Error, Camp on and Connect), Answer Mode (Any Key). The "Auto" option in Answer Mode is available only when the phone is in Headset Mode. Headset mode need not be activated. The phone will switch to headset mode automatically when you plug the headset into your phone. Flight Mode This menu allows you to set your menu to Normal Mode or Flight Mode. You can also select Query When Power On so that you will be asked which mode you prefer when the phone is powered on. If Flight Mode is activated, network function will be closed and all related network operations will be prohibited. 5. Camera (Menu 5) The Multimedia menu provides you with several multimedia functions. 5.1 Camera You can use the camera module embedded in your phone to take photos. Before taking a picture, you can set your camera settings on screen by using navigation keys or sensitive keys, and [Option] soft key (left). Note: • Do not take photos of people without their permission. • Do not take photos in a place where cameras are not allowed. • Do not take photos in a place where you may interfere with another person’s privacy. When you take a photo in direct sunlight or in bright conditions, shadows may appear on the photo. Taking and Saving a Photo 1. Choose [Camera] menu. To access this menu, press [Menu] in Idle mode and select Multimedia then select [Camera] menu. 2. Set your camera by using [Option]. Turn your handset in Landscape position for better usage. 240x320 resolution is used for wall paper portrait position. 3. The [camera] key on the side of the phone has a two-stage action. Pressing half way automatically sets the exposure and focus. Pressing fully releases the shutter. 4. The picture will be saved automatically to the Image Viewer. 5. If you want to send the picture by MMS promptly, select the [OK] key](https://usermanual.wiki/Avantech-Mobile/ATTITUDEE310/User-Guide-991674-Page-24.png)
![or [MMS] sensitive key. You can attach the picture automatically. This function is not available if continuous shot is activated. 6. If you want to take more pictures, select the [Cancel] soft key (right). The screen will display the camera preview and picture is not saved. 7. If you want to view the image, you can access the Image Viewer menu. Key Usages in Camera Preview ※※※※ Sensitive navigation pad • Brightness Setting ( by pressing Navigation Key): allows you to adjust the brightness (Exposure Value). • Zoom Setting (by pressing Navigation Key): By pressing the navigation keys, you can zoom in and out the preview. • Camera Shutter ([OK] Key): you can take a picture by pressing the [OK] key. ※※※※ Function Keys There are more functions. You can use these functions by pressing the keys. • Option (Left Soft key) – press the [Option] soft key (left) to view and select options for the Camera settings and viewer. See details the following descriptions for Option. • Cancel or Back (Right Soft key)– if you want to cancel your key-input or go back to upper menu, press the [Back] soft key (right). ※※※※ Alphanumeric Keys You can easily change the camera setting by pressing the following alphanumeric keys. The screen will display and toggle camera option icons, when you press the following keys. Note: Camera options Key Setting Key Setting 1 Effect Settings 7 Image Quality 2 White Balance 8 Image Size 3 Flash # Show or Hide Option icon 4 Delay Timer 5 Continuous Shot 6 Scene mode These settings can be also accessed via touch sensitive icons. Album : Enables to access image viewer. Camera Settings • Shutter Sound : You can select a shutter sound or turn off the shutter sound. The sound makes you feel the sense of taking a picture. • EV (-4/-3/-2/-1/0/+1/+2/+3/+4): You can set the EV (Exposure Value) and the preview will look darker in lower EV and brighter in higher EV. • A/E Meter : Auto/Spot/Weight/average. • Banding (50Hz/60Hz): You can select the sampling bandwidth of the camera sensor. When bandwidth increases, the memory size and the picture quality will increase. • Delay Timer (Off/5Sec/10Sec/15Sec): It allows you to take a picture with delayed timer. If you set the delay timer at 5 sec, and press the [OK] key, it will take a picture 5 seconds later. • Cont Shot (Off/ 1shot/ bust shot): It allows you to take multiple continuous shots by pressing the camera key. Image settings : • Image Size (240x320/320x240/ 640x480/ 1280x1024/ 2048x1536) • Image quality (Low/Normal/High) White Balance : Auto / Daylight / Tungsten / Fluorescent / Cloud / Incandescence Scene Mode : Auto/ Close-Up/ Night Effect Settings :](https://usermanual.wiki/Avantech-Mobile/ATTITUDEE310/User-Guide-991674-Page-25.png)
![Normal, Grayscale, Sepia, Sepia Green, Sepia Blue, Color Invert, Gray Invert, Blackboard, Whiteboard, Copper Carving, Blue Carving, Embossment, Contrast, Sketch. Add Frame: You may select various types of frames to create stylish frame to your photo. It only supports the ‘Add Frame’ when the resolution is 320x240. You can adjust “Add Frame” menu by Volume Up/Down key. Storage (Phone/ Memory Card): Allows you to select the storage for saving images. Restore Default: This menu allows you to restore to the camera’s default settings. 5.2 Image Viewer You can see your photos in your phone by choosing [Image Viewer] menu in [Multimedia] menu. It will display the photos with thumbnail, image name, and image size. Option: 1) View: allows you to view the image in full screen. Use the Navigation key to view other images 2) Image Info: allows you to provide the image information 3) Browse style: allows you to view images either List view or Matrix view 4) Set as : allows you to set the image as Wallpaper, Screen Saver, Power On Display, Power Off Display, Phone Book. 5) Forward: allows you to forward the image to, MMS, E-Mail, and Bluetooth 6) Rename: allows you to edit the image name. 7) Delete: allows you to delete the selected image. 8) Delete All Files: allows you to delete all images in the storage. 9) Sort: allows you to sort the image by Name, Type, Time and Size. 10) Storage (Phone / Memory Card): allows you to select the storage for saving images. 5.3 Dowload pictures Allows you to download pictures from Fly website. 5.4 Video Recorder With this phone, you may record a video with the Video Recorder menu. Recording and Saving a Video 1. Choose [Video Recorder] menu. 2. Set your video recorder by using [Option] or alphanumeric keys. 3. After setting the view, start to record a video by pressing the [OK] key or camera key 4. The video will be saved automatically by pressing the [Stop] soft key (right). 5. If you want to view the recorded file, you can access it via the Video Player menu. Alphanumeric Keys You can easily change the video setting by pressing the following alphanumeric keys. The screen will display and toggle camera option icons, when you press the following keys. Camcorder Settings: press [Option] soft key (left) to enter options sub-menu • White Balance (Auto / Daylight / Tungsten / Fluorescent / Cloud / Incandescence) • EV (-4/-3/-2/-1/0/+1/+2/+3/+4): You can set the EV (Exposure Value) and the preview will look darker in lower EV and brighter in higher EV. • Night Mode : (On/Off) • Banding (50Hz/60Hz): You can select the sampling bandwidth of the camera sensor. When bandwidth increases, the memory size and the picture quality will increase. Video setting : • Video Size (QCIF (176x144) / CIF (352x288)) • Video Quality (Low/Normal /High/Fine): The recorded file’s memory size will increase if you choose higher quality. • File Size Limit (No Limit/ 95k/ 195k/ 295k)](https://usermanual.wiki/Avantech-Mobile/ATTITUDEE310/User-Guide-991674-Page-26.png)
![• Record Time Limit (No Limit/ 15sec/ 30sec/ 60sec) • Record Audio (On/ Off) • Encode Format (H.263/ Mpeg4) Effect settings Normal, Grayscale, Sepia, Sepia Green, Sepia Blue, Color Invert, Gray Invert, Blackboard, Whiteboard, Copper Carving, Blue Carving, Embossment, Contrast, Sketch Storage Phone/ Memory Card: allows you to select the storage for saving files. Restore Default: This menu allows you to restore to the video recorder’s default settings. 5.5 Video Player You can see your video in your phone with the Video Player menu. By pressing the **** key, you can view the recorded file with the wide screen. Option: 1) Play: allows you to play the recorded video 2) Forward: allows you to forward the video image to MMS, E-Mail, and Bluetooth. 3) Rename: allows you to rename the video file 4) Delete: allows you to delete the video file 5) Delete All Files: allows you to delete entire recorded video files. 6) Sort: allows you to sort video files by name, type, time and size 7) Streaming URL : (predefined/history/input URL) 8) Network settings (data account/proxy/UDP port) 9) Storage (Phone / Memory Card): allows you to select the storage for saving video files. 5.6 Download video Alows you to download videos from Fly website. 5.7 Photo Editor Photo Manager You can edit photo image with this function.. 1. Select the image file you want to edit in the File Manager storage. 2. Choose ‘Auto Resize’, ‘Main LCD Clip’. (1) Auto Resize function resizes the selected image to full image (2) Main LCD Clip function clips a part of image to fit in 320x240 pixels.. 3. Option 1) Save As: after editing the selected image, save the image to other file name. Phone automatically issues a file name. You can also edit the file name. 2) Add Effect: you can add effect such as Sepia, Grayscale, and so on. Press the left or right navigation keys to change selection. 3) Add Frame: press left or right navigation keys to change selection of picture frames. 4) Add Icon: Use the Sensitive Navigation keys to select the icon. Press icon and drag to move it on the picture. Press the [Done] soft key (left) to stamp the icon on the image. 5) Add Text: Edit the text and you can change text color, border color, shadow color, font size (depending on language), and italic the font. Press the up, down, left or right navigation key to move the text, or press text and drag to move it on the picture. Press the [Done] soft key (left) to stamp the text. 6) Adjustment: you can adjust image brightness and color 7) Flip: you can flip the image in horizontal left/right, vertical up/down. 8) Expand Canvas: when the image is smaller than 240x320 pixels, you can expand canvas size to full screen. Slide Show You can view your images as a slide show, a sequential presentation of each image in the current folder. 1. Select an image folder. 2. Set the Type of play. 3. Select [Play] option. The slide show begins. 3. Select the [Back] soft key (right) to stop the slide show.](https://usermanual.wiki/Avantech-Mobile/ATTITUDEE310/User-Guide-991674-Page-27.png)
![6. Music (Menu 6) 6.1 Music Player You can listen to MP3, MIDI, WAV, AMR, iMelody music files with the Audio Player by selecting Music sensitive key and then music player. To view the music list, Press [List] soft key. It will display available music list from the micro SD Card or Phone depending on Play List setting. To play the music, From the music player screen, select ▶ or press [List] soft key and select the song you want then select “Play.” Option: 1) Play: allows you to play the music files 2) Detail: displays details of the music file, such as a Music Title, Artist, Album, Play Time, File Size and so forth. 3) Add to Rings: allows you to set the music file in the microSD card or phone memory as a ring tone. You should insert the microSD card to enable this function and to use the ring tones from the microSD card. 4) Add: allows you to add a directory to the play list. This option is available when you set the List Auto Generate to Off. 5) Remove: allows you to remove the selected file from the play list. This option is available when you set the List Auto Generate to Off. 6) Remove All: allows you to remove all files from the play list. This option is available when you set the List Auto Generate to Off. 7) Refresh List: allows you to refresh the music list. 8) Settings (1) Player Setting: - Play List (From Memory Card/From Phone) - List Auto Generation (On/Off): you can select whether to generate the music list automatically or manually. When this option is On, music files in the main directory will be selected in the play list; when the option is Off, you can add a file or a directory to the play list. - Repeat (One/All/Off): - Shuffle (On/Off): - Background Play (On/Off): allows you to set the Audio Player to play the music while you are using the phone other than audio player, such as menu navigation. When Background Play option is On, it will play the music, even if you press the End key or [Back] soft key (right). When the Background Play option is Off, and you press the End key or [Back] soft key (right), it will stop playing the music file. (2) Sound Effects: - Equalizer: allows you to set equalizer as Normal, Bass, Dance, Classical, Treble, Party, Pop, Rock. - Play Speed (Normal, Fast, Fastest, Slowest, Slow) - Reverb Effect (None, Concert, Shower, Church, Small Room, Opera, Bath Room) - 3D Surround (3) Bluetooth settings : - Bluetooth stereo output (On/Off) - Bluetooth stereo headset To make a play list from the selected directory: 1. Access to the Audio Player. 2. Press the [List] soft key (left). 3. Press the [Option] soft key (left) and select Settings, then player settings and set the List Auto Generate to Off. 4. Select 4. Add from the [Option] menu, the phone will display the File Manager. Using the navigation keys, highlight the desired directory or file in the File Manager 5. Press the [Option] soft key (left), and select 1.Select. The music files in the selected directory will be added to the play list. 6.2 Audio Equalizer Allows you to set equalizer as Normal, Bass, Dance, Classical, Treble, Party, Pop and Rock: 6.3 Sound Recorder With this menu, you can record sound in AMR, WAV and AWB format and use it as voice memo, ring tone, MMS attachment. 1) Options when there is no record file in the Sound Recorder: (1) Record](https://usermanual.wiki/Avantech-Mobile/ATTITUDEE310/User-Guide-991674-Page-28.png)
![(2) Settings 2) Options, if you have more than one record file: (1) Record: allows you to start recording. (2) Play: when there is a file in the list, it will play the recorded sound file. (3) Append: allows you to append additional recording to the previously recorded file. This function is available only for AMR format files. This option appears when there is any recorded file. (4) Rename: allows you to change the file name. (5) Delete: allows you to delete the selected file. (6) Delete All: allows you to delete all files in the sound record list. (7) Settings A. Preferred Storage (Phone / Memory Card): allows you to set the preferred storage. B. File Format (AMR / WAV/ AWB): allows you to select recording the sound in AMR and WAV format. C. Audio Quality: allows you to choose recording quality (Low/high) (8) Forward: allows you to use the sound file to User Profile, MMS, E-Mail, and Bluetooth. 6.4 FM Radio The FM Radio application turns the mobile phone into a portable FM Radio device. It primarily provides users the interface to a single-chip electronically turned FM stereo radio for listening to live-broadcast stations. You must connect the earphone to your phone as it works as an antenna. To listen to the radio: Connect the earphone to your phone. When entering the main screen, a default frequency is selected and it’s power off for the first time of entrance. Option: 1) Channel List: By selecting this menu, you can check the saved Channels. (1) Play : allows you to listen the channel chosen (2) Edit: allows you to edit the channel’s name 2) Manual Input: allows you to search Channels directly by inputting the Frequency. 3) Preset Auto Search: By selecting this menu, you can search the channels automatically. 4) Settings (1) Background Play (ON/OFF) (2) Loud Speaker (ON/OFF) (3) Record Format (WAV/ AMR/ AWB) (4) Record Storage (Phone/ Card) 5) Record: With this phone, you can record the channel you are listening with shortcut [OK] key. When you press REC [OK] key, you can check “REC” sign on the right side of LCD and the recoding time will be displayed below “REC” sign. 6) Append: allows you to append additional recording to the previously recorded file. This function is available for AMR and AWB format files. This option appears when there is any recorded file. 7) File List 6.5 Schedule FM Record This menu allows you to set the Schedule FM Radio to record at a specific time. You can save up to 4 channels. Option: 1) Schedule FM Record: ON/OFF 2) DATE/TIME: input the Day and start-end Time. 3) Repeat (Once/ Every day/ Days/ Weekly/ Monthly): select the repeat characteristics of the task. 4) Channel Settings: (Channel list/ Manual input) 5) Record Settings: (Record Format/ Audio quality/Storage/ Record File) After you completed editing the option, press the [Done] soft key (right) to save the changes. 6.6 Melody Compose With this menu, you can create an iMelody file. You can use this melody as your Ring Tone, MMS attachment. How to compose a melody: 1) When you first use the Melody Compose, 1. Press the [Add] soft key (left) 2. Start composing a melody pressing the numeric keys. 3. Press the [Option] soft key and select “Save.” 4. Edit and save a file name by pressing the [Option] soft key (left)](https://usermanual.wiki/Avantech-Mobile/ATTITUDEE310/User-Guide-991674-Page-29.png)
![and select “Done.” Option while editing: 1) Play: allows you to play the composed file before you save the file. 2) Play Speed (Fast / Normal / Slow) 3) Select Instrument (Piano / Guitar / Violin / Saxophone / Steel Drums / Flute / Harmonica / Trumpet / Music Box / Xylophone) 4) Save: when you are done composing, select “Save.” Note: 1: Do, 2: Re, 3: Mi, 4: Fa, 5: Sol, 6: La, 7: Si 8: Vibration – allows the phone vibrates. 9: Screen flickering 0: Rest – indicates the rest place. * : allows to modify the rest timing or the selected note. # : allows to add sharp to selected note. Up & down : allows to modify the octave of selected note. 2) If you have more than a record file, Press the [Option] soft key (left), and select ‘Add’ to start composing a melody. Option: 1) Play: allows you to play the selected file. 2) Edit: allows you to edit the composed music. 3) Add: allows you to compose a new music file. 4) Rename: allows you to rename the selected file. 5) Delete: allows you to delete the selected file. 6) Delete All Files: allows you to delete all files in the list. 7) Forward: allows you to forward the composed file to User Profile, MMS, E-Mail, EMS, and Bluetooth. 6.6 Download Music Allows you to download musics from Fly website 6.7 Download funny sounds 7. Organizer (Menu 7) Use this menu to keep track of your schedule. You can also use convenient features, such as Calendar, to do list, Alarm, World Clock, Calculator, Unit Converter, Stopwatch. To access this menu, press [Menu] in Idle mode and select Organizer. 7.1 Calendar The calendar helps you to keep track of your monthly schedule. When you access the Calendar menu, the calendar in Month view appears with today’s date indicated by a colored bow line. 7.2 To Do List You can view all saved tasks. It displays a task or tasks saved in the calendar. The To Do List shows the notes of the tasks from the oldest task to the latest task. 7.3 Alarm This menu allows you to set the alarm to ring at a specific time. You can save up to five alarms. To stop the alarm when it rings, press the [Stop] soft key (left) to stop the alarm or press the [Snooze] soft key (right) to snooze the alarm so that it will remind you again in four minutes. 7.4 World Clock This feature allows you to check the current time based on Greenwich Mean Time (GMT) for major cities around the world. From the world map, use right or left sensitive keys or scroll to the city you want. As the time line moves, the current day and time of the given zone displays. 7.5 Calculator Use this menu to perform basic arithmetic functions and memory functions; Addition, Subtraction, Multiplication and Division; 7.6 Units Converter You can convert from one type of unit to another. To convert a value:](https://usermanual.wiki/Avantech-Mobile/ATTITUDEE310/User-Guide-991674-Page-30.png)
![1. Select the weight or length options. 2. Select the type of conversion to be performed. 3. Input the value to be converted, and then press [Ok] to get the result. You can enter a decimal point (.) using the [*] key. Weight Kg ↔ Pound, Kg ↔ Ounce Length Km ↔ Mile, M ↔ Yard M ↔ Foot, cm ↔ Inch 7.7 Currency Converter To convert currency: 1. Input a currency rate. 2. Press the [Ok] soft key (left). 3. Input the local currency value. 4. Press the [Ok] soft key (left) to get the result. 7.8 Countdown Alloows you to indicate the time remaining. 7.9 Stopwatch This is a tool to measure timing; Split Stopwatch, Lap Stopwatch and nWay Stopwatch. Typical Stopwatch There are Split Timing and Lap Timing stopwatch functions in this typical stopwatch menu. • Split Timing: Split Timing is useful for measuring each player’s record from start. The timing will be recorded earliest to latest. • Lap Timing: You can use the Lap Timing function to measure each lap record. • View Record: When you save the timing records from the Split Timing and the Lap Timing, it will be saved and listed in this menu. 4Way Stopwatch You can use 4-way direction icons for measuring times for each direction. When you press a direction icon, the direction stopwatch will start timing, and other direction stopwatch will pause the timing. When you press the paused direction’s direction icon, the stopwatch will resume timing. 8. Services (Menu 8) This menu allows you to use services including SIM card additional services, WAP and Data Service. 8.1 Opera Mini Opera mini is a web browser. 8.2 WAP The Wireless Application Protocol (WAP) on your phone allows you to access the wireless web. Using the web browser, you can access up-to-date information and a wide variety of media content, such as wallpapers, ring tones, and music files. To access this menu, press [Menu] and select Services then WAP. Homepage When you choose [Homepage] menu, WAP browser opens the main page of home site that you had activated among the sites in [Profile]. Bookmarks You can make bookmark data in your phone. And you can connect to the site directly. Recent Pages When you choose [Recent Pages] menu, WAP browser opens the latest WAP page. Enter Address If you know the URL of the site, you can go to the site directly by inputting the URL. Settings This option allows you to set the WAP settings. There are several profiles of sites in this phone. You can activate one of them as a home site and change or set each profile. • Edit Profile: Shows the name of selected site and you can edit the profile(s). • Browser options allow you to set time out duration and to set or not](https://usermanual.wiki/Avantech-Mobile/ATTITUDEE310/User-Guide-991674-Page-31.png)
![image view. • Service message settings • Clear Cache: clears the most recent site files that you have downloaded in the temporary memory. • Clear Cookie: deletes cookies in the memory. • Trusted Certificates: saves and lists the Trusted Certificated from the WAP sites. You can view and delete the certificates. 8.3 Data Account This menu allows you to change the settings for the GSM and GPRS network services. For further details, contact your service provider. GSM This setting allows you to change the settings for the GSM network as following: • Account Name: Edit the account name. • Number: Enter the server phone number. • User Name: Enter the user name required to connect to GSM Data network. • Password: Enter the password required to connect to GSM Data network. • Line Type: Choose a network connection type between Analogue and ISDN. • Speed: Select the desired speed from 4.8, 9.6 Kbps and 14.4 Kbps. • DNS (000.000.000.000): Enter the IP address GPRS This setting allows you to change the settings for the GSM Data network as following. • Account Name: Edit the account name. • APN: Enter the access point name used for the address of the GPRS network gateway. • User Name: Enter the User Name required to connect to GPRS network. • Password: Enter the password required to connect to GPRS network • Auth. Type: Select the authorization type from Normal and Secure. 8.4 SIM Toolkit (depends on SIM) If you use a SIM card that provides additional services, the STK menu displays. For details, please refer to your SIM card instructions or contact your service provider. 9 Entertainment (Menu 9) Entertainment menu provides you with Java interface and Games. You can use your phone as your entertainment center. 9.1 Java Your mobile phone features a Java run-time environment, which allows you to run Java applications, such as games downloaded on the network. The first time you launch Java, a message appears to alert you that the installation and configuration of Java will take several moments. This is a one-time occurrence. This phone only supports Java games downloaded from the network provider based on this handset model. 9.2 Java Settings You can setup audio, network profile, and free data space. 1) Java Audio: allows you to set the Java audio sound to on or off. 2) Java Vibration: allows you to set the vibration to on or off. 3) Java Network: you can select the java network from the list. 4) Heap Size: you can view the remaining heap size. 9.3 E-book reader The viewer application provides an easy way for you to read documents stored in the phone’s memory or a memory card. 9.4 Games This phone provides you embedded games. Please see the following instructions for each game, and enjoy the games. When you select a game, you will have the following menu: • Start Game: allows you to start playing the game. When you press the right soft key, it will go back to menu with Resume option added. Select “Resume” to continue playing the game. • Game Level: you can choose the game level from Easy/Normal/Hard. • Best Grades: will display the best records in each level. Press [Reset]](https://usermanual.wiki/Avantech-Mobile/ATTITUDEE310/User-Guide-991674-Page-32.png)
![soft key (left) to reset the best grades record. • Game Help: describes about the game and an instruction. 10. settings (Menu 10) The Settings menu provides you with various setting options to customize the phone to your preferences and needs. You can also reset the settings to their default values. To access this menu, press [Menu] in Idle mode and select Settings. 10.1 Touch settings • Vibrator activation : Select ON or OFF • Calibration In case of the failure to operate Touch screen, you can set again the coordinates for optimal use. Please follow instruction 10.2 Phone Setup Many different features of your phone’s system can be customized to suit your preferences. Time and Date You can set time and date for your phone. • Set Home City This menu allows you to set a city as your home city. • Set Time/Date This menu allows you to set the current time and date displayed in the idle screen. Also you can set the day light saving to On/Off. • Set Format This menu allows you to set Time Format and Date Format. Schedule Power On/Off : You can set a schedule for powering on and off your mobile phone. When you schedule the power on or off, the phone will power on or off at every scheduled time. When the phone powers on, it will alarm with alarm tone. It is useful when you want to turn off your phone while you are sleeping, and let the phone power on in the morning so that you would not miss any call or alarm Language Use this menu to select one of several languages for the display text. Select your preferred language and press [Ok] soft key (left) to save the setting. Preferred Input Methods This menu allows you to define your preferred input method. Once you set the preferred input method, next time you edit in text input mode, it will reflect the setting until you change to another. Greeting text Turn On or Off, and edit the greeting text of the phone. Dedicated keys You can use the dedicated icons as shortcut keys to access specific menus directly from idle mode. Select from the menu lists, and press [Ok] key to change the dedicated menu. Auto update of date and time This menu allows the phone to update the current date and time automatically from the network. You can turn on or off this function by pressing the [On] or [Off] soft key (left). 10.3 Display Set up This menu allows you to customize desired phone display items as below. • Wallpaper • Screen Saver • Power On Display • Power Off Display • Show Date and Time • Show Owner Number](https://usermanual.wiki/Avantech-Mobile/ATTITUDEE310/User-Guide-991674-Page-33.png)
![• LCD backlight 10.4 Call Setup The following Call Setup features are network services. Please contact your network service provider to check availability and subscribe to the feature. Caller ID This network service informs your Caller ID to the recipient when you call out. You can set the following options for the Caller ID function as following. 1) Set By Network: The network will decide whether to send or hide the Caller ID, 2) Hide ID: If you do not want to send your phone number, select [Hide ID] menu. 3) Send ID: It will send the Caller ID when you call out. Call Waiting This network service informs when someone is trying to reach you during another call. You can specify the call waiting option for voice calls only. The following options for each service are available: 1) Activate: activates the call waiting service. 2) Deactivate: deactivates the call waiting service. 3) Query Status: displays the status of the call waiting service. Call Divert This network service reroutes incoming calls to the number that you specify. Example: you may wish to divert your business calls to a colleague while you are busy. Call diverting can be set up in the following ways. • Divert All Voice Calls: diverts all voice calls. • Divert If Unreachable: diverts calls, if you are not in a coverage area of your service provider. • Divert If No Answer: diverts calls, if you do not answer the phone. • Divert If Busy: diverts calls, if you are already making another call. • Divert All Data Calls: diverts all data calls. • Cancel All Divert: cancels all call diverting options. Note: The phone sends your settings to the network and the network will acknowledge the settings. You can deactivate all call diverting settings by selecting the Cancel All. Call Barring This network service allows you to restrict your call for Outgoing Calls, Incoming Calls. You can also cancel all call barring settings. You will be able to make and receive calls normally. You can set and change the call barring password obtained from your service provider using this option. You must enter the current password before you can specify a new one. Note: The phone sends your settings to the network and the network returns the acknowledgement. You can deactivate all call barring settings by selecting the Cancel All. Call Time Reminder You can set the call time reminder. Options are Off, Single, and Periodic. Call Time Display If you want, you can set the phone to display the call time. Auto Redial This option allows you to set redial automatically when the call receiver is busy. If you set [Auto Redial] on, it will redial 10 times to make a call. Closed User Group Provides you the interface to add closed user group settings. Every closed user group entry contains a name and an index. IP Number Set the IP number. Black list Enables you to select a number as black listed. 10.5 Security Setup](https://usermanual.wiki/Avantech-Mobile/ATTITUDEE310/User-Guide-991674-Page-34.png)
![Settings Allows you to set the following Options : Visibility, Change Device Name, Authentification, Audio path and FTP Setting Making a Bluetooth connection To make a Bluetooth connection, first of all, make sure you switch on the Bluetooth feature in the option On/Off. Then select My devices. Connection with an audio device Choose <Inquiry Audio Device>. When the list of device appears, select the one you want to make a connection with it. As soon as you select a device and a connection is made, you are prompted to enter a passkey in order to pair with the device. This passkey is supplied by the manufacturer of the other Bluetooth device, refer to its documentation for further information. The passkey feature ensures that only legitimate connections are allowed to connect either to your device or the selected device. If you do not use the Bluetooth feature for some time, you should deactivate it in order to conserve battery power. 11.2 Network Setup Network Setup helps you in Network Selection, selection of Preferred Network, and GPRS connection Network Selection The Network Selection feature enables you to select automatically or manually the network used when roaming outside of your home network. Note: You can select a network other than your home network only if it has a valid roaming agreement with your home network. Options are as following: 1) Automatic: You will be connected to the first available network when roaming 2) Manual: The phone scans for the available network, and you can select the network manually. Preferred Networks You can set your preferred networks from PLMN list. You can Change Priority and Delete GPRS Connection Press [Change] soft key (left) to change the setting for the GPRS connection. It will switch and save the GPRS connection to set on: 1) When Needed. 2) Always 11.3 USB This option is only visible when you connect a USB cable to the phone. This feature allows you to connect your phone to a PC via USB cable. You can carry out the following operations: Mass Storage Acts as a mass storage for your mobile phone data on the computer and recover the data saved in the computer, upload and download files, access the internal memory and micro SD card (if present) and the size of transfer is unlimited until your memory is full. Webcam Acts as a webcam for your PC. COM Port Acts as a modem for your phone and PC connnection. You can use the software provided to edit your mobile phone contacts pictures and melodies. When the transfer is finished, please make sure that you safely remove your device based on the instruction](https://usermanual.wiki/Avantech-Mobile/ATTITUDEE310/User-Guide-991674-Page-36.png)