Avaya Business Communications Manager Bcm Users Manual Bulletin #/ Goes Here
2015-06-01
: Avaya Avaya-Business-Communications-Manager-Bcm-Users-Manual-735431 avaya-business-communications-manager-bcm-users-manual-735431 avaya pdf
Open the PDF directly: View PDF ![]() .
.
Page Count: 7
Compas ID: 152861
1
avaya.com
Technical Tip
Date: 21 July 2011
Business Communications Manager (BCM) –
Reporting for Call Centre (RCC): Cannot decrypt
the symmetric key
Revision History
Date
Revision #
Summary of Changes
21 July 2011
Original bulletin
This is the original publication
Problem Description
This document is provides instructions on what actions should be taken if the Microsoft Reporting Services
symmetric key is corrupted while using the Reporting for call Centre application (RCC)
SUMMARY
Issue Details
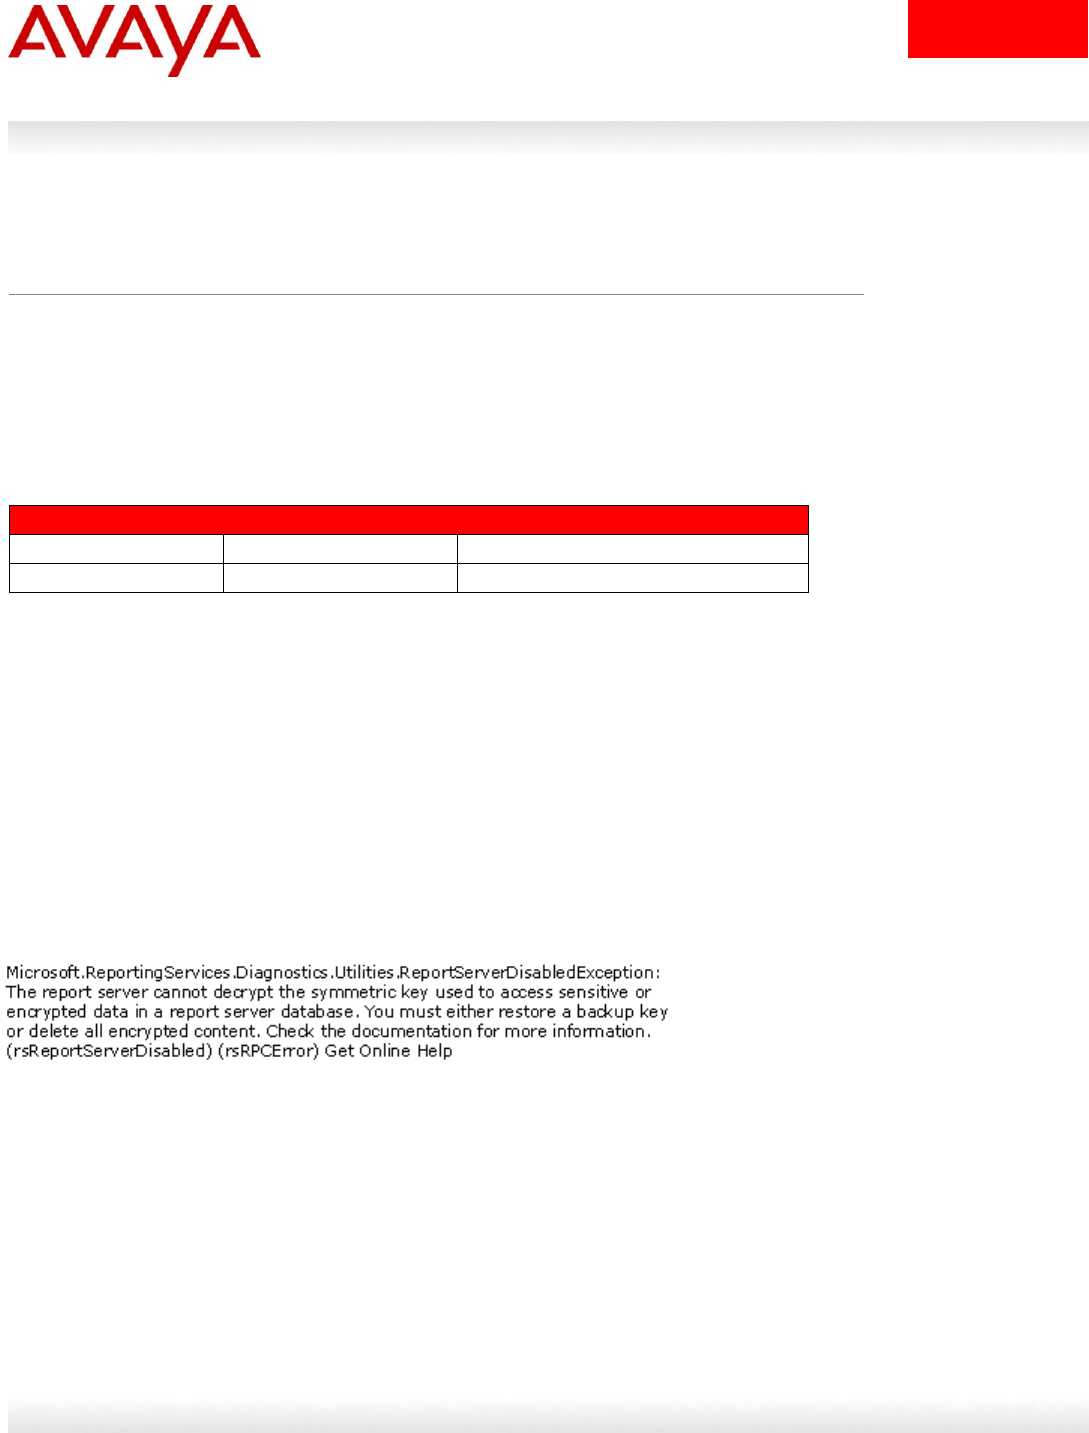
Reporting for Contact Center requires Microsoft Reporting Services to create an encryption key. This is created
during the installation of RCC. In the event that the Microsoft Reporting Services encryption key is compromised a
user may see one of a range of error messages containing the text ‘cannot decrypt the symmetric key’:
Affected RCC Versions
RCC 2.45 Stream up to and including RCC 2.45.108
RCC 2.5 Stream up to and including RCC 2.5.462
RCC 2.6 Stream up to and including RCC 2.6.414
Note 1:This issue should not be seen on installations using RCC 2.6.415 or later. That build of RCC contains
modifications to overcome this problem. These modifications will be added to a future build of the RCC 2.45 Stream.

Compas ID: 152861
2
avaya.com
Preventative Action
To prevent this problem from arising, perform steps 1 to 16 outlined in the Solution section.
Remedial Action
If the error has already occurred, perform all the steps outlined in the Solution section.
SOLUTION
Note 2: Using Registry Editor incorrectly can cause serious, system-wide problems that may require you to re-
install Windows to correct them. Avaya cannot guarantee that any problems resulting from the use of Registry
Editor can be solved. Use the information in all steps of this Bulletin at your own risk.
Log on to the Web Host PC as a Local Administrator in Windows.
1. Click on Start > Settings > Control Panel > Administrative Tools > Computer Management. The Computer
Management window is displayed.
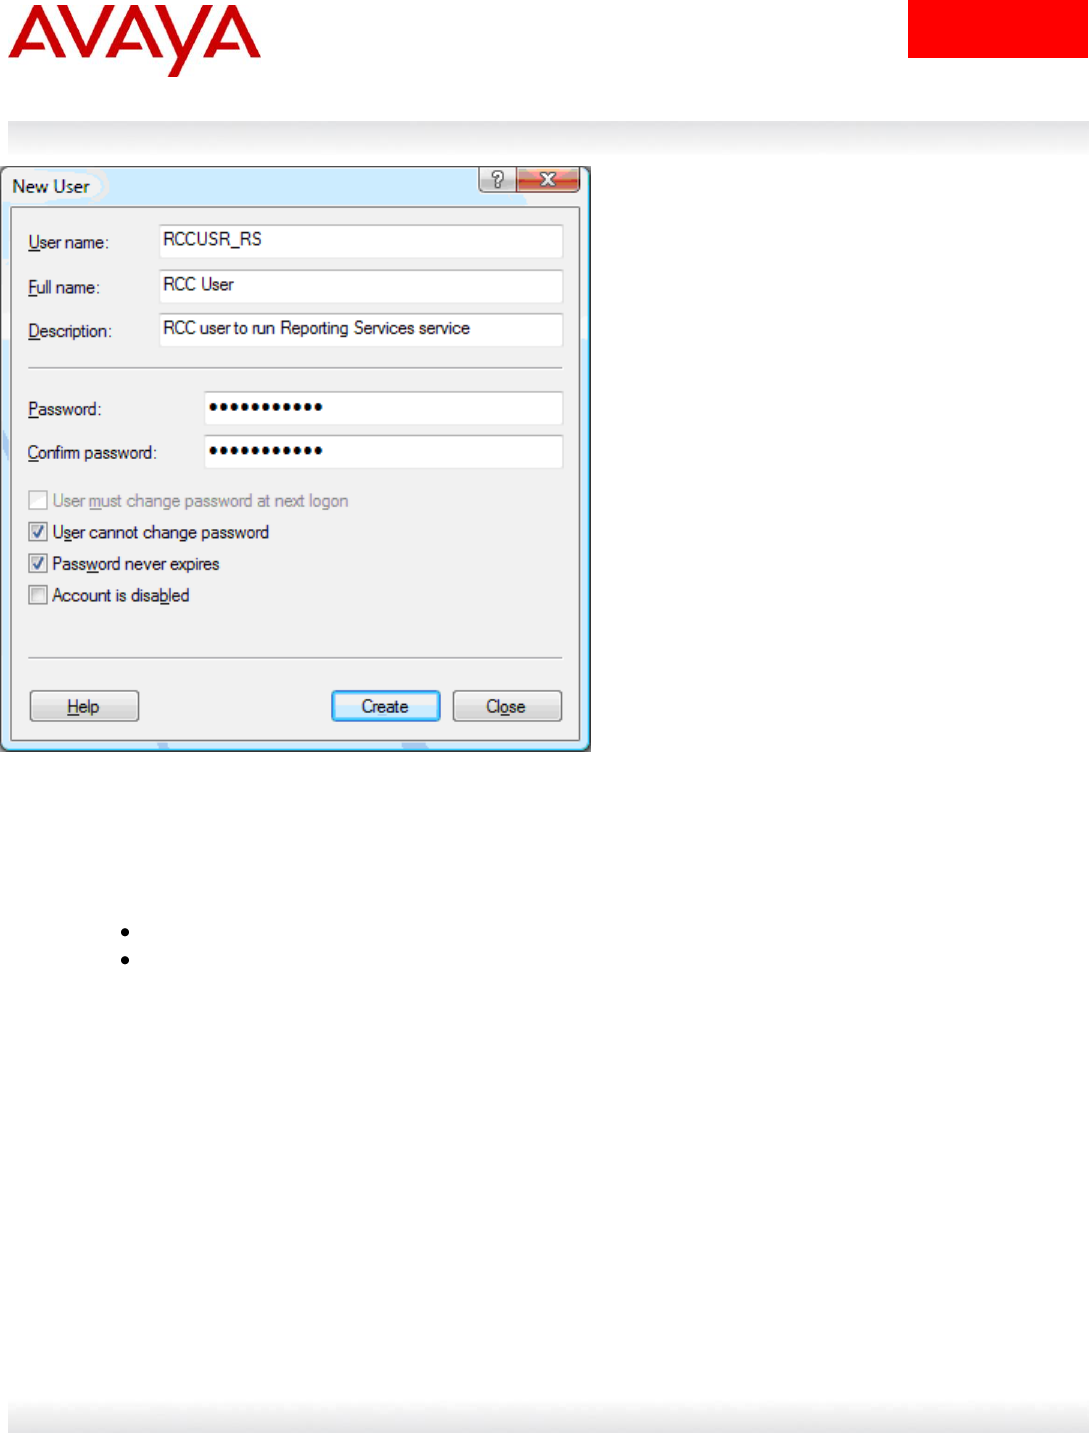
2. Expand the nodes System Tools > Local Users and Groups. Right-click Users and select New User. A New
User dialog box is displayed.
3. For the User name, enter the name RCCUSR_RS.
4. For the Password enter a strong password. Re-enter the password for Confirm password.
5. Clear the User must change password at next logon checkbox. Select the checkboxes User cannot change
password and Password never expires. See Figure 1: New User dialog box.
Compas ID: 152861
3
avaya.com
Figure 1: New User dialog box
6. Click Create.
7. Associate this user with the following groups:
SQLServer2005MSSQLUser$[ComputerName]$RCCSQLEXPR
SQLServer2005ReportServerUser$[ComputerName]$RCCSQLEXPR
8. Remove the RCCUSR_RS user from the “User” group.
9. Click on Start > Settings > Control Panel > Administrative Tools > Services. The Services window is
displayed.
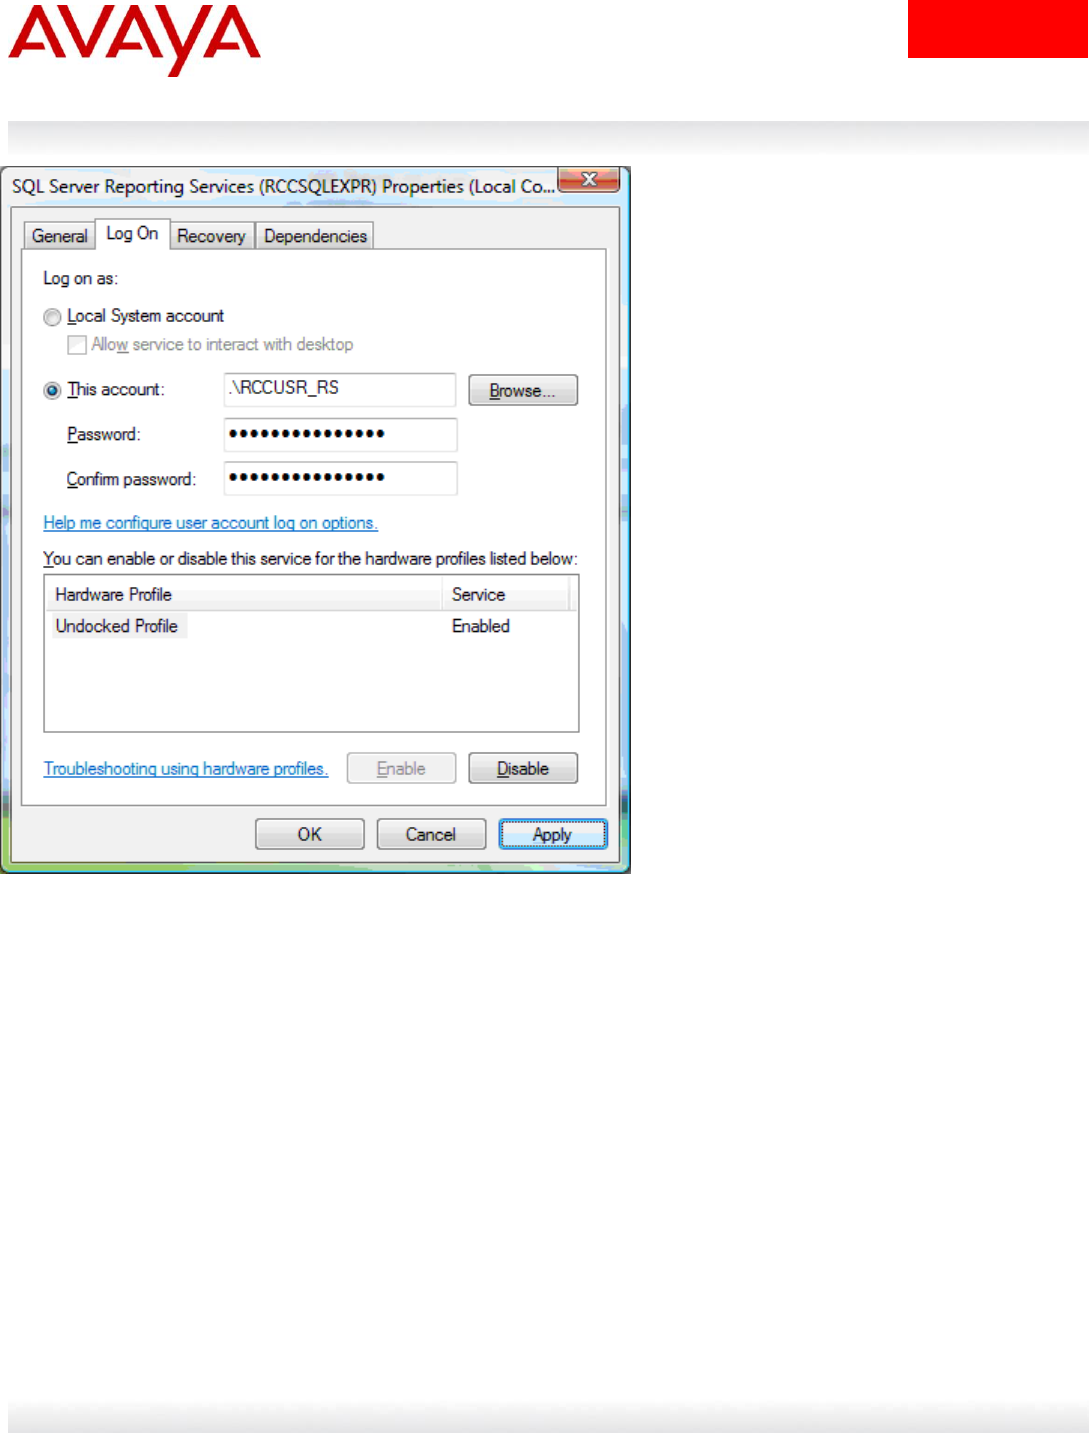
10. Locate the SQL Server Reporting Services (RCCSQLEXPR) service. Right-click the service and click Stop.
11. Right-click the service again and select Properties. The SQL Server Reporting Services (RCCSQLEXPR)
Properties (Local Computer) window is displayed.
12. From the Log On tab select This account.
13. Enter the username .\RCCUSR_RS, or click Browse to locate the user created.
14. For the Password and Confirm password fields, enter the password created in step 5.
See Figure 2: SQL Server Reporting Services Properties window Log On tab.
Compas ID: 152861
4
avaya.com
Figure 2: SQL Server Reporting Services Properties window Log On tab
15. Click Apply and click OK to close the window.
16. Restart Reporting Services. A dialog box should appear confirming that the user has been granted the
appropriate login service rights.
17. Click Start > All Programs > Microsoft SQL Server 2005 > Configuration Tools > Reporting Services
Configuration.
18. In the dialog box click Connect.
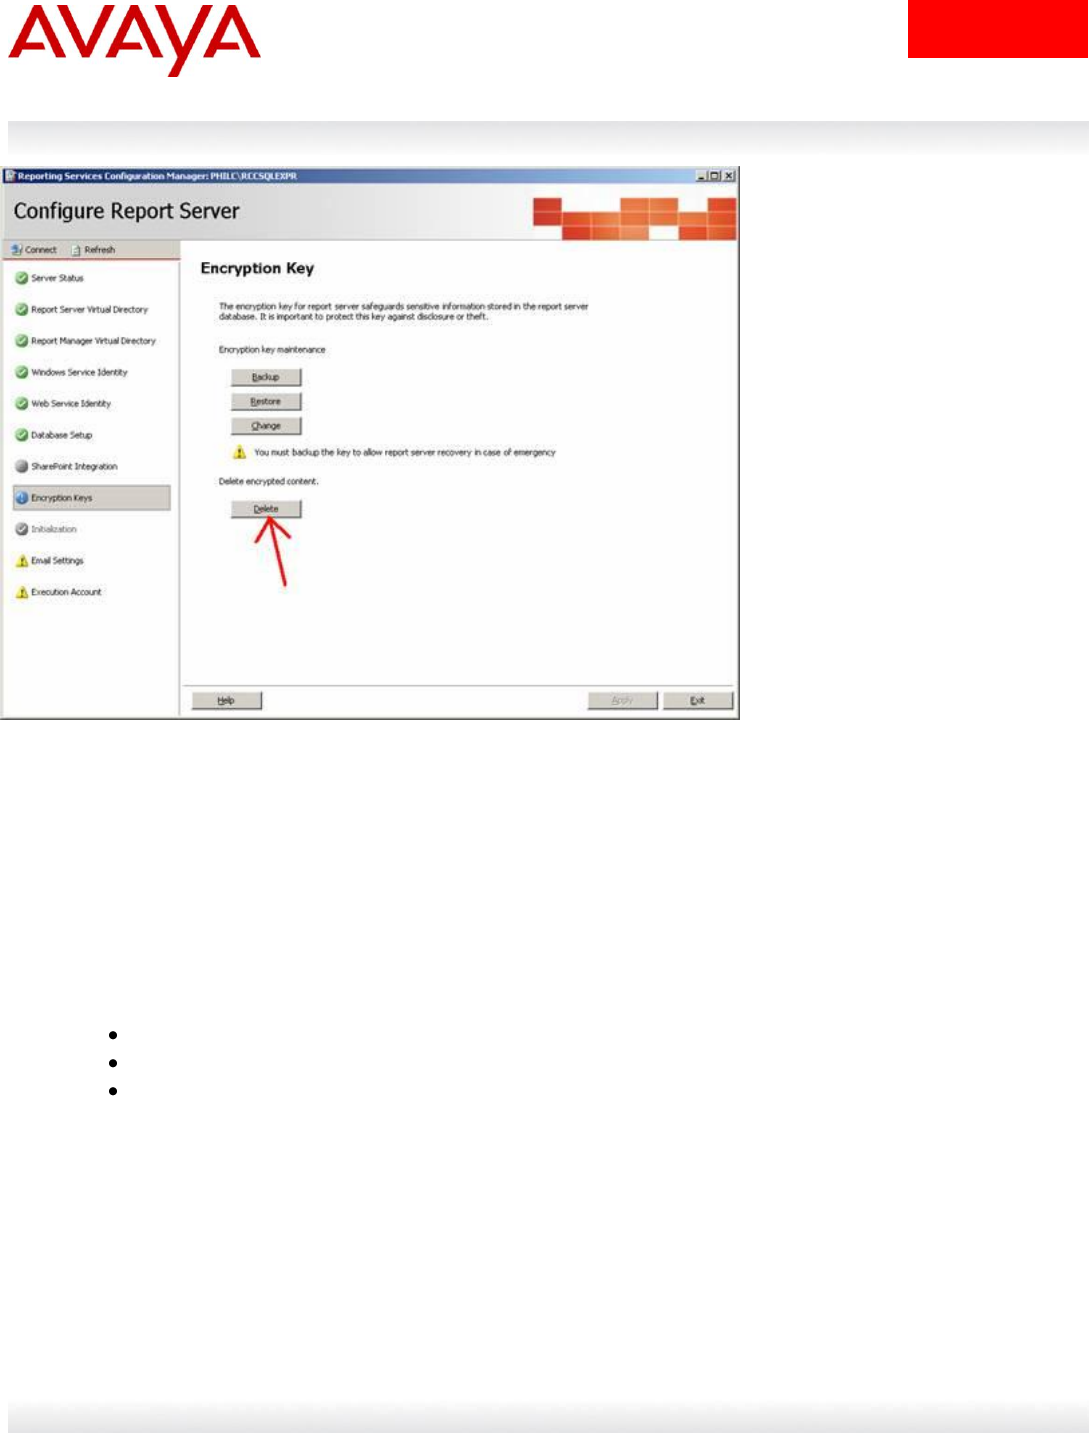
19. Click the Encryption keys link on the left.
Compas ID: 152861
5
avaya.com
Figure 3: SQL Configure Report Server Dialog – Delete Button highlighted
20. Click the Delete button, as shown above, then click OK on the next dialog box.
21. Click the Restore button and navigate to C:\Program Files\Nortel\Reporting For Contact
Center\SQLInstall\RSDBKey.snk and use the password YR46L43!
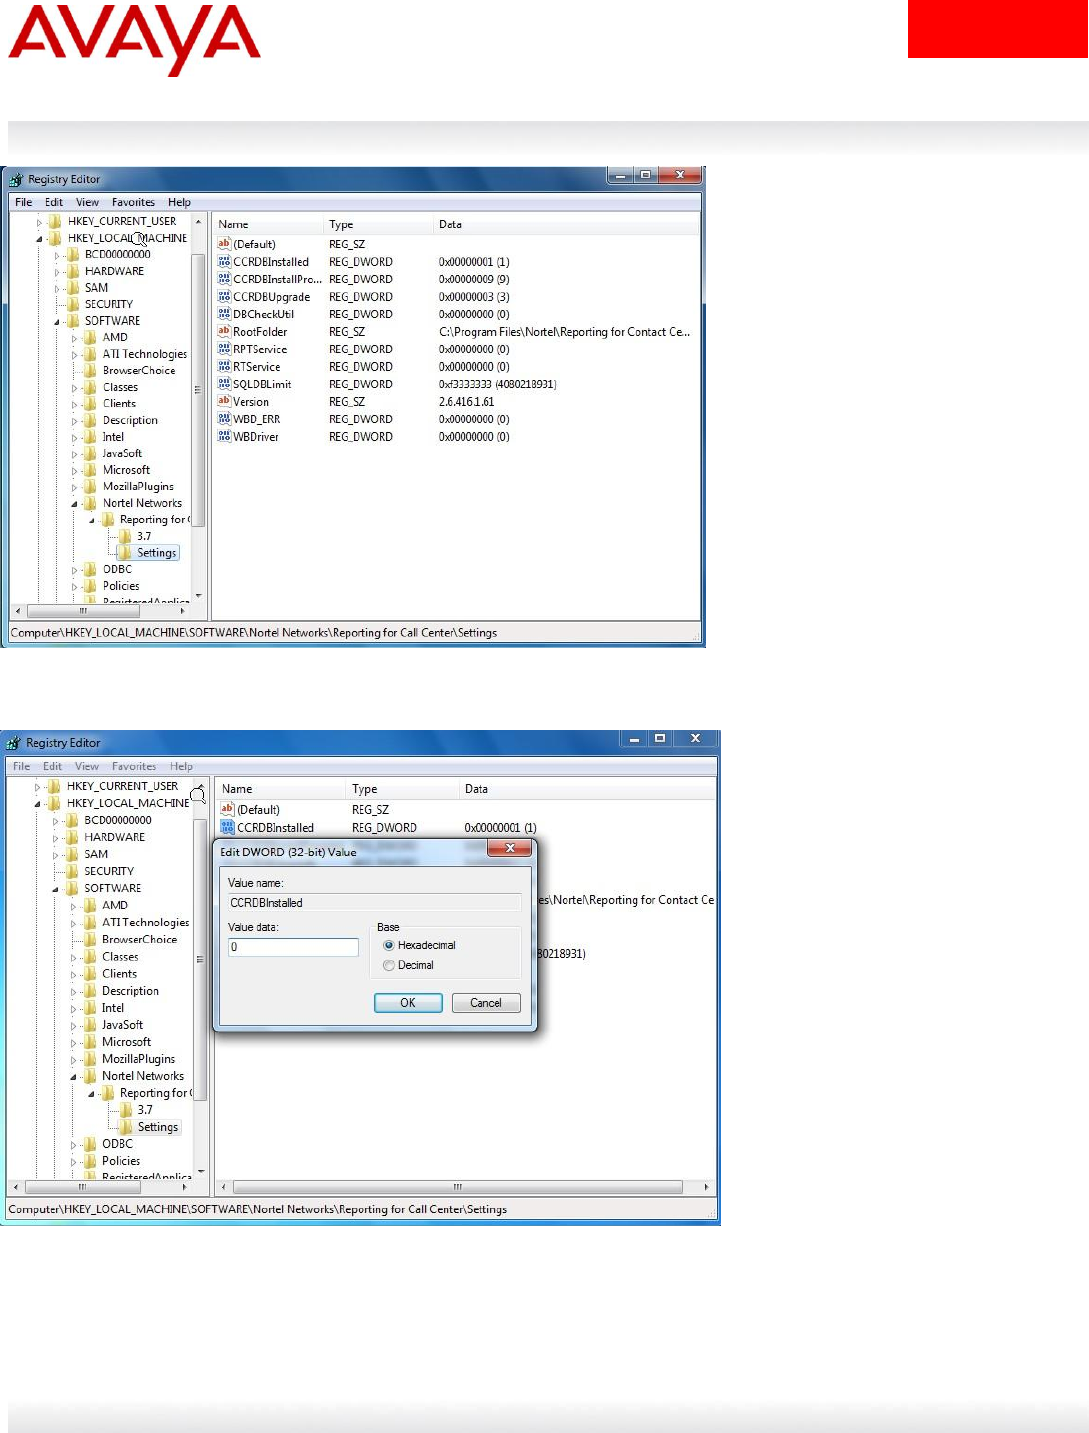
22. Open Regedit and navigate to HKEY_Local_Machine\SOFTWARE\Nortel Networks\Reporting for Call
Center\Settings and change the following RCC Registry entries:
CCRDBInstalled : change data to 0
CCRDBInstallProgress : change data to 6
CCRDBUpgrade : change data to 0
Compas ID: 152861
6
avaya.com
Figure 4: Regedit open at HKEY_Local_Machine\SOFTWARE\Nortel Networks\Reporting for Call Center\Settings
Figure 5: Setting the value of CCRDBInstalled to Zero (0).
Compas ID: 152861
7
avaya.com
23. Navigate to C:\Program Files\Nortel\Reporting for Contact Center\Utils and run the DBI (RCC Database
Installer Utility.exe). This redeploys the reports and re-creates the DS_Nortel data source.
24. Open localhost\rcc in Internet Explorer and check that reports are now able to be generated.
© 2011 Avaya Inc. All Rights Reserved.
Avaya and the Avaya Logo are trademarks of Avaya Inc. and are registered in the United States and other countries.
All trademarks identified by ®, TM or SM are registered marks, trademarks, and service marks, respectively, of Avaya Inc.
All other trademarks are the property of their respective owners. Avaya may also have trademark rights in other terms used herein.
References to Avaya include the Nortel Enterprise business, which was acquired as of December 18, 2009.
02/10
