Avaya E129V13 Sip Deskphone User Manual
AVAYA Sip Deskphone
UserManual.wiki
>
Avaya
>
E129V13 User Manual
User Manual
Navigation menu
Upload a User Manual
Namespaces
Wiki Guide
HTML
PDF
Info
Views
User Manual
Discussion / Help
Navigation


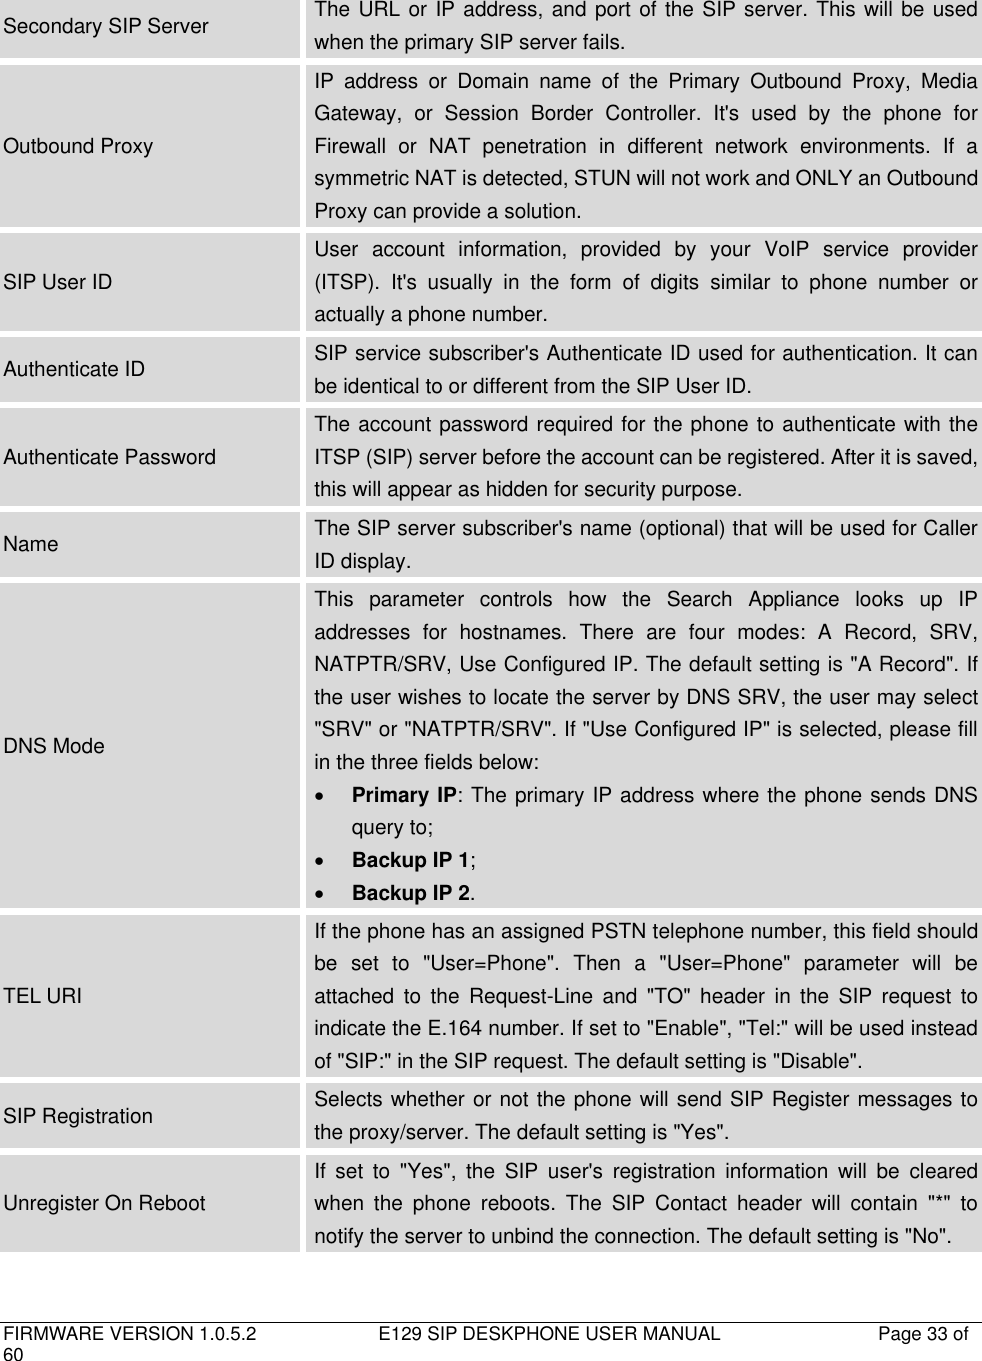
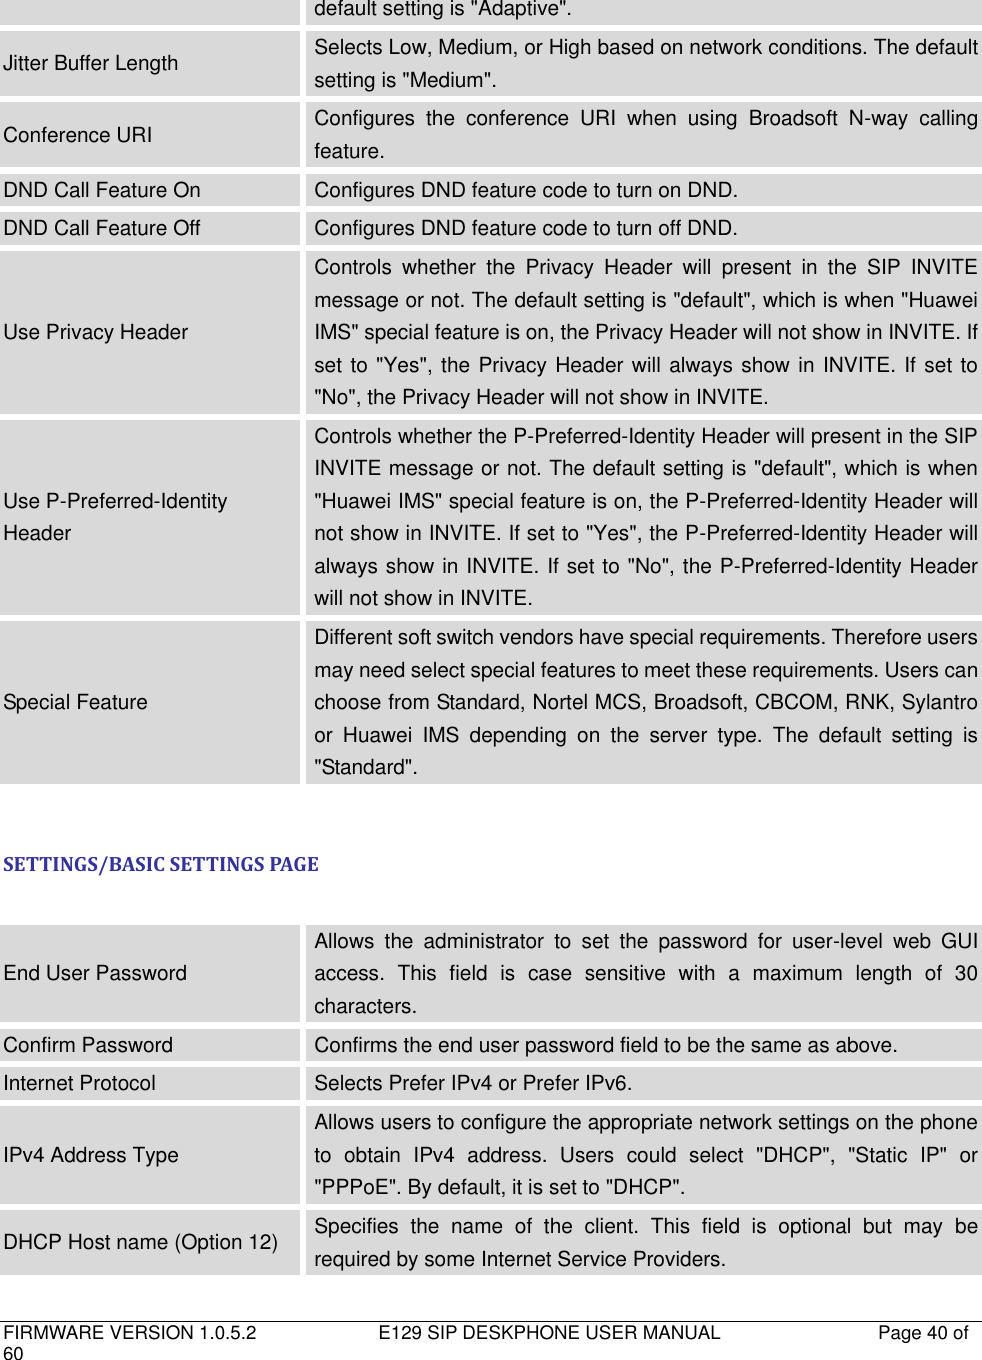
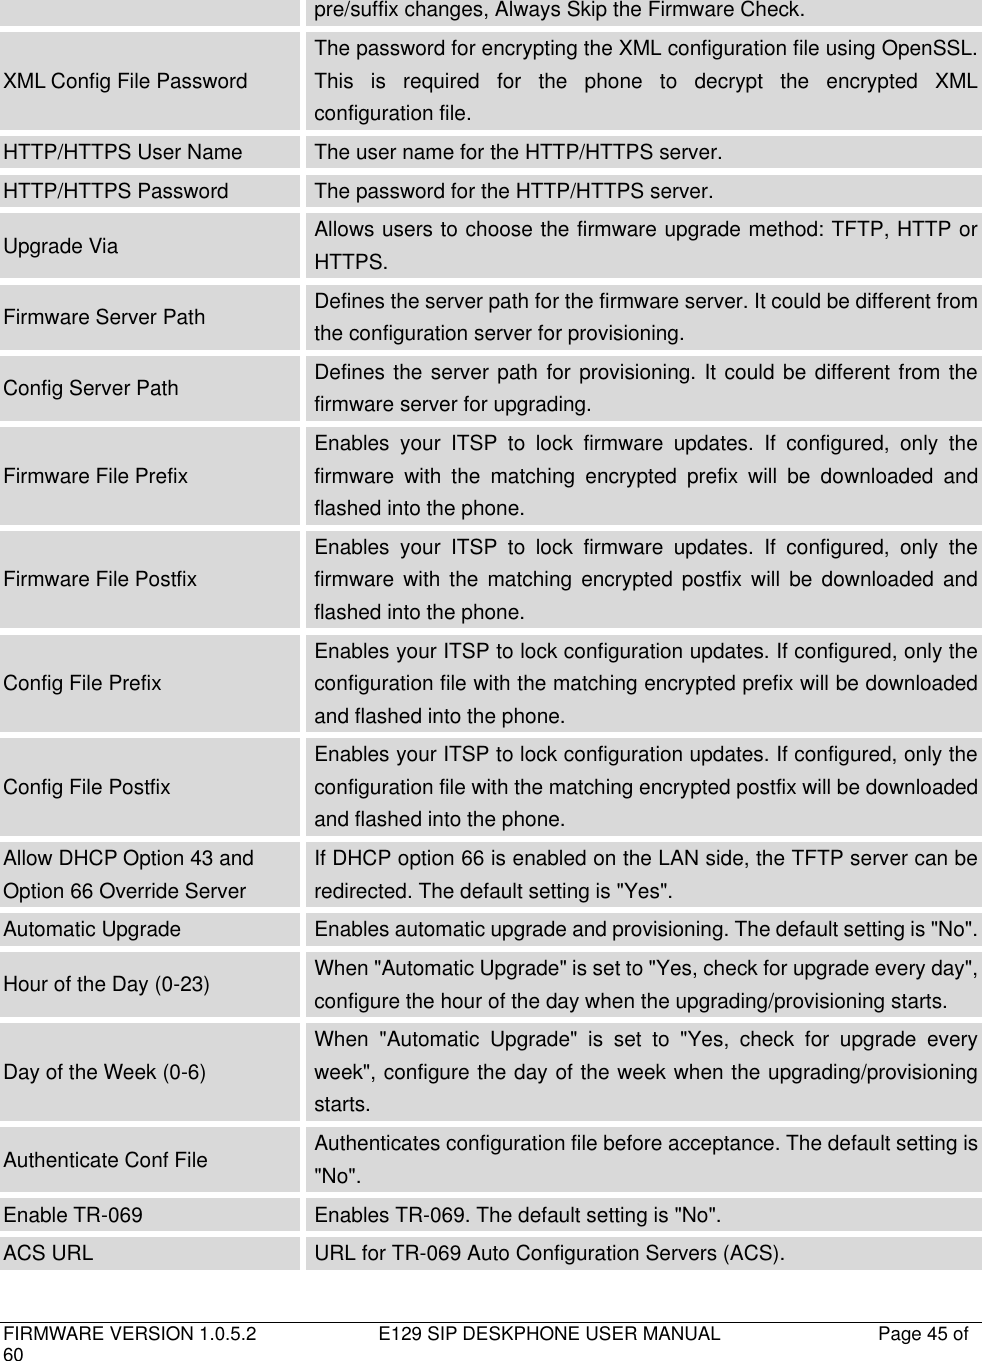
![FIRMWARE VERSION 1.0.5.2 E129 SIP DESKPHONE USER MANUAL Page 35 of 60 "STUN" cannot be used if the detected NAT is symmetric NAT. SUBSCRIBE for MWI When set to "Yes", a SUBSCRIBE for Message Waiting Indication will be sent periodically. The phone supports synchronized and non-synchronized MWI. The default setting is "No". SUBSCRIBE for Registration When set to "Yes", a SUBSCRIBE for Registration will be sent out periodically. The default setting is "No". Feature Key Synchronization This feature is used for Broadsoft call feature synchronization. When it's enabled, DND and Call Forward features can be synchronized with Broadsoft server. The default setting is "Disabled". Proxy-Require A SIP Extension to notify the SIP server that the phone is behind a NAT/Firewall. Do not configure this parameter unless this feature is supported on the SIP server. Voice Mail UserID Allows you to access voice messages by pressing the MESSAGE button on the phone. This ID is usually the VM portal access number. For example, in Asterisk server, 8500 could be used. Send DTMF Specifies the mechanism to transmit DTMF digits. There are 3 supported modes: in audio which means DTMF is combined in the audio signal (not very reliable with low-bit-rate codecs), via RTP (RFC2833), or via SIP INFO. DTMF Payload Type Configures the payload type for DTMF using RFC2833. The default value is 101. Early Dial Selects whether or not to enable early dial. If it's set to "Yes", the SIP proxy must support 484 response. The default setting is "No". Dial Plan Prefix Sets the prefix added to each dialed number. Dial Plan A dial plan establishes the expected number and pattern of digits for a telephone number. This parameter configures the allowed dial plan for the phone. Dial Plan Rules: 1. Accepted Digits: 1,2,3,4,5,6,7,8,9,0 , *, #, A,a,B,b,C,c,D,d; 2. Grammar: x - any digit from 0-9; a) xx+ - at least 2 digit numbers b) xx. - only 2 digit numbers c) ^ - exclude d) [3-5] - any digit of 3, 4, or 5 e) [147] - any digit of 1, 4, or 7 f) <2=011> - replace digit 2 with 011 when dialing](https://usermanual.wiki/Avaya/E129V13/User-Guide-2801393-Page-34.png)
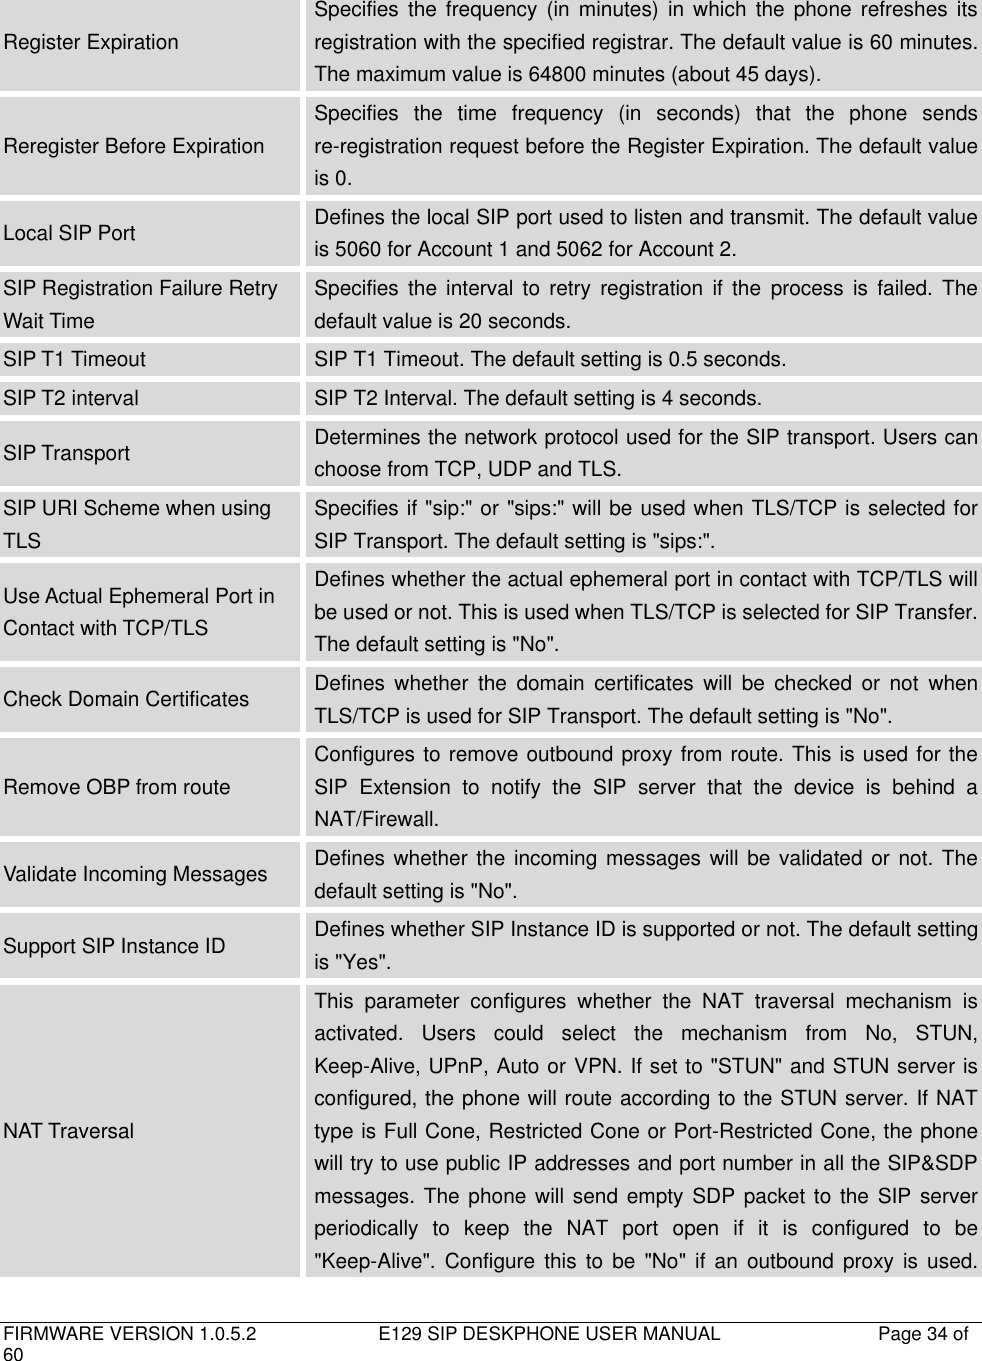
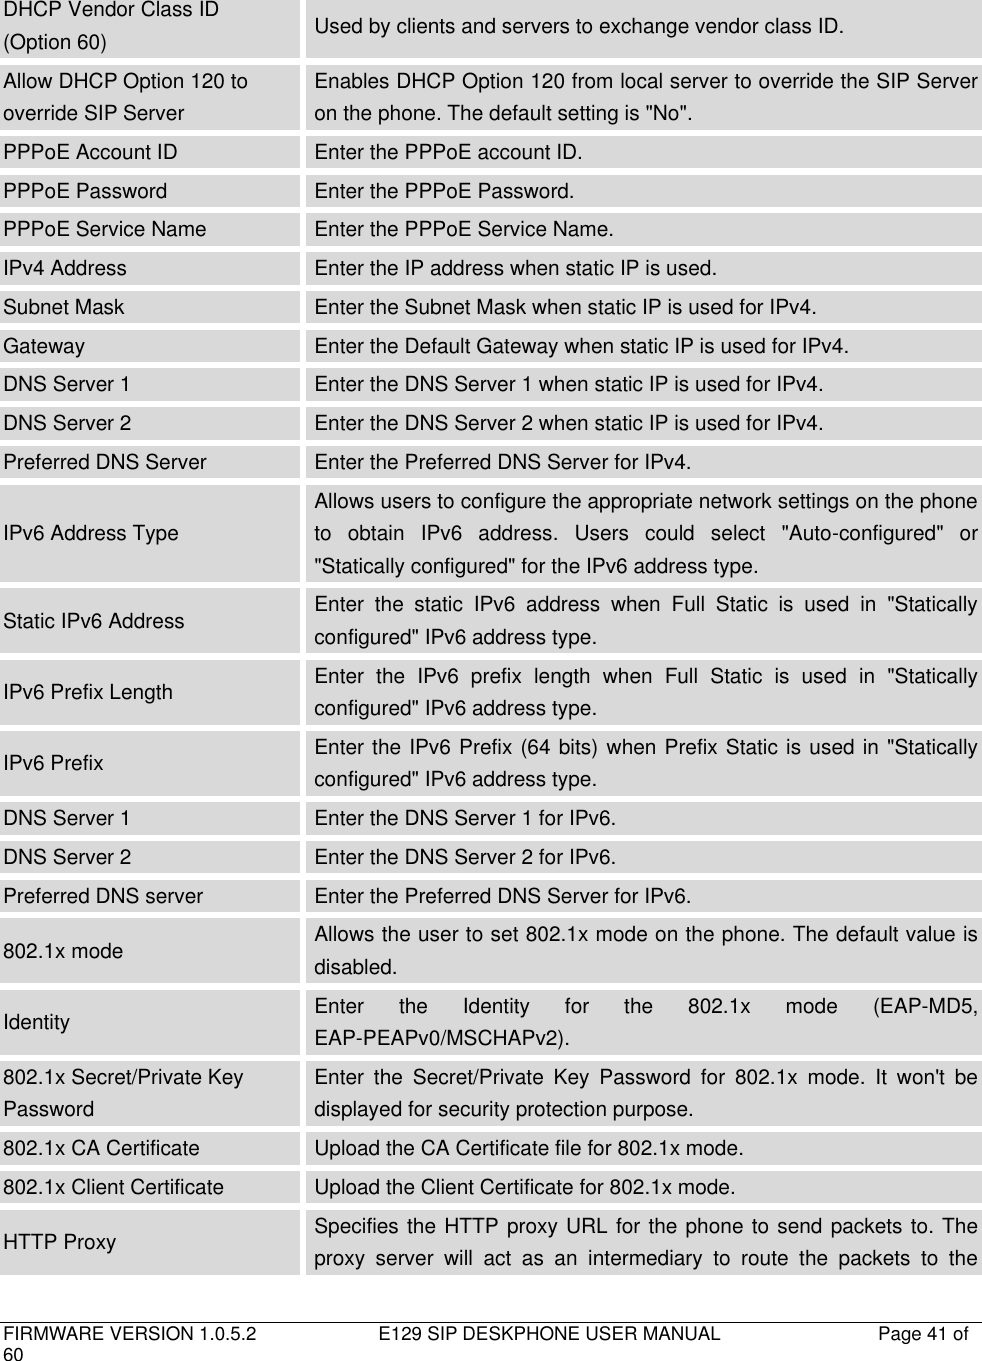
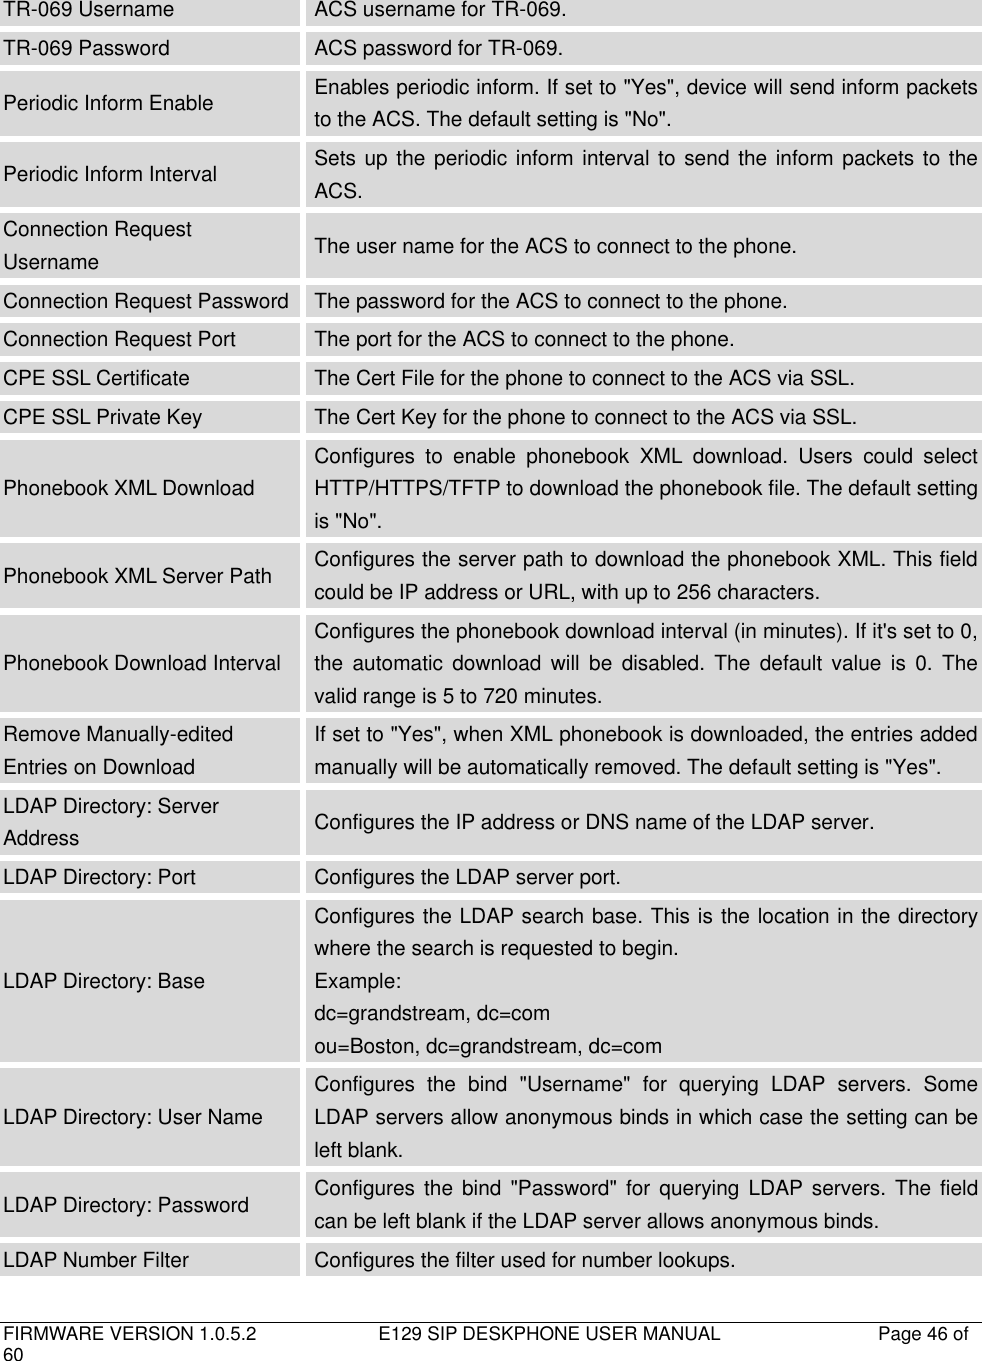
![FIRMWARE VERSION 1.0.5.2 E129 SIP DESKPHONE USER MANUAL Page 36 of 60 g) | - the OR operand Example 1: {[369]11 | 1617xxxxxxx} Allow 311, 611, and 911 or any 10 digit numbers with leading digits 1617; Example 2: {^1900x+ | <=1617>xxxxxxx} Block any number of leading digits 1900 or add prefix 1617 for any dialed 7 digit numbers; Example 3: {1xxx[2-9]xxxxxx | <2=011>x+} Allows any number with leading digit 1 followed by a 3 digit number, followed by any number between 2 and 9, followed by any 7 digit number OR Allows any length of numbers with leading digit 2, replacing the 2 with 011 when dialed. Example of a simple dial plan used in a Home/Office in the US: { ^1900x. | <=1617>[2-9]xxxxxx | 1[2-9]xx[2-9]xxxxxx | 011[2-9]x. | [3469]11 } Explanation of example rule (reading from left to right): ^1900x. - prevents dialing any number started with 1900; <=1617>[2-9]xxxxxx - allows dialing to local area code (617) numbers by dialing 7 numbers and 1617 area code will be added automatically; 1[2-9]xx[2-9]xxxxxx |- allows dialing to any US/Canada Number with 11 digits length; 011[2-9]x - allows international calls starting with 011; [3469]11 - allows dialing special and emergency numbers 311, 411, 611 and 911. Note: In some cases where the user wishes to dial strings such as *123 to activate voice mail or other applications provided by their service provider, the * should be predefined inside the dial plan feature. An example dial plan will be: { *x+ } which allows the user to dial * followed by any length of numbers. Delayed Call Forward Wait Time Defines the timeout (in seconds) before the call is forwarded on no answer. The default value is 20 seconds. Enable Call Features When enabled, Do No Disturb, Call Forward and other call features will](https://usermanual.wiki/Avaya/E129V13/User-Guide-2801393-Page-35.png)
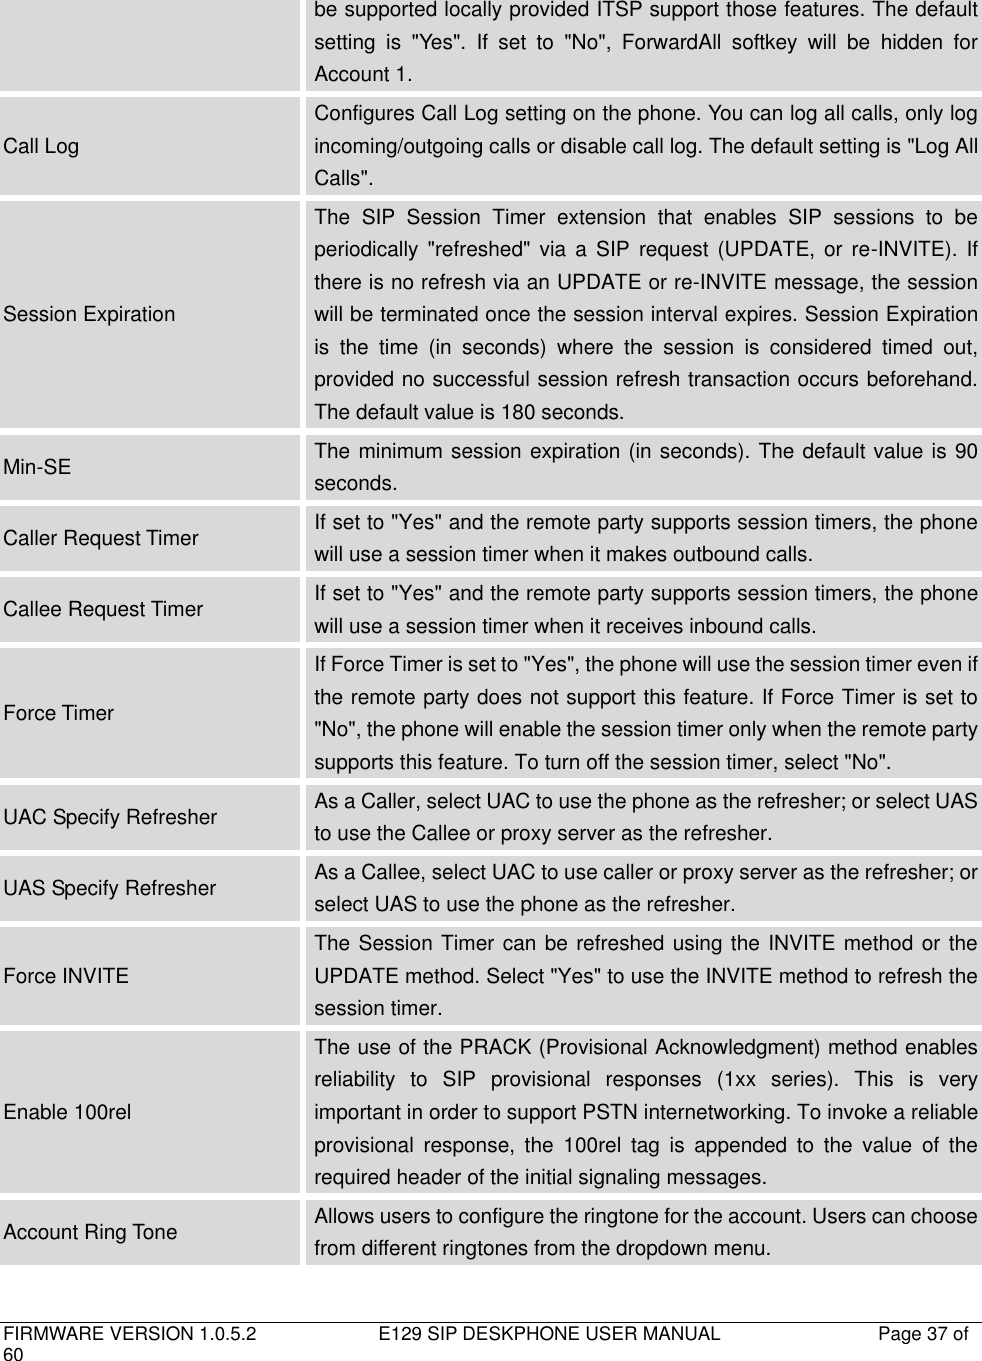
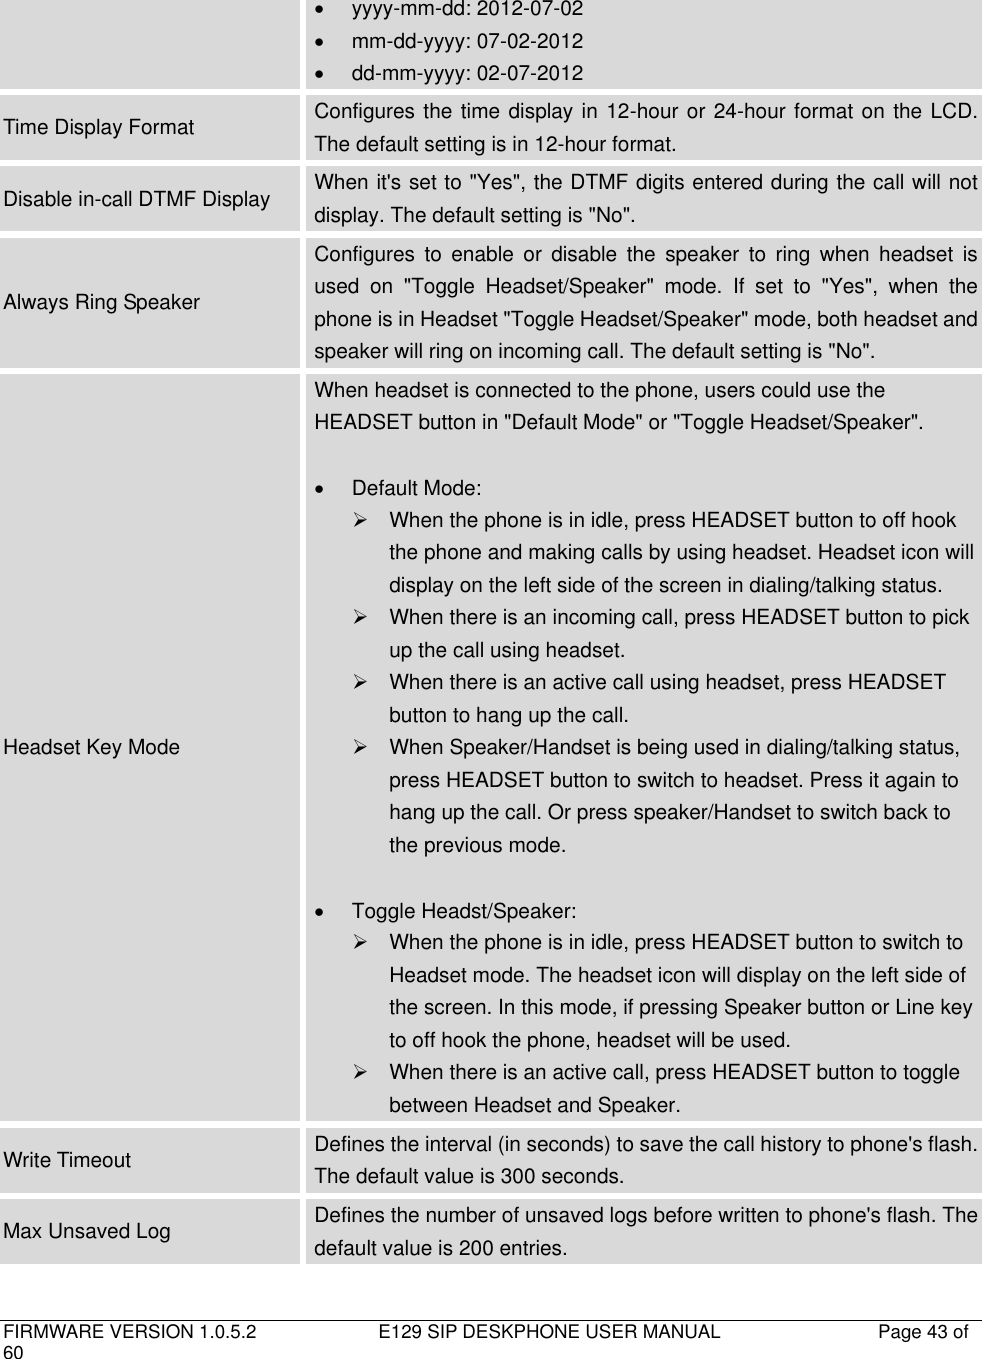
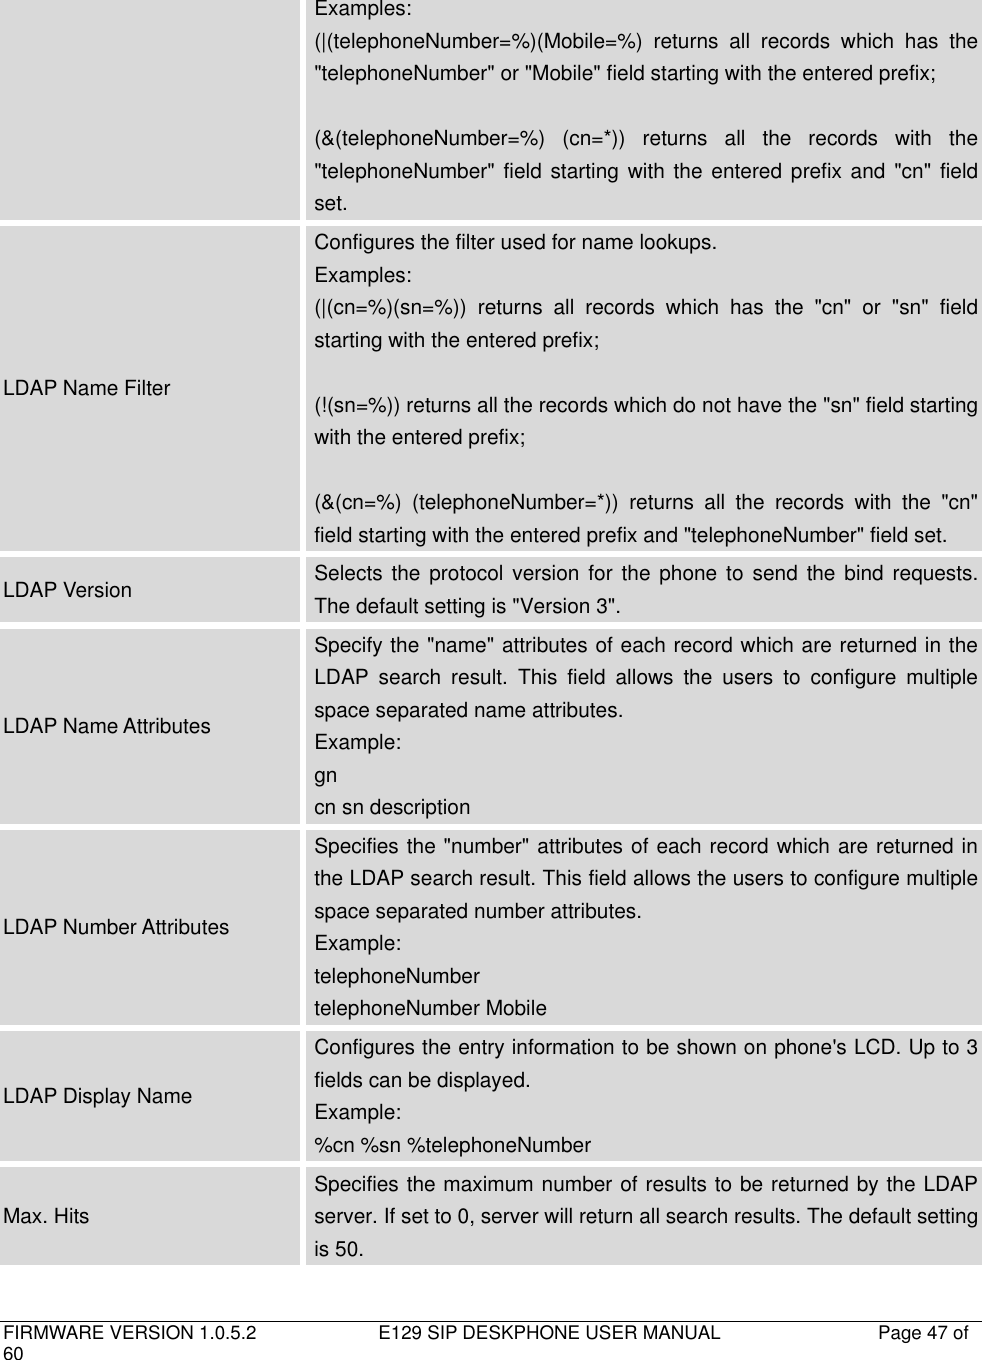
![FIRMWARE VERSION 1.0.5.2 E129 SIP DESKPHONE USER MANUAL Page 38 of 60 Matching Incoming Caller ID Specifies matching rules with number, pattern or Alert Info text. When the incoming caller ID or Alert Info matches the rule, the phone will ring with selected distinctive ringtone. Matching rules: Specific caller ID number. For example, 8321123; A defined pattern with certain length using x and + to specify, where x could be any digit from 0 to 9. Samples: xx+ : at least 2-digit number; xx : only 2-digit number; [345]xx: 3-digit number with the leading digit of 3, 4 or 5; [6-9]xx: 3-digit number with the leading digit from 6 to 9. Alert Info text Users could configure the matching rule as certain text (e.g., priority) and select the custom ring tone mapped to it. The custom ring tone will be used if the phone receives SIP INVITE with Alert-Info header in the following format: Alert-Info: <http://127.0.0.1>; info=priority Distinctive Ringtones Selects the distinctive ring tone for the matching rule. When the incoming caller ID or Alert Info matches the rule, the phone will ring with the selected ring. Ring Timeout Defines the timeout (in seconds) for the rings on no answer. The default setting is 60 seconds. Send Anonymous If set to "Yes", the "From" header in outgoing INVITE messages will be set to anonymous, essentially blocking the Caller ID to be displayed. Anonymous Call Rejection If set to "Yes", anonymous calls will be rejected. The default setting is "No". Auto Answer If set to "Yes", the phone will automatically turn on the speaker phone to answer incoming calls after a short reminding beep. Allow Auto Answer by Call-Info If set to "Yes", the phone will automatically turn on the speaker phone to answer incoming calls after a short reminding beep, based on the SIP info header sent from the server/proxy. The default setting is "No". Refer-To Use Target Contact If set to "Yes", the "Refer-To" header uses the transferred target's Contact header information for attended transfer. The default setting is "No". Transfer on Conference Hangup Defines whether or not the call is transferred to the other party if the initiator of the conference hangs up. The default setting is "No". Check SIP User ID for incoming INVITE If set to "Yes", SIP User ID will be checked in the Request URI of the incoming INVITE. If it doesn't match the phone's SIP User ID, the call will be rejected. The default setting is "No".](https://usermanual.wiki/Avaya/E129V13/User-Guide-2801393-Page-37.png)
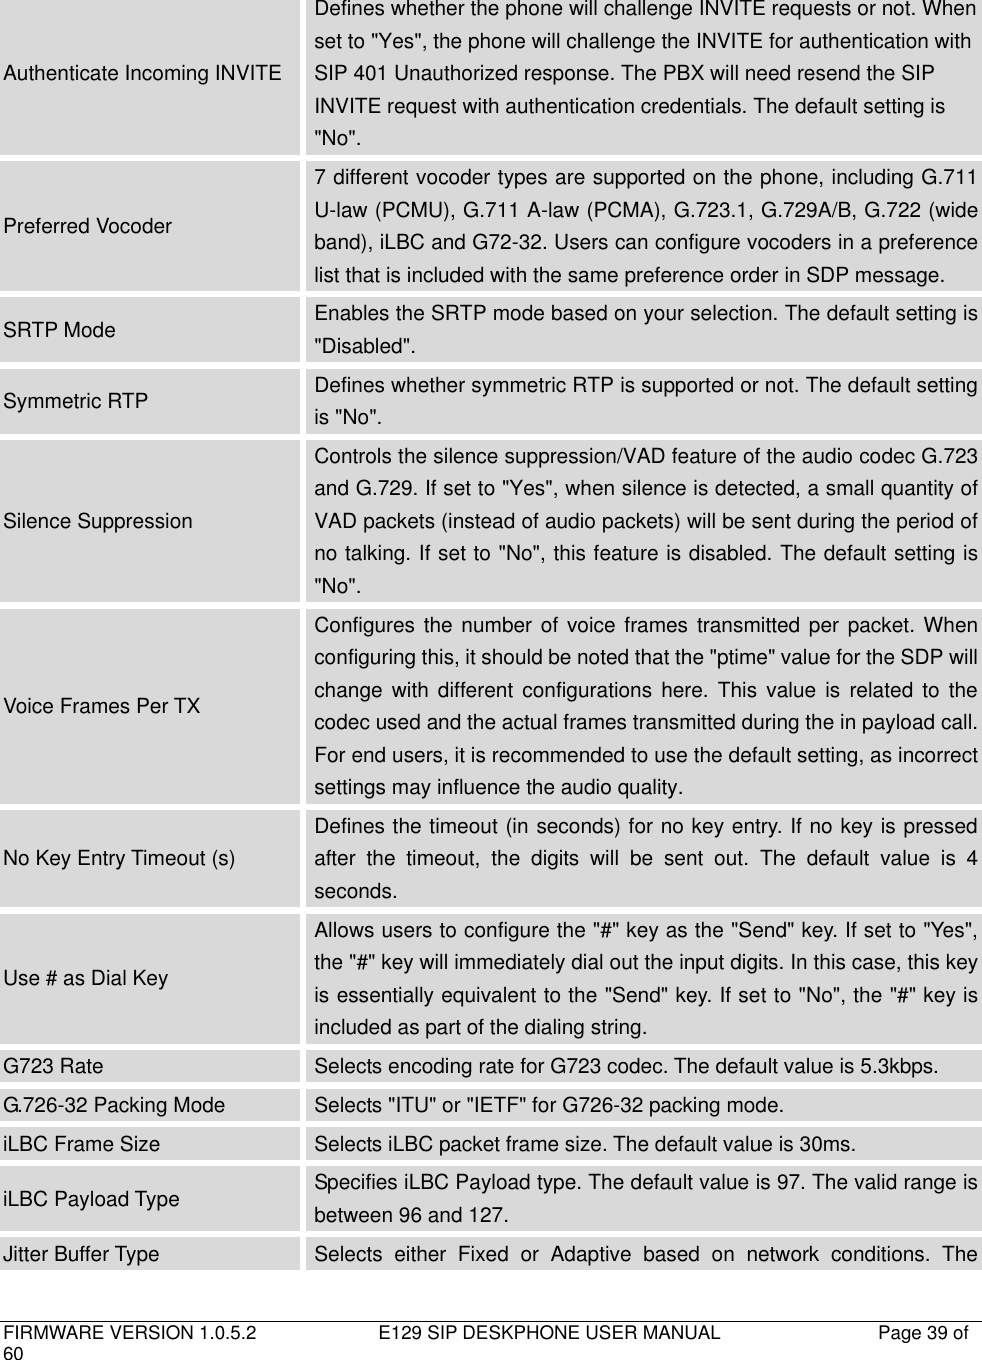
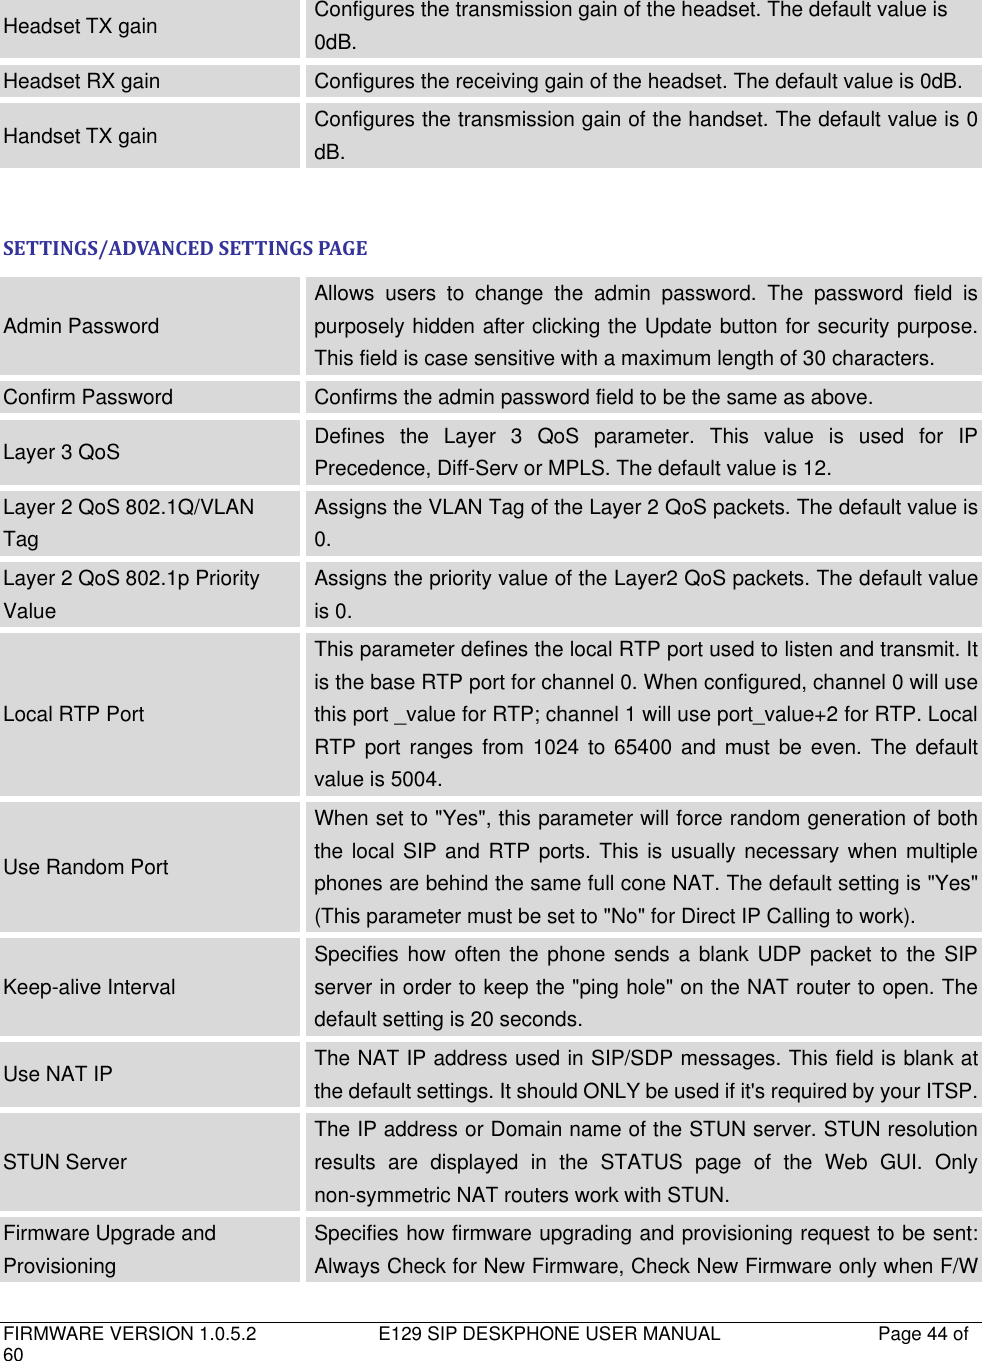
![FIRMWARE VERSION 1.0.5.2 E129 SIP DESKPHONE USER MANUAL Page 42 of 60 destination. HTTPS Proxy Specifies the HTTPS proxy URL for the phone to send packets to. The proxy server will act as an intermediary to route the packets to the destination. Time Zone Configures the date/time used on the phone according to the specified time zone. Self-Defined Time Zone This parameter allows the users to define their own time zone. The syntax is: std offset dst [offset], start [/time], end [/time] Default is set to: MTZ+6MDT+5,M4.1.0,M11.1.0 MTZ+6MDT+5 This indicates a time zone with 6 hours offset with 1 hour ahead which is U.S central time. If it is positive (+) if the local time zone is west of the Prime Meridian (A.K.A: International or Greenwich Meridian) and negative (-) if it is east. M4.1.0,M11.1.0 The 1st number indicates Month: 1,2,3.., 12 (for Jan, Feb, .., Dec) The 2nd number indicates the nth iteration of the weekday: (1st Sunday, 3rd Tuesday…) The 3rd number indicates weekday: 0,1,2,..,6( for Sun, Mon, Tues, ... ,Sat) Therefore, this example is the DST which starts from the First Sunday of April to the 1st Sunday of November. Enable Weather Update Configures to enable or disable weather update on the phone. The default setting is "Yes". If set to "No", the weather information screen will not show. City Code Configures weather city code for the phone to look up the weather information. The default setting is "Automatic" and the weather information will be obtained based on the IP location of the phone if available. Otherwise, specify the self-defined city code. For example, USCA0638 is the city code for Los Angeles, CA, United States. Update Interval Specifies the weather update interval (in minutes). The default value is 15 minutes. Degree Unit Specifies the degree unit for the weather information to display on the phone. LCD Contrast Configures the LCD contrast level (from 0 to 20). The default value is 10. Date Display Format Configures the date display format on the LCD. The following formats are supported:](https://usermanual.wiki/Avaya/E129V13/User-Guide-2801393-Page-41.png)
![FIRMWARE VERSION 1.0.5.2 E129 SIP DESKPHONE USER MANUAL Page 49 of 60 inbound and outbound calls (INFO level); registration status change (INFO level); negotiated codec (INFO level); ethernet link up (INFO level); SLIC chip exception (WARNING and ERROR levels); memory exception (ERROR level). Send SIP Log Configures whether the SIP log will be included in the syslog messages or not. The default setting is "No". NTP Server Defines the URL or IP address of the NTP server. The phone may obtain the date and time from the server. Allow DHCP Option 42 Override NTP Server Defines whether DHCP Option 42 should override NTP server or not. When enabled, DHCP Option 42 will override the NTP server if it's set up on the LAN. The default setting is "Yes". Public Mode Configures to turn on/off public mode for hot desking feature on the phone. If set to "Yes", users would need fill in the SIP Server address for account 1 as well. Then reboot the phone. When the phone boots up, users will need enter SIP User ID and Password on the LCD to login and use the phone. Note: When the phone is in public mode login screen, press HOLD button will have the IP address of the phone displayed. SSL Certificate SSL Certificate used for SIP Transport in TLS/TCP. SSL Private Key SSL Private key used for SIP Transport in TLS/TCP. SSL Private Key Password SSL Private key password used for SIP Transport in TLS/TCP. System Ring Tone Configures system ring tone. The default value is North American standard. Users could adjust system ring tone frequencies and cadences based on local telecom standard. Call Progresses Tones: Dial Tone Message Waiting Ring Back Tone Call-Waiting Tone Busy Tone Reorder Tone Configures ring or tone frequencies based on parameters from local telecom. The default value is North American standard. Frequencies should be configured with known values to avoid uncomfortable high pitch sounds. Syntax: f1=val,f2=val[,c=on1/off1[-on2/off2[-on3/off3]]]; (Frequencies are in Hz and cadence on and off are in 10ms) ON is the period of ringing (“On time” in ‘ms’) while OFF is the period of silence. In order to set a continuous ring, OFF should be zero. Otherwise it will ring ON ms and a pause of OFF ms and then repeat the pattern.](https://usermanual.wiki/Avaya/E129V13/User-Guide-2801393-Page-48.png)
![FIRMWARE VERSION 1.0.5.2 E129 SIP DESKPHONE USER MANUAL Page 57 of 60 Firmware upgrades take around 60 seconds in a controlled LAN or 5-10 minutes over the Internet. We recommend completing firmware upgrades in a controlled LAN environment whenever possible. NO LOCAL TFTP/HTTP SERVERS For users that would like to use remote upgrading without a local TFTP/HTTP server, AVAYA offers a NAT-friendly HTTP server. This enables users to download the latest software upgrades for their phone via this server. Please refer to the webpage: Alternatively, users can download a free TFTP or HTTP server and conduct a local firmware upgrade. A free windows version TFTP server is available for download from : . Instructions for local firmware upgrade via TFTP: 1. Unzip the firmware files and put all of them in the root directory of the TFTP server; 2. Connect the PC running the TFTP server and the phone to the same LAN segment; 3. Launch the TFTP server and go to the File menu->Configure->Security to change the TFTP server's default setting from "Receive Only" to "Transmit Only" for the firmware upgrade; 4. Start the TFTP server and configure the TFTP server in the phone’s web configuration interface; 5. Configure the Firmware Server Path to the IP address of the PC; 6. Update the changes and reboot the phone. End users can also choose to download a free HTTP server from http://httpd.apache.org/ or use Microsoft IIS web server. Note: When the phone boots up, it will send a TFTP or HTTP request to download the configuration file "cfgxxxxxxxxxxxx" where "xxxxxxxxxxxx" is the MAC address of the phone. If it is a normal TFTP or HTTP upgrade, the following messages “TFTP Error from [IP ADRESS] requesting cfg000b82023dd4 : File does not exist. Configuration File Download” can be ignored in the TFTP/HTTP server log. CONFIGURATION FILE DOWNLOAD AVAYA SIP Devices can be configured via the Web Interface as well as via a Configuration File (binary or XML) through TFTP or HTTP/HTTPS. The "Config Server Path" is the TFTP or HTTP/HTTPS server path for the configuration file. It needs to be set to a valid URL, either in FQDN or IP address format. The "Config Server Path" can be the same or different from the "Firmware Server Path".](https://usermanual.wiki/Avaya/E129V13/User-Guide-2801393-Page-56.png)