Axesstel PX220 Fixed WLL Telephone (CDMA) User Manual PX200 Manual v0 1
Axesstel Inc Fixed WLL Telephone (CDMA) PX200 Manual v0 1
Axesstel >
Users Manual
1
User Manual
PX210
PX220
PX230
2
INTRODUCTION
The Fixed Wireless phone operates through a wireless connection instead of a landline
phone cable, enabling the subscriber to set up the phone at any where wireless service
is available.
Axesstel CDMA 2000 Fixed Wireless Phone provides high quality and
superior performance with many features such as superior voice quality, optional data
service, caller ID, three-way calling, call waiting, short message service, etc.
A large graphic liquid crystal display provides user-friendly interface for quick and easy
information display.
FEATURES
1. Speaker Phone with Hands-Free Dialing
2. Signal Strength Indicator
3. Redial
4. Volume Control
5. Dust-proof Laminate Keypad
6. Battery Power Backup
7. LCD Screen
8. One-touch, Two-touch Dialing
9. Automatic Sending
10. Phone Book
11. Short Message Service
12. Data Service Call with Speed up to 153kbps
13. FM Radio with Programmable Preset
3
TABLES OF CONTENTS
Advanced Features
Safety Precautions……………………… 4 Changing Greeting Message……….. 27
Checking Parts .………………………… 5 System Reset………………………... 27
Starting R-UIM Card Restricting Use of the Phone………. 28
Setting up Your Phone ……….……….. 6 Locking / Unlocking the Phone…….. 28
Getting to Know Your Phone ……….… 8 Changing the Lock Code…………… 29
Display Icons……………………………. 9
Function Keys…………………………... 10
Optional Features
Basic Operation Call Forwarding……………………….. 31
Boot with R-UIM Card (Optional)……..
Making Calls ....………………………… 12 Call Waiting…………………………… 31
Redial……………………………………. 12 Three-Way Calling………………….... 31
Receiving Calls ………………………… 12
Adjusting Volumes …………………….. 13 Miscellaneous
Choosing the Ring Tone ……………… 13 Menu Table…………………………… 33
Message Service ..……………………. 14
FM Radio (Optional) …………………… Specification………………………….. 34
Internal Phone Book
Internal Phone Book…………………… 17
Storing in phonebook …………………. 17
Searching for Entries in Phonebook…. 18
Erasing An Entry in Phonebook ….….. 19
Erasing All Entries in Phonebook ....… 19
One-Touch Dialing ………………….… 19
Two-Touch Dialing ………………….… 20
Useful Features
Call History.......................................... 22
Displaying Your Phone Number.......... 23
Mute……………………………….……. 23
Selecting Time Mode…………………. 23
Setting the Alarm……………………… 24
Checking and Clearing Call Times….. 24
Setting Warning Alerts………………... 25
4
SAFETY PRECAUTIONS
1. Avoid placing the phone in a dusty location, or near a source of gas or fire.
2. Don't Shake, hit of drop the phone.
3. To if you clean the outside of the phone, use only a soft, dry cloth. The chemicals
in alcohol, benzene or acetone can damage the surface of the phone.
4. Do not twist or pull the cord out of the phone.
5. Do not disassemble the phone.
6. Do NOT use the power adaptor if:
- The power cord is damaged.
- The phone has been dropped or damaged in any way.
7. Use only the AXESSTEL provided adaptor. Do not use the AXESSTEL adaptor for
any other purpose.
8. Use only the AXESSTEL provided antenna. Do not use the antenna for any
other purpose.
9. Frequency and length of use can affect the life of the self-charging battery.
Contact your customer service if the battery is not operating properly.
10. Use only the designated self-charging battery. Dispose of exhausted batteries
properly. Never discard a battery in or near fire or flame.
11. Do not place the telephone near water, for example, near a bathtub, sink, wet
basement, or swimming pool.
NOTE 1: The input and output voltages are indicated on the adapter.
(Input: AC 100~240V, 50~60 Hz, Output: DC 5V, 2A)
NOTE 2: For phones with R-UIM Card Option, do not insert or eject R-UIM Card while
the phone is powered on.
5
CHECKING THE PARTS
Once you have unpacked your phone, make sure that you have all the parts shown
below. If any piece is missing or broken, please call your customer service.
1. Main Unit 4. User Manual
2. Handset 5. Antenna
3. Power Adaptor 6. Handset Cord
6
SETTING UP YOUR PHONE
Installing the phone
This phone operates by receiving DC power from the AXESSTEL power adaptor,
this connects to an electrical outlet. The phone is equipped with a rechargeable
battery as a back up in case of an AC power failure.
Desktop installation
Connect the antenna Attach the handset
ON/OFF power switch is located
on the bottom side of the phone.
Please turn on the power switch to
"ON" for operation
Plug the Power adaptor into an
appropriate Wall outlet
7
SETTING UP YOUR PHONE
Service Status Check
Display in the Service Area
When the power cord is connected properly,
all segments of the LCD window will turn on briefly.
The number of bars of signal strength indicator
(antenna icon) indicates the strength of service signal
of the area. The display will show the greeting with date
and time.
You can change the greeting. (See page 27)
Display in area with no service
When there is no service signal detected in your area,
no antenna bar appears. Contact your service provider
for the coverage area information.
First, check if the antenna is connected
AXESSTEL
THU 10/09 5:24P
A
XESSTEL
8
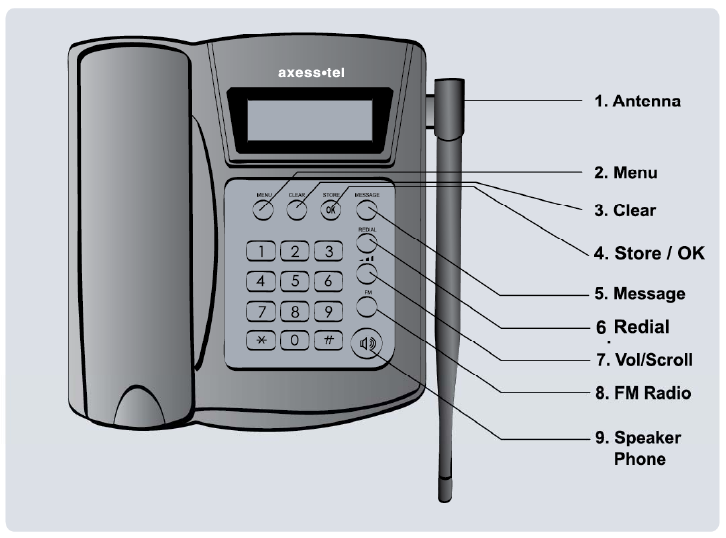
GETTING TO KNOW YOUR PHONE
1. Antenna: Adjusting the position of antenna improves the sound quality of the call.
2. Menu: Press to access the phone's menus.
3. Clear: Lets you clear your last entry.
4. Store: Stores phone numbers, and any settings you select in the menu with in the
phone's memory
5. Message: Press to retrieve messages.
6. Redial: Allows you to redial the last
7. Vol/Scroll: Lets you adjust sound levels and scroll through the menu options and
displays.
8. FM Radio: Turn on or off the FM Radio
9. Speaker Phone: Turn on or off the speaker phone feature

9
DISPLAY ICONS
Icons display on the screen to indicate what features you are using, signal strength
battery status and etc...
Indicate the strength of the signal. More bars indicates
stronger signal.
Indicates the level of battery power. The more bars, the
more power. When the battery is low, the icon blinks,
and an alert tone sounds.
Indicates that you are using the phone's menu.
Indicates that the alarm has been set.
Indicates that you are in the Phonebook menu.
Indicates that you have text message or a voice mail message.
Indicates that a voice or data call is in progress.
AXESSTEL
THU 10/09 5:24P

10
FUNCTION KEYS
Press this key to display the phone's main menu.
Clears information from display screen.
- To erase one character from the display screen, press it once.
- To erase all characters on the screen, press and hold.
- To go back one step in the menu mode, press it once
Press this key to retrieve messages.
Press this key to store a phone number in the phone book, to save
menu settings.
Press this key to redial the last number called or to connect a
call right after dialing the number without waiting until the call
is connected automatically.
Press this key to control the volume of keypad, earpiece
And speaker. In the menu mode, use this key to scroll through
The menu items.
Press this key to turn on or off the FM radio. If there is an incoming
call of if the user attempts to make an outgoing call while the FM radio
is on, the FM radio turns off automatically
The Hands-Free Dialing button is used to place a call without
Using the handset. Built-in speaker allows dialing without
picking up the handset
11
Basic Operation
Boot With R-UIM Card (Optional)
Making Calls
Redial
Receiving Calls
Adjusting Volumes
Choosing the Ring Tones
FM Radio (Optional)
Message Service

12
Boot With R-UIM Card (Optional)
1. Enter PIN Code.
NOTE 1: The function of pin feature can be set on/off in PIN
Setup menu.
NOTE 2: PIN code can be changed in pin setup menu.
2. If an incorrect PIN code is entered, an error message
Displays.
NOTE: After entering wrong PIN code 3 times, the R-UIM
Card becomes locked.
3. The phone is ready to use after entering the correct PIN
code.
* Default PIN code is provided by your service provider.
MAKING CALLS
1. Make sure your phone is turned on.
2. Pick up the handset to hear a dial tone.
When the phone fails to acquire service signal, you will
hear "No Service" tone (intermittent tone).
3. Dial the number to call. The LCD window displays
the number.
4. Wait for a moment for auto calling or press <REDIAL> .
5. When the other person answers, begin conversation.
6. To end the call, replace the handset on the main unit.
NOTE1: Modifying a phone number while dialing.
- To erase the last digit entered: Press <CLEAR> .
- To erase the entire number: Press <CLEAR> and hold.
NOTE2: Automatic calling
The phone was set to places a call automatically 4~10 seconds after last digit
entry from the factory. To disable automatic calling or change the delay time.
1. Press <MENU> , <0> , <1>.
2. Press <*>, <#> to select different time or 'OFF', then press <STORE> to save.
Once automatic calling is disabled, you have to dial the number and press
<REDIAL> to place a call.
CALLING....
02255558282
PLEASE
DIAL
INPUT PIN
****____
WRONG PIN
X TIMES LEFT
AXESSTEL
THU 10/19 2:32P
13
REDIAL
Redial the last number you dialed.
1. Pick up the handset or press <SPEACKER>.
2. Press <REDIAL>.
NOTE: You may not redial when there is no last number dialed stored
in the memory. "NO LAST CALL!" message is displayed on the LCD.
RECEIVING CALLS
When there is an incoming call, the phone rings blinks
"Incoming Call" message on the display.
1. Simply pick up the handset or press <SPEAKER> to answer
the call.
2. To disconnect, replace the handset or press <SPEACKER>.
NOTE: When the ringer volume is set to 'Silent', the
phone does not ring. Only the "Incoming Call“
message blinks.
When the Caller ID service is activated.
Call ID Display
The Caller ID feature displays the caller's number when the
phone receives a call. If the caller's name and number are
stored together in the phone book, the caller's name is
displayed. Contact your service provider to activate this
feature.
NOTE: If the call is not answered, the phone displays the
“Missed Call" message with the call arrival date and
time.
INCOMING CALL
123-456-7890
INCOMING CALL
AMIT
MISSED 1CALL
THU 10/09 2:56P
14
ADJUSTING VOLUMES
You can control the sound volumes including the key tone,
Earpiece, speaker and the ringer
Adjusting key tone volume
Press <volume key> repeatedly until it reaches proper volume.
Adjusting external speaker volume
Press <volume key> repeatedly during hands free call to adjust
external speaker volume.
Adjusting earpiece volume
Pick up the handset and press <volume key> repeatedly during
a phone call to adjust earpiece volume.
Adjusting ring volume
1. Press <MENU> , <5> , <3>.
2. Press <*> , <#> to adjust ringer volume.
3. Press <STORE> to save.
NOTE: If 'Silent' is selected, the phone does not ring
when an incoming call comes in. Only the
"INCOMING CALL" message blinks on the display.
CHOOSING THE RING TONES
You can choose from twelve different ring tones.
1. Press <MENU> , <5> , <2>.
2. Press <volume key> (or <*>, <#> ) to select ring type.
3. Press <STORE> to save.
KEY VOLUME
SPEAKER VOLUME
EARPIECE VOLUME
RING VOLUME
RING TONE
▶TONE # 1

15
FM Radio (Optional)
Using FM Radio
1. Press<Volume> to turn on the Radio.
2. Entering Radio Mode, Preset Channel and Frequency
display
on the screen.
3. Press<Left> or <Right> lightly to move the preset channel.
4. Press<up> or <Down> to change the volume.
5. To stop FM Radio, Press <Volume>.
NOTE 1: When you lift the phone handet or an incoming call in, Fm Radio stops
Automatically, switching to the phone mode. Also Pressing <Speaker> to use
Speaker phone also stops the FM Radio.
NOTE 2: Power cord acts as FM Radio Antenna. For best reception, plug in the power
Cord to the phone while listening to FM Radio.
PROGRAMMING and USING PRESET
10 programmable presets are available.
1. Press<MENU> to toggle between normal and preset modes.
2. ”Preset Mode” and preset number appear.
3. Press<Left> or <Right> to select the preset number.
NOTE: Preset 6~10 are indicated by highlighted”+5”
4. Press and hold Number key what you want to store.
5. Press<Left>,<Right> or Number key to change From one
Preset to andther.
Auto Preset
Press<REDIAL> button for automatic scan of available ststions. Once the scan is
Performed, the phone will automatically store detected ststions to 10 presets.
RADIO ON
FM 107.1 MHz
FM 107.1 MHz
16
MESSAGE SERVICE
Message service is network dependent feature and is available only when your
service provider supports it. Check your service provider is providing message
service before using this function.
Sending New Text Messages
1. Press <MESSAGE> . Press <1>(New Message).
2. Write message using the keypad. Toggle between uppercase,
lowercase, and numeric by pressing <MESSAGE> button.
3. Press <STORE>.
4. Enter destination number and press <STORE>.
5. Once the destination number has been entered, the message
will be sent.
NOTE: To change default message options, access Message
Options menu.
Sending Saved Text Messages
1. Press <MESSAGE> , <6>(Saved MSG).
2. Select message to resend with <Volume key> (or <*>, <#>)
and press <STORE>.
3. To edit the message press <MESSAGE>.
1: NEW MESSAGE
2: INBOX
PHONE NUMBER
123_
HELLO
_
SENDING...
PLEASE WAIT...
17
MESSAGE!
10/12 4:04 P
1: NEW MESSAGE
2: INBOX
▶ 1: SUNNY
2: 022255558282
10/12 4 : 04 PM
FROM:022255558282
ERASE MSG?
▶ YES
THE MESSAGE
IS ERASED
V
OICE MSG
10/12 4:05A
3: SMS SERVICES▼
4: VOICE MSG
Received Text Message
1. When text message arrives, 'MESSAGE! 10/12 4:04PM'
displays shortly and appears in the icon line.
2. Press <MESSAGE> , <2>(Inbox).
3. Press <Volume key> (or <*>, <#>) to select message you
want to see and press <STORE>.
4. The message, arrival time and call back number (if available)
Is displayed. If the message is long, it will be scrolled down in
3 seconds automatically.
To scroll up and down manually,
press <Volume key> (or <*>, <#>).
5. If the message contains call back number and you want to
make a call to that number.
press <REDIAL> if you want to call back.
NOTE: If the call back number is stored in the phonebook
with a name, the name will display instead of the
phone number.
6. To forward the received message to another number,
press <MENU>.
7. To write a reply to the sender, press <MESSAGE>.
Delete Text Message
1. After reading the <MESSAGE>, Press <Volume key>
to erase the message.
2. Press <STORE> to confirm erase.
Retrieving Voice Messages
1. When voice messages arrive, "VOICE MSG“
10/12 4:04 PM" shortly appears and <SMS ICON> appears
in the icon line.
2. Press <MESSAGE> ,<4>(Voice MSG) or press <STORE>
to view message directly.
3. Press <REDIAL> to dial voice mail service center.
18
ERASE ALL?
▶ YES
MESSAGE ALERT
▶ ON
Erasing All Messages
1. Press <MESSAGE> , <6>(Erase MSG).
2. Select 'YES' with <Volume key> (or <*>, <#>).
3. Press <STORE>.
Setting/Releasing Message Alert
1. Press <MESSAGE>, <7>(MSG Option), <1>(MSG Alert).
2. Select ON or OFF with <Volume key>(or <*>, <#>).
3. Press <STORE>.
NOTE: While the message alert is set, the phone will alert
user when messages arrive.
Saving Sent Message
1. Press <MESSAGE>, <7> (MSG Option), <5> (Save Sent MSG).
2. Select "ON" or "OFF" with <Volume key> (or <*>, <#>).
3. Press <STORE>.
While this option is turned on, outgoing new messages will be automatically
saved. Retrieve the saved messages by accessing Saved Message Menu.
Setting Message Priority Type
1. Press <MESSAGE> , <7> (MSG Option), <4> (MSG Priority).
2. Select "NORMAL" or "URGENT” with <Volume key> (or <*>, <#>).
3. Press <STORE>.
Setting Message Auto Delete
1. Press <MESSAGE> , <7> (MSG Option), <6> (Auto Delete).
2. Select "ON" or "OFF“ with <Volume key> (or <*>, <#>).
3. Press <STORE>.
When Auto Delete is enabled, the phone will automatically delete oldest received
messages in INBOX in case of full memory.
19
Phone book
Internal phone Book
Storing in phonebook
Searching for Entries in Phonebook
Erasing an Entry in Phonebook
Erasing all Entries in Phonebook
One-Touch Dialing
Two-Touch Dialing
20
NAME ?
_
PHONE NUMBER ?
_
MEMORY LOCATION
SPEED DIAL : [01]
OVERWRITE ?
01 : SUNNY
CONFIDENTIAL ?
NO
INTERNAL PHONE BOOK
Your phone has an internal "Phone Book" in which you can store
up to 99 frequently used names and numbers.
STORING IN THE MEMORY PHONEBOOK
1. Press <MENU> , <1> .
2. Enter the name by pressing the alphanumeric keypad
and pressing <STORE> after completed.
NOTE1: If you do not want to enter a name. just press
<STORE> here. The number will be saved as
"No Name".
NOTE2: Name entry is limited to maximum of 16 letters.
How to Enter &Edit Texts
You can enter letters using the alphanumeric keypad.
Each button has 3 to 4 letters assigned. Each stroke on the button scrolls the assigned
alphabet letters and the numeric value. Stop pressing when the letter you want appears.
You can switch between uppercase, lowercase, and numeric characters by pressing
<MESSAGE> .
To enter special characters. Press <1> repeatedly.
For space, press <#> . To go back, press <*> .
A single stoke on <CLEAR> will erase the last letter in line.
3. Enter the telephone number and press <STORE>.
Up to 32 digits can be saved.
4. An empty location displays automatically.
Press <STORE> to save the number in the location.
5. To assign a different location, enter 2 digit location number and press <STORE>.
NOTE: If you select the location in which a number
has already been stored, “OVERWRITE?” will be
displayed. Press <STORE> to overwrite or press
to go back to automatic location.
6. “CONFIDENTIAL?” will be displays. Press <STORE>
if no secret feature is necessary. To store the number in
secret, select ’YES’ by pressing (or <*>, <#>)and
press <STORE> .
NOTE: Secretly saved number will not be displayed unless
the lock code is entered. One or two touch-dialing
secretly saved number will prompt lock code entry.
21
NAME ?
_
▶ 01 : SUNNY
02 : VISHAL
LAT
A
022255558282
ENTER LOCK CODE
_ _ _
_
SEARCHING FOR ENTRIES IN PHONEBOOK
You can search information stored in the phone book in various
way and make a call directly from the phonebook.
Searching by Name
1. Press <MENU>, <1>(Phone book), <1> (Search),
<1> (Name).
2. Enter all or part of the name and press <STORE>.
Example) Enter A and press <STORE> to find all names
3. The phone displays the memory location numbers along
with the name of the first match.
NOTE: “NO NAME MATCHES” appears when there is no
name matching with your entry.
4. Press <Volume key> (or <*>, <#>) to search for the name
you’re looking for and press <STORE> to display the
number.
NOTE: “ENTER LOCK CODE” appears when you try to
Access secretly saved number. Enter lock code and
press <STORE>.
5. Press <REDIAL> to dial the number displayed to make
a call.
CALLING....
02255558282

22
PHONE NUMBER ?
_
LOOK UP
LOCATION ??
Searching by Phone Number
1. Press <MENU> (Phone book), <1>(Search),
<2>(Number).
2. Enter all or part of the number you remember and
press <STORE>.
3. The phone displays the memory location and names
which contain your entry.
NOTE: “NO NAME MATCHES” appears when there is no number
matching your entry.
4. Press <Volume key> (or <*>, <#>) to search for the name
you’re looking for and press <STORE> to display the number.
NOTE: “ENTER LOCK CODE” appears when you try to
access secretly saved number. Enter lock code and press <STORE>.
5. Press <REDIAL> to dial the number displayed.
Searching by Memory Location
1. Press <MENU> , <1> (Phonebook), <1> (Search),
<3> (Memory)
2. Enter the three-digit memory location. The phone
displays the information of the memory location.
NOTE: “EMPTY LOCATION!” displays when you enter
location number that is empty.
3. Press <STORE> to display the number.
NOTE: “ENTER LOCK CODE” appears when you try to
access secretly saved number. Enter lock code and press <STORE> .
4. Press <REDIAL> to dial the number displayed.
23
NAME ?
_
▶ 01 : AMIT
03 : SUNNY
AMIT
SUNNY
ERASE? #01
02255558282
ENTER LOCK CODE
_ _ _
_
ERASING AN ENTRY IN PHONEBOOK
To Erase a Specific Number
1. Press <MENU>, <1> (Phonebook) and <3> (Erase).
2. Press one of search options, <1> (Name),
<2> (Number) or <3> (Memory).
3. Enter name, address, or phone number according to
search option.
4. Select an item to erase by pressing <Volume key>
(or <*>, <#>) and pressing <STORE>.
NOTE: “ENTER LOCK CODE” appears when you try to
access a secretly saved number.
Enter the lock code and press <STORE>.
5. Press <STORE>. again to erase.
6. Press <STORE>. again to confirm.
To cancel, press <CLEAR>.
ERASING ALL ENTRIES IN PHONEBOOK
To Erase All Numbers in Phonebook
1. Press <MENU>, <7> (Security)
2. Enter lock code.
NOTE: Default Lock code is last 4 digits of your phone
number. To change lock code, see page 33.
3. Press <6>(Erase Names).
4. Press <STORE> to confirm.
-ERASED -
ERASE ALL NAME
▶ YES
24
MEMORY 1
AMIT
MEMORY 23
AMIT
ONE-TOUCH DIALING
Memory locations 01 ~ 09 are special one-touch dialing locations. You can dial the
numbers stored in 01~09 by pressing just one key.
1. Pick up the handset or press <SPEACKER>.
2. Press and hold the number of the location (1~9)
containing the number to be called for a moment.
3. The name and the phone number displays and dials
automatically.
NOTE: Location 1 may be preprogrammed as emergency
number or voice mail. Please check with your
service provider.
TWO-TOUCH DIALING
Memory locations 10 ~ 99 are two-touch dialing locations. You can dial the numbers
Stored in 10~99 by pressing the first digit and pressing and holding the second digit.
1. Pick up the handset or press <Speaker>.
2. Briefly press the first digit of the memory location
number, then press the second digit
and hold it down for a moment.
Example) To dial location 23, briefly press the <2>,
Then press <3> and hold for a moment.
3. The phone number stored displays and dials
automatically.
NOTE1: When you try one-touch or two-touch dialing
for the number secretly saved, the phone will
prompt for Lock code entry. Enter the lock code to make a call.
NOTE2: “EMPTY LOCATION” displays when you try one-touch
or two-touch dialing with empty location number.
CALLING....
02255558282
CALLING....
02255558282
25
Useful Features
Call History
Displaying Your phone Number
Mute
Selecting Time Mode
Setting Time Mode
Checking and Clearing Call Times
Setting Warning Alerts

26
0 : MISSED
1 : INCOMING
▶ 01 : AMIT
02 : SUNNY
FRI 10/09 9: 45P
CALLING....
02255558282
CALL HISTORY
Your phone stores the last 30 outgoing calls, incoming, and missed
Calls combined (only when Caller ID function is activated).
You can display and redial these numbers.
Redialing Outgoing Calls
1. Press <MENU>, <3> (Call History), <3> (Outgoing)
NOTE: If there’s no outgoing call history.
“OUTGOING CALL MEMORY EMPTY!” displays.
2. Press <Volume key> (or <*>, <#>) to select number
to redial.
3. Press <REDIAL> to redial the number.
NOTE1: Press <STORE> to see time and date of the call
made. Then press <REDIAL> to redial the number
or press <STORE> again to save the number
in memory
NOTE2: To redial the last number called. Just pick up the
handset or press <Volume key> and <REDIAL>.
Redialing Incoming Calls
1. Press <MENU>, <3> (Call History), <2> (Outgoing).
NOTE: If there’s no incoming call record.
“INCOMING CALL MEMORY EMPTY!” displays.
2. Press <Volume key> or <*>, <#> to select number to
redial.
3. Press <REDIAL> to redial the number.
NOTE1: Press <STORE> to see time and date of the call arrival.
Then press <REDIAL> to redial the number or press
<STORE> again to save the number in memory.
NOTE2: Incoming history is available only when caller ID is activated.
Redialing missed Calls
To display a list of missed received calls.
1. Press <MENU>, <3> (Call History), <1>(Missed).
NOTE: If there’s no missed call record, ‘MISSED CALL MEMORY EMPTY!” displays.
2. Press <Volume key> or <*>, <#> to select number to redial.
3. Press <REDIAL> to redial the number.
NOTE1: Press <STORE> to see time and date of the call arrival. Then press <REDIAL>
to redial the number or press <STORE> again to save the number in memory.
NOTE2: Missed history is available only when caller ID is activated.
27
ENTER LOCK CODE
_ _ _
_
MY PHONE NUMBER
02255558282
MUTE
02255558282
TIME MODE
▶ AM/PM
Erasing Call History
1. Press <MENU>, <7> (Security).
2. Enter lock code.
NOTE: Default Lock code is last 4 digits of your
Phone number. To change lock code, see page 29.
3. Press <5> (Erase Logs).
4. Press <1> (Outgoing Clear).
5. Press <STORE> to confirm.
Erasing missed and all logs use the same steps.
Call Timer Display
1. Toggle Call Timer Display.
2. Press <MENU> . Press <6> (Configuration).
3. Press <1> (Call Timer).
4. Scroll to select ON or OFF.
5. Press <STORE> to confirm.
DISPAYING YOUR PHONE NUMBER
Displaying Your Phone Number
1. Press <MENU>, <6> (configuration).
2. Press <4> (My phone Number).
MUTE
This feature lets you mute the microphone, so that the other party cannot
hear your voice or the sound of your surroundings. This function is only available
during conversation.
1. Press <MENU> , <1>(Mute / UnMute) during conversation.
The message ‘MUTE’ blinks to indicate the function Is working.
The other party can no longer hear you, but you can hear them.
2. Press <MENU> , <1> again to resume the conversation.
SELECTING TIME MODE
1. Press <MENU>, <4>(Time), <5>(Time Mode).
2. Select the time display mode by pressing
<Volume key> or ( <*> , <#> ).
ERASE CALL LOGS
YES?
28
A
LARM
▶ ON
07 : 00am
22 : 32pm
A
LARM MODE
▶ DAILY
ALARM SOUND TIME
1 MINUTE
AM/PM: Display 0~12 hours with A or P indicator
24 Hour: Display 00~24 hours
3. Press <STORE> to save the change.
SETTING THE ALARM
You can set the alarm sound daily or one time only.
1. Press <MENU>, <4>(Time), <1>(Alarm).
2. Select “SET” by Pressing <Volume key> (or <*>, <#>)
and Press <STORE>.
3. Enter alarm time and press <STORE>.
4. Select alarm mode by pressing <Volume key>
(or <*>, <#>) and press <STORE>.
Daily: Alarm sounds daily.
One time: Alarm sounds once.
5. Enter the duration of the alarm by pressing <Volume key>
(or <*>, <#>) and press <STORE>.
A bell icon appears in icon line. On alarm time,
the icon and “ALARM TIME” message blinks and alarm
activates. Press any key to stop the alarm.
Canceling the Alarm Time
1. Press <MENU>, <4>(Time), <1>(Alarm).
2. Select “RELEASE” by pressing <Volume key> (or <*>, <#>)
and press <STORE> to store the setting.
29
CHECKING AND CEARING CALL TIMES
Checking the Last call Time
1. Press <MENU>, <4> (Time), <2>(Last Call).
2. Press <CLEAR> to exit the display.
Checking Accumulated Incoming Call Time
1. Press <MENU>, <4> (Time), <3>(Total Time),
<1> (Incoming).
2. Press <CLEAR> to exit the display.
Checking Accumulated Outgoing Call Air Time
1. Press <MENU>, <4> (Time), <3>(Total Time),
<2> (Outgoing).
2. Press <CLEAR> to exit the display.
Reset Accumulated Call Time
1. Press <MENU>, <4> (Time), <4> (Clear Call Time).
2. Press <CLEAR>.
LAST CALL TIME
3:25
INCOMING CALL
3:25
OUTGOING CALL
12:26:32
CLEAR CALL TIME
▶ YES
30
SETTING WARNING ALERTS
You can set your phone to sound warning beeps that indicate:
- each minute you are on a phone call
- when you are out of the service area
Setting/Releasing 1 Minute Alert
1. Press <MENU>, <5> (Sound), <4> (1 Min Alert).
2. Select ON or OFF by pressing <Volume key> (or <*>, <#>).
3. Press <STORE>.
NOTE: When 1 minute alert is set, the phone gives alert sound
each minute while you are on a phone call.
Setting/Releasing Service Alert
1. Press <MENU>, <5> (Sound), <5>(Service Alert).
2. Select ON or OFF by pressing <Volume key> (or <*>, <#>).
3. Press <STORE>.
NOTE: When service alert is set, the phone gives alert sound
when the phone is acquiring or loses the service signal.
Setting/Releasing Connection Alert
1. Press <MENU>, <5> (Sound), <7> (Connect Alert).
2. Select ON or OFF by pressing <Volume key> (or <*>, <#>).
3. Press <STORE>.
NOTE: When service alert is set, the phone gives alert sound
when the call has been connected to the number dialed.
Setting/Releasing Voice Privacy Alert
1. Press <MENU>, <5> (Sound), <8> (Voice Privacy Alert).
2. Select ON or OFF by pressing <Volume key> (or <*>, <#>).
3. Press <STORE>.
NOTE: When Voice privacy alert is set, the phone gives alert
sound when the voice privacy is on.
1 MINUTE ALERT
▶ OFF
SERVICE ALERT
▶ OFF
CONNECT ALERT
▶ ON
VOICE PRIV ALERT
▶ ON
31
Advanced Features
Changing Greeting Message
System Reset
Restricting Use of the Phone
Locking / Unlocking the Phone
Changing the Lock Code
Back Light
32
1. GREETING ▼
2. CHANGE CODE
MY Phon
_
MY Phone
FRI 10/10 1:24A
RESET PHONE
▶ YES
PHONE
INTIALIZATION
CHANGING GREETING MESSAGE
This feature lets you change the greeting message that the
phone displays during standby mode.
1. Press <MENU>, <6> (Configuration).
2. Press <2>(Getting). Current greeting displays.
3. Press <STORE> to change greeting.
4. Enter your new greeting message with alphanumeric keys
NOTE: Press <MESSAGE> to switch between capital and
lower case
Example) To enter “My Phone”
Press <MESSAGE>, <9>, <9>, <9>, <#>
<MESSAGE>, <7>, <MESSAGE>, <4>, <4>, <6>,
<6>, <6>, <6>, <6>, <3>, <3>.
5. Press <STORE> to save change.
SYSTEM RESET
To reset your phone settings to manufacture’s defaults, follow these steps:
1. Press <MENU>, <7> (Security).
2. Enter lock code.
NOTE: Lock code is set as 0000 from the factory.
To change lock code see page 29.
3. Press <7> (Factory Reset).
4. Select “YES” by pressing <Volume key> (or <*>, <#>).
5. Press <STORE>.
6. “PHONE INTIALIZATION” blinks while the phone is
resetting.
To reset your phone settings to manufacture’s defaults and clear all user data ,
follow these steps:
1. Press <MENU>, <7> (Security).
2. Enter lock code.
NOTE: Lock code is set as 0000 from the factory.
To change lock code see page 29.
3. Press <8> (Factory Reset).
4. Select “YES” by pressing <Volume key> (or <*>, <#>).
5. Press <STORE>.
6. “PHONE INTIALIZATION” blinks while the phone is resetting.

33
1. OUTGOING ▼
2. INTERNATIONAL
OUTGOING CALL
▶ ON
OUTGOING CALL
RESTRICTED
INTENATIONAL
▶ ON
INTERNATIONAL
RESTRICTED
- LOCKED -
FRI 10/11 2:44P
RESTRICTING USE OF THE PHONE
You can restrict the use of the phone by unauthorized persons
Restricting Outgoing Calls
1. Press <MENU>, <7> (Security).
2. Enter lock code.
NOTE: Lock code is set as 0000 from the factory.
To change lock code, see page 29.
3. Press <2> (Restrict), <1> (Outgoing).
4. Select ‘ON’ by pressing <Volume key> (or <*>, <#>).
5. Press <STORE> to save change.
In this mode, when you try to call, “OUTGOING
CALL RESTRICTED” displays and no outgoing call
goes through.
Restricting Outgoing Calls
1. Press <MENU>, <7> (Security).
2. Enter lock code.
3. Press <2> (Restrict), <2> (International).
4. Select ‘ON’ by pressing <Volume key> (or <*>, <#>).
5. Press <STORE> to save change.
In this mode, when you try to make an international
call (headed by00), “INTERNATIONAL RESTRICTED”
displays and no outgoing goes through.
LOCKING / UNLOCKING THE PHONE
You can lock your phone so that calls cannot be made by unauthorized
Persons. You can still receive incoming calls. Turning the phone off does
not unlock the phone; the phone stays in locked mode until you change it.
1. Press <MENU>, <7> (Security).
2. Enter lock code.
3. Press <3> (Auto Lock).
4. Select ‘ON’ or ‘OFF’ by pressing
<Volume key> (or <*>, <#>).
5. Press <STORE> to save the change.
NOTE1: When locked, the phone displays “LOCKED”.
NOTE2: When locked, you have to enter the lock code to make a call.
NOTE3: You can still receive incoming calls.
34
ENTER NEW CODE
_ _ _
_
CONFIRM NEW CODE
_ _ _
_
BACK LIGHT
8 SECONDS
CHANSING THE LOCK CODE
The lock code is preset to 0000 from the factory.
You can Change the lock code to any 4 digit number.
1. Press <MENU>, <7> (Security).
2. Enter lock code.
3. Press <2> (Change Code).
4. Enter your new lock code.
NOTE: The lock must be four numeric digits.
5. Press <STORE>.
6. Re-enter new lock code for verification.
7. Press <STORE> to confirm.
NOTE: CODE NOT MATCHED TRY AGAIN!” displays
if the second entry does not match the first entry.
BACK LIGHT
You can control the length of back lighting of the display and the keypad.
1. Press<MENU>,<5>(Configuration),<2>(Back light).
2. Selet”8 SECONS”or “ALWAYS OFF” by pressing
<Volume Key> (or <*>, <#>)
3. Press<STORE> to save the change.
8 SECONDS: The light goes off auto matically 8 seconds
after no key press, calling, or no other
activity occurs.
Always OFF: The light never comes on.
NOTE: This setting is in effective only when the phone is operating with battery power
Only. When power adaptor is connected, the back light always on.
35
Optional Features
Call Forwarding
Call Waiting
Three-way Calling
Data Call Service
36
Call Forwarding
Call Forwarding is a feature that lets you forward your incoming calls to another phone
number, even if your phone is turned off or is in no service area. Contact your service
Provider to activate Call Forwarding.
Call Waiting
Call Waiting alerts you to a second incoming call while you are on the conversation.
When there’s another incoming call, you will hear warning beep. To respond to
the call waiting, press <REDIAL> or hit shortly the hook switch once.
Pressing <REDIAL> again or hitting the hook again will let you go back to the first call.
Contact your service provider to activate Call Waiting.
Three-Way Calling
Three-Way Calling is a feature that lets you set up a three-way conversation
with two different parties. While you’re in conversation with a party, hit or the hook
switch and place another call with the third party. Then press <REDIAL> or hit the hook
switch again to connect the three parties together. Contact your service provider
to activate Three-Way Calling.
Data Call Service
Data call Service is a network dependent feature and is available only when your service
Provider supports it. Check with your service provider for availability.
Connecting your PC repuires optional cable, available separately.
1. Connect the phone to your PC with the optional Axesstel serial or USB data cable.
2. Please refer to the manual provided with the cable for setting up a connection on
Your PC.
37
Miscellaneous
Menu Table
Specification
38
MENU OPTION TABLE
I II III Explanation
NAME
NUMBER
SEARCH MEMORY
LOCATION
Used When searching for a phone
number
in the phone book by name/number/
stored memory number
STORE Used when storing a phone number and
name in the phone book
NAME
NUMBER
1. PHONE
BOOK
ERASE
LOCATION
Used when erasing a phone number in
the phone book
NEW MESSAGE LOCATION Send a new message
INBOX Received SMS messages
VOICE MSG SMS Services
TEMPLATES Open pre-saved templates
SAVED MSG Open saved message
ERASE MSG Erase received messages
MSG ALERT Set message alert
MSG ALERT
TYPE
Set message alert type
MSG ACK Set message Delivery ACK
MSG PRIORITY Set default message priority
SAVE SENT MSG Auto-Save sent messages
AUTO DELETE Auto-Delete received messages
if INBOX is full.
2. MESSAGE
MSG OPTION
EDIT TEMPLATE Edit default templates
MISSED CALL Stores phone numbers called recently
INCOMING Stores phone numbers of calls
received recently
OUTGOING Stores missed incoming calls
3.CALL
HISTORY
ALL CALL LIST Stores all call history
ALARM Alarm On/Off
LAST CALL Shows time duration of last call
OUTGOING Shows accumulated outgoing call time
TOTAL TIME INCOMING Shows accumulated incoming call time
CLR CALL TIME Resets accumulated call time
AM/PM Time: AM/PM display mode.
4. TIME
TIME MODE 24 HOURS Time: 24 Hours display mode.
RING TYPE
Determines whether the phone alerts
the incoming call with sound or only
With message
RING TONE Selects the ring type
RING VOLUME Adjust ring volume
1 MIN ALERT ON/OFF Beeps at one minute interval during
conversation
SERVICE ALERT ON/OFF Beeps when the phone is getting out
of or entering service area
ALARM TONE ALARM TONE Selects alarm sound
5. SOUND
CONNECT
ALERT
ON/OFF Beeps when the call is connected
39
VOX PRIV ALERT ON/OFF Voice privacy audible alert
CALL TIMER ON/OFF Toggles call timer display
GREETING change greeting
LANGUAGE Set language
6. CONFI
GURATION MY PHONE
NUMBER
Show your phone number
CHANGE CODE Change Lock Code
OUTGOING Restrict outgoing calls
LONG DISTANCE Restrict long distance calls
RESTRICT
INTERNATIONAL Restrict international calls
AUTO LOCK ON/OFF Lock the phone
VERSION Show phone information
OUTGOING Erase outgoing calls history
INCOMING Erase incoming calls history
MISSED Erase missed calls history
ERASE LOGS
ALL CALLS Erase all calls history
ERASE NAMES Erase all phonebook names
FACTORY RESET Reset to default settings
7. SECURITY
PHONE RESET Reset to default settings and then
user data
SPECIFICATIONS
Frequency Range PX210 Rx: 869 ~ 894 MHz
Tx: 824 ~ 849 MHz
Channel Bandwidth CDMA 1.25 MHz
Stability of frequency 0.4 ppm
External appearance (mm) 208 x 200 x 105 mm
Weight 849 g (without battery)
Sending output maximum 0.23W E.R.P
Temperature of operation
Relative humidity
-20 ~ +50 degrees Celsius
5% ~ 90%
Adapter Input: AC 100~240V 50~60Hz Output:
DC 5V/2A
Standby 16mA (Slot Cycle
Index: 2) 72 hours
Battery
Talk 3 Hours

SAR INFORMATION
THIS MODEL PHONE MEETS THE GOVERNMENT ’S REQUIREMENTS FOR
EXPOSURE TO RADIO WAVES.
Your wireless phone is a radio transmitter and receiver. It is designed and
manufactured not to exceed the emission limits for exposure to radio frequency
(RF)energy set by the Federal Communications Commission of the
U.S.Government.These limits are part of comprehensive guidelines and establish
permitted levels of RF energy for the general population. The guidelines are based on
standards that were developed by independent scientific organizations through
periodic and thorough evaluate on of scientific studies. The standards include a
substantial safety margin designed to assure the safety of all persons, regardless of
age and health.
The exposure standard for wireless mobile phones employs a unit of measurement
known as the Specific Absorption Rate, or SAR. The SAR limit set by the FCC is 1.6
W/kg.*Tests for SAR are conducted with the phone transmitting at its highest certified
power level in all tested frequency bands. Although the SAR is determined at the
highest certified power level, the actual SAR level of the phone while operating can be
well below the maximum value. This is because the phone is designed to operate at
multiple power levels so as to use only the power required to reach the network. In
general, the closer you are to a wireless base station antenna, the lower the power
output. Before a phone model is available for sale to the public, it must be tested and
certified to the FCC that it does not exceed the limit established by the government-
adopted requirement for safe exposure.
The tests are performed in positions and locations
(e.g., at the ear and worn on the body) as required by the FCC for each model. The
highest SAR value for this model phone when worn on the body, as described in this
user guide, is 1.02W/kg . (Body worn measurements differ among phone models,
depending upon available accessories and FCC requirements). While there may be
differences between the SAR levels of various phones and at various positions, they
all meet the government requirement for safe exposure. The FCC has granted an
Equipment Authorization for this model phone with all reported SAR levels evaluated
as in compliance with the FCC RF exposure guidelines. SAR information on this model
phone is on file with the FCC and can be found under the Display Grant section of
http://www.fcc.gov / oet / fccid after searching on FCC ID : PH7PX220.
Additional information on Specific Absorption Rates (SAR)can be found on the Cellular
Telecommunications &Internet Association (CTIA)web-site at http://phonefacts.net.*In the
United States and Canada, the SAR limit for mobile phones used by the public is 1.6watts/kg
(W/kg)averaged over one gram of tissue. The standard incorporates a substantial margin of safety
to give additional protection for the public and to account for any agitations in measurements.
FCC Compliance Information
This device complies with Part 15 of FCC Rules.
Operation is subject to the following two conditions:
(1) This device may not cause harmful interference, and
(2) This device must accept any interference received.
Including interference that may cause undesired operation.
Information to User
This equipment has been tested and found to comply with the limits for a Class B digital
device, pursuant to part 15 of the FCC Rules. These limits are designed to provide
reasonable protection against harmful interference in a residential installation. This
equipment generates, uses and can radiate radio frequency energy and, if not installed
and used in accordance with the instructions,
may cause harmful interference to radio communications. However, there is no guarantee
that interference will not occur in a particular installation. If this equipment does cause
harmful interference to radio or television reception, which can be determined by turning
the equipment off and on, the user is encouraged to try to correct the interference by one
or more of the following measures:
- Reorient or relocate the receiving antenna.
- Increase the separation between the equipment and receiver.
- Connect the equipment into an outlet on a circuit different from that to which the receiver
is connected.
- Consult the dealer or an experienced radio/ tv technician for help.
CAUTION
The user who makes changes or modifications to the unit without the express
approval by the manufacturer will void user authority to operate the equipment.
Safety Information
1 . SAFETY INFORMATION FOR FIXED WIRELESS TERMINALS
.POTE NTIALLY EXPLOSIVE ATMOSPHERES
Turn your phone OFF when in any area with a potentially explosive atmosphere and
obey all signs and instructions. Sparks in such areas could cauls e an explosion or fire
resulting in bodily injury or even death.
INTERFERENCE TO MEDICAL DIVICES
Certain electronic equipment may be shielded against RF signal from you wireless
phone. (pacemakers, Hearing Aids, and so on) Turn your phone OFF in health c are
facilities when any regulations posted in these areas instruct you to do so. RF signals
may affect improperly installed or inadequately shielded electronic system in motor
vehicles.
.EXPOSURE TO RF ENERGY
Use only the supplied or an approved replacement antenna. Do not touch the antenna
unnecessarily when the phone is in use. Do not move the antenna close to, or
couching any exposed part of the body when making a call.
SAFETY INFORMATION FOR RF EXPOSURE
Body worn operation
This device was tested for typical body-worn operations with the back of the phone
kept 25 mm. from the body. To maintain compliance with FCC RF exposure
requirements, use only belt-clips, holsters or similar accessories that maintain a 25
mm. separation distance between the user’s body and the back of the phone, including
the antenna. The use of belt-clips, holsters and similar accessories should not contain
metallic components in its assembly. The use of accessories that do not satisfy these
requirements may not comply with FCC RF exposure requirements, and should be
avoided.