AzureWave Technologies GM120 Wireless Digital Media Adapter Module User Manual AR5005 STA
AzureWave Technologies, Inc. Wireless Digital Media Adapter Module AR5005 STA
Manual
AW-GM120
User’s Guide
1
Document Conventions
Text Conventions
Bold
Bold type within paragraph text indicates commands, file names, directory
names, paths, output, or returned values.
Example: The DK_Client package will not function, except when the
wdreg_install batchfile is used.
Italic
Within commands, italics indicate a variable that the user must specify.
Example: mem_alloc size_in_bytes
Titles of manuals or other published documents are also set in italics.
Courier
The Courier font indicates output or display.
Example:
Error:Unable to allocate memory for transfer!
[ ]
Within commands, items enclosed in square brackets are optional parameters
or values that the user can choose to specify or omit.
{ }
Within commands, items enclosed in braces are options from which the user
must choose.
|
Within commands, the vertical bar separates options.
…
An ellipsis indicates a repetition of the preceding parameter.
>
The right angle bracket separates successive menu selections.
Example: Start > Programs > DK > wdreg_install.
Notices
NOTE: This message denotes neutral or positive information that calls out important
points to the text. A note provides information that may apply only in special cases.

2
Revision History
Revision Description of Changes
2005/10/20 Initial AW-GM120 release.
3
Contents
Preface 4
About this Document 4
1 Installation 5
ACU Installation and Driver Update 5
Driver Installation 8
Windows NT 4.0 Installation 10
Windows NT 4.0 Driver Installation and TCP/IP Setup 10
Windows NT 4.0 ACU Installation and Driver Update 11
Driver and ACU Uninstallation 11
2 Security 13
EAP Security 15
PEAP Security 17
LEAP Security 21
WPA/WPA2 Security 23
WPA2 Security 23
WPA/WPA2 Passphrase Security 23
Pre-Shared Key Security 24
4
Preface
This user's guide provides the necessary information for first-time users to successfully
install the AW-GM120 network driver interface specification (NDIS) driver. This guide also
provides information for users who wish to upgrade the AW-GM120 NDIS driver from
previous releases.
This guide describes the steps required to install NDIS drivers for the AW-GM120
Wireless Network Adapter in Windows 2000, Windows XP, Windows Millennium Edition,
Windows 98SE, and Windows NT 4.0.
About this Document
The document consists of the following chapters and appendix:
Chapter 1 Installation—Installation/un-installation procedures and device/network
configurations for Windows XP, Windows 2000, Windows ME, Windows 98SE, and
Windows NT 4.0.
Chapter 2 Security—Procedures on setting security up using the Client Utility.
5
1
Installation
This chapter describes using the AW-GM120 installer to install the Atheros Client Utility
(ACU) and driver. AW-GM120 provides an InstallShield utility to upgrade the NDIS driver,
if a previous release is installed, and to install the ACU.
■ Use the ACU to configure the device driver. The ACU provides extensive online help to
aid in configuring the device.
■ Use the InstallShield Updater to uninstall the NDIS driver and ACU application and
remove them from the Device Manager.
ACU Installation and Driver Update
This section describes installing the ACU and driver on the Windows XP, Windows 2000,
Windows ME, and Windows 98SE OSs. For Windows NT 4.0, please refer to “Windows
NT 4.0 Installation”.
To install the ACU and upgrade the NDIS driver:
1. When an AW-GM120 NDIS driver has been previously installed, insert the AW-GM120
Wireless Network Adapter.
2. Open the InstallShield Wizard (setup.exe).
3. The license agreement window appears. Read and accept the agreement to continue.
Click Next.
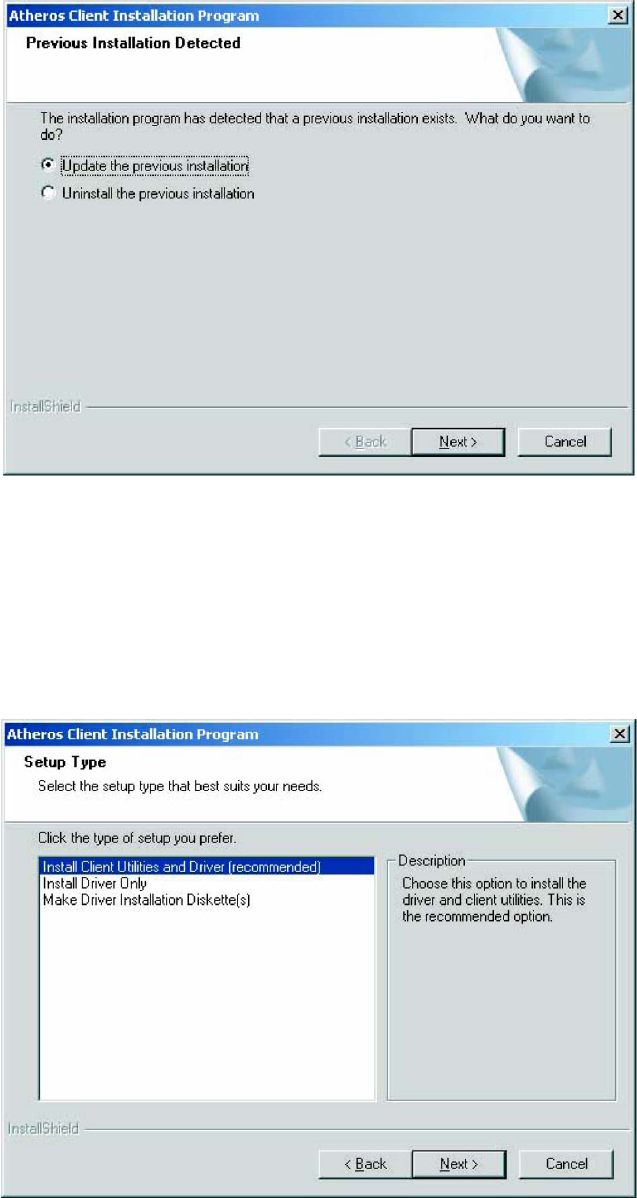
4. The installer program detects any previous installations.
a. If the installer program finds a previous installation, the Previous Installation
Detected window appears. Choose to update the previous installation. Click Next.
Figure 1-1. Installer Initial Setup (Previous Installation Detected)
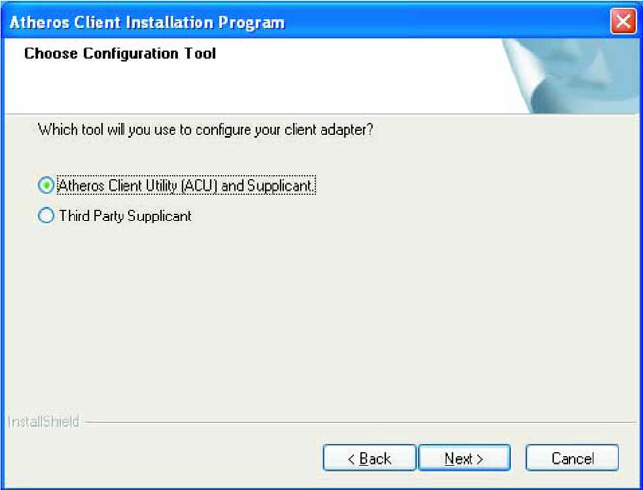
b. If the installer program finds no previous installation, the installation Setup Type
window appears with three setup options.
Choose the installation type. To install the client utilities and driver, select the
appropriate radio button and click Next.
Figure 1-2. Installation Setup Type Window
5. A prompt appears warning that the install requires the system to be rebooted at the end
of the installation process. Click Yes to continue.
6
6. Choose the setup directory. The default is C:\Program Files\Atheros. Click Next.
7. Choose the program folder for the start menu. The default is Atheros. Click Next.
8. For a Windows XP installation, the next screen defines the Windows Zero Configuration.
Windows XP Zero Configuration provides functionality to automatically try to connect the
STA to available wireless networks. For complete information on Windows Zero
configuration, see the Microsoft web site.
In this Windows XP installation, select the primary configuration tool.
Figure 1-3. Windows Zero Configuration: Configuration Tool Selection
9. The installer automatically installs the driver. Make sure that the adapter is inserted. If it
is not, insert it then cancel the Found New Hardware Wizard if it appears, then proceed
with the installation. Click OK.
7
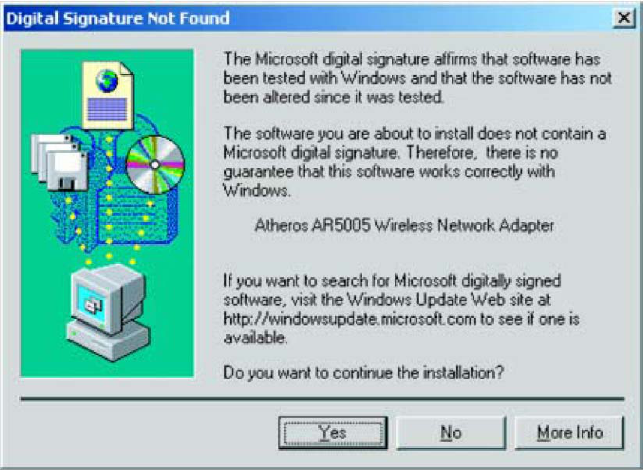
10. The installation program begins to install the client utility and driver. A “Digital
signature Not Found” screen may appear. Click Yes to continue.
Figure 1-4. Digital Signature Not Found Window
11. Click OK at the prompt to reboot and complete the installation. Use the ACU to
configure the device driver. The ACU provides extensive online help to aid in configuring
the device. Access the ACU by double-clicking the tray icon.
Driver Installation
This section describes the installation for the Windows driver on the Windows XP,
Windows 2000, Windows ME, and Windows 98SE OSs. For Windows NT 4.0, please
refer to “Windows NT 4.0 Installation”.
To install the driver:
1. Insert the AW-GM120 Wireless Network Adapter.
2. Wait for the Found New Hardware Wizard dialog box to appear. Click Next.
8
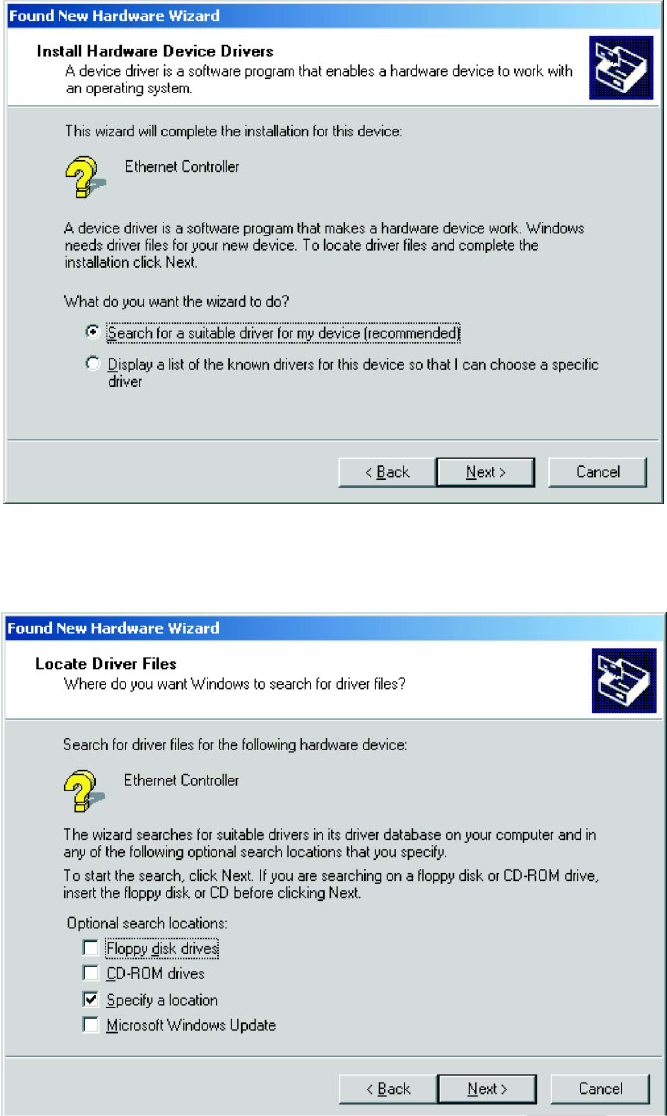
Figure 1-5. Install Hardware Device Drivers Window
3. Choose “Search for a suitable driver for my device” and click Next.
Figure 1-6. Locate Driver Files Window
4. Check “Specify a location” and click Next.
5. Windows asks for the directory to search for a new Driver in. Enter the directory, then
click OK to start Windows searching for the drivers.
9
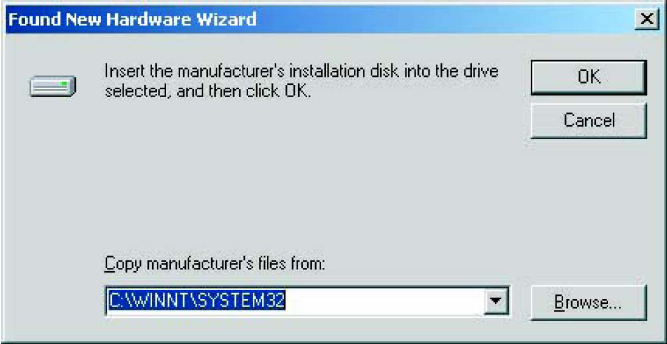
Figure 1-7. Driver Files Search Results Window
6. Once Windows finds the driver for the device, click Finish to complete driver installation.
Use the ACU to configure the device driver. The ACU provides extensive online help to
aid in configuring the device.
Windows NT 4.0 Installation
This section describes the Windows NT 4.0 driver installation, TCP/IP setup, and ACU
installation.
Windows NT 4.0 Driver Installation and TCP/IP Setup
Windows NT 4.0 does not support “plug-and-play,” therefore the AW-GM120 NDIS driver
installation uses an approach that is different from the installation used in other OSs.
Insert the AW-GM120 Wireless Network Adapter, and follow these steps to install the
NDIS driver:
1. Windows NT 4.0 Network Properties windows displays. Click Add to continue.
2. On the Select Network Adapter dialog box, click Have Disk.
3. Manually enter the location of where the Atheros NDIS 4.0 driver is located. For
example, D:\ndis\bin\production\install.
4. Click OK to continue.
5. Make sure AW-GM120 Wireless Network Adapter is selected.
6. Click OK to continue.
Windows NT 4.0 binds the TCP/IP protocol to the AW-GM120 Wireless Network Adapters,
so TCP/IP properties have to be entered. Depending on the type of network the STA
connects to, Gateway and DNS Configuration information may also be required. IP
configuration information (DHCP or assigned IP address, Gateway and DNS server IP
10
11
addresses) is usually obtained from the corporate IT staff. For a simple demonstration, the
STA is assigned a static IP address.
7. Choose “Specify an IP address” and enter an IP address and subnet mask.
Assigning an IP address and subnet mask allows the STA to interact with the AP or other
STAs in the same IP subnet.
8. Click OK to complete the TCP/IP configuration.
9. Restart the system for the changes to take effect.
Windows NT 4.0 ACU Installation and Driver Update
AW-GM120 provides an InstallShield utility to upgrade the NDIS driver, if a previous
release is installed, and to install the ACU. For complete information on upgrading your
NDIS driver, refer to “ACU Installation and Driver Update”. Use the ACU to configure the
device driver. The ACU provides extensive online help to aid in configuring the device.
Use the InstallShield Updater to uninstall the NDIS driver and ACU application and
remove them from the Device Manager. See “Driver and ACU Uninstallation”.
Driver and ACU Un-installation
This section provides information about uninstallation procedures for AW-GM120 software
releases on Windows XP, Windows 2000, Windows ME, Windows 98SE, and Windows
NT 4.0.
To uninstall the ACU and the NDIS driver:
Use the InstallShield Updater to uninstall the NDIS driver and ACU application and
remove them from the Device Manager.
1. Open the InstallShield Wizard (setup.exe).
2. Click Next to continue.
3. Click Yes to accept the License Agreement.
4. On the Setup Type page, choose Uninstall Driver and Applications to uninstall drivers
and ACU.
Click Next to continue.
5. Click Finish when the InstallShield Wizard is complete.
In Windows 98 SE and Windows ME, a message appears that uninstallation most be
completed manually. On all OSs, some files are left on the system to ease reinstallation.
To completely remove these files:
1. Go to the Start menu and choose Search For Files or Folders...
2. Enter oem*.inf in the “Search for files or folders named “field”, and enter Atheros in the
“Containing text:” field.
12
3. Click Search Now.
A few files matching these criteria are possible, if previous drivers have not been removed
properly.
4. Choose the files that have been found and delete them from the system.
5. To complete the uninstallation, remove the file ar5211.sys from the
\WINNT\system32\drivers folder.
13
2
Security
This chapter describes setting up security using the Atheros Client Utility (ACU). See the
Atheros Client Utility Online Help for more information on configuring the security settings
using the ACU.
While using the client adapter, encrypting data can protect it as it is transmitted through
the wireless network.
The ACU allows connection profiles of:
■ No security (not recommended)
Link encryption/decryption is disabled, no keys are installed.
■ WPA/WPA2 security
Enables the use of wi-fi protected access (WPA). This option requires IT administration.
This option includes the EAP (with dynamic wired equivalent privacy (WEP) keys) security
protocols: extensible authentication protocol (EAP), protected EAP (PEAP), and
lightweight EAP (LEAP).
WPA/WPA2 is a standard-based, interoperable security enhancement that provides data
protection and access control for wireless LAN systems. It is derived from the IEEE
802.11i standard. WPA/WPA2 leverages Temporal Key Integrity Protocol (TKIP) and
Michael message integrity check (MIC) for data protection, and 802.1X for authenticated
key management.
WPA/WPA2 supports two mutually exclusive key management types: WPA/WPA2 and
WPA/WPA2 passphrase (also known as WPA-Pre Shared Key (PSK)). Using WPA/WPA2,
clients and the authentication server authenticate to each other using an EAP
authentication method, and the client and server generate a pairwise master key (PMK).
The server generates the PMK dynamically and passes it to the access point (AP).
■ WPA-PSK security
Enables WPA passphrase security (also known as WPA-Pre Shared Key (PSK)).
14
■ 802.1X security
Enables 802.1X security. This option requires IT administration. This option includes the
EAP (with dynamic WEP keys) security protocols: EAP, PEAP, and LEAP. 802.1X is the
standard for wireless LAN security defined by IEEE as 802.1X for 802.11, or simply
802.1X. An AP that supports 802.1X and its protocol, EAP, acts as the interface between
a wireless client and an authentication server such as RADIUS server, to which the AP
communicates over the wired network.
■ Pre-shared key security (Static WEP)
Enables the use of up to four pre-shared (static WEP) keys defined on both the AP and
the station (STA). These keys are stored in an encrypted format in the registry of the
Windows device. When the driver loads and reads the client adapter's registry parameters,
it also finds the static WEP keys, decrypts them, and stores them in volatile memory on
the adapter. If a device receives a packet that is not encrypted with the appropriate key
(as the WEP keys of all devices that are to communicate with each other must match), the
device discards the packet and never delivers it to the intended receiver.
Authentication Sequence
Enabling EAP on the AP and configuring the client adapter to LEAP, EAPTLS, PEAP
(EAP-GTC), or PEAP (EAP-MSCHAP V2) authentication to the network occurs in the
following sequence:
1. The client associates to an AP and begins authentication.
2. Communicating through the AP, the client and RADIUS server complete authentication
with the password (LEAP and PEAP) or certificate (EAP-TLS). The password is never
transmitted during the process.
3. After successful authentication, the client and RADIUS server derive a dynamic WEP
key unique to the client.
4. The RADIUS server transmits the key to the AP using a secure channel on the wired
LAN.
5. For the length of a session, the AP and the client use this key to encrypt or decrypt all
unicast and broadcast packets.
EAP Security
To use EAP security, access the Security tab in Profile Management.
1. In the ACU, edit the security settings by clicking New or Modify on the Profile
Management tab.
2. Choose a profile to edit, or name the new profile in the Profile Management window.
Enter the SSID of the AP the STA connects to.
3. On the Security tab, choose the WPA/WPA2 radio button.
OR: On the Security tab, choose the 802.1X radio button.
4. Choose EAP-TLS or EAP-TTLS from the drop-down menu.
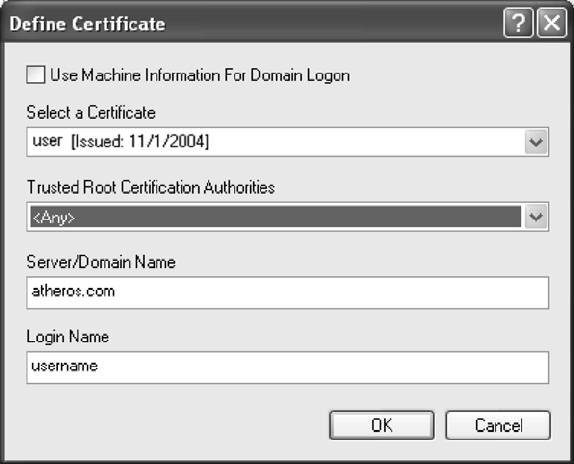
To enable EAP-TLS security:
1. To use EAP-TLS security, the machine must already have the EAP-TLS certificates
downloaded onto it. Check with the IT manager.
2. If supported, choose EAP-TLS from the drop-down menu on the right, then click the
Configure button.
3. Select the appropriate certificate authority from the list. The server/domain name and
the login name are filled in automatically from the certificate information. Click OK.
4. Click OK.
5. Enable the profile.
Figure 2-1. EAP-TLS Configuration Window
To enable EAP-TTLS security:
1. To use EAP-TTLS security, the machine must already have the EAP-TTLS certificates
downloaded onto it. Check with the IT manager. EAP security uses a dynamic
session-based WEP key from the client adapter and RADIUS server for encryption, and a
15

client certificate for authentication.
2. If EAP-TTLS is supported, choose EAP-TTLS from the drop-down menuon the right,
then click the Configure button.
Figure 2-2. EAP-TTLS Configuration Window
3. Select the appropriate certificate from the drop-down list and click OK.
4. Specify a user name for EAP authentication:
Check Use Windows User Name to use the Windows user name as the EAP user name.
OR: Enter a EAP user name in the User Name field to use a separate user name and
password and start the EAP authentication process.
5. Click the Advanced button and:
– Leave the server name field blank for the client to accept a certificate from any server
with a certificate signed by the authority listed in the Network Certificate Authority
drop-down list. (recommended)
– Enter the domain name of the server from which the client will accept a certificate.
– Change the login name if needed.
6. Click OK.
7. Enable the profile.
PEAP Security
To use PEAP security, access the Security tab in the Profile Management window.
1. In the ACU, edit the security settings by clicking New or Modify on the Profile
16
17
Management tab.
2. Choose a profile to edit, or name the new profile in the Profile Management window.
Enter the SSID of the AP the STA connects to.
3. On the Security tab, choose the WPA/WPA2 radio button.
OR: On the Security tab, choose the 802.1X radio button.
4. Choose PEAP (EAP-GTC) or PEAP (EAP-MSCHAP V2) from the drop-down menu.
– PEAP (EAP-GTC) is designed to support one-time Password (OTP), the Windows NT or
Windows 2000 domain, and L DAP user databases over a wireless LAN. It is based on
EAP-TLS authentication but uses a password instead of a client certificate for
authentication.PEAP (EAP-GTC) uses a dynamic session-based WEP key derived from
the client adapter and RADIUS server to encrypt data.
Networks using an OTP user database require entering a hardware or software token
password to start the PEAP (EAP-GTC) authentication process and to gain access to the
network. Networks using a Windows NT or 2000 domain user database or an L DAP user
database (such as NDS) require entering a username, password, and domain name to
start the PEAP (EAP-GTC) authentication process.
– The PEAP (EAP-MSCHAP V2) authentication type is based on EAPTLS authentication,
but uses a password instead of a client certificate for authentication. PEAP
(EAP-MSCHAP V2) uses a dynamic session based WEP key, which is derived from the
client adapter and RADIUS server, to encrypt data.
To enable PEAP (EAP-GTC) security:
1. To use PEAP (EAP-GTC) security, the server must have PEAP certificates, and the
server properties must already be set. Check with the IT manager.
2. If PEAP is supported, choose PEAP from the drop-down menu on the right, then click
the Configure button.
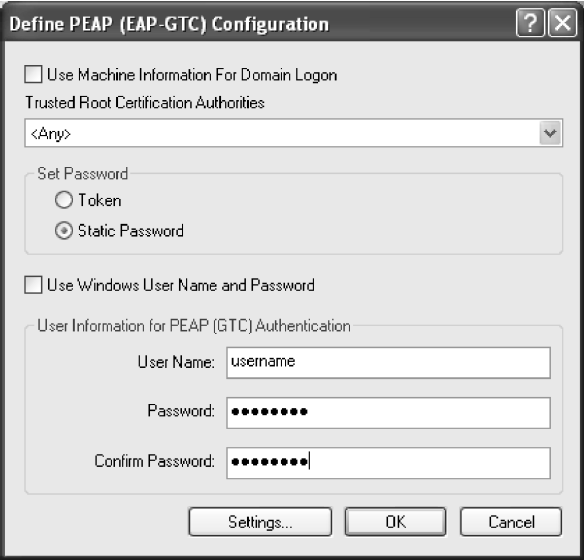
Figure 2-3. PEAP (EAP-GTC) Configuration Window
3. Select Use Machine Information For Domain Logon to use the machine name as the
security user name.
4. Select the network certificate authority from the drop-down list.
5. Specify a user name for inner PEAP tunnel authentication:
– Check Use Windows User Name to use the Windows user name as the PEAP user
name.
– OR: Enter a PEAP user name in the User Name field to use a separate user name and
start the PEAP (GTC) authentication process.
6. Choose Token or Static Password, depending on the user database.
Note that Token uses a hardware token device or the Secure Computing SofToken
program (version 1.3 or later) to obtain and enter a one-time password during
authentication.
7. Click Settings and:
– Leave the server name field blank for the client to accept a certificate from any server
with a certificate signed by the authority listed in the Network Certificate Authority
drop-down list. (recommended)
– OR: Enter the server domain name from which the client will accept a certificate.
The login name used for PEAP tunnel authentication fills in automatically as
18
PEAP-xxxxxxxxxxxx, where xxxxxxxxxxxx is the computer's MAC address. Change the
login name if needed.
8. Click OK.
9. Enable the profile.
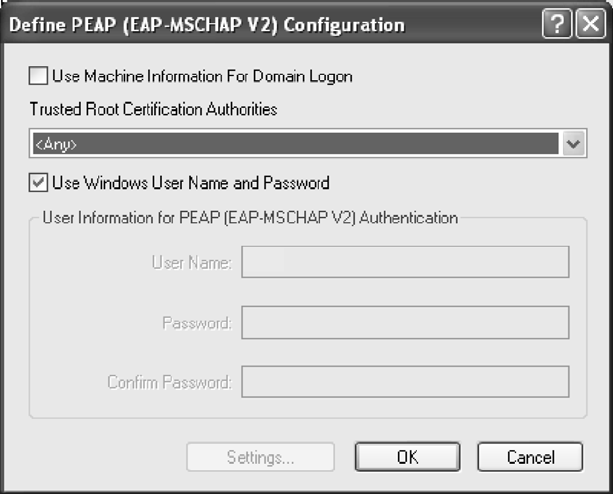
To enable PEAP (EAP-MSCHAP V2) security:
1. To use PEAP (EAP-MSCHAP V2) security, the server must have PEAP certificates,
and the server properties must already be set. Check with the IT manager.
2. If supported, choose PEAP (EAP-MSCHAP V2) from the drop-down menu on the right,
then click the Configure button.
Figure 2-4. PEAP (MSCHAP V2) Configuration Window
3. Select the appropriate certificate from the drop-down list.
4. Specify a user name for inner PEAP tunnel authentication:
5. Check Use Windows User Name to use the Windows user name as the PEAP user
name.
OR: Enter a PEAP user name in the User Name field to use a separate user name and
start the PEAP authentication process.
6. Click Advanced and:
19
20
– Leave the server name field blank for the client to accept a certificate from any server
with a certificate signed by the authority listed in the Network Certificate Authority
drop-down list. (recommended)
– Enter the domain name of the server from which the client will accept a certificate.
– The login name used for PEAP tunnel authentication, fills in automatically as
PEAP-xxxxxxxxxxxx, where xxxxxxxxxxxx is the computer's MAC address. Change the
login name if needed.
7. Click OK.
8. Enable the profile.
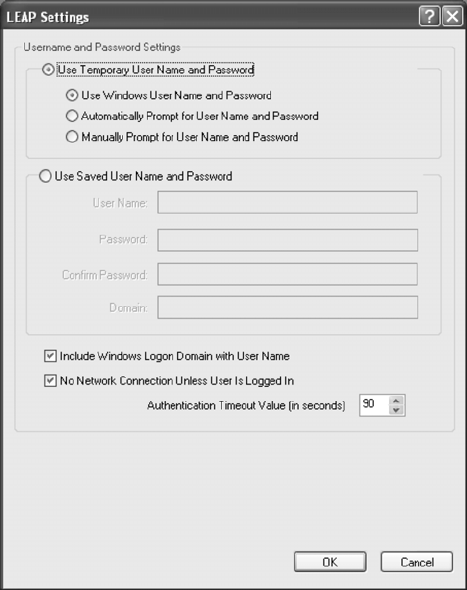
LEAP Security
The LEAP authentication type uses Cisco Key Integrity Protocol (CKIP) and MMH
message integrity check for data protection. The client adapter uses the username and
password to perform mutual authentication with the RADIUS server through the AP.
To use LEAP security, access the Security tab in Profile Management.
1. In the ACU, edit the security settings by clicking New or Modify on the Profile
Management tab.
2. Choose a profile to edit, or name the new profile in the Profile Management window.
Enter the SSID of the AP the STA connects to.
3. On the Security tab, choose the WPA/WPA2 radio button.
OR: On the Security tab, choose the 802.1X radio button.
4. Choose LEAP from the drop-down menu.
To enable LEAP security:
1. LEAP security requires that all infrastructure devices are configured for LEAP
authentication. Check with the IT manager.
2. If supported, choose LEAP from the drop-down menu on the right, then click the
Configure button.
Figure 2-5. LEAP Configuration Window
3. Specify a user name and password:
– Select to Use Temporary User Name and Password by choosing the radio button Check
21
22
Use Windows User Name to use the Windows user name as the LEAP user name.
OR: Check Manually Prompt for LEAP User Name and Password to manually login and
start the LEAP authentication process.
– Select to Use Saved User Name and Password by choosing the radio button. Specify
the LEAP user name, password, and domain to save and use.
4. Enter the user name and password.
5. Confirm the password.
6. Specify a domain name:
Check the Include Windows Logon Domain with User Name setting to pass the Windows
login domain and user name to the RADIUS server. (default)
OR: Enter a specific domain name.
7. If desired, check No Network Connection Unless User Is Logged In to force the wireless
adapter to disassociate after logging off.
8. Enter the LEAP authentication timeout time (between 30 and 500 seconds) to specify
how long LEAP should wait before declaring authentication failed, and sending an error
message. The default is 90 seconds.
9. Click OK.
10. Enable the profile.
WPA/WPA2 Security
WPA2 Security
WPA2 is the next generation of WPA, based on the 802.11i standard.On the STA side, for
Microsoft Zero Configuration, install SP2 for Windows XP. Then apply the Microsoft Zero
Configuration patch, available at the Microsoft update site. Then install an Atheros
WPA2-capable driver and control the connection with Windows.
WPA/WPA2 Passphrase Security
To use WPA/WPA2 Passphrase security In the ACU, access the Security tab in the Profile
Management window.
1. In the ACU, edit the security settings by clicking New or Modify on the Profile
Management tab.
2. Choose a profile to edit, or name the new profile in the Profile Management window.
Enter the SSID of the AP the STA connects to.
3. On the Security tab, choose WPA/WPA2 Passphrase.
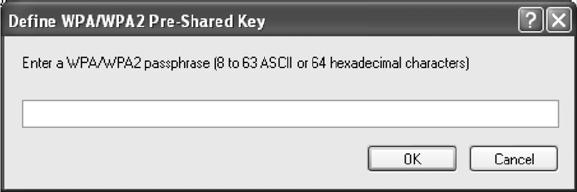
To enable WPA-PSK security:
1. Click on the Security tab, and choose the WPA/WPA2 Passphrase radio button. Click
the Configure button.
2. Enter the WPA passphrase (for ASCII text, enter 8–63 characters, for hexadecimal,
enter 64 characters). Click OK
3. Click OK and enable the profile.
Figure 2-6. WPA-PSK Configuration Window
23
Pre-Shared Key Security
To use Pre-Shared Key (static WEP) security In the ACU, access the Security tab in the
Profile Management window.
1. In the ACU, edit the security settings by clicking New or Modify on the Profile
Management tab.
2. Choose a profile to edit, or name the new profile in the Profile Management window.
Enter the SSID of the AP the STA connects to.
3. On the Security tab, choose Pre-Shared Key (Static WEP).
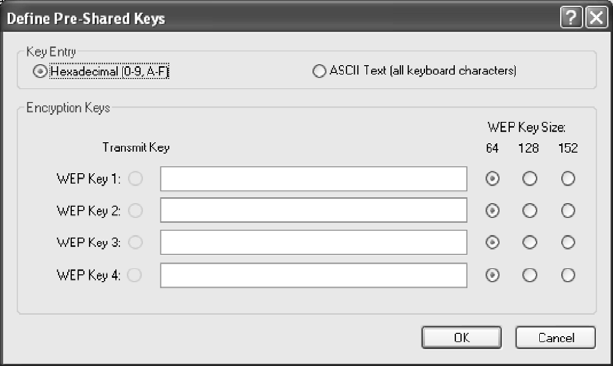
To enable Pre-Shared Key security:
1. Click on the Security tab, and choose the Pre-Shared Key radio button. Click the
Configure button.
Figure 2-7. Define Pre-Shared Keys Configuration Window
2. Define the pre-shared keys and select the default key.
3. Click OK.
4. If the AP that the wireless adapter is associating to has WEP set to Optional and the
client has WEP enabled, make sure that Allow Association to Mixed Cells is checked on
the Security Tab to allow association.
5. Click OK and enable the profile.
24
25
DGT 警語 :
經型式認證合格之低功率射頻電機,非經許可,公司、商號或使用者均不得擅自
變更頻率、加大功率或變更原設計之特性及功能。
低功率射頻電機之使用不得影響飛航安全及干擾合法通信;經發現有干擾現象
時,應立即停用,並改善至無干擾時方得繼續使用。前項合法通信,指依電信法
規定作業之無線電通信。低功率射頻電機須忍受合法通信或工業、科學及醫療用
電波輻射性電機設備之干擾。
本模組於取得認證後將依規定於模組本體標示審合格籤,並要求平台上標示[本
產品內含射頻模組:ID 編號]

OEM Installation Info:
This device is intended only for OEM integrators under the following conditions:
1) The antenna must be installed such that 20 cm is maintained between the antenna and users,
and
2) The transmitter adapter may not be co-located with any other transmitter or antenna.
As long as 2 conditions above are met, further transmitter test will not be required.
However, the OEM integrator is still responsible for testing their end-product for any
additional compliance requirements required for the final product (for example, digital device
emissions, PC peripheral requirements, etc.).
IMPORTANT NOTE:
In the event that these conditions can not be met (for example certain laptop configurations or
co-location with another transmitter), then the FCC authorization is no longer considered
valid and the FCC ID can not be used on the final product. In these circumstances, the OEM
integrator will be responsible for re-evaluating the end product (including the transmitter) and
obtaining a separate FCC authorization.
End Product Labeling
This transmitter adapter is authorized only for use in device where the antenna may be
installed such that 20 cm may be maintained between the antenna and users (for example:
Internet Radio and Desktop PC). The final end product must be labeled in a visible area with
the following: “Contains TX FCC ID: TLZ-GM120”.
Manual Information That Must be Included
The OEM integrator has to be aware not to provide information to the end user regarding how
to install or remove this RF adapter in the user manual of the end product which integrates
this adapter. The user’s manual for OEM integrators must include the following information
in a prominent location:
IMPORTANT NOTE: To comply with FCC RF exposure compliance requirements, the
antenna used for this transmitter must be installed to provide a separation distance of at least
20 cm from all persons and must not be collocated or operating in conjunction with any other
antenna or transmitter.