AzureWave Technologies R20 HSPA+ MOBILE ROUTER User Manual Ai R1
AzureWave Technologies, Inc. HSPA+ MOBILE ROUTER Ai R1
User Manual

1
HSPA+ Mobile Router
User Manual
V1.3

2
Table of Contents
1. Introduction ...................................................................................................................... 4
1.1 Features ..................................................................................................................................4
1.2 General Specifications ............................................................................................................5
1.3 Product Overview ...................................................................................................................6
1.3.1 Appearance ......................................................................................................................6
1.3.2 HSPA+ Mobile Router .....................................................................................................7
1.3.3 FCC Regulations: .............................................................................................................8
1.3.4 RF Exposure Information (SAR) ......................................................................................8
2. HSPA+ Mobile Router Connection ..................................................................................... 10
2.1 Install HSPA+ Mobile Router for Ethernet connection ....................................................... 10
2.2 HSPA+ Mobile Router for Wi-Fi connection ....................................................................... 10
3. Connection Manager ........................................................................................................ 11
3.1 Default Page for First Time ................................................................................................ 11
3.2 Information ........................................................................................................................ 12
3.2.1. Status ........................................................................................................................... 12
3.2.2. Usages.......................................................................................................................... 12
3.2.3. Wi-Fi User List .............................................................................................................. 13
3.2.4. History ......................................................................................................................... 13
3.3 3G Settings ......................................................................................................................... 13
3.3.1. Profile .......................................................................................................................... 13
3.3.2. Network Settings ......................................................................................................... 14
3.3.3. PIN Code ...................................................................................................................... 14
3.4 Wi-Fi Settings ..................................................................................................................... 15
3.4.1. Basic ............................................................................................................................. 15
3.4.2. Advanced ..................................................................................................................... 16
3.4.3. Mac filter ..................................................................................................................... 16
3.5 DHCP .................................................................................................................................. 17
3.6 Message ............................................................................................................................. 17
3.6.1. Write new .................................................................................................................... 17
3.6.2. Inbox ............................................................................................................................ 18

3
3.6.3. Sent .............................................................................................................................. 18
3.6.4. Draft ............................................................................................................................. 18
3.7 System ................................................................................................................................ 19
3.7.1. Administrator .............................................................................................................. 19
3.7.2. Configuration ............................................................................................................... 19
3.7.3. Firmware Upgrade ....................................................................................................... 20
3.7.4. Language...................................................................................................................... 20
4. Troubleshooting ............................................................................................................... 21

4
1. Introduction
HSPA+ Mobile Router is a highly integrated wireless solution for 3G and Wi-Fi. It provides HSPA+
downlink data rate up to 21 Mbps, uplink data rate up to 5.76 Mbps and 3G mobile broadband
wherever you are. With HSPA+ Mobile Router, you don’t have to worry about the availability of
Internet access as long as 3G network is available. It provides connection with 1 PC USB host (via
Ethernet) and at the same time connect up to 6 Wi-Fi enabled devices such as smart phones,
laptops, or tablet PCs. HSPA+ Mobile Router is the best choice for users to enjoy the Internet for
data transmission and media streaming while on-the-go.
1.1 Features
HSPA+/HSDPA/HSUPA/UMTS packet data service
EDGE/GPRS packet data service
HSPA/GSM Short Message Service (SMS)
HSPA+ Downlink data rate up to 21 Mbps
HSPA+ Uplink data rate up to 5.76 Mbps
UMTS PS domain data rate up to 384 kbps
EDGE packet data rate up to 236.8 kbps
GPRS packet data rate up to 115.2 kbps
Wi-Fi 802.11 b/g/n
Share internet connection with up to 6 Wi-Fi enabled devices and 1 PC USB host
Micro USB interface for battery charging and PC connection
Multi-color LED indicating status
Support Microsoft Windows XP SP3/ Vista SP2/ Windows 7 SP1
Support Linux
Support Mac OS X 10.6
5
1.2 General Specifications
Model Name
HSPA+ Mobile Router
Technical Standard
3GPP Release 7 compliant
GSM/GPRS/EDGE 3GPP Release 99 compliant
External Interfaces
Micro USB interface: supporting USB 2.0 high speed
Standard 6-pin SIM card interface
Operating Conditions
Voltage
USB 5V
Temperature
Operating:-10℃ to +45℃
Storage:-20℃ to +70℃
Dimension
90mm x 50mm x 12mm
Form Factor
Bar type mobile router
Battery capacity
3.7V 1500 mAh
Electrical Specifications
Operating Frequency
WCDMA/HSPA+ 2100/1900/1700/850 MHz (Band 1/2/4/5)
WCDMA/HSPA+ 2100/1900/850/900 MHz (Band 1/2/5/8)
EDGE/GPRS/GSM 1900/1800/900/850 MHz
IEEE 802.11 b/g/n 1x1 Wi-Fi:2.4GHz ISM radio band
Maximum Output Power
HSPA+/UMTS: 23 dBm (Power Class 3)
GSM/GPRS 850/900 MHz: 33 dBm (power Class 4)
GSM/GPRS 1800/1900 MHz: 30 dBm (Power Class 1)
EDGE 850/900 MHz: 33 dBm (Power Class E2 )
EDGE 1800/1900 MHz: 30 dBm (Power Class E2)
802.11 b/g/n 2.4GHz: 9 dBm
Antenna
Embedded antenna
Receive Sensitivity
HSPA+/UMTS: compliant with 3GPP R7
EDGE/GPRS/GSM 850/900/1800/1900 MHz: compliant with 3GPP R99
802.11 b/g/n 2.4GHz: compliant with IEEE 802.11b/g/n standard
6
1.3 Product Overview
1.3.1 Appearance
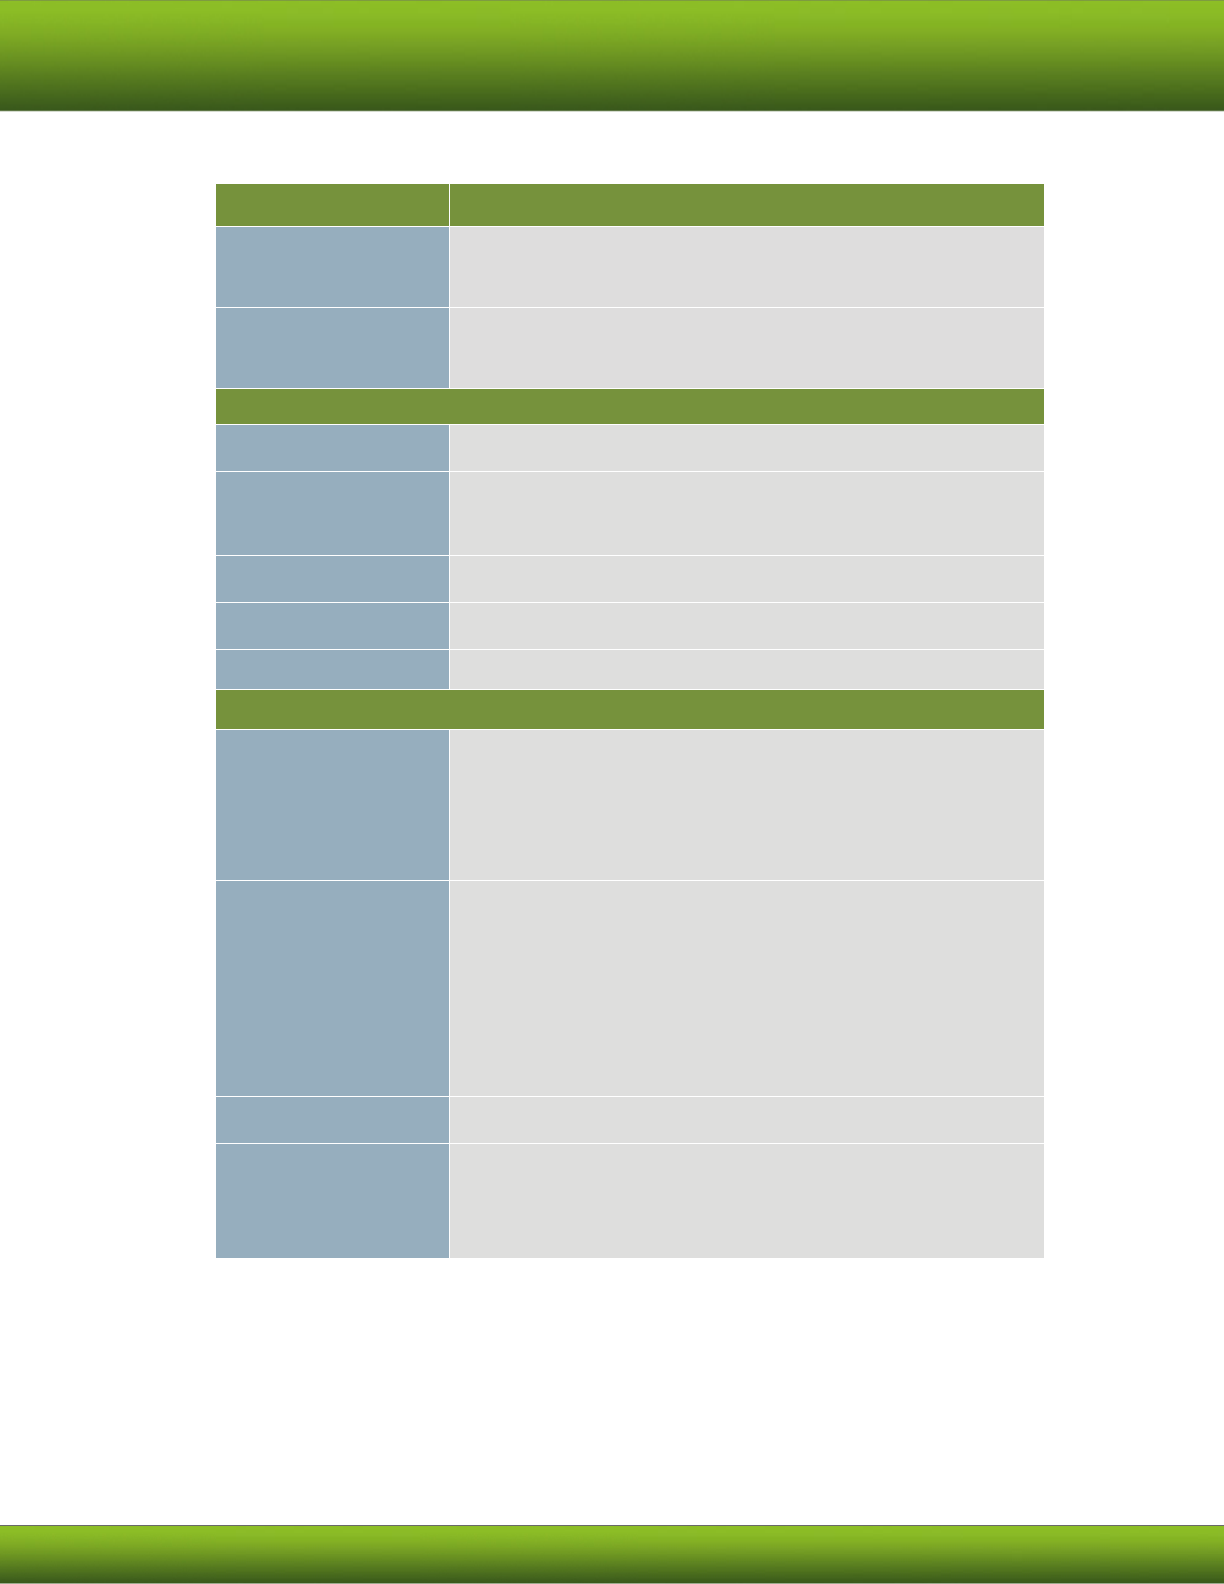
LED indicator:
Indicator
Color
Solid
Blinking
(Fast)
Blinking
(Slow)
SMS
Green
New incoming
message
Message full
Signal
Purple
HSPA+ network
transmitting
Signal
Blue
WCDMA/HSDPA/
HSUPA network
transmitting
Signal
Green
GSM/GPRS
network
transmitting
Signal
Red
1. SIM error
2. No Service
Signal
Amber
Signal of usable
roaming operator
found but not
connected
transmitting
LED
Power button
Reset
7
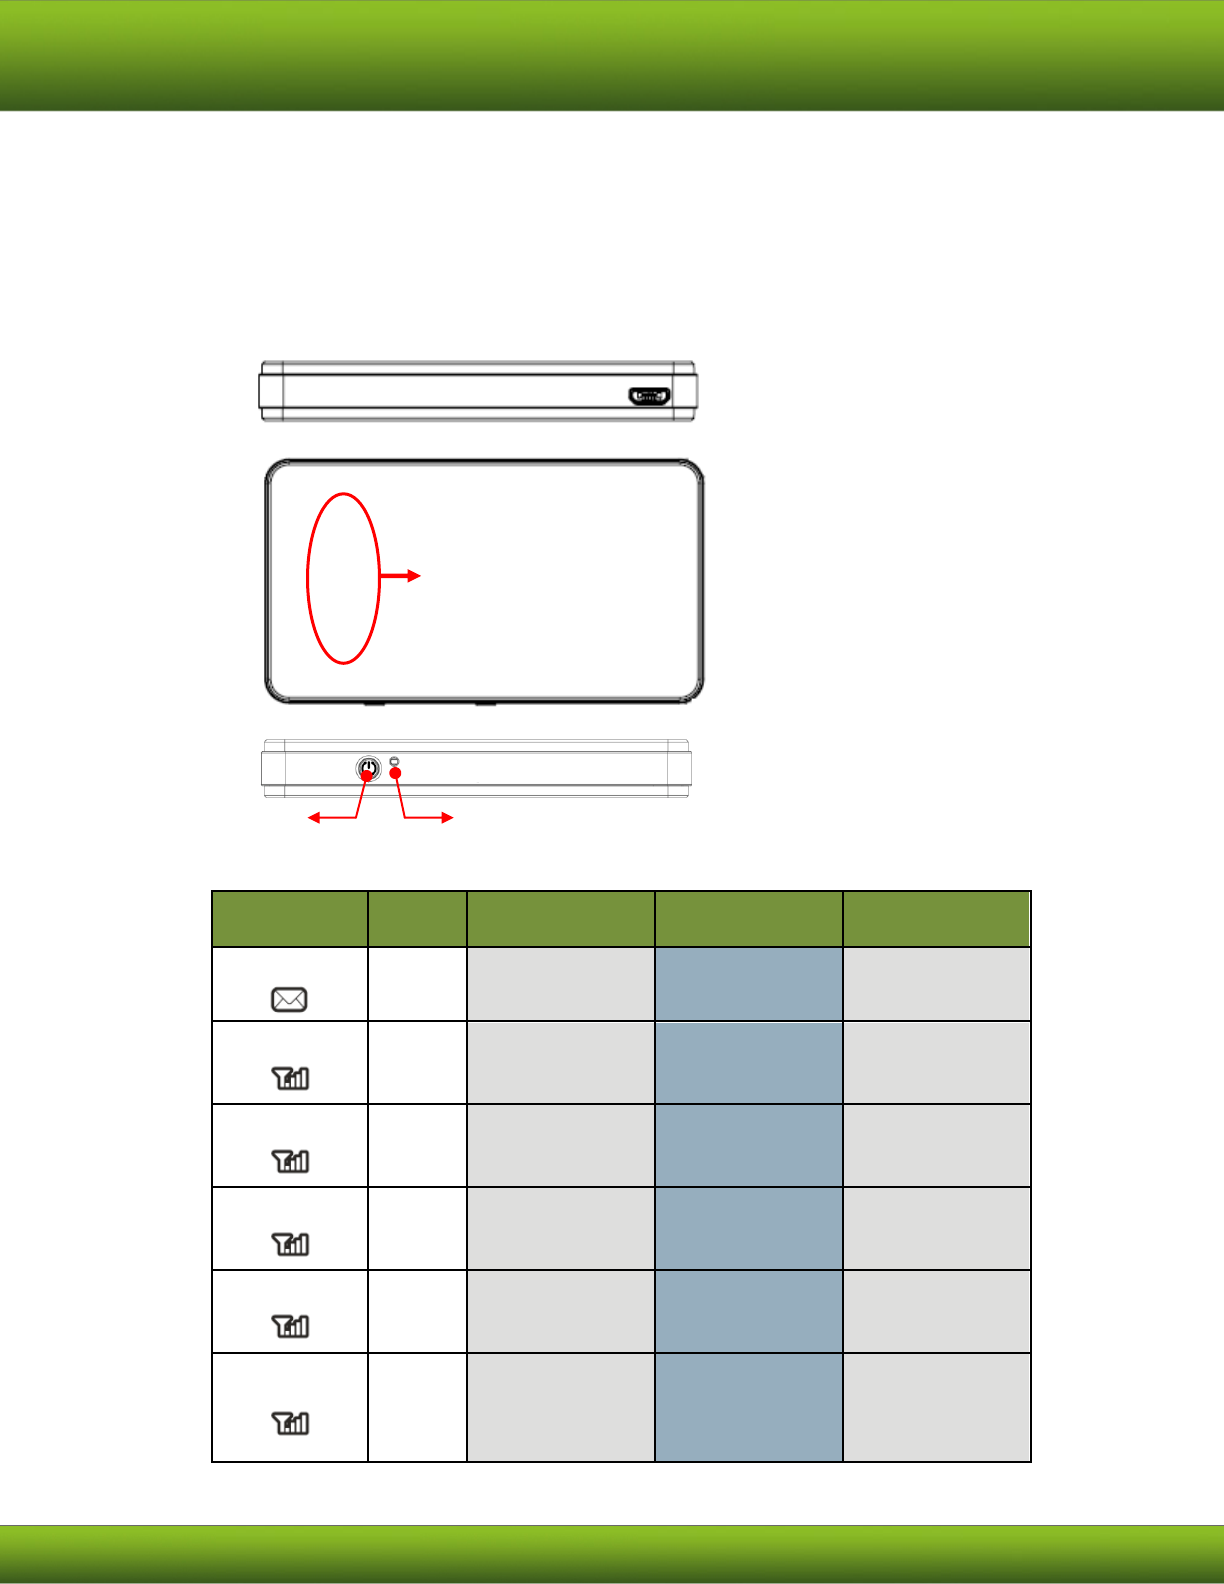
Indicator
Color
Solid
Blinking
(Fast)
Blinking
(Slow)
Battery
Blue
Fully charged
100% to 50%
capacity, without
charge
Battery
Green
Battery is 50% to
99% charged
50% to 10%
capacity, without
charge
Battery
Red
Battery is 0% to
50% charged
Less than 3%
capacity, without
charge
Less than 10%
capacity, without
charge
Wi-Fi
Green
Wi-Fi active
transmitting
Solid: LED stays on
Blinking (Fast): LED will blink every 0.1 second when transmitting data on “Always on”
mode
Blinking (Slow): LED will turn on 0.5 second and turn off 3 seconds when transmitting
data on “Dial on demand” mode
SIM card slot:
Please open the bottom cover and insert your SIM card into this slot.
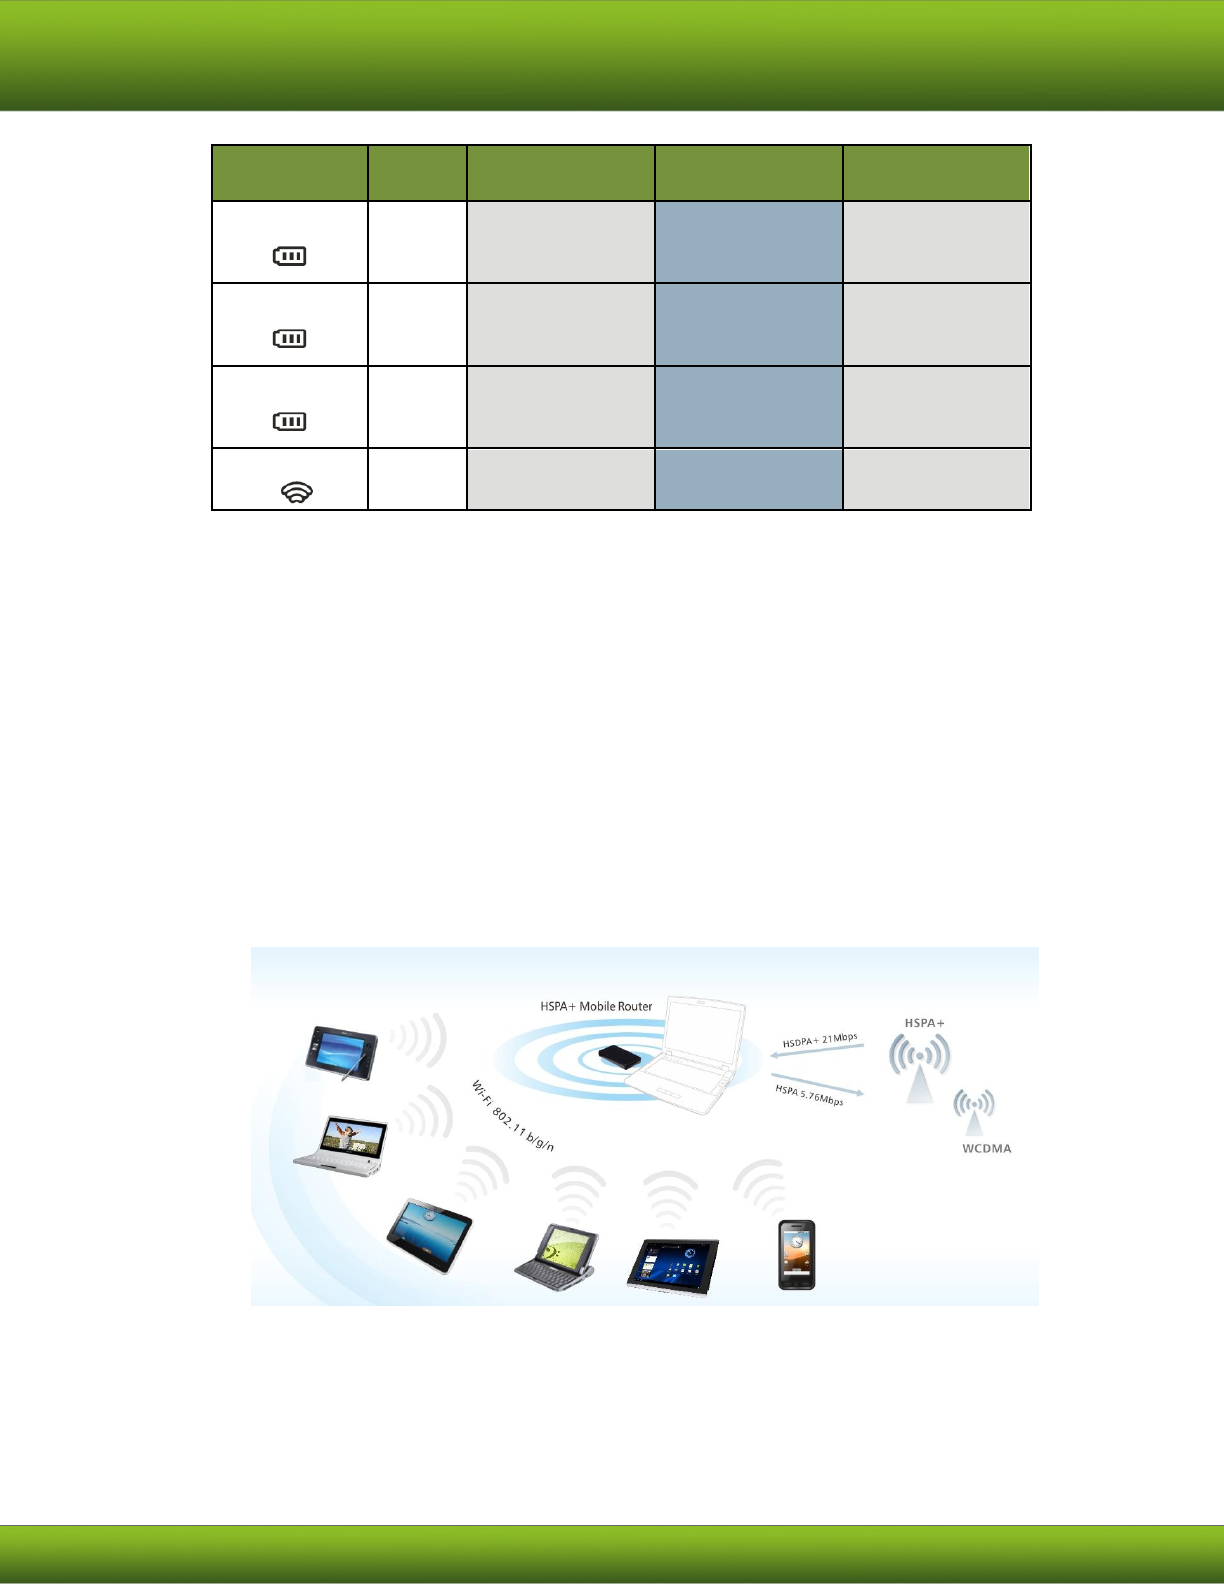
1.3.2 HSPA+ Mobile Router
Please refer to the illustration below. This device provides 3G network connections for
one device via Ethernet and at the same time can connect up to 6 Wi-Fi-enabled devices
to share the 3G mobile broadband service.

8
1.3.3 FCC Regulations:
This device complies with part 15 of the FCC Rules. Operation is subject to the following two
conditions: (1) This device may not cause harmful interference, and (2) this device must accept
any interference received, including interference that may cause undesired operation.
This device has been tested and found to comply with the limits for a Class B digital device,
pursuant to Part 15 of the FCC Rules. These limits are designed to provide reasonable protection
against harmful interference in a residential installation. This equipment generates, uses and
can radiated radio frequency energy and, if not installed and used in accordance with the
instructions, may cause harmful interference to radio communications. However, there is no
guarantee that interference will not occur in a particular installation If this equipment does
cause harmful interference to radio or television reception, which can be determined by turning
the equipment off and on, the user is encouraged to try to correct the interference by one or
more of the following measures:
-Reorient or relocate the receiving antenna.
-Increase the separation between the equipment and receiver.
-Connect the equipment into an outlet on a circuit different from that to which the receiver is
connected.
-Consult the dealer or an experienced radio/TV technician for help.
Changes or modifications not expressly approved by the party responsible for compliance could
void the user‘s authority to operate the equipment.
1.3.4 RF Exposure Information (SAR)
This device meets the government’s requirements for exposure to radio waves.
This device is designed and manufactured not to exceed the emission limits for exposure to
radio frequency (RF) energy set by the Federal Communications Commission of the U.S.
Government.
The exposure standard for wireless devices employs a unit of measurement known as the
Specific Absorption Rate, or SAR. The SAR limit set by the FCC is 1.6W/kg. *Tests for SAR are
conducted using standard operating positions accepted by the FCC with the device transmitting
at its highest certified power level in all tested frequency bands. Although the SAR is
determined at the highest certified power level, the actual SAR level of the device while
operating can be well below the maximum value. This is because the device is designed to
operate at multiple power levels so as to use only the poser required to reach the network. In
general, the closer you are to a wireless base station antenna, the lower the power output.

9
The highest SAR value for the device as reported to the FCC, as described in User’s guide is 1.39
W/kg.
While there may be differences between the SAR levels of various devices and at various
positions, they all meet the government requirement.
The FCC has granted an Equipment Authorization for this device with all reported SAR levels
evaluated as in compliance with the FCC RF exposure guidelines. SAR information on this device
is on file with the FCC and can be found under the Display Grant section of
www.fcc.gov/oet/ea/fccid after searching on FCC ID: TLZ-R20.
This device is compliance with SAR for general population /uncontrolled exposure limits in
ANSI/IEEE C95.1-1999 and had been tested in accordance with the measurement methods and
procedures specified in OET Bulletin 65 Supplement C.
10
2. HSPA+ Mobile Router Connection
With HSPA+ MOBILE ROUTER, no installation of driver is required. All you need to do is plug-and-
play and 6 Wifi-enabled devices can be connected simultaneously.
2.1 Install HSPA+ Mobile Router for Ethernet connection
After connecting HSPA+ MOBILE ROUTER by USB, please refer installing steps below.
1. Open battery cover and take out battery
to insert SIM card.
2. Put in the battery.
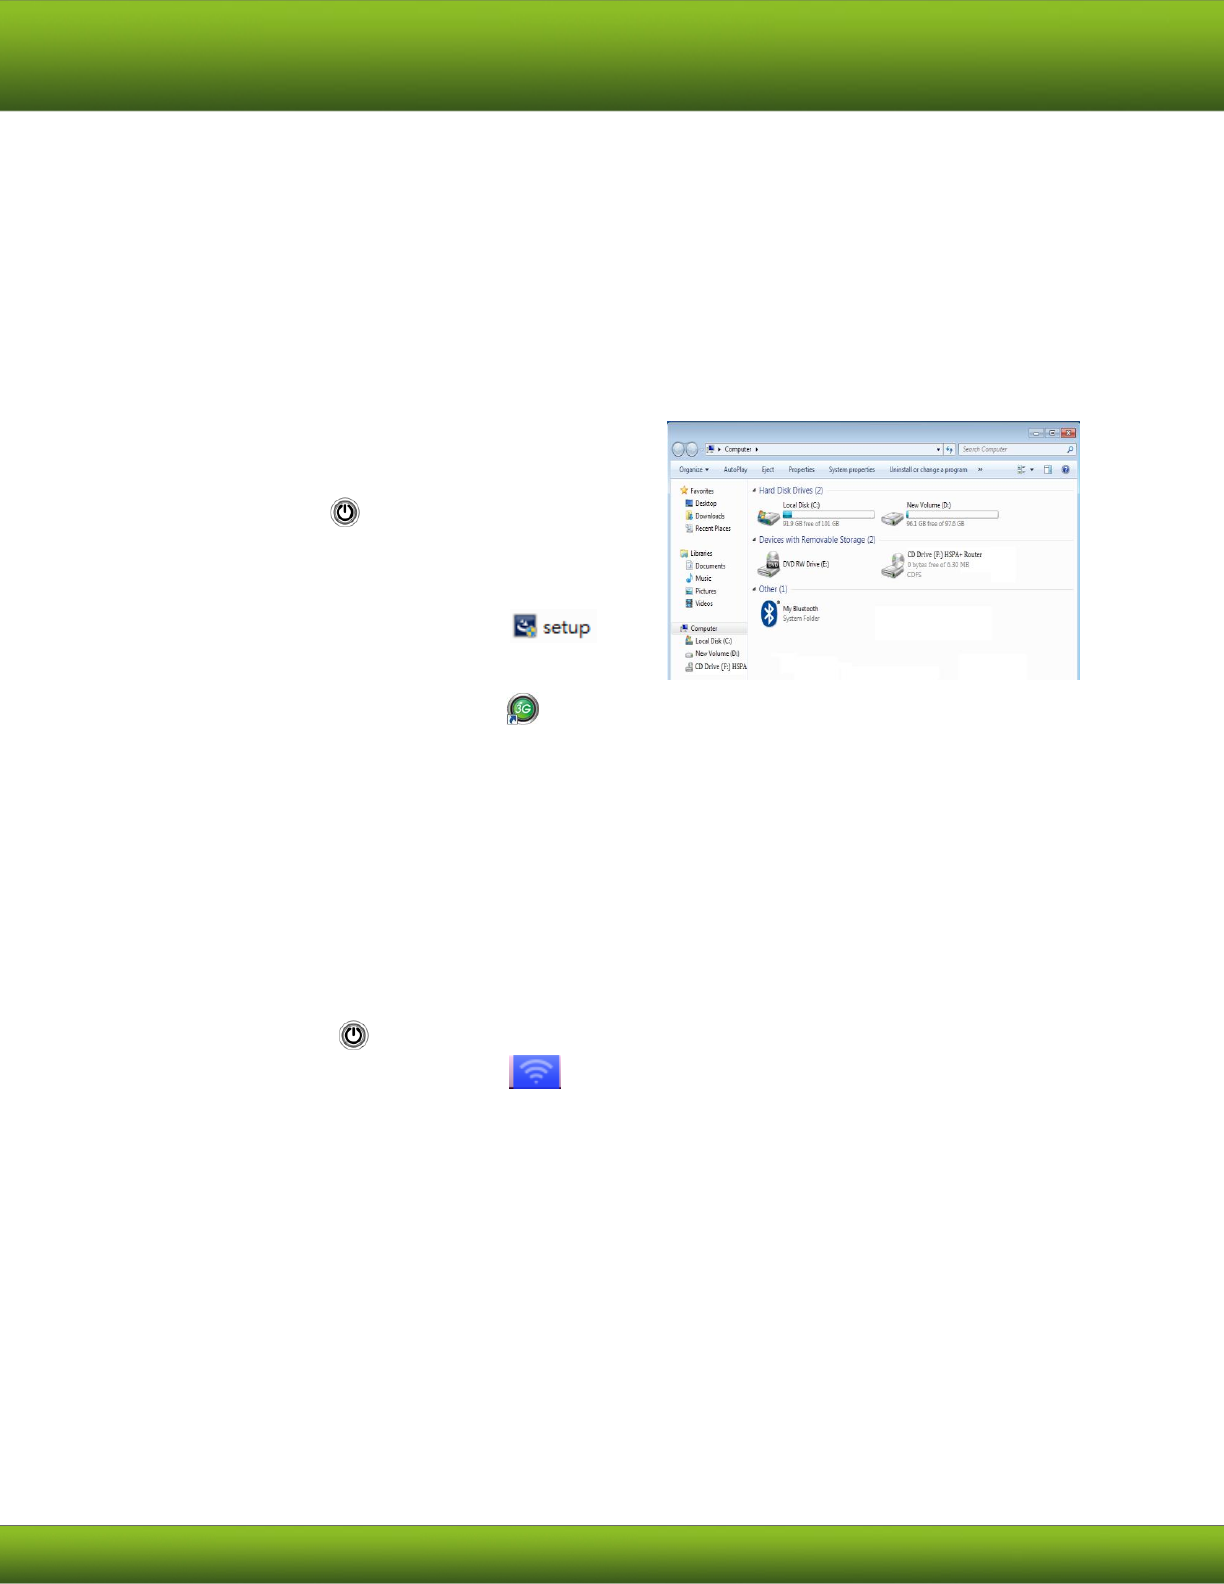
3. Push to turn on the device.
4. Double click “Computer”
5. Click “CD Drive (HSPA+ Router)”
6. Open “Setup” folder
7. Double Click “Setup.exe”( ) to
install driver.
8. Re-plug-in the device to finish installing.
9. After installing, the icon ( ) which is quick link to connection manager will appear
in the desktop.
10. You can also enter “http://192.168.1.1.” on browser to link connection manager.
(refer to “3. Connection Manager” as below)
2.2 HSPA+ Mobile Router for Wi-Fi connection
You do not need to install anything to connect HSPA+ MOBILE ROUTER by Wi-Fi.
1. Open battery cover and take out battery to insert SIM card.
2. Put in the battery.
3. Push to turn on the device.
4. Click on the AirPort icon displayed on your device and connect to SSID “HSPA+
Mobile Router”.
5. You can now connect to your 3G network
11
3. Connection Manager
HSPA+ MOBILE ROUTER provides a connection manager for users to manage mobile broadband
connections. Through the connection manager you can manage and adjust settings for your
device. Please follow the steps below to enter the webpage of you connection manager.
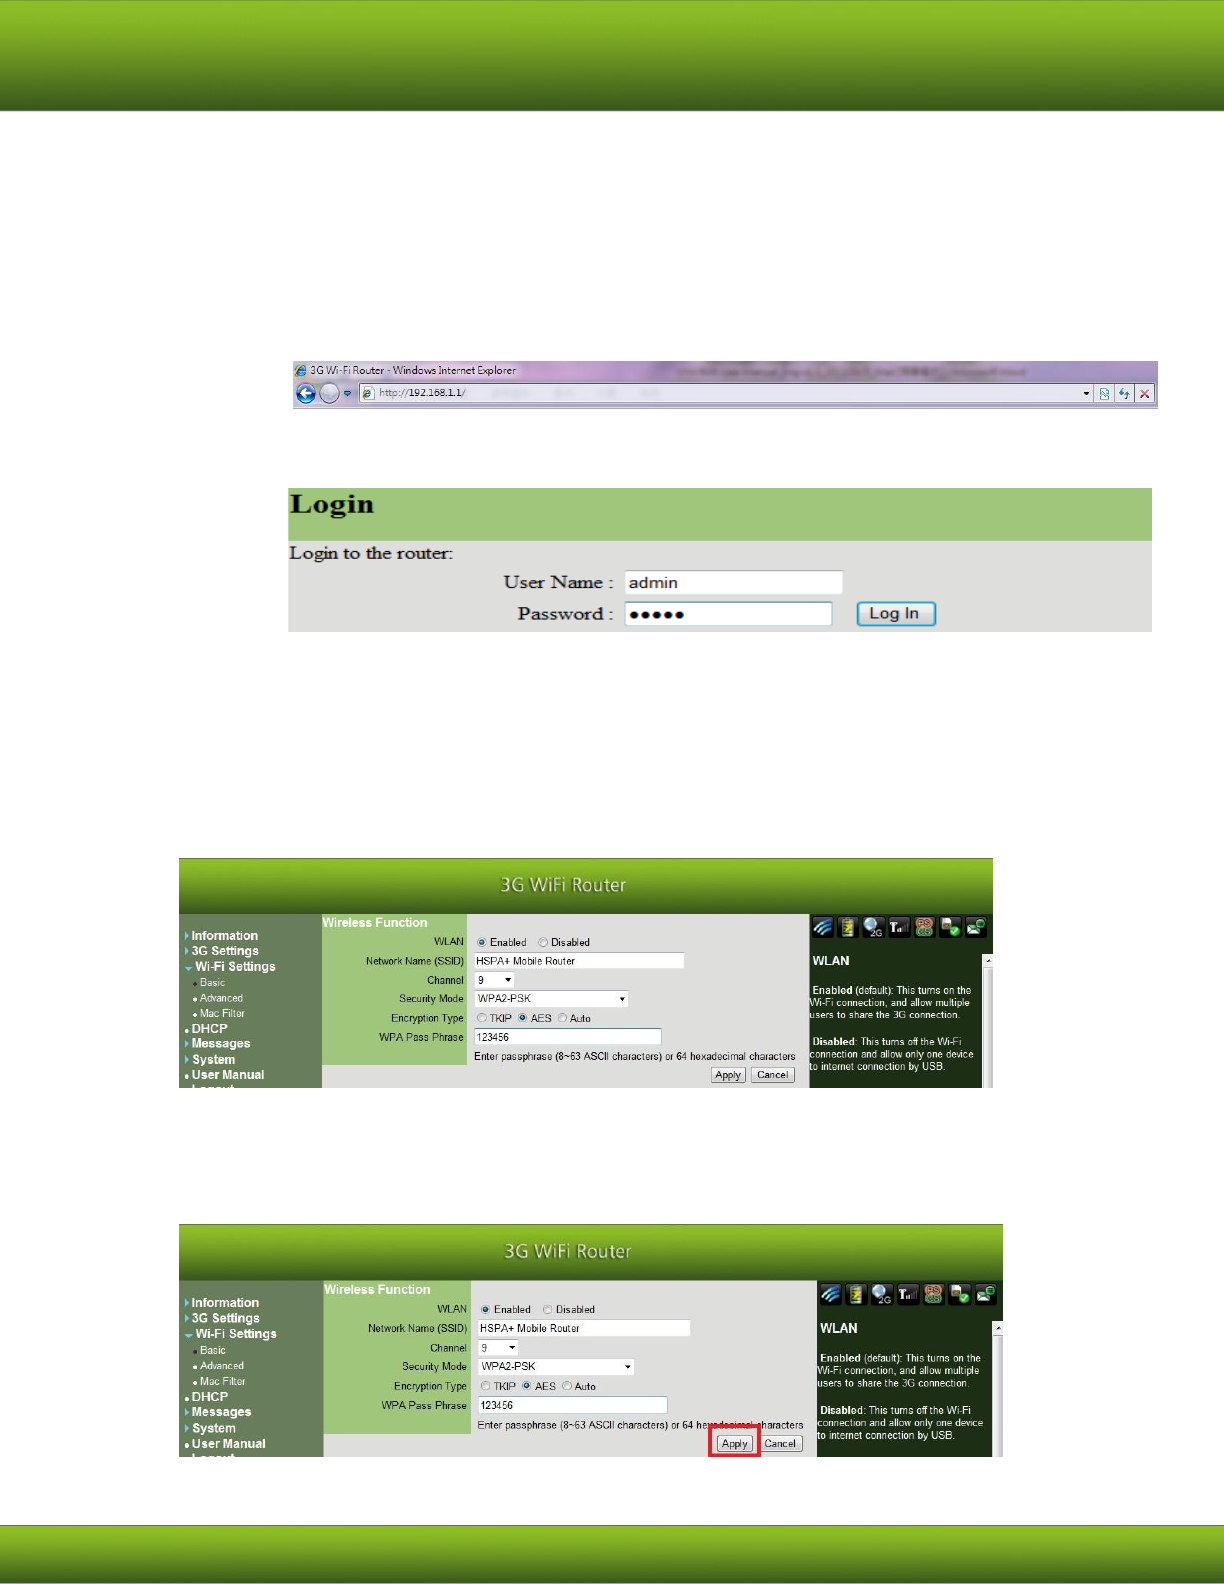
1. Firstly, turn the power on and connect to HSPA+ MOBILE ROUTER.
2. Open browser and enter http://192.168.1.1.
3. The default user name and password are both admin. Enter “admin” in Name and
Password field.
4. Click “Log In”.
3.1 Default Page for First Time
When you log into the webpage for the first time, the default page will look like the below.
The warning message is to remind you to setup the “SSID” (the device name which shows
up on the connection network) and ”Encryption Type”. For more details please refer to “3.4.1.”
If you do not want to setup right away, the warning message will not show up again after
the “Apply” button is clicked. But you can access the setting again through “Wi-Fi Settings”
“Basic” (3.4.1).
12
3.2 Information
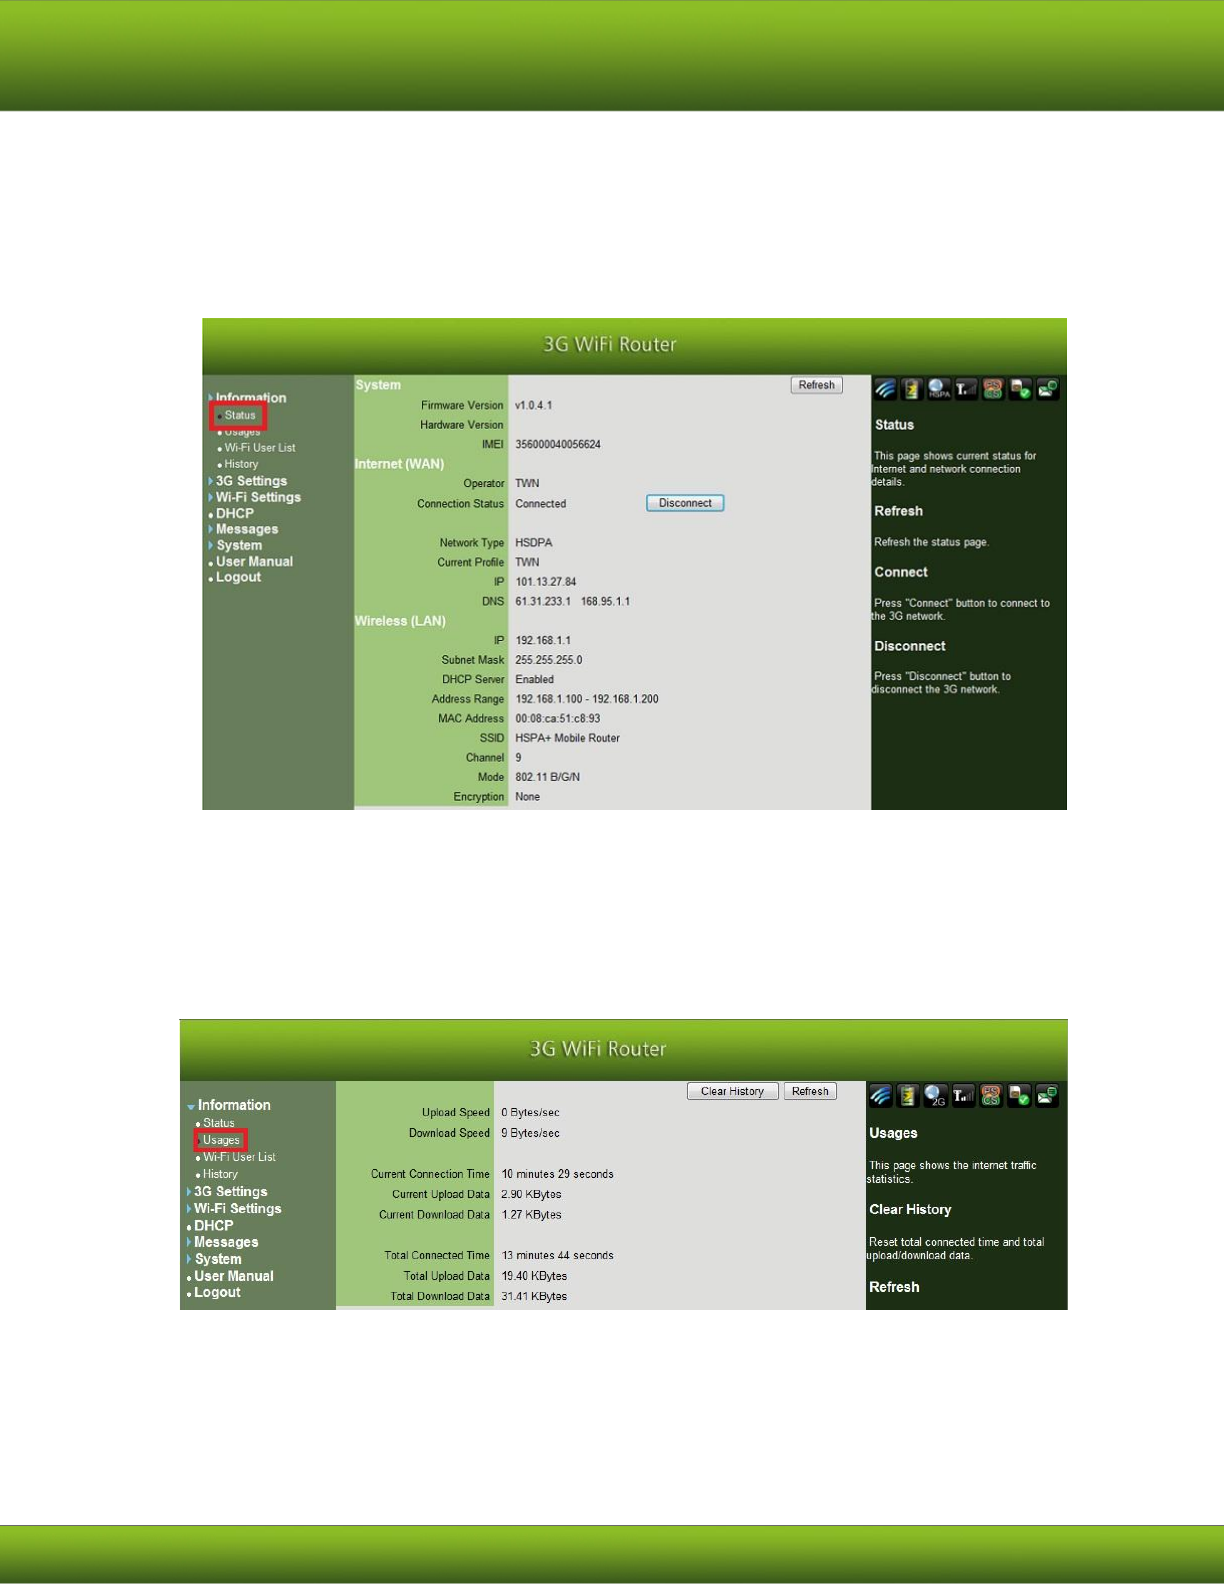
3.2.1. Status
After logging onto the connection manager webpage, the status page will show. This is what
the default page will look like for your new HSPA+ MOBILE ROUTER device.
Refresh: Refresh the status page.
Connect: Press "Connect" button to connect to the 3G network.
Disconnect: Press "Disconnect" button to disconnect from the 3G network.
3.2.2. Usages
Clear History:Reset total connected time and total upload/download data.
Refresh: Refresh the statistics page.
13
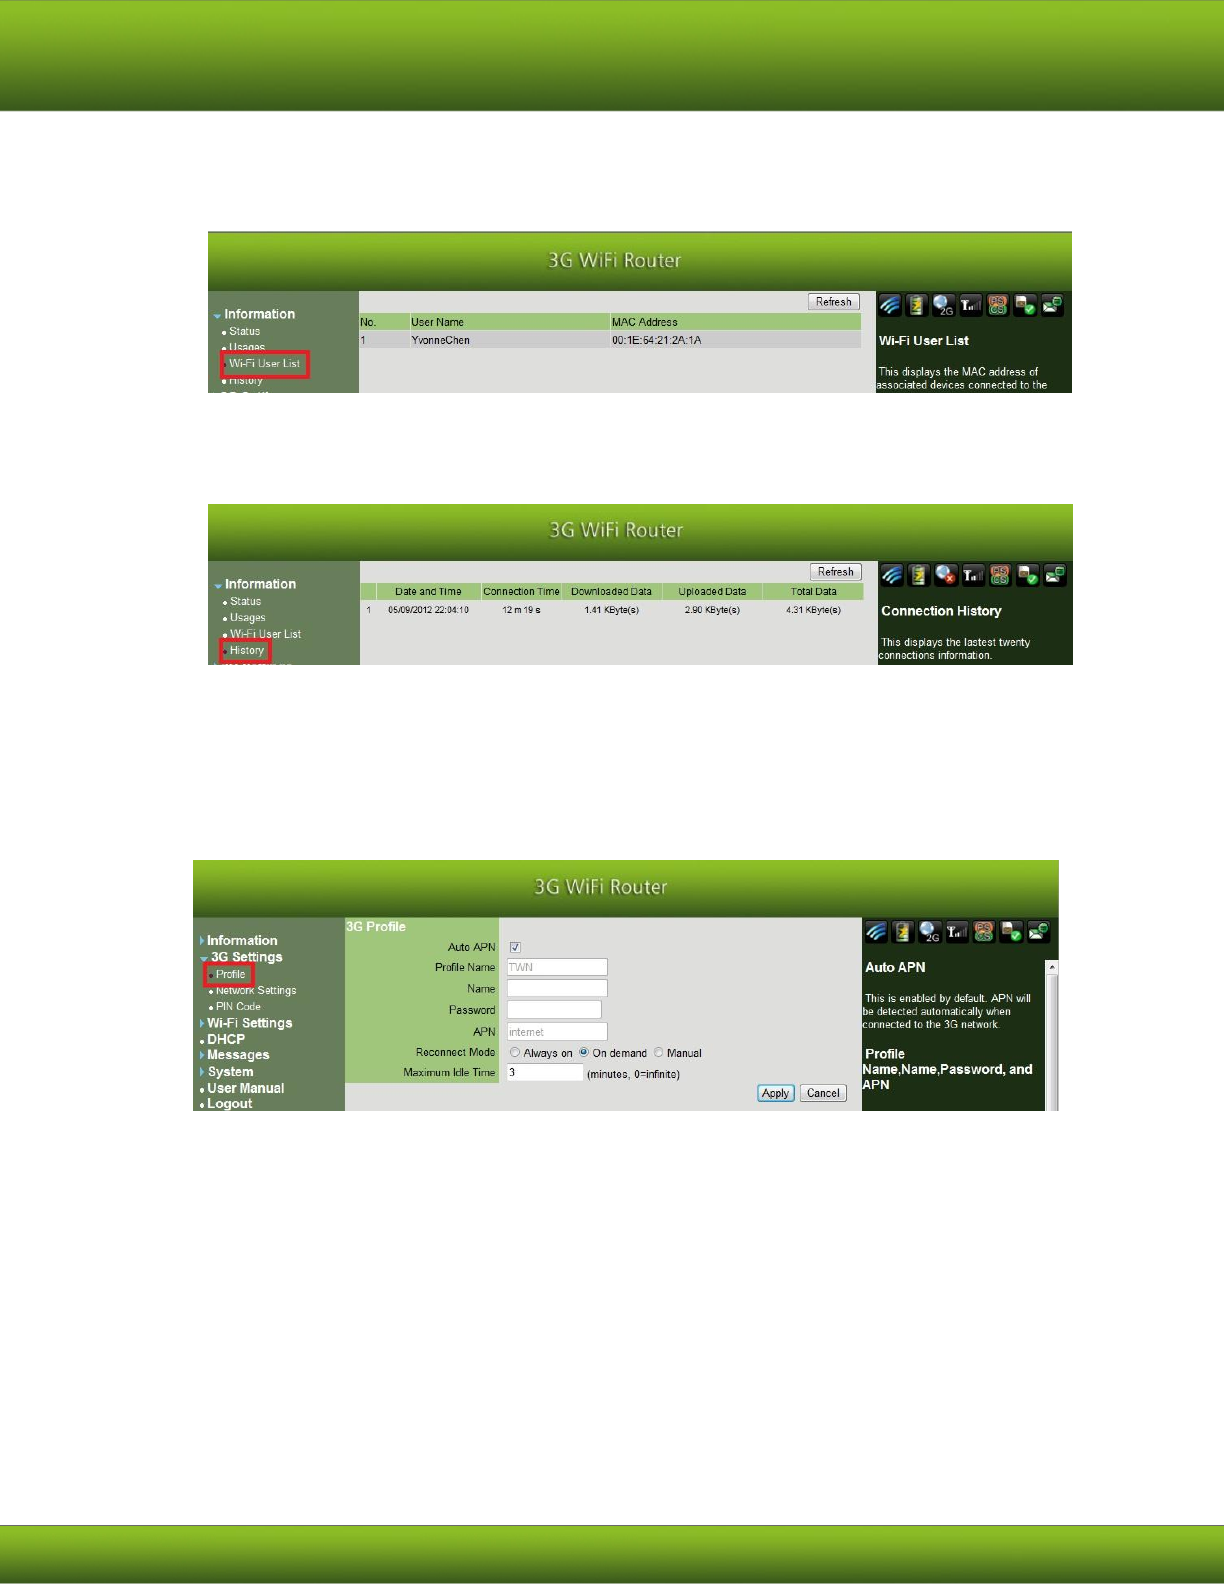
3.2.3. Wi-Fi User List
This displays the MAC address of associated devices connected to the HSPA+ MOBILE
ROUTER.
3.2.4. History
This displays the connections information of associated devices connected to the HSPA+
MOBILE ROUTER.
3.3 3G Settings
3.3.1. Profile
Auto APN: This is enabled by default. APN will be detected automatically when
connected to the 3G network.
Profile Name, Name, Password, and APN: Please enter the information
provided by your Internet Service Provider if "Auto APN" is disabled.
Reconnection Mode
Always on: The mobile network connection is always maintained.
On demand (default): It will connect to your 3G network whenever you access the
Internet.
14
Manual: You have to go to "Status-> Status" in this web setting page and click the
"Connect" button manually to bring up the 3G connection.
Maximum Idle Time: On the "On demand" or "Manual" reconnection mode,
the 3G connection will disconnect if you do not use the internet within this setting
time.
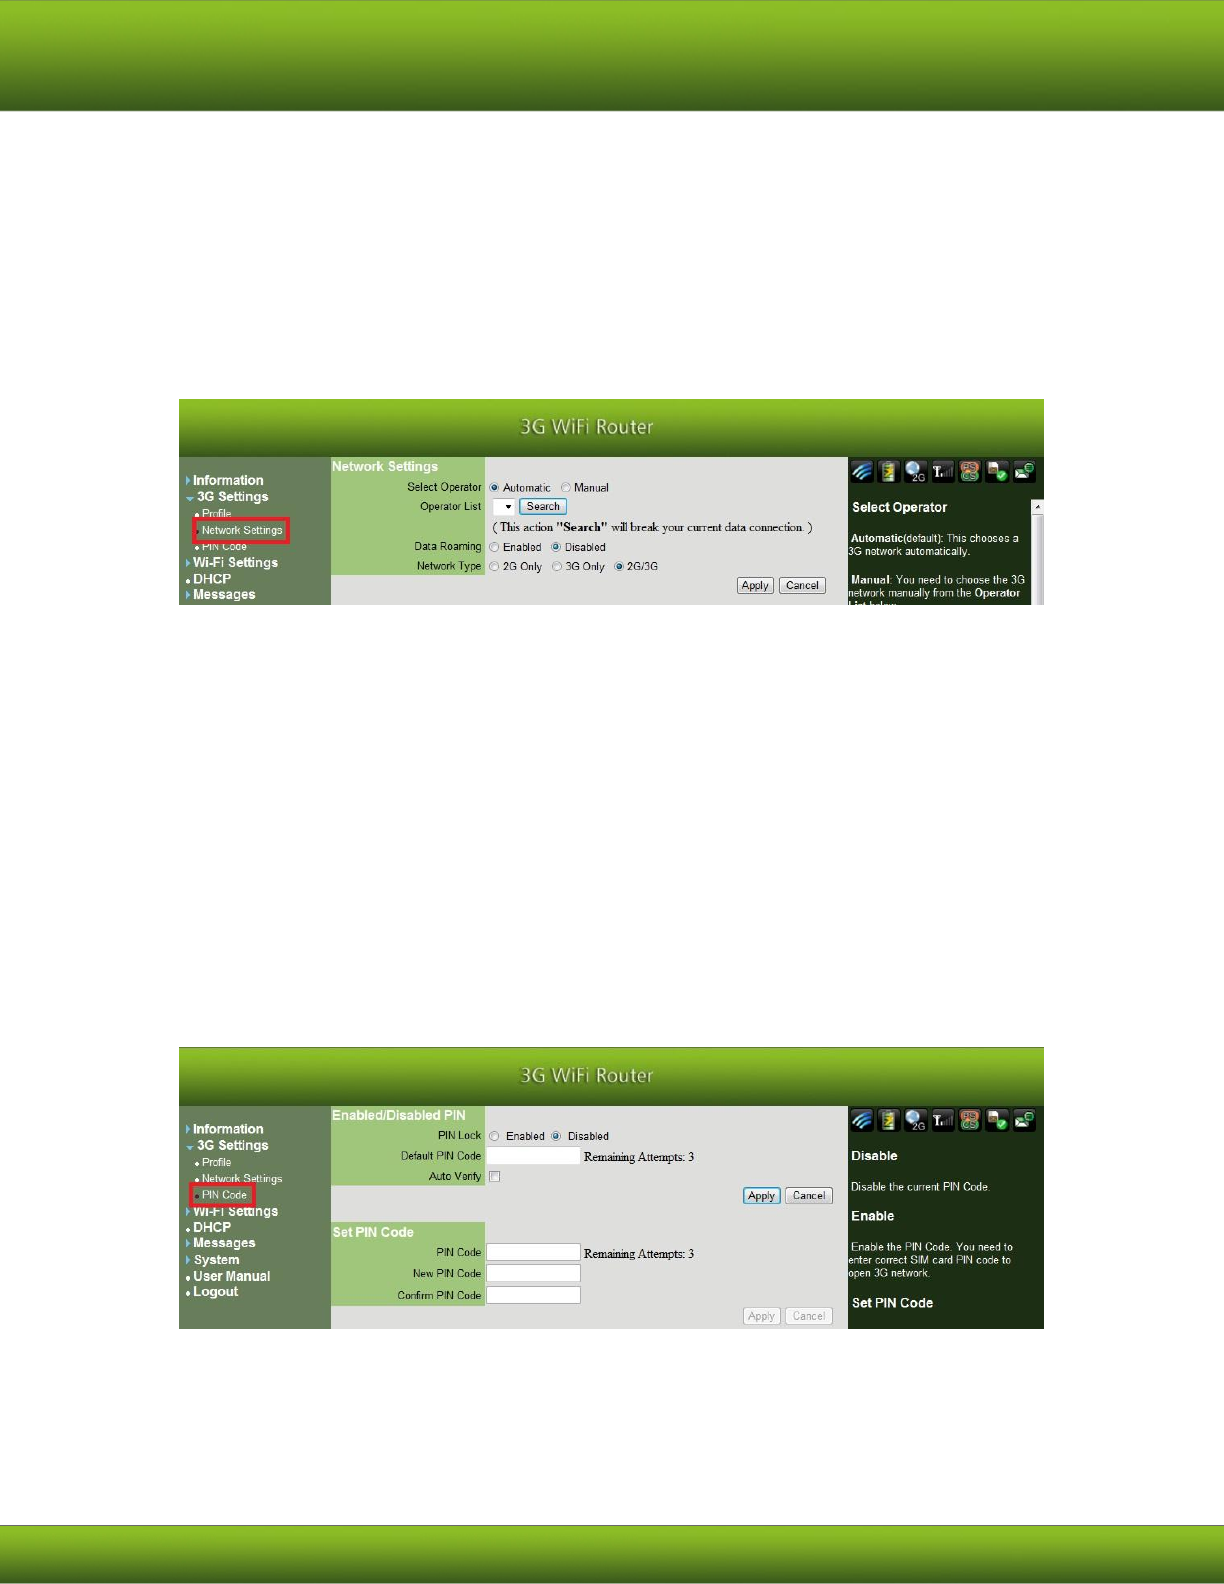
3.3.2. Network Settings
Select Operator
Automatic (default): This chooses a 3G network automatically.
Manual: You need to choose the 3G network manually from the “Operator List”
below.
Search: Click button and search for enabled 3G network
Data Roaming:
Disabled (default): Disable roaming.
Enabled: Enable roaming
3.3.3. PIN Code
PIN Lock:
Disable (default): Disable the current PIN Code.
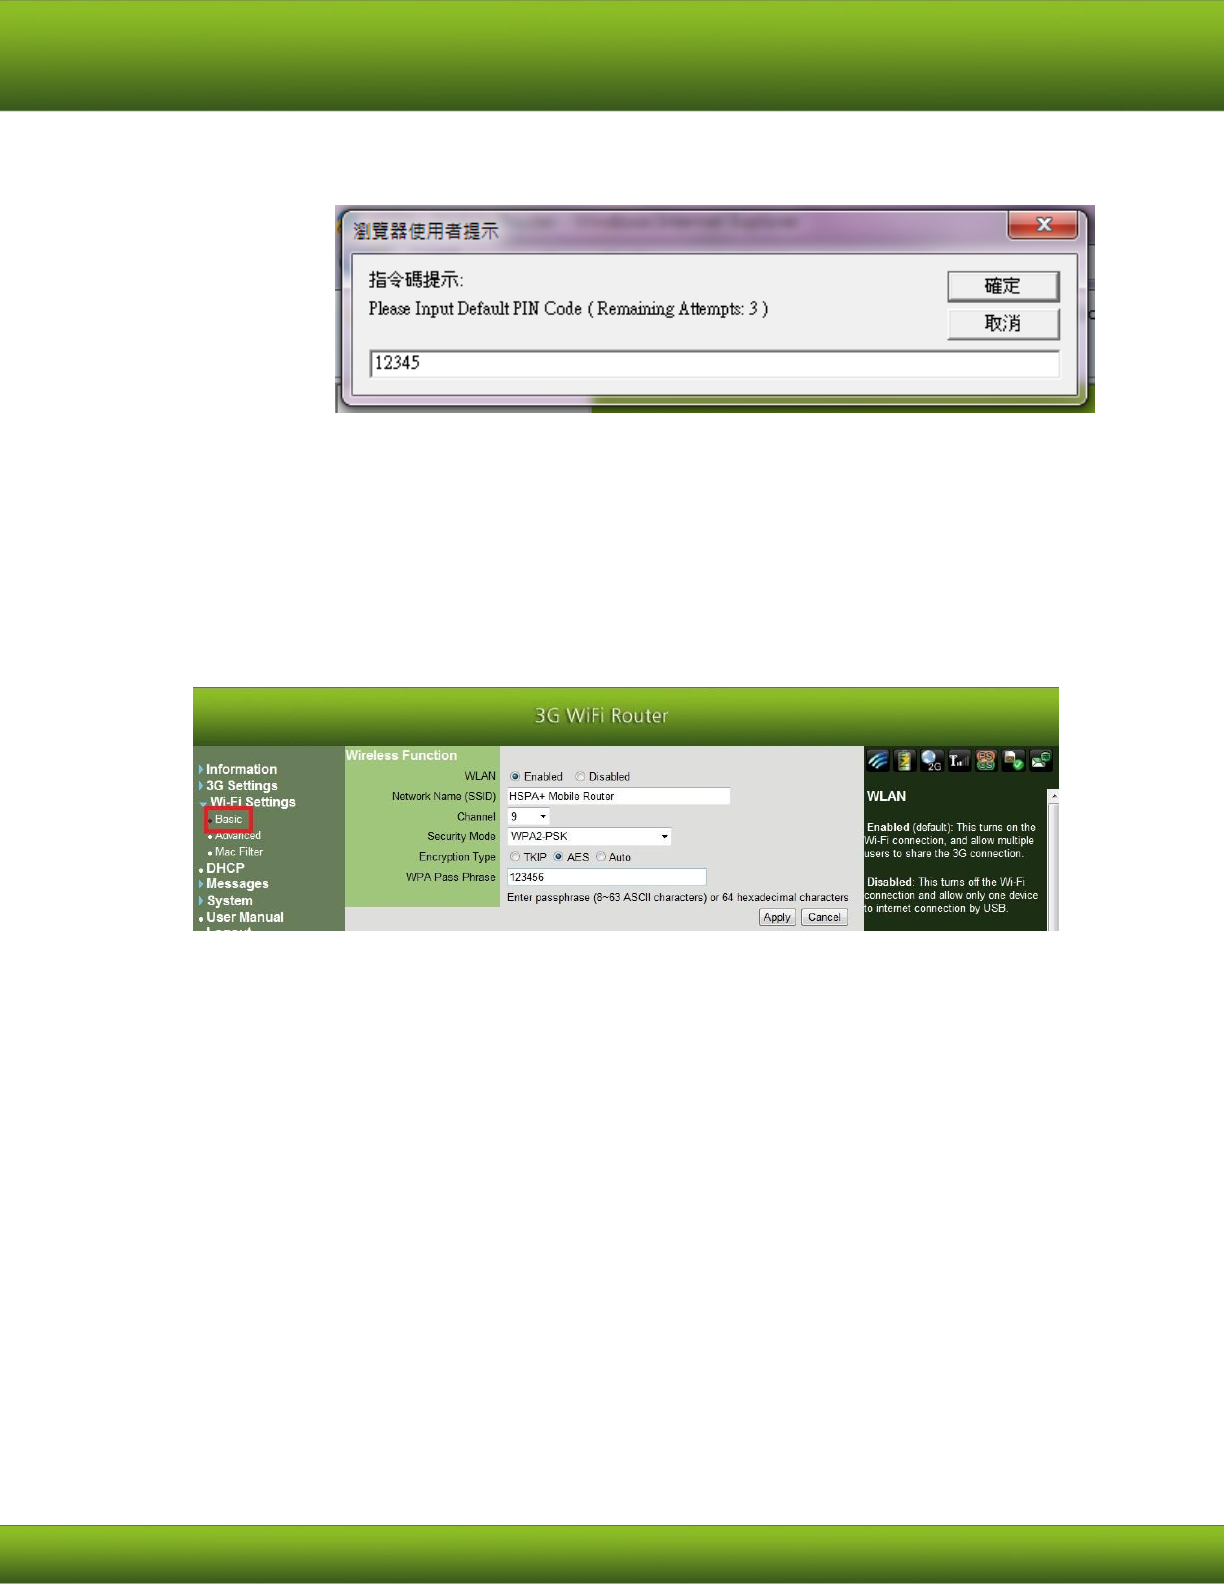
15
Enable: Enable the PIN Code. You need to enter correct SIM card PIN code to
open 3G network.
Set PIN Code: When PIN is enabled, you can change the PIN Code from current
PIN Code to New PIN Code and confirm it in HSPA+ Mobile Router.
3.4 Wi-Fi Settings
3.4.1. Basic
WLAN:
Enabled (default): This turns on the Wi-Fi connection, and becomes a router
sharing the 3G connection.
Disabled: This turns off the Wi-Fi connection and becomes modem mode
allowing only one device to internet connection by USB.
Network Name (SSID): This is the ID of HSPA+ Mobile Router which appears on
the wireless network. You can assign an ID up to 32 characters here.
Channel: You can change the Wi-Fi radio channel in this drop-down menu.
Encryption Type: We highly recommend you to select one of the encryption
types to secure your wireless connection when using this device. Please make
sure your Wi-Fi device can support the encryption mode you selected.
WPA Pass Phrase: Enter 8 to 63 characters for the WPA encryption key. All
wireless devices must use this key to connect.
16
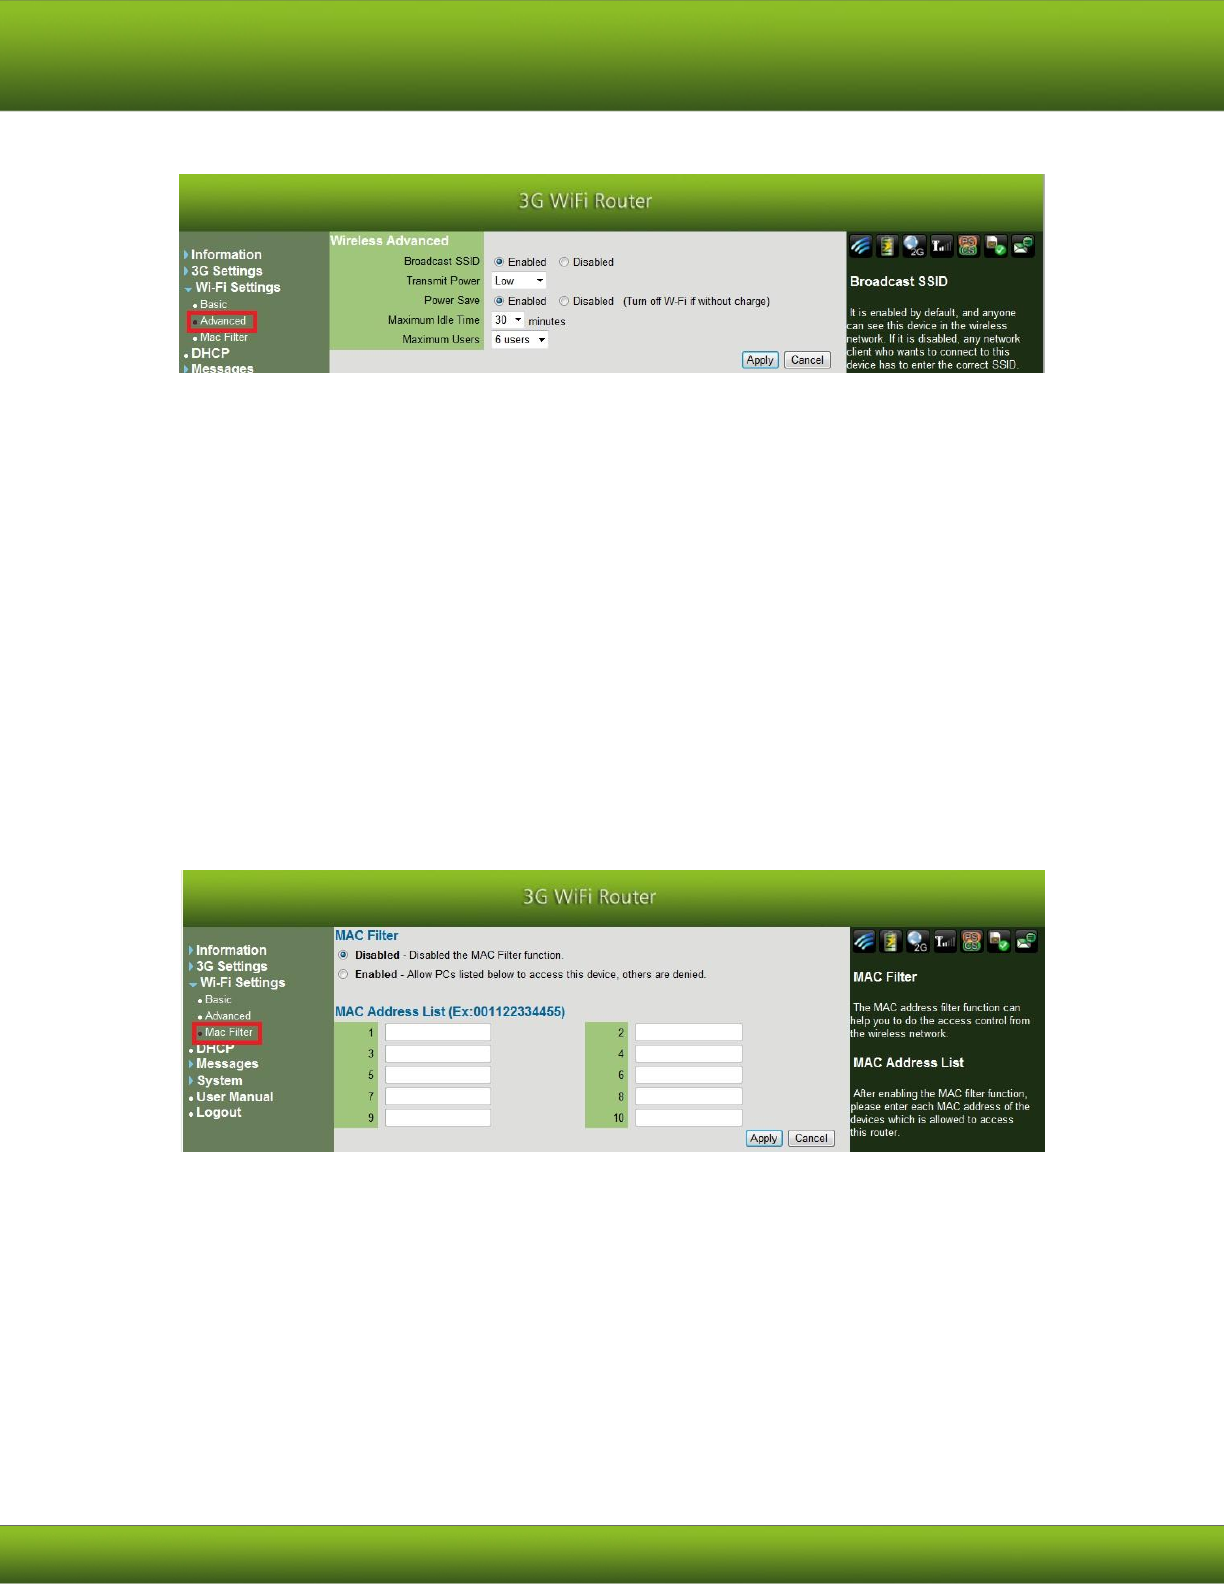
3.4.2. Advanced
Broadcast SSID: It is enabled by default, and anyone can see this device in the
wireless network. If it is disabled, any network client who wants to connect to
this device has to enter the correct SSID.
Power Save: This function only works on no charging mode. If no any Wireless
station connect to Router and idle time is up, the Wi-Fi will be turn off. At this
time, user must press power button 1 second, and then the Wireless interface
will be wake up again.
Maximum Idle time: In no charging mode, you can set the idle time for power
saving. If no wireless station is connected to the router and the idle time expires,
Wi-Fi will turn off.
Maximum Users: You can select the maximum number of network clients
allowed to connect to this device.
3.4.3. Mac filter
MAC Address List: After enabling the MAC filter function, please enter each MAC
address of the devices which is allowed to access this router.
17
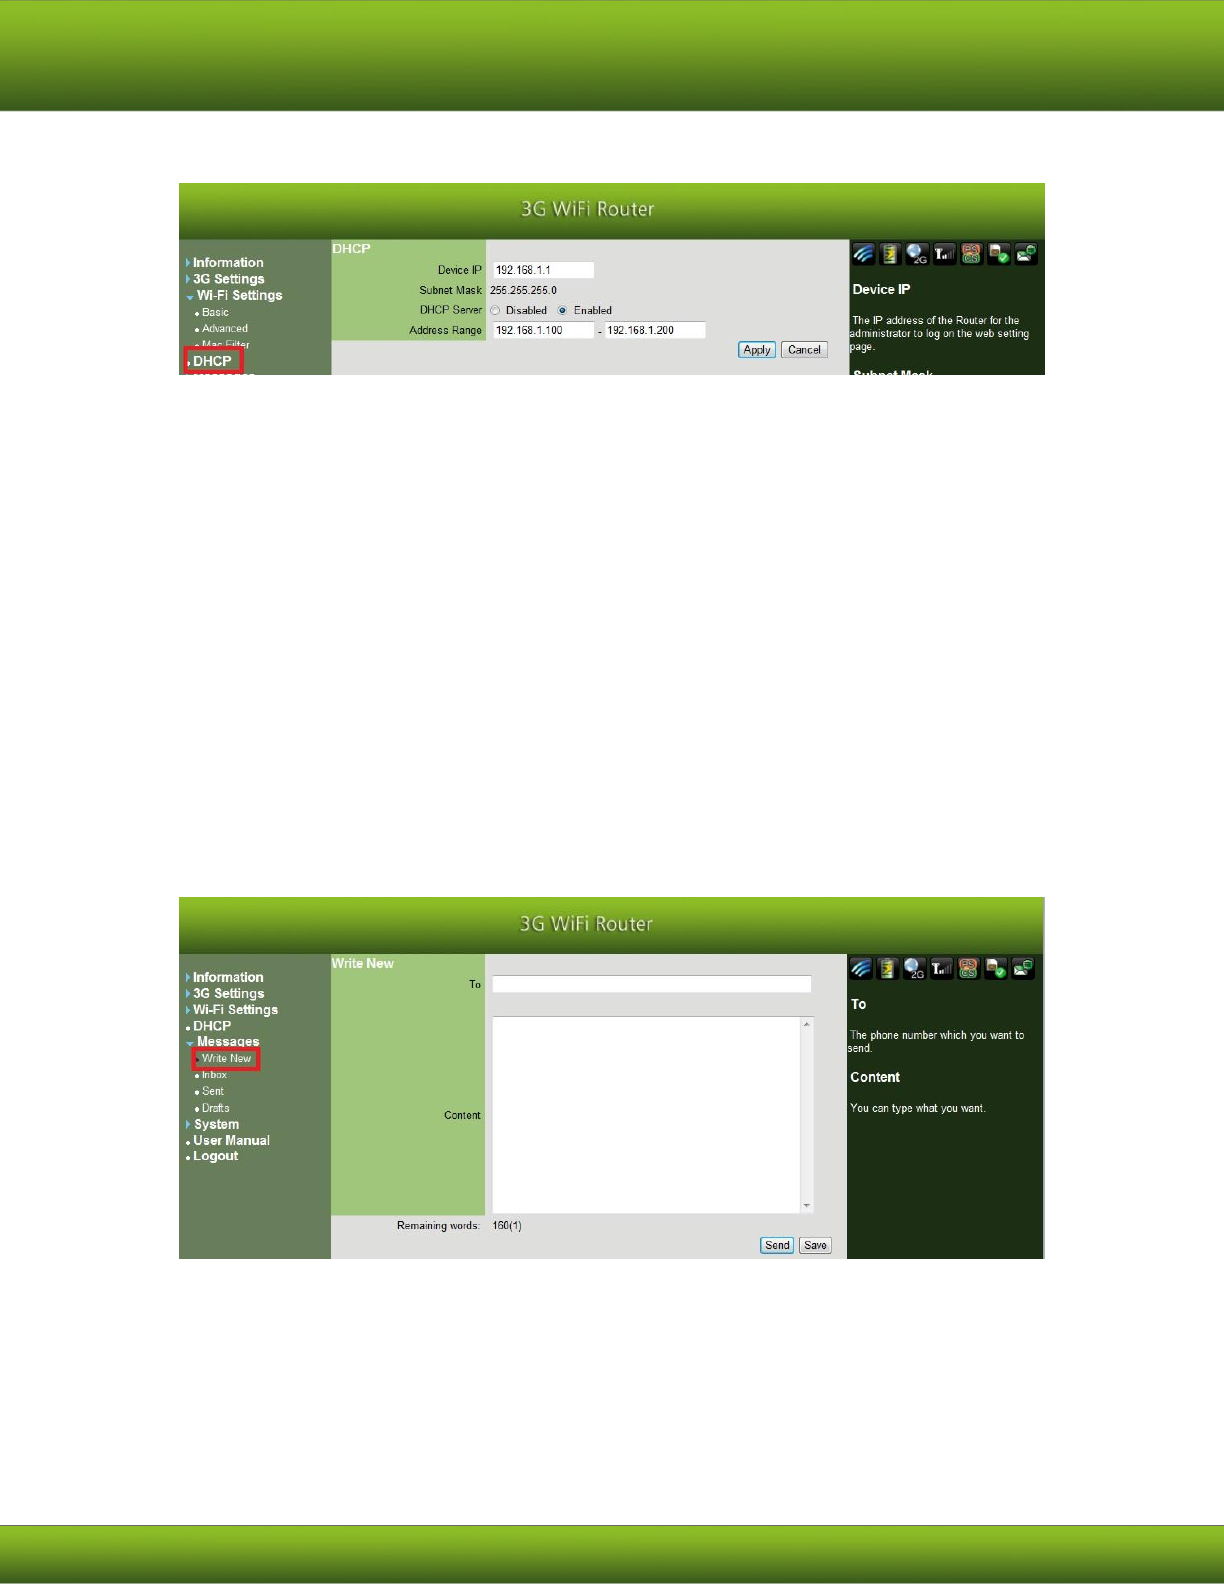
3.5 DHCP
Device IP: The IP address of the HSPA+ MOBILE ROUTER for the administrator to
log on the web setting page.
Subnet Mask: The subnet mask of this device is 255.255.255.0.
DHCP Server: The HSPA+ Mobile Router could be used as a DHCP server and
assign IP address to the network client in your wireless network. The default is
“Enabled”.
Address Range: Specify the range of IP address that DHCP server can assign to
the network client.
3.6 Message
3.6.1. Write new
To:The phone number which you want to send to.
Content:Type in message here.
18
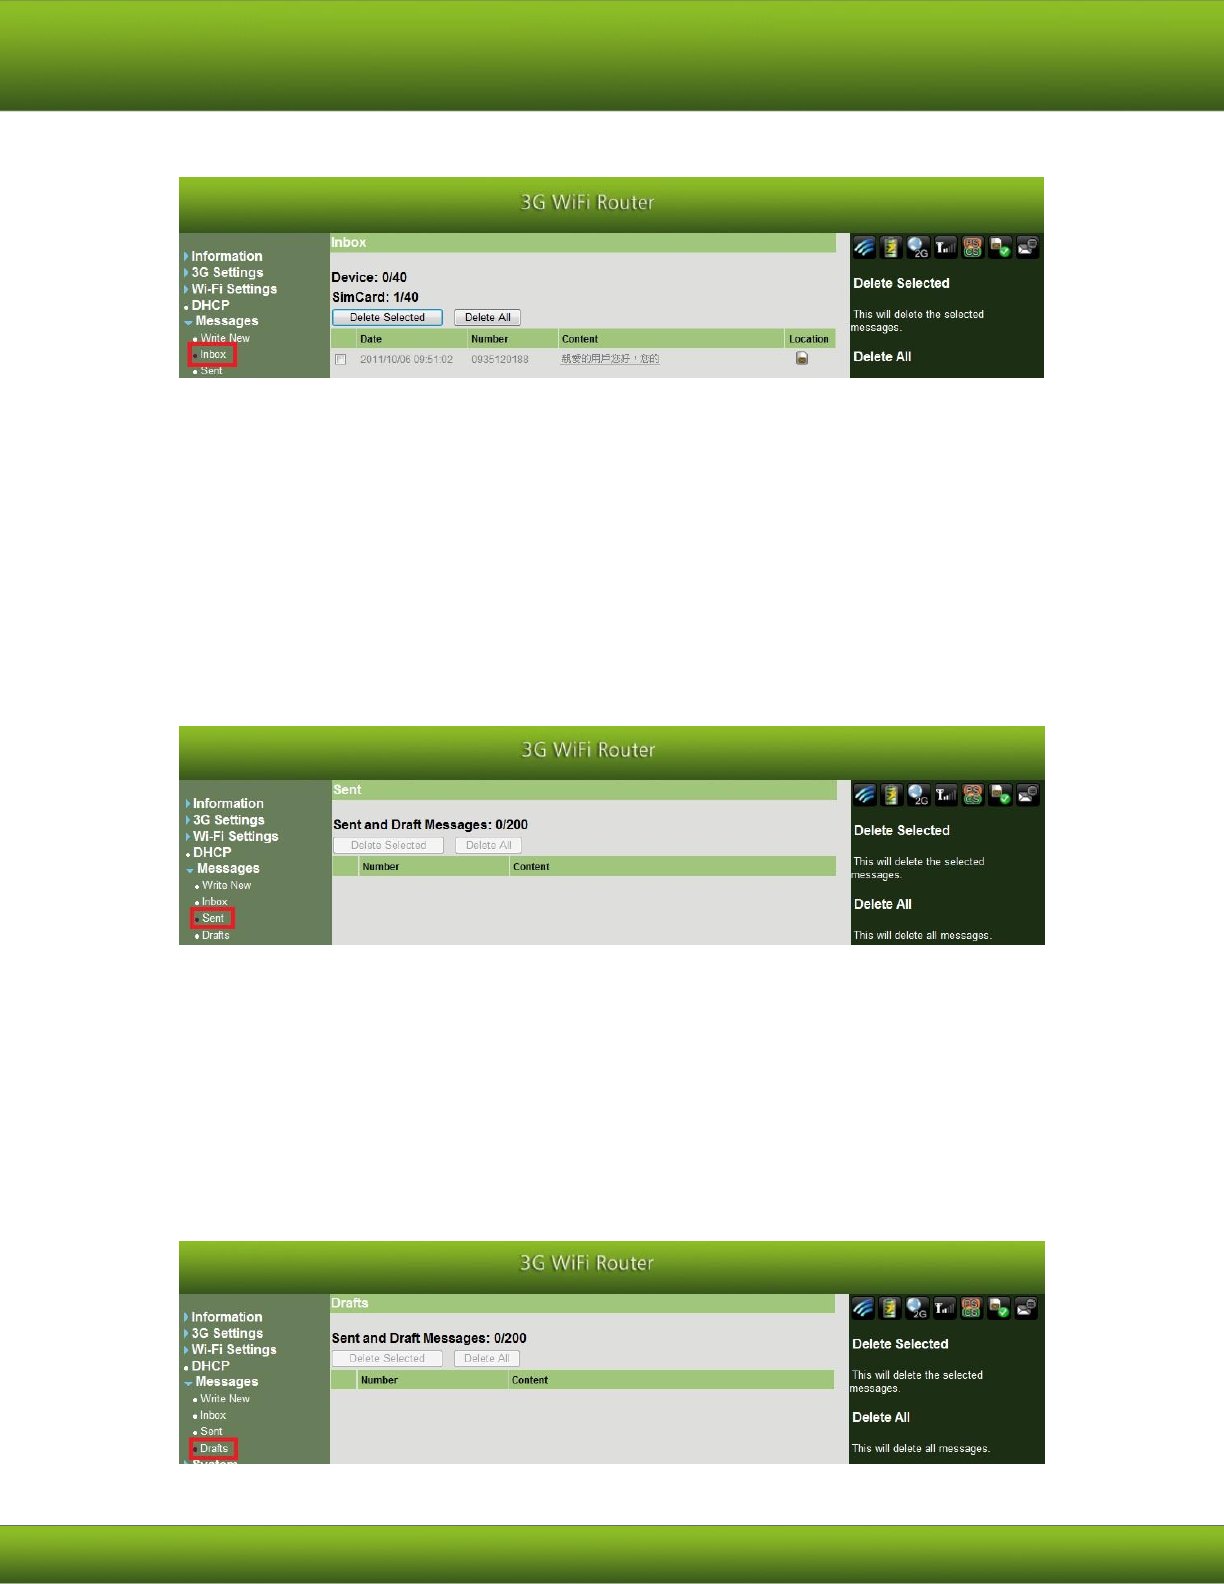
3.6.2. Inbox
Store every received message.
Device & SimCard:Total number of received messages/Maximum stored
number.
Delete Selected:Delete messages selected.
Delete All:Delete all messages in the inbox.
Read and reply messages selected.
3.6.3. Sent
Stores every sent message.
Delete Selected:Delete messages selected.
Delete All:Delete all messages in the inbox.
Sent and Draft Messages: Total number of messages sent and saved in draft /
Maximum capacity of messages.
3.6.4. Draft
19
Store the draft. You can continue to edit the message afterwards
Delete Selected:Delete messages selected.
Delete All:Delete all messages in the inbox.
Sent and Draft Messages: Total number of messages sent and draft saved /
Maximum capacity of stored messages.
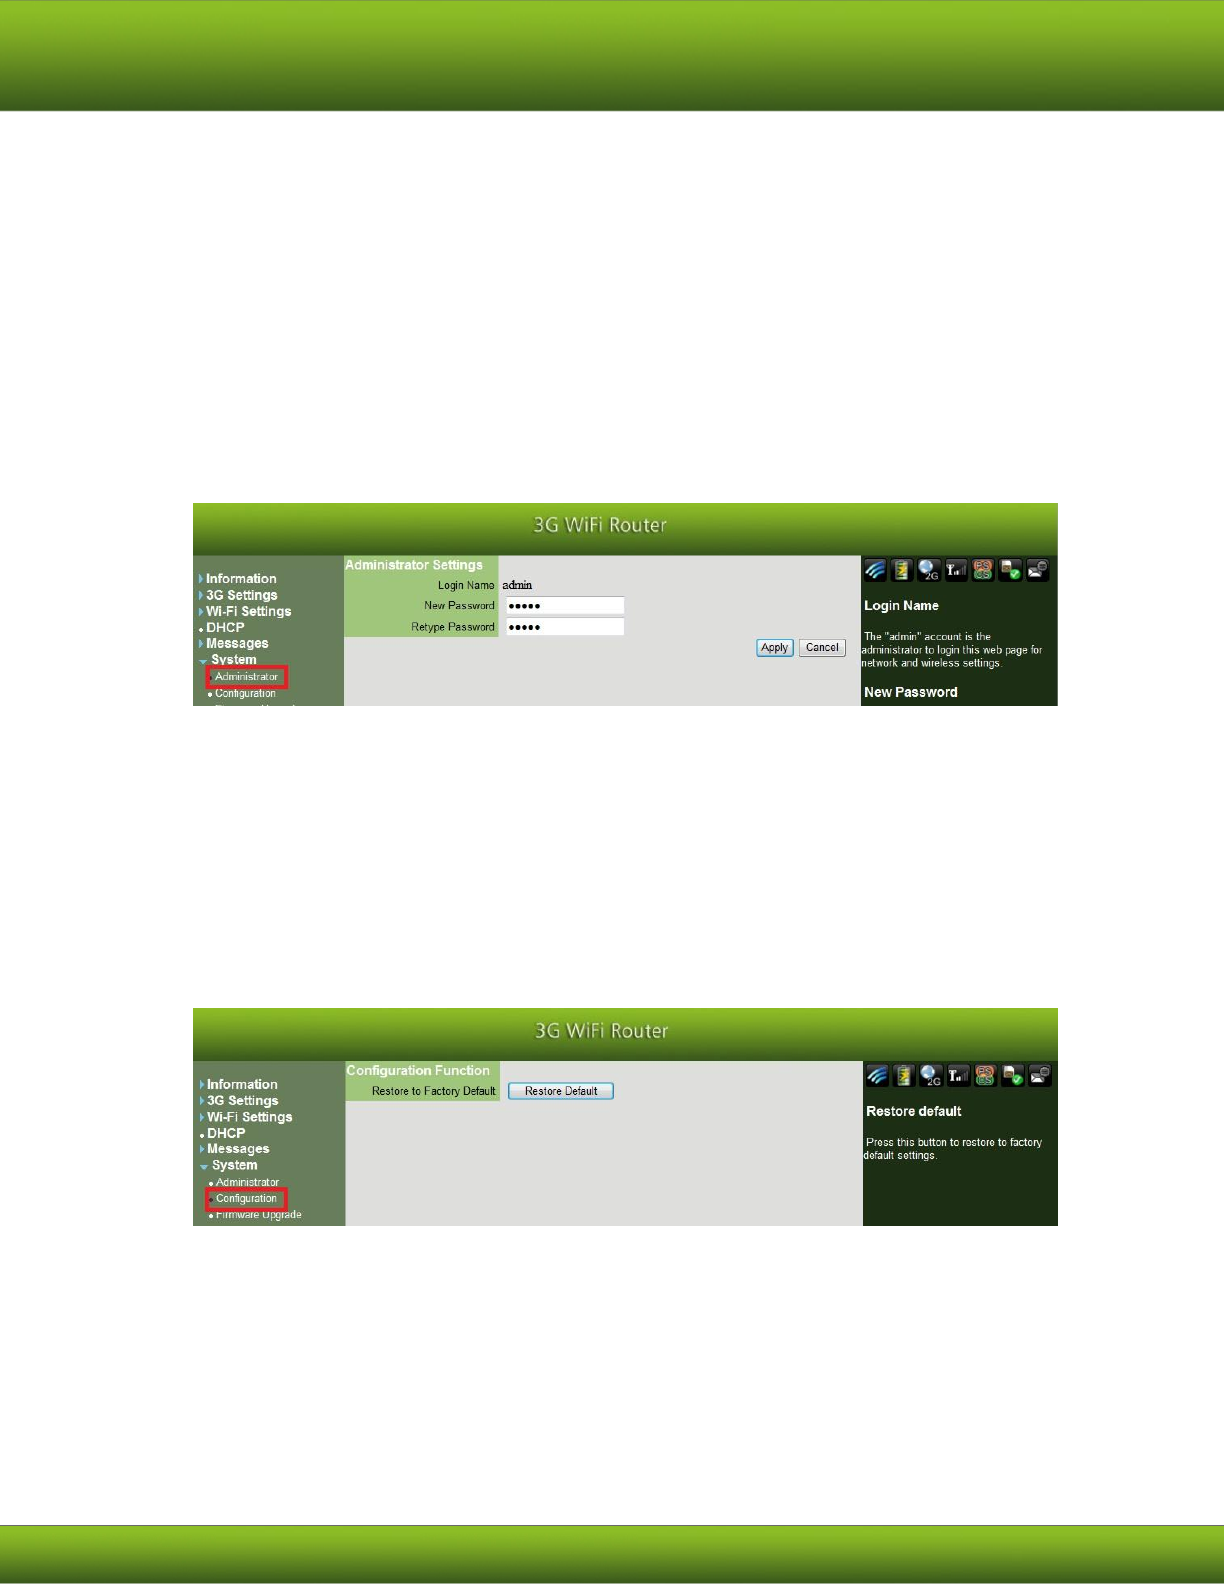
3.7 System
3.7.1. Administrator
Login Name: Using "admin" account log in this web page for network and
wireless settings.
New Password: The default password is "admin". You can enter new password
here for admin to log in setting page.
Retype Password: You should enter the same password as above for
confirmation.
3.7.2. Configuration
Restore Default: Press this button to restore to factory default settings.
20
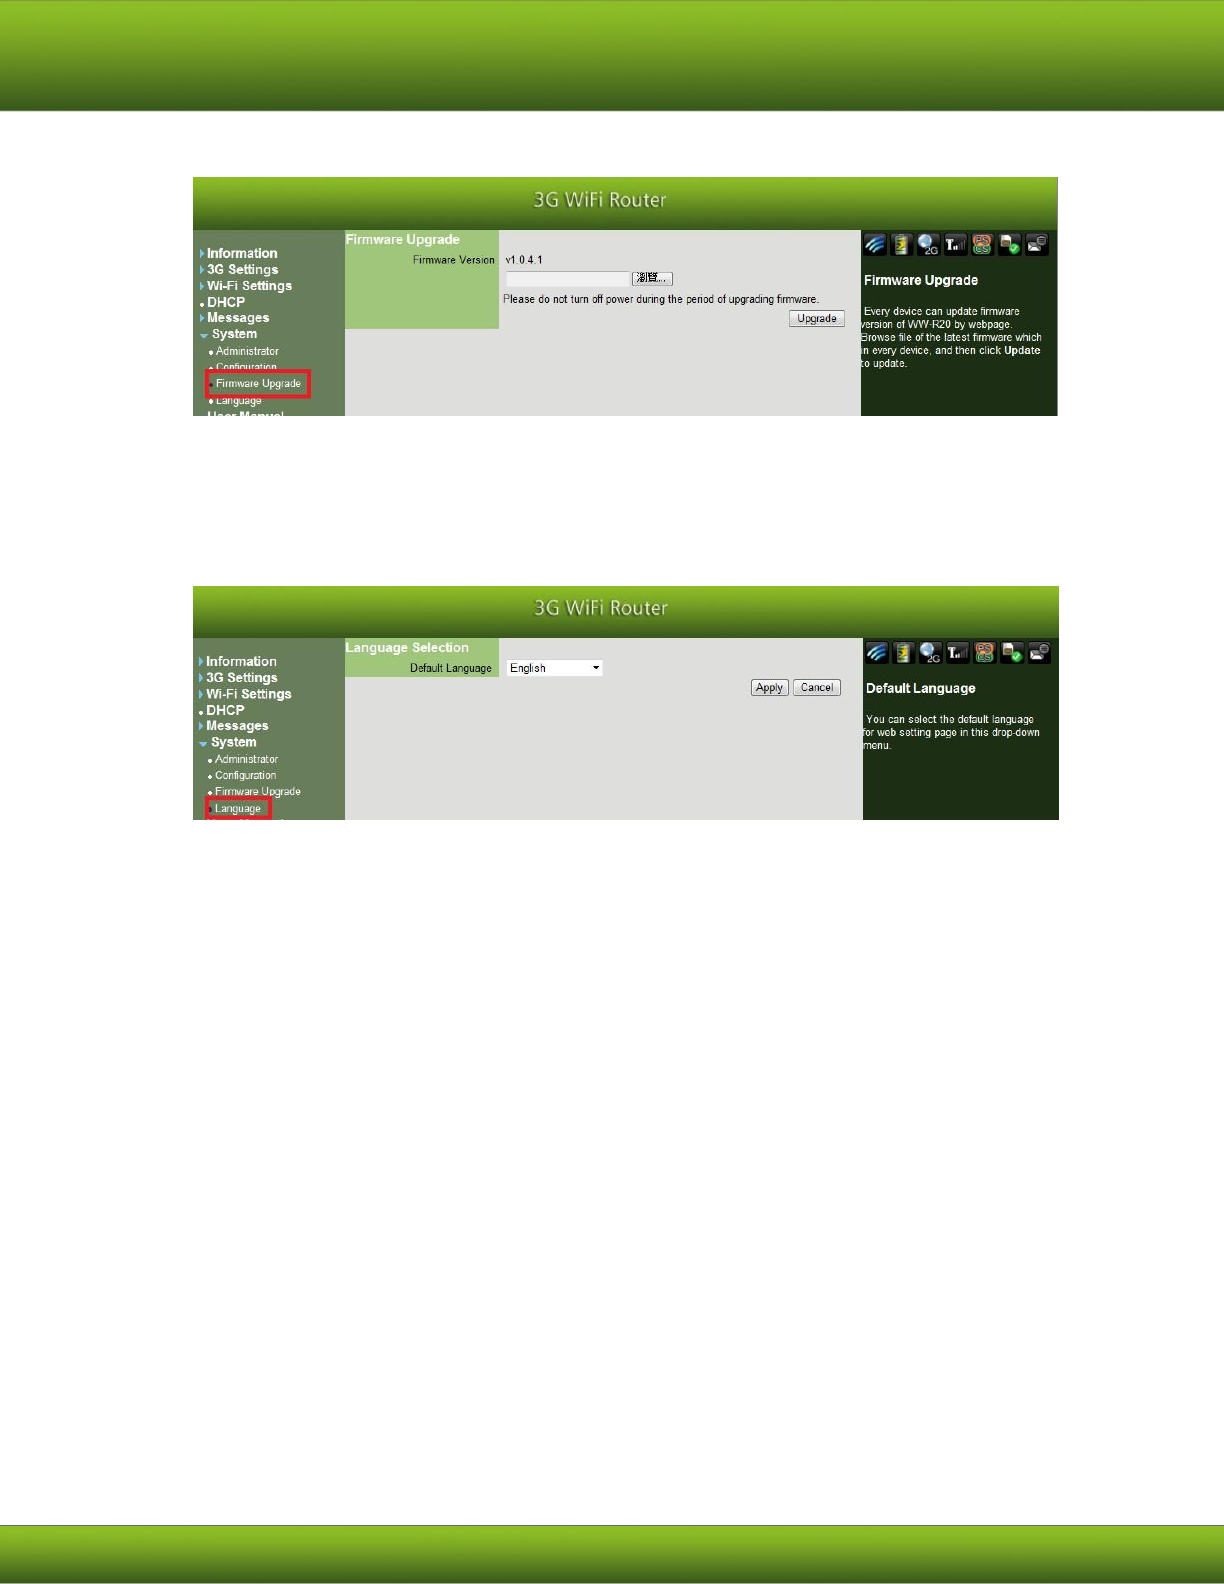
3.7.3. Firmware Upgrade
Every device can update firmware version of HSPA+ MOBILE ROUTER by
webpage. Browse file of the latest firmware which in every device, and then click
“Update” to update.
3.7.4. Language
Default Language: You can select the default language for web setting page in
this drop-down menu.

21
4. Troubleshooting
1. Why can’t I access the web setting page?
Ans:
1. Please check if the LED is illuminating, otherwise you may need to unplug the HSPA+
MOBILE ROUTER and insert once again.
2. Please make sure if your device has connected to the SSID via Wi-Fi.
3. The default IP address is 192.168.1.1, please make sure you have typed it correctly in
your web browser.
2. How to restore to default router settings?
Ans:
1. Please connect to HSPA+ MOBILE ROUTER and log in to the router web setting page, the
default IP address is http://192.168.1.1
2. Open the page through “System” -> “Configuration” and click on “Restore Default”
button.
3. What is the LED meaning of illuminating?
Ans: Please refer to “1.3.1 Appearance.”
4. Why can’t I see “HSPA+ Mobile Router” appearing in the wireless network?
Ans:
1. Connect HSPA+ MOBILE ROUTER with your device by USB.
2. Type 192.168.1.1 in your web browser to open connection manager.
3. Go to the “Wi-Fi Settings -> Basic” and make sure you have selected “Enabled” option in
“WLAN”.

22
4. Go to the page “Wi-Fi Settings -> Advanced” and make sure you have selected the
“Enabled” option in “Broadcast SSID”.
5. What should I do if my SIM card is locked and I can’t connect to the mobile network?
Ans: Please contact your service provider for further assistance.