BARCO AMM15TK2 LCD Monitor User Manual TABLE OF CONTENTS
Advan Int'l Corp. LCD Monitor TABLE OF CONTENTS
BARCO >
Contents
- 1. Users Manual
- 2. User Manual
User Manual

AUTO-SCANNING WITH DIGITAL CONTROL
LCD COLOR MEDICAL MONITOR
AMM15TK3/AMM15TK2-TE/AMM15TK2-TEW
Operation Manual
For future reference, record the serial
number of your display monitor in the
space below:
SERIAL number
The serial number is located on the
back of the monitor

2
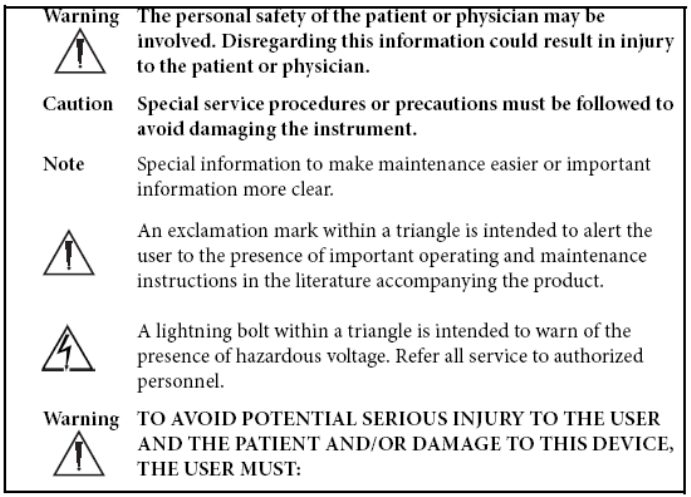
WARNING
The title “WARNING” is used to inform the users of
possible causes that could inflict the injury, death, or
property damage to the patients.
CAUTION
The title “CAUTION” is used to inform the users of possible
causes that could inflict the patients although it might not
severe enough to cause deaths.
NOTE
The title “NOTE” is used to inform the users of items that
are of importance in terms of installation, operation, or
maintenance of the Equipment although the failure does not
inflict the bodily harm to the patients.
ADAVN INT’L CORP.2005
“ELO” is a Registered trademark of Elo TouchSystems, Inc.,
All other trademarks are the property of their reference owners.
This document is subject to change without notice.
Advan provides this information as reference only. Reference to other vendor’s
products does not imply any recommendation or endorsement.
Revision Control
Date Description
07162005 Document number
3
TABLE OF CONTENTS
Warnings and Cautions…………………………………………… 4
Warnings…………………………………………………………….. 5
Cautions……………………………………………………………… 6
Product Description and Intended Use…….………………….. 7
Functional Description……………………………………………. 8
Product Features…………………………………………………… 8
Cleaning instructions……………………………………………… 9
Symbol Explanations……………………………………………… 10
Regulatory Compliance…………………………………………… 11
EU Declaration of Conformity for Medical Applications……. 11
Prepare for Unpack………………………………………………… 11~12
DDC…………………………………………………………………... 13
Installation…………………………………………………………... 13
Screen Position Adjustment…………………………………….. 14
Connecting the Power Cord…………………………………….. 14
Power Management Function…………………………………… 15
Power Management System…………………………………….. 15
User Controls………………………………………………………. 16
Standard OSD Operation…………………………………………. 16
OSD Function Description (Analog)……………………………. 17
OSD Function Description (C or S Video )…….………………. 18
Specification Of AMM15TK3..…………………………………….. 19
Supported Modes…………………………………………………... 20
Connectors…………………………………………………………... 21
Troubleshooting…………………………………………………….. 22
Electromagnetic Compatibility…………………………………… 24~26
Description of Warranty……………………………………………. 27~28
Tounchscreen User’s Manual………………………………………29~30
Warnings and Cautions
Please read this manual and follow its instructions carefully. The words warning, caution, and
note carry special meanings and should be carefully reviewed:
Warranty is void if any of these warnings are disregarded.
ADVAN Int’l Corp accepts full responsibility for the effects on safety, reliability, and
performance of the equipment only if:
• Re-adjustments, modifications, and/or repairs are carried out exclusively by ADVAN Int’l
Corp.
• The electrical installation of the relevant operating room complies with the applicable IEC and
CE requirements.
Warning Federal law (United States of America) restricts this device to use by,
or on order of a physician.
The ADVAN Int’l Corp AMM15TK3 Series Monitor has been tested under UL 60601-1
standard and UL listed for Medical application.
4
ADAVN Int’l Corp reserves the right to make improvements in the product(s) described herein.
Product(s), therefore, may not agree in detail to the published design or specifications. All
specifications are subject to change without notice. Please contact ADVAN Int’l Corp directly
or phone your local ADVAN Int’l Corp sales representative or agent for information on changes
and new products.
Warnings
1. Read the operating manual thoroughly and be familiar with its contents prior to using this
equipment.
2. Carefully unpack the unit and check if any damage occurred during shipment.
3. Should any solid object or liquid fall into the panel, unplug the unit and have it checked by
qualified personnel before operating it any further.
4. Unplug the unit if it is not to be used for an extended period of time. To disconnect the cord,
pull it out by the plug. Never pull the cord itself.
5. Be a qualified physician, having complete knowledge of the use of this equipment.
6. Test this equipment prior to a surgical procedure. This monitor was fully tested at the factory
before shipment.
7. Avoid removing covers on control unit to avoid electric shock.
8. Attempt no internal repairs or adjustments not specifically detailed in this operating manual.
9. Pay close attention to the care, cleaning instructions in this manual. A deviation may cause
damage (refer to the Cleaning section on page 9).
10. DO NOT STERILIZE MONITOR.
11. Read the entire instruction manual before assembling or connecting the camera.
12. Do not place the monitor or any other heavy object on the power cord. Damage to the cable
can cause fire or electric shock.
13. Monitor with power supply is suitable for use in patient environment.
14. DO NOT stack more than 8 boxes high
This equipment has been tested and found to comply with the limits for medical devices in IEC
601-1-2:2003. These limits are designed to provide reasonable protection against harmful
interference in a typical medical installation.
This equipment generates, uses and can radiate radio frequency energy and, if not installed and
used in accordance with the instructions, may cause harmful interference to other devices in the
vicinity. However, there is no guarantee that interference will not occur in a particular
installation. If this equipment does cause harmful interference to other devices, which can be
determined by turning the equipment off and on, the user is encouraged to try to correct the
interference by one or more of the following measures:
- Reorient or relocate the receiving device.
- Increase the separation between the equipment.
- Connect the equipment into an outlet on a circuit different from that to which the other
device(s) are connected.
- Consult the manufacturer or field service technician for help.
NOTICE TO USER
This device complies with Part 15 of the FCC Rules. Operation is subject to the
following two conditions:
(1) this device may not cause harmful interference,and (2) this device must accept any interference
received,including interference that may cause undesired operation.
FCC WARNING
This equipment generates or uses radio frequency energy. Changes or modifications to this equipment
may cause harmful interference unless the modifications are expressly approved in the instruction manual.
The user could lose the authority to operate this equipment if unauthorized change or modification is made.
5
6
Cautions
1. The AC Adapter must be plugged into a Grounded power outlet.
2. Use only the proprietary AMM15TK3 power supply for the AMM15TK3 monitor. Make a
proper connection by ensuring that the shrink tubing completely secures the connection between
the DC power cord and the extension cord.
3. Turn power off when unit is not in use.
4. Never operate the unit right after having transported from a cold location directly to a warm
location.
5. Do not expose the monitor to moisture or directly apply liquid cleaners directly to the screen.
Spray the cleaning solution into a soft cloth and clean gently.
6. Handle the monitor with care. Do not strike or scratch the screen.
7. Do not block the monitor cooling vents. The monitor is cooled by natural convection and has
no fan.
8. Do not force the monitor past 28 degrees of vertical when adjusting the screen position. (For
monitors equipped with stands only.)
9. Remove the power module and connection when transporting the unit.
10. Save the original carton and associated packing material. They will be useful should you
have to transport or ship the unit.
11. Allow adequate air circulation to prevent internal heat buildup.
12. Do not place the unit on surfaces (rugs, blankets, etc.) or near materials (curtains, draperies)
that may block the ventilation slots.
13. Do not install the unit near sunlight, excessive dust, mechanical vibration or shock.
14. The unit is designed for operation in a horizontal position. Never operate the unit in a
vertical position.
15. Keep the unit away from equipment with strong magnets (i.e. a large loudspeaker.)
16. Do not expose the monitor to moisture or excessive dust.
17. Equipment with SIP/SOP connectors should either comply with IEC 60601-1 and/or IEC
60601-1-1 harmonized national standard or the combination should be evaluated. Do not touch
the patient with signal input or output connectors.
18. Use only a hospital grade power supply cord.
19. This equipment generates, uses, and can radiate radio frequency energy. If not installed
correctly and or not used in accordance with these instructions, it may cause harmful
interference with other devices. This may be determined by turning the equipment off and on.
The user is encouraged to try to correct the interference through one or more of the following
measures: •Reorient or relocate the receiving device.
•Increase the separation distance between the equipment.
•Connect the equipment to an outlet on a circuit different from that to which the other
device(s) are connected.
•Consult the manufacturer or field service technician for help.
20. Grounding reliability can only be achieved when the equipment is connected to an
equipment receptacle labeled “Hospital Only” or “Hospital Grade.”
Note To connect to an international power supply, use a an attachment plug appropriate for
the power outlet.
Note Refer to the “Electromagnetic Compatibility” (EMC) section of this manual to ensure
EMC. The AMM15TK3 must be installed and operated according to the EMC information
provided in this manual.
7
Product Description and Intended Use
The AMM15TK3 Series Medical Monitor is an intelligent, microprocessor-based TFT-LCD
monitor intended for use in medical applications. It has an ergonomically designed display and
is compatible with most analog RGB (Red, Green, Blue) display standards.
Advan AMM15TK3 Series Medical Monitor consists of a low-profile molded plastic monitor
head, video and a power supply. Options include a Super sonic Acoustic Wave (AMM15TK2-
TEW) or Resistive (AMM15TK2-TE) touchscreen with interface cable. The display shows
262,144 colors with a pixel matrix of 1024 columns by 768rows.
• Advanced Viewing Solution (AVS): Our sophisticated filter extends the viewing angle of
the screen image, without sacrificing contrast ratio and brightness.
• Advanced Timing Setup (ATS): A unique technology from ADVAN is the One Touch
Auto Adjustment. Pressing the Auto Adjust button on the front panel, automatically
optimizes position, phase, frequency, contrast and color balance. This allows the user to
maximize the perfect screen setting in the shortest amount of time.
• Advanced Mounting Solution (AMS): ADVAN and Ergoton share their technology to
improve flat panel environment, utilizing numerous ergonomic mounting solutions to allow
creative use in conjunction to product application.
• The monitor is able to properly function even in case of upgrade video cards or software
because of the wide auto-scanning compatibility range without requiring to buy a new
monitor.
• The internal microprocessor digitally controls auto-scanning. For horizontal scan
frequencies between 24.8 KHz and 60.2 KHz, and vertical scan frequencies between 50.0
Hz and 85.1 Hz. In each frequency mode, the microprocessor-based circuitry allows the
monitor to function at the precision-of a fixed frequency.
• The resident memory allows for storing factory default settings and also additional user
adjustment parameters.
• The maximum resolution achievable is XGA (1024 x 768), best suited for Windows
applications
• The compact and sleek cabinet design saves lot of your desk space and makes your desk
look neat and tidy.
• The monitor is compliant with VESA-DPMS power management standard. In order to save
energy, the monitor must be connected to a system compliant with the standard.
The monitor is certified by UL International to medical standard UL 60601-1, EN60601-1
and EN60601-1-2. It is also CE marked for sale into the European Community for integration or
use with medical products.

Functional Description and Product Features
• Display Type Color Active Matrix LCD
• Control Buttons:
-OSD menu display: Menu Button
-Adjustment increase and Adjustment decrease and
-Power on/off
-Auto adjust & exit OSD menu: Auto Button
• Adjust brightness/contrast directly with the adjustment increase/decrease buttons.
• Indicators
-On-Screen Display "OSD" function
-Power LED indicator is lit when the monitor is on and blinking when the monitor is
power-save/standby mode
• Display formats
-VGA, SVGA, and XGA
-VESA DDC1 and DDC2B Plug and Play Functions
8
Cleaning Instructions
Advan AMM15TK2 Series Monitors will continue to operate normally while being cleaned in a
fashion normal for a hospital environment. This includes cleaning with a damp (wrung out),
mild soapy cloth. Protection from various chemicals used for cleaning.
Advan AMM15TK2 Series Monitors will withstand non-abrasive cloths and cleaning solutions
used in hospitals for like equipment. This is typically warm water and mild detergent for all
surfaces or 70% IPA for the touchscreen surface. Possible chemicals include:
• 70% isopropyl alcohol
• 6% aqueous ammonia
• Cidex (2.4% glutaraldehyde solution)
• Sodium Hypochlorite (bleach) 10%
• “Green soap” USP
• 0.5% Chlorhexidine in 70% isopropyl alcohol
• Ovation®
• Formula 409®
• Fantastic®
• Wex Cide®
To clean the screen, do not spray liquid cleaners directly on to the unit. Stand away Form the
monitor and spray cleaning solution onto a cloth. Without applying excessive pressure, clean
the screen with the slightly dampened rag.
9
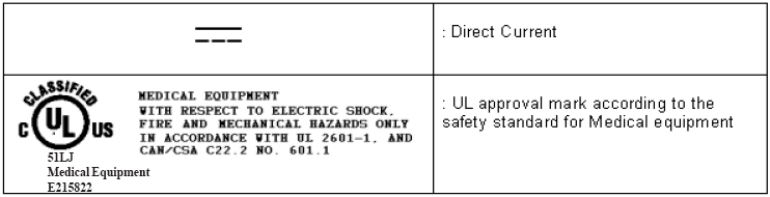
Symbol Explanations
Indicates proof of conformity to applicable European Economic
Community Council directives and to harmonized standards
published in the official journal of the European Communities
Tested and certified by UL to UL60601-1. If this mark appears with
the indicators "C" and "US" the product is certified for both the U.S
and Canadian markets, to the applicable U.S and Canadian
standards.
Tested to comply with FCC Class B standards.
Dangerous high voltage.
Consult accompanying documents.
Indicates protective earth ground.
For indoor use only.
Direct Current
DC power control switch
10

Regulatory Compliance
This monitor has been tested to comply with IEC/EN 60601-1 and IEC/EN60601-1-2
Certified by UL to medical standard UL60601-1(UL/cUL Mark).
Because many medical offices are located in residential areas, this monitor, in addition to the
medical requirements, has also been tested and found to comply with the limits for FCC Class B
computing devices in a typically configured system. It is the system integrator or configurer's
responsibility to test and ensure that the entire system complies with applicable EMC laws.
EU Declaration of Conformity for Medical Applications
A Declaration of Conformity has been filed for this product. A sample of this document may be
found in the addendum which accompanied this manual. For a copy of the Declaration of
Conformity document, please contact ADVAN Int’l Corp. and request for AMM15TK3 DOC.
Prepare for Unpack
Before you unpack your monitor, prepare a suitable workspace. You need a stable and level
surface near a grounded wall outlet in an area which is relatively free of glare from sunlight or
other sources of bright light. The monitor is cooled by natu convection (it has no fan). ral
For optimum performance, do not block the cooling vents.
While unpacking the monitor, inspect it and other package contents for shipping damage that
could cause a fire or shock hazard. Immediately report any shipping damage to the carrier or
transportation company and contact customer service for monitor in the future or in case of
return.
After you unpack the monitor, make sure the following items are included
• Monitor with 1.5 meter(5ft)monitor-to computer video cable
• AC adapter with cable
( CAUTION: AC Adapter must be plugged into Grounded a power outlet)
CAUTION : AC adapter
Manufacturer: Ault Inc
Model No: MW160KA1203F54
• Touchscreen cable if monitor has touchscreen option
• This operations manual
Note : Your system provider may offer alternative cords or cables
depending on the installation requirement and local geography issues.
11
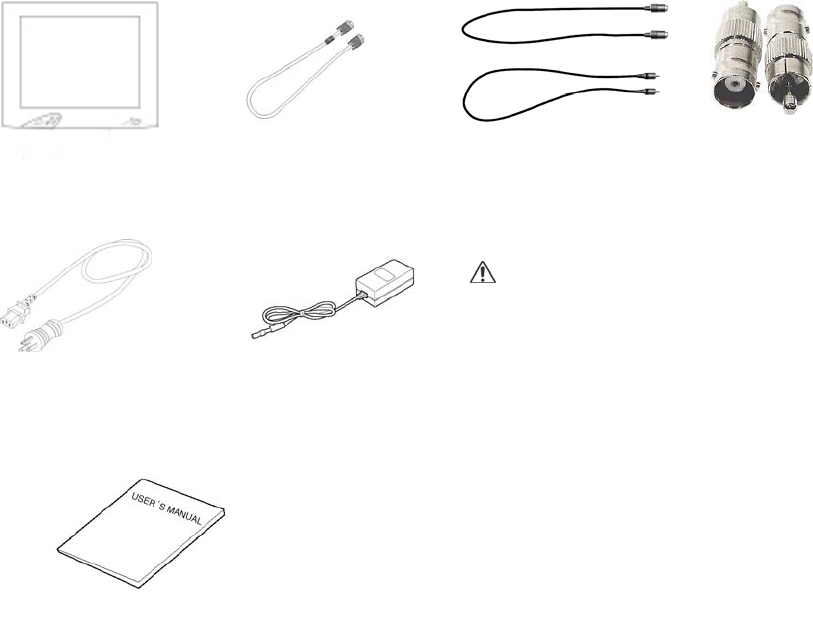
Please check if the following items are present when you unpack the box, and save the
packing materials in case you will need to ship or transport the monitor in future.
·AMM15TK2 Series Medical Monitor, VGA cable, S-Video cable, BNC cable and
BNC to RCA adapter.
·AC power cord and AC-Adapter
CAUTION
Manufacturer : Ault Inc.
Model No : MW160KA1203F54
·User Manual.
·Touch screen DB9 data cable and floppy disk (touchscreen driver) optional
12
DDC
To make your installation easier, the monitor is able to Plug and Play with your system
if your system also supports DDC protocol. The DDC(Display Data Channel)is a
communication protocol through which the monitor automatically informs the host
system about its capabilities, for example, supported resolution and corresponding
timing. The monitor supports DDC1 and DDC2B standard.
Installation
To install the monitor to your host system, please follow the steps as given below:
Steps
1. Use the VGA cable that provides D-SUB 15P connector and connect to the 15-pin
connector on the VGA controller card.
2. Use the S-Video cable that provides S-Video connector and connector to the S-
Video port on the video source device (ex. VCR, Camera system)
3. Use the BNC cable with the BNC to RAC adapter that provides composite video
connector and connector to the composite video port on the video source device.
4. Use the RS-232 serial cable that provides DB9 pin connector and connect to the 9-
pin connector on the source device for touch screen communication. (Optional)
5. Connect the DC power to the DC power connector on the monitor.
6. Connect one end of AC power cord into the AC Adapter and the other end to AC
power outlet.
7. Then turn the computer on and then the monitor.
8. If the monitor still does not function properly, please refer to the troubleshooting
section to diagnose the problem.
13
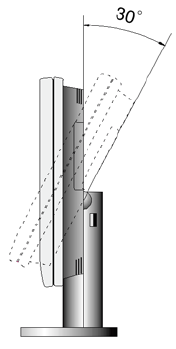
Screen Position Adjustment (with optional stand)
In order to optimize the best viewing position, you can adjust the tilt of the monitor by
using both of your hands to hold the edges of the monitor as shown in the figure below.
The monitor can be adjusted up to 30 degrees as indicated by arrow below.
Connecting the Power Cord
• Check first to make sure that the power cord you use is the correct type required
for your area.
• This monitor has an universal AC adapter that allows operation in either AC 100
- 240 Vac voltage area. No user-adjustment is required.
• Plug one end of the power cord to the AC adapter, plug another end to a proper
AC outlet.
The cord set should have the appropriate safety approvals for the country in which
the equipment will be installed and marked HAR.
For 120 volt Applications, use only UL Listed detachable power cord with NEMA
configuration 5-15P type (parallel blades) plug cap. For 240 volt applications use only
UL Listed Detachable power supply cord with NEMA configuration 6-15P type
(tandem blades) plug cap.
14

15
Power Management Function
The monitor is equipped with the power management function which automatically reduce the
power consumption when not in use in three power level modes.
• Stand-by Mode
The monitor goes into stand-by mode when the horizontal sync signal is off for about 10
seconds. In this mode, the screen goes off and the power LED blinks for 1 seconds On and 1
second Off. The screen is displayed after the horizontal sync signal is restored.
• Suspend Mode
The monitor goes into suspend mode when the vertical sync signal is off for about 10 seconds.
The power consumption during this is less than 8 W. In this mode, the screen goes off and the
power LED blinks for 1 seconds On and 1 second Off. The screen is displayed after the vertical
sync signal is restored.
• Off Mode
The monitor goes into power-off mode when the vertical and horizontal sync signals are off for
about 10 seconds. In this mode, the screen goes off and the power LED blinks for 1 seconds On
and 1 second Off. The screen is displayed after the vertical and horizontal sync signals are
restored.
Power Management System
The AMM15TK2 Series Medical Monitor complies with the VESA DPMS power management
proposal. The VESA DPMS proposal provides four phases of power-saving modes by detecting
the horizontal sync signal as shown in the table blow.
Mode
DC Input Power
(monitor only) AC Input power
(incl. AC adapter) LED Status
On 28.0 W max. 37 W max. Steady Green
Standby 4.5 W max. 6W max Blinking Green
Suspend 4.5 W max. 6W max Blinking Green
Off 4.5 W max. 6W max Blinking Green
When the monitor is power saving mode or detects an incorrect timing, the screen will be blank
and power LED indicator will blink.
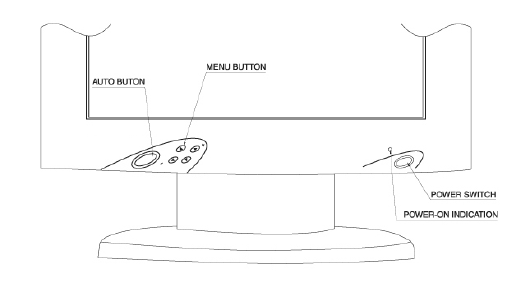
User Controls
Front Panel Controls
1. Power LED : Lights up to indicate the power is turned ON.
2. Power Switch : To turn ON or OFF the power.
3. + : To increase the value of the parameter in the OSD you have selected for
adjustment.
: To increase the contrast directly when OSD menu is not activated.
: To move upward in the OSD menu.
: Execute a function of selected item.
4. - : To decrease the value of the parameter in the OSD you have selected for
adjustment.
: To decrease the brightness directly when OSD menu is not activated.
: To move downward in the OSD menu.
5. Menu : To enter OSD.
6. Select : Enter a sub menu or select a menu item.
If video display option is adopted, switch PC display to Video display and vice versa
by one touch when OSD menu is not activated.
7. Auto Button : One touch Auto adjust or Exit OSD menu.
Standard OSD Operation
1. Press “Menu” button to activate the OSD.
2. Use “+” then “-” keys to move through the menu.
The parameter will be highlighted when selected.
3. Then use “+” or “-” to increase or decrease the value of the parameter, or make
selection between different options.
4. To quit the OSD screen at any time during the operation, press “Auto” button.
If no keys are pressed for a time period, the OSD automatically disappears.
16

17
OSD Function Description
Under Analog RGB Display
Item Function
Brightness To increase or decrease the brightness.
Contrast To increase or decrease the contrast.
Frequency To adjust frequency (dot clock).
Phase To adjust phase (clock-phase).
Vertical. To move the screen upward or downward
Horizontal To move the screen left or right.
OSD Hor Pos To move OSD menu left or right.
OSD Ver Pos To move OSD menu upward or downward.
OSD Background Choose between Opaque and Translucent.
User Timeout Set OSD screen appearing time.
Color Temp Choose between Default, System1, Sytem2, Sytem3, System4 for
color temp.
Red Balance Red.
Green Balance Green.
Blue Balance Blue.
DPMS Enable or Disable DPMS.
Auto Source Select Enable or disable auto source selection.
Freeze Frame Enable or disable freeze frame.
Zoom Enable zoom-in function.
Scale Mode Choose scale mode between “Fill Screen”, “Aspect Ratio”, “One to
One”
Input Source Select Choose input source between “Analog RGB”, “Composite Video”,
“Super Video”
Auto Adjust Press + to turn on this function. The Auto-Adjust will automatically
adjust V-Position, H-Position, Frequency, Clock-Phase. The whole
process takes about 5 seconds. (Please use the test pattern file in the
attached LCD monitor utility disk for Auto Adjust)
Factory Reset Set to factory default.
Information Display information on resolution, refresh rate and input mode.

18
Under Composite or Super Video Display
Item Function
Hue To increase or decrease the hue level.
Saturation To increase or decrease the saturation level.
Brightness To increase or decrease the brightness.
Contrast To increase or decrease the contrast.
Frequency To adjust frequency (dot clock).
Phase To adjust phase (clock-phase).
Vertical. To move the screen upward or downward
Horizontal To move the screen left or right.
OSD Hor Pos To move OSD menu left or right.
OSD Ver Pos To move OSD menu upward or downward.
OSD Background Choose between Opaque and Translucent.
User Timeout Set OSD screen appearing time.
Color Temp Choose between Default, System1, Sytem2, Sytem3, System4 for
color temp.
Red Balance Red.
Green Balance Green.
Blue Balance Blue.
DPMS Enable or Disable DPMS.
Auto Source Select Enable or disable auto source selection.
Freeze Frame Enable or disable freeze frame.
Zoom Enable zoom-in function.
Video-Sharp To increase or decrease the video sharpness.
Video Scale Mode Choose scale mode between “Normal”, “One to One”, “Wide”
Input Source Select Choose input source between “Analog RGB”, “Composite Video”,
“Super Video”
Factory Reset Set to factory default.
Information Display information on resolution, input mode.

Specification Of AMM15TK3
AMM 15TK2 LCD Panel 15" Color TFT Panel
Type Active Matrix
Resolution 1024 ×768 @ 75Hz Max.
Display Color 16 million colors
Response Time 25 ms
Color Tone Upto 256 tone
Color Filter RGB vertical stripe type
Face Finishing Anti-glare Hard Coated
Viewing
Angle(L/R/T/B) 85/85/85/85
Video 0.7 Vp-p analog RGB
Sync 2.5 ~ 5.0 Vp-p separated sync
Input Signal Input Impedance Video-75 Ohm, Sync-1k Ohm
Horizontal 30 ~ 68 KHz
Scanning
Frequency Vertical 50 ~ 75 Hz
Display Size H x V 12.09 "×9.07 "(307.2 mm ×230.4 mm)
Brightness 300 cd/m
270 cd/m (AMM15TK2-TEW,)
225 cd/m (AMM15TK2-TE)
Gray Scale Up to 256 Gray Scale
Brightness,
Contrast Ratio
Gray Scales
Contrast Ratio 450 : 1
Video D-Sub 15pin, Composite Video, S-Video
Signal
Input Connector Touchscreen RS-232 DB-9 (Optional)
Operating Temperature
& Humidity 50 F ~ 104 F (10°C ~ 40°C),
30% ~75% (Without Condensation)
Storage Temperature -4 F ~ 140 F (-20°C ~ 60°C)
Storage Humidity 10% ~90% (Max, Without condensation)
Environment
Atmospheric Pressure Within 500 to 1060 hPa
Display Monitor DC 12 V 3.5 A
Power Source AC Adapter AC 100 ~ 240 V
Regulations Safety and EMC UL 60601-1, EN60601-1, EN60601-1-2,
CE, FCC
15.7 "(W)×15.5 "(H) x 5.9 "(D)
Desk top Stand
399 mm(W)×395 mm(H)×64 mm(D)
45.7 "(W)×12.6 "(H)×2.5 "(D)
Cabinet
Free Mount
399 mm(W)×320 mm(H)×64 mm(D)
Desktop Stand 11.7 lbs (5.3 Kg)
13.9 lbs (6.3 Kg) Touchscreen model
Weight
Free Mount 7.5 lbs (3.4 Kg)
10.7 lbs (4.8 Kg) Touchscreen model
Optional Module Touch Panel
* All contents are subject to change without notice.
* Touch Screen Model doesn’t include the Video-in (C-Video, S-Video) function.
* Surface Wave Touchscreen model AMM15TK2-TEW and Resistive Touchscreen model AMM15TK2-TE
19

20
Supported Modes
Mode Resolution(H ×V) H. Freq.(KHz) V. Freq.(Hz)
1 640 ×350 31.5 70
4 720 ×400 31.5 70
6 640 ×480 31.5 60
7 640 ×480 35.0 67
8 640 ×480 37.9 72
9 640 ×480 37.5 75
11 800 ×600 35.1 56
12 800 ×600 37.9 60
13 800 ×600 48.1 72
14 800 ×600 46.9 75
16 832 ×624 49.7 75
17 1024 ×768 48.8 60
18 1024 ×768 48.4 60
19 1024 ×768 56.5 70
20 1024 ×768 60 75
21
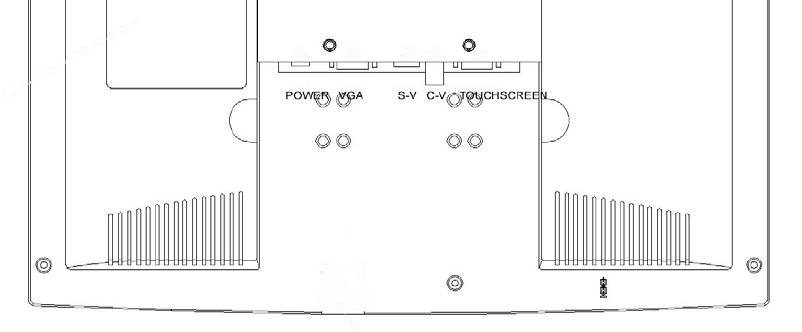
Connectors
DC Input
Connector Jack Power Input
The SCD-014-1-A (SHIUA CHYUAN)or equivalent.
Pin Description
1 +12V DC
2 GND
Video Input
15 pin D-subminiature connector.
The vendor P/N is DHSB-15 FRF7(LEOCO) or equivalent.
Description Pin Pin Description
Red Video 1 9 NC
Green Video 2 10 VGA CON
Blue Video 3 11 NC
NC 4 12 SDA (DDC1/2)
Logic Ground 5 13 H- sync
Red Video Ground 6 14 V-sync
Green Video Ground 7 15 SCL (DDC2B)
Blue Video Ground 8
Touch Port
9Pin D-subminiature connector.
Description Pin Pin Description
DCD 1 6 DSR
RXD 2 7 RTS
TXD 3 8 CTS
DTR 4 9 RINC
Logic Ground 5

22
Troubleshooting
Before sending your LCD monitor for servicing, please check the troubleshooting list
below to see if you can self-diagnose the problem.
Problem Current Status Remedy
LED ON ·Using OSD, adjust brightness and contrast to
maximum or reset to their default setting.
·Check the power switch.
LED OFF
·Check if AC power cord is properly
connected to the AC adapter.
·Check if video signal cable is properly
connected at the back of monitor.
No
Picture
LED Blinking
·Check if the power to computer system is ON.
Unstable Picture ·Check if the specification of graphics adapter
and monitor is in compliance which may be
causing the input signal frequency mismatch.
·Using Auto adjust button, if still display
abnormal picture then adjust Frequency,
Clock -Phase, H-Position and V-Position
with non-standard signals.
·Using OSD, in case of missing full-screen
image, please select other resolution in your
Operating System (Windows 95/98, NT) or
other vertical refresh timing.
Abnormal ·
Picture
Display is missing,
center shift, or too
small or too large
in display size
·Must wait for a few seconds after adjusting
the size of the image before changing or
disconnecting the signal or powering OFF the
monitor.
For more update information on our monitor
http://www.advancorp.com
Tech Support : 1-888-786-1688
23
This monitor is intended for use in Health Care Facilities model AMM15TK3
Equipment is not suitable for use in the presence of flammable anesthetic mixture with air or
with oxygen or nitrous oxide.
No user serviceable parts inside, ask qualified personnel when accessing inside.
For disposal of waste product, follow the requirement of local code.
Electrical input rating: 12V DC 3.5A
Classification
Type of protection against electric shock: Class I Equipment.
Degree of protection against the ingress of water: IPX0
Mode of operation: Continuous
This monitor has been tested to comply with IEC/EC 60601-1 and IEC/EN60601-1-2 Certified
by UL to medical standard UL60601-1(UL/cUL Mark).
Because many medical offices are located in residential areas, this monitor, in addition to the
medical requirements, has also been tested and found to comply with the limits for FCC Class B
computing devices in a typically configured system. It is the system integrator or configurer’s
responsibility to test and ensure that the entire system complies with applicable EMC laws.
Environmental conditions for transport and storage:
- Temperature range within –4° to 140° F (-20° to 60° C)
- Relative humidity range within 10% to 90%
- Atmospheric pressure range within 500 to 1060 hPa.
24
Electromagnetic Compatibility
Like other electrical medical equipment, the AMM15TK3 requires special
precautions to ensure electromagnetic compatibility with other electrical medical
devices. To ensure electromagnetic compatibility (EMC), the AMM15TK3 must be
installed and operated according to the EMC information provided in this manual.
Note The AMM15TK3 has been designed and tested to comply with
IEC 60601-1-2:2001 requirements for EMC with other devices.
Caution Portable and mobile RF communications equipment may affect
the normal function of the AMM15TK3.
Warning Do not use cables or accessories other than those provided
with the AMM15TK3, as this may result in increased electromagnetic emissions
or decreased immunity to such emissions.
Warning If the AMM15TK3 is used adjacent to or stacked with other
equipment, observe and verify normal operation of the AMM15TK3 in the
configuration in which it will be used prior to using it in
a
surgical procedure.
Consult the tables below for guidance in placing the AMM15TK3.
snoissimEcitengamortcelE:noitaralceDs'rerutcafunaMdnaecnadiuG snoissimEcitengamortcelE:noitaralceDs'rerutcafunaMdnaecnadiuG snoissimEcitengamortcelE:noitaralceDs'rerutcafunaMdnaecnadiuG snoissimEcitengamortcelE:noitaralceDs'rerutcafunaMdnaecnadiuG snoissimEcitengamortcelE:noitaralceDs'rerutcafunaMdnaecnadiuG
deificepstnemnorivnecitengamortceleehtniesurofdednetnisi3KT51MMA deificepstnemnorivnecitengamortcele
ehtniesurofdednetnisi3KT51MMA deificepstnemnorivnecitengamortceleehtniesurofdednetnisi3KT51MMA deificepstnemnorivnecitengamortceleehtniesurofdednetnisi3KT51MMA deificepstnemnorivnecitengamortceleehtniesurofdednetnisi3KT51MMA
nidesusititahterusnedluohs3KT51MMAforesuehtroremotsucehT.woleb nidesusititahterusne
dluohs3KT51MMAforesuehtroremotsucehT.woleb nidesusititahterusnedluohs3KT51MMAforesuehtroremotsucehT.wo
leb nidesusititahterusnedluohs3KT51MMAforesuehtroremotsucehT.woleb nidesusititahterusnedluohs3KT51MMAfo
resuehtroremotsucehT.woleb
.tnemnorivnenahcus.tnemnorivnenahcus .tnemnorivnenahcus .tnemnorivnenahcus.tnem
norivnenahcus
11RPSICsnoissimeFR 1puorG
FRsesu3KT51MMA
lanretnistirofylnoygrene
FRsti,erofereht;noitcnuf
dn
awolyreverasnoissime
ynaesuacotylekiltonera
ybraenniecnerefretni
.tnempiuqecinortcele
11RPSICsnoissimeFR B
ssalC
rofelbatiussi3KT51MMA
,stnemhsilbatsellaniesu
citsemodgnidulcni
esohtdnastnemhsilbatse
ehtotdetcenno
cyltcerid
rewopegatlov-wolcilbup
seilppustahtkrowtenylppus
citsemodrofdesusgnidliub
sesoprup
snoissimecino
mraH
2-3-00016CEI AssalC
rekcilf/snoitautculFegatloV
3-3-00016CEIsnoissime seilpmoC

25
25
ytinummIcitengamortcelE:noitaralceDs'rerutcafunaMdnaecnadiuG ytinummIcitengamortcelE:noitaralceDs'rerutcafunaMdnaecnadiuG ytinummIcitengamortcelE:noitaralceDs'rerutcafunaMdnaecnadiuG ytinummIcitengamortcelE:noitaralceDs'rerutcafunaMdnaecnadiuG ytinummIcitengamortcelE:noitaralceDs'rerutcafunaMdnaecnadiuG
eht
roremotsucehT.wolebdeificepstnemnorivnecitengamortceleehtniesurofdednetnisi3KT51MMA ehtroremotsucehT.wolebdeificepstnemnorivnecitengamortceleehtniesurofdednetnisi3KT51MMA ehtroremotsucehT.wolebdeificepstn
emnorivnecitengamortceleehtniesurofdednetnisi3KT51MMA ehtroremotsucehT.wolebdeificepstnemnorivneciteng
amortceleehtniesurofdednetnisi3KT51MMA ehtroremotsucehT.wolebdeificepstnemnorivnecitengamortceleehtniesurofdednetnisi3KT51MMA
.tnemnorivnenahcusnidesusititahterusnedluohs3KT51MMAforesu .tnemnorivnenahcusni
desusititahterusnedluohs3KT51MMAforesu .tnemnorivnenahcusnidesusititahterusnedluohs3KT51MMAforesu .tnemnorivnenahcusnidesusititahterusnedluohs3KT51MMAforesu .tnemnorivnenahcusnidesusititahterusnedluohs3KT51MMAforesu
tseTytinummItseTytinummI tseTytinummI tseTytinummItseTytinummIleveLtseT10606CEIleveLtseT10606CEI l
eveLtseT10606CEI leveLtseT10606CEIleveLtseT10606CEIleveLecnailpmoCleveLecnailpmoC leveLecnailpmoC leveLecna
ilpmoCleveLecnailpmoCcitengamortcelEcitengamortcelE citengamortcelE citengamortcelEcitengamortcelE
egrahcsiD
citatsortcelE
2-4-00016CEI)DSE(
tcatnocVk6±
riaVk8±
tcatnocVk6,4,2±
riaVk8,4,2±
,doowebdluohssroolF
fI.elitc
imarecro,etercnoc
htiwderevocerasroolf
eht,lairetamcitehtnys
ebdluohsytidimuhevitaler
.%03tsaelta
tsrub!tn
eisnarttsaflacirtcelE
4-4-00016CEI
senilylppusrewoprofVk2±
seniltuptuo/tupnirofVk1±
dnuorgotenilVk2±
enilo
tenilVk1±
dluohsytilauqrewopsniaM
lacipytafotahteb
latipsohrolaicremmoc
.tnemnorivne
5-4-00016CEIegruSedoml
aitnereffidVk1±
edomnommocVk2±
edomlaitnereffidVk1,5.0±
edomnommocVk2,1,5.0±
dluohsytilauqrewopsniaM
lacipytafotahteb
latipsohrolaicremmoc
.tnemnorivne
trohs,spidegatloV
egatlovdnasnoitpurretni
ylppusrewopnosnoit
airav
11-4-00016CEIseniltupni
)tUnipid%59>(tU%5<
elcyc5.0rof
)tUnipid%06(tU%04
selcyc5rof
)tUnipid%03(tU%07
selcyc52rof
)tUnipid%59>(tU%5<
.ces5rof
)tUnipid%59>(tU%5<
elcyc5.0rof
)tUnipid%06(tU%04
selcyc5rof
)tUnipid%03(tU%07
selcyc52rof
)tUnipid%59>(tU%5<
.ces5rof
dluohsytiliauqrewopsniaM
lacipytafotahteb
latipsohrolaicr
emmoc
foresuehtfI.tnemnorivne
seriuqer3KT51MMA
gnirudnoitarepodeunitnoc
ti,snoitpurretnisniamrewop
tahtded
nemmocersi
derewopeb3KT51MMA
elbitpurretninunamorf
.yrettabaroylppusrewop
ycneuqerfrewoP
dleifcitengam)zH0
6/05(
8-4-00016CEI miA3A/N
citengamycneuqerf-rewoP
sleveltaebdluohssdleif
lacipytafocitsiretcarahc
lacipytaninoitacol
latipsohrolaicremmoc
.tnemnorivne
FRdetcudnoC
6-4-00016CEI
FRdetaidaR
3-4-00016CEI
zHM08otzHK051sm
rV3
zHG5.2otzHM08m/V3
V3
miV3
FRelibomdnaelbatroP
tnempiuqesnoitacinummoc
otresolcondesuebdluohs
3KT51MMAeht
fotrapyna
,selbacstignidulcni,metsys
dednemmocerehtnaht
ecnatsidnoitarapes
noitauqeehtmorfdetaluclac
ycneu
qerfehtotelbacilppa
.rettimsnartehtfo
dednemmoceRdednemmoceR dednemmoceR dednemmoceRdednemmoceR
ecnatsiDnoit
arapeSecnatsiDnoitarapeS ecnatsiDnoitarapeS ecnatsiDnoitarapeSecnatsiDnoitarapeS
p,71.1=d
otzHM08p,71.1=d
zH
M008
otzHM008p,33.2=d
zHG5.2
mumixamehtsiPerehw
ehtfognitarrewoptuptupo
)W(sttawnirettimsnart
rettimsnarteh
totgnidrocca
ehtsiddnarerutcafunam
noitarapesdednemmocer
.)m(sretemniecnatsid
dexifmorfshtgnertsdleiF
sa,s
rettimsnartFR
naybdenimreted
etiscitengamortcele
sselebdluohs,)a(yevrus
nilevelecnailpmocehtnaht
.)b(egnar
ycneuqerfhcae
niruccoyamycnerefretnI
tnempiuqefoytiniciveht
gniwllofehthtiwdekram
:lobmys
.seilppaegnarycn
euqerfrehgiheht,zHM008dnazHM08tA:1ETON
dnanoitprosbaybdetceffasinoitagaporpcitengamortcelE.snoitautisl
laniylppatonyamsenilediugesehT:2ETON
.elpoepdna,stcejbo,serutcurtsmorfnoitcelfer
.leveltsetehtfonoitaci
lppaotroirpgatlovsniam.c.aehtsitU:3ETON
dnaldnasenohpelet)sseldroc/ralullec(oidarrofsnoitatsesabsahcus
,srettimsnartdexifmorfshtgnertsdleiF)a(
htiwyllaciteroehtdetciderpebtonnoc,tsacdaorbVTdna,tsacdaorboid
arMFdnaMA,oidarruetama,soidarelibom
yevrusetiscitengamortcelena,srettimsnartFRdexifoteudtnemnorivnecitengamortceleehtssessaoT.ycarucca
sdeecxedesusimetsys3KT51MMAehthcihwninoitacolehtnihtgnertsdleifderusa
emehtfI.deredisnocebdluohs
fI.noitarepolamronyfirevotdevresboebdluohsmetsys3KT51MMAeht,evobalevelecnai
lpmocFRelbacilppaeht
ehtgnitacolerrognitneircersahcus,yrassecenebyamserusaemlanoitidda,devresbosiecnamrofreplamronba
.tinu3KT51MMA
.m/V3nahtsselebdluohsshtgnertsdleif,zHM08otzHk051egnarycneuqerfehtrevO)b(
26
26
dnatnemepiuqEsnoitacinummoCFReliboMdnaelbatroPneewteBsecnatsiDnoitarapeSdednemmoceR dnatnemepiuqEsnoitacinummoCFReliboMdnaelbatroPneewteBsecnatsiDnoitarapeSdednemmoceR dnatnemepiuqEsnoitacinummoCFReliboMd
naelbatroPneewteBsecnatsiDnoitarapeSdednemmoceR dnatnemepiuqEsnoitacinummoCFReliboMdnaelbatroPneewteBs
ecnatsiDnoitarapeSdednemmoceR dnatnemepiuqEsnoitacinummoCFReliboMdnaelbatroPneewteBsecnatsiDnoitarapeSdednemmoceR
metsyS3KT51MMAehtmetsyS3KT51MMAeht metsyS3KT51MMAeht metsyS3KT51MMAehtmetsyS3KT51MMAeht
FRdetai
darhcihwnitnemnorivnecitengamortcelenaniesurofdednetnisimetsys3KT51MMAehT FRdetaidarhcihwnitnemnorivnecitengamortcelenaniesurofdednetnisimetsys3KT51MMAehT FRdetaidarhcihwnitnemnorivnecitengamortcelenanies
urofdednetnisimetsys3KT51MMAehT FRdetaidarhcihwnitnemnorivnecitengamortcelenaniesurofdednetnisimetsys3
KT51MMAehT FRdetaidarhcihwnitnemnorivnecitengamortcelenaniesurofdednetnisimetsys3KT51MMAehT
citengamort
celetneverpplehnacmetsys3KT51MMAehtforesuehT.dellortnocerasecnabrutsid citengamortceletneverpplehnacmetsys3KT51MMAehtforesuehT.dellortnocerasecnabrutsid citengamortceletneverpplehnacmetsys3KT51MMAehtfores
uehT.dellortnocerasecnabrutsid citengamortceletneverpplehnacmetsys3KT51MMAehtforesuehT.dellortnocerase
cnabrutsid citengamortceletneverpplehnacmetsys3KT51MMAehtforesuehT.dellortnocerasecnabrutsid
snoitacinu
mmocFRelibomdnaelbatropneewtebecnatsidmuminimagniniatniamybecnerefretni snoitacinummocFRelibomdnaelbatropneewtebecnatsidmuminimagniniatniamybecnerefretni snoitacinummocFRelibomdnaelbatropneewtebecnatsidmu
minimagniniatniamybecnerefretni snoitacinummocFRelibomdnaelbatropneewtebecnatsidmuminimagniniatniamybe
cnerefretni snoitacinummocFRelibomdnaelbatropneewtebecnatsidmuminimagniniatniamybecnerefretni
mumixameh
totgnidrocca,wolebdednemmocersametsys3KT51MMAehtdna)srettimsnart(tnempiuqe mumixamehtotgnidrocca,wolebdednemmocersametsys3KT51MMAehtdna)srettimsnart(tnempiuqe mumixamehtotgnidrocca,wolebdednemmocersametsy
s3KT51MMAehtdna)srettimsnart(tnempiuqe mumixamehtotgnidrocca,wolebdednemmocersametsys3KT51MMAehtdna)sr
ettimsnart(tnempiuqe mumixamehtotgnidrocca,wolebdednemmocersametsys3KT51MMAehtdna)srettimsnart(tnempiuqe
.tnempiuqesnoitacinummocehtforewoptuptuo.tnempiuqesnoitacinummocehtforewoptuptuo .tnempiuqesnoitacinummocehtforewoptuptuo .tnempiuqesnoitacinummocehtforewoptuptuo.tnempiuqesnoitacinummocehtforewoptuptuo
tu
ptuomumixamdetaRtuptuomumixamdetaR tuptuomumixamdetaR tuptuomumixamdetaRtuptuomumixamdetaR
fo)W(rewopfo)W(r
ewop fo)W(rewop fo)W(rewopfo)W(rewop
rettimsnartrettimsnart rettimsnart rettimsnartrettimsnart
rettimsnartfoyc
neuqerfotgnidrocca)m(ecnatsidnoitarapeSrettimsnartfoycneuqerfotgnidrocca)m(ecnatsidnoitarapeS rettimsna
rtfoycneuqerfotgnidrocca)m(ecnatsidnoitarapeS rettimsnartfoycneuqerfotgnidrocca)m(ecnatsidnoitarapeSret
timsnartfoycneuqerfotgnidrocca)m(ecnatsidnoitarapeS
zHM08otzHk051
p,71.1=d
zHM008otzHM08
p,71.1=d
zHG5.2ot
zHM008
p,33.2=d
10.021.021.032.0
1.073.021.047.0
171.171.133.2
0107.307.373.7
00107.1107.1103.32
ni)d(ecnatsidnoitarapesded
nemmocereht,evobadetsiltonrewoptuptuomumixamatadetarsrettimsnartroF
ehtsiPerehw,rettimsnartehtfoycneuq
erfehtotelbacilppanoitauqeehtgnisudetamitseebnac)m(sretem
.rerutcafunamrettimsnartehtotgnidrocca)W(stt
awnirettimsnartehtfognitarrewoptuptuomumixam
.seilppaegnarycneuqerfrehgihehtrofecnatsidnoitarapeseht,z
HM008dnazHM08tA:1ETON
dnanoitprosbaybdetceffasinoitagaporpcitengamortcelE.snoitautisllaniylppatonyamse
nilediugesehT:2ETON
.elpoepdna,stcejbo,serutcurtsmorfnoitcelfer
27
Description of Warranty
Advan warrants that the goods the goods sold hereunder will be free of defects in materials and
workmanship, and such goods will substantially conform to the specifications furnished by
Advan, and to any drawings or specifications furnished to Advan by the Buyer if approved by
Advan. This warranty shall be effective only if Advan receives notice of such defect or
nonconformance during the period of the warranty. Advan sole and exclusive the Advan
product(s) with refurbished units provide a credit to buyer in the amount of the purchase
price.
Commencement and Duration of Warranty
The warranty period begins on the date of shipment from Advan. The goods sold hereunder are
warranted for a period of 18 months from date of shipment unless otherwise agreed to by Buyer
and Advan. No extension of the warranty will be given during the time the goods are in Advan
possession.
Place of Repair or Replacement
In order to obtain service under this warranty, Buyer must notify Advan of the defect before
expiration on the warranty period, and request a “Return Material Authorization Number.” If the
configuration has been modified in any manner, the product must be returned to its original
configuration before any warranty service will be performed by Advan. No goods are to be
returned to Advan without prior authorization. Buyer will be responsible for packaging and
shipping the defective goods to the Advan Service Facility with shipping charges prepaid.
Limitation of Warranty
Monitor:
For 18 months after the date of purchase, ADVAN or its Authorized Service Centers, will repair
or replace if defective in material or workmanship. This Limited Warranty does not include cle
aning, or damage caused by accident, neglect, misuse or improper installation or operation, any
damage caused from service, maintenance, modifications or tampering by anyone other than an
ADVAN Authorized Service Representative, or by the use of supplies, consumable items and co
nditions beyond the control of ADVAN, such as common carrier provided equipment and/or fac
ilities, operation of ADVAN product in excess of the specifications or with the Serial Number or
Rating label removed.
*Touch Screen:
For one year after the date of purchase, ADVAN or its Authorized Service Centers, will repair o
r replace if defective in material or workmanship. This Limited Warranty does not include clea
ning, or damage caused by accident, neglect, misuse or improper installation or operation, any d
amage caused from service, maintenance, modifications or tampering by anyone other than an
ADVAN Authorized Service Representative, or by the use of supplies, consumable items and co
nditions beyond the control of ADVAN, such as common carrier provided equipment and/or fac
ilities, operation of ADVAN product in excess of the specifications or with the Serial Number or
Rating label removed.

ADVAN DISCLAIMS ALL OTHER WARRANTIES EXPRESS OR IMPLIED INCLUDING,
WITHOUT LIMITATION, ANY IMPLIED WARRANTIES OF MERCHANTABILITY OR FI
TNESS FOR PARTICULAR PURPOSE, EXCEPT TO THE EXTENT THAT ANY WARRAN
TIES IMPLIED BY LAW CANNOT BE VALIDLY WAIVED.
No oral or written information or advice given by ADVAN, its authorized service center, distrib
utors, dealers, agents or employees, shall create another warranty or modify this warranty. This
warranty states ADVAN’s entire liability and your exclusive remedy against ADVAN for any fai
lure of the ADVAN’s product to operate properly.
Neither ADVAN nor anyone else involved in the development, production, or delivery of this pr
oduct shall be liable for any indirect, incidental, special consequential, exemplary, or punitive d
amages, including lost profits, arising from the use of or inability to consequential or incidental
damages, the above limitation may not apply to you.
This Limited Warranty gives you special legal rights and you may also have other right, which v
ary from State to State.
Installation
Advan makes no warranty with respect to any installation of Advan's product(s)
by Advan, any authorized dealer, or any other person.
Technical Assistance
For technical assistance please call (510)490-1005 between 8:00 a.m. and 5:00 p.m. PST,
Monday through Friday or email to support@mail.advancorp.com with a description of your
technical issues.
Service
If your Medical Monitor needs service, call Advan Customer Service at
(510)490-1005 between 7:00 a.m and 4:00 p.m PST, Monday through
Friday or fax to (510)490-1151. You will need the unit's serial number and a
brief description of the problem and where unit were purchased to receive a RMA number.
If a service is required please return the product for service using the original shipping container
with the RMA number included in package on the outside of the box.
In order to protect ADVAN employees form potential health hazards, ADVAN requires that the
RMA product be disinfected before returning to ADVAN for service. Any product not cleaned
prior to shipment will be returned to the customer.
Note: Returns will not be accepted without an assigned RMA number.
In-transit damage is not covered by warranty. We suggest you always insure your shipment.
Advan will only pay for the return shipment by surface transportation. It is the responsibility of
the sender to prepay transportation charges.
28
29
Tounchscreen User’s Manual
(AMM15TK2-TE or AMM15TK2-TEW)
Quick Start
1.Connect Power Code and VGA Cable of LCD Monitor.
2.Connect Touchscreen DB9 male RS-232 cable.
3.Turn the LCD display Power ON.
4.Adjust the tilt of LCD Monitor.
5.Adjust the Picture of LCD Monitor.
6.Install driver software of Touchscreen (See “Driver software” for details).
7.Adjust the calibration of Touchscreen (See “Driver software” for details).
Introduction
The ELO IntelliTouch Touchscreen system consists of a touchscreen and an electronic
touchscreen controller. The touchscreen may be a flat, spherical, or cylindrical and is installed
over the face of the LCD. The touchscreen controller installed inside of theLCD.
▪The IntelliTouch Touchscreen
The IntelliTouch surface wave touchscreen consists of a glass panel molded to the precise
shape of a display’s face. A scratch-resistant, hard-coated plastic cover sheet may be clear for
best image clarity or have an antiglare finish.
▪The IntelliTouch Controller
The IntelliTouch controllers provide the drive signal for touchscreen, convert the received
analogue signals into digital touch coordinates, and send these coordinates to the computer.
Touchmonitor installation
▪Cable Connection
1. Connect and test LCD as a video display only.
2. Plug the DB9 male into the DB9 female connector labeled “TOUCHSCREEN” on the
back of the LCD Monitor.
Driver software
ELO provide driver programs for the DOS, Windows, Windows NT, OS/2, and Macintosh
systems. Additional drivers may be available for other system. Contact ELO for details.
Installing Driver software for Windows / Windows NT
1. Shutdown Windows or Windows NT and turn off your computer.
2. Install touchscreen hardware as described in the “Quick start” or
“Touchmonitor installation”.
3. Start your computer.
30
4. Insert the Windows or Windows NT driver disk into diver A or B.
5. Browse for “setup.exe” in the directory to which you extracted the driver files.
6. Type “setup.exe” in the space provided and press Enter.
7. The touchscreen setup wizard will appear.
You will need to select serial port, type of touchscreen controller, and language.
8. Complete the setup program.
9. Shutdown and restart windows NT.
10. Click the start button, then click control panel.
11. Double-click touchscreen control panel.
12. Click the calibrate button and touch each of the three targets as
they appear on the screen.
Contacting ELO
www.elotouch.com
ELO Touchsystems INC.
6500 Kaiser Drive Fremont,
CA 94554 USA
31
ADVAN INTERNATIONAL CORPORATION
47456 Fremont Blvd. Fremont,CA 94538
Tel : 510-490-1005
Fax : 510-490-1151
Web Page : http://www.advancorp.com