BCM Communication WLAN660 WIRELESS IP PHONE User Manual USERS MANUAL
BCM Communication Co., Ltd. WIRELESS IP PHONE USERS MANUAL
UserManual.wiki
>
BCM Communication
>
WLAN660 User Manual
USERS MANUAL
Navigation menu
Upload a User Manual
Namespaces
Wiki Guide
HTML
PDF
Info
Views
User Manual
Discussion / Help
Navigation
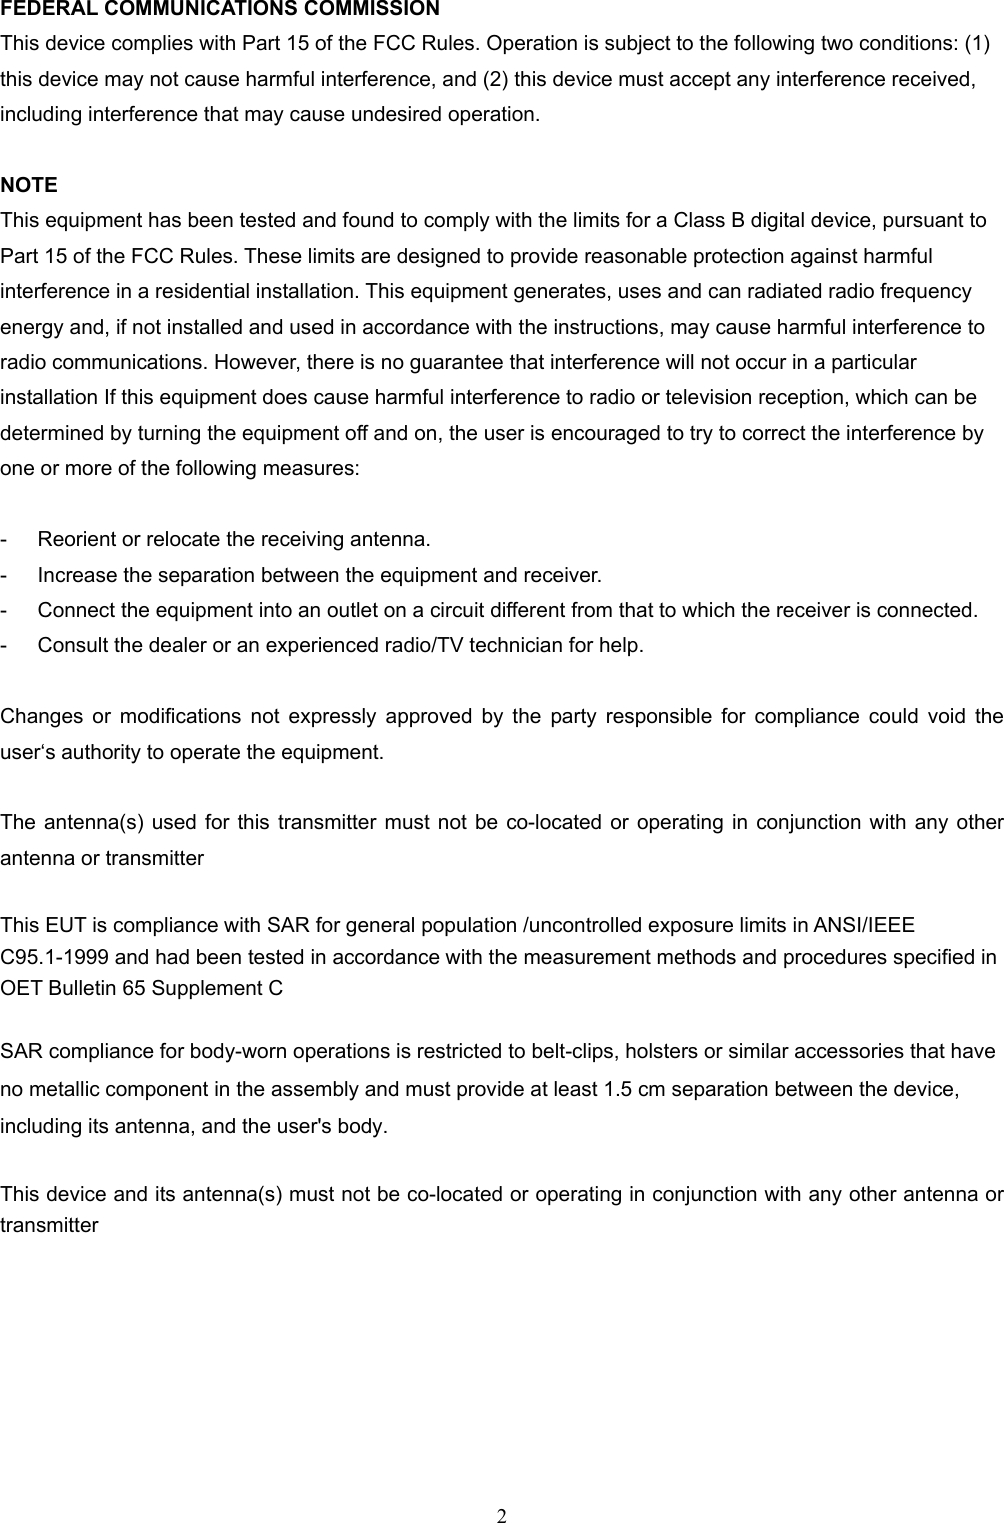
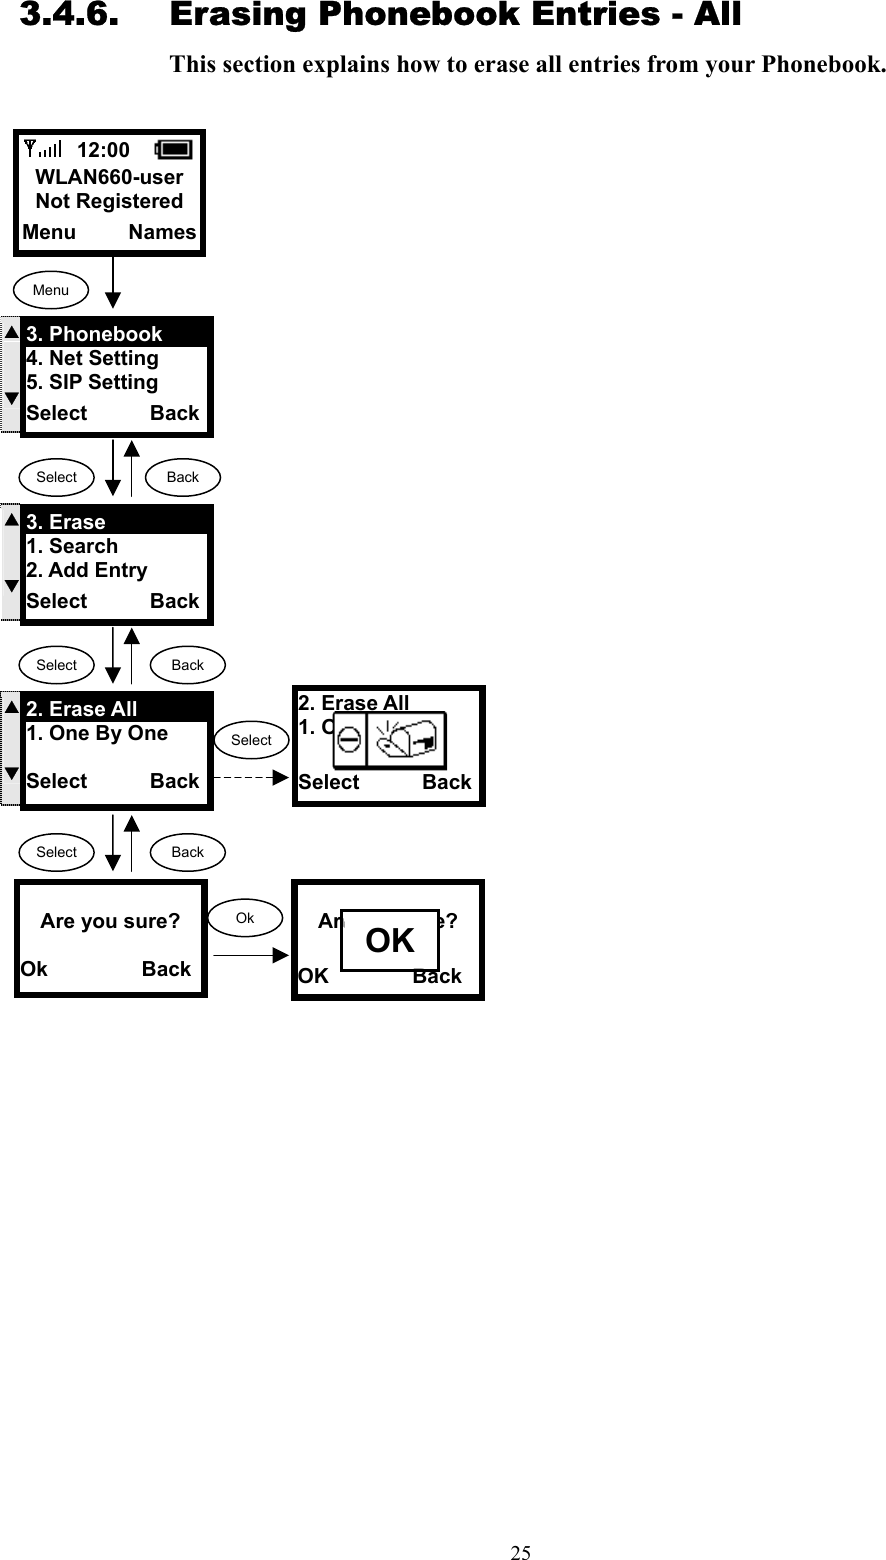
![103. Configuring Network Environment This chapter explains how to modify the network environment. 3.1. Network Configuration This section introduces modifications to the network information. 3.1.1. Fixed IP This section introduces how to select Fixed IP. 12:00 WLAN660-user Not Registered Menu Names Menu SelectSelect Back IP Address 192.168.0.6| Ok Aa1@ BackSubnet Mask 255.255.0.0| Ok Aa1@ BackSelectGateway 172.16.0.1| Ok Aa1@ BackSelectBack Back Back S T4. Net Setting 5. SIP Setting 6. Settings Select Back BackST[1]Fixed IP [2]DHCP [3]PPPoE Select Back S T2. IP Address 3. Subnet Mask 4. Gateway Select BackSelectS T3. Subnet Mask 4. Gateway 1. Network ModeSelect BackS T4. Gateway 1. Network Mode2. IP Address Select Back[1]Fixed IP [2]DHCP [3]PPPoE Select Back OK SelectS T1. Network Mode 2. IP Address 3. Subnet Mask Select BackBackBackBackOk IP Address 192.168.0.6| Ok Aa1@ Back OK Ok Subnet Mask 255.255.0.0|6| Ok Aa1@ Back OK Ok Gateway 172.16.0.1| Ok Aa1@ Back OK](https://usermanual.wiki/BCM-Communication/WLAN660/User-Guide-490729-Page-10.png)
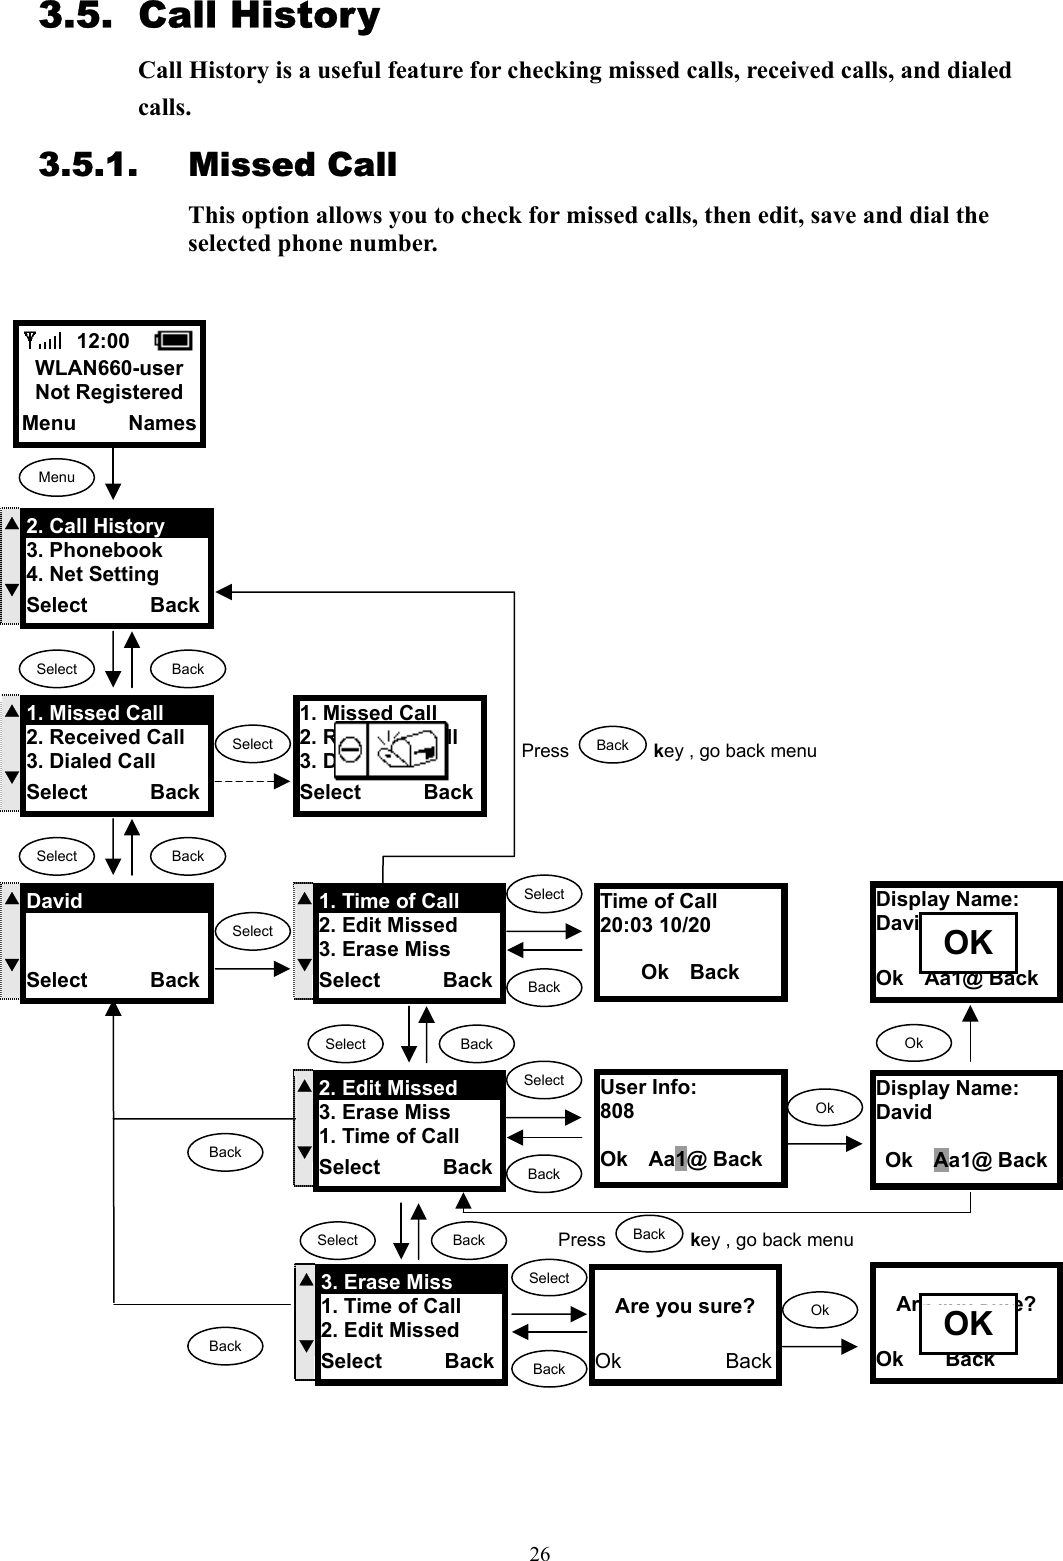
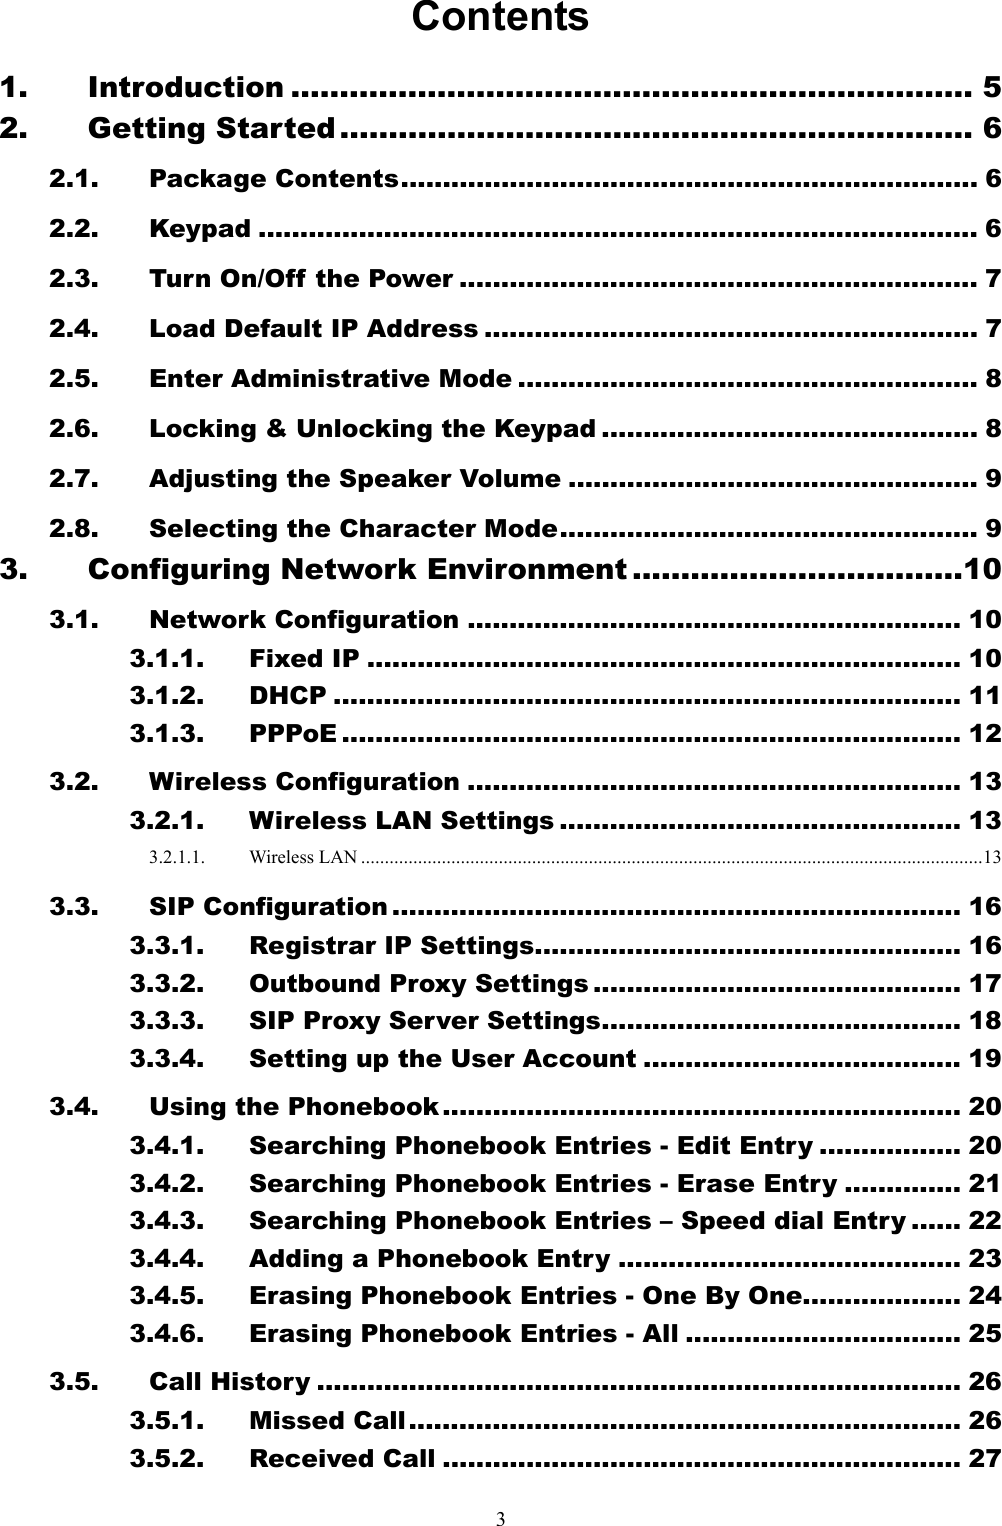
![113.1.2. DHCP This section provides instructions for performing the DHCP settings. The Dynamic Host Configuration Protocol (DHCP) client provides a mechanism for allocating IP address dynamically so that addresses can be reused when hosts no longer need them. 12:00 WLAN660-user Not Registered Menu Names Menu SelectSelect Back S T4. Net Setting 5. SIP Setting 6. Settings Select Back BackST[2]DHCP [3]PPPoE [1]Fixed IP Select Back [2]DHCP [3]PPPoE [1]Fixed IP Select Back OK SelectS T1. Network Mode 2. IP Address 3. Subnet Mask Select Back](https://usermanual.wiki/BCM-Communication/WLAN660/User-Guide-490729-Page-11.png)
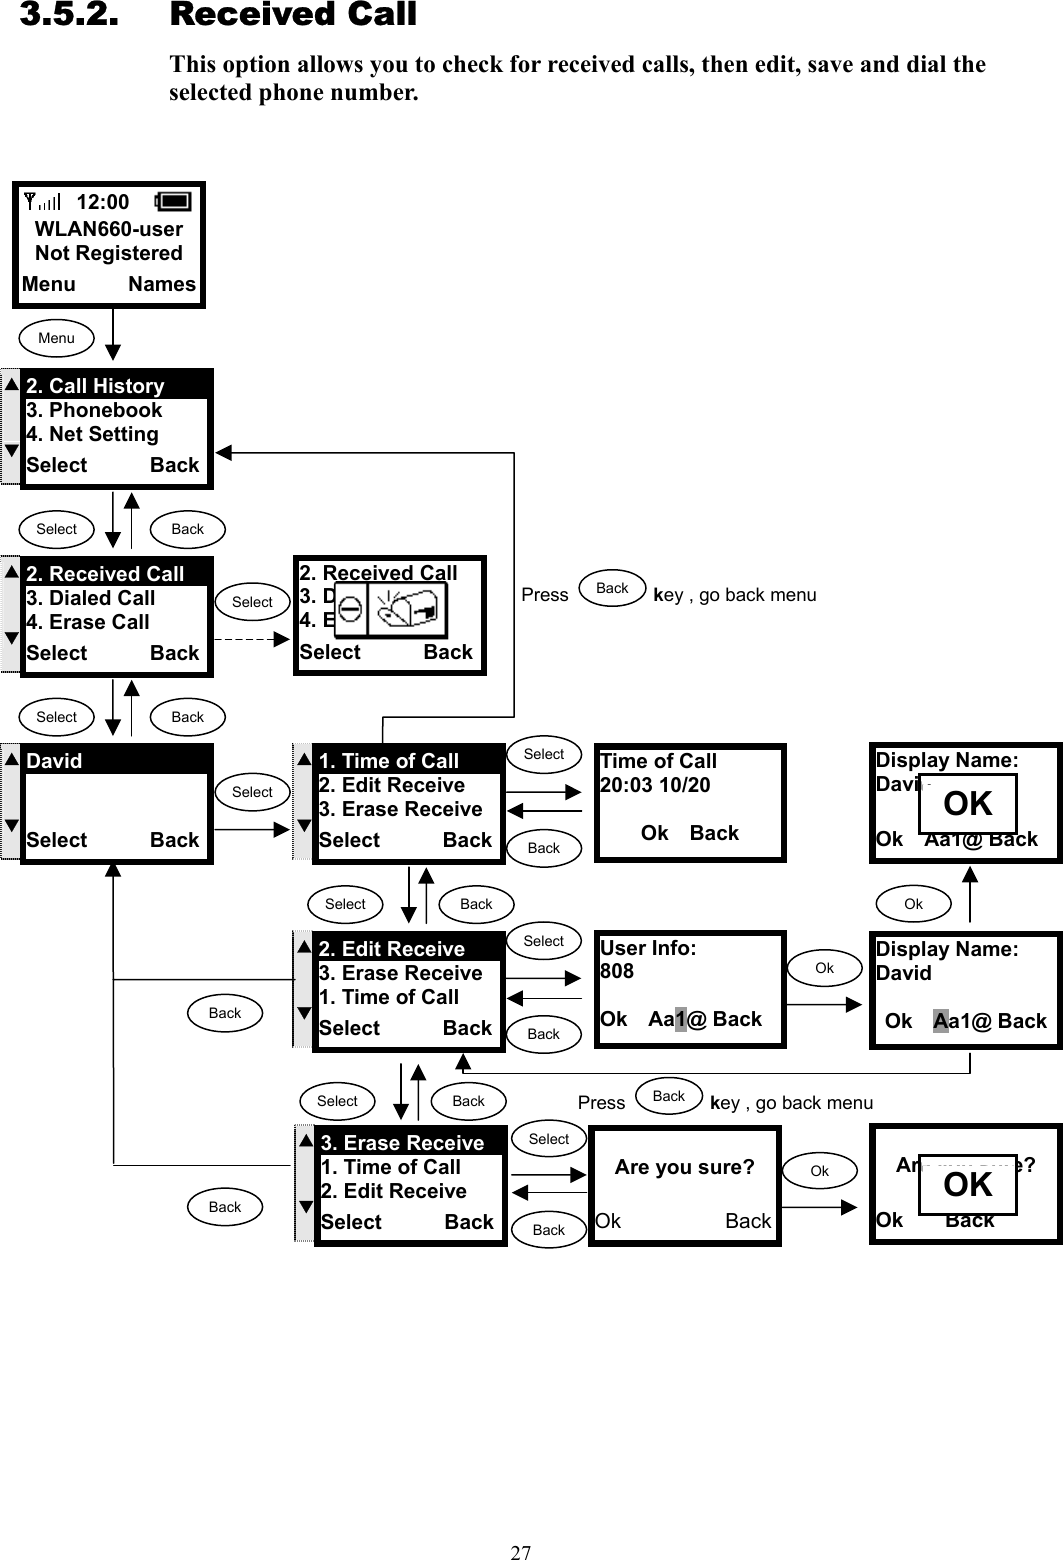
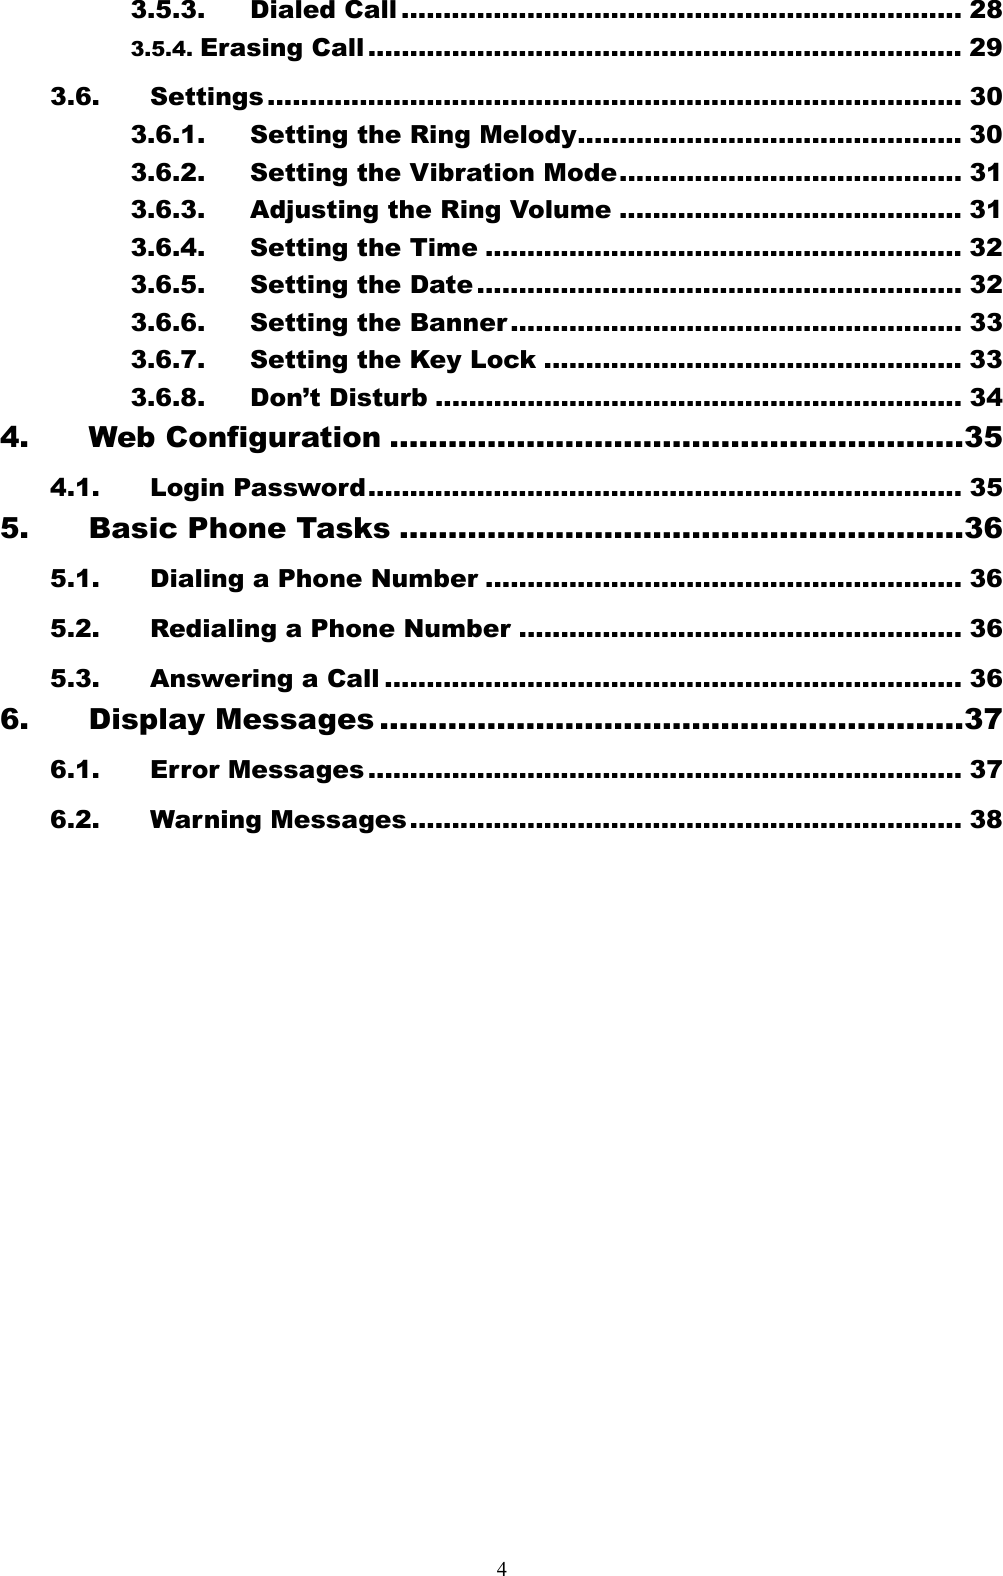
![123.1.3. PPPoE The Point-to-Point Protocol over Ethernet (PPPoE) provides more than just IP address assignment, which is the primary purpose of DHCP (assigning a unique and available IP address based upon a unique network adapter address). PPPoE also allows for the movement of TCP/IP traffic between two known points. It requires a username and password to log on. PPPoE Name pppoe_username| Ok Aa1@ BackSelectOk PPPoE Pwd ************| Ok Aa1@ BackSelectOk Back Back 12:00 WLAN660-user Not Registered Menu Names Menu Select SelectSelect Back BackS T4. Net Setting 5. SIP Setting 6. Settings Select Back ST1. Network Mode 2. IP Address 3. Subnet Mask Select BackST[3]PPPoE [1]Fixed IP [2]DHCP Select BackST3. PPPoE Pwd 1. Network Mode2. PPPoE Name Select BackST2. PPPoE Name 3. PPPoE Pwd 1. Network ModeSelect BackInput the name Input the passwordBackBack[3]PPPoE [1]Fix IP [2]DHCP Select Back OK PPPoE Name pppoe_username Ok Aa1@ Back OK PPPoE Pwd ************| Ok Aa1@ Back OK](https://usermanual.wiki/BCM-Communication/WLAN660/User-Guide-490729-Page-12.png)
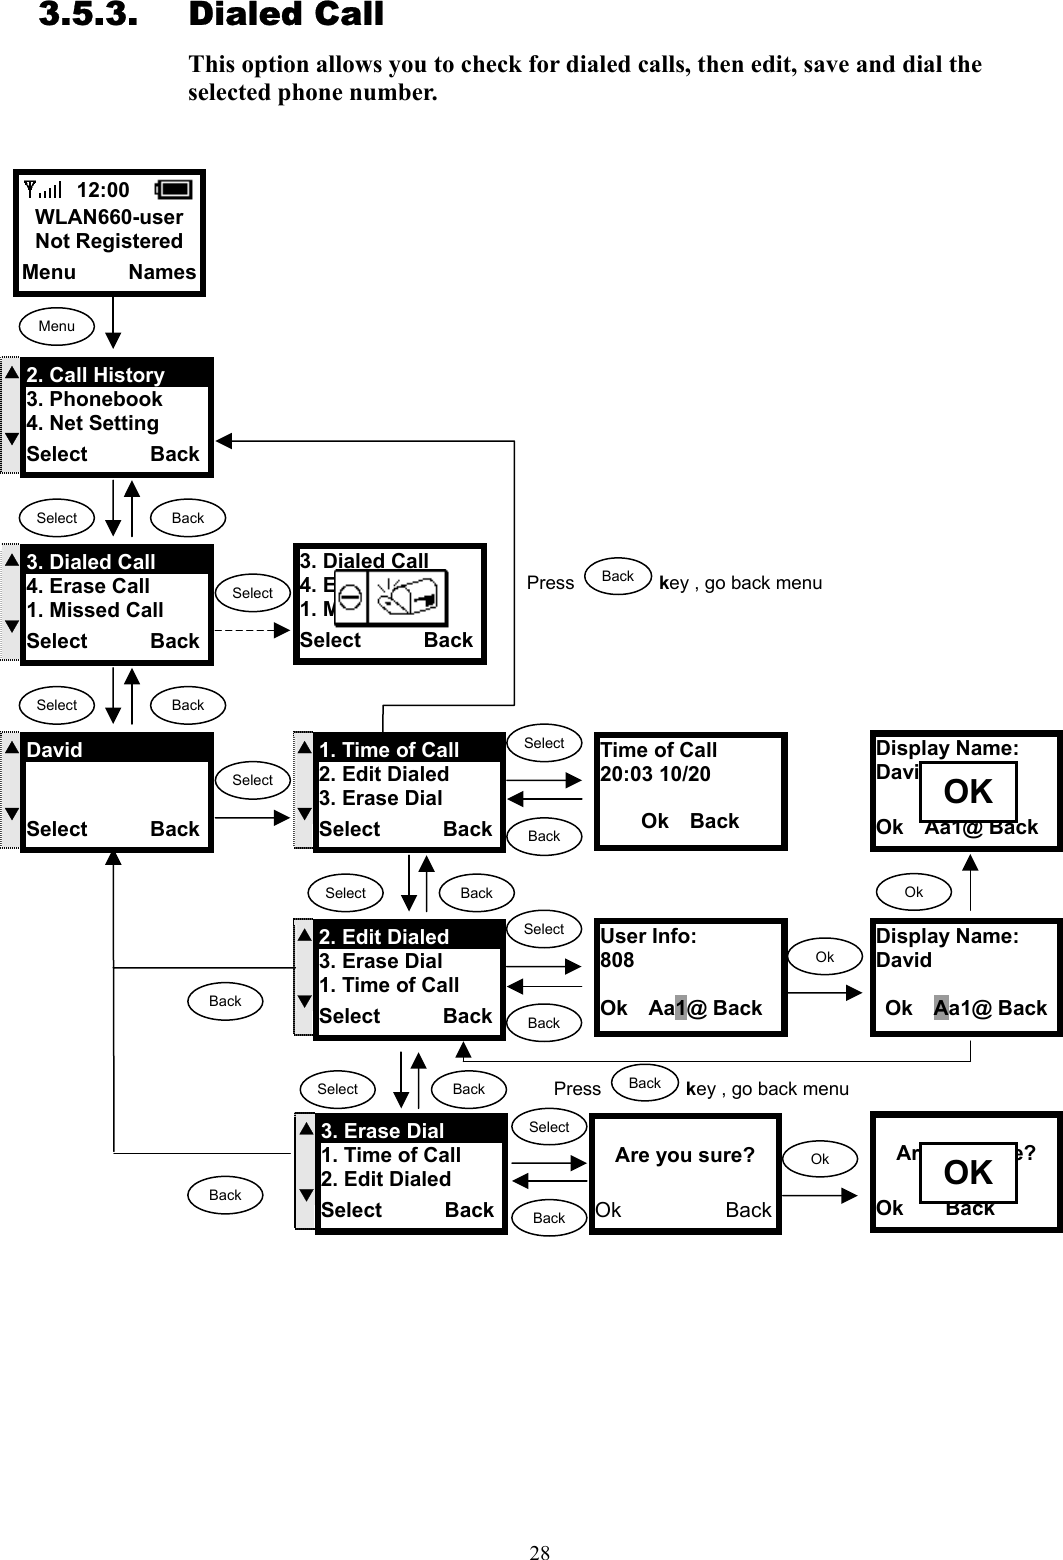
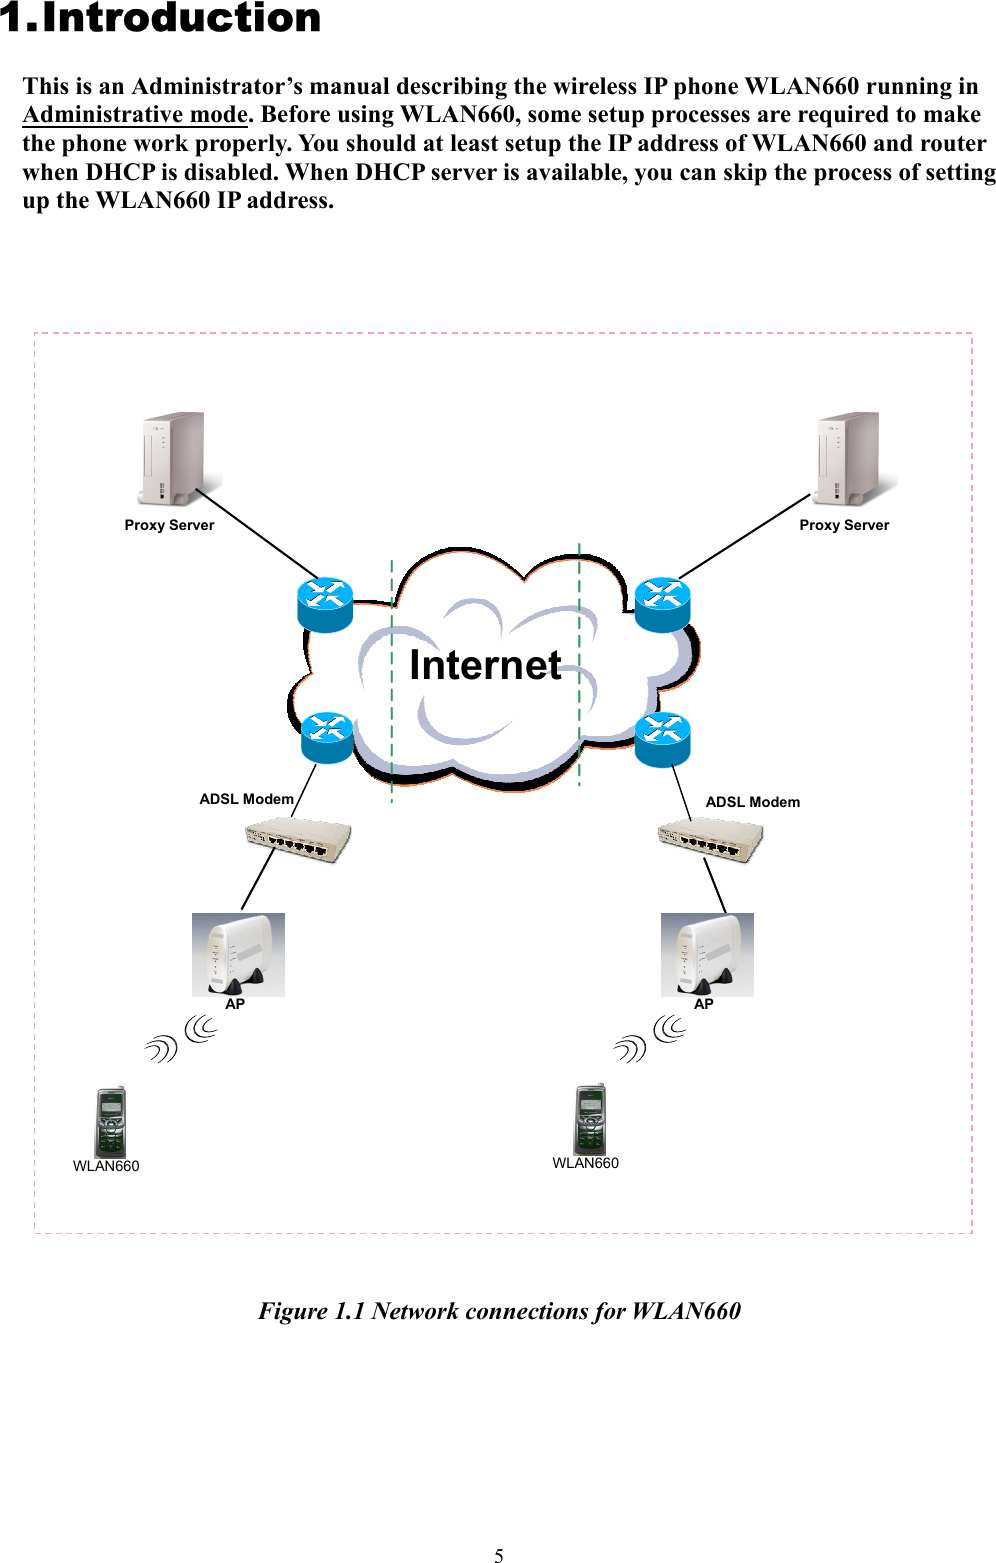
![13 3.2. Wireless Configuration This section provides instructions for configuring the wireless, 802.11b, configuration submenu. 3.2.1. Wireless LAN Settings This section explains the following: Scanning for the Wireless Service Set Identifier Making wireless settings Setting up WEP Keys (Wireless Equivalent Privacy Keys) 3.2.1.1. Wireless LAN Ok ST2. SSID 3. Network Mode4. Channel Select BackInput the SSID 12:00 WLAN660-user Not Registered Menu Names Menu Select SelectSelect Back BackS T7. Wireless 8. Restart 1. Information Select Back ST1. Site Survey 2. SSID 3. Network ModeSelect BackSTAP1 AP2 AP3 Select BackBack SelectSelectSelect BackSelect Back Back ST[1]Ad Hoc [2]Infra. Select BackST3. Network Mode4. Channel 5. Rate Select BackST4. Channel 5. Rate 6. WEP Select Select BackSTChannel 1 Channel 2 Channel 3 Select BackSelectSelect BackBack ST5. Rate 6. WEP Select 7. Profile Select BackST[1]Auto [2]1M [3]2M Select BackSelectBackSTSSID bcm-test| Ok Aa1@ BackAP1 AP2 AP3 Select Back OK BackSSID bcm-test| Ok Aa1@ Back OK [1]Ad Hoc [2]Infra. Select Back OK Channel 1 Channel 2 Channel 3 Select Back OK [1]Auto [2]1M [3]2M Select Back OK](https://usermanual.wiki/BCM-Communication/WLAN660/User-Guide-490729-Page-13.png)
![14 Back S T6. WEP Select 7. Profile 8. Auth Type Select Back 12:00 WLAN660-user Not Registered Menu Names SelectMenu Select Ok SelectOk Ok Back Back S T7. Wep Key 1 8. Wep Key 2 9. Wep Key 3 Select BackS T8. Wep Key 2 9. Wep Key 3 10. Wep Key 4 Select BackS T9. Wep Key 3 10. Wep Key 4 11. Key Select Select BackSelectOk S T10. Wep Key 4 11. Key Select 12. Profile Select BackInput the wep key 1Wep Key 1 ******* Ok Aa1@ BackSelectWep Key 2 ******* Ok Aa1@ BackWep Key 3 ******* Ok Aa1@ BackWep Key 4 ******* Ok Aa1@ BackInput the wep key 3Input the wep key 4Select SelectSelect Back BackST[1]None [2]64bit [3]128bit Select Back SelectSelectSelect BackST[2]64bit [3]128bit [1]None Select Back S T7. Wireless 8. Restart 1. Information Select Back Input the wep key 2[1]None [2]64bit [3]128bit Select Back OK [2]64bit [3]128bit [1]None Select Back OK BackWep Key 1 ******* Ok Aa1@ Back OK Wep Key 3 ******* Ok Aa1@ Back OK Wep Key 3 ******* Ok Aa1@ Back OK BackBackBackWep Key 4 ******* Ok Aa1@ Back OK S T6. WEP Select 7. Profile 8. Auth Type Select BackSelectBackS T11. Key Select 12. Profile 13. Auth type Select BackSTKey 1 Key 2 Key 3 Select Back Key 1 Key 2 Key 3 Select Back OK Select Back](https://usermanual.wiki/BCM-Communication/WLAN660/User-Guide-490729-Page-14.png)
![15 Select Back Select[1]Open System [2]Shared Key Select Back OK S T7. Wireless 8. Restart 1. Information Select Back Select 12:00 WLAN660-user Not Registered Menu Names Menu 1: (AP) Bcm 2: 3: Select BackSelectBack S T1. Create 2. Activate 3. Remove Select BackS T12. Profile 13. Auth type 1. Site Survey Select Back SelectBack1: (AP) Bcm 2: 3: Select Back OK S T2. Activate 3. Remove 1. Create Select BackS T3. Remove 1. Create 2. Activate Select BackSelect Back S T[1]Open System [2]Shared Key Select BackS T13. Auth type 1.Site Survey 2.SSID Select Back Select 1: (AP) Bcm 2: 3: Select Back OK 1: (AP) Bcm 2: 3: Select BackSelectBack1: (AP) Bcm 2: 3: Select BackSelectBack Are you sure? Ok BackOk Select Back](https://usermanual.wiki/BCM-Communication/WLAN660/User-Guide-490729-Page-15.png)