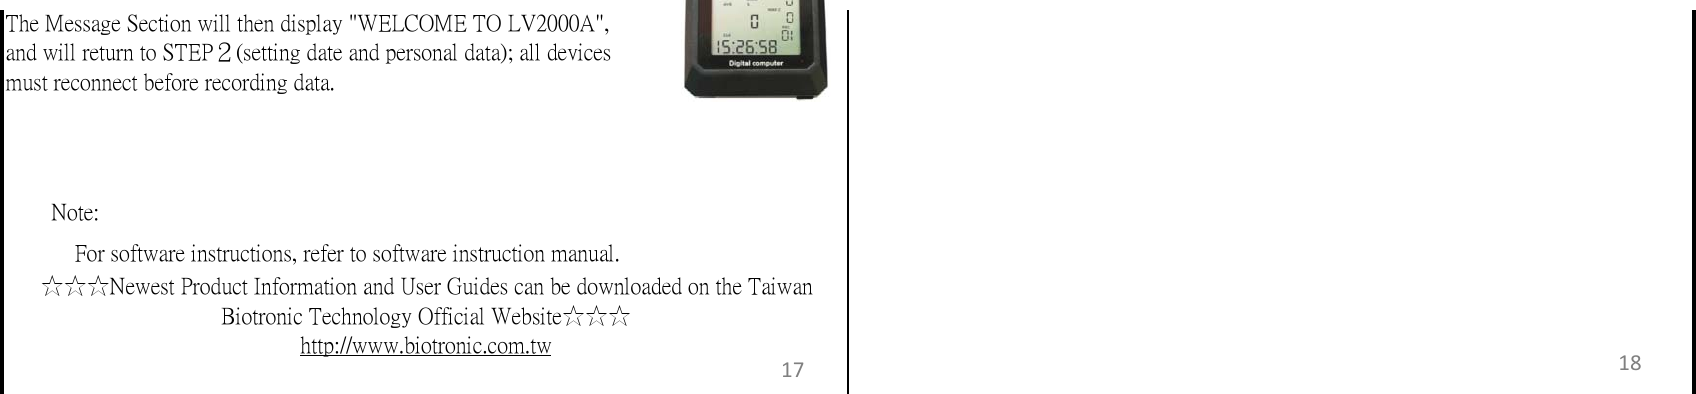
BIOTRONIC TECHNOLOGY 4C563230303041 WIRELESS CYCLE COMPUTER User Manual

Taiwan Biotronic Technology Inc. WIRELESS CYCLE COMPUTER Users Manual

Users Manual

 Taiwan Biotronic Technology Inc .No.69, Gongjiao St., Dali Dist., Taichung City 412,Taiwan (R.O.C.)http://www.biotronic.com.twLove excercising? Start with Lifevisa    !We work hard because we care http www:// .biotronic.com.tw[LV‐2000A]WIRELESSCYCLECOMPUTERWireless Cycle Computer/ IntelligentCoaching SoftwareInstruction ManualTaiwan Biotronic  TechnologyInc2.4GH
Personal Data Settings…………… ……………… ………13Date Settings……………………………………………………Message Section Symbols…………………………………16Intelligent Coaching Software … … … … … … … … … … … 17Keys…………………………………………………………6Functions……………………………………………………6First-Time Usage Operation Procedure ………………9Time Settings…………………………………………………13Charging the LV-2000A……………………………………4Using the LV-2000A ………………………………………5            Thank you for using a Lifevisa product. This instruction manual includes informationon how to properly use the LV-2000A, so please read carefully before usage. In this section,you will become familiar with the main features, setting up your device, and basic features ofthe user interface.Getting Started…………………………………………………… ..2Before Using ………………………………………………4Components ………………………………………………….3   Product Features of the LV-2000AProduct Features of the LV-2000A … … … … … … … … … 2Optional Accessories…………………………………………3   The LV-2000A is a multi-functional, large screened, high-tech cycle computer that cansatisfy anyone who enjoys sharing cycling statistics with friends. The LV-2000A can recordevery detail of your cycling, and the data can be professionally analyzed by the softwareincluded. The data can also be easily shared to improve excercise results and achieve personalgoals.Assembling the LV-2000A……………………………………4Start Recording Excercise…………………………………15Clearing Current Data Setting………………………………16  *Large liquid-crystal display (LCD) screen  *In-built rechargeable battery  *Can store 99 cycling data  *Simple, easy to use data selection key  *Highly accurate readings  *Views, records, and analyzes excercise data  *2.4GHz wireless transmission technology, without interferenceGetting StartedContents
 Charging Steps: 1. Open the water-proof cap at the top of the LV-2000A. 2. Plug the micro USB cable into the LV-2000A's micro USB port. 3. Connect the other end of the USB cable to a computer USB port.   Optional accessories can be chosen by a user's individual needs.        to secure the stand in place.    Assembling LV-2000A      To assemble LV-2000A, a Phillips screwdriver is needed.    Wireless Cycle Computer     LV-2000A Series and Optional Accessories    1. Place the adjustable stand on the bicycle handle, and use a screwdriver     LV-2000A3:Main Computer + Heart Rate Chest Strap + Speed Sensor +    Before using the LV-2000A, please make sure the device is fully charged. Before the firsttime using the device, please charge for at least 8 hours to ensure the batteries are fully charged.To charge, please prepare a USB cable.                          Cadence Sensor    LV-2000A2:Main Computer + Speed Sensor + Cadence Sensor    LV-2000A1:Main Computer + Heart Rate Chest Strap + Speed Sensor1 2MainHeart RateChest StrapSpeedSensor Cadence Sensor AdjustableStandComponents Before Using
     Keys         tighten the screw. Functions     3. Place the main computer into the adjustable stand, and adjust         horizontally to a suitable viewing angle.     Selection Key: press to adjust through the 8 functions of the LV-2000A     Up/Down Key: press to adjust operations or numerical data in each        section     Enter Key: press to submit data     2. Adjust the stand vertically to a suitable viewing angle for biking, and3 4Enter KeySelection KeyUp/Down Key1. Message  Section2. Current Heart Rate and Speed3. Average Heart Rate, Speed,Cadence, Trip Distance, and TotalDistance4. Clock and TimerUsing theLV-2000A
   4. Clock and Timer     Function     Displays current time or timer.   5. Maximum Heart Raten and Target Heart Rate Percentage     Function     Displays maximum heart rate and target heart rate percentage.   6. Maximum Speed     Function     Displays "MAX S" (Maximum Speed).               Message Section, press the【Up/Down Key】to enter data.   Note:    7. Maximum Cadence and Calories Burned     Function     Displays maximum cadence and calories burned.   8. Number of Total Trips     Function     Displays number of total trips. 3. Average Heart Rate, Speed, Cadence, Trip Distance, and Total Distance     Function     Procedure: press the【Selection Key】, and when the dot appears in this section, press the【Up/Down Key】to select to "MAX C"(Maximum Cadence) or "K CAL"(Calories Burned)during cycling, and press the【Enter Key】to finish.     Displays heart rate and speed while cycling.   1. Message Section     Procedure: press the【Selection Key】, and when the dot appears in this section, press the【Up/Down Key】to select to "MAX H"(Maximum Heart Rate) or "HR%"(Target Heart RatePercentage), and press the【Enter Key】to finish.     Procedure: press the【Selection Key】, and when the dot appears in this section, press the【Up/Down Key】to adjust "CLK" (Clock) or "Timer" (Timer) to display the clock or timerduring cycling, and press the【Enter Key】to finish.     (a) Displays month, date, and day of week.      Besides entering personal data via the LV2000 main computer itself, data can also beentered via the LV-2000 application software.     Function:     (b) Set-up Personal Data.    2. Current Heart Rate and Speed           Procedure: press the【Selection Key】, and when the dot appears in the     Function:     Procedure: press the【Selection Key】, and when the dot appears in this section, press the【Up/Down Key】and select "S"(Speed) or "H"(Heart Rate). Now the speed or heart rate isvisible during cycling, and press the【Enter Key】to finish.5 64. Clock and Timer8. Number of Total Trips7. Maximum Cadence andCalories Burned6.  Maximum Speed5. Maximum Heart Rate andTarget Heart Rate Percentage
 First-Time Usage Operation Procedure STEP 1. STEP 2. Press the 【Enter Key】to move to the nextselection (7)【AGE:20】:    Press the【Up/Down Key】to enter          age (ranging from 16-65 years old;          20 years being the default age).         Press the 【Enter Key】to move          to the next selection (6)【UNT:KM】:    Press the【Up/Down Key】to select the unit.          K stands for Kilometers, and M for Miles. (5)【CIR:207】:    Press the【Up/Down Key】to enter wheelcircumference (ranging  from 72-231 cm; 207 cm being thedefault circumference).         Press the 【Enter Key】to move          to the next selection (8)【HI:172C】:    Press the【Up/Down Key】to enter height          (ranging from 50-220 cm; 172 cm being          the  default height). When using the LV-2000A for the first time, the system will ask you for basic  Pressing any button will power on the LV-2000A, and the Message Section will     display "WELCOME TO LV2000A." Note: The LV-2000A will automatically turn off, no button pressing is necessary. (1)【Yr? 20__】:     Press the【Up/Down Key】to enter theyear, then press the【Enter Key】to move onto the next selection.     Procedure: press the【Selection Key】, and when the dot appears in this section, press the【Up/Down Key】to adjust to desired numbers during cycling, "AVG H" (Average HeartRate), "AVG S" (Average Speed), "AVG C" (Average Cadence), "Tripd" (Trip Distance), or"ODO" (Total Cumulative Distance), and press the【Enter Key】to finish.     Displays average heart rate, speed, cadence, trip distance, and total distance         Press the 【Enter Key】to move          to the next selection (3)【Dt?  __】:     Press the【Up/Down Key】toenter thedate, then the【Enter Key】to move on to thenext selection. (2)【Mth? __】:     Press the【Up/Down Key】to enter the month, thenpress the【Enter Key】to move on to the next selection.    information, in the order of:7 8
 Note:       enter system. STEP 3. To connect the Heart Rate Chest Strap, Speedometer, and Cadence Sensor. Procedure (4)【NS?HSCQ】:      Asks whether the device is registeredor not; H stands for the Heart Rate Chest Strap,S for the Speedometer, and C for the CadenceSensor; press the【Up/Down Key】to selectone of the mentioned devices; then select Q toquit. (9)【WT:062K】:    Press the【Up/Down Key】to enter weight         (ranging from 20-250 kg; 62 cm being the         default weight).         Press the 【Enter Key】to move          to the next selection  After BMI is calculated, press the【Enter Key】to  If accessories for the LV-2000A are not yet connected to the main computer, the MessageSection will display "NO HRM SENSOR CONFIG", "NO SPEED SENSOR CONFIG", or "NOCANDENCE SENSOR CONFIG." (10)【BMI:21-】:       The system will calculate BMI according to theinformation recorded. High, middle, and low values will beindicated by"↑", "-", and "↓" respectively. (4)【WEEK? MN】:    Press the【Up/Down Key】to enter the day of the week, thenpress the【Enter Key】to finish set-up.    MN stands for Monday, TU for Tuesday, WE, for Wednesday,TH for Thursday, FR for Friday, SA for Saturday, and SU for Sunday. (3)【AS? YNQ】:    Asks whether to enter deviceregistration or not; select Y toconfirm, and N to skip to next step,Q to quit. Select Y to continue. The Message Section will display "CFG→→→→",meaning the system is searching for connectable devices. If none are found, the Message Section will display "CFG →Err". If the Heart Rate Chest Strap is found,the Message Section will display "FND HS"; if theSpeedometer is found, it will display "FND SP"; if (2)【DC? YNQ】: (1)【Ent? YQ】:    Asks whether to enter and confirminformation or not;press the【Up/Down Key】to select Y to confirm, Q to quit. Select Y tocontinue.  Press the【Selection Key】to adjust to the Message Section to enter information. PleasePlease follow the steps below to connect the Heart Rate Chest Strap: (5)【CFG?YNQ】:     Asks whether to make a connection; select Y toconfirm, N to skip to the next step, and Q to quit;press the【Up/Down Key】to select Y to continue and the systemwill search for a connectable device for 1 minute, and selecta device in this time.9 10Repeat until all devicesare connectedSwipe magnetic key in thisacdirection; activate Heart Rate ChestStrap, and enter Registration ModePress key to activateSpeedometer, and enterregistration mode.Press key to activateCadence Sensor, andenter Registration Mode.
 Note: Time Settings  Date Settings Personal Data Settingsaccording to the following steps:Press the 【Enter Key】to submit the selectionPress the 【Enter Key】to submit the selection Press【Selection Key】to adjust to Time Section, after using the【Up/Donw Key】to adjustto "CLK", hold down the 【Selection Key】and【Enter Key】, the time will flash and can beadjusted by the【Up/Down Key】.  (1)【Ent?Y Q】:    Asks whether to enter data or not; pressthe【Up/Down Key】to select Y to confirm,and Q to quit. Select Y to continue. (2)【DC? YNQ】:    Asks whether to update statistical data or not; pressthe【Up/Down Key】to select Y to confirm, and it willreturn to STEP 2 (entering statistical information); select Nto proceed to the next step, Q to quit. Select N to continue. Press【Selection Key】to adjust to this section, please change personal data settings (1)【Ent?Y Q】:    Asks whether to enter information ornot; press the【Up/Down Key】to select Y toconfirm, and Q to quit. Select Y to continue. Press【Selection Key】to adjust to the Message Section, please change date settings (3)【AS? YNQ】:    Asks whether to enter productregistration; press the【Up/Down Key】toselect Y to confirm, N to proceed to next step,Q to quit. Select N to continue. When connection is set, the Message Section will display "NS?HSCQ" ;     if all devices are registered, press Q to enter system.the Candence Sensor is found, it will display "FND CA".***For instructions for each device, please refer to their respective instruction manuals.***Asks whether to update data or not; press the【Up/DownKey】to selection Y to confirm, and it will return to STEP2 (entering statistical information); select N to proceed tothe next step, and Q to quit. Select N to continue.11 12
 Start Recording Exercise Clearing Current Data Settingsaccording to the following steps:Press the【Enter Key】to submit the selection (2)【DC? YNQ】:    Asks whether to update data or not; press Y toconfirm, and it will return to STEP 2 (entering statisticalinformation); select Y to confirm, N to proceed to the nextstep, and Q to quit. Press the【Up/Down Key】to select Yto continue.    Statistics from STEP2 will be displayed. Please refer toinstructions on Page 10. (8)【WEEK?MN】:    Press【Up/Down Key】to enter the day of the week, then press (4)【CCL?YNQ】:     Asks whether to change date; press the         【Up/Down Key】to select Y to confirm,          N to proceed to the next step, Q to quit.          Select Y to continue. (5)【Yr?20__】:     Press【Up/Down Key】to enter theyear, then press the【Enter Key】to proceed tothe next step. (7)【Dt?  __】:     Press the【Up/Down Key】to enterdate, then press the【Enter Key】to proceed tothe next step. Press the【Up/Down Key】to adjust to the Message Section, and clear data (1)【Ent?Y Q】:    Asks whether to enter data or not; pressthe【Up/Down Key】to select Y to confirm, Qto quit. Select Y to continue. (6)【Mth? __】:     Press the【Up/Down Key】to enter month, thenpress the【Enter Key】to proceed to the next step. Press the【Up/Down Key】to adjust to the Current Average Section or the Number of TotalTrips Section, then press the【Enter Key】to proceed to recording cycling data. Press【EnterKey】again to stop recording.13 14
Press the【Enter Key】to submit the selection    Message Section Symbols    Mth: Month    Dt: Date    CIR: Wheel CircumferencePress the【Enter Key】to submit the selection     UNT KM: Select Unit (K: Kilometers, M: Miles)    AGE: Age    HI: Height    WT: Weight    BMI: BMI (Body Mass Index)    Ent: Enter    DC: Revise dataPress the【Enter Key】to submit the selection     AS: Add device   NS: New connected device   CFG: New connected device   CCL: Change date settings   RUN: Restore to factory default settings   SUR: ConfirmationPress the【Enter Key】to submit the selection    YNQ: Y: Yes, N: No, Q: Quit   Err: Error   HS: Heart Rate Chest Strap   SP: Speed Sensor   CA: Cadence Sensorthe【Enter Key】to finish.    MN stands for Monday, TU for Tuesday, WE, for Wednesday,TH for Thursday, FR for Friday, SA for Saturday, and SU for Sunday. (5)【RUN?Y Q】:     Asks whether to clear all data and data settings ornot; press the【Up/Down Key】to select Y to confirm, andQ to quit. If sure to clear all data, select Y. (6)【SUR?Y Q】:     To avoid accidental clearance, the system will once again makesure whether to clear all data and data setting or not; select Y toconfirm, and Q to quit. If sure to clear all data, select Y to continue.    Yr: Year (3)【AS? YNQ】:    Asks whether to enter productregistration or not; press the【Up/Down Key】to select Y to confirm, N to proceed to nextstep, Q to quit. Select N to continue. (4)【CCL?YNQ】:     Asks whether to change date or not; press the【Up/Down Key】to select Y to confirm, N to proceed tothe next step, Q to quit. Select N to continue.    MN: Monday, TU: Tuesday, WE: Wednesday, TH: Thursday, FR: Friday,    SA: Saturday, SU: Sunday (2)【DC? YNQ】:    Asks whether to update statistical data or not; Pressthe【Up/Down Key】to select Y to confirm, and it willreturn to STEP 2 (entering statistical information); select Nto proceed to next next, Q to quit. Select N to continue.15 16
  Note:   For software instructions, refer to software instruction manual.The Message Section will then display "WELCOME TO LV2000A",and will return to STEP2(setting date and personal data); all devicesmust reconnect before recording data.☆☆☆Newest Product Information and User Guides can be downloaded on the TaiwanBiotronic Technology Official Website☆☆☆http://www.biotronic.com.tw17 18
 Federal Communication Commission Interference Statement  This equipment has been tested and found to comply with the limits for a Class B digital device, pursuant to Part 15 of the FCC Rules. These limits are designed to provide reasonable protection against harmful interference in a residential installation. This equipment generates, uses and can radiate radio frequency energy and, if not installed and used in accordance with the instructions, may cause harmful interference to radio communications. However, there is no guarantee that interference will not occur in a particular installation. If this equipment does cause harmful interference to radio or television reception, which can be determined by turning the equipment off and on, the user is encouraged to try to correct the interference by one of the following measures: . Reorient or relocate the receiving antenna. . Increase the separation between the equipment and receiver. . Connect the equipment into an outlet on a circuit different from that to which the receiver is connected. . Consult the dealer or an experienced radio/TV technician for help.  FCC Caution: To assure continued compliance, any changes or modifications not expressly approved by the party responsible for compliance could void the user's authority to operate this equipment. (Example - use only shielded interface cables when connecting to computer or peripheral devices).    This device complies with Part 15 of the FCC Rules. Operation is subject to the following two conditions: (1) This device may not cause harmful interference, and (2) This device must accept any interference received, including interference that may cause undesired operation.

Navigation menu