BIOTRONIK SE and KG CMII Patient Device User Manual CardioMessenger
BIOTRONIK SE & Co. KG Patient Device CardioMessenger
Contents
- 1. User Man
- 2. UserMan
User Man

1
Contents
Contents . . . . . . . . . . . . . . . . . . . . . . . . . . . 1
What is Home Monitoring? . . . . . . . . . . . . 3
Included Equipment . . . . . . . . . . . . . . . . . . 4
How Do I Use the CardioMessenger? . . . . 6
Where Should I Put the CardioMessenger? 6
How Do I Install the CardioMessenger? . . 8
Telephone connection . . . . . . . . . . . . . 11
Version A . . . . . . . . . . . . . . . . . . . . . . . . 13
Version B . . . . . . . . . . . . . . . . . . . . . . . . 19
How Do I Understand the Lights of the
CardioMessenger? . . . . . . . . . . . . . . . . . . 24
Light 1 . . . . . . . . . . . . . . . . . . . . . . . . . . 24
Light 2 . . . . . . . . . . . . . . . . . . . . . . . . . . 25
Light 3 . . . . . . . . . . . . . . . . . . . . . . . . . . 25
Light 4 . . . . . . . . . . . . . . . . . . . . . . . . . . 26
Light 5 . . . . . . . . . . . . . . . . . . . . . . . . . . 27
How Do I Turn On the CardioMessenger? 28
How Do I Turn Off the CardioMessenger? 29
How Do I Charge the CardioMessenger? . 30
How Do I Turn Off the Charging Station? . 31
How Do I Resolve Problems? . . . . . . . . . . 32
Light 3 . . . . . . . . . . . . . . . . . . . . . . . . . . 32
Light 4 . . . . . . . . . . . . . . . . . . . . . . . . . . 33
Light 5 . . . . . . . . . . . . . . . . . . . . . . . . . . 33
How Do I Reset the CardioMessenger? . . 34
How Do I Take Care of the
CardioMessenger? . . . . . . . . . . . . . . . . . . . 35
How Do I Carry the CardioMessenger? . . 36
Safety Precautions – What Should I Watch
out For? . . . . . . . . . . . . . . . . . . . . . . . . . . . . 38
356845--PreJ
CardioMessenger.book Page 1 Thursday, January 5, 2012 1:13 PM

2
Guidelines . . . . . . . . . . . . . . . . . . . . . . . . . . 40
USA . . . . . . . . . . . . . . . . . . . . . . . . . . . . . . . 40
FCC RF exposure requirements . . . . . . 41
UL classification . . . . . . . . . . . . . . . . . . 41
Canada . . . . . . . . . . . . . . . . . . . . . . . . . . . . 42
Electromagnetic Compatibility . . . . . . . . . 43
Warranty . . . . . . . . . . . . . . . . . . . . . . . . . . . 43
Technical Data . . . . . . . . . . . . . . . . . . . . . . 44
General . . . . . . . . . . . . . . . . . . . . . . . . . . . . 44
Permissible Environmental Conditions . . 44
During operation . . . . . . . . . . . . . . . . . . 44
Shipping and storage . . . . . . . . . . . . . . 44
CardioMessenger Remote Unit . . . . . . . . . 44
CardioMessenger Charging Station . . . . . 45
Rechargeable Battery (Integrated) . . . . . . 46
Power Supply . . . . . . . . . . . . . . . . . . . . . . . 46
Appendix . . . . . . . . . . . . . . . . . . . . . . . . . . . 47
CardioMessenger.book Page 2 Thursday, January 5, 2012 1:13 PM

3
What is Home Monitoring?
Dear Patient:
You have received a BIOTRONIK pacemaker
or implantable cardioverter-defibrillator
(ICD) with Home Monitoring function.
Home Monitoring pacemakers and ICDs are
additionally equipped with a special trans-
mitter. This transmitter automatically
transmits medical and technical information
to a mobile device, the CardioMessenger.
The CardioMessenger works like a cell
phone and automatically transmits the
information received from your device as
encoded messages to the BIOTRONIK
Service Center.
The transmission power from your device is
low so as to not impair your health in any
way. Since the transmission range is short,
the CardioMessenger is needed to send
the information to the BIOTRONIK Service
Center.
At the Service Center, the data are processed
and can be viewed only by your physician
on a secured Internet site in the form
of a comprehensive report called a
Cardio Report.
Your doctor can use this Cardio Report to
decide whether your device settings need
to be updated or if your therapy plan needs
to be changed. Thus, Home Monitoring
serves as a practical diagnostic aid.
CardioMessenger.book Page 3 Thursday, January 5, 2012 1:13 PM
4
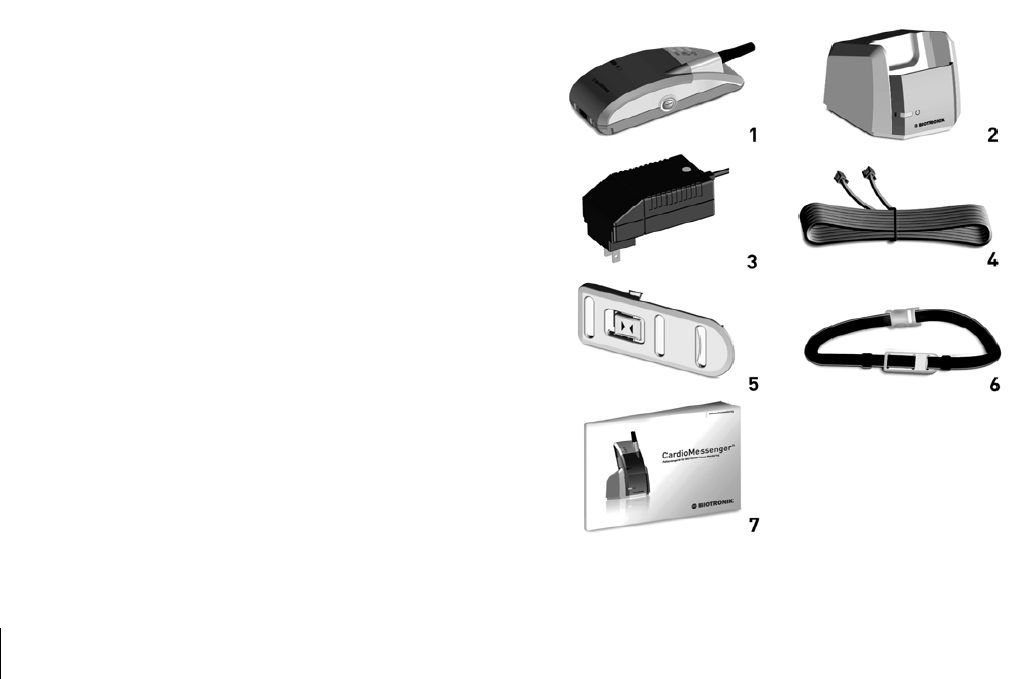
Included Equipment
The set comes equipped with the following
components:
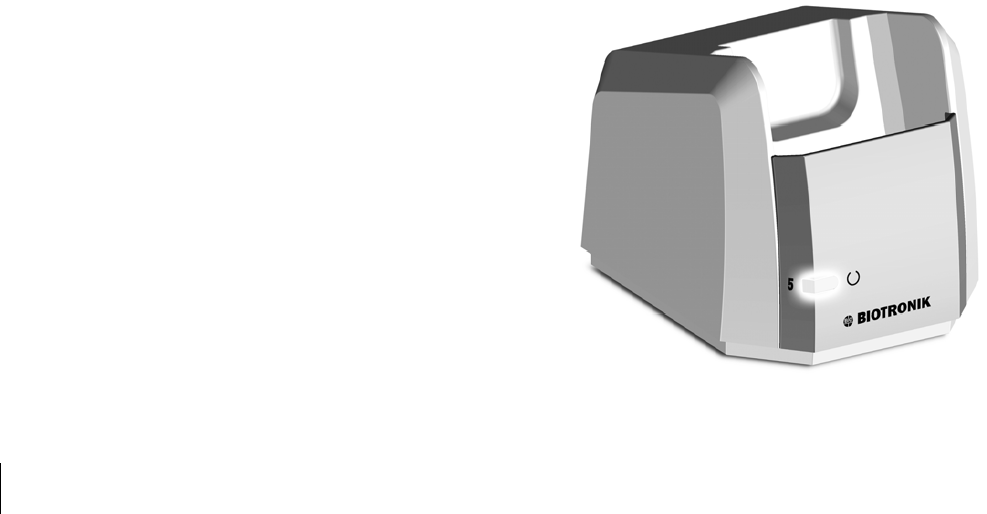
1. Mobile unit
2. Charging station
3. Wall mounted power supply
4. Telephone cable
5. Belt clip (already affixed)
6. Carrying strap
7. Patient manual
CardioMessenger.book Page 4 Thursday, January 5, 2012 1:13 PM

5
Before use, make sure that none of the
components are visibly damaged and that all
necessary components have been delivered
to you.
Caution! Never use the CardioMessenger
if it has been damaged; return it to your
physician.
Only use the following original
BIOTRONIK devices, as other accessories
can increase the interference emitted and
the device's susceptibility to interference:
–
The CardioMessenger
– The charging station with the wall
mounted power supply (type: FW 7555 M/06)
– The telephone cord
(type: BIOTRONIK VK-117)
CardioMessenger.book Page 5 Thursday, January 5, 2012 1:13 PM

6
How Do I Use the CardioMessenger?
The following section describes:
2How to optimize CardioMessenger
placement
2How to operate it
2How it functions
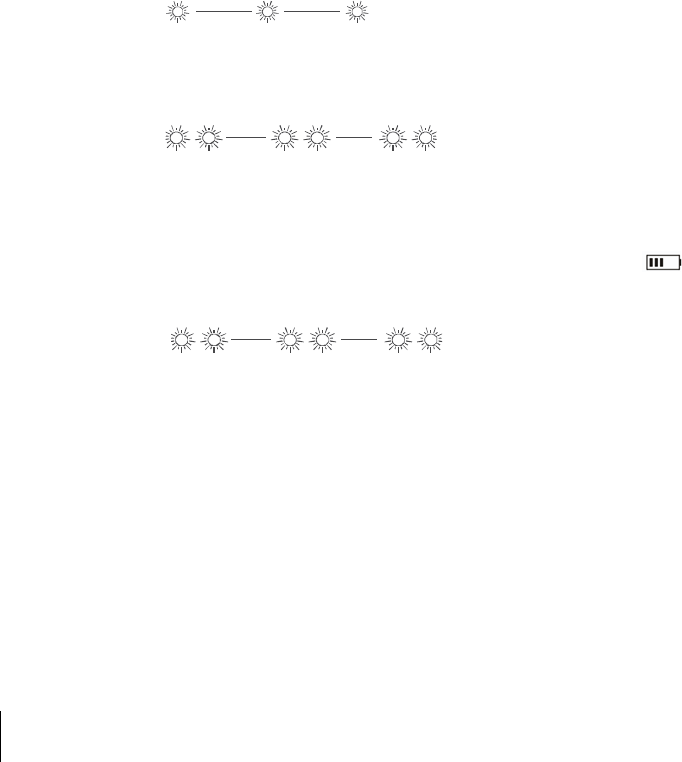
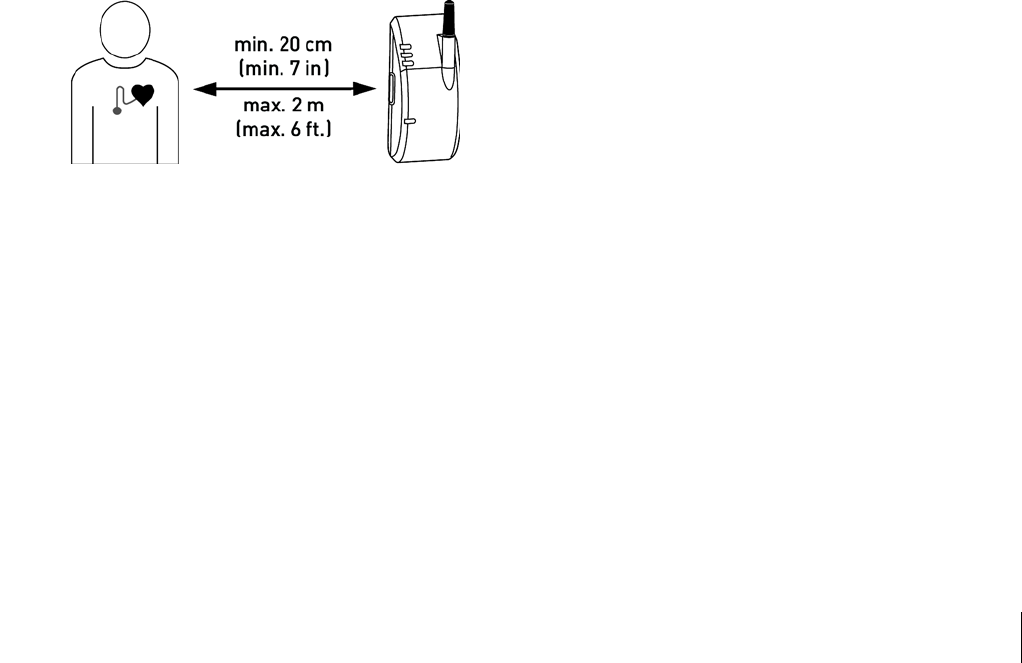
Where Should I Put the CardioMessenger?
On your bedside table or close to your bed
is a suitable place for your CardioMessenger
since it generally fulfills the following
conditions:
2The distance to the device is less than
2 meters (6 feet), so that regular data
transmission at night is guaranteed.
2The distance to the device is more than
20 centimeters (7 inches), so that the
CardioMessenger does not interfere
with the device.
2The CardioMessenger is placed on
a solid base and cannot fall.
Please also consider the following:
2Do not expose the device to moisture or
heat; exposure to direct sunlight and
taking the device into the bathroom are
not recommended.
2The CardioMessenger should not be
connected to a power outlet controlled
by a light switch.
2Do not place the device next to a television
set, microwave oven, or similar source of
electromagnetic interference.
CardioMessenger.book Page 6 Thursday, January 5, 2012 1:13 PM

7
Warning! The distance between the device
and CardioMessenger must not be less
than 20 centimeters (7 inches).
Note: If the CardioMessenger is too close
to a loudspeaker (or a radio alarm or TV),
you may hear interference noises typical
for mobile phones.
CardioMessenger.book Page 7 Thursday, January 5, 2012 1:13 PM

8
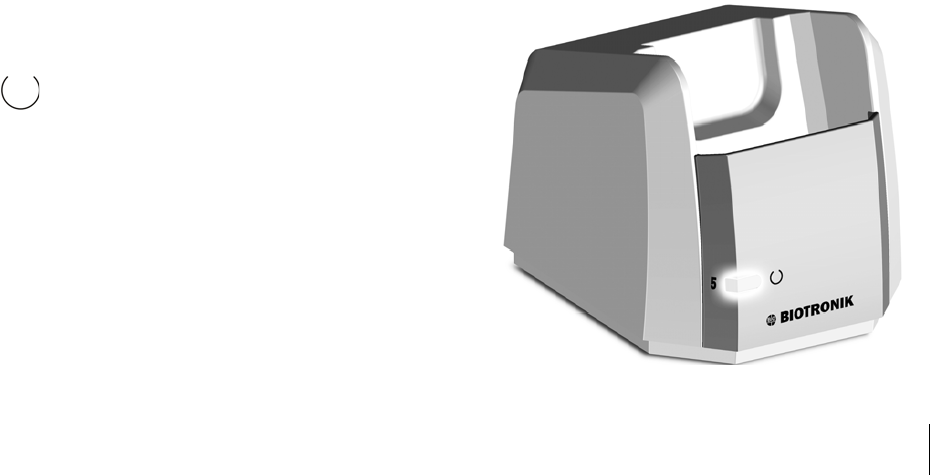
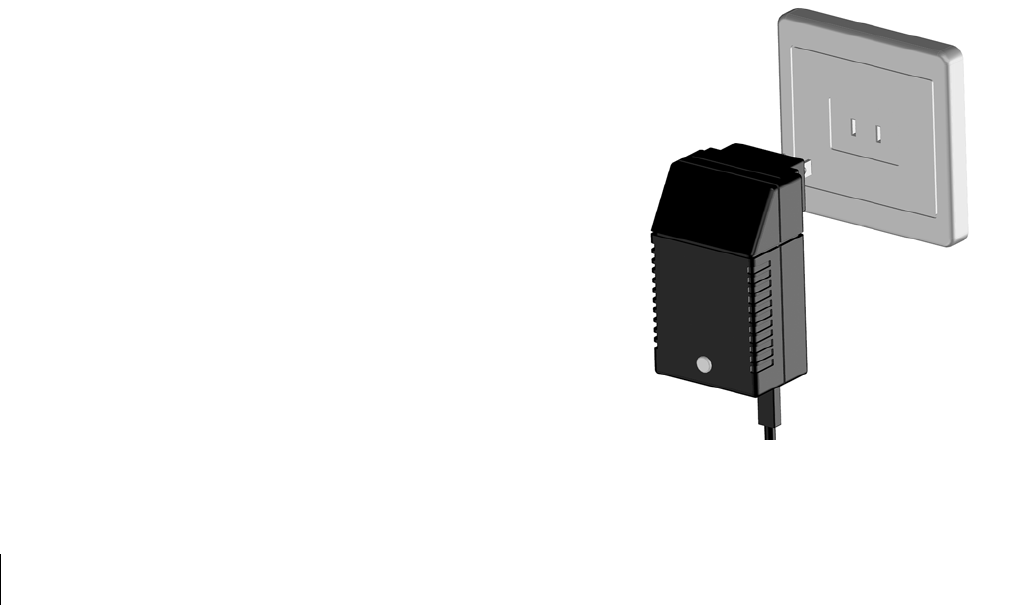
How Do I Install the CardioMessenger?
Insert the plug into a socket in your wall.
Make sure you do not connect the Cardio-
Messenger to a power outlet controlled by
a light switch.
Make sure that the socket to which the
charging station is connected is easily
accessible. This ensures that you can
disconnect the power supply from the mains
at any time.
Arrange power cable carefully to reduce the
risk of entanglement or strangulation.
Now the green light on the upper side of
the power supply should be illuminated;
if not, please refer to “How Do I Resolve
Problems?” on page 32.
CardioMessenger.book Page 8 Thursday, January 5, 2012 1:13 PM

9
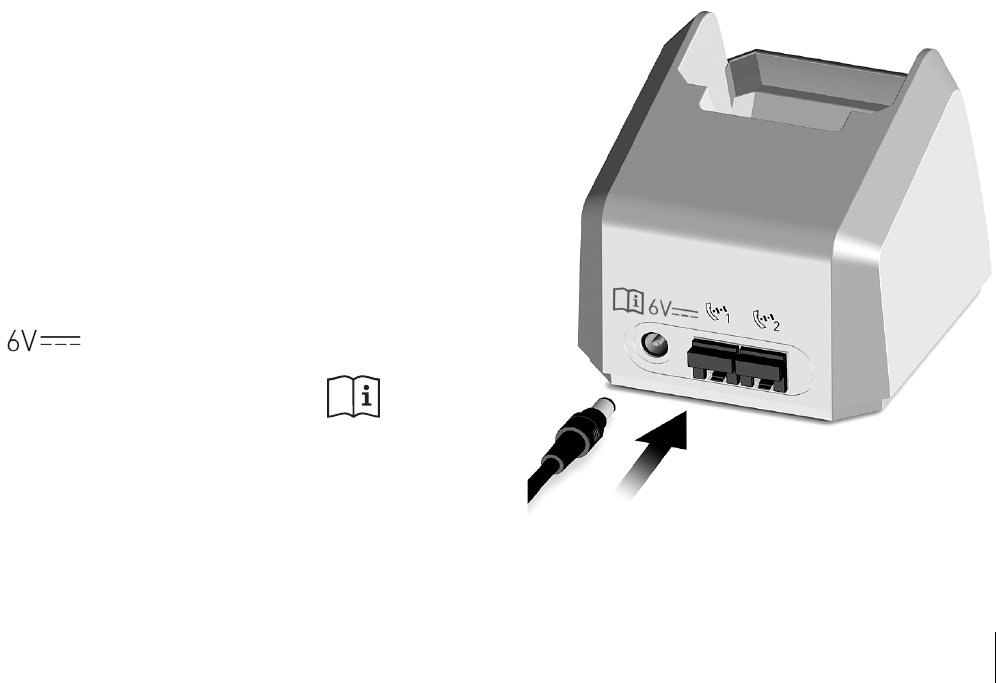
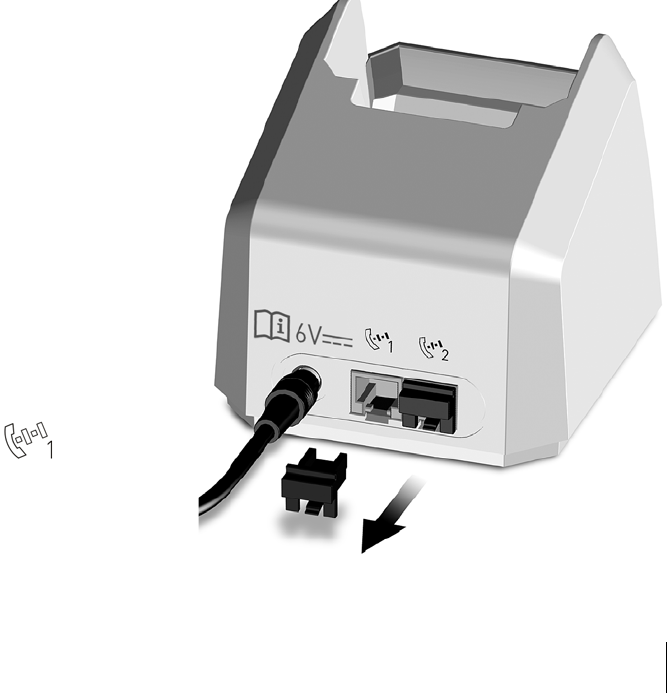
Now, insert the small plug of the power
supply cable into the charging station.
Arrange power cable carefully to reduce the
risk of entanglement or strangulation.
The port for the small plug is situated on
the rear side of the charging station and
is marked with the following symbol:
Follow the instructions for use!
Use only the original power supply that
came with the CardioMessenger, see
“Included Equipment” on page 4.
CardioMessenger.book Page 9 Thursday, January 5, 2012 1:13 PM


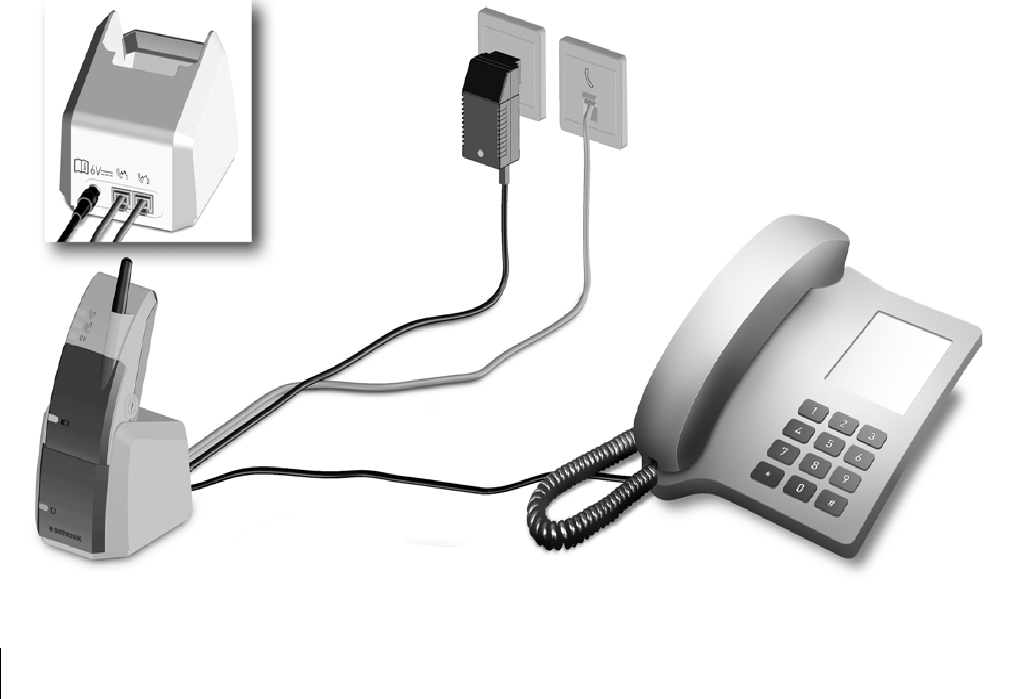
11
Telephone connection
You need a telephone connection so that
your CardioMessenger can send the
Home Monitoring data to your physician.
You may operate your CardioMessenger with
your existing telephone sharing one single
telephone socket (version A) or connect it
directly to a free telephone socket (version B).
Either way, your normal phone use remains
unaffected.
Version A
Version B
CardioMessenger.book Page 11 Thursday, January 5, 2012 1:13 PM

12
Note: The CardioMessenger is designed to
operate with standard analog phone lines
providing Plain Old Telephone Service
(POTS). Compatibility with other phone
lines or services (e.g., Voice over IP (VoIP)
via analog or digital lines, cable TV phone
lines or ISDN) is not guaranteed. In these
cases compatibility testing at the patient’s
home is recommended. Proper set up of
the system at the patient’s home may
require installation of adapters and/or
analog phone lines. Please contact your
telephone service provider for informa-
tion on the type of phone line that you
have.
CardioMessenger.book Page 12 Thursday, January 5, 2012 1:13 PM

13
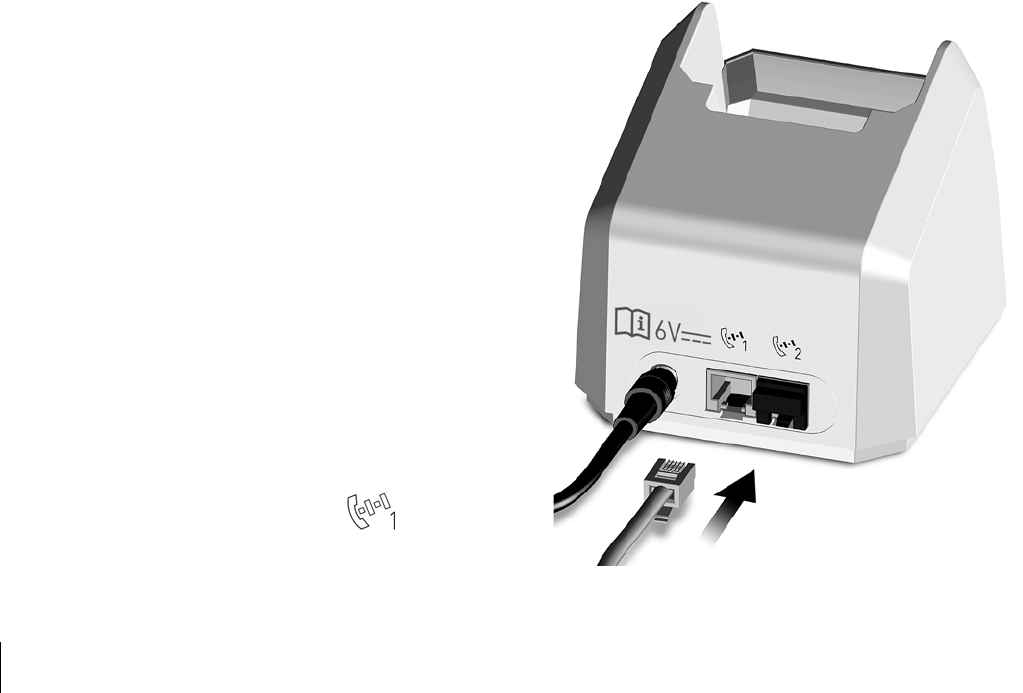
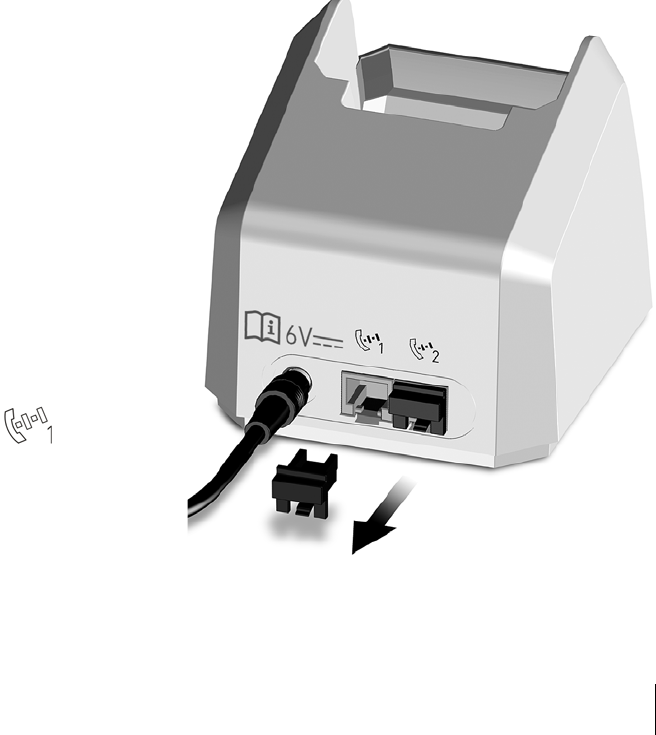
Version A
Unplug your telephone cable from your
telephone socket in your wall.
Remove the safety plug on port 1
on the rear side of the charging station.
Keep the sealing plug of the telephone inlet
out of the reach of children.
CardioMessenger.book Page 13 Thursday, January 5, 2012 1:13 PM

14
Now insert the free end
of your telephone cable into port 1
of the charging station.
CardioMessenger.book Page 14 Thursday, January 5, 2012 1:13 PM
15
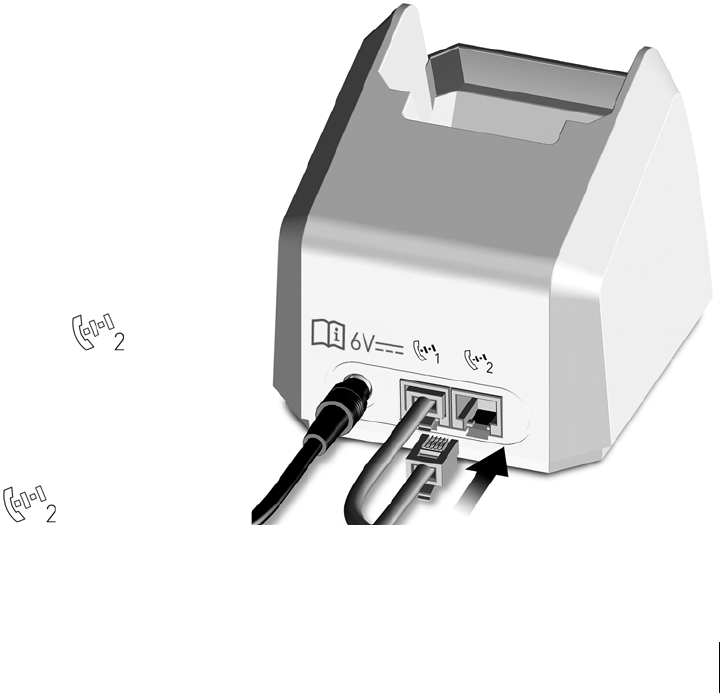
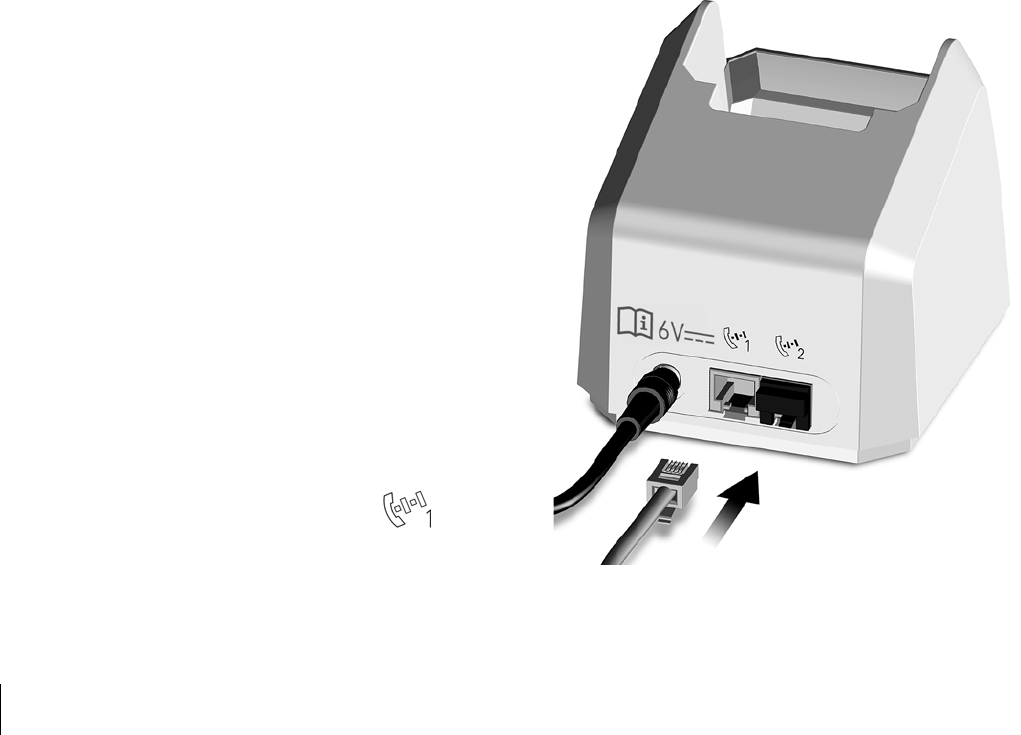
Take the telephone cable that came with
the CardioMessenger, remove
the second safety plug from port 2
of the charging station.
Keep the sealing plug of the telephone inlet
out of the reach of children.
Plug one end of the
telephone cable into port 2.
CardioMessenger.book Page 15 Thursday, January 5, 2012 1:13 PM

16
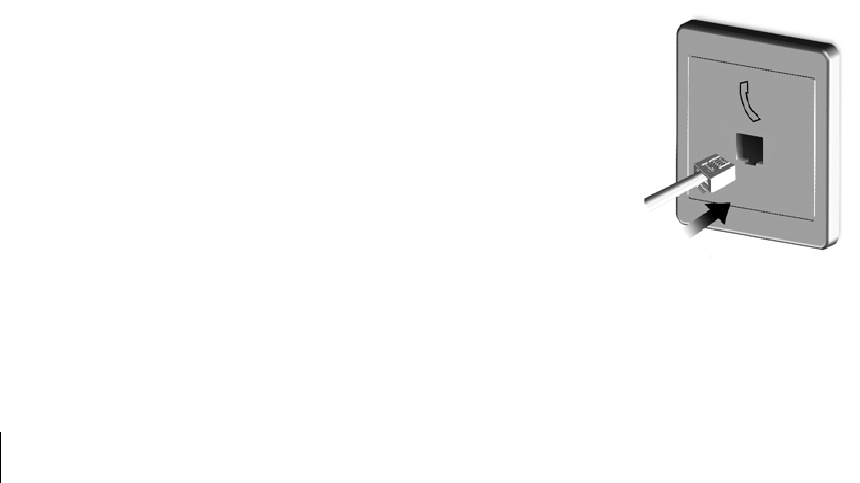
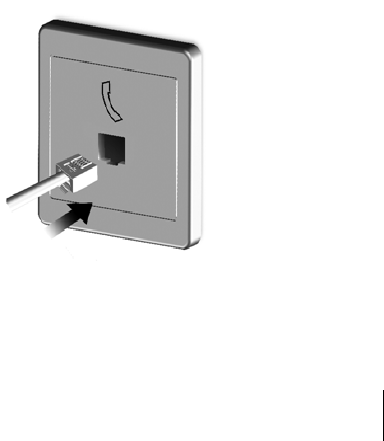
Insert the other end of your telephone cable
into the telephone socket in your wall.
Arrange the telephone cable carefully
toreduce the risk of entanglement or stran-
gulation.
CardioMessenger.book Page 16 Thursday, January 5, 2012 1:13 PM

17
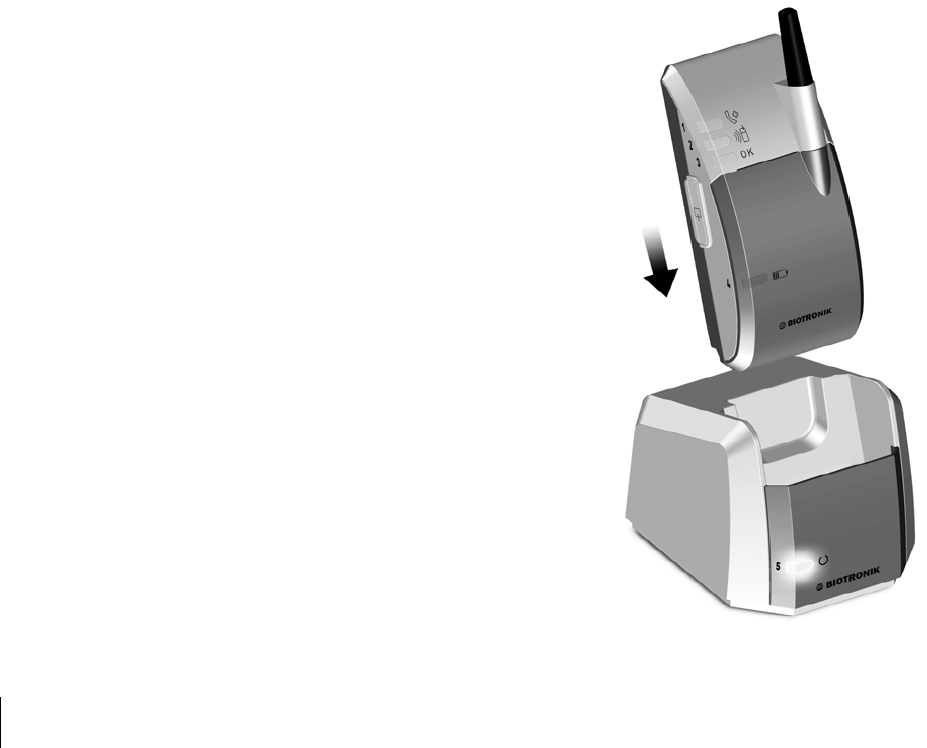
Now, place the CardioMessenger into the
charging station. The CardioMessenger
should switch itself on immediately, unless
the batteries are completely depleted.
A brief tone will sound when the Cardio-
Messenger is switched on.
If the batteries are completely depleted, then
the CardioMessenger first charges itself and
then switches itself on later (approximately
after 30 minutes).
Additional information can be found in
“How Do I Charge the CardioMessenger?” on
page 30.
CardioMessenger.book Page 17 Thursday, January 5, 2012 1:13 PM

18
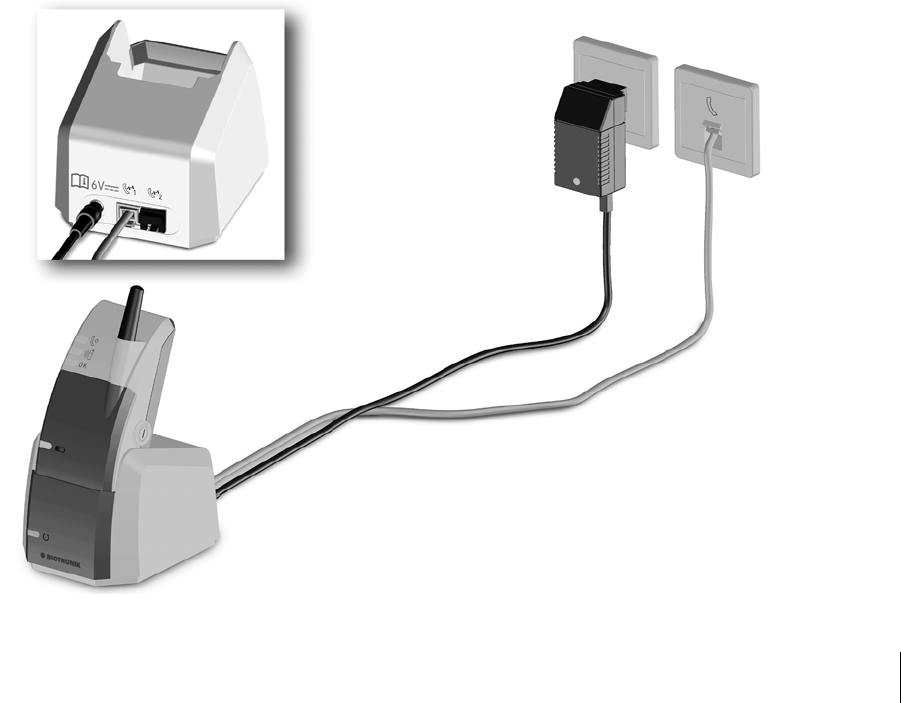
When you are finished, the connection
should look like as follows:
CardioMessenger.book Page 18 Thursday, January 5, 2012 1:13 PM

19
Version B
If you wish to set up the CardioMessenger
close to a telephone outlet, but there is
no telephone, you may connect the Cardio-
Messenger directly to the telephone outlet.
Please proceed as follows:
Take the telephone cable that came with
the CardioMessenger and
remove the safety plug on port 1
on the rear side of the charging station.
Keep the sealing plug of the telephone inlet
out of the reach of children.
CardioMessenger.book Page 19 Thursday, January 5, 2012 1:13 PM
20
Now insert one end of
your telephone cable into port 1
of the charging station.
CardioMessenger.book Page 20 Thursday, January 5, 2012 1:13 PM

21
Insert the other end of your telephone cable
into the telephone socket in your wall.
Arrange the telephone cable carefully
toreduce the risk of entanglement or stran-
gulation.
CardioMessenger.book Page 21 Thursday, January 5, 2012 1:13 PM

22
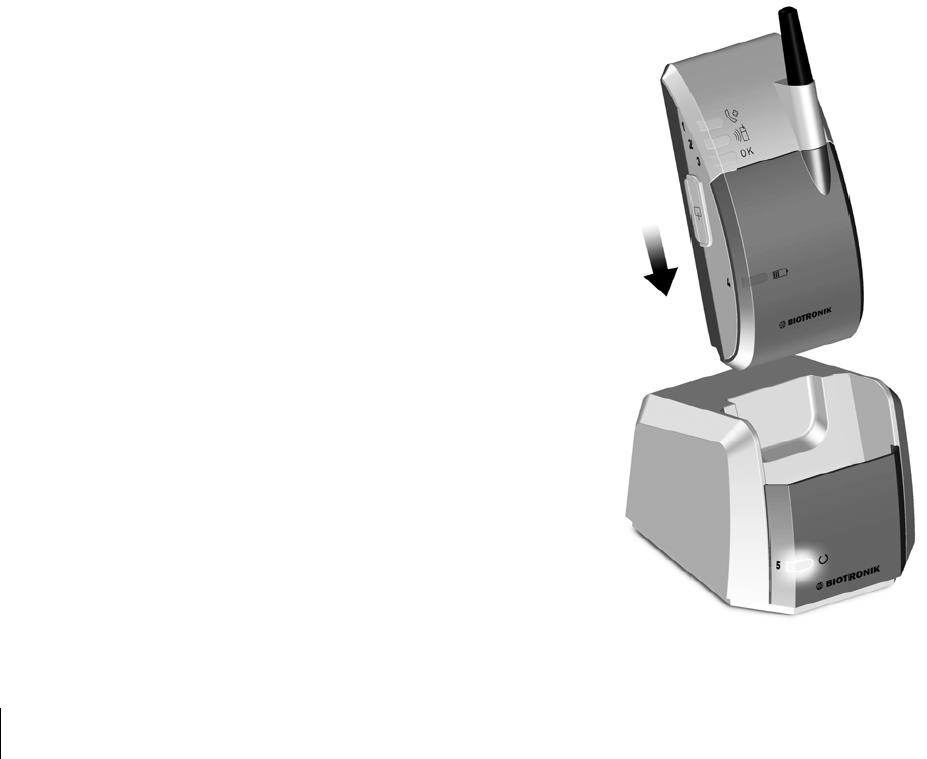
Now, place the CardioMessenger in the
charging station. The CardioMessenger
should switch itself on immediately, unless
the batteries are completely depleted.
A brief tone will sound when the Cardio-
Messenger is switched on.
If the batteries are depleted, then the
CardioMessenger first charges itself and
then switches itself on later (approximately
after 30 minutes).
Additional information can be found in
“Version B” on page 19.
CardioMessenger.book Page 22 Thursday, January 5, 2012 1:13 PM
23
When you are finished, the connection
should look like as follows:
CardioMessenger.book Page 23 Thursday, January 5, 2012 1:13 PM

24
How Do I Understand the Lights of the
CardioMessenger?
Your CardioMessenger has four lights and
one light on the charging station.
The lights numbered 1 – 3 represent the
general functions of the CardioMessenger,
light 4 is the battery monitor light, and
light 5 shows the operational status of the
charging station.
Note: Whether or not the lights flash or
are lit continuously, the operation of
your device remains unaffected.
Light 1
Off – This is the normal status.
CardioMessenger.book Page 24 Thursday, January 5, 2012 1:13 PM

25
Yellow flashing – When this light flashes
yellow, your physician wants you to call.
This situation may never occur. You will be
informed by your physician if s/he will use
this feature.
Note: After you have switched the Cardio-
Messenger off and on, this light will not
flash anymore. However, please do not
forget to call your physician.
Light 2
This light will only be used during a follow-
up visit and can be triggered via the device
programmer ICS 3000. Your physician will
find further information in the ICS 3000
manual.
Note: Light 2 is not illuminated when your
device transmits regular messages.
This light may be illuminated or flash yellow,
or flash green.
Off – This is the normal status.
Yellow illumination – When the light is
illuminated yellow, the CardioMessenger
is receiving a message. Please wait until
the data transmission has finished (light
flashing green) before you walk away from
the CardioMessenger.
Green flashing – When the light flashes
green several times, the transmission of
the message has been completed.
Yellow flashing – However, when the light
flashes yellow several times, the transmis-
sion was not successful. Your physician will
decide what to do next.
Light 3
This light informs you about the normal
operation of the CardioMessenger.
CardioMessenger.book Page 25 Thursday, January 5, 2012 1:13 PM
26
Green flashing –
When the light single-flashes green repeat-
edly, the CardioMessenger is operating
properly. This is the normal status.
Green flashing –
When the light double-flashes green repeat-
edly, the CardioMessenger is also operating
properly. Additionally, there are messages
stored that have to be transmitted to the
Service Center.
Yellow flashing –
When the light double-flashes yellow
repeatedly, there is no connection to the
GSM network or modem and additionally
the CardioMessenger has messages stored
to be transmitted to the Service Center.
For further information, see the “How Do I
Resolve Problems?” on page 32.
Yellow illumination – When the light is
illuminated yellow, the CardioMessenger
is performing a self-test.
This test should last no longer than
10 seconds after the CardioMessenger
has been switched on.
Off – The CardioMessenger is switched off.
Light 4
In the following, the four statuses of the
battery monitor light are described as
follows:
Green Illumination – When the light is
illuminated green, the CardioMessenger is
fully charged. You may now use it in mobile
operation for at least 24 hours. But the
CardioMessenger can certainly also be
kept in the charging station.
Off –
This is the normal status when the
CardioMessenger is used in mobile operation.
CardioMessenger.book Page 26 Thursday, January 5, 2012 1:13 PM
27
When this light is off but the Cardio-
Messenger is in the charging station, please
refer to “How Do I Resolve Problems?” on
page 32.
Red flashing – When the light flashes red,
the CardioMessenger batteries are nearly
depleted. Please place the CardioMessenger
in the charging station.
Yellow illumination – When the light is
illuminated yellow, the CardioMessenger is
charging.
Light 5
Green Illumination – This is the normal
status when the charging station is
connected to the power supply.
If this is not the case, there might be
an error. Additional information can be
found in “How Do I Resolve Problems?” on
page 32.
CardioMessenger.book Page 27 Thursday, January 5, 2012 1:13 PM

28
How Do I Turn On the CardioMessenger?
As soon as you place the CardioMessenger
in the charging station, it is automatically
switched on.
You certainly may also switch on the
CardioMessenger when it is not placed in the
charging station; the On/Off button is located
on the right side of the CardioMessenger.
Press the On/Off button of the Cardio-
Messenger until you can feel slight
resistance. A brief tone will sound, the
CardioMessenger will start its self-test,
and light 3 will be illuminated yellow.
You can now release the button.
CardioMessenger.book Page 28 Thursday, January 5, 2012 1:13 PM

29
When the self-test of the CardioMessenger
has finished, light 3 flashes yellow. Now, the
CardioMessenger will try to connect to the
BIOTRONIK Service Center.
After a successful connection to the
Service Center, light 3 flashes green.
Your CardioMessenger is now operational.
In case light 3 does not flash green, please
refer to “How Do I Resolve Problems?” on
page 32.
Note: When the CardioMessenger has
not been used for a long time or if it was
stored below operational temperature,
the battery can be completely depleted.
In this case, the CardioMessenger
switches itself on only after the battery
has been charged for about 30 minutes.
How Do I Turn Off the CardioMessenger?
Press and hold the CardioMessenger
On/Off button for at least two seconds.
A brief tone will sound and light 3 will
go out after a short period of time.
The CardioMessenger is switched off;
no data can be received or transmitted.
Note: A switched-off or improperly
functioning CardioMessenger does
not affect the operation of your device.
CardioMessenger.book Page 29 Thursday, January 5, 2012 1:13 PM

30
How Do I Charge the CardioMessenger?
The CardioMessenger has to be charged
when the battery monitor light (light 4)
flashes red. If you wish to use the Cardio-
Messenger in mobile operation, you should
charge it every 24 hours.
It is recommended that you charge the
CardioMessenger before you use it for
the first time.
To do so, place the CardioMessenger in
the charging station; the charging process
will start immediately.
During the charging process, the battery
monitor light (light 4) of the CardioMessenger
will be illuminated yellow.
Once the CardioMessenger is charged, the
battery monitor light is illuminated green.
Charging usually takes no longer than three
and a half hours.
CardioMessenger.book Page 30 Thursday, January 5, 2012 1:13 PM

31
However, if the battery monitor light (light 4)
is off even though the CardioMessenger is
in the charging station, there might be a
problem.
Please refer to “How Do I Resolve Problems?”
on page 32 to find out how to resolve this
problem.
Note: In case the CardioMessenger has
been stored outside the operational
temperature, i.e., below 0°C (32°F) and
above 40°C (104°F), the batteries
discharge themselves much more quickly.
You should then first charge the Cardio-
Messenger before attempting to use it.
How Do I Turn Off the Charging Station?
The charging station can remain perma-
nently connected. This ensures that your
CardioMessenger will always start charging
as soon as you place it in the charging
station.
Disconnect the power cable plug from the
socket to turn off the charging station. The
charging station does not have a power
switch.
CardioMessenger.book Page 31 Thursday, January 5, 2012 1:13 PM

32
How Do I Resolve Problems?
Problems with your CardioMessenger are
easy to identify, and they are ususally easy
to resolve.
Light 3
Yellow illumination – When this light is
continuously illuminated yellow, the Cardio-
Messenger was not able to end its self-test.
Solution – Reset the CardioMessenger.
If light 3 is still illuminated yellow, inform
your physician. You will find information
on a reset in “How Do I Reset the Cardio-
Messenger?” on page 34.
Yellow flashing – When this light continu-
ously flashes yellow, the CardioMessenger
cannot connect to the Service Center.
Solutions – Check if the charging station
is connected to the power supply and if
the cables from the charging station to
the telephone wall outlet are loose.
Check that the standard telephone line is
not dead, i.e., the CardioMessenger is not
blocked by other devices.
Check if you are able to dial toll-free
numbers with your telephone. If this is
generally not possible, have this service
set up for you by your telephone provider
or inform your physician.
Note: The CardioMessenger is designed to
operate with standard analog phone lines
providing Plain Old Telephone Service
(POTS). Compatibility with other phone
lines or services (e.g., Voice over IP (VoIP)
via analog or digital lines, cable TV phone
lines or ISDN) is not guaranteed. In these
cases compatibility testing at the patient’s
home is recommended. Proper set up of
CardioMessenger.book Page 32 Thursday, January 5, 2012 1:13 PM
33
the system at the patient’s home may
require installation of adapters and/or
analog phone lines. Please contact your
telephone service provider for information
on the type of phone line that you have.
Light 4
Off – When this light is off even though the
CardioMessenger is in the charging station,
proceed as follows:
Solutions – Check if light 5 on the charging
station is illuminated. Is this not the case,
refer to the solutions described for light 5.
If light 5 is illuminated, check whether the
connecting parts on the CardioMessenger or
on the charging station are easily accessible
and not dirty.
If light 4 is still off, inform your physician
so that the device can be checked and the
battery may be exchanged.
Note: If you take the CardioMessenger
out of the charging station, the battery
monitor light will go out to save energy.
Light 5
Off – If this light is off, proceed as follows:
Solutions – Check that the plugs of the
power cables are connected both to the
outlet in the wall and to the power supply.
Check that the green light of the power
supply is illuminated. If this is not the case,
either the power outlet is not being supplied
with electricity or the power supply is defec-
tive. Return a non-functioning power supply
to your physician.
CardioMessenger.book Page 33 Thursday, January 5, 2012 1:13 PM

34
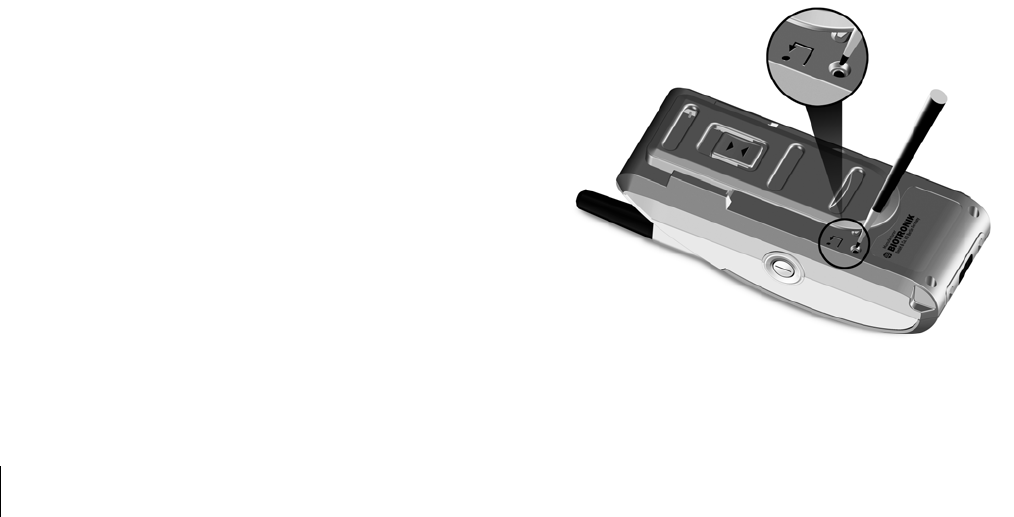
How Do I Reset the CardioMessenger?
You should reset your CardioMessenger by
restarting it when light 3 is lit continuously
in yellow and if this error could not be elimi-
nated by turning the CardioMessenger off
and on.
The reset button is located on the back of
the CardioMessenger, on the left towards
the lower end of the belt clip.
Press the reset button (located on the back
of the CardioMessenger) with a sharp object
such as a ballpoint pen or the end of a
straightened paper clip.
CardioMessenger.book Page 34 Thursday, January 5, 2012 1:13 PM

35
If the problem still exists, inform your
physician.
Note: Only reset the CardioMessenger if
you have eliminated other sources of error.
When resetting the CardioMessenger, you
abruptly cut off the current and data might
be lost. Also, please note when you have
done a reset; this could be useful for future
troubleshooting.
How Do I Take Care of the CardioMessenger?
Handle the CardioMessenger with care, so
that you will be able to use it for a long time
and so that BIOTRONIK can guarantee its
proper operation:
2Keep the CardioMessenger clean and
away from dirty or dusty environments.
2Don't bend the antenna and don't hold
the CardioMessenger by the antenna.
2Use a soft cloth for cleaning. If necessary,
this can be moistened with water or
ethyl alcohol. Unplug the charging station
before cleaning. Do not bring the mobile
unit or the charging station into direct
contact with water or other solvents.
2Protect the CardioMessenger from direct
contact with water. For example, wear it
under your coat when it rains.
2Don't turn on the CardioMessenger if
it has been recently stored in a cold
environment. Let it warm up slowly to
room temperature, since the resulting
condensed water may harm the elec-
tronic circuit.
Return the CardioMessenger to your
physician if it no longer works.
Maintenance at regular intervals is not
necessary for the CardioMessenger.
CardioMessenger.book Page 35 Thursday, January 5, 2012 1:13 PM

36
Note: Before use, make sure the
CardioMessenger, charging station,
power supply and cable are not visibly
damaged. If you find damage, consult
your physician.
If handled properly, the installed batteries
should supply the CardioMessenger with
24 hours of power even after 500 charging
cycles (which is at least two years).
If you feel the CardioMessenger is not
lasting long enough during mobile opera-
tion, ensure that it has been charged in
the charging station for at least three and
a half hours before mobile use. Additional
information can be found in “How Do I
Charge the CardioMessenger?” on page 30.
If you find that the battery is always running
low too soon, contact your physician. The
physician will have a new battery installed.
Note: When authorized personnel change
the battery, they should also check the
button cell.
In particular, rechargeable lithium ion
batteries should be disposed of by the
manufacturer according to legal guidelines.
How Do I Carry the CardioMessenger?
You can wear your CardioMessenger in
various ways:
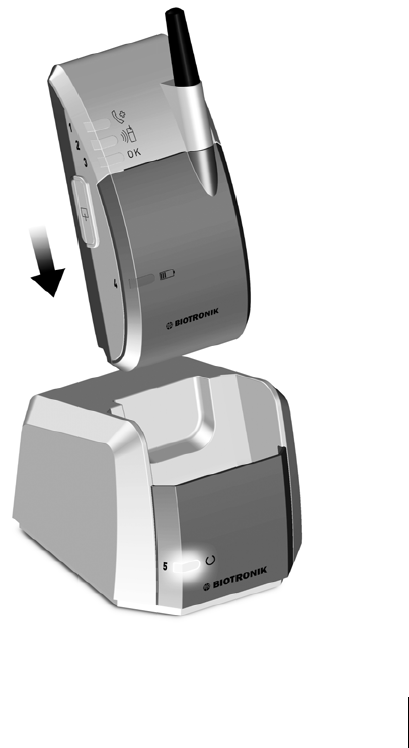
2With the clip of the CardioMessenger
on your belt
2With the carrying strap
If you don't need the clip or if you wish to
attach the carrying strap, proceed as
follows:
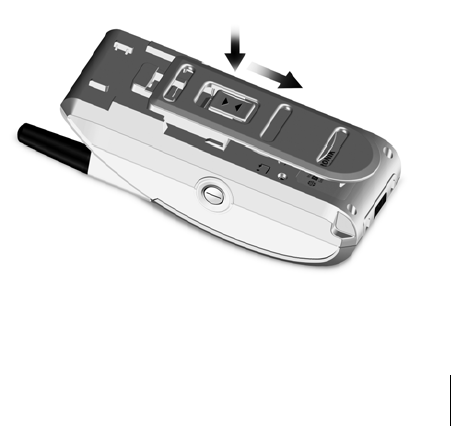
Remove the clip by pressing the
symbol with your thumb (see figure) and
slide the clip downwards – away from the
antenna.
CardioMessenger.book Page 36 Thursday, January 5, 2012 1:13 PM

37
The carrying strap has a clip attached.
Take the carrying strap and reattach the clip
of the carrying strap.
To do so, slide the clip upwards toward
the antenna until the clip snaps in.
Warning! When you use the clip with
the carrying strap, make sure that
the distance between the device and
CardioMessenger is greater than
20 centimeters (7 inches).
Warning!
Do not carry the CardioMessenger
inside the breast pocket of your shirt or
jacket, and do not place it directly on your
skin.
CardioMessenger.book Page 37 Thursday, January 5, 2012 1:13 PM

38
Safety Precautions – What Should I Watch out For?
The CardioMessenger and its components
are medical devices and therefore comply
with strict requirements for their develop-
ment, manufacture and testing.
Please observe the following safety instruc-
tions, which are summarized below:
Warning! Turn off the CardioMessenger
in locations where cell phones are
prohibited for safety reasons (such
as in hospitals or airplanes).
Such areas can be identified by the following
or similar signs:
Warning! To avoid interference, maintain
a minimum distance of 20 centimeters
(7 inches) between the CardioMessenger
and the device.
Like a cellular phone, the CardioMessenger
device can temporarily interfere with your
device if it is too close to it.
Warning!
Do not carry the CardioMessenger
inside the breast pocket of your shirt or
jacket, and do not place it directly on your
skin.
Warning! According to government
regulations, the charging station of the
CardioMessenger may not be operated
within a distance of 1.5 m (5 feet) of a
patient in a hospital environment. At
home, this restriction does not apply.
CardioMessenger.book Page 38 Thursday, January 5, 2012 1:13 PM

39
Warning! Keep the sealing plugs of the
telephone inlet out of the reach of
children.
Warning! Arrange power and telephone
cables carefully to reduce the risk of
entanglement or strangulation.
Caution! Protect the CardioMessenger
and charging station from:
– Water and high humidity (e.g., in the
bathroom)
– Temperatures above 40°C (104°F)
– Temperatures below -5°C (23°F)
(mobile operation for CardioMessenger)
– Barometric pressure below 700 hPa
(corresponding to altitudes above
3000 m/10,000 feet)
– Barometric pressure above 1060 hPa
(corresponding to altitudes below sea
level)
– Violent shocks or other strong mechan-
ical influences
– Intensive light sources (direct sunlight,
strong halogen emitters)
-Solvents, acids, detergents, and lyes
Caution! Never use the CardioMessenger
if it has been damaged; return it to your
physician.
Before use, make sure that none of the
components are visibly damaged and that all
necessary components have been delivered
to you. Additional information can be found
in “Included Equipment” on page 4.
Caution! The CardioMessenger must not
be modified. It must only be opened and
repaired by authorized trained personnel.
The rechargeable batteries must only be
exchanged by authorized trained
personnel.
Note: For proper operation, the Cardio-
Messenger must be put into the charging
station for at least three and a half hours
each day.
CardioMessenger.book Page 39 Thursday, January 5, 2012 1:13 PM

40
Guidelines
USA
Your device is equipped with a radio
frequency (RF) transceiver for wireless
communications to the CardioMessenger.
These messages are transmitted via an RF
assigned by the Federal Communications
Commission's (FCC) MedRadio.
This device may not interfere with stations
operating in the 400.150–406.000 MHz band
in the Meteorological Aids, Meteorological
Satellite, and Earth Exploration Satellite
Services and must accept any interference
received, including interference that may
cause undesired operation.
Analog and digital voice communications are
prohibited. Although this transceiver has
been approved by the Federal Communica-
tions Commission, there is no guarantee
that it will not receive interference or that
any particular transmission from this trans-
ceiver will be free from interference.
Depending on the embedded GSM modem
the FCC ID number for the CardioMessenger
is either QRICM06-1 or else QRICMII.
Depending on the embedded cable modem
type in the charging station the ACTA ID
number of the cable modem is either
AU7MM01BMT5656SMI or else
AU7MD04B2456 or else
AU7MMO1BMT5692SMI.
The CardioMessenger, as well as the device
itself, must conform to appropriate govern-
ment standards and regulations.
The CardioMessenger uses a GSM modem
that connects to the mobile cellular
telephone service at 850/1900 MHz.
BIOTRONIK uses the modem according to
CardioMessenger.book Page 40 Thursday, January 5, 2012 1:13 PM

41
the specifications of the manufacturer in
compliance with FCC approval require-
ments.
FCC RF exposure requirements
This device has been tested for operation
when worn on the body and meets the FCC
RF exposure guidelines when used with
BIOTRONIK accessories supplied or desig-
nated for this product. Use of other accesso-
ries may not ensure compliance with FCC RF
exposure guidelines.
This EUT (Equipment Under Test) has
been shown to be capable of compliance
for localized specific absorption rate (SAR)
for uncontrolled environment/ general
population exposure limits specified in
ANSI/ IEEE Std. C95.1-1992 and had been
tested in accordance with the measurement
procedures specified in FCC/OET Bulletin 65
Supplement C (2001) and IEEE Std. 1528-
200X (Draft 6.5, January 2002).
UL classification
The CardioMessenger charger is classified
by Underwriters Laboratories Inc. with re-
spect to electric shock, fire, and mechanical
hazards only in accordance with UL 60601-1
and CAN/CSA-C22.2 No 601.1-M90.
The devices are denoted accordingly:
CardioMessenger.book Page 41 Thursday, January 5, 2012 1:13 PM

42
Canada
The CardioMessenger is registered at
Industry Canada. Depending on the
embedded GSM modem this number is
either IC: 4708A-CM06V1 or else 4708A-
CMII.
The cable modem in the charging station is
registered at Industry Canada. Depending
on the embedded cable modem type the
number is either IC: 125A-0015 or else
IC: 125A-0008 or else 125A-0032.
The term "IC:" before the certification/
registration number only signifies that the
Industry Canada technical specifications
were met.
Note: This device may not interfere
with stations operating in the 400.150 –
406.000 MHz band in the meteorological
aids, meteorological-satellite, and
earth exploration-satellite services and
must accept any interference received,
including interference that may cause
undesired operation.
In addition, the CardioMessenger contains a
GSM modem (Motorola g24 or
Motorola g24l) that establishes the connec-
tion to the cellular network at
the frequencies of 900/1800 MHz.
BIOTRONIK uses the modem in accordance
with the manufacturer’s specifications and
in compliance with the approval require-
ments.
The GSM modem has been evaluated and
approved by an independent authority for its
compliance with the statutory regulations.
As an indication of this, it carries the
following approval mark
(IMEI Number: 35726200-xxxxxx-x):
CardioMessenger.book Page 42 Thursday, January 5, 2012 1:13 PM

43
Electromagnetic Compatibility
Note: The CardioMessenger is protected
from disturbances resulting from
electromagnetic interference, electro-
static discharges, and other sources –
including interference induced by cables.
Interfering emissions from the Cardio-
Messenger have been minimized. The
CardioMessenger therefore meets the
requirements of EN 60601-1-2 in every
respect.
Warning! Other equipment, including
portable and mobile RF radiocommu-
nications equipment may interfere
with the CardioMessenger, even if this
equipment complies with CISPR emission
requirements. However, this possible
interference does not affect the device
functionality.
Warranty
The CardioMessenger and all original com-
ponents by BIOTRONIK are not subject to
warranty when used improperly or stored
and transported incorrectly. Use only the
original packaging when shipping the
device.
CardioMessenger.book Page 43 Thursday, January 5, 2012 1:13 PM

44
Technical Data
General
2Class of protection: II
2Operating mode: Continuous operation
Permissible Environmental Conditions
During operation
2Temperature:
-5°C (23°F) to +40°C (104°F) (remote unit)
0°C (32°F) to +40°C (104°F) (charging
station)
2Store in a dry place!
Relative humidity: 30% to 75%
(non-condensing)
2Atmospheric pressure:
700 hPa to 1060 hPa
2Altitude: Sea level up to 3000 m
(10,000 feet)
Shipping and storage
2Temperature:
-20°C (-4°F) to +60°C (140°F)
2Store in a dry place!
Relative humidity: 30% to 75%
(non-condensing)
2Atmospheric pressure:
700 hPa to 1060 hPa
CardioMessenger Remote Unit
2Dimensions (WxHxD): 60 x 132 x 45 mm
2Charging voltage: 5,2 V DC / 0.8 A
2Max. charge time: 3.5 hours
CardioMessenger.book Page 44 Thursday, January 5, 2012 1:13 PM

45
2Interfaces:
Serial infrared port and IrDA1.0 standard
2MedRadio: Modulation FSK
2MedRadio frequencies:
402 – 405 MHz, 9 channels,
300 kHz band width
2MedRadio transmission power:
25 μW EIRP
2GSM: Modulation GMSK
2GSM frequencies:
850 MHz, 900 MHz, 1800 MHz, 1900 MHz,
9,6 kHz band width
2GSM transmission power:
0.8 Watt (850 MHz); 2 Watt (900 MHz);
1 Watt (1800/1900 MHz)
CardioMessenger Charging Station
2Dimensions (WxHxD): 90 x 82 x 105 mm
2Input voltage: 6 V DC / 1 A
2Output voltage: 5.2 V DC / 1 A
CardioMessenger.book Page 45 Thursday, January 5, 2012 1:13 PM

46
Rechargeable Battery (Integrated)
2Type: Lithium ions (CGA 103460A)
2Dimensions (WxHxD):
approx. 36.5 x 64.5 x 12 mm
2Operating voltage: 3.6 V (nominal)
2Charging voltage: 4.1 V DC
2Max. charging current: 2 A
2Capacity: 1850 mAh or more
Power Supply
2Type: FW 7555M/06
2Dimensions: 51.5 x 87.5 x 34 mm
2Input voltage:
100 – 240 V AC at 50 – 60 Hz, 400 mA
2Output voltage: 6 V DC / 2.1 A
CardioMessenger.book Page 46 Thursday, January 5, 2012 1:13 PM

47
Appendix
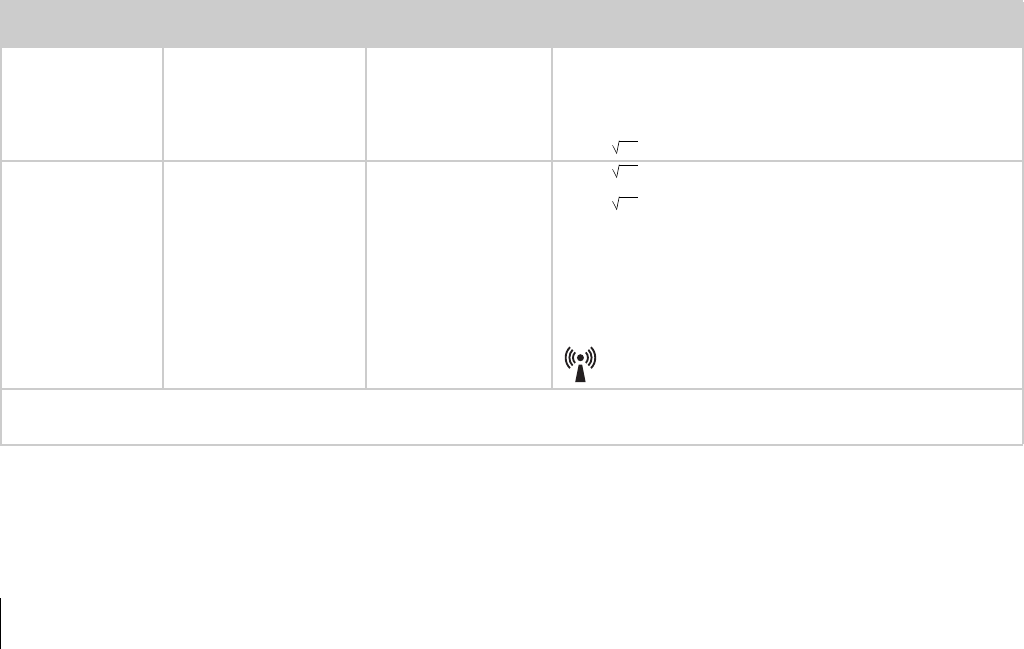
Electromagnetic emitted interference according to IEC 60601-1-2
The CardioMessenger is suitable for operation in the indicated electromagnetic environment.
The customer and/or operator of the CardioMessenger should make sure that it is used in an
electromagnetic environment as described below.
Measuring the interference Compliance Guidelines for the Electromagnetic Environment
High-frequency interference
according to CISPR 11
Group 1 The CardioMessenger uses RF energy only for its internal
function. Therefore, the HF interference is very low and not likely
to cause any interference in nearby electronic equipment.
High-frequency interference
according to CISPR 11 Class B The CardioMessenger is suitable for use in all areas, including
living space and those areas that are directly connected to a
public power supply system that also supplies buildings
intended for residential purposes.Interference of harmonics
according to IEC 61000-3-2 Class A according to IEC 61000-3-2
Voltage fluctuations/ flicker
emissions according to
IEC 61000-3-3
Complies
CardioMessenger.book Page 47 Thursday, January 5, 2012 1:13 PM
48
Electromagnetic emitted interference according to IEC 60601-1-2
The CardioMessenger is suitable for operation in the indicated electromagnetic environment.
The customer and/or operator of the CardioMessenger should make sure that it is used in an
electromagnetic environment as described below.
Testing resistance
to interference
Test level according to
IEC 60601-1-2
Conformance level Guidelines for the electromagnetic environment
Conducted RF inter-
ference according to
IEC 61000-4-6
3Veff
150 kHz to 80 MHz Same as test level The minimum distance of the CardioMessenger from portable
and mobile radio devices, including the cables, should correspond
to the recommended safe distance that is calculated according
to the equation for the suitable transmission frequency.
Recommended safe distance:
D= 1,17
Radiated RF inter-
ference according to
IEC 61000-4-3
3V/m
80 MHz to 2.5 GHz Same as test level D= 1,17 for 80 to 800 MHz
D= 2,34 for 800 MHz to 2.5 GHz with P as the nominal output
of the transmitter in Watts (W) according to the information from
the transmitter manufacturer, and d as the recommended safe
distance in meters (m).
The field strength of stationary transmitting devices should be
measured on sitea and must be lower than the compliance level at
all frequenciesb.
Interference can be generated when the CardioMessenger is
close to devices that have the following warning sign:
Note: The higher frequency range applies at 80 MHz and at 800 MHz.
Note: These guidelines may not be applicable in all cases. The spread of electromagnetic waves is influenced by absorption and reflection from
buildings, objects, and humans.
p
p
p
CardioMessenger.book Page 48 Thursday, January 5, 2012 1:13 PM

49
a. Field strengths from fixed transmitters, such as base stations for radio (cellular(/cordless) telephones and land mobile radios, amateur radio,
AM and FM radio broadcast and TV broadcast cannot be predicted theoretically with accuracy.
To assess the electromagnetic environment due to fixed RF transmitters, an electromagnetic site survey should be considered. If the measured
field strength in the location in which the CardioMessenger is used exceeds the applicable RF compliance level above, the CardioMessenger
should be observed to verify normal operation. If abnormal performance is observed, additional measures may be necessary, such as
re-orienting or relocating the CardioMessenger.
b. Above the frequency range of 150 KHz to 80 MHz, ensure that field strengths are less than 3 V/m.
CardioMessenger.book Page 49 Thursday, January 5, 2012 1:13 PM

50
Electromagnetic emitted interference according to IEC 60601-1-2
The CardioMessenger is suitable for operation in the indicated electromagnetic environment.
The customer and/or operator of the CardioMessenger should make sure that it is used in
an electromagnetic environment as described below.
Checking
immunity to noise
Test level according
to IEC 60601-1-2
Conformance
level
Guidelines for the electromagnetic environment
Discharge of static
electricity (ESD)
According to
IEC 61000-4-2
± 6 kV contact discharge
±8 kV air discharge
Same as the
test level Floors should be made of wood or cement, or have ceramic tiles.
When the floor consists of a synthetic material, the relative
humidity must be at least 30%.
Rapid transient elec-
trical disturbances/
bursts
According to
IEC 61000-4-4
± 2 kV for
power supply lines
± 1 kV for input/output
lines
Same as the
test level The quality of the supply voltage should correspond to that in a
typical business and/or hospital.
Surge
According to
IEC 61000-4-5
±1kV normal mode
voltage
± 2 kV common mode
voltage
Same as the
test level The quality of the supply voltage should correspond to that in a
typical business and/or hospital.
CardioMessenger.book Page 50 Thursday, January 5, 2012 1:13 PM

51
Voltage dips, brief
interruptions and
fluctuations in the
supply voltage
According to
IEC 61000-4-11
‹ 5% UT for
1/2 cycle
(› 95% drop)
40% UT for 5 periods
(60% drop)
70% UT for 25 periods
(30% drop)
‹ 5% UT for 5 s
(› 95% drop)
Same as the
test level The quality of the supply voltage should correspond to that in a
typical business and/or hospital.
The CardioMessenger is powered by a battery. An interruption in
the supply voltage to the power supply unit will not impair the
functioning of the CardioMessenger.
Magnetic field at the
supply frequencies
(50/60 Hz)
According to
IEC 61000-4-8
3A/m Same as the
test level The magnetic field strength should correspond to the typical
value in business and hospital environments.
Comment: UT is the mains alternating voltage before applying the test levels.
Checking
immunity to noise
Test level according
to IEC 60601-1-2
Conformance
level
Guidelines for the electromagnetic environment
CardioMessenger.book Page 51 Thursday, January 5, 2012 1:13 PM
52
Recommended separation distances
between portable
and mobile RF communications equipment
and the CardioMessenger
Transmission
frequency
150 kHz to 80 MHz 80 MHz to 800 MHz 800 MHz to 2.5 GHz
Equation D= 1,17 : D= 1,17 : D= 2,34 :
Rated power
of transmitter (W)
Safe distance (m) Safe distance (m) Safe distance (m)
0.01 0.12 0.12 0.24
0.1 0.37 0.37 0.74
1 1.17 1.17 2.34
10 3.7 3.7 7.4
100 11.7 11.7 23.4
For transmitters whose maximum nominal output is not indicated in the above table, the distance can be calculated using the equation in the
column, where P is the maximum nominal output of the transmitter in Watts (W) according to the transmitter’s manufacturer.
Note: The higher frequency range applies at 80 MHz and at 800 MHz.
Note: These guidelines may not be applicable in all cases. The propagation of electromagnetic values is affected by absorption and reflection by
structures, objects and people.
p
p
p
CardioMessenger.book Page 52 Thursday, January 5, 2012 1:13 PM
UserMan

1
Contents
Contents . . . . . . . . . . . . . . . . . . . . . . . . . . . 1
What is Home Monitoring? . . . . . . . . . . . . 3
Included Equipment . . . . . . . . . . . . . . . . . . 4
How Do I Use the CardioMessenger? . . . . 6
Where Should I Put the CardioMessenger? 6
How Do I Install the CardioMessenger? . . 8
Telephone connection . . . . . . . . . . . . . 11
Version A . . . . . . . . . . . . . . . . . . . . . . . . 13
Version B . . . . . . . . . . . . . . . . . . . . . . . . 19
How Do I Understand the Lights of the
CardioMessenger? . . . . . . . . . . . . . . . . . . 24
Light 1 . . . . . . . . . . . . . . . . . . . . . . . . . . 24
Light 2 . . . . . . . . . . . . . . . . . . . . . . . . . . 25
Light 3 . . . . . . . . . . . . . . . . . . . . . . . . . . 25
Light 4 . . . . . . . . . . . . . . . . . . . . . . . . . . 26
Light 5 . . . . . . . . . . . . . . . . . . . . . . . . . . 27
How Do I Turn On the CardioMessenger? 28
How Do I Turn Off the CardioMessenger? 29
How Do I Charge the CardioMessenger? . 30
How Do I Turn Off the Charging Station? . 31
How Do I Resolve Problems? . . . . . . . . . . 32
Light 3 . . . . . . . . . . . . . . . . . . . . . . . . . . 32
Light 4 . . . . . . . . . . . . . . . . . . . . . . . . . . 33
Light 5 . . . . . . . . . . . . . . . . . . . . . . . . . . 33
How Do I Reset the CardioMessenger? . . 34
How Do I Take Care of the
CardioMessenger? . . . . . . . . . . . . . . . . . . . 35
How Do I Carry the CardioMessenger? . . 36
Safety Precautions – What Should I Watch
out For? . . . . . . . . . . . . . . . . . . . . . . . . . . . . 38
356845--PreJ
CardioMessenger.book Page 1 Thursday, January 5, 2012 1:13 PM

2
Guidelines . . . . . . . . . . . . . . . . . . . . . . . . . . 40
USA . . . . . . . . . . . . . . . . . . . . . . . . . . . . . . . 40
FCC RF exposure requirements . . . . . . 41
UL classification . . . . . . . . . . . . . . . . . . 41
Canada . . . . . . . . . . . . . . . . . . . . . . . . . . . . 42
Electromagnetic Compatibility . . . . . . . . . 43
Warranty . . . . . . . . . . . . . . . . . . . . . . . . . . . 43
Technical Data . . . . . . . . . . . . . . . . . . . . . . 44
General . . . . . . . . . . . . . . . . . . . . . . . . . . . . 44
Permissible Environmental Conditions . . 44
During operation . . . . . . . . . . . . . . . . . . 44
Shipping and storage . . . . . . . . . . . . . . 44
CardioMessenger Remote Unit . . . . . . . . . 44
CardioMessenger Charging Station . . . . . 45
Rechargeable Battery (Integrated) . . . . . . 46
Power Supply . . . . . . . . . . . . . . . . . . . . . . . 46
Appendix . . . . . . . . . . . . . . . . . . . . . . . . . . . 47
CardioMessenger.book Page 2 Thursday, January 5, 2012 1:13 PM

3
What is Home Monitoring?
Dear Patient:
You have received a BIOTRONIK pacemaker
or implantable cardioverter-defibrillator
(ICD) with Home Monitoring function.
Home Monitoring pacemakers and ICDs are
additionally equipped with a special trans-
mitter. This transmitter automatically
transmits medical and technical information
to a mobile device, the CardioMessenger.
The CardioMessenger works like a cell
phone and automatically transmits the
information received from your device as
encoded messages to the BIOTRONIK
Service Center.
The transmission power from your device is
low so as to not impair your health in any
way. Since the transmission range is short,
the CardioMessenger is needed to send
the information to the BIOTRONIK Service
Center.
At the Service Center, the data are processed
and can be viewed only by your physician
on a secured Internet site in the form
of a comprehensive report called a
Cardio Report.
Your doctor can use this Cardio Report to
decide whether your device settings need
to be updated or if your therapy plan needs
to be changed. Thus, Home Monitoring
serves as a practical diagnostic aid.
CardioMessenger.book Page 3 Thursday, January 5, 2012 1:13 PM

4
Included Equipment
The set comes equipped with the following
components:
1. Mobile unit
2. Charging station
3. Wall mounted power supply
4. Telephone cable
5. Belt clip (already affixed)
6. Carrying strap
7. Patient manual
CardioMessenger.book Page 4 Thursday, January 5, 2012 1:13 PM

5
Before use, make sure that none of the
components are visibly damaged and that all
necessary components have been delivered
to you.
Caution! Never use the CardioMessenger
if it has been damaged; return it to your
physician.
Only use the following original
BIOTRONIK devices, as other accessories
can increase the interference emitted and
the device's susceptibility to interference:
–
The CardioMessenger
– The charging station with the wall
mounted power supply (type: FW 7555 M/06)
– The telephone cord
(type: BIOTRONIK VK-117)
CardioMessenger.book Page 5 Thursday, January 5, 2012 1:13 PM

6
How Do I Use the CardioMessenger?
The following section describes:
2How to optimize CardioMessenger
placement
2How to operate it
2How it functions
Where Should I Put the CardioMessenger?
On your bedside table or close to your bed
is a suitable place for your CardioMessenger
since it generally fulfills the following
conditions:
2The distance to the device is less than
2 meters (6 feet), so that regular data
transmission at night is guaranteed.
2The distance to the device is more than
20 centimeters (7 inches), so that the
CardioMessenger does not interfere
with the device.
2The CardioMessenger is placed on
a solid base and cannot fall.
Please also consider the following:
2Do not expose the device to moisture or
heat; exposure to direct sunlight and
taking the device into the bathroom are
not recommended.
2The CardioMessenger should not be
connected to a power outlet controlled
by a light switch.
2Do not place the device next to a television
set, microwave oven, or similar source of
electromagnetic interference.
CardioMessenger.book Page 6 Thursday, January 5, 2012 1:13 PM
7
Warning! The distance between the device
and CardioMessenger must not be less
than 20 centimeters (7 inches).
Note: If the CardioMessenger is too close
to a loudspeaker (or a radio alarm or TV),
you may hear interference noises typical
for mobile phones.
CardioMessenger.book Page 7 Thursday, January 5, 2012 1:13 PM
8
How Do I Install the CardioMessenger?
Insert the plug into a socket in your wall.
Make sure you do not connect the Cardio-
Messenger to a power outlet controlled by
a light switch.
Make sure that the socket to which the
charging station is connected is easily
accessible. This ensures that you can
disconnect the power supply from the mains
at any time.
Arrange power cable carefully to reduce the
risk of entanglement or strangulation.
Now the green light on the upper side of
the power supply should be illuminated;
if not, please refer to “How Do I Resolve
Problems?” on page 32.
CardioMessenger.book Page 8 Thursday, January 5, 2012 1:13 PM
9
Now, insert the small plug of the power
supply cable into the charging station.
Arrange power cable carefully to reduce the
risk of entanglement or strangulation.
The port for the small plug is situated on
the rear side of the charging station and
is marked with the following symbol:
Follow the instructions for use!
Use only the original power supply that
came with the CardioMessenger, see
“Included Equipment” on page 4.
CardioMessenger.book Page 9 Thursday, January 5, 2012 1:13 PM

11
Telephone connection
You need a telephone connection so that
your CardioMessenger can send the
Home Monitoring data to your physician.
You may operate your CardioMessenger with
your existing telephone sharing one single
telephone socket (version A) or connect it
directly to a free telephone socket (version B).
Either way, your normal phone use remains
unaffected.
Version A
Version B
CardioMessenger.book Page 11 Thursday, January 5, 2012 1:13 PM

12
Note: The CardioMessenger is designed to
operate with standard analog phone lines
providing Plain Old Telephone Service
(POTS). Compatibility with other phone
lines or services (e.g., Voice over IP (VoIP)
via analog or digital lines, cable TV phone
lines or ISDN) is not guaranteed. In these
cases compatibility testing at the patient’s
home is recommended. Proper set up of
the system at the patient’s home may
require installation of adapters and/or
analog phone lines. Please contact your
telephone service provider for informa-
tion on the type of phone line that you
have.
CardioMessenger.book Page 12 Thursday, January 5, 2012 1:13 PM
13
Version A
Unplug your telephone cable from your
telephone socket in your wall.
Remove the safety plug on port 1
on the rear side of the charging station.
Keep the sealing plug of the telephone inlet
out of the reach of children.
CardioMessenger.book Page 13 Thursday, January 5, 2012 1:13 PM
14
Now insert the free end
of your telephone cable into port 1
of the charging station.
CardioMessenger.book Page 14 Thursday, January 5, 2012 1:13 PM

15
Take the telephone cable that came with
the CardioMessenger, remove
the second safety plug from port 2
of the charging station.
Keep the sealing plug of the telephone inlet
out of the reach of children.
Plug one end of the
telephone cable into port 2.
CardioMessenger.book Page 15 Thursday, January 5, 2012 1:13 PM
16
Insert the other end of your telephone cable
into the telephone socket in your wall.
Arrange the telephone cable carefully
toreduce the risk of entanglement or stran-
gulation.
CardioMessenger.book Page 16 Thursday, January 5, 2012 1:13 PM
17
Now, place the CardioMessenger into the
charging station. The CardioMessenger
should switch itself on immediately, unless
the batteries are completely depleted.
A brief tone will sound when the Cardio-
Messenger is switched on.
If the batteries are completely depleted, then
the CardioMessenger first charges itself and
then switches itself on later (approximately
after 30 minutes).
Additional information can be found in
“How Do I Charge the CardioMessenger?” on
page 30.
CardioMessenger.book Page 17 Thursday, January 5, 2012 1:13 PM
18
When you are finished, the connection
should look like as follows:
CardioMessenger.book Page 18 Thursday, January 5, 2012 1:13 PM
19
Version B
If you wish to set up the CardioMessenger
close to a telephone outlet, but there is
no telephone, you may connect the Cardio-
Messenger directly to the telephone outlet.
Please proceed as follows:
Take the telephone cable that came with
the CardioMessenger and
remove the safety plug on port 1
on the rear side of the charging station.
Keep the sealing plug of the telephone inlet
out of the reach of children.
CardioMessenger.book Page 19 Thursday, January 5, 2012 1:13 PM

20
Now insert one end of
your telephone cable into port 1
of the charging station.
CardioMessenger.book Page 20 Thursday, January 5, 2012 1:13 PM
21
Insert the other end of your telephone cable
into the telephone socket in your wall.
Arrange the telephone cable carefully
toreduce the risk of entanglement or stran-
gulation.
CardioMessenger.book Page 21 Thursday, January 5, 2012 1:13 PM
22
Now, place the CardioMessenger in the
charging station. The CardioMessenger
should switch itself on immediately, unless
the batteries are completely depleted.
A brief tone will sound when the Cardio-
Messenger is switched on.
If the batteries are depleted, then the
CardioMessenger first charges itself and
then switches itself on later (approximately
after 30 minutes).
Additional information can be found in
“Version B” on page 19.
CardioMessenger.book Page 22 Thursday, January 5, 2012 1:13 PM

23
When you are finished, the connection
should look like as follows:
CardioMessenger.book Page 23 Thursday, January 5, 2012 1:13 PM

24
How Do I Understand the Lights of the
CardioMessenger?
Your CardioMessenger has four lights and
one light on the charging station.
The lights numbered 1 – 3 represent the
general functions of the CardioMessenger,
light 4 is the battery monitor light, and
light 5 shows the operational status of the
charging station.
Note: Whether or not the lights flash or
are lit continuously, the operation of
your device remains unaffected.
Light 1
Off – This is the normal status.
CardioMessenger.book Page 24 Thursday, January 5, 2012 1:13 PM

25
Yellow flashing – When this light flashes
yellow, your physician wants you to call.
This situation may never occur. You will be
informed by your physician if s/he will use
this feature.
Note: After you have switched the Cardio-
Messenger off and on, this light will not
flash anymore. However, please do not
forget to call your physician.
Light 2
This light will only be used during a follow-
up visit and can be triggered via the device
programmer ICS 3000. Your physician will
find further information in the ICS 3000
manual.
Note: Light 2 is not illuminated when your
device transmits regular messages.
This light may be illuminated or flash yellow,
or flash green.
Off – This is the normal status.
Yellow illumination – When the light is
illuminated yellow, the CardioMessenger
is receiving a message. Please wait until
the data transmission has finished (light
flashing green) before you walk away from
the CardioMessenger.
Green flashing – When the light flashes
green several times, the transmission of
the message has been completed.
Yellow flashing – However, when the light
flashes yellow several times, the transmis-
sion was not successful. Your physician will
decide what to do next.
Light 3
This light informs you about the normal
operation of the CardioMessenger.
CardioMessenger.book Page 25 Thursday, January 5, 2012 1:13 PM

26
Green flashing –
When the light single-flashes green repeat-
edly, the CardioMessenger is operating
properly. This is the normal status.
Green flashing –
When the light double-flashes green repeat-
edly, the CardioMessenger is also operating
properly. Additionally, there are messages
stored that have to be transmitted to the
Service Center.
Yellow flashing –
When the light double-flashes yellow
repeatedly, there is no connection to the
GSM network or modem and additionally
the CardioMessenger has messages stored
to be transmitted to the Service Center.
For further information, see the “How Do I
Resolve Problems?” on page 32.
Yellow illumination – When the light is
illuminated yellow, the CardioMessenger
is performing a self-test.
This test should last no longer than
10 seconds after the CardioMessenger
has been switched on.
Off – The CardioMessenger is switched off.
Light 4
In the following, the four statuses of the
battery monitor light are described as
follows:
Green Illumination – When the light is
illuminated green, the CardioMessenger is
fully charged. You may now use it in mobile
operation for at least 24 hours. But the
CardioMessenger can certainly also be
kept in the charging station.
Off –
This is the normal status when the
CardioMessenger is used in mobile operation.
CardioMessenger.book Page 26 Thursday, January 5, 2012 1:13 PM

27
When this light is off but the Cardio-
Messenger is in the charging station, please
refer to “How Do I Resolve Problems?” on
page 32.
Red flashing – When the light flashes red,
the CardioMessenger batteries are nearly
depleted. Please place the CardioMessenger
in the charging station.
Yellow illumination – When the light is
illuminated yellow, the CardioMessenger is
charging.
Light 5
Green Illumination – This is the normal
status when the charging station is
connected to the power supply.
If this is not the case, there might be
an error. Additional information can be
found in “How Do I Resolve Problems?” on
page 32.
CardioMessenger.book Page 27 Thursday, January 5, 2012 1:13 PM

28
How Do I Turn On the CardioMessenger?
As soon as you place the CardioMessenger
in the charging station, it is automatically
switched on.
You certainly may also switch on the
CardioMessenger when it is not placed in the
charging station; the On/Off button is located
on the right side of the CardioMessenger.
Press the On/Off button of the Cardio-
Messenger until you can feel slight
resistance. A brief tone will sound, the
CardioMessenger will start its self-test,
and light 3 will be illuminated yellow.
You can now release the button.
CardioMessenger.book Page 28 Thursday, January 5, 2012 1:13 PM

29
When the self-test of the CardioMessenger
has finished, light 3 flashes yellow. Now, the
CardioMessenger will try to connect to the
BIOTRONIK Service Center.
After a successful connection to the
Service Center, light 3 flashes green.
Your CardioMessenger is now operational.
In case light 3 does not flash green, please
refer to “How Do I Resolve Problems?” on
page 32.
Note: When the CardioMessenger has
not been used for a long time or if it was
stored below operational temperature,
the battery can be completely depleted.
In this case, the CardioMessenger
switches itself on only after the battery
has been charged for about 30 minutes.
How Do I Turn Off the CardioMessenger?
Press and hold the CardioMessenger
On/Off button for at least two seconds.
A brief tone will sound and light 3 will
go out after a short period of time.
The CardioMessenger is switched off;
no data can be received or transmitted.
Note: A switched-off or improperly
functioning CardioMessenger does
not affect the operation of your device.
CardioMessenger.book Page 29 Thursday, January 5, 2012 1:13 PM
30
How Do I Charge the CardioMessenger?
The CardioMessenger has to be charged
when the battery monitor light (light 4)
flashes red. If you wish to use the Cardio-
Messenger in mobile operation, you should
charge it every 24 hours.
It is recommended that you charge the
CardioMessenger before you use it for
the first time.
To do so, place the CardioMessenger in
the charging station; the charging process
will start immediately.
During the charging process, the battery
monitor light (light 4) of the CardioMessenger
will be illuminated yellow.
Once the CardioMessenger is charged, the
battery monitor light is illuminated green.
Charging usually takes no longer than three
and a half hours.
CardioMessenger.book Page 30 Thursday, January 5, 2012 1:13 PM

31
However, if the battery monitor light (light 4)
is off even though the CardioMessenger is
in the charging station, there might be a
problem.
Please refer to “How Do I Resolve Problems?”
on page 32 to find out how to resolve this
problem.
Note: In case the CardioMessenger has
been stored outside the operational
temperature, i.e., below 0°C (32°F) and
above 40°C (104°F), the batteries
discharge themselves much more quickly.
You should then first charge the Cardio-
Messenger before attempting to use it.
How Do I Turn Off the Charging Station?
The charging station can remain perma-
nently connected. This ensures that your
CardioMessenger will always start charging
as soon as you place it in the charging
station.
Disconnect the power cable plug from the
socket to turn off the charging station. The
charging station does not have a power
switch.
CardioMessenger.book Page 31 Thursday, January 5, 2012 1:13 PM

32
How Do I Resolve Problems?
Problems with your CardioMessenger are
easy to identify, and they are ususally easy
to resolve.
Light 3
Yellow illumination – When this light is
continuously illuminated yellow, the Cardio-
Messenger was not able to end its self-test.
Solution – Reset the CardioMessenger.
If light 3 is still illuminated yellow, inform
your physician. You will find information
on a reset in “How Do I Reset the Cardio-
Messenger?” on page 34.
Yellow flashing – When this light continu-
ously flashes yellow, the CardioMessenger
cannot connect to the Service Center.
Solutions – Check if the charging station
is connected to the power supply and if
the cables from the charging station to
the telephone wall outlet are loose.
Check that the standard telephone line is
not dead, i.e., the CardioMessenger is not
blocked by other devices.
Check if you are able to dial toll-free
numbers with your telephone. If this is
generally not possible, have this service
set up for you by your telephone provider
or inform your physician.
Note: The CardioMessenger is designed to
operate with standard analog phone lines
providing Plain Old Telephone Service
(POTS). Compatibility with other phone
lines or services (e.g., Voice over IP (VoIP)
via analog or digital lines, cable TV phone
lines or ISDN) is not guaranteed. In these
cases compatibility testing at the patient’s
home is recommended. Proper set up of
CardioMessenger.book Page 32 Thursday, January 5, 2012 1:13 PM

33
the system at the patient’s home may
require installation of adapters and/or
analog phone lines. Please contact your
telephone service provider for information
on the type of phone line that you have.
Light 4
Off – When this light is off even though the
CardioMessenger is in the charging station,
proceed as follows:
Solutions – Check if light 5 on the charging
station is illuminated. Is this not the case,
refer to the solutions described for light 5.
If light 5 is illuminated, check whether the
connecting parts on the CardioMessenger or
on the charging station are easily accessible
and not dirty.
If light 4 is still off, inform your physician
so that the device can be checked and the
battery may be exchanged.
Note: If you take the CardioMessenger
out of the charging station, the battery
monitor light will go out to save energy.
Light 5
Off – If this light is off, proceed as follows:
Solutions – Check that the plugs of the
power cables are connected both to the
outlet in the wall and to the power supply.
Check that the green light of the power
supply is illuminated. If this is not the case,
either the power outlet is not being supplied
with electricity or the power supply is defec-
tive. Return a non-functioning power supply
to your physician.
CardioMessenger.book Page 33 Thursday, January 5, 2012 1:13 PM
34
How Do I Reset the CardioMessenger?
You should reset your CardioMessenger by
restarting it when light 3 is lit continuously
in yellow and if this error could not be elimi-
nated by turning the CardioMessenger off
and on.
The reset button is located on the back of
the CardioMessenger, on the left towards
the lower end of the belt clip.
Press the reset button (located on the back
of the CardioMessenger) with a sharp object
such as a ballpoint pen or the end of a
straightened paper clip.
CardioMessenger.book Page 34 Thursday, January 5, 2012 1:13 PM

35
If the problem still exists, inform your
physician.
Note: Only reset the CardioMessenger if
you have eliminated other sources of error.
When resetting the CardioMessenger, you
abruptly cut off the current and data might
be lost. Also, please note when you have
done a reset; this could be useful for future
troubleshooting.
How Do I Take Care of the CardioMessenger?
Handle the CardioMessenger with care, so
that you will be able to use it for a long time
and so that BIOTRONIK can guarantee its
proper operation:
2Keep the CardioMessenger clean and
away from dirty or dusty environments.
2Don't bend the antenna and don't hold
the CardioMessenger by the antenna.
2Use a soft cloth for cleaning. If necessary,
this can be moistened with water or
ethyl alcohol. Unplug the charging station
before cleaning. Do not bring the mobile
unit or the charging station into direct
contact with water or other solvents.
2Protect the CardioMessenger from direct
contact with water. For example, wear it
under your coat when it rains.
2Don't turn on the CardioMessenger if
it has been recently stored in a cold
environment. Let it warm up slowly to
room temperature, since the resulting
condensed water may harm the elec-
tronic circuit.
Return the CardioMessenger to your
physician if it no longer works.
Maintenance at regular intervals is not
necessary for the CardioMessenger.
CardioMessenger.book Page 35 Thursday, January 5, 2012 1:13 PM

36
Note: Before use, make sure the
CardioMessenger, charging station,
power supply and cable are not visibly
damaged. If you find damage, consult
your physician.
If handled properly, the installed batteries
should supply the CardioMessenger with
24 hours of power even after 500 charging
cycles (which is at least two years).
If you feel the CardioMessenger is not
lasting long enough during mobile opera-
tion, ensure that it has been charged in
the charging station for at least three and
a half hours before mobile use. Additional
information can be found in “How Do I
Charge the CardioMessenger?” on page 30.
If you find that the battery is always running
low too soon, contact your physician. The
physician will have a new battery installed.
Note: When authorized personnel change
the battery, they should also check the
button cell.
In particular, rechargeable lithium ion
batteries should be disposed of by the
manufacturer according to legal guidelines.
How Do I Carry the CardioMessenger?
You can wear your CardioMessenger in
various ways:
2With the clip of the CardioMessenger
on your belt
2With the carrying strap
If you don't need the clip or if you wish to
attach the carrying strap, proceed as
follows:
Remove the clip by pressing the
symbol with your thumb (see figure) and
slide the clip downwards – away from the
antenna.
CardioMessenger.book Page 36 Thursday, January 5, 2012 1:13 PM
37
The carrying strap has a clip attached.
Take the carrying strap and reattach the clip
of the carrying strap.
To do so, slide the clip upwards toward
the antenna until the clip snaps in.
Warning! When you use the clip with
the carrying strap, make sure that
the distance between the device and
CardioMessenger is greater than
20 centimeters (7 inches).
Warning!
Do not carry the CardioMessenger
inside the breast pocket of your shirt or
jacket, and do not place it directly on your
skin.
CardioMessenger.book Page 37 Thursday, January 5, 2012 1:13 PM

38
Safety Precautions – What Should I Watch out For?
The CardioMessenger and its components
are medical devices and therefore comply
with strict requirements for their develop-
ment, manufacture and testing.
Please observe the following safety instruc-
tions, which are summarized below:
Warning! Turn off the CardioMessenger
in locations where cell phones are
prohibited for safety reasons (such
as in hospitals or airplanes).
Such areas can be identified by the following
or similar signs:
Warning! To avoid interference, maintain
a minimum distance of 20 centimeters
(7 inches) between the CardioMessenger
and the device.
Like a cellular phone, the CardioMessenger
device can temporarily interfere with your
device if it is too close to it.
Warning!
Do not carry the CardioMessenger
inside the breast pocket of your shirt or
jacket, and do not place it directly on your
skin.
Warning! According to government
regulations, the charging station of the
CardioMessenger may not be operated
within a distance of 1.5 m (5 feet) of a
patient in a hospital environment. At
home, this restriction does not apply.
CardioMessenger.book Page 38 Thursday, January 5, 2012 1:13 PM

39
Warning! Keep the sealing plugs of the
telephone inlet out of the reach of
children.
Warning! Arrange power and telephone
cables carefully to reduce the risk of
entanglement or strangulation.
Caution! Protect the CardioMessenger
and charging station from:
– Water and high humidity (e.g., in the
bathroom)
– Temperatures above 40°C (104°F)
– Temperatures below -5°C (23°F)
(mobile operation for CardioMessenger)
– Barometric pressure below 700 hPa
(corresponding to altitudes above
3000 m/10,000 feet)
– Barometric pressure above 1060 hPa
(corresponding to altitudes below sea
level)
– Violent shocks or other strong mechan-
ical influences
– Intensive light sources (direct sunlight,
strong halogen emitters)
-Solvents, acids, detergents, and lyes
Caution! Never use the CardioMessenger
if it has been damaged; return it to your
physician.
Before use, make sure that none of the
components are visibly damaged and that all
necessary components have been delivered
to you. Additional information can be found
in “Included Equipment” on page 4.
Caution! The CardioMessenger must not
be modified. It must only be opened and
repaired by authorized trained personnel.
The rechargeable batteries must only be
exchanged by authorized trained
personnel.
Note: For proper operation, the Cardio-
Messenger must be put into the charging
station for at least three and a half hours
each day.
CardioMessenger.book Page 39 Thursday, January 5, 2012 1:13 PM

40
Guidelines
USA
Your device is equipped with a radio
frequency (RF) transceiver for wireless
communications to the CardioMessenger.
These messages are transmitted via an RF
assigned by the Federal Communications
Commission's (FCC) MedRadio.
This device may not interfere with stations
operating in the 400.150–406.000 MHz band
in the Meteorological Aids, Meteorological
Satellite, and Earth Exploration Satellite
Services and must accept any interference
received, including interference that may
cause undesired operation.
Analog and digital voice communications are
prohibited. Although this transceiver has
been approved by the Federal Communica-
tions Commission, there is no guarantee
that it will not receive interference or that
any particular transmission from this trans-
ceiver will be free from interference.
Depending on the embedded GSM modem
the FCC ID number for the CardioMessenger
is either QRICM06-1 or else QRICMII.
Depending on the embedded cable modem
type in the charging station the ACTA ID
number of the cable modem is either
AU7MM01BMT5656SMI or else
AU7MD04B2456 or else
AU7MMO1BMT5692SMI.
The CardioMessenger, as well as the device
itself, must conform to appropriate govern-
ment standards and regulations.
The CardioMessenger uses a GSM modem
that connects to the mobile cellular
telephone service at 850/1900 MHz.
BIOTRONIK uses the modem according to
CardioMessenger.book Page 40 Thursday, January 5, 2012 1:13 PM
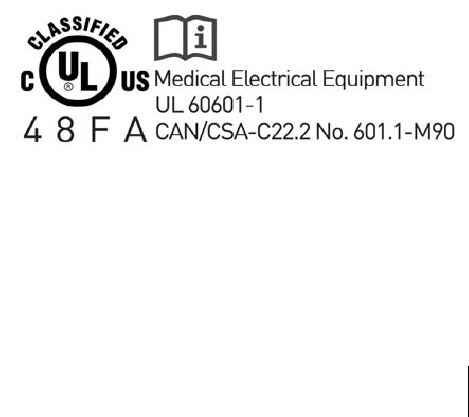
41
the specifications of the manufacturer in
compliance with FCC approval require-
ments.
FCC RF exposure requirements
This device has been tested for operation
when worn on the body and meets the FCC
RF exposure guidelines when used with
BIOTRONIK accessories supplied or desig-
nated for this product. Use of other accesso-
ries may not ensure compliance with FCC RF
exposure guidelines.
This EUT (Equipment Under Test) has
been shown to be capable of compliance
for localized specific absorption rate (SAR)
for uncontrolled environment/ general
population exposure limits specified in
ANSI/ IEEE Std. C95.1-1992 and had been
tested in accordance with the measurement
procedures specified in FCC/OET Bulletin 65
Supplement C (2001) and IEEE Std. 1528-
200X (Draft 6.5, January 2002).
UL classification
The CardioMessenger charger is classified
by Underwriters Laboratories Inc. with re-
spect to electric shock, fire, and mechanical
hazards only in accordance with UL 60601-1
and CAN/CSA-C22.2 No 601.1-M90.
The devices are denoted accordingly:
CardioMessenger.book Page 41 Thursday, January 5, 2012 1:13 PM

42
Canada
The CardioMessenger is registered at
Industry Canada. Depending on the
embedded GSM modem this number is
either IC: 4708A-CM06V1 or else 4708A-
CMII.
The cable modem in the charging station is
registered at Industry Canada. Depending
on the embedded cable modem type the
number is either IC: 125A-0015 or else
IC: 125A-0008 or else 125A-0032.
The term "IC:" before the certification/
registration number only signifies that the
Industry Canada technical specifications
were met.
Note: This device may not interfere
with stations operating in the 400.150 –
406.000 MHz band in the meteorological
aids, meteorological-satellite, and
earth exploration-satellite services and
must accept any interference received,
including interference that may cause
undesired operation.
In addition, the CardioMessenger contains a
GSM modem (Motorola g24 or
Motorola g24l) that establishes the connec-
tion to the cellular network at
the frequencies of 900/1800 MHz.
BIOTRONIK uses the modem in accordance
with the manufacturer’s specifications and
in compliance with the approval require-
ments.
The GSM modem has been evaluated and
approved by an independent authority for its
compliance with the statutory regulations.
As an indication of this, it carries the
following approval mark
(IMEI Number: 35726200-xxxxxx-x):
CardioMessenger.book Page 42 Thursday, January 5, 2012 1:13 PM

43
Electromagnetic Compatibility
Note: The CardioMessenger is protected
from disturbances resulting from
electromagnetic interference, electro-
static discharges, and other sources –
including interference induced by cables.
Interfering emissions from the Cardio-
Messenger have been minimized. The
CardioMessenger therefore meets the
requirements of EN 60601-1-2 in every
respect.
Warning! Other equipment, including
portable and mobile RF radiocommu-
nications equipment may interfere
with the CardioMessenger, even if this
equipment complies with CISPR emission
requirements. However, this possible
interference does not affect the device
functionality.
Warranty
The CardioMessenger and all original com-
ponents by BIOTRONIK are not subject to
warranty when used improperly or stored
and transported incorrectly. Use only the
original packaging when shipping the
device.
CardioMessenger.book Page 43 Thursday, January 5, 2012 1:13 PM

44
Technical Data
General
2Class of protection: II
2Operating mode: Continuous operation
Permissible Environmental Conditions
During operation
2Temperature:
-5°C (23°F) to +40°C (104°F) (remote unit)
0°C (32°F) to +40°C (104°F) (charging
station)
2Store in a dry place!
Relative humidity: 30% to 75%
(non-condensing)
2Atmospheric pressure:
700 hPa to 1060 hPa
2Altitude: Sea level up to 3000 m
(10,000 feet)
Shipping and storage
2Temperature:
-20°C (-4°F) to +60°C (140°F)
2Store in a dry place!
Relative humidity: 30% to 75%
(non-condensing)
2Atmospheric pressure:
700 hPa to 1060 hPa
CardioMessenger Remote Unit
2Dimensions (WxHxD): 60 x 132 x 45 mm
2Charging voltage: 5,2 V DC / 0.8 A
2Max. charge time: 3.5 hours
CardioMessenger.book Page 44 Thursday, January 5, 2012 1:13 PM

45
2Interfaces:
Serial infrared port and IrDA1.0 standard
2MedRadio: Modulation FSK
2MedRadio frequencies:
402 – 405 MHz, 9 channels,
300 kHz band width
2MedRadio transmission power:
25 μW EIRP
2GSM: Modulation GMSK
2GSM frequencies:
850 MHz, 900 MHz, 1800 MHz, 1900 MHz,
9,6 kHz band width
2GSM transmission power:
0.8 Watt (850 MHz); 2 Watt (900 MHz);
1 Watt (1800/1900 MHz)
CardioMessenger Charging Station
2Dimensions (WxHxD): 90 x 82 x 105 mm
2Input voltage: 6 V DC / 1 A
2Output voltage: 5.2 V DC / 1 A
CardioMessenger.book Page 45 Thursday, January 5, 2012 1:13 PM

46
Rechargeable Battery (Integrated)
2Type: Lithium ions (CGA 103460A)
2Dimensions (WxHxD):
approx. 36.5 x 64.5 x 12 mm
2Operating voltage: 3.6 V (nominal)
2Charging voltage: 4.1 V DC
2Max. charging current: 2 A
2Capacity: 1850 mAh or more
Power Supply
2Type: FW 7555M/06
2Dimensions: 51.5 x 87.5 x 34 mm
2Input voltage:
100 – 240 V AC at 50 – 60 Hz, 400 mA
2Output voltage: 6 V DC / 2.1 A
CardioMessenger.book Page 46 Thursday, January 5, 2012 1:13 PM

47
Appendix
Electromagnetic emitted interference according to IEC 60601-1-2
The CardioMessenger is suitable for operation in the indicated electromagnetic environment.
The customer and/or operator of the CardioMessenger should make sure that it is used in an
electromagnetic environment as described below.
Measuring the interference Compliance Guidelines for the Electromagnetic Environment
High-frequency interference
according to CISPR 11
Group 1 The CardioMessenger uses RF energy only for its internal
function. Therefore, the HF interference is very low and not likely
to cause any interference in nearby electronic equipment.
High-frequency interference
according to CISPR 11 Class B The CardioMessenger is suitable for use in all areas, including
living space and those areas that are directly connected to a
public power supply system that also supplies buildings
intended for residential purposes.Interference of harmonics
according to IEC 61000-3-2 Class A according to IEC 61000-3-2
Voltage fluctuations/ flicker
emissions according to
IEC 61000-3-3
Complies
CardioMessenger.book Page 47 Thursday, January 5, 2012 1:13 PM

48
Electromagnetic emitted interference according to IEC 60601-1-2
The CardioMessenger is suitable for operation in the indicated electromagnetic environment.
The customer and/or operator of the CardioMessenger should make sure that it is used in an
electromagnetic environment as described below.
Testing resistance
to interference
Test level according to
IEC 60601-1-2
Conformance level Guidelines for the electromagnetic environment
Conducted RF inter-
ference according to
IEC 61000-4-6
3Veff
150 kHz to 80 MHz Same as test level The minimum distance of the CardioMessenger from portable
and mobile radio devices, including the cables, should correspond
to the recommended safe distance that is calculated according
to the equation for the suitable transmission frequency.
Recommended safe distance:
D= 1,17
Radiated RF inter-
ference according to
IEC 61000-4-3
3V/m
80 MHz to 2.5 GHz Same as test level D= 1,17 for 80 to 800 MHz
D= 2,34 for 800 MHz to 2.5 GHz with P as the nominal output
of the transmitter in Watts (W) according to the information from
the transmitter manufacturer, and d as the recommended safe
distance in meters (m).
The field strength of stationary transmitting devices should be
measured on sitea and must be lower than the compliance level at
all frequenciesb.
Interference can be generated when the CardioMessenger is
close to devices that have the following warning sign:
Note: The higher frequency range applies at 80 MHz and at 800 MHz.
Note: These guidelines may not be applicable in all cases. The spread of electromagnetic waves is influenced by absorption and reflection from
buildings, objects, and humans.
p
p
p
CardioMessenger.book Page 48 Thursday, January 5, 2012 1:13 PM

49
a. Field strengths from fixed transmitters, such as base stations for radio (cellular(/cordless) telephones and land mobile radios, amateur radio,
AM and FM radio broadcast and TV broadcast cannot be predicted theoretically with accuracy.
To assess the electromagnetic environment due to fixed RF transmitters, an electromagnetic site survey should be considered. If the measured
field strength in the location in which the CardioMessenger is used exceeds the applicable RF compliance level above, the CardioMessenger
should be observed to verify normal operation. If abnormal performance is observed, additional measures may be necessary, such as
re-orienting or relocating the CardioMessenger.
b. Above the frequency range of 150 KHz to 80 MHz, ensure that field strengths are less than 3 V/m.
CardioMessenger.book Page 49 Thursday, January 5, 2012 1:13 PM

50
Electromagnetic emitted interference according to IEC 60601-1-2
The CardioMessenger is suitable for operation in the indicated electromagnetic environment.
The customer and/or operator of the CardioMessenger should make sure that it is used in
an electromagnetic environment as described below.
Checking
immunity to noise
Test level according
to IEC 60601-1-2
Conformance
level
Guidelines for the electromagnetic environment
Discharge of static
electricity (ESD)
According to
IEC 61000-4-2
± 6 kV contact discharge
±8 kV air discharge
Same as the
test level Floors should be made of wood or cement, or have ceramic tiles.
When the floor consists of a synthetic material, the relative
humidity must be at least 30%.
Rapid transient elec-
trical disturbances/
bursts
According to
IEC 61000-4-4
± 2 kV for
power supply lines
± 1 kV for input/output
lines
Same as the
test level The quality of the supply voltage should correspond to that in a
typical business and/or hospital.
Surge
According to
IEC 61000-4-5
±1kV normal mode
voltage
± 2 kV common mode
voltage
Same as the
test level The quality of the supply voltage should correspond to that in a
typical business and/or hospital.
CardioMessenger.book Page 50 Thursday, January 5, 2012 1:13 PM

51
Voltage dips, brief
interruptions and
fluctuations in the
supply voltage
According to
IEC 61000-4-11
‹ 5% UT for
1/2 cycle
(› 95% drop)
40% UT for 5 periods
(60% drop)
70% UT for 25 periods
(30% drop)
‹ 5% UT for 5 s
(› 95% drop)
Same as the
test level The quality of the supply voltage should correspond to that in a
typical business and/or hospital.
The CardioMessenger is powered by a battery. An interruption in
the supply voltage to the power supply unit will not impair the
functioning of the CardioMessenger.
Magnetic field at the
supply frequencies
(50/60 Hz)
According to
IEC 61000-4-8
3A/m Same as the
test level The magnetic field strength should correspond to the typical
value in business and hospital environments.
Comment: UT is the mains alternating voltage before applying the test levels.
Checking
immunity to noise
Test level according
to IEC 60601-1-2
Conformance
level
Guidelines for the electromagnetic environment
CardioMessenger.book Page 51 Thursday, January 5, 2012 1:13 PM

52
Recommended separation distances
between portable
and mobile RF communications equipment
and the CardioMessenger
Transmission
frequency
150 kHz to 80 MHz 80 MHz to 800 MHz 800 MHz to 2.5 GHz
Equation D= 1,17 : D= 1,17 : D= 2,34 :
Rated power
of transmitter (W)
Safe distance (m) Safe distance (m) Safe distance (m)
0.01 0.12 0.12 0.24
0.1 0.37 0.37 0.74
1 1.17 1.17 2.34
10 3.7 3.7 7.4
100 11.7 11.7 23.4
For transmitters whose maximum nominal output is not indicated in the above table, the distance can be calculated using the equation in the
column, where P is the maximum nominal output of the transmitter in Watts (W) according to the transmitter’s manufacturer.
Note: The higher frequency range applies at 80 MHz and at 800 MHz.
Note: These guidelines may not be applicable in all cases. The propagation of electromagnetic values is affected by absorption and reflection by
structures, objects and people.
p
p
p
CardioMessenger.book Page 52 Thursday, January 5, 2012 1:13 PM