BK Technologies APV5 VHF FM Portable transceiver User Manual AuroraUser9ToRelm
RELM WIRELESS CORP. - BK RADIO VHF FM Portable transceiver AuroraUser9ToRelm
UserManual.wiki
>
BK Technologies
>
APV5 User Manual
Users Manual
Navigation menu
Upload a User Manual
Namespaces
Wiki Guide
HTML
PDF
Info
Views
User Manual
Discussion / Help
Navigation

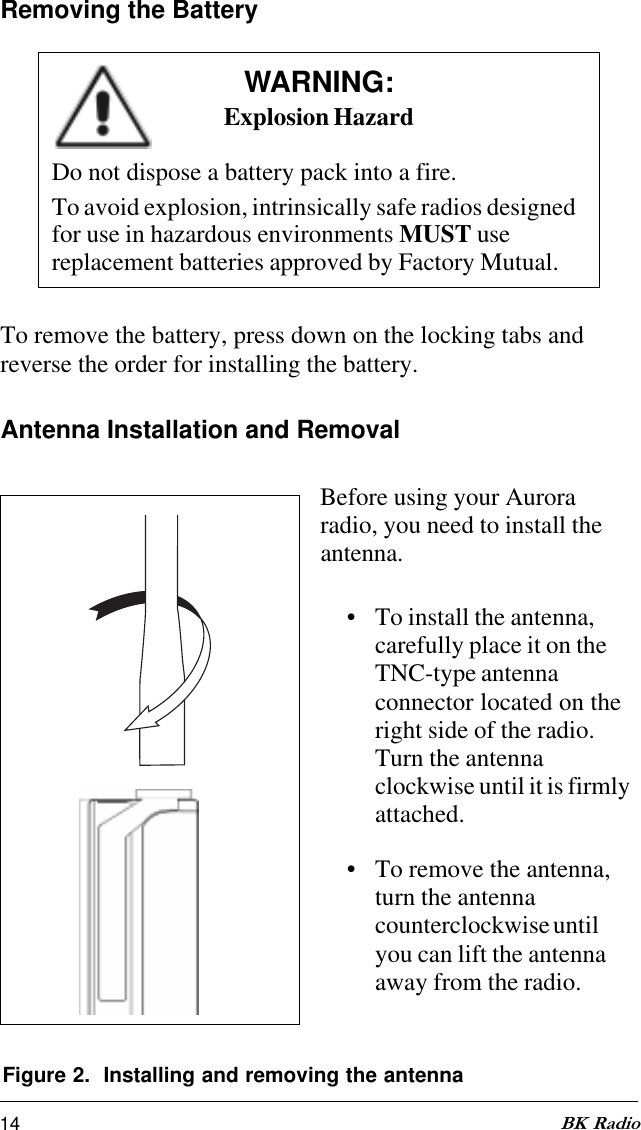

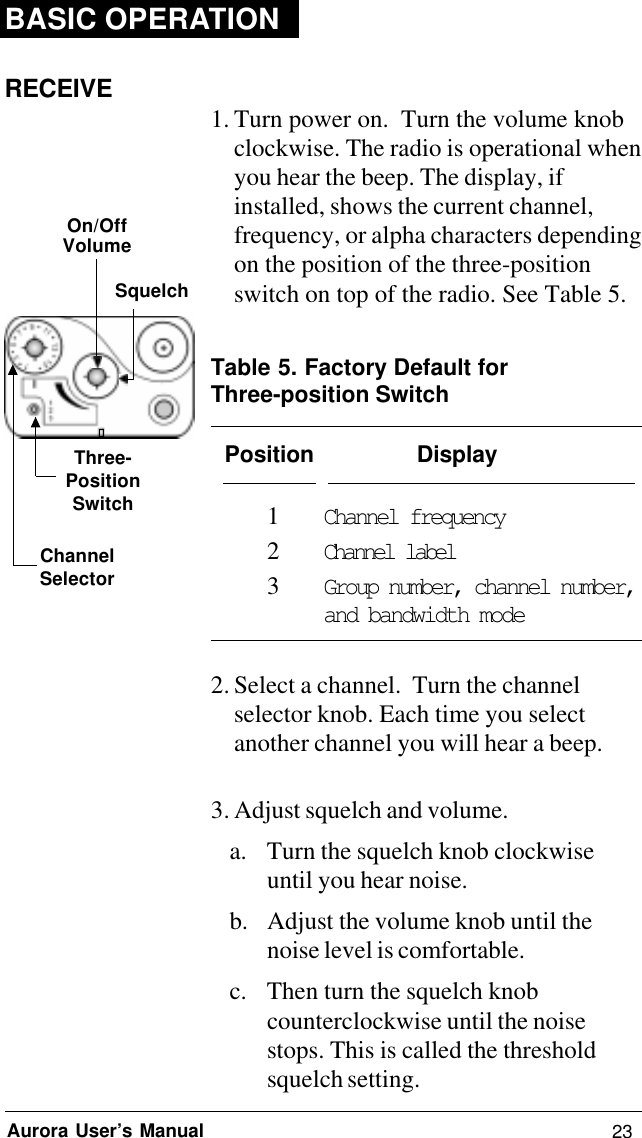
![24 BK RadioAuroraTRANSMITFollow these steps to transmit:1. Press the PTT switch. When thetransmitter is on, the red transmitindicator glows and the transmit icon[ ] appears in the display.2. Talk in a normal voice with themicrophone 1–2 inches from yourmouth.3. Release the PTT switch to stoptransmitting.If the transmit status indicator does notglow red when you press the PTTswitch, the battery pack may need tobe charged. If so, the display will showthe low-battery icon [ ], and the redlow-battery status indicator will flash.If the transmit status indicator doesnot glow and you hear a boop (lowerror tone), you are on a receive-onlychannel or the channel is busy (if busychannel lockout is enabled). Select anauthorized transmit channel.If you talk longer than the presettimer setting, the transmitterautomatically shuts off, and you hear aboop. To continue transmitting,release the PTT switch, press it again,and continue talking.Status IndicatorChannel 1PTTMicrophone](https://usermanual.wiki/BK-Technologies/APV5/User-Guide-109950-Page-24.png)
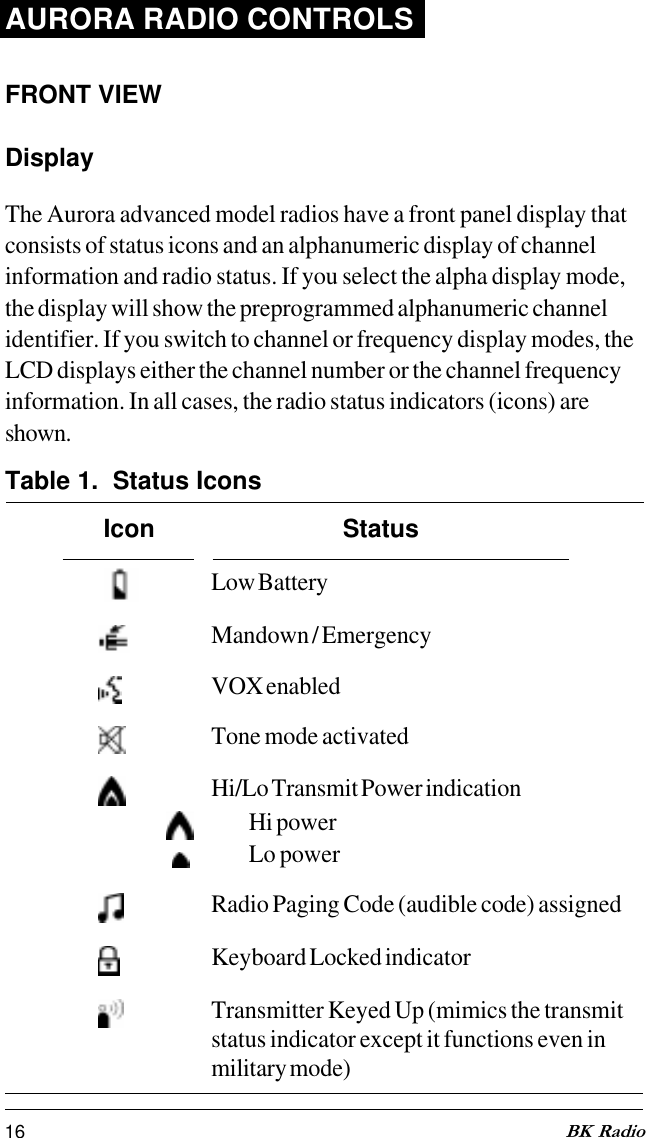
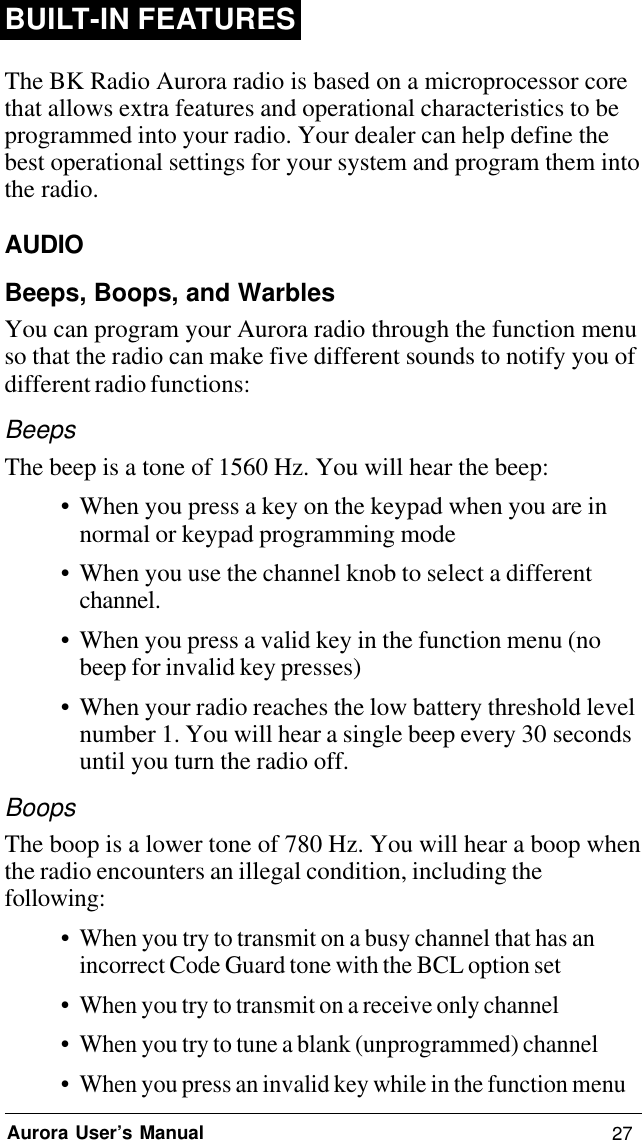
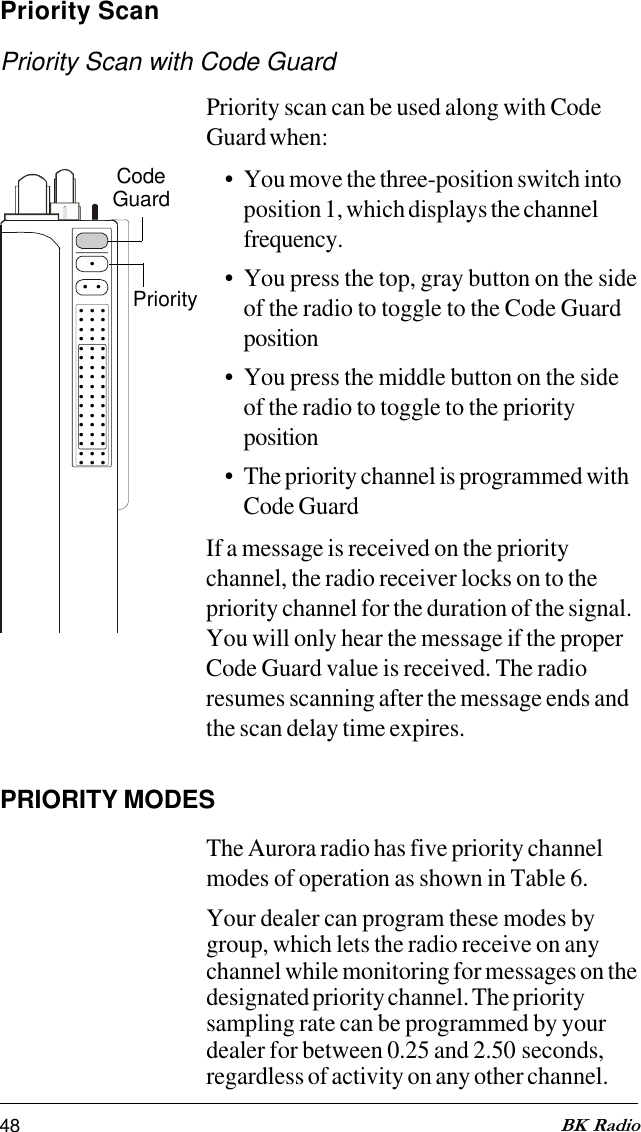
![25Aurora User’s ManualCODE GUARD OPERATIONCode GuardTM (sometimes called tone code) allows one radioor group of radios to be selectively called within a system. Ifthe radio has been programmed with Code Guard, use thefollowing receive and transmit instructions:CODE GUARD RECEIVE1. Turn power on by turning the volumeknob clockwise.2. Select a Code Guard channel byturning the channel selector knob.3. Adjust volume (see Receive, step 3, onthe previous page.4. Set Code Guard mode by pushing thesoft function button (top gray button isthe factory default) that waspreprogrammed to toggle Code Guardon or off.If your dealer reassigned the gray softfunction button to a different function,you can also select Code Guard bypushing or until Monitor Modeis displayed and then push [E]nter totoggle tone mode [ ]. Push [H]omefor normal display.If your radio is already set to tonemode, the function menu will showTone Mode instead of Monitor Mode.If you see tone mode in the display,just press [H]ome for normal display.You will only hear a message if your radioreceives the proper Code Guard value..... . . . . . . . . . . . . . . . . . ...CodeGuardChannel 1Monitor ModeCode Guard/Tone ModeChannel 1](https://usermanual.wiki/BK-Technologies/APV5/User-Guide-109950-Page-25.png)
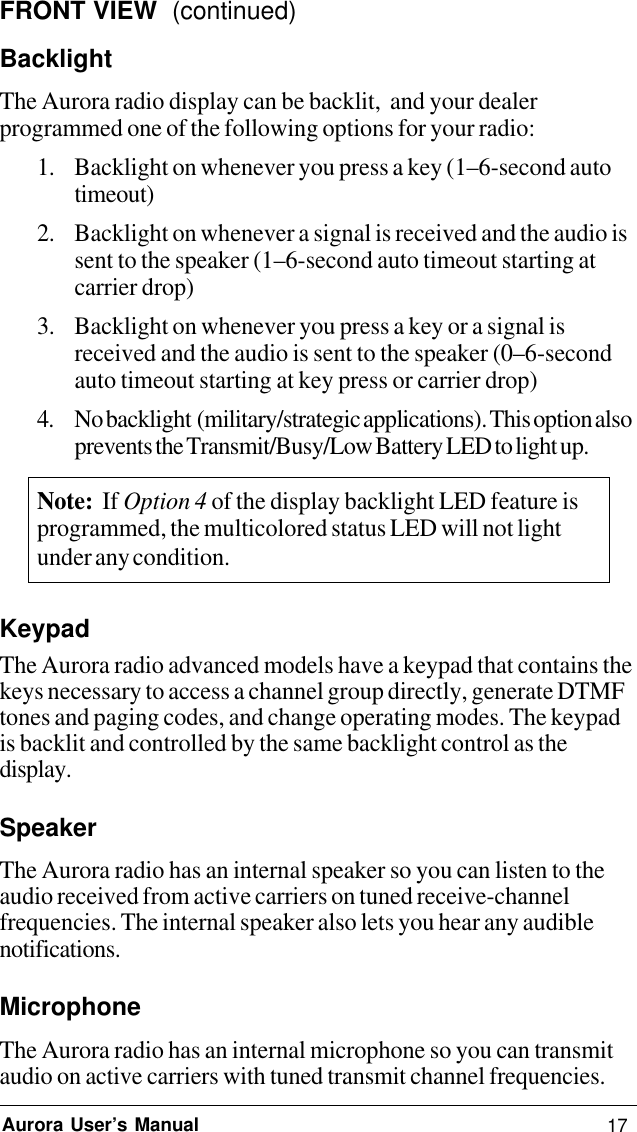
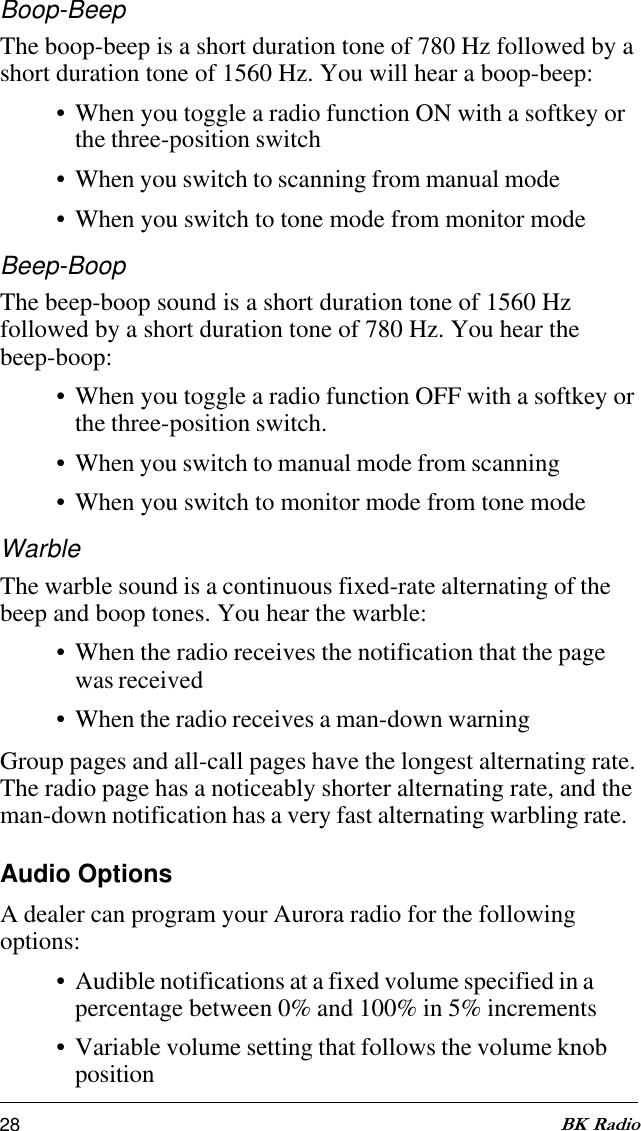
![26 BK RadioCODE GUARD TRANSMIT1. Turn on Code Guard mode bypushing the gray button on the side ofthe radio, which is the factory defaultfor toggling Code Guard on or off. IfCode Guard is not assigned to a softswitch, you can also push one of themenu select buttons [ or ] untilMonitor Mode is displayed, and thenpush [E]nter to toggle tone mode.Push [H]ome for normal display.2. Listen to the Code Guard channelbefore transmitting.Note: Do not transmit if the greenbusy-channel status indicator is lit.3. Press the PTT switch. When thetransmitter is on, the red transmit statusindicator glows and the transmit icon[ ] appears in the display.4. To receive only the messages with theproper Code Guard value, press the graybutton on the side of the radio. You willsee the tone mode icon [ ] in thedisplay. During extended transmissions,you can leave the squelch open until theexchange has ended.CodeGuard.... . . . . . . . . . . . . . . . . . . . . . . . . . . . . . PTTBusy-ChannelStatus Indicator000.0000Transmit CodeGuard MessagesReceive CodeGuard Messages000.0000](https://usermanual.wiki/BK-Technologies/APV5/User-Guide-109950-Page-26.png)

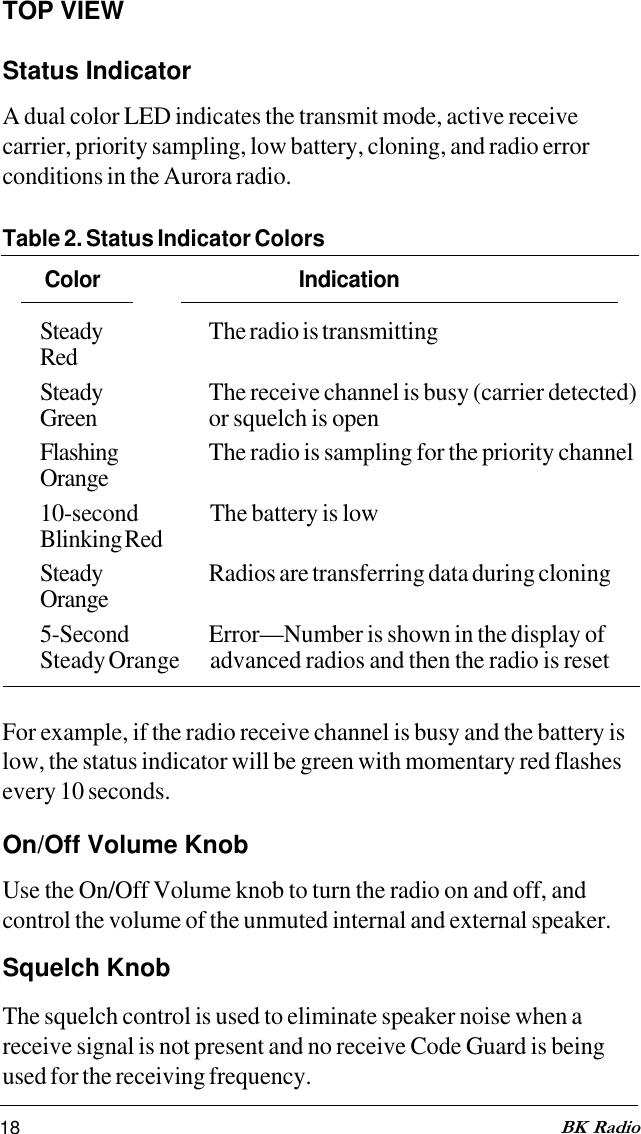
![30 BK RadioAfter 1 second, the radio willautomatically start adjusting the VOXtrigger sensitivity value. The radiocycles through the 16 available triggervalues, starting at the least sensitivevalue and incrementing to the mostsensitive value. Then the cycle wrapsaround, and the radio repeats the cycleas long as you keep pressing thesoftkey.4. When the status indicator LED on theradio turns red, immediately release theVOX softkey. The VOX triggersensitivity value has been reached.CHANNEL SELECTORUse the channel selector knob to determinewhich channel (from 1 to [up to] 16) istuned for receiving and transmitting whenthe radio is in manual mode and no prioritychannel operations are activated. Seepriority channel operation (page 48) andscanning mode (page 47) for moreinformation about the channel selectorknob when these features are activated.ChannelSelectorKnobStatus Indicator](https://usermanual.wiki/BK-Technologies/APV5/User-Guide-109950-Page-30.png)
![31Aurora User’s ManualHI/LOW TRANSMIT POWEREach channel in the radio can beindividually programmed to alwaystransmit in low-power or high-powermode, regardless of the position of theradio’s switches (or the function menusetting).Once a radio channel is programmed forlow power, you will not be able to changethis setting to high power. If a channel hasbeen set to high power at the factory, thedealer can change the power setting to asoftkey or the three-position switch. Youcan also change the power setting from thefunction menu if not assigned to the three-position switch.The Aurora radio has a set of displaytransmit power icons [ ]. Oneilluminated icon indicates the channel willtransmit using low power [ ], and theother illuminated icon indicates the channelwill transmit using high power [ ].If the radio is in manual mode, these iconsare always illuminated to show either highor low power for the selected channel. Ifthe radio is in scanning mode, the iconsonly light when a scanned channel has anactive carrier that breaks the squelch ofyour radio. If you select the low-powersetting, the low-power icon will be the onlytransmit-power icon lit, regardless of thetransmit power programmed for thatchannel.Low PowerHigh Power](https://usermanual.wiki/BK-Technologies/APV5/User-Guide-109950-Page-31.png)
![32 BK RadioFUNCTION MENUAny functions not assigned to a side button orthe three-position toggle switch can beenabled/disabled with or on the keypad.You can use the function menu as follows:1. Press or to display the functionmenu.2. Use the or keys to move from onefunction to the next forward or backward.You will hear a beep with each key press. Ifyou press an invalid key, however, you willhear a boop.3. Press [H]ome to exit the function menu.If the function menu is on Radio Page,press [H]ome twice slowly to exit.4. Press [H]ome twice to quickly clear theradio page number. The radio then waitsfor you to enter the new number.Note: Any functions assigned to thethree-position switch or the three buttonson the side of the radio, that function isnot displayed in the function menu.Mode SelectionsPress [E]nter to toggle the followingfactory-default mode selections:• Call DTMF/5 Tone • Scan All• Monitor/Tone • Key Beep• Back Light • Power Hi/Low• Priority • Programming• Talk Back (for dealers only)• Talk Around • Frequently called• Manual/Scan number list](https://usermanual.wiki/BK-Technologies/APV5/User-Guide-109950-Page-32.png)
![33Aurora User’s ManualYou can change the attributes of the following functions bypressing keys as described below:Backlite1. Press [E]nter to start the timeout valueto flash.2. Press [E]nter. The existing number willflash.3. Press [0]–[6] to set the time to off (0)or for 1-6 seconds.4. Press or to change the timeoutvalue by 0.1 second.5. Press the [E]nter key to exit thebacklite editing mode. Press [H]ome toexit function menu.Priority ChannelYou can only select priority channel modewhen the radio is in Mode C or D.Press the [E]nter key to make the valuechange to the channel knob assignment.Radio PageThis function displays the page type(DTMF or 5 Tone) and then displays thelast-called number, if any. (These numberscan only call other radios. Don’t give yourcell phone away.)1. Press any key [0]–[9] to clear thedisplay.The key you just pressed and subsequentkeys are displayed, up to 10 digits.2. Press PTT when a radio page numberhas been entered. After the page hasbeen sent, the radio exits the functionmenu.](https://usermanual.wiki/BK-Technologies/APV5/User-Guide-109950-Page-33.png)
![34 BK Radio3. Press the [H]ome key twice quickly todelete the number from the list.4. Press the [H]ome key twice slowly toexit the function menu.Each time you press [E]nter, the numbertype is toggled between DTMF and5 Tone. The radio then displays the currentfrequently called number.Selecting and Activating FrequentlyCalled “Phone List” Numbers1. To see your list of frequently calledphone list numbers, press [E]nter whenthe list is displayed to choose afrequently called number. Press [0]–[9],or press or .2. Press [#] while scrolling the frequentlycalled numbers list to sequentiallydisplay one of the three attributes ofthe current frequently called number:• type (DTMF or 5 Tone)• alpha (Name for frequently callednumber)• number (frequently called number,shortcut to number in list)3. Press the PTT switch while the radiotransmits the selected DTMF page, andthen exit the function menu..... . . . . . . . . . . . . . . . . . . . . . . . . . . . . . . . . . . . . . . . . . . . . PTT](https://usermanual.wiki/BK-Technologies/APV5/User-Guide-109950-Page-34.png)
![35Aurora User’s ManualEditing Frequently Called NumbersTo edit a frequently called number, press[E]nter when the display shows theattribute for the currently selected number.You can use the following valid keys toedit a frequently called number attribute:•[H]ome. Clears the number or alpha.Type attribute has no effect.•. In edit mode, the down arrow keyshifts the cursor to the right.•. In edit mode, the up arrow keyshifts the cursor to the left.•Any key. When you press any keymore than once, the radio will displaythe character set for that key based onthe number or alpha attribute youselected.Pressing the same key more than oncealso lets you move the cursor whenyou are editing a number and/or alphacharacter.](https://usermanual.wiki/BK-Technologies/APV5/User-Guide-109950-Page-35.png)
![36 BK RadioDTMF ENCODINGKeypad-equipped radios can beprogrammed to enable DTMF (Dual ToneMultiple Frequency) number dialingsequences.To send DTMF tones:1. Press [H]ome to return to the maindisplay if your radio is in the DTMFfunction menu.2. Press and hold the PTT switch.3. Press any key on the keypad (exceptarrow keys) .You will hear a sidetone (sounds like thetones you hear when dialing a telephone).The frequently called number list can beused for storage of DTMF transmitsequences.Use the frequently called number list tostore your DTMF transmit sequences.Note: If you are still in the DTMFfunction menu, press [H]ome to leavethe function menu.ANI ENCODINGANI encoding (Automatic NumberIdentification), if enabled, transmits asequence of 5-tone or DTMF tones eachtime you press PTT. You will hear asidetone. Your dealer can program an ANInumber for your radio..... . . . . . . . . . . . . . . . . . . . . . . . . . . . . . . . . . . . . . . . . . . . . . . . . . . PTT](https://usermanual.wiki/BK-Technologies/APV5/User-Guide-109950-Page-36.png)
![37Aurora User’s ManualTRANSMIT TIME-OUT TIMERThe transmit timeout timer isdealer-programmable. The length of thetime out is the maximum amount of timethe radio transmits after you press the PTTbutton. If you are still talking past thetimeout timer, the radio will stoptransmitting and you will hear a continuousboop error message until you stop pressingPTT. Your dealer can program a group’stransmit timeout timer from 0 [no timeout] to 4 minutes in 15-second increments.TALK AROUNDWhen you select Talk Around, your radiowill transmit on the frequency of thechannel you just received, and use thereceive Code Guard and bandwidthparameters of that channel.You can activate the talk-around featurefrom the function menu if the function wasnot assigned to the three-position switch.If talk around is enabled, Code Guard andpaging ANIs are both temporarily removedfrom the channel. When this happens, youcannot see the radio paging icon [ ] inthe display of your radio.MAN-DOWN SWITCHThe man-down feature is a factory-installed option. The switch is activatedwhen the radio is tilted. Then the radiowill start an emergency ANI sequencetransmission indicating the user is“down.”](https://usermanual.wiki/BK-Technologies/APV5/User-Guide-109950-Page-37.png)
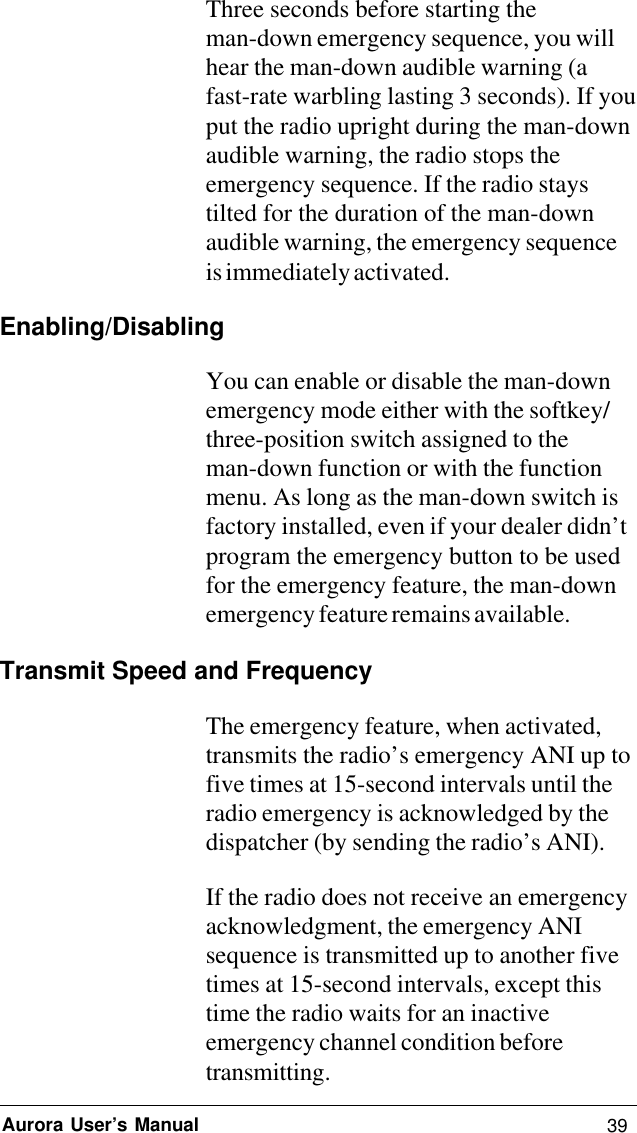
![38 BK RadioEMERGENCY GROUP/CHANNELThe emergency sequence is alwaystransmitted on the emergency group/channel regardless of the current functionmode and channel. Once the emergencysequence is started, and up to the time it isacknowledged, the radio will stay on theemergency group channel, although thechannel knob and group change functionare still active.If you take the radio off the emergencygroup/channel during an emergencysequence, within the next 15-secondtransmission interval, the radio will returnto the designated emergency group/channel.ActivationTo activate the emergency ANI sequencetransmission:• Press and hold the emergency button.Your dealer can program theemergency activation from 0.5 to 4.0seconds in 0.5-second intervals, or• Tip the radio sideways. The factoryinstalled internal man-down tilt switchwill activate the signal.Once activated, the man-down/emergencyicon [ ] appears in the display inadvanced models. Your dealer canprogram the length of time the radio can betilted before the man-down/emergencycode is transmitted.Man-down/Emergency IconEmergency Button](https://usermanual.wiki/BK-Technologies/APV5/User-Guide-109950-Page-38.png)
![40 BK RadioOPERATING MODESMANUAL MODEThe Aurora radio can operate in manualmode, which ties the receive and transmitfrequencies to the channel you select withthe channel selection knob (within thecurrently selected channel group).For advanced model radios, you can selectmanual mode from the function menu ifmanual/scan or talk around is not assignedto the three-position switch.For advanced radios in tone mode [ ],your radio displays the receive andtransmit frequencies that indicate thereassigned Code Guard. You can see thenumber of the reassigned channel in theright-most part of the radio display.Receive and transmit frequencies alsoindicate the assigned radio paging code(audible signals) by lighting the paging icon[ ] in the display when the radio istuned to that frequency.When the radio is in monitor mode, thepaging code icon is not lit.ChannelSelectorKnob000.0000000.0000000.0000 12Reassignedchannel number](https://usermanual.wiki/BK-Technologies/APV5/User-Guide-109950-Page-40.png)
![41Aurora User’s ManualFor advanced radios in manual mode, youcan use the keypad for the following sixfunctions:1. Reassign the variable guard.Press number keys [0] through [9]2. Enter group change mode:Press the [H]ome key. Then press or to change the group number.3. Add or delete channels from the scanlist.Press the [E]nter key.4. Review a channel’s Code Guardassignment.Press and hold the [*] key.5. Enter the function menu.Press either or .6. Lock or unlock the keypad.Press and hold the [#] key for 1second.If priority channel operation is activated inmanual mode, the radio will monitor, notonly the selected manual channel, but alsothe group priority channel at the prioritysampling rate.Tone/Monitor ToggleFrom the function menu, you can toggletone mode and monitor mode:1. Tone mode—Listening to channelsonly if the correct Code Guard or radiopaging code programmed for thatchannel is present.2. Monitor mode—Listening to channelsregardless of the channel Code Guardor radio paging code programming.R114.8 T107.2Code GuardAssignmentChannel 1Keypad Locked](https://usermanual.wiki/BK-Technologies/APV5/User-Guide-109950-Page-41.png)
![42 BK RadioChannels assigned with receive selectivecalling signals and set for busy-channellockout cannot be monitored if the radio is inmonitor mode.Channels that are programmed with no toneare not affected if the radio is placed in eithermonitor mode or tone mode.You will hear a beep/boop sound whentoggling between tone and monitor modes.For advanced model radios, the tone modeicon [ ] is illuminated when you put theradio in tone mode, and turned off when youput the radio in monitor mode.CODE GUARD MODEThe Aurora radio is capable of encoding ordecoding any of the currently used 50 CTCSStone guard signals, as well as any custom tonefrom 67.0 Hz to 254.1 Hz within 1%tolerance, or any of the 104 CDCSS CodeGuard signals. The radio is capable ofencoding one tone/code and decoding adifferent tone/code on the same channel.Code Guard is active only when the radio is intone mode. While the radio is in tone modeand the receive channels are programmed withCode Guard, you can hear the message whentuned to and receiving a frequency that has thesame Code Guard.If the receive channel frequency is present, butCode Guard is either not present or incorrect,your radio stays quiet while receiving thatsignal, even though the status LED isilluminated to show channel activity.000.0000Code Guard](https://usermanual.wiki/BK-Technologies/APV5/User-Guide-109950-Page-42.png)
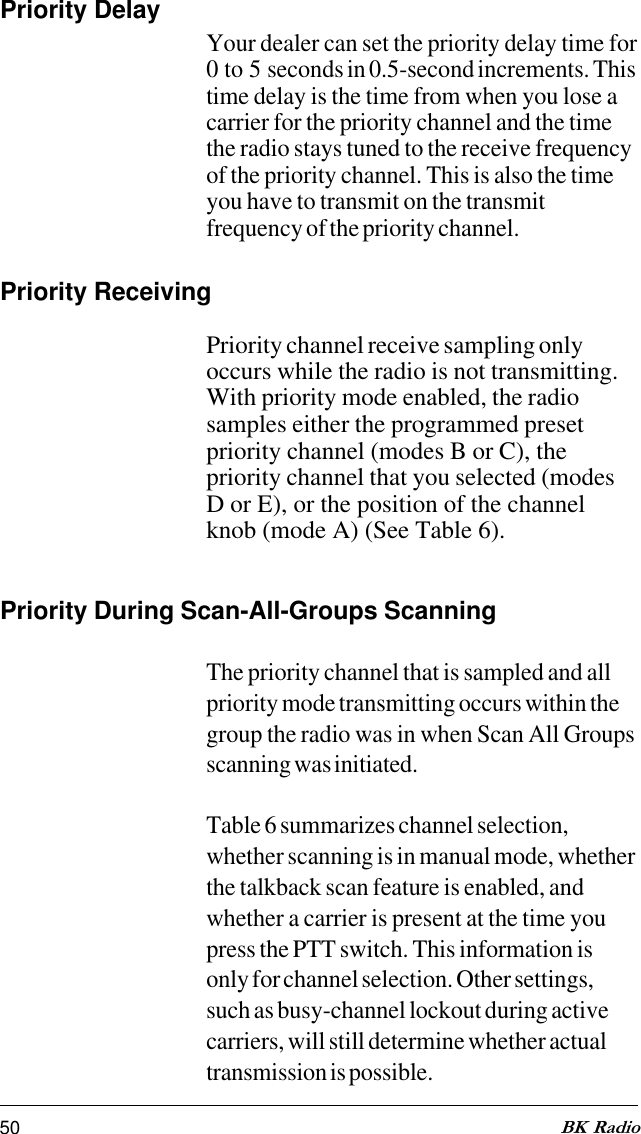
![47Aurora User’s ManualChannel Scan Delete/AddWith the Aurora radio, you can delete andadd channels to the scan list in each group ifthis feature is programmed in your radio.To add or delete a channel from the scan list:1. Use the function menu to put the radio inscan mode on an active receive carrier.2. Tune your radio to the frequency of areceive channel frequency, or open thesquelch to the channel being added ordeleted.3. Press [E]nter to toggle between deletingor adding a channel to the scan list.If the channel is already in the scan list,pressing [E]nter will delete it from the scanlist, and if the channel is not on the scan list,pressing [E]nter will add the channel to thescan list.When the radio is on a channel in manualmode (or scan mode on an active channel)and you have deleted the channel from thescan list, the display will indicate that thischannel is not on the scan list by displaying“d” in the first alpha character position of thedisplay. If the channel is the group’s prioritychannel, then a “p” is shown instead of “d”for a deleted channel.Squelch KnobChanneldeleted fromscan listPriority channeldeleted fromscan listd 000.0000P 000.0000](https://usermanual.wiki/BK-Technologies/APV5/User-Guide-109950-Page-47.png)
![49Aurora User’s ManualWhen you turn on priority mode by pressingthe middle button on the side of the radio,you will see the status indicator flash orange,which indicates an actual priority channelsampling.For advanced model radios, the prioritychannel of a group is indicated by a “P” [asmall “p” when deleted from the scan list] onthe left side of the radio display.Priority Channeldeleted from scanlistP 000.0000Priority ChannelP 000.0000Orange StatusIndicatorTable 6. Priority Modes](https://usermanual.wiki/BK-Technologies/APV5/User-Guide-109950-Page-49.png)
![51Aurora User’s ManualRECEIVE MODEGroupsA channel group can have up to 16 tunablechannels (both receive and transmitfrequencies). The basic Aurora radio has onegroup, and the advanced Aurora (withkeyboard and display) has from 1 to 15groups, depending on the computerprogramming. Although the maximumallowable channels per group is 16, anynumber less than that, down to one channel,can be programmable in a group.For advanced model radios, you enter group-change mode by following these three steps:1. Put the radio into receive mode by nottransmitting.2. Press the [H]ome key while in receivemode. The display will show “GroupXX” where XX is the current channelgroup.Note: If the radio is scanning when youenter group-change mode, the radio willbe temporarily disabled until you exitgroup-change mode.3. Once the radio is in group change mode,the only active front keypad keys are:•[ ] Changes the radio to the nexthighest group, or if the radio isalready at the highest group, itwraps around to Group 1•[ ] Changes the radio to the nextlowest group, or if the radio isalready at group 1, the groupwraps around to the highestchannel groupGroup 12Channel Group 12](https://usermanual.wiki/BK-Technologies/APV5/User-Guide-109950-Page-51.png)
![52 BK Radio•[E]nter Exits the group change mode•[H]ome Displays the alpha label of thegroupThe radio will remain in group changemode until you exit by pressing the [E]nterkey.DISPLAY MODESYou can select a display mode either witha softkey/three-position switchprogrammed to display functions, or withthe function menu.If you use a softkey, each key you pressselects the next display mode. The radiowill keep cycling through the channel,frequency, and alpha modes.If you use the three-position switch(factory default),• Position 1 is channel frequency• Position 2 is channel label• Position 3 is group number, channelnumber, and bandwidth modeTUNING RANGEThe tuning range of Aurora’s basic andadvanced radios cover the VHF band from136.0000 MHz to 174.0000 MHz.](https://usermanual.wiki/BK-Technologies/APV5/User-Guide-109950-Page-52.png)
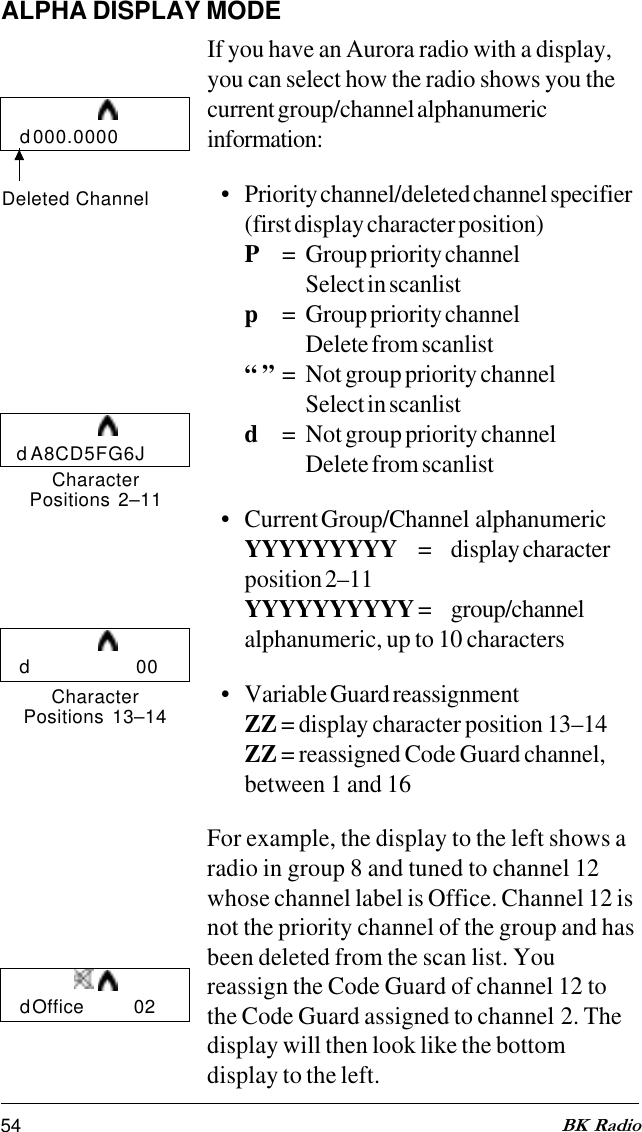
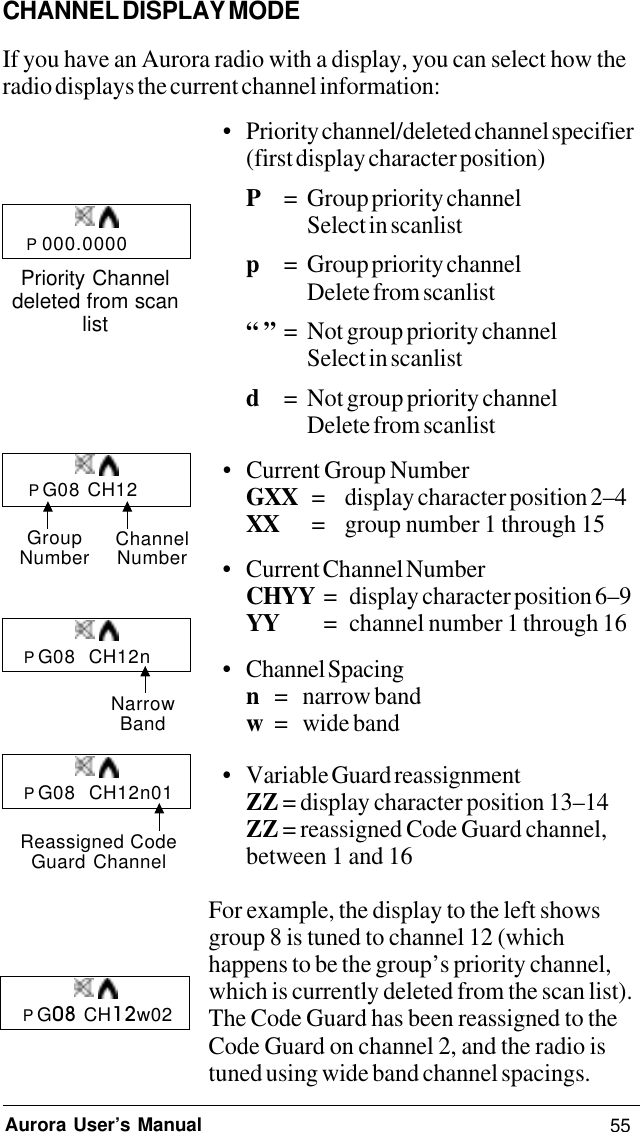
![53Aurora User’s ManualFREQUENCY DISPLAY MODEIf you own an Aurora radio with a display,you have the option of displaying the currentgroup/channel frequency information asfollows:• Priority channel/deleted channel specifier(first display character position)P= Group priority channelSelect in scanlistp= Group priority channelDelete from scanlist“ ” = Not group priority channelSelect in scanlistd= Not group priority channelDelete from scanlist• Current Group/Channel frequency inmegahertzP00000000= character positions 2–9PG01 CH01= group/channel• Variable Code Guard reassignmentZZ = [display character positions 13–14]ZZ = reassigned Code Guard channel1–16For example, a radio is in group 8 and tunedto channel 12 at a frequency of139.6500 MHz. Channel 12 is the prioritychannel for group 8 and currently in the scanlist. You reassign the Code Guard ofchannel 12 to the Code Guard of channel 2by pressing the channel numbers on thekeypad. The display of the radio will thenlook like the display to the left.Priority ChannelP 000.0000CharacterPositions 13–14P 139 . 650 00P 00000000CharacterPositions 2–9P 139. 6500 02](https://usermanual.wiki/BK-Technologies/APV5/User-Guide-109950-Page-53.png)

![61Aurora User’s ManualRADIO PAGINGChannels with radio paging code signals areindicated in the display with the radio pageicon [ ] regardless of whether channels,frequencies, or alphas are being displayed.When the radio is receiving signals and theradio page icon is illuminated, the receivefrequency has a paging code assigned. If theradio is in monitor mode, the radio page iconwill not be illuminated while receiving.When your radio is transmitting and the radiopage icon is illuminated, the transmitfrequency has a paging code assigned. Thiscode will go out on the leading edge, trailingedge, or both edges of the PTT press.FLEX MODEThe Aurora radio has two IF sections andoperates on either 12.5 kHz (narrowbandwidth) or 30 kHz (wide bandwidth) forthe VHF model radio. The operatingbandwidth of the channel is a dealer-programmable option that you can select on aper-channel basis.KEYPAD AND CHANNEL SELECTOR LOCKYou can lock the keypad on your radio soany presses on the keypad are ignored by theradio. While the keypad is locked, you cansee the lock icon [ ] in the display.To lock or unlock the keypad, press and hold[#] for 2 seconds.d Office 02](https://usermanual.wiki/BK-Technologies/APV5/User-Guide-109950-Page-61.png)
![62 BK RadioBUSY CHANNEL LOCKOUTThe Aurora radio has a Busy ChannelLockout [BCL] feature that you canuse to program individual channels.With the BCL feature, you can keepanyone from hearing a channel unlessthe correct Code Guard signal isreceived.With BCL set, the transmitter cannottransmit until the channel is free ofactivity. If the channel is active, thetransmitter cannot transmit until acorrect decode Code Guard is received.If the BCL transmit criteria is not met,you will hear a boop. When thishappens, release PTT and trytransmitting again.If the BCL feature is set for a channeland that channel has a Code Guardassigned to it, the carrier must have atone. If a carrier is detected on thatchannel and no tone is present, then theradio will remain muted [no tone is thewrong tone].The BCL feature is activatedwhenever you tune in to a channel thathas BCL assigned. If BCL mode is seton the channel, the tone/monitorfeature will not override the BCLfunction.](https://usermanual.wiki/BK-Technologies/APV5/User-Guide-109950-Page-62.png)
![63Aurora User’s ManualBATTERY POWERBattery SaverThe Aurora radio has a battery-saverfeature that your dealer can program ona per radio basis. If enabled, the radioperforms the battery-saver functionwhen receiving channels withoutreceive-ANIs whenever in manual modeand priority operation is turned off.The battery-saver function cycles thepower to the RF, audio, and CPUhardware, temporarily powering downthe hardware when the channel is notbusy. The Aurora radio has three low-battery thresholds to let your radio runas long as possible before shuttingdown.Low BatteryFirst Battery ThresholdThe Aurora radio has a first batterythreshold level, which causes the radioto transmit all channels using lowpower, regardless of the transmit powersetting for that channel. You will see thelow-battery display icon [ ] once thebattery voltage of the radio goes belowthis threshold level.At the first low-battery threshold, onlythe low-power transmit icon [ ] is litregardless of the programmed transmitLow-batteryindicatord Office 02Low Battery IconLow Battery](https://usermanual.wiki/BK-Technologies/APV5/User-Guide-109950-Page-63.png)
![73Aurora User’s ManualAlphanumeric Both letters from the alphabet and numbersANI Automatic Number IdentificationBCL Busy Channel LockoutBeep A higher tone of 1560 HzBoop A lower tone of 780 Hz, “error tone”BW Band WidthCG Code GuardCloning The process of copying data from one radio,called “master,” to other radios, called “slaves”or “clones”Code Guard A subaudible tone for selective listening andreceiving, sometimes referred to as tone codeDetent The click/hesitation you feel as you turn a knobfrom one position to anotherDTMF Dual Tone Multiple FrequencyDTMF Tones Tones that sound like those used by a standardpush-button telephone[E]nter EnterFCN Function[H]ome HomeLCD Liquid Crystal DisplayLED Light Emitting DiodePRG ProgramPTT Push To TalkRTA Repeater Talk AroundRX ReceiveSCN ScanSquelch A control that eliminates background noiseTime-Out Timer A feature that limits the duration of callsTX TransmitVOX Voice-Operated TransmissionWarble Sound that quickly changes back and forthbetween beep and boopDEFINITIONS AND ACRONYMS](https://usermanual.wiki/BK-Technologies/APV5/User-Guide-109950-Page-73.png)