BK Technologies KNGM800 MOBILE TRANSCEIVER User Manual
RELM WIRELESS CORP. - BK RADIO MOBILE TRANSCEIVER
UserManual.wiki
>
BK Technologies
>
KNGM800 User Manual
User Manual
Navigation menu
Upload a User Manual
Namespaces
Wiki Guide
HTML
PDF
Info
Views
User Manual
Discussion / Help
Navigation


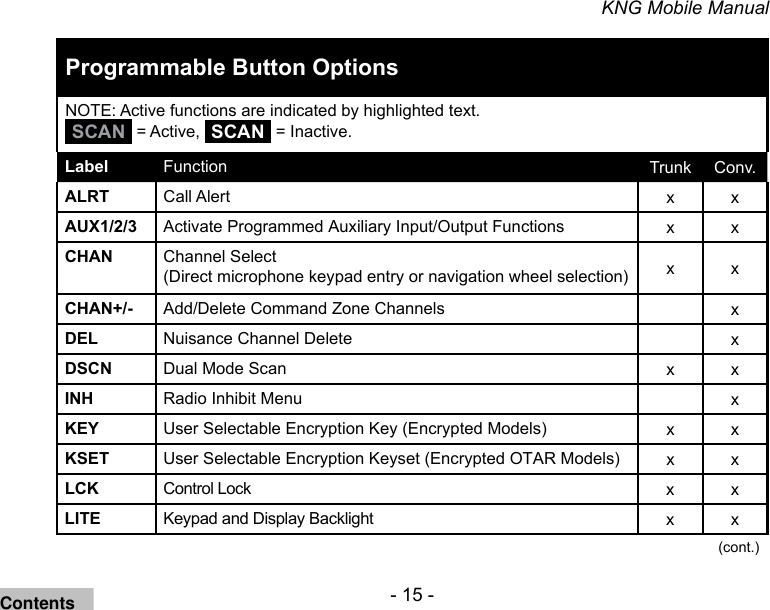
![ContentsIntroduction .............................................................................................. 1FCC Requirements .................................................................................. 1Radio Controls ......................................................................................... 8LCD Touch Screen ................................................................................. 10Microphone Controls ............................................................................ 19Function Selection ................................................................................ 21Channel/Zone Selection Options ......................................................... 26Basic Operation ..................................................................................... 29Command Zone Operation ................................................................... 31Building a Command Zone [CHAN+] .................................................. 31Editing a Command Zone [CHAN-] ..................................................... 32Code Guard/NAC Operation ................................................................. 33Code Guard Transmit .......................................................................... 33Code Guard Receive........................................................................... 34Analog Squelch Control ...................................................................... 34APCO Project 25 Digital Squelch Control ........................................... 34>](https://usermanual.wiki/BK-Technologies/KNGM800/User-Guide-1729001-Page-4.png)
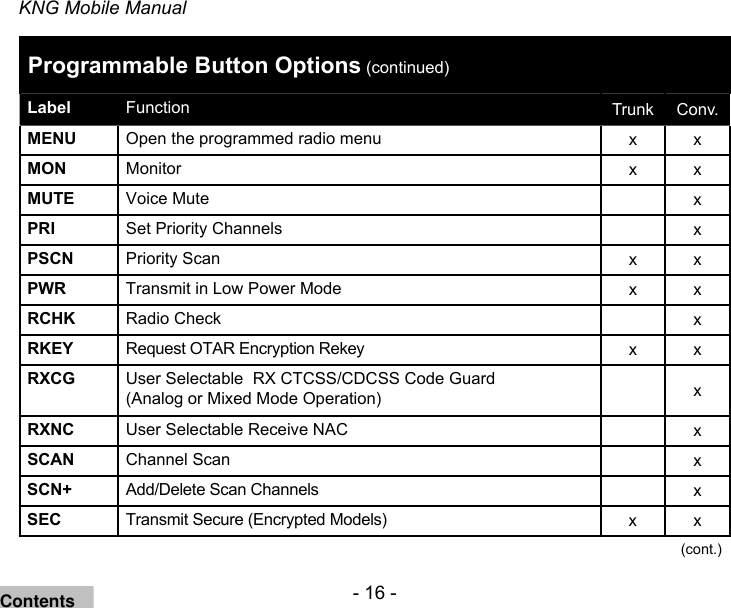
![Mixed Mode Operation .......................................................................... 36Trunking Channel Basic Operation ...................................................... 38Scan Options ......................................................................................... 40Channel Scan [SCAN]......................................................................... 40Channel Scan List [SCN+] .................................................................. 41Talkback Scan ..................................................................................... 42Vote Scan [Requires Option KZA0581] ............................................... 42Dual Mode Scan [DSCN] .................................................................... 43Priority Scan [PSCN] ........................................................................... 44Priority Channel Select [PRI]............................................................... 45Zone Scan [ZSCN] .............................................................................. 47Zone Scan List [ZSC+] ........................................................................ 47Pick List Options ................................................................................... 48TX/RX CxCSS Picklist [TXCG] [RXCG] .............................................. 49TX/RX Network Access Code Picklist [TNAC] [RNAC] ....................... 49Talk Group ID Picklist [TGID] .............................................................. 50Encryption Key Picklist [KEY].............................................................. 50Keyset Picklist [KSET]......................................................................... 51><](https://usermanual.wiki/BK-Technologies/KNGM800/User-Guide-1729001-Page-5.png)
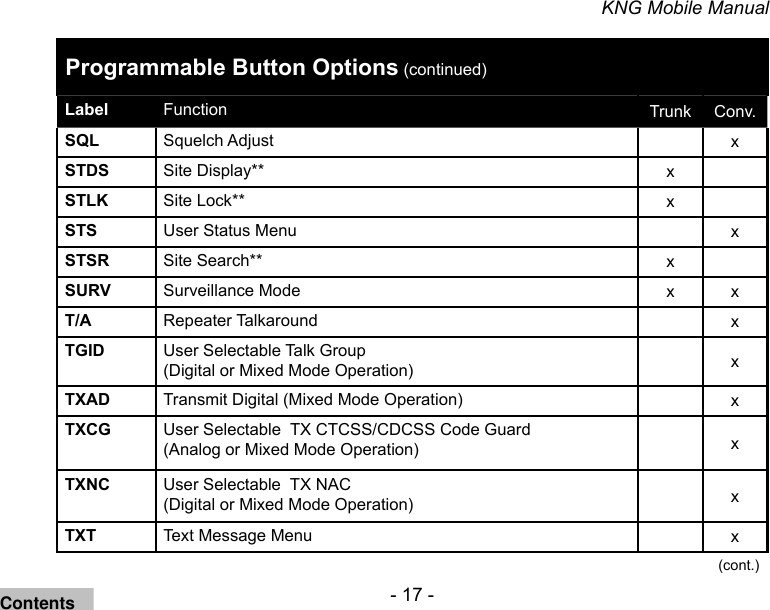
![Unit-to-Unit Call Options ....................................................................... 52Emergency Signalling Options ............................................................ 55Encryption Operation ............................................................................ 57Required Setup ................................................................................... 57Basic Operation................................................................................... 58Transmit Secure [SEC] ....................................................................... 59Transmit Encryption Key Selection [KEY] ........................................... 59User Selectable Encryption Keyset [KEYST] ...................................... 60Rekey Request [RKEY] ....................................................................... 61Keyset Viewing and Selecting [KSET] ................................................ 62Zeroizing [ZERO] ................................................................................ 62Messaging ............................................................................................. 63Text Messaging [TXT] ......................................................................... 63User Status Messaging [STS] ............................................................. 67Paging and Call Alert ........................................................................... 70Conventional Two-Tone/DTMF/MDC1200 Paging [MUTE] ................ 70Call Alert Paging [ALRT] .................................................................... 71Radio Check [RCHK] ......................................................................... 72><](https://usermanual.wiki/BK-Technologies/KNGM800/User-Guide-1729001-Page-6.png)
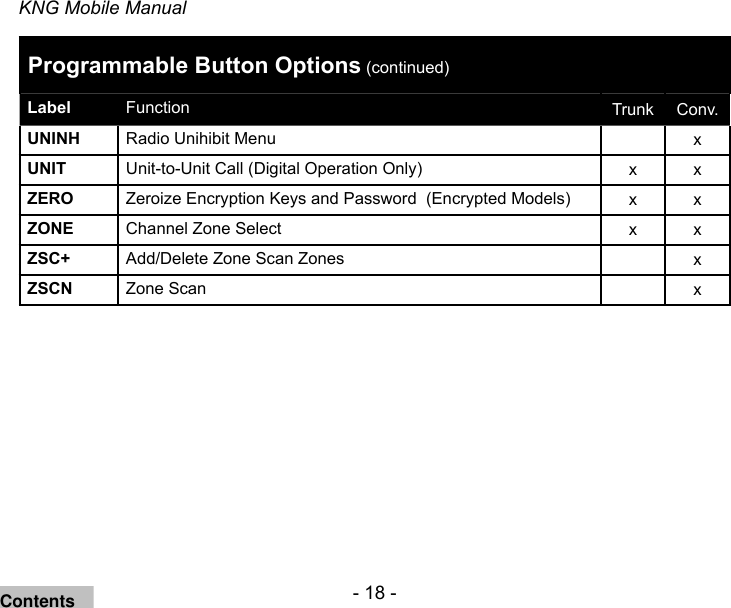
![Radio Inhibit/Enable [INH]/[UNINH] ...................................................... 74Other Options and Functions ............................................................... 76Backlight [LITE] ................................................................................... 76Busy Channel Operation ..................................................................... 77Channel Select [CHAN]....................................................................... 78Cloning ................................................................................................ 78Control Lockout [LCK] ......................................................................... 79Keypad Programming ......................................................................... 80Monitor [MON] ..................................................................................... 80Nuisance Channel Delete [DEL] ......................................................... 81Radio info ............................................................................................ 82Repeater Talkaround [T/A] .................................................................. 82Squelch Adjust [SQL] .......................................................................... 82Site Display [STDS]............................................................................. 83Site Lock [STLK] ................................................................................. 83Site Search [STSR] ............................................................................. 84Surveillance Mode [SURV] .................................................................. 84Transmit Digital [TXAD] ....................................................................... 84Transmit Power [PWR] ........................................................................ 85><](https://usermanual.wiki/BK-Technologies/KNGM800/User-Guide-1729001-Page-7.png)

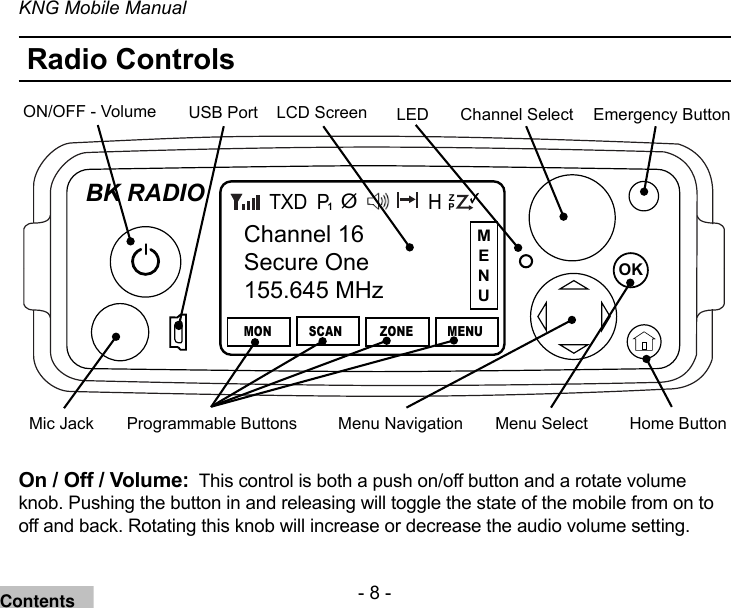
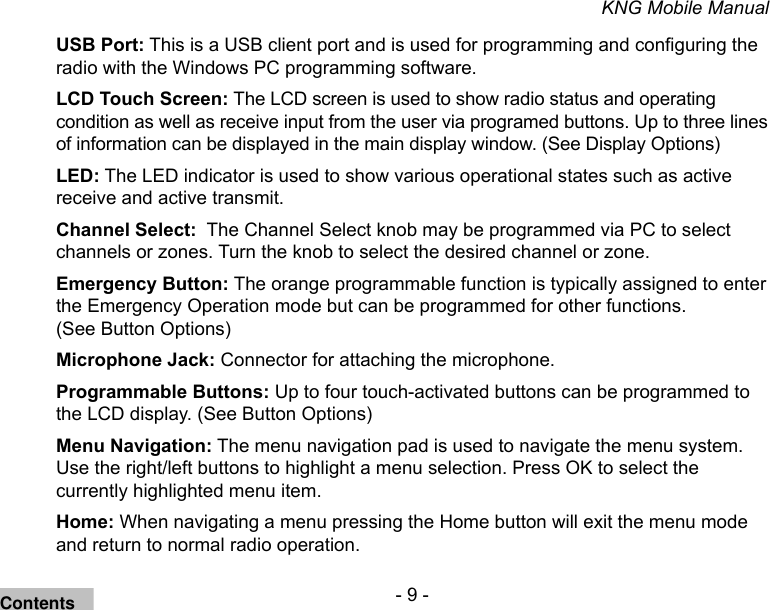
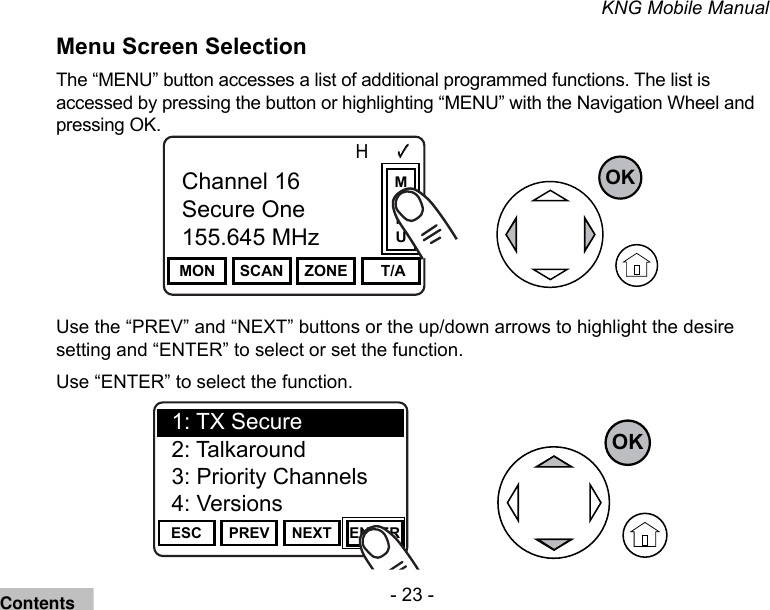
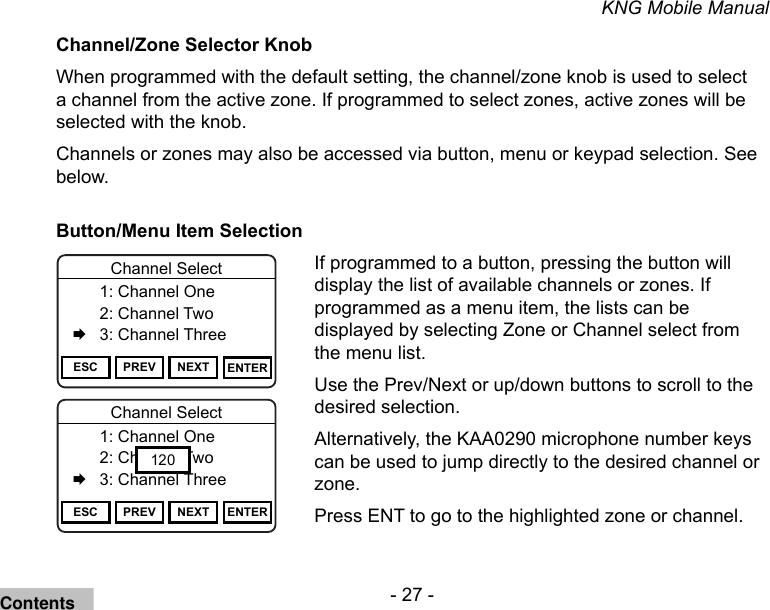
![- 29 -KNG Mobile ManualBasic OperationReceiveTurn power on by pushing and releasing the Volume knob. The radio will 1. beep, indicating that it has passed its self test and is operational. Set volume by pressing and holding the [MON] button, to hear squelch noise 2. or by selecting “Monitor” from the menu list and selecting "Open" . Turn the Volume knob to set a comfortable volume level. Press the [MON] button again or select desired monitor mode from the “Monitor” menu to stop squelch noise.Select a channel zone (if applicable) by pressing the [ZONE] button or 3. selecting “Zone Select” from the menu and scrolling to the desired zone. Press the “OK” button to return to Channel Select mode. Select a channel by turning the Channel Selector knob. When the unstopped 4. channel selector is rotated past the highest channel, the radio will return to the lowest channel. When rotated past the lowest (1st) channel, the radio will go to the highest channel.Contents](https://usermanual.wiki/BK-Technologies/KNGM800/User-Guide-1729001-Page-38.png)
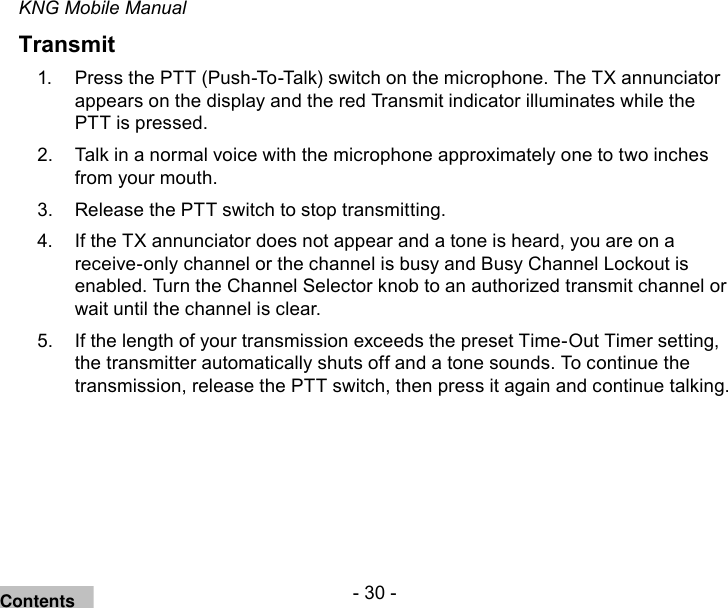
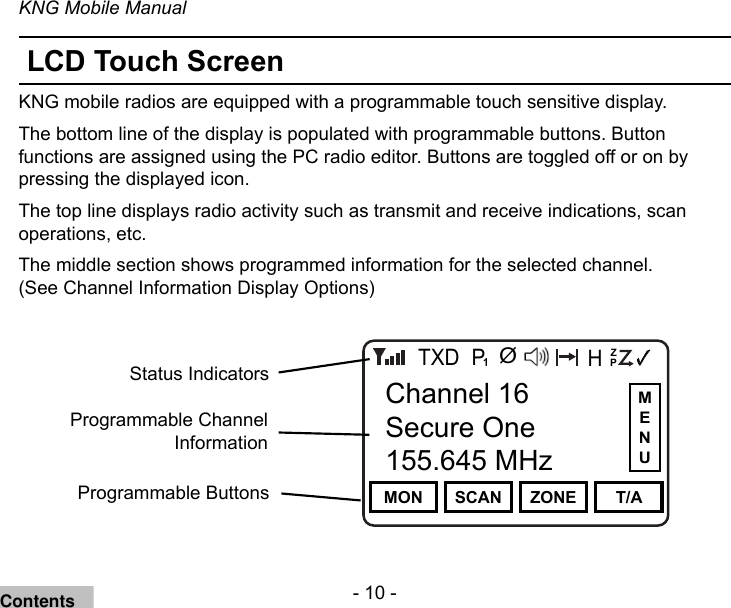
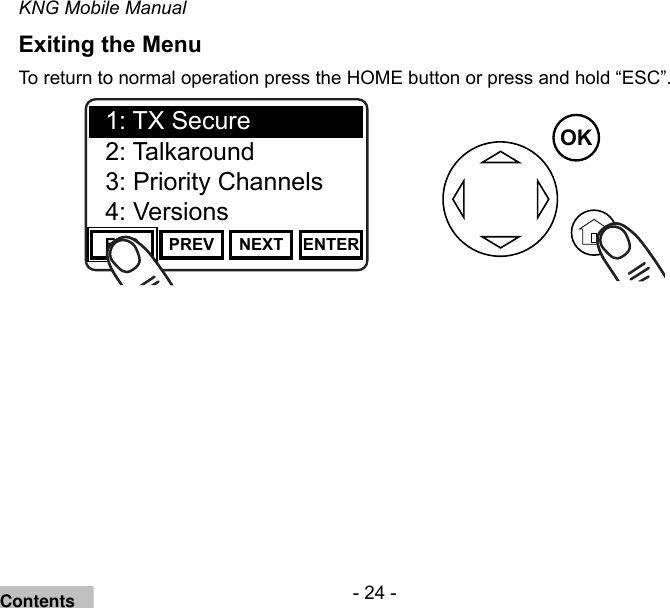
![- 31 -KNG Mobile ManualCommand Zone OperationThe KNG portable radio allows construction of Command Zones drawn from any of the programmed channels in standard operating zones. Each zone is designated as a Standard Operating Zone or a Command Zone with the PC radio editor software. Building a Command Zone [CHAN+]To build a Command Zone the “Channel Add/Delete” function must be assigned to a programmable button.Channel 16Secure One155.645 MHzZPPH✓P1TXDØChannel 16Secure One155.645 MHzCHAN+ ZONE AUX1 SCANWhile operating in a standard zone press the “CHAN+” button to add the currently selected channel to a command zone. The list of available command zones will be displayed. Use the 'previous/next or up/down buttons to select the zone to add the channel or use the number keys to move directly to the desired zone.Pressing the “Enter” button copies the channel information to the rst available channel slot in the selected command zone.Example: If the command zone has three channels, the newly added channel will be channel four.Contents](https://usermanual.wiki/BK-Technologies/KNGM800/User-Guide-1729001-Page-40.png)
![- 32 -KNG Mobile ManualEditing a Command Zone [CHAN-]Channel 16Secure One155.645 MHzZPPH✓P1TXDØChannel 16Secure One155.645 MHzCHAN+ ZONE AUX1 SCANWhen operating in a Command Zone, press the “CHAN-” button to remove the selected channel from the zone. When a channel is deleted, the display momentarily shows “Channel Deleted”, and the following channels move up in the list. For example, if channel 5 is deleted, channel 6 becomes the new channel 5, channel 7 becomes the new channel 6, etc. NOTE: Modications to a command zone channel, such as User Selected Tones, do not affect the original standard zone channel.Contents](https://usermanual.wiki/BK-Technologies/KNGM800/User-Guide-1729001-Page-41.png)
![- 40 -KNG Mobile ManualScan OptionsChannel Scan [SCAN]Conventional ChannelsWhen on, Channel Scan monitors activity on the scan list channels in the currently operating zone. Scan operates only while the radio is not transmitting.Channels designated as scan channels are identied by the symbol at the top of the LCD display. If allowed, the scan list can be edited by the radio user. (See Channel Scan List).When Channel Scan is on, the C symbol will be shown at the top of the LCD display.When a signal is detected, scanning stops and the message is received. The received channel is shown in place of the selected channel. Once the signal ends, the radio continues to monitor the channel for the preset scan delay time before it resumes scanning. Channel Scan operation can be programmed as a button or menu list item.Channel Scan may be used in conjunction with Priority Scan operation (see Priority Scan).Contents](https://usermanual.wiki/BK-Technologies/KNGM800/User-Guide-1729001-Page-49.png)
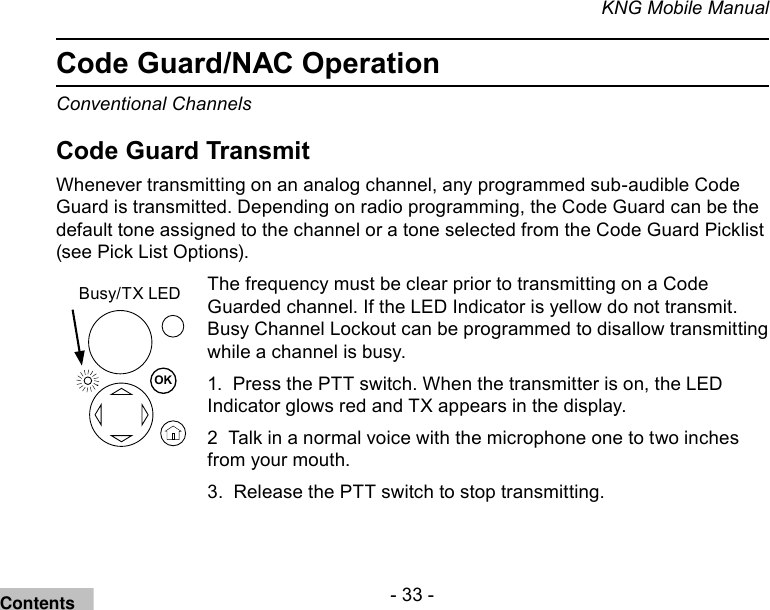
![- 41 -KNG Mobile ManualScanning Code Guarded ChannelsConventional Analog Channels When a signal is detected, scanning stops while the radio checks for the proper Code Guard value. If the signal contains the proper Code Guard value, the radio receives the message. Otherwise, the radio resumes scanning immediately.Transmitting with Scan On The radio transmits on the channel selected by the Channel Selector knob unless Talkback Scan is enabled (see Talkback Scan) or Priority Scan is on and Transmit on Priority 1 is enabled (see Priority Scan).Channel Scan List [SCN+]Conventional ChannelsThe Channel Scan List allows the radio user to add or remove channels from the list of channels to be monitored while channel scanning. Channels designated as scan channels are identied by the symbol at the top of the LCD display. The Scan List operation can be assigned as a button or menu list item.Contents](https://usermanual.wiki/BK-Technologies/KNGM800/User-Guide-1729001-Page-50.png)
![- 42 -KNG Mobile ManualWhen Channel Scan List is assigned to a button, press the button to add or remove the selected channel from the scan list.When assigned as a menu item, open the menu and select the channel you wish to add or remove from the scan list. Press “+/-” to add or remove. Channels in the scan list will be indicated with the symbol.Talkback ScanConventional and Trunking ChannelsIf your radio is programmed for Talkback Scan, press PTT while a channel is active or while scan delay time remains, you will be responding on the transmit frequency of the received channel. The ‘RX’ indicator will be shown in the display while scan delay time remains.Talkback Scan will not work if Priority Scan is on and your radio is also programmed to transmit on the Priority 1 channel (see Priority Scan).Vote Scan [Requires Option KZA0581]Conventional ChannelsChannels in a multicast conventional systems can be added to the scan list and designated as “voted” channels. When a signal is received on a voted channel the Contents](https://usermanual.wiki/BK-Technologies/KNGM800/User-Guide-1729001-Page-51.png)
![- 43 -KNG Mobile Manualradio checks all voted channels and selects the channel with the best signal.If enabled, vote scanning takes place whenever the channel scan switch in on.NOTE: Channel voting occurs only with Channel Scan and is disabled when Zone Scanning. Channels programmed as Vote channels are treated as normal scan list channels during Zone Scan operation.See also Priority Scan and Zone Scan.Dual Mode Scan [DSCN]Conventional and Trunking ChannelsDual Mode scan provides the ability to scan trunking and conventional channels simultaneously. NOTE: The Dual Mode Scan list must be setup using the PC radio editor and cannot be changed by the radio user.When Dual Mode Scan is turned on the D icon is displayed and the radio scans all channels in the dual mode scan list.Dual Mode Scan can be assigned to a button or menu list item. For best operation, Dual Mode Scan should be assigned in both conventional and trunking global settings with the PC editor.Contents](https://usermanual.wiki/BK-Technologies/KNGM800/User-Guide-1729001-Page-52.png)
![- 44 -KNG Mobile ManualPriority Scan [PSCN]Conventional ChannelsTwo channels can be designated as priority channels. When Priority Scan is on, these channels are monitored for incoming trafc. When a qualied signal is detected the speaker is opened to listen to the message.If a message is detected on the channel designated as Priority 2, the radio will continue to monitor Priority 1 channel for activity. If activity is detected the radio will switch to the Priority 1 channel.When used in conjunction with Channel Scan, the radio monitors the Priority channels and will switch from a scanned channel to the Priority channel if a qualied signal is detected.Depending on radio setup, priority channels can be tied to the currently operating zone or can be assigned to a specic channel regardless of the operating zone.Channels designated as Priority channels are identied by the P1 or P2 symbol at the top of the LCD display. When Priority Scan is on, the CP symbol will be shown. Priority Scan operation can be a button or menu list item.Trunked ChannelsWhen on trunked channels, Priority Scan is used to turn system scanning on or off.Contents](https://usermanual.wiki/BK-Technologies/KNGM800/User-Guide-1729001-Page-53.png)
![- 45 -KNG Mobile ManualPriority Channel Select [PRI]Conventional ChannelsDepending on programming, priority channels can be radio-wide (System) or zone specic (Zone). Radio-wide priority channels are monitored regardless of the current operating zone. (See Priority Scan for more details.)If enabled the user can change the priority channels. Priority Channel Select can be assigned to a button or menu list item.Selecting a System Priority ChannelOpen the menu and select the System Priority channel you wish to change.Press “ENTER” to open System Priority Channel menu.Options:Off - Disables the priority channel.Use Main - Uses the selected channel as the priority channel.Select - Assigns a specic channel as the priority channel.To assign a specic channel as a System Priority Channel, highlight “Select” and press the “ENTER” button.The Zone selection menu will be displayed.Highlight the zone of the desired priority channel and press the “ENTER” button.The Channel selection menu will then be displayed.Contents](https://usermanual.wiki/BK-Technologies/KNGM800/User-Guide-1729001-Page-54.png)
![- 47 -KNG Mobile ManualZone Scan [ZSCN]Conventional ChannelsWhen Zone Scan and Channel Scan are on, the radio scans all programmed scan channels in zones designated as Zone Scan zones. If allowed, the scanned zone list can be edited by the radio user. (See Zone Scan List).When Zone Scan is on, the ZP symbol will be shown at the top of the LCD display.Zone Scan operation can be a button or menu list item and may be used in conjunction with Priority Scan operation.Zone Scan List [ZSC+]Conventional ChannelsThe Zone Scan List allows the radio user to add or remove zones from the list of zones to be scanned.The Zone Scan List operation can be assigned as a button or menu list item.When Zone Scan List is assigned to a button [ZSC+], press the button to add or remove the currently operating zone from the scan list.When assigned as a menu item, open the menu and select the Zone you wish to add or remove from the scan list. Press “ENTER” to add or remove. Zones in the scan list will be indicated with the symbol.Contents](https://usermanual.wiki/BK-Technologies/KNGM800/User-Guide-1729001-Page-56.png)
![- 49 -KNG Mobile ManualTX/RX CxCSS Picklist [TXCG] [RXCG]Conventional Analog or Mixed Mode ChannelsSelecting a CTCSS/CDCSS Code Guard from the Pick List will assign the tone to the currently select analog or mixed-mode channel. All other channels are unaffected.User assigned Transmit and Receive Code Guards are selected independently. To change a Code Guard, open the RXCG or TXCG menu, select the desired tone and press “ENTER”.To return the tone to the pre-programmed value select “Default” or "0".If allowed, picklist values can be changed through keypad programming.TX/RX Network Access Code Picklist [TNAC] [RNAC]Conventional Digital or Mixed Mode ChannelsSelecting a Network Access Code (NAC) from the Pick List will assign the NAC to the currently select digital or mixed-mode channel. All other channels are unaffected.User assigned Transmit and Receive NACs are selected independently. To change a NAC, open the RXNAC or TXNAC menu, select the desired NAC and press “ENTER”.To return the NAC to the pre-programmed value select “Default” or "0".If allowed, picklist values can be changed through keypad programming.Contents](https://usermanual.wiki/BK-Technologies/KNGM800/User-Guide-1729001-Page-58.png)
![- 50 -KNG Mobile ManualTalk Group ID Picklist [TGID]Conventional Digital ChannelsSelecting a Talk Group ID from the Pick List will assign the TGID to the currently select channel. All other channels are unaffected.User selectable menu access can be assigned to a button or menu list item.Open the menu of available TGIDs. Select the desired Talk Group ID or, to return the TGID to the pre-programmed value, select “Default” or "0".Press “ENTER” to set the selection.If allowed, picklist values can be changed through keypad programming. Encryption Key Picklist [KEY]Digital or Mixed Mode Channels Encryption equipped radios only.Selecting an Encryption Key from the Pick List will assign the key to all encrypted channels that do not have ‘Key Lock’ programmed. Locked key channels will continue to use the pre-programmed key. (See Encryption Operation)Contents](https://usermanual.wiki/BK-Technologies/KNGM800/User-Guide-1729001-Page-59.png)
![- 51 -KNG Mobile ManualKeyset Picklist [KSET]Digital or Mixed Mode Channels OTAR equipped radios only. Selecting a Keyset from the Pick List will cause the radio to use encryption keys from the selected Keyset. (See Encryption Operation)Contents](https://usermanual.wiki/BK-Technologies/KNGM800/User-Guide-1729001-Page-60.png)
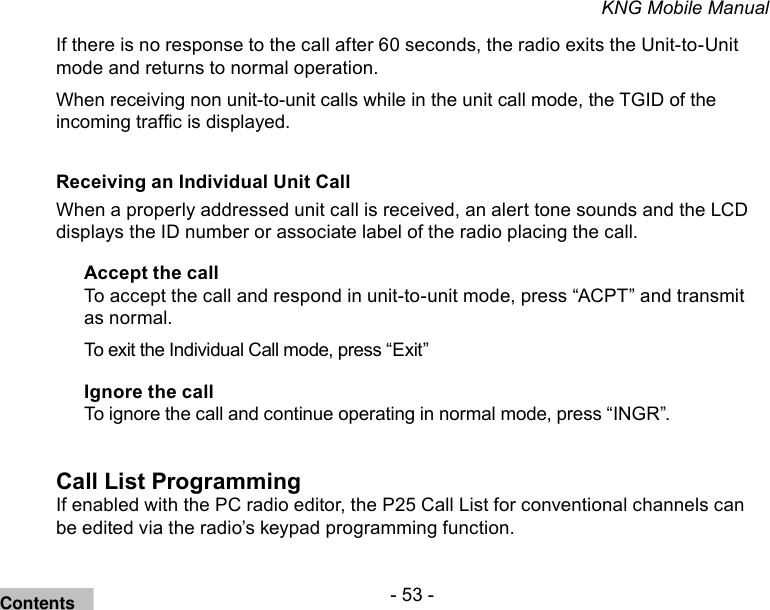
![- 52 -KNG Mobile ManualUnit-to-Unit Call OptionsIndividual Unit Call [UNIT]Conventional Digital and Trunking ChannelsP25 Unit IDs allow for Unit-To-Unit calls when the radio is operating in Digital Mode. Channels programmed for analog only operation will not be able to transmit or receive Unit-To-Unit calls.Conventional ChannelsPlacing an Individual Unit CallOpen the Unit Call menu and select the desired “Unit Call” option.Last Call = Use the P25 ID of the last Call.Call List = Use the programmed P25 ID List.Enter ID = Enter a numeric P25 ID.Press Enter to enter Unit Call Mode.The LCD displays the ID number or associate label of the targeted radio.Press the PTT button to send the unit-to-unit call.To exit the Individual Call mode press “Exit”.Contents](https://usermanual.wiki/BK-Technologies/KNGM800/User-Guide-1729001-Page-61.png)
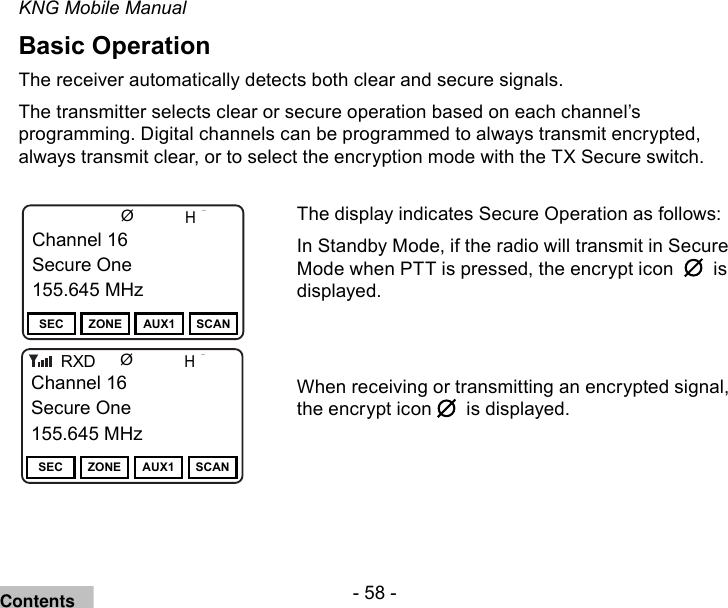
![- 59 -KNG Mobile ManualTransmit Secure [SEC]Channels programmed for selectable encryption can have “Transmit Secure” programmed as a button or menu item. The default setting uses the collar switch to select Transmit Secure.Ø = encrypted, O = clear When SEC is on, encrypted channels programmed for switchable encryption will transmit an encrypted signal. NOTE: The SEC switch has no effect on channels programmed as Encrypted Only or Clear Only. Channels in the Ready-to-Transmit Encrypted mode will display the symbol on the top line of the LCD.Transmit Encryption Key Selection [KEY]The radio can hold up to 32 DES and/or AES encryption keys. Each channel is assigned a default key for transmit. The key can be locked to the channel, or if programming allows, a transmit key other than the default key can be selected from the radio’s Key Pick List. NOTE: Selecting a user dened transmit key assigns that key to all radio channels programmed for selectable keys.Contents](https://usermanual.wiki/BK-Technologies/KNGM800/User-Guide-1729001-Page-68.png)
![- 60 -KNG Mobile ManualTo change an encryption key, open the User Keys menu. Programmed key labels will be displayed.Select the desired key and press “ENTER”.To return the key to the pre-programmed value select “Default”.If a key is selected that has not been programmed, the radio will emit a three beep tone and display “Key Fail” before going to standby mode. The radio will not transmit but will beep and display “Key Fail” when PTT is pressed.User Selectable Encryption Keyset [KEYST]OTAR equipped radios only.Selecting a keyset from the Pick List will cause the radio to use encryption keys from the selected keyset.User selectable menu access can be assigned to a button or menu list item.To change the encryption keyset, open the KEYST menu. Programmed Keyset labels will be displayed.Select the desired keyset and press “ENTER”.Contents](https://usermanual.wiki/BK-Technologies/KNGM800/User-Guide-1729001-Page-69.png)
![- 61 -KNG Mobile ManualRekey Request [RKEY]OTAR equipped radios only. On radios equipped with over-the-air rekeying (OTAR), a radio user can manually request an encryption rekey from the Key Management Facility (KMF). For a radio to receive encryption keys or keysets over-the-air, the selected channel must be designated as an OTAR channel via PC programming. Refer to your PC programming documentation for more information.To request a re-key:Open the Rekey Request menu. Press the “YES” button to Request Keys, or press “ESC” to cancel the operation.If the “YES” button is pressed while on a channel that has not been marked as an OTAR channel, the radio will boop and “NON-OTAR” will appear on the display.If a successful rekey occurs, a tone will sound, and the display will momentarily show “REKEYED”.Contents](https://usermanual.wiki/BK-Technologies/KNGM800/User-Guide-1729001-Page-70.png)
![- 62 -KNG Mobile ManualKeyset Viewing and Selecting [KSET]OTAR equipped radios only. The radio can hold up to 8 encryption keysets. Only one keyset can be active at any time. The radio will receive messages encrypted with any of the keys in any of the keysets, but transmit keys can only be selected from the active keyset. To change an encryption keyset, open the KEYST menu. Programmed keyset labels will be displayed. Select the desired keyset and press “ENTER”.Zeroizing [ZERO]The radio provides a method for the user to “panic-zeroize” all encryption keys. Zeroizing removes all encryption keys from the radio, including keys used for OTAR and Tactical OTAR operation.Zeroize can be assigned as a button or menu list item.Open the “Zeroize Keys” menu.Press “YES” to erase all encryption keys or “ESC” to cancel the action.When successfully removed the “Keys Removed” message will momentarily be displayed.Contents](https://usermanual.wiki/BK-Technologies/KNGM800/User-Guide-1729001-Page-71.png)
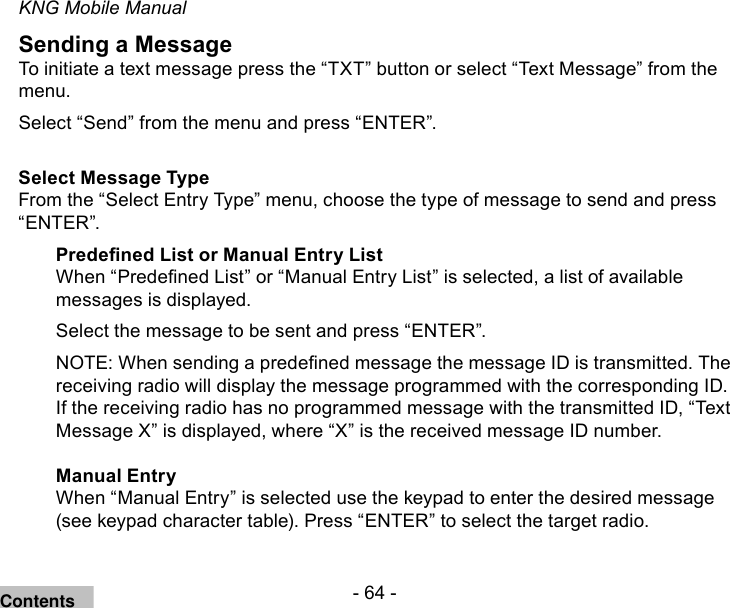
![- 63 -KNG Mobile ManualMessaging Digital Conventional P25 channels can be programmed to send and receive text messages and radio status messages.Text messages can be selected from a pre-programmed list or manually entered using the radio keypad.Status messages are pre-programmed only.Text Messaging [TXT]Conventional Digital Channels Message types include predened messages, manually entered messages or locally stored messages.Predened messages - Predened messages are programmed into the radio memory using the radio editor software.Manually Entered Messages - Text messages can be manually entered via the radio’s keypad.Locally Stored Messages - Up to ve manually entered messages can be stored in individual radios.Contents](https://usermanual.wiki/BK-Technologies/KNGM800/User-Guide-1729001-Page-72.png)
![- 67 -KNG Mobile ManualSelect “Store” and press “Enter”.Use the keypad to enter the desired message then press “Enter”. (See keypad character table)Select the storage slot for the message and press “Enter” to store the message.User Status Messaging [STS]Conventional Digital ChannelsSending a Status UpdateNOTE: When sending a message the message ID is transmitted. The receiving radio will display the message programmed with the corresponding ID. If the receiving radio has no programmed message with the transmitted ID “Status: Status X” is displayed, where “X” is the received ID number.Select Status MessagePress the “STS” button or select “Status Update” from the menu.From the “Select Status” menu, select the programmed message to send and press “Enter”.Contents](https://usermanual.wiki/BK-Technologies/KNGM800/User-Guide-1729001-Page-76.png)
![- 70 -KNG Mobile ManualPaging and Call Alert Conventional Two-Tone/DTMF/MDC1200 Paging [MUTE] Conventional Analog ChannelsThe KNG can be programmed to receive two-tone, DTMF or MDC1200 pages on conventional analog channels.Receiving a pageSelect an analog or mixed-mode receive channel.Turn on “Voice Mute” from the programmed button or menu item.When voice mute is activated the icon is displayed.The radio ignores all voice trafc until the proper tone sequence is received.When a proper signal is received the radio will emit an alert tone and allow the audio to pass.If Auto Reset is programmed, the radio will return to the muted standby mode when the time conditions have been met. Contents](https://usermanual.wiki/BK-Technologies/KNGM800/User-Guide-1729001-Page-79.png)
![- 71 -KNG Mobile ManualCall Alert Paging [ALRT] Digital ChannelsThe KNG can be programmed to send and receive Call Alert messages on digital channels.Sending a Call AlertPress the “ALRT” button or open “Call Alert” from the menu.Select Target RadioLast CallSelect “Last Call” to send the message to the radio which you last sent or received a call alert. Press “Enter” to send the message.Call ListSelecting “Call List” opens a list alias’ for the pre-programmed Unit IDs. Select the desired target radio and press “Enter” to send the Call Alert.Unit IDSelect “Unit ID” to enter the ID of the target radio.Use the keypad to enter the ID then press “Enter” to send the Call Alert.Contents](https://usermanual.wiki/BK-Technologies/KNGM800/User-Guide-1729001-Page-80.png)
![- 72 -KNG Mobile ManualReceiving a Call AlertWhen a Call Alert is received, an alert tone will sound and the incoming unit ID or alias is displayed for approximately 5 seconds.The top display line line will alternated between the programmed display information and a Call Alert Received message until.To clear the message, open the "Call Alert" menu, changing the channel or cycling radio power.Radio Check [RCHK] Conventional Digital ChannelsThe KNG can be programmed to check the availability of a KNG radio with a specic P25 ID. Requesting a Radio CheckPress the “RCHK” button or open “Radio Check” from the menu list.Select Target RadioLast CallSelect “Last Call” to send the request to the radio which you last sent a radio check request. Press “Enter” to send the query.Contents](https://usermanual.wiki/BK-Technologies/KNGM800/User-Guide-1729001-Page-81.png)
![- 74 -KNG Mobile ManualRadio Inhibit/Enable [INH]/[UNINH]Conventional Digital ChannelsWith “Inhibit” assigned to a button or menu function, a KNG Radio can temporarily disable other KNG radios using the targeted radio’s unit ID number.The disabled radio can only be re-enabled by sending an “Unhibit” command.NOTE: Inhibited radios cannot be read with the Neovision radio editor.Sending a commandTo initiate an inhibit/uninhibit message press the programmed button or select from the menu.Use the keypad to enter the Administrator password.Press “ENTER” to open the menu.Select Target RadioLast CallSelect “Last Call” to send the message to radio you last sent an inhibit or uninhbit message. Press “SEND” to send the message.Contents](https://usermanual.wiki/BK-Technologies/KNGM800/User-Guide-1729001-Page-83.png)
![- 76 -KNG Mobile ManualOther Options and FunctionsMany operational features and functions can be programmed for user selection and control. Items can be programmed to the radio buttons. In addition to these quick set buttons, a menu of multiple functions can be accessed with from the “MENU” button.Backlight [LITE]Conventional and Trunked ChannelsLCD Backlight control can be assigned to a button or as a menu item. Lighting Options:Auto - Automatically adjusts brightness depending on ambient light. Off - Display, navigation button backlights and microphone lighting are turned off.Touch the display to turn the lights on.Dim, Medium, Bright - Locks display to selected brightness.Contents](https://usermanual.wiki/BK-Technologies/KNGM800/User-Guide-1729001-Page-85.png)
![- 78 -KNG Mobile ManualConditions include:Off - Channel is never declared busy.Carrier - A busy condition is declared when carrier is present on the selected Rx frequency.Non-Qualied - A busy condition is declared when a non-qualied signal is present on the Rx frequency. (Non-qualied = Incorrect CTCSS/CDCSS, talk group or NAC )Status Symbol - Digital Channels Only. A busy condition is declared if the P25 busy status symbol is present on the Rx frequency.Channel Select [CHAN]Conventional and Trunked Channels Channel Selection can be assigned to a button or menu item. (See Channel/Zone Selection Options for details.)CloningConventional ZonesKNG radios can be set up to send or receive programmed information from other BK Radio products via a cloning cable available from RELM Wireless. Refer to the cloning cable manual for cloning information. Contents](https://usermanual.wiki/BK-Technologies/KNGM800/User-Guide-1729001-Page-87.png)
![- 79 -KNG Mobile ManualControl Lockout [LCK]Conventional and Trunking ChannelsThe KNG portable offers a variety of control lock options. Control lock can be assigned as a button or menu item. Users can select from two lockout settings, “Lock Keypad Only” and “Lock All Controls”.“Lock Keypad Only” locks all front panel a nd touch screen button operations except the Orange emergency button. Also locks the navigation wheel and keypad of the KAA0290 microphone.“Lock All Controls” locks all buttons and switches as determined by radio programming. Any or all of the following function may be locked when “Lock All Controls” is selected: Microphone keypad and side buttons, channel/zone knob, emergency button and push-to-talk.To enable the lock function press the assigned button or open the menu and select Control Lock from the list.Select the desired lockout setting and press “ENTER”To disable Control Lock press the left arrow twice, followed by the right arrow twice.Contents](https://usermanual.wiki/BK-Technologies/KNGM800/User-Guide-1729001-Page-88.png)
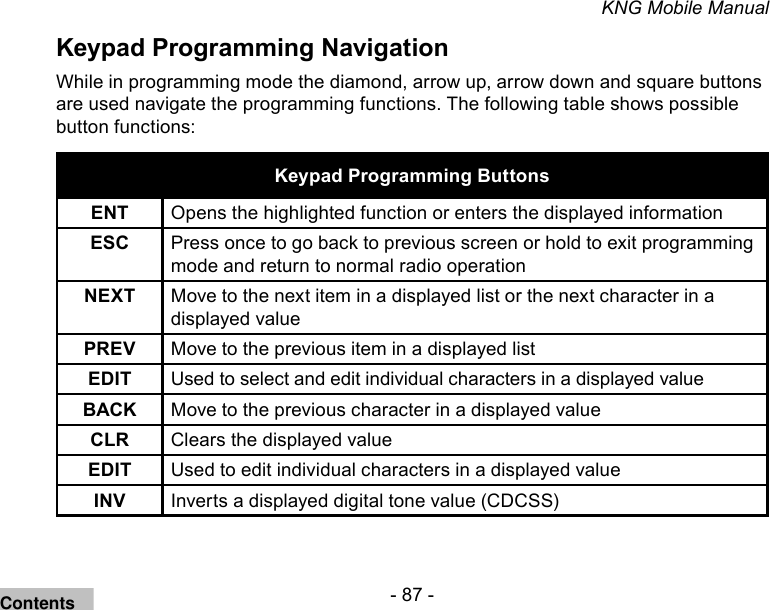
![- 80 -KNG Mobile ManualKeypad ProgrammingConventional Systems and ChannelsMuch of the information stored in the KNG can be edited using the keypad. Four separate programming functions can be enabled with the PC Radio Editor software.Refer to the Keypad Programming section for detailed information on how to edit programmed radio information.Monitor [MON]Conventional ChannelsThere are four settings available for monitoring trafc on a selected channel. “Monitor” can be assigned to a button or as a menu item.Monitor Modes and IndicatorsSelective - Digital channels only. Required for Unit-to-Unit calls and Talkgroup use. (No indicator)Normal - Requires NAC or Tone. Ignores Talkgroup and Unit-to-Unit information on digital channels. Flashing when selected.Monitor - Monitors activity on selected channel. Steady when selected.Open - Open Squelch. Solid when selected.Contents](https://usermanual.wiki/BK-Technologies/KNGM800/User-Guide-1729001-Page-89.png)
![- 81 -KNG Mobile ManualButton Operation - Press the button to cycle to the next mode. Press and hold for Open Squelch. Availability of “Selective” or “Normal” is determined by each channel’s programmed Squelch Operation setting.Menu Operation - Open the Monitor menu, select the desired operation and press “Enter”.Nuisance Channel Delete [DEL]Conventional ChannelsIf enabled, a nuisance channel can be temporarily removed from the scan list. Nuisance Channel Delete can only be assigned to a button.To temporarily remove a channel from the scan list, press the assigned button while the nuisance channel is being received.To revert to the programmed scan list, turn off Scan, cycle radio power or select another zone or channel.Contents](https://usermanual.wiki/BK-Technologies/KNGM800/User-Guide-1729001-Page-90.png)
![- 82 -KNG Mobile ManualRadio infoConventional and Trunking ChannelsRadio information can be assigned as a menu item.When selected, the LCD displays programmed radio settings.Repeater Talkaround [T/A]Conventional ChannelsIn Repeater Talkaround mode, the radio will transmit on the programmed receive frequency of the selected channel. When T/A is enabled the icon will be displayed on the top line of the LCD. NOTE: Channels programmed as receive only are not affected by the Talkaround selection.Talkaround selection can be assigned to a button or as a menu list item.Squelch Adjust [SQL]Conventional ChannelsSquelch Adjust is used to change the signal strength required for the radio’s speaker to unmute.Squelch can be assigned as a button or menu list item.Contents](https://usermanual.wiki/BK-Technologies/KNGM800/User-Guide-1729001-Page-91.png)
![- 83 -KNG Mobile ManualTo adjust the squelch setting, open the squelch menu and select "Adjust Channel Squelch". Select the desired threshold using the -/+ buttons.Press “ENTER” to set the level.By selecting "Reset Squelch" from the menu list, preset squelch threshold can be reset for the currently selected channel, currently selected zone or all programmed conventional channels.Site Display [STDS]Trunking ChannelsWhen selected, the Site Display functions shows information for the currently operating site.Displayed information includes: Site ID, Site Alias and RSSI.Site Display can be assigned as a button or menu list item.Site Lock [STLK]Trunking ChannelsSite lock prevents the radio from searching for other sites by locking it to the currently selected site.Site Lock can be assigned as a button or menu list item.Contents](https://usermanual.wiki/BK-Technologies/KNGM800/User-Guide-1729001-Page-92.png)
![- 84 -KNG Mobile ManualSite Search [STSR]Trunking ChannelsSite Search automatically searches and selects the best available trunking site.Site Search can be assigned as a button or menu list item.Surveillance Mode [SURV]Conventional and Trunking ChannelsWhen Surveillance Mode is on, all audible indicators (beeps etc.), Keypad lighting functions and LED's are disabled. The LCD display is set to "Dim". Each channel can be programmed for selectable surveillance mode or be set to always or never in surveillance mode.Surveillance Mode can be assigned as a button or menu list item.Transmit Digital [TXAD]Conventional Mixed-Mode Transmit ChannelsWhen Transmit Digital is on, channels programmed for mixed-mode transmit will transmit in digital mode. When off, mixed-mode channels transmit in analog mode.Contents](https://usermanual.wiki/BK-Technologies/KNGM800/User-Guide-1729001-Page-93.png)
![- 85 -KNG Mobile ManualWhen transmitting in digital mode the display shows "D" behind the TX indicator. In analog transmit, "A” will follow the indicator.Transmit Digital selection can be assigned as a button, switch or menu list item.When assigned as a button function, the “TXAD” button will be highlighted when in the Transmit Digital mode.Transmit Power [PWR]Conventional and Trunking ChannelsTransmit Power can be selected between the programmed high and low settings. The power output of the settings depend on radio options, model and editor settings.When operating in the high power mode, “H” will be displayed on the top line of the LCD. In low power mode, “L” is displayed.Power selection can be assigned as a button or menu list item.Contents](https://usermanual.wiki/BK-Technologies/KNGM800/User-Guide-1729001-Page-94.png)

![Keypad Text/Programming Characters11PQRS7P, Q, R, S, p, q, r, s, 7ABC2A, B, C, a, b, c, 2TUV8T, U, V, t, u, v, 8DEF3D, E, F, d, e, f, 3WXYZ9W, X, Y, Z, w, x, y, z, 9GHI4G, H, I, g, h, i, 4 00, Blank SpaceJKL5J, K, L, j, k, l, 5**, ., ,, ;, :, ", ', !, ?, %, &, ', ~, @, _MNO6M, N, O, m, n, o, 6##, $, +, -, =, ^, /, \, |, <, >, {, }, [, ]Contents](https://usermanual.wiki/BK-Technologies/KNGM800/User-Guide-1729001-Page-115.png)