BK Technologies KNGP150 VHF HANDHELD TRANSCEIVER User Manual
RELM WIRELESS CORP. - BK RADIO VHF HANDHELD TRANSCEIVER
Contents
- 1. OWNERS MANUAL
- 2. User Manual
User Manual
Contents
Introduction.....................................................................................1
FCC Requirements .........................................................................1
Industry Canada Compliance........................................................2
Safety Precautions .........................................................................4
Information and Options ...............................................................7
Battery Installation and Removal .................................................8
Battery Care and Maintenance ....................................................9
Antenna Installation and Removal ...............................................9
Radio Controls ..............................................................................10
LCD Display ...................................................................................11
Status Indicators ..........................................................................11
Alphanumeric Label Options ........................................................12
Programmable Switch and Button Functions ...........................13
Options and Labels .......................................................................14
Channel/Zone Selection Options ................................................17
Channel/Zone Selector Knob ........................................................17
Button/Menu Item Selection ..........................................................17
Direct Keypad Entry ......................................................................17
Using Knob and Button Operations Together ...............................18
Basic Radio Operation .................................................................18
Command Zone Operation ..........................................................19
Building a Command Zone [CHAN+] ............................................19
Editing a Command Zone [CHAN-] ...............................................19
Code Guard/NAC Operation ........................................................20
Code Guard Receive.....................................................................20
Code Guard Transmit ....................................................................20
Analog Squelch Control ................................................................20
APCO Project 25 Digital Squelch Control .....................................21
Mixed Mode Operation .................................................................22
Trunking Channel Basic Operation ............................................23
Scan Options ................................................................................24
Channel Scan [SCAN] ..................................................................24
Channel Scan List [SCN+] ............................................................25
Talkback Scan ...............................................................................25
Vote Scan [Requires Option KZA0581].........................................25
Dual Mode Scan [DSCN] ..............................................................26
Enhanced Scan [ESCN] ................................................................26
Priority Scan [PSCN] ....................................................................26
Priority Channel Select [PRI] ........................................................27
Zone Scan [ZSCN] ........................................................................28
Zone Scan List [ZSC+] ..................................................................28
Pick List Options ..........................................................................29
TX/RX CxCSS Picklist [TXCG] [RXCG] .......................................29
TX/RX Network Access Code Picklist [TNAC] [RNAC] ................29
Talk Group ID Picklist [TGID] ........................................................30
Encryption Key Picklist [KEY] .......................................................30
Keyset Picklist [KSET] ...................................................................30
Unit-to-Unit Call Options .............................................................31
Emergency Signaling Options ....................................................33
Encryption Operation ..................................................................34
Required Setup .............................................................................34
Basic Operation.............................................................................34
Transmit Secure [SEC] ..................................................................35
Transmit Encryption Key Selection [KEY] .....................................35
User Selectable Encryption Keyset [KEYST] ................................35
Rekey Request [RKEY] .................................................................36
Keyset Viewing and Selecting [KSET] ..........................................36
Zeroizing [ZERO] ..........................................................................36
Messaging ....................................................................................37
Text Messaging [TXT] ...................................................................37
Short Message Update [MSG] ......................................................39
User Update Messaging [STS] ......................................................39
Paging and Call Alert ..................................................................41
Conventional Two-Tone/DTMF/MDC1200 Paging [MUTE] ..........41
Call Alert Paging [ALRT] ..............................................................41
Radio Check [RCHK] ...................................................................42
Radio Inhibit/Enable [INH]/[UNINH] ............................................43
Other Options and Functions .....................................................44
Backlight [LITE] .............................................................................44
Battery Life [LIFE] .........................................................................44
Bluetooth [BT] ...............................................................................44
Busy Channel Operation ...............................................................44
Channel Select [CHAN] ................................................................45
Cloning [CLON] .............................................................................45
Contrast .........................................................................................46
Control Lockout [LCK] ...................................................................46
Date and Time [DATE] ..................................................................46
Global Positioning [GPS] ...............................................................47
Hard Power Down [PWRD] ...........................................................47
Keypad Programming ...................................................................48
Minimum Volume [VOL] ................................................................48
Monitor [MON] ...............................................................................48
Nuisance Channel Delete [DEL] ...................................................48
Phone [PHN] and Hang Up [HANG] .............................................49
Radio Accountability Tone [RAT] ..................................................49
Radio info ......................................................................................49
Repeater Talkaround [T/A] ............................................................49
Send Alert Tone [SNDT] ...............................................................49
Send Signal [SEND] ......................................................................50
Squelch Adjust [SQL] ....................................................................50
Site Display [STDS] .......................................................................50
Site Lock [STLK] ...........................................................................50
Site Search [STSR] .......................................................................50
Surveillance Mode [SURV] ...........................................................51
System Test ...................................................................................51
Transmit Digital [TXAD] ................................................................51
Transmit Power [PWR] ..................................................................51
Two-Tone Select [TONE] ..............................................................51
Versions ........................................................................................52
Zone Select [ZONE] .....................................................................52
Keypad Programming ..................................................................53
Keypad Programming Navigation .................................................53
Entering Keypad Programming Mode ...........................................54
Global, System, Zone and Channel Parameters...........................54
Global Settings ....................................................................54
Displayed Information Lines ..............................................54
User Password...................................................................56
System Settings .................................................................56
System Priority 1 or 2 Channel ..........................................56
Tx on Priority 1 Channel ....................................................56
Zone Settings .......................................................................56
Add Zone ...........................................................................56
Delete Zone .......................................................................57
Edit Zone ............................................................................57
Channel Settings .................................................................57
Add Channel ......................................................................58
Delete Channel ..................................................................58
Edit Channel ......................................................................58
P25 ID Unit Call/Receive List ........................................................60
User Selectable Code Guards ......................................................60
User Selectable Network Access Codes ......................................62
User Selectable Talkgroup IDs ......................................................62
Warranty ........................................................................................62
My Radio Settings ........................................................................64

KNG2 Portable Radio User’s Manual
- 1 -
Introduction
Congratulations on your purchase of the BK Radio KNG2 Portable radio
from RELM Wireless.
The KNG2 APCO Project 25 radio oers an array of programmable
functionality to help radio users get the most out of their portable
communications. Check with your RELM/BK Radio dealer or
communications ocer for information on the programmed functions of
your radio prior to operation.
This manual contains information concerning the operation procedures
for the BK Radio KNG2 Portable radio. The KNG2 has been
designed to meet the tough requirements of today’s communications
environment. Please take a moment to read the information in this
manual so you can get optimum performance from your new radio.
FCC Requirements
Your radio must be properly licensed by the Federal Communications
Commission prior to use. Your BK Radio dealer can assist you in
meeting these requirements. Your dealer will program each radio with
your authorized frequencies, signaling codes, etc., and will be there to
meet your communications needs as your system expands.
The FCC rules require manufacturers to comply with the FCC RF
energy exposure limits for portable 2-way radios before they can be
marketed in the U.S. When 2-way radios are used as a consequence
of employment, the FCC requires users to be fully aware of and able
to control their exposure to meet occupational requirements. Exposure
awareness can be facilitated by the use of a product label directing
users to specic user awareness information. Your BK Radio 2-way
radio has a RF exposure product label. Also, your BK Radio owner’s
and service manuals include information and operating instructions
required to control your RF exposure and to satisfy compliance
requirements.
Compliance with RF Exposure Standards
Your BK Radio 2-way radio is designed and tested to comply with a
number of national and international standards and guidelines (listed

RELM Wireless Corporation
- 2 -
below) for human exposure to radio frequency electromagnetic energy.
This radio complies with the IEEE and ICNIRP exposure limits for
occupational/controlled RF exposure environment at operating duty
factors of up to 50% transmitting and is authorized by the FCC for
occupational use only. In terms of measuring RF energy for compliance
with the FCC exposure guidelines, your radio radiates measurable
RF energy only while it is transmitting (during talking), not when it is
receiving (listening) or in Standby Mode. Note: The approved batteries
supplied with this radio are rated for a 5-5-90 duty factor (5% talk - 5%
listen - 90% standby), even though this radio complies with the FCC
occupational RF exposure limits and may operate at duty factors of up
to 50% talk.
Your BK Radio 2-way radio complies with the following RF energy
exposure standards and guidelines:
United States Federal Communications Commission, Code of Federal
Regulations; 47 CFR §§ 1.1307, 1.1310, 2.1091 and 2.1093
American National Standards Institute (ANSI) / Institute of Electrical and
Electronic Engineers (IEEE) C95. 1-1992
Institute of Electrical and Electronic Engineers (IEEE) C95.1-1999
Edition
Industry Canada Compliance
This device complies with Industry Canada’s license-exempt RSSs.
Operation is subject to the following two conditions:
(1) This device may not cause interference; and
(2) This device must accept any interference, including interference that
may cause undesired operation of the device.
Le présent appareil est conforme aux CNR d'Industrie Canada
applicables aux appareils radio exempts de licence. L'exploitation est
autorisée aux deux conditions suivantes : (1) l'appareil ne doit pas
produire de brouillage, et (2) l'utilisateur de l'appareil doit accepter tout
brouillage radioélectrique subi, même si le brouillage est susceptible
d'en compromettre le fonctionnement.
WARNING:
Under Industry Canada regulations, this radio transmitter may only
operate using an antenna of a type and maximum (or lesser) gain
approved for the transmitter by Industry Canada. To reduce potential
radio interference to other users, the antenna type and its gain should
be so chosen that the equivalent isotropically radiated power (e.i.r.p.) is
not more than that necessary for successful communication.
KNG2 Portable Radio User’s Manual
- 3 -
Conformément à la réglementation d'Industrie Canada, le présent
émetteur radio peut fonctionner avec une antenne d'un type et d'un
gain maximal (ou inférieur) approuvé pour l'émetteur par Industrie
Canada. Dans le but de réduire les risques de brouillage radioélectrique
à l'intention des autres utilisateurs, il faut choisir le type d'antenne
et son gain de sorte que la puissance isotrope rayonnée quivalente
(p.i.r.e.) ne dépassepas l'intensité nécessaire à l'établissement d'une
communication satisfaisante.
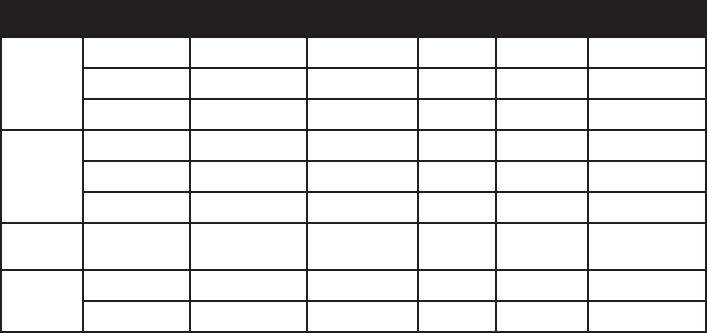
The KNG2 Series Radio Transmitter has been approved by Industry
Canada to operate with the antenna types listed below with the
maximum permissible gain and required antenna impedance for each
antenna type indicated. Antenna types not included in this list, having a
gain greater than the maximum gain indicated for that type, are strictly
prohibited for use with this device.
Le présent émetteur radio (identier le dispositif par son numéro de
certication ou son numéro de modèle s'il fait partie du matériel de
catégorie I) a été approuvé par Industrie Canada pour fonctionner avec
les types d'antenne énumérés ci-dessous et ayant un gain admissible
maximal et l'impédance requise pour chaque type d'antenne. Les types
d'antenne non inclus dans cette liste, ou dont le gain est supérieur au
gain maximal indiqué, sont strictement interdits pour l'exploitation de
l'émetteur.
Approved Antennas:
Antenna Freq. Range Impedance Gain Radiation Polarization
KNG2-
P150
KAA0810G2 136 -174MHz 50 Ohms -8dBi Omni Vertical
KAA0818 150-170MHz 50 Ohms 0dBi Omni Vertical
K A A0 811C 162-174MHz 50 Ohms 0dBi Omni Vertical
KNG2-
P400
KAA0817 380-420MHz 50 Ohms 0dBi Omni Vertical
KAA0826 403-435MHz 50 Ohms 1dBi Omni Vertical
KAA0815 380-470MHz 50 Ohms 1dBi Omni Vertical
KNG2-
P500 KAA0816 440-520MHz 50 Ohms 1dBi Omni Vertical
KNG2-
P800
KAA0825 746 -870MHz 50 Ohms 2dBi Omni Vertical
KAA0833 760-870MHz 50 Ohms 0dBi Omni Vertical
Please refer to the following websites for more information on what
RF energy exposure is and how to control your exposure to assure
compliance with established RF exposure limits.
http://www.ic.gc.ca/eic/site/smt-gst.nsf/eng/sf01904.html
http://www.ic.gc.ca/eic/site/ceb-bhst.nsf/eng/h_tt00080.html
RELM Wireless Corporation
- 4 -
Safety Precautions
• Do not operate the transmitter in close
proximity to blasting caps.
• Do not operate the radio in an explosive
atmosphere (petroleum fuels, solvents, dust,
etc.) unless your radio is an intrinsically safe
model designed for such use.
RF ENERGY EXPOSURE AWARENESS AND CONTROL
INFORMATION, AND OPERATIONAL INSTRUCTIONS FOR
FCC OCCUPATIONAL USE REQUIREMENTS
BEFORE USING YOUR PORTABLE 2-WAY RADIO,
READ THIS IMPORTANT RF ENERGY AWARENESS AND
CONTROL INFORMATION AND OPERATIONAL INSTRUCTIONS
TO ENSURE COMPLIANCE WITH THE FCC’S RF EXPOSURE
GUIDELINES.
NOTICE: This radio is intended for use in occupational/controlled
conditions, where users have full knowledge of their exposure and
can exercise control over their exposure to meet FCC limits. This radio
device is NOT authorized for general population, consumer, or any
other use.
This 2-way radio uses electromagnetic energy in the radio frequency
(RF) spectrum to provide communications between two or more users
over a distance. It uses radio frequency (RF) energy or radio waves
to send and receive calls. RF energy is one form of electromagnetic
energy; other forms include electric power, radar, sunlight and x-rays.
RF energy, however, should not be confused with these other forms
of electromagnetic energy, which when used improperly can cause
biological damage. Very high levels of x-rays, for example, can damage
tissues and genetic material. The energy levels associated with radio
waves from portable 2-way radios, when properly used, are not great
enough to cause biological damage.
Experts in science, engineering, medicine, health and industry work
with organizations to develop standards for exposure to RF energy.
These standards provide recommended levels of RF exposure for both
workers and the general public. These recommended RF exposure
levels include substantial margins of protection. All 2-way radios
KNG2 Portable Radio User’s Manual
- 5 -
marketed in North America are designed, manufactured and tested
to ensure they meet government established RF exposure levels. In
addition, manufacturers also recommend specic operating instructions
to users of 2-way radios.
These instructions are important because they inform users about RF
energy exposure and provide simple procedures on how to control it.
Please refer to the following websites for more information on what
RF energy exposure is and how to control your exposure to assure
compliance with established RF exposure limits.
http://www.fcc.gov/oet/rfsafety/rf-faqs.html
http://www.osha.gov/SLTC/radiofrequencyradiation/index.html
RF Exposure Compliance and Control Guidelines and Operation
Instructions
To control your exposure and ensure compliance with the occupational/
controlled environment exposure limits always adhere to the following
procedures.
Guidelines:
Do not remove the RF Exposure Label from the device.
User awareness instructions must accompany device when transferred
to other users. Do not use this device if the operational requirements
described herein are not met.
Operating Instructions:
Transmit no more than the rated duty factor of 50% of the time.
To transmit (talk), push the Push-To-Talk (PTT) button. To receive
calls, release the PTT button. Transmitting 50% of the time, or less,
is important because this radio generates measurable RF energy
exposure only when transmitting (in terms of measuring for standards
compliance).
Hold the radio in a vertical position in front of face with the microphone
(and the other parts of the radio, including the antenna) at least one
inch (2.5 cm) away from the nose. Keeping the radio at the proper
distance is important because RF exposures decrease with distance
from the antenna. Antenna should be kept away from eyes.
RELM Wireless Corporation
- 6 -
When worn on the body, always place the radio in a BK Radio approved
clip, holder, holster, case, or body harness for this product. Using
approved body-worn accessories is important because the use of BK
Radio or other manufacturer’s non-approved accessories may result
in exposure levels which exceed the FCC’s occupational/controlled
environment RF exposure limits.
If you are not using a body-worn accessory and are not using the radio
in the intended use position in front of the face, then ensure the antenna
and the radio are kept at least one inch (2.5 cm) from the body when
transmitting. Keeping the radio at the proper distance is important
because RF exposures decrease with increasing distance from the
antenna.
Use only BK Radio approved supplied or replacement antennas,
batteries, and accessories. Use of non-BK Radio approved antennas,
batteries, and accessories may exceed the FCC RF exposure
guidelines.
For a list of BK Radio approved accessories visit the following website:
http://www.relm.com.
The AMBE® voice compression software included in this product
is protected by intellectual property rights including patent rights,
copyrights and trade secrets of Digital Voice Systems, Inc. The user
of this software is explicitly prohibited from attempting to decompile,
reverse engineer, or disassemble the object code, or in any other way
convert the object code into a human-readable form. This software is
licensed solely for use within this product. US Patent Nos. #6,912,495
B2, #5,870,405, #5,826,222, #5,754,974, #5,715,365, #5,701,390,
#5,649,050, #5,630,011, #5,581,656, #5,517,511, #5,491,772,
#5,247,579, #5,226,084, and #5,195,166.
Contact Information
For additional information on exposure requirements or other
information, visit website http://www.relm.com.
KNG2 Portable Radio User’s Manual
- 7 -
Information and Options
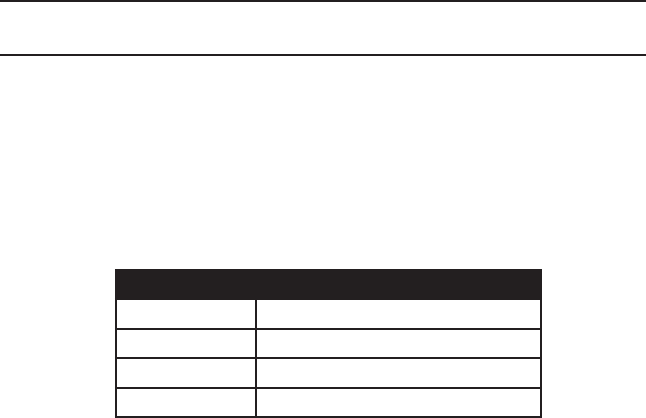
Depending on model type, KNG2 radios operate in the VHF, UHF or
800MHz frequency band. Up to 5000 channels can be programmed
into the radio. The channels may be divided into operating zones.
Zones can be designated as standard operating zones or command
zones. Command zones are made of up of channels selected from
standard operating zones.
Model Frequency Range
P150 136 - 174Mhz
P400 380 - 470Mhz
P500 440 - 520Mhz
P800 763 - 870Mhz
RELM Wireless Corporation
- 8 -
Options
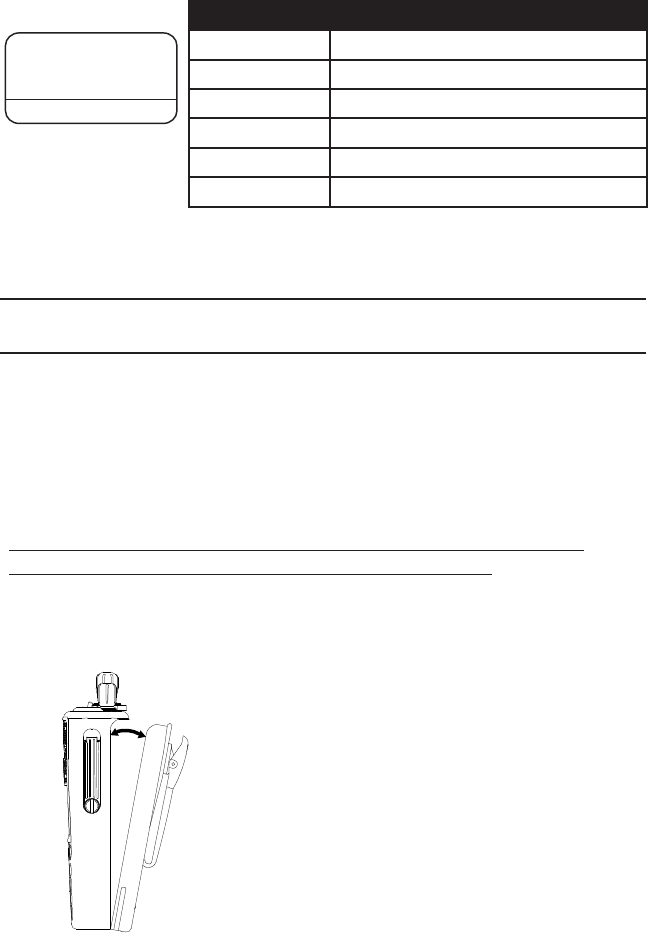
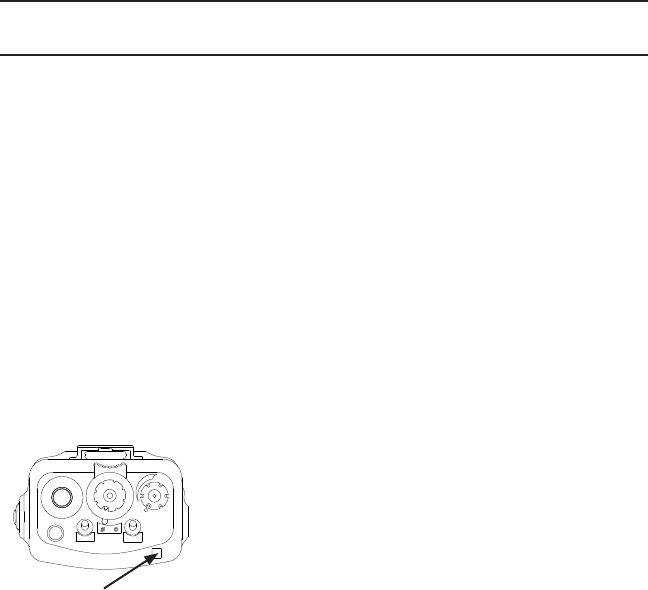
Factory installed options are listed on a tag located on the back of your
radio near the top.
Number Option
KZA0558 Intrinsically Safe Certication
KZA0577 AES/DES Encryption
KZA0570 Over-the-Air Rekeying (OTAR)
KZA0579 P25 Trunking
KZA0581 Vote-Scan
KZA0582 Over-the-Air Programming (OTAP)
Battery Installation and Removal
NOTE: For safety reasons, rechargeable battery packs are shipped
uncharged or only partially charged. Therefore, a rechargeable battery
pack should be properly charged in an approved battery charger before
use.
Only RELM Wireless approved batteries should be used to insure
proper operation and specications.
Models with KZA0558, intrinsically safe certication, must use a
KAA0100IS battery to meet certication requirements.
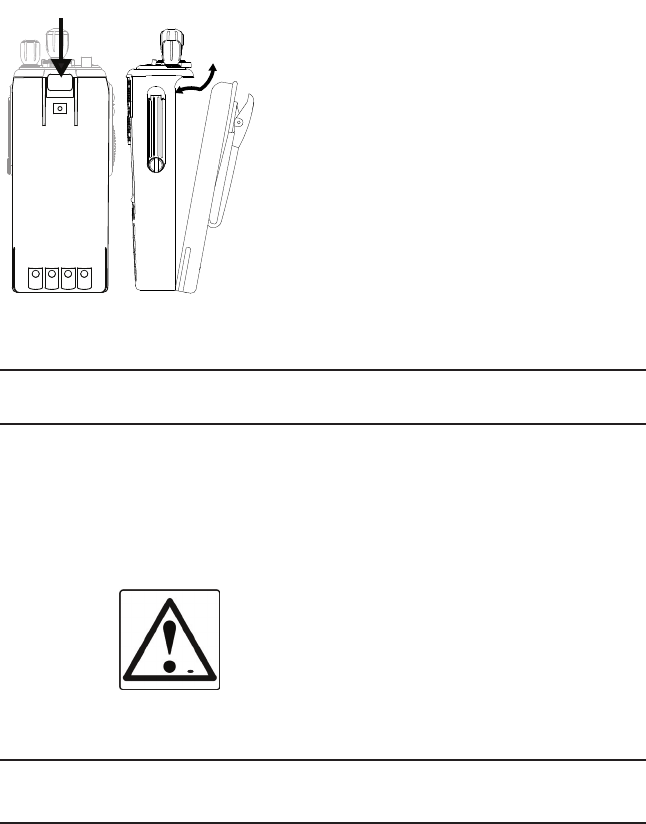
Installing the Battery
Turn the radio o.1.
Align the tabs on the bottom of the battery 2.
with the slots on the radio.
Push the top of the battery toward the radio 3.
until release tab “clicks” into place.
KZA0577
KZA0579
Options Tag
KNG2 Portable Radio User’s Manual
- 9 -
Removing the Battery
Slide the release tab toward the 1.
bottom of the radio.
Pull the top of the battery out. 2.
(Approximately 30o)
Pull up to remove the battery pack.3.
NOTE: All information programmed into the
radio is maintained even when the battery
pack is removed.
Battery Care and Maintenance
BK Radio battery packs are available in a variety of capacities and
types for special applications. Rechargeable battery packs can be
charged separately or while attached to a radio.
Periodically check the contacts on the battery pack for dirt or debris
that could prevent a good electrical contact with the charging base.
WARNING!
DO NOT DROP A BATTERY
PACK INTO FIRE.
AN EXPLOSION MAY OCCUR
Antenna Installation and Removal
NOTE: Transmitting without an antenna could result in damage to
your radio.
Use RELM/BK Radio approved antennas only. Use of non-qualied
or mismatched antennas could result in diminished radio operation.
Published radio specications cannot be guaranteed with non-approved
antennas. Bent, broken or damaged antennas should be replaced.
+TS ON
-
Release Tab
RELM Wireless Corporation
- 10 -
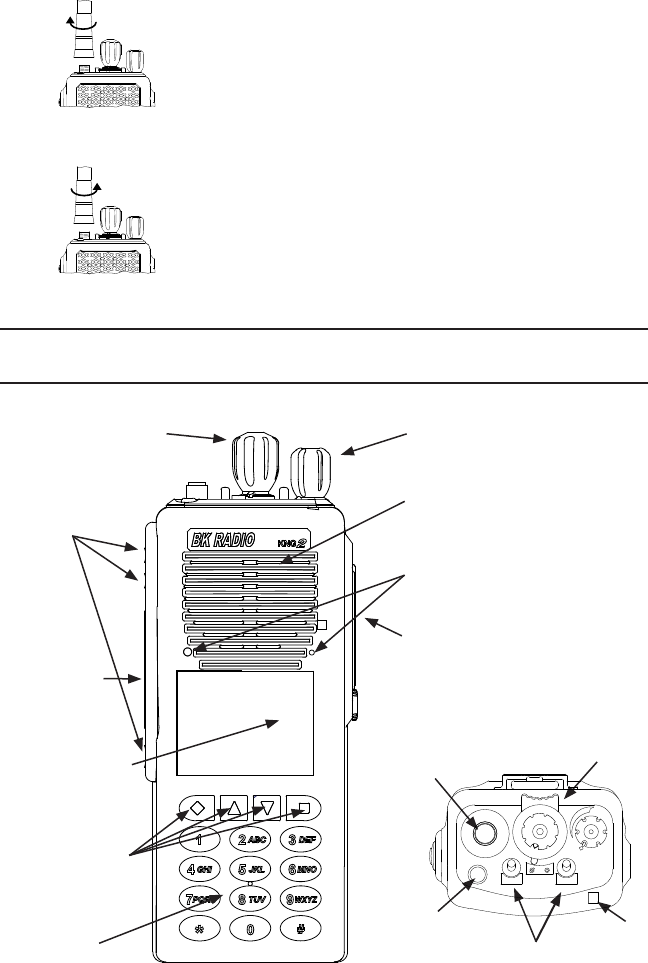
Installing the Antenna
Insert the radio’s antenna connector into the
threaded connector of the antenna and turn it
clockwise until it is rmly seated.
Removing the Antenna
Holding the base, turn the antenna
counterclockwise until released.
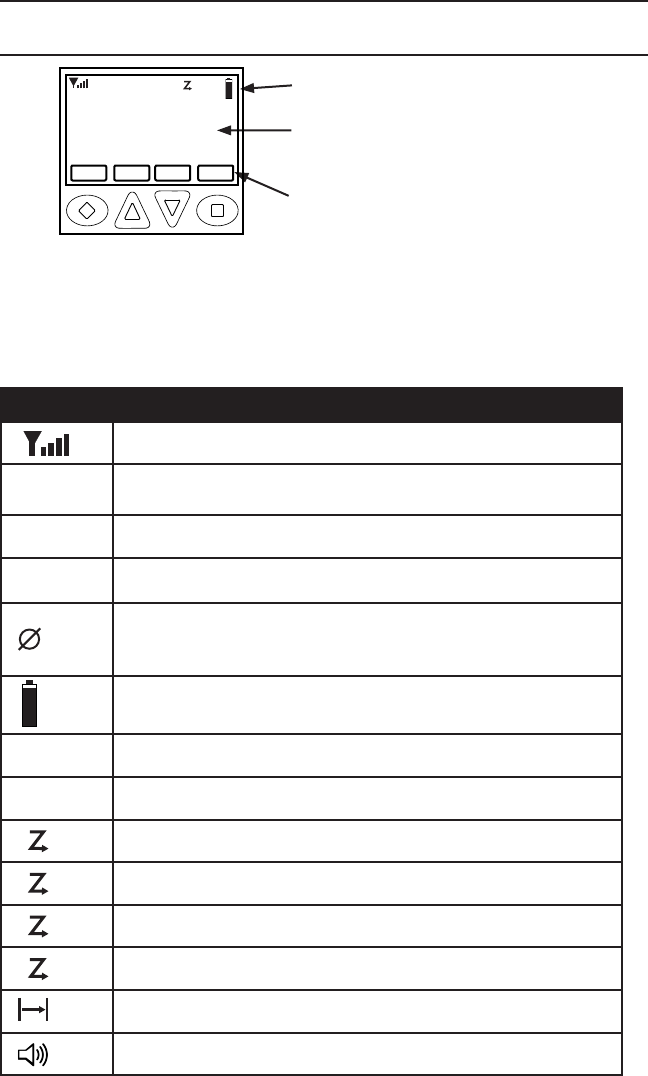
Radio Controls
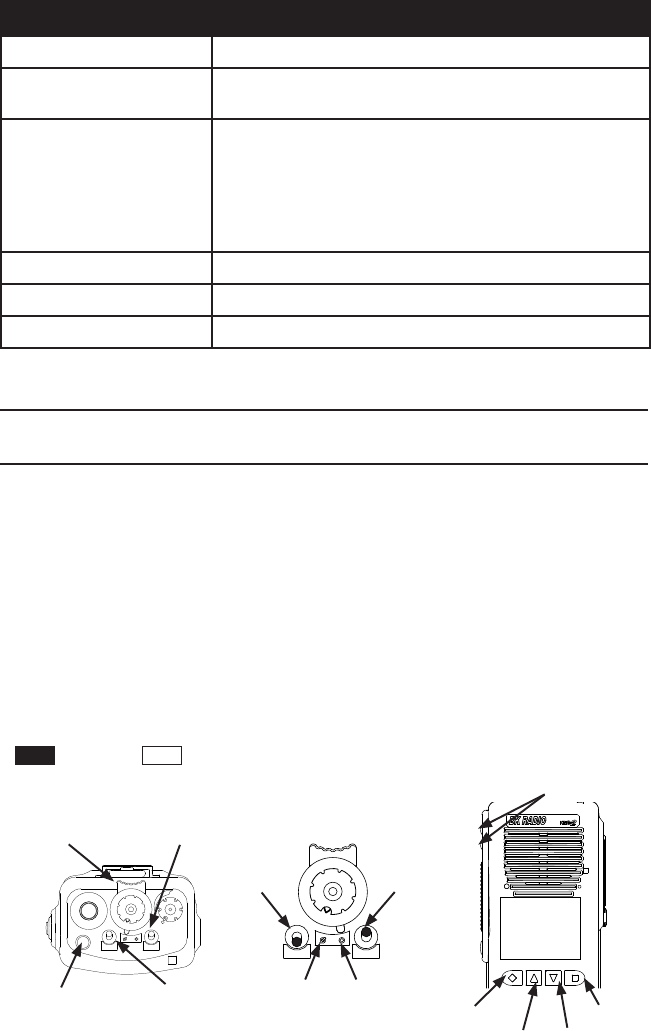
On/O
Volume
3 Programmable
Side Buttons
Push-to-Talk
Speaker
Accessory
Connector
Alphanumeric
Display
Dual Microphones
Programmable
Buttons
Keypad
Channel/Zone
Select
Collar Switch
Antenna
Connector
Emergency
Button
Toggle Switches
LED
15
1
2
3
4
5
6
7
89
1 1
10
12
13
14
16
SCAN
PRI
VOL
KNG2 Portable Radio User’s Manual
- 11 -
LCD Display
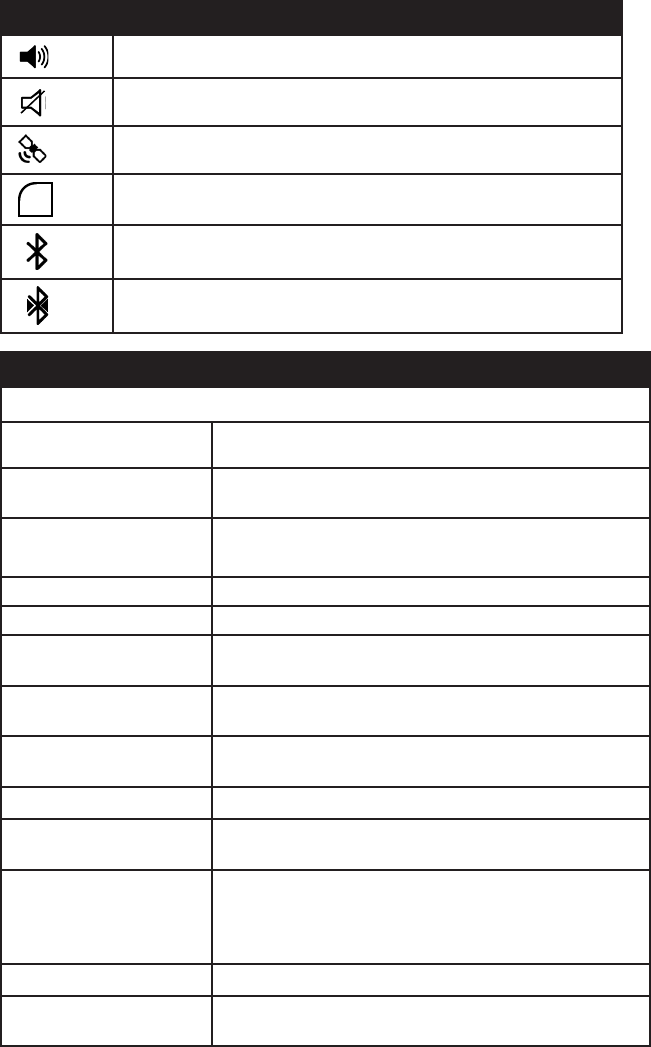
The KNG2 display can be programmed for a variety of options and
functionality. Check with your RELM/BK Radio dealer or communications
ocer for information on the programmed functions of your radio.
NOTE: The KNG2 display can be programmed to display dierent
information when a trunking or conventional channel is selected.
Status Indicators
Receiver Signal Strength
RXD,
RXA Receive Digital, Receive Analog, Hold Time Active
TXD, TXA Transmit Digital, Transmit Analog
L, H Low or High transmit power
Selected channel is encrypted.
Flashing means a reception is decrypted - solid means next TX will
be encrypted.
Battery Level Indicator
P1, P2 Priority 1 Channel, Priority 2 Channel
Scanned Channel
C
Channel Scan On
D
Dual Mode Scan On
Z
P
Zone Scan On
C
P
Priority Scan On
Repeater Talkaround Enabled
Monitor Mode
Status Indicators
Programmable Alphanumeric Labels
Programmable Button Labels
Ch 1
171.58500 MHz
RXD
KNG2-P150
CHAN+ TXCG ZONE MENU
C
RELM Wireless Corporation
- 12 -
Status Indicators
Open Audio
Voice Mute Enabled
GPS Enabled
iP
Trunking IP Data Enabled
Bluetooth Enabled. Flashing indicates Discovery Mode.
Bluetooth Paired
Alphanumeric Label Options
NOTE: Three channel information lines are programmable with PC Radio Editor.
None No information is displayed.
Channel Label Alphanumeric label of currently selected channel or
active scanned channel.
Channel Number Channel number of currently selected channel or
active scanned channel.
Channel # and Zone Currently selected channel numbers and zone.
Date and Time Displays date and time.
DTMF* Displays the numeric DTMF tones of received
signal.
Frequency* Operating frequency of currently selected channel
or active scanned channel.
MDC* Displays the numeric MDC ID or received signal
DT MF.
Radio Name Displays radio name.
Received TGID P25 Talk Group ID of the radio transmitting the
message currently being received.
Rx’d Unit ID P25 ID of a received digital signal. If the incoming
ID is programmed in your Unit ID Call List list, the
associated label will be displayed. During standby
you radio ID number is displayed.
Rx/Tx Key Currently selected encryption key.
Rx Picklist
Selections*
NAC, TGID or Code Guard currently selected from
the programmable RX Pick Lists.
KNG2 Portable Radio User’s Manual
- 13 -
Alphanumeric Label Options
Subaudible* Displays CxCSS value of received signal.
Tx Picklist Selections* NAC, TGID or Code Guard currently selected from
the programmable TX Pick Lists.
Unit ID Shows your P25 Unit ID
While receiving, the ID of the radio transmitting the
message is displayed
If the received ID is programmed in your radio's Call
List, the corresponding label will be displayed
Zone Label Label of currently selected zone.
Zone and Channel # Currently selected zone and channel numbers.
Zone Number Currently selected zone number.
*Conventional Channels Only
Programmable Switch and Button Functions
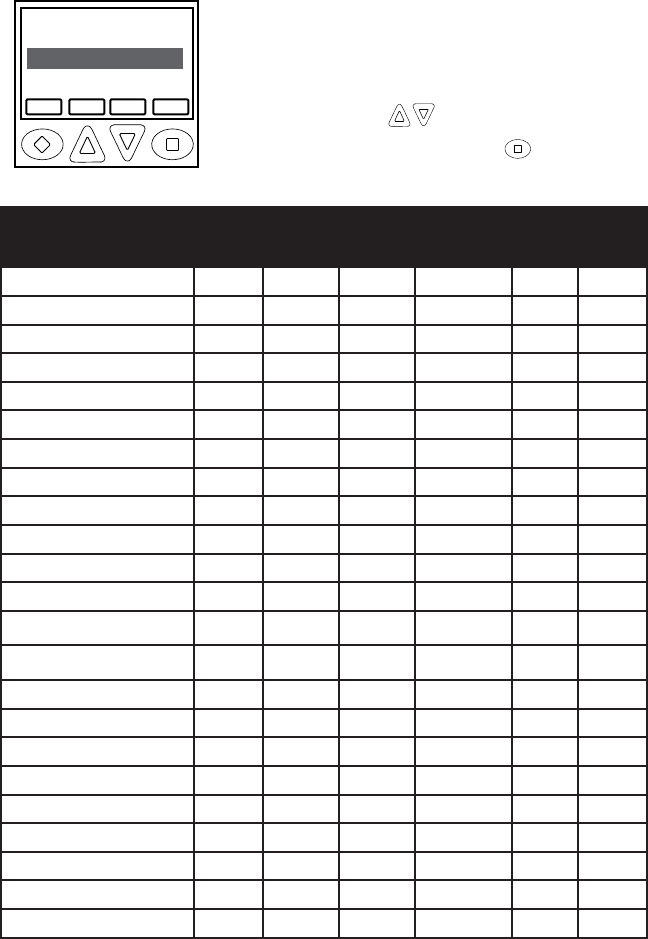
The KNG2 portable radio is equipped with seven programmable control
buttons and three programmable switches. Switch and button functions
are assigned via PC programming.
NOTE: Switches, buttons and menu items can be programmed for
dierent functions when a trunking or conventional channel is selected.
Button Options and Labels
The Diamond, Up Arrow, Down Arrow, and Square buttons are
programmable with PC Radio Editor. The programmed functions are
activated by pressing the associated button. Active functions are
indicated by a highlighted background.
SCN = Active, SCN = Inactive.
15
1
2
3
4
5
6
7
89
1 1
10
12
13
14
16
SCAN
PRI
VOL
Right ToggleCollar Switch
Left ToggleOrange Button
Square
Diamond
Up Down
Side Buttons
15
1
2
3
4
5
6
7
89
11
10
12
13
14
16
SCAN
PRI
On O
On O
RELM Wireless Corporation
- 14 -
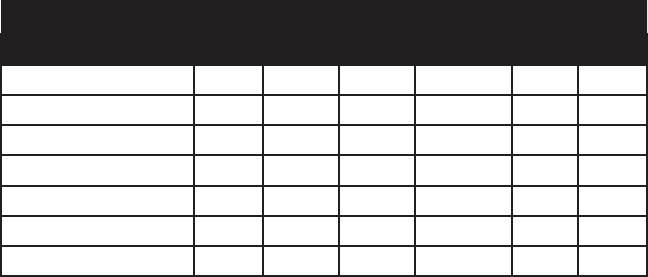
Keypad Menu Operation
One button can be programmed as “Menu”. Items shown in the
Options and Labels table can be programmed and arranged via PC
programming. These items can then be accessed with the Menu button.
To select from the menu:
1. Press the programmed “Menu” button.
2. Scroll to the desired menu item with the
up/down buttons .
3. Press the button marked ENT to open
the item.
Options and Labels
Menu Switch Button Label Trunk Conv.
Backlight x x x LITE x x
Battery Life x x LIFE x x
Bluetooth x x BT x x
Call Alert x x ALRT x x
Channel Add/Delete x CHAN+/- x
Channel Scan x x x SCAN x
Channel Scan List x x SCN+ x
Channel Select x x CHAN x x
Cloning x-x
Contrast x-x x
Control Lock x x x LCK x x
Date and Time x x x DATE x x
Dual Mode Scan x x x DSCN x x
Dual Mode Scan List x x DSED x x
Emergency1x-x x
Enhanced Scan x x x ESCN x
GPS* x x GPS x x
Hang Up x x HANG x
Hard Power Down x PWRD x x
Home Channel x HOME x x
Inhibit x x INH x
Keyset Select x x KSET x x
Menu xMENU x x
Channel Scan
Tx Digital
PRI Scan
TXD
ESC ▲ ▼ ENT

KNG2 Portable Radio User’s Manual
- 15 -
Options and Labels (cont.)
Menu Switch Button Label Trunk Conv.
Minimum Volume x x VOL x x
Monitor x x x MON x
Nuisance Delete x DEL x
Phone x x PHN x
Picklist - Rx CxCSS x x RXCG x
Picklist - Rx NAC x x RXNC x
Picklist - Talkgroup ID x x TGID x
Picklist - Tx CxCSS x x TXCG x
Picklist - Tx NAC x x TXNC x
Picklist-KEY** x x KEY x
Priority Channel x x PRI x
Priority Scan x x x PSCN x x
Radio Accountability Tone xRAT x x
Radio Check x x x RCHK x
Radio Info x -x x
Rekey Request*** x x RKEY x x
Repeater Talkaround2x x x T/A x
Send Alert Tone x SNDT x x
Send Signal x SEND x
Short Message Update x x MSG x
Site Display**** x x STDS x
Site Lock**** x x STLK x
Site Search**** x x STSR x
Squelch Adjust x x SQL x
Surveillance Mode x x x SURV x x
System Test x -
Talkback Scan x TKBK x
Text Message x x TXT x
Two-Tone Select x x TONE x
Tx Digital/Analog x x x TXAD x
Tx Power x x x PWR x x
Tx Secure** x x x SEC x x
Uninhibit x x UNINH x
Unit Call x x UNIT x x
RELM Wireless Corporation
- 16 -
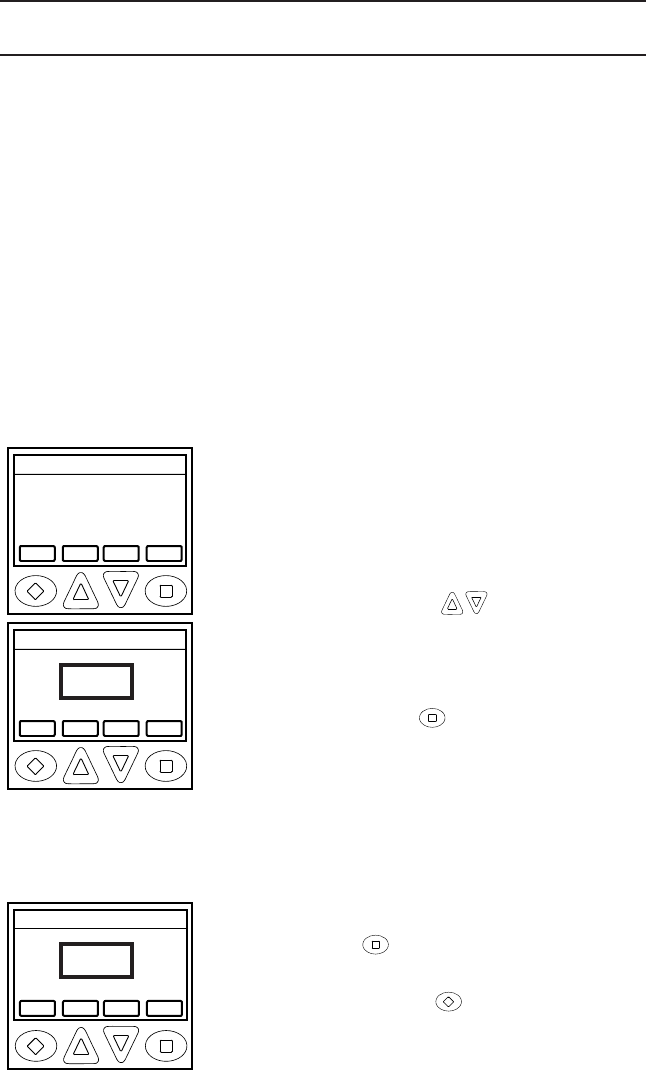
Options and Labels (cont.)
Menu Switch Button Label Trunk Conv.
User Update x x STS x
Version x-x x
Voice Mute2x x MUTE x
Zeroize Keys** x x ZERO x x
Zone Scan xx x ZSCN x
Zone Scan List xxZSC+ x
Zone Select xxZONE x x
1Emergency button can only be assigned to the orange button.
2Works on a per-channel basis.
*Requires GPS option.
**Requires Encryption option.
***Requires Encryption and OTAR options.
****Requires P25 Trunking option.
KNG2 Portable Radio User’s Manual
- 17 -
Channel/Zone Selection Options
The KNG2 can be programmed with up to 8192 individual channels.
These channels can be divided into zones of one or more channels.
Accessing a channel or zone depends on radio programming.
Channels or zones can be selected using the channel/zone select knob,
by an assigned button or menu item or by direct keypad entry. More
than one selection mode can be programmed.
Channel/Zone Selector Knob
When programmed with the default setting, the channel/zone knob is
used to select a channel (1-16) from the active zone. If programmed to
select zones, zones (1-16) will be selected with the knob.
Channels or zones above sixteen can only be accessed via button,
menu or keypad selection. See below.
Button/Menu Item Selection
If programmed to a button, pressing the button
will display the list of available channels or
zones. If programmed as a menu item, the lists
can be displayed by selecting Zone or Channel
select from the menu list. (See “Keypad Menu
Operation”)
Use the Prev/Next buttons to scroll to the
desired selection.
Alternatively, the number keys can be used to
jump directly to the desired channel or zone.
Press the square button marked ENT to go to
the highlighted zone or channel.
Direct Keypad Entry
The numeric keypad may also be programmed to directly select channels
or zones. Pressing a number will activate the zone or channel list.
Select the desired channel or zone and press
the square button marked ENT to go to the
highlighted location.
Press the diamond button marked ESC to
cancel the selection and return to the currently
operating zone or channel.
2: Label 2
ESC PREV NEXT ENT
Zone Select
1: Label 1
3: Label 3
4: Label 4
118: Label 118
ESC PREV NEXT ENT
Zone Select
117: Label 117
119: Label 119
120: Label 120
120
118: Label 118
ESC PREV NEXT ENT
Zone Select
117: Label 117
119: Label 119
120: Label 120
120
RELM Wireless Corporation
- 18 -
Using Knob and Button Operations Together
When selected via the button, menu or keypad method, the entered
channel or zone becomes active regardless of the knob position.
When the knob is turned, the radio leaves the keypad selected channel
and goes to the selection indicated by the knob position.
Example: With the channel select knob on channel 1, selecting channel
12 from the keypad will switch the operating channel to channel 12.
Turning the channel knob to channel 2, switches the operating channel
to channel 2.
Basic Radio Operation
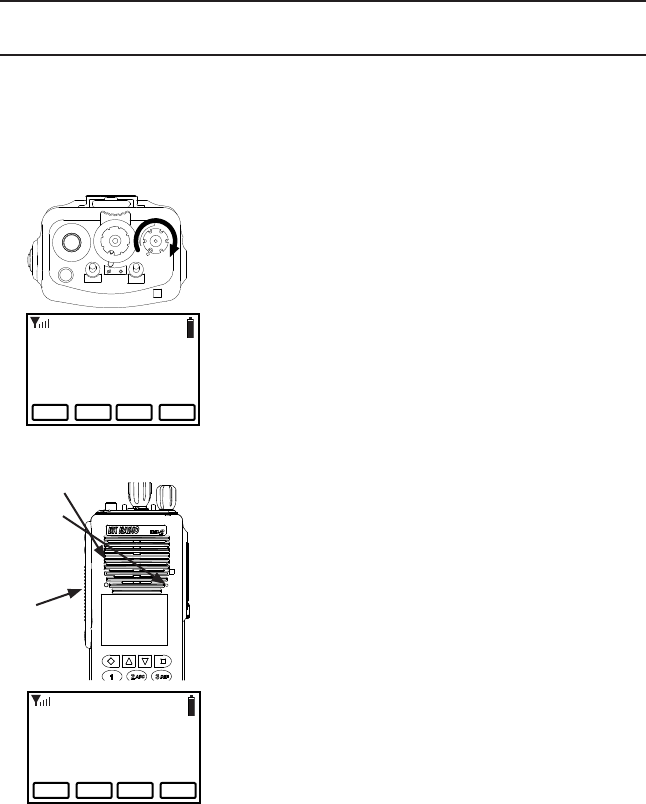
Turn power on by turning the Volume knob clockwise. A beep sounds,
indicating the radio is operational. The LCD display shows the
programmed display information of the currently selected channel.
Receive
15
1
2
3
4
5
6
7
89
1 1
10
12
13
14
16
SCAN
PRI
VOL
LITE T/A MENU LCK
Set the volume knob to approximately 50-60%.
When a signal is received, the unprogrammable
top line of the display indicates the signal
strength and operating mode of the incoming
transmission. RXA = analog, RXD = digital.
To check radio volume when no signal is
being received, put the Monitor mode in “Open
Squelch” (see “Monitor”) and adjust the volume
to a comfortable level.
Transmit
TXD
Microphones
PTT
1. Press the PTT (Push-To-Talk) switch. When
the radio is transmitting the indicator LED glows
red and TXD or TXA appears in the display.
2. Talk in a normal voice with the microphone
one to two inches from your mouth.
3. Release the PTT switch to stop transmitting.
If the length of your message is nearing the
programmed Time-Out Timer setting, a tone
sounds indicating 5 seconds left to transmit. At
the end of the programmed time, the transmitter
automatically shuts o and an alert tone
sounds. To continue transmission, release the
Ch 1
171.58500 MHz
RXD
KNG2-P150
CHAN+ TXCG ZONE MENU
Ch 1
171.58500 MHz
TXD
KNG2-P150
CHAN+ TXCG ZONE MENU

KNG2 Portable Radio User’s Manual
- 19 -
PTT switch, then press it again and continue talking.
If the Transmit Indicator does not glow and a tone sounds, you are
on a receive-only channel or the channel is busy (see Busy Channel
Lockout). Select an authorized transmit channel.
NOTE: When using a channel programmed for mixed mode transmit
the signal will be transmitted in the mode selected by the TX Digital
selection. Or if programmed for Mixed Mode Talkback, the radio will
transmit in the mode of the last received channel while the “RX” icon is
displayed. (See Mixed Mode Operation.)
Command Zone Operation
The KNG2 portable radio allows construction of Command Zones
drawn from any of the programmed channels in standard operating
zones. Each zone is designated as a Standard Operating Zone or a
Command Zone with the PC Radio Editor.
Building a Command Zone [CHAN+]
To build a Command Zone the “Channel Add/Delete” function must be
assigned to a programmable button.
While operating in a standard zone press the “CHAN+” button to add
the currently selected channel to a command zone. The list of available
command zones will be displayed. Use the up/down arrows to select
the zone to add the channel or use the number keys to move directly to
the desired zone.
Pressing the “Enter” button copies the channel information to the rst
available channel slot in the selected command zone.
Example: If the command zone has three channels, the newly added
channel will be channel four.
Editing a Command Zone [CHAN-]
When operating in a Command Zone, press the “CHAN-” button to
remove the selected channel from the zone.
When a channel is deleted, the display momentarily shows “Channel
Deleted”, and the following channels move up in the list. For example, if
channel 5 is deleted, channel 6 becomes the new channel 5, channel 7
becomes the new channel 6, etc.
NOTE: Modications to a command zone channel, such as User
Selected Tones, do not aect the original standard zone channel.
RELM Wireless Corporation
- 20 -
Code Guard/NAC Operation
Conventional Channels
Code Guard Receive
Analog channels programmed with a receive code guard will be heard
only when the proper carrier frequency and Code Guard value is
received. Analog and mixed mode receive channels will also unmute
when the radio is in monitor mode.
Code Guard Transmit
Whenever transmitting on an analog channel, any programmed sub-
audible Code Guard is transmitted. Depending on radio programming,
the Code Guard can be the default tone assigned to the channel or a
tone selected from the Code Guard Picklist (see Pick List Options).
15
1
2
3
4
5
6
7
89
1 1
10
12
13
14
16
SCAN
PRI
VOL
Busy Channel/Transmit
Indicator
Ch 1
KNG - P25
171.58500 MHz
LITE T/A MENU LCK
TXA
The frequency must be clear prior to
transmitting on a Code Guarded channel. If the
LED Indicator is yellow do not transmit. Busy
Channel Lockout can be programmed to
disallow transmitting while a channel is busy.
1. Press the PTT switch. When the transmitter
is on, the LED Indicator glows red and TX
appears in the display.
2 Talk in a normal voice with the microphone
one to two inches from your mouth.
3. Release the PTT switch to stop transmitting.
Analog Squelch Control
Sub-audible signaling (CTCSS/CDCSS) is used to allow a group of
radios to be selectively called in an analog system. Programming the
receive code guard equal to zero allows for Carrier Squelch operation,
where the radio will unmute whenever a carrier is detected regardless
of the transmitted Code Guard.
KNG2 Portable Radio User’s Manual
- 21 -
APCO Project 25 Digital Squelch Control
Network Access Codes (NACs) provide the digital equivalent of analog
sub-audible signaling (CTCSS/CDCSS) allowing a group of radios to be
selectively called within a system.
Users in the same area (using the same NAC) can be further divided
into Talk Groups, with each group having its own Talk Group ID (TGID).
Group Calls are made by designating both the users’ NAC and TGID.
Each radio also has an individual P25 unit ID. A Unit-to-Unit call
contains the addressee’s NAC, and uses the addressee’s P25 unit ID
instead of the TGID.
When operating in Digital Mode, each channel can be programmed to
use either Normal squelch or Selective squelch.
Normal squelch is used to mimic analog operation. Signals are only
qualied with the programmed NAC. TGIDs and P25 Unit IDs are
ignored. Each digital channel is programmed with a receive NAC and a
transmit NAC. When an incoming signal’s NAC matches the channel’s
programmed receive NAC, the radio unmutes. The default NAC is 0659
($293 hex).
The digital equivalent of carrier squelch is achieved by programming
the receive NAC = $F7E (3966 decimal). The radio will unmute when a
digital signal with any NAC is detected. The $F7E (3966 decimal) NAC
is reserved for receivers and is not allowed as a transmit NAC.
Selective squelch is used for processing Group Calls and Unit-to-
Unit Calls. TGIDs are assigned on a per-channel basis. Users can be
separated into Talk Groups with each group having its own TGID. Then,
on channels programmed for Selective squelch, the incoming signal’s
NAC and TGID must match the channels programmed receive NAC
and TGID for the radio to unmute. The default TGID is 1.
The TGID value 65535 ($FFFF hex) is used to eect an “All Call”. If the
radio receives a signal with a matching NAC and the TGID = 65535
($FFFF hex), it will unmute. Also, if the radio’s programmed TGID is
65535 ($FFFF hex), it will open on any signal with a matching NAC,
ignoring the incoming TGID. A TGID = 0 means “no one”. If the radio
is programmed with the TGID = 0, it will accept incoming group calls
containing the “All Call” TGID, and correctly addressed Unit-to-Unit
calls only.
RELM Wireless Corporation
- 22 -
Mixed Mode Operation
The receiver and transmitter are capable of operating in analog wide-
band (25 kHz channel spacing), analog narrow-band (12.5 kHz channel
spacing) and APCO Project 25 Digital Mode.
Each channel’s Receive and Transmit Mode can be set independently
as follows:
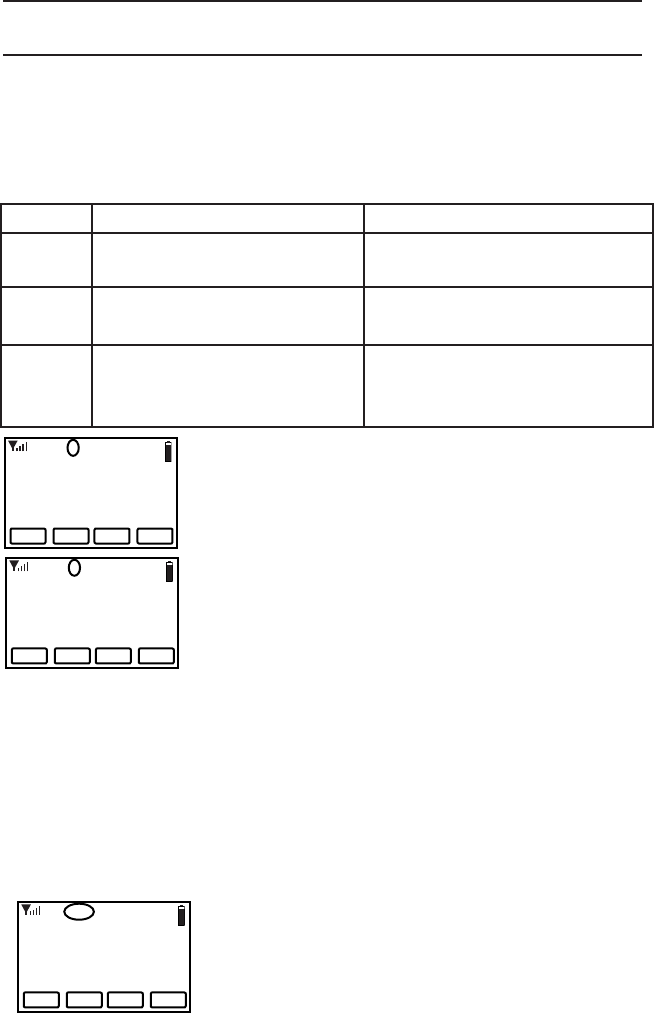
Mode RX TX
Analog Receive qualied analog
signals only
Transmit analog signals only
Digital Receive qualied digital
signals only
Transmit digital signals only
Mixed Automatically receive qualied
analog or digital signals
Transmit analog or digital signal,
depending on the status of “TX
Digital” switch
Digital receptions and transmissions will be
indicated by illuminating the D annunciator in
addition to the RX or TX annunciator.
Analog receptions and transmissions will be
indicated by illuminating the A annunciator in
addition to the RX or TX annunciator.
Mixed Mode Talkback
If Mixed Mode Talkback is enabled, transmissions initiated while
hold time remains will be in the same mode as the received signal,
if the signal was received on the Ready to Transmit (RTX) channel.
Depending on programming, the RTX channel can be the main
channel, a held scan or priority channel if Talkback Scan is enabled, or
the Priority 1 channel if “TX on PR1” is enabled. TX Mode on the RTX
channel must be set to MIXED.
While hold time after a reception remains,
transmissions will be in the same mode as the
received signal, regardless of the status of the
TX Digital switch. As in Talkback Scan, the
RTX channel and receive annunciators will be
displayed for the duration of the timer.
Ch 1
171.58500 MHz
TXD
KNG2-P150
CHAN+ TXCG ZONE MENU
Ch 1
171.58500 MHz
TXA
KNG2-P150
CHAN+ TXCG ZONE MENU
Ch 1
171.58500 MHz
RXD
KNG2-P150
CHAN+ TXCG ZONE MENU
Press the PTT while the RX
indicator is shown

KNG2 Portable Radio User’s Manual
- 23 -
Trunking Channel Basic Operation
Some KNG2 radios are equipped with optional P25 Trunking capability.
To determine if your radio is trunking compatible, remove the battery
and check the Options Label near the top of the radio. “KZA0579”
indicates the trunking option is installed.
Trunking parameters and functions can only be programmed by
qualied persons via PC. Contact your system administrator or radio
dealer for information on how your radio is programmed.
System Registration
If the radio is powered on when a trunking channel is selected, the radio
will attempt to register with the selected trunking system.
The LED will ash twice upon successfully registering with the system
and setting talkgroup aliation.
If the aliation was unsuccessful the LED will continue to ash.
If the radio is not in range of the system “Out of Range” will be
displayed and an alert tone will sound every ten seconds.
If registration is refused or denied, a denied message and tone will
appear briey before switching to “Out of Range” mode.
After successful registration the programmed LCD display criteria is
displayed.
Transmitting
When the PTT is pressed, a three beep Talk Permit Tone will be heard
if the channel is available.
If there is no channel available the radio will emit a tone and display
“BUSY”. Release the PTT.
The radio will remain in busy mode until the channel is available.
When the channel becomes available the three beep Talk Permit Tone
will be emitted. Re-press the PTT to continue your call.
If the PTT is not pressed within two seconds of the Talk Permit Tone,
the radio will return to normal standby mode.
RELM Wireless Corporation
- 24 -
Scan Options
Channel Scan [SCAN]
Conventional Channels
When on, Channel Scan monitors activity on the scan list channels in
the currently operating zone. Scan operates only while the radio is not
transmitting.
Channels designated as scan channels are identied by the symbol
at the top of the LCD display. If allowed, the scan list can be edited by
the radio user. (See Channel Scan List).
When Channel Scan is on, the
C
symbol will be shown at the top of
the LCD display.
When a signal is detected, scanning stops and the message is
received. The received channel is shown in place of the selected
channel.
Once the signal ends, the radio continues to monitor the channel for the
preset scan delay time before it resumes scanning.
Channel Scan operation can be a switch or as a button or menu list
item.
Channel Scan may be used in conjunction with Priority Scan operation
(see Priority Scan).
Scanning Code Guarded Channels
Conventional Analog Channels
When a signal is detected, scanning stops while the radio checks for
the proper Code Guard value. If the signal contains the proper Code
Guard value, the radio receives the message. Otherwise, the radio
resumes scanning immediately.
Transmitting with Scan On
The radio transmits on the channel selected by the Channel Selector
knob unless Talkback Scan is enabled (see Talkback Scan) or Priority
Scan is on and Transmit on Priority 1 is enabled (see Priority Scan).
KNG2 Portable Radio User’s Manual
- 25 -
Channel Scan List [SCN+]
Conventional Channels
The Channel Scan List allows the radio user to add or remove channels
from the list of channels to be monitored while channel scanning.
Channels designated as scan channels are identied by the symbol
at the top of the LCD display.
The Scan List operation can be assigned as a button or menu list item.
When Channel Scan List is assigned to a button, press the button to
add or remove the selected channel from the scan list.
If Vote Scan option is installed, pressing the "+/-" button will cycle the
scan setting for the selected channel through checked (for scan on),
"(V)" for Vote Scan, and O.
When assigned as a menu item, open the menu and select the channel
you wish to add or remove from the scan list. Press “+/-” to add or
remove. Channels in the scan list will be indicated with the symbol.
Talkback Scan
Conventional and Trunking Channels
If your radio is programmed for Talkback Scan, any PTT transmission
that occurs while a channel is active or while scan delay time remains,
will be on the transmit frequency of the received channel. The ‘RX’
indicator will be shown in the display while scan delay time remains.
Talkback Scan will not work if Priority Scan is on and your radio is also
programmed to transmit on the Priority 1 channel (see Priority Scan).
Vote Scan [Requires Option KZA0581]
Conventional Channels
Channels in a multicast conventional systems can be added to the scan
list and designated as “voted” channels. When a signal is received on
a voted channel the radio checks all voted channels in the vote scan
group and selects the channel with the best signal.
If enabled, vote scanning takes place whenever the channel scan
switch in on.
NOTE: Channel voting occurs only with Channel Scan and is disabled
when Zone Scanning. Channels programmed as Vote channels are
treated as normal scan list channels during Zone Scan operation.
Vote Scan groups can only be created in the PC Radio Editor.
See also Priority Scan and Zone Scan.

RELM Wireless Corporation
- 26 -
Dual Mode Scan [DSCN]
Conventional and Trunking Channels
Dual Mode scan provides the ability to scan trunking and conventional
channels simultaneously.
NOTE: The Dual Mode Scan list must be setup using the PC Radio
Editor and cannot be changed by the radio user.
When Dual Mode Scan is turned on the
D
icon is displayed and the
radio scans all channels in the dual mode scan list.
Dual Mode Scan can be assigned to a switch or as a button or menu list
item. For best operation, Dual Mode Scan should be assigned in both
conventional and trunking global settings with the PC Radio Editor.
Enhanced Scan [ESCN]
Conventional Channels
Enhanced Scan combines Priority Scan and Channel Scan to one
switch/button. Enabling Enhanced Scan will turn on both Priority and
Channel Scan.
Priority Scan [PSCN]
Conventional Channels
Two channels can be designated as priority channels. When Priority
Scan is on, these channels are monitored for incoming trac. When
a qualied signal is detected the speaker is opened to listen to the
message.
If a message is detected on the channel designated as Priority 2, the
radio will continue to monitor Priority 1 channel for activity. If activity is
detected the radio will switch to the Priority 1 channel.
When used in conjunction with Channel Scan, the radio monitors the
Priority channels and will switch from a scanned channel to the Priority
channel if a qualied signal is detected.
Depending on radio setup, priority channels can be tied to the currently
operating zone or can be assigned to a specic channel regardless of
the operating zone.
Channels designated as Priority channels are identied by the P1 or P2
symbol at the top of the LCD display. When Priority Scan is on, the
C
P
symbol will be shown.
Priority Scan operation can be a switch or as a button or menu list item.
Trunked Channels
When on trunked channels, Priority Scan is used to turn system
scanning on or o.
KNG2 Portable Radio User’s Manual
- 27 -
Priority Channel Select [PRI]
Conventional Channels
Depending on programming, priority channels can be radio-wide
(System) or zone specic (Zone). Radio-wide priority channels are
monitored regardless of the current operating zone. (See Priority Scan
for more details.)
If enabled the user can use the keypad to change the priority channels.
Priority Channel Select can be assigned to a switch or as a button or
menu list item.
Selecting a System Priority Channel
Open the menu and select the System Priority channel you wish to
change.
Press “ENTER” to open System Priority Channel menu.
Options:
O - Disables the priority channel.
Use Main - Uses the selected channel as the priority channel.
Select - Assigns a specic channel as the priority channel.
To assign a specic channel as a System Priority Channel, highlight
“Select” and press the “ENTER” button.
The Zone selection menu will be displayed.
Highlight the zone of the desired priority channel and press the
“ENTER” buttons.
The Channel selection menu will then be displayed.
Highlight the desired channel and press the “ENTER” button to set the
priority channel.
The display will return to the main Priority Channel Select menu.
Selecting a Zone Priority Channel
Open the menu and select the Zone Priority channel you wish to
change.
Press “ENTER” to open Priority Channel menu.
Options:
O - Disables the priority channel.
Use Main - Uses the selected channel as the priority channel.
Select - Assigns a specic channel as the priority channel.
To assign a specic channel as a Zone Priority Channel, highlight
“Select” and press the “ENTER” button.

RELM Wireless Corporation
- 28 -
The Channel selection menu will be displayed.
Highlight the desired channel and press the “ENTER” button to set the
priority channel.
The display will return to the main Priority Channel Select menu.
Zone Scan [ZSCN]
Conventional Channels
When Zone Scan and Channel Scan are on, the radio scans all
programmed scan channels in zones designated as Zone Scan zones.
If allowed, the scanned zone list can be edited by the radio user. (See
Zone Scan List).
When Zone Scan is on, the
Z
P
symbol will be shown at the top of the
LCD display.
Zone Scan operation can be a switch or as a button or menu list item
and may be used in conjunction with Priority Scan operation.
Zone Scan List [ZSC+]
Conventional Channels
The Zone Scan List allows the radio user to add or remove zones from
the list of zones to be scanned.
The Zone Scan List operation can be assigned as a button or menu list
item.
When Zone Scan List is assigned to a button [ZSC+], press the button
to add or remove the currently operating zone from the scan list.
When assigned as a menu item, open the menu and select the Zone
you wish to add or remove from the scan list. Press “ENTER” to add or
remove. Zones in the scan list will be indicated with the symbol.

KNG2 Portable Radio User’s Manual
- 29 -
Pick List Options
The KNG2 provides users the ability to select and assign Pick List
functions to specic channels. Pick List Options can be assigned to a
programmed button or as menu list items.
Available Pick List options include:
Transmit Code Guards
Receive Code Guards
Transmit Network Access Codes
Receive Network Access Codes
Talk Group IDs
Encryption Keys (see Encryption Operation)
Encryption Keysets (see Encryption Operation)
TX/RX CxCSS Picklist [TXCG] [RXCG]
Conventional Analog or Mixed Mode Channels
Selecting a CTCSS/CDCSS Code Guard from the Pick List will assign
the tone to the currently select analog or mixed-mode channel.
User assigned Transmit and Receive Code Guards are selected
independently.
To change a Code Guard, open the RXCG or TXCG menu, select the
desired tone and press “ENTER”.
To return the tone to the pre-programmed value select “Default”.
If allowed, picklist values can be changed through keypad programming.
TX/RX Network Access Code Picklist [TNAC] [RNAC]
Conventional Digital or Mixed Mode Channels
Selecting a Network Access Code (NAC) from the Pick List will assign
the NAC to the currently select digital or mixed-mode channel.
User assigned Transmit and Receive NACs are selected independently.
To change a NAC, open the RXNAC or TXNAC menu, select the
desired NAC and press “ENTER”.
To return the NAC to the pre-programmed value select “Default”.
If allowed, picklist values can be changed through keypad programming.
RELM Wireless Corporation
- 30 -
Talk Group ID Picklist [TGID]
Conventional Digital Channels
Selecting a Talk Group ID from the Pick List will assign the TGID to the
currently select channel. All other channels are unaected.
User selectable menu access can be assigned to a button or menu list
item.
Open the menu of available TGIDs.
Select the desired Talk Group ID or, to return the TGID to the pre-
programmed value, select “Default”.
Press “ENTER” to set the selection.
If allowed, picklist values can be changed through keypad
programming.
Encryption Key Picklist [KEY]
Digital or Mixed Mode Channels
Encryption equipped radios only.
Selecting an Encryption Key from the Pick List will assign the key to all
encrypted channels that do not have ‘Key Lock’ programmed. Locked
key channels will continue to use the pre-programmed key.
(See Encryption Operation)
Keyset Picklist [KSET]
Digital or Mixed Mode Channels
OTAR equipped radios only.
Selecting a Keyset from the Pick List will cause the radio to use
encryption keys from the selected Keyset.
(See Encryption Operation)

KNG2 Portable Radio User’s Manual
- 31 -
Unit-to-Unit Call Options
Individual Unit Call [UNIT]
Conventional Digital and Trunking Channels
P25 Unit IDs allow for Unit-To-Unit calls when the radio is operating in
Digital Mode. The function must be enabled by radio programming to
allow this mode of operation.
Channels programmed for analog only operation will not be able to
transmit or receive Unit-To-Unit calls.
Conventional Channels
Placing an Individual Unit Call
Open the Unit Call menu and select the desired “Unit Call” option.
Last Call = Use the P25 ID of the last Call.
Call List = Use the programmed P25 ID List.
Enter ID = Enter a numeric P25 ID.
Press Enter to enter Unit Call Mode.
The LCD displays the ID number or associate label of the targeted
radio.
Press the PTT button to send the unit-to-unit call.
To exit the Individual Call mode press “Exit”.
If there is no response to the call after 60 seconds, the radio exits the
Unit-to-Unit mode and returns to normal operation.
Receiving an Individual Unit Call
When a properly addressed unit call is received, an alert tone sounds
and the LCD displays the ID number or associated label of the radio
placing the call.
Accept the call
To accept the call and respond in unit-to-unit mode, press “ACPT”
and transmit as normal.
To exit the Individual Call mode, press “Exit”.
Ignore the call
To ignore the call and continue operating in normal mode, press “INGR”.
RELM Wireless Corporation
- 32 -
Unit-to Unit Callback
If enabled, pressing PTT during the hold time results in a Unit-to-Unit
call to the received unit ID.
If there is no response to the call after 60 seconds, the radio returns to
normal operation.
Call List Programming
If enabled with the PC Radio Editor, the P25 Call List for conventional
channels can edited via the radio’s keypad programming function.
Trunking Channels
Limitations on unit-to-unit calls may programmed in trunking systems.
Options include disallowing unit-to-unit operation, limiting operation
to only the programmed unit call list or ‘response only’ which allows
the user to respond to incoming calls only. Check with your system
administrator for information about your programmed features.
Placing a Call
When placing a unit-to-unit call on a trunking channel, a telephone-
type ring tone will be emitted until the targeted radio acknowledges or
responds to the call.
Receiving an Individual Unit Call
When receiving a unit call, an alert tone will be emitted and the LCD will
display the Unit ID of the radio sending the call.
Press “Accept” to respond to the call or “Ignore” to remain in normal
operation.
KNG2 Portable Radio User’s Manual
- 33 -
Emergency Signaling Options
Conventional Digital and Trunking Channels
The KNG2 portable radio supports P25 Emergency Operation. When
Emergency Operation is engaged the radio will transmit the P25 ID
of the radio along with the required P25 Emergency bit. Emergency
operation applies only to channels programmed for Digital or Mixed
Mode transmissions.
On channels programmed for analog transmissions, pressing PTT in
Emergency Mode will result in a normal analog transmission.
On channels programmed for Mixed Mode transmissions, pressing PTT
will result in a digital transmission, regardless of the position of the ‘TX
Digital’ switch.
All scanning and priority functions will be disabled during Emergency
operation.
Depending on the radio’s PC programmable settings, emergency signal
will be sent automatically or with each Push-to-Talk.
Placing an Emergency Call
15
1
2
3
4
5
6
7
89
1 1
10
12
13
14
16
SCAN
PRI
VOL
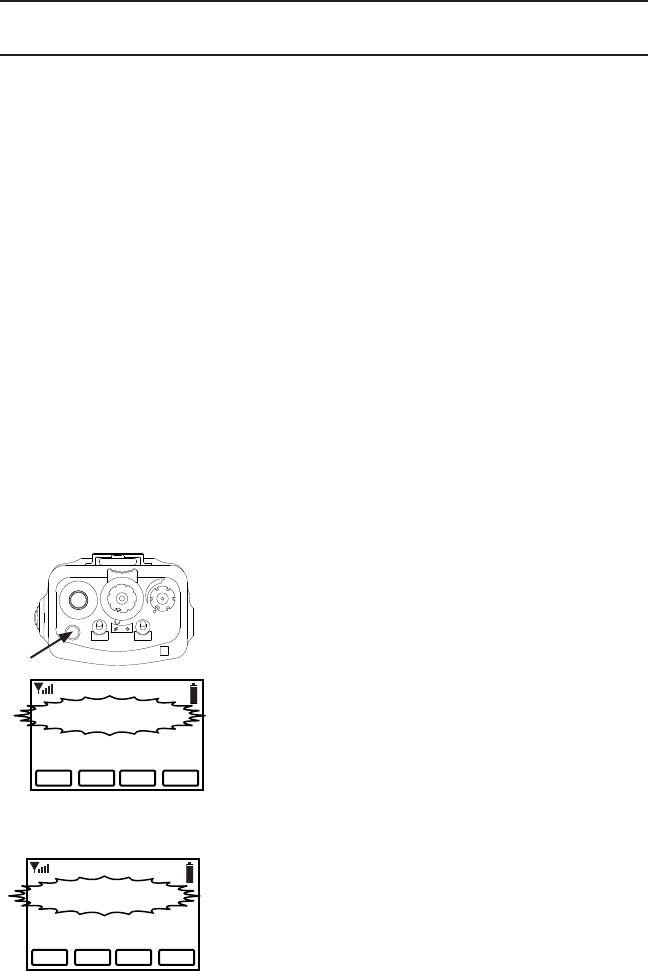
To place an emergency call, press and hold the
programmed emergency button until the radio
beeps and the display ashes “EMERGENCY”.
Radio automatically sends the emergency
signal on the pre-programmed emergency
channel.
To return to normal operation press and hold
the Emergency button or cycle radio power.
Receiving an Emergency Signal
To receive an emergency call, the radio’s
receive mode must be programmed to Digital or
Mixed.
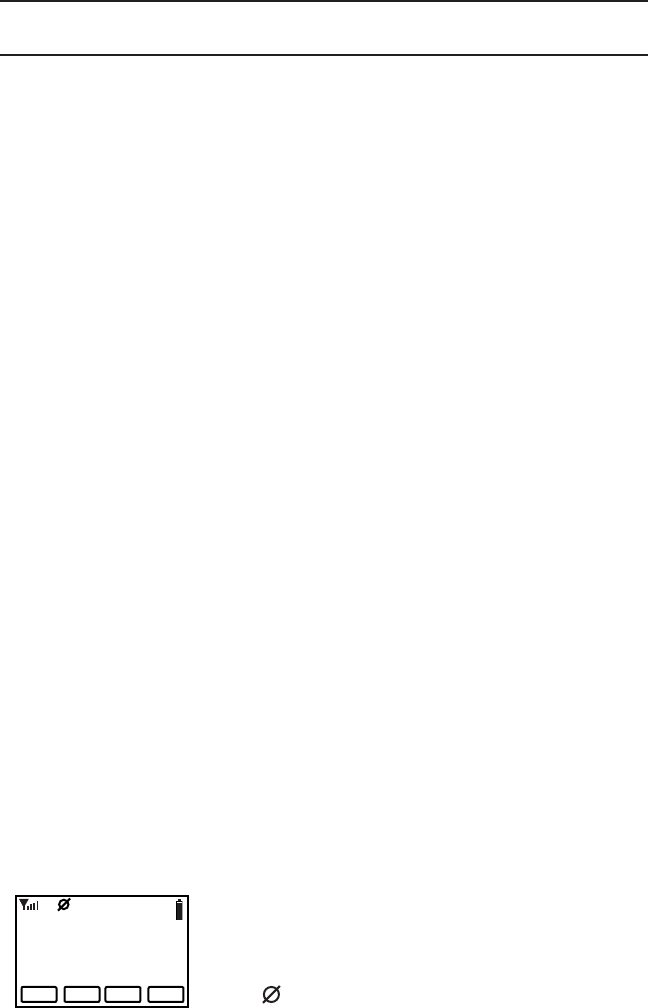
When receiving a qualied emergency call, the
radio will beep. The display will ash the word “EMERGENCY” along
with the P25 ID of the radio sending the signal, for the duration of the
reception, as well as during any hold time. The RXD icon will also be lit.
EMERGENCY
TXD
KNG2-P150
CHAN+ TXCG ZONE MENU
EMERGENCY
RXD
Unit ID 12345
CHAN+ TXCG ZONE MENU
RELM Wireless Corporation
- 34 -
Encryption Operation
Conventional and Trunking Channels
The KNG2 may optionally be congured for Secure communication on
channels operating in Analog or Digital Mode. To determine if your radio
is encryption compatible, remove the battery and check the Options
Label near the top of the radio. “KZA0577” indicates the encryption
option is installed.
Required Setup
Radios that have the DES/AES factory option for encryption must
have encryption keys loaded with an APCO Project 25 compatible
key ll device such as the Motorola KVL 3000 Plus, using a BK Radio
keyloader cable. The radio can hold up to 64 AES and/or DES keys.
After loading keys in the radio, the PC Radio Editor must be used to
congure the radio’s key table and to assign default transmit keys to
each channel.
Radios that have the OTAR factory option support Over-the-Air
Rekeying of encryption keys (OTAR). The PC Radio Editor must be
used to enable OTAR and to mark the channel(s) that will communicate
with the Key Management Facility (KMF). In addition, the radio must
have key encryption keys (used only to encrypt other keys) loaded with
an APCO Project 25 compatible key ll device such as the Motorola
KVL 3000 Plus, using a BK Radio keyloader cable.
Basic Operation
The receiver automatically detects both clear and secure signals.
The transmitter selects clear or secure operation based on each
channel’s programming. Digital channels can be programmed to always
transmit encrypted, always transmit clear, or to select the encryption
mode with the TX Secure switch.
The display indicates Secure Operation as follows:
In Standby Mode, if the radio will transmit in
Secure Mode when PTT is pressed, the encrypt
icon is displayed.
When receiving an encrypted signal, the encrypt
icon ' ' ashes in the display. When transmitting
an encrypted signal, the LED alternates
between red and blue.
Ch 1
171.58500 MHz
KNG2-P150
CHAN+ TXCG ZONE MENU

KNG2 Portable Radio User’s Manual
- 35 -
Transmit Secure [SEC]
Channels programmed for selectable encryption can have “Transmit
Secure” programmed as a switch, button or menu item. The default
setting uses the collar switch to select Transmit Secure.
Ø = encrypted, O = clear
When SEC is on, encrypted channels programmed for switchable
encryption will transmit an encrypted signal.
NOTE: The SEC switch has no eect on channels programmed as
Encrypted Only or Clear Only.
Channels in the Ready-to-Transmit Encrypted mode will display the
symbol on the top line of the LCD.
Transmit Encryption Key Selection [KEY]
The radio can hold up to 64 DES or AES encryption keys. Each channel
is assigned a default key for transmit. The key can be locked to the
channel, or if programming allows, a transmit key other than the default
key can be selected from the radio’s Key Pick List.
To change an encryption key, open the KEY menu. Programmed key
labels will be displayed.
Select the desired key and press “ENTER”.
To return the key to the pre-programmed value select “Default”.
If a key is selected that has not been programmed, the radio will emit a
three beep tone and display “Key Fail” before going to standby mode.
The radio will not transmit but will beep and display “Key Fail” when
PTT is pressed.
User Selectable Encryption Keyset [KEYST]
OTAR equipped radios only.
Selecting a keyset from the Pick List will cause the radio to use
encryption keys from the selected keyset.
User selectable menu access can be assigned to a button or menu list
item.
To change the encryption keyset, open the KEYST menu. Programmed
Keyset labels will be displayed.
Select the desired keyset and press “ENTER”.
RELM Wireless Corporation
- 36 -
Rekey Request [RKEY]
OTAR equipped radios only.
On radios equipped with over-the-air rekeying (OTAR), a radio user
can manually request an encryption rekey from the Key Management
Facility (KMF).
For a radio to receive encryption keys or keysets over-the-air, the
selected channel must be designated as an OTAR channel via PC
programming. Refer to your PC programming documentation for more
information.
To request a re-key:
Open the Rekey Request menu.
Press the “YES” button to Request Keys, or press “ESC” to cancel the
operation.
If the “YES” button is pressed while on a channel that has not been
marked as an OTAR channel, the radio will beep and “NON-OTAR” will
appear on the display.
If a successful rekey occurs, a tone will sound, and the display will
momentarily show “REKEYED”.
Keyset Viewing and Selecting [KSET]
OTAR equipped radios only.
The radio can hold up to 8 encryption keysets. Each keyset is limited to
a maximum of 64 keys. Only one keyset can be active at any time. The
radio will receive messages encrypted with any of the keys in any of the
keysets, but transmit keys can only be selected from the active keyset.
To change an encryption keyset, open the KEYST menu. Programmed
keyset labels will be displayed. Select the desired keyset and press
“ENTER”.
Zeroizing [ZERO]
The radio provides a method for the user to “panic-zeroize” all
encryption keys. Zeroizing removes all encryption keys from the radio,
including keys used for OTAR and Tactical OTAR operation.
Zeroize can be assigned as a button or menu list item.
Open the “Zeroize Keys” menu.
Press “YES” to erase all encryption keys or “ESC” to cancel the action.
When successfully removed the “Keys Removed” message will
momentarily be displayed.

KNG2 Portable Radio User’s Manual
- 37 -
Messaging
Digital Conventional P25 channels can be programmed to send and
receive text messages and radio status messages.
Text messages can be selected from a pre-programmed list or manually
entered using the radio keypad.
Status messages are pre-programmed only.
Text Messaging [TXT]
Conventional Digital Channels
Text Messaging needs to be congured in the PC Radio Editor for
both tx and rx radios. Message types include predened messages,
manually entered messages or locally stored messages.
Predened messages - Predened messages are programmed
into the radio memory using the PC Radio Editor.
Manually Entered Messages - Text messages can be manually
entered via the radio’s keypad.
Locally Stored Messages - Up to ve manually entered messages
can be stored in individual radios.
Sending a Message
To initiate a text message press the “TXT” button or select “Text
Message” from the menu.
Select “Send” from the menu and press “ENTER”.
Select Message Type
From the “Select Entry Type” menu, choose the type of message to
send and press “ENTER”.
Predened List or Manual Entry List
When “Predened List” or “Manual Entry List” is selected, a list of
available messages is displayed.
Select the message to be sent and press “ENTER”.
NOTE: When sending a predened message the message ID
is transmitted. The receiving radio will display the message
programmed with the corresponding ID. If the receiving radio has no
programmed message with the transmitted ID, “Text Message X” is
displayed, where “X” is the received ID number.
RELM Wireless Corporation
- 38 -
Manual Entry
When “Manual Entry” is selected use the keypad to enter the desired
message (see keypad character table). Press “ENTER” to select the
target radio.
Select Target Radio
Last Call - Select “Last Call” to send the message to same radio
you last sent a text message.
Press “Send” to send the message.
Call List - Selecting “Call List” opens a list aliases for the pre-
programmed Unit IDs. Select the desired target radio and press
“Send” to send the message.
Unit ID - Select “Unit ID” to enter the P25 ID of the target radio.
Use the keypad to enter the ID then press “Send” to send the
message
Broadcast - Select “Broadcast” to send the text message to all
text enabled radios regardless of unit ID. Press “Send” to send the
message.
Message Acknowledgement
When the text message has been received by the targeted radio,
an alert tone will sound and the acknowledgment message will be
displayed.
Press “OK” or wait for ve seconds to return to normal radio operation.
If the targeted radio is unavailable, an alert tone will sound and the
failed acknowledgement message will be displayed.
Press “RTRY” to resend the message.
Press “OK” or wait for ve seconds to return to normal radio operation.
When sending a “Broadcast” message, no “text received” notication
is shown. Only conrmation that the text has been broadcast will be
displayed.
Receiving a Message
When an incoming text message is received an alert tone is sounded
and the Text Message Received message is momentarily displayed.
The top programmed display line will alternate between the programmed
setting and “Text Message” until the message is read.
KNG2 Portable Radio User’s Manual
- 39 -
Reading the message
To read the message press the “TXT” button or select ‘Text Message”
from the menu.
Select “Read” to view the message
Stored Messages
Up to ve messages can be programmed into the “Manual Entry List”
and are accessed from the “Select Entry Type” menu.
To store a manually entered text message press the “TXT” button or
select “Text Message” from the menu.
Select “Store” from the menu an press “Enter”.
Use the keypad to enter the desired message then press “Enter”.
(See keypad character table)
Select the storage slot for the message and press “Enter” to store the
message.
Short Message Update [MSG]
Conventional Digital Channels
Short Message Update is a way for the radio to transmit an
enumeration that corresponds to a predened message that is stored in
other radios.
User Update Messaging [STS]
Conventional and Trunking Digital Channels
Sending a Status Update
NOTE: When sending a message the message ID is transmitted.
The receiving radio will display the message programmed with the
corresponding ID. If the receiving radio has no programmed message
with the transmitted ID “Status: Status X” is displayed, where “X” is the
received ID number.
Select Status Message
Press the “STS” button or select “Status Update” from the menu.
From the “Select Status” menu, select the programmed message to
send and press “Enter”.
Select Message Type
From the “Select Target Type” select the type of message to be sent.
Unit - Send the message to an individual radio ID.
Group - Send message to a group of radios using the Talk Group ID.
Dispatch - Send the message to a dispatch console.
RELM Wireless Corporation
- 40 -
Unit Call
Select Target Radio
Last Call
Select “Last Call” to send the message to the same radio you last
sent a status message.
Press “Send” to send the message.
Call List
Selecting “Call List” opens a list aliases for the pre-programmed Unit
IDs.
Select the desired target radio and press “Send” to send the message.
Unit ID
Select “Unit ID” to enter the P25 ID of the target radio.
Use the keypad to enter the ID then press “Send”.
Group Call
Select Target Group ID
Selecting “Group” opens the menu to send a status message to a
group of radios with matching talk group ID.
Select “Enter” to manually enter the ID or “Select” to choose and ID
from the pre-programmed talk group pick list.
Dispatch
Select “Dispatch” to send a status message to a dispatch console.
Message Acknowledgement
If the message has been received by the targeted radio, an alert tone
will sound and the acknowledgment message will be displayed.
If the targeted radio is unavailable, an alert tone will sound and the
failed acknowledgement message will be displayed.
Press “OK” or wait for ve seconds to return to normal radio operation.
Receiving a Status Update
When an incoming status update is received an alert tone is sounded
and the status message is momentarily displayed before returning to
normal operation.
KNG2 Portable Radio User’s Manual
- 41 -
Paging and Call Alert
Conventional Two-Tone/DTMF/MDC1200 Paging [MUTE]
Conventional Analog Channels
The KNG2 can be programmed to receive two-tone, DTMF or
MDC1200 pages on conventional analog channels.
Receiving a page
Select an analog or mixed-mode receive channel.
Turn on “Voice Mute” from the programmed button or menu item.
When voice mute is activated the icon is displayed.
The radio ignores all voice trac until the proper tone sequence is
received.
When a proper signal is received the radio will emit an alert tone and
allow the audio to pass.
If Auto Reset is programmed, the radio will return to the muted standby
mode when the time conditions have been met.
Call Alert Paging [ALRT]
Digital Channels
The KNG2 can be programmed to send and receive Call Alert
messages on digital channels.
Sending a Call Alert
Press the “ALRT” button or open “Call Alert” from the menu.
Select Target Radio
Last Call
Select “Last Call” to send the message to radio which you last sent
or received a call alert. Press “Enter” to send the message.
Call List
Selecting “Call List” opens a list aliases for the pre-programmed Unit
IDs.
Select the desired target radio and press “Enter” to send the Call Alert.
Unit ID
Select “Unit ID” to enter the ID of the target radio.
Use the keypad to enter the ID then press “Enter” to send the Call.
RELM Wireless Corporation
- 42 -
Receiving a Call Alert
When a Call Alert is received, an alert tone will sound and the incoming
unit ID or alias is displayed for approximately 5 seconds.
The top display line will alternate between the programmed display
information and a Call Alert Received message.
Select “Call Alert” to reset.
Radio Check [RCHK]
Conventional Digital Channels
The KNG2 can be programmed to check the availability of a KNG2/
KNG radio with a specic P25 ID.
Requesting a Radio Check
Press the “RCHK” button or open “Radio Check” from the menu.
Select Target Radio
Last Call
Select “Last Call” to send the request to the radio which you last sent
a radio check request. Press “Enter” to send the query.
Call List
Selecting “Call List” opens a list aliases for the pre-programmed Unit
IDs.
Select the desired target ID and press “Enter” to send the query.
Unit ID
Select “Unit ID” to enter the P25 ID of the target radio.
Use the keypad to enter the ID then press “Enter” to send the query.
If a successful handshake is performed, an alert tone will sound and
the "Unit Available" message will be displayed for approximately ve
seconds.
If no validation is received from the targeted radio, an alert tone
will sound and the "No Response" message will be displayed for
approximately ve seconds.

KNG2 Portable Radio User’s Manual
- 43 -
Radio Inhibit/Enable [INH]/[UNINH]
Conventional Digital Channels
With “Inhibit” is assigned to a button or menu function, a KNG2 Radio
can temporarily disable other KNG2/KNG radios using the targeted
radio’s unit ID number.
The disabled radio can only be re-enabled by sending an “Unhibit”
command.
NOTE: Inhibited radios cannot be read with the PC Radio Editor.
Sending a command
To initiate an inhibit/uninhibit message press the programmed button or
select from the menu.
Use the keypad to enter the User or Administrator password.
Press “ENTER” to open the menu.
Select Target Radio
Last Call
Select “Last Call” to send the message to same radio you last sent an
inhibit or uninhbit message. Press “SEND” to send the message.
Call List
Selecting “Call List” opens a list aliases for the pre-programmed Unit IDs.
Select the desired target radio and press “SEND” to send the message.
Unit ID
Select “Unit ID” to enter the P25 ID of the target radio.
Use the keypad to enter the ID and press “SEND” to send the message.
Message Acknowledgement
When the message has been received by the targeted radio, an alert
tone will sound and the acknowledgment message will be displayed.
Press “OK” or wait for three seconds to return to normal radio operation.
If the targeted radio is unavailable, an alert tone will sound and the failed
acknowledgement message will be displayed.
Press “RTRY” to resend the message.
Press “OK” or wait for three seconds to return to normal radio operation.

RELM Wireless Corporation
- 44 -
Other Options and Functions
Many operational features and functions can be programmed for user
selection and control. Items can be programmed to the radio buttons
or switches. In addition to these quick set buttons, a menu of multiple
functions can be accessed with a “MENU” button.
Backlight [LITE]
Conventional and Trunked Channels
Backlight on/o control can be assigned to a switch, button or as a
menu item. In addition, backlighting may be programmed with the PC
Radio Editor to illuminate when any key is pressed.
Battery Life [LIFE]
Conventional and Trunked Channels
Battery Life information includes:
% battery capacity available until depletion
The full capacity of the battery
Estimated time left before depletion
Bluetooth [BT]
Conventional and Trunking Channels
The radio can be connected to approved bluetooth devices.
Bluetooth options include:
Bluetooth - Toggles bluetooth on/o.
Discoverable - Toggles the radio's bluetooth discoverable state on/o
My Devices - Lists current and previously used bluetooth devices.
Scan for Devices - Scans for discoverable bluetooth devices.
This Device Info - Display's the radio's name and MAC address.
Busy Channel Operation
Conventional Channels
The radio can be programmed for dierent behavior when a
conventional channel is busy.
How the radio reacts to a busy channel is programmed with the
following operation options only accessible in the PC Radio Editor:
O - No busy channel transmit limiting will occur.
Indicate - This setting will display "Busy" momentarily and an alert
KNG2 Portable Radio User’s Manual
- 45 -
tone will sound if conicting trac is present, but the radio is still
allowed to transmit.
Lockout - This setting prevents the radio from transmitting, "Busy"
will be displayed and an alert will sound until the PTT is released.
Override - This setting prevents the radio from transmitting. "Busy"
will be displayed and an alert tone will sound until the PTT is
released. However a rapid release and press of the PTT will allow the
radio to transmit.
Automatic - This setting will display "Busy" momentarily and an alert
tone will sound. The radio will then revert back to receive mode and
monitor the active receive trac. (carrier mode only)
Busy Channel Conditions
With the PC Radio Editor, each channel is programmed for the
conditions under which the channel is considered busy.
Conditions include:
O - Channel is never declared busy.
Carrier - A busy condition is declared when carrier is present on the
selected Rx frequency.
Non-Qualied - A busy condition is declared when a non-qualied
signal is present on the Rx frequency. (Non-qualied = Incorrect
CTCSS/CDCSS, talk group or NAC )
Status Symbol - Digital Channels Only. A busy condition is declared
if the P25 busy status symbol is present on the Rx frequency.
Correct NAC - A busy condition is declared when receiving digital
signal with the correct NAC, and declared not busy under all other
conditions.
Channel Select [CHAN]
Conventional and Trunked Channels
Channel Selection can be assigned to a button or menu item.
(See Channel/Zone Selection Options for details.)
Cloning [CLON]
Conventional Zones
KNG2 radios can be set up to send or receive programmed information
from other BK Radio products via a cloning cable available from RELM
Wireless. Cloning can be assigned to a button. Refer to the cloning
cable manual for cloning information.
RELM Wireless Corporation
- 46 -
Contrast
Conventional and Trunking Channels
Allows the user to adjust the contrast of the screen.
Select the desired contrast using the -/+ buttons.
Press "ENTER" to set the contrast.
Control Lockout [LCK]
Conventional and Trunking Channels
The KNG2 portable oers a variety of control lock options. Control lock
can be assigned to a toggle switch, collar switch or as a button or menu
item.
Switch Assignment
When assigned to a toggle switch, toggling the switch on locks all
controls except the toggle switches, PTT and volume/o.
When assigned to the collar switch, toggling the switch on locks all
controls except the collar switch, PTT and volume/o.
Button/Menu Assignment
When assigned as a button or menu item, users can select from two
lockout settings, “Lock Keypad Only” and “Lock All Controls”.
“Lock Keypad Only” locks only front panel button operations.
“Lock All Controls” locks all buttons and switches as determined by
radio programming. Any or all of the following function may be locked
when “Lock All Controls” is selected: Front keypad, side top buttons,
toggle switches, channel knob, collar switch and push-to-talk.
To enable the lock function press the assigned button or open the menu
and select Control Lock from the list.
Select the desired lockout setting and press “ENTER”
To disable Control Lock press the diamond button twice, then the
square button twice.
Date and Time [DATE]
Conventional and Trunked Channels
Displays the date and time. The edit button allows the user to change
the date and time. The time will stay stored in the radio when powered
o.
KNG2 Portable Radio User’s Manual
- 47 -
Global Positioning [GPS]
Conventional and Trunked Channels
(Requires GPS Option KZA0589 or KAA0589)
To access GPS functions press the “GPS” button or select “GPS” from
the menu.
Viewing GPS information
To view current coordinates open the GPS menu and select “GPS
Information”. After acquisition, the current location is displayed in
degrees, minutes and seconds.
Sending GPS information
GPS information is sent by a variety of triggers only accessible in the
PC Radio Editor:
PTT - After a digital transmission, the GPS coordinates will be
automatically transmitted.
Periodic - GPS coordinates are transmitted periodically using a
programmed time.
Emergency - GPS coordinates are sent if the radio activates
emergency.
Power on/o - GPS coordinates are sent once the radio powers up
and acquires a position and also on power o.
User Request - To send GPS information, open the GPS menu and
select “Transmit Request”. From the Request menu select the desired
target ID and press “Enter”.
Hard Power Down [PWRD]
Conventional and Trunking Channels
When pressed, turns the radio completely o.
Home [HOME]
Conventional and Trunking Channels
When pressed, the radio returns to a preprogrammed channel that is
congured in the PC Radio Editor.

RELM Wireless Corporation
- 48 -
Keypad Programming
Conventional Systems and Channels
Much of the information stored in the KNG2 can be edited using the
keypad. Five separate programming functions can be enabled with the
PC Radio Editor.
Keypad programming selections can only be assigned as a menu item.
Refer to the Keypad Programming section for detailed information on
how to edit programmed radio information.
Minimum Volume [VOL]
Conventional and Trunking Channels
Must be congured as "Customizable" in the PC Radio Editor to access
through the radio. When pressed, changes the volume level at lower
volumes. This allows the user to set their minimum volume to an audible
level.
Monitor [MON]
Conventional Channels
There are three settings available for monitoring trac on a selected
channel. “Monitor” can be assigned to a button or as a menu item.
Monitor Modes and Indicators
O - Squelch works as congured. (No indicator)
On - Only carrier squelch is in eect. NAC and CxCSS and
TGID are all ignored. Steady on.
Open - No squelch is taking place. If there is no signal, the
audio will be static. Solid on.
Button Operation - A quick press will toggle between O and On,
while a long press will turn on "Open" mode and short press will return
the radio to O mode.
Menu Operation - Open the Monitor menu, select the desired operation
and press “Enter”.
Nuisance Channel Delete [DEL]
Conventional Channels
If enabled, a nuisance channel can be temporarily removed from the
scan list. Nuisance Channel Delete can only be assigned to a button.
To temporarily remove a channel from the scan list, press the assigned
button while the nuisance channel is being received.
To revert to the programmed scan list, turn o Scan, cycle radio power
or select another zone or channel.

KNG2 Portable Radio User’s Manual
- 49 -
Phone [PHN] and Hang Up [HANG]
Conventional Channels
The Phone function is a way for a conventional radio to instruct the
system to dial a phone number and begin a call with that radio. Using
the Hang Up button allows the user to end that call.
Radio Accountability Tone [RAT]
Conventional and Trunked Channels
The Radio Accountability Tone transmits a preprogrammed sequence
of DTMF tones when the RAT button is pressed and held. Must be
programmed with a Radio Accountability Tone ID in the PC Radio Editor.
Radio info
Conventional and Trunking Channels
Information about your radio can be viewed via the “Radio Info” menu
item.
To review the information, open the Radio Info menu. Use the NEXT or
PREV to view individual items.
Radio Info information includes:
UID - P25 Unit ID.
IP - IP Address of the radio.
OTAR Registered - Acknowledges if radio is registered to an OTAR
system.
Up Time - Amount of time the radio has been on.
Repeater Talkaround [T/A]
Conventional Channels
In Repeater Talkaround mode, the radio will transmit on the programmed
receive frequency of the selected channel. When T/A is enabled the
icon will be displayed on the top line of the LCD.
NOTE: Channels programmed as receive only are not aected by the
Talkaround selection.
Talkaround selection can be assigned to a switch, button or as a menu
list item.
Send Alert Tone [SNDT]
Conventional and Trunking Channels
When pressed and held, the radio will transmit a 781.3Hz tone for the
programmed duration. Duration can be set in the range from 0.5 to 5
seconds.
RELM Wireless Corporation
- 50 -
Send Signal [SEND]
Conventional Analog Channels
Activated by a long-press and is the 5-tone equivalent to emergency
alarm. ANI Mode needs to be set to ve-tone. Holding this button will
send the ve-tone signal.
Squelch Adjust [SQL]
Conventional Channels
Squelch Adjust is used to change the signal strength required for the
radio’s speaker to unmute.
Squelch can be assigned as a button or menu list item.
To adjust the squelch setting, open the squelch menu. Select the
desired threshold using the -/+ buttons.
Press “ENTER” to set the level.
Site Display [STDS]
Trunking Channels
When selected, the Site Display functions shows information for the
currently operating site.
Displayed information includes: Site ID, Site Alias and RSSI.
Site Display can be assigned as a button or menu list item.
Site Lock [STLK]
Trunking Channels
Site lock prevents the radio from searching for other sites by locking it
to the currently selected site.
Site Lock can be assigned as a button or menu list item.
Site Search [STSR]
Trunking Channels
Site Search automatically searches and selects the best available
trunking site.
Site Lock can be assigned as a button or menu list item.
KNG2 Portable Radio User’s Manual
- 51 -
Surveillance Mode [SURV]
Conventional and Trunking Channels
When Surveillance Mode is on, all audible indicators (beeps etc.) and
lighting functions (LEDs and Display) are disabled.
Surveillance Mode can a switch, button or as a menu list item.
System Test
Conventional and Trunking Channels
The KNG2 portable oers a variety of system tests when connected to
the appropriate test equipment. Select the appropriate test and follow
the onscreen prompts.
Transmit Digital [TXAD]
Conventional Mixed-Mode Transmit Channels
When Transmit Digital is on, channels programmed for mixed-mode
transmit will transmit in digital mode. When o, mixed-mode channels
transmit in analog mode.
When transmitting in digital mode the display shows ‘D’ behind the TX
indicator. In analog transmit, ‘A” will follow the indicator.
Transmit Digital selection can be assigned as a button, switch or menu
list item.
When assigned as a button function, the “TXAD” button will be
highlighted when in the Transmit Digital mode.
Transmit Power [PWR]
Conventional and Trunking Channels
Transmit Power can be selected between the programmed high and
low settings. The power output of the settings depend on radio options,
model and editor settings.
When operating in the high power mode, “H” will be displayed on the
top line of the LCD. In low power mode, “L” is displayed.
Power selection can be assigned as a button, switch or menu list item.
Two-Tone Select [TONE]
Conventional Analog Channels
Allows the user to select from their two-tone list (programmed with the
PC Radio Editor). Selecting an item will send the two-tone signal.
RELM Wireless Corporation
- 52 -
Versions
Conventional and Trunking Channels
Version information about your radio can be viewed via the “Versions”
menu item.
To review the information, open the Versions menu. Use the NEXT or
PREV to view the installed revisions of individual items.
Version information includes:
Date: Date of release.
Release: Overall release code.
Software: Release code for ARM.
DSP: Release code for DSP.
File Format: Currently installed le format.
BSP: Release code of installed BSP rmware.
PCB Revision: Installed printed circuit board revision number.
Date of Manufacture: Date of manufacture.
C-ACE: Version of encryption module.
Current version information can be found in the service section at
www.relm.com.
Zone Select [ZONE] (Conventional and Trunked Channels)
Zone Select allows the radio user to switch between programmed
channel zones.
The Zone Select operation can be assigned as a button, switch or
menu list item..
When Zone is assigned to a button, press the button to open the menu
of available zones.
When assigned as a menu item, open the menu as described in the
Navigation section.
Select the Zone you want to use.
Press “ENTER” select the Zone.
Also, If enabled, a zone can also be accessed directly from the keypad.
(Refer to your PC Radio Editor documentation.)
(See also, Channel/Zone Selection Options.)

KNG2 Portable Radio User’s Manual
- 53 -
Keypad Programming
Radio programming is to be performed only by authorized personnel.
Any or all functions may be password protected to prevent unauthorized
access. Check with your communications ocer for information on the
programmed functions of your radio.
NOTE: Trunking channels and systems cannot be programmed via the
radio keypad.
Keypad programmable categories include individual Channel, Zone
and Global radio parameters, individual P25 ID Quick Call/Receive List,
User Tone List, User NAC List and User Talk Group ID List.
Check with your RELM/BK Radio dealer or communications ocer for
information on the programmed functions of your radio.
Keypad Programming Navigation
While in programming mode the diamond, arrow up, arrow down and
square buttons are used navigate the programming functions. The
following table shows possible button functions:
Keypad Programming Buttons
ENT Opens the highlighted function or enters the displayed information
ESC Press once to go back to previous screen or hold to exit
programming mode and return to normal radio operation
NEXT Move to the next item in a displayed list or the next character in a
displayed value
PREV Move to the previous item in a displayed list
EDIT Used to select and edit individual characters in a displayed value
BACK Move to the previous character in a displayed value
CLR Clears the displayed value
EDIT Used to edit individual characters in a displayed value
INV Inverts a displayed digital tone value (CDCSS)

RELM Wireless Corporation
- 54 -
Entering Keypad Programming Mode
To enter programming mode open the menu list by pressing the
assigned “Menu” button and select “Keypad Prog” from the menu list.
Use the keypad to enter the six-digit user or master password and press
the Enter button.
Select the item to program and press Enter.
Available programmable functions are:
Keypad - Used to edit individual channel and zone information such
as labels, frequencies, operating modes, etc.
Call List - Used to edit the P25 ID Call List entries.
User Tones - Used to edit the user selectable Code Guard entries.
User NACs - Used to edit user selectable Network Access Codes.
User TGIDs - Used to edit user selectable P25 Talk Groups
NOTE: Depending on PC programming, not all functions may be
accessible for keypad programming.
Global, System, Zone and Channel Parameters
The “Keypad” programming menu consists of four sub-menus for editing
global, system, zone and channel parameters (see table).
Keypad Programming Sub-Menus
Global System Zone Channel
Display Top Sys Pri 1 Add/Delete Add/Delete Rx/Tx NAC
Display Middle Tx on Pri 1 Label Label Sq Mode
Display Bottom Sys Pri 2 Zone Pri 1 Rx/Tx Freq Bandwidth
User Password Tx on Pri 1 Rx/Tx Mode Tx Power
Zone Pri 2 Rx/Tx Guard TGID
Global Settings
To edit the programmable Global settings, select “Keypad” from the
programing menu then select “Global” from the sub-menu.
Select the item you wish to edit from the Global menu.
Displayed Information Lines
The three main display lines can be programmed with the PC Radio

KNG2 Portable Radio User’s Manual
- 55 -
Editor to display radio information. Select top, middle or bottom line to
change its displayed information. Then select the desired setting from
the list (see table).
NOTE: Display changes do not aect the display on trunked channels.
Conventional Display Line Options
None No information is displayed.
Channel Label Alphanumeric label of currently selected channel or
active scanned channel.
Channel Number Channel number of currently selected channel or
active scanned channel.
Channel # and Zone Currently selected channel numbers and zone.
Date and Time Displays date and time.
DTMF* Displays the numeric DTMF tones of received signal.
Frequency* Operating frequency of currently selected channel or
active scanned channel.
MDC* Displays the numeric MDC ID or received signal
DT MF.
Radio Name Displays radio name.
Received TGID P25 Talk Group ID of the radio transmitting the
message currently being received.
Rx’d Unit ID P25 ID of a received digital signal. If the incoming
ID is programmed in your Unit ID Call List list, the
associated label will be displayed. During standby
you radio ID number is displayed.
Rx/Tx Key Currently selected encryption key.
Rx Picklist Selections* NAC, TGID or Code Guard currently selected from
the programmable RX Pick Lists.
Subaudible* Displays CxCSS value of received signal.
Tx Picklist Selections* NAC, TGID or Code Guard currently selected from
the programmable TX Pick Lists.
Unit ID Shows your P25 Unit ID
While receiving, the ID of the radio transmitting the
message is displayed
If the received ID is programmed in your radio's Call
List, the corresponding label will be displayed
Zone Label Label of currently selected zone.
Zone and Channel # Currently selected zone and channel numbers.
Zone Number Currently selected zone number.
*Conventional Channels Only
RELM Wireless Corporation
- 56 -
User Password
Select “User Password” from the “Global” menu to edit the keypad
programming password. Enter a six-digit numeric.
NOTE: Changing the user password does not aect the power-up or
administrator password.
System Settings
To edit the programmable System settings, select “Keypad” from the
programing menu then select “System” from the sub-menu.
Select the item you wish to edit from the System menu.
System Priority 1 or 2 Channel
Priority channels can be assigned on a system wide basis. If
assigned, a system priority channel will be monitored during priority
scan regardless of the current operation zone priority channel.
When set to “O”, the Priority 1 or Priority 2 Channel is designated by
the selected zone setting.
When set to “Use Main” the channel selected by the channel knob
operates as the priority channel.
To designate a specic priority channel choose “Select” from the
priority channel menu.
Select the Zone and Channel.
Tx on Priority 1 Channel
If on, the radio will transmit on the System Priority 1 channel
whenever Priority Scan is on.
Zone Settings
To edit the programmable Zone settings, select “Keypad” from the
programing menu then select “Zone” from the sub-menu.
Select Add, Delete or Edit Zone from the Zone menu.
Add Zone
When selected, a new zone is added in the next available slot.
Example: If there are seven zones in the radio, the added zone will be
zone eight.
KNG2 Portable Radio User’s Manual
- 57 -
Delete Zone
When selected the list of available zones is displayed. Choose the
zone you wish to delete.
When a zone is removed all subsequent zones move up one spot.
Example: If there are seven zones in the radio and zone ve is
deleted, zone six now becomes zone ve and zone seven becomes
zone six.
Edit Zone
Select “Edit Zone” to change the programmable zone information.
Zone Label
Use the keypad to enter a label of up to sixteen characters.
(See keypad character table)
Zone Priority 1 or 2 Channel
NOTE: If system priority channels are programmed, zone priority
settings are ignored.
When set to “O”, the Priority 1 or Priority 2 Channel is designated
by the selected zone setting.
When set to “Use Main” the channel selected by the channel knob
operates as the priority channel.
To designate a specic priority channel choose “Select” from the
priority channel menu and choose from the channel list.
Zone Tx Priority 1 Channel
If on, the radio will transmit on the Zone Priority 1 channel
whenever Priority Scan is on and there is no system priority 1
programmed.
Channel Settings
To edit the programmable Channel settings, select “Keypad” from the
programing menu then select “Channel” from the sub-menu.
Select Add, Delete or Edit Channel from the Channel menu.
NOTE: REFER TO THE COMMAND ZONE OPERATIONS SECTION
FOR ADDING OR DELETING COMMAND ZONE CHANNELS.
DO NOT ADD OR DELETE COMMAND ZONE CHANNELS VIA THE
KEYPAD PROGRAMMING METHOD.
RELM Wireless Corporation
- 58 -
Add Channel
Select to add a new channel.
Choose the zone to which the channel is to be added.
Enter a valid channel index number of 1-5000.
NOTE: To access channels above channel sixteen, the radio must be
programmed via PC for keypad channel select or “Channel Select”
must be assigned as a button or menu item.
Delete Channel
When selected the list of programmed zones is displayed. Choose the
zone of the channel you wish to delete.
Select the channel from the list.
Edit Channel
Select “Edit Channel” to change the programmable channel
information.
Select the zone and channel to be edited.
Channel Label
Use the keypad to enter a label of up to sixteen characters.
(See keypad character table)
Rx Frequency
Enter a valid receive frequency in MHz. Frequencies must be
divisible by 1.25kHz.
Rx Mode
Select Analog, Digital or Mixed Mode.
Rx Guard
Analog or Mixed Mode Receive Channels Only
Select “O” for analog signals to operate in carrier squelch mode.
Select “Tone” to enter a CTCSS tone,
Select “Digital” to enter a DCS value.
Use “INV” to invert a DCS tone.
RX NAC
Digital or Mixed Mode Receive Channels Only
Select “Enter” to program a receive NAC via the keypad.
Enter the desired value in hexadecimal (000 - FFF).
KNG2 Portable Radio User’s Manual
- 59 -
NOTE: $F7F is an invalid receiver NAC.
Choose “Select” to use a receiver NAC from the programmed pick
list.
Squelch Mode
Digital or Mixed Mode Receive Channels Only
Normal - Requires carrier and NAC only to unmute digital
signals.
Selective - Required for Individual Calls and use of Talkgroup
IDs. Requires a matching TGID to unsquelch.
Bandwidth
Analog or Mixed Mode Channels Only
Narrowband - 12.5kHz spacing when operating in analog.
Wideband - 25kHz spacing when operating in analog.
Tx Power
Low Power - Lock channel in low power mode.
High Power - Lock channel in high power mode.
Selectable - Allow high/low transmit power selection form
assigned button, switch or menu item.
Tx Frequency
Enter a valid receive frequency in MHz. Frequencies must be
divisible by 1.25kHz.
Tx Mode
Select Analog, Digital or Selectable.
Tx Guard
Analog or Mixed Mode Receive Channels Only
Select “O” for analog signals to operate in carrier squelch mode.
Select “Tone” to enter a CTCSS tone,
Select “Digital” to enter a DCS value.
Use “INV” to invert a DCS tone.
Tx NAC
Digital or Mixed Mode Transmit Channels Only
Select “Enter” to program a transmit NAC via the keypad.
Enter the desired value in hexadecimal (000 - FFF).
RELM Wireless Corporation
- 60 -
NOTE: $F7E and $F7F are invalid transmit NACs.
Choose “Select” to use a transmit NAC from the pick list.
TGID
Digital or Mixed Mode Channels Only
Select “Enter” to program a transmit Talk Group ID via the keypad.
Enter the desired value (1- 65535).
NOTE: 0 is an invalid transmit Talk Group ID.
Choose “Select” to use a TGID from the pick list.
P25 ID Unit Call/Receive List
The KNG2 can be pre-programmed with up to 100 Project 25 IDs and
labels. If ‘RX’d Unit ID’ is designated as a display line, the P25 ID of
the radio sending the call will be shown when receiving a digital signal.
If the P25 ID of the received call is programmed in the Call List, the
alphanumeric label associated with the ID will be displayed. If the P25
ID is not in the Call List, the numeric P25 ID will be displayed.
Select “Call List” from the programing menu.
Select the P25 ID you wish to edit.
The display shows the label and P25 ID of the selected ID.
Select “Label” to edit or add an alphanumeric label.
Select “Dest ID” to change the P25 ID.
User Selectable Code Guards
The KNG2 can be pre-programmed with up to 32, user selectable,
CTCSS or CDCSS subaudible tones. Tones are selected via a
programmed button or menu item (see TX/RX CxCSS Picklist). If
enabled, the tones can be programmed via the radio’s keypad.
Select “User Tones” from the programing menu.
Select the tone to edit.
To enter a CTCSS tone select “Tone” and enter the desired frequency in
Hertz (67.0 - 254.1 Hz).
To enter a CDCSS (digital) tone select “Digital” then enter the three digit
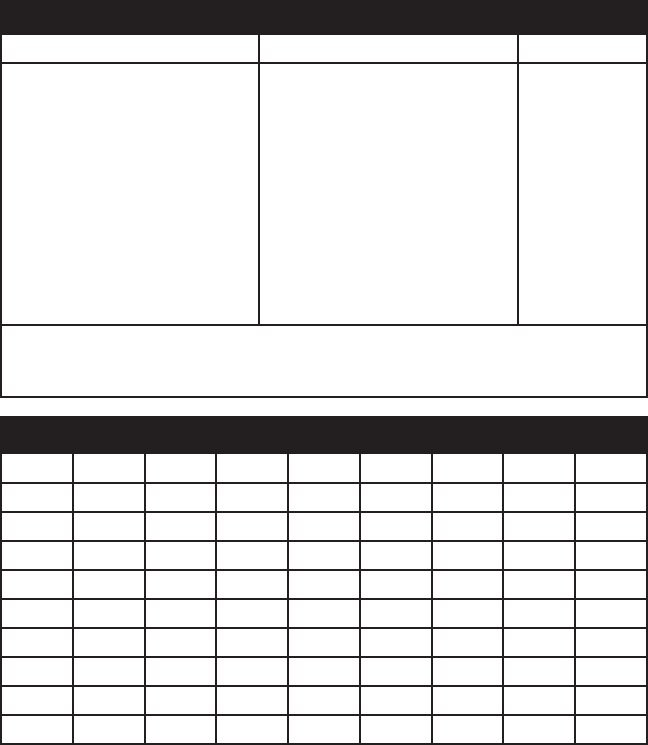
KNG2 Portable Radio User’s Manual
- 61 -
code. Use the INV button to invert the code. The following tables show
the standard values for tone and digital. Any value can be entered in
keypad programming. The user is not restricted to these values.
Valid Code Guard Tone Values
Group A Group B Group C
67.0 (XZ) *151.4 (5Z) 71.9 (XA) 146.2 (4B) 74.4
77.0 (XB) 162.2 (5B) 82.5 (YZ) 156.7 (5A) 79.7
88.5 (YB) 173.8 (6A) 94.8 (ZA) 167.9 (6Z) 85.4 (YA)
*100.0 (1Z) 186.2 (7Z) 103.5 (1A) *179.9 (6B) 91.5 (ZZ)
107.2 (1B) 203.5 (M1) 110.9 (2X) 192.8 (7A)
114.8 (2A) 218.1 (M3) *118.8 (2B) 210.7 (M2)
123.0 (3Z) 233.6 127.3 (3A) 225.7 (M4)
131.8 (3B) 250.3 136.5 (4Z) 241.8
141.3 (4A)
* 50/60 Hz power distribution systems could cause falsing.
The assignments in a given area should be made from within one of the Groups:
A, B, or C.
Valid Digital Code Guard Values
023 025 026 031 032 043 047 051 054
065 071 072 073 074 114 115 116 125
131 132 134 143 152 155 156 162 165
172 174 205 223 226 243 244 245 251
261 263 265 271 306 311 315 331 343
346 351 364 365 371 411 412 423 431
432 445 464 465 466 503 506 516 532
546 565 606 612 624 627 631 632 654
662 664 703 712 723 731 732 734 743
754

RELM Wireless Corporation
- 62 -
User Selectable Network Access Codes
The KNG2 can be pre-programmed with up to 32, user selectable
NACs. NACS are selected via a programmed button or menu item (see
TX/RX Network Access Code Picklist). If enabled, the tones can be
programmed via the radio’s keypad.
Select “User NACs” from the programing menu.
Select the NAC to edit.
Enter the desired value in hexadecimal (000 - FFF).
NOTE: $F7E and $F7F are invalid as user selectable NAC values.
User Selectable Talkgroup IDs
The KNG2 can be pre-programmed with up to 32, user selectable
TGIDs. TGIDs are selected via a programmed button or menu item (see
Talk Group ID Picklist). If enabled, the TGIDs can be programmed via
the radio’s keypad.
Select “User TGIDs” from the programing menu.
Select the Talk Group ID to edit.
Enter the desired value (1 - 65535).
NOTE: A Talk Group ID value of 0 is not allowed.
Warranty
The KNG2 portable radio is covered by a two-year warranty. Extended
warranties may be available. For information about your warranty
contact RELM/BK Radio at (800) 648-0947. Email; sales@relm.com
If you need service, contact your BK Radio dealer. If you nd it
impractical to have service provided by your dealer, contact the RELM/
BK Radio Technical Service Department at (800) 422-6281.
Repairs may be sent to the address below.
RELM Wireless Corporation
Attention: Customer Service
7100 Technology Drive
West Melbourne, FL 32904
KNG2 Portable Radio User’s Manual
- 63 -
Keypad Text/Programming Characters
11
ABC
2A, B, C, a, b, c, 2
DEF
3D, E, F, d, e, f, 3
GHI
4G, H, I, g, h, i, 4
JKL
5J, K, L, j, k, l, 5
MNO
6M, N, O, m, n, o, 6
PQRS
7P, Q, R, S, p, q, r, s, 7
TUV
8T, U, V, t, u, v, 8
WXYZ
9W, X, Y, Z, w, x, y, z, 9
00, Blank Space
*
*, ., ,, ;, :, ", ', !, ?, %, &, ', ~, @, _
#
#, $, +, -, =, ^, /, \, |, <, >, {, }, [, ]

RELM Wireless Corporation
- 64 -
My Radio Settings
Serial # ID#
Conv. Trunked
Collar Switch
Left Toggle
Right Toggle
Orange Button
Top Side
Middle Side
Bottom Side
Diamond
Up Arrow
Down Arrow
Square
Menu Settings
Conv. Trunked