Q203_BLU user manual-final
1
CONTENTS
1. SAFETY .............................................................. 1
2. START ................................................................ 3
2.1 Power on and off.................................................................................................................... 7
2.1.1 Power on ....................................................................................................................... 8
2.1.2 Power off ....................................................................................................................... 8
2.2 Using the touch screen ........................................................................................................... 8
2.2.1 Touch operation ............................................................................................................. 8
2.2.2 Gravity Sensor ............................................................................................................... 8
2.3 Locking and unlocking the screen .......................................................................................... 9
2.3.1 Locking the screen ......................................................................................................... 9
2.3.2 To unlock the screen ...................................................................................................... 9
2
2.4 The main screen ..................................................................................................................... 9
2.4.1 Notice board .................................................................................................................. 9
2.4.2 View expanding screen interface ................................................................................. 10
2.4.3 Definite the main screen .............................................................................................. 10
2.4.4 Changing the desktop wallpaper.................................................................................. 11
3. CALL FUNCTION ..................................................... 11
3.1 Dial telephone...................................................................................................................... 11
3.1.1 By dialing call ............................................................................................................... 11
3.1.2 Through contacts to dial the phone ............................................................................. 11
3.1.3 Make a call through call record .................................................................................... 12
3.2 Answer or reject a call .......................................................................................................... 12
3.2.1 Answer a call ................................................................................................................ 12
3.2.2 End call ........................................................................................................................ 12
3.2.3 Reject a call .................................................................................................................. 12
3
3.3 The operation in call ............................................................................................................ 12
3.3.1 Conduct multiparty call ................................................................................................ 12
3.3.2. Answer another call .................................................................................................... 13
3.4 The use of call records .......................................................................................................... 13
3.4.1 Add the numbers that in the call records to contacts. ................................................. 13
3.5 Using flight mode ................................................................................................................. 14
4. CONTACTS .............................................................. 14
4.1 Open contacts ...................................................................................................................... 14
4.2 Copy contact information from the SIM card. ...................................................................... 14
4.3 Create contact informations ................................................................................................. 14
4
4.4 Collector contacts ................................................................................................................ 15
4.5 Find contact information ...................................................................................................... 15
4.6 Edit contact information ...................................................................................................... 15
4.7 Contact with the contact ...................................................................................................... 15
4.7.1 Contact with the contact ............................................................................................. 15
4.8 Delete contact information .................................................................................................. 16
4.9 Backup contact through the storage。 ................................................................................. 16
4.9.1 Backup contacts ........................................................................................................... 16
4.9.2 Restore contacts .......................................................................................................... 16
4.10 Administrate group ............................................................................................................ 16
5
4.10.1 Create a group ........................................................................................................... 16
4.10.2 Edit group .................................................................................................................. 17
4.10.3 Take contact to a group list ........................................................................................ 17
4.11 Send contact ...................................................................................................................... 17
5. USING SCREEN KEYBOARD ..................................... 17
5.1 Using the input panel ........................................................................................................... 17
5.1.1 Switching input method ............................................................................................... 18
6. MESSAGING ........................................................... 18
6.1 SMS and MMS ...................................................................................................................... 18
6.1.1 Open SMS .................................................................................................................... 18
6.1.2 Create and send SMS ................................................................................................... 18
6.1.3 Create and send MMS .................................................................................................. 18
6.1.4 Custom information set ............................................................................................... 20
6
6.2 Email .................................................................................................................................... 20
6.2.1 Add an email account .................................................................................................. 20
6.2.2 Check email ................................................................................................................. 21
6.2.3 Create and send email ................................................................................................. 21
6.2.4 Reply email .................................................................................................................. 21
6.2.5 Delete the email account ............................................................................................. 21
6.2.6 Custom e-mail account setting ..................................................................................... 21
7. ESTABLISH CONNECTION ..................................... 22
7.1 Mobile Networks ................................................................................................................. 22
7.1.1 Check network connection .......................................................................................... 22
7.1.2 Open data services .................................................................................................. 22
7.2 The use of wireless LAN ....................................................................................................... 23
7.2.1 Open the wireless LAN ................................................................................................. 23
7.2.2 Connect to wireless LAN .............................................................................................. 23
7
7.3 Browsing the internet .......................................................................................................... 24
7.3.1 Browser basic operation .............................................................................................. 24
7.3.2 Open the page ............................................................................................................. 24
7.3.3 Set homepage .............................................................................................................. 25
7.3.4 Manage bookmarks ..................................................................................................... 25
7.3.5 Custom browser settings ............................................................................................. 26
7.4 Using Bluetooth ................................................................................................................... 26
7.4.1 Open Bluetooth ........................................................................................................... 26
7.4.2 Search the mobile that has enable Bluetooth and pair ................................................ 26
7.4.3 Transfer files via Bluetooth .......................................................................................... 27
7.4.4 Disconnect or cancel the Bluetooth pairing ................................................................. 27
8. RECREATIONAL FUNCTION ..................................... 27
8.1 Take pictures and video........................................................................................................ 27
8.1.1 open and close camera ................................................................................................ 27
8.1.2 Take pictures ................................................................................................................ 27
8
8.1.3 View photos ................................................................................................................. 28
8.1.4 Shoot video ............................................................................................................... 28
8.1.5 view videos .................................................................................................................. 28
8.2 Use gallery ........................................................................................................................... 28
8.2.1 Open gallery ................................................................................................................ 28
8.2.2View photos .................................................................................................................. 29
8.3 Enjoy the music .................................................................................................................... 29
8.3.1 open music .................................................................................................................. 29
8.3.2 Play music files............................................................................................................. 29
8.3.3 Add music to playlist .................................................................................................... 29
9. ACCOUNT AND SYNC ............................................. 30
9.1 Manage account................................................................................................................... 30
9.1.1 Add account ................................................................................................................. 30
9.1.2 Delete account ............................................................................................................. 30
9
9.2 Custom account synchronization information ...................................................................... 31
9.2.1 A conventional sync settings ........................................................................................ 31
10.MORE APPLICATIONS ............................................ 31
10.1 Calendar ............................................................................................................................. 31
10.1.1 Open calendar............................................................................................................ 31
10.1.2 Add new event ........................................................................................................... 31
10.1.3 Set event reminder .................................................................................................... 31
10.1.4 Custom calendar settings ........................................................................................... 32
10.2 Using clock ......................................................................................................................... 32
10.2.1 Open clock ................................................................................................................. 32
10.2.2 Open alarm clock ....................................................................................................... 32
10. 3 Use calculator .................................................................................................................... 33
10.3.1 Open calculator .......................................................................................................... 33
10.3.2 Switch to senior panel................................................................................................ 33
10
10.4 Use notes ........................................................................................................................... 33
11. MANAGE THE MOBILE PHONE ............................. 33
11.1 Set data and time ............................................................................................................... 33
11.2 Display settings .................................................................................................................. 34
11.2.1 Adjust screen brightness ............................................................................................ 34
11.2.2 Set screen standby time ............................................................................................. 34
11.3 Sound settings .................................................................................................................... 35
11.3.1 Open the silent mode ................................................................................................ 35
11.3.2 Set volume ................................................................................................................. 35
11.3.3 Change mobile phone ringtones ................................................................................ 35
11.3.4 Set notification tones ................................................................................................. 35
11.4 Mobile phone service settings ........................................................................................... 36
11
11.4.1 Call settings ................................................................................................................ 36
11.4.2 Data roaming ............................................................................................................. 36
11.4.3 Closing data service ................................................................................................... 36
11.5 Set text to speech ............................................................................................................... 36
11.5.1 Regulate the speed of the voice ................................................................................. 36
11.6 Security settings ................................................................................................................. 37
11.6.1 Set up SIM card lock ................................................................................................... 37
11.6.2 Set up pattern lock ..................................................................................................... 37
11.6.3 Set up PIN lock ........................................................................................................... 37
11.7 Manage applications .......................................................................................................... 38
11.7.1 View installed applications ........................................................................................ 38
11.7.2 Uninstall applications................................................................................................. 38
11.7.3 Application shift to SD card ........................................................................................ 38
11.7.4 Release the mobile phone memory ........................................................................... 39
12
11.8 Restore settings.................................................................................................................. 39
11.8.1 Restore factory settings ............................................................................................. 39
11.9 Online upgrade .................................................................................................................. 40

1
1. Safety
Read these simple guidelines. Not following them may be dangerous or illegal. For further
information, read the complete user guide.
Switch off in restricted areas.
Switch off the device when cell phone use is prohibited or when it may cause interference
or danger, for example, in aircraft, in hospital or near medical equipment, fuel, chemicals,
inflammable goods, or blasting areas. Obey all instructions in restricted areas.
Road safety comes first
Don’t use mobile phone and always keep your hand free to operate the vehicle while
driving. You first consideration while driving should be road safety.
Interference
Mobile communication may be susceptible to interfere, thereby could affect
performance.
Waterproof
Your mobile phone is not waterproof, keep it dry.
The mobile phone is placed where the children not touch.Mobile phone and all its
accessories (including accessories) should be placed where children can not touch.
Accessories and batteries
Use only the designated battery and charger approved by Qmobile, Do not connect
2
incompatible product.
Qualified Services
Only authorized agencies or qualified personnel may install or repair this mobile phone.
3
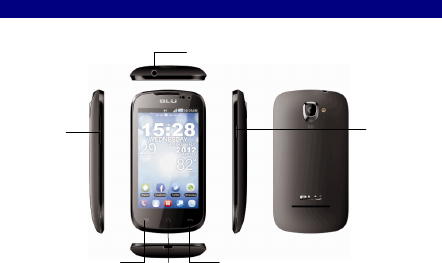
2. start
Earphone Jack
Volume key
Power key
Menu
Return
Home

4
Your mobile
Button
Functions
Menu Key
Click on the function interface can eject menu
Home key
Click this button to return to the main screen
Long press the button to open a recently used
program list.
Back key
Return to previous screen
Volume Key
Regulate the call volume, tone, music and video
volume
Power Key
Long press this key to open and close mobile phone
In the state of normal use and short press, off
mobile phone backlight ,on dormant state short
press can awaken the mobile phone
Back cover and battery
Upward pulling the cover of battery along the handle
position
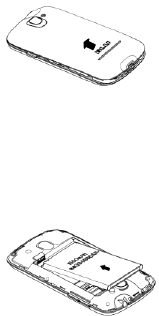
5
Removing rear cover:The left hand to hold the fuselage side, right hand pulling back cover along
the handle position.
Take the battery:The left hand to hold the fuselage side; right hand by hand to pull the battery.
Along this direction out of battery
6
Note: changing or removing the battery must be shut down!
The note of using a battery:
if battery long unused or battery depletion, in charge may not boot. This is a normal
phenomenon. Please give the battery charge for a period of time, then start to use.
The battery can be recharged. As time passes by, the battery will gradually be worn and thus need
longer time to charge. This is normal. However, after normal charging, if call duration decreases
but charging time increases, you need to replace a new battery.
The purpose of using the data service can use more power, shorten the waiting time.
The purpose of the battery charging time with temperature condition and the battery status and
changes.
When battery power is insufficient, mobile phone will popup. When the battery power is low,
mobile phone will automatically shut down.
The purpose of charging please use standard charger.
SD card and SIM card
Mobile support for T-Flash card, T-Flash card is a method for increasing mobile phone
multimedia card memory. This card is more compact, the installation or removal need
careful,cautious, so as to avoid damage.
Along the direction of inserting the SD card
7
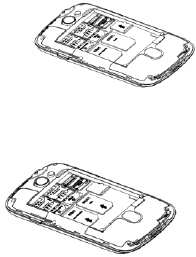
The mobile phone is a dual card dual standby, can be inserted into the2 SIM cards. Each SIM card
in a card slot, insert SIM-1 card slot for card 1, inserted SIM-2 card slot for the2 card, SIM card
and its contact is easily scratched or damaged, so the use of curved, insertion or removal of SIM
2.1 Power on and off
Along the direction of inserting the card 1
Along the direction of inserting the card 2

8
2.1.1 Power on
Long press open mobile phone
※If your SIM/UIM card set a personal identification number ( PIN ) code, need to enter the PIN
code before it can use the mobile phone.
2.1.2 Power off
1. Long press ,Open the options menu.
2. Click the Power off
2.2 Using the touch screen
2.2.1 Touch operation
Click:The use of finger click to the object, to confirm the selection or launch an application.
Long press:In the current user interface, icon, input bar and long press, can open the current
interface options menu
Slide:Horizontal sliding a finger on the screen.
Drag:Press and hold on the object that you want to drag, and then dragging the item to the
screen in any position. For example, you can use the drag to move or delete icon on the main
screen interface.
2.2.2 Gravity Sensor
When you're in some operations, such as the webpage that browse, view, edit information,
rotate mobile phone and the mobile phone will automatically changes the display direction.

9
※In the main screen,press > Settings> Display,Uncheck the automatic screen rotation
can cancel the function.
2.3 Locking and unlocking the screen
2.3.1 Locking the screen
When the mobile phone opening,press to lock Screen
In idle, mobile phone will automatically lock screen after a period of time.
2.3.2 To unlock the screen
1. Press to wake up the screen
2. Hold the unlocking icon and drag to right, when you touch openings small lock and can
complete to unlock.
※If you have set the unlock pattern, need to draw on the screen graphics to unlock screen.
2.4 The main screen
※Long press a shortcut key, you can drag it to the trash or the position you want, you can also be
a drag the icon to a shortcut location.
2.4.1 Notice board
Notice board will display a new SMS, calendar of events and ongoing activities. You can also
open the notification panel to view remind or activities notice. Open notice panel, check your
network operator, to browse information, remind or new events.
Open notice board
通知和状态栏

10
1. When the new notification icon displayed in the status bar notification area, from the state
column suggested gently downward sliding panel, open notice.
2. You can perform the following operations on the notice panel:
• Quick open or close related applications.
• Click to clear all notifications.
Close notice board
From the bottom panel gently slide up, closure of a circular panel.
2.4.2 View expanding screen interface
※Sliding around can switch screen
2.4.3 Definite the main screen
On the main screen to increase the project
1. On the main screen,press ,Open the application list screen.
2. Long press on an application icon, and drag to the blank and released, then the icon is
placed on the main screen.
Moving project on the main screen
1. On the main screen, long press on the project that you want to move, until mobile phone
vibration.
2. Keep fingers pressing and not releasing, drag the item to your desired location, and then
release.
11
Removing projects from the main screen
1. Long press on the project that you want to delete
2. Drag the project into the trash icon.
3. When the project icon becomes red, released project.
2.4.4 Changing the desktop wallpaper
1. In the main screen, press blank > Wallpaper
2. You can go through several ways, setting the mobile phone wallpaper:
• Gallery • Live Wallpapers • Wallpapers
3. Call function
3.1 Dial telephone
3.1.1 By dialing call
1. On the main screen,press > phone. If you see no Dialer Interface,press Switch to
dial page label.
2. Click the number keys,press ,and you can make a call.
During a call,press , and you can input digital in the dialing disk.
3.1.2 Through contacts to dial the phone
1. On the main screen,press > phone
12
2. Press , Switch to contacts tab, click on a contact and make a call.
3.1.3 Make a call through call record
1. On the main screen ,press >phone . press , Switch to the call record tab.
2. Click on the button , that on the right side of the phone records.
3.2 Answer or reject a call
3.2.1 Answer a call
When the call is incoming, drag the phone icon to right, answer the call.
3.2.2 End call
In call,press ,end the call.
3.2.3 Reject a call
When a call is incoming,drag the phone icon to left ,reject the call.
※You can also drag to text Icon,Refuse d to answer the phone and to send a short
message.
3.3 The operation in call
3.3.1 Conduct multiparty call
※Multiparty service requires network support, such as the need to use this service, please
contact your service provider.
13
1. Call the first party that want to add to the multiparty call,during call with the first
party ,press .
2.Input another telephone number that will join the multiparty,press , or press ,
select a number that will join the multiparty.
3. Attached to the second party,press ,start multiparty call.
4. Press ,end multiparty call.
3.3.2. Answer another call
If the network support, can be on a call answering another call.
1. During the call,If another call is coming,answer the new call,and press ,you can switch
the call between the two calling.
2. The current call is automatically maintained, mobile phone is switched to the other party.
3.4 The use of call records
3.4.1 Add the numbers that in the call records to contacts.
1. On the main screen,press >Phone.
2. Press ,switch to the call records.
3. Click the entry that you want to add to contact.
14
4. Press “add to contacts”.
5. Press“ add to contacts”, or Select an existing contact records,add the number to the
contact information.
3.5 Using flight mode
According to many national or regional laws and regulations, by air must turn off your mobile
phone .One way to turn off your mobile phone function is to switch to flight mode.
1. Long press .
2. Select “Mode flight”.
4. Contacts
4.1 Open contacts
On the main screen,press >People.
4.2 Copy contact information from the SIM card.
1. In the contact,press > import/ export.
2. Press ”Import from SIM card”.
4.3 Create contact informations
1. In the contact,press .
2. In the pop-up window,select “phone” or “SIM card”.
15
3. Input the contact information.
4. Press “DONE”.
4.4 Collector contacts
Click the contact that will add to collection,Then click the star on the right side of the
contact ,The becomes white ,Then the contact has added to collection.
4.5 Find contact information
1. In the contact,press .
2. Input the contact name that you want to find , below the search bar will display the search
results.
4.6 Edit contact information
1. In the contact,click the contact that you want to edit,and press > Edit.
2. After inputting the information,press “DONE”,save the contact information .Press >
discard,cancel the changing.
4.7 Contact with the contact
4.7.1 Contact with the contact
1.In the contact,Click the you contact that you want to contact.
2. In the contact information interface, you can click on an entry to contact the contact,In the
following ways:
16
• Click on the phone number to dial telephone.
• Click on the mail address mail.
• Click on to send mms.
4.8 Delete contact information
1. In the contact,Click the contact that you want to delete,and press > delete.
2. Press “OK“,Confirm delete contact information.
4.9 Backup contact through the storage。
4.9.1 Backup contacts
1. In the contact,Press > Import/ Export.
2. In the pop-up menu select “Export to storage”.
3. Press “OK”, Export contact information to the storage.
4.9.2 Restore contacts
1. In the contact,press > Import/ Export.
2. In the pop-up menu select “import from storage”.
4.10 Administrate group
4.10.1 Create a group
1. On the main screen,press > People,then press .
2. Press , In the pop-up window,select “phone” or “SIM card”.
3. Enter the group name.

17
4. Enter the contact name, mobile phone will automatically associate stored contacts, click to
select a contact.
5. After the operation is finished, click “OK” to save the group information.
4.10.2 Edit group
1. In the group,click the contact that you want to edit,then press > edit.
2. After inputting the information,press “DONE”,save the contact information .Press >
discard,cancel the changing.
4.10.3 Take contact to a group list
As follows, the contacts to the list of groups:When you edit the group,Enter the contact name,
mobile phone will automatically associate stored contacts, click to select a contact.
4.11 Send contact
1. In the contact,click a contact.
2. Press > Share.
3. Select the transmission mode, for example, can be selected through Bluetooth or email and so
on .
5. Using screen keyboard
5.1 Using the input panel
The use of mobile phone touch screen, you can enter text, new information and contacts.
When you need to enter text, click the text input area, can open the input panel .Press ,hide
18
input panel.
5.1.1 Switching input method
1. When the screen display keyboard, the status bar will display the keyboard icon, this time with
the finger slipped the status bar.
2. Click and select method.
You can also modify the system default input method .On the main screen,Press > Settings >
language and input> default,select a method.
6. Messaging
You can use messaging to send and receive SMS and mms. Using email receive and transmit the
e-mail.
6.1 SMS and MMS
6.1.1 Open SMS
Press > messaging.
6.1.2 Create and send SMS
1. Press > messaging,and then press .
2. Click the recipient field, enter the addressee number.
3. Click on the content of the input fields, input to be transmitted message content.
4. Press ,send SMS.
6.1.3 Create and send MMS
19
1. Press > messaging,then press .
2. Click the recipient field, enter the addressee number.
3. Click on the content of the input fields, input to be transmitted message content.
※ If you want to enter a smiling face, you can click , and then click Insert emoticons.
4. Through the following ways to convert SMS to MMS:
• Add the theme and input the theme.
• Click , add pictures、music or video files.
5. Press ,send MMS.
※Send MMS, you can directly choose media files ( music, video or picture) and send as
attachments .Enter the file manager and long press on the media file that you want to send ,
and press “share” >MMS.
Add slideshow
If you want to in the MMS to add more than one file, you can use the slideshow options.
1. In the MMS,press .
2. Press “slideshow”,and begin to edit.
3. Press ,and press “Add slide”, you can add more slides.
4. Click Finish to finish editing and returned to the message editing interface.
5. If you need to modify the message, on the message editing interface, you can click “edit”. After
finish editing,press .
20
6.1.4 Custom information set
In the messaging,press ,and press “Settings”, You can set the SMS, MMS, information
notification ring and other relevant information.
6.2 Email
You can use the e-mail program, send and receive mail information.
6.2.1 Add an email account
You first need to set up your email address, then you can send or receive email. Email needs to
be connected via a network to send and receive messages.
1. Press > Email.
2. Enter your e-mail address and password, and click next.
3. According to the screen, related configuration
If you don't know the mailbox configuration parameters, please consult the mail service provider,
or on the web query.
4. Click on the finish, complete set.
Add default account is completed, will go to the inbox screen.
Add other email accounts
1. After creating the initial email account,On the inbox screen , press ,and click “ account”.
2. On the account screen,Click “add account”,and you can add another account.

21
※Increasing other mail account, you can set up to use the new account to send all mail.
6.2.2 Check email
on the inbox screen,click on and check the email.
You can also press and select other folder to visit.
6.2.3 Create and send email
1. On the inbox screen,press .
2. Click on the recipient field, enter the recipient 's e-mail address.
3. Enter the mail subject and message content.
4. Press , and send email.
6.2.4 Reply email
1. On the inbox screen,press the email that you want to reply.
2. Press “reply” or or > “reply all”.
6.2.5 Delete the email account
1. On the inbox screen,Press > settings.
2. Click on a account.
3. In the bottom of the menu, click delete account, and click on ok.
6.2.6 Custom e-mail account setting
1. On inbox screen,press > settings

22
2. Click on an account.
3. Edit the account settings.
7. Establish connection
7.1 Mobile Networks
Your mobile phone has been set, the first open mobile phone, you can access your network
operator.
7.1.1 Check network connection
1. Press > Settings.
2. Press “More…” > Mobile networks
3. Click the network operator or access point name ( APN ), you can check the network
connection configuration.
※Your mobile phone will automatically from the SIM/UIM card ( if any ) read access point
configuration information. Do not modify the access point parameters, otherwise you may not be
able to access the network.
7.1.2 Open data services
1. Press > settings.
2. press “More…” > Mobile networks
3. Select enabled data flow box, open data services.

23
※Using the data services may have additional flow of costs, you can disable the service data to
avoid unnecessary costs, clearance has enabled data flow marquee can disable data service.
7.2 The use of wireless LAN
You can use the wireless local area network ( WLAN ) function to access the internet. To use the
mobile phone WLAN function, you must be able to access the wireless access points (hot spots ).
Attention, obstacles may make WLAN decreased signal intensity.
7.2.1 Open the wireless LAN
1. Press > Settings.
2. Press “Wi-Fi” to open and close the wireless LAN.
※If you have opened the wireless local area network and operators provided data services,
wireless data business priorities, supplied by the operators of the data service in wireless LAN
connection after an interruption.
7.2.2 Connect to wireless LAN
1. After opening Wi-Fi,press > settings.
2. Click the WLAN menu bar to enter the WLAN setup screen. Mobile phone will list search within
a wireless local area network.

24
3. You have to choose the connection network:
• If you choose an open network, you can directly connect to the network.
• If you choose an encrypted network, you need to input password to connect access.
※In the WLAN setup screen, click on the add network, can add new wireless lan .
7.3 Browsing the internet
You can use the browser program to access the webpage and applications based web.
7.3.1 Browser basic operation
press > browser.
Click on the and will show all open webpage, and can carry out the following operations.
• Click on a webpage to switch to the page.
• click X ,close this page.
• click + ,create a new page.
press ,Open the options menu, you can read more.
• Bookmarks:show bookmarks.。
• Refresh:refresh page.
• Forward:browsing the next page.
7.3.2 Open the page
1. In the browser window, click on the top of the address bar.

25
2. Use the keyboard to enter the url .
3. When you enter the URL, matching the URL automatically displayed. If you need them access
the web site, click enter directly. Or input the URL complete can also enter.
7.3.3 Set homepage
1. In the browser window,press .
2. Click “settings” > general > set homepage.
3. In the list to select a page, or click on the other, to enter the URL and click OK.
7.3.4 Manage bookmarks
You can store the bookmarks that you want to use
Add bookmarks
1. Through the browser, enter the webpage that you want to add to bookmarks.
2. Press ,Then click Save to bookmarks.
3. Input script signature, click ok.
Open bookmarks
1.In the browser window,press ,and click “bookmarks”.
In the bookmarks screen, click on the history tab can browse the webpage you visited, or click the
saved pages tab to browse the webpage that has been saved.
2.Click the bookmarks that you want to visit and you can open it.
26
7.3.5 Custom browser settings
Open the browser,press ,and press “settings”.
7.4 Using Bluetooth
Your mobile phone support wireless connection via Bluetooth.
7.4.1 Open Bluetooth
1. press > settings
2. press “Bluetooth” to open and close the Bluetooth . Mobile phone screen top status bar
display Bluetooth Icon.
3. Click the Bluetooth menu, your mobile phone device name will displayed on the screen, click
the name and set for other Bluetooth devices visible.
If you need to modify your mobile phone device name, click the > rename mobile phone.
7.4.2 Search the mobile that has enable Bluetooth and pair
Your device and the other Bluetooth device transmit files ,you must pair with the device.
1. Check your mobile phone and to confirm the Bluetooth function has been opened.
2.In the wireless and network section ,click on Bluetooth .mobile phone will automatically start
to scan Bluetooth device in the range.
3. Click on the device that you have searched.

27
7.4.3 Transfer files via Bluetooth
You can through Bluetooth, sharing pictures, videos or music file with family and friends.
If you want to transfer files via Bluetooth, please perform the following steps:
1. Long press the files that you want to send
2. Click on share, and then click the Bluetooth, choose the equipment to receive files .
7.4.4 Disconnect or cancel the Bluetooth pairing
1. Press > settings.
2. Press “Bluetooth”
3. Find the paired device
4. Click to cancel pairing and can be disconnected to the equipment.
8. Recreational function
8.1 Take pictures and video
8.1.1 open and close camera
• press > camera,and you can open the camera.
• In the view state,press to close camera.
8.1.2 Take pictures

28
1. Open the camera application and switching to a camera mode.
2. If need, can adjust the camera parameters .After adjusting parameters, the frame may vary.
3. Lens alignment to be photographed object and adjust.
4. Long press ,When the frame into a green, said focusing completed.
5. Release ,and take photo.
8.1.3 View photos
1. After taking pictures, photo thumbnails will be displayed in the upper right corner of the
screen, click on the thumbnail view photos.
8.1.4 Shoot video
1.open the camera and switch to video mode.
2. Lens alignment to capture the object and adjust.
3. press ,start recording .
4. press ,stop recording.
8.1.5 view videos
1. After shooting videos, video thumbnails will be displayed in the upper right corner of the
screen, click on the thumbnail view videos.
8.2 Use gallery
You can use the gallery to manage the images and video files.
8.2.1 Open gallery
29
Press > gallery
8.2.2View photos
1. In the gallery,click the files that you want to view.
2. and then click the photo that you want to view.
8.3 Enjoy the music
8.3.1 open music
Press > ,music
Music program according to the music files stored in the associated information to organize
music files. It contains four tabs: artist, albums, songs and playlists.
8.3.2 Play music files
1. In the music library to select a category.
2. Click the music file that you want to play
※During playing music,press ,you can use other applications and music will play in the
background. Open tips column, choose the music being played, can return to the music player
interface.
8.3.3 Add music to playlist
1. In the music library to select a category.
2. Long press the music file that you want to add to playlist,In the pop-up menu click “Add to

30
playlist”.
• Click on the play list, add the songs to the playlist.
• Click new playlist, add the songs to the new playlist.
9. Account and sync
You can use a mobile phone on some applications to synchronize mail list, Email and other
information. When you are on the Internet through these applications to add, change or delete
information, information related to the mobile phone will also update.
9.1 Manage account
9.1.1 Add account
1. On the main screen,press > Settings > account and sync
2. Click “add account”.
3. According to the screen to input account information.
Adding account generally need to input the user name and password
. Specific input which information and it is about your account type
4. Configure account,Set to what information will be synchronized to the mobile phone.
5. After setting ok,In account and synchronous interface, will appear the account that you have
configured.
9.1.2 Delete account
1. In account and synchronous interface,click the account that you want to delete.

31
2. Press > delete account.
3. Confirm if you want to delete the account.
9.2 Custom account synchronization information
9.2.1 A conventional sync settings
In account and synchronous interface,Click on the buttons at the top of the screen,Light open,
open the synchronization.
In the account list, click on the account you want to synchronize.
10.More applications
10.1 Calendar
You can use calendar to manage and arrange the things that you want to do.
10.1.1 Open calendar
On the main screen,press > Calendar.
10.1.2 Add new event
1. open calendar,press ,and click “New event”.
2. Edit event name, time, location and other details.
3. Click “DONE”,preserve this event.。
10.1.3 Set event reminder
32
1. In any calendar view interface, click on an event, you can view the details or summary.
2. Click Add alert button, can the activity is added to remind; or click the X button, delete
remind.
3. Click the reminder time, in the open dialog box, click on the corresponding period options. To
remind time, the system will send you information about the activities of the notice.
10.1.4 Custom calendar settings
Open calendar,press ,and press “settings”
10.2 Using clock
Clock can display time and date .You can also set alarm clock.
10.2.1 Open clock
press > clock
10.2.2 Open alarm clock
In the clock interface,press ,and then open the alarm clock.
Add alarm clock
1. In the clock interface,press “add alarm”
2. Set alarm information,press “OK”.
Set the alarm clock
1. In the clock interface,Click on the screen to display an alarm event.
2. Click on the time ,set alarm time.

33
3. Click repetition,select clock repetition time
4. Click ringing and select the clock ringing.
5. Click on the vibration box ,you can set vibration when ringing.
6. Click on the tag ,input clock event name.
7. Press ”OK”
Custom alarm clock settings
In the alarm list,press ,and then press “settings”
10. 3 Use calculator
10.3.1 Open calculator
Press > calculator
10.3.2 Switch to senior panel
Open the calculator,left or right sliding screen,switch between senior panel and the base panel.
10.4 Use notes
1. Press > Notes
2. Press” +”
3. Editorial content,press the return key to save.
11. Manage the mobile phone
press >settings,You can set up a detailed on mobile phone.
11.1 Set data and time

34
※If you use network-provided time ,you will set data、time、time zone.
1. In set interface,press “date and time”.
2. Cancel select “Automatic date and time” and “Automatic time zone”.
3. Press “set date”,and then press or to adjust date,after completion ,click “Set”
4. Press “set time”,and then press or to adjust time,after completion ,click “set”.
5. Press “set time zone”,and then select time zone .Scroll down the list to view more time zone.
6. Cancel or select “Use 24-hour format”,Switch between “24-hour format” and “12-hour
format”.
7. Press “Select date format”, Then select the display format in the mobile phone.
11.2 Display settings
11.2.1 Adjust screen brightness
1. In set interface,press “display” > “brightness”.
※To manually adjust screen brightness ,need to cancel “automatic brightness” check box.
2. Left drag to reduce the brightness of the screen .or right drag to increase the brightness of the
screen
3. Click “OK “, save settings.
11.2.2 Set screen standby time
You can set the screen standby time.
1. In set interface,press “display” > “sleep”.

35
2. Click your selection of standby time,complete “set”.
11.3 Sound settings
11.3.1 Open the silent mode
1. In set interface,press “sound”.
2. Select “silent mode”, In addition to the media and alarm clock ,all sounds are mute.
11.3.2 Set volume
You can in the main screen or the majority of the application screen and adjust the volume,For
example ,in a call or play music , video , press the volume keys to adjust the volume.
You can also use the following method to adjust the volume.
1. In set interface,press “sound” > “volumes”.
2. Left drag the volume slider to lower the volume, or right drag to increase volume.
3. Click “OK “, save settings.
11.3.3 Change mobile phone ringtones
1. In set interface,Press “sound”> “phone ringtone”
2. Choose the ringtone you need ,When selected will be playing tones.
3. Click “OK”.
11.3.4 Set notification tones
1. On the main screen,press > Messaging.
2. In the message list,press >settings > “default notification”.

36
3. Choose the ringtone you need ,When selected will be playing tones.
4. Click “OK”.
11.4 Mobile phone service settings
11.4.1 Call settings
You can set up voice mail 、call transfer、call waiting and other function .If you want to know the
detailed service information , please contact your internet service provider.
On the main screen,press > “phone”,and then press > “settings”.
11.4.2 Data roaming
1. In set interface,press “More…”> Mobile networks.
2. Select “Data roaming”
※when roaming data service may produce additional cost .Specific roaming charges please
consult your network service provider.
11.4.3 Closing data service
1. In set interface,press “more…”> mobile networks.
2. Cancel select “Data enabled”
11.5 Set text to speech
Set text to speech settings, you can configure the Android text-to-speech synthesizer, so that
the application can use this function.
11.5.1 Regulate the speed of the voice
37
1. In the set interface,press “language and input” > “Text-to-speech output”> “speed rate”.
2. Set the text playing speed.
11.6 Security settings
11.6.1 Set up SIM card lock
1. In set interface,press “security” > “set up SIM card lock”
2. Select “Lock SIM card”
3. Use the keyboard to enter the SIM PIN code, and select “OK”.
11.6.2 Set up pattern lock
You can set up pattern lock,When the screen is locked,You need draw pattern to lock screen.
1. In set interface,press “security” > “screen lock” > “pattern”.
2. Draw pattern according the prompt.
3. The next
4. Draw the pattern again,Select “OK”.
11.6.3 Set up PIN lock
You can set up PIN lock to lock your screen.
1. In set interface,press “security” > “screen lock”> PIN.
2. You need enter at least 4 digitals.
3. The next
4. Enter the same digital again, and select ”OK”.

38
If you want to change PIN, press “security” > “Screen lock” > PIN.
11.7 Manage applications
11.7.1 View installed applications
1. In set interface,Press “Apps” > “ALL”.
2. You can proceed as follows:
• Press ,press “sort by size”,Then click on an application to view details.
• click on an application to view details.
11.7.2 Uninstall applications
※You can not uninstall the application that belongs to system .
1. In the set interface,Press “APPS”.
2. Click the applications that you want to uninstall,click “uninstall”,press the screen prompt to
complete unloading.
11.7.3 Application shift to SD card
Application program is stored in the mobile phone USB storage device or the SD card (According
to the mobile phone models), rather than the internal storage space .Some applications may
change storage location.
1. In set interface, press “APPS”.
2. Click on the application list,and then click to the SD card ,the application will remove from the
mobile phone’s internal storage space.
39
On the application of the detailed interface, storage list will show the detail data of the storage
space that occupied by the application .If the application can be moved, you can use the button.
Click to mobile phone memory, applications can be moved back to the mobile phone internal
memory space.
11.7.4 Release the mobile phone memory
• Move file and email attachments to the SD card.
• In the browser, clear all cached page content and browsing m history information.
• Uninstall the applications that will no longer used
• Restore factory settings
11.8 Restore settings
11.8.1 Restore factory settings
Restore factory settings will delete your personal data stored in the mobile phone ,including
mail accounts、system settings、your applications settings and installed applications ,but does not
remove the system updating . The set includes a check box ,if you tick him ,will delete all stored
in the SD card or mobile phone card data .these data may include your download pr backup
music or photos.
1. In set interface,press “backup and reset” > “factory data reset”.
2. According to the screen, click reset to mobile phone ,and then click remove all content .Then
mobile phone begins to restore the factory settings ,and automatic restart.

40
11.9 Online upgrade
Your mobile phone has been preset software online upgrade function. When a software
update is required, the system will automatically prompt you to upgrade software .You can also
press “settings” > “about phone” > Online check for if have new software can be used.
Specific Absorption Rate
Specific Absorption Rate (SAR) is the unit of measurement for the amount of radio frequency
energy absorbed by the body when using a device. The SAR value is determined at the highest
certified power level in laboratory conditions, but the actual SAR level of the device while being
operated can be well below the value. This is because the device is designed to use the minimum
power required to reach the network. Before a device model is available for sale to the public,
it must be tested and certified by the Federal Communications Commission (FCC), ensuring that it
does not exceed the limit established by the government-adopted requirement for safe exposure.
The tests are performed in positions and locations (that is, at the ear and worn on the body) as
required by the FCC for each model. For body worn operation, this device has been tested and
meets FCC RF exposure guidelines when the handset is positioned a minimum of 5 mm from the
body with an accessory that contains no metal part. Use of other accessories may not ensure
compliance with FCC RF exposure guidelines. The SAR limit adopted by USA and Canada is 1.6
41
watts/kilogram (W/kg) averaged over one gram of tissue. The highest SAR value reported to the
FCC and IC for this device type when tested for use at the ear is 0.566W/kg, and when properly
worn on the body is 1.078W/kg. The SAR limit adopted by the CNIRP is 2.0 W/kg over one gram
of tissue. The value guarantees a safe distance to protect device users and the difference caused
by measurement errors. Under different test requirements and frequency, the value varies. �
Statement This equipment has been tested and found to comply with the limits for a Class B
digital device, pursuant to Part 15 of the FCC Rules. This device complies with part 15 of the FCC
Rules. Operation is subject to the following two conditions: (1) This device may not cause harmful
interference, and (2) this device must accept any interference received, including interference
that may cause undesired operation. These limits are designed to provide reasonable protection
against harmful interference in a residential installation. The operation is subject to the condition
that this device does not cause harmful interface. This equipment guarantee, uses and can
radiate radio frequency energy and, if not installed and used in accordance with the instructions,
may cause harmful interference to radio communications. There is no guarantee, however, that
interference does not occur in a particular installation. If this equipment does cause harmful
interference to radio or television reception, which can be determined by turning the equipment
off and on, the user is encouraged to try to correct the interference by one or more of the
following measures: � Reorient or relocate the receiving antenna. � Increase the separation
between the equipment and receiver. � Connect the equipment into an outlet on a circuit
42
different from that to which the receiver is connected. � Consult the dealer or an experienced
radio/TV technician for help.
Warning: Changes or modifications made to this equipment not expressly approved by
manufacturer may void the FCC authorization to operate this equipment.