User manual
DASH X PLUS LTE
D0030UU User Manual

1
Warnings
Not following these simple guidelines may be dangerous or
illegal. Read the complete user guide for further
information.
TURN ON SAFELY
Do not turn on the phone when wireless phone is
prohibited or when it may cause interference or danger.
ROAD SAFETY
Obey all road safety laws. Always use both of your hands to
operate the vehicle while driving.
INTERFERENCE
All wireless phones may be sensitive to interference, which
may affect performance.
TURN OFF IN HOSPITALS
Follow all restrictions. Turn off the phone near medical
equipment.
TURN OFF ON AIRCRAFTS
Follow all restrictions. Wireless devices can cause
interference on aircrafts.

2
TURN OFF WHEN REFUELING
Do not use the phone at/near refueling stations. Do not use
near fuel or chemicals.
USE SENSIBLY
Only qualified personnel may install or repair this product.
ENHANCEMENTS AND BATTERIES
Use only appropriate enhancements and batteries. Do not
connect incompatible products.
WATER-RESISTANCE
Your phone is not water-resistant. Keep it dry.
BACKUP COPIES
Remember to make back-up copies or keep a written
record of all important information stored in your phone.
CONNECTING TO OTHER DEVICES
When connecting to any external device, read its user
guide for detailed safety instructions. Do not connect with
incompatible products.
3
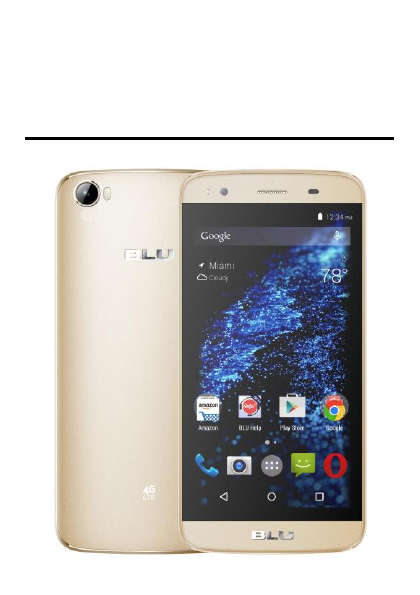
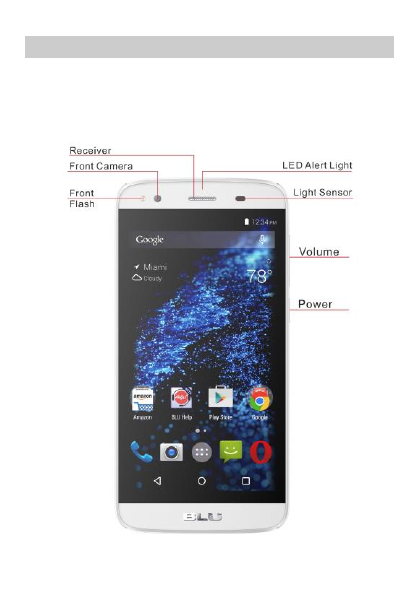
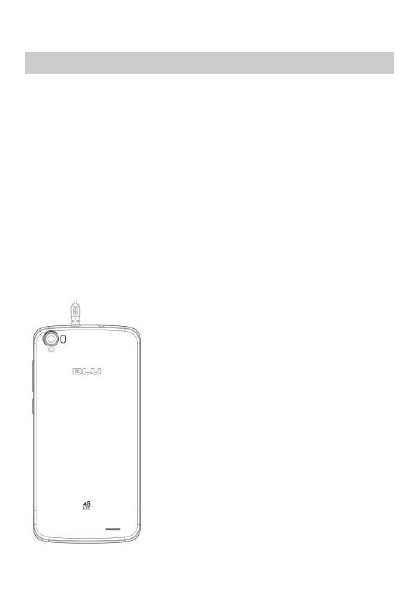
Your Phone
The phone appearance is shown as below. The picture is for reference
only; your phone may be different. Please take your actual phone as
the standard.
Front View
4
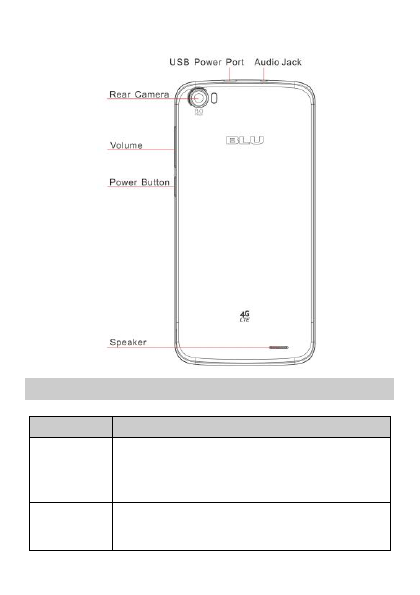
Back View
Keypad Descriptions
Key
Description
Power Key
Long press the key to turn on the phone.
In the power on status, press the key to lock
keypad and screen; long press the key to show
phone options.
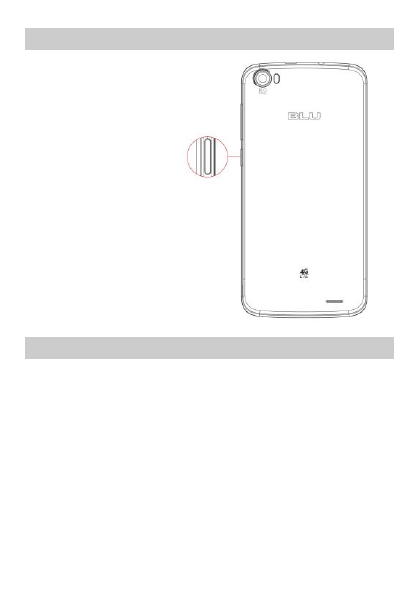
Volume Keys
To adjust incoming call ringtone volume.
During a call, playing music, video, or listening to
radio, press the keys to adjust volume.
5
Start to Use
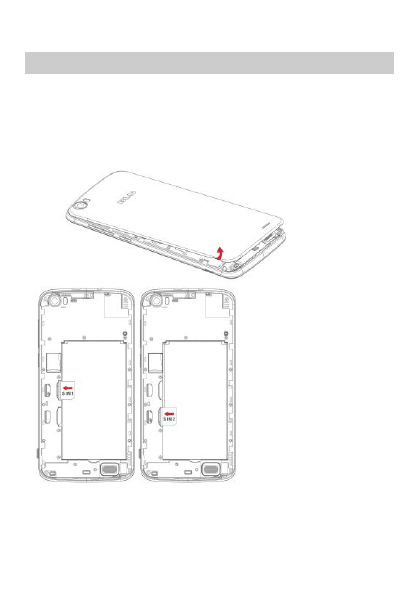
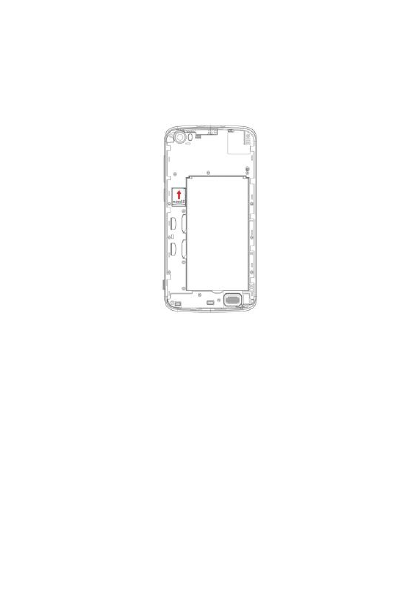
Install Memory Card and SIM Card
When you apply for a network, you will get a plug-in SIM card. SIM
(Subscriber Identity Module) card that contains phone number,
service projects and can be used to store phone numbers and
personal information.
Please insert the SIM card according to the mark on the phone.
Make sure that the clipped corner of the SIM card and the metallic
contacts are facing the correct direction. Slide the SIM card into the
slot until it doesn't move up any further.
6
The direction in which the microSD card has to be inserted into the
designated slot is shown by an label on the phone.
Tip: For additional media storage insert a microSD card.
Attention: Do not bend or scratch SIM card, do not let it contact with
static electricity, dust or water.
Keep all SIM cards where children cannot reach or touch.
Note: Keep the SIM card chip contacts face downward. Make the
SIM card fits card slot.
Remove Memory Card and SIM Card
Note: If the phone is turned on, long press Power Key about 3
seconds until it tips phone options and select Power off and
then press OK to turn off the phone. Then, remove the battery,
SIM card and memory card.
Do not plug or remove memory card in boot state, otherwise it
will cause damage to the file system.
7
Charge the Battery
1. Before charging, check the battery slot to ensure the battery
has been installed correctly.
2. Plug one end of the charger into phone.
3. Connect another end of the charger to the socket.
4. Start charging. It can be charged whether power on or power
off.
▪ In power on state, when the battery icon on screen start rolling
means it is been charged. When the icon is full and stop rolling
means charge is completed.
▪ In power off state, the battery icon on screen start rolling
means it is been charged. When the icon is full and stop rolling
means charge is completed.
5. Unplug the charger from the socket.
6. Disconnect the charger and phone.
8
Turn on/off the Phone
Hold down the power
button to turn the phone
on.
Hold down the power
button, then touch Power
off to turn the phone off
Use Touch Screen
Press: Use finger to press the desired option to confirm
selection or start an application.
Long press: Long press the screen in current operation interface,
icon, or input area; you can open the option menu in current
interface.
Slide: Slide the finger on screen horizontally or vertically. For
example, slide the screen in standby mode or main menu
horizontally to change menu page.
Drag: Use finger to long press desired item, drag it to anywhere
on screen. For example, you can drag the icon in main menu to
standby screen.
9
Home Screen
Status Bar
The status bar shows your phone’s status and notifications.
(Notifications are described on the next page.)
Notification icons Status icons
Phone status bar and
notifications
Slide left or right to see
more panels
Touch to enter opera
Touch to enter message
Touch to enter main menu
Touch to enter camera
Touch to enter dial pad

10
Status icons
The following status icons may appear on your screen:
Icon
Statement
Icon
Statement
SIM
Network
signal level
Headset is
inserted
Indicates
battery
capacity
Bluetooth is
activated
Unread
messages
Wi-Fi is
connected
Missed calls
Airplane
mode is
activated
Alarm is
activated
USB is
connected
Make a Call
1. In standby mode or in main menu, press the dial icon to
enter dial panel, press numbers on screen to enter phone
number.
2. Press dial icon at bottom and select SIM card
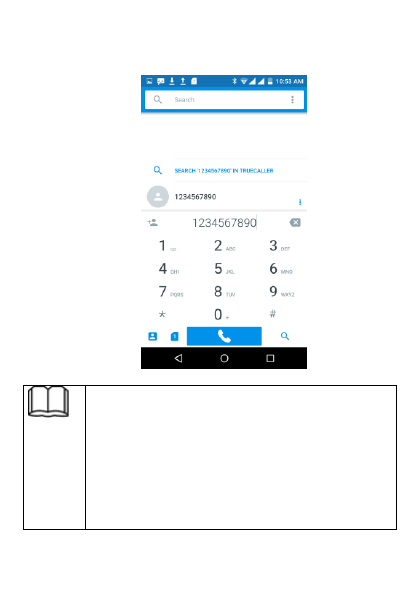
11
to dial the number. You can also press video dial icon to make a
video call.
3. Press end icon to cancel the call.
You need to unlock the phone if the keypad and
screen is locked.
You can make calls through call log, contacts, and
messages.
During a call, press Volume Keys to adjust the volume.
Your phone supports intelligent dial. When input
numbers, the phone will search the corresponding
contact in phonebook or call log.
12
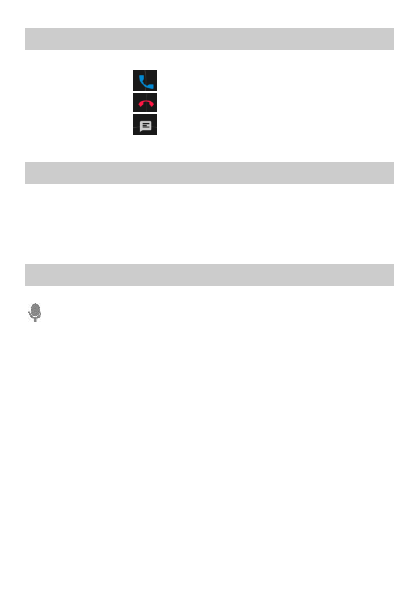
Answer a Call
When there is an incoming call, you can:
▪ Drag the icon toward right to answer the call.
▪ Drag the icon toward left to decline the call.
▪ Drag the icon upward to reject the call with SMS.
Emergency Service
You can call emergency service number directly without SIM card.
Different networks use different emergency numbers, please query
your network operator.
Input Method
Your phone has the built-in input method. In edit mode, long press
to show Input options and set input languages and Android
keyboard settings.
Input English
Press the on-screen keypad to enter corresponding letters.
Input Number
Press “?123”, you can input numbers directly by press the number
icons. Long press the letter icons with number, or after long press,
slide finger to the numbers to input.
Input Symbol
Press “?123” to enter symbol list. Press the desired symbol to input.
Long press “.…” to show symbol list, slide finger to the desired
symbol to input.
13
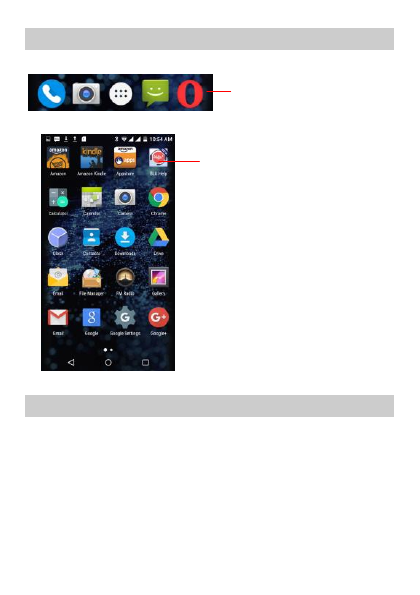
Application screen
In standby mode, press the launcher to enter application screen.
1. Opera
You can use your phone to access Wireless Application Protocol
(WAP) sites and use WAP-based services. To browse WAP pages, you
must subscribe to the data service from your service provider and
configure your phone's relevant settings.
Select the website list on screen or input URL in address bar to visit.
Touch to enter app tray.
Touch an app to launch it

14
2. Games
Your phone has several built-in games, you can select to play.
3. Calculator
The calculator can execute simple calculations. Slide the screen
toward left or right, you can change the calculator in Basic panel
and Advanced panel.
4. Calendar
In the calendar, you can check schedules for current month. It has
alarm for the date with schedule. Select one date to check all
schedules for that day, or you can edit or delete the schedules.
5. Camera
By using the camera application, you can take photos or records for
around people or events anytime. Press the Camera icon in main
menu to enter. Press the shoot icon or record icon to take photos or
records.
Press the icons on screen or Option Key to set parameters of the
camera or recorder.
6. Clock
In the clock interface, you can check time and date. Press the alarm
icon, you can add new alarm clock or turn on/off existed alarm
clocks.
In the clock interface, you can also press the icons to enter count
down function, stopwatch, cities settings, night mode, and settings.
15
7. Downloads
To check all downloads applications.
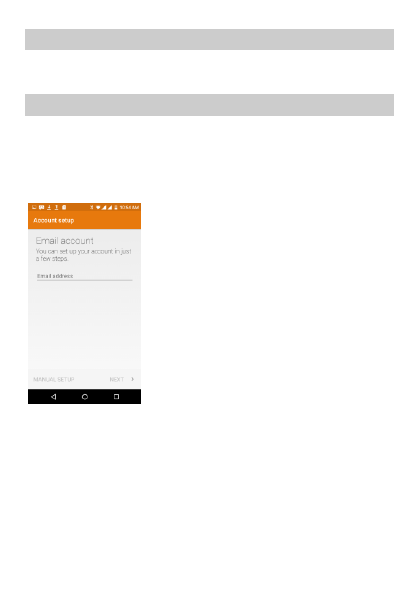
8. Email
You can use Email to send and receive emails.
Setup Email Account
According to the tips on screen to input email address, and press
Next. You can press Manual setup to setup server information
manually.
Check Emails
In the Inbox, select the email you want to check to enter. Press the
icons at bottom to delete, reply, add to favorite.
Compose and Send Email
In the Inbox, press new mail icon to create new email. Input receiver
email address, subject, and content, and then press send icon to
send the email.

16
Delete Accounts
In the Inbox, press Option Key to select Settings. Select the account
you want to delete and then select Remove account in the option
list. Press OK to confirm and delete the account.
9. File Manager
In this menu, you can select to check Phone storage and SD card.
10. FM Radio
Select FM Radio in the main menu and plug earphone to enter. Press
Power icon to turn on/off the radio. Press setting icon and select
Search, the phone will search available channels and save in the list.
Press the icons on screen to operate the FM radio.
11. Gallery
You can use Gallery to view or manage images and videos.
12. Google Service
Availability of Google applications, services, and features may vary
according to your country or carrier. Please follow local laws and
regulations to use them.
When you turn on your mobile phone for the first time, touch a
Google services such as Gmail, Google, Maps, Play Store, Chrome,
Google +, Play Music, Play Newsstand & Weather, Photos,
Hangouts, Weather , or YouTube, and you may be prompted to sign
in to your Google account.
Ensure that your mobile phone has an active data connection
(4G/GPRS) before you sign in to your Google account.
If you already have a Google account, enter your username and
password.

17
13. Messaging
Select Messaging in the main menu or standby mode to enter.
Select new message icon at left down corner to create new SMS or
MMS and send.
1. Enter receiver’s number or add number from contacts
.
2. Press to input message content.
3. If you want to send picture or video file, press + to add pictures,
videos and audio. The message will shift to multimedia
message automatically.
4. Press send icon and select SIM card to send the message.
14. Music
Select Music in main menu. Press Artists, Albums, Songs, and
Playlists at the top of screen to change category. Select one audio
file to play the music. Press the icons on screen to operate the audio
player.

18
15. Contacts
In the Contacts, press search icon to search contact, press add new
icon to add new contact. Press Option Key to enter:
Delete Contact
Select one or more contacts, then press OK to delete all selected
contacts.
Contacts to Display
Select All contacts, contacts on SIM card, Phone, or Customize the
contacts to display.
Import/Export
Copy the contacts from SIM cards, phone, phone storage or SD card,
and then select location to copy.
Accounts
Select whether to Auto-sync app data.
Memory Query
To check the memory of phone and SIM cards.
Join Contacts
You can use this function to join same contacts.
16. Phone
Press the icons on screen to input numbers in sequence. After
inputting numbers, press dial icon and select SIM1/2 to dial. Press
video call icon, you can make video call with your phone. Press the
icons at the top screen, you can enter call log or contact.

19
17. Search
Input keyword in search bar, the phone will match applications or
contacts first. If there is no result, press the arrow icon on right to
link to network and search.
18. Settings
Wireless & Networks
In this menu, you can select and set Wi-Fi, Bluetooth, SIM cards,
Data usage, under More... - Airplane mode, VPN, Tethering &
portable hotspot, VPN, Cellular networks and Wi-Fi calling..
Wi-Fi
You can connect to a wireless LAN (Wi-Fi), use it to access and
download with high speed.
In Menu/Settings/WIRELESS & NETWORKS, slide the icon beside
WLAN toward right to turn on WLAN. Press WLAN to check available
WLAN networks. Select one open network, you can access to the
network directly. If the network you selected is encrypted, you need
to input password.
Bluetooth
The phone supports Bluetooth. It can exchange information
between devices including mobile phones wirelessly. Through
Bluetooth, you can sync phone and computer, exchange data with
other Bluetooth devices, and can connect to Bluetooth earphone.
In Menu/Settings/WIRELESS & NETWORKS, slide the icon beside
Bluetooth toward right to turn on Bluetooth and set. Before
transmit data, you may need to match with other Bluetooth devices.
Device
In this menu, you can set display and sound & notification, check
storage and battery, and manage apps.
Personal

20
Location
Select whether to access to my location, whether to turn on GPS
satellites, or whether to use WLAN & mobile network location.
Security
You can select SCREEN SECURITY, ENCRYPTION, SIM CARD LOCK,
PASSWORDS, DEVICE ADMINISTRATION, CREDENTIAL STORAGE
and ADVANCED in this menu.
Account
To add new account of Corporate, Email, or Google.
Language & Input
Select and set Language, keyboard & input methods, speech, and
mouse/trackpad.
Backup & Reset
In this menu, select Factory data reset and then select Reset phone
to clear all data in the phone memory. Select DRM reset to delete
all DRM licenses.
System
Date & Time
Set time and date for the phone.
Scheduled Power On & Off
Set time to power on/off the phone automatically.
Accessibility
To set accessibility functions for the phone.
Developer Options
Select whether to turn on this function and choose the options in
the list.
About device
To check status, legal information, etc.
System Update
Through WLAN and high-speed wireless network, you can wirelessly
upgrade, convenient stay at home to update the latest software,

21
have better experience to the mobile phone of new features, and
have a better experience with the optimized functionality.
select Auto System Update to set update check interval.
19. Sound Recorder
The phone supports sound record function, recorded files will be
saved with different quality.
20. Voice Search
You can use the voice search function to search via Google search.
Before using this function, you need to check the network settings.
Widgets
In the widgets list, you can select desired widget to add to idle
screen.
Care and Maintenance
Battery Care
• Your device is powered by a rechargeable battery. When the power
is weak, please charge the battery. In order to extend the lifespan of
the battery, use all the battery's power before recharging.
• Unplug the charger from the electrical plug and the device when
not in use. Do not leave the battery connected to a charger more
than a week. Overcharging may shorten its lifespan.
• Extreme temperatures can affect the ability of your battery to
charge. Battery needs the fit temperature. If the surrounding
temperature is over 40°C, the battery cannot be charged.

22
• Use the battery only for its intended purpose. Never use any
charger or battery that is damaged.
Do not short-circuit the battery. Accidental short-circuiting can occur
when a metallic object such as a coin, clip, or pen causes direct
connection of the positive (+) and negative (-) terminals of the
battery. (These look like metal strips on the battery.) Short-circuiting
the terminals may damage the battery or the connecting object.
• Leaving the battery in hot or cold places, such as in a closed car in
summer or a freezer in winter conditions, will reduce the capacity
and lifetime of the battery. Always try to keep the battery between
59°F and 77°F (15°C and 25°C). A hot or cold battery may not
function temporarily, even when the battery is fully charged.
• Battery performance is particularly limited in temperatures below
freezing.
• Do not dispose of batteries in a fire! Dispose of batteries according
to local regulations. Please recycle when possible. Cellphones are
not considered household waste.
Mobile phone maintenance
• Keep the device dry. Precipitation, humidity, and all types of liquids
or moisture can contain minerals that will corrode electronic circuits.
If your device does get wet, remove the battery and allow the device
to dry completely before replacing it.
• Do not use or store the device in dusty, dirty areas. Its moving
parts and electronic components can be damaged.
• Do not store the device in hot areas. High temperatures can
shorten the life of electronic devices, damage batteries, and warp or
melt certain plastics.
• Do not store the device in cold areas. When the device returns to
its normal temperature, moisture can form inside the device and
damage electronic circuit boards.

23
• Do not attempt to open the device other than as instructed in this
guide.
• Do not drop, knock, or shake the device. Rough handling can break
internal circuit boards and fine mechanics.
• Do not use harsh chemicals, cleaning solvents, or strong
detergents to clean the device.
• Do not paint the device Paint can clog the moving parts and
prevent proper operation.
• Use only the supplied or an approved replacement antenna.
Unauthorized antennas, modifications, or attachments could
damage the device and may violate regulations governing radio
devices.
All of the above suggestions apply to your device, battery, charger,
or any enhancement. If any device is not working properly, take it to
the nearest authorized service facility for service.
Caution: The manufacturer assumes no responsibility for the
consequences of the users does not comply with the above
suggestions or misuse of the phone.
FCC Regulations:
This mobile phone complies with part 15 of the FCC Rules. Operation
is subject to the following two conditions: (1) This device may not
cause harmful interference, and (2) this device must accept any
interference received, including interference that may cause
undesired operation.
This mobile phone has been tested and found to comply with the
limits for a Class B digital device, pursuant to Part 15 of the FCC
Rules. These limits are designed to provide reasonable protection
against harmful interference in a residential installation. This
equipment generates, uses and can radiated radio frequency energy

24
and, if not installed and used in accordance with the instructions,
may cause harmful interference to radio communications. However,
there is no guarantee that interference will not occur in a particular
installation If this equipment does cause harmful interference to
radio or television reception, which can be determined by turning
the equipment off and on, the user is encouraged to try to correct
the interference by one or more of the following measures:
-Reorient or relocate the receiving antenna.
-Increase the separation between the equipment and receiver.
-Connect the equipment into an outlet on a circuit different from
that to which the receiver is connected.
-Consult the dealer or an experienced radio/TV technician for help.
FCC Note:
Caution: Changes or modifications not expressly approved by the
party responsible for compliance could void the user‘s authority to
operate the equipment.
RF Exposure Information (SAR)
This phone is designed and manufactured not to exceed the
emission limits for exposure to radio frequency (RF) energy set by
the Federal Communications Commission of the United States.
During SAR testing, this device was set to transmit at its highest
certified power level in all tested frequency bands, and placed in
positions that simulate RF exposure in usage against the head with
no separation, and near the body with the separation of 10 mm.
Although the SAR is determined at the highest certified power level,
the actual SAR level of the device while operating can be well below
the maximum value. This is because the phone is designed to
operate at multiple power levels so as to use only the power

25
required to reach the network. In general, the closer you are to a
wireless base station antenna, the lower the power output.
The exposure standard for wireless devices employing a unit of
measurement is known as the Specific Absorption Rate, or SAR.
The SAR limit set by the FCC is 1.6W/kg.
This device is complied with SAR for general population
/uncontrolled exposure limits in ANSI/IEEE C95.1-1992 and had been
tested in accordance with the measurement methods and
procedures specified in IEEE1528.
The FCC has granted an Equipment Authorization for this model
phone with all reported SAR levels evaluated as in compliance with
the FCC RF exposure guidelines. SAR information on this model
phone is on file with the FCC and can be found under the Display
Grant section of www.fcc.gov/oet/ea/fccid after searching on FCC ID:
YHLBLUDXPLUSLTE.
For this device, the highest reported SAR value for usage against the
head is 0.69 W/kg, for usage near the body is 0.87 W/kg.
While there may be differences between the SAR levels of various
phones and at various positions, they all meet the government
requirements.
SAR compliance for body-worn operation is based on a separation
distance of 10 mm between the unit and the human body. Carry this
device at least 10 mm away from your body to ensure RF exposure
level compliant or lower to the reported level. To support body-worn
operation, choose the belt clips or holsters, which do not contain
metallic components, to maintain a separation of 10 mm between
this device and your body.

26
RF exposure compliance with any body-worn accessory, which
contains metal, was not tested and certified, and use such
body-worn accessory should be avoided.
Hearing Aid Compatibility (HAC) regulations for
Mobile phones
In 2003, the FCC adopted rules to make digital wireless telephones
compatible with hearing aids and cochlear implants. Although
analog wireless phones do not usually cause interference with
hearing aids or cochlear implants, digital wireless phones sometimes
do because of electromagnetic energy emitted by the phone's
antenna, backlight, or other components. Your phone is compliant
with FCC HAC regulations (ANSI C63.19- 2011). While some wireless
phones are used near some hearing devices (hearing aids and
cochlear implants), users may detect a buzzing, humming, or
whining noise. Some hearing devices are more immune than others
to this interference noise and phones also vary in the amount of
interference they generate. The wireless telephone industry has
developed a rating system for wireless phones to assist hearing
device users in finding phones that may be compatible with their
hearing devices. Not all phones have been rated. Phones that are
rated have the rating on their box or a label located on the box. The
ratings are not guarantees. Results will vary depending on the user's
hearing device and hearing loss. If your hearing device happens to
be vulnerable to interference, you may not be able to use a rated
phone successfully. Trying out the phone with your hearing device is
the best way to evaluate it for your personal needs.
This phone has been tested and rated for use with hearing aids for
some of the wireless technologies that it uses. However, there may
be some newer wireless technologies used in this phone that have

27
not been tested yet for use with hearing aids. It is important to try
the different features of this phone thoroughly and in different
locations, using your hearing aid or cochlear implant, to determine if
you hear any interfering noise. Consult your service provider or the
manufacturer of this phone for information on hearing aid
compatibility. If you have questions about return or exchange
policies, consult your service provider or phone retailer.
M-Ratings: Phones rated M3 or M4 meet FCC requirements and are
likely to generate less interference to hearing devices than phones
that are not labeled. M4 is the better/higher of the two ratings.
T-Ratings: Phones rated T3 or T4 meet FCC requirements and are
likely to be more usable with a hearing device’s telecoil (“T Switch”
or “Telephone Switch”) than unrated phones. T4 is the better/
higher of the two ratings. (Note that not all hearing devices have
telecoils in them.)
Your phone meets the M4/T4 level rating.
Hearing devices may also be rated. Your hearing device
manufacturer or hearing health professional may help you find this
rating. For more information about FCC Hearing Aid Compatibility,
please go to http://www.fcc.gov/cgb/dro.
IC Notice
This device complies with Industry Canada license-exempt RSS
standard(s). Operation is subject to the following two conditions:
(1) this device may not cause interference, and
(2) this device must accept any interference, including interference
that may cause undesired operation of the device.

28
Le présent appareil est conforme aux CNR d'Industrie Canada
applicables aux appareils radio exempts de licence. L'exploitation est
autorisée aux deux conditions suivantes:
(1) l'appareil ne doit pas produire de brouillage, et
(2) l'utilisateur de l'appareil doit accepter tout brouillage
radioélectrique subi, même si le brouillage est susceptible d'en
This Class B digital apparatus complies with Canadian ICES-003.
Cet appareil numérique de la classe B est conforme à la norme
NMB-003 du Canada.
IC: 11492A-DXPLUSLTE
IC Radiation Exposure Statement
This EUT is compliance with SAR for general population/uncontrolled
exposure limits in IC RSS-102 and had been tested in accordance
with the measurement methods and procedures specified in IEEE
1528 and IEC 62209. This equipment should be installed and
operated with minimum distance 1.0 cm between the radiator and
your body. This device and its antenna(s) must not be co-located or
operating in conjunction with any other antenna or transmitter.
Cet appareil est conforme aux limites d'exposition DAS incontrôlée
pour la population générale de la norme CNR-102 d'Industrie
Canada et a été testé en conformité avec les méthodes de mesure et
procédures spécifiées dans IEEE 1528 et IEC 62209. Cet appareil doit
être installé et utilisé avec une distance minimale de 1.0 cm entre

29
l’émetteur et votre corps. Cet appareil et sa ou ses antennes ne
doivent pas être co-localisés ou fonctionner en conjonction avec
tout autre antenne ou transmetteur.
The pictures in user manual only for reference, please
take your actual phone as the standard.