user manual

-1-
Android 2.3 (Gingerbread) is the Operating System for your
Touch Screen smartphone

-2-
Understanding your Phone
1
1.
.1
1
Y
Yo
ou
ur
r
P
Ph
ho
on
ne
e
(SAMPLE)

-3-
(Sample)
1
1.
.2
2
D
De
es
sc
cr
ri
ip
pt
ti
io
on
n
I
Ic
co
on
ns
s
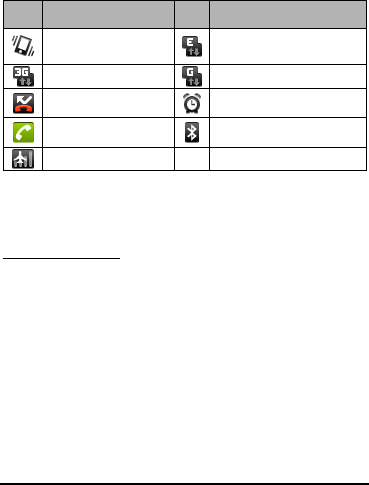
Icons
Descriptions
Icons
Descriptions
Shows the phone’s
network signal strength.
Show the phone’s battery
capacity.
Speaker has been
activated.
You have unread SMS.
Call Forwarding
You have unheard voice
mail.
Call on hold
USB storage Turned on.
-4-
Icons
Descriptions
Icons
Descriptions
The ringing type is
set on Vibration.
Edge network in use.
3G network in use.
2G network in use.
You have missed calls.
A clock alarm is active.
In call
Bluetooth ON
Flight Mode
1
1.
.3
3
I
In
ns
se
er
rt
ti
in
ng
g
&
&
R
Re
em
mo
ov
vi
in
ng
g
t
th
he
e
b
ba
at
tt
te
er
ry
y
Inserting the battery
1. Open the battery cover on the back of your phone.
2. Align the battery's contact points with those of the phone
and gently press the battery down into place.
3. Replace the battery cover clicking it back into position.
Inserting the Battery
Closing the Back Cover
-5-
Removing the battery
1. Switch off your phone.
2. Open the battery cover.
3. Lift the battery up and out of your phone.
1
1.
.4
4
C
Ch
ha
ar
rg
gi
in
ng
g
t
th
he
e
b
ba
at
tt
te
er
ry
y
The rechargeable Li-ion battery that comes with your phone is
ready to be used, but is not charged. It is easy to do & can be
done in 3 simple steps below:
Inserting the Battery
Removing the Battery
Removing the Battery
Open the Back Cover

-6-
1. Connect the charger to your phone, and plug it into a
socket.
2. The battery indicator in the corner of the screen will scroll
to show you it’s charging.
3. When fully charged, the battery indicator will stop
scrolling.
4. Disconnect the charger from your mobile, and unplug.
1
1.
.5
5
P
Po
ow
we
er
r
O
ON
N/
/O
OF
FF
F
Press the power key to power-ON/OFF the phone.
When you turn your phone on, it’ll automatically check the SIM
and show the following information on screen:
Input phone lock code: If you’ve set a lock code.
Input SIM1 PIN: If you’ve set a PIN for your SIM1.
Input SIM2 PIN: If you’ve set a PIN for your SIM2.
Note:
The PIN is supplied with your SIM. Please replace it with your
own PIN code as soon as possible. Enter the wrong PIN three
times, and your SIM will be locked. Then you’ll need to contact
your network service provider to ask for a PUK code to unlock it.

-7-
It is applicable for both the SIMs if you are using 2 SIM Cards.
1
1.
.6
6
E
En
nt
te
er
r
m
ma
ai
in
n
m
me
en
nu
u
In idle mode, press the Menu key to enter the main menu on
the desktop and click the Home key to return.
1
1.
.7
7
E
En
nt
te
er
r
s
su
ub
b
m
me
en
nu
u
Once at the main menu, click the icon to select the submenu,
press Back Key to return to the previous menu, and press the
Home Screen to return to the home screen.
1
1.
.8
8
U
Us
se
e
n
no
ot
ti
if
fi
ic
ca
at
ti
io
on
n
p
pa
an
ne
el
l
As a new notification appears in the notification area, slide
down in the area to view the contents of the notification.
1
1.
.9
9
E
Ex
xp
pa
an
nd
d
m
ma
ai
in
n
i
in
nt
te
er
rf
fa
ac
ce
e
The main interface may extend and exceed the screen width to
provide more space for newly added shortcuts and tools.
Slide your finger horizontally on the main interface to extend to
the left or right area of the main interface.

-8-
1
1.
.1
10
0
A
Ad
dd
d
i
ic
co
on
ns
s
o
on
n
t
th
he
e
m
ma
ai
in
n
i
in
nt
te
er
rf
fa
ac
ce
e
Long press any empty space on the main interface to open “Add
to Home screen”. Select “Shortcuts”, “Widgets”, “Folders”, etc
to add.
You can also long press the icon on the main menu until it’s
enlarged and the mobile phone vibrates, and copies the icons in
the main menu to the main interface.
1
1.
.1
11
1
M
Mo
ov
ve
e
i
ic
co
on
ns
s
o
on
n
t
th
he
e
m
ma
ai
in
n
i
in
nt
te
er
rf
fa
ac
ce
e
1. Long press the icon on the main interface until it’s
enlarged and the mobile phone vibrates.
2. Drag the icon to the desired position and then release it.
1
1.
.1
12
2
D
De
el
le
et
te
e
i
ic
co
on
ns
s
o
on
n
t
th
he
e
m
ma
ai
in
n
i
in
nt
te
er
rf
fa
ac
ce
e
1. Long press the icon on the main interface until it’s
enlarged and the mobile phone vibrates.
2. Drag the icon into to delete it.
1
1.
.1
13
3
C
Ch
ha
an
ng
ge
e
w
wa
al
ll
lp
pa
ap
pe
er
rs
s
1. Long press “Touch screen” to open the menu.

-9-
2. Press “Wallpapers” “Gallery /Live wallpapers /
“Wallpapers”, and Select the wallpaper and press “Set
wallpaper” to complete.
1
1.
.1
14
4
I
In
ns
st
ta
al
ll
l
A
AP
PK
K
t
th
hr
ro
ou
ug
gh
h
f
fi
il
le
e
m
ma
an
na
ag
ge
er
r
APK is a packaging file format for the Android mobile operating
system.
1.Please copy the downloaded APK file into the SD card, and
then insert the SD card into the terminal.
2.In idle mode, click Main Menu to enter the main menu.
3.Click “File Manager” to enter the directory of SD card.
4.Click the APK file you wish to install, and follow the
installation wizard.
-10-
2
2
U
Us
si
in
ng
g
y
yo
ou
ur
r
P
Ph
ho
on
ne
e
2
2.
.1
1
M
Ma
ai
in
n
M
Me
en
nu
u
&
&
I
It
ts
s
F
Fu
un
nc
ct
ti
io
on
ns
s
Select to enter the main menu…
Allows you to view a list of features available in your phone-
1. Alarm
Allows you to set the alarm from Clock.
2. Black List
Allows you to add undesirable contact numbers to blacklist,
hence preventing calls from such numbers.
3. Browser
Browse the search engine- default set as Google.
4. Calculator
Allows you to make tedious calculations quickly.
5. Calendar
View the calendar

-11-
6. Camera
Allows you to click pictures anytime you want. You A9 has 5.0
Mega Pixel Auto Focus camera which ensures you click good
quality of pictures and stores them under the Gallery folder. In
Camera, easily slide to Camcorder to record Video Files.
Note: You need to have SD card to store the Pictures & Videos.
7. Contacts
Contacts from your SIM can be downloaded into your phone by
Emport / Export
Go to: Menu>contacts>Press Menu Display>Import/Export
8. Email
Allows you set up your POP/IMAP email accounts.
9.Gallery
Allows you to save & view photos & videos.
10. Market
Log in to your Gmail account to view all the app lications
& download from thousands of applications available
under the Google Market.
Note:

-12-
To use this app please connect to an internet connection.
Menu> Settings> Wireless & networks.
11.Messaging
Allow you to view messages sent & received as a thread.
12. Music
View the list of songs available in your phone. View the artists,
albums, playlists & more.
13. Phone
Allow you to make quick outgoing calls.
14. File Manager
You could install the files in APK format.
15. Settings
Modify settings under the following-
Dual SIM Settings
Wireless & networks
Call settings
Sound & Display
Location & security

-13-
Go to: Menu>Settings>Location & Security >Use wireless
Network/Use gps satellites
Note: “Use wireless network” by default is “Off". You need to
change it to “On” when using the lattitude application.
Applications
Accounts & sync
Privacy
SD card & storage
Language & keyboard
Accessibility
Date & time
About phone
16. SIM Toolkit
This service is provided by the operator. It provides many types
of personalized message services.
17. Sound Recorder
Allows you to record sounds.
18. Videos
View from a list of recorded videos.

-14-
3
3
I
In
np
pu
ut
tt
ti
in
ng
g
T
Te
ex
xt
t
Your full touch mobile phone supports XT9 text input method and
Android keyboard input method. XT9 text input method supports
the handwriting input and keyboard input.
Switch between XT9 text input method and Android: Long press
the text input field and select “Input method” to select XT9
Input method or Android Keyboard.
Keyboard input method.
Insert a space
Delete
Input upper
case/lower case

-15-
Input numbers
and symbols
Swipe
4
4
M
Ma
ai
in
nt
te
en
na
an
nc
ce
e
Use a dry soft cloth to wipe general dirt.
Do not use a hard cloth, benzene or thinner to wipe the phone,
otherwise, the surface of the phone will be scratched or could
even result in the fading of colour.

-16-
5
5
T
Ta
ak
ki
in
ng
g
C
Ca
ar
re
e
o
of
f
y
yo
ou
ur
r
D
De
ev
vi
ic
ce
e
Your device is a product of superior design and craftsmanship
and should be handled with care: The following suggestions will
help you protect your phone:
Always keep the small parts of the phone away from
children.
Keep the device dry. Precipitation, humidity, and all
types of liquids or moisture can contain minerals that
will rust electronic circuits. If your device does get wet,
remove the battery, and allow the device to dry
completely before replacing it.
Do not use or store the device in dusty, dirty areas. Its
moving parts and electronic components can be
damaged.
Do not store the device in high or cold temperature.
High temperatures can shorten the life of electronic
devices and damage batteries.
The operating temperature is between -10~40℃.
Do not attempt to open the device other than as
instructed in this guide.
Do not drop, knock, or shake the device. Rough handling
can break internal circuit boards and fine mechanics.

-17-
Do not use harsh chemicals, cleaning solvents, or strong
detergents to clean the device. Only use a soft, clean,
dry cloth to clean the surface of the device.
Do not paint the device. Paint can clog the moving parts
and prevent proper operation.
Use chargers indoors.
6
6
F
FC
CC
C
R
Re
eg
gu
ul
la
at
ti
io
on
ns
s:
:
This mobile phone complies with part 15 of the FCC Rules.
Operation is subject to the following two conditions: (1) This
device may not cause harmful interference, and (2) this device
must accept any interference received, including interference
that may cause undesired operation.
This mobile phone has been tested and found to comply with
the limits for a Class B digital device, pursuant to Part 15 of the
FCC Rules. These limits are designed to provide reasonable
protection against harmful interference in a residential
installation. This equipment generates, uses and can radiated
radio frequency energy and, if not installed and used in
accordance with the instructions, may cause harmful
interference to radio communications. However, there is no
guarantee that interference will not occur in a particular

-18-
installation If this equipment does cause harmful interference
to radio or television reception, which can be determined by
turning the equipment off and on, the user is encouraged to try
to correct the interference by one or more of the following
measures:
-Reorient or relocate the receiving antenna.
-Increase the separation between the equipment and receiver.
-Connect the equipment into an outlet on a circuit different
from that to which the receiver is connected.
-Consult the dealer or an experienced radio/TV technician for
help.
Changes or modifications not expressly approved by the party
responsible for compliance could void the user‘s authority to
operate the equipment.
RF Exposure Information (SAR)
This mobile phone meets the government’s requirements for
exposure to radio waves.
This phone is designed and manufactured not to exceed the
emission limits for exposure to radio frequency (RF) energy set
by the Federal Communications Commission of the U.S.
Government.
The exposure standard for wireless mobile phones employs a

-19-
unit of measurement known as the Specific Absorption Rate, or
SAR. The SAR limit set by the FCC is 1.6W/kg. *Tests for SAR
are conducted using standard operating positions accepted by
the FCC with the phone transmitting at its highest certified
power level in all tested frequency bands. Although the SAR is
determined at the highest certified power level, the actual SAR
level of the phone while operating can be well below the
maximum value. This is because the phone is designed to
operate at multiple power levels so as to use only the power
required to reach the network. In general, the closer you are
to a wireless base station, the lower the power output.
The highest SAR value for the model phone as reported to the
FCC when tested for use at the ear is 1.17 W/kg and when worn
on the body, as described in this user guide, is 1.42 W/kg
(Body-worn measurements differ among phone models,
depending upon available accessories and FCC requirements.)
While there may be differences between the SAR levels of
various phones and at various positions, they all meet the
government requirement.
The FCC has granted an Equipment Authorization for this model
phone with all reported SAR levels evaluated as in compliance
with the FCC RF exposure guidelines. SAR information on this
model phone is on file with the FCC and can be found under the
Display Grant section of www.fcc.gov/oet/ea/fccid after

-20-
searching on FCC ID: YHLBLUELITE.
For body worn operation, this phone has been tested and
meets the FCC RF exposure guidelines for use with an accessory
that contains no metal and the positions the handset a
minimum of 1.0 cm from the body. Use of other accessories
may not ensure compliance with FCC RF exposure guidelines.
If you do no t use a body-worn accessory and are not holding
the phone at the ear, position the handset a minimum of 1.0
cm from your body when the phone is switched on.