User manual

1
ENERGY X 2
Quick Guide / Guía Rápida / Guia Rápido / Guide Rapide
ATTENTION
2
o For instructions or any questions pertaining to phone usage, please click on the BLU Help icon
on the home screen of the phone. Also included in BLU Help is a product registration link and
technical support. You may also access the BLU help page by visiting the following address:
manuals.bluproducts.com
o Para obtener instrucciones o preguntas relacionadas con el uso del teléfono, por favor haga
clic en el icono de BLU Help en la pantalla principal del teléfono. También se incluye en BLU
Help un enlace para registro del producto y soporte técnico. Usted también puede acceder la
página de BLU Help visitando la siguiente dirección: manuals.bluproducts.com
o Para obter instruções ou perguntas relacionadas ao uso do telefone, por favor, clique no
ícone BLU Help na tela principal do telefone. Também incluído no BLU Help um link para
registrar o produto e suporte técnico. Você também pode acessar a página de BLU Help
visitando o seguinte endereço: manuals.bluproducts.com
o Pour des instructions ou pour toutes questions sur l'utilisation du téléphone, veuillez cliquer
sur l'icône Aide BLU sur l'écran d'accueil du téléphone. L'Aide BLU comprend un lien pour
enregistrer le produit et pour le soutien technique. Vous pouvez aussi accéder à la page aide
BLU en visitant l'adresse suivante: manuals.bluproducts.com
SAFETY INFORMATION
3
Transportation Safety
Please observe all transportation laws and regulations.
PLEASE DRIVE RESPONSIBLY - DO NOT TEXT & DRIVE
Hospital Safety
Please follow hospital rules and limitations.
Please turn off your mobile phone when near medical instruments.
Airport Safety
Remember to follow all airport and flight safety regulations.
Water Hazard
Your phone is not waterproof. Keep your phone away from water or liquid to avoid damage.
Emergency Calls
Make sure your mobile phone is switched on and in a service area. In home screen, tap the phone key and
dial the emergency number.
Battery Usage
For better performance and longer battery life, it is recommended that you charge the battery fully before
using the mobile phone for the first time and that you initially complete two to three charge cycles.
BLU_E050U_04
4
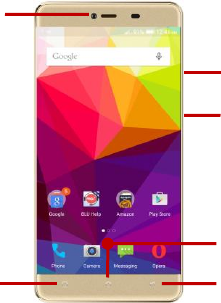
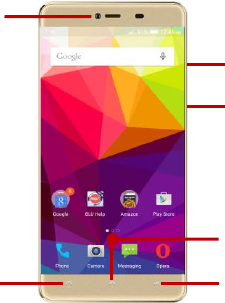
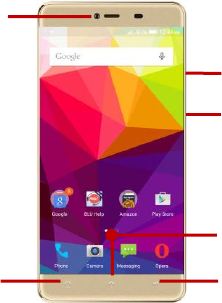
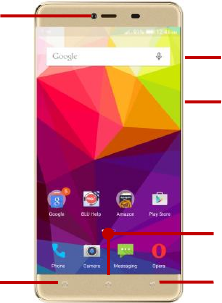
KEY FUNCTIONS
Volume
Power On / Off
Back
Home
Recent Apps
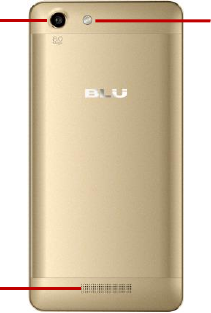
Front Camera
5
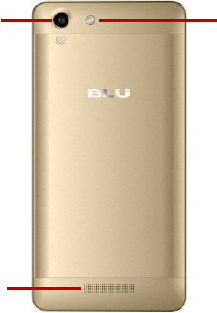
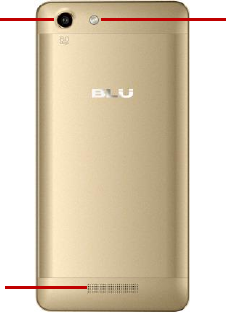
Rear Camera
Flash
Speaker

6
Power
On / Off
Used to power on/off the device and to lock the screen.
» Long press the power button to power on
» While the phone is powered on, long press to access the power off menu or click to lock the screen
Volume
Adjusts the ringer volume, call volume, and multimedia volume.
Home
The home button pauses any current action and returns to the home screen.
Recent Apps
Opens a list of recently opened applications that allows you to conveniently switch between them. This
option can also close any open applications by swiping to the side.
Back
Returns to the previous screen; Closes the keyboard, any open program, or any menu option.
USB Port
Charges the device and also transfers data such as documents, music, and video between your device and
a PC.
Headset Port
Connect earphones to this port for hands-free capabilities. You may also to listen to music or FM radio.
Front Camera
A high resolution front camera to take pictures and video. This option is ideal for self-portraits.
Rear Camera
A high resolution rear camera to take pictures and video.
Flash
Provides light for pictures in low-light conditions. It may also be used as a flashlight.

7
INTRODUCTION
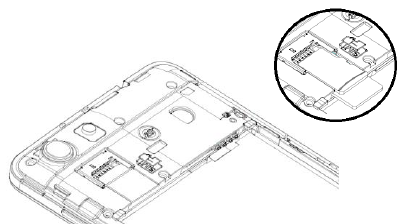
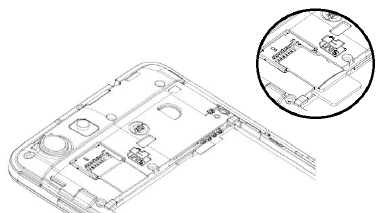
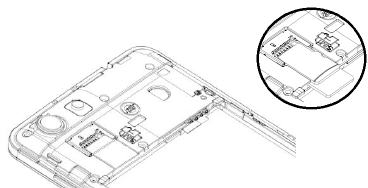
Installation of the SIM Card
Warning: Please keep the SIM card out of the reach of children. The SIM card and its contact are easily
damaged due to scratching or bending. Please use caution when carrying, installing, or taking out the SIM
card. Note: Please contact your cellular phone service provider directly to obtain your SIM card.
To insert SIM card:
Remove the rear cover. Insert the SIM card.
Insert the SD card (For additional storage capacity)
Insert the battery, replace the rear cover, and power on the phone.
Note: This model has a
multi-level slot where the
SIM card and the memory
card are shared through
the same input. The SIM
Card is inserted in the
bottom slot and the
Memory Card is inserted in
the top slot. Please insert
both cards accordingly.
8
When you initially power on your phone, there will be a series of steps to set up basic features.
INSERT SIM
Insert your SIM card so the phone can register to the network.
SELECT LANGUAGE
While on the Welcome screen, please scroll to select your language.
SELECT WI-FI
This process allows the device to connect to the internet. Click on the desired Wi-Fi network that the device
will be connecting to. Please note that any unsecured Wi-Fi networks can be connected to directly and any
secured Wi-Fi networks require a password for credentials prior to connection. It is recommended that you
connect to a Wi-Fi network to check for software updates prior to startup.
ADD YOUR ACCOUNT
Sign in to your Google account in order to keep accounts streamlined with Google services. Your Gmail
account will be used for some Google programs which include: Google Play Store, Google Drive, Google +
and Google Wallet. If you do not have a Google account, click to create a new account. In this step you can
also setup payment info if desired.
RESTORE APPS & DATA
You can restore your previous applications and data that have been backed up from another device. You
may also setup the phone as a new device.
GOOGLE SERVICES
Click to add or remove Google services which include Backup, Location Service, and Google Now.
9
INFORMACIÓN DE SEGURIDAD
Seguridad de Transporte
Por favor siga todas las leyes y regulaciones de transporte.
MANEJE RESPONSABLEMENTE - NO USE MENSAJERIA DE TEXTO CUANDO CONDUCIENDO
Seguridad de Hospitales
Por favor siga todas las leyes y regulaciones de hospital
Por favor, apague su teléfono móvil cuando cerca de instrumentos médicos.
Seguridad de Aeropuertos
Por favor, siga todas las normas de seguridad de vuelo y
Prueba de Agua
El teléfono móvil no es impermeable. Manténgalo alejado de agua o líquidos para evitar daño.
Llamadas de Emergencia SOS
Asegúrese de que su teléfono móvil está encendido y en un área de servicio. En la pantalla de inicio, pulse
la tecla del teléfono y marque el número de emergencia.
Uso de batería
Para mejorar el rendimiento y la vida útil de la batería, se recomienda que cargue la batería
completamente antes de utilizar el teléfono móvil por primera vez.
El rendimiento óptimo de una batería nueva se obtiene generalmente después de dos o tres ciclos de
carga completos.
10
FUNCIONES
Volumen
Retroceder
Inicio
Apps Recientes
Encendido
Cámara Frontal
11
Cámara Trasera
Alto-parlante
Flash

12
Encendido /
Apagado
Se utiliza para encender/apagar el dispositivo y bloquear la pantalla.
» Mantenga pulsado el botón de encendido para encender
» Mientras el teléfono esta encendido, mantenga pulsado para acceder el menú de apagado o haga
clic para bloquear la pantalla.
Volumen
Ajusta el volumen del timbre, el volumen durante una llamada, y el volumen de multimedia.
Inicio
El botón de inicio se detiene cualquier acción actual y vuelve a la pantalla de inicio.
Aplicaciones
Recientes
Abre una lista de aplicaciones recientemente abiertas y le permite cambiar cómodamente entre ellas.
Esta opción también puede cerrar todas las aplicaciones abiertas deslizando hacia el lado.
Retroceder
Regresa a la pantalla anterior; Se cierra el teclado, cualquier programa abierto, opción de menú, o el
panel de notificaciones.
Puerto de USB
Carga el dispositivo y también transfiere documentos, música y vídeo entre el teléfono y un PC.
Puerto de
Auricular
Conecte los auriculares a este puerto para capacidades de manos libres. También se puede escuchar
música o radio FM.
Cámara Frontal
Una cámara frontal de alta resolución para tomar fotos y video. Esta opción es ideal para autorretratos.
Cámara Trasera
Una cámara trasera de alta resolución para tomar fotos y video.
Flash
Proporciona luz para fotos en condiciones de poca luz. También se puede utilizar como una linterna.
13
INDRODUCCIÓN
Instalación de la Tarjeta SIM
Advertencia: Mantenga la tarjeta SIM fuera del alcance de los niños. El contacto de la tarjeta SIM se daña
fácilmente debido al roce o flexión. Por favor tenga cuidado al transportar o instalar la tarjeta SIM.
Nota: Por favor comuníquense con el proveedor de servicio directamente para obtener su tarjeta SIM.
Para insertar la tarjeta SIM:
Retire la cubierta posterior. Inserte la tarjeta SIM.
Inserte la tarjeta de memoria (para capacidad adicional).
Inserte la batería, coloque la cubierta posterior, y encienda el teléfono.
Aviso: Este modelo tiene
una ranura multinivel
donde la tarjeta SIM y la
tarjeta de memoria se
comparten a través de la
misma entrada. La tarjeta
SIM se inserta en la
ranura inferior y la tarjeta
de memoria se inserta en
la ranura superior. Por
favor inserte ambas
tarjetas en las ranuras
correspondientes.
14
Cuando inicialmente se enciende el teléfono, habrá una serie de configuraciones básicas.
INSERTAR SIM
Inserte su tarjeta SIM para que el teléfono pueda registrarse a la red.
SELECCIONAR IDIOMA
En la pantalla de bienvenida, por favor, haga clic y desplace para elegir su selección de idioma.
SELECCIONAR WI-FI
Este paso permite que el dispositivo se conecte a la red de Wi-FI. Haga clic en la red Wi-Fi que desee que
el dispositivo se conecte. Por favor, tenga en cuenta que todas las redes sin seguridad pueden conectarse
directamente y cualquiera de las redes protegidas requieren una contraseña antes de conexión.
AGREGAR LA CUENTA
Ingrese a su cuenta de Google para llevar una contabilidad simplificada con los servicios de Google. Tu
cuenta de Gmail se utilizará para algunos programas de Google que incluyen: Google Play Store, Google
Drive, Google + y Google Wallet. Si usted no tiene una cuenta de Google, haga clic para crear una cuenta
nueva. En este paso también se puede configurar información de pago, si lo desea.
RESTABLECER APLICACIONES Y DATOS
Puede restaurar sus aplicaciones y datos que han sido copiados de otros dispositivos anteriores. Usted
puede también configurar el teléfono como un dispositivo nuevo.
SERVICIOS DE GOOGLE
Haga clic para agregar o quitar servicios de Google que incluyen copia de seguridad, servicio de ubicación,
y Google Now.
15
INFORMAÇÕES DE SEGURANÇA
Segurança no Transporte
Observe todas as leis e regulamentos sobre transporte
DIRIJA RESPONSAVELMENTE - NÃO DIGITE DIRIGINDO
Segurança em Hospitais
Sigas as regras e limitações em hospitais
Desligue seu celular perto de instrumentos médicos.
Segurança em Aeroportos
Lembre-se de seguir todas as regras de segurança de vôo e em aeroportos.
Risco de Água
Seu celular não é à prova d’água. Mantenha-o afastado de água ou líquidos.
Ligações de Emergência
Certifique-se de que o celular esteja ligado e em área de cobertura. Na tela inicial, toque na tecla de
telefone e digite o número de emergência.
Uso de Bateria
Para melhorar o desempenho e aumentar a vida da bateria, recomenda-se carregar a bateria
completamente antes de usar o celular pela primeira vez.
16
FUNÇÃO
Volume
Ligar / Desligar
Voltar
Início
Apps Recentes
Câmera Frontal
17
Câmera Traseira
Alto-falante
Flash

18
Ligar / Desligar
Usado para ligar / desligar o aparelho e para bloquear a tela.
» Pressione e segure o botão de ligar para ligar
» Enquanto o telefone estiver ligado, pressione e segure para acessar o menu de desligar ou clique
para bloquear a tela
Volume
Ajusta o volume do toque do celular, o volume de chamadas, durante uma ligação, e volume de
multimídia.
Início
O botão de início pausa qualquer ação atual e retorna à tela inicial.
Apps Recentes
Abre uma lista de aplicativos abertos recentemente que permite alternar convenientemente entre eles.
Esta opção também pode fechar todos os aplicativos abertos deslizando para o lado.
Voltar
Retorna à tela anterior; Fecha o teclado, qualquer programa aberto, ou opção de menu.
Entrada USB
Multifuncional
Carrega o dispositivo e também transfere dados, como documentos, música e vídeo entre o dispositivo
e um PC.
Entrada do Fone
de Ouvido
Conectar fones de ouvido a essa porta para recursos de mãos-livres. Você também pode ouvir música
ou rádio FM.
Câmera Frontal
Uma câmera frontal de alta resolução para tirar fotos e vídeo. Esta opção é ideal para auto-retratos.
Câmera Traseira
Uma câmera traseira de alta resolução para tirar fotos e vídeo.
Flash
Fornece luz para fotos em condições de pouca luz. Ele também pode ser usado como uma lanterna.
19
INTRODUÇÃO
Instalação do Cartão SIM (Chip)
Atenção: Mantenha o cartão SIM fora do alcance de crianças. O cartão SIM e seus contatos são
facilmente danificados por arranhões ou empenos. Tenha cuidado ao transportar, instalar ou retirar o
cartão SIM.
Nota: Faça contato com o provedor de serviços do seu celular diretamente, para obter o cartão SIM.
Para inserir o cartão SIM:
Retire a tampa traseira. Insira o cartão SIM.
Insira o cartão SD. (para capacidade de armazenagem adicional)
Encaixe a bateria, recoloque a tampa traseira, e ligue o celular.
Nota: Este modelo tem um
slot multinível onde o
cartão SIM e o cartão de
memória são
compartilhados pela
mesma entrada. O cartão é
inserido na ranhura inferior
e o cartão de memória
inserido na ranhura
superior. Por favor, Insira
ambas as placas nos slots.
20
Quando você iniciar o telefone, haverá uma série de etapas para configurar como recursos básicos e
necessários para o seu telefone.
INSERÇÃO SIM
Insira o seu cartão SIM para o telefone para se registar na rede.
SELECIONE O IDIOMA
Na tela de boas-vindas, por favor, clique no botão de linguagem e escolha seu idioma.
SELECIONAR WI-FI
Esta etapa permite que o aparelho se conecte à rede Wi-Fi. Clique na rede Wi-Fi que você deseja para o
aparelho conectar-se. Por favor, note que todas as redes não seguras podem ser conectadas diretamente
e qualquer uma das redes protegidas exige uma senha para credenciais antes de conectar.
ADICIONE SUA CONTA
Faça login na sua conta do Google para manter uma contabilidade simplificada com serviços do Google.
Sua conta do Gmail é usado para alguns programas que incluem Google: Google Play Store, Google Drive,
Google + e Google Wallet. Se você não tiver uma Conta do Google, clique em criar uma nova conta. Nesta
etapa, você também pode configurar as informações de pagamento.
RECUPERE SEUS APPS E DADOS
Você pode restaurar seus aplicativos e dados que foram copiados de outros dispositivos anteriores. Você
também pode definir o telefone como um novo dispositivo.
SERVIÇOS DO GOOGLE
Clique para adicionar ou remover serviços do Google, incluindo backup, serviço de localização, e Google
Now.
21
RENSEIGNEMENTS RELATIFS À LA SÉCURITÉ
Sécurité au volant
Veuillez observer toutes les lois et règles de transport.
VEUILLEZ CONDUIRE DE MANIÈRE RESPONSABLE - NE JAMAIS TEXTER ET CONDUIRE.
Sécurité dans les hôpitaux
Veuillez suivre les règles et limitations des hôpitaux.
Veuillez éteindre votre téléphone mobile si vous êtes près d'appareils médicaux.
Sécurité aéroportuaire
N'oubliez pas de suivre les règles de sécurité des aéroports et de vol.
Risque lié à l'eau
Votre téléphone n'est pas à l'épreuve de l'eau. Garder votre téléphone à l'abri de l'eau ou de tout autre
liquide pour éviter des dommages.
Appels d'urgence
S'assurer que votre téléphone mobile est allumé dans une zone de service. Dans l'écran d'accueil, toucher
sur la touche téléphone et composer le numéro d'urgence.
Utilisation de la batterie
Pour une meilleure autonomie de la batterie, il est recommandé de charger la batterie complètement avant
d'utiliser le téléphone mobile pour la première fois et de compléter deux à trois cycles de recharge.
22
FONCTION DES TOUCHES
Volume
Marche / Arrêt
Reculer
Accueil
Appareil photo avant
Applications récentes

23
Appareil photo arrière
Flash
Haut-parleur

24
Marche / Arrêt
Utilisé pour marche/arrêt l'appareil et verrouiller l'écran.
» Maintenir appuyé le bouton pour allumer
» Lorsque le téléphone est allumé, appuyez longuement sur pour accéder à la mise hors tension du
menu ou cliquez sur pour verrouiller l'écran
Volume
Ajuste le volume de la sonnerie, volume d'appels, et le volume de multimédia.
Accueil
Bouton d'accueil arrête toute action en cours, puis retourne à l'écran d'accueil.
Applications
Récentes
Ouvre une liste d'applications récemment ouvertes qui permet de basculer facilement entre eux. Cette
option peut également fermer toutes les applications ouvertes en faisant glisser sur le côté.
Reculer
Retourne à l'écran précédent; Ferme du clavier, tous les programmes ouverts ou n'importe quelle
option de menu.
Port USB
Recharge de l'appareil et transfère également les données telles que des documents, musique et vidéo
entre votre appareil et un PC.
Port de Casque
Connecter les écouteurs à ce port pour des fonctions mains-libres. Vous pouvez également écouter de
la musique ou la radio FM.
Appareil
Photo Avant
Un appareil photo avant de haute résolution pour prendre des photos et vidéo. Cette option est idéale
pour les autoportraits.
Appareil
Photo Arrière
Un appareil photo arrière de haute résolution pour prendre des photos et vidéo.
Flash
Fournit une lumière pour les photos en conditions de faible luminosité. Il peut également être utilisé
comme une lampe de poche.
25
INTRODUCTION
Installation de la carte SIM
Avertissement: Veuillez garder la carte SIM hors de la portée des enfants. La carte SIM et les contacts
sont facilement endommagés par une déformation ou des rayures. Veuillez faire attention lors du transport,
de l'installation ou du retrait de la carte SIM. Note : Veuillez communiquer directement avec votre
fournisseur de service cellulaire pour obtenir votre carte SIM. Pour insérer la carte SIM:
Retirer le couvercle arrière. Insérer la carte SIM.
Insérer la carte SD (pour une plus grande capacité de stockage)
Insérer la batterie, reposer le couvercle arrière, et allumer le téléphone.
Lorsque vous allumez votre téléphone pour la première fois, il y aura une série d'étapes à suivre pour
régler les fonctionnalités de base.
Remarque: Ce modèle dispose
d’une fente multi-niveau où la
carte SIM et la carte mémoire
sont partagés par la même
entrée. La carte SIM est
insérée dans la fente du bas et
la carte mémoire est insérée
dans la fente supérieure.
Veuillez insérer les deux cartes
en conséquence.
26
INSÉRER LA SIM
Insérer votre carte SIM pour que le téléphone puisse s'inscrire au réseau.
CHOISIR LA LANGUE
Pendant que vous êtes sur l'écran de bienvenue, défiler pour sélectionner votre langue.
SÉLECTION WI-FI
Ce processus permet à l'appareil de se connecter à l'internet. Cliquer sur le réseau Wi-Fi désiré auquel
l'appareil sera connecté. Veuillez noter que les réseaux non sécurisés peuvent être connectés directement
- les réseaux sécurisés nécessitent un mot de passe comme justificatif d'identité avant d'établir la
connexion. Nous vous recommandons d'être connecté à un réseau Wi-Fi pour vérifier les mises à jour
disponibles avant le démarrage.
AJOUTER VOTRE COMPTE
Connectez-vous à votre compte Google afin de synchroniser vos comptes avec les services de Google.
Votre compte Gmail sera utilisé pour certains programmes Google tels que: Google Play Store, Google
Drive, Google + et Google Wallet. Si vous n'avez pas de compte Google, cliquez pour créer un nouveau
compte. À cette étape vous pouvez aussi configurer vos données de paiement si vous le désirez.
RESTAURATION DES DONNÉES ET APPLICATIONS
Vous pouvez restaurer vos données et applications qui ont été sauvegardées sur un autre appareil. Vous
pouvez aussi configurer le téléphone tel qu'un nouvel appareil.
SERVICES GOOGLE
Cliquez pour ajouter ou retirer les services Google qui comprennent, Backup, Location, et Google Now.
27
FCC Rules Compliance
(United States Federal Communications Commission)
This mobile phone complies with part 15 of the FCC Rules. Operation is subject to the following two
conditions: (1) This device may not cause harmful interference, and (2) this device must accept any
interference received, including interference that may cause undesired operation.
This mobile phone has been tested and found to comply with the limits for a Class B digital device,
pursuant to Part 15 of the FCC Rules. These limits are designed to provide reasonable protection
against harmful interference in a residential installation. This equipment generates uses and can radiate
radio frequency energy and, if not installed and used in accordance with the instructions, may cause
harmful interference to radio communications. However, there is no guarantee that interference will not
occur in a particular installation if this equipment does cause harmful interference to radio or television
reception, which can be determined by turning the equipment off and on, the user, is encouraged to try to
correct the interference by one or more of the following measures:
Reorient or relocate the receiving antenna.
Increase the separation between the equipment and receiver.
Connect the equipment into an outlet on a circuit different from that to which the receiver is
connected.
Consult the dealer or an experienced radio/TV technician for help.
Changes or modifications not expressly approved by the party responsible for compliance could void the
user‘s authority to operate the equipment. The antenna(s) used for this transmitter must not be
28
co-located or operating in conjunction with any other antenna or transmitter.
RF Exposure Information (SAR)
This mobile phone meets the government’s requirements for exposure to radio waves.
This phone is designed and manufactured not to exceed the emission limits for exposure to radio
frequency (RF) energy set by the Federal Communications Commission of the U.S. Government.
The exposure standard for wireless mobile phones employs a unit of measurement known as the
Specific Absorption Rate, or SAR. The SAR limit set by the FCC is 1.6W/kg - Tests for SAR are
conducted using standard operating positions accepted by the FCC with the phone transmitting at its
highest certified power level in all tested frequency bands. Although the SAR is determined at the
highest certified power level, the actual SAR level of the phone while operating can be well below the
maximum value. This is because the phone is designed to operate at multiple power levels so as to use
only the poser required to reach the network. In general, the closer you are to a wireless base station
antenna, the lower the power output.
The highest SAR value for the model phone as reported to the FCC when tested for use at the ear is
0.96 W/kg and when worn on the body, as described in this user guide, is 1.19 W/kg (Body-worn
measurements differ among phone models, depending upon available accessories and FCC
requirements.) While there may be differences between the SAR levels of various phones and at various
positions, they all meet the government requirement.

29
The FCC has granted an Equipment Authorization for this model phone with all reported SAR levels
evaluated as in compliance with the FCC RF exposure guidelines.
SAR information on this model phone is on file with the FCC and can be found under the Display Grant
section www.fcc.gov/oet/ea/fccid after searching - FCC ID: YHLBLUENERGYX2.
For body worn operation, this phone has been tested and meets the FCC RF exposure guidelines for
use with an accessory that contains no metal and the positions the handset a minimum of 1.0cm from
the body. Use of other accessories may not ensure compliance with FCC RF exposure guidelines. If you
do not use a body-worn accessory and are not holding the phone at the ear, position the handset a
minimum of 10mm from your body when the phone is switched on.
Additional Information
The information provided in this user manual is subject to change without notice and BLU Products
reserves the right to modify the manual at any given time. BLU Products has made every effort to ensure
that this user manual is accurate and disclaims responsibility and liability for any inaccuracies or
omissions. BLU Products makes no commitment to keep current the user manuals, however, does
reserve the right to make improvements to the user manual at any given time without notice.
IC Notice
This device complies with Industry Canada license-exempt RSS standard(s). Operation is subject to the
following two conditions:
(1) this device may not cause interference, and
30
(2) this device must accept any interference, including interference that may cause undesired operation
of the device.
Le présent appareil est conforme aux CNR d'Industrie Canada applicables aux appareils radio exempts
de licence. L'exploitation est autorisée aux deux conditions suivantes:
(1) l'appareil ne doit pas produire de brouillage, et
(2) l'utilisateur de l'appareil doit accepter tout brouillage radioélectrique subi, même si le brouillage est
susceptible d'en
This Class B digital apparatus complies with Canadian ICES-003.
Cet appareil numérique de la classe B est conforme à la norme NMB-003 du Canada.
IC: 11492A-ENERGYX2
31
IC Radiation Exposure Statement
This EUT is compliance with SAR for general population/uncontrolled exposure
limits in IC RSS-102 and had been tested in accordance with the measurement
methods and procedures specified in IEEE 1528 and IEC 62209. This equipment
should be installed and operated with minimum distance 1.0 cm between the
radiator and your body. This device and its antenna(s) must not be co-located or
operating in conjunction with any other antenna or transmitter.
Cet appareil est conforme aux limites d'exposition DAS incontrôlée pour la population
générale de la norme CNR-102 d'Industrie Canada et a été testé en conformité avec
les méthodes de mesure et procédures spécifiées dans IEEE 1528 et IEC 62209.
Cet appareil doit être installé et utilisé avec une distance minimale de 1.0 cm entre
l’émetteur et votre corps. Cet appareil et sa ou ses antennes ne doivent pas être
co-localisés ou fonctionner en conjonction avec tout autre antenne ou transmetteur.