Contents
- 1. USERS MANUAL
- 2. USER MANUAL
USERS MANUAL
#.
BIP-1500
www.bluebird.co.kr
www.mypidion.com

PIDION as the future mobile’s leading global brand, expresses with reliability,
representativeness, and image of advanced technology. It is a registered trademark from the
global brand of Bluebird Soft. and is copyright protected.
ö
PLEASE READ THE WARNING SIGNS BEFORE USING THIS PRODUCT.
MODEL TYPE NOTICE TO USERS
Class B Device
(Household Information and
Communication Device)
This device has qualified the electromagnetic wave suitable registration and can be
used as a household device at a residential area as well as any other areas.
Form Registration This wireless equipment cannot service related to safety of human lives due to
possible signal interference.
NOTICE TO USERS
REGISTERED TRADEMARK
䭓 This user manual is copyright protected.
䭓 This user manual has been created by the Bluebird Soft. We have done our best not to create typos, editing errors,
and leaving out any information. Please understand if there are any inconveniences.
䭓 This product’s program is legally protected. Illegal copying, transmitting, or erasing of the program is prohibited.
䭓 This product’s partial functions might have problems from the environment, user program, and other machines.
䭓 This wireless equipment cannot service related to safety of human lives due to possible signal interference.

FCC compliance
This equipment has been tested and found to comply with the limits for a Class B digital device, pursuant to Part 15 of the FCC rules.
These limits are designed to provide reasonable protection against harmful interference in a residential installation. This equipment
generates, uses, and can radiate radio frequency energy. If it is not installed and used in accordance with the instructions, it may
cause harmful interference to radio communications. However, there is no guarantee that interference will not occur in a particular
installation. If this equipment does cause harmful interference to radio or television reception, which can be determined by turning
the equipment off and on, the user is encouraged to try to correct the interference by one or more of the following measures:
䭓 Reorient or relocate the receiving antenna.
䭓 Increase separation between equipment and receiver.
䭓 Connect equipment to an outlet on a circuit different from that to which the receiver is located.
䭓 Consult your dealer or an experienced radio/TV technician.
Any changes or modifications to the printer that are not expressly approved by HP could void the user’s authority to
operate this equipment.
Use of a shielded interface cable is required to comply with the Class B limits of Part 15 of FCC rules.

FCC (Federal Communications Commission)
This device complies with Part 15 of the FCC`s Rules. Operation is subject to the following two Conditions:
1. This device may not cause harmful interference, and
2. This device must accept ant interference received, including interference that may cause undesirable operation.
This device complies with part 15 of the FCC Rules. Operation is subject to the condition that this device does not cause harmful
interference.
The antenna must be installed such that 0 cm is maintained between the antenna and users, and the transmitter module may not be
co-located with any other transmitter or antenna.
End users cannot modify this transmitter device. Any Unauthorized modification could void the user`s authority to operate this
device.
CE
Hereby, Bluebird Soft Inc. declares that this BIP-1500 is in compliance with the essential requirements and other relevant provisions
of directive 1999/5/EC.

2
BIP-1500 Manual
&RQWHQWV
/PUJDF#FGPSF6TJOHUIF%FWJDF
1SFDBVUJPOT#FGPSF6TJOHUIF#BUUFSZ
(FUUJOH5P,OPX:PVS%FWJDF
Getting to know your device’s each part
7
Getting to know the buttons
9
-FBSOJOH#BTJDT
Insert/Remove the battery
Insert/Remove the USIM card
Insert/Remove the MicroSD card
Changing the Printing Paper
Charging with Cradle
Turning On
Soft Reset
Hard Reset
Using the Stylus Pen
Adjusting the Display
$POOFDUJOH"DUJWF4ZOD
Installing on PC
Using ActiveSync
Connecting ActiveSync
6TJOHUIF#BSDPEF3FBEFS
Using the Barcodes
Scanning with Barcodes
Checking Barcodes
(FUUJOHUPLOPXZPVS)PNF4DSFFO
Looking at the Home screen
Setting up Photos as Home screen Background
Adjusting Volume
Checking Battery Level
*OQVUUJOH5FYU
Selecting text input mode
Block recognizer
Keyboard

BIP-1500
3
%FWJDF4QFDJGJDBUJPOT
7BMVF1BDL%FUBJMT
PINPAD
Finger scan
Payment
Snap on
7BMVF1BDL
Connecting the Hand Strap
Connecting the Shoulder Strap
Connecting IC Card Cover
2"
4FSWJDF$FOUFS
8BSSBOUZ$FSUJGJDBUF
Letter recognizer
Transcriber
1IPOF
Making a Call
Receiving a Call
Blocking a Call
Hanging Up
$POUBDUT
Searching
Adding a Contact
Menu
$BNFSB
Taking Photos
Viewing Photos
4FUUJOHT

4
BIP-1500 Manual
䭓
In case your device is wet, do not put your device in
heaters, microwaves, or etc to dry- there is a risk of
explosion or it can be the cause of malfunction. (Please
note there is a label in the device that changes color
when it gets wet. In this case your will not be able to
get your free repair service.)
䭓 Do not use your device on-board an airplane or in
hospitals.
䭓 Please backup your device’s inner data and information.
During the repair or upgrade, there is a slight possibility
of your data being erased. (Ring tones, text/voice
message, characters will be reset.)
1RWLFH%HIRUH8VLQJ'HYLFH
䭓 This device is qualified of electromagnetic wave human
safety standards. For your own safety please use the
authenticated devices only from the head company. If
not the case, we cannot guarantee your safety.
䭓 Do not press the power button or the power adepter/
cord when the device is wet. There is a danger of
electrical shock.
䭓 Do not remodel, take apart, or repair the device. Please
refer to your customer service center. If not the case,
you will not be able to get your free repair service.
䭓Please follow instructions when using the batter.
䭓 Do not use your device at an explosive danger zone.
This information is for your own safety. Please observe the following precautions

BIP-1500
5
䭓 Please refrain from using your device while driving. If
you are in an unavoidable situation, stop your vehicle or
use your hand free kit.
䭓 Do not use in places of high temperature and
high humidity. The following can be the causes of
malfunction: getting wet from the rain, spilling drinks,
and taking it in with you at the sauna (high temp.) In
these cases, you cannot receive your free repair service.
䭓 Do not place credit cards, phone cards, bankbook, and
tickets next to the device. The device’s magnetism can
damage the listed item’s information.
䭓 Please avoid impacts or vibrations. When not using the
device unplug the power cord and place it at a safe
place where it will not drop.
䭓
Do not place your device at a dusty place. Keep your
power cord away from any heating devices. Unplug
the power cord when cleaning. If there are any dusts or
residue clean the power cords pins thoroughly.
䭓 When not using a battery for long periods, please
charge it and leave in at room temperature. Even a
charged battery’s voltage will decrease over time.
䭓 Do not paint your device. It can damage your screen or
your device’s exterior. Also, the paint can peel off and
trigger allergies. If there is a allergic reaction please
seek medical advice.

6
BIP-1500 Manual
䭓 If the battery is taken apart by impact, applied
heat, submersion, or hole-drilling, there is a risk of a
dangerous explosion. Please keep away from children
and animals.
䭓 Leaving the battery in a hot car or enclosed space
where there is direct sunlight, can deform or break
down the battery.
䭓 Please take precaution in not letting necklaces, coins
and etc touch the battery’s terminal (metal part). Do not
give an impact on the battery by a sharp object or an
animal. There is a risk of explosion.
䭓 Please use only the designated battery for the device.
If the original battery is not used, the device’s life may
decrease and there is a risk of explosion.
(In this case you cannot receive the free repair service)
䭓 When charging the battery you must use the supplied
standard power adapter. If the original adapter is not
used the battery life may decrease and may explode.
(In this case you cannot receive the free repair service)
3UHFDXWLRQV%HIRUH8VLQJ%DWWHU\
These are safety precautions in order to prevent a dangerous accident. Please use the battery correctly and carefully
observe the instructions.
BIP-1500
7
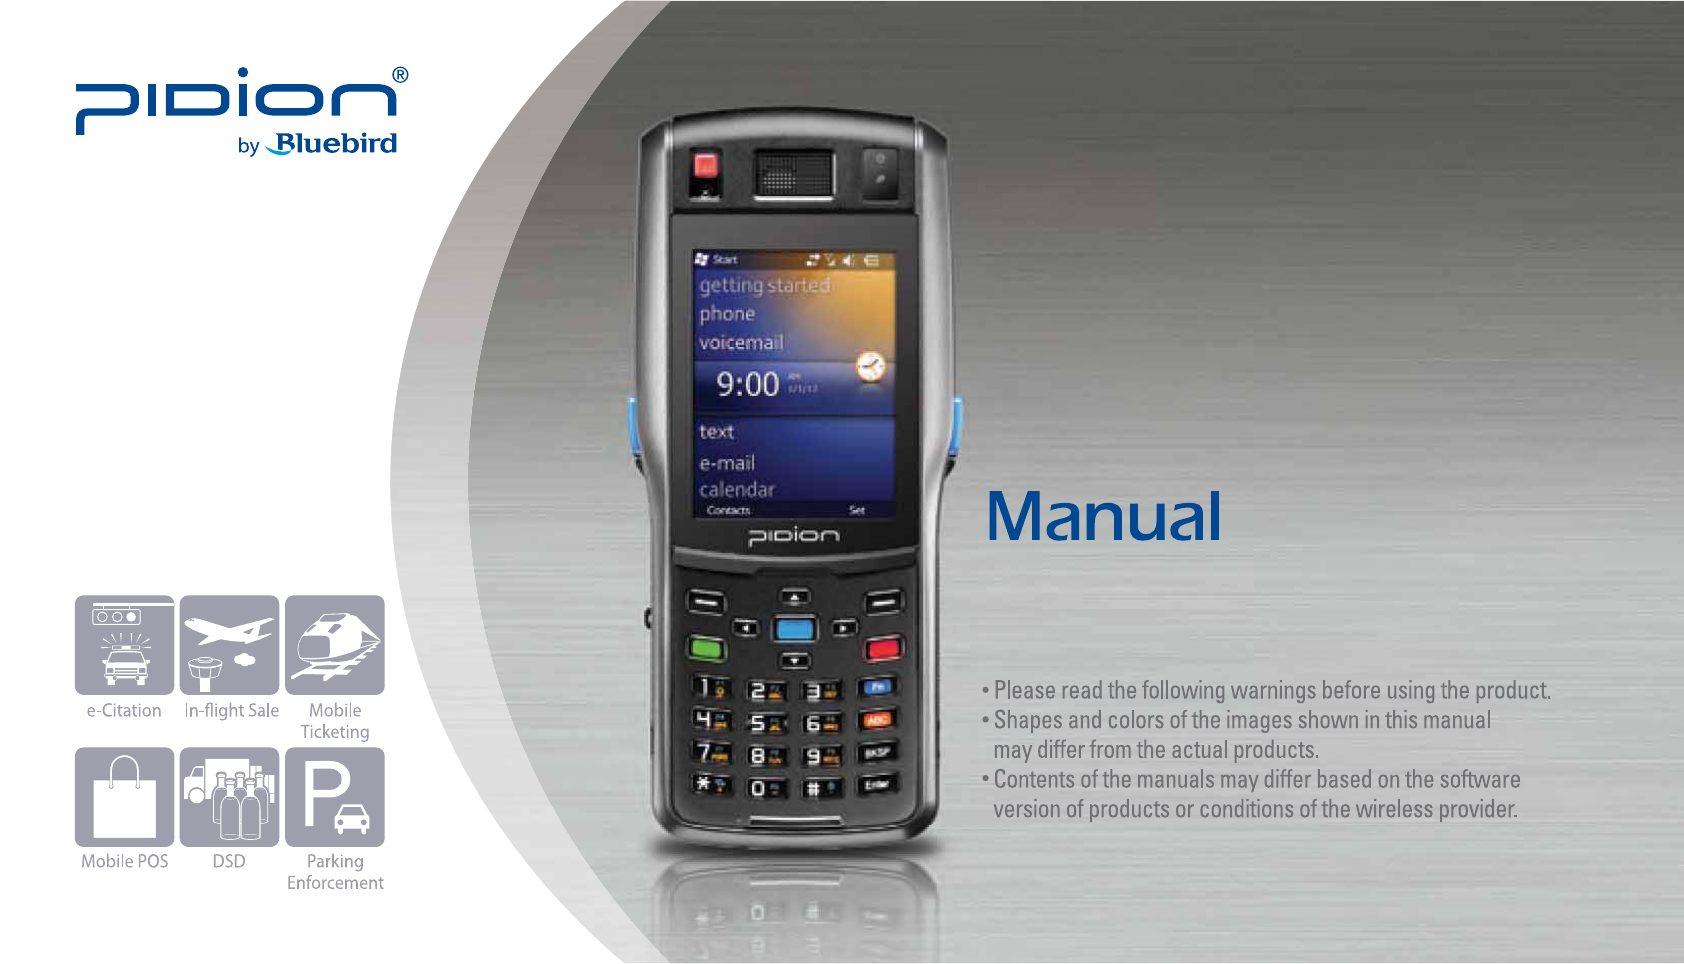
*HWWLQJWRNQRZ\RXU'HYLFH
(FUUJOHUPLOPXZPVSEFWJDFTFBDIQBSU
Barcode
Scan Button
Battery
Cover Button
Screen
Shoulder
Strap Holder
Speaker
On button On State LED
Communicating
State LED
Reset button
8
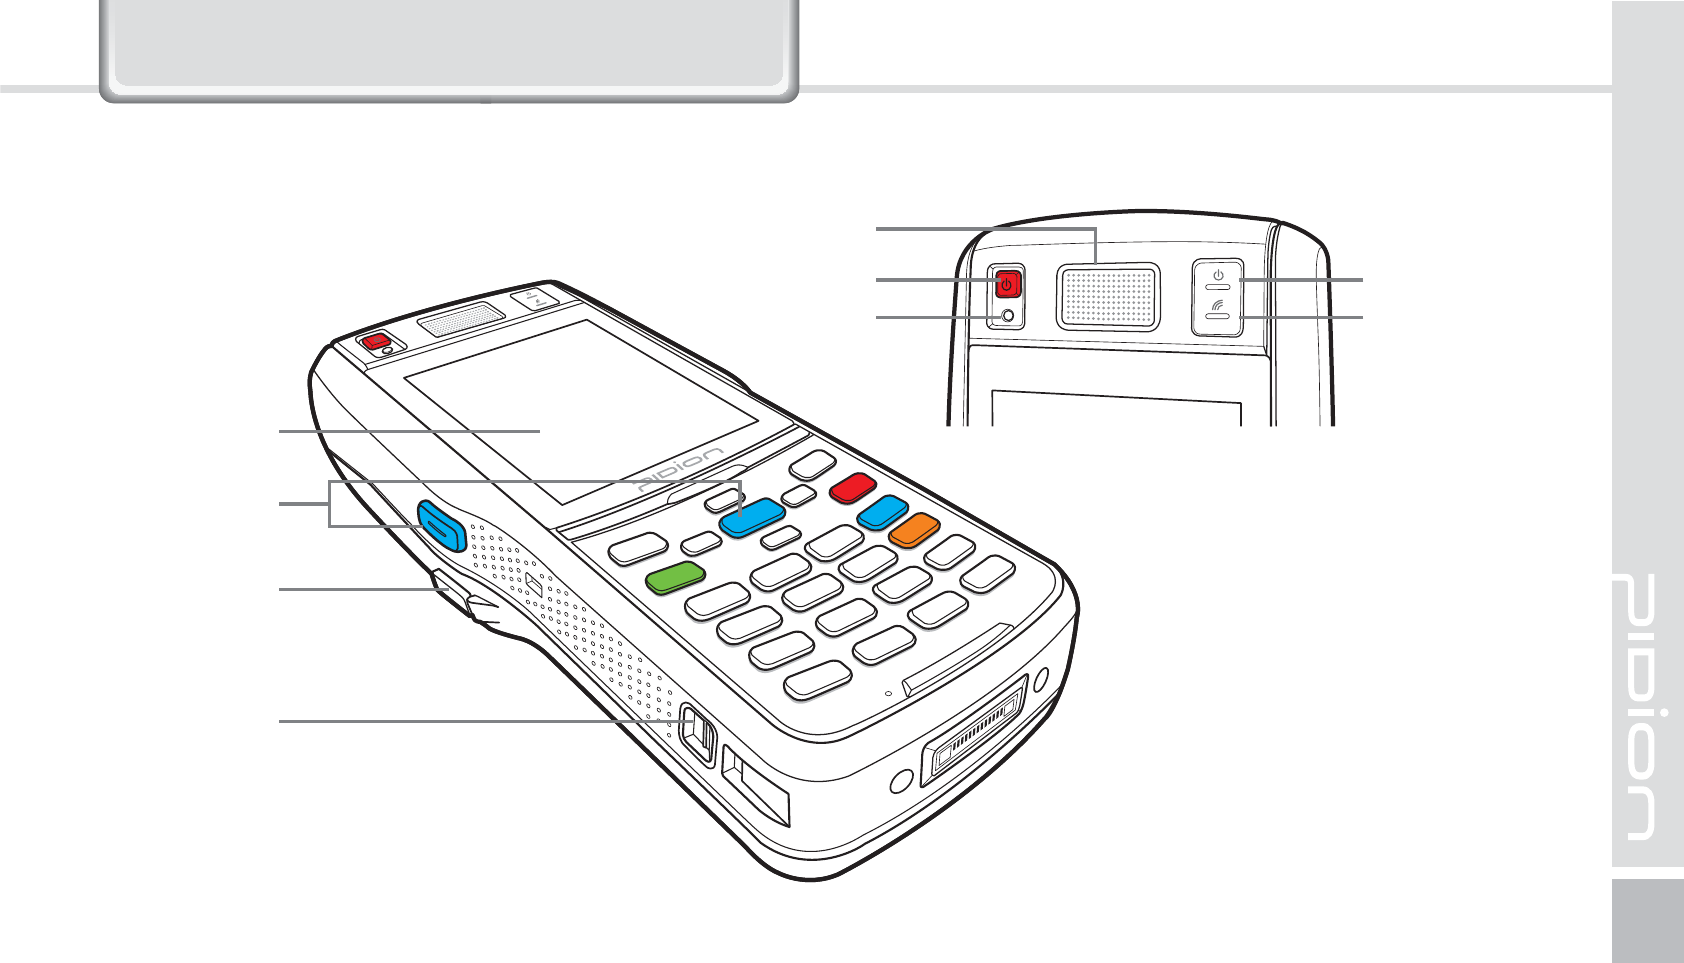
BIP-1500 Manual
Barcode Scanner
Window
Stylus Pen Holder
Flash
Camera
Printer Cover
Hand Strap Holder Battery Cover
Printer Cover Button
Battery Cover Button
Barcode Scan Button
Stylus Pen
*HWWLQJWRNQRZ\RXU'HYLFH
BIP-1500
9
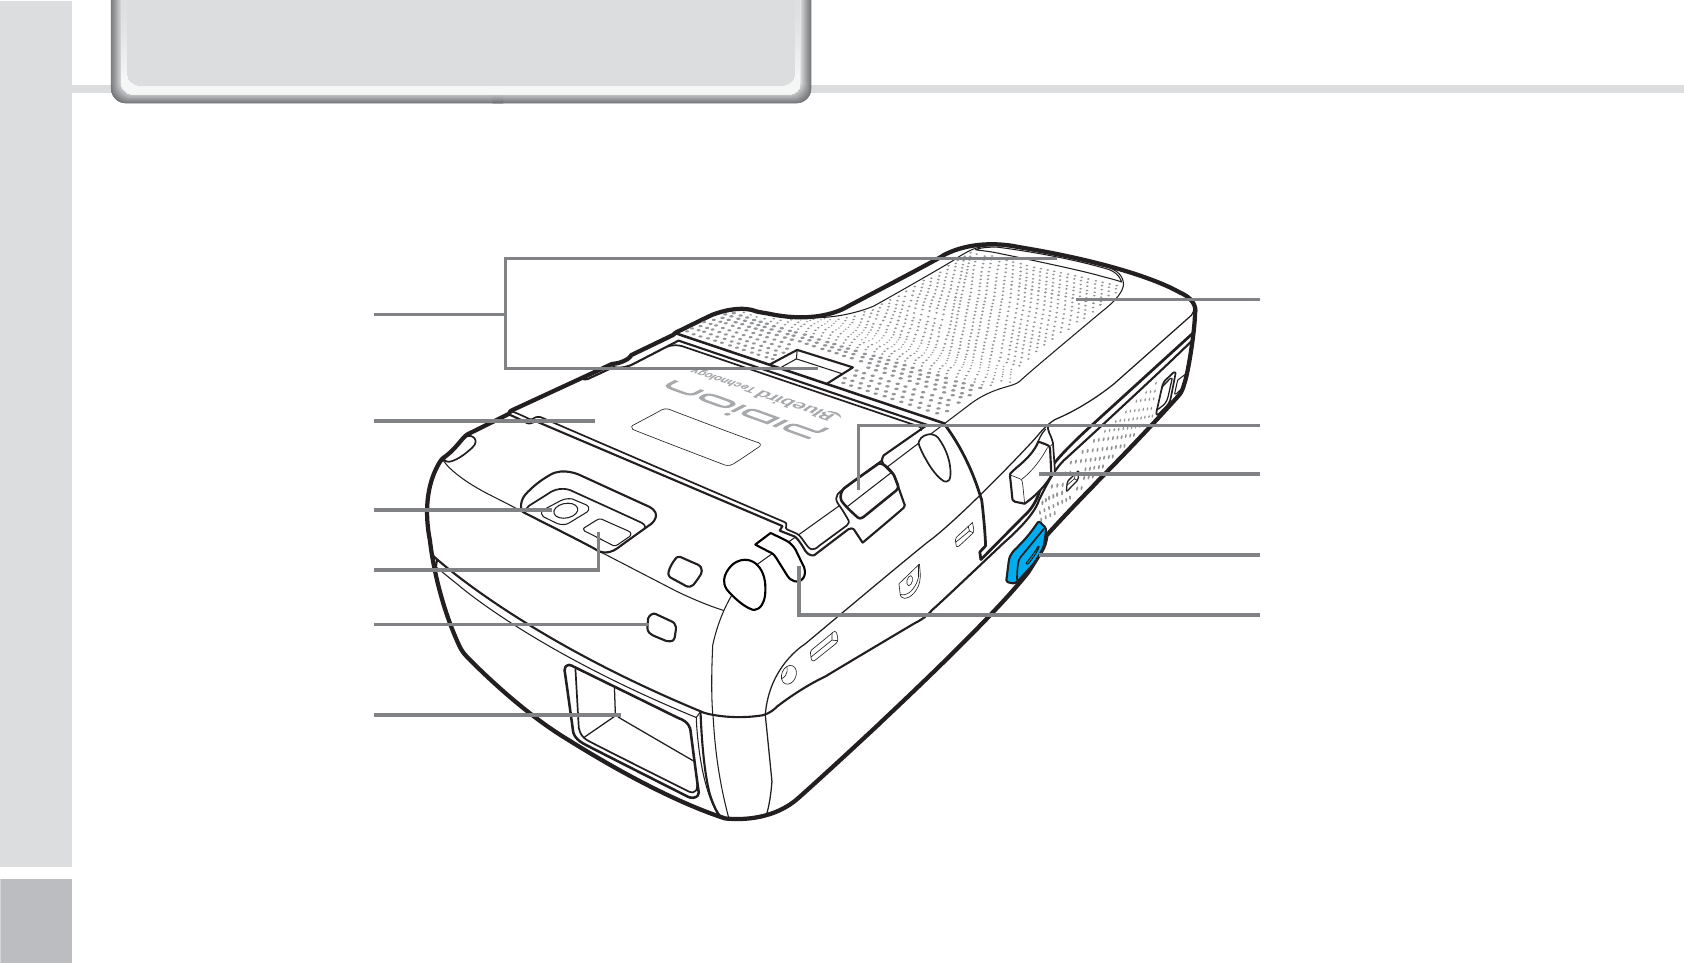
(FUUJOHUPLOPXUIFCVUUPOT
Buttons Details
Power
Button Turns on the device
Reset
Button
Soft reset
All the programs running will close and
the device will restart.
Hard reset
The device will reset into factory mode.
10
BIP-1500 Manual
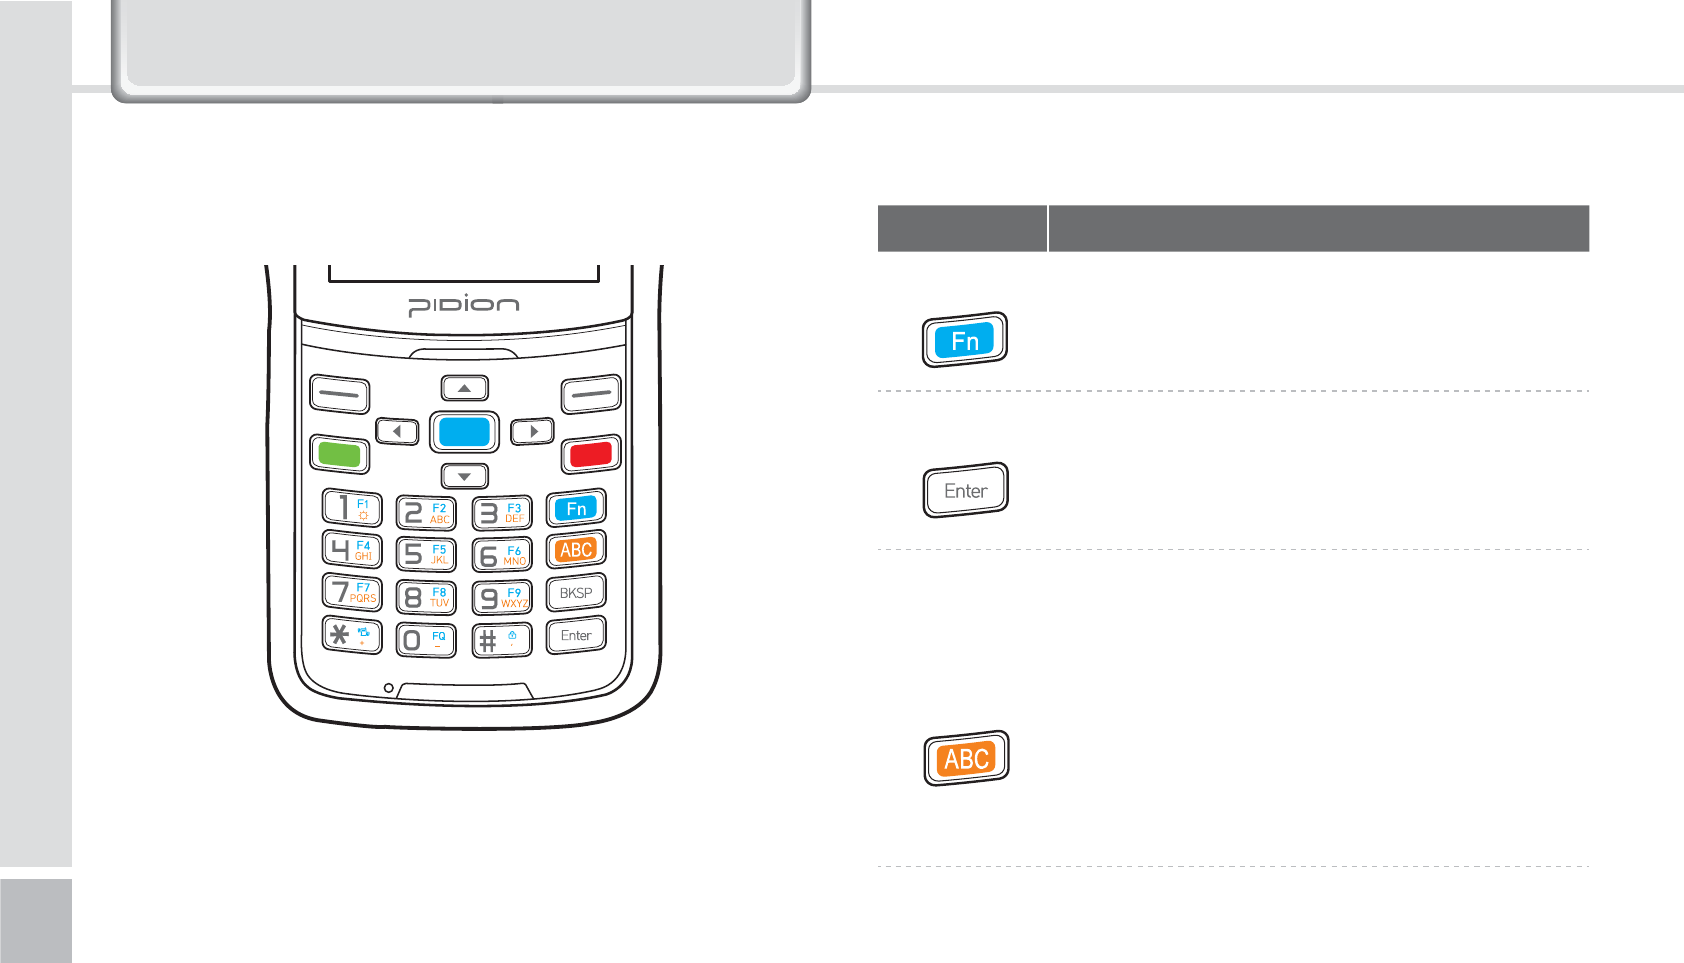
<#*1/VNFSJD,FZQBE>
Buttons Details
Fn
Button This button’s function is used as a
combination. It is used when the blue
printed button is used.
Enter Button You can change the row you are typing
in.
It functions the same as the computer
enter button.
Mode
Change
Button
This is a button that changes the mode
of Local language/Alpha. Capital/
Alpha. Lower Case. When pressed at the
number mode, the Alphabet lower case
and symbols will be activated.
The default state is the number mode.
When pressed, Alphabet and symbol
mode will be activated.
*HWWLQJWRNQRZ\RXU'HYLFH
BIP-1500
11
Buttons Details
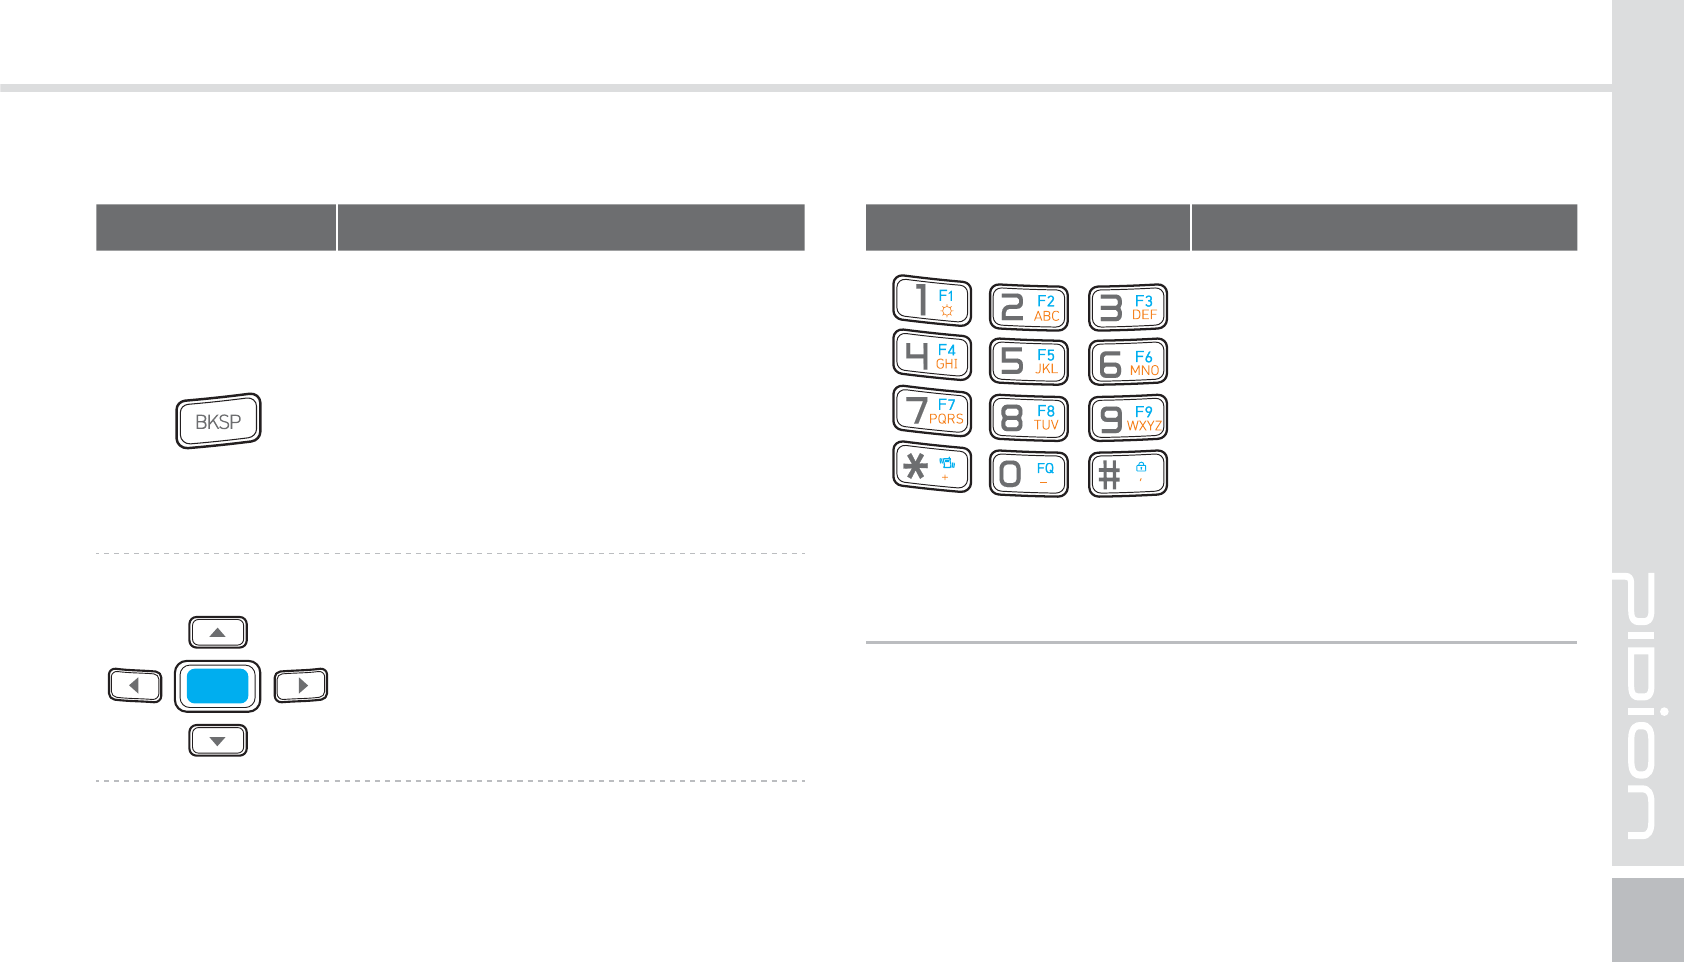
BKSP Button
It moves one space at a time and
erases the written information.
It is the same is the computer’s
back space button.
If pressed down for more than
3 seconds it will quickly erase
consecutively.
Direction Button
It is used when moving Up/Down/
Left/Right.
Buttons Details
Numbers / Alphabet
Capitalized / Symbols
Default state is Number
mode and you can input
Alphabet or Symbols.
F1 ~ F9 Button
It is used with Fn as a
combination.
You can customize these
buttons.
12
BIP-1500 Manual
<#*128&35:,FZQBE>
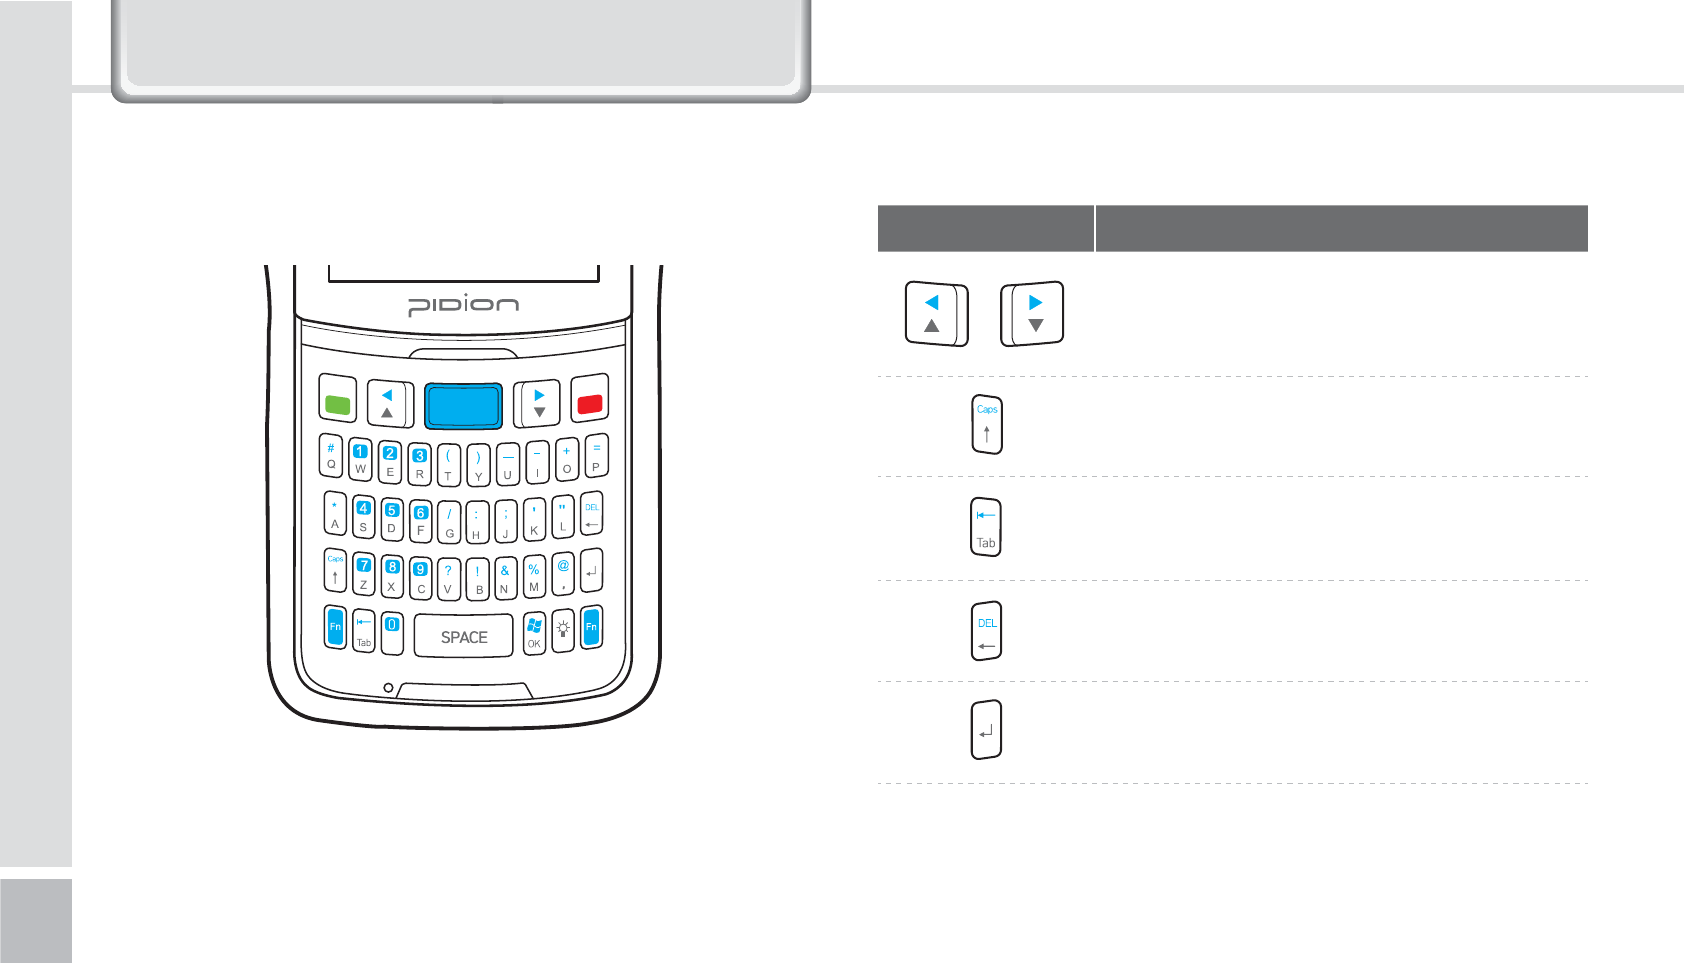
Buttons Details
Direction button
Used when moving Up/Down/Left/
Right
Caps Lock Button
Tab Button
Erase / Backspace Button
Approval OK / Check Button
*HWWLQJWRNQRZ\RXU'HYLFH
BIP-1500
13
Buttons Details
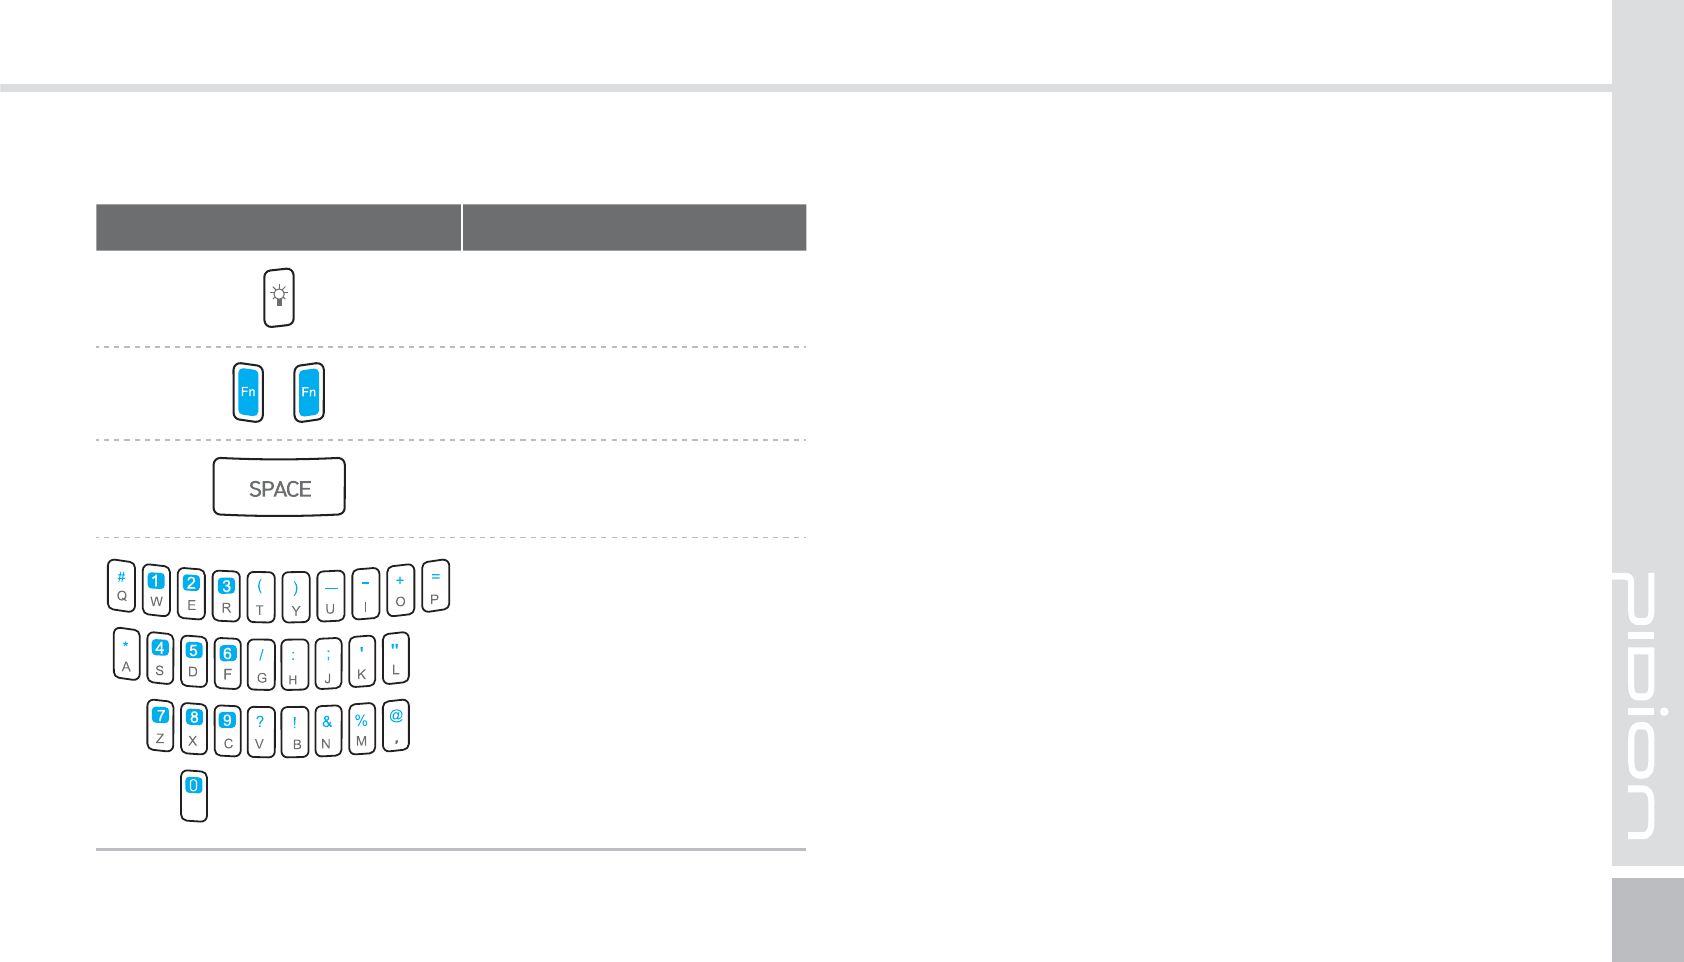
Flash Button
Fn Button
SPACE Button (moves
one space forward)
Numbers / Alphabet /
Symbols button
Default is Number
mode and you can input
Alphabet or symbols.
F1 ~ F9 Button
You can customize these
buttons.

14
BIP-1500 Manual
/HDUQLQJ%DVLFV
䭓Only use the supplied adapter to charge your battery.
䭓
The batter cover supports high-capacity batteries. Option accessory module only supports the standard batter. [Code : 13774]
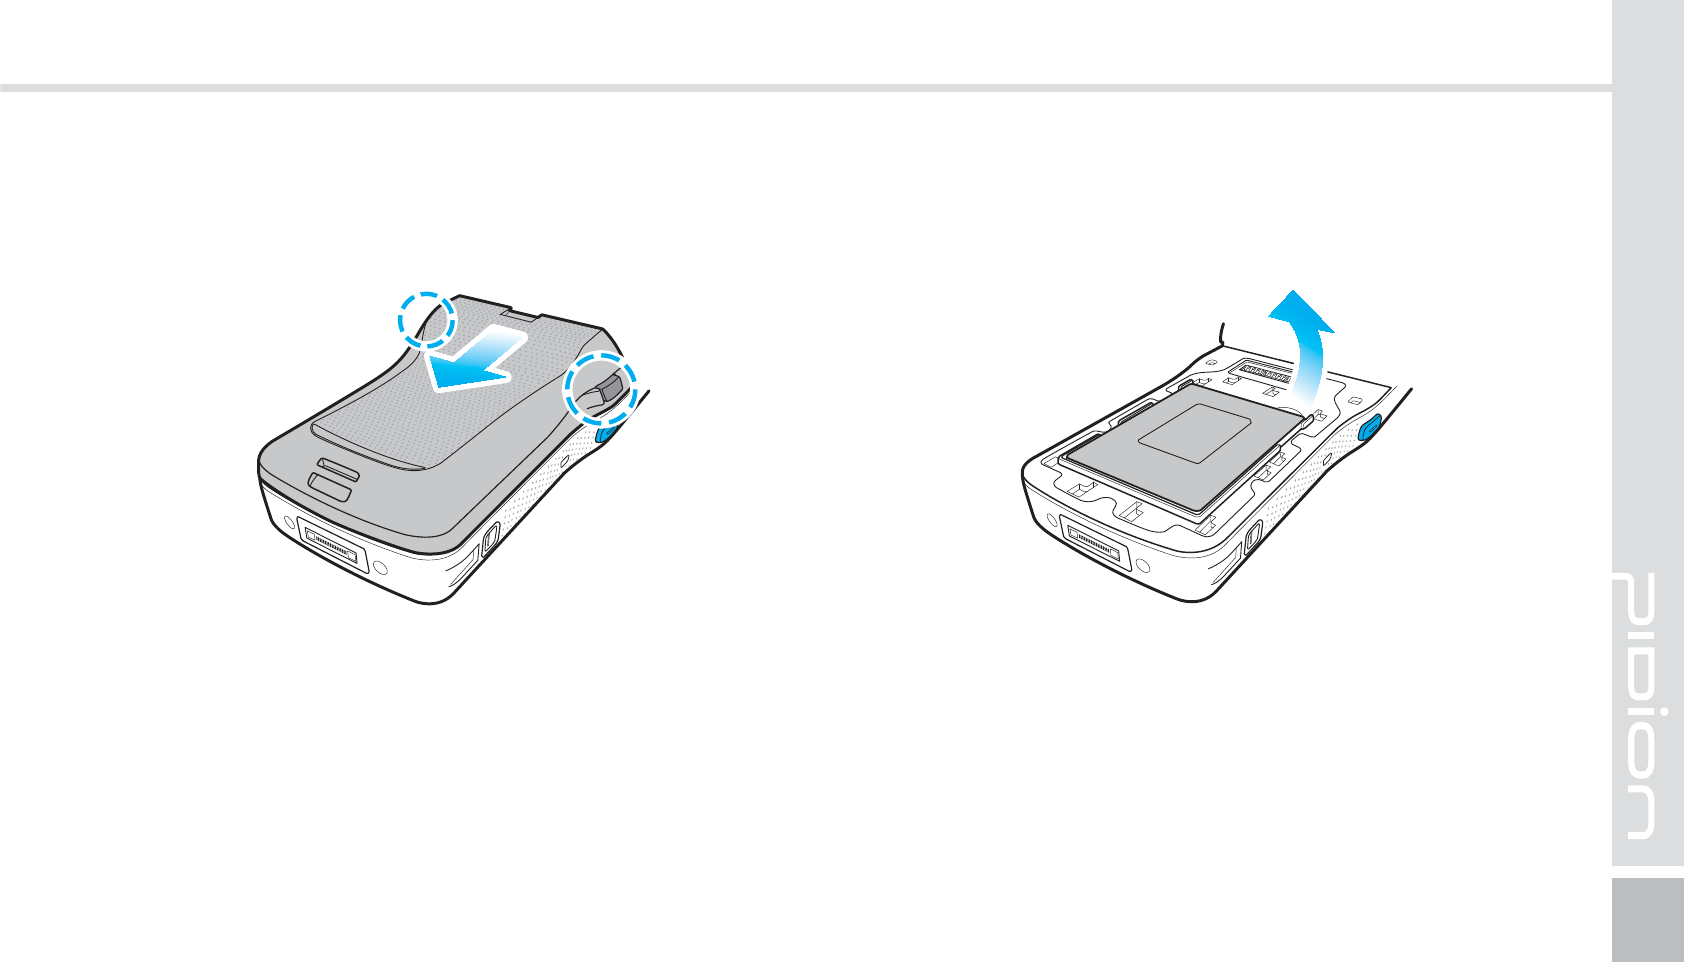
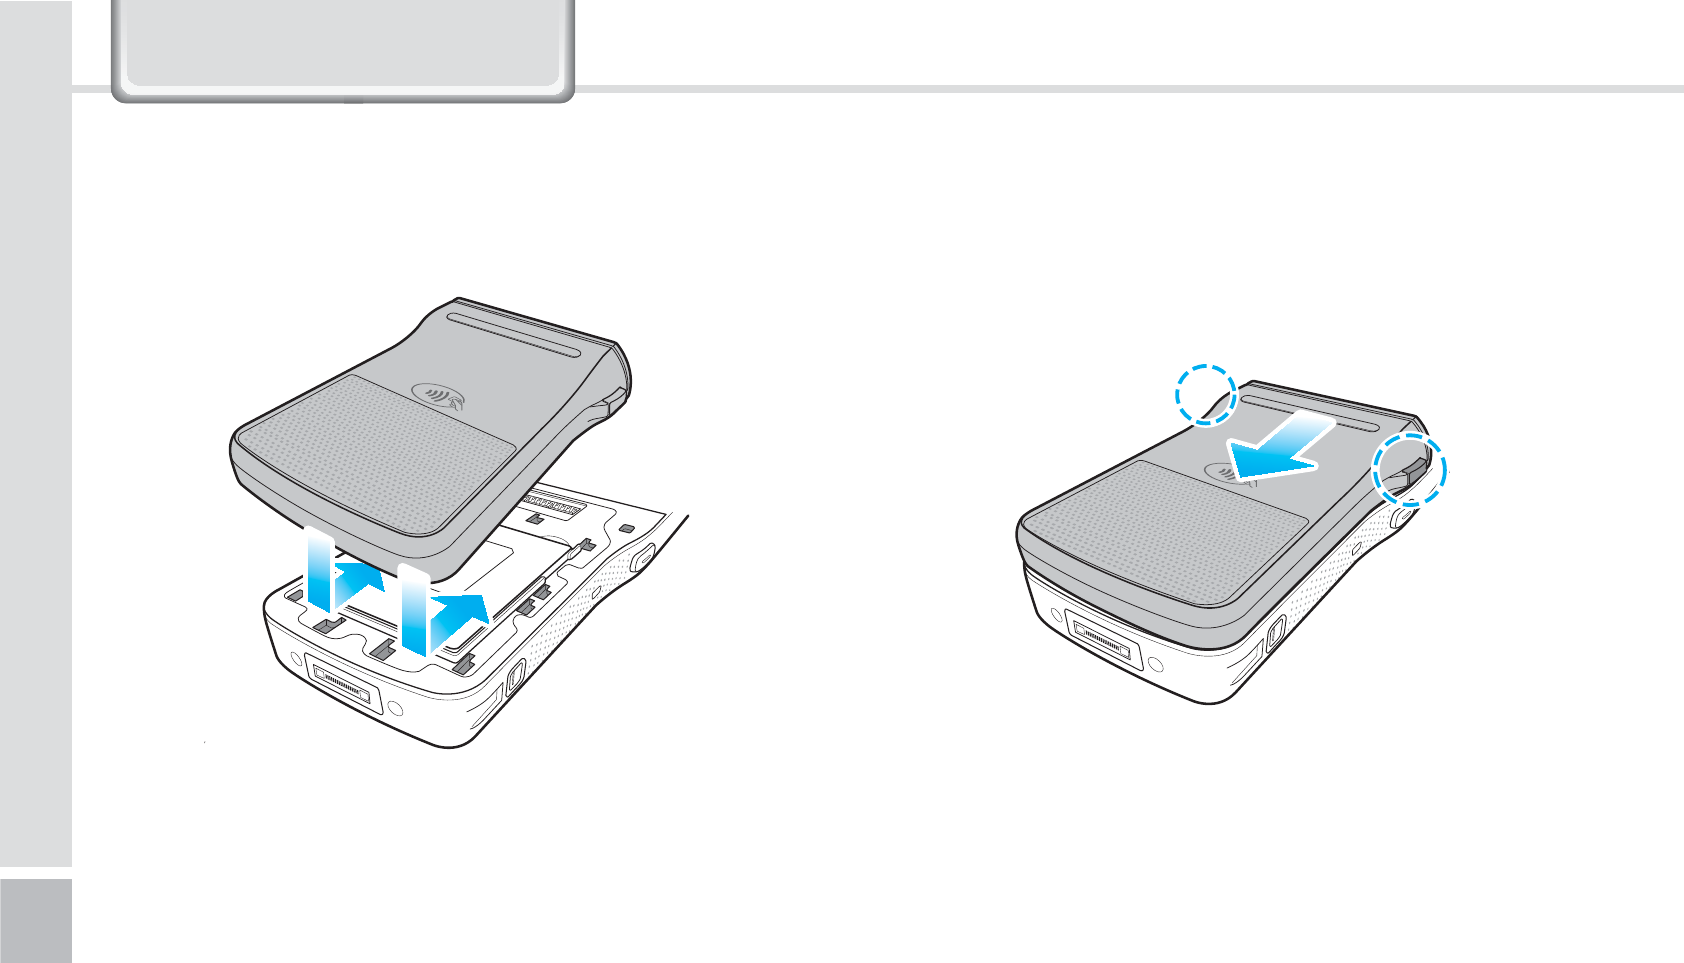
1-1. Insert the battery
*OTFSU3FNPWFUIFCBUUFSZ
1
Push your battery in the direction of the arrow. 2
Put on the battery cover in the direction on the
arrows.
BIP-1500
15
1-2. Removing the battery
1
Press both of the battery cover buttons on the side
and slide the battery cover out.
2
Lift the battery in the direction of the arrow.
16
BIP-1500 Manual
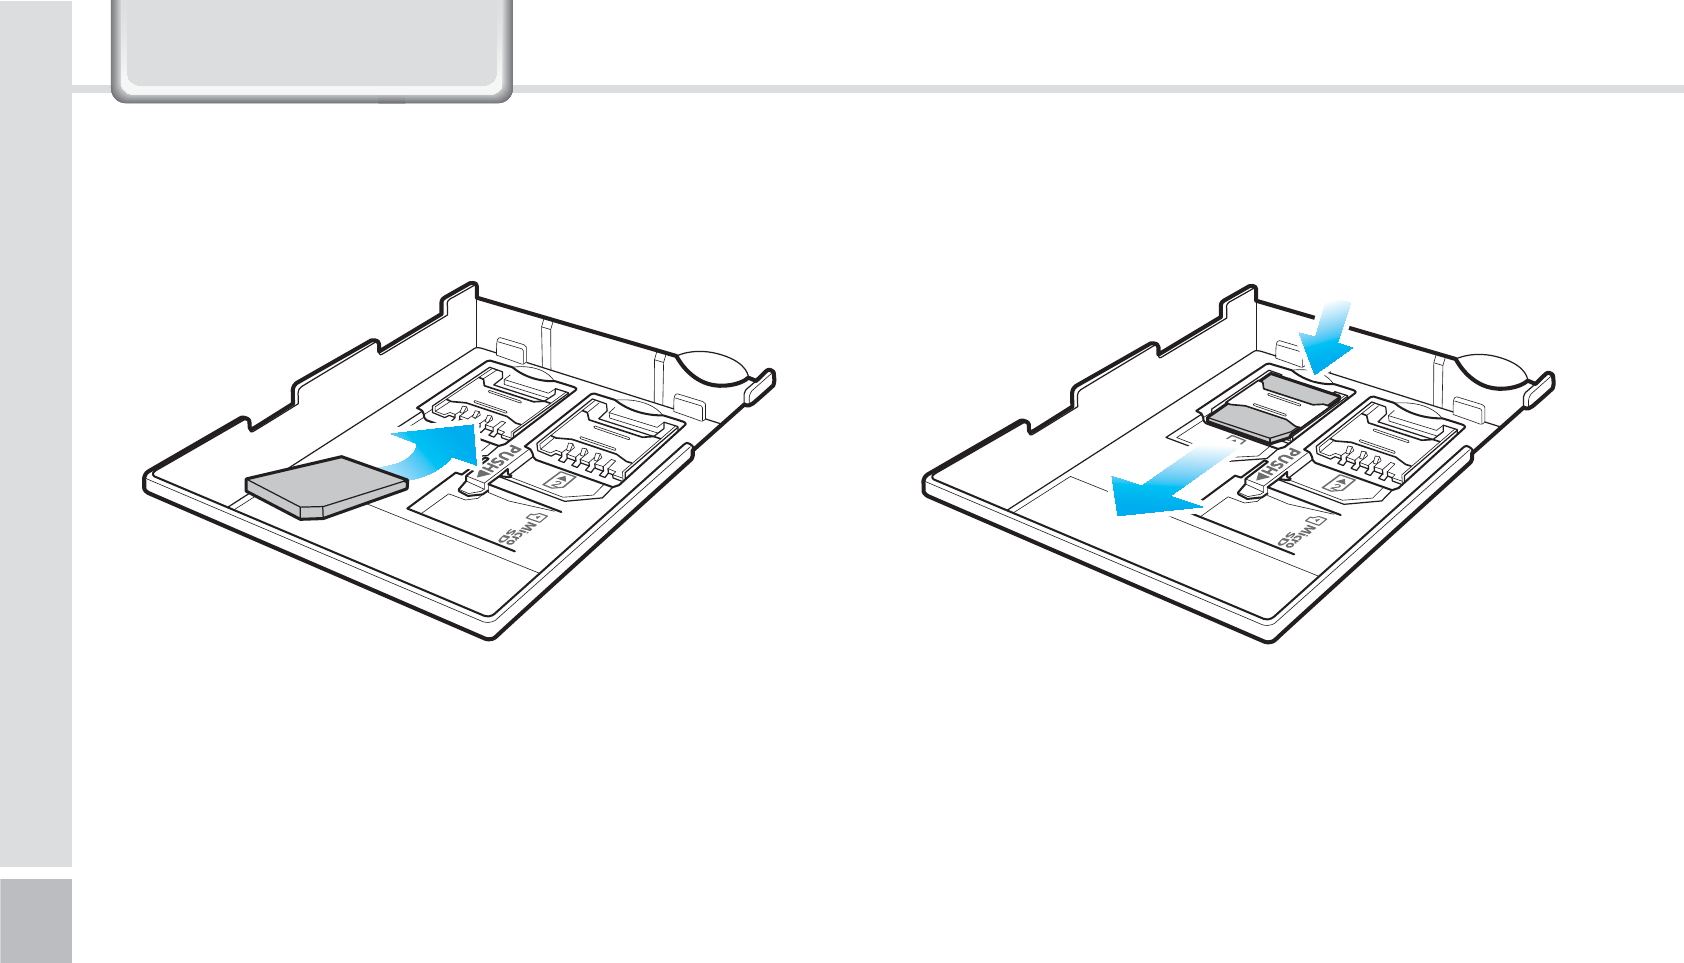
Push the top of the USIM card to slide it out in the
arrow direction.
Slide in the USIM card in the arrow direction.
The devices supports 2 USIM slots.
2-1. Insert the USIM card 2-2. Removing the USIM card
*OTFSU3FNPWFUIF64*.DBSE
/HDUQLQJ%DVLFV
BIP-1500
17
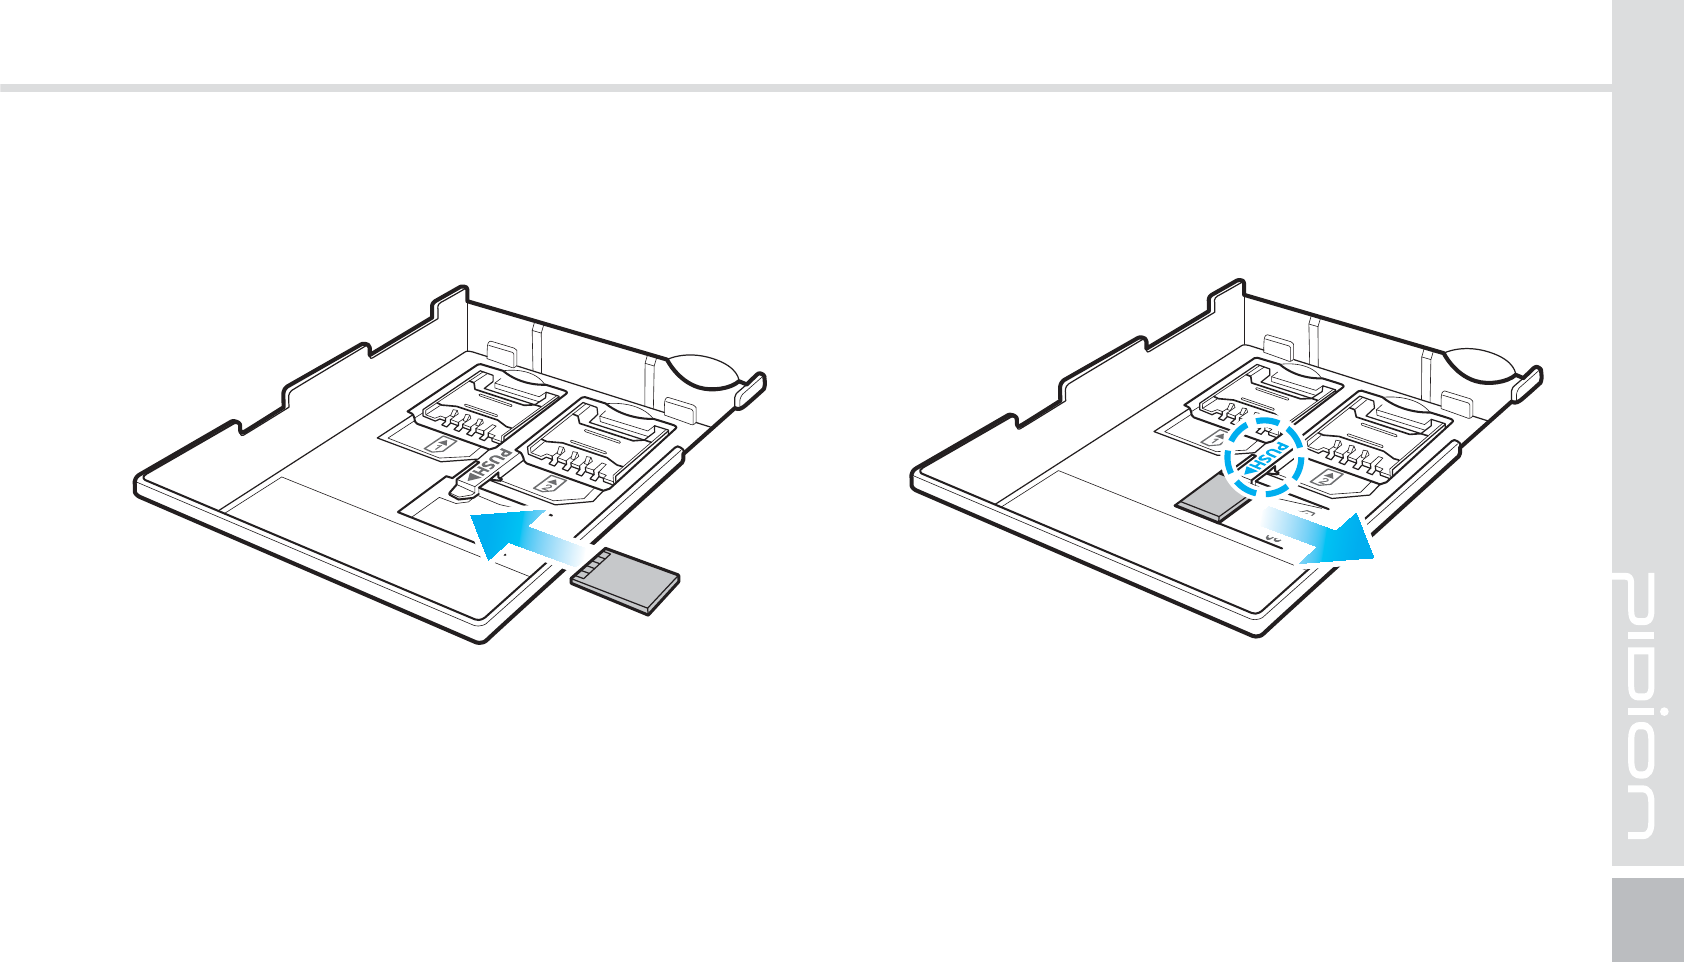
Press push do slide the MicroSD card out.In the arrow direction, slide in the MicroSD card with
the metal terminal facing up.
3-1 Insert the MicroSD Card 3-2 Removing the MicroSD card
*OTFSU3FNPWFUIF.JDSP4%$BSE
18
BIP-1500 Manual
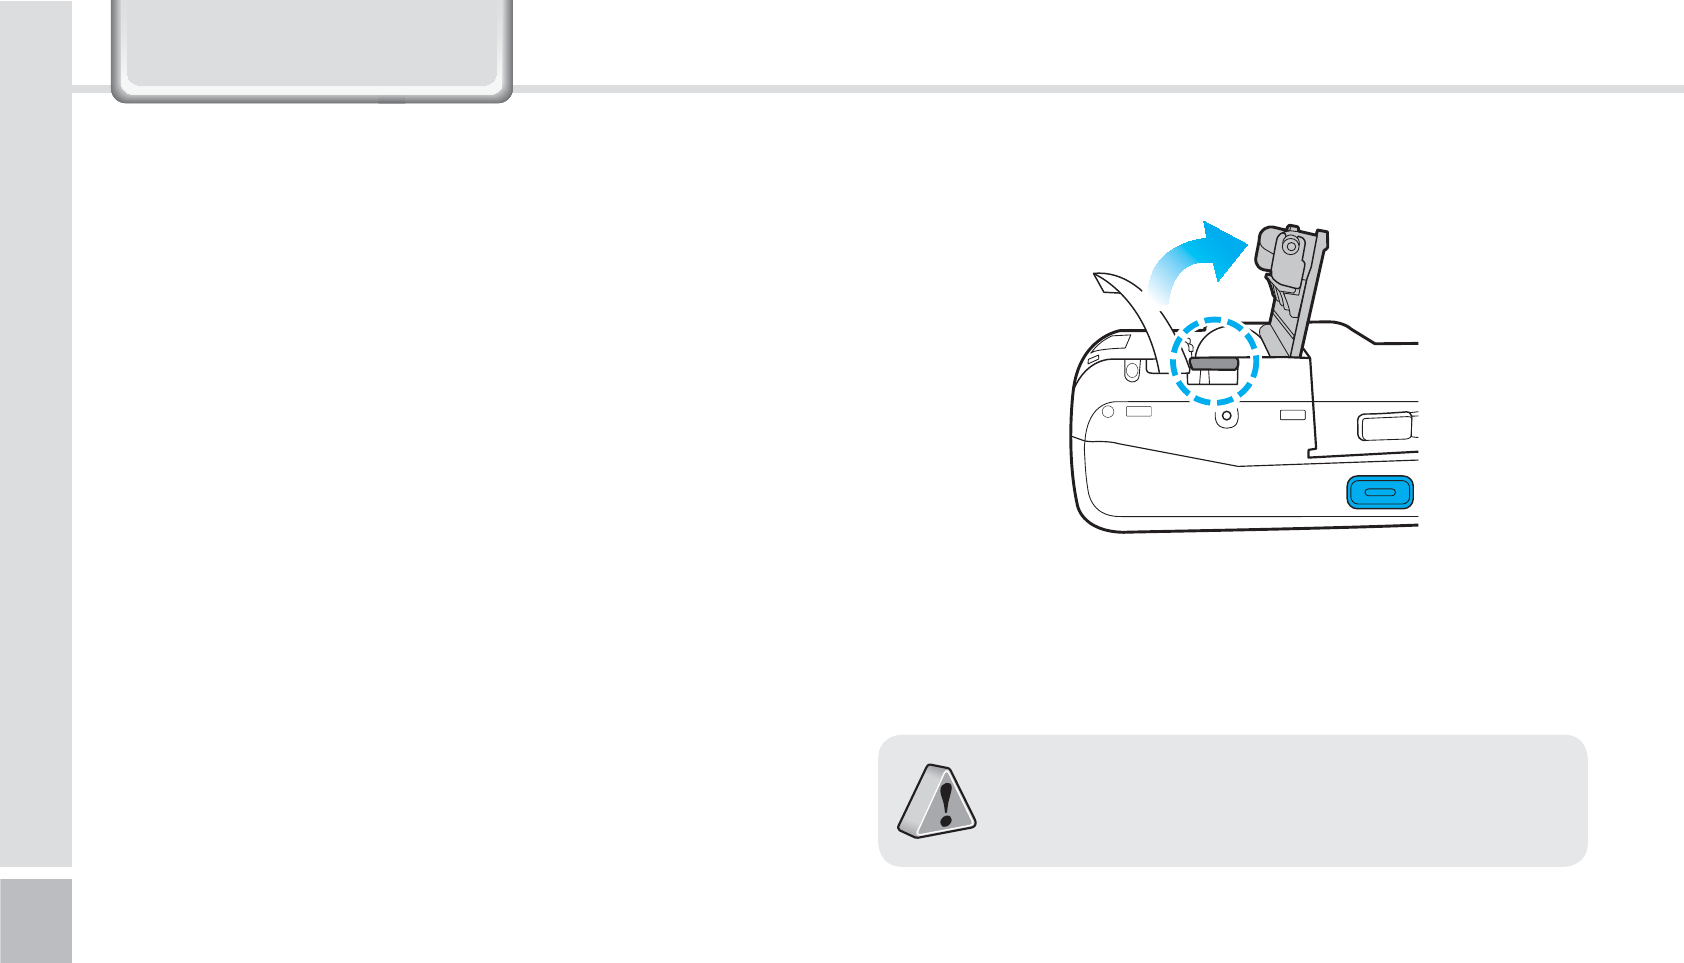
While pressing the button on back and top of
the device, open the printer cover with the arrow
direction.
Please be careful not to insert printing paper in
the opposite direction.
䭓 The SD card can break if you frequently slide in/out
or put or excessively put too much force.
䭓
If the card is removed while being used or being
turned off, the data can be lost or malfunction.
䭓
Please back up important data. We are not
responsible for the lost data.
䭓 If the memory card does not slide out, do not
remove by force. After removing the card at the
repair center, exchange your device or get a refund.
3-3 Precautions using the MicroSD Card
$IBOHJOHUIFQSJOUJOHQBQFS
/HDUQLQJ%DVLFV
BIP-1500
19
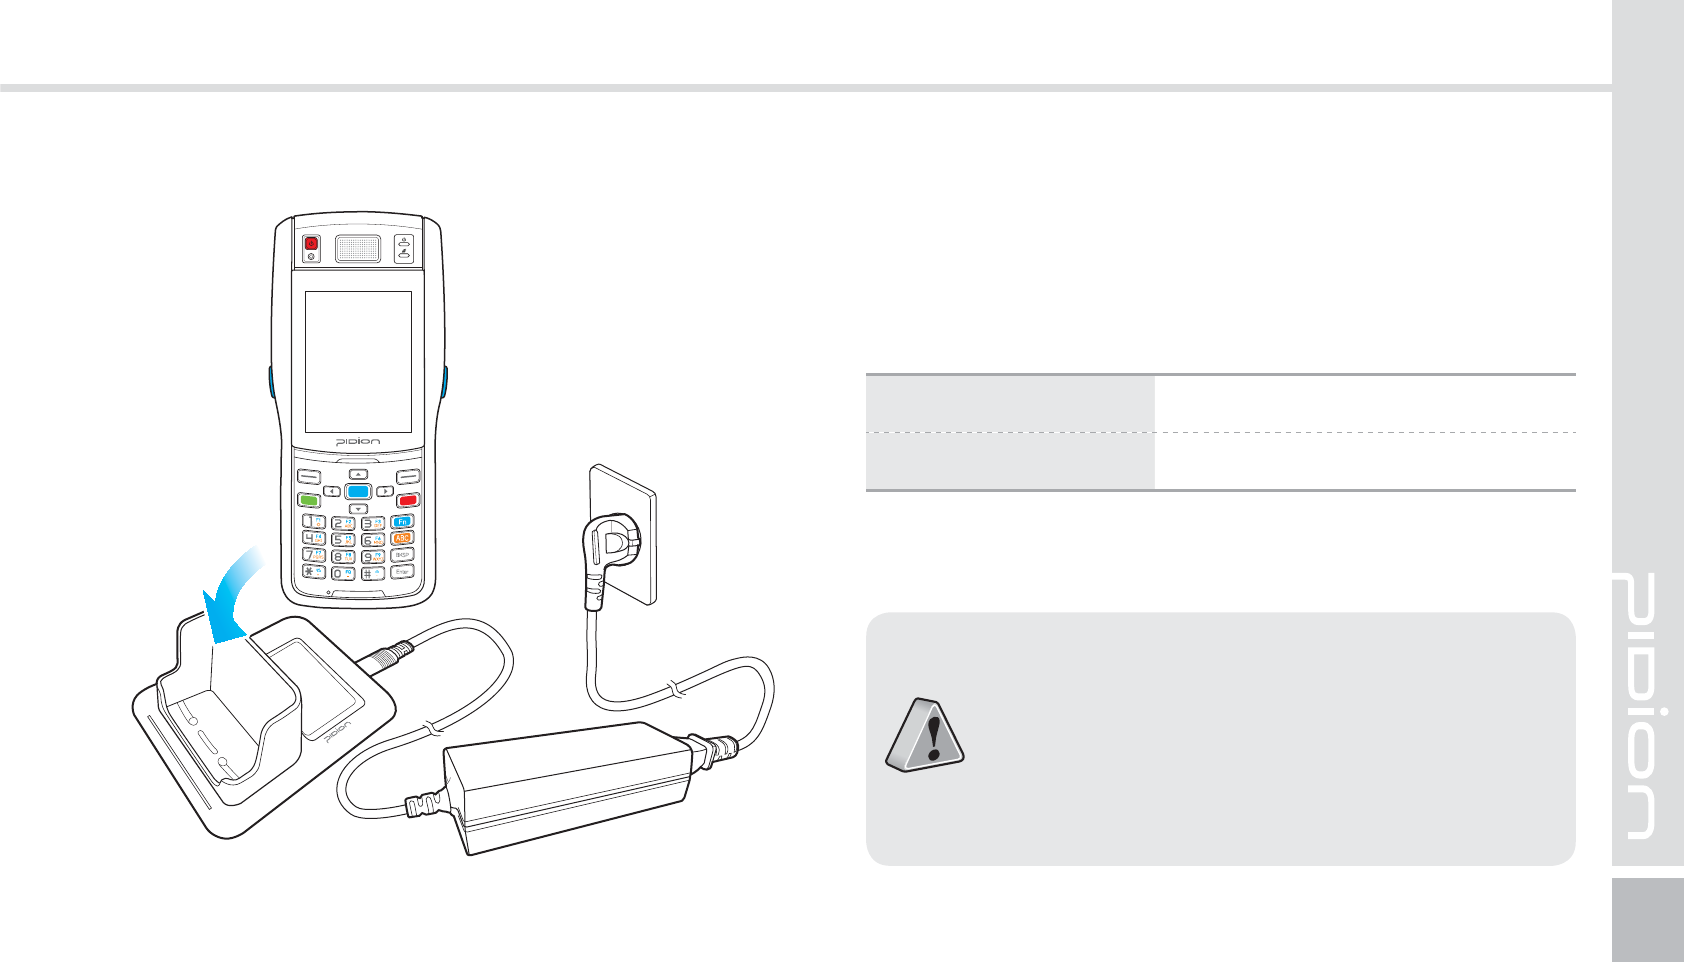
As you see in the picture, connect the adapter with
the power cable to charge the PDA.
Power Charging Light
$IBSHJOHXJUI$SBEMF
Charging Orange
Charged Green
䭓When the device’s battery is low, it may
warn you with a ring and a message.
䭓The charging time can vary depending on
the environment. A new battery is only
partially charged. Please charge fully before
using.
20
BIP-1500 Manual
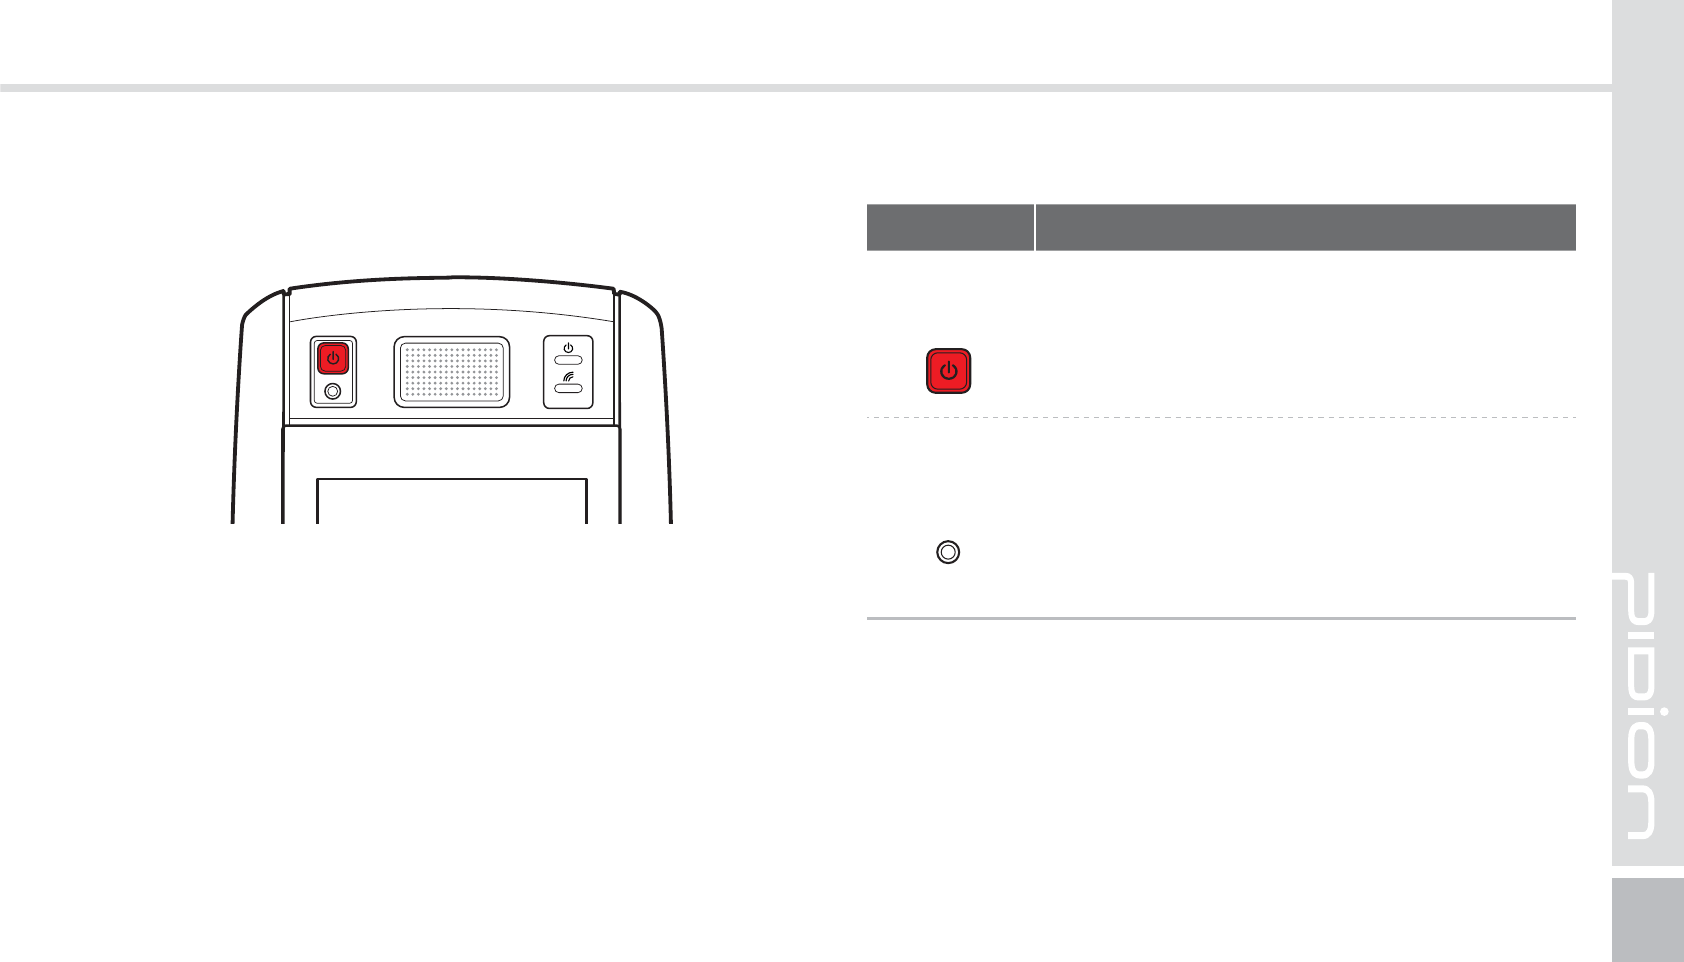
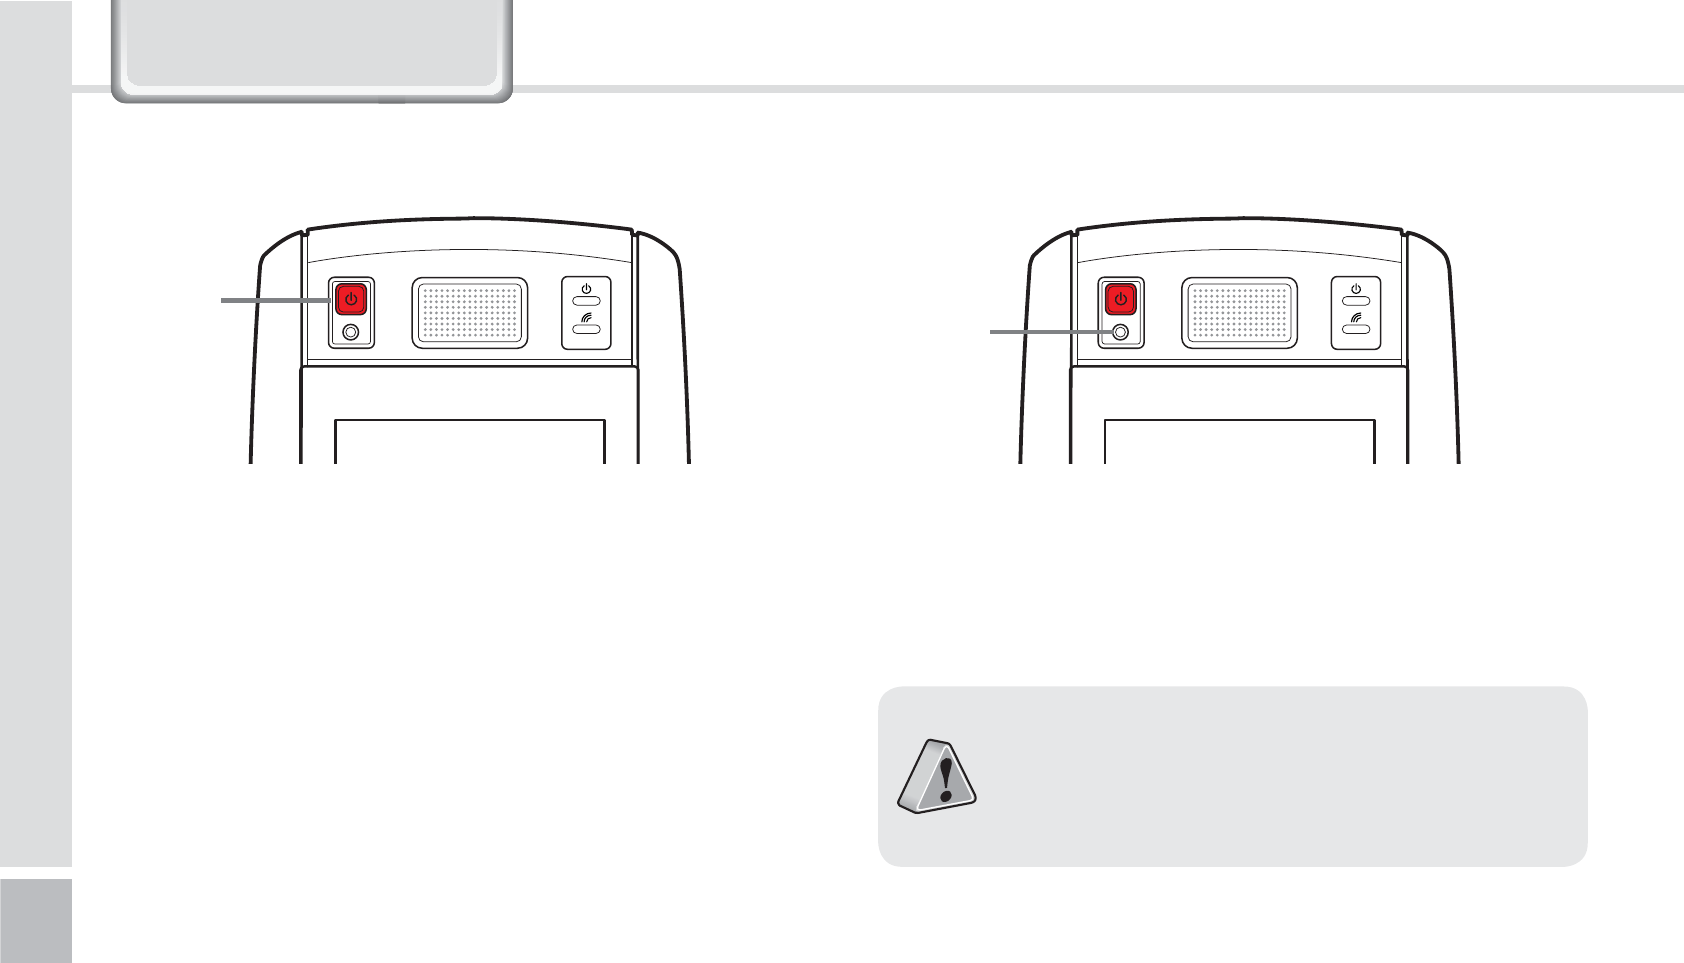
䭓 The [Power] button in on the front.
䭓 To turn your device on you must press the shortly.
䭓 You must hold down the button more than 3
seconds to turn on/off the LCD back light.
䭓 After purchasing your device or hard reseting, the
booting process can take some time. We apologize
for the inconvenience.
Power
Button Reset
Button
5VSOJOH0O 4PGU3FTFU
To reset, press the [Reset] button, in front of the
device, lightly with the stylus pen.
䭓Please soft reset if your device freezes or has
an unexpected error.
䭓It is very similar to rebooting your computer.
Any information not saved will not be lost.
/HDUQLQJ%DVLFV
BIP-1500
21
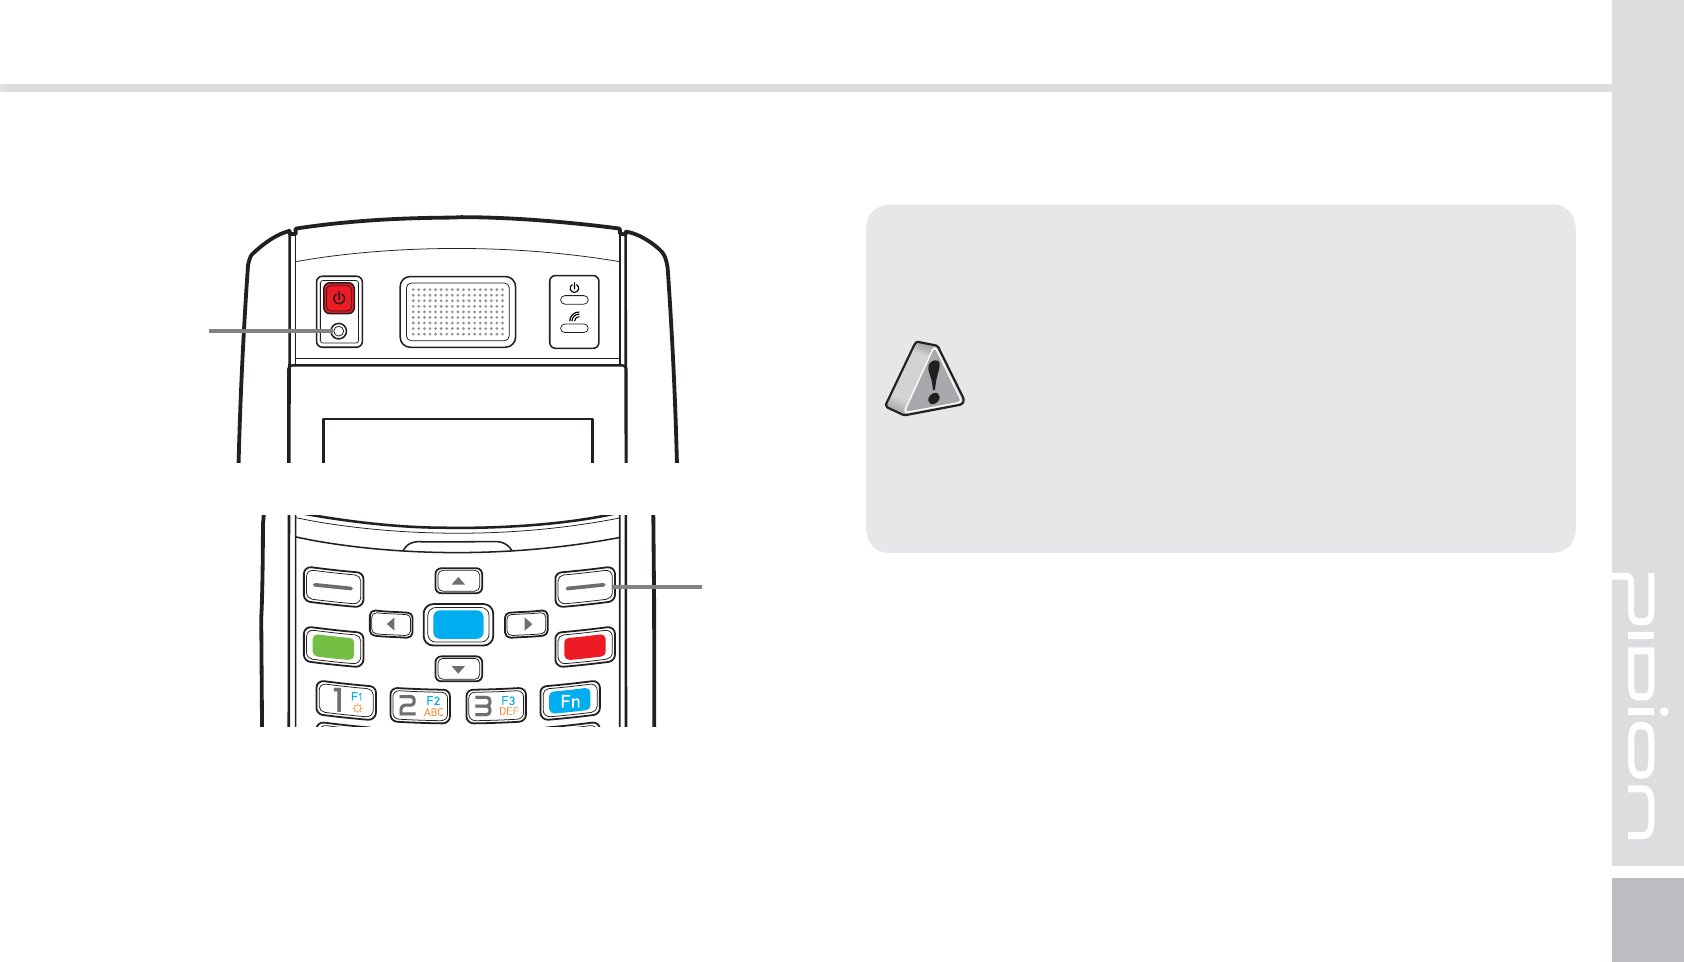
Hold [OK] button + [Reset] button for 5 seconds.
䭓Please use this function when your device
does not react to the soft reset. It will go
back to the factory state.
䭓When doing the hard reset, everything will
be erased. Please do it at your own risk.
䭓We are not responsible for any information
being erased. Before you hard reset, please
back up your data.
)BSE3FTFU
Reset
Button
OK
Button
22
BIP-1500 Manual
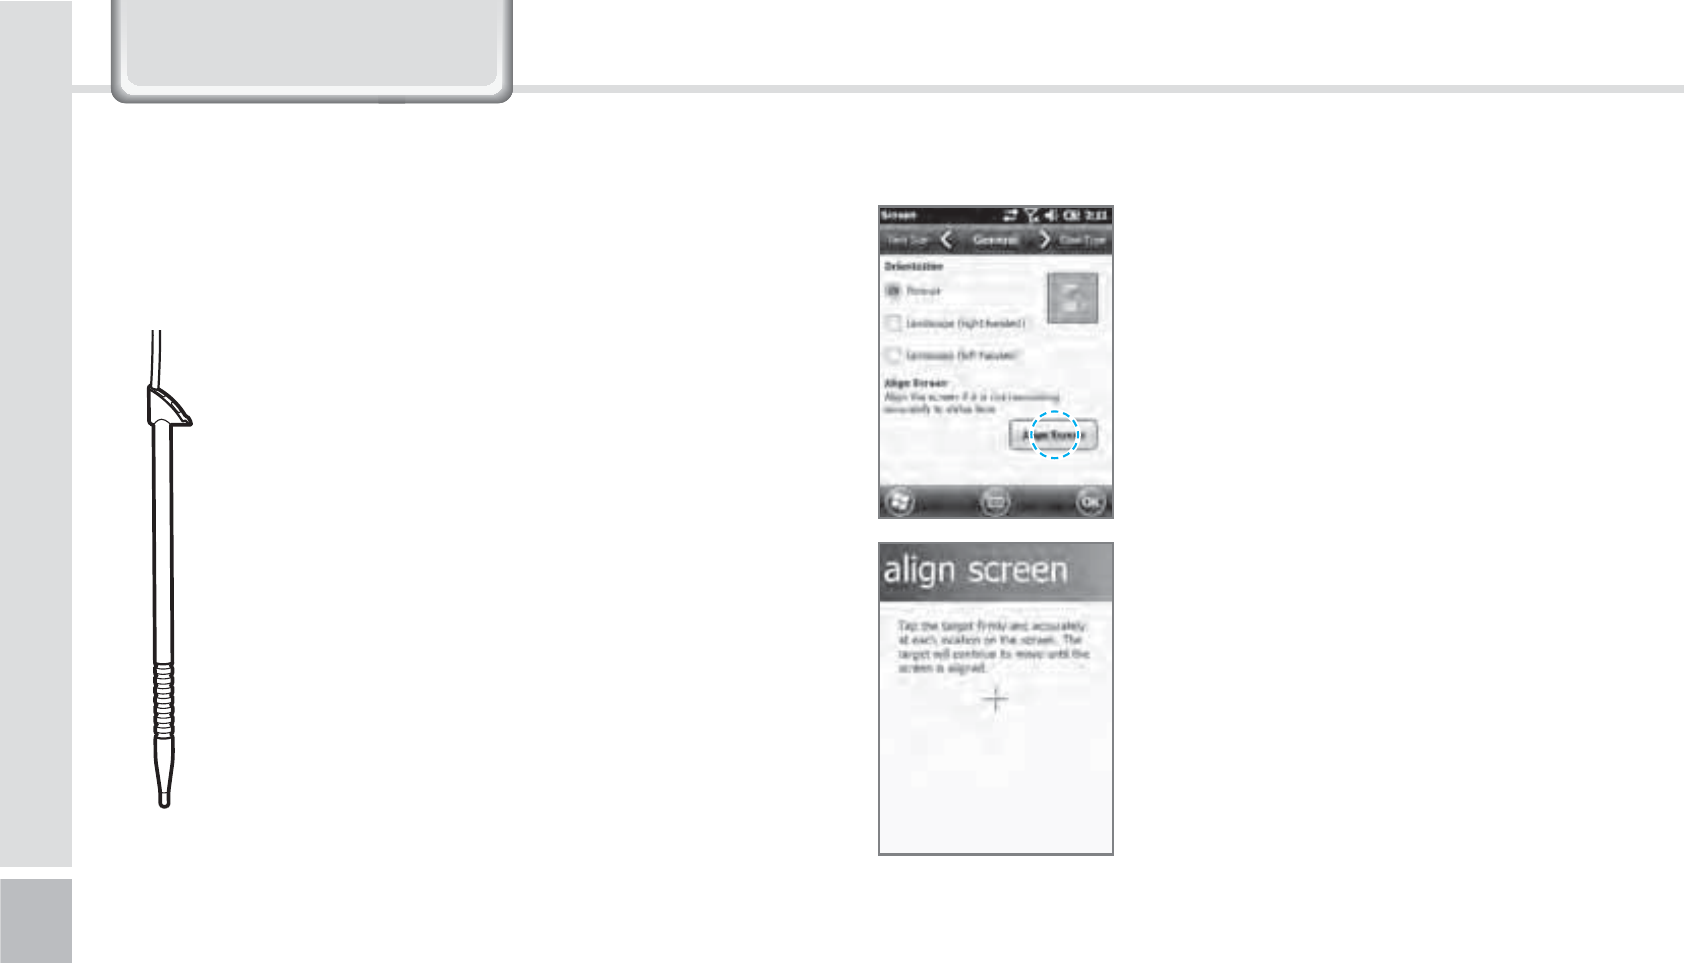
On your LCD screen, it is the
function of setting the input
value of the stylus pen.
Adjusting screen Setting
Start
Ķ
Settings
Ķ
System
Ķ
display
Ķ
Screen adjustment
Press the center target accurately
followed by left top
Ą
left
bottom
Ą
right bottom
Ą
right
top.
The supplied stylus pen is used to run programs or
inputting on the touch screen.
Pressing
Pressing means to open, run, and cancel
any items.
Pulling
Using the stylus pen you can select multiple
items as much as needed. (it is similar to the
mouse drag on the PC)
Holding Down
If you want to see further details of the
selected item, hold down on the item and
a popup will appear. ( it is similar to the
mouse right click on the PC)
"EKVTUJOHUIF%JTQMBZ6TJOHUIFTUZMVT1FO
/HDUQLQJ%DVLFV

BIP-1500
23
&RQQHFWLQJ$FWLYH6\QF
1
After connecting to the Microsoft homepage,
download and install [Microsoft ActiveSync].
*OTUBMMJOHPO1$
䭓[Microsoft ActiveSync 4.5] Korean version.
䭓The functions and the layout and be different for
other manuals.
䭓 [Microsoft ActiveSync] can be updated through the
Microsoft Homepage.
䭓
[Windows Vista] users need to install [Windows
Mobile Device Center].
24
BIP-1500 Manual
&RQQHFWLQJ$FWLYH6\QF
2
On the window [Please read the license terms]
press <I accept the license terms>
Ķ
[Client
information] window - input <User name>
Ķ
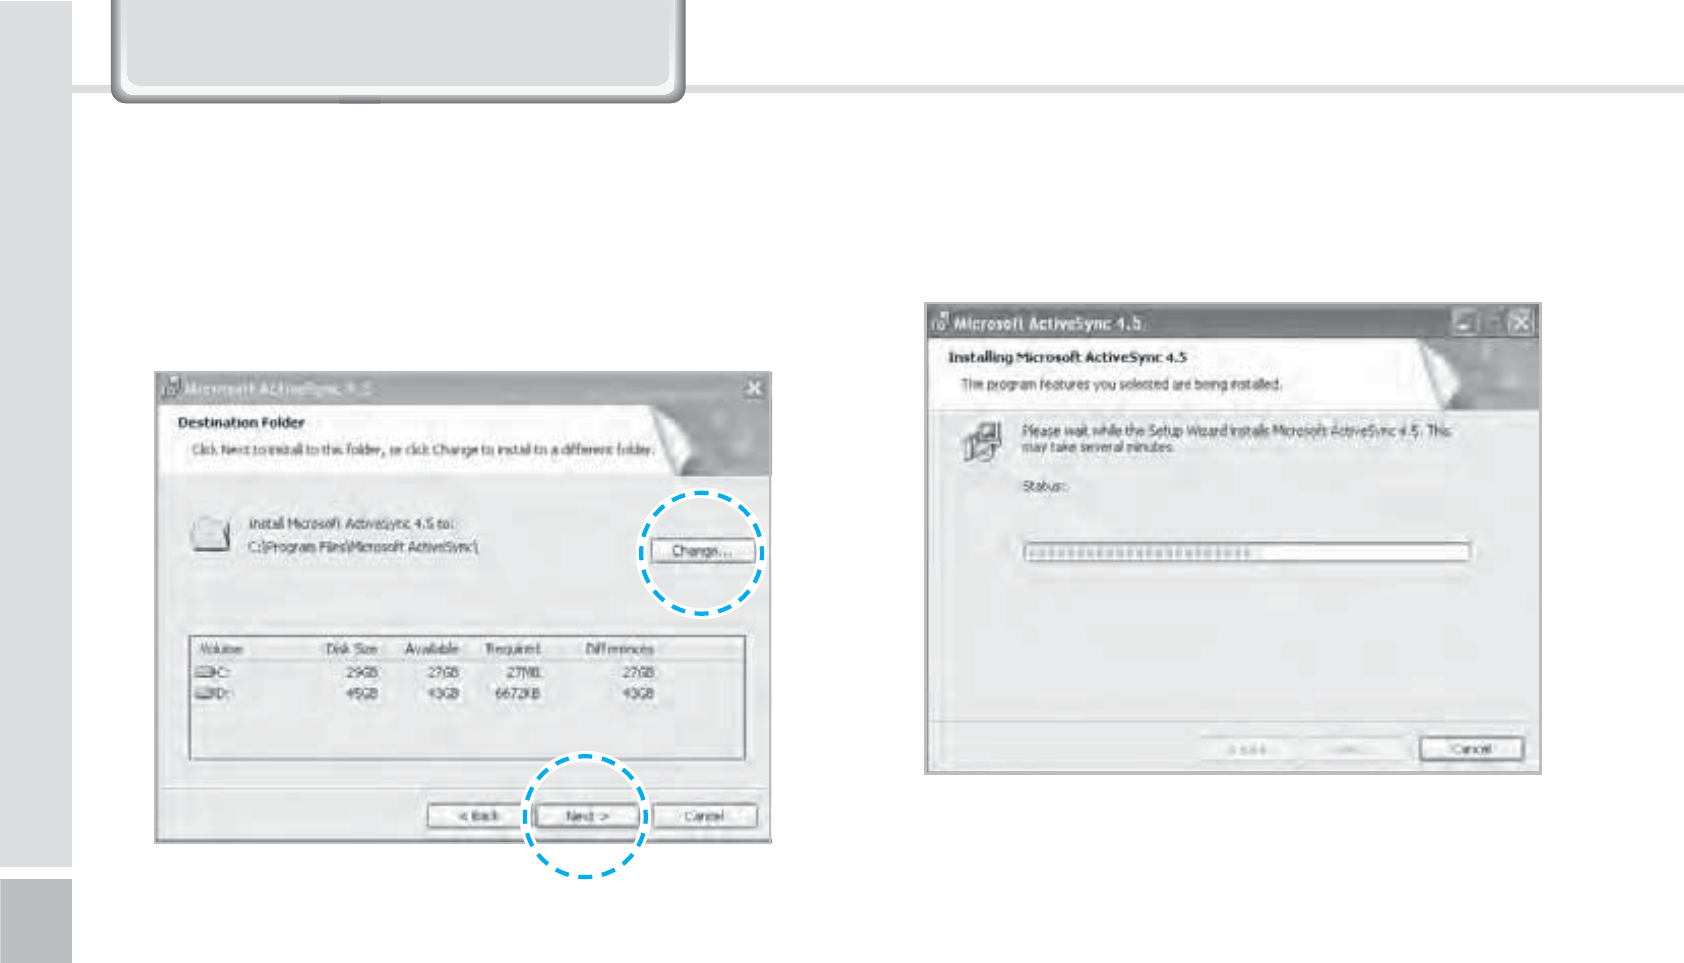
Please specify where you want to install.
3
When ready to install [Microsoft ActiveSync] will
install.
4
[Microsoft ActiveSync] is installed.
BIP-1500
25
䭓The display you see is a [Windows Mobile] version
and it can vary depending on the version.
䭓[Microsoft ActiveSync] can be used when the device
is plugged into a notebook or pc. You can transfer
files by syncing it. You can also install/uninstall new
programs.
䭓The USB cable is sold separately. Please contact the
service center for more details. [Code : 12132]
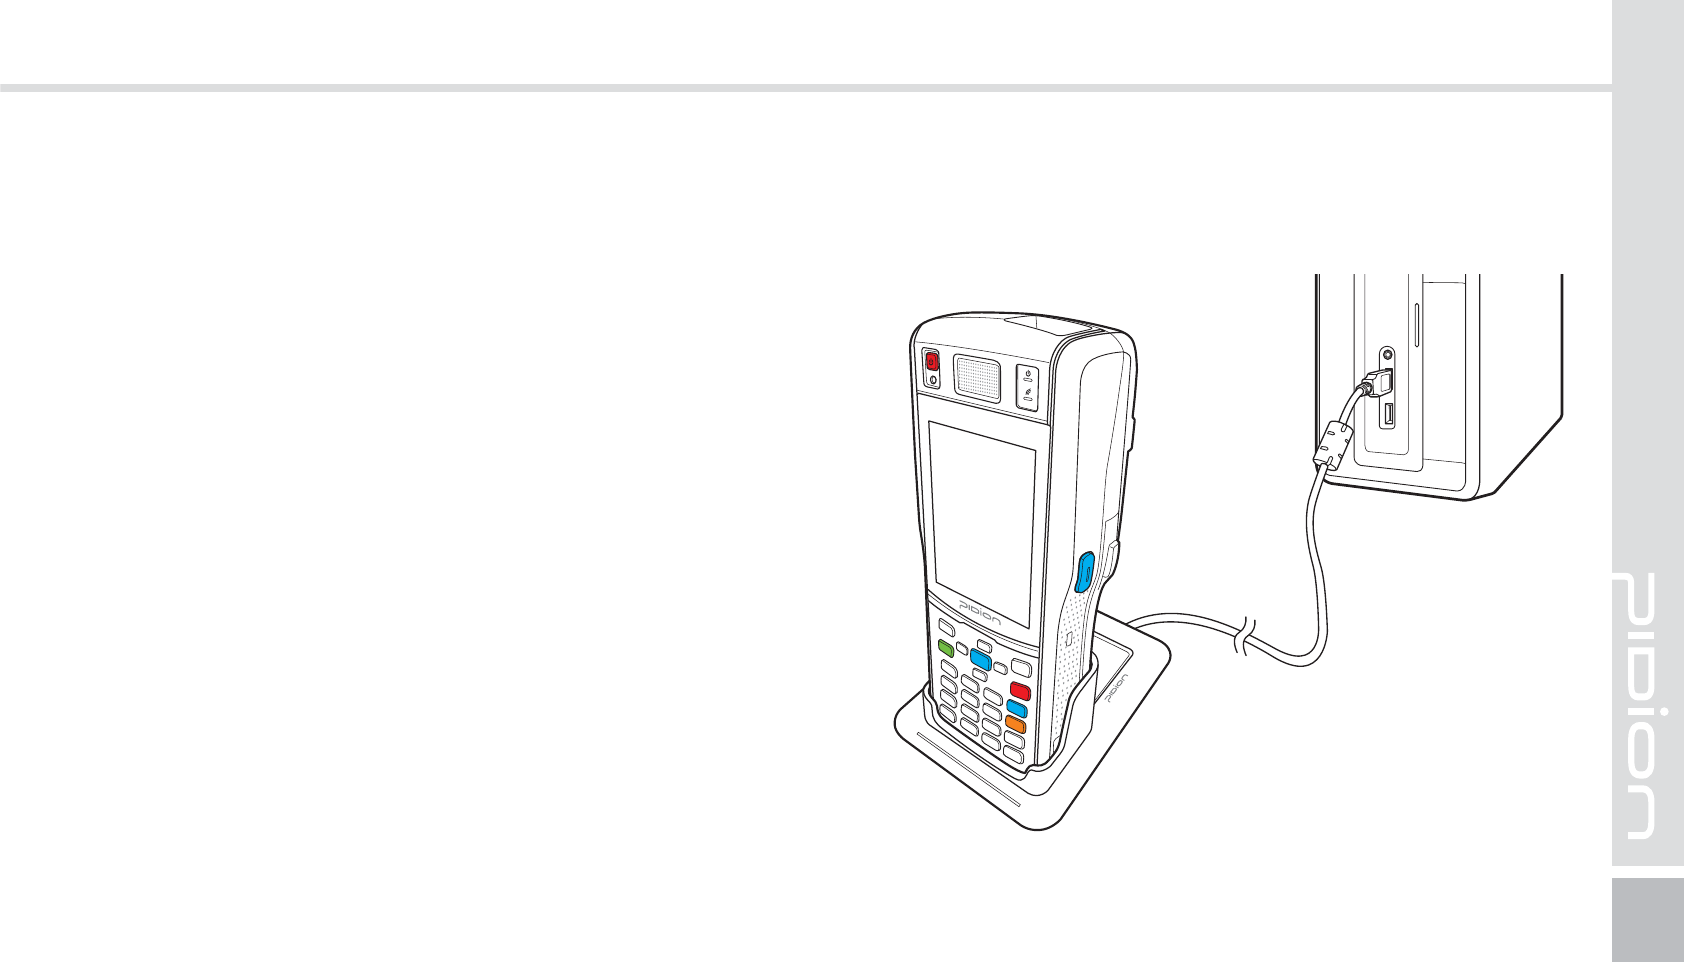
1
You can connect with the Cradle.
6TJOH"DUJWF4ZOD
26
BIP-1500 Manual
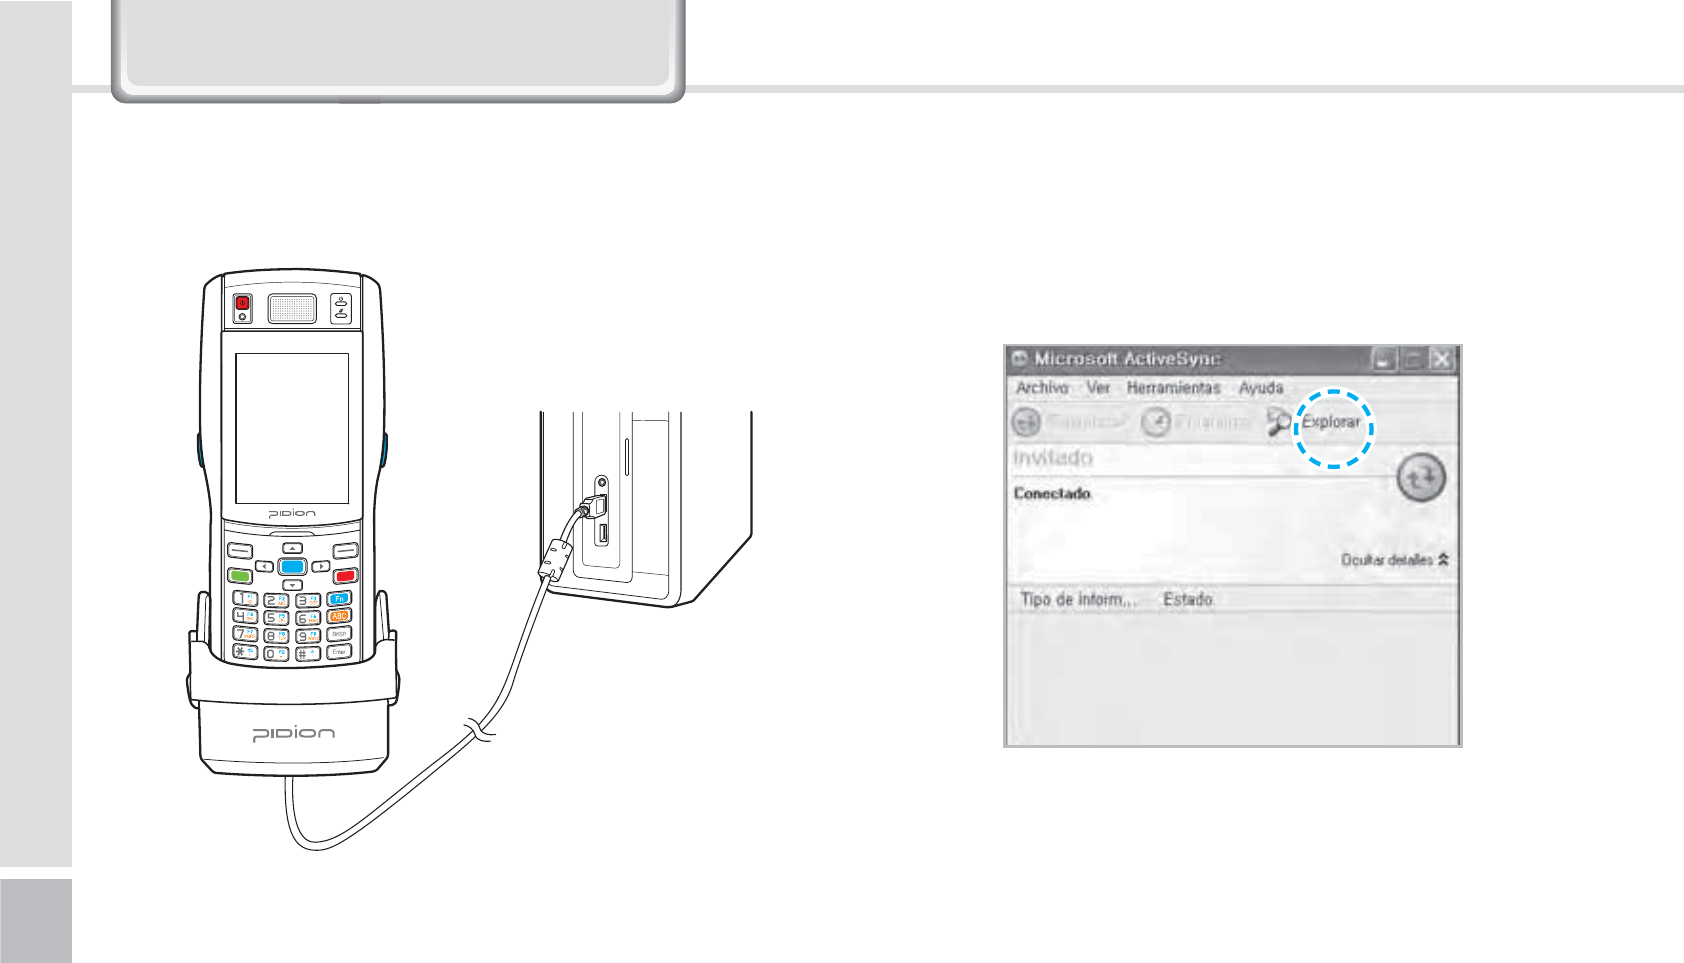
2
If the device and the computer successfully
connects, [Microsoft Activesync] will automatically
start. Please Select the <Search> button.
※
You can connect by an option accessory Snap-on.
&RQQHFWLQJ$FWLYH6\QF
BIP-1500
27
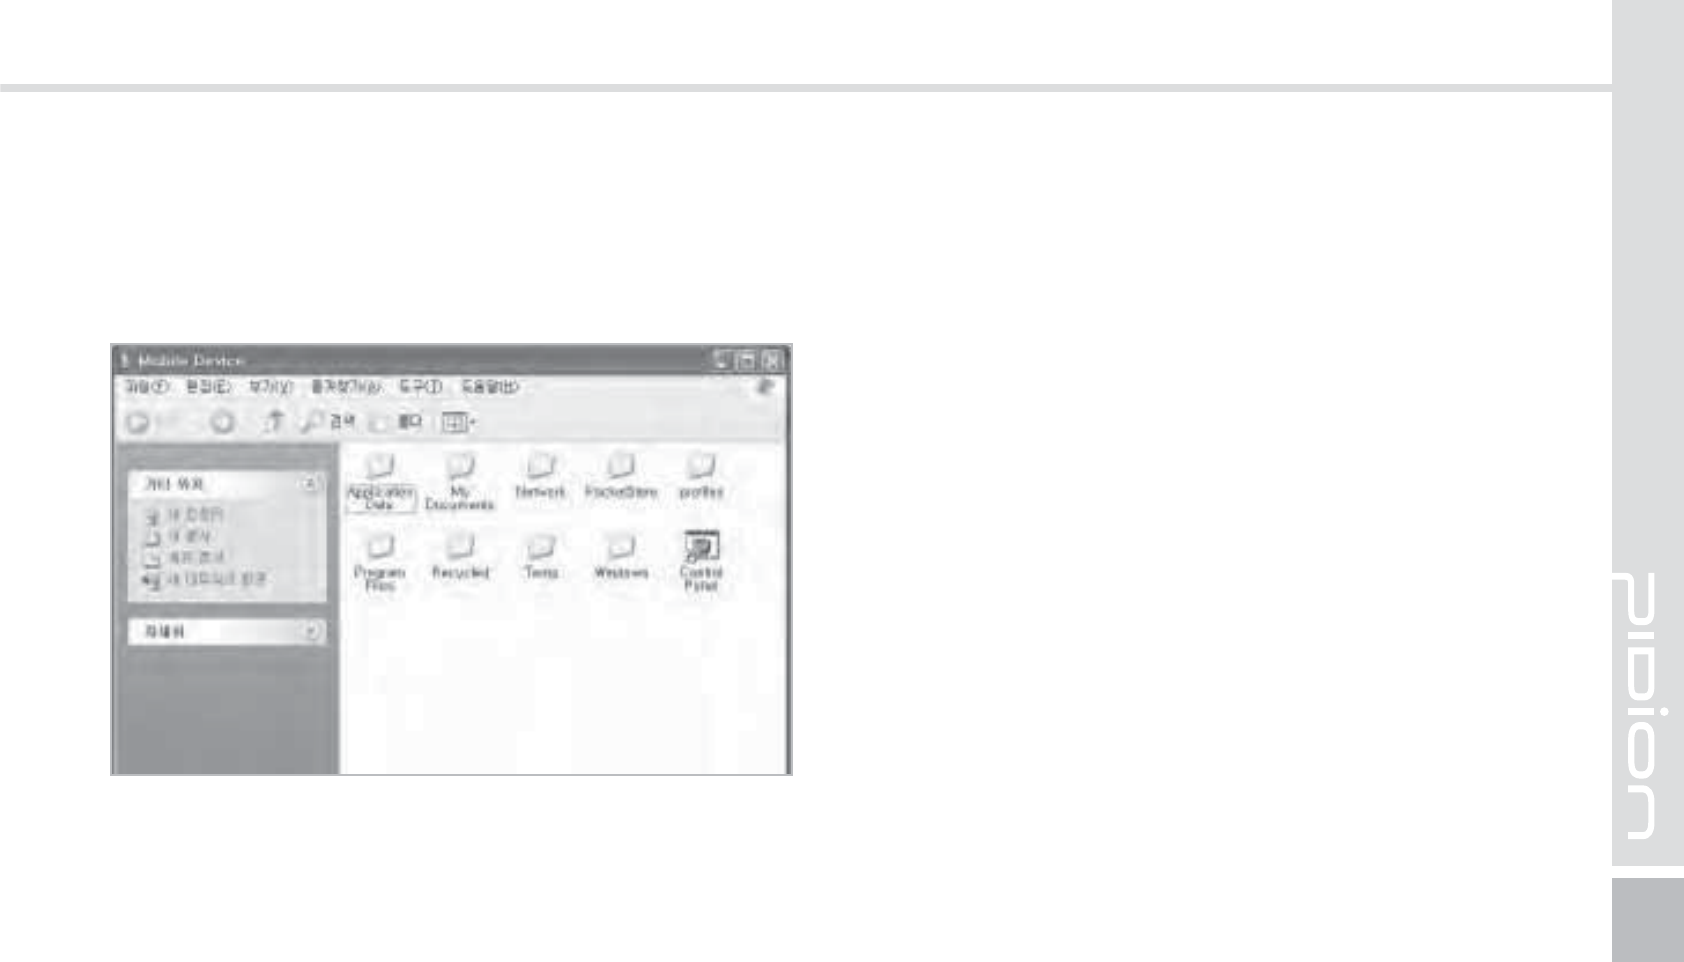
3
In the <Mobile device> folder, you can check the
photos, music, and documents stored in the device
and move it to the computer.
[Precautions using ActiveSync]
䭓 When "unknown USB device" can pop up, when
the device is turning on while connected to the
<Micro USB Cable>. If you reconnect the device
from the <Micro USB Cable> the ActiveSync will run
properly.
䭓 If in ActiveSync, the state "connecting…" is
continued for a long period of time, disconnect the
device from the <Micro USB Cable>. In [ActiveSync]
press FILE
Ķ
CONNECTION SETTINGS
Ķ
Select
<Allow USB connection>
Ķ
Press [OK]. Reconnect
the device.

28
BIP-1500 Manual
䭓 The device not running after removing the battery
while device on.
For this to be avoided, do not remove the battery
while the device on. You must press the [Power]
button or the [Shut Down] button with the stylus
pen in order for the Windows Mobile to [turn off]
correctly.
If in a case where you have removed the battery
while the device is on, hold the [Reset] button +
[OK] button to hard reset.
Please note if you hard reset, all the data in the
memory will be erased.
䭓 If you have reconnected several times and still
“unknown USB device” pops up
In certain cases the computer’s USB host has gone
wrong leading to connection failure.
Remove the device from the <Micro USB Cable>
and reboot the computer. Reconnect the device to
the cable and it will run properly.
&RQQHFWLQJ$FWLYH6\QF
BIP-1500
29
Start
Ķ
Setting
Ķ
Connect
Ķ
USB-PC connect
If you select [Advanced Network
Function Use] you can connect
various Surrounding USB devices
to your PDA device.
If you use the function [USB-PC Connect] your
device’s battery consumption will be high. If you
are not using the function [USB-PC Connect]
disconnect to save your battery consumption.
Your device and the surrounding
devices can you used when
connected with the <USB Cable>.
$POOFDUJOH"DUJWF4ZOD
30
BIP-1500 Manual
8VLQJ7KH%DUFRGH5HDGHU
6TJOHUIF#BSDPEFT 4DBOOJOH#BSDPEFT
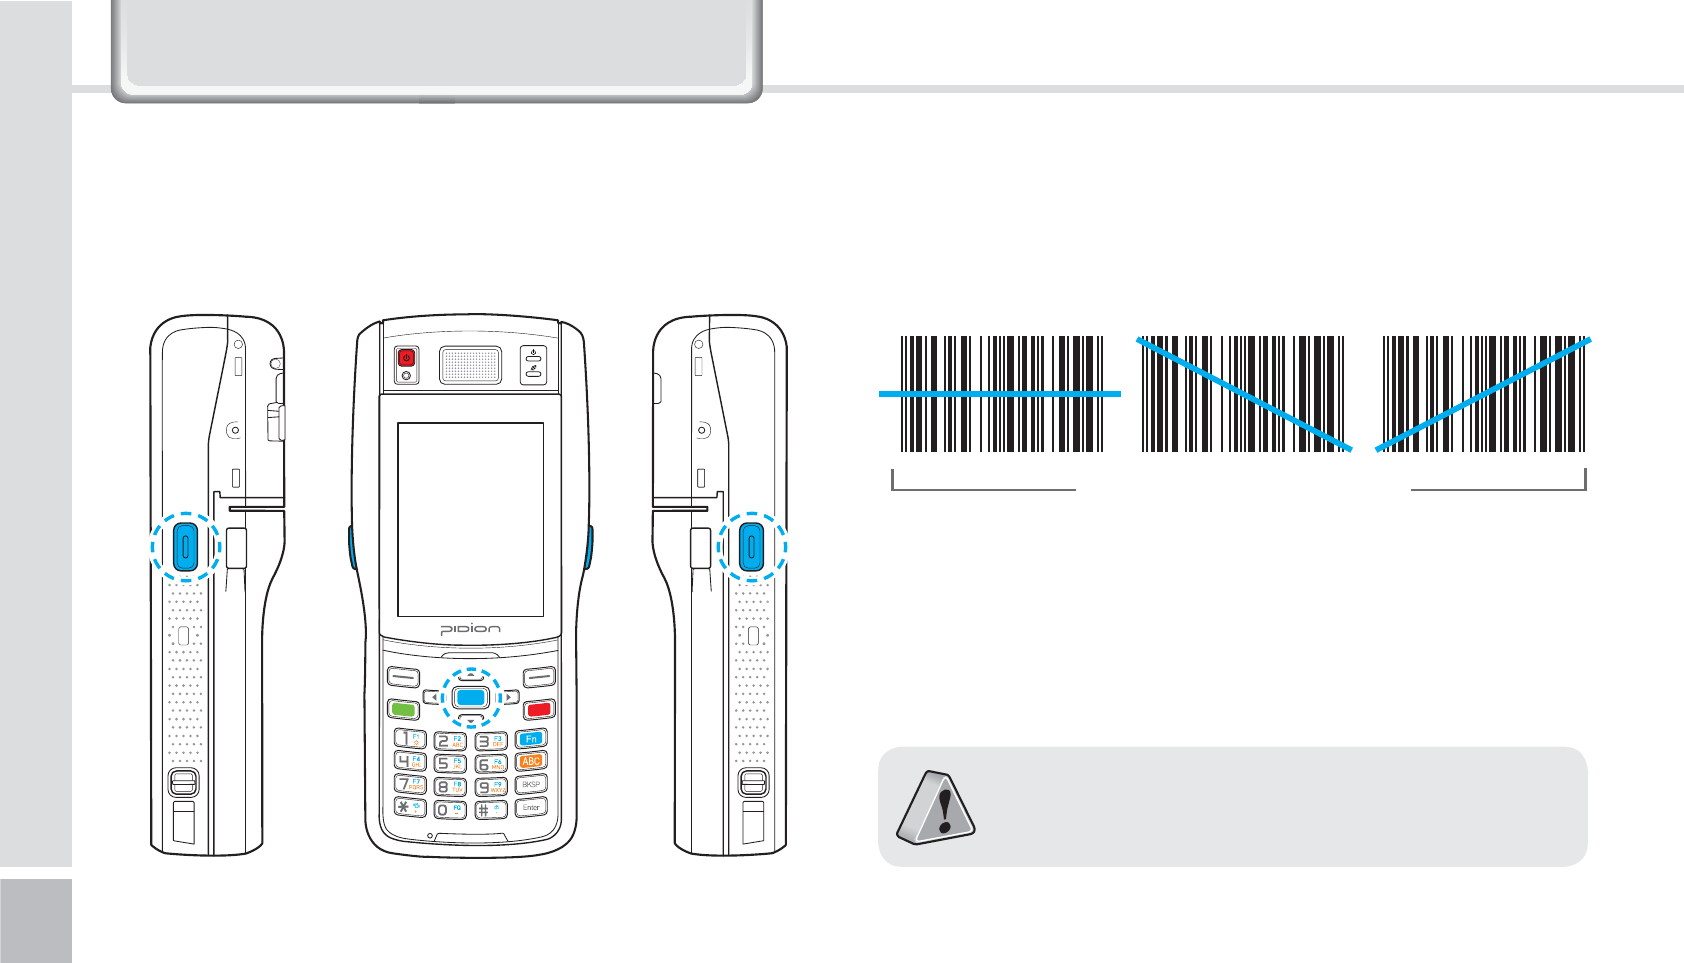
Press the [Barcode Scan] button on the side or front of
the device to start scanning barcodes.
In order to scan accurately, you must scan with the
correct angle 10cm away.
If you are using Barcodes with special programs,
please contact the manufacturing company.
Correct scanning Angle

BIP-1500
31
$IFDLJOH#BSDPEFT
Start
Ķ
Memo
The barcode’s information will
appear if you press the [Create
New] button in <Memo>.
If you scan a barcode while
<Memo> is open, the barcode
will be automatically saved in
<Memo>.
If you scan when <Memo> is not
opened, it will not be saved. To
do this, press the [Menu] button
in [Create New] and [Paste] to
save.
32
BIP-1500 Manual
*HWWLQJ7R.QRZ<RXU+RPH6FUHHQ
On top of the screen, [Start],
[Wi-Fi], [Connection Status],
[Volume], [Battery], and etc will
been displayed.
You can see the [Weather],
[Time], [Wireless Connection
Status], [Owner Information],
[Messages], [Operation],
[Schedule], [Device Lock Status],
and etc on the [Home screen]
with your user settings.
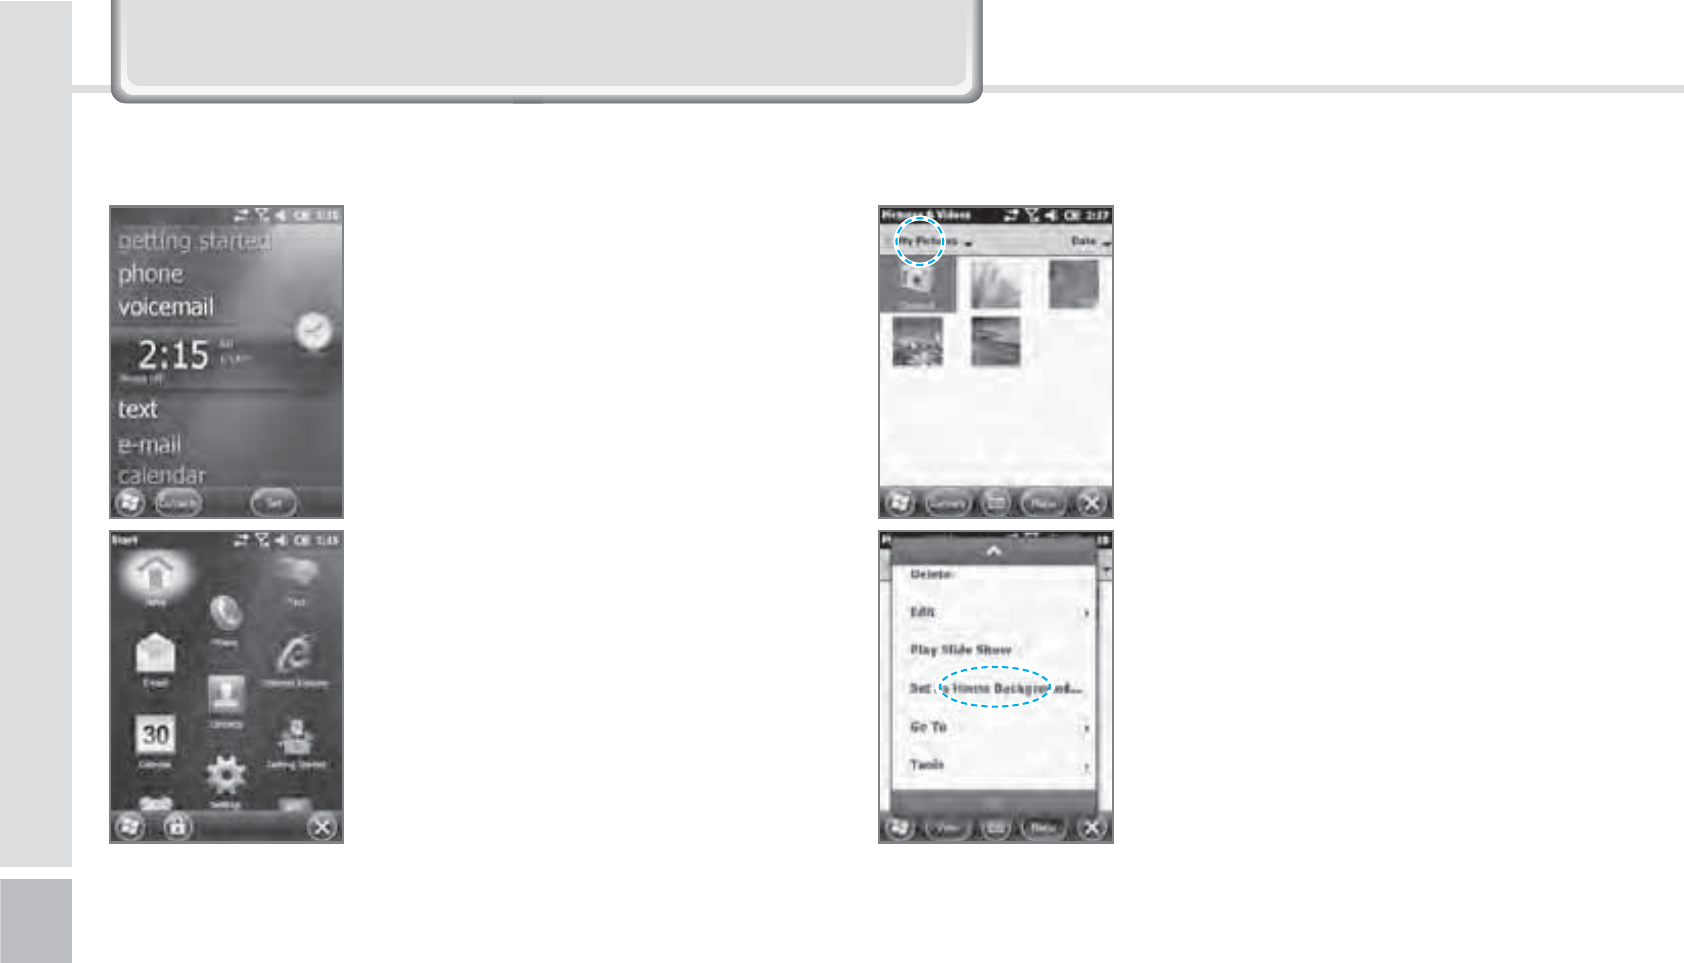
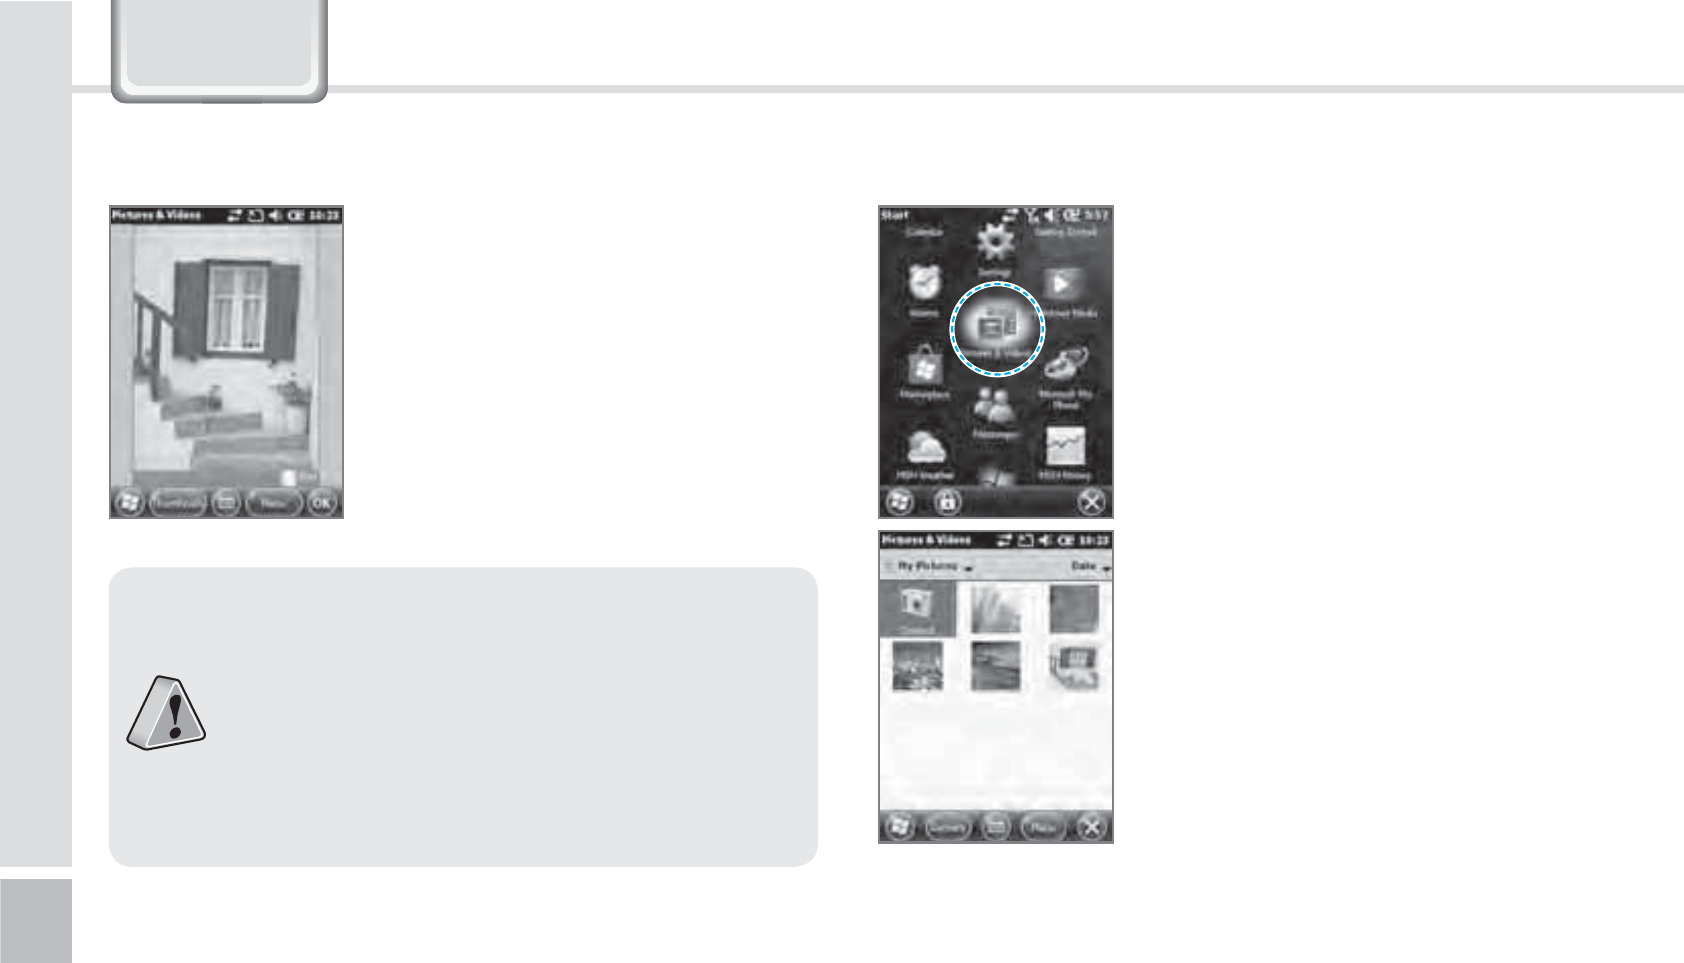
You can set the photos you can
taken as a background image.
1
Start
Ķ
Photos & Video
Ķ
select My Photos.
2
Press the bottom right [Menu]
button on the screen.
3
Select [Set as Home Screen
Wallpaper].
4
After setting the transparency
level select [OK].
-PPLJOHBUUIFIPNFTDSFFO VQQIPUPTBT)PNF4DSFFO#BDLHSPVOE
BIP-1500
33
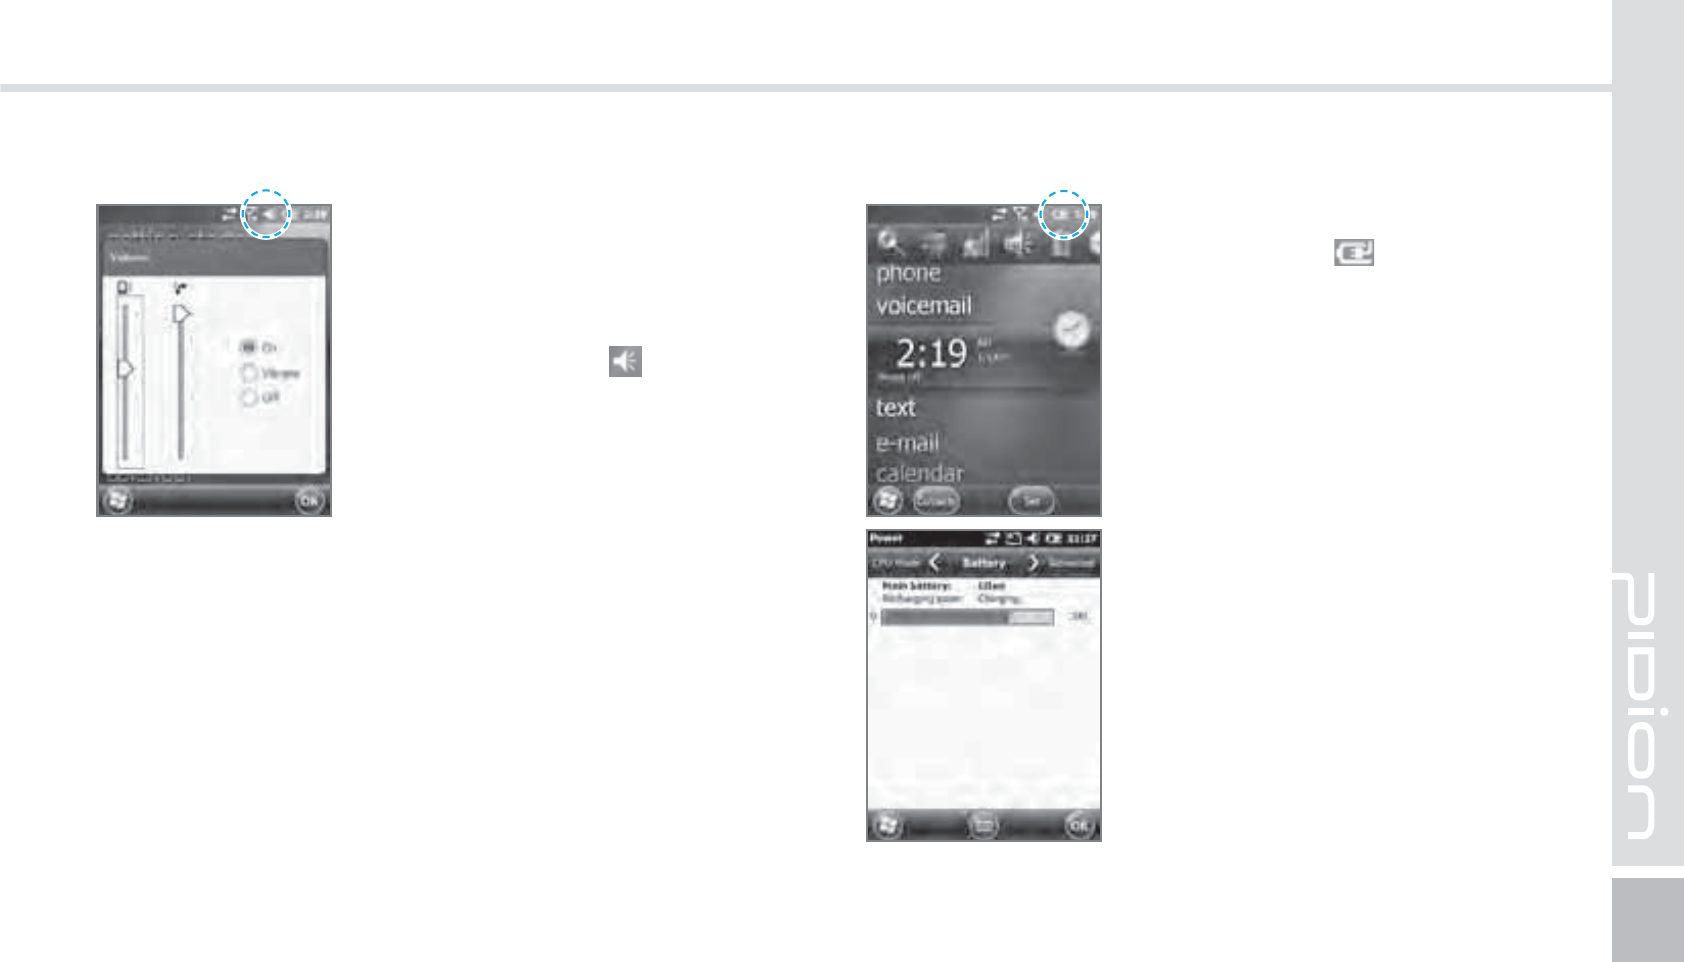
You can adjust your volume for
program folders, selecting menus,
or In-call volume.
After selecting the on the top
right, you can adjust your system/
ring tone volume.
Selecting Vibrate will make
your phone muted and into the
Vibrate Mode.
You can check your battery level
by pressing the on the top
right of your display.
"EKVTUJOH7PMVNF $IFDLJOH#BUUFSZ-FWFM
34
BIP-1500 Manual
,QSXWWLQJ7H[W
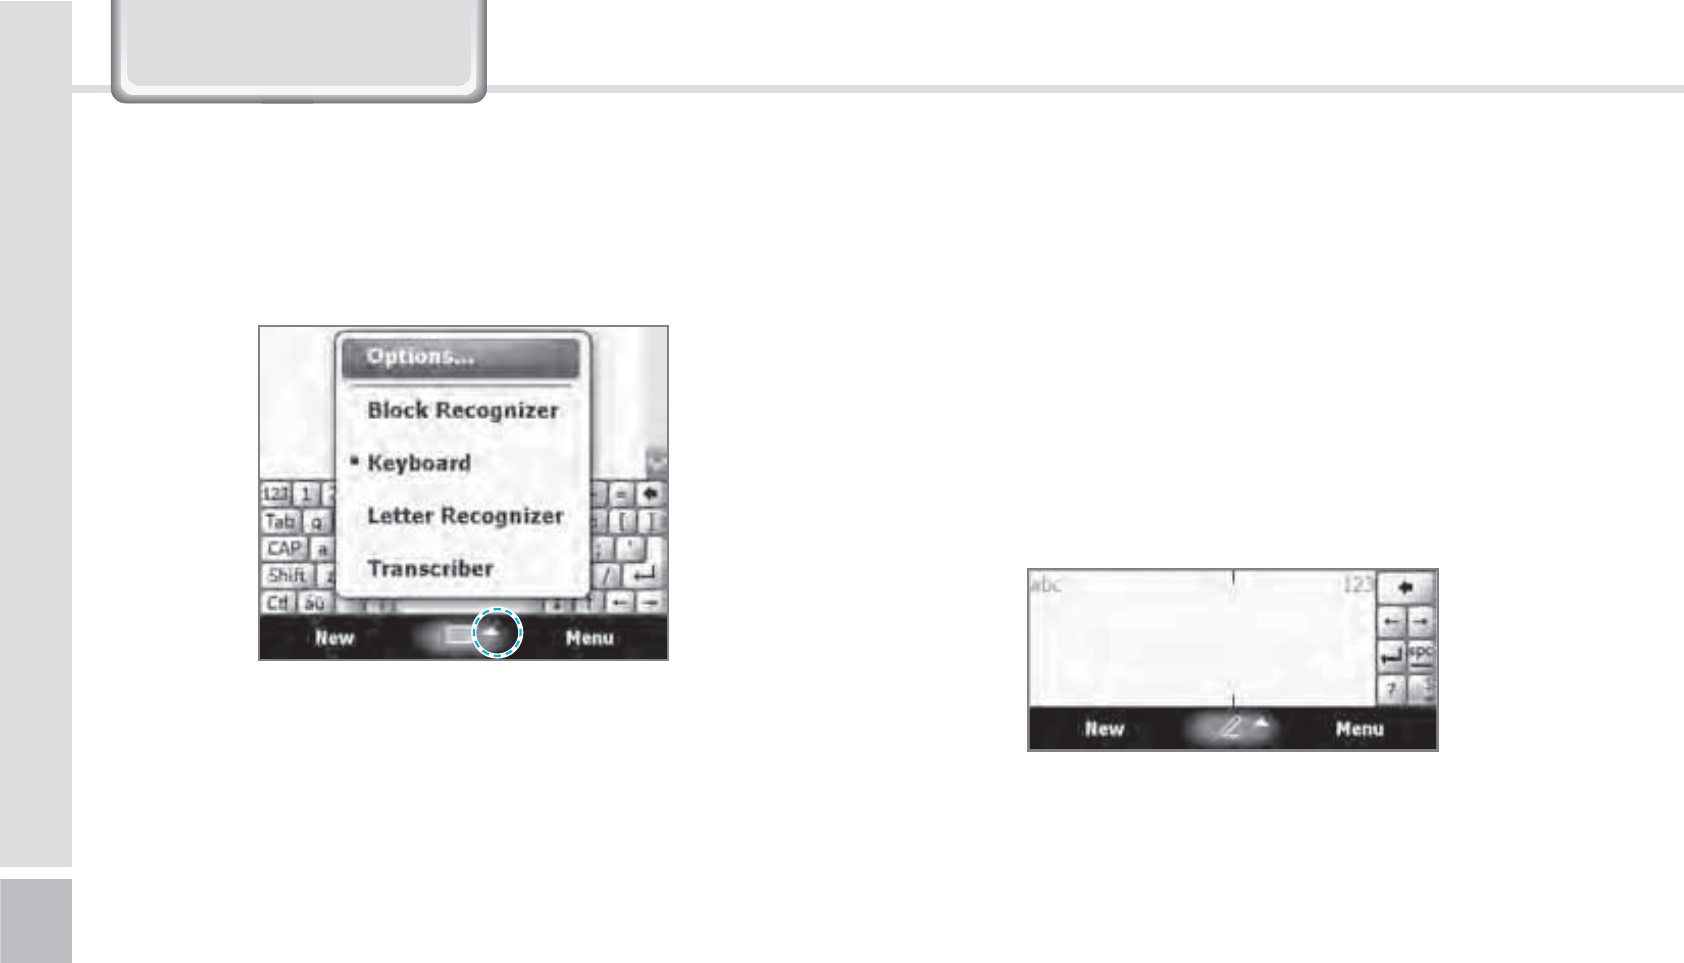
4FMFDUJOHUFYUJOQVUNPEF #MPDLSFDPHOJ[FS
This input method uses the traditional writing area
box split in the middle.
The left side is used to write letters and the right side
is for number entry.
Symbols and common functions are located in other
smaller boxes located in the right of the writing box
area.
There are five different character input methods
available.

BIP-1500
35
This input method displays an on-screen keyboard
that can be used to input characters by tapping the
screen using the stylus pen.
This option allows you to enter text using your own
handwriting.
The screen is divided into three different areas. A
capital letter area, small letter area, and a number
area.
Characters are entered by printing letters in each
area. The character is then analyzed and typed on the
screen automatically.
,FZCPBSE -FUUFSSFDPHOJ[FS

36
BIP-1500 Manual
,QSXWWLQJ7H[W
The transcriber option is similar to the letter
recognizer, except instead of entering characters into
a designated area, you can enter entire words and
sentences using your own handwriting.
Transcriber supports both printing and cursive writing
styles and then automatically types the information
on the screen.
5SBOTDSJCFS
BIP-1500
37
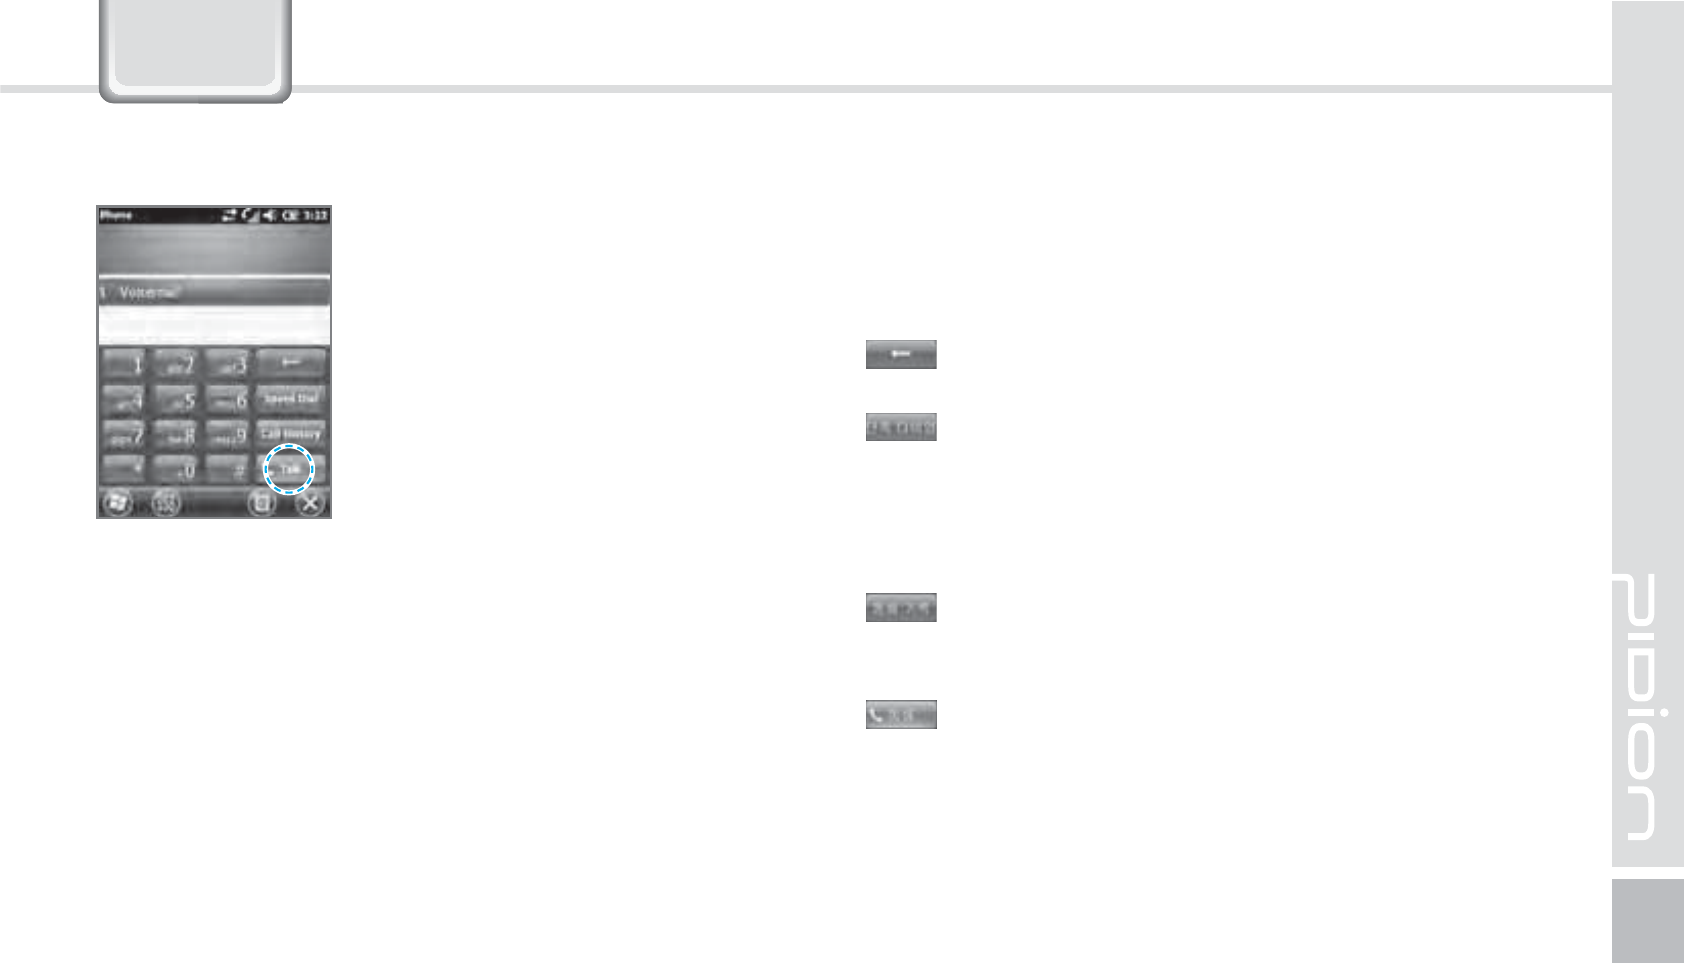
To make a call, press the [Phone]
button in the bottom of the
screen. Input a phone number
and press [Call].
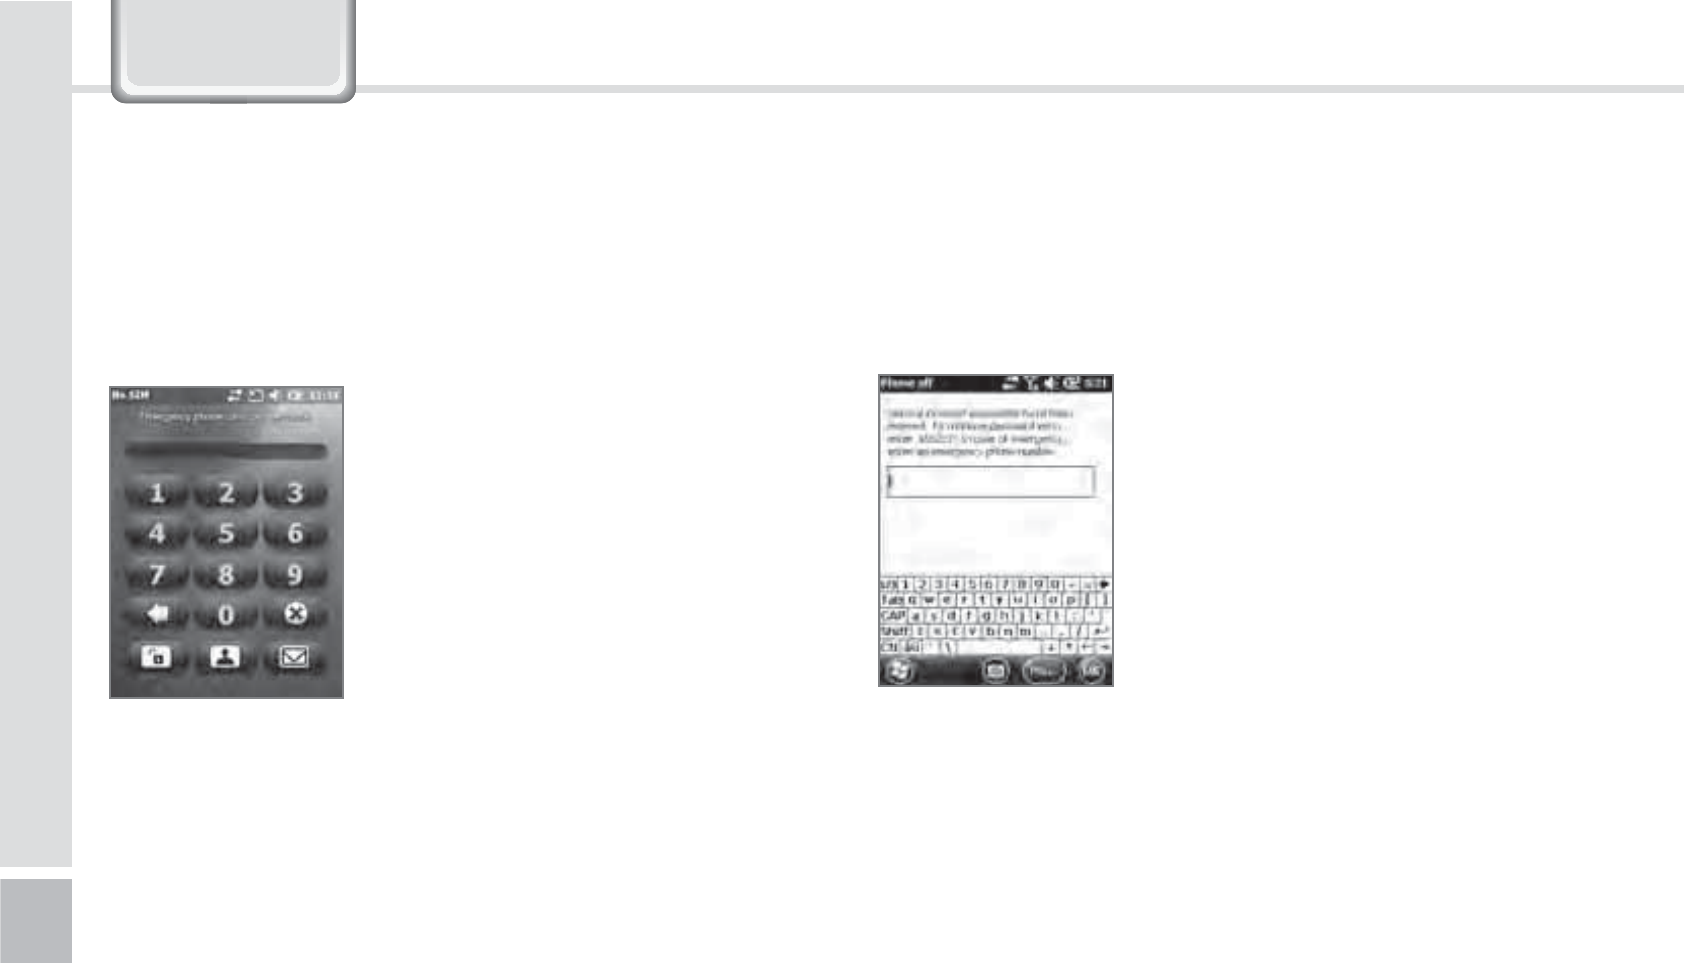
3KRQH
Redial
Without inputting the a phone number again, press
the [Call] button to redial.
: Deletes mistake numbers.
: You can use the saved speed dials to make a
call. To add/edit/delete a speed dial, press the
menu on the bottom right.
(You can save a maximum of 98 speed dials.)
: You can the recent view received calls/out
going calls/missed calls.
: After inputting a phone number press this
button to make the call.
.BLJOHB$BMM
38
BIP-1500 Manual
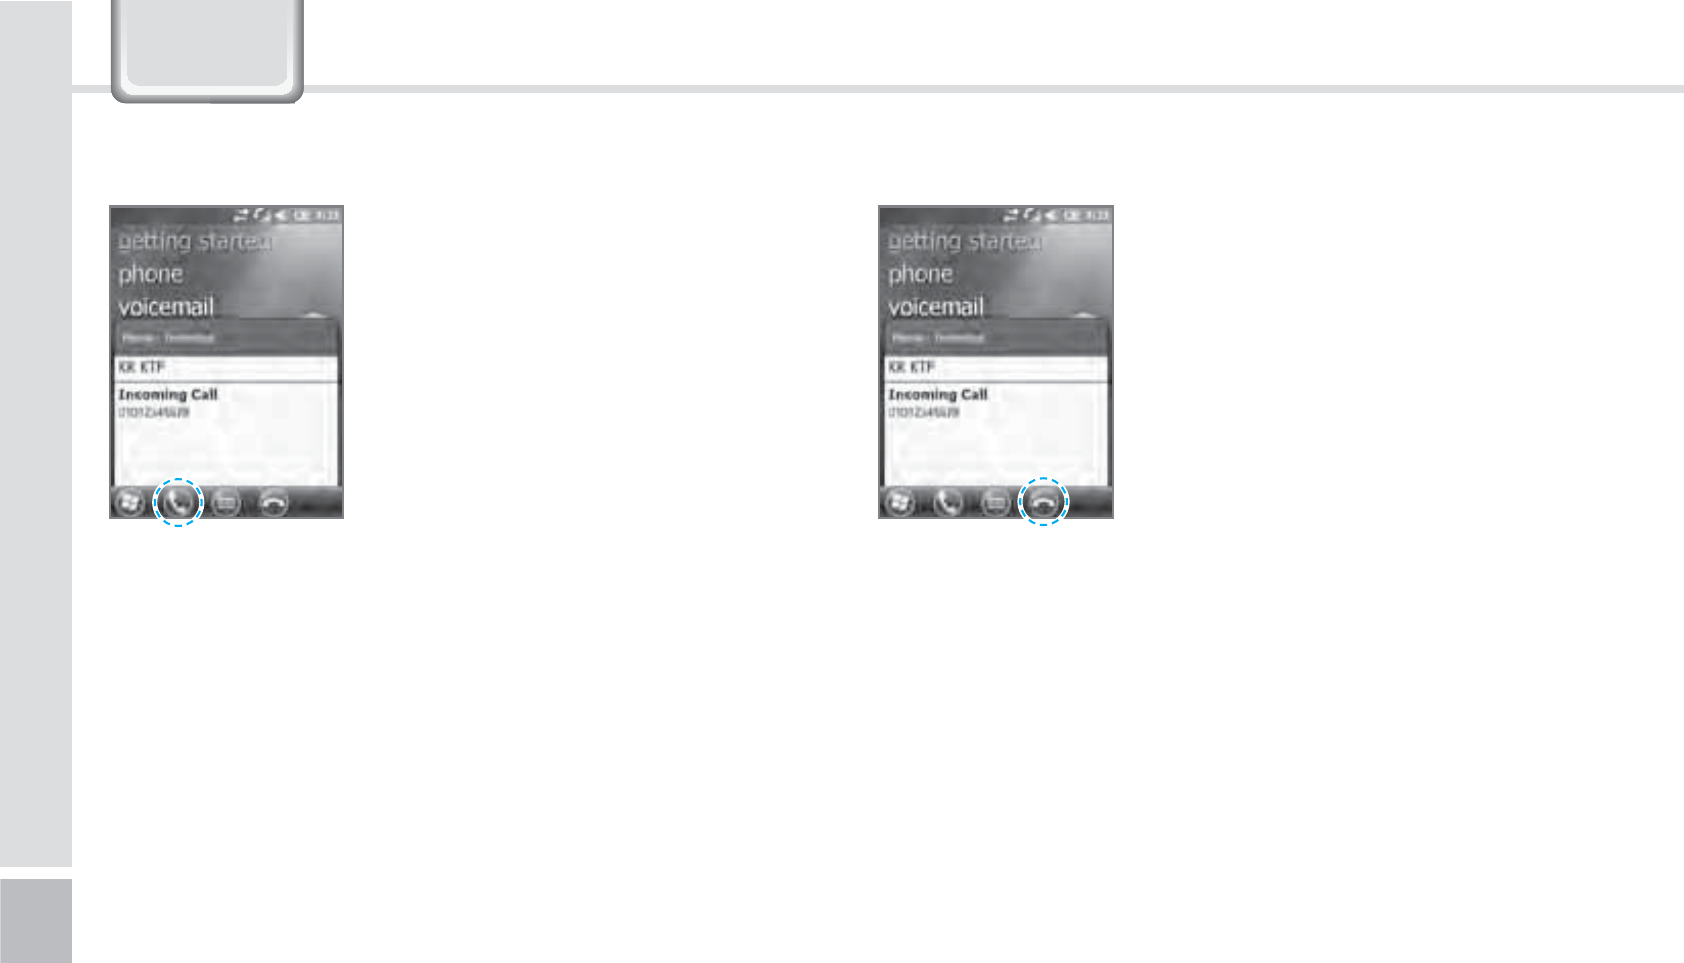
When you are receiving a call,
press the [Call] button or the
[Answer] button on the bottom
of the screen.
ö
The outgoing information message can be different
from the regular devices.
To block a call, press the [Ignore]
button on the bottom of the
screen or the [End] button on the
keyboard.
You can also block the call by
shorting pressing the volume
button.
#MPDLJOHBDBMM3FDFJWJOHB$BMM
3KRQH
BIP-1500
39
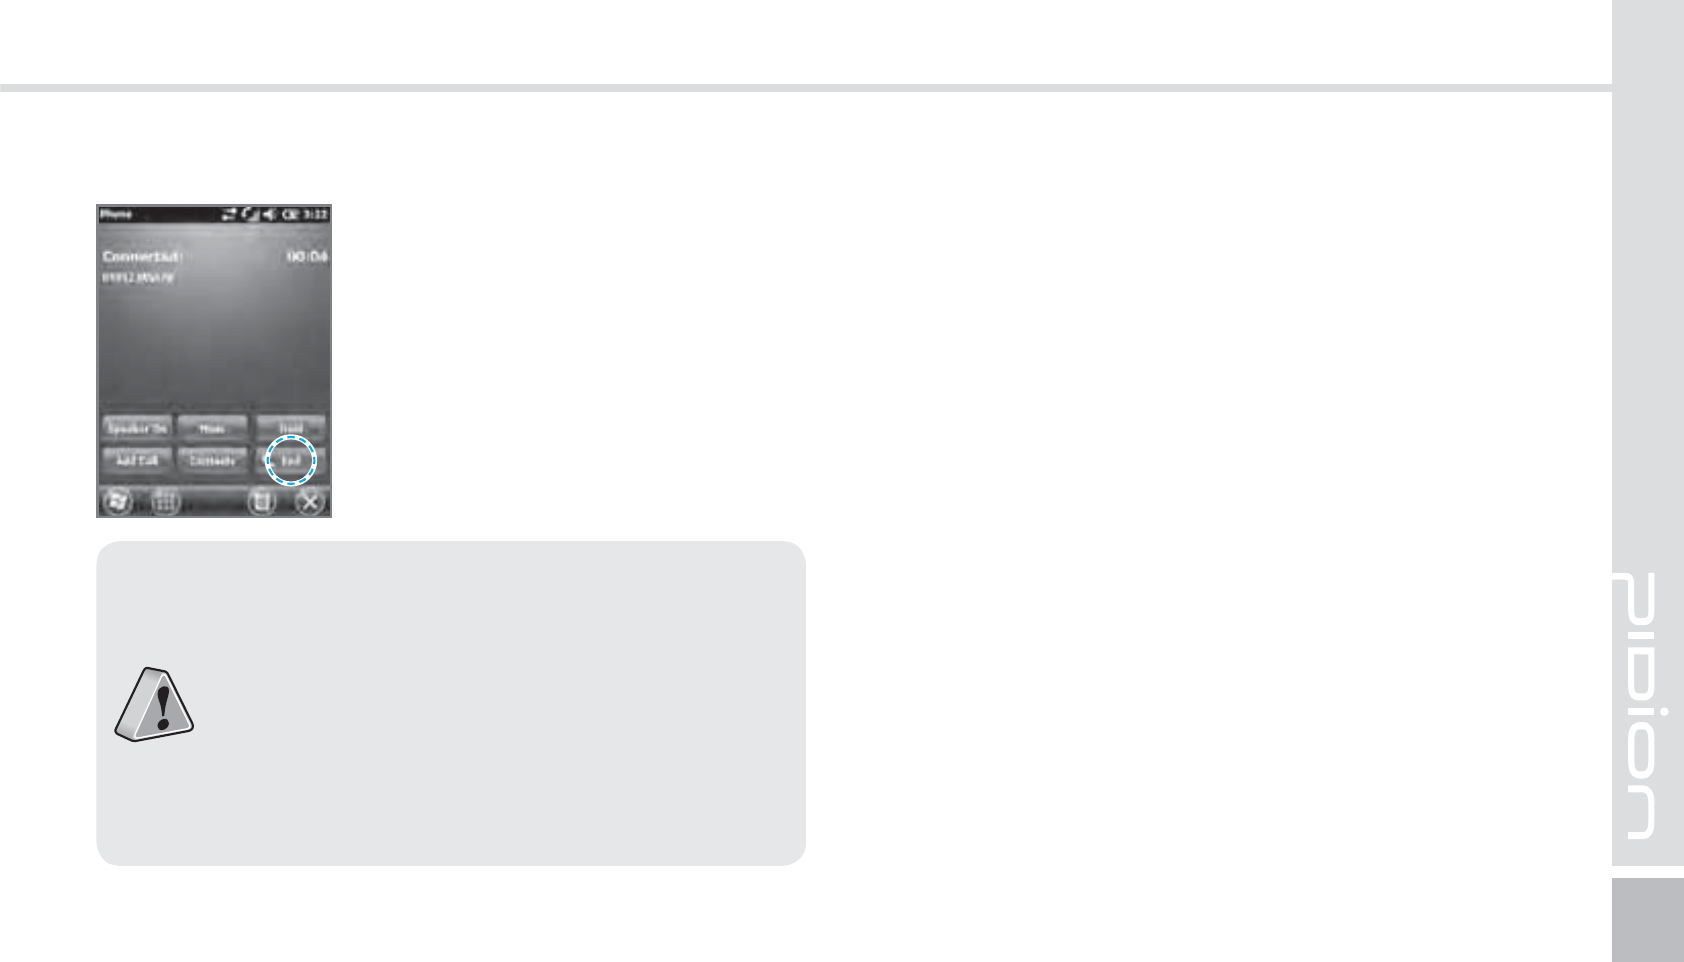
To hang up, press the [End]
button or the [End] button on the
device’s keyboard.
)BOHJOHVQ
䭓The BIP-1500 Does not support conference
calls, call transferring optional call services.
䭓The BIP-1500 Does not support Voice Call
during Dial-up.
䭓The BIP-1500 supports only the regular
optional call service <Call waiting>. (The SMS
service from call waiting is not supported.)
40
BIP-1500 Manual
1
Start
Ķ
Select Contacts.
2
Type in a name on the [Name
Input] to search a contact.
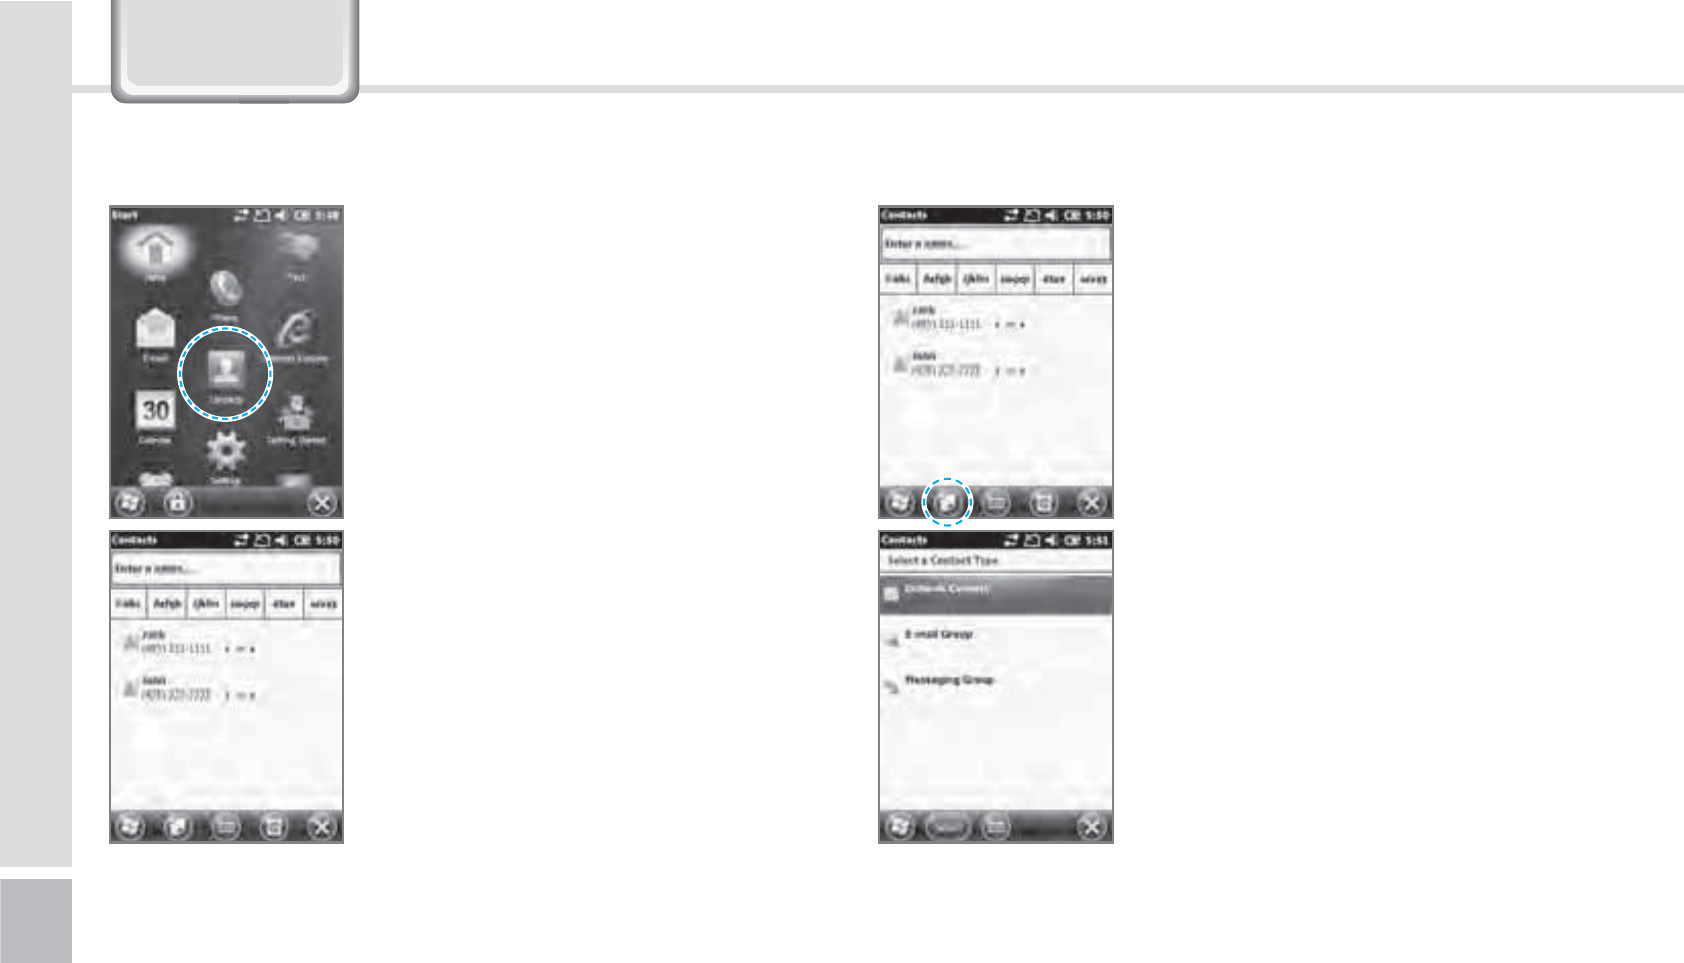
&RQWDFWV
1
Select the [Create New] button
on the top left.
2
Select the contact’s category.
4FBSDIJOH "EEJOHB$POUBDU
BIP-1500
41
You can use various menus when
you hold down the contact.
Call Work/Home/Cell phone :
Each numbers saved can be
called.
Send Email : Sends email to the
saved email account.
Send Message : Sends a text
message to the saved phone
number.
Copy Contact : Copies the
selected contact.
Delete : Deletes the selected
contact.
䭓 If the BIP-1500 device has been reset, there
will not be a information message when
retrieving/deleting a contact list.
䭓 The BIP-1500 device may take some time
showing the saved contacts when it has been
reset or has been erased from the USIM card.
42
BIP-1500 Manual
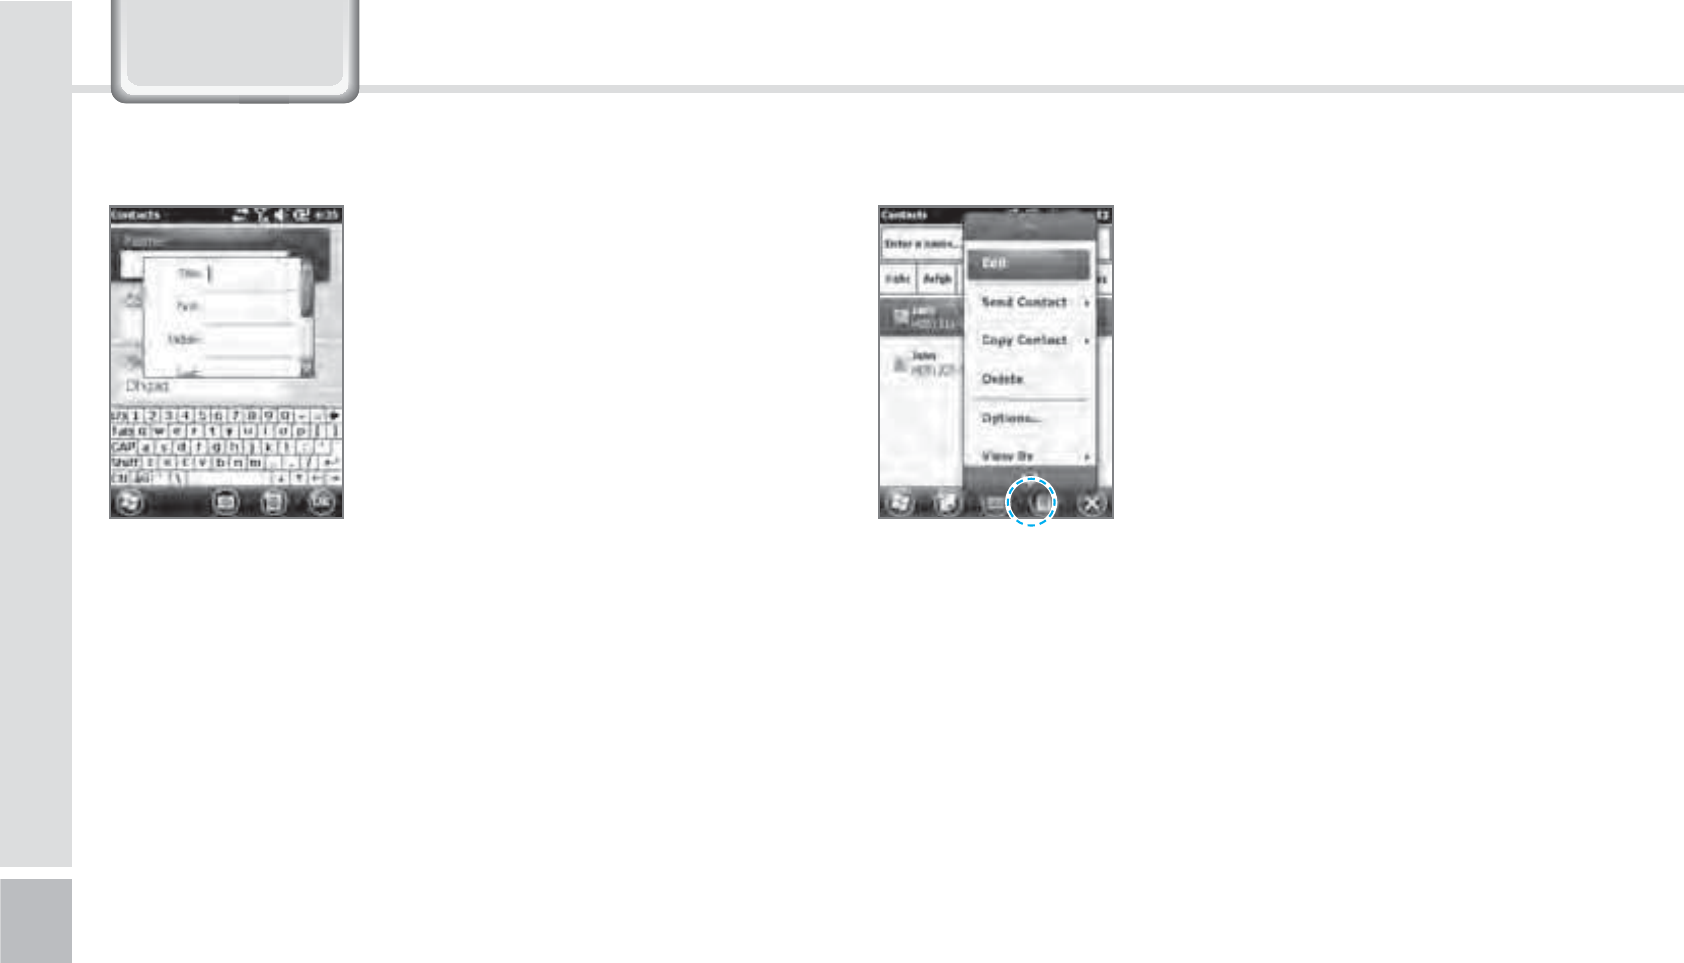
Press and select the [Menu]
button on the bottom right of
the contacts screen.
Edit : You can edit a saved
contact.
Send Contact : You can send a
contact wirelessly.
Contact copy/delete : You can copy/delete a selected
contact.
Option : You can do the setup of <Alphabetical order
> and <Show only name of contact>.
Display standards : You can set up the standards of
the contacts for the names/companies.
Filter : You can filter the selected items.
Selecting Contacts : You can multi-select or select all.
3
The contact will be saved
when the attributes are
imputed in order. Press [OK] to
save in Contacts.
.FOV
&RQWDFWV
BIP-1500
43
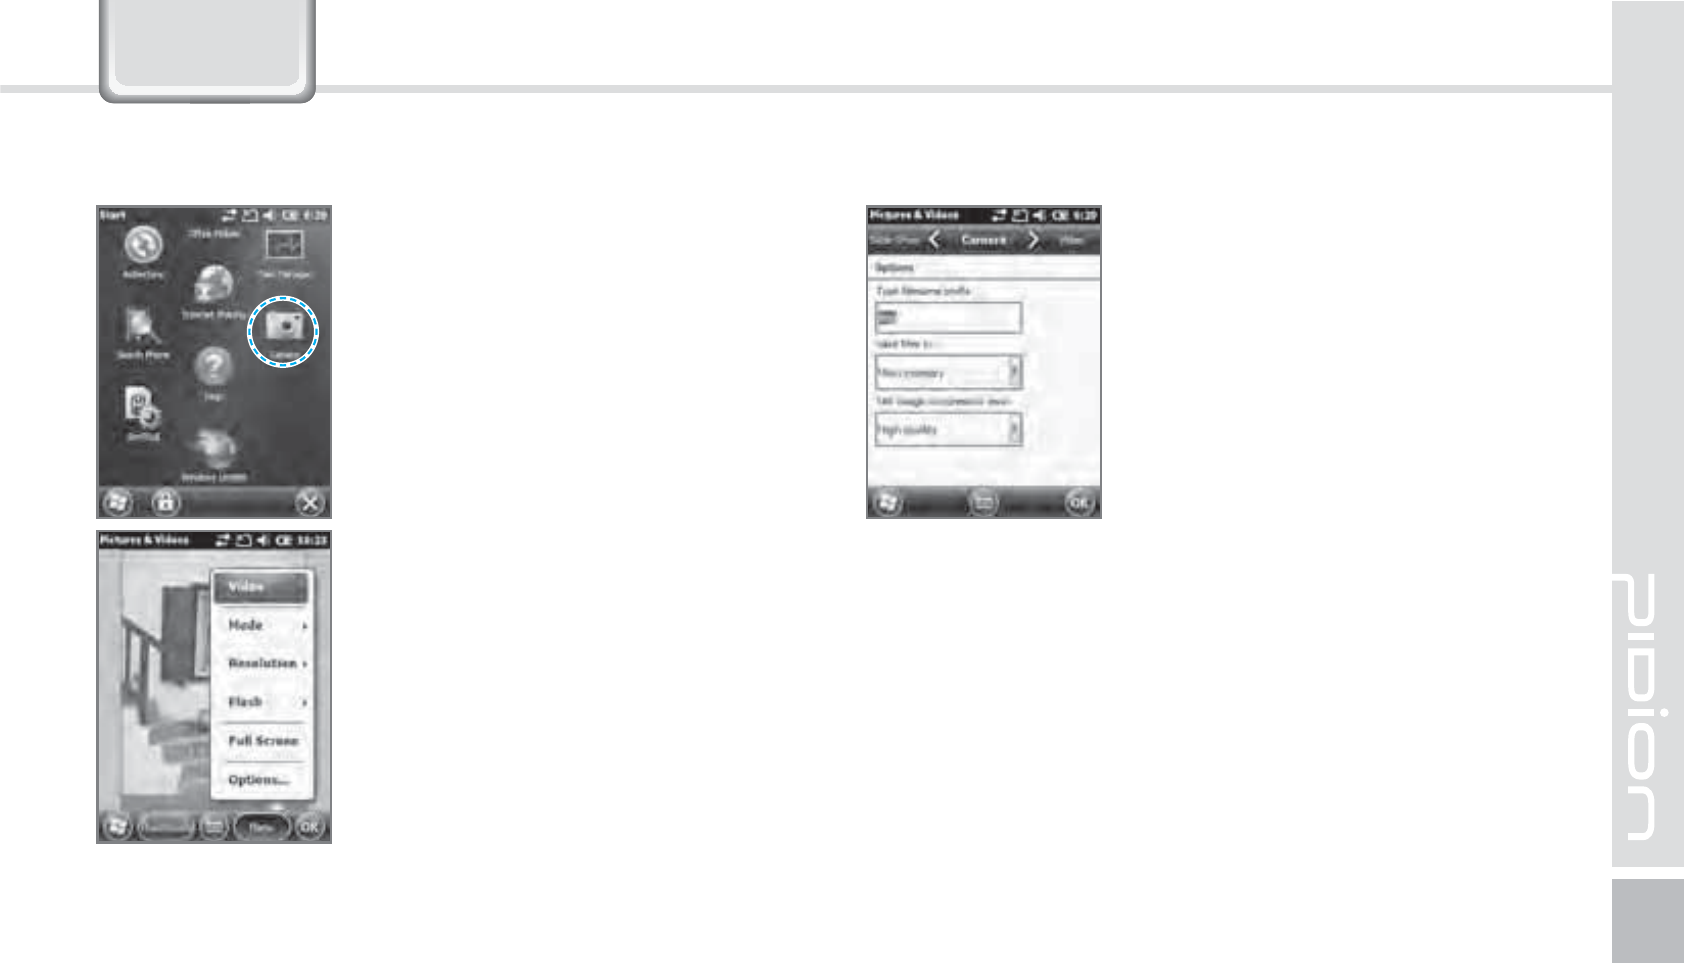
&DPHUD
Start
Ķ
Camera Video : Switches to Video mode.
Mode : You can set it up as
normal/bust/timer.
Resolution : You can set various
resolutions of 480x640 / 600x800 /
768x1024 / 1536x2048.
Flash : You can turn on/off your
flash.
Full-Screen : You can change your
display to full screen.
Option : You can change the
name/storing location/file size.
Your photo will be taken when
you press the [OK] button. The
photo/video will be automatically
saved in the album.
5BLJOH1IPUPT
44
BIP-1500 Manual
&DPHUD
You can do the following options
: Delete / Send / Wireless-transfer /
Set up as background / Enlarge /
Edit / Properties with the photo
/ Video.
Start
Ķ
Photos and Video
You can Enlarge/Reduce or check
the information of the saved
Photo/Video.
7JFXJOH1IPUPT
䭓If the battery is too low, the camera will turn
off or will not open.
䭓If not in use more than a minute, it will go
into sleep mode.
䭓 If the device can shoot video, the user
manual will vary depending on the camera
program.
BIP-1500
45
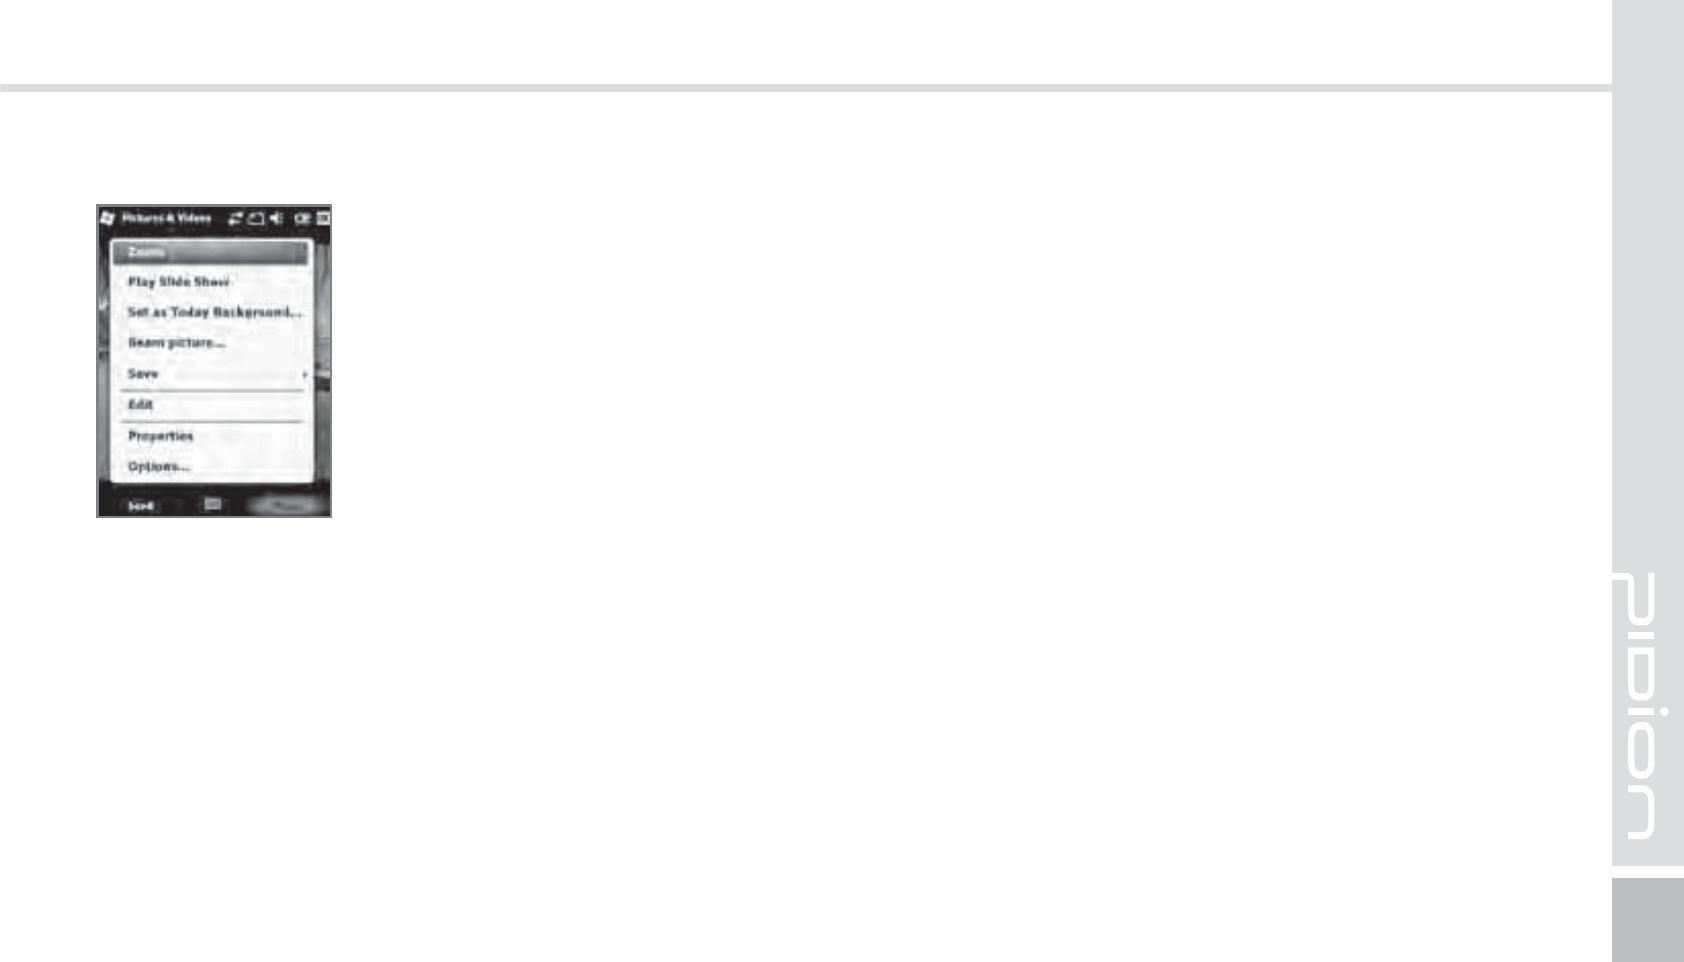
The selected Photo/Video can
be Enlarged / Reduced / Viewed
with as a slideshow/set as a
background / Wireless-transfer /
Save / Edit /Properties.
46
BIP-1500 Manual
6HWWLQJV
#MVFUPPUI
Making your device discoverable
Other devices and search and discover your BIP-1500
device.
Setup for the communication of Bluetooth
equipment.
Start
Ķ
Settings
Ķ
Bluetooth
Turning on Bluetooth
Set up as on/off.
(If not in use, it will drain your
battery.)
Search surrounding Bluetooth
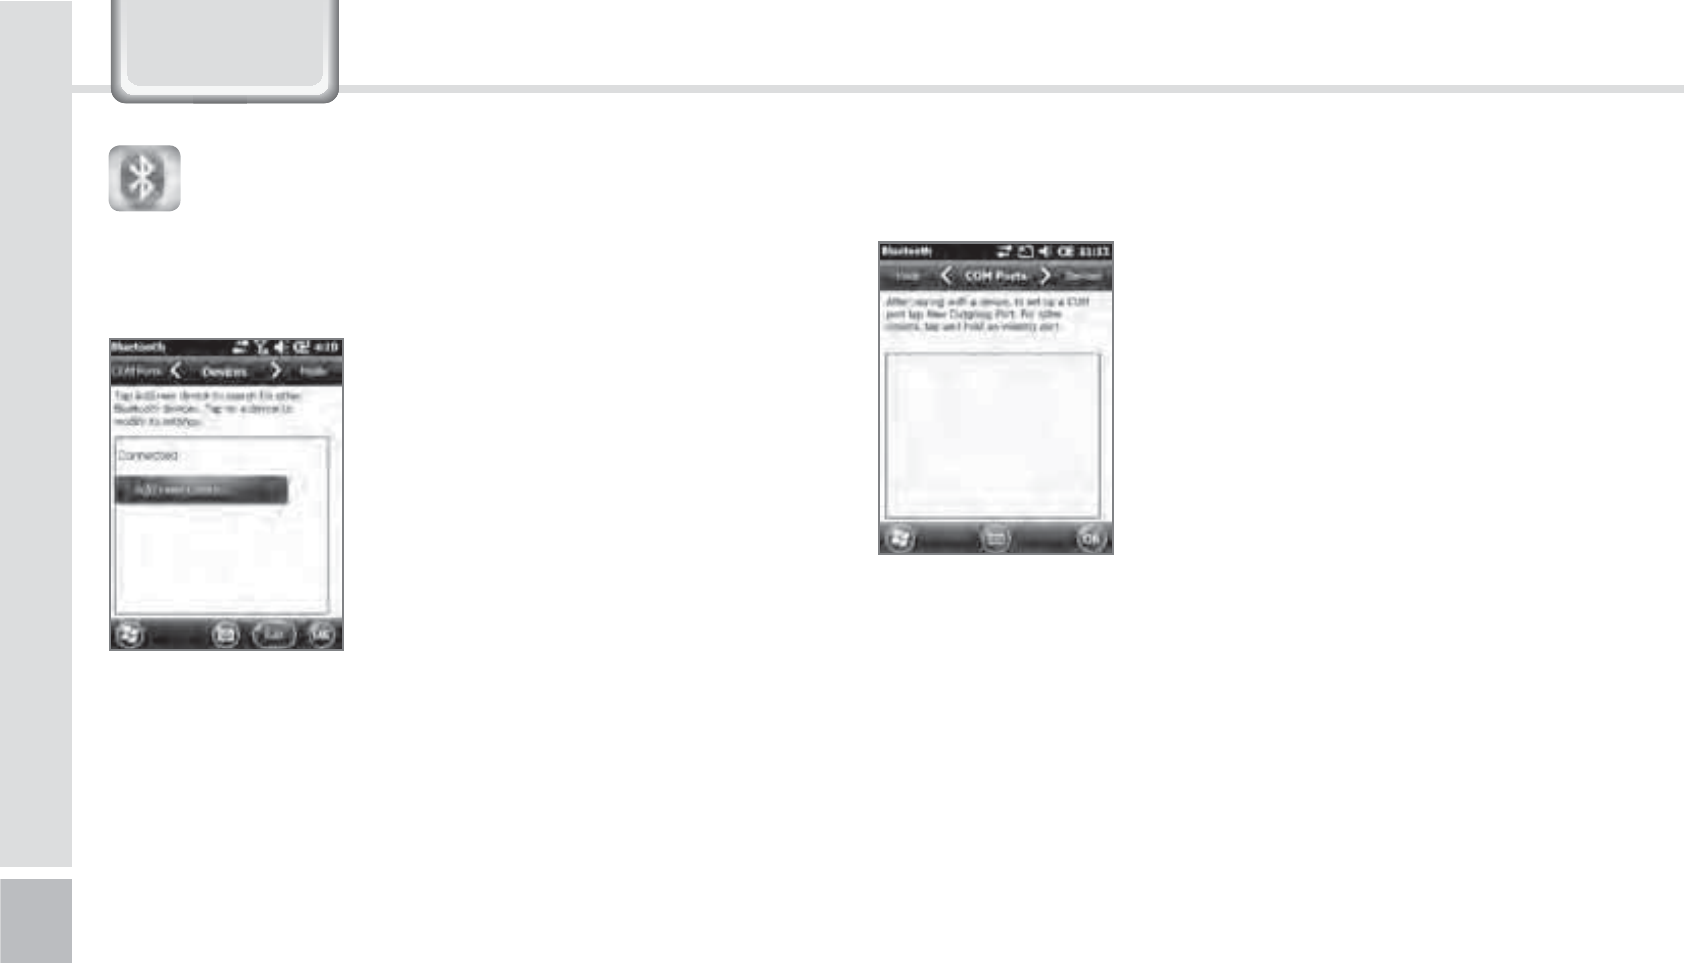
devices and pair (connect).
Way to set up your Bluetooth
1
Press [Search for devices] to search other Bluetooth
devices.
2
Select a Bluetooth device and press [Next].
BIP-1500
47
3
Type in the password to connect with the selected
device and press [Next]. (The password will be
different for every device. Please refer to manual)
4
Check if you are connecting to the right device. It
correct, press [Finish].
5
If the model name and icon of the device you have
chose appears, you are finished connecting.
The pairing method is different for every
Bluetooth devices. Please read the manual for
other Bluetooth devices.
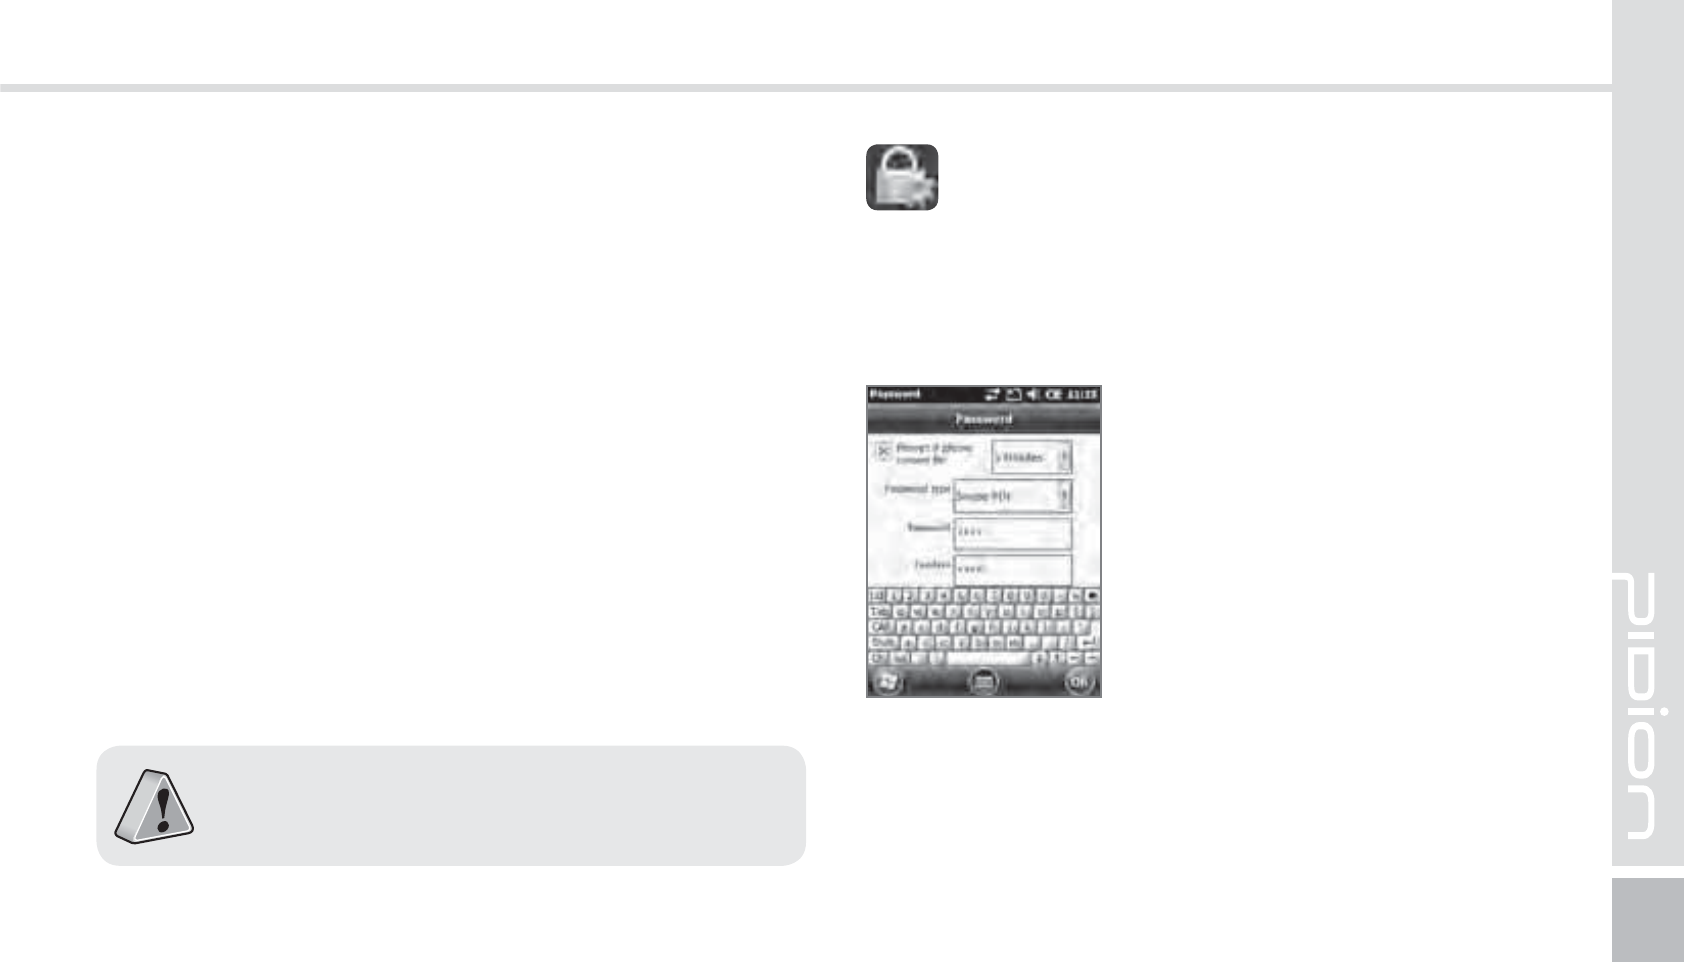
Password
Set up a password for your device every time you turn
it on.
Start
Ķ
Settings
Ķ
Lock
You must input your password
twice.
After selecting [Press ok if
the device is not used for the
following time] set up a time.
The password must be 4~6 characters long. Simple
passwords such as [1111] or [1234] cannot be used.
-PDL
48
BIP-1500 Manual
6HWWLQJV
If the [Check if the device is not used for the
following time] is set up, the screen below will show
when turning on your device.
After inputting your password,
press the [Unlock] button on the
bottom of the screen.
Hint
Type in a phrase in which will help you to remember
your password.
If you get the password wrong 4
times in a row, a [Hint] window
will appear.
BIP-1500
49
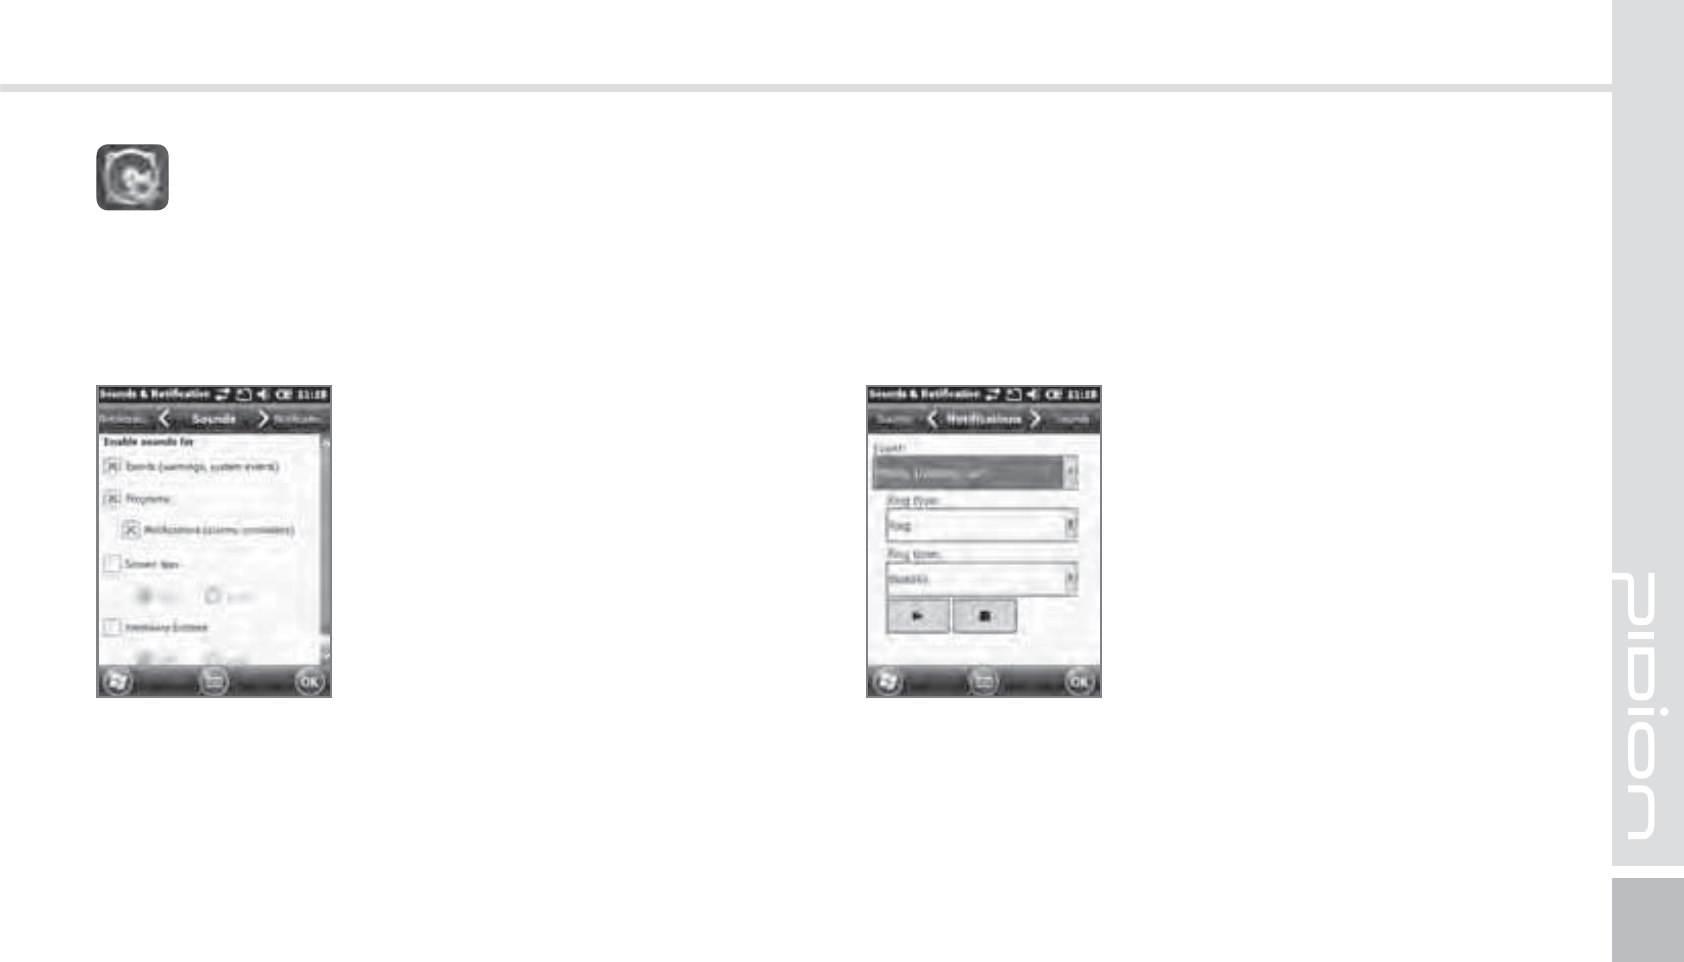
Sound
You can set up your event, program, screen pressing,
hardware button notification sounds.
Start
Ķ
Settings
Ķ
Sound and
Notifications.
If you check each item the (sound
and notification) will be setup
with a sound.
Notifications
You can set the Notifications sounds when the (sound
and notification) is set up.
Start
Ķ
Settings
Ķ
Sound and
Notifications
Ķ
Notifications
You can set the phone, wireless
network, notification, Activesync,
and etc sounds by Ring/Vibration.
4PVOEBOE/PUJGJDBUJPOT
50
BIP-1500 Manual
6HWWLQJV
Start
Ķ
Settings
Ķ
Home
1
After selecting [Use this as
background] press the [Find]
button.
2
Select the folder that has the
photo you want to use in
[Folder].
3
Select your photo.
4
After selecting you photo
press [OK].
Background Display
You can set up your photos as the home screen
background.
)PNF
Items
You can set up items to be displayed on your home
screen.
Start
Ķ
Settings
Ķ
Home
Ķ
Items
When you check the item it will
be shown on your home screen.
You can set the order of the items
that are going to be shown by
using the [Move up] / [Move
down] button.
BIP-1500
51
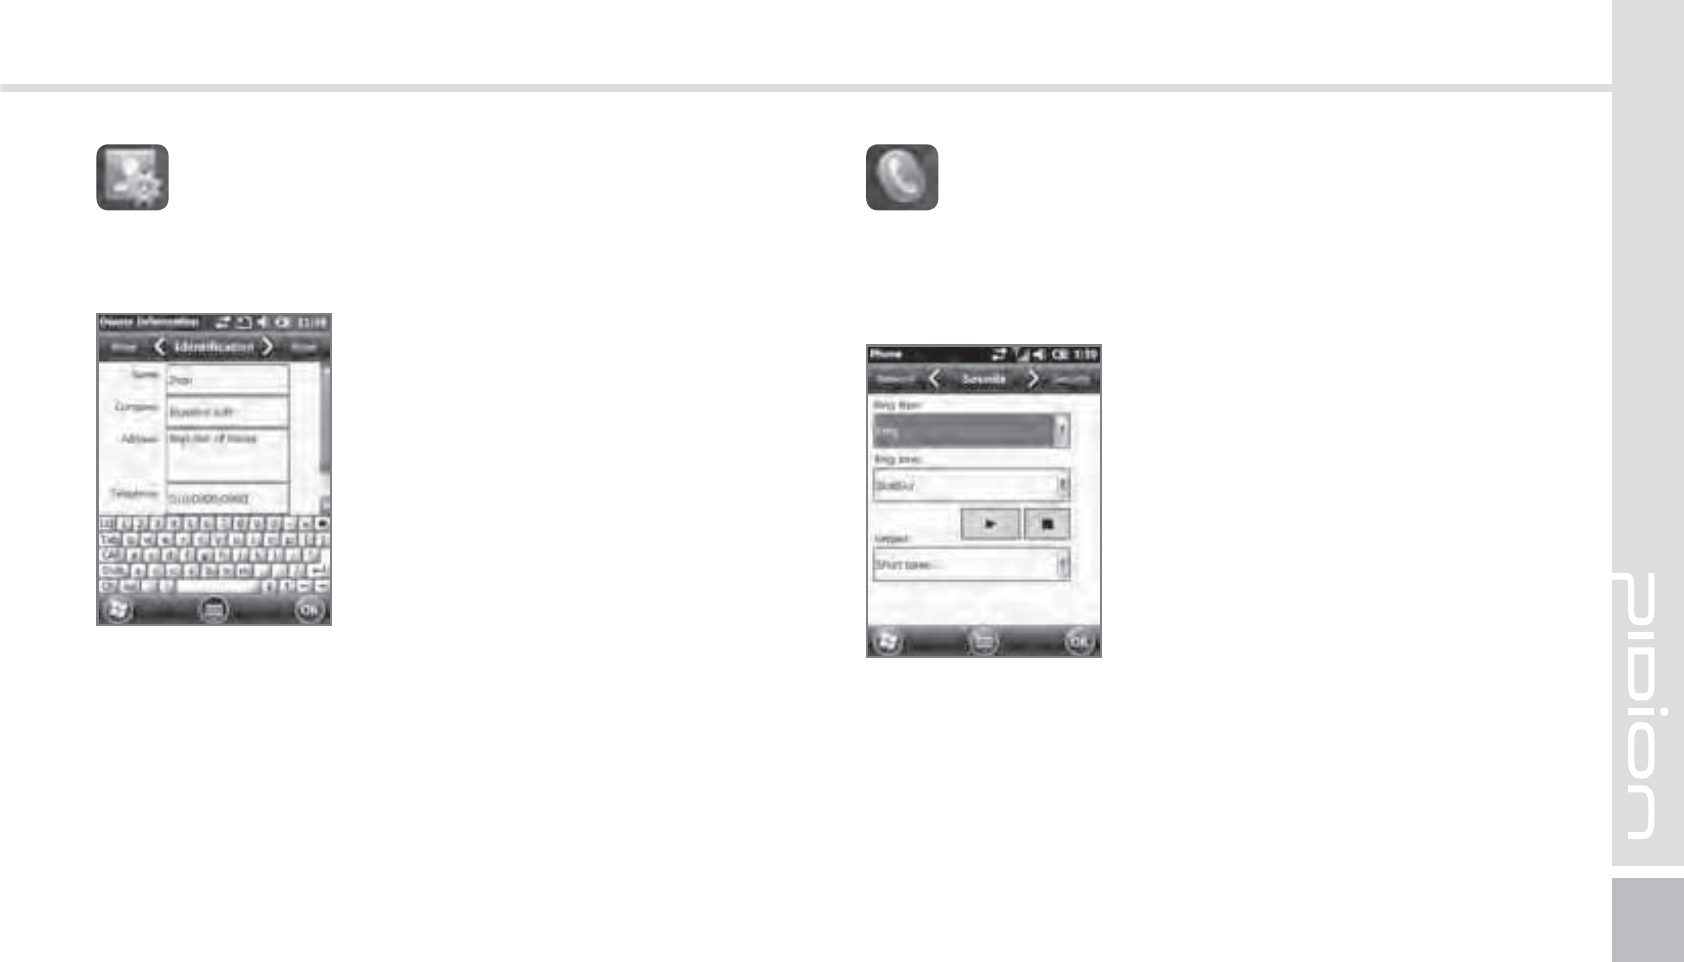
You can set up a memo or your personal information.
Start
Ķ
Settings
Ķ
Personal
Ķ
User Information
You can set your name, company
name, address, phone number,
email address, and memo to be
shown when your device turns
on.
6TFS*OGPSNBUJPO
Start
Ķ
Settings
Ķ
Personal
Ķ
Phone
Ring/Vibration : You can set as
Ring / Ring(getting louder) /
Ring only once / vibrate / Ring
and vibrate / Ring after Vibrate
/ None.
Ring tones : You can adjust the
Ring tones.
Keypad : The key pad sound
can be adjusted to Long tone /
Short tone / Off when keypad is
selected.
1IPOF
Phone
You can adjust/turn off the devices sounds.
52
BIP-1500 Manual
6HWWLQJV
Battery power / Exterior power
To save battery, you can set the battery power and
exterior power to be turned off automatically.
Start
Ķ
Settings
Ķ
System
Ķ
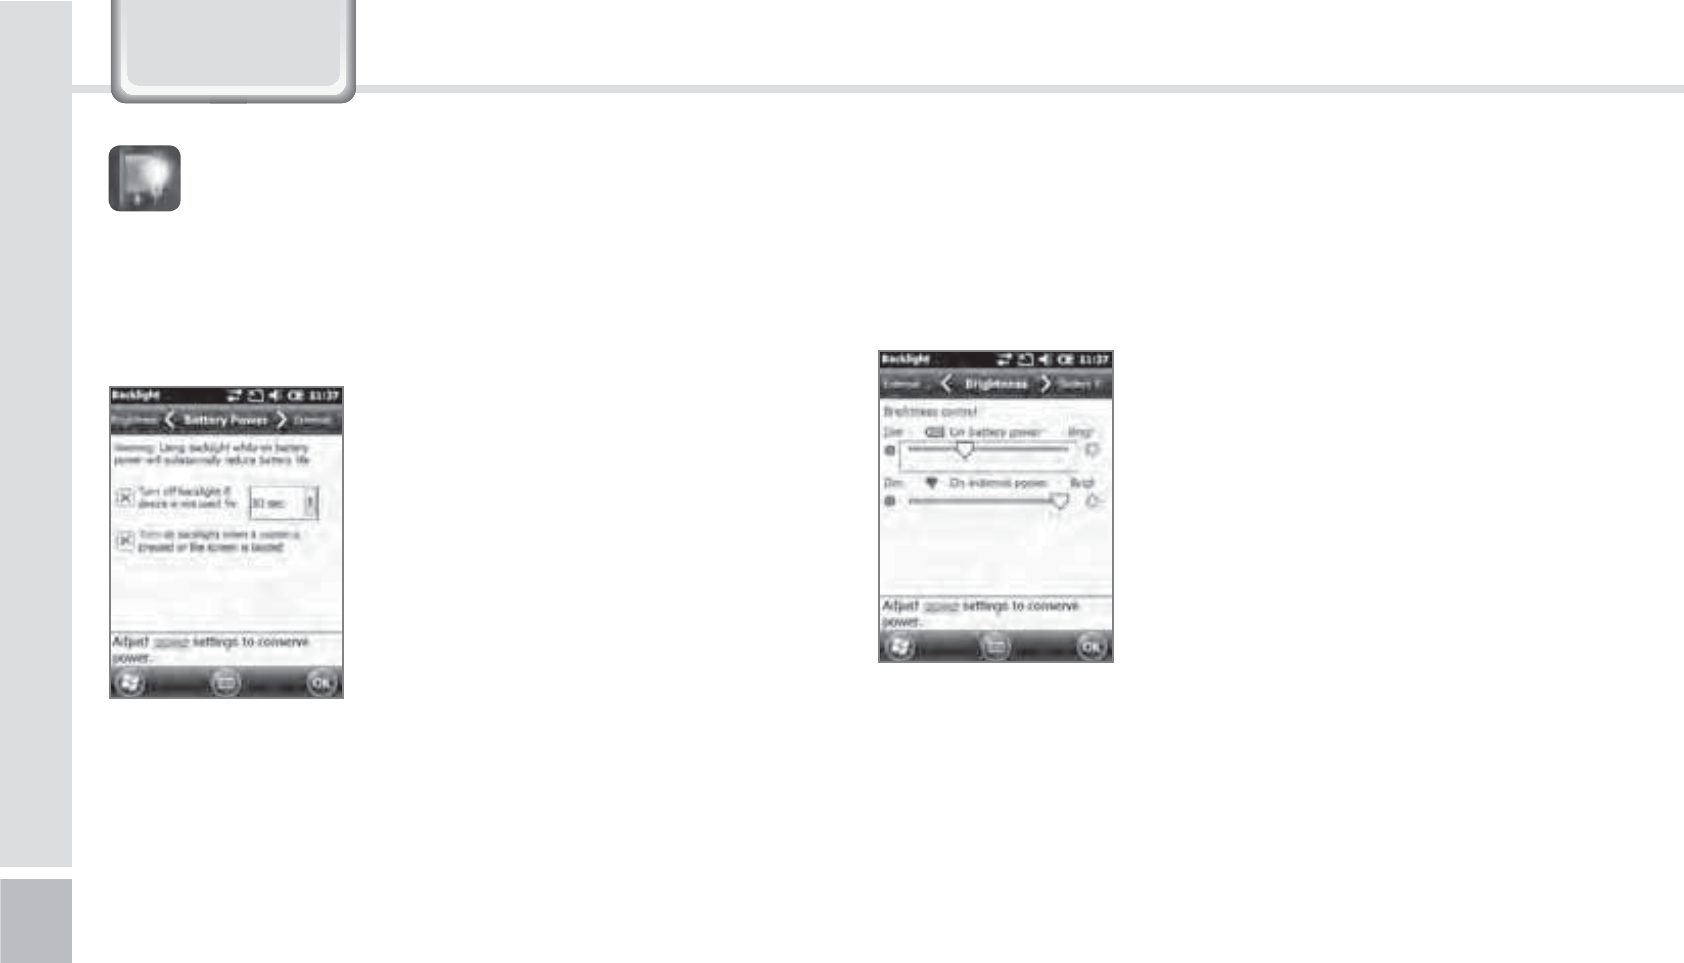
Display Light
The shorter you adjust your
display time, the longer your
battery will last.
You can turn the light back on
again by press the buttons of the
display.
%JTQMBZ-JHIU
Brightness
Use the slider bar to adjust the brightness.
Start
Ķ
Settings
Ķ
System
Ķ
Display Light
Ķ
Brightness
If you set the brightness of PDA
close to [Darker] mode, the
battery of PDA will last longer.
BIP-1500
53
Start
Ķ
Settings
Ķ
System
Ķ
External GPS
All the programs using GPS can
communicate with this port.
Hardware
You can designate the hardware
port in which GPS devices will
connect to.
&YUFSOBM(14
Program
Select the port you want to use by receiving data from
the program’s external GPS.
Access
If you select [Automatic GPS management] you can
receive multiple program’s GPS data simultaneously.
(4FOTPS
You can set up the usage for the G-Sensor.
Start
Ķ
Settings
Ķ
System
Ķ
G-Sensor
54
BIP-1500 Manual
6HWWLQJV
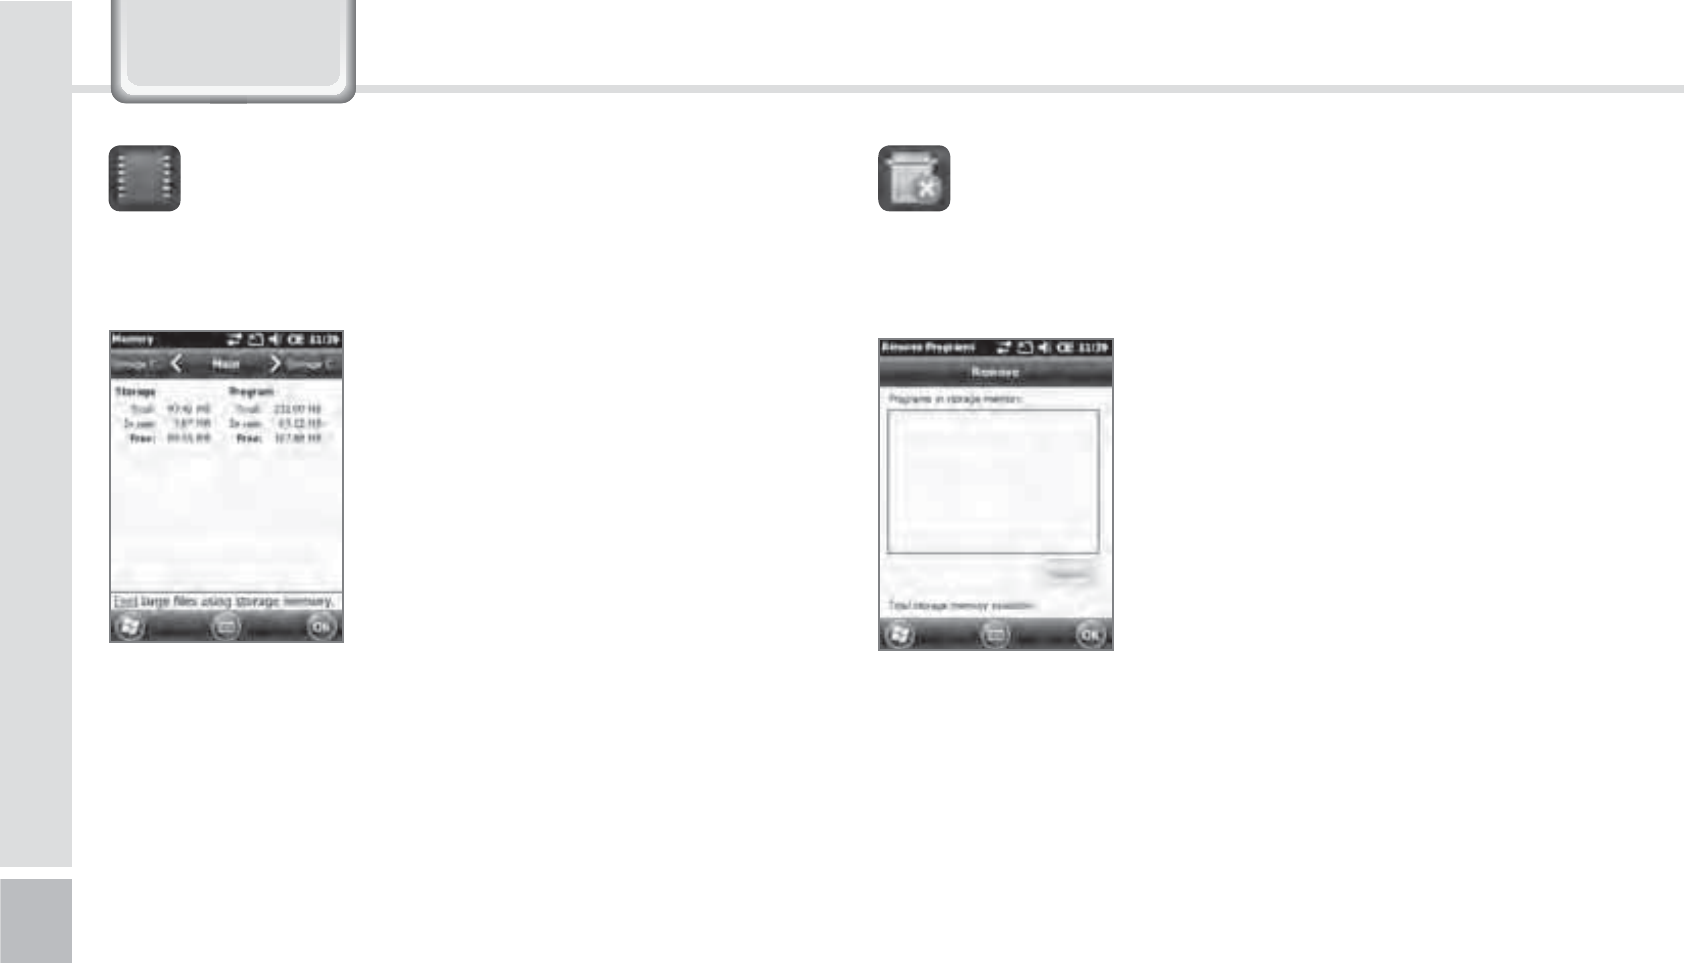
The memory’s current state (Usage, Available space)
will be displayed.
Start
Ķ
Settings
Ķ
System
Ķ
Memory
Main memory
You can check the memory for
Total/Usage/Available space of
storage and programs.
Storage Card
You can check the usage/available
space of the Micro SD memory
card and the program store.
.FNPSZ 6OJOTUBMMJOH1SPHSBNT
The programs installed by the user or in default will
be displayed.
Start
Ķ
Settings
Ķ
System
Ķ
Uninstall Program
Select the program you
want to uninstall on the list.
Press [Uninstall] and it will
automatically be removed.
BIP-1500
55
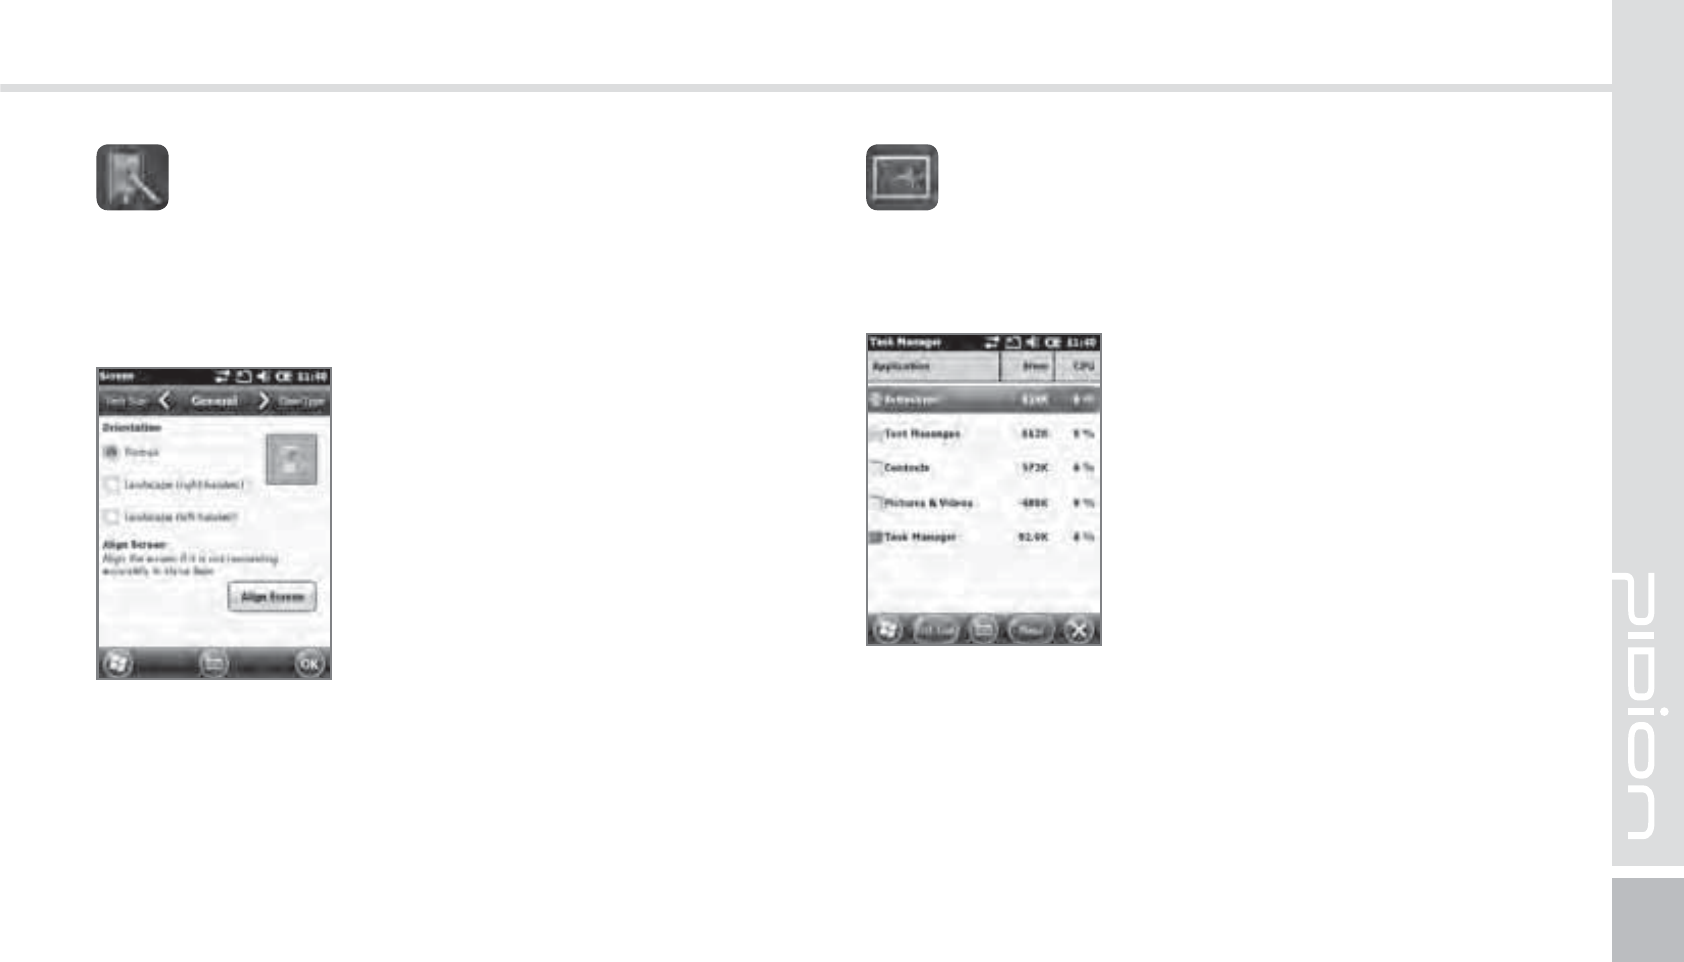
General
You can change the screen vertically, horizontally
(right hand), horizontally (left hand)
Text Size
You can adjust your text in 5 sizes.
Start
Ķ
Settings
Ķ
System
Ķ
Display
You can readjust the stylus pen
points by pressing the [Display
Adjust] button.
%JTQMBZ
The memory status of running programs will be
displayed
Start
Ķ
Settings
Ķ
System
Ķ
Program Monitor
Using the menu you can select
the running programs and to
stop it. You can also stop all the
programs running at once.
1SPHSBN.POJUPS
56
BIP-1500 Manual
6HWWLQJV
You can connect with a PC.
Start
Ķ
Settings
Ķ
Connections
Ķ
USB-PC connection
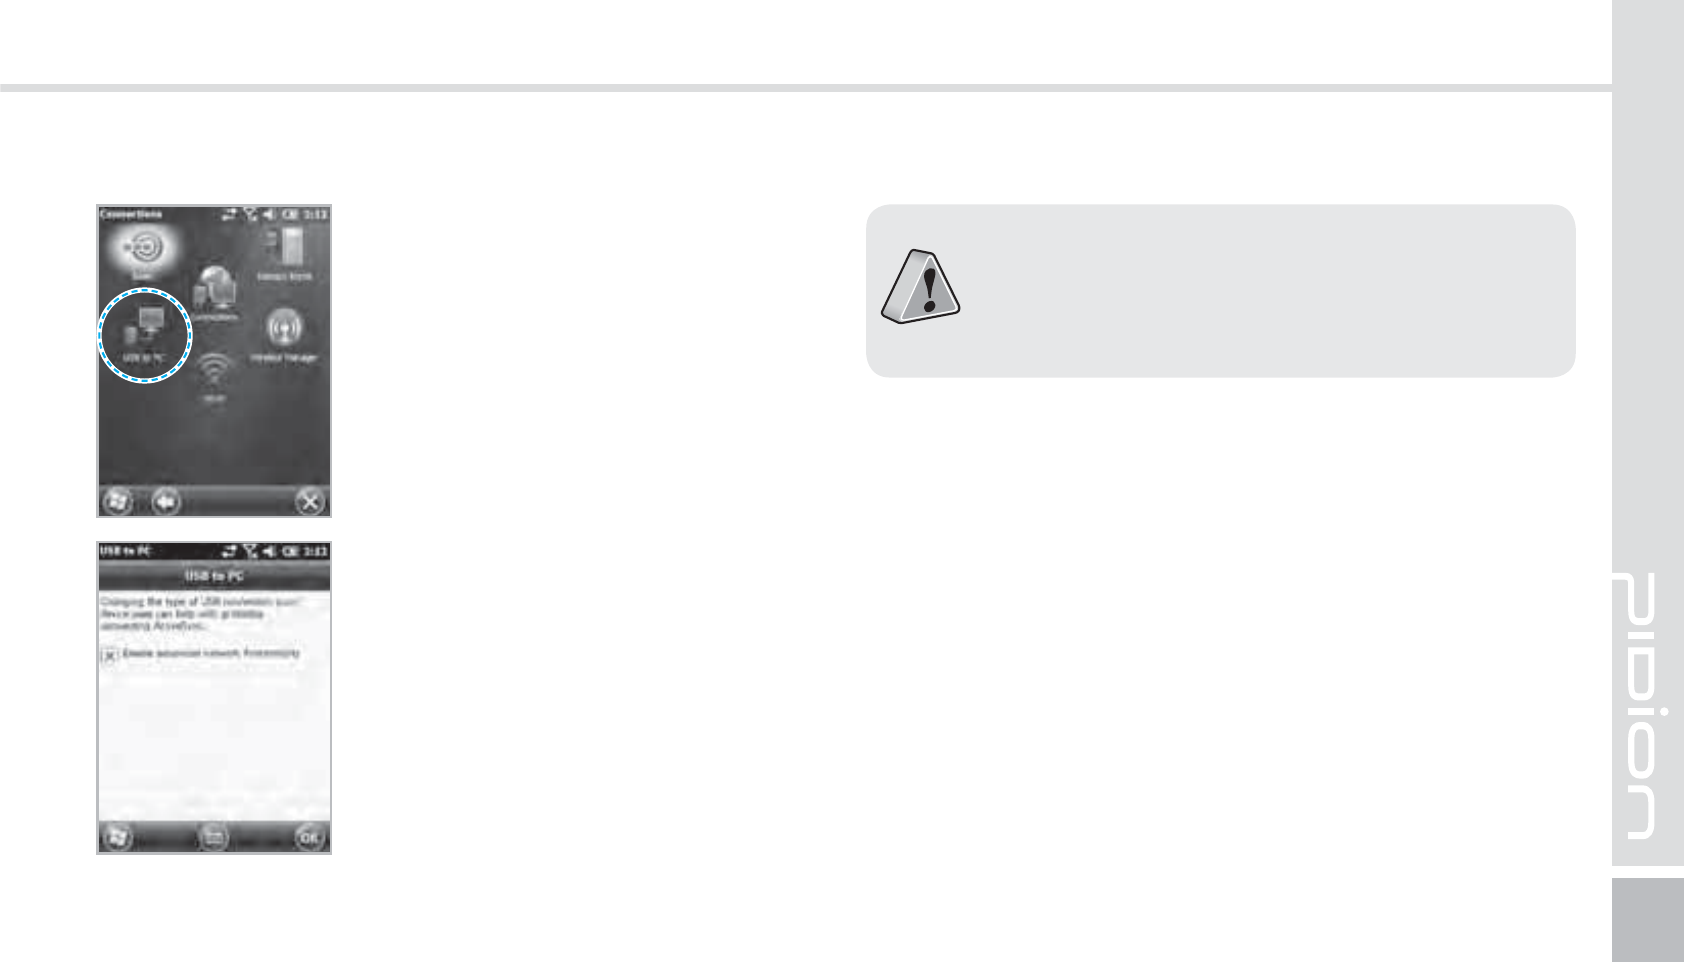
The computer uses a tunneling
VPS can connect with your
device with RNDIS. In this case,
try to connect un-checking the
[Advanced Network Function].
If the [ActiveSync] does not work
properly, try using the [Advanced
Network Function].
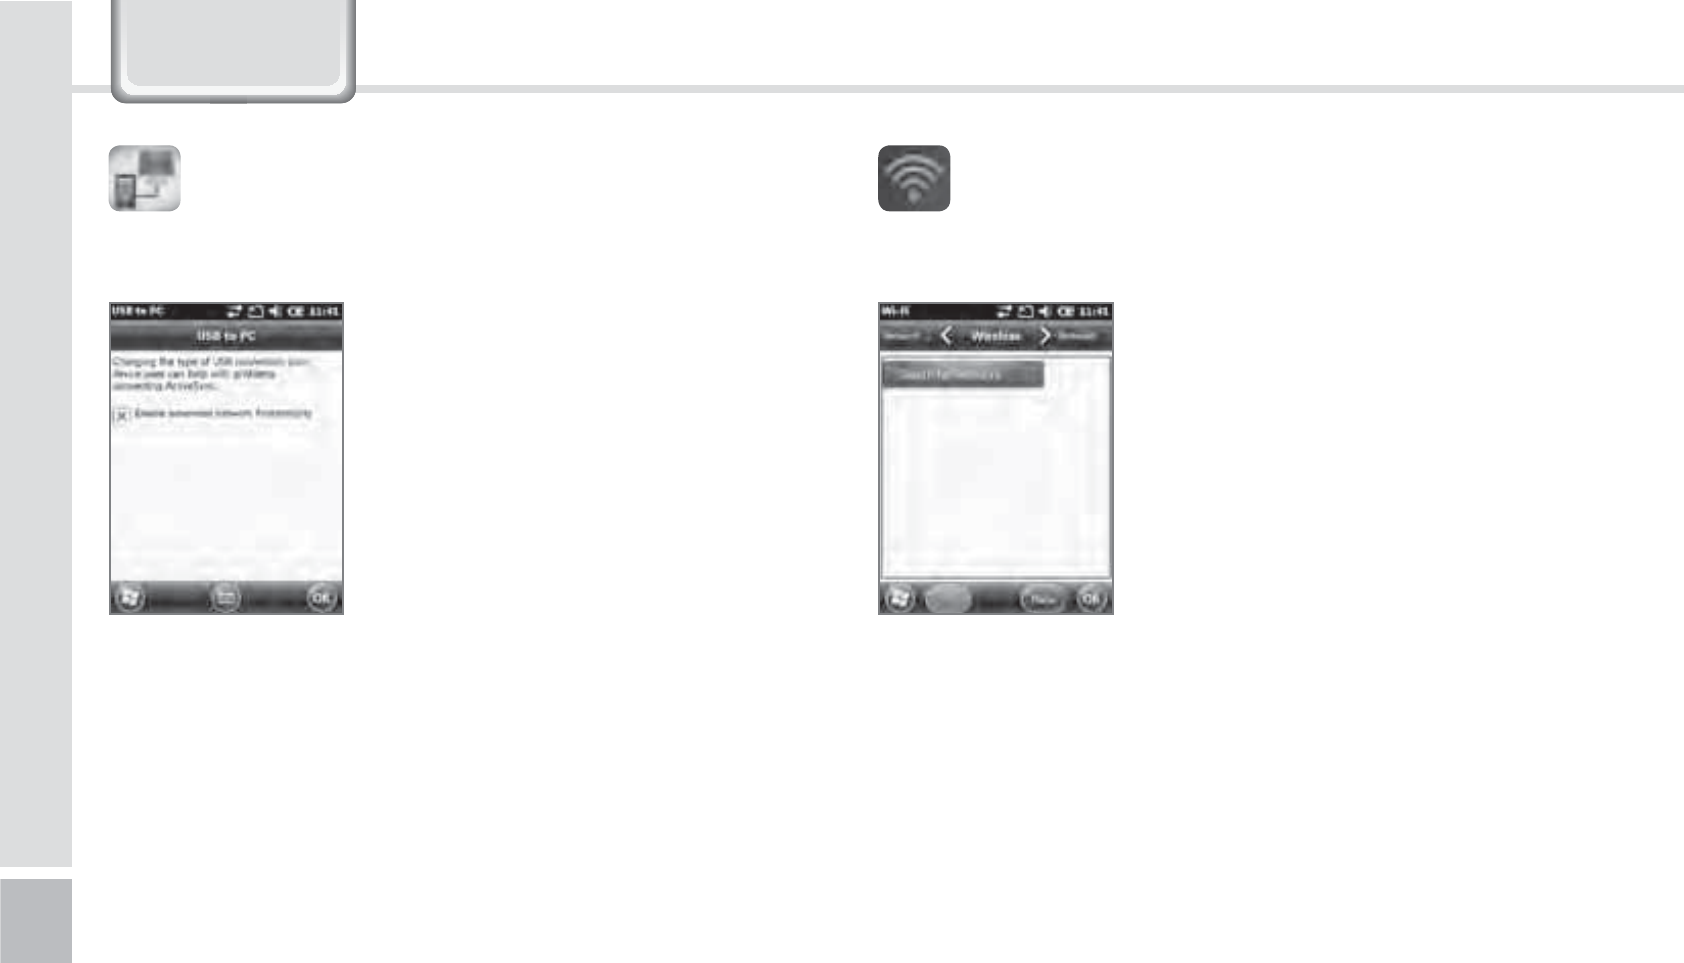
64#1$$POOFDUJPO
Setting up the wireless internet with Wi-Fi.
Start
Ķ
Settings
Ķ
System
Ķ
Wi-Fi
Through the wireless internet
settings, you can set up the Wi-Fi
that connects the surrounding AP
(access point).
8J'J
BIP-1500
57
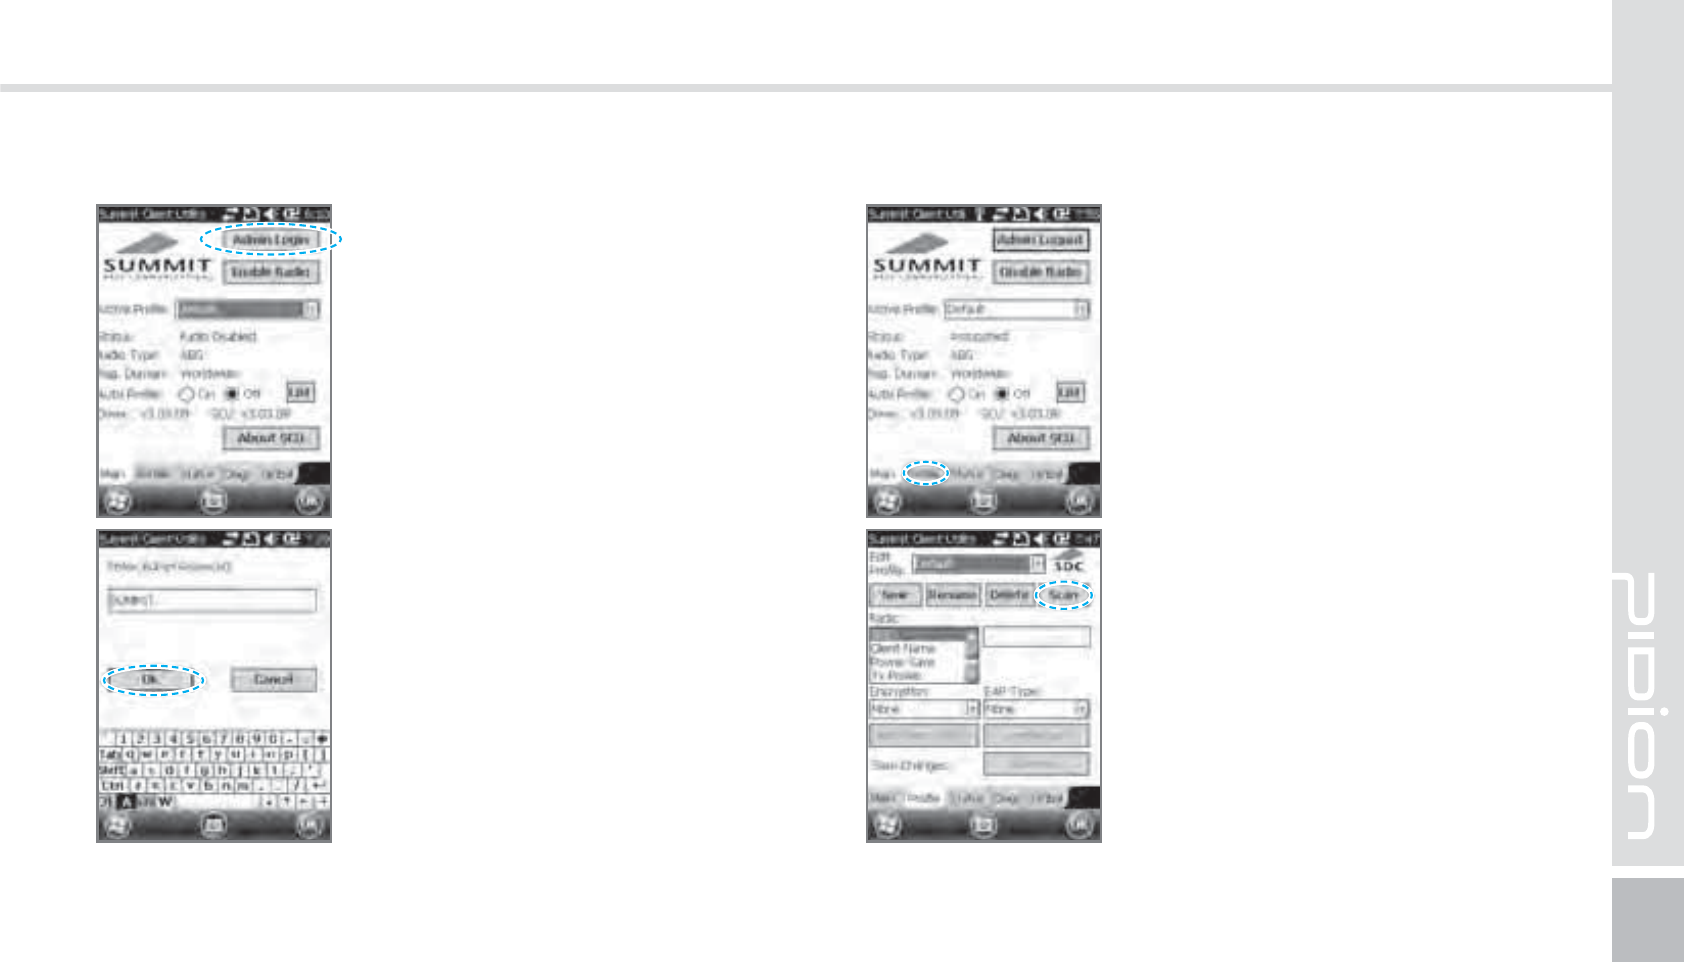
46..*5
Setting up Wireless Internet
1
Select the [Admin Login]
button on the top right.
2
Type in SUMMIT(Capitalized)
in the password box and press
[OK] button.
3
Select the [Profile] buttons on
the bottom.
4
Select the [Scan] button on the
top right.
58
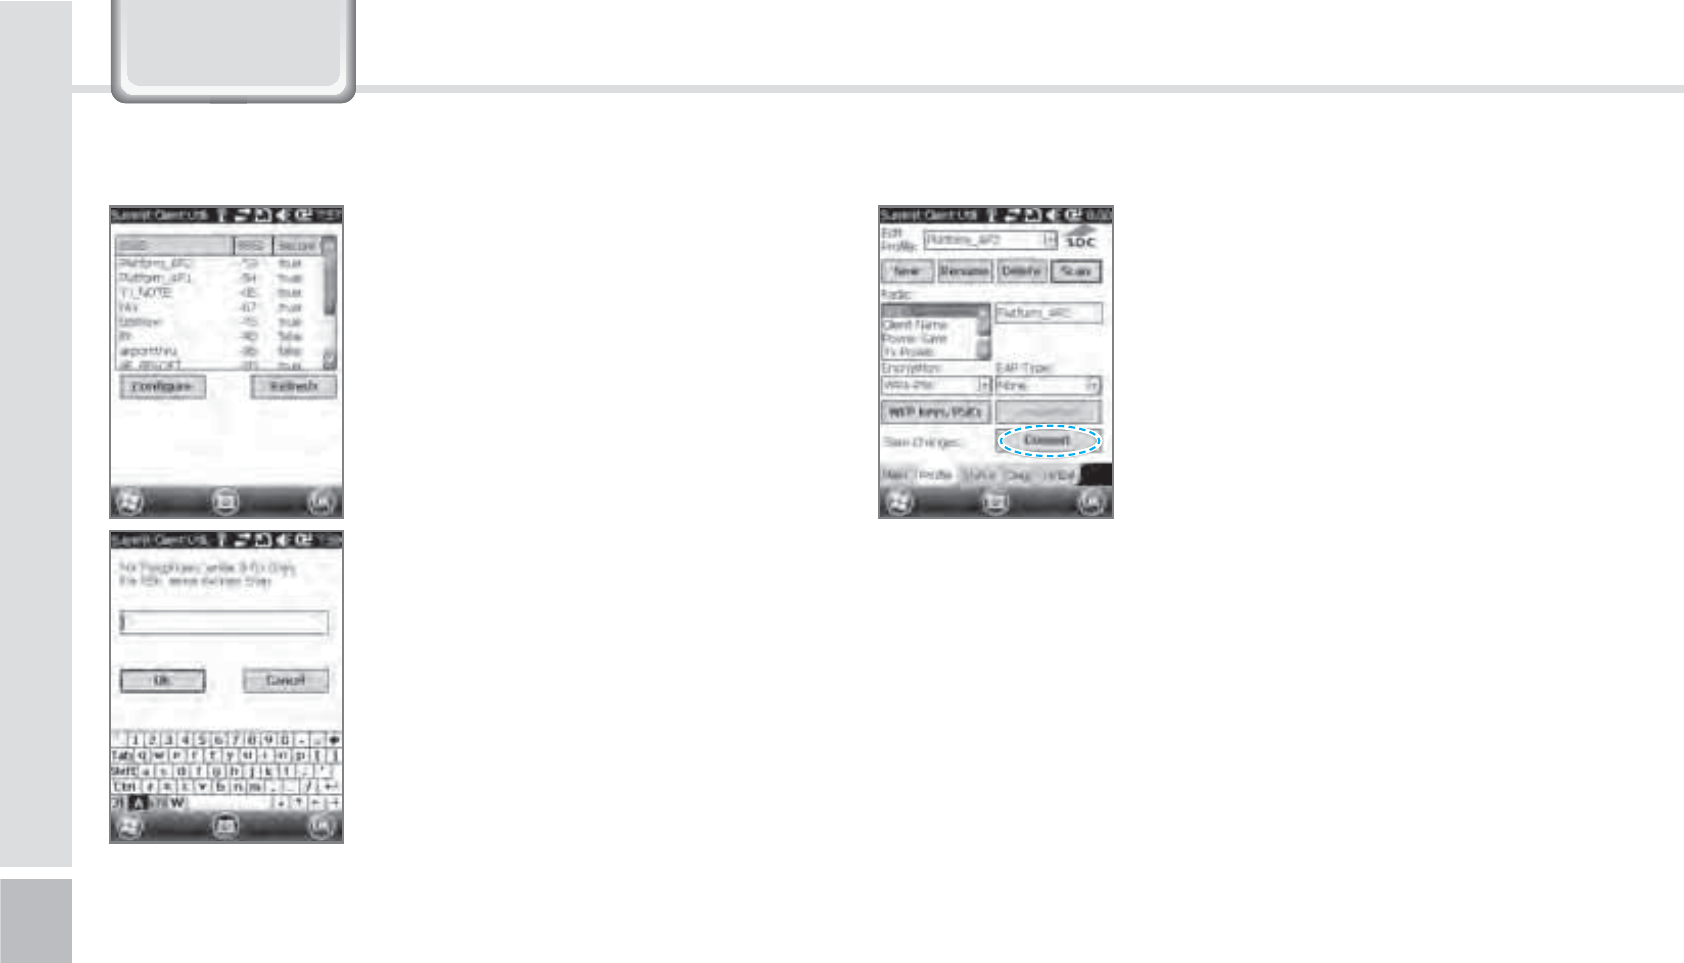
BIP-1500 Manual
6HWWLQJV
5
A list of AP your device
can connect to will appear.
Connect to ex.) Platform_AP2.
(Please select a desired AP)
When the popup appears,
Press [YES].
6
Type password in the box of
the AP you wish to connect
and press [OK] buttons.
7
Once you press [Commit],
you will be connected to the
internet.

BIP-1500
59
Item Features
8$%." TJOHMFCBOE.)[6.54)4%1"
$16 .BSWFMM19".)[
04 8JOEPXT.PCJMF
.FNPSZ 3"..#30..#
%JTQMBZ ”27("Y5PVDI8JOEPX
”7("Y5PVDI8JOEPX0QUJPOBM
8-"/ *&&&CH
*&&&BCH0QUJPOBM
#MVFUPPUI #MVFUPPUI7&%3$MBTT
(14 "(14TVQQPSU4J3'*OTUBOU'JYɇ
$BNFSB ."'-&%'MBTI
4MPU .JDSP4%
64# 64#'VMM4QFFE
Item Features
#BUUFSZ N")-JJPO
%JNFOTJPO
UIFSNBMQSJOUFS
-Y8Y%NN
UIFSNBMQSJOUFS
-Y8Y%NN
*OUFSGBDF 1JO1PSU
0QFSBUJPO5FNQFSBUVSF °UP°'°UP°$
&OWJSPONFOU N4UFFMTVSGBDFESPQTQFSTJEFT
'SFRVFODZ
8-"/ *&&&CH
*&&&BCH0QUJPOBM
#MVFUPPUI
'SFRVFODZ.)[_.)[
/VNCFSPGDIBOOFMT
"OUFOOBQPXFSN8BOEMFTT
.PEVMBUJPOUZQF'%
'HYLFH6SHFLILFDWLRQV
60
BIP-1500 Manual
9DOXH3DFN'HWDLOV
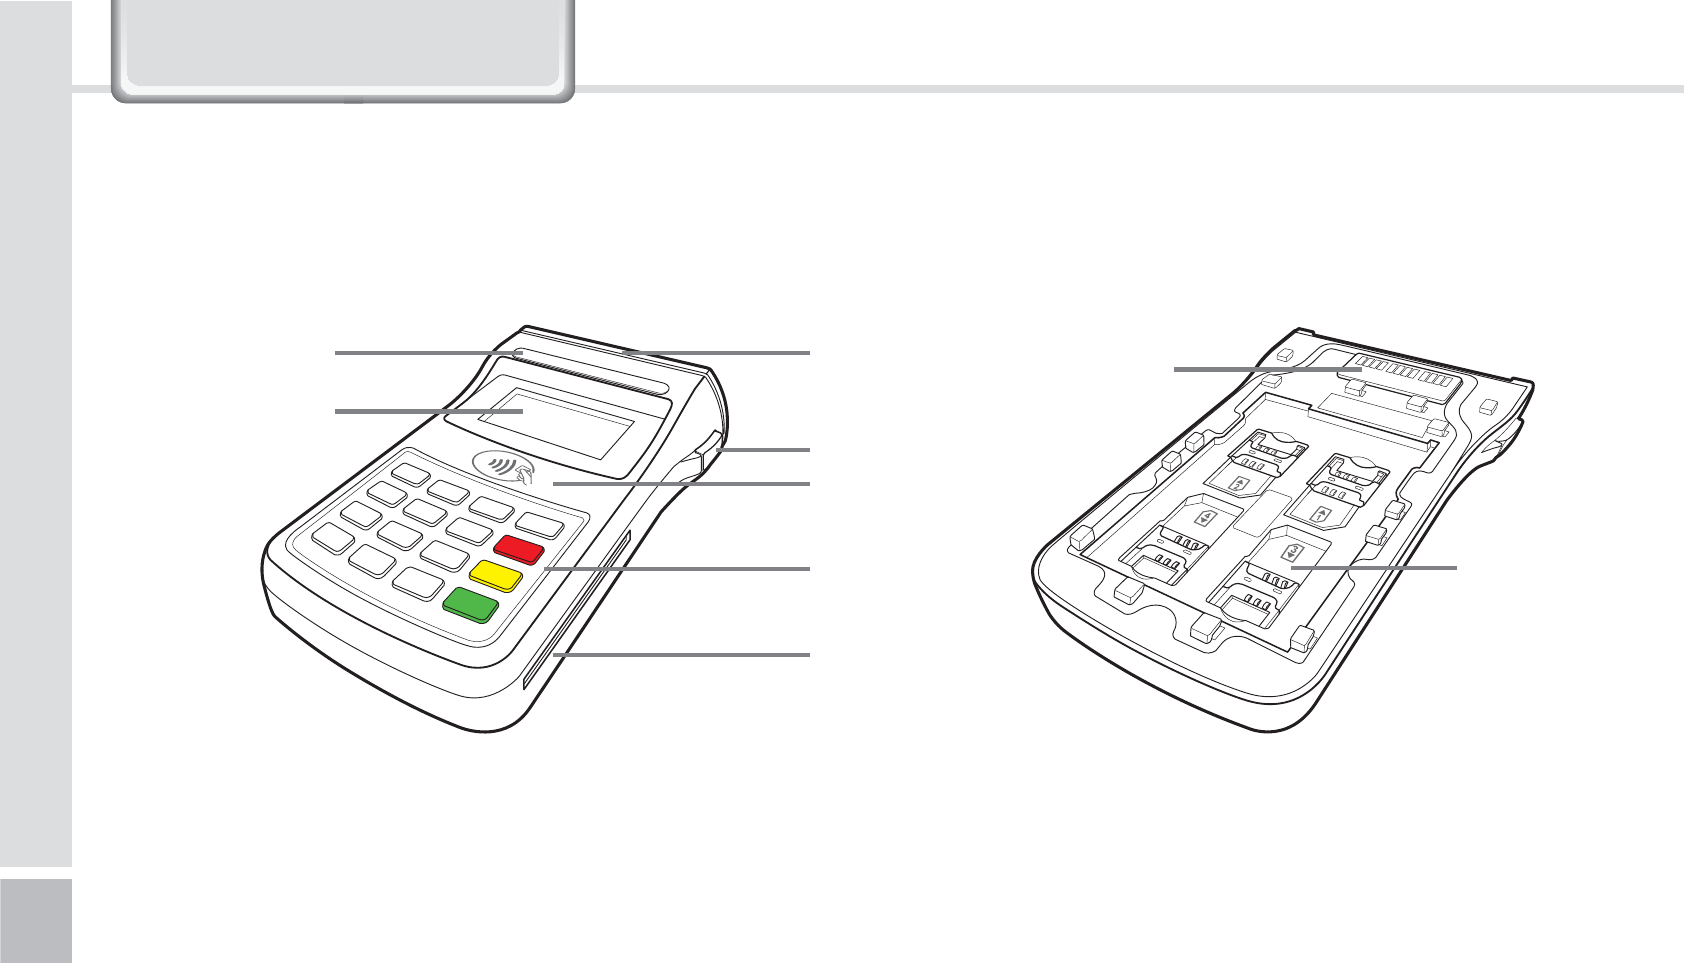
1*/1"%
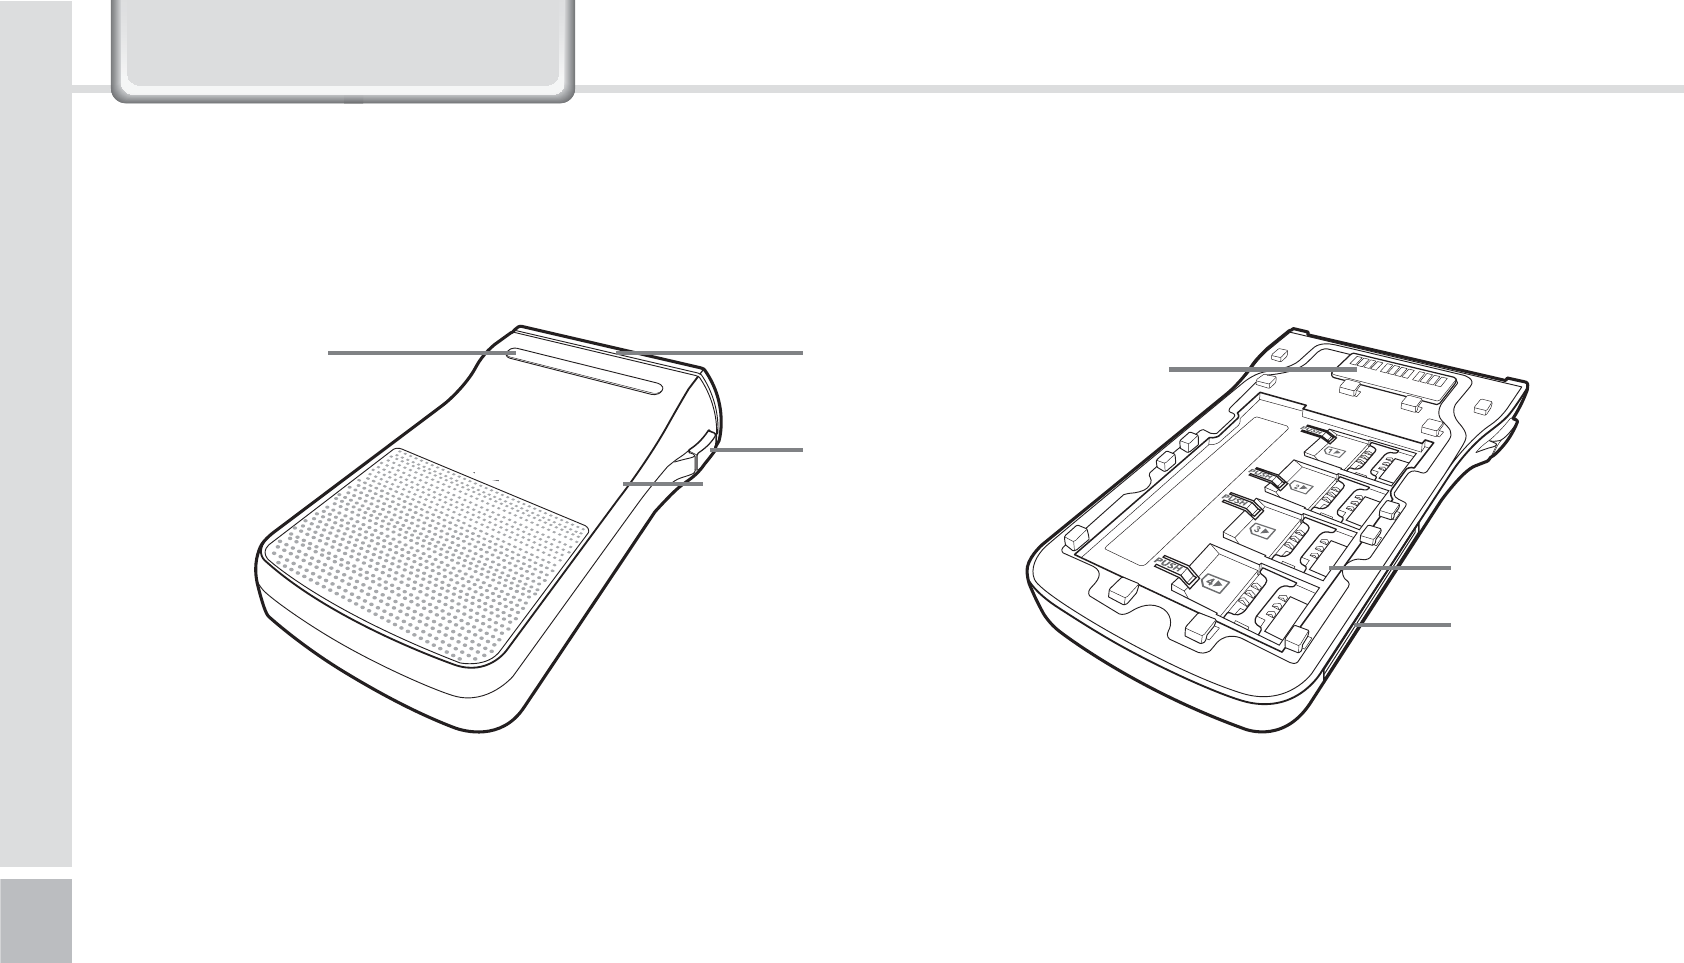
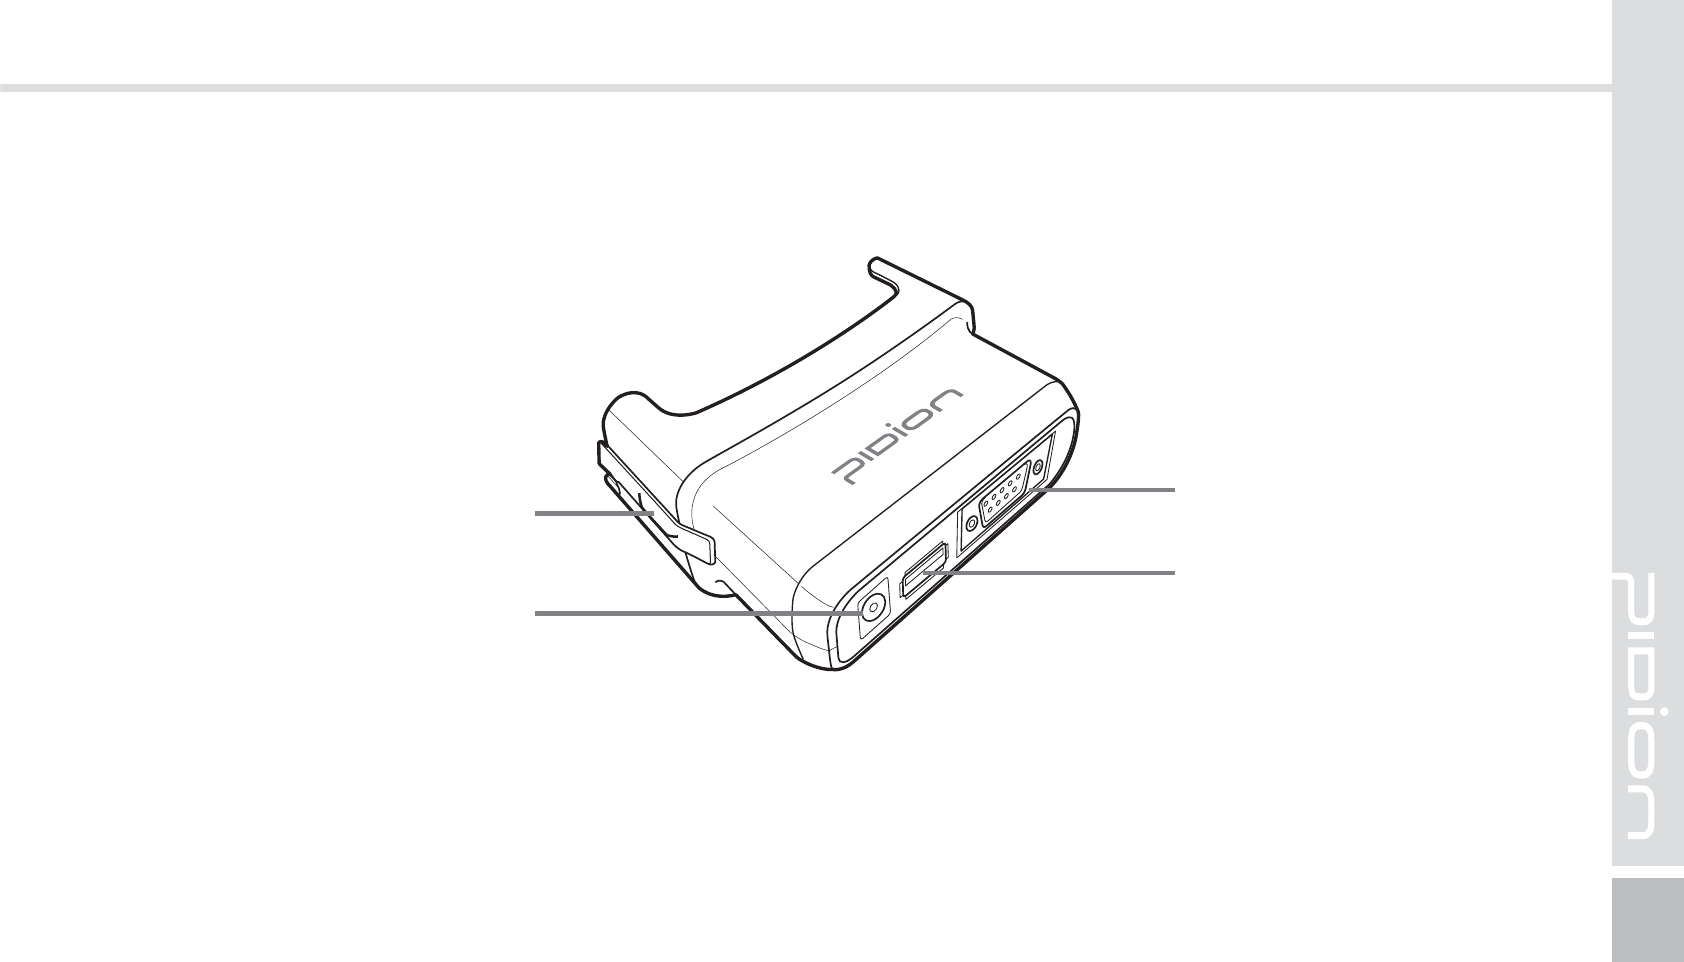
1-1. Parts of the pack
PINPAD separation button
Main to PINPAD
contact terminal
SAM Slot
LCD
RFID ANT
Keypad
IC card slot
MSR
LED to check the
state of the pack.

BIP-1500
61
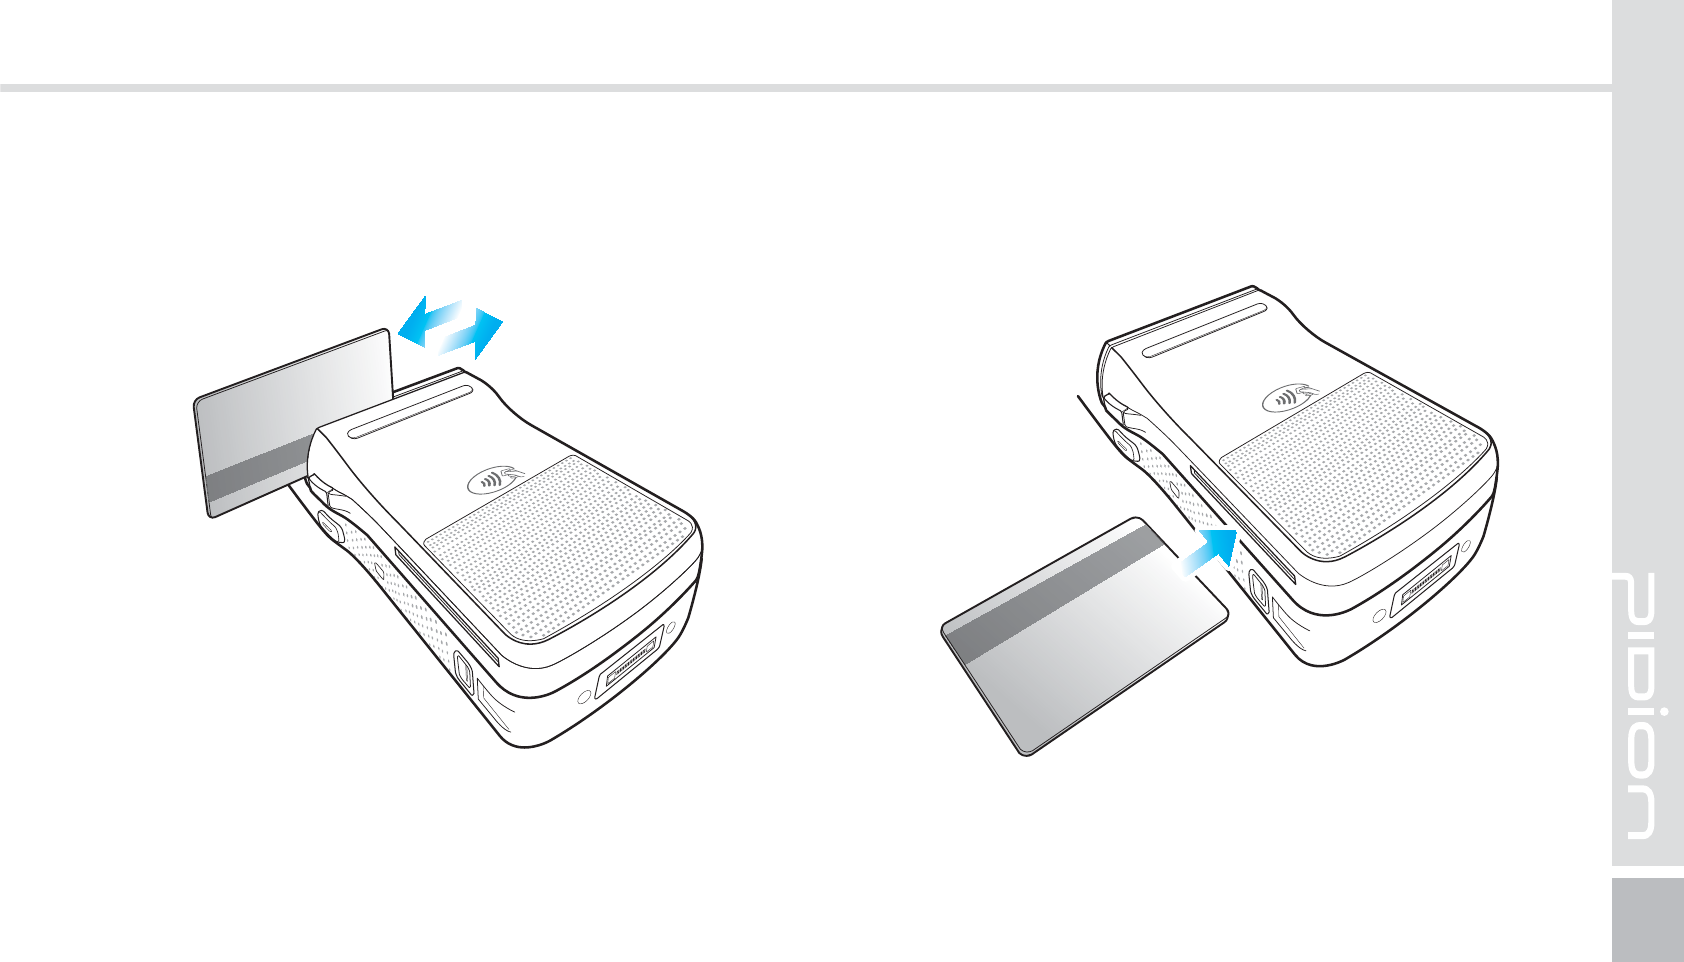
1-2. Paying with card
The card can be swiped in both directions.
Please swipe the card fluidly.
Insert with the card with the IC chip going in first.
Please make sure to insert the card all the way.
1-2-1. Paying with MSR 1-2-2. Paying with IC Card
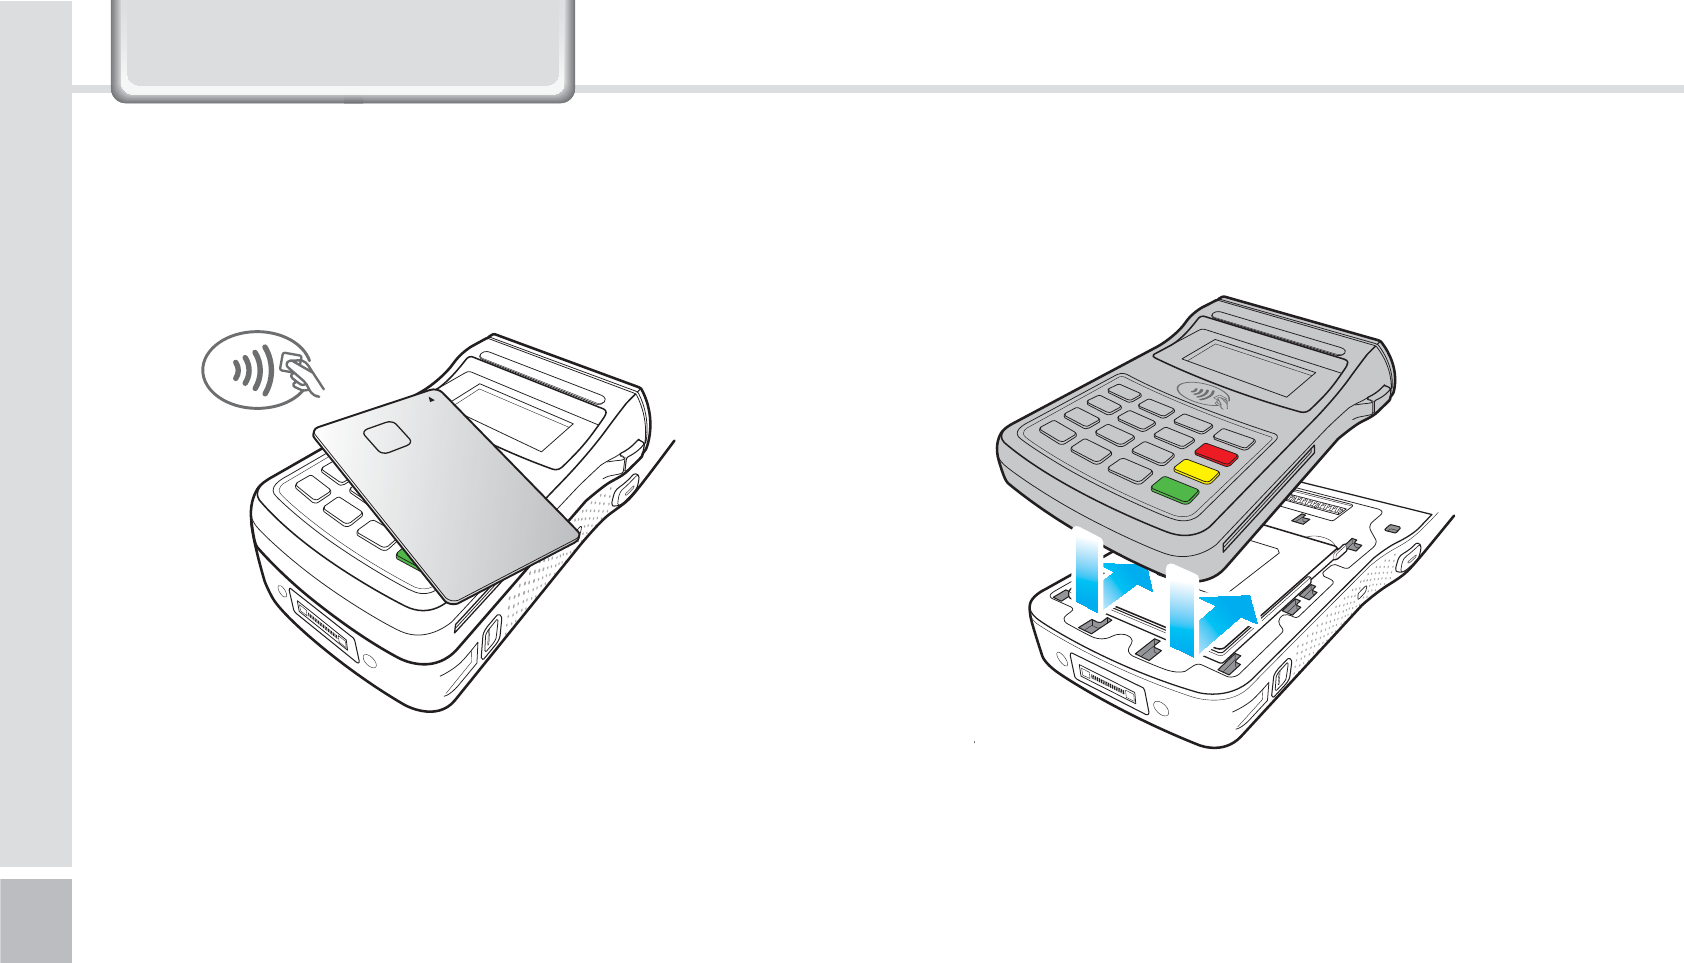
62
BIP-1500 Manual
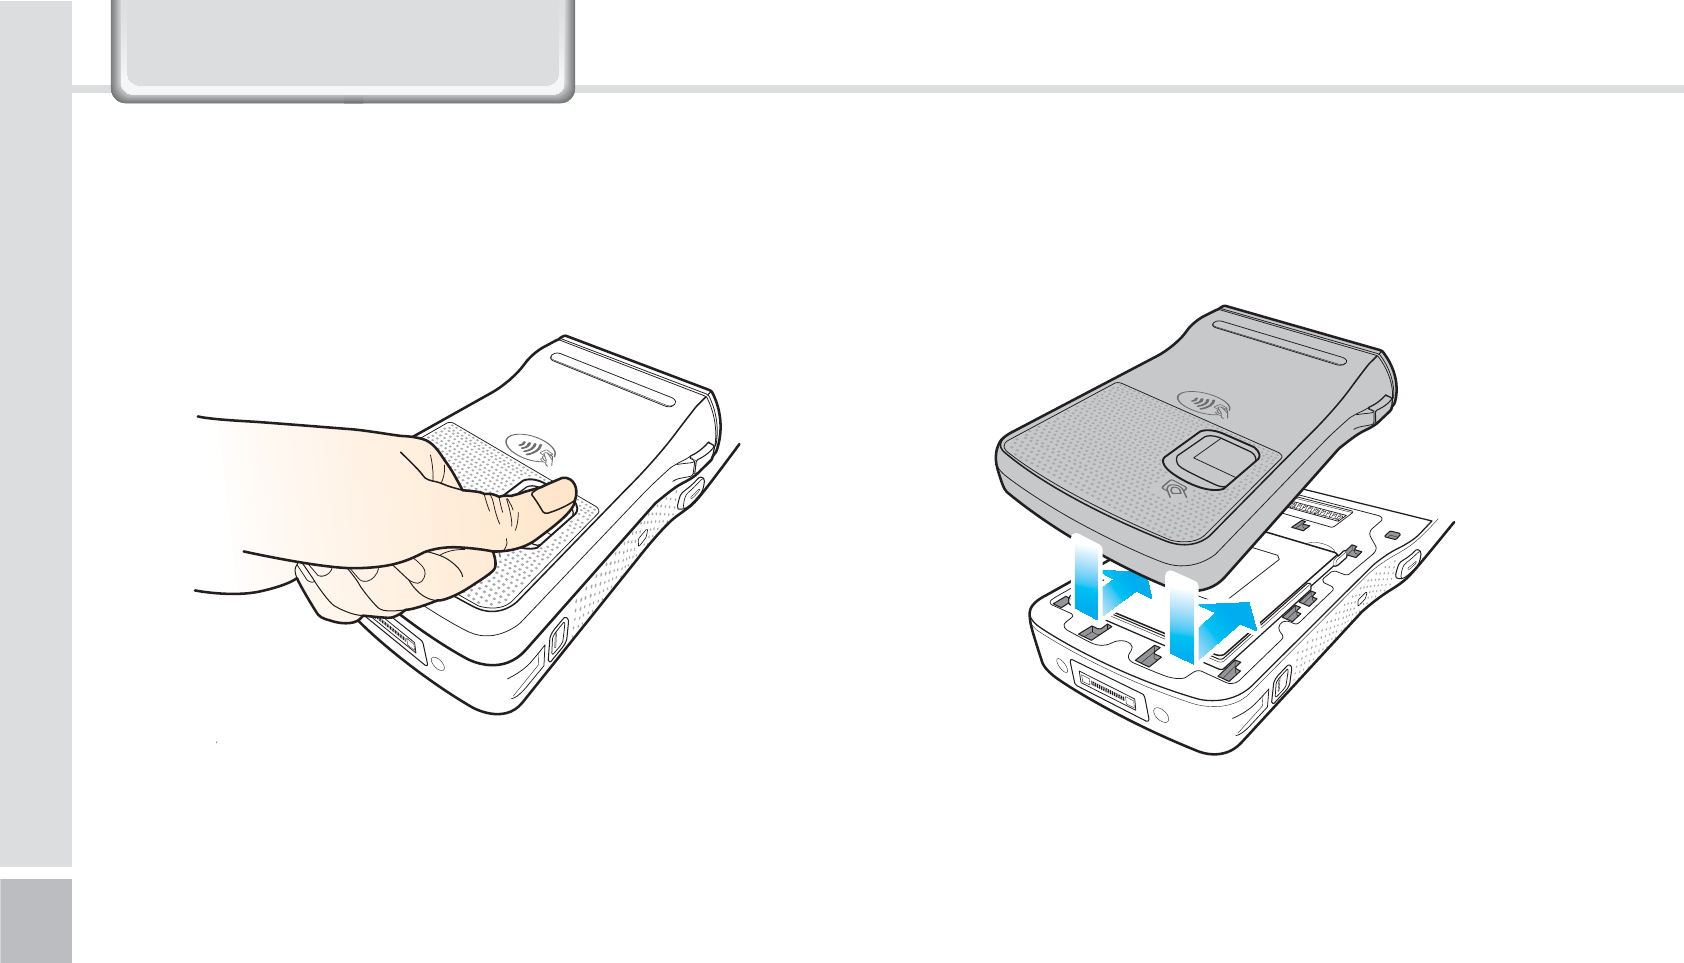
Install the PINPAD in the direction of the arrows.Make sure you place the card on the RFID antenna.
1-2-3. Paying with RFID
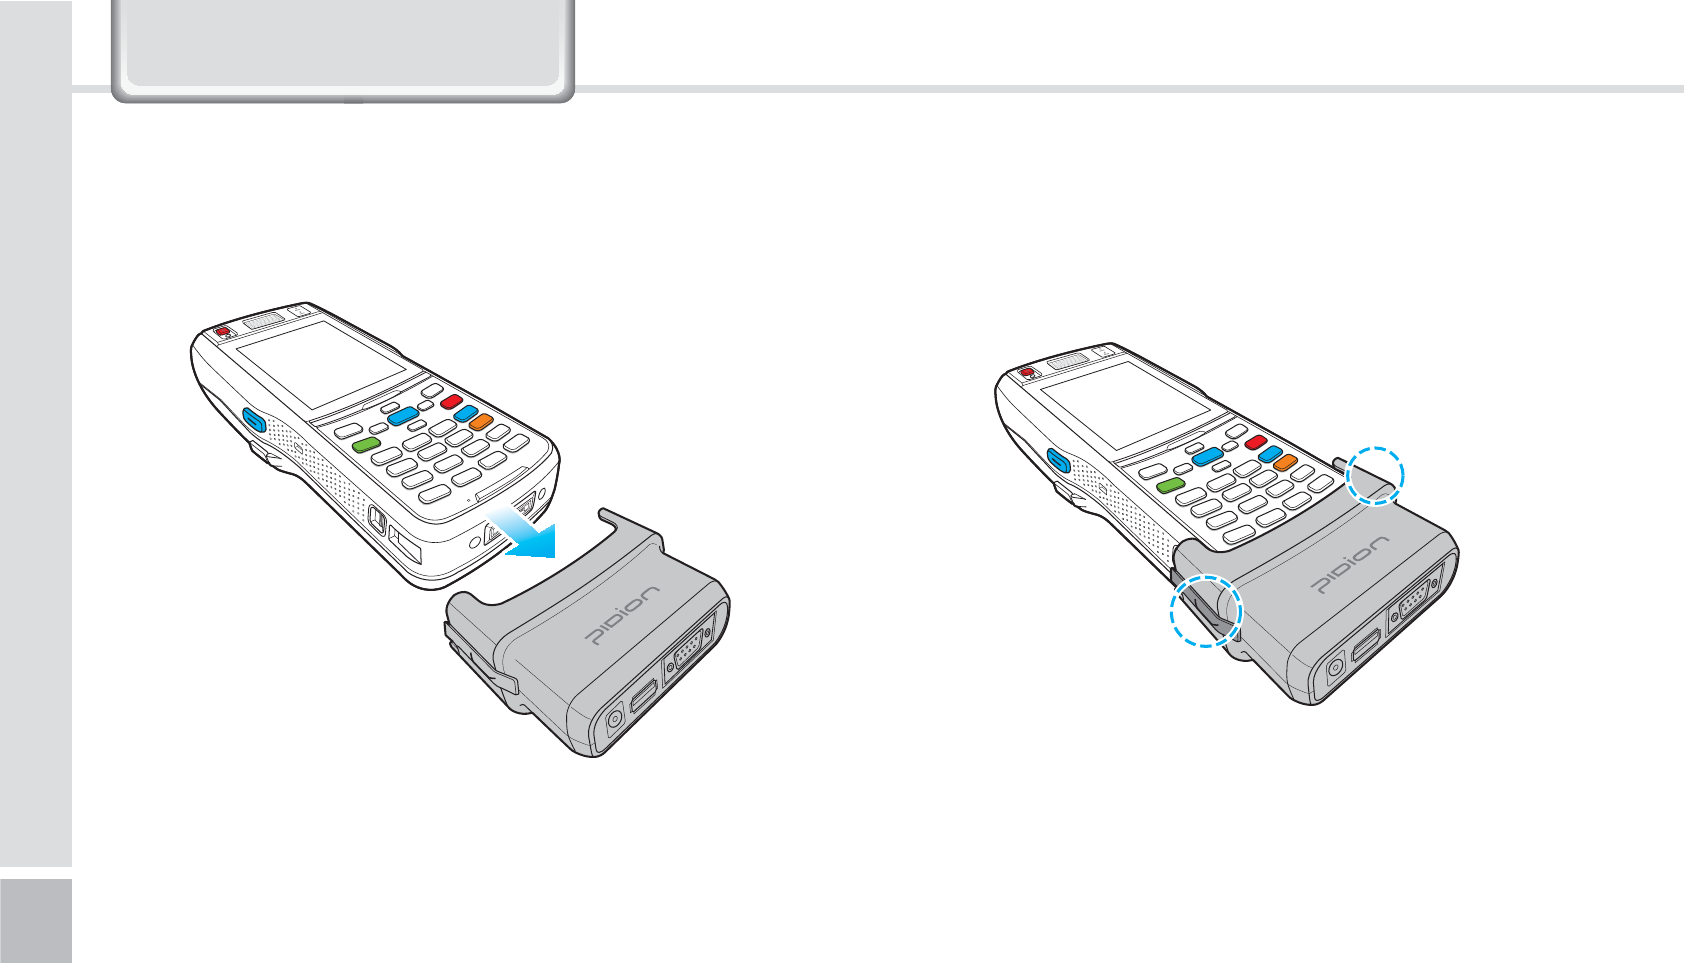
1-3. Installing/Removing the PINPAD
1-3-1. Installing the PINPAD
9DOXH3DFN'HWDLOV
BIP-1500
63
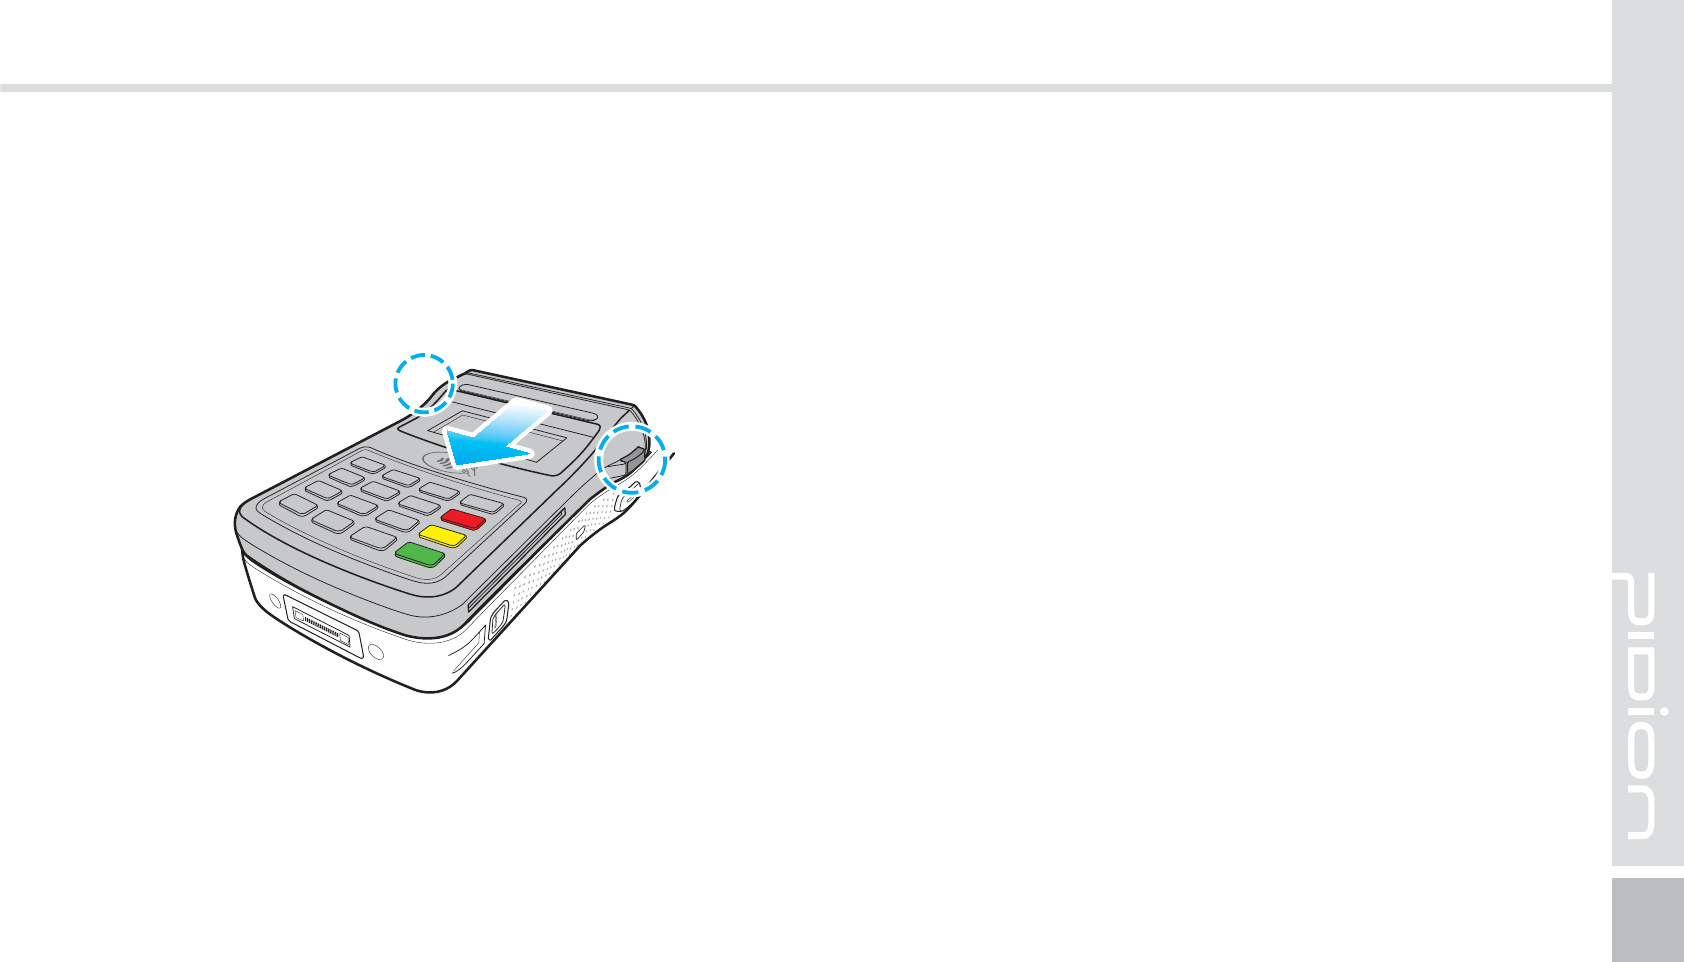
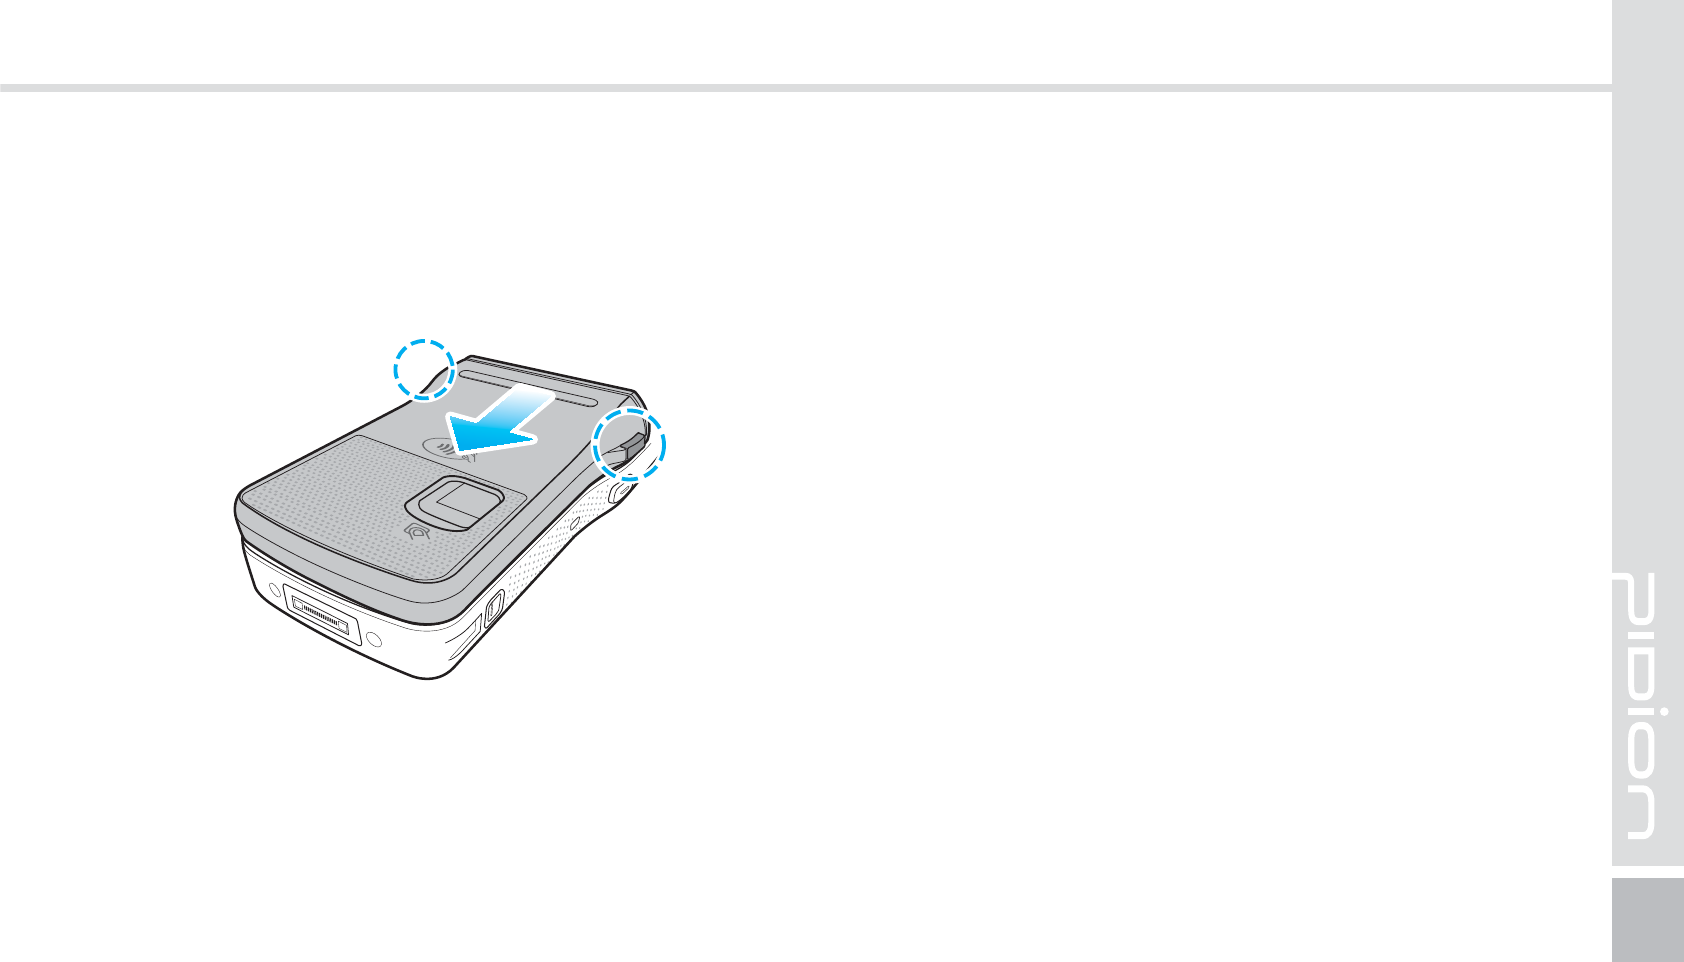
To remove, press the [PINPAD remove button] to slide
the PINPAD out in the arrow direction.
1-3-2. Removing the PINPAD
64
BIP-1500 Manual
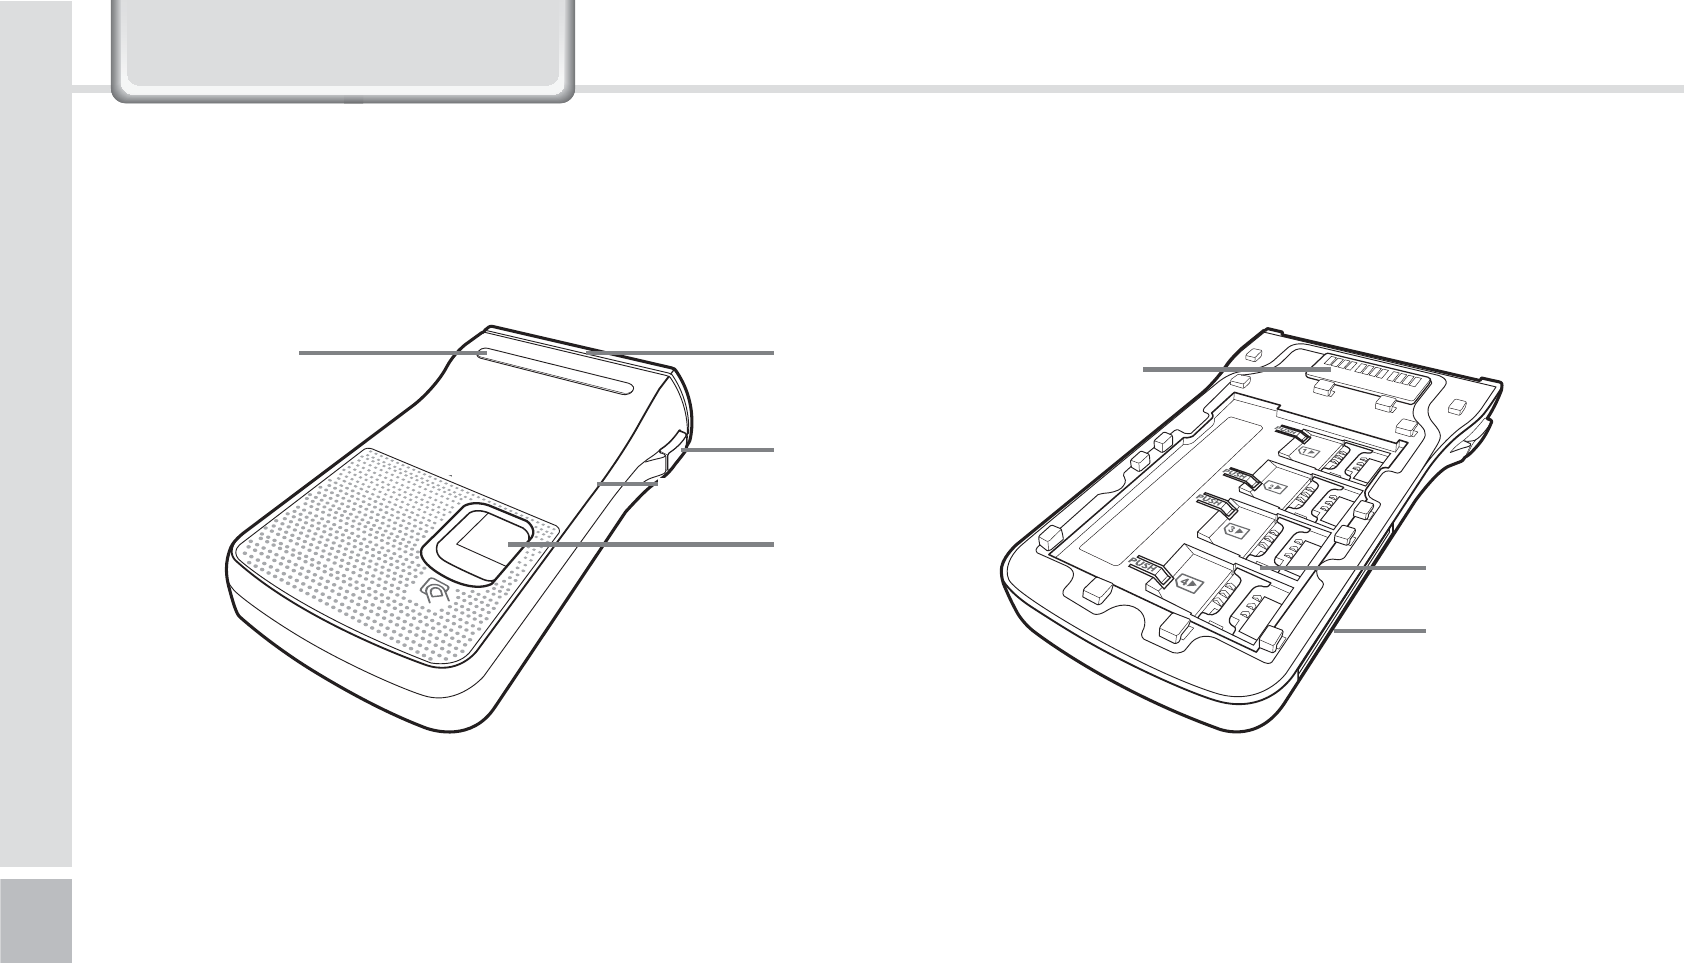
Finger scan remove button
The main Finger scan
terminal
SAM Slot
IC Card Slot
RFID ANT
Finger scan
Module
MSR
LED to check
the state
'JOHFS4DBO
2-1. Each part explained
9DOXH3DFN'HWDLOV
BIP-1500
65
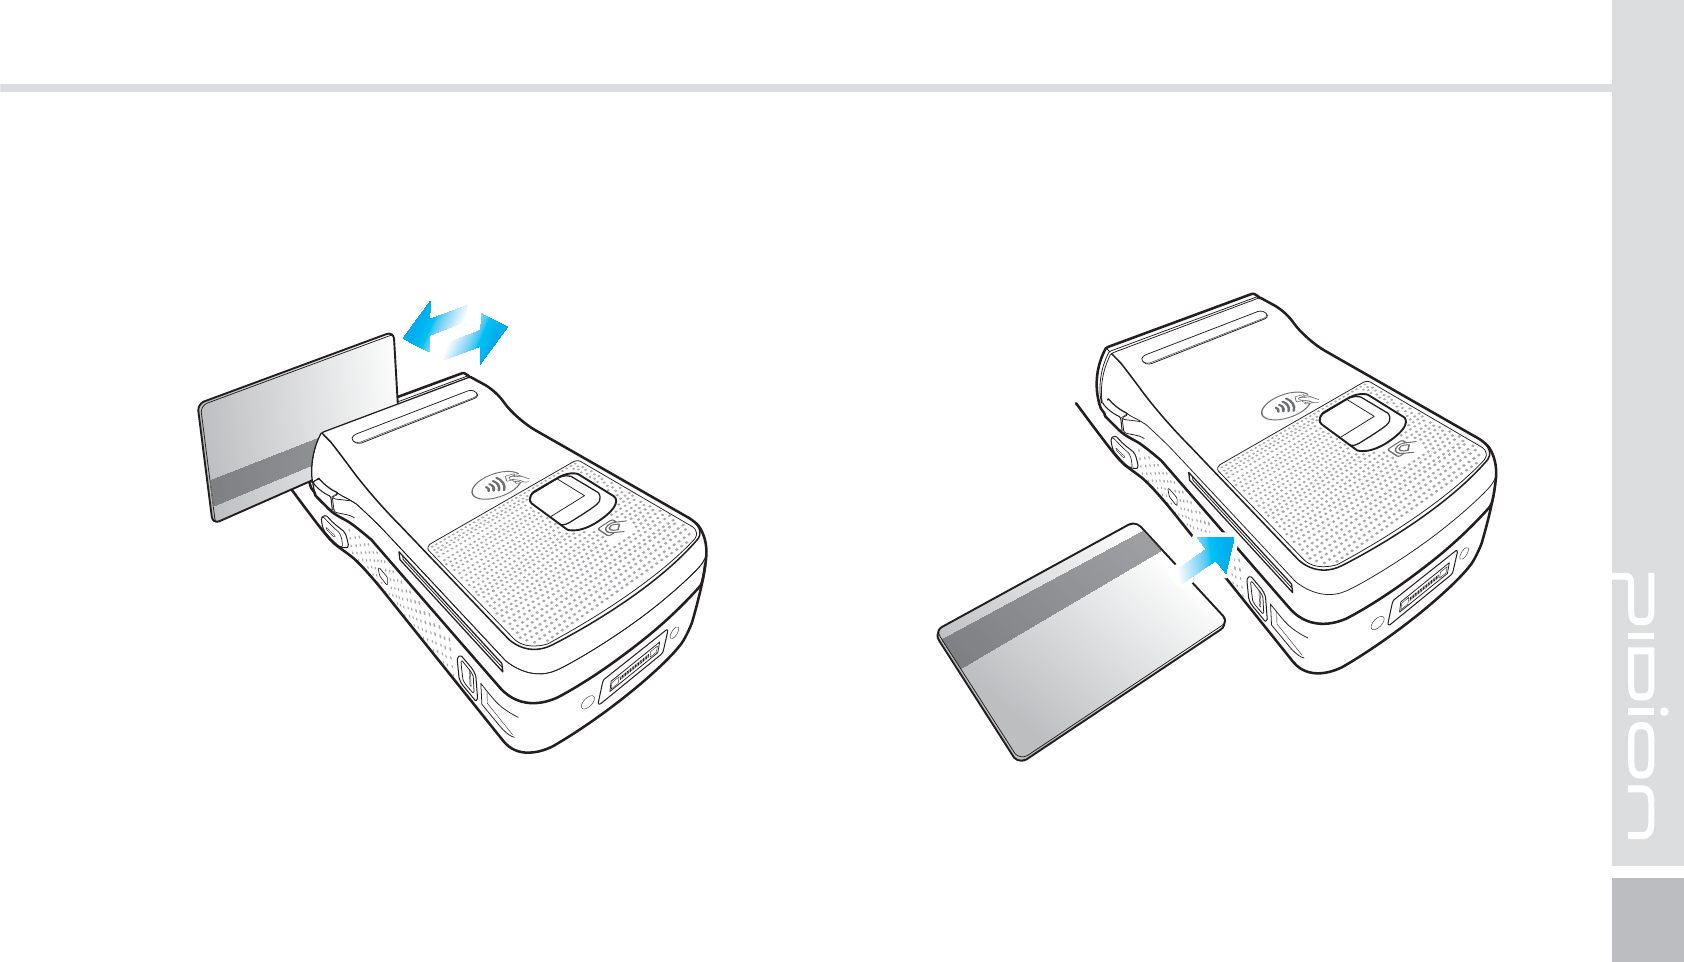
Insert with the card with the IC chip going in first.
Please make sure to insert the card all the way.
2-2. Paying with card
The card can be swiped in both directions.
Please swipe the card fluidly.
2-2-1. Paying with MSR 2-2-2. Paying with IC card
66
BIP-1500 Manual
Your device will start scanning once you have placed
your finger on the Finger scan.
2-3. Using the Finger scan
9DOXH3DFN'HWDLOV
Install the Finger scan in the arrow direction.
2-4. Installing/Removing the Finger scan
2-4-1. Installing the Finger scan
BIP-1500
67
To remove, press the Finger scan remove button and
slide it downwards.
2-4-2. Removing the Finger scan
68
BIP-1500 Manual
Main Payment
Terminal
SAM Slot
IC Card Slot
Payment Remove button
RFID ANT
MSR
LED to check the
state
1BZNFOU
3-1. Each part explained
9DOXH3DFN'HWDLOV
BIP-1500
69
The card can be swiped in both directions.
Please swipe the card fluidly.
Insert with the card with the IC chip going in first.
Please make sure to insert the card all the way.
3-2. Paying with card
3-2-1. Paying with MSR 3-2-2. Paying with IC card
70
BIP-1500 Manual
Install the payment equipment in the arrow direction.
1-3. Installing/Removing the payment equipment
1-3-1. Installing the payment equipment
9DOXH3DFN'HWDLOV
To remove, press the remove button and slide it
downwards.
1-3-2. Removing the Payment equipment
BIP-1500
71
4OBQPO
4-1. Each parts explained
Snap on separation hook
Power Connector
USB Port
RS232 Serial Port
72
BIP-1500 Manual
9DOXH3DFN'HWDLOV
Slide the snap on in the arrow direction to install. Press the remove buttons and slide it downwards to
remove.
4-2. Installing/Removing Snap on
4-2-1. Installing Snap on 4-2-1. Removing Snap on
BIP-1500
73
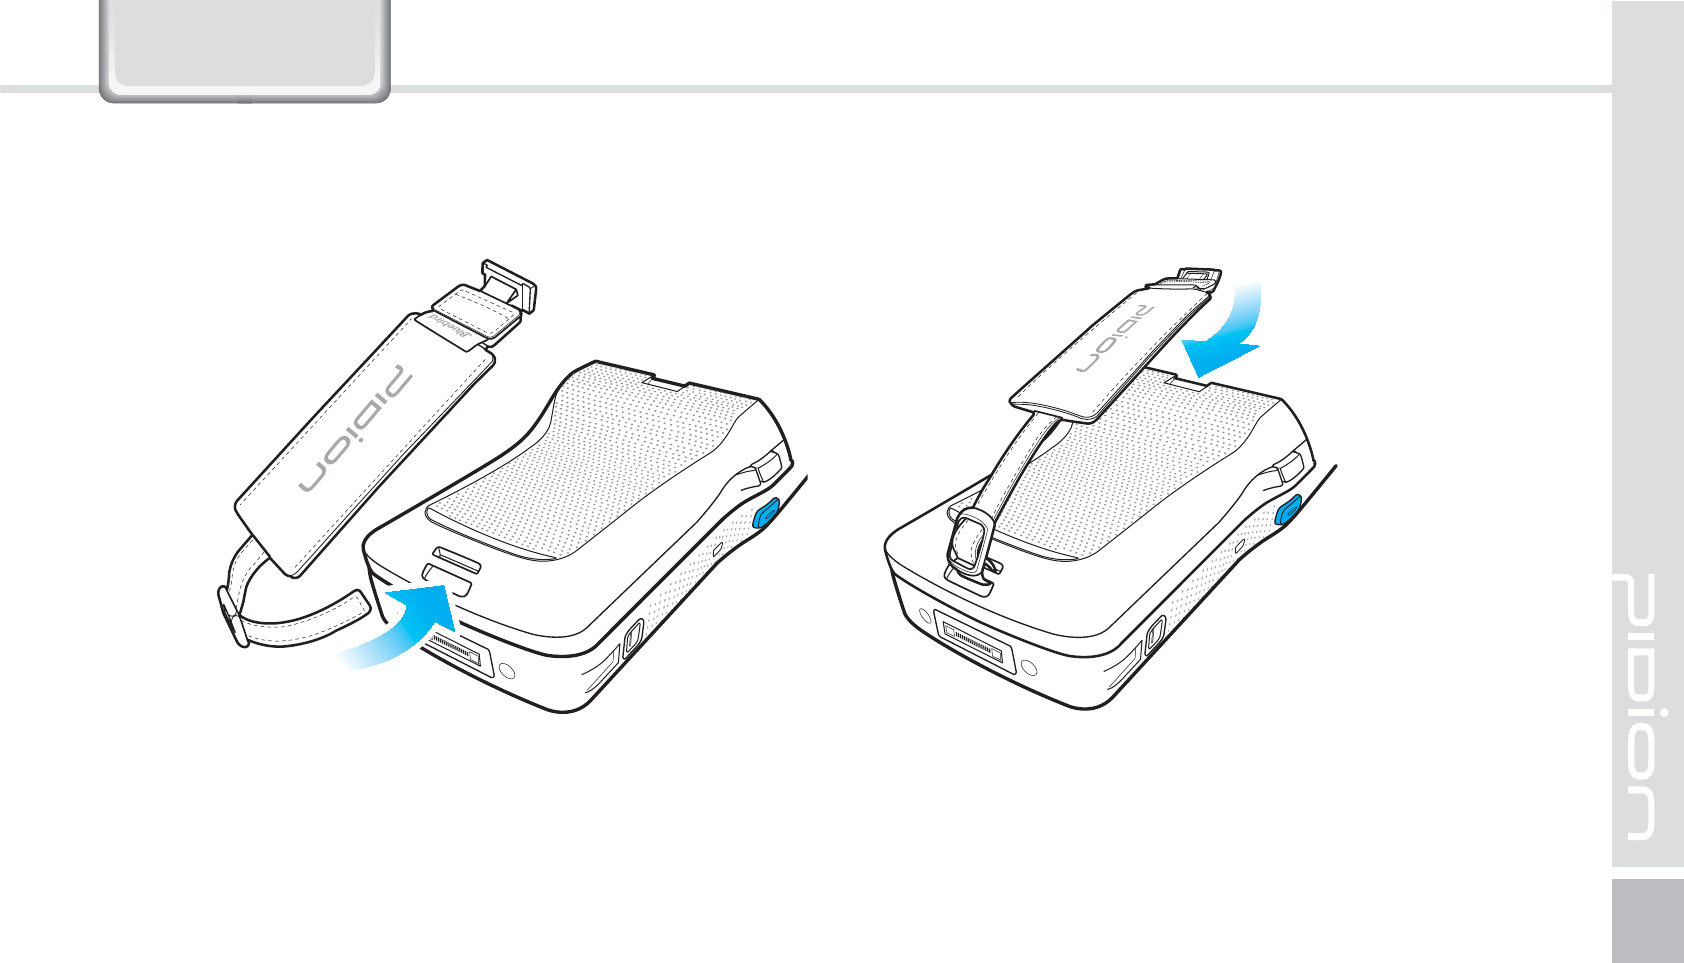
$POOFDUJOHUIFIBOETUSBQ
Connect the hand-strap on the battery cover’s hand-strap holder.
9DOXH3DFN
74
BIP-1500 Manual
9DOXH3DFN
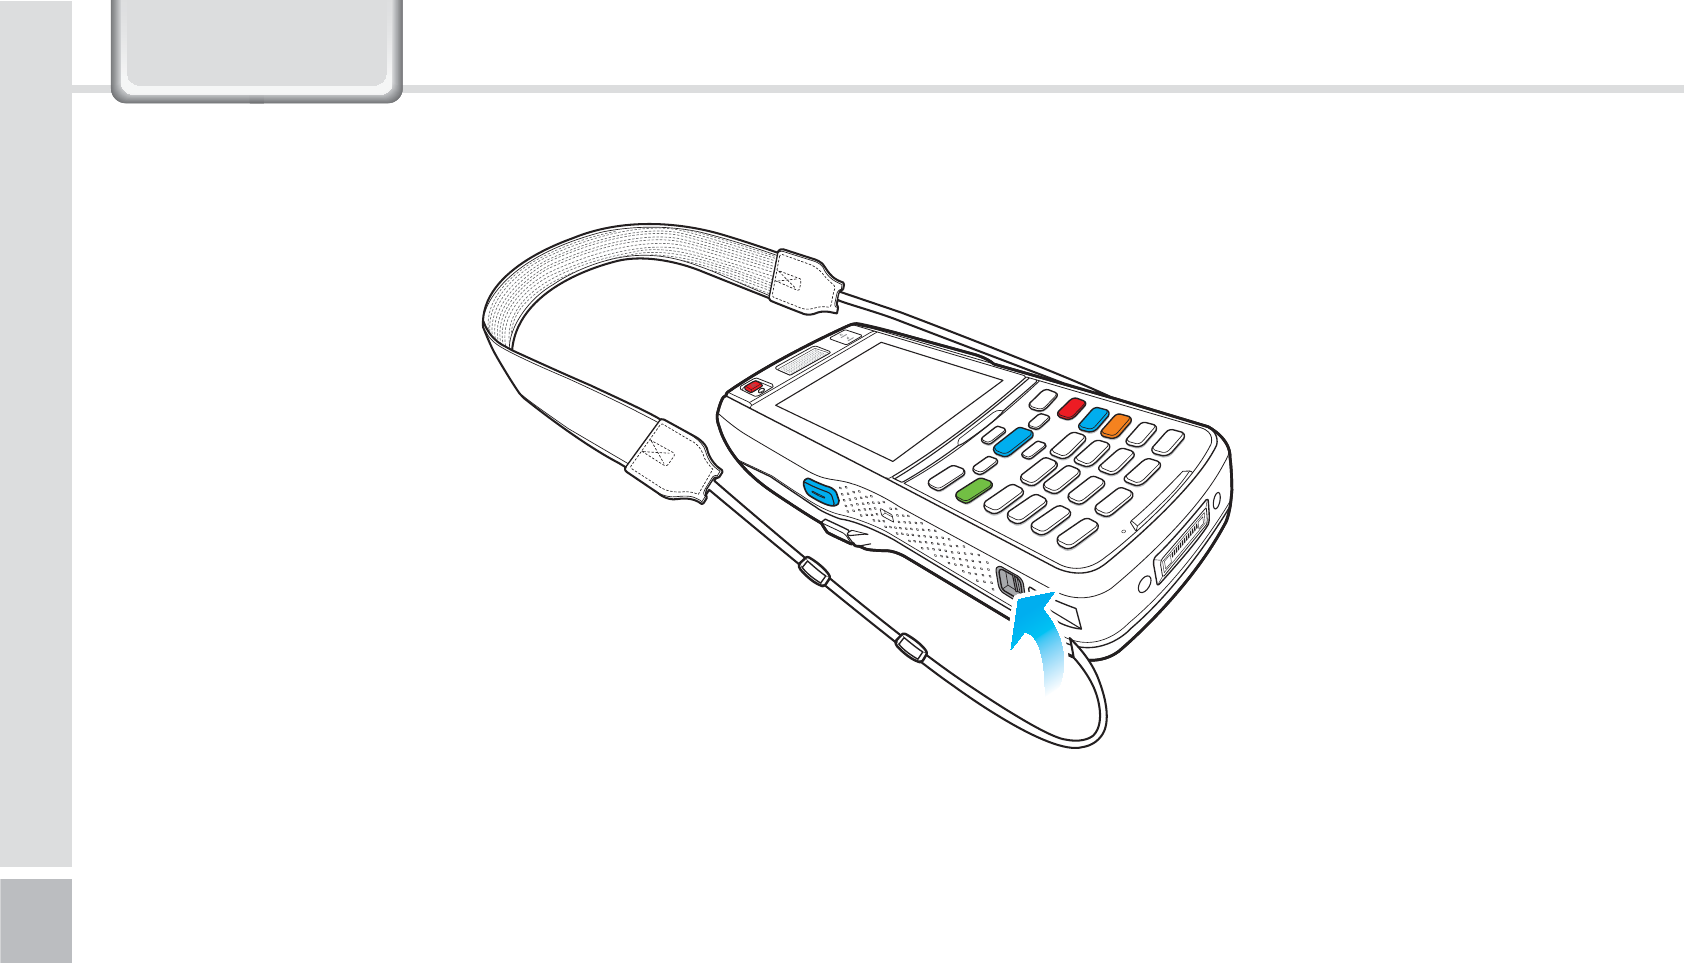
$POOFDUJOHUIF4IPVMEFS4USBQ
Connect the shoulder strap on both sides of the device’s Shoulder strap holder.

BIP-1500
75
$POOFDUJOHUIF*$$BSEDPWFS
Install the IC card cover in the PINPAD/ Payment equipment / Finger scan/ IC card slot.
Connect the IC card cover strap on the shoulder strap holder.

76
BIP-1500 Manual
Q Water went into my device. What do I do?
A First, remove your battery from the device and
dry them in a dry place. After drying for a period
of time try turning it on. If it still does not turn
on, the main-board or other parts needs to be
replaced. Please refer to your service center.
Q It won’t turn on.
A The program may be damaged. Please try resetting
your device. If it still doesn’t work, refer to your
service center.
Q It won’t charge.
A Make sure the power cable and your device
has been connected correctly. Try cleaning your
charging terminals. If it still doesn’t work, your
battery life might be finished or it can be a broken
battery. (The battery warranty is 6 menthes)
Q How do I get the repair service?
A You can send via a delivery service to the
headquarters. When sending the package make
sure you pay for the shipping fee in advance.
When the repair is finished the headquarters will
be covering the shipping fee.
Q My battery drains very quickly.
A The battery can be drained quickly when the
Wi-Fi or Bluetooth is turned on. If it drains quickly
regardless of using the options above, please
purchase another battery.
4$
ఐ If you have done the above and the device still
does not work, please refer to the service center.
ఐ After the 1 year warranty the repair service will
be charged.

BIP-1500
77
6HUYLFH&HQWHU
Before Requesting After-Sales Service
Before asking for after-sales service, please back up
the data from the terminal.
We do not back up data from the products received
in the Customer Care Center. Therefore, we assume
no responsibility for loss/deletion of data.
Bluebird Soft Customer Service
FAX : +82-2-548-0870
E-Mail : gcs@bluebird.co.kr
Address : 1242, Gaepo-dong, Gangnam-gu, Seoul,
Korea
Operating hours
Mon.-Fri. : 9:30 A.M. ~ 6:30 P.M. (GMT Time: +9 Hours)
The center is closed on Saturdays, Sundays and
holidays.
Registering for After-Sales Service
We receive the products for after-sales service through
mail, delivery service and hand carry only in principle.
If you bought the product from any party other than the
authorized dealer, you need to register the product
before asking for after-sales service.
Please enclose an evidence of purchasing or the receipt to
the product for after-sales service.
Please enclose the name, telephone number, address and
symptom for prompt service.
You can ask for after-sales service through the dealer or
the Customer Care Center in the head office.
Do not intentionally damage the label on the product.
Damaged label may result in a disadvantage to the
customer.
When you return the product to Bluebird Soft for service,
please put the product in a protective box.
No warranty will not be provided for any damage
occurring during delivery. We recommend you to use the
box and protective cover supplied with the product.
Make sure to deliver the product in a safe way. Bluebird
Soft assumes no responsibility for loss of the product
during delivery.

78
BIP-1500 Manual
Charged Service
1. If it is not a default, it will be charged when requesting
for after-sales service.
- Service request due to inappropriate use of the
customer
- Loss of a PIN number
- Use of programs that might effect the program
(over-clock, forceful changes in the input of the system,
personal developments)
2. Default due to a mistake on the part of the customer
- Default due to inappropriate or careless use of the
product (dropping, submersion under water, shock,
damage, unreasonable operations, etc).
- Default due to a repair or unauthorized technician.
- Default caused intentionally or by carelessness of the
customer.
- Default due to the use of fraudulent parts or
components.
3. Other cases
- Default due to nature (fire, damage due to sea wind,
flood damage, etc.).
- Expendable parts have exhausted there life (batteries,
antenna, or other component parts).
4. Regulations of treatment after charged service
- If the same default occurs on the part that had been
repaired within a 2 months(60 days) period, it will be
provided with free of charge repair service.
There will be no returning of goods or
repayment upon the following situation
Removal of the sealing of the product if it had been
sealed.
If the product has been damaged due to careless use
by the customer or due to a natural disaster (floods,
rain, fire, etc.).
Loss of product or other components (CD, diskette,
manual, connecting cables, etc).
Damage to the product after 10 days of purchase,
the product will either be exchanged or provided with
after-sales service (note, returning of goods or
repayment is not allowed).
6HUYLFH&HQWHU

BIP-1500
79
:DUUDQW\&HUWLILFDWH
Thank you for purchasing a product from Bluebird Soft Inc.
If a circumstance arises where you lose a receipt or the
certificate of guarantee, then the term of guarantee will
be calculated 3 months (certified by the number of the
manufacture, a certificate of inspection) after the date of
manufacture.
In case of accessories (such as batteries), only those that
match the sales list managed by the service center will be
eligible for customer service.
A repair or an exchange of batteries that does not match
the sales list of the service center due to the carelessness
of the customer will be fully charged.
Name of Product PDA
Name of Model BIP-1500
Date of Purchase
Manufacture Number
Place of Purchase
Term of Guarantee 1 year from purchase

80
BIP-1500 Manual
Warranty
1. Bluebird Soft Inc. (hereinafter referred to as Bluebird)
provides the warranty service for its products in
compliance with the regulations on compensation for
damage of customer.
2. Upon receiving a notification on a defect of its product
within the range of warranty during the warranty
period, Bluebird will repair or replace the defective
product according to its warranty policy.
3. If the defective product within the range of warranty is
not repairable or replaceable, Bluebird shall refund the
purchasing price within a designated period from the
date of receiving a notice of defect.
4. Bluebird assumes no responsibility for repairing,
replacement or refund until it receives the defective
product from the customer. The replacement shall
be equivalent to a new product in the aspect of
performance.
5. Warranty of Bluebird is valid in the countries where the
Bluebird products are distributed by Bluebird. (Contract
for additional warranty service like field service)
6. Bluebird products may contain the recycled products,
components or materials equivalent to new products in
the aspect of performance.
7. This warranty is applied to software products only when
the programming commands are not executed. Bluebird
does not guarantee interruption-free or error-free
performance.
:DUUDQW\&HUWLILFDWH

#.4FSJFT.BOVBM
Bluebird constantly strives to bring utmost satisfaction to all our customers.
Hours
Mon.- Fri. : 9:30 A.M. ~ 6:30 P.M.
(GMT Time: +9 Hours)
We are not open on Saturday,
Sundays and National Holidays.
Address : 1242 Gaepo-dong,
Gangnam-gu, Seoul, Korea
Customers Service Center