User Manual

-Before getting started, ensure that you read and follow the -Before getting started, ensure that you read and follow the
“Safety Warnings and Precautions”section of this manual.

Safety Warnings and Precautions
Safety Warnings and Precautions
! Warning
•Exercise precautions when using the battery.
- Always completely charge the battery after purchasing the product.
- If the batteries are damaged, severely shocked, heated, exposedto moisture
or high temperatures, or bored by a gimlet, they may explode.
- Do not use inferior quality batteries or battery chargers as doing so may cause
explosion.
! Precautions
•Learn how to properly use the antenna.
- For terminals with an antenna, hold the terminal like a normal telephone, and place
the antenna straight over your shoulder.
•Never touch power outlets with wet hands or mobile phones.
- This may cause electric shock.
•Never insert or place the terminal, battery, or charger into or near heating devices,
such as heaters or electronic ovens.
- This may cause product transformation, explosion, or fire.
•Never reconstruct, disassemble, or repair the product arbitrarily.
- Always contact a service center authorized by Bluebird Soft.
- Ensure that you adhere to the Safety Warnings and Precautions.
If these principles are not adhered to, free repair service will not be offered.
•Use only accessories and batteries provided or authorized by Bluebird Soft.
- Not adhering to this advice may cause battery explosion, or defect in the terminal.

Table of Contents
Table of Contents
1. Product Composition
2. Getting Started
3. Precautions
4. Using Barcode
5. Using Wireless LAN Features
6. Connecting BIP-3010 to Desktop
1. Product Composition
2. Getting Started
3. Precautions
4. Using Barcode
5. Using Wireless LAN Features
6. Connecting BIP-3010 to Desktop

4
Copyright © 2004 Bluebird Soft, Inc. All Rights Reserved.
BIP-3010 Series
1.Product Composition
1.Product Composition
1.Product Composition
1. Product Composition
2. Getting Started
3. Precautions
4. Using Barcodes
5. Using Wireless LAN Features
6. Connecting BIP-3010 to Desktop
5
Copyright © 2004 Bluebird Soft, Inc. All Rights Reserved.
BIP-3010 Series
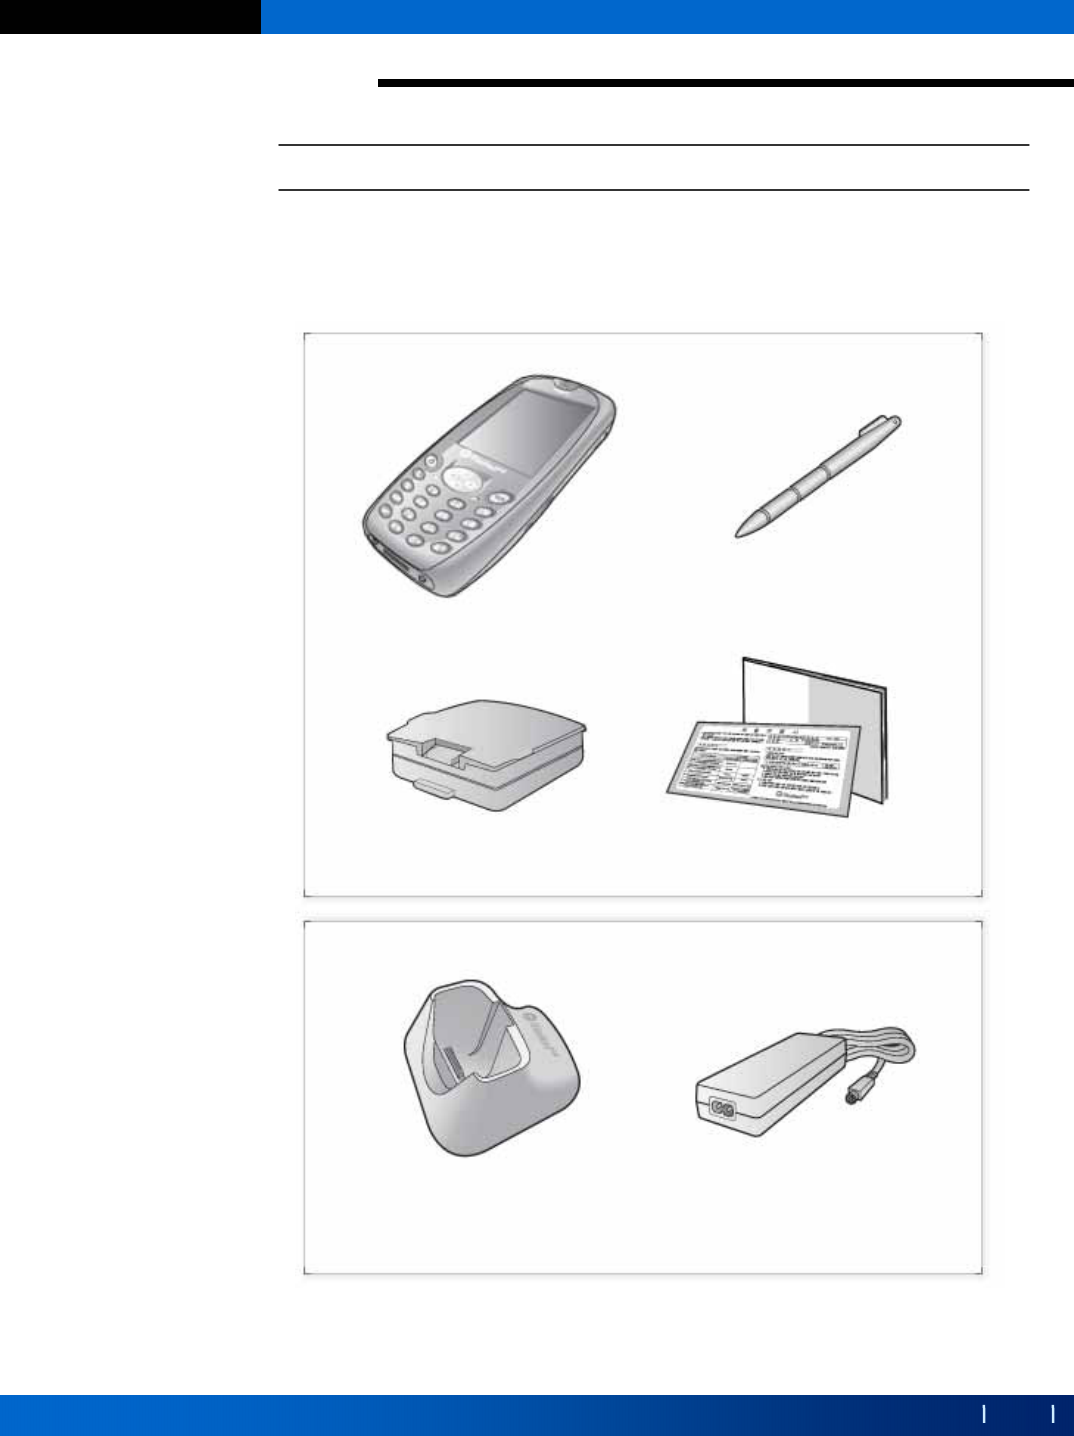
1-1. Inspecting Components
Before using the product, inspect the contents of your package box for all
the components shown below:
1.Product Composition
1.Product Composition
1.Product Composition
[ACCESSORY BOX]
[One Main body of BIP-3010] [One Stylus Pen]
[One Battery for BIP-3010] [Warranty]
[One Cradle for BIP-3010] [Power Cable(AC Adapter)]
[PDA BOX]
6
Copyright © 2004 Bluebird Soft, Inc. All Rights Reserved.
BIP-3010 Series
1-2. Hardware Specifications
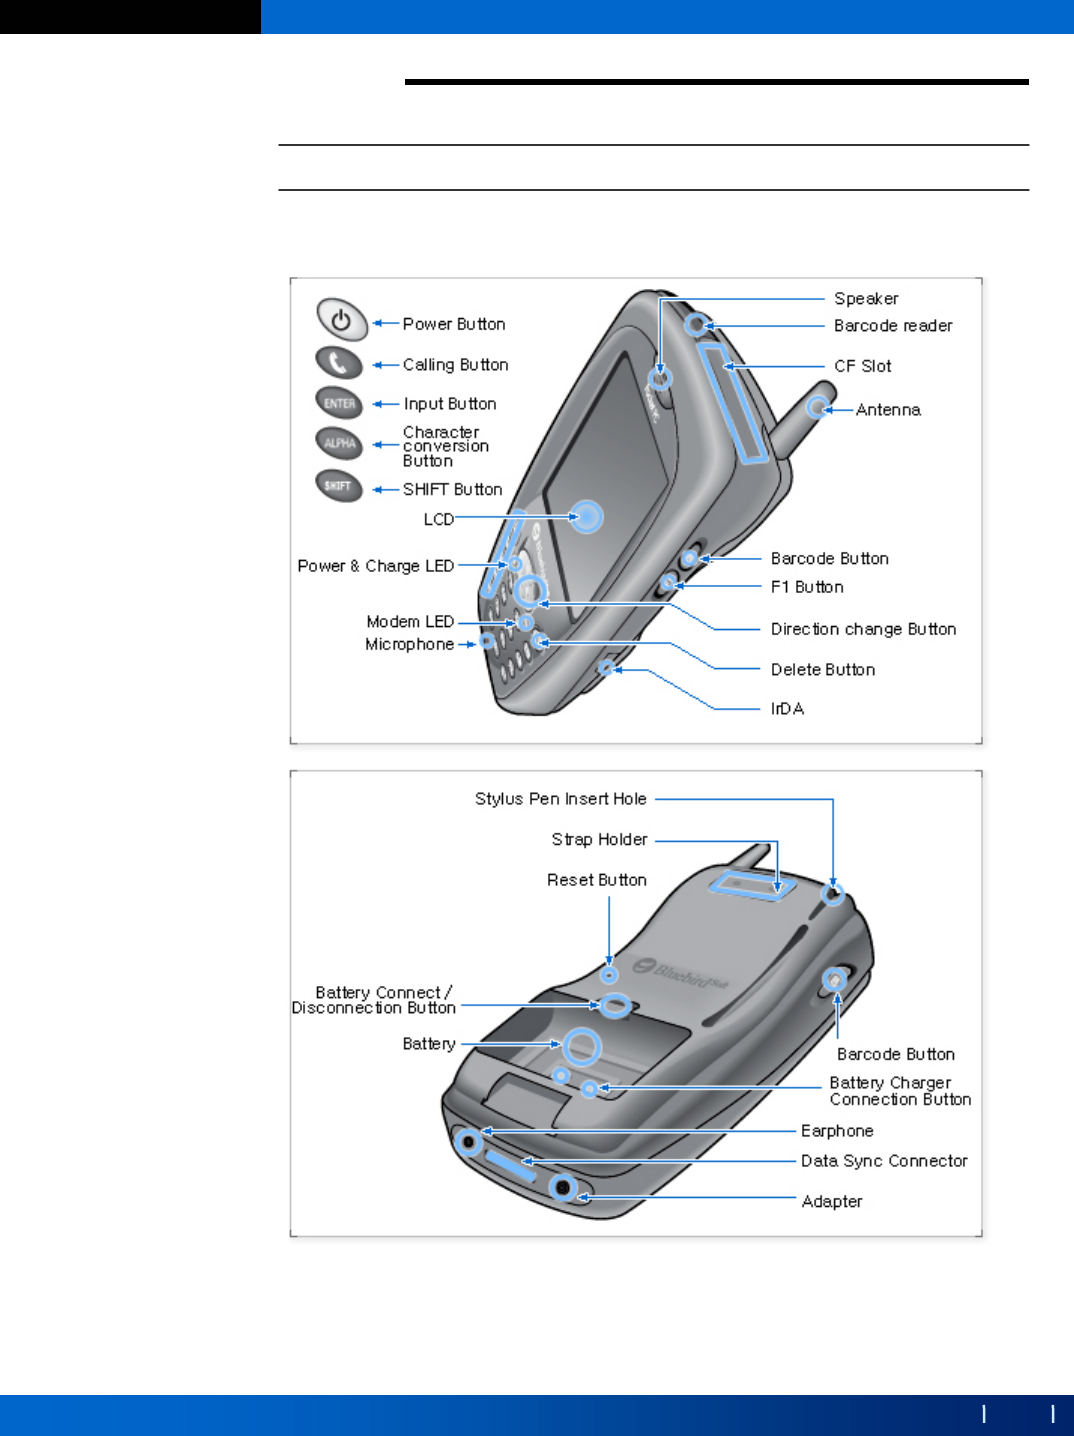
Acquaint yourself with the basic parts and names of the terminal
using the following figures:
1.Product Composition
1.Product Composition
1.Product Composition
7
Copyright © 2004 Bluebird Soft, Inc. All Rights Reserved.
BIP-3010 Series
1-2. Hardware Specifications
1 ) Antenna: device for receiving radio waves
2 ) Barcode Scanner: device for reading barcodes
3 ) LED
- Left LED: indicates availability of CDMA communication
- Right LED: indicates the terminal’s operational status
4 ) LCD: window which displays desired information
5 ) Speaker: external speaker enabling audio without an earphone
6 ) Button
-22 buttons on the front (Keyboard)
- Power button(when depressed and held, the front light turns ON/OFF)
- Button to change directions to top, bottom, left and right
- Text function button
- One button on the left side
- Two buttons on the right side
7 ) I/O receptacle: connector used for charging or for USB communication(via
ActiveSync)
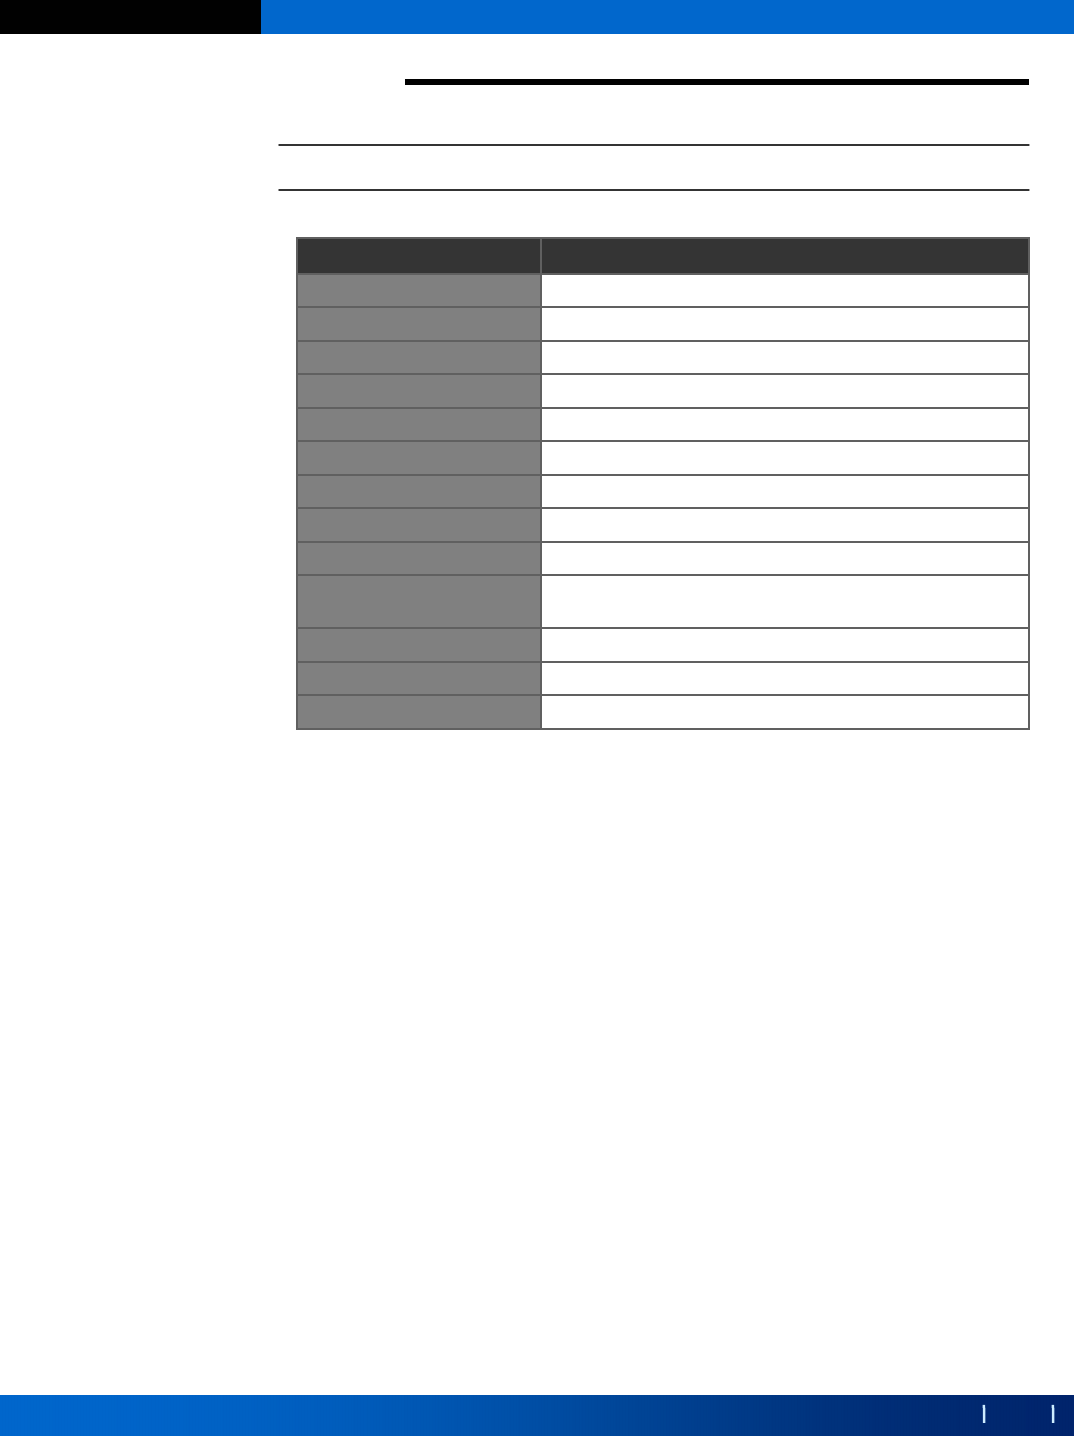
Description Details
CPU X-scale PXA-255
MEMORY 64MB Flash Memory, 64MB RAM
DISPLAY 65536color TFT LCD
KEY 25key
CF CARD SLOT CF II type Slot
INTERFACE External : RS-232C, IrDA 1.1, USB
BATTERY 4.2V 2000mAH Li-ion Battery
SIZE 183.5x84.5x39.1mm
WEIGHT 413g
BATTERY Must be use 3.7 V Lithium battery, model BIA-3002, made
by Bluebird.
INPUT 5.0 V 2.5 A
ADAPTOR add a core on the adapter line
BARCODE SCANNER Class 2 Laser product
1.Product Composition
1.Product Composition
1.Product Composition

8
Copyright © 2004 Bluebird Soft, Inc. All Rights Reserved.
BIP-3010 Series
8 ) CF socket: connector supporting CF II type
9 ) Stylus pen: pen used for inputting data or making selectionsusing the LCD
touch screen
10) Jack
- Right Jack : used for the connection of an earphone set and a microphone
during a call
- Left Jack : used for adapter during battery charging
11) IrDA: port enabling wireless ultra-red communication between terminals
12) Battery: detachable 7.4V 1000mAH lithium-ion battery
* FCC Compliance Statement:
This device complies with part 15 of the FCC Rules.
Operation is subject to the following two
conditions: (1) This device may not cause harmful interference,
and (2) this device must accept any interference received, including
interference that may cause undesired operation.
CAUTION: Changes or modifications not expressly
approved by the manufacturer responsible for compliance
could void the user’s authority to operate the equipment.
Important Note: To comply with FCC RF exposure compliance
requirements, the antenna used for this transmitter must not be
co-located or operating in conjunction with any other antenna or
transmitter.
This PDA is designed to be used for hand-held operation only.
European Union Notice
This system has been tested for conformance with CE radio spectral,
EMC and safety requirements.

9
Copyright © 2004 Bluebird Soft, Inc. All Rights Reserved.
BIP-3010 Series
2.Getting Started
2.Getting Started
2.Getting Started
1. Product Composition
2. Getting Started
3. Precautions
4. Using Barcodes
5. Using Wireless LAN Features
6. Connecting BIP-3010 to Desktop
10
Copyright © 2004 Bluebird Soft, Inc. All Rights Reserved.
BIP-3010 Series
2-1. Charging the Battery
2.Getting Started
2.Getting Started
2.Getting Started
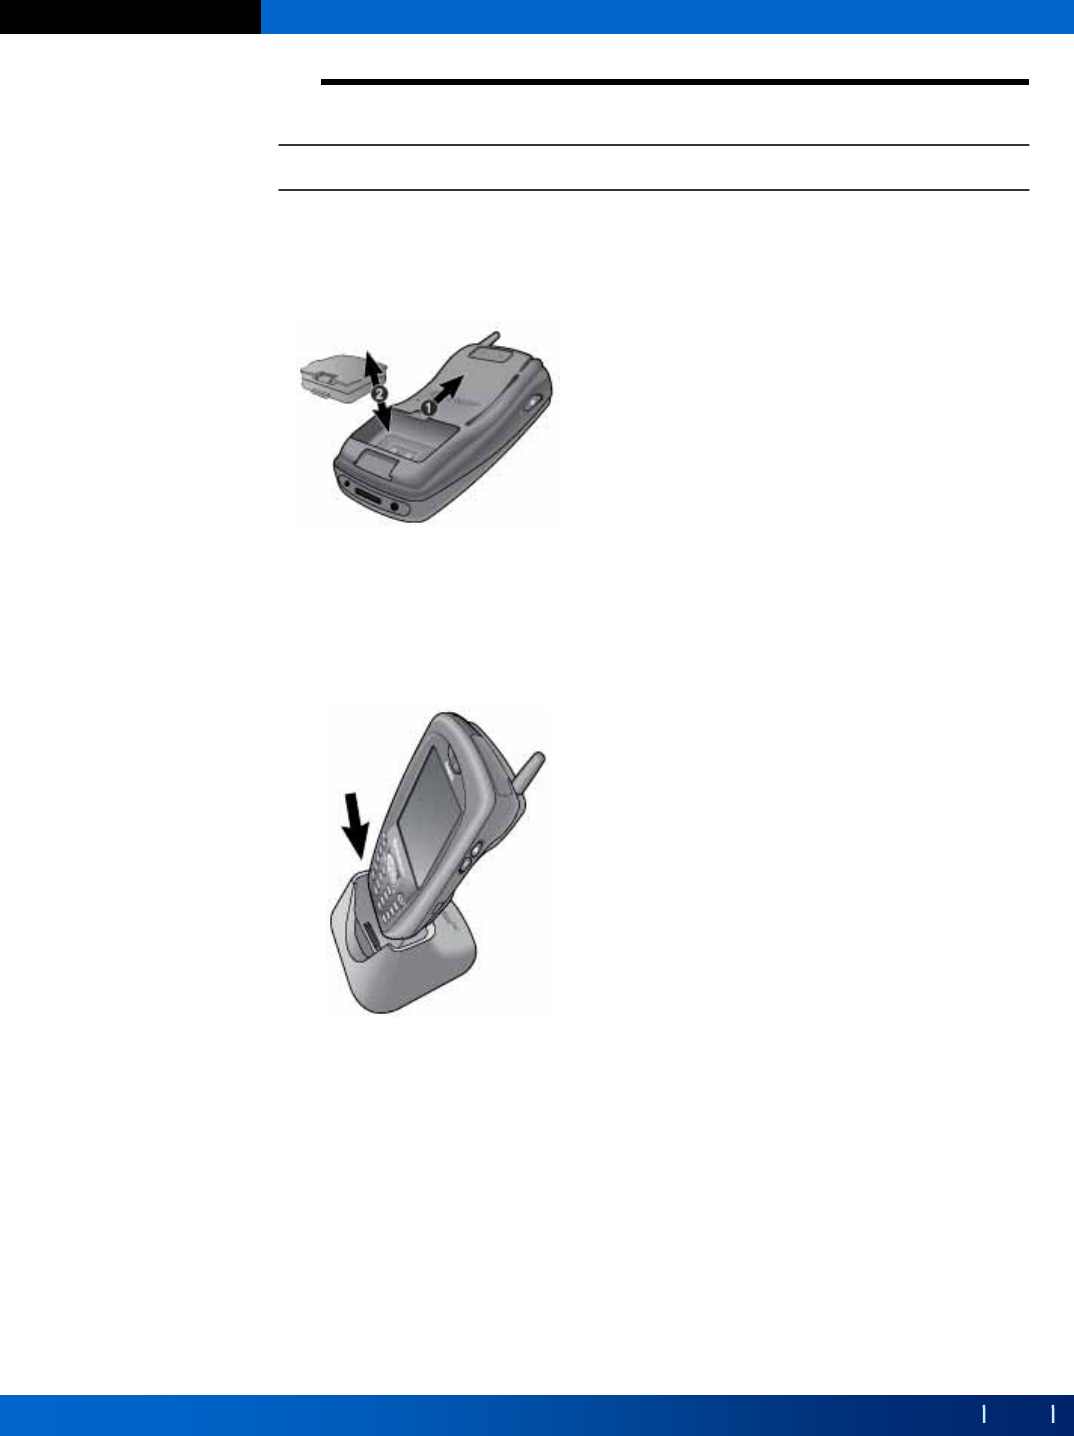
A. Connecting/Disconnecting the Battery
To connect the battery:depress the Battery
Connect/Disconnect button and gently
push the battery in until it clicks into place.
To disconnect the battery: depress the
Battery Connect/Disconnect button, hold
the grooves of the battery on each side,
and gently removed it .
B. Charging the Battery: Connect the power plug of the charger to a 220V outlet
To charge the battery separately
Insert the battery into the charging port on the
back of the charger, with the outer
side(connection terminal) side of the battery
facing downwards.
To charge the battery combined with the product
Insert the connector(I/O receptacle) into the
bottom of the product and into the bottom of the
charger.
Caution:
•Applying excessive force to the terminal without the I/O connector properly inserted
may cause damage. Take special care not to connect the terminal to the battery
charger by force.
•Charging the battery combined with the product will cause the charge indicator lamp
light to light up. The indicator is red when the battery is not fully charged, and green
when charging is complete.
11
Copyright © 2004 Bluebird Soft, Inc. All Rights Reserved.
BIP-3010 Series
2.Getting Started
2.Getting Started
2.Getting Started
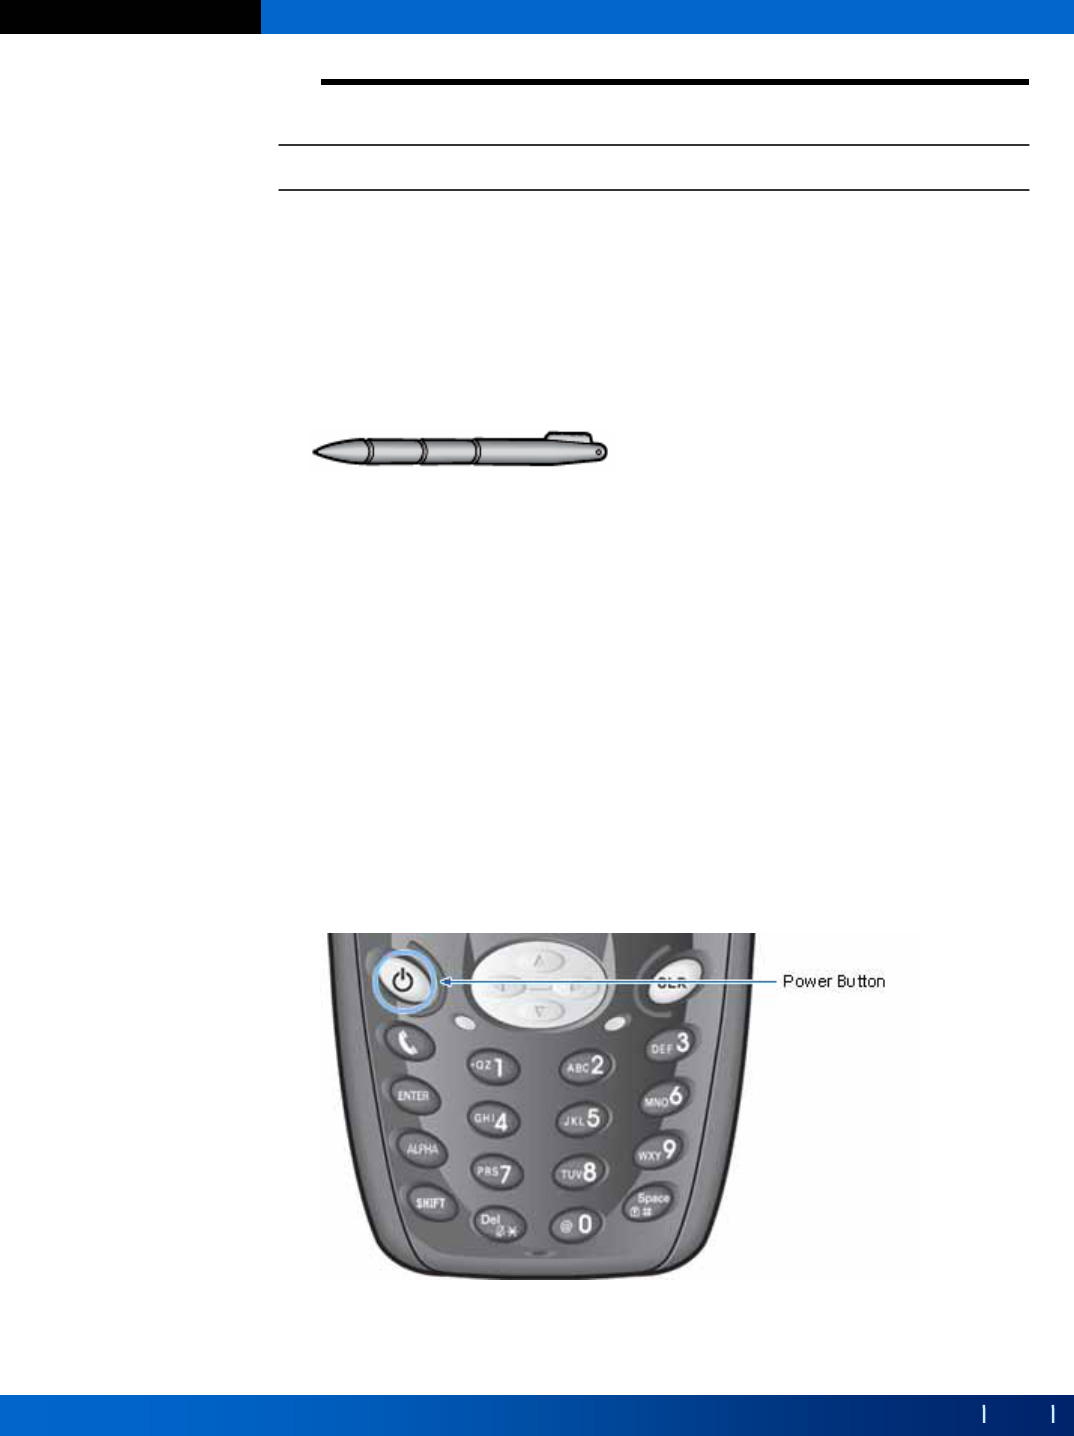
2-2. Using the stylus Pen and Power ON/OFF
A. Using the Stylus Pen
•The handle of the Stylus pen is in the middle of the back of the product.
•After disconnecting the stylus pen, hold both tips of the pen and stretch them
out until it is locked in full length.
B. Storing the Stylus Pen
•Insert the shortened stylus pen into the groove at the back of the product.
C. Power ON/OFF
•Depress the Power button to turn the power on.
•When you depress the Power button for about two seconds while power is on
the front light turns off.

12
Copyright © 2004 Bluebird Soft, Inc. All Rights Reserved.
BIP-3010 Series
3.Precautions
3.Precautions
3.Precautions
1. Product Composition
2. Getting Started
3. Precautions
4. Using Barcodes
5. Using Wireless LAN Features
6. Connecting BIP-3010 to Desktop
13
Copyright © 2004 Bluebird Soft, Inc. All Rights Reserved.
BIP-3010 Series
3.Precautions
3.Precautions
3.Precautions
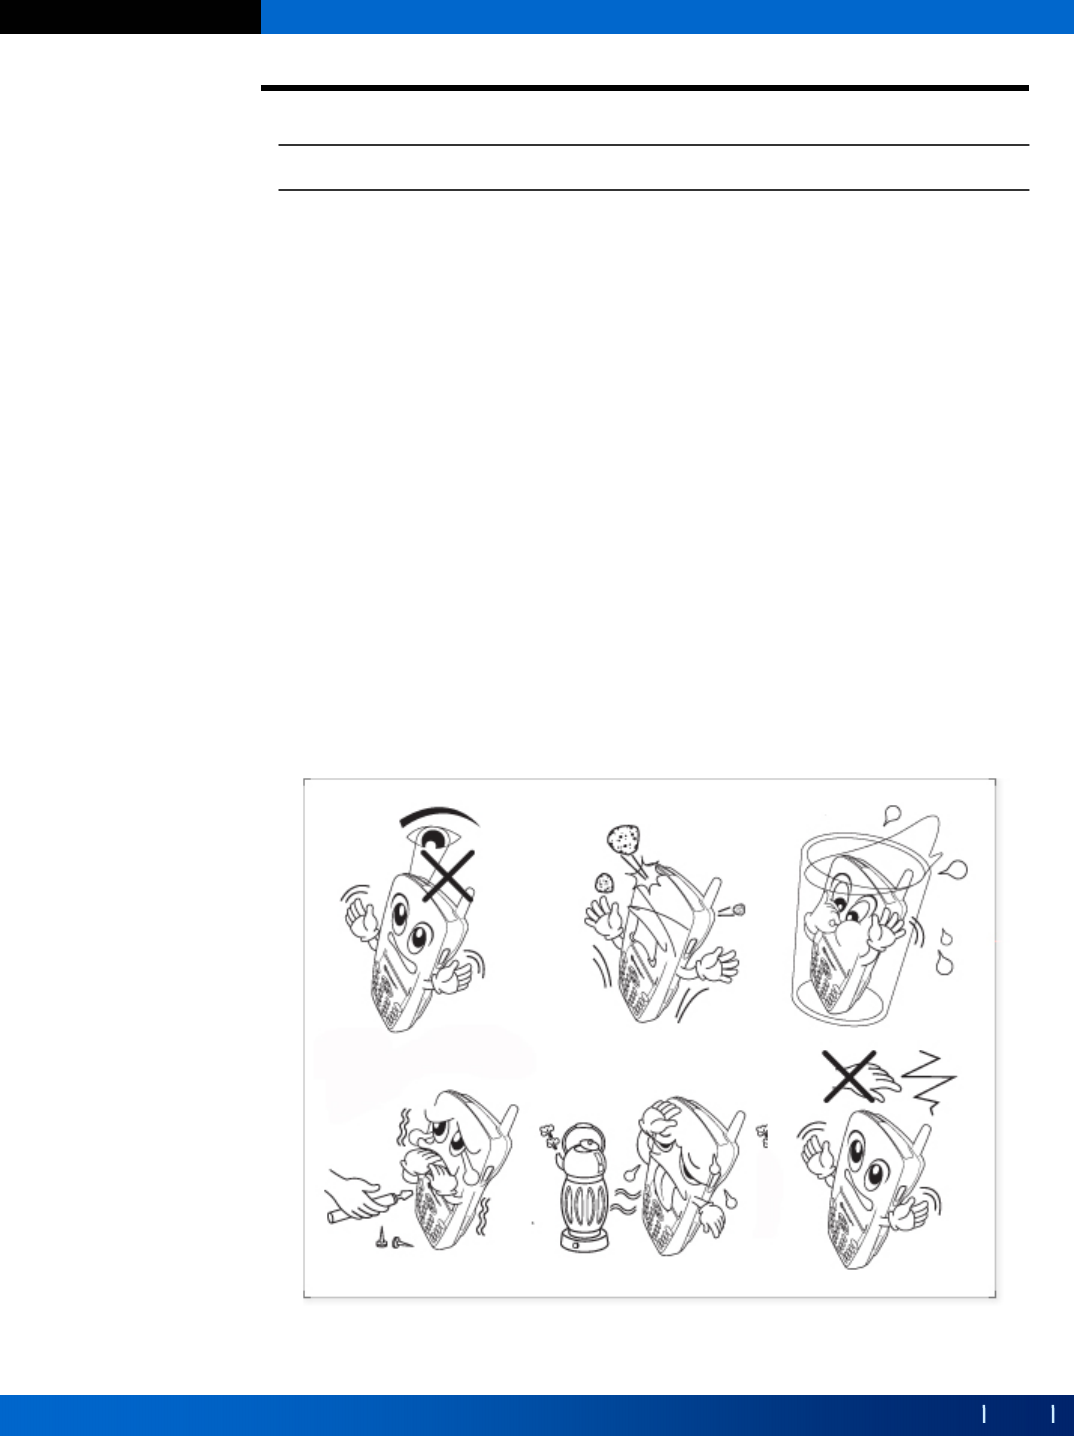
3-1. Cautions for Handling the Terminal
1 ) Do not direct the barcode scanner towards human eyes.
2 ) Do not expose the product to severe shock, such as dropping in.
3 ) Do not use the product in an environment inferior to IP54 standards for
protection from dust and water particles.
4 ) Do not disassemble or reconstruct the product arbitrarily.
5 ) Do not store the product near heating appliances, such as heaters.
6 ) Do not touch the antenna while the product is in use .
7 ) Do not disassemble the battery, or electrically connect its poles.
8 ) Charge the battery only with the charger provided by your dealer.
9 ) The battery’s life span will decrease with repeated charging and
discharging. Replace it when its capacity is half original capacity.
10) Avoid storing the battery in excessive heat or cold, as this may limit its
capacity and life span. Store the battery at room temperature.
11) Do not disconnect the battery while using the terminal.

14
Copyright © 2004 Bluebird Soft, Inc. All Rights Reserved.
BIP-3010 Series
3-2. Precautions for Using ActiveSync
3.Precautions
3.Precautions
3.Precautions
A. Before getting started
①. Uninstall the ActiveSync program installed on your PC.
②. Reinstall ActiveSync 3.7. When the [Get Connected]dialog box
appears during installation, click [Cancel].
③. When installations in complete, select [File]→ [Connection Settings]
from the ActiveSync Menu. When a dialog box appears, check “Allow
USB connection with this desktop computer”, and ensure that the
message “Status: USB is available” appears at the bottom of the
window. If the [Get Connected] dialog box appears, it means that the
old USB driver that causes malfunction still exists in the PC. In this
case, remove the device in error.
Select [Control Panel] → [Management Tools] →
[Computer Management] → [System Tool] → [Device Manager]
on your desktop, and remove the device in error listed under
“Windows CE USB Devices”.
B. When the message “Unknown Device”appears after the PC detects a
USB device:
①. This message may appear when you turn on the PDA while it is sitting
on the cradle.
②. Remove the PDA from the cradle and reconnect it. ActiveSync should
work properly.
C. When the message [Connecting…]appears in ActiveSync for a long time
without any change:
①. Remove the PDA from the cradle to disconnect it.
②. From the ActiveSync Menu, select [File]→ [Connection Settings].
When a dialog box appears, uncheck the checkbox “Allow USB
connection with this desktop computer”and click [OK].
③. Select [Connection Settings]again. When the dialog box appears,
check the checkbox for “Allow USB connection with this desktop
computer”and click [OK].
④. Connect the PDA to the cradle. ActiveSync should work properly.

15
Copyright © 2004 Bluebird Soft, Inc. All Rights Reserved.
BIP-3010 Series
3-2. Precautions for Using ActiveSync
3.Precautions
3.Precautions
3.Precautions
D. In the event that repeated connection trials fail, and the icon for “Unknown
hardware device”keeps appearing in your PC tray:
①. The USB host in the PC falls into an abnormal state and connection fails
repeatedly.
②. In this situation, remove the terminal from the cradle, reboot the PC, and
reconnect it to the cradle.
E. When the terminal does not work after disconnection and reconnection of
the power supply to the main battery:
In order to prevent this problem, depress the Power button of the terminal,
or depress Shut Down from the Start menu with the stylus pen for Windows
CE to undergo the process of “system shut down”before disconnecting
the main battery.
When you inadvertently disconnect power supply to the battery and the
terminal does not work properly, depress and hold the Power button,
depress the hard reset switch at the back of the terminal, and release the
Power button. Note that this will remove all data in the memory –only the
data in file storage will be preserved.
F. Please refer to Microsoft ActiveSync help menu for more information.

16
Copyright © 2004 Bluebird Soft, Inc. All Rights Reserved.
BIP-3010 Series
4.Using Barcode
4.Using Barcode
4.Using Barcode
1. Product Composition
2. Getting Started
3. Precautions
4. Using Barcodes
5. Using Wireless LAN Features
6. Connecting BIP-3010 to Desktop

17
Copyright © 2004 Bluebird Soft, Inc. All Rights Reserved.
BIP-3010 Series
4. Using Barcode
4. Using Barcode
4. Using Barcode
4-1. Basic Barcode Test Method
The barcode feature may be tested as follows:
①.Run Notepad.
②.Open a new note.
③.Direct the barcode reader to the barcode and depress the Barcode button.
④.The barcode is then outputted in the opened note in Notepad.
•To use barcodes in another program, contact the program’s manufacturer.
•To read barcodes other than the default barcode, print out the document
“SE923Int.pdf”in the download page for BIP-3010 at www.bluebird.co.kr,
and output the corresponding code (Enable) and read it. If you don’t want
a barcode, output the corresponding code (Disable) and read it. When the
Enable and Disable commands are input successfully, you will hear two
“bees”.

18
Copyright © 2004 Bluebird Soft, Inc. All Rights Reserved.
BIP-3010 Series
5.Using Wireless LAN Features
5.Using Wireless LAN Features
5.Using Wireless LAN Features
1. Product Composition
2. Getting Started
3. Precautions
4. Using Barcodes
5. Using Wireless LAN Features
6. Connecting BIP-3010 to Desktop

19
Copyright © 2004 Bluebird Soft, Inc. All Rights Reserved.
BIP-3010 Series
5.Using Wireless LAN Features
5.Using Wireless LAN Features
5.Using Wireless LAN Features
5-1. Using the Wireless LAN Program
1) The “WLAGS4681”menu window appears.
Note:If the “WLAGS4681”menu window does not appear, double click
“”in the tool bar.
2) Click “Wireless Information”, select the corresponding AP, and select
“Connect”.
Note: If the AP information does not exist, enter it manually.
2-1) Double click “Add”in the AP list window.
2-2) When the wireless network properties window appears, enter the
corresponding AP in “Network Name (SSID)”. Check the corresponding
settings for the AP.
2-3) Depress “OK”.
3) The window in (2) above appears again, and the AP name appears.
4) Depress “OK”.
4-1) Depress “Connect”on the window.

20
Copyright © 2004 Bluebird Soft, Inc. All Rights Reserved.
BIP-3010 Series
6.Connecting BIP-3010 to Desktop
6.Connecting BIP
6.Connecting BIP-
-3010 to Desktop
3010 to Desktop
1. Product Composition
2. Getting Started
3. Precautions
4. Using Barcodes
5. Using Wireless LAN Features
6. Connecting BIP-3010 to Desktop
21
Copyright © 2004 Bluebird Soft, Inc. All Rights Reserved.
BIP-3010 Series
6. Connecting BIP-3010 to Desktop
6. Connecting BIP
6. Connecting BIP-
-3010 to Desktop
3010 to Desktop
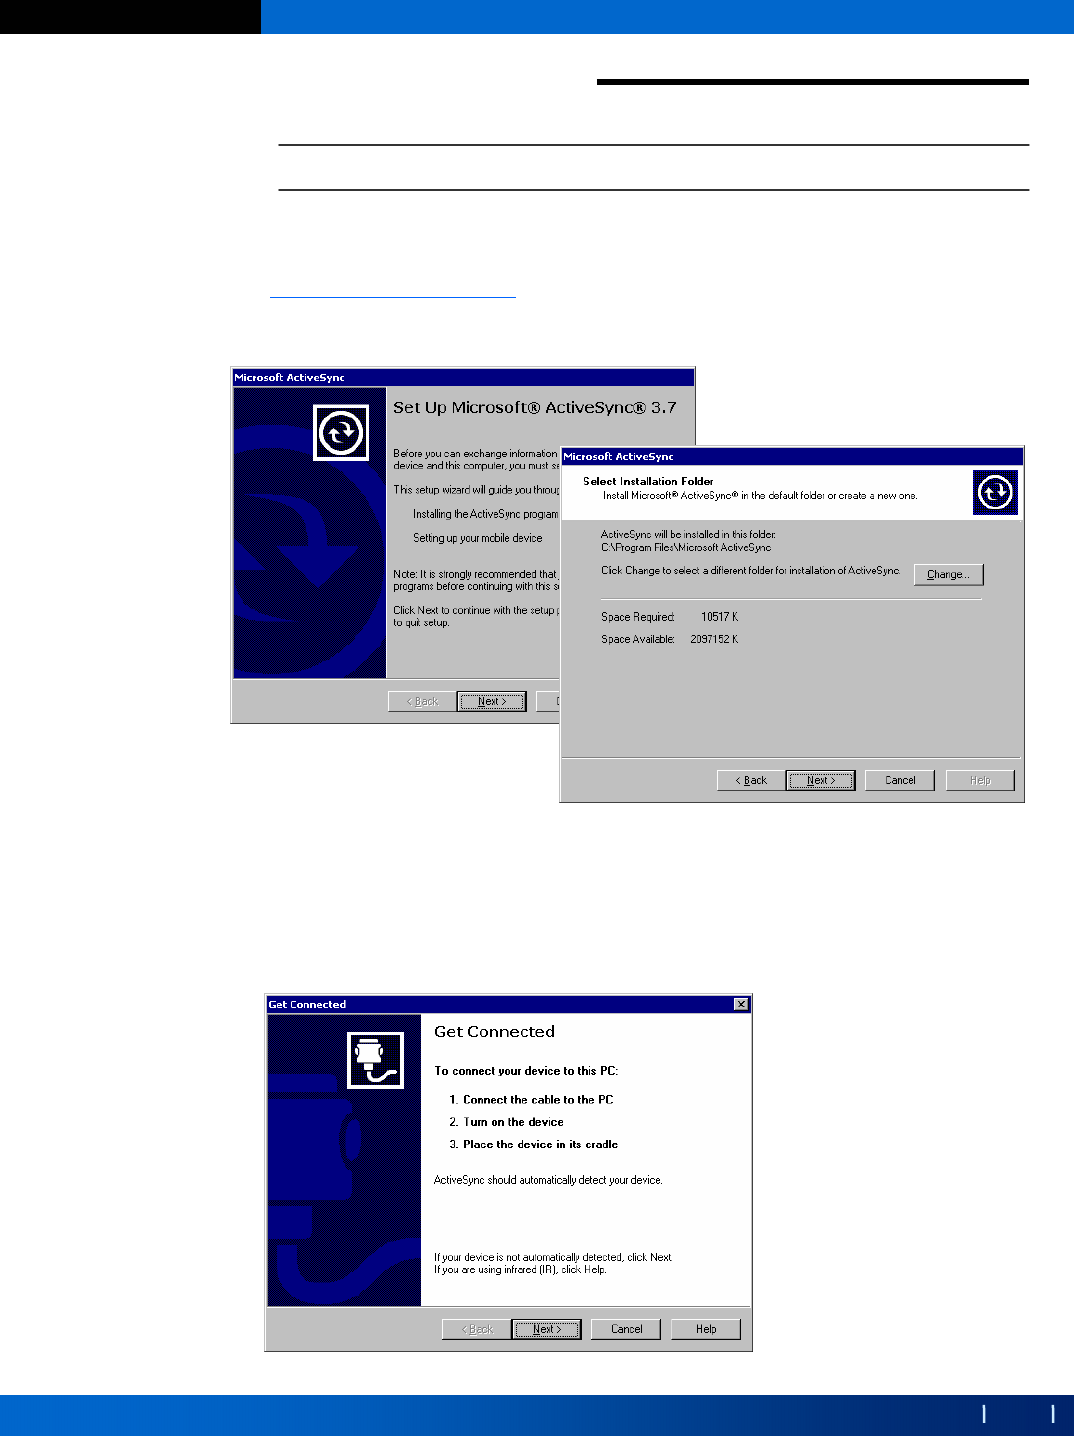
6-1. Installing Microsoft ActiveSync
1) Download the installation file (msasync.exe) for ActiveSync 3.7 from
to your PC, and run the msasync.exe file.
2) When the following window appears, click “Next”.
3) When the above window appears, select a destination folder and click “Next”.
4) After all files are copied, the connection setting window appears if the
terminal is as yet unconnected. When the terminal is connected, the installation
process moves on to the next step. (If you have already connected the terminal,
this step is skipped).
http://www.microsoft.com
22
Copyright © 2004 Bluebird Soft, Inc. All Rights Reserved.
BIP-3010 Series
6-1. Installing Microsoft ActiveSync
6. Connecting BIP-3010 to Desktop
6. Connecting BIP
6. Connecting BIP-
-3010 to Desktop
3010 to Desktop
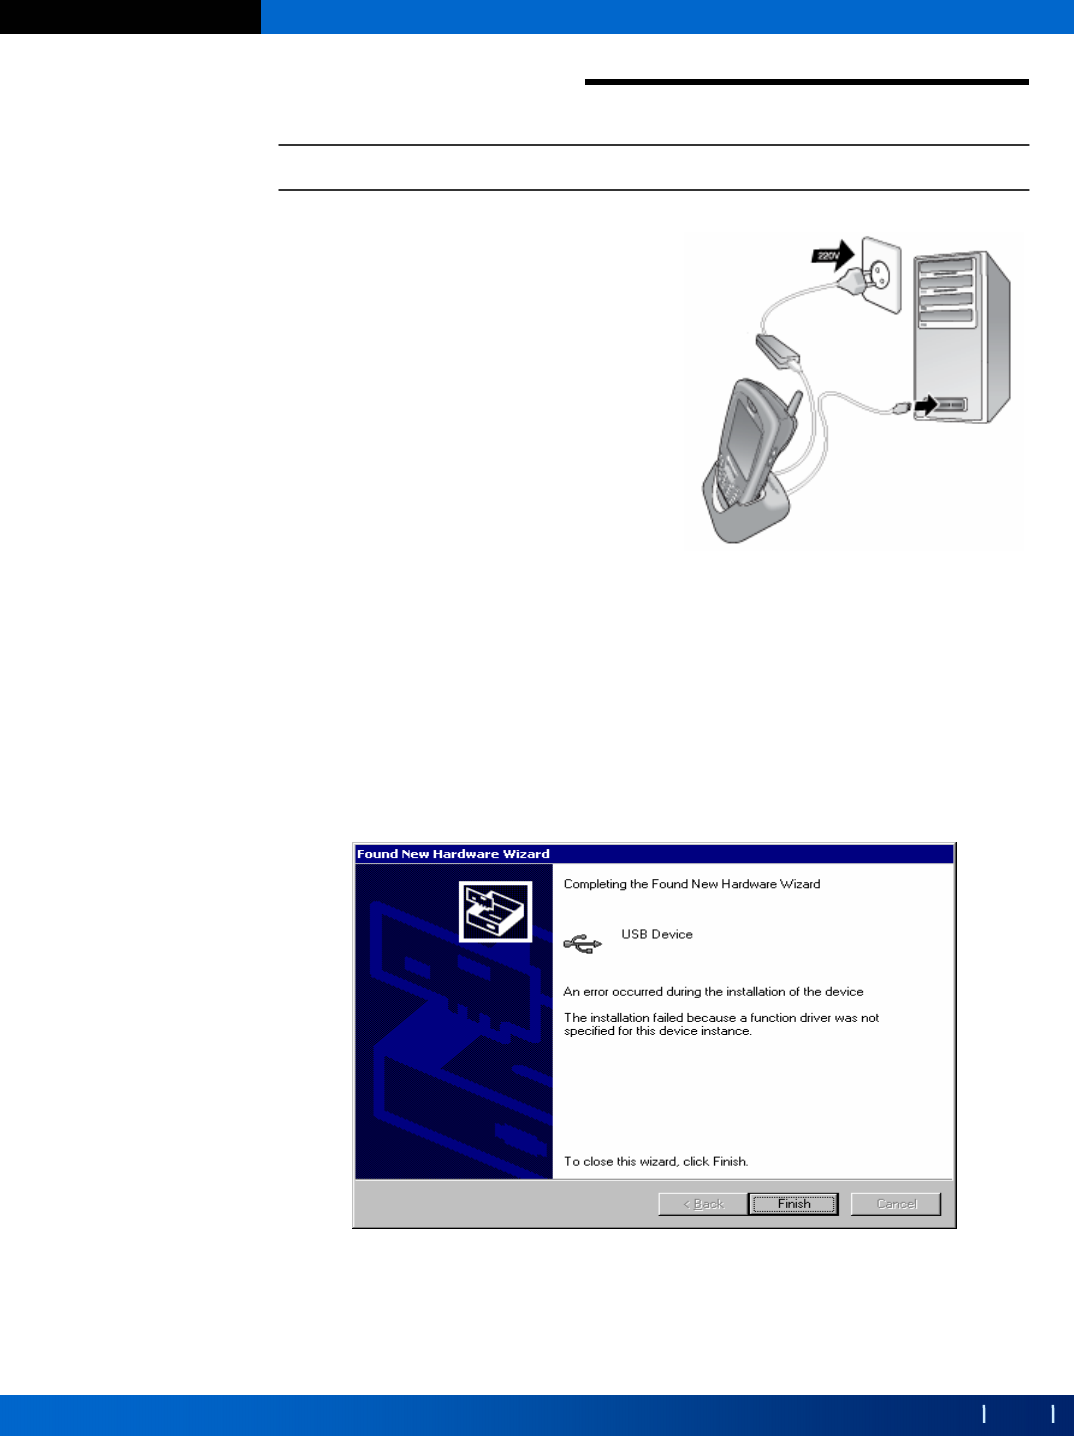
5) Connecting BIP-3010 to Desktop
•Turn the power on and connect the USB
cable to the desktop.
•Place BIP-3010 on the USB cradle.
a. When you first connect BIP-3010 to
PC, the New Hardware Search
Wizard of the PC is activated.
If you have already installed
Microsoft ActiveSync Version 3.7,
you do not need to install an additional driver program.
b. Depending on your PC environment, the Wizard may ask you to
restart your PC as shown below. In this case, restart your PC.
c. During first installation, the terminal may not be able to connect to
the PC. In this case, the Communication Error dialog box appears on
the terminal. Click “OK”in this dialog box and retry connection.
23
Copyright © 2004 Bluebird Soft, Inc. All Rights Reserved.
BIP-3010 Series
6-1. Installing Microsoft ActiveSync
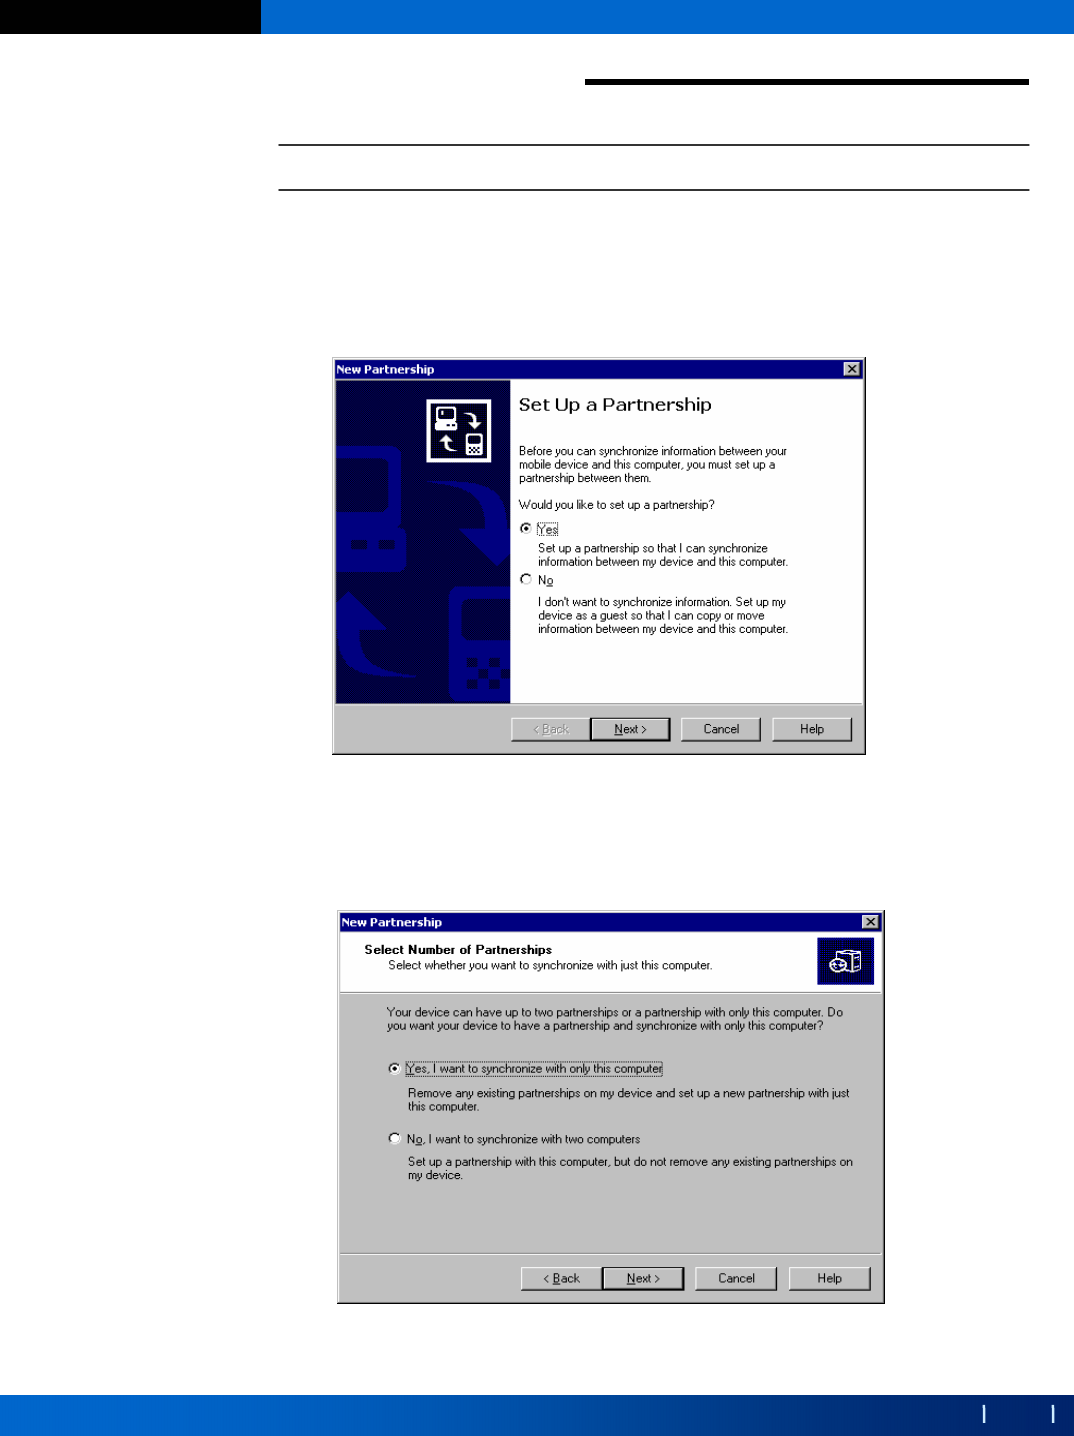
6) When connection is made, the following window appears. SelectYes and
click “Next.”If you are making a temporary connection to the desktop,
select “No.”
7) When you select “Yes,”the following window appears.
6. Connecting BIP-3010 to Desktop
6. Connecting BIP
6. Connecting BIP-
-3010 to Desktop
3010 to Desktop
24
Copyright © 2004 Bluebird Soft, Inc. All Rights Reserved.
BIP-3010 Series
6-1. Install Microsoft ActiveSync
6. Connecting BIP-3010 to Desktop
6. Connecting BIP
6. Connecting BIP-
-3010 to Desktop
3010 to Desktop
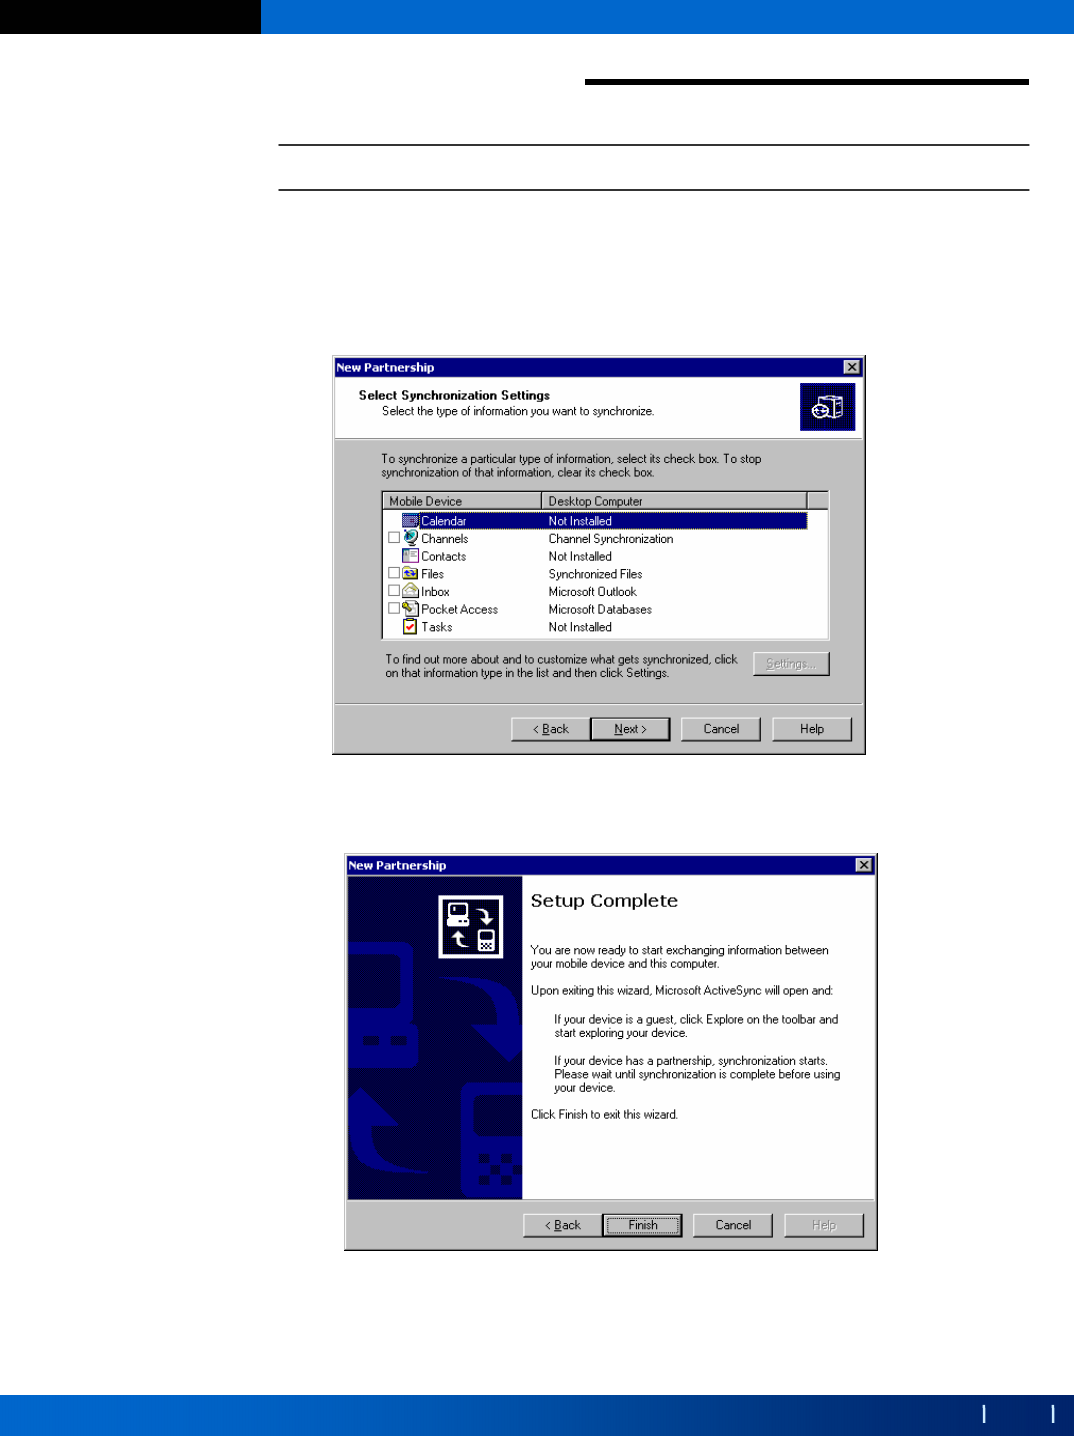
8) To synchronize the terminal with two desktops, select “Yes”and click
“Next.”To connect to one desktop, select “No.”The following window
appears.
9) Select programs to synchronize and click “Next.”The following window
appears.
10) By clicking “Finish,”installation is completed.
11) Please refer to Microsoft ActivSync’s help menu if any problem occur
during installation.
