BLUEBIRD BIP6000MAXID RFID Reader User Manual BIP 6000 0903 indd
BLUEBIRD INC. RFID Reader BIP 6000 0903 indd
UserManual.wiki
>
BLUEBIRD
>
BIP6000MAXID User Manual
User Manual
Navigation menu
Upload a User Manual
Namespaces
Wiki Guide
HTML
PDF
Info
Views
User Manual
Discussion / Help
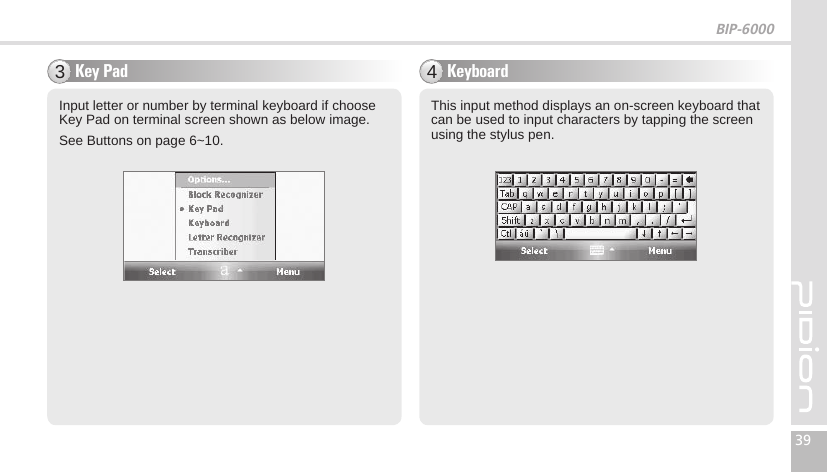
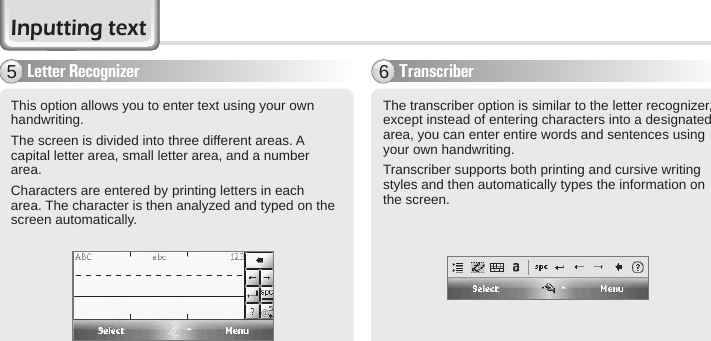
Navigation


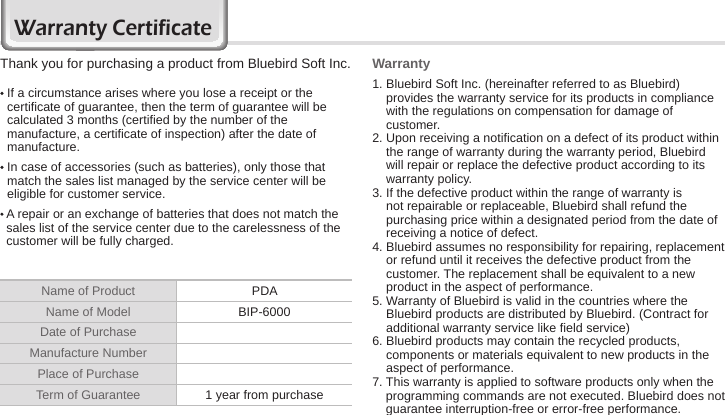
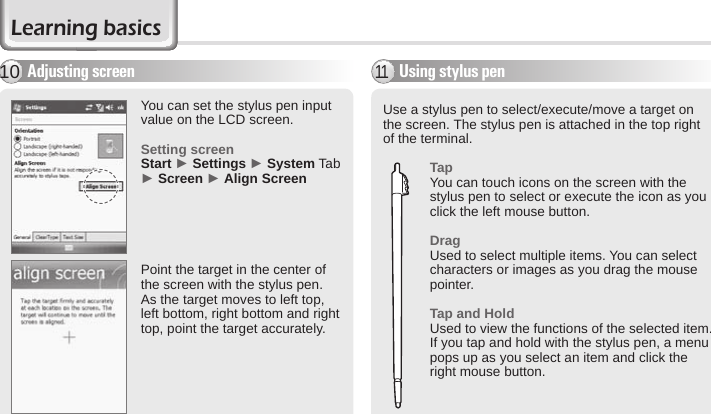
![4BIP-6000 ManualAbout the productThe images in this User’s Manual may not reect the color and shape of the actual product.Please contact the Customer Care Center if you wish to purchase any additional or optional products.[ USB cable ][ BIP-6000 Main Body ]Checking components1[ Stylus Pen ][ Desktop Cradle ] [ Battery ][ Adapter ] [ Spring Wire ]](https://usermanual.wiki/BLUEBIRD/BIP6000MAXID/User-Guide-1883475-Page-7.png)
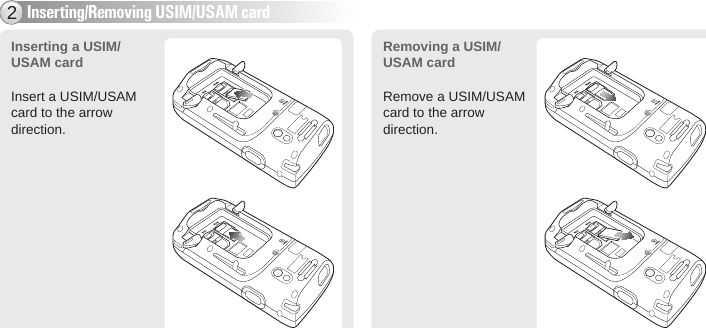
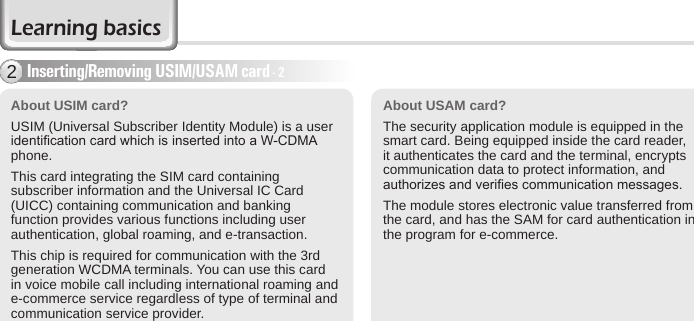
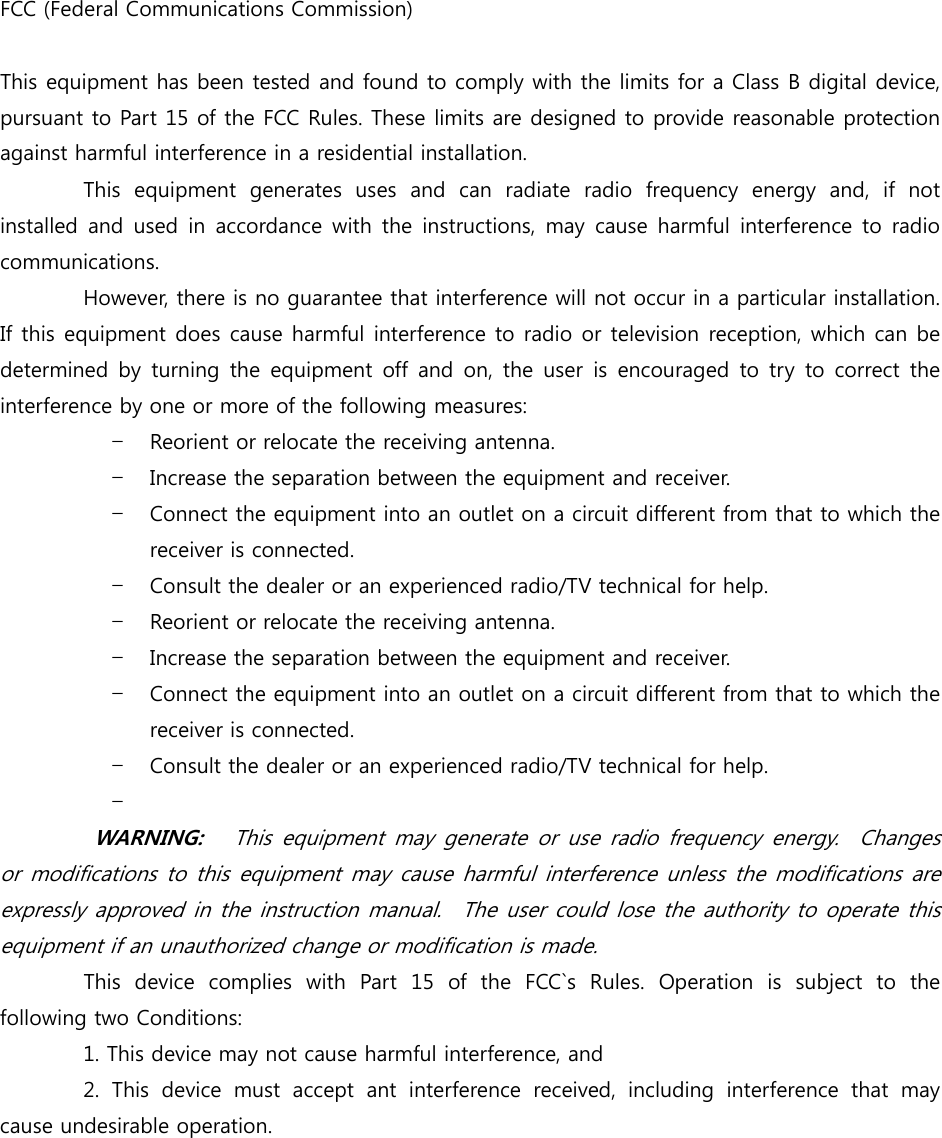
![BIP-600015Cautions PIN code is a password used to protect the data in a USIM card. The default PIN code is <0000>, and you can change it as you like. PUK code is an 8-digit code which resets 3 consecutive PIN input errors. The PUK code is written on the envelope or the body of the USIM card. Note that the USIM card is disabled if you enter incorrect PUK codes for 10 consecutive times. The USIM card is permanently disabled if you enter incorrect PIN codes for 3 consecutive times or incorrect PUK code for 10 consecutive times. In this case, you need to purchase a new card. Please visit the nearest dealer if you forget your PIN and PUK.Setting password3In order to prevent your USIM card from being used by another person, you need to lock your USIM card.Setting a PIN codeStart ► Phone ► Menu Tab ► Options... ► Security TabClick [PIN required for telephone use], enter 4~8 digit-password, and click [ok].](https://usermanual.wiki/BLUEBIRD/BIP6000MAXID/User-Guide-1883475-Page-18.png)
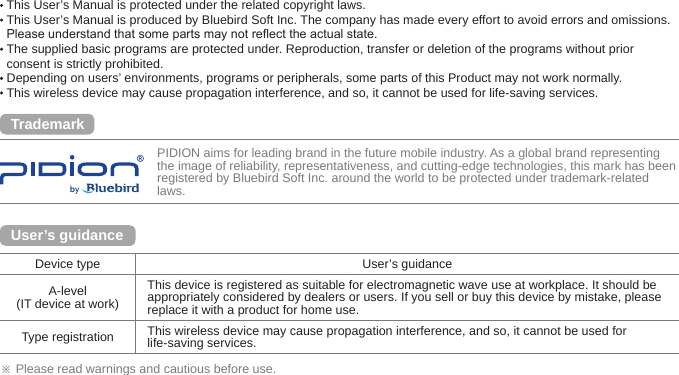
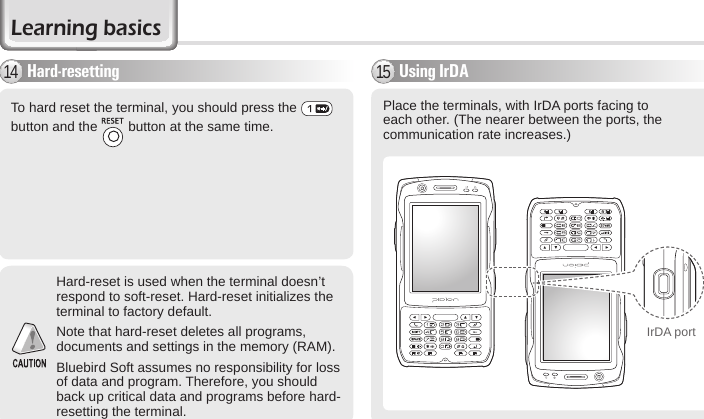
![20 BIP-6000 Manual6-2. Ethernet settingWritten that is based on BIP6000 WM6.1 ※Slightlydependingontheversionyouareusingmaydifferfromthescreenimage,butthefunctionalityisthesame.1InstallEthernetdriverinPIDION(copy->install)BluebirdSoftaWebsitetoaccessthemodelof[Driver]todownloadandinstall.2Checkthenetworkadapter,Infineon851XseriesUSB-to-LANAdapterorDavicomFastEthernetAdapteroverUSB.-TherearetwoEthernetAdaptorslike“Infineon851XseriesUSB-to-LANAdapter”and“DavicomFastEthernetAdapteroverUSB”-I f EthernetCradleproducedbeforeJuly,2011,theEthernetAdaptoris“Infineon851XseriesUSB-to-LANAdapter”-I f EthernetCradleproducedafterJuly,2011,theEthernetAdaptoris“DavicomFastEthernetAdapteroverUSB”](https://usermanual.wiki/BLUEBIRD/BIP6000MAXID/User-Guide-1883475-Page-23.png)
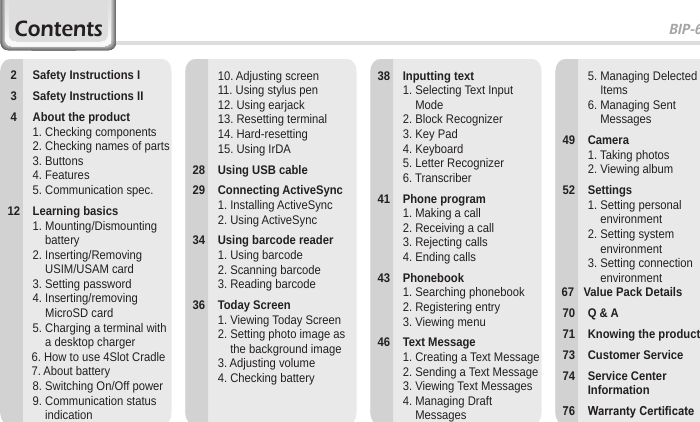
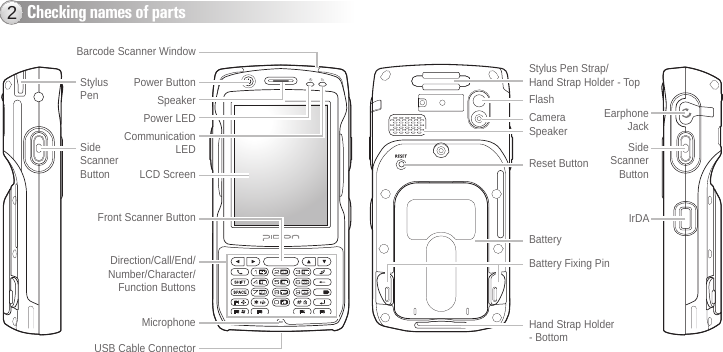
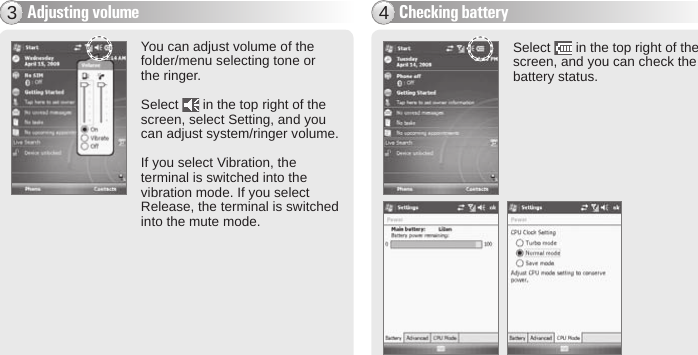
![BIP-600023You can switch on/off power by pressing the [Power] button on the upper part of the terminal.Switching On/Off power8For the terminals which support WCDMA communication, you can view the GSM or WCDMA 1xEVDO communication status with the [Communication status indication lamp] on the upper right side of the terminal.For the terminals whichsupport GSM communication,the lamp indicates the GSM communication status. For the terminals whichsupport WCDMA 1xEVDO,the lamp indicates the WCDMA 1xEVDO communication status.※ The wireless LAN status is not indicated with the lamp.Communication status indication9Power Button Communication status indication lamp](https://usermanual.wiki/BLUEBIRD/BIP6000MAXID/User-Guide-1883475-Page-26.png)
![BIP-600025Using earjack12You can use an earphone by removing the earphone cover on the right top of the terminal and inserting the earphone to the jack.Resetting terminal13Press the [Reset] button on the back of the terminal slightly with the stylus pen. Reset buttonIf there is a collision between programs or a program is stopped due to an unexpected situation, you may use the soft reset function. It is like rebooting a computer. Any information that is not saved is lost. Earjack coverEarjacks are sold as optional items. Please contact the Customer Care Center if you wish to buy one.](https://usermanual.wiki/BLUEBIRD/BIP6000MAXID/User-Guide-1883475-Page-28.png)
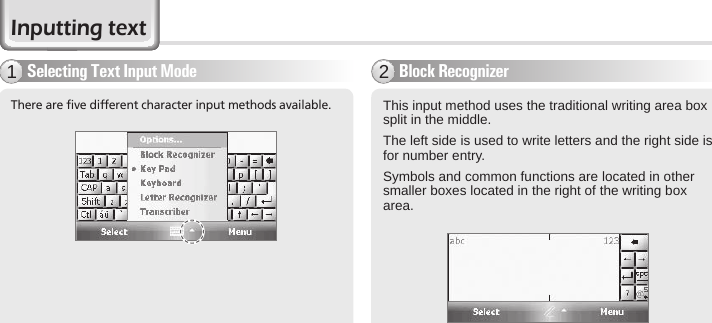
![BIP-600027Procedures of using IrDA port1 Select Start ► Settings ► Connections Tab ► Wireless Communication.2 Select <Receive all wireless data>, and click [ok].3 Check the data to be sent, and select Menu ► Wireless Communication.4 Check the corresponding IrDA port and touch the LCD.](https://usermanual.wiki/BLUEBIRD/BIP6000MAXID/User-Guide-1883475-Page-30.png)
![28 BIP-6000 ManualUsing USB cableStart ► Settings ► Connections Tab ► USB to PCYou can use various USB peripherals connected with the terminal by selecting [Use advanced network function].This menu is enabled as the peripherals are connected with the terminal through USB cables.[USB to PC] increases consumption of battery power. You can save battery by deselecting this function when you don’t use any peripherals.](https://usermanual.wiki/BLUEBIRD/BIP6000MAXID/User-Guide-1883475-Page-31.png)
![BIP-600029Connecting ActiveSyncInstalling ActiveSync11 Download [Microsoft ActiveSync] from the website of Microsoft, and install the program in the PC.To connect the terminal with PC, you need to install the [Microsoft ActiveSync] program in your PC.If the [MicroSoft ActiveSync] program is already installed in your PC, you don’t need to install the program again.The screenshots are for the Korean version of [Microsoft ActiveSync 4.5].The images may vary depending on the version of [Microsoft ActiveSync], but the functions are the same.](https://usermanual.wiki/BLUEBIRD/BIP6000MAXID/User-Guide-1883475-Page-32.png)
![30 BIP-6000 Manual2 On the [License Agreement] window, select <Agree> ► On the [Customer Information] window, ll in the <User Name> and <Company> eld ► On the [Target Folder] window, select the <Installation Location>. 3 The [Microsoft ActiveSync] is installed when installation process is ready.4 The [Microsoft ActiveSync] program is installed.Installing ActiveSync - 21Connecting ActiveSync](https://usermanual.wiki/BLUEBIRD/BIP6000MAXID/User-Guide-1883475-Page-33.png)
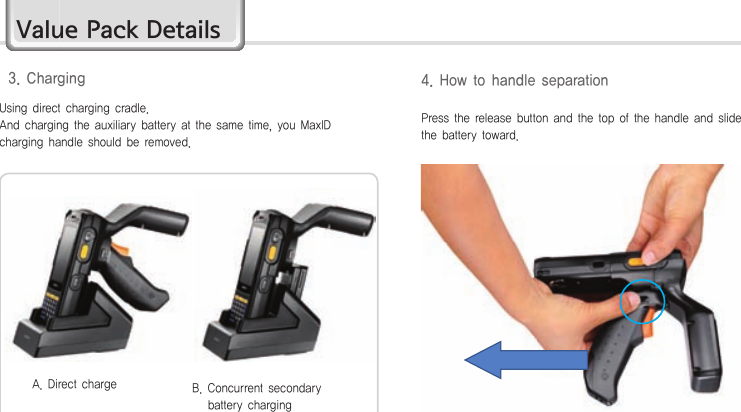
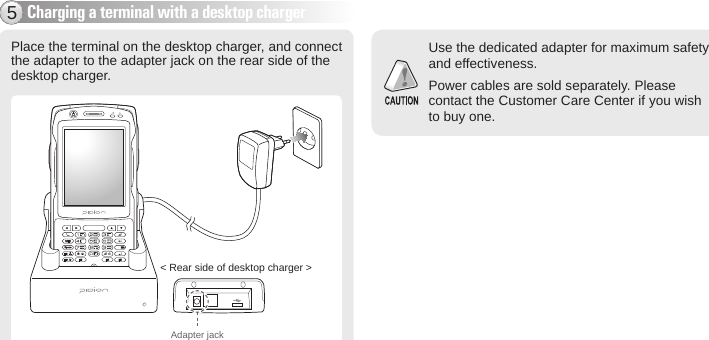
![BIP-600031Using ActiveSync2The screenshots are for the [Windows Mobile] version. The images may vary depending on the version of the software.Window images for [Windows CE] are different from the samples, but the functions are the same with those of [Windows Mobile].You must connect the terminal to PC or notebook rst to use [MicroSoft ActiveSync].You can copy/paste les, or install/uninstall programs through synchronization with the terminal.USB cables are sold separately. Please contact the Customer Care Center if you wish to buy one.1 Place the terminal on the desktop charger, and connect the charger or the terminal with the computer through the USB cable. Adapter jack USB cable jack(Back of the desktop charger)](https://usermanual.wiki/BLUEBIRD/BIP6000MAXID/User-Guide-1883475-Page-34.png)
![32 BIP-6000 Manual2 When the terminal is connected with the computer successfully, the [Microsoft ActiveSync] program is started automatically. Click the [Search] button.3 The <Mobile Devices> folder shows the image, music or document folders in the terminal. You can save the les in the computer.Using ActiveSync - 22Connecting ActiveSync](https://usermanual.wiki/BLUEBIRD/BIP6000MAXID/User-Guide-1883475-Page-35.png)
![BIP-600033Precautions in using ActiveSyncThe message “Unknown Device” pops up after the computer detects the USB deviceThis message may be displayed when you switch on the terminal as it is mounted on the desktop charger. If you dismount the terminal and then mount it back to the charger, the ActiveSync program works properly. The message “Connecting…” continues Dismount the terminal from the desktop charger to disconnect it from the computer. On [ActiveSync], select File ► Set Connection ► <Allow USB Connection>, and then, click [ok]. Connect the terminal again. If connection attempts continue to fail and the message “Unknown Hardware Device” pos up Abnormal status of the USB host in the computer may result in connection fail. Remove the terminal from the desktop charger, reboot the computer, and then, return the terminal to the desktop charger. The terminal does not work when you remove and return the batteryTo prevent this problem, you should press the [Power] button or select [Exit] in the Start menu with the stylus pen so that Windows Mobile (or Windows CE) should “Exits System” before you remove the battery.If you had to remove the battery due to an unavoidable situation, and the terminal does not work properly,press the button and the button at the same time for hard-reset. Note that hard-resetting deletes data from the memory. Only the data in the le storage are preserved.](https://usermanual.wiki/BLUEBIRD/BIP6000MAXID/User-Guide-1883475-Page-36.png)
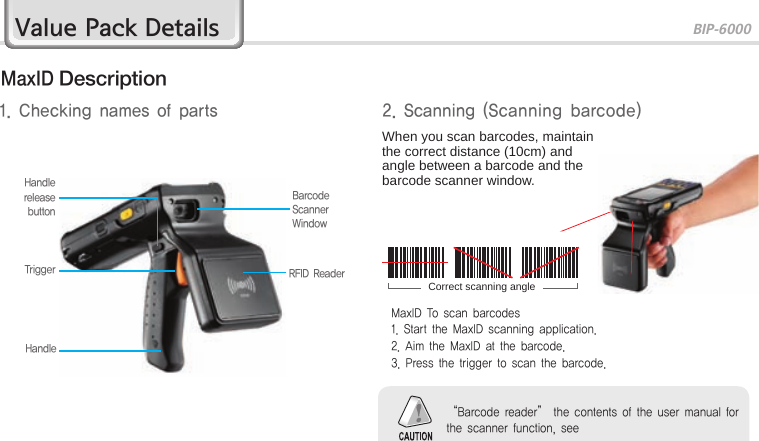
![34 BIP-6000 ManualUsing barcode readerUsing barcode1You can scan barcodes by pressing the [Barcode] button on the side or front of the terminal. When you scan barcodes, maintain the correct distance (10cm) and angle between a barcode and the barcode scanner window.Scanning barcode2When you use barcodes in a specic program, contact the developer of the program for details. Correct scanning angle Incorrect scanning angleBarcode button](https://usermanual.wiki/BLUEBIRD/BIP6000MAXID/User-Guide-1883475-Page-37.png)
![BIP-600035Reading barcode3Start ► Programs ► NotesOn <Notes>, select [New] button and read a barcode. Then, the barcode data are displayed. If you read a barcode as <Notes> is open, the barcode is saved automatically in [Notes].If you read a barcode as <Notes> is shut, because the data is not saved, you should select [New] and [Menu], and then, [Paste].](https://usermanual.wiki/BLUEBIRD/BIP6000MAXID/User-Guide-1883475-Page-38.png)
![36 BIP-6000 ManualToday ScreenViewing Today Screen1Terminal states such as [Start], [Wi-Fi], [Com Status], [Volume] and [Battery] are indicated on the top of the screen.Depending on the settings, [Today Screen] may display [Date], [Time], [Wireless Access Setting], [User Info.], [Message], [Work], [Schedule] or [Lock Status].See p.50 for details.You can set the [Start] menu as you like.See p.48 for details.Setting photo image as the background image2You can set the photo taken by yourself as the background image.1 Select Start ► Programs ► Pictures and Videos ► Show ► My Documents ► My Pictures.2 Select the [Menu] button in the right bottom of the screen.3 Select [Set as Today Background...].4 Select the transparency level of the background image, and select [ok].](https://usermanual.wiki/BLUEBIRD/BIP6000MAXID/User-Guide-1883475-Page-39.png)
![BIP-600041Making a call1Execute the phone program by selecting the [Phone] button, enter a telephone number, and press the [Call] button to make a call.RedialingIf you press the [Call] button without entering a phone number, the terminal automatically makes a call to the last call party.Receiving a call2If the terminal rings and a call receiving message is displayed, click the [Call] button or select the [Answer] button in the bottom of the screen. ※ The calling party information message can be indicated differently from the one of normal phones.※ The phone functions are the same as the normal phones. Refer to p.21 if you wish to use an earphone.Phone program: Cancel numbers one by one.: You can make a call with speed dial number. If you select menu in the bottom right of the speed-dial screen, you can add/edit/delete speed-dial numbers. (You can save up to 98 speed-dial numbers.): You can view the list of received calls/originated calls/missed calls.: Enter a phone number and press this button to make a call.](https://usermanual.wiki/BLUEBIRD/BIP6000MAXID/User-Guide-1883475-Page-44.png)
![42 BIP-6000 ManualRejecting calls3Select the [Ignore] button in the bottom of the screen or press the [End] button on the keypad to cut off an incoming call.Select the [End] button in the bottom of the screen or press the [End] button on the keypad to automatically end a call.Ending calls4Phone program](https://usermanual.wiki/BLUEBIRD/BIP6000MAXID/User-Guide-1883475-Page-45.png)
![BIP-600043Searching phonebook11 Select the [Phonebook] button in the bottom right of the Today Screen, or select Start ► Contacts. 2 Enter a name in the [Enter a Name...] eld to search for the phone number.Phonebook1 Select the [New] button in the bottom left of the Phonebook screen. 2 Select the type of phone number.Registering entry2](https://usermanual.wiki/BLUEBIRD/BIP6000MAXID/User-Guide-1883475-Page-46.png)
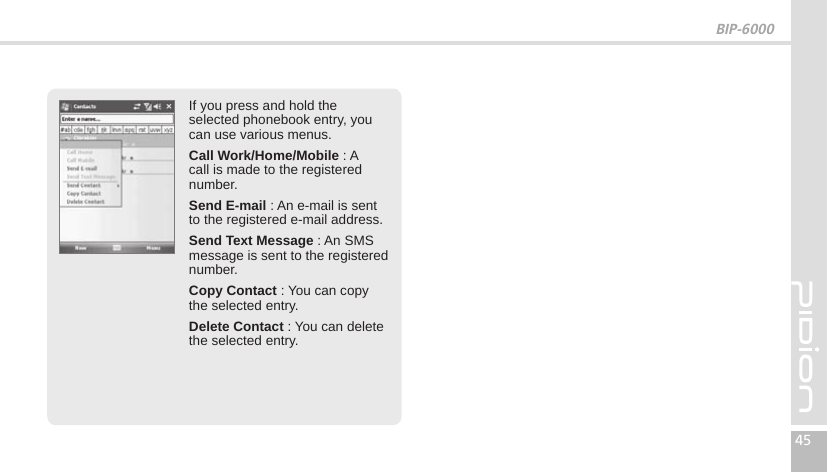
![44 BIP-6000 ManualViewing menu3Select the [Menu] button in the bottom right of the Phonebook window.Edit : You can edit the existing phone number.Send Contact : You can send a phone number through wireless communication.Copy/Delete Contact : You can copy/delete the selected phone number.3 Enter all the elds, and select [ok] in the top right of the screen to register the entry in the phonebook.Registering entry - 22PhonebookOptions... : You can select <Show alphabetical index> or <Show contact names only>.View By : You can set the display standard of phone number by name / Company.Filter : You can set lters for display.Select Contacts : You can select Several / All.](https://usermanual.wiki/BLUEBIRD/BIP6000MAXID/User-Guide-1883475-Page-47.png)
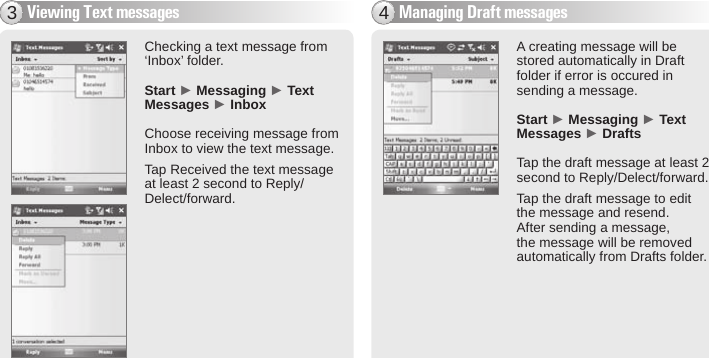
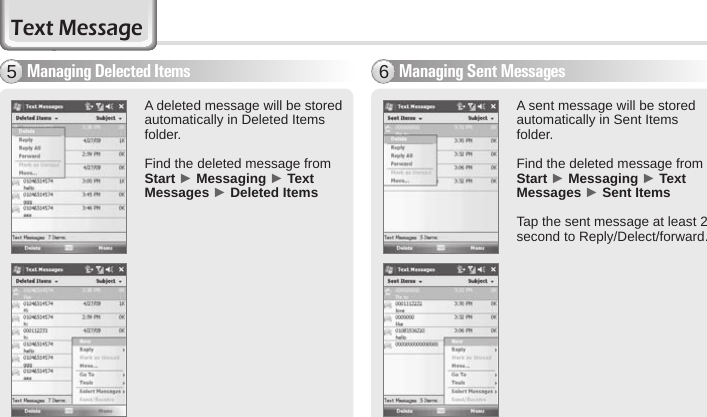
![46 BIP-6000 ManualText MessageSending a Text Message2Start ► Messaging ► Text Messages ► OutboxAfter creating Text message including masaage receiver, tap Send on the Text Messages screen.On the Text Messages screen, tap Menu and select [Add Recipient...] to add massage receiver.Maximum 18 people can be added to message reciever.Start ► Messaging ► Text Messages oron the Today screen, tap Messages.Go to Text Message screen, tap [Menu] and select [New]or Go to Phone screen, Select a contact name from Call History.Tap Menu and Select tap Contacts and select [Send Text Message]Tap Inbox on Text Message screen.Inbox shows Deleted Items/Drafts/Outbox/sent Items foldersCreating a Text Message1](https://usermanual.wiki/BLUEBIRD/BIP6000MAXID/User-Guide-1883475-Page-49.png)
![BIP-600049Taking photos1Start ► Programs ► CameraCameraIf you press the [Barcode] button, the terminal takes the Still/Video and automatically saves the Still/Video in the album.MenuVideo : Switches into video recording.Mode : You can select Normal/Burst/Timer.Resolution : 480×640/600×800/768×1024/1536×2048.Flash : Select/deselect ash function.Full Screen : The display is extended to the entire screen.Options... : You can select Name/Folder/Size of les.Barcode buttonIf you press the [Barcode] button in the center of the terminal as Camera is enabled, the terminal takes an Still/Video.](https://usermanual.wiki/BLUEBIRD/BIP6000MAXID/User-Guide-1883475-Page-52.png)
![50 BIP-6000 ManualBy selecting the [Menu] button, you can select Delete, Send, Beam, Set as Today Background, Zoom, Edit, Properties, Options, Send to your space for the Still/Video.The terminal may get off or switch into the standby mode in case the battery is low.If the camera is not used for 1 min, the terminal switches into the standby mode.The video function may be different from this User’s Manual according to the camera program. Start ► Programs ► Camera ► ThumbnailsYou can extend/reduce the selected Still/Video, or check information on the Still/Video.Viewing album2Taking photos - 21Camera](https://usermanual.wiki/BLUEBIRD/BIP6000MAXID/User-Guide-1883475-Page-53.png)
![BIP-600051By selecting the [Menu] button, you can select Zoom, Play Slide Show, Set as Today Background, Beam picture, Save, Edit, Properties, Options or Send to your space for the selected Still/Video.](https://usermanual.wiki/BLUEBIRD/BIP6000MAXID/User-Guide-1883475-Page-54.png)
![52 BIP-6000 ManualSettingsSetting personal environment1ButtonsYou can set the short-cut key functions for <F1 ~ F5> buttons on the terminal.Start ► Settings ► Personal Tab ► ButtonsSetting short-cut key allocation programSelect a button, and select the program you wish to allocate to the selected button.Available programsIn addition to basic programs, you can allocate all programs installed by yourself. You can register the frequently used programs in the [Start] menu.Start ► Settings ► Personal Tab ► MenusAll the available programs are displayed on the checklist. The checked programs are indicated on the [Start] menu on the title bar. (You can check up to 7 programs.)Menus](https://usermanual.wiki/BLUEBIRD/BIP6000MAXID/User-Guide-1883475-Page-55.png)
![54 BIP-6000 ManualSetting personal environment - 21You can set owner information or memo.Start ► Settings ► Personal Tab ► Owner InformationYou can register user Name, Company, Address, Telephone, E-mail and Notes, and select if they are to be displayed when the terminal is switched on.Start ► Settings ► Personal Tab ► Today1 Select [Use this picture as the background], and select the [Browse] button.2 Select the [Folder] in which the desired photo is stored.3 Select the picture le [Type]. 4 Select the picture le and press the [ok] button.Appearance TabYou can select an image in the terminal as the background of Today screen.Owner Information TodaySettings](https://usermanual.wiki/BLUEBIRD/BIP6000MAXID/User-Guide-1883475-Page-57.png)
![BIP-600055Items TabYou can select items to be displayed on the Today screen.Start ► Settings ► Personal Tab ► Today ► Items TabThe selected items on the list are displayed on Today screen. You can change the order of display of the items with the [Move Up]/[Move Down] button.Start ► Settings ► Personal Tab ► InputIf you select Option for Handwriting, you can make setting for Handwriting layout for left hander / Three handwriting input boxes / Restriction of handwriting recognition time.Options TabYou can select the voice recording format.You can select the text input method or the voice recording format.Input](https://usermanual.wiki/BLUEBIRD/BIP6000MAXID/User-Guide-1883475-Page-58.png)
![56 BIP-6000 ManualSetting personal environment - 31Password TabUse this function to protect data by setting the terminal to request password every time it is switched on.Start ► Settings ► Personal Tab ► LockEnter the password in the Password eld, and enter it again for conrmation.Select [Prompt if device unused for], and enter time. The password should be 4 ~ 8 digits, and repeated numbers (e.g., [1111]) or sequential numbers (e.g., [1234]) is not allowed. If [Prompt if device unused for] is selected, if the terminal is left unused for the designated time, the following window pops up.Enter the password, and select [Unlock] in the bottom of the screen.LockSettings](https://usermanual.wiki/BLUEBIRD/BIP6000MAXID/User-Guide-1883475-Page-59.png)
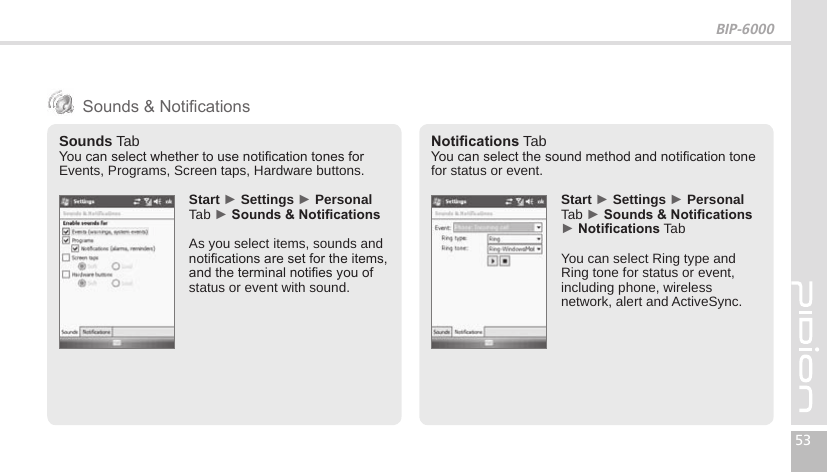
![BIP-600057Hint TabEnter the words which will help you remembering your password.A [Hint] window pops up if you fail to enter the correct password for 4 consecutive times. Start ► Settings ► Personal Tab ► Phone ► Phone TabRing type : You can select Ring / Increasing ring / Ring once / Vibrate / Vibrate and ring / Vibrate then ring / None. Ring tone : You can select a bell.Keypad : You can set the keypad tone from Long tones / Short tones / Off.PhonePhone TabYou can select/deselect sound of the terminal.](https://usermanual.wiki/BLUEBIRD/BIP6000MAXID/User-Guide-1883475-Page-60.png)
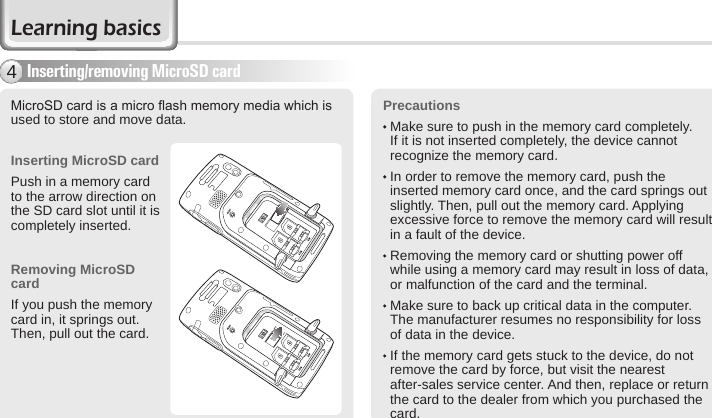
![58 BIP-6000 ManualSetting system environment2Current status of memory (In use, Free) is displayed. Start ► Settings ► System Tab ► MemoryMain TabYou can nd Total / In use / Free for memory storage and program. Storage Card Tab You can nd the status (In use / Free) of the MicroSD memory and ProgramStore.MemoryStart ► Settings ► Personal Tab ► Phone ► Security TabSelect [Require PIN when phone is use], enter 4~8 digit password, and select [ok].To change your password, select [Change PIN].See p. 15 for details.Security TabYou can set a password for USIM card to prevent unauthorized use when it is lost or stolen.Setting personal environment - 41Phone - 2Settings](https://usermanual.wiki/BLUEBIRD/BIP6000MAXID/User-Guide-1883475-Page-61.png)
![BIP-600059Program TabSelect the port to be used by the program to import the GPS data.Start ► Settings ► System Tab ► External GPSAll the programs which use GPS can communicate through this port.Hardware TabDesignate the hardware port with which the GPS device is to be connected.External GPSThe list of the programs in use and the memory status are displayed.Start ► Settings ► System Tab ► Task ManagerWith the menu, you can exit all or specic programs.Task ManagerAccess TabIf you select [Manage GPS automatically], GPS data from multiple programs can be imported at the same time.](https://usermanual.wiki/BLUEBIRD/BIP6000MAXID/User-Guide-1883475-Page-62.png)
![60 BIP-6000 ManualBattery Power Tab / External Power TabYou can set the LED Off time after which the LED should be turned off automatically if no key action has been made.Start ► Settings ► System Tab ► Lighting ► Battery Power Tab / External Power TabThe shorter the LED Off time, the battery life extends longer.The LED is turned on when you press any button or touch the screen.Keypad TabSet the keypad LED Off time.Start ► Settings ► System Tab ► Lighting ► Keypad TabThe shorter the [LED Lighting Time], the battery life extends longer.The keypad remains off if no [LED Lighting Time] is selected. BacklightSetting system environment - 22Settings](https://usermanual.wiki/BLUEBIRD/BIP6000MAXID/User-Guide-1883475-Page-63.png)
![BIP-600061The list of programs installed personally or by the company, except the basic programs, is displayed.Start ► Settings ► System Tab ► Remove ProgramsSelect the program you wish to uninstall, and then, select the [Remove] button.Brightness TabYou can control brightness by moving the slider bar.Start ► Settings ► System Tab ► Lighting ► Brightness TabThe nearer to [Dim], the longer the battery life extends. Remove Programs](https://usermanual.wiki/BLUEBIRD/BIP6000MAXID/User-Guide-1883475-Page-64.png)
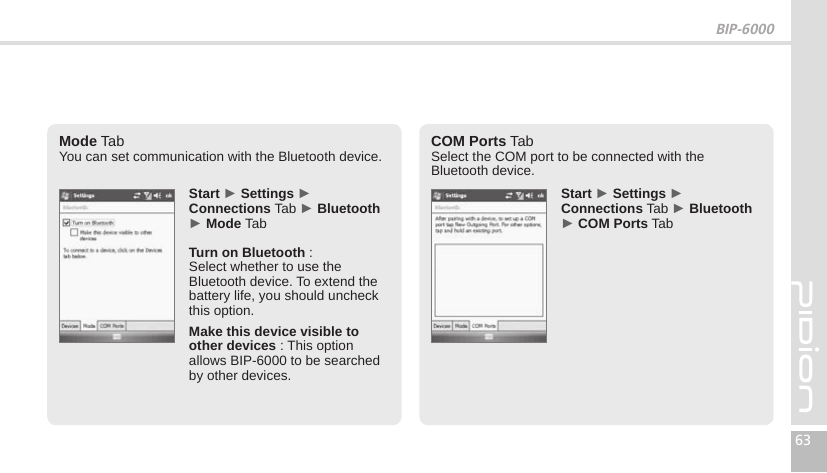
![62 BIP-6000 ManualGeneral Tab Switch the screen to Portrait / Landscape (right-handed) / Landscape (left-handed).Start ► Settings ► System Tab ► ScreenIf you select the [Align Screen] button, you can reset the stylus pen points.See p.20 for details. Text Size Tab The text size displayed on the screen can be set by 5 steps.ScreenDevices Tab Set the Bluetooth Device (Bluetooth printer, card reader, etc.) for communication with the terminal.Start ► Settings ► Connections Tab ► Bluetooth1 Search Bluetooth device at near to select [Add New Hardware].2 Choose the Bluetoothe device to connect and select [Next].3 Select [Finish] after conrming the chosen device name.Setting connection environment3BluetoothSetting system environment - 32Starting of Bluetooth device is depending on the Bluetooth device model. Please refer to the manual of the Bluetooth device. Settings](https://usermanual.wiki/BLUEBIRD/BIP6000MAXID/User-Guide-1883475-Page-65.png)
![64 BIP-6000 ManualYou can set the communication environment with PC.Start ► Settings ► Connections Tab ► USB to PCComputers adopting the tunneling VPN can make a connection with the terminal through RNDIS. In this case, uncheck [Enable advanced network functionality] before attempting to connect.If [ActiveSync] is not started when the terminal is connected with PC normally, you should select [Enable advanced network functionality].USB to PCSetting connection environment - 23You can set the Wi-Fi wireless Internet.Start ► Settings ► Connections Tab ► Wi-FiYou can set the Wi-Fi environment for access with AP (Access Points) through wireless Internet.Wi-FiSettings](https://usermanual.wiki/BLUEBIRD/BIP6000MAXID/User-Guide-1883475-Page-67.png)
![BIP-600065Setting wireless Internet1 Select Wi-Fi on the Wireless Manager window. Then the list of nearby APs is displayed.2 Select an AP on the wireless networks list, and select the [Connect] button.If APs list is not displayed, set the connection manually.1 On the Wireless Network Conguration window, select [Add].2 Enter the AP name on the [Network Name] eld, and select [Next].3 After selecting [Next], check [Provide key automatically], and select [Next].4 Select [Finish], and the selected AP is displayed in the wireless networks list.5 Select the [Connect] button to connect the wireless LAN.Start ► Settings ► Connections Tab ► Wireless ManagerYou can select [All] to enable/disable three functions at the same time, or select [Wi-Fi] / [Bluetooth] / [Phone] for independent enabling/disabling.Wireless Manager](https://usermanual.wiki/BLUEBIRD/BIP6000MAXID/User-Guide-1883475-Page-68.png)
![66 BIP-6000 ManualWireless Manager - 2Setting connection environment - 33When you enable this function, you can set the details of this function.When you disable this function, you can set the function independently by selecting the [Menu] button in the bottom right of the screen.SettingsTrigger](https://usermanual.wiki/BLUEBIRD/BIP6000MAXID/User-Guide-1883475-Page-69.png)